
В данной статье я расскажу как добавить разрешающее правило в Брандмауэр Windows Server 2012 R2 (в Windows Server 2008 R2 действия аналогичны). Правило будем добавлять на примере работы сервера 1С:Предприятие 8.х (необходимо открыть порт 1541 для менеджера кластера, порты 1560-1591 для рабочих процессов и порт 1540 для агента сервера).
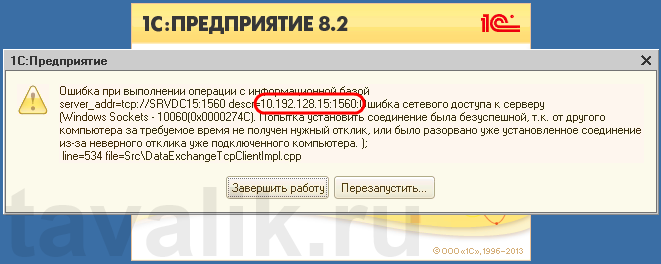
Некоторые программы и службы при работе через сетевые протоколы используют определенные порты для обмена данными. По умолчанию включенный брандмауэр Windows блокирует подобную сетевую активность. В частности, если попытаться подключиться с клиентской машины к серверу 1С:Предприятие 8.х можно натолкнуться на ошибку:
«Ошибка при выполнении операции с информационной базой (…). Ошибка сетевого доступа к серверу (…). Попытка установить соединение была безуспешной, т. к. от другого компьютера за требуемое время не получен нужный отклик, или было разорвано уже установленное соединение из-за неверного отклика уже подключенного компьютера (…) »
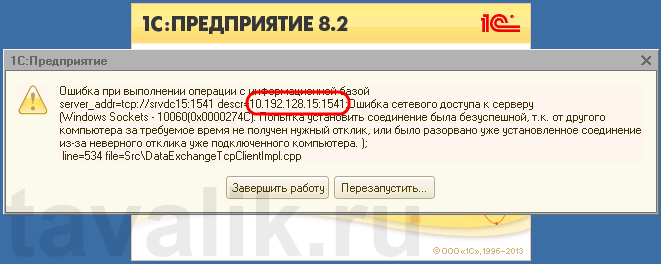
Данная ошибка означает, что по указанному адресу не найден сервер «1С:Предприятия», ну или на сервере закрыт порт (в данном случае порт 1541).
Для открытия порта, заходим на компьютер, где установлен сервер «1С:Предприятия» (в моем примере это компьютер с адресом 10.192.128.15 и установленной на нем операционной системой Windows Server 2012 R2).
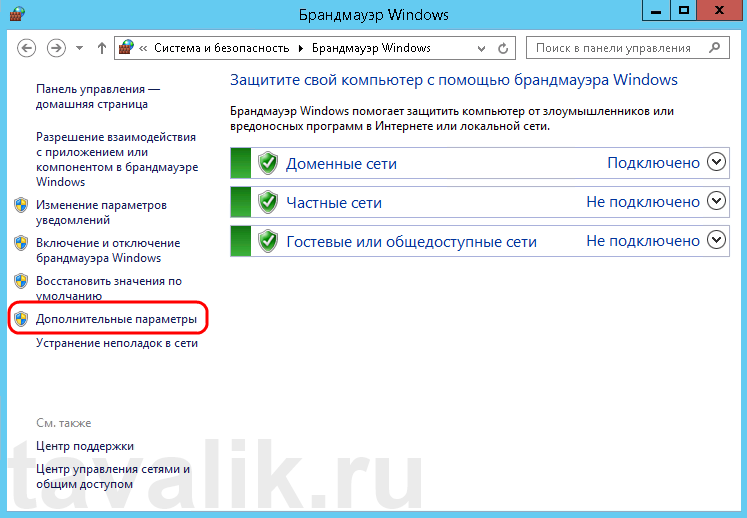
Запускаем брандмауэр Windows. Сделать это можно кликнув правой кнопкой мыши по «Пуск» (Start), затем «Панель управления» (Control Panel) — «Система и безопасность» (System and Security) — «Брандмауэр Windows» (Windows Firewall). Или же выполнив команду firewall.cpl (для этого необходимо нажать комбинацию клавиш Win + R, в окне «Отрыть» (Open) ввести имя команды и нажать «ОК» ) .
Далее нажимаем на «Дополнительные параметры» (Advanced Settings) в меню слева.
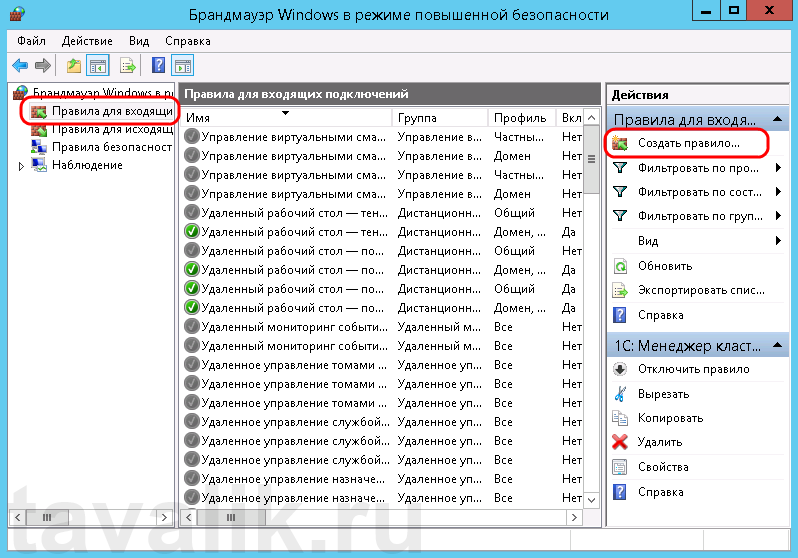
В открывшемся окне, в дереве слева откроем вкладку «Правила для входящих подключений» (Inbound Rules), а затем в меню «Действия» (Actions) выберем пункт «Создать правило…» (New Rule…).
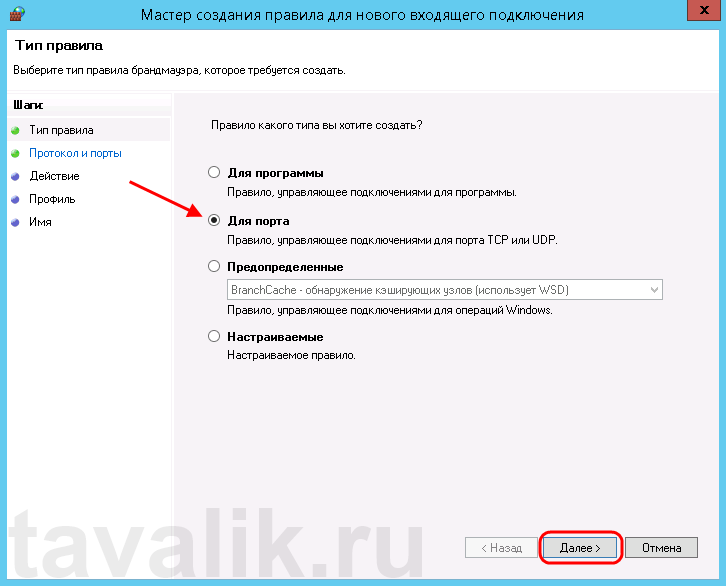
Запустится «Мастер создания правила для нового входящего подключения» (New Inbound Rule Wizard). На первой странице выберем тип правила (Rule Type) «Для порта» (Port) и нажмем «Далее» (Next).
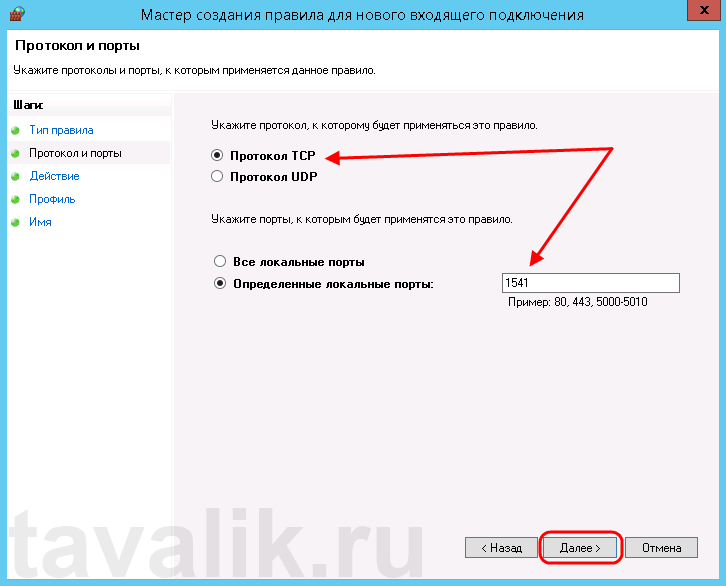
Затем необходимо указать протокол (в нашем примере это TCP) и, непосредственно, номер порта (Specific local ports), который открываем. После чего жмем «Далее» (Next).
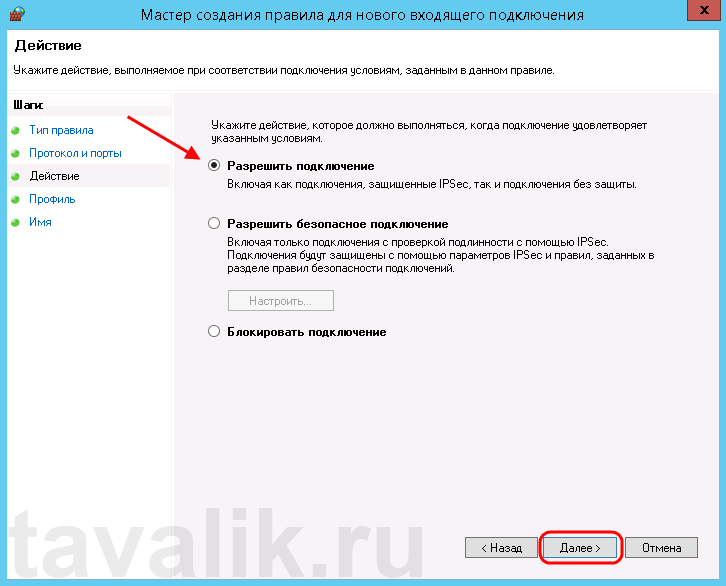
Теперь укажем действие связанное с добавляемым правилом. Выберем «Разрешить подключение» (Allow the connection) и нажмем «Далее» (Next).
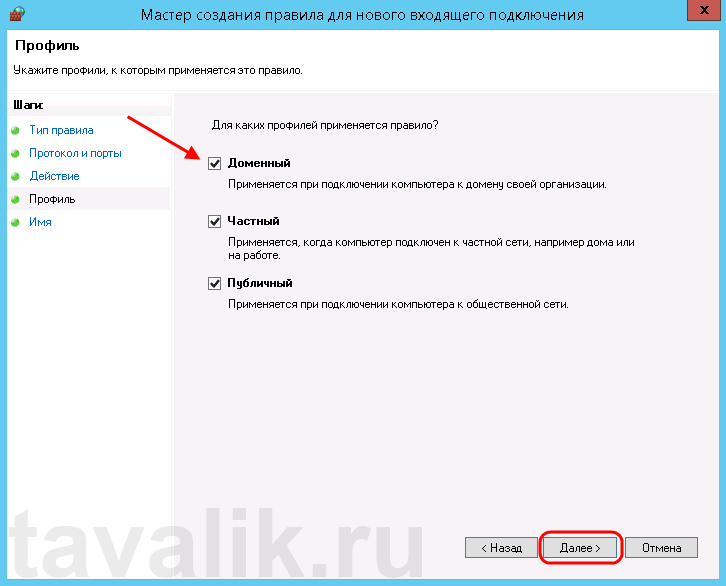
На следующей странице нужно указать, для каких профилей брандмауэра будет действовать правило. Отмечаем нужные профили галочками и жмем «Далее» (Next).
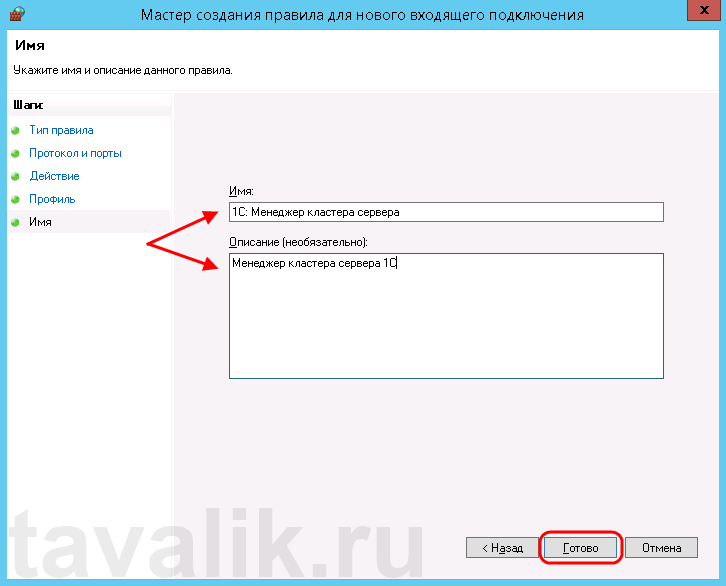
Ну и наконец, вводим имя и описание для нового правила и нажимаем «Готово» (Finish) для завершения работы мастера.
Пробуем снова подключиться к серверу «1С:Предприятия» и видим что ошибка сохранилось, но в сообщении уже другой, 1560-ый порт.
Вышеописанным способом добавим еще одно разрешающее правило, с названием «1С: Рабочие процессы» для всего диапазона портов с 1560 по 1591 (для рабочих процессов 1С), указав их через дефис на шаге «Протокол и порты» (Protocol and Ports).

Теперь, в оснастке «Брандмауэр Windows в режиме повышенной безопасности» (Windows Firewall with Advanced Security) в таблице «Правила для входящих подключений» (Inbound Rules) мы должны увидеть 2 только что созданных правила.
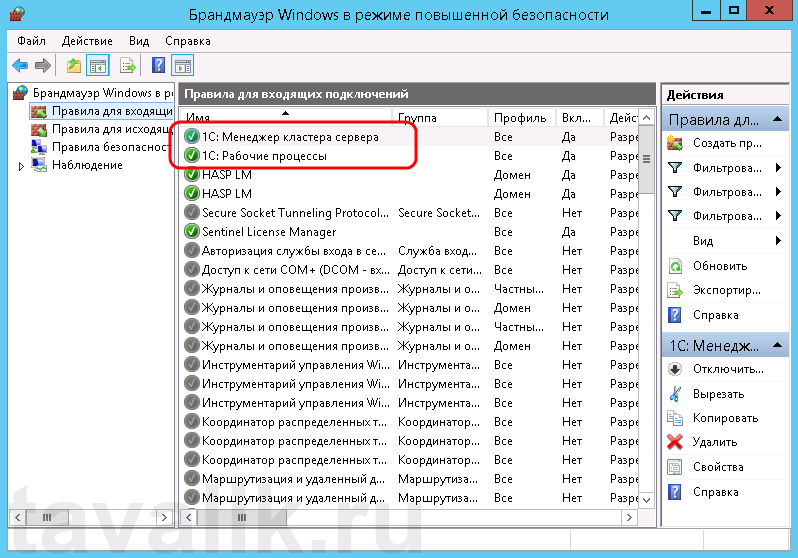
Ну а клиент «1С:Предприятия» должен без ошибок подключиться к серверу. Если же потребуется подключаться к этом серверу через консоль администрирования серверов «1С:Предприятия», то необходимо также открыть порт 1540.
Аналогичным образом добавляются правила для для исходящих подключений (Outbound Rules), запрещающие правила, правила для определенных программ и протоколов. Также любое правило можно изменить, открыв его свойства из данной оснастки.
Configuring the firewall on a Windows Server 2012 R2 is an essential step in ensuring the security of your server and network. The firewall acts as a barrier between your server and potential threats from the internet or other networks. By properly configuring the firewall, you can control the traffic that is allowed to enter or leave your server, protecting it from unauthorized access or malicious activity.
In this blog post, we will explore several methods to configure the firewall on Windows Server 2012 R2. We will provide detailed steps for each method, along with the pros and cons of each approach. Additionally, we will discuss alternative solutions if you encounter any difficulties during the configuration process. Finally, we will share some bonus tips to optimize your firewall settings and answer some commonly asked questions about firewall configuration.
Configuring the firewall on your Windows Server 2012 R2 is crucial for several reasons:
1. Enhanced Security: By configuring the firewall, you can define which network traffic is allowed to access your server. This ensures that only authorized connections are established, reducing the risk of unauthorized access or external attacks.
2. Network Segmentation: The firewall allows you to divide your network into different segments, each with its own set of rules. This helps in isolating sensitive services or resources from the rest of the network, limiting the potential impact of a security breach.
3. Compliance Requirements: Many industries have specific compliance requirements that mandate the use of firewalls to protect sensitive data. By configuring the firewall according to these requirements, you can ensure that your server meets the necessary security standards.
Now let’s dive into the various methods you can use to configure the firewall on Windows Server 2012 R2.
Video Tutorial:
Part 1: Using Windows Firewall with Advanced Security:
Windows Firewall with Advanced Security is a built-in feature in Windows Server 2012 R2 that provides advanced options for configuring the firewall. Here’s how you can use it:
1. Open the Windows Firewall with Advanced Security console by clicking on «Start» and searching for «Windows Firewall with Advanced Security«.
2. In the console window, you will see separate sections for inbound and outbound rules. Right-click on either section and select «New Rule» to create a new rule.
3. Follow the wizard to define the rule properties, such as the rule type, protocol, ports, and IP addresses. You can choose to allow or block the specific traffic according to your requirements.
4. Once you have defined the rule properties, you can assign it a name and description for easy identification.
5. Review the rule settings and click «Finish» to create the rule. The new rule will be added to the corresponding section (inbound or outbound) and will take effect immediately.
Pros:
1. Windows Firewall with Advanced Security provides a comprehensive set of options for configuring the firewall, allowing you to create highly specific rules to control network traffic.
2. The built-in console makes it easy to manage and monitor firewall rules, ensuring that your server remains protected.
3. The granular control provided by Windows Firewall with Advanced Security allows you to customize the firewall rules according to the specific needs of your server.
Cons:
1. Configuring the firewall using Windows Firewall with Advanced Security may require some technical knowledge and understanding of network protocols.
2. Incorrect configuration of firewall rules can lead to unintended consequences, such as blocking legitimate network traffic or allowing unauthorized access.
3. The complexity of the interface may be overwhelming for those who are new to firewall configuration.
Part 2: Using Group Policy:
Group Policy is a powerful tool in Windows Server that allows you to manage and configure settings for multiple computers within an Active Directory domain. You can also use Group Policy to configure firewall settings on your Windows Server 2012 R2.
1. Open the Group Policy Management console by clicking on «Start» and searching for «Group Policy Management«.
2. Expand the tree view to locate the Group Policy Object (GPO) that you want to edit. Right-click on the GPO and select «Edit«.
3. In the Group Policy Management Editor, navigate to «Computer Configuration» > «Policies» > «Windows Settings» > «Security Settings» > «Windows Firewall with Advanced Security«.
4. Here, you can define firewall rules by right-clicking on «Inbound Rules» or «Outbound Rules» and selecting «New Rule«. Follow the wizard to specify the rule properties and save the changes.
5. Once you have configured the firewall rules in the GPO, link it to the appropriate organizational unit (OU) or the entire domain. The GPO will be applied to the computers within the scope, automatically configuring the firewall settings.
Pros:
1. Using Group Policy to configure the firewall allows for centralized management of firewall settings across multiple servers or computers.
2. Changes made to Group Policy are automatically applied to the computers within the scope, ensuring consistent and standardized firewall configurations.
3. Group Policy provides a familiar and user-friendly interface for configuring firewall rules, making it accessible to administrators with varying levels of technical expertise.
Cons:
1. Group Policy can be complex to set up and requires a good understanding of Active Directory and Group Policy concepts.
2. Changes made to Group Policy may take some time to propagate to all computers within the scope, depending on the replication settings.
3. Overlapping or conflicting Group Policies can lead to unexpected results and difficulties in troubleshooting firewall issues.
Part 3: Using Third-Party Firewall Software:
In addition to the built-in firewall options, you can also choose to install third-party firewall software on your Windows Server 2012 R2. These software solutions often provide enhanced features and additional layers of protection.
1. Research and select a third-party firewall software that suits your requirements. Some popular options include Norton Firewall, McAfee Firewall, and ZoneAlarm Firewall.
2. Download and install the chosen software on your server, following the instructions provided by the vendor.
3. Launch the firewall software and configure the firewall rules according to your needs. Each software will have its own interface and configuration options.
4. Specify the inbound and outbound rules, protocols, ports, and IP addresses that are allowed or blocked.
5. Save the configuration and activate the firewall. The third-party firewall software will now protect your server according to the defined rules.
Pros:
1. Third-party firewall software often provides advanced features and additional layers of protection not available in the built-in Windows Firewall.
2. The interface and configuration options of third-party firewall software may be more user-friendly and intuitive for novice administrators.
3. Some third-party firewall software may offer additional security features, such as intrusion detection systems and advanced threat prevention mechanisms.
Cons:
1. Installing and managing third-party firewall software may require additional licensing and maintenance costs.
2. Compatibility issues may arise if the third-party firewall software conflicts with other software or applications installed on your server.
3. Relying on third-party software introduces an additional layer of complexity and potential vulnerabilities that need to be regularly updated and patched.
Part 4: Using Network Hardware Firewall:
Another approach to firewall configuration is to rely on network hardware firewalls. These devices are standalone appliances that sit between your server and the external network, filtering and controlling network traffic.
1. Research and select a network hardware firewall that suits your requirements and budget. Consider factors such as throughput capacity, number of network interfaces, and management features.
2. Install the network hardware firewall between your server and the external network. Follow the vendor’s instructions for physical installation and initial configuration.
3. Access the management interface of the network hardware firewall using a web browser or dedicated software provided by the vendor.
4. Configure the firewall rules in the management interface, specifying which traffic is allowed or blocked. This can include protocols, ports, IP addresses, and advanced filtering options.
5. Save the configuration and activate the network hardware firewall. It will now act as the first line of defense for your server, filtering and controlling the incoming and outgoing network traffic.
Pros:
1. Network hardware firewalls provide a dedicated and specialized approach to filtering and controlling network traffic, often with high throughput capacity.
2. They can offer additional security features, such as intrusion prevention systems (IPS) and virtual private network (VPN) functionality.
3. Network hardware firewalls are designed to handle large volumes of network traffic without affecting the performance of your server.
Cons:
1. Network hardware firewalls typically require higher upfront costs compared to software-based solutions.
2. Configuration and management of network hardware firewalls may require technical expertise and understanding of networking concepts.
3. Upgrading or replacing network hardware firewalls can be more complex and time-consuming compared to software-based solutions.
What to Do If You Can’t Configure the Firewall on Windows Server 2012 R2:
If you encounter difficulties in configuring the firewall on your Windows Server 2012 R2, there are a few alternative solutions you can try:
1. Seek Professional Assistance: If you are unsure about the configuration process or encounter technical issues, consider consulting a professional IT services provider or a network security specialist. They can assist you in configuring the firewall according to your requirements and ensure that your server remains protected.
2. Configure Basic Firewall Settings: If you are unable to configure the firewall using advanced options or third-party software, you can still rely on the basic firewall settings provided by Windows. These settings can help block unauthorized access and provide some level of protection until you can implement more advanced configurations.
3. Utilize Host-Based Intrusion Prevention Systems (HIPS): HIPS software is designed to monitor and protect individual systems from unauthorized access and attacks. By installing a HIPS solution on your server, you can add an extra layer of security in addition to the firewall.
Bonus Tips:
1. Regularly Update Firewall Rules: Network requirements and security policies can change over time. Make it a habit to review and update your firewall rules periodically to ensure they align with the current needs and best practices.
2. Test Firewall Configurations: After configuring the firewall, it is crucial to conduct a thorough testing process to validate the effectiveness of the rules. Test different network scenarios and connections to ensure that your server remains protected while allowing legitimate traffic.
3. Monitor Firewall Logs: Enable firewall logging and monitor the logs regularly for any suspicious activity or attempted intrusions. Monitoring the logs can provide valuable insights into potential security threats and help you take proactive actions to mitigate them.
The Bottom Line:
Configuring the firewall on your Windows Server 2012 R2 is a crucial step in ensuring the security of your server and network. By following the methods outlined in this blog post, you can create firewall rules that control network traffic and protect your server from unauthorized access and malicious activity. Remember to regularly review and update your firewall configurations to adapt to changing network requirements and security threats.
5 FAQs about Configuring Firewall on Windows Server 2012 R2:
Q1: Can I combine multiple methods to configure the firewall on my Windows Server 2012 R2?
A1: Yes, you can combine multiple methods, such as using Windows Firewall with Advanced Security and a third-party firewall software, to create a layered approach to firewall configuration. However, it is important to ensure that the rules do not conflict or duplicate each other.
Q2: What is the difference between inbound and outbound rules?
A2: Inbound rules control the incoming network traffic to your server, while outbound rules control the outgoing network traffic. Both types of rules allow you to define the allowed or blocked protocols, ports, IP addresses, and other parameters.
Q3: Can I configure the firewall settings individually for each user on the server?
A3: No, the firewall settings are applied at the system level and affect all users on the server. However, you can create different firewall rules based on IP addresses or user groups to achieve a more granular level of control.
Q4: How often should I review and update my firewall rules?
A4: It is recommended to review and update your firewall rules periodically, especially when there are changes in network requirements or security policies. Make it a part of your regular maintenance and security practices.
Q5: Are there any other alternatives to third-party firewall software?
A5: Yes, apart from third-party firewall software, you can also consider using software-based solutions like Windows Firewall with Advanced Security or hardware solutions like network hardware firewalls. Each option has its own pros and cons, so choose the one that best suits your requirements and budget.
Configuring the firewall in Windows Server 2012 R2 is essential for keeping your network secure. Did you know that unsecured networks are vulnerable to cyber attacks and data breaches? To protect your system and data, it is crucial to set up the firewall correctly.
To configure the firewall in Windows Server 2012 R2, you need to understand its significance and features. The firewall acts as a barrier between your network and the external world, monitoring and controlling the incoming and outgoing network traffic. By allowing only authorized connections, it prevents malicious activities and safeguards your infrastructure. With the right configuration, you can ensure that your system is protected from potential threats and vulnerabilities.
Learn how to configure the firewall in Windows Server 2012 R2 with these step-by-step instructions. Start by opening the Windows Firewall with Advanced Security console, then create inbound and outbound rules to allow or block specific traffic. Set the rule properties, such as protocol, port, and IP addresses, and apply them to the desired profiles. Finally, test the firewall rules to ensure they are working as intended. Protect your server with a properly configured firewall.

Introduction to configuring Firewall in Windows Server 2012 R2
In today’s digital landscape, security is of utmost importance. One key aspect of ensuring the security of your network is configuring the firewall properly. In this article, we will explore how to configure the firewall in Windows Server 2012 R2, a powerful operating system widely used in enterprise environments. By understanding the various firewall settings and options available in Windows Server 2012 R2, you can enhance the security of your network and protect your valuable data from unauthorized access.
Understanding Windows Server 2012 R2 Firewall
Before we dive into the configuration process, let’s take a moment to understand the Windows Server 2012 R2 firewall itself. The built-in firewall in Windows Server 2012 R2 is designed to protect the system and network by filtering incoming and outgoing network traffic. It acts as a barrier between your network and the external world, allowing only authorized connections to pass through while blocking potentially harmful or unauthorized traffic.
The Windows Server 2012 R2 firewall operates based on rules and profiles. Rules define what traffic is allowed or blocked based on various criteria such as the source and destination IP addresses, ports, protocols, and programs. Profiles, on the other hand, determine the behavior of the firewall based on the network location, such as Public, Private, and Domain. By default, each profile has its own set of predefined rules, but you can customize them according to your specific requirements.
With this basic understanding in mind, let’s move on to the configuration process and explore how to effectively configure the firewall in Windows Server 2012 R2.
Step 1: Accessing the Firewall Configuration
The first step in configuring the firewall is to access the firewall configuration settings. To do this, you can follow these steps:
- Log in to your Windows Server 2012 R2 system using an account with administrative privileges.
- Click on the «Start» button and open the «Control Panel.»
- Click on the «System and Security» option, followed by «Windows Firewall.»
- This will open the Windows Firewall interface, where you can configure the various settings.
Once you have accessed the firewall configuration settings, you can proceed to the next step in the configuration process.
Step 2: Configuring Inbound Rules
The next step is to configure the inbound rules, which control the traffic that is allowed to enter your network. To configure the inbound rules, follow these steps:
- In the Windows Firewall interface, click on the «Advanced settings» option on the left-hand side.
- This will open the «Windows Firewall with Advanced Security» window.
- Click on the «Inbound Rules» option in the left-hand pane to view the existing inbound rules.
- You can either modify the existing rules or create new rules based on your requirements.
- To create a new rule, right-click on the «Inbound Rules» option and select «New Rule.»
- Follow the prompts in the wizard to specify the details of the rule, such as the rule type, program, protocol, port, and action.
- Once you have configured the inbound rules, click on the «Finish» button to save the changes.
Configuring the inbound rules correctly is crucial to ensuring that only authorized traffic is allowed into your network while blocking any potentially harmful or unauthorized traffic.
Step 3: Configuring Outbound Rules
In addition to configuring inbound rules, it is also important to configure outbound rules to control the traffic that is allowed to leave your network. To configure the outbound rules, follow these steps:
- In the «Windows Firewall with Advanced Security» window, click on the «Outbound Rules» option in the left-hand pane.
- Similar to configuring inbound rules, you can modify the existing rules or create new rules based on your requirements.
- To create a new rule, right-click on the «Outbound Rules» option and select «New Rule.»
- Follow the prompts in the wizard to specify the details of the rule, such as the rule type, program, protocol, port, and action.
- Once you have configured the outbound rules, click on the «Finish» button to save the changes.
By configuring outbound rules, you can ensure that only authorized traffic is allowed to leave your network, providing an additional layer of security.
Advanced Firewall Configuration Options
In addition to the basic configuration steps mentioned above, Windows Server 2012 R2 provides several advanced firewall configuration options that can further enhance the security of your network. Let’s explore some of these options:
1. Connection Security Rules
Connection security rules in Windows Server 2012 R2 are used to establish and enforce secure connections between computers or network segments. These rules can be used to encrypt network traffic, authenticate computers, and protect against network-level attacks. To configure connection security rules, follow these steps:
- In the «Windows Firewall with Advanced Security» window, click on the «Connection Security Rules» option in the left-hand pane.
- Right-click on the «Connection Security Rules» option and select «New Rule.»
- Follow the prompts in the wizard to specify the details of the rule, such as the authentication method, encryption method, and security association.
- Once you have configured the connection security rules, click on the «Finish» button to save the changes.
Connection security rules provide an added layer of security by ensuring that network traffic is encrypted and authenticated, protecting against unauthorized access or interception.
2. Security Logging and Monitoring
Windows Server 2012 R2 allows you to enable security logging and monitoring, which can help you track and analyze firewall activity. By enabling security logging, you can capture detailed information about blocked and allowed connections, auditing events, and firewall rule matches. To enable security logging and monitoring, follow these steps:
- In the «Windows Firewall with Advanced Security» window, click on the «Properties» option in the right-hand pane.
- Click on the «Domain Profile,» «Private Profile,» or «Public Profile» tab, depending on the profile you want to configure.
- Under the «Logging» section, click on the «Customize» button.
- Specify the logging settings, such as the log file path, maximum log size, and log file location.
- Click on the «Ok» button to save the changes.
Enabling security logging and monitoring allows you to have a comprehensive view of firewall activity, helping you identify potential security issues and take necessary actions.
3. Remote Administration
If you are managing multiple Windows Server 2012 R2 systems, you can remotely administer the firewall settings using the Windows Firewall with Advanced Security MMC snap-in. This allows you to configure and manage the firewall settings of multiple systems from a centralized location. To enable remote administration, follow these steps:
- In the «Windows Firewall with Advanced Security» window, click on the «Properties» option in the right-hand pane.
- Click on the «Domain Profile,» «Private Profile,» or «Public Profile» tab, depending on the profile you want to configure.
- Under the «Settings» section, click on the «Customize» button next to the «Remote Administration» option.
- Select the «Custom» option and specify the IP addresses or IP address ranges that are allowed to remotely manage the firewall settings.
- Click on the «Ok» button to save the changes.
Enabling remote administration allows you to centrally manage the firewall settings of multiple systems, simplifying firewall management and ensuring consistent security across the network.
Conclusion
Configuring the firewall in Windows Server 2012 R2 is essential for safeguarding your network against unauthorized access and potential threats. By understanding the different aspects of the firewall and utilizing its configuration options, you can ensure that only authorized traffic is allowed in and out of your network. Remember to regularly review and update your firewall rules to adapt to changing security needs and stay protected in today’s constantly evolving security landscape.

Configuring Firewall in Windows Server 2012 R2
Firewalls are an essential component of network security, and configuring them properly is crucial for a Windows Server 2012 R2 environment. Here are the steps to configure the firewall in Windows Server 2012 R2:
- Identify the network profiles: Windows Server 2012 R2 provides three network profiles — Domain, Private, and Public. Determine which profile applies to your network.
- Open Windows Firewall settings: Go to Control Panel, select System and Security, and click on Windows Firewall.
- Configure inbound and outbound rules: In the Windows Firewall settings, click on «Advanced settings» to access the advanced configuration interface. Here you can create inbound and outbound rules to allow or block specific applications and ports.
- Configure the network profiles: In the advanced settings, click on «Windows Firewall with Advanced Security» and select the network profile you want to configure. Enable or disable the firewall, specify custom inbound and outbound rules, and manage connection security rules.
- Monitor and refine rules: Regularly review firewall rules, monitor network traffic, and make necessary adjustments to ensure optimal protection without hindering legitimate network activities.
By following these steps, you can effectively configure the firewall in Windows Server 2012 R2 to safeguard your network and maximize security.
### Key Takeaways for «How to Configure Firewall in Windows Server 2012 R2»:
Key Takeaways
- Windows Server 2012 R2 allows you to configure a robust firewall to protect your network.
- The Windows Firewall with Advanced Security provides granular control over inbound and outbound traffic.
- Firewall rules can be customized to allow or block specific ports, protocols, and applications.
- Server roles and services can have specific firewall rules to enhance security.
- Regularly review and update firewall rules to ensure the highest level of protection.
Frequently Asked Questions
Configuring the firewall in Windows Server 2012 R2 is an essential step in ensuring the security of your network. Here are some frequently asked questions about configuring the firewall in Windows Server 2012 R2:
1. How do I open ports in the Windows Server 2012 R2 firewall?
To open ports in the Windows Server 2012 R2 firewall, follow these steps:
First, open the Server Manager and navigate to the «Tools» menu. From there, select «Windows Firewall with Advanced Security.» In the «Windows Firewall with Advanced Security» window, click on «Inbound Rules» to view the existing rules.
Next, right-click on «Inbound Rules» and select «New Rule.» In the «New Inbound Rule Wizard,» select the rule type (such as Port or Program) and specify the port number or program path that you want to open. Follow the prompts to complete the rule creation process. Once the rule is created, the specified port will be open in the Windows Server 2012 R2 firewall.
2. How do I block a specific IP address in the Windows Server 2012 R2 firewall?
To block a specific IP address in the Windows Server 2012 R2 firewall, you can create an inbound rule. Here’s how:
Open the Server Manager and go to the «Tools» menu. Select «Windows Firewall with Advanced Security» and navigate to «Inbound Rules.» Right-click on «Inbound Rules» and choose «New Rule.» In the «New Inbound Rule Wizard,» select the rule type as «Custom» and click «Next.»
On the «Program» screen, select «All Programs» and click «Next.» On the «Protocol and Ports» screen, select «TCP» or «UDP,» depending on the protocol you want to block, and specify the port number if necessary. Click «Next.»
On the «Scope» screen, select «These IP addresses» and click «Add.» Enter the specific IP address you want to block and click «OK.» Click «Next» and then «Block the connection.» Finally, give the rule a name and click «Finish.» This rule will block the specified IP address in the Windows Server 2012 R2 firewall.
3. How do I allow a program through the Windows Server 2012 R2 firewall?
To allow a specific program through the Windows Server 2012 R2 firewall, you can create an inbound rule. Follow these steps:
Open the Server Manager and go to the «Tools» menu. Choose «Windows Firewall with Advanced Security» and navigate to «Inbound Rules.» Right-click on «Inbound Rules» and select «New Rule.» In the «New Inbound Rule Wizard,» choose the rule type as «Program» and click «Next.»
On the «Program» screen, select «This program path» and browse to the location of the program you want to allow. Click «Next.» On the «Action» screen, select «Allow the connection» and click «Next.»
On the «Profile» screen, select the applicable profiles (Domain, Private, or Public) and click «Next.» Finally, give the rule a name and click «Finish.» This rule will allow the specified program through the Windows Server 2012 R2 firewall.
4. How do I enable or disable the Windows Server 2012 R2 firewall?
To enable or disable the Windows Server 2012 R2 firewall, follow these steps:
Open the Server Manager and go to the «Tools» menu. Choose «Windows Firewall with Advanced Security» and select «Windows Firewall Properties.» In the «Windows Firewall Properties» window, select the appropriate options under «Firewall state» to enable or disable the firewall. Click «OK» to save the changes. Enabling the firewall helps safeguard your network, while disabling it may be necessary in certain scenarios.
5. How do I configure outbound rules in the Windows Server 2012 R2 firewall?
To configure outbound rules in the Windows Server 2012 R2 firewall, follow these steps:
Open the Server Manager and go to the «Tools» menu. Choose «Windows Firewall with Advanced Security» and navigate to «Outbound Rules.» Right-click on «Outbound Rules» and select «New Rule.» In the «New Outbound Rule Wizard,» choose the rule type (such as Port or Program) and follow the prompts to specify the outbound rule criteria.
You can define the protocol, port number, program path, and other criteria to allow or block outbound traffic. Once the rule is created, the specified outbound traffic will be allowed or blocked according to your configuration in the Windows Server 2012 R2 firewall.
In conclusion, configuring the firewall in Windows Server 2012 R2 is a crucial step in protecting your system from potential threats. By following the steps outlined in this article, you can successfully configure the firewall and ensure that only authorized network traffic is allowed.
Remember to regularly review and update your firewall settings to adapt to changing security needs. With a properly configured firewall, you can enhance the security of your Windows Server 2012 R2 and safeguard your data and network from unauthorized access.
How To Configure Firewall In Windows Server 2012 R2
Windows Server 2012 R2 is a powerful operating system that boasts several features aimed at improving security, performance, and management. One of the most significant security features available in Windows Server 2012 R2 is the Windows Firewall. Properly configuring the firewall is crucial for protecting your server from unauthorized access and other potential threats. In this comprehensive guide, we’ll delve into the details of how to configure the firewall in Windows Server 2012 R2, explore its features, and provide best practices for maintaining a secure server environment.
Understanding Windows Firewall
Windows Firewall is a network security system that monitors and controls incoming and outgoing network traffic based on predetermined security rules. In Windows Server 2012 R2, the firewall is integral in providing a strong defense against threats, provided it is properly configured.
Key Features of Windows Firewall:
-
Profile Configuration: Windows Firewall allows you to create rules based on different profiles (Domain, Private, and Public) so that you can tailor your firewall’s response to the network environment.
-
Rule-Based Management: You can create specific rules that determine which network traffic is allowed or blocked. This includes filtering traffic by port numbers, protocols, IP addresses, and applications.
-
Connection Security Rules: These set up requirements for secure communications between computers, providing protection against unauthorized access and data interception.
-
Advanced Security: The Windows Firewall with Advanced Security interface provides granular control, allowing detailed configurations including monitoring and logging capabilities.
Pre-Configuration Steps
Before diving into the actual configuration of the firewall, it’s important to consider these preparatory steps:
-
Assess Network Configuration: Understand your network and how the Windows Server 2012 R2 will interact with other devices. Are you using a domain, or is it a standalone server? This will help determine which firewall profile to configure.
-
Backup Current Settings: If you have settings configured, it is prudent to back them up before making changes. This can save you from potential issues caused by misconfiguration.
-
Determine Needed Exceptions: Identify the applications, services, or ports that need to be open for normal operations. This careful planning will help in creating rules that don’t inadvertently block legitimate traffic.
Accessing Windows Firewall
To configure Windows Firewall in the Windows Server 2012 R2, follow these steps:
-
Open the Control Panel: Navigate to the Control Panel through the Start screen or desktop.
-
Network and Internet: Click on «Network and Internet» and then choose «Network and Sharing Center.»
-
Windows Firewall: On the left sidebar, click on “Windows Firewall.” You will be directed to the firewall management interface.
Configuring Firewall Settings
-
Enable or Disable the Firewall:
- In the Windows Firewall window, you will see options to enable or disable the firewall for different profiles (Domain, Private, and Public).
- For security reasons, it’s generally advised to keep the firewall enabled for at least the domain profile if your server is part of a domain.
-
Advanced Settings:
- Click on “Advanced settings” on the left to bring up the Windows Firewall with Advanced Security console. This interface provides more options for configuring inbound and outbound rules and connection security rules.
Creating Inbound and Outbound Rules
Inbound Rules
Inbound rules govern the traffic that is allowed to enter your server. Here’s how to create one:
-
Inbound Rules Section: In the Windows Firewall with Advanced Security console, click on «Inbound Rules.»
-
New Rule: On the right side under the «Actions» pane, click on “New Rule.”
-
Rule Type: Choose the type of rule you want to create. You can choose from:
- Program: Allows a specific program through the firewall.
- Port: Opens a port or a range of ports (e.g., TCP port 80 for HTTP).
- Predefined: Uses a predefined set of rules (like File and Printer Sharing).
- Custom: Offers granular control for more advanced configurations.
-
Setting Up the Rule: Depending on your choice, follow the prompts to specify details such as:
- The path to the program if you chose “Program.”
- Specify TCP or UDP and enter ports to open in the case of “Port.”
-
Allow or Block: Decide whether to allow or block the connection based on the rules you set. You can also specify conditions under which the rule applies (Domain, Private, Public).
-
Finish and Name: After configuration, name the rule and add a description if necessary. Click “Finish” to save it.
Outbound Rules
Outbound rules function similarly to inbound rules but control traffic leaving your server.
-
Outbound Rules Section: Navigate to «Outbound Rules» in the left pane.
-
Repeat Steps to Create Rule: Click on “New Rule” and follow similar steps as you did to create inbound rules.
-
Testing the Rules: After creating the rules, it’s important to test them. Make sure that the applications or services you allowed are functioning correctly and that blocked services are indeed unreachable.
Configuring Connection Security Rules
Connection security rules are designed to encrypt traffic between computers and secure communication. To create a connection security rule:
-
Navigate to Connection Security Rules: In the Advanced Security console, select «Connection Security Rules.»
-
New Rule: Click on “New Rule” in the right Actions pane.
-
Rule Types: Choose between «Tunnel» (enabling VPN or secure encryption) or «Authentication» (forcing mutual authentication).
-
Define Rules: Follow the prompts to define the scope of the rule, what type of authentication will be required, and any specific settings that apply.
-
Per-Computer Settings: Depending on the traffic, choose whether the rules apply to all connections or specific IP addresses.
Monitoring and Logging Firewall Activity
Continually monitoring the firewall is essential to maintain security and detect any suspicious activity.
-
Enable Logging: To enable logging in the Windows Firewall:
- Go to the Properties of the Windows Firewall in “Windows Firewall with Advanced Security.”
- Select the “Logging” tab and choose the types of events to log (successful connections, dropped packets, etc.).
-
Viewing Logs: Logs can often be found in the
C:WindowsSystem32LogFilesFirewalldirectory. You can analyze these logs through a text editor or import them into dedicated log analysis software for deeper insights. -
Regular Review: Schedule regular reviews of the firewall logs to identify any anomalies and refine rules as necessary.
Best Practices for Firewall Configuration
-
Least Privilege: Always apply the principle of least privilege by only opening ports and allowing services that are necessary for operation. The fewer open channels, the lower the risk.
-
Regular Updates: Keep your server updated with security patches and enhancements to ensure compliance and reduce vulnerabilities.
-
Document Changes: Keep detailed records of your firewall configurations and any modifications made. This helps with audits and troubleshooting.
-
Combine with Other Security Measures: Use the firewall alongside other security solutions such as antivirus and intrusion detection systems for a layered security approach.
-
Test Configurations: After any changes, conduct comprehensive testing to ensure the firewall rules are operational and do not block legitimate traffic.
-
Consider NLA (Network Level Authentication): For RDP connections, use NLA to enforce authentication before a full connection is established.
Troubleshooting Firewall Issues
Even with the best configurations, you might encounter issues. Here are steps to troubleshoot:
-
Check Rule Status: Ensure that the rules you’ve created are active and configured correctly.
-
Network Connectivity: Verify that network issues are not interfering. Use tools like
pingortracertto diagnose connectivity problems. -
Turn Off Firewall Temporarily: For troubleshooting purposes, you can temporarily disable the firewall to see if it resolves connectivity issues, but make sure to enable it afterward.
-
Review Logs: Check your firewall logs for any blocked connections that might indicate the source of the problem.
-
Use PowerShell: For advanced troubleshooting, using PowerShell commands can help you to modify and view firewall rules without navigating through the GUI.
Conclusion
Configuring the firewall in Windows Server 2012 R2 is an essential task for safeguarding your server infrastructure. Through detailed planning, careful rule creation, and consistent monitoring, you can greatly enhance your server’s security posture. By adhering to best practices and staying informed about network threats, you can ensure that your firewall configuration remains robust and effective over time. Always remember that firewall management is an ongoing process; constant vigilance is key to a secure server environment. With these guidelines, you’re well on your way to mastering Windows Firewall configuration and ensuring the integrity of your server systems.
В процессе работы различных служб и программного обеспечения по сетевым протоколам, данные рабочие элементы используют конкретные порты, через которые происходит обмен данными.
В конфигурации брандмауэра Windows Server 2008/2012 R2 по умолчанию предусмотрена блокировка сетевой активности. Чтобы дать возможность вашим клиентским программам работать через соответствующие порты с серверными компонентами, необходимо добавить в Windows Firewall правила, которые позволят производить обмен данными в сети с использованием определенных портов.
Зачастую пользователи сталкиваются с ситуациями, в которых клиентскому ПО не удается найти сервер «1С:Предприятие», запущенный в серверной среде, управляемой Win Server 2012. При этом могут вылетать ошибки следующего характера:
-
ошибка доступа к серверу по сети;
-
ошибка при выполнении операций с информационной базой;
-
безуспешная попытка установить соединение, не был получен нужный отклик от другого компьютера;
-
было разорвано уже установленное соединение из-за неверного отклика уже подключенного компьютера.
Данные ошибки указывают на то что клиентскому ПО не удалось по указанному адресу найти сервер для 1С. Нередко случается так, что на сервере требуемый для подключения порт просто закрыт. В случае с 1С-сервером это порт под номером 1541.
Чтобы открыть данный порт, необходимо зайти на сервер через RDP-подключение и запустить управление Windows Firewall. Эту операцию можно произвести двумя способами. Первый вариант – перейти в «Панель управления», далее в подраздел «Система и безопасность», гд е нужно запустить, собственно, брандмауэр.
Также для этого можно воспользоваться командной строкой, выполнив в ней команду firewall.cpl – для этого нажимаем горячие клавиши Win+R, после чего переходим в раздел «Открыть», вводим имя команды и жмем подтверждение действия.
После того, как мы получили доступ к брандмауэру Windows, в его активном окне нам нужно выбрать раздел дополнительных параметров, который расположен в левом меню. Дальше в левой части открывшегося нового окна необходимо перейти к разделу правил для входящих подключений и через меню «Действия» выбрать «Создать новое правило».
Перед нами откроется мастер создания правил для новых входящих подключений. На титульной странице необходимо выбрать тип выбираемого правила, помеченный названием «Для портов» и можно перейти дальше. Теперь укажем протокол передачи сетевых данных (в нашем случае указываем TCP), а также номер открываемого порта.
На следующей вкладке нам нужно будет указать непосредственно действие, которое будет связано с создаваемым нами правилом. Нас интересует действие «Разрешить подключения». Выбираем его и жмем «Далее». Теперь отмечаем требуемые профили Windows Firewall, на которые должно распространяться создаваемое нами действие. Последняя страница мастера предлагает нам ввести имя для нового правила, а также добавить для него описание по желанию. Жмем готово и завершаем работу с мастером.
После создания правила нужно снова попробовать подключиться к 1С-серверу. При подключении мы увидим ту же самую ошибку, но теперь в сообщении говорится уже о другом порте под номером 1560.
По аналогии с описанной выше схемой добавления портов добавляем еще одно правило, в котором указываем диапазон портов 1560-1591. Эти порты требуются для обеспечения различных рабочих процессов программы 1C. Порты, входящие в этот диапазон, указываем через дефис в разделе «Protocol and Ports».
После проделанных манипуляций переходим в оснастку «Windows Firewall with Advanced Security». Здесь, в разделе правил для входящего подключения мы сможем увидеть созданные нами правила. При этом теперь клиент 1С должен свободно подключаться к серверному окружению. Если требуется подключение к вашему серверу через консоль серверного администрирования 1C, вам потребуется создать отдельное правило, открывающее порт 1540.
При необходимости добавления правил к исходящим подключениям можно воспользоваться той же схемой создания правил для отдельных протоколов и программ.
Настройка Windows Firewall для Win Server 2012 на 1С-сервере + MS SQL
Теперь несколько слов о том, как произвести настройку брандмауэра под Windows Server 2012 в указанной конфигурации. Такая связка – не редкость для современных офисов, но иногда требуется дополнительное время, чтобы разобраться в принципе работы Windows Firewall относительно серверного окружения 1С.
При условии, что сервер осуществляет прием подключения на стандартный TCP-порт 1433, нужно просто разрешить этот порт, воспользовавшись созданием правил для брандмауэра, принцип которого мы рассмотрели выше. Чтобы проверить, действительно ли работа идет через этот порт, можно запустить оснастку «Диспетчер конфигурации SQL Server» в Server 2012 и перейти на вкладку сетевой конфигурации. Здесь нужно выбрать вкладку протоколов для MSSQLSERVER и в левом окне найти TCP/IP-протокол. Выбираем его и кликаем «Свойства», после чего ищем вкладку «IP-адреса» и раскрываем ветку «IPAII».
Если же SQL-порт динамический, потребуется разрешение подключения к следующему приложению %ProgramFiles%\Microsoft SQL Server\MSSQL10_50.MSSQLSERVER\MSSQL\Binn\sqlservr.exe.
Как уже было сказано выше, 1С-сервер работает с портом 1541 и портами в диапазоне 1560-1591. Однако нередко случается так, что по непонятным причинам данный список открытых портов все равно не дает выполнять подключение к серверу. Чтобы все работало на 100% нужно всего лишь расширить этот диапазон, указав в нем порты от 1540 до 1591.
Как настроить HASP License Manager