
This is a single server deployment where the default settings are used to deploy the server. It is recommended to enable a firewall at the server and client-side to make the remote access more secure. We don’t need a certificate authority in an Active Directory domain, but if it is there we can make use of it. In this deployment, a public hostname pointing to the DirectAccess server with a third-party certificate will be used. The client computers accessing DirectAccess must be Windows 8 Client operating system or later. The network location server in this scenario is the same server with that we are deploying the DirectAccess role. Also, the Network Access Protection server is not used and multi-factor authentication is not supported. As all services related to DirectAccess point to the same server, the installation of the DirectAccess role service will be simple and easy.
The server deployment is started with creating a security group to assign client computers that are a member of this computers group. After that, we are installing a remote access role and configuring DirectAccess alone Remote Access client, Remote Server, and Infrastructure is the components we are going to configure in it. Also, the DirectAccess client configuration is mostly dependent on Group Policy objects and the windows client computers need to be connected to the domain network before connecting from the remote network as the client computers need to be updated with group policy object settings. The client PC with group policy updated required for DirectAccess connected to domain network from any public network over the internet where the connection to the DirectAccess server is allowed to access.
What are we waiting for, lets’s start dipping in the water to get a rinse of how to deploy DirectAccess and configure of single server scenario. The demonstration will cover DirectAccess role installation and configuration and connecting from an external network using a windows 10 client computer. Let’s get started.
Create Direct Access Client Security Group
Before we start adding the Remote Access role on the DirectAccess server we are going to create a group to allow access to specific computers as a member and get the DirectAccess connectivity privileges.
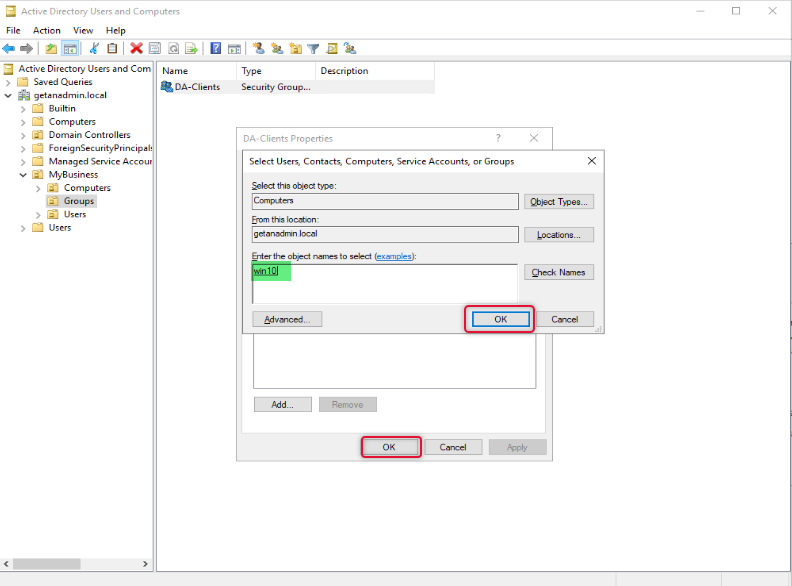
To add a security group, we are login into Domain Controller and launching “Active Directory Users and Computers” and this group is under the appropriate OU under the Domain hierarchy. In this case to identify the nature of the group we call the OU name “DA-Clients”.
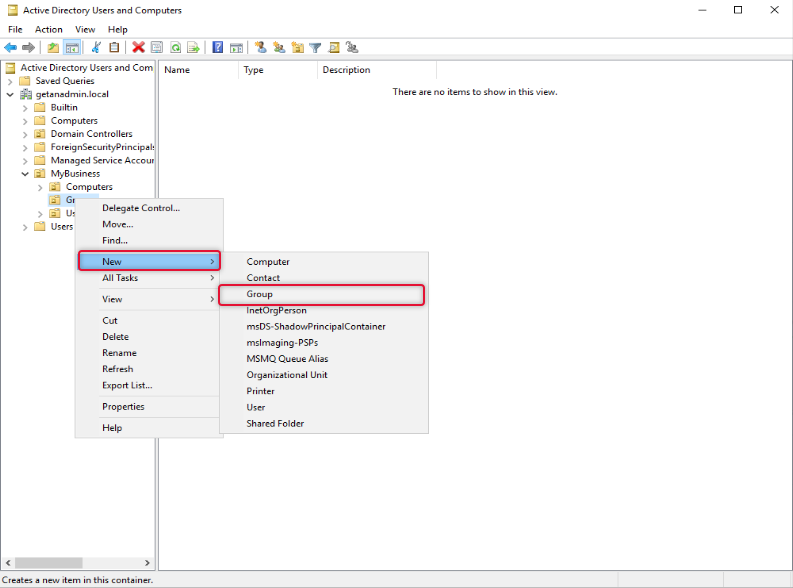
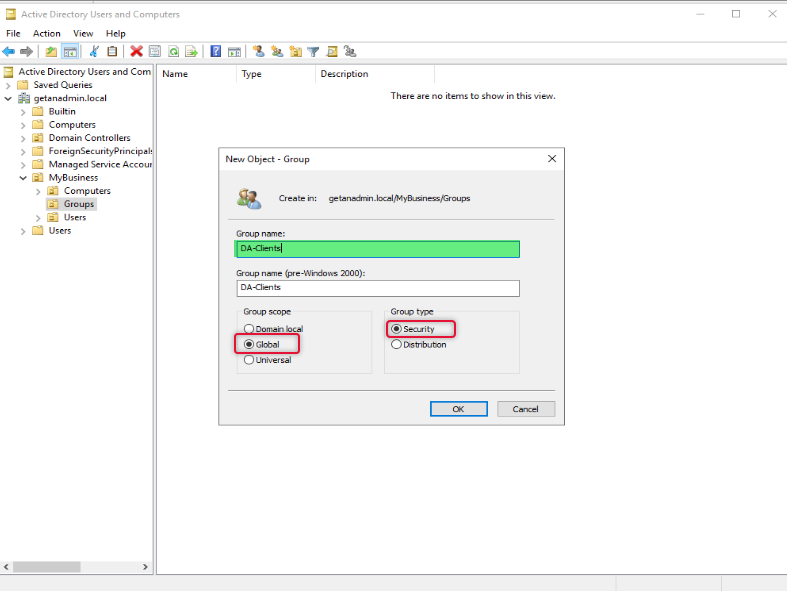
Type a name for the group and select scope as Global and type as Security and click OK.
Once a group has been created double click the group object to go to its property and select the member’s tab and add the computers that you want to allow access to connect to DirectAccess.
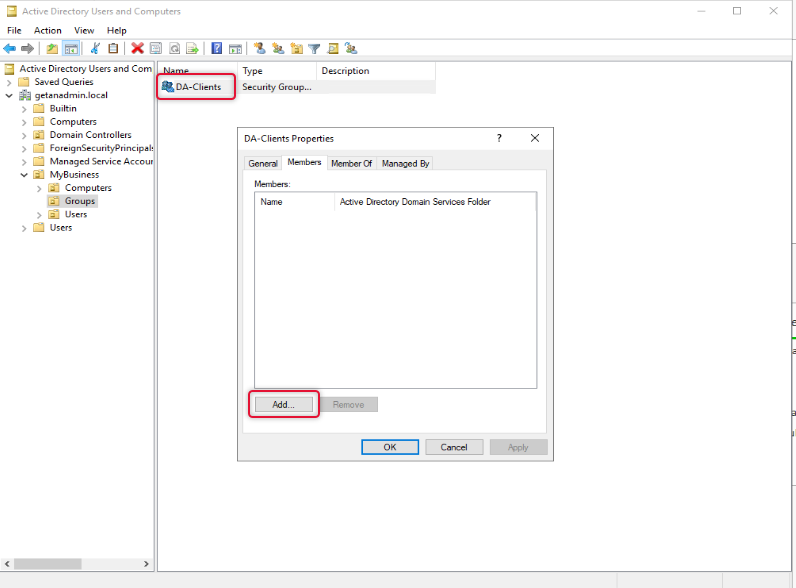
On the Select object type select Computers as we are going to add computer objects as members.
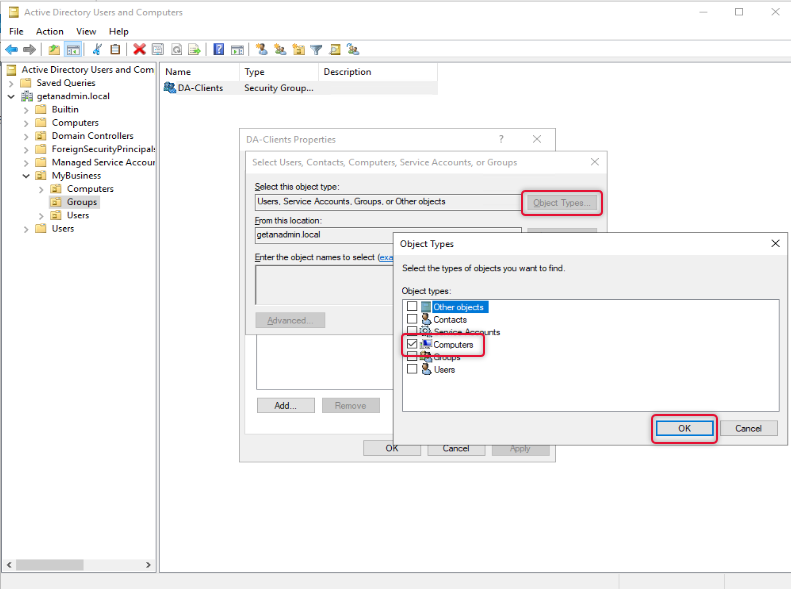
On the Enter object names to select box type names of the computers, you want to give access to and click OK twice to close the properties window.
We have completed creating a group and are ready to go to the next step which is to add the Remote Access role.
Add Remote Access Role Service
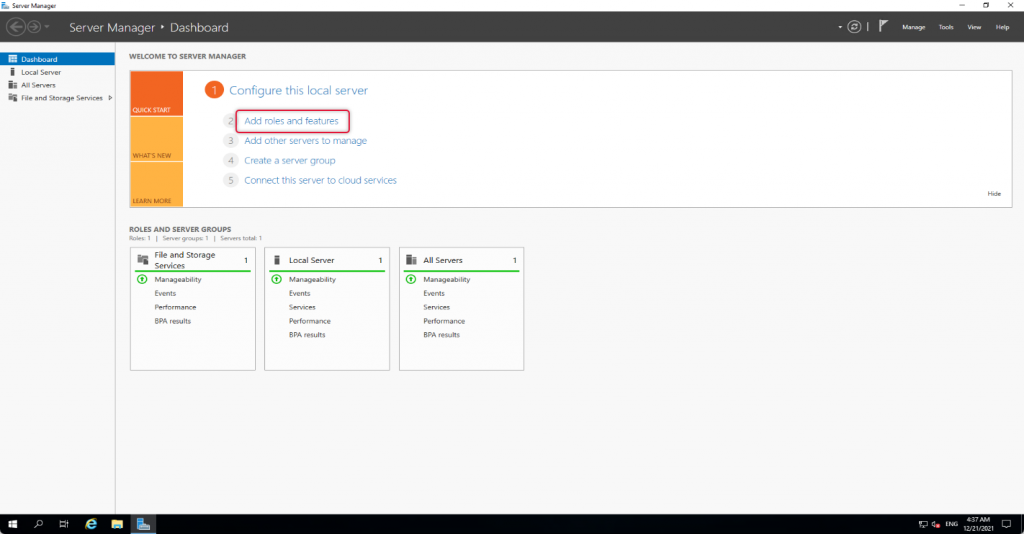
To add Remote Access role launch, Select Server Manager “Add roles and features”
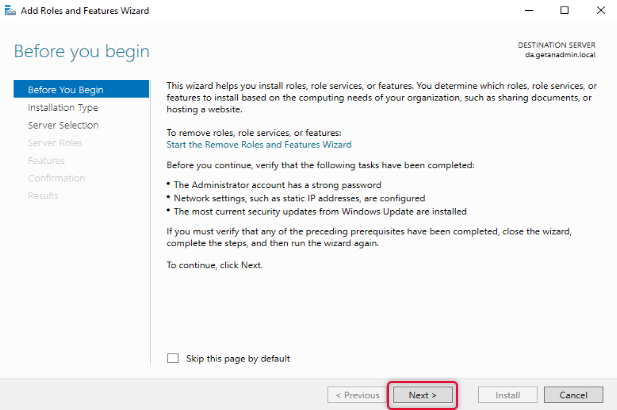
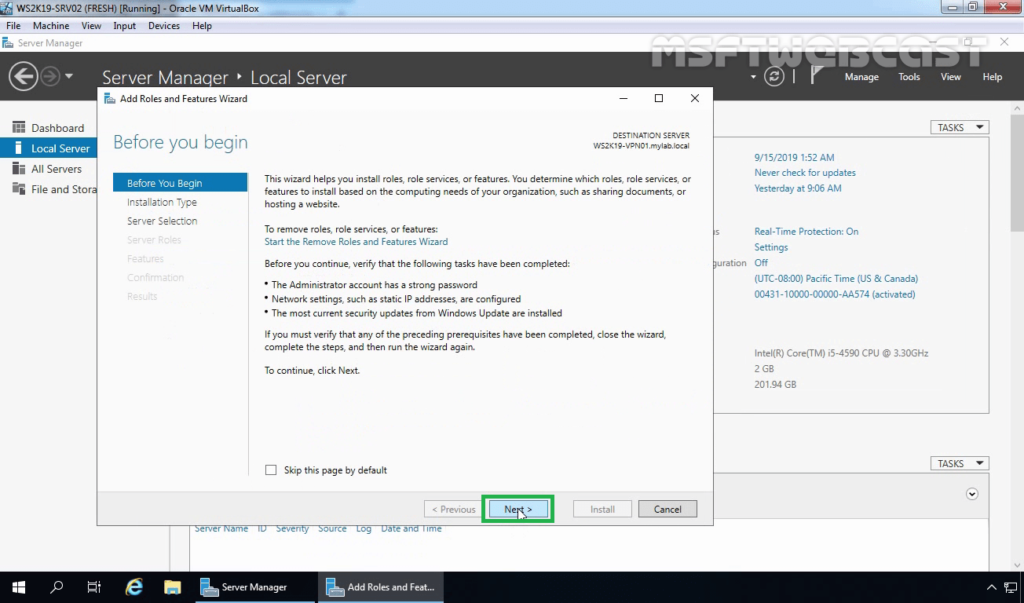
The wizard instructions give you a gist of how the Add roles and features wizard helps you install the roles or features to your local or remote computer. You may go through the instruction if you are new to adding roles and features to Windows Server. If you don’t want to see “before you begin page” anymore, click skip this page and click next to move on to the next page of the wizard.
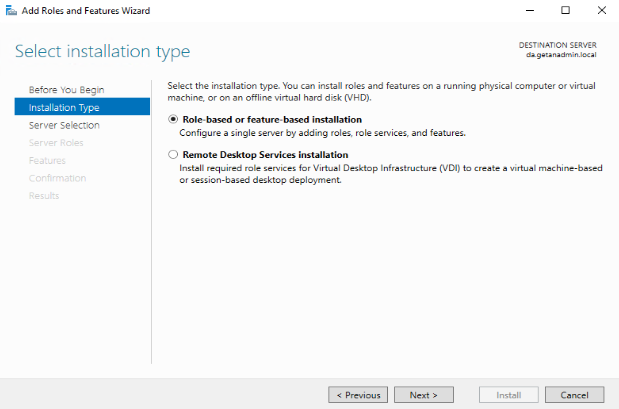
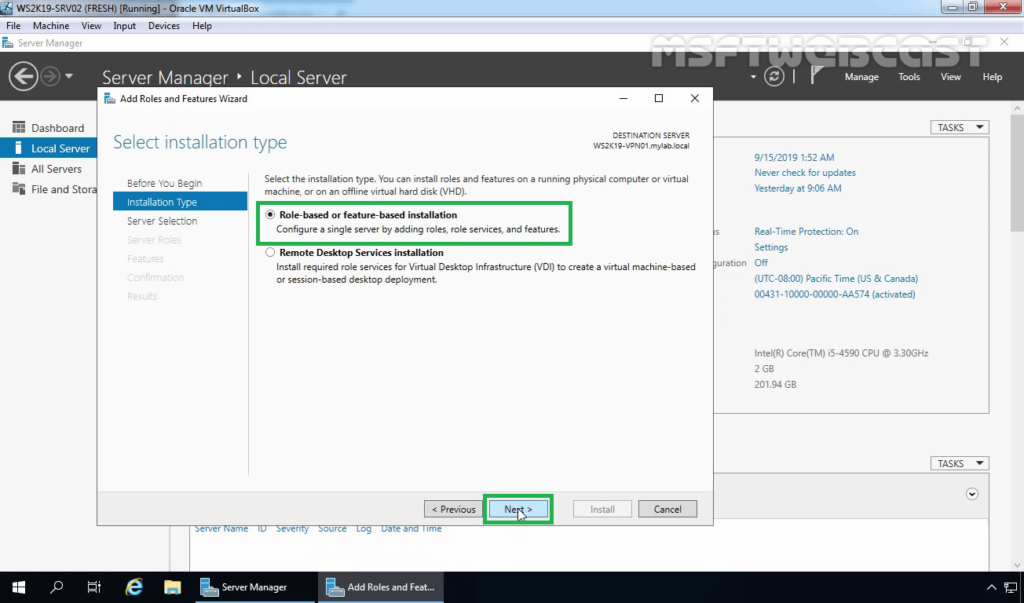
The Remote Access role comes under role-based or feature-based installation. So, click Role-Based or Feature-Based installation and click Next.
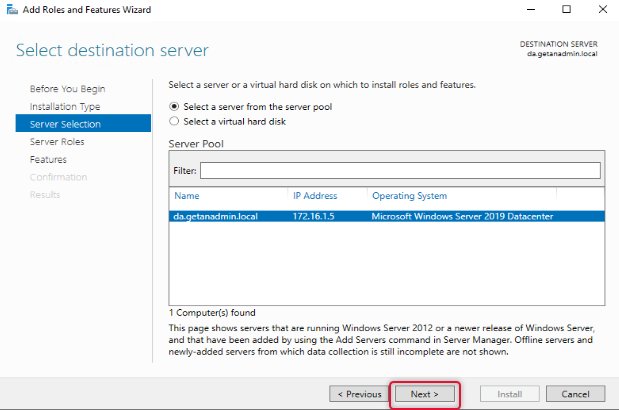
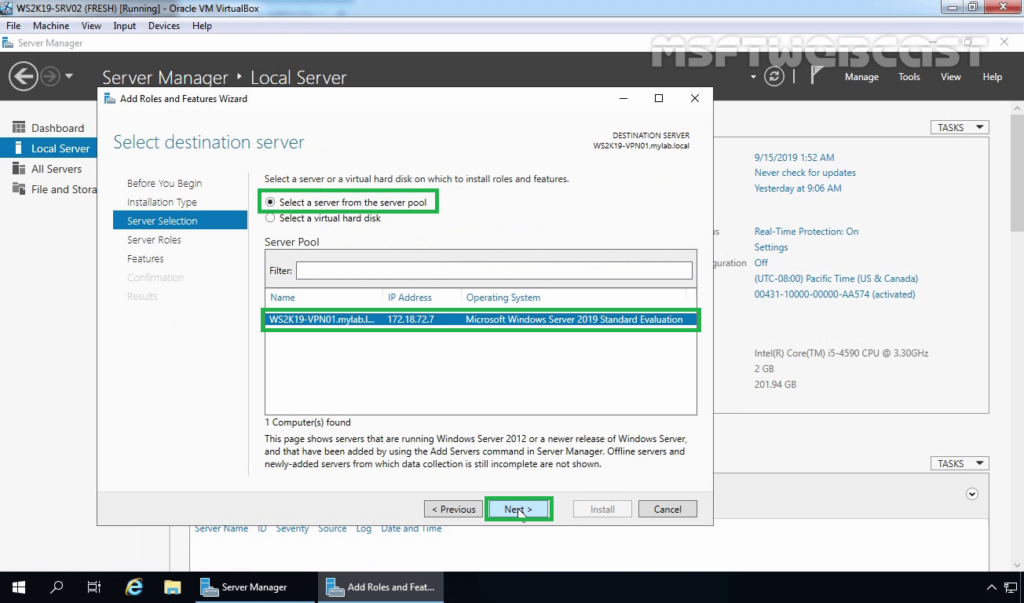
On the server selection, the local server is listed, and our intention is also to install the Remote Access role on the local server. Click Next to continue.
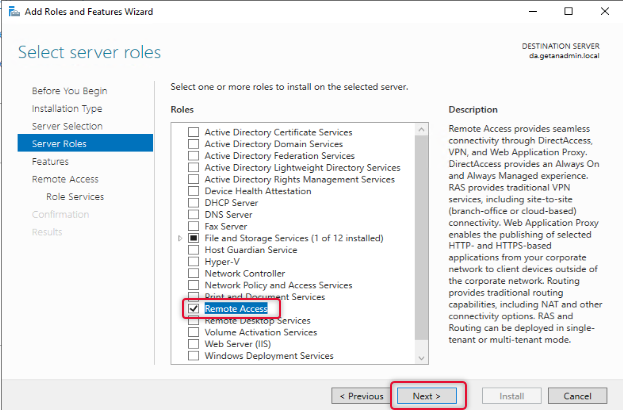
From the server roles list, select Remote Access and click Next.
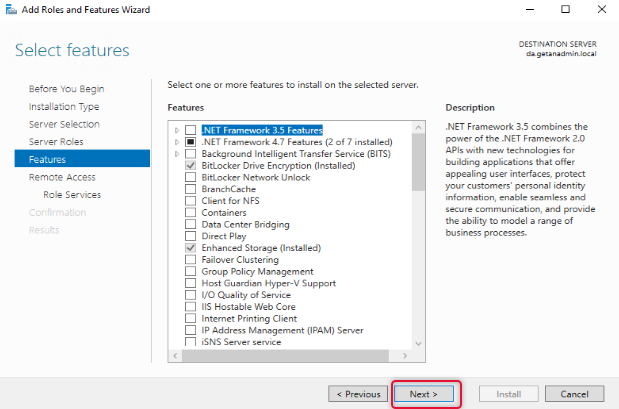
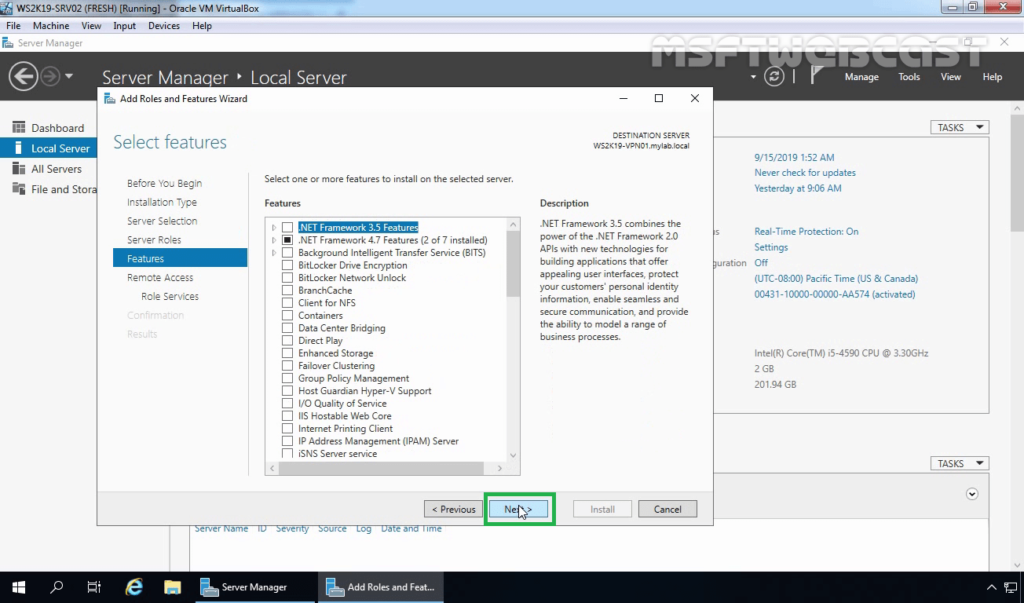
The next screen is to select features related to the role, leave the default selection, and click Next.
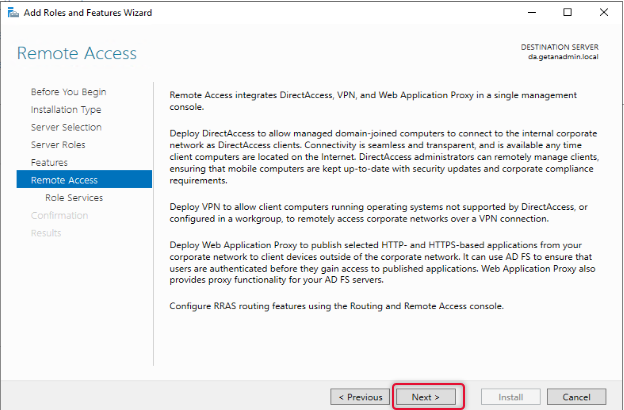
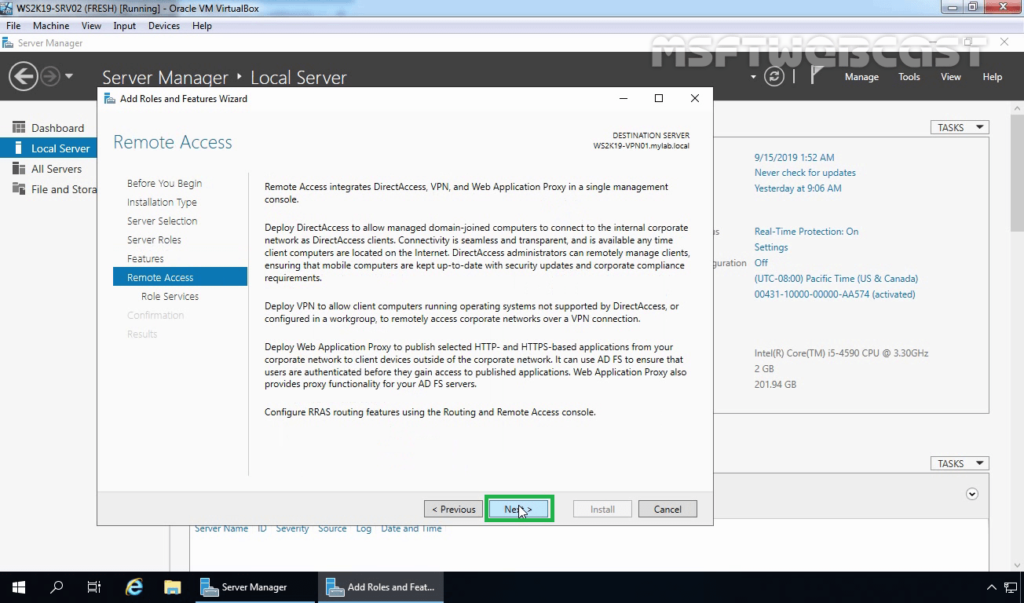
On the Remote Access page, the instruction for the Remote Access role would be given, go through the Remote Access instruction, and click Next to continue.
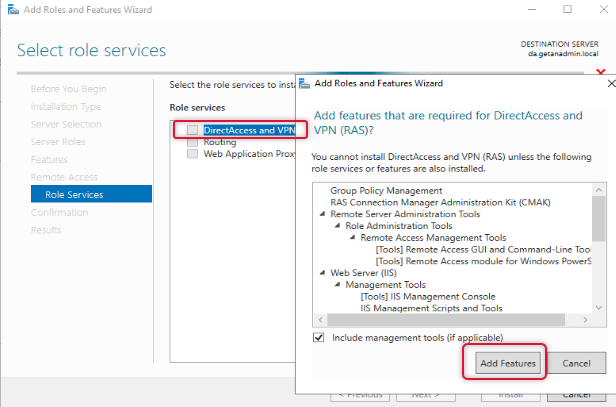
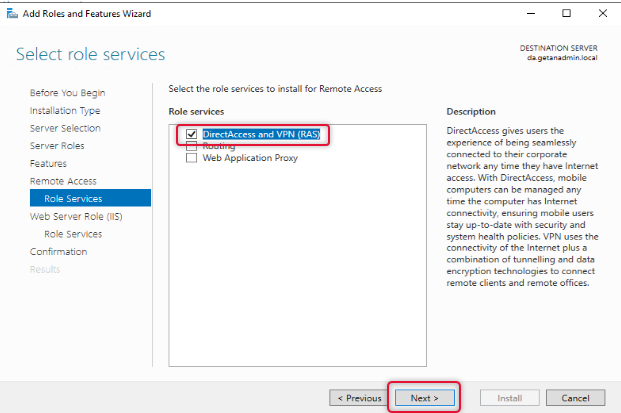
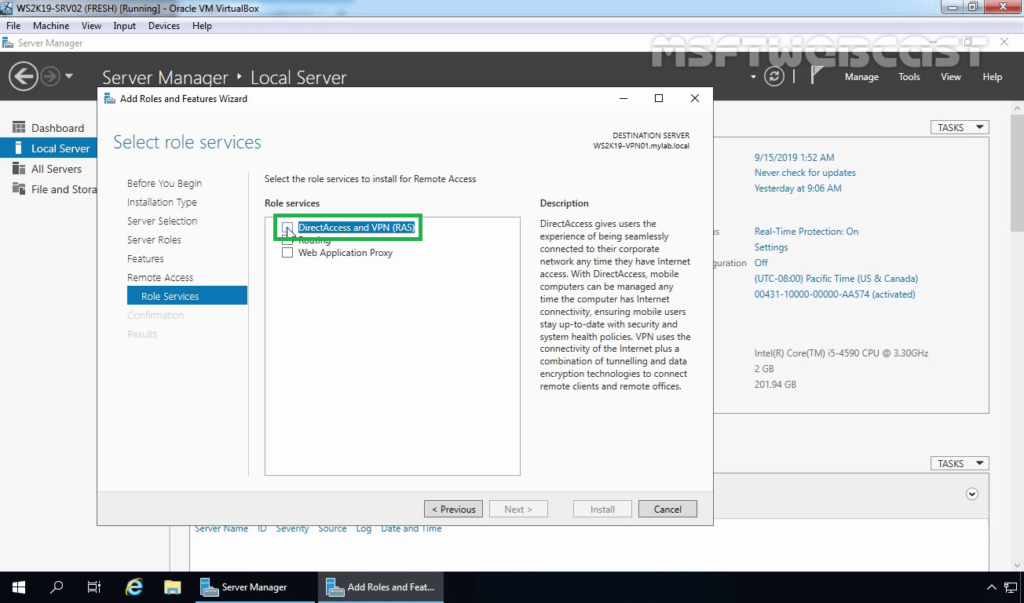
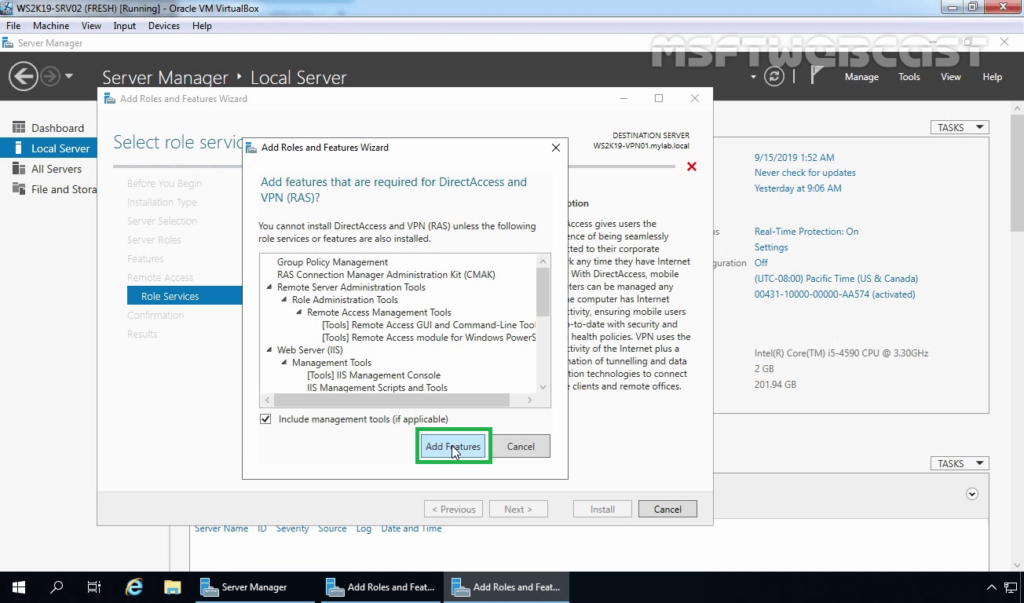
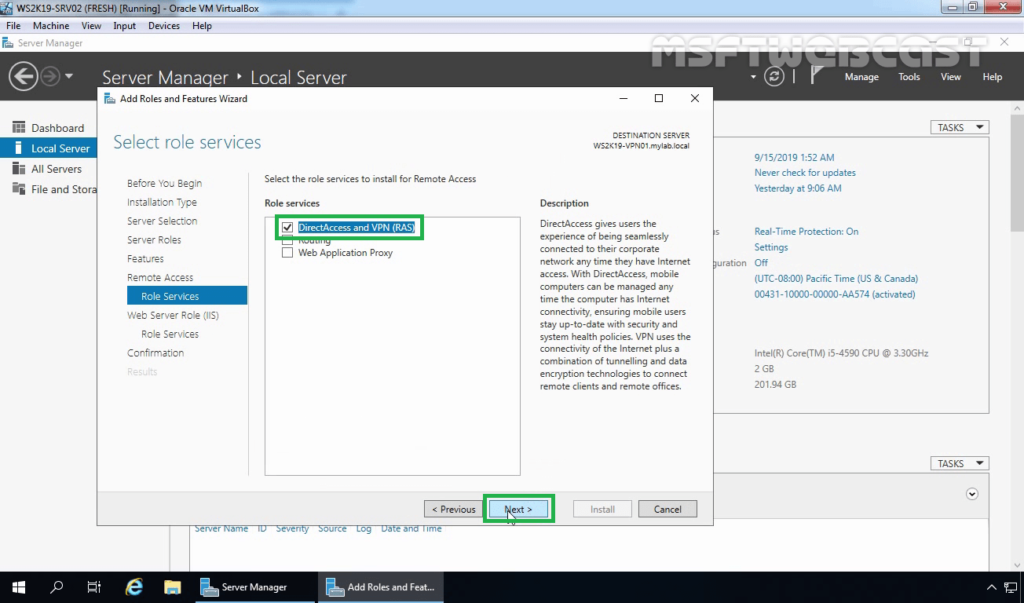
From the Remote Access role services list, select DirectAccess and VPN, and when you click on the role service, you will be prompted to choose the features to install, leave the default selection and click Add Features to return to the role services selection window.
When the role service features are selected click Next to continue.
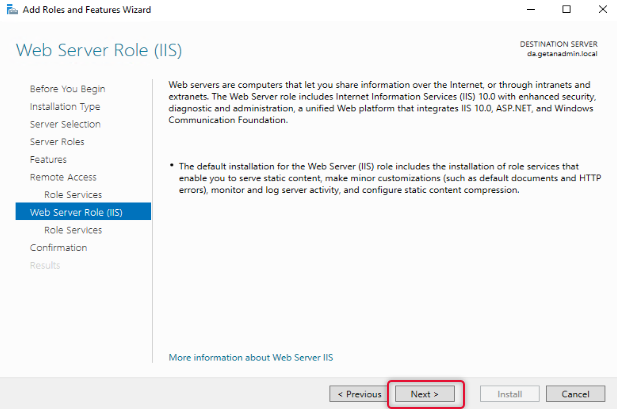
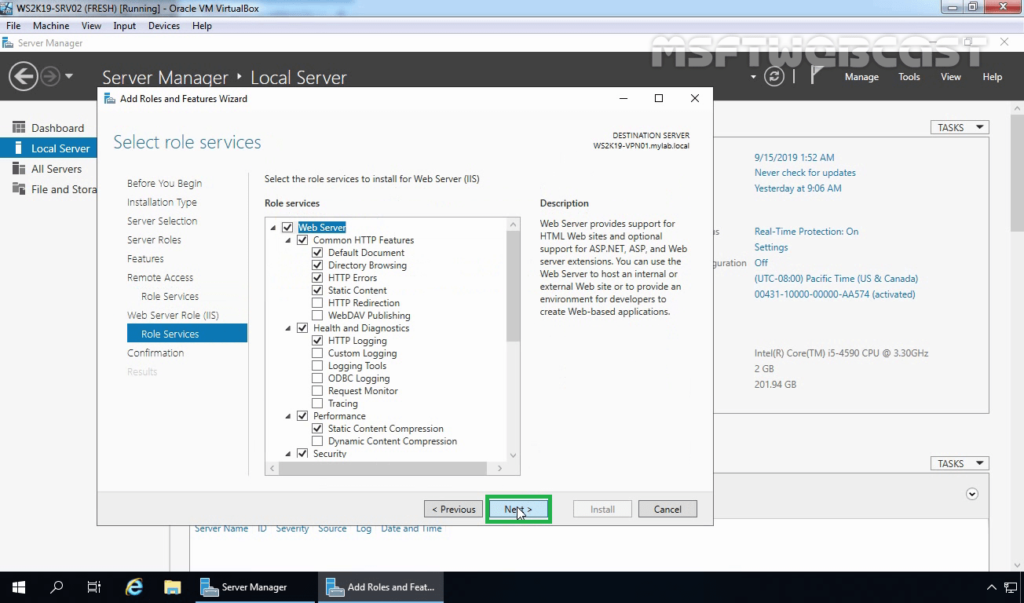
On the web service, role services go through the instruction and click Next.
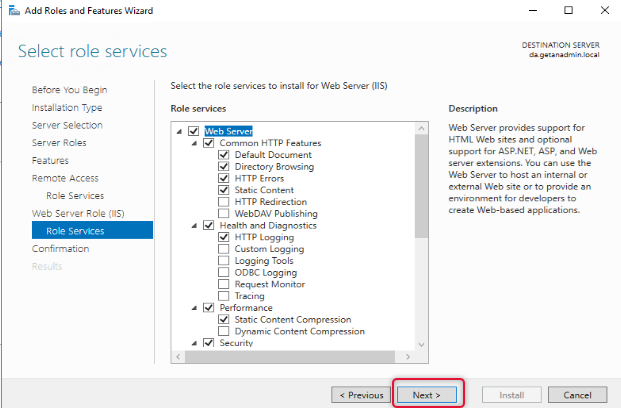
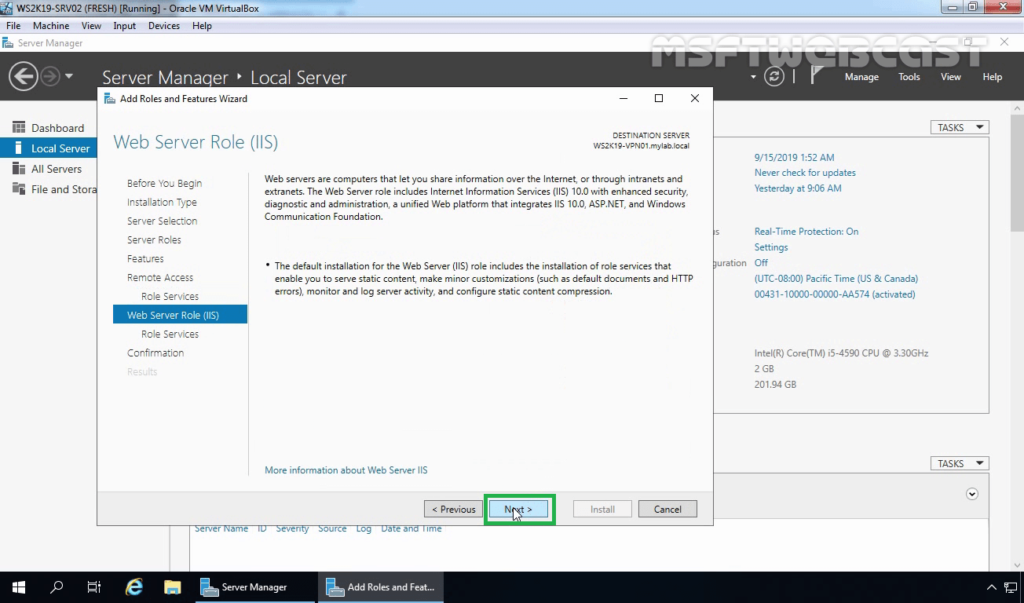
Under Web Server Role, leave the default role services and click Next.
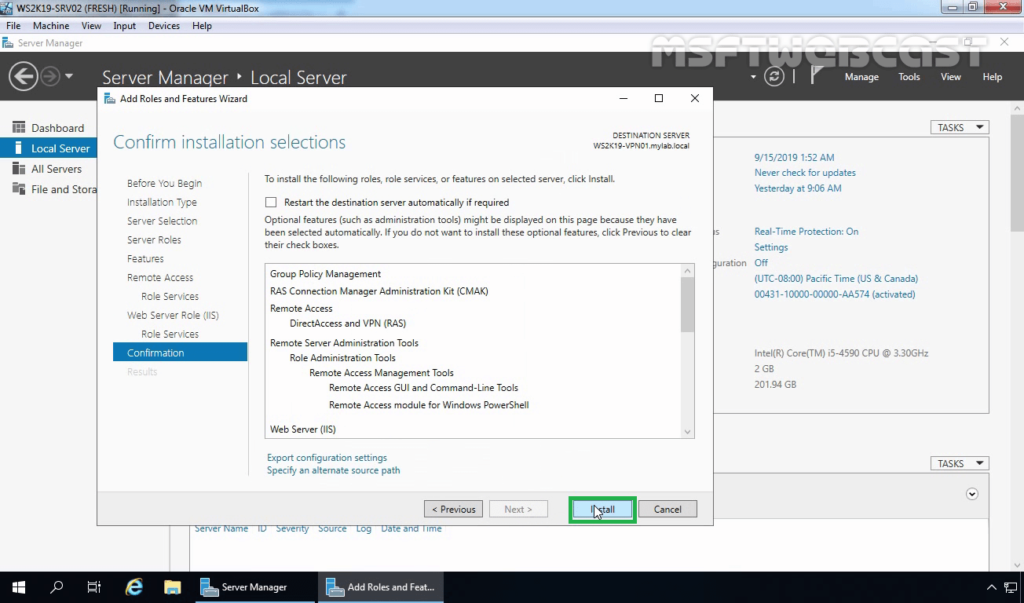
Click Install on the confirmation page to start the installation.
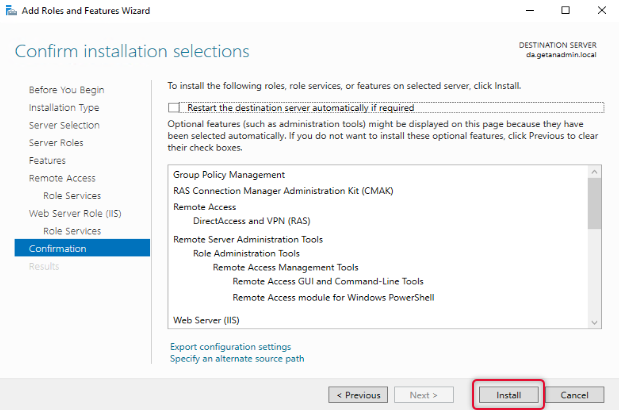
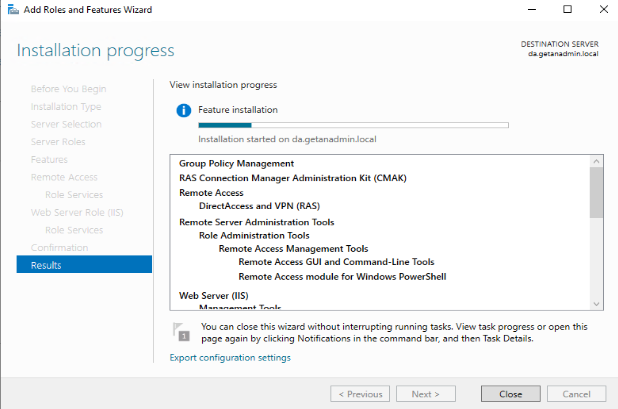
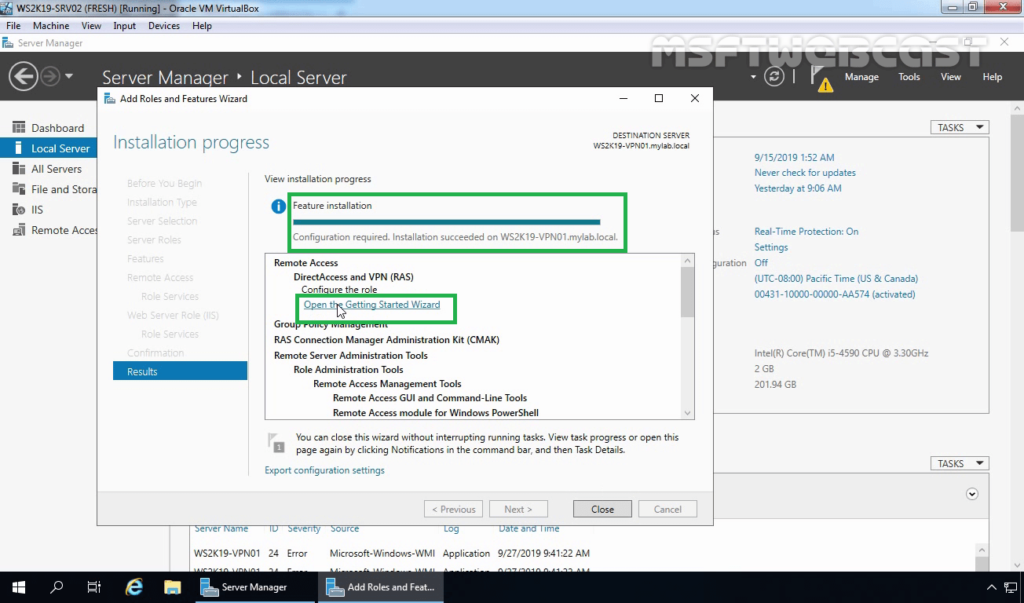
The view installation progress, let you know the installation progress of the installation, wait for the Remote Access role installation to complete.
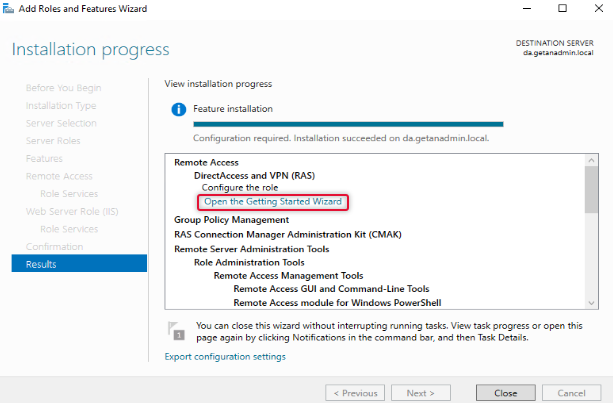
The Remote Access role has been added. Now, click on Open the getting started wizard to start the wizard.
Configure and Deploy DirectAccess Service
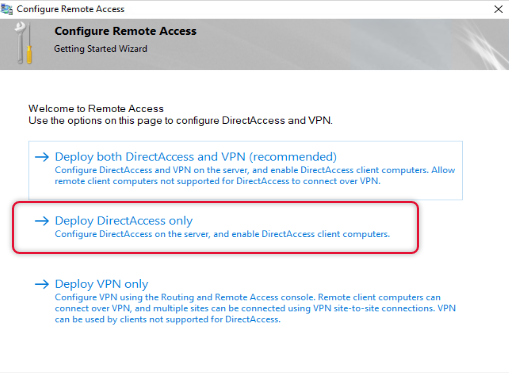
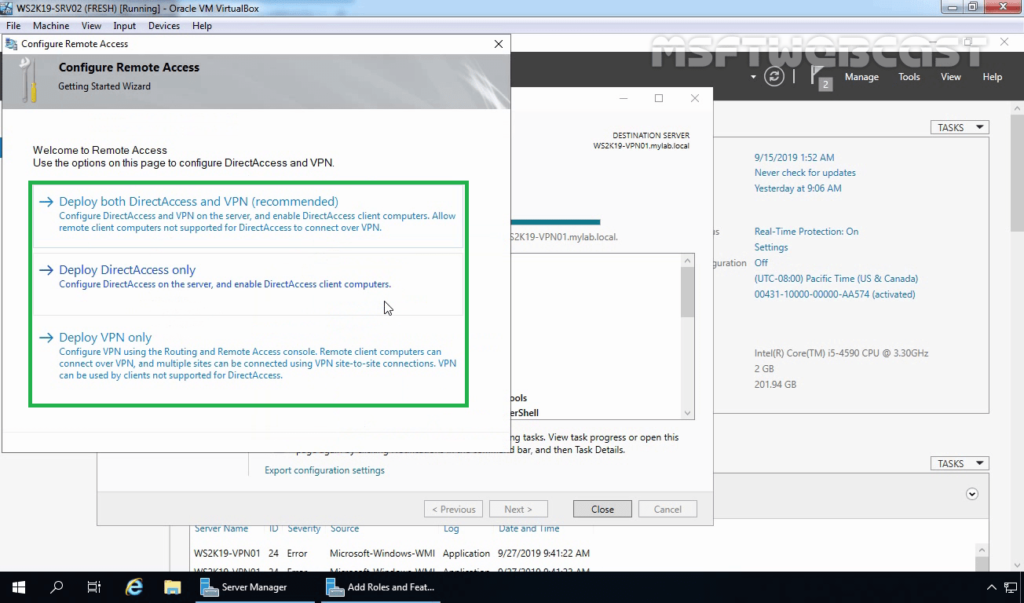
We are going to configure DirectAccess, so click on Deploy DirectAccess only.
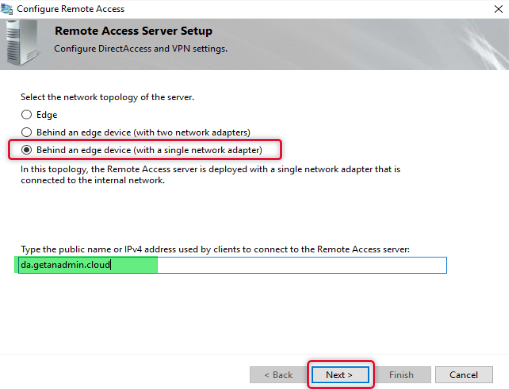
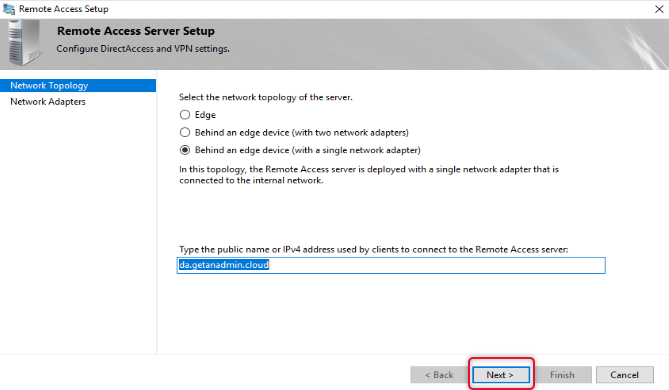
Every DirectAccess setup may not have the same network topology of the server, select the appropriate topology as per your network, if your remote access server is behind a firewall, choose behind an edge device. Type the public hostname of the DirectAccess server. You can create a host record on your domain registrar DNS and install a third-party certificate from a CA. I have created a hostname in the name of da.getanadmin.cloud and installed the CA certificate already.
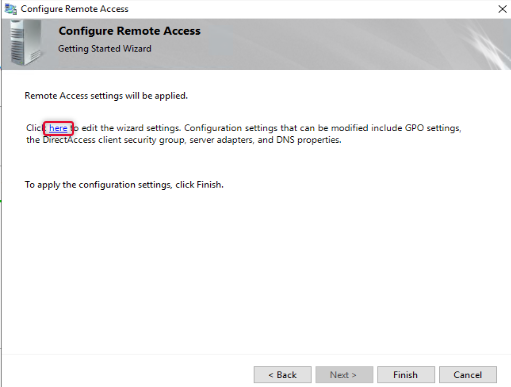
On clicking Next, you will be prompted to apply settings, before we apply settings, we need to configure a few more settings, to open the settings wizard, click the link on the as in the wizard.
First, we are going to configure Remote clients with a few settings.
The default group added to the remote clients is domain computers, to allow only certain computers to access the domain network we need to remove domain computers and add the group with computers that we need. Click Add to add a group to the list. You may remember we have created a security group previously for this purpose add that group and remove the Domain Computers group.
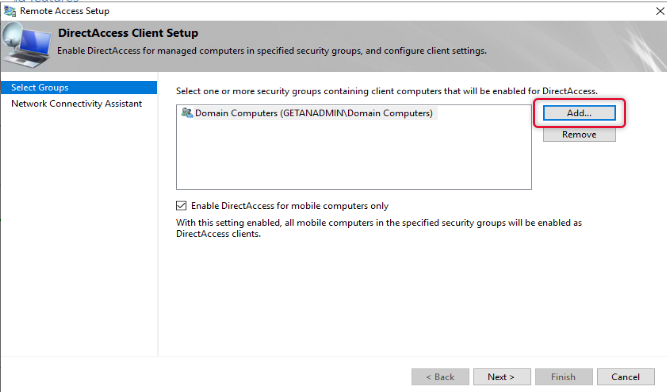
Once the security group with allowed computer members in it is added, remove the domain computers. Also, uncheck “Enable DirectAccess for mobile Computers Only”.
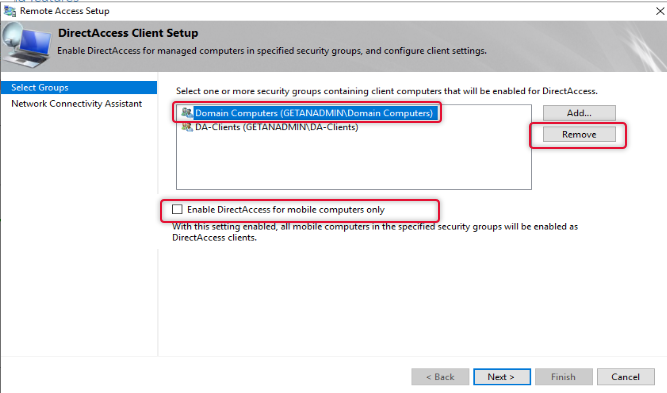
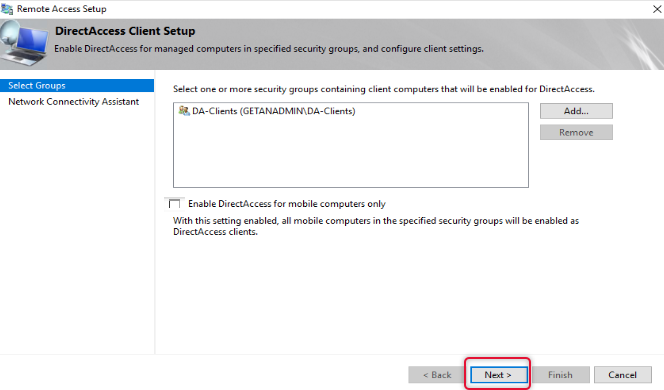
Now the group has been tidied up and click Next to continue.
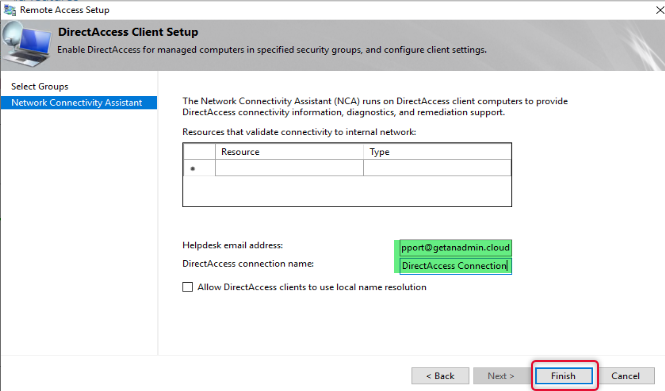
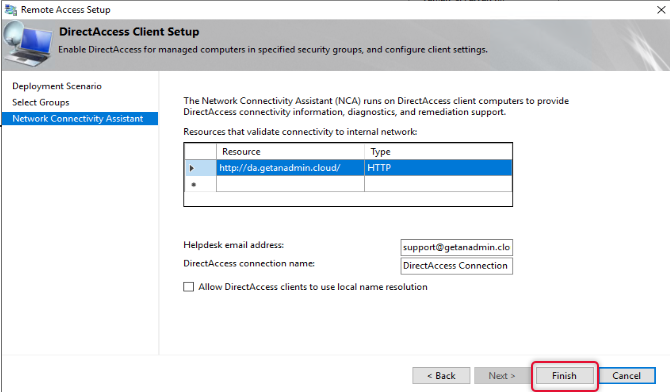
Type email address to get email related to the issue and logs from Remote client computers to contact the administrator and type a connection name and click finish.
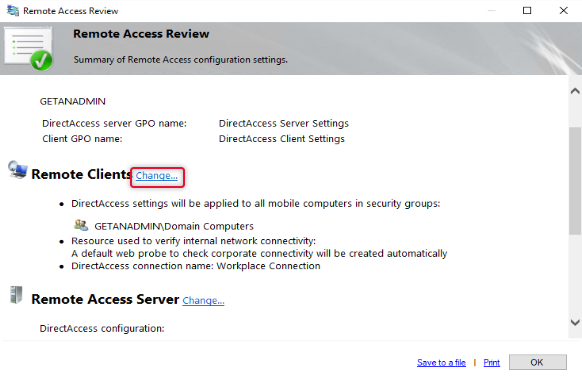
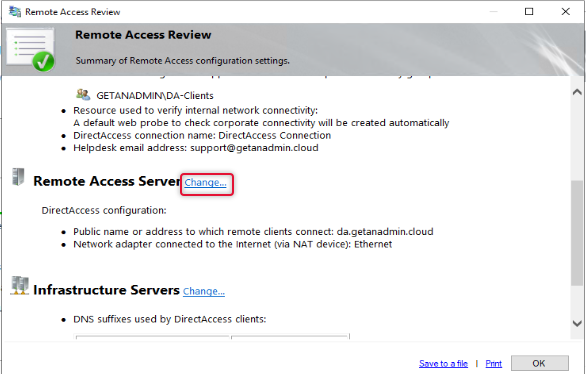
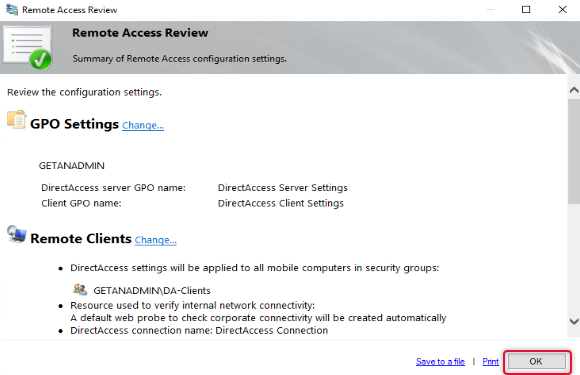
On the Remote Access review page click Change besides Remote Access Server.
On the Remote Access Server settings, we have already configured the details click next on the network topology to get to the next page.
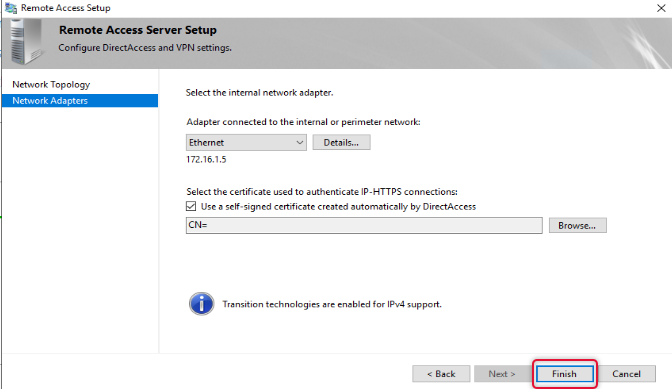
On the Network Adapters page leave the default settings and click Finish.
The Final setting, we are doing on the remote access review is to change the remote access infrastructure server. Click Change next to Infrastructure Servers
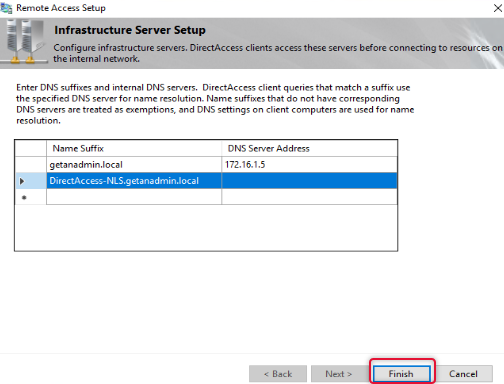
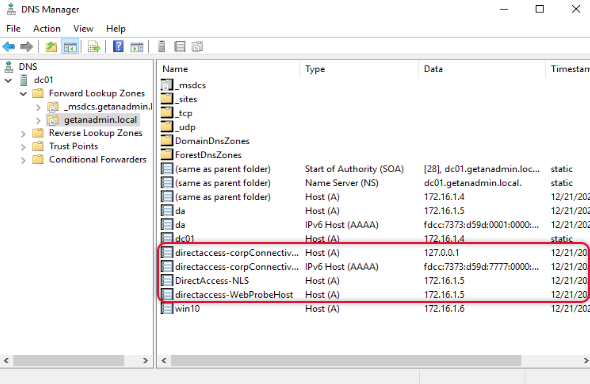
Here makes sure DNS IP address is specified for domain suffix and make sure there is a DNS host record available on the local DNS for the name DirectAccess-NLS. Click Finish to exit out of the infrastructure server configuration.
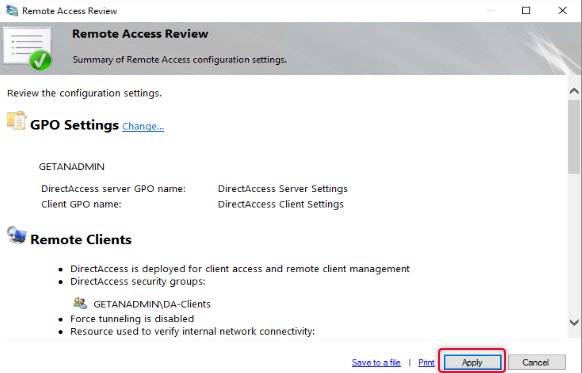
Click OK on the Remote Access review page to apply changes.
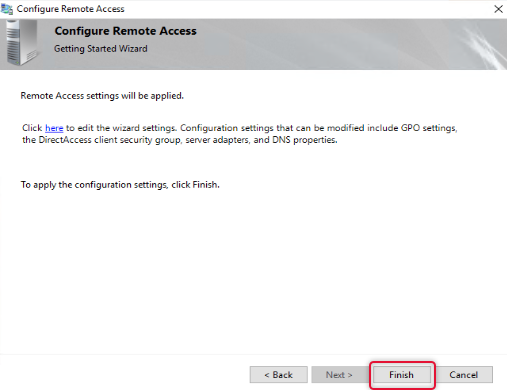
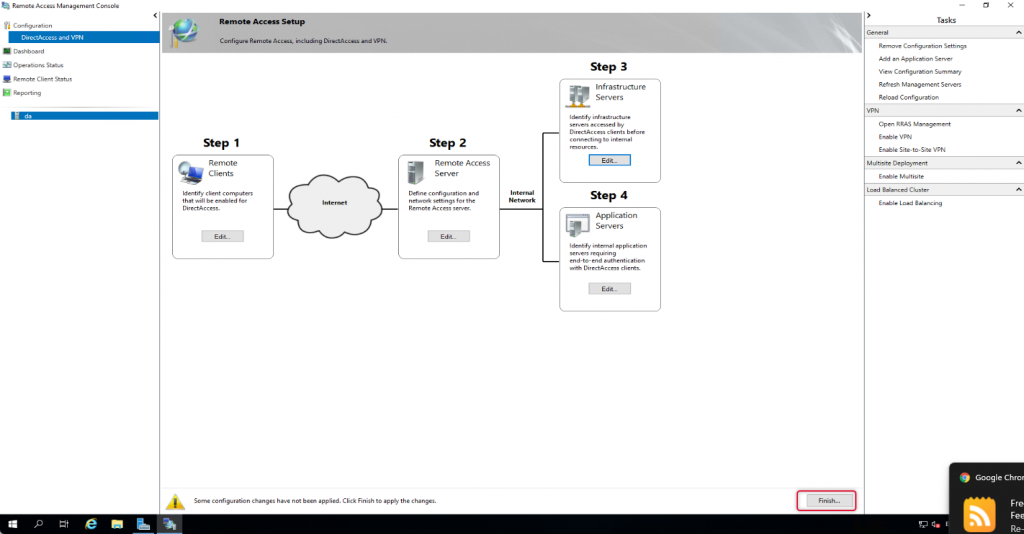
Click Finish to apply changes to return to the Remote Access Management console.
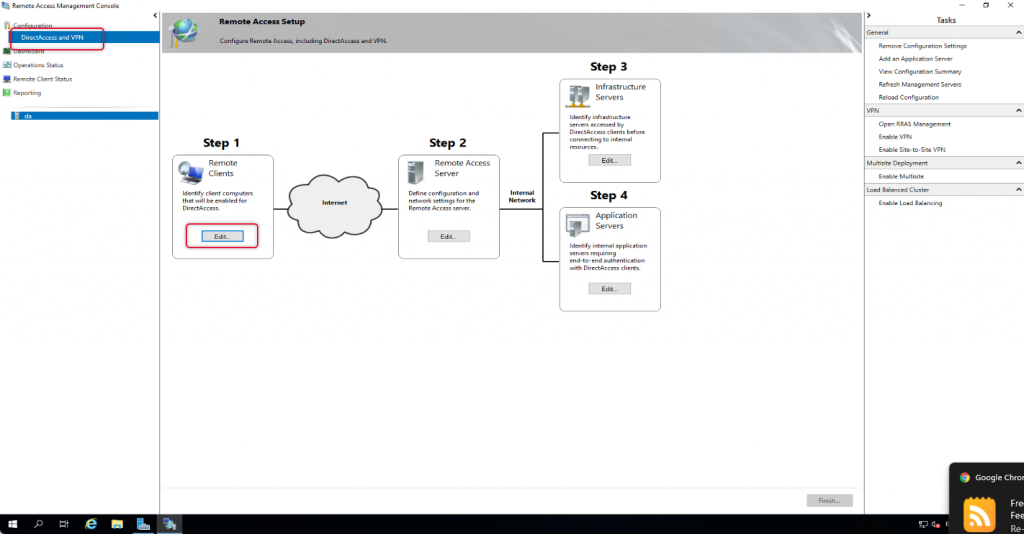
On the Remote Access management console, under configuration and Remote Client, click Edit to Edit the settings.
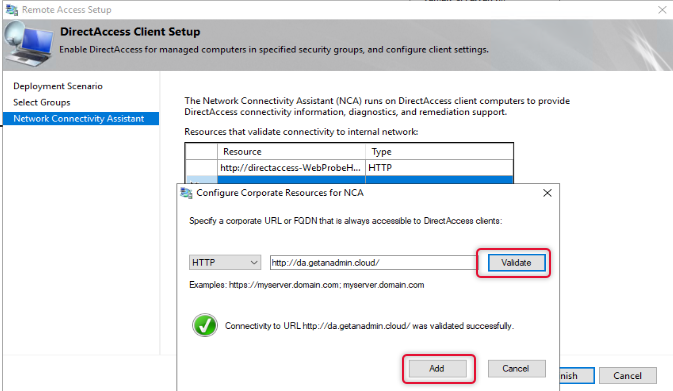
By Default, Network Connectivity Assistant settings will get Direct-AccessWebProbehost hostname on the resources list, we need to remove it and add the hostname we have added on the public DNS. Choose the protocol as HTTP on the dropdown list. And add the URL with the public hostname pointing to the DirectAccess server. Click Validate to validate the URL and click add.
Click Finish to exit out of Remote client settings.
Click Finish at the bottom of the Remote access setup to apply changes.
Click Apply to apply the configuration changes.
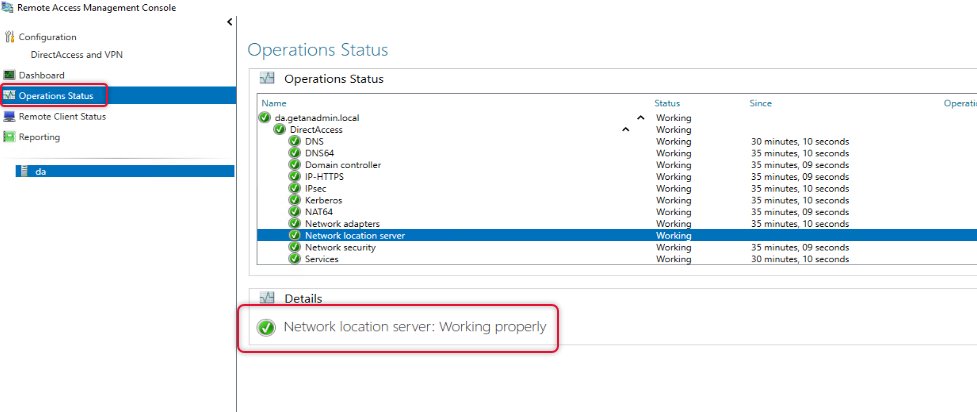
Once configuration changes are applied go to operation status and check all operations are working.
Go to Domain controller and open DNS Manager management console and check the highlighted hostnames are created.
Connect Windows 10 client from an external network
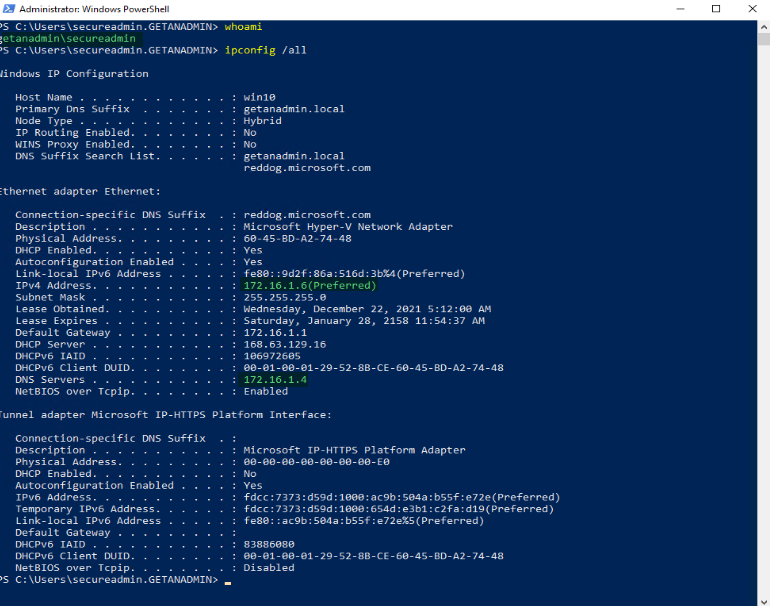
We have completed the server-side setup and now the time to access a windows client PC from an outside network using DirectAccess connected. Before we do log in to the client computer and check the server is in the domain network and the IP address of it by running ipconfig /all. We can run gpupdate /force to get the PC to get the DirectAccess group policy settings, but I recommend restarting the Windows client PC.
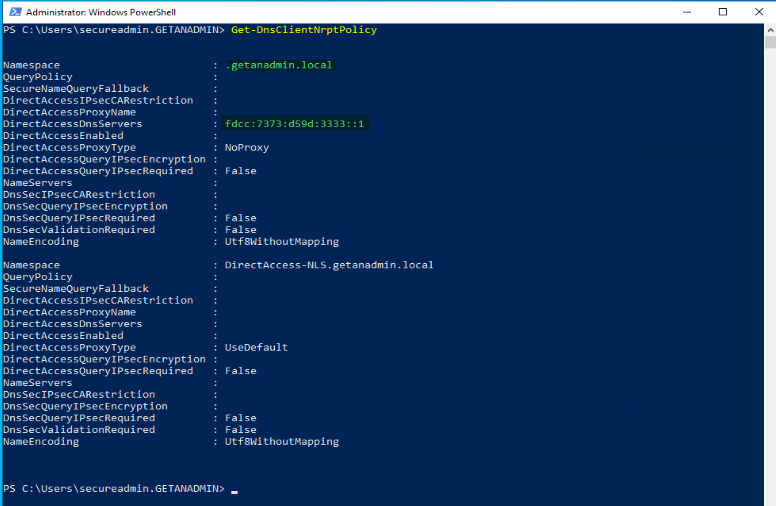
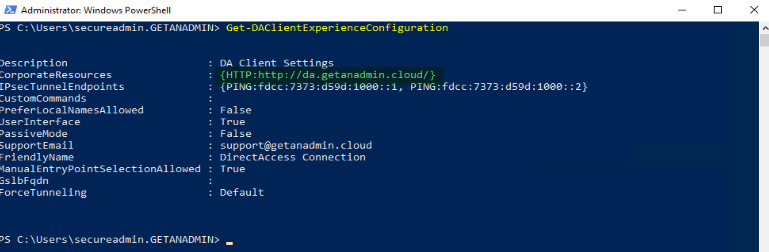
We can utilize some PowerShell commands to check if the settings are updated on the client’s computer. You can use these commands to troubleshoot DirectAccess in case remote clients are not connecting or unable to access resources from outside the network.
Get-DNSClientNRPTPolicy is the command to check the DirectAccess DNS IP address is assigned for the domain namespace.
Get-DAClientExperienceConfiguration PowerShell command to check the URL that we mentioned in the remote client resource setup is displaying correctly.
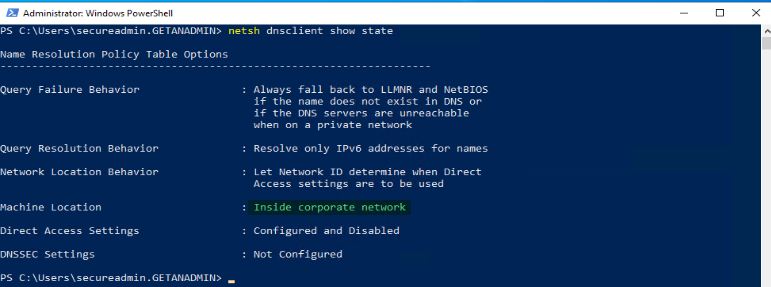
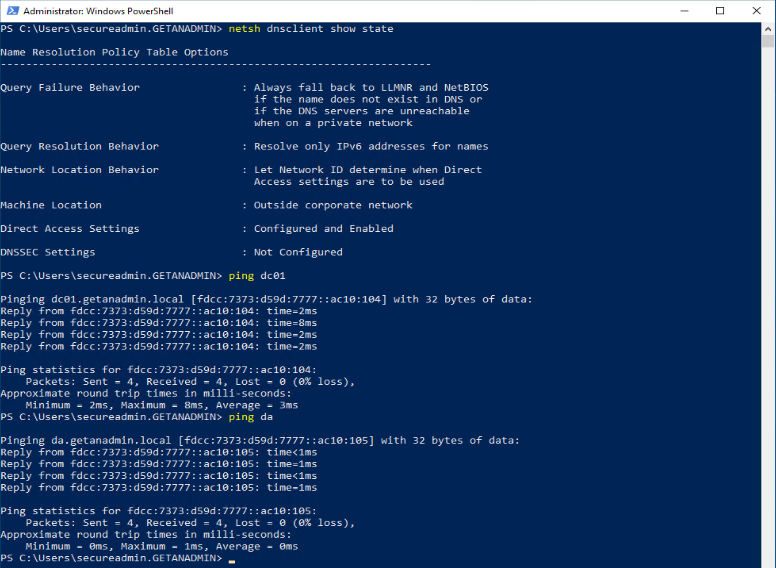
netsh dnsclient show state
Command will show whether the windows client PC is inside or outside the network. In this case, we have not disconnected from the domain network, so it’s showing that the client PC is inside the network as Machine Location.
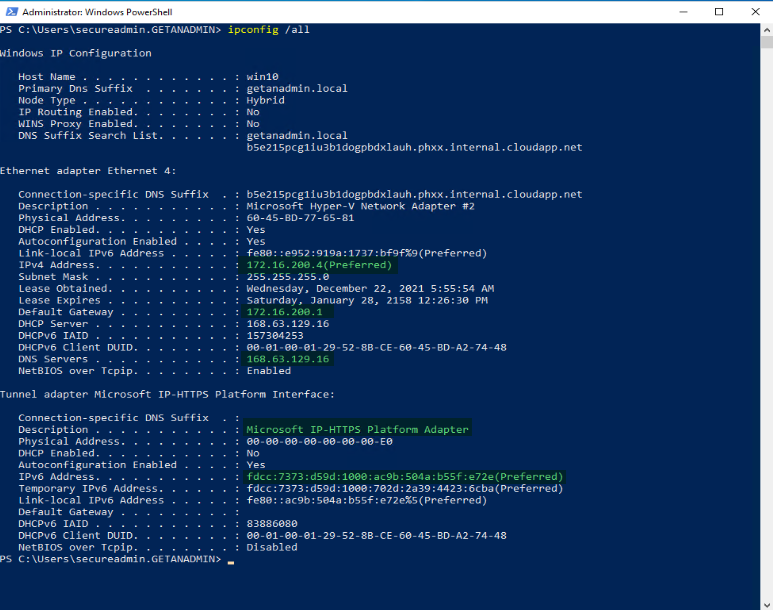
Now, we have disconnected the Windows Client PC from the domain network and connected it to a private network away from the domain network. You can see the different network and DNS IP addresses. Also, you can see the tunnel network adapter IP address for the Microsoft IP-HTTPS platform. The adapter will get only IPv6.
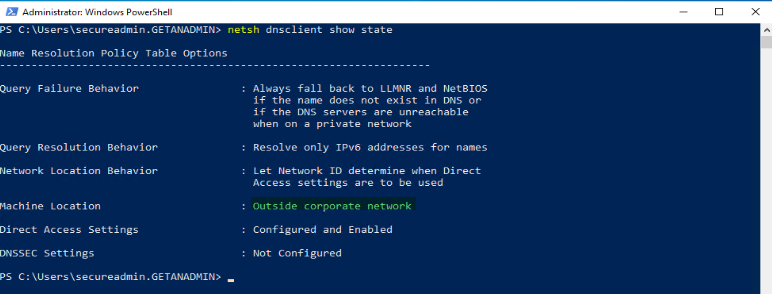
As you can see that the Machine Location is not Outside Corporate Network.
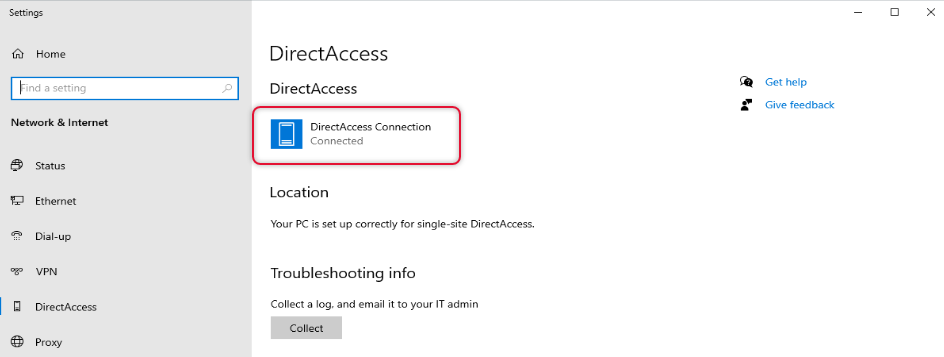
Click on the network link on the taskbar and find the Direct Access connection connected.
If you look under network & Internet settings you can see DirectAccess connection status.
Test domain network resources access
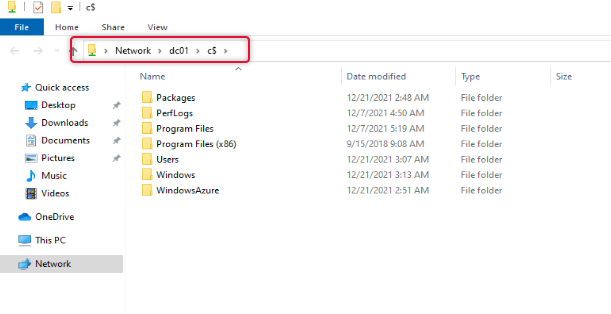
We can try to ping some servers inside the corporate network, and you can see it pining. I try to ping the domain controller and DirectAccess server and I can see a successful ping reply.
I also tried to access the file share on the DC01 and was able to get to the share as well.
Conclusion
In this article, we have discussed the complete installation and configuration to deploy DirectAccess. Also, we have tested with a remote client to access the resources inside the corporate network. The demonstration is completed here and if you have any queries or feedback that you want to share, please send a comment below. I look forward to seeing you another time with a different article.
Содержание
- Шаг 2. Настройка VPN-сервера DirectAccess Step 2 Configure the DirectAccess-VPN Server
- Запуск мастера установки DirectAcces To Start the Enable DirectAcces Wizard
- Настройка клиентов DirectAccess Configure DirectAccess clients
- Настройка топологии сети Configure the Network Topology
- Настройка списка DNS-суффиксов Configure the DNS Suffix Search List
- Настройка объектов групповой политики GPO Configuration
- Итоги Summary
- Развертывание Directaccess (упрощенная установка)
- Установка Directaccess
- Настройка Directaccess
- Тестирование конфигурации
- Выводы
- Развертывание одного сервера DirectAccess с помощью мастера начальной настройки Deploy a Single DirectAccess Server Using the Getting Started Wizard
- Перед началом развертывания ознакомьтесь со списком неподдерживаемых конфигураций, известных проблем и предварительных условий. Before you begin deploying, see the list of unsupported configurations, known issues, and prerequisites
- Описание сценария Scenario description
- Содержание сценария In this scenario
- Предварительные требования Prerequisites
- Шаги планирования Planning steps
- Шаги по развертыванию Deployment steps
- Практическое применение Practical applications
- Роли и компоненты, входящие в этот сценарий Roles and features included in this scenario
- Требования к оборудованию Hardware requirements
- Требования к программному обеспечению Software requirements
- См. также See also
Шаг 2. Настройка VPN-сервера DirectAccess Step 2 Configure the DirectAccess-VPN Server
Область применения. Windows Server (Semi-Annual Channel), Windows Server 2016 Applies To: Windows Server (Semi-Annual Channel), Windows Server 2016
В этом разделе описывается настройка клиентов и сервера при развертывании базового удаленного доступа с помощью мастера установки DirectAccess. This topic describes how to configure the client and server settings required for a basic Remote Access deployment using the Enable DirectAccess Wizard.
В следующей таблице приведены общие сведения о действиях, которые можно выполнить с помощью этого раздела. The following table provides an overview of the steps you can complete by using this topic.
| Задача Task | Описание Description |
|---|---|
| Настройка клиентов DirectAccess Configure DirectAccess clients | Настройте сервер удаленного доступа с группами безопасности, в которые входят клиенты DirectAccess. Configure the Remote Access server with the security groups containing DirectAccess clients. |
| Настройка топологии сети Configure the Network Topology | Настройте параметры сервера удаленного доступа. Configure Remote Access server settings. |
| Настройка списка DNS-суффиксов Configure the DNS Suffix Search List | Измените список суффиксов, если требуется. Modify the Suffix search list if desired. |
| Настройка объектов групповой политики GPO Configuration | Измените объекты групповой политики, если требуется. Modify the GPOs if desired. |
Запуск мастера установки DirectAcces To Start the Enable DirectAcces Wizard
В диспетчер сервера выберите Сервис, а затем — Удаленный доступ. Мастер включения DirectAccess запускается автоматически, если не выбран параметр больше не показывать этот экран. In Server Manager, click Tools, and then click Remote Access.The Enable DirectAccess Wizard starts automatically unless you have selected Do not show this screen again.
Если мастер не запустился автоматически, щелкните правой кнопкой мыши по узлу сервера в дереве Маршрутизация и удаленный доступ и нажмите Включить DirectAccess. If the wizard does not start automatically, right-click the server node in the Routing and Remote Access tree, and then click Enable DirectAccess.
Щелкните Далее. Click Next.
Настройка клиентов DirectAccess Configure DirectAccess clients
Чтобы использовать DirectAccess, клиентский компьютер должен входить в выбранную группу безопасности. For a client computer to be provisioned to use DirectAccess it must belong to the selected security group. После настройки DirectAccess клиентские компьютеры из группы безопасности получают групповую политику DirectAccess. After DirectAccess is configured, client computers in the security group are provisioned to receive the DirectAccess group policy.
На странице Выбор групп щелкните Добавить. On the Select Groups page, click Add.
В диалоговом окне Выбор групп выберите группы безопасности, в которые входят компьютеры клиентов DirectAccess. On the Select Groups dialog box, select the security groups containing DirectAccess client computers.
Отметьте флажком пункт Разрешить DirectAccess только для мобильных компьютеров, чтобы открыть доступ к внутренней сети только для мобильных устройств. Select the Enable DirectAccess for mobile computers only check box to allow only mobile computers to access the internal network.
Отметьте флажком пункт Использовать принудительное туннелирование, чтобы направить весь трафик клиентов (внутренний и внешний) через сервер удаленного доступа. Select the Use force tunneling check box to route all client traffic (to the internal network and to the Internet) through the Remote Access server.
Щелкните Далее. Click Next.
Настройка топологии сети Configure the Network Topology
Чтобы развернуть удаленный доступ, вам потребуется настроить на сервере удаленного доступа правильную конфигурацию сетевых адаптеров, установить общедоступный URL (адрес подключения), а также сертификат IP-HTTPS с именем субъекта, совпадающим с адресом подключения. To deploy Remote Access, you need to configure the Remote Access server with the correct network adapters, a public URL for the Remote Access server to which client computers can connect (the connect to address), and an IP-HTTPS certificate whose subject matches the connect to address.
Настройка списка DNS-суффиксов Configure the DNS Suffix Search List
Для клиентов DNS вы можете настроить список DNS-суффиксов домена, расширяющий или преобразующий их возможности поиска DNS. For DNS clients, you can configure a DNS domain suffix search list that extends or revises their DNS search capabilities. Добавляя в список дополнительные суффиксы, вы можете искать компьютеры по коротким или неполным именам в более чем одном домене DNS. By adding additional suffixes to the list, you can search for short, unqualified computer names in more than one specified DNS domain. Затем, если происходит сбой запроса DNS, служба DNS-клиента может использовать этот список для добавления других суффиксов имен к исходному имени и повторения запросов DNS к DNS-серверу для этих альтернативных полных доменных имен. Then, if a DNS query fails, the DNS Client service can use this list to append other name suffix endings to your original name and repeat DNS queries to the DNS server for these alternate FQDNs.
Щелкните Настроить для клиентов DirectAccess список поиска суффиксов DNS-клиента, чтобы указать дополнительные суффиксы для поиска клиентов по именам. Select Configure DirectAccess Clients with DNS client suffix search list to specify additional suffixes for client name searches.
Введите новое имя суффикса в новом суффиксе и нажмите кнопку Добавить. Type a new suffix name in New Suffix and then click Add. Кроме того, можно изменить порядок поиска и удалить суффиксы из доменных суффиксов для использования. Additionally, you can change the search order and remove suffixes from Domain Suffixes to use.
Для компьютеров и серверов следующее поведение поиска DNS по умолчанию предопределено и используется при завершении и разрешении коротких неполных имен. Если список поиска суффиксов пуст или не указан, основной DNS-суффикс компьютера добавляется к коротким неполным именам, а запрос DNS используется для разрешения результирующего полного доменного имени. For computers and servers, the following default DNS search behavior is predetermined and used when completing and resolving short, unqualified names.When the suffix search list is empty or unspecified, the primary DNS suffix of the computer is appended to short unqualified names, and a DNS query is used to resolve the resultant FQDN.
Если этот запрос завершается неудачей, компьютер может попытаться выполнить дополнительные запросы на альтернативные доменные имена, добавив суффикс DNS, заданный для подключения, настроенный для сетевых подключений. Если суффиксы подключения не настроены или запросы для этих результирующих доменных имен, связанных с подключением, завершаются сбоем, клиент может начать попытки повторить запросы на основе систематического сокращения основного суффикса (также известного как регрессия). If this query fails, the computer can try additional queries for alternate FQDNs by appending any connection-specific DNS suffix configured for network connections.If no connection-specific suffixes are configured or queries for these resultant connection-specific FQDNs fail, then the client can then begin to retry queries based on systematic reduction of the primary suffix (also known as devolution).
Например, если первичным суффиксом является «example.microsoft.com», процесс регрессии может повторить запросы для короткого имени, выполнив поиск в доменах «microsoft.com» и «com». For example, if the primary suffix is «example.microsoft.com,» the devolution process can retry queries for the short name by searching for it in the «microsoft.com» and «com» domains.
Если список поиска суффиксов не пуст и в нем задан хотя бы один DNS-суффикс, попытки определить и разрешить короткие DNS-имена ограничиваются только поиском только тех полных доменных имен, которые были доступны в указанном списке суффиксов. When the suffix search list is not empty and has at least one DNS suffix specified, attempts to qualify and resolve short DNS names is limited to searching only those FQDNs made possible by the specified suffix list.
Если запросы для всех полных доменных имен, выполненные в результате подстановки всех суффиксов из списка, не дают результата, запрос считается неудачным и выводится сообщение «имя не найдено». If queries for all FQDNs formed as a result of appending and trying each suffix in the list are not resolved, the query process fails, producing a «name not found» result.
Если используется список суффиксов домена и ответ на запрос или разрешение не получается, клиенты продолжают посылать дополнительные альтернативные запросы на основе различных имен доменов DNS. If the domain suffix list is used, clients continue to send additional alternate queries based on different DNS domain names when a query is not answered or resolved. Если имя домена разрешается с помощью записи в списке суффиксов, остальные записи не используются для поиска. Once a name is resolved using an entry in the suffix list, unused list entries are not tried. По этой причине для наиболее эффективного поиска рекомендуется поместить в начало списка наиболее часто используемые суффиксы доменов. For this reason, it is most efficient to order the list with the most used domain suffixes first.
Поиск по суффиксам доменного имени выполняется лишь в случае указания неполного имени DNS. Domain name suffix searches are used only when a DNS name entry is not fully qualified. В конце полного имени DNS добавляется точка (.). To fully qualify a DNS name, a trailing period (.) is entered at the end of the name.
Настройка объектов групповой политики GPO Configuration
При настройке удаленного доступа параметры DirectAccess собираются в групповая политика объекты (GPO). When you configure Remote Access, DirectAccess settings are collected into Group Policy Objects (GPO).
В параметрах GPO указаны имя объекта групповой политики сервера DirectAccess и имя объекта групповой политики клиента. In GPO Settings, the DirectAccess server GPO name and Client GPO name are listed. Кроме того, вы можете изменить параметры выбора объектов групповой политики. Additionally, you can modify the GPO selection settings.
Два GPO автоматически заполняются параметрами DirectAccess и распределяются таким образом: Two GPOs are populated automatically with DirectAccess settings, and distributed in this way:
Объект групповой политики клиента DirectAccess. DirectAccess client GPO. Этот GPO содержит параметры клиента, в том числе параметры технологии туннелирования IPv6, записи NRPT и правила безопасности подключений брандмауэра Windows в режиме повышенной безопасности. This GPO contains client settings, including IPv6 transition technology settings, NRPT entries, and Windows Firewall with Advanced Security connection security rules. Объекты групповой политики применяются к группам безопасности, указанным для клиентских компьютеров. The GPO is applied to the security groups specified for the client computers.
Объект групповой политики сервера DirectAccess. DirectAccess server GPO. Этот объект групповой политики содержит параметры конфигурации DirectAccess, которые применяются к любому серверу, настроенному в качестве сервера удаленного доступа в развертывании. This GPO contains the DirectAccess configuration settings that are applied to any server configured as a Remote Access server in your deployment. Кроме того, в них записываются правила брандмауэра Windows в режиме повышенной безопасности. It also contains Windows Firewall with Advanced Security connection security rules.
Итоги Summary
Источник
Развертывание Directaccess (упрощенная установка)
Продолжая свое повествование о Directaccess, в этой статье я продемонстрирую способ упрощенной установки данного сервиса. Статья является продолжением предыдущей публикации, где были описаны задачи и цели как таковые, а также заложен фундамент для дальнейших действий описанных в данной публикации.
И так, в названии присутствует словосочетание «упрощенная установка», это отнюдь не означает что она таковой является (хотя по сравнению с установкой в WindowsServer 2008 R2 так и есть). Смысл в том, что множество возможных настроек при развертывании устанавливается в значение по умолчанию. При таком способе сервис работает, как говорят, «из коробки». Конечно в будущем пытливому уму будет предоставлена возможность что-то да как-то изменит или, другими словами, внести коррективы в конфигурацию. Но это уже будет совсем другая история, повествование о которой обязательно можно будет найти в дальнейшем, а если точнее в следующей статье цикла о Directaccess.
Установка Directaccess
Для начала установки на уже подготовленном сервере необходимо развернуть фичу роли Directaccess.
Добавление новой роли или фичи в Server Manager
В Server manager необходимо выбрать добавление новой роли или фичи, как показано на скриншоте.
Установка роли RemoteAccess
Дойдя по шагам в мастере, необходимо выбрать RemoteAccess
Установка фичи роли DirectAccess and VPN (RAS)
Из интересующего нас, необходимо выбрать DirectAccess and VPN (RAS)
Установка дополнительных ролей и фич для DirectAccess
После этого, мастер автоматически предложит доустановить дополнительные фичи для работы служб. В них будут входить как консоли управления, так и ряд других ролей.
Установка Directaccess
Далее начинаем установку Install. По старой привычке я поставил чекбокс напротив автоматической перезагрузки сервера, хотя после завершения установки система ее не потребовала. Сама же перезагрузка требовалась в Windows Server 2012 и, не изменяя традициям, все же ее произвел вручную.
Настройка Directaccess
Сервер перезагружен и готов к настройке.
Запуск мастера Getting Started Wizard для настройки Directaccess
В Server Manager, в области уведомлений, вызываем мастер настройки удаленного доступа.
Установка только Directaccess
На следующем шаге, необходимо выбрать Deploy DirectAccess only. Сей час и в ближайших статьях я буду рассматривать только установку DirectAccess без VPN хотя существуют сценарии когда их можно развернуть одновременно. Собственно, это является одной из особенностей DirectAccess на Windows Server 2012 / 2012 R2, так как в Windows Server 2008 R2 это сделать не представлялось возможным.
Выбор Edge топологии и DNS имени
Далее, выбираем необходимую сетевую топологию, напоминаю в этой и в последующих публикациях я буду использовать только пограничную топологию, а также публичное DNS имя по которому клиенты будут подключатся к серверу или серверам DA. Кроме наличия самого имени необходимо иметь также SSL сертификат безопасности выписанный на него. В качестве сертификатов допускается использование как корпоративные центры CA, так и публичные от третьих сторон. В отношении корпоративных, необходимо взять на заметку, что ваша PKI инфраструктура должны быть правильно опубликована во внешнею сеть. Допускается использование SAN, а также Windcard типов сертификатов, собственно в этой лабе как раз будет использован Windcard сертификат от третей стороны.
Внесение дополнительных настроек
Хотя все настройки можно оставить по умолчанию, все же я внесу определенные правки для дальнейшей работоспособности лабы.
Внесение дополнительных настроек
В секции Remote Clients выбираем Change.
Отключение Enable DirectAccess for mobile computers only и изменение группы безопасности
По умолчанию, группа которой разрешено получать настройки DirectAccess это Domain Computers, то есть все компьютеры домена. На мой взгляд под клиентские компьютеры, под которые планируется DA, необходимо создать отдельную группу безопасности и указать ее в мастере. Далее, также желательно снять чекбокс с Enable DirectAccess for mobile computers only. После выполнения данного шага созданная в последствии групповая политика не будет обладать специфическим WMI фильтром. Задача этого фильтра, это отсеивание компьютеров которые обладают физической архитектурой отличной от архитектуры ноутбуков.
Добавление почтового ящика администратора поддержки
Следующий весьма не примечательный шаг, это указание почтового ящика хелпдеска. Не примечательный потому, что если он не будет указан, клиентская машина, которая по тем или иным причинам не может подключится к серверам DA, не сможет собрать лог-файлы для последующего анализа. По этому, на мой взгляд, стоит его указывать.
Применение настроек для конфигурирования DirectAccess
После внесения изменений, необходимо лишь запустить мастер и дальше процесс развертывания происходит полностью автоматически.
Консоль управления Remote Access Management Console
Не сразу, а примерно через 2-3 минуты при просмотре всех служб DA их статус будет свидетельствовать что все хорошо. Теперь стоит перейти к тестированию и получению первых результатов.
Тестирование конфигурации
Для тестирования была взята виртуальная машина обладающая двумя сетевыми интерфейсами. Первый смотрит в локальную сеть предприятия, второй — во внешнюю. Цель тестирования показать получение настроек DA, а также подключение к корпоративным ресурсам предприятия.
Клиентский компьютер до применения настроек DirectAccess
Как видно на скриншоте, подключение DA отсутствует. Для появления подключения необходимо выполнить процесс скачивания и применения групповых политик.
Применение настроек через групповые политики, а также их проверка
Применив групповые политики просмотрим результат. Со скриншота видно, что групповые политик DA успешно применились.
Переключение между сетевыми интерфейсами
Далее я произведу отключение от корпоративной сети и подключение к внешней.
Проверка активности подключения DirectAccess
Открыв подключения, видно что DirectAccess активен.
Далее я произвел ряд тестов на подключения как со стороны клиентской машины так и со стороны корпоративной инфраструктуры.
Тестирование доступа к файловому серверу
Доступ к файлам которые находятся на файловом сервере который работает под управлением Windows Server 2012 R2
Тестирование доступа к файловому серверу
Доступ к файлам которые находятся на файловом сервере который работает под управлением Windows Server 2003 R2
Тестирование RDP подключения
Открытие RDP сессии к файловому серверу.
Тестирование доступа к внутреннему вебсайту
Открытие корпоративного веб сайта.
Тестирование RDP подключения со стороны организации
Возможность RDP доступа с сервера внутри организации.
Эхо запросы к клиента DirectAccess
Выполнение эхо запросов к клиенту DA
Эхо запросы к контроллера домена к клиенту DirectAccess
Выполнение эхо запросов к контроллеру домена.
Применение групповых политик
Применение групповых политик.
Выводы
В статье «Развертывание Directaccess (упрощенная установка)» я продемонстрировал процесс базовой настройки DirectAccess и тестирование на клиентской машине под управление Windows 8.1 Enterprise. В следующей статье я рассмотрю уже комплексное развертывание, в котором будут описаны дополнительные настройки и возможности технологии. Слетите за обновлениями!
Источник
Развертывание одного сервера DirectAccess с помощью мастера начальной настройки Deploy a Single DirectAccess Server Using the Getting Started Wizard
Область применения. Windows Server (Semi-Annual Channel), Windows Server 2016 Applies To: Windows Server (Semi-Annual Channel), Windows Server 2016
В этом разделе описывается сценарий DirectAccess, в котором используется один сервер DirectAccess и представлена несложная процедура развертывания DirectAccess. This topic provides an introduction to the DirectAccess scenario that uses a single DirectAccess server, and allows you to deploy DirectAccess in a few easy steps.
Перед началом развертывания ознакомьтесь со списком неподдерживаемых конфигураций, известных проблем и предварительных условий. Before you begin deploying, see the list of unsupported configurations, known issues, and prerequisites
Следующие разделы содержат предварительные требования и другие сведения перед развертыванием DirectAccess. You can use the following topics to review prerequisites and other information before you deploy DirectAccess.
Описание сценария Scenario description
В этом сценарии один компьютер под управлением Windows Server 2016, Windows Server 2012 R2 или Windows Server 2012, настроен в качестве сервера DirectAccess с параметрами по умолчанию в нескольких простых шагах мастера, без необходимости настройки параметров инфраструктуры, таких как центр сертификации или группы безопасности Active Directory. In this scenario, a single computer running either Windows Server 2016, Windows Server 2012 R2 or Windows Server 2012, is configured as a DirectAccess server with default settings in a few easy wizard steps, without any need to configure infrastructure settings such as a certification authority (CA) or Active Directory security groups.
Сведения о настройке расширенного развертывания с пользовательскими параметрами см. в разделе Deploy a Single DirectAccess Server with Advanced Settings. If you want to configure an advanced deployment with custom settings, see Deploy a Single DirectAccess Server with Advanced Settings
Содержание сценария In this scenario
Чтобы настроить базовый сервер DirectAccess, требуется выполнить несколько этапов планирования и развертывания. To set up a basic DirectAccess server, several planning and deployment steps are required.
Предварительные требования Prerequisites
Перед началом развертывания этого сценария ознакомьтесь со списком важных требований. Before you begin deploying this scenario, review this list for important requirements:
Брандмауэр Windows должен быть включен для всех профилей. Windows firewall must be enabled on all profiles
Этот сценарий поддерживается только в том случае, если клиентские компьютеры работают под управлением Windows 10, Windows 8.1 или Windows 8. This scenario is only supported when your client computers are running Windows 10, Windows 8.1 or Windows 8.
ISATAP в корпоративной сети не поддерживается. ISATAP in the corporate network is not supported. Если вы используете протокол ISATAP, необходимо удалить его и перейти на собственный IPv6. If you are using ISATAP, you should remove it and use native IPv6.
Инфраструктура открытых ключей (PKI) не требуется. A Public Key Infrastructure is not required.
Для развертывания не поддерживается двухфакторная проверка подлинности. Not supported for deploying two factor authentication. Для проверки подлинности требуются учетные данные домена. Domain credentials are required for authentication.
DirectAccess автоматически развертывается на всех мобильных компьютерах в текущем домене. Automatically deploys DirectAccess to all mobile computers in the current domain.
Трафик в Интернет не передается по туннелю DirectAccess. Traffic to Internet does not go over the DirectAccess tunnel. Конфигурация принудительного туннелирования не поддерживается. Force tunnel configuration is not supported.
Сервер DirectAccess действует как сервер сетевых расположений. DirectAccess server is the Network Location Server.
Защита доступа к сети (NAP) не поддерживается. Network Access Protection (NAP) is not supported.
Изменение политик вне консоли управления DirectAccess или командлетов PowerShell не поддерживается. Changing policies outside of the DirectAccess management console or PowerShell cmdlets is not supported.
Чтобы развернуть многосайтовую, сейчас или в будущем, сначала разверните один сервер DirectAccess с дополнительными параметрами. To deploy multisite, now or in the future, first Deploy a Single DirectAccess Server with Advanced Settings.
Шаги планирования Planning steps
Планирование разделено на два этапа. Planning is divided into two phases:
Планирование инфраструктуры DirectAccess. Planning for the DirectAccess infrastructure. На этом этапе описывается планирование до начала развертывания DirectAccess, необходимое для настройки сетевой инфраструктуры. This phase describes the planning required to set up the network infrastructure before beginning the DirectAccess deployment. Включает в себя планирование топологий сети и серверов, а также сервера сетевых расположений DirectAccess. It includes planning the network and server topology, and the DirectAccess network location server.
Планирование развертывания DirectAccess. Planning for the DirectAccess deployment. На этом этапе описывается планирование для подготовки к развертыванию DirectAccess. This phase describes the planning steps required to prepare for the DirectAccess deployment. Он включает в себя планирование требований при проверке подлинности серверов, клиентов и компьютеров клиентов DirectAccess, параметров VPN, инфраструктуры серверов, серверов управления и серверов приложений. It includes planning for DirectAccess client computers, server and client authentication requirements, VPN settings, infrastructure servers, and management and application servers.
Шаги по развертыванию Deployment steps
Развертывание разделено на три этапа. Deployment is divided into three phases:
Настройка инфраструктуры DirectAccess. на этом этапе включается настройка сети и маршрутизации, Настройка параметров брандмауэра при необходимости, Настройка сертификатов, DNS-серверов, параметров Active Directory и объектов групповой политики и сервера сетевого расположения DirectAccess. Configuring the DirectAccess infrastructure-This phase includes configuring network and routing, configuring firewall settings if required, configuring certificates, DNS servers, Active Directory and GPO settings, and the DirectAccess network location server.
Настройка параметров сервера DirectAccess. Configuring DirectAccess server settings. Этот этап включает в себя действия для настройки компьютеров клиентов DirectAccess, сервера DirectAccess, серверов инфраструктуры, серверов управления и серверов приложений. This phase includes steps for configuring DirectAccess client computers, the DirectAccess server, infrastructure servers, management and application servers.
Проверка развертывания. Verifying the deployment. Этот этап включает шаги, позволяющие убедиться, что развертывание работает должным образом. This phase includes steps to verify that the deployment is working as required.
Более подробное описание шагов развертывания см. в разделе Install and Configure Basic DirectAccess. For detailed deployment steps, see Install and Configure Basic DirectAccess.
Практическое применение Practical applications
Ниже описываются преимущества, предоставляемые развертыванием единого сервера удаленного доступа. Deploying a single Remote Access server provides the following:
Простота доступа. Ease-of-access. В качестве клиентов DirectAccess можно настроить управляемые клиентские компьютеры под управлением Windows 10, Windows 8.1, Windows 8 или Windows 7. You can configure managed client computers running Windows 10, Windows 8.1, Windows 8, or Windows 7, as DirectAccess clients. Эти клиенты могут получать доступ к ресурсам внутренней сети через DirectAccess в любое время, когда они находятся в Интернете, без необходимости входа в VPN-подключение. These clients can access internal network resources via DirectAccess any time they are located on the Internet without needing to log in to a VPN connection. Клиентские компьютеры, использующие другие операционные системы, могут подключаться к внутренней сети с помощью традиционных VPN-подключений. Client computers that are not running one of these operating systems can connect to the internal network by using traditional VPN connections.
Простота управления. Ease-of-management. Администраторы могут управлять клиентскими компьютерами DirectAccess, расположенными в Интернете, через DirectAccess с помощью удаленного доступа, даже если эти компьютеры не находятся во внутренней корпоративной сети. DirectAccess client computers located on the Internet can be remotely managed by Remote Access administrators over DirectAccess, even when the client computers are not located in the internal corporate network. Серверы управления могут автоматически исправить клиентские компьютеры, которые не отвечают корпоративным требованиям. Client computers that do not meet corporate requirements can be remediated automatically by management servers. Управление DirectAccess и VPN осуществляется с помощью одной консоли и одного набора мастеров. Both DirectAccess and VPN are managed in the same console and with the same set of wizards. Кроме того, при помощи одной консоли управления удаленным доступом можно администрировать один или более серверов удаленного доступа. Additionally, one or more Remote Access servers can be managed from a single Remote Access Management console
Роли и компоненты, входящие в этот сценарий Roles and features included in this scenario
В следующей таблице перечислены роли и компоненты, необходимые для сценария. The following table lists the roles and features required for the scenario:
| Роль/компонент Role/feature | Способ поддержки сценария How it supports this scenario |
|---|---|
| Роль удаленного доступа Remote Access role | Роль можно установить и удалить с помощью консоли диспетчера серверов или Windows PowerShell. The role is installed and uninstalled using the Server Manager console or Windows PowerShell. Эта роль включает как DirectAccess, который раньше был компонентом Windows Server 2008 R2, так и службы маршрутизации и удаленного доступа, которые были службой роли в рамках роли сервера служб политики сети и доступа (NPAS). This role encompasses both DirectAccess, which was previously a feature in Windows Server 2008 R2, and Routing and Remote Access Services which was previously a role service under the Network Policy and Access Services (NPAS) server role. Роль удаленного доступа включает два компонента. The Remote Access role consists of two components:
1. VPN-подключение DirectAccess и службы маршрутизации и удаленного доступа (RRAS). 1. DirectAccess and Routing and Remote Access Services (RRAS) VPN. Управление DirectAccess и VPN осуществляется вместе в консоли управления удаленным доступом. DirectAccess and VPN are managed together in the Remote Access Management console. Роль сервера удаленного доступа зависит от следующих ролей и компонентов сервера: The Remote Access Server Role is dependent on the following server roles/features: Средства управления удаленным доступом включают следующие элементы: The Remote Access Management Tools feature consists of the following: Зависимости включают следующее: Dependencies include: Требования к оборудованию Hardware requirementsДля этого сценария действуют следующие требования к оборудованию. Hardware requirements for this scenario include the following: Требования к серверу. Server requirements: Сервер должен иметь по меньшей мере один сетевой адаптер, установленный, включенный и подключенный к внутренней сети. The server must have at least one network adapter installed, enabled, and connected to the internal network. При использовании двух адаптеров один адаптер должен быть подключен к внутренней корпоративной сети, а другой — к внешней сети (к Интернету или частной сети). When two adapters are used, there should be one adapter connected to the internal corporate network, and one connected to the external network (Internet, or private network). Минимум один контроллер домена. At least one domain controller. Сервер удаленного доступа и клиенты DirectAccess должны быть членами домена. The Remote Access server and DirectAccess clients must be domain members. Требования к клиенту. Client requirements: Клиентский компьютер должен работать под управлением Windows 10, Windows 8.1 или Windows 8. A client computer must be running Windows 10, Windows 8.1 or Windows 8. Требования к серверу инфраструктуры и управления. Infrastructure and management server requirements: Требования к программному обеспечению Software requirementsДля этого сценария действуют следующие требования. There are a number of requirements for this scenario: Требования к серверу. Server requirements: Сервер удаленного доступа должен быть членом домена. The Remote Access server must be a domain member. Сервер можно развернуть на границе внутренней сети или за пограничным межсетевым экраном либо другим устройством. The server can be deployed at the edge of the internal network, or behind an edge firewall or other device. Если сервер удаленного доступа расположен за пограничным межсетевым экраном или устройством преобразования сетевых адресов (NAT), на устройстве необходимо разрешить трафик на сервер удаленного доступа и с него. If the Remote Access server is located behind an edge firewall or NAT device, the device must be configured to allow traffic to and from the Remote Access server. Пользователю, который развертывает удаленный доступ на сервере, требуются права администратора на сервере или права пользователя домена. The person deploying remote access on the server requires local administrator permissions on the server, and domain user permissions. Кроме того, администратору требуются права для объектов групповой политики, которые используются при развертывании DirectAccess. In addition, the administrator requires permissions for the GPOs used in DirectAccess deployment. Чтобы воспользоваться преимуществами компонентов, ограничивающих развертывание DirectAccess только мобильными компьютерами, необходимы права на создание фильтра WMI на контроллере домена. To take advantage of the features that restricts DirectAccess deployment to mobile computers only, permissions to create a WMI filter on the domain controller are required. Требования к клиенту удаленного доступа. Remote Access client requirements: Клиенты DirectAccess должны входить в состав домена. DirectAccess clients must be domain members. Домены, членами которых являются клиенты, могут принадлежать одному лесу с сервером удаленного доступа или иметь двустороннее доверие с лесом сервера удаленного доступа. Domains containing clients can belong to the same forest as the Remote Access server, or have a two-way trust with the Remote Access server forest. См. также See alsoВ следующей таблице перечислены ссылки на дополнительные ресурсы. The following table provides links to additional resources. Источник Читайте также: Установка виндовс на флешку как полноценную |
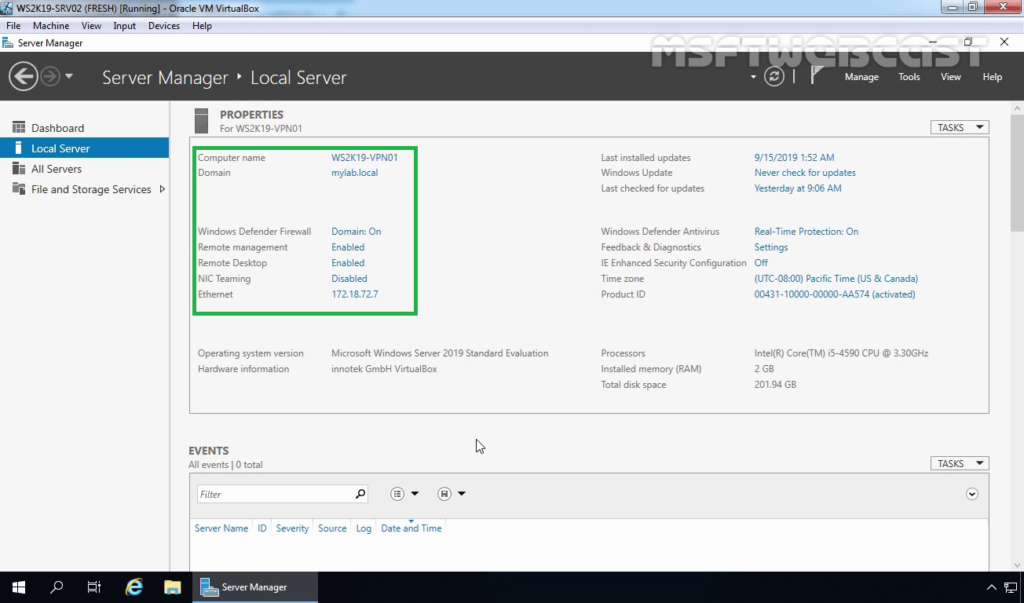
This blog post is a step by step guide on how to install Routing and Remote Access Service on Windows Server 2019.
Overview:
The Remote Access server role provides three network access technologies in Windows Server 2019. These technologies are the role services of the Remote Access server role.
- DirectAccess
- Routing and Remote Access
- Web Application Proxy
By using RRAS, you can deploy DirectAccess and VPN connections to provide end-users with remote access to your organization’s network. You can also create a site-to-site VPN connection between two servers at different locations.
- PART-1 How to Install Remote Access Service on Windows Server 2019
- PART-2 How to Install and Configure VPN in Windows Server 2019
- PART-3 Configure Network Policy Server (NPS) for VPN in Windows Server 2019
- PART-4 Configure Port Forwarding and Test VPN Connection on Windows 10
Understanding Test Lab:
- WS2K19-DC01: Domain Controller and DNS server.
- WS2K19-VPN01: Member Server.
- WS10-CLI01: Windows 10 PC.
Install Remote Access service on Windows Server 2019:
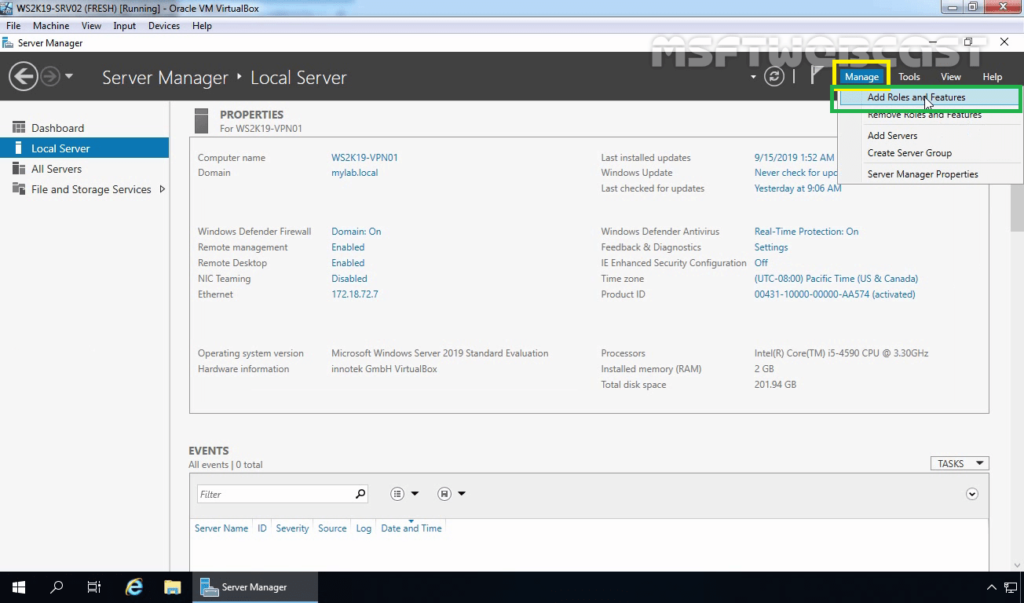
1. Open Server Manager Console.
2. At the top of the Server Manager, click on Manage and select Add Roles and Features.
3. On the Before you begin page, click Next.
4. Select Role-based or feature-based installation and then click Next.
5. Select a server from the server pool on which you want to install the Remote Access Service, click Next.
6. On select server roles page, select Remote Access Service. Click Next.

7. On select features page, click Next.
8. On the Remote Access page, read a brief overview of the Routing and Remote Access Service. Click Next.
9. On select role services page, select DirectAccess and VPN (RAS) service.
10. A new window will pop up, click on Add Features to include required features and management tools for DirectAccess and VPN.
11. Make sure that DirectAccess and VPN role service is selected.
12. On the Web Server Role (IIS) page, read a brief overview of the IIS Service. Click Next.
13. All required IIS role services are already selected. Click Next to continue.
14. Click on the Install button to start the installation of Remote Access Service on Windows Server 2019.
15. After installing the Remote Access service on windows server 2019, the next step is to configure the Remote Access server.
16. Click on the Open the Getting Started Wizard link to start the wizard to configure DirectAccess and VPN on Windows Server 2019 Remote Access Server.
17. From this console, we can configure VPN on Windows Server 2019. In the next post on How to Configure VPN using Remote Access Service on Windows Server 2019.
After installing the Remote Access Service, next steps will be configure it.
Thank you for reading.
Post Views: 4,510
This blog post is a step by step guide how to install and configure VPN on Windows Server 2019. The blog post shows you how you can easily set up a VPN server for a small environment, branch office, or for a hosted server scenario. This VPN (Virtual Private Network) server allows you to connect from remote clients or firewalls to the Windows Server.
I already did a similar post for other versions of Windows
- How to Install VPN on Windows Server 2008 R2
- How to Install VPN on Windows Server 2012
- How to Install VPN on Windows Server 2012 R2
- How to Install VPN on Windows Server 2016
To install VPN access to a Windows Server 2019, simply follow this step by step guide:
Install Remote Access Role
First, install the “Remote Access” via Server Manager or PowerShell.
Open Server Manager and select Add Roles and Features
Select the Remote Access Role and click next through the wizard.
On the step Role Services, select the DirectAccess and VPN (RAS)
On the final step, select install to install the Remote Access role.
This might requires a reboot of the server.
Install and Configure VPN on Windows Server 2019
After you have successfully installed, now you can start the wizard to install and configure the VPN server in Windows Server 2019.
After the features are installed, which can take a while to finish, you see the link for the Getting Started Wizard. Click on “Open the Getting Started Wizard“.
This opens a new wizard which will help you to configure the server. On the first screen, select “Deploy VPN only“.
This opens the Routing and Remote Access Management Console
Right click on the Server name and click on “Configure and Enable Routing and Remote Access“.
On the new wizard select “Custom configuration“.
Select “VPN Access“.
After you have click finish, you can now start the Routing and Remote Access service.
Configure VPN Access Users and Network
If you have a firewall between the internet and your Windows Server you have to open the following Firewall port sand forward them to your Windows Server:
For PPTP: 1723 TCP and Protocol 47 GRE (also known as PPTP Pass-through)
For L2TP over IPSEC: 1701 TCP and 500 UDP
For SSTP: 443 TCP
After the installation Users have to be enabled for Remote Access to connect to your VPN Server. On a standalone server this can be done in the Computer Management MMC, in a domain environment this can be done in the user properties of an Active Directory user.
If you don’t have a DHCP Server in your environment, you have to add a static IP address pool. This is often needed if you have a single server hosted at a service provider. In the properties of your VPN server, you can click on the IPv4 tab and enable and configure the “Static address pool”.
You now have to add an IP address from the same subnet as your static address pool to the network interface of your server so that users can access the server.
I hope this helps you to set up a VPN server in a small environment, lab, or hosted server. You can find more information about Windows Server in the Microsoft Docs.
Tags: DirectAccess, Install VPN Server on Windows Server, Microsoft, Remote Access, Virutal Private Network, VPN, VPN Server, Windows Server, Windows Server 2019, Windows Server 2019 VPN, Windows VPN Last modified: July 7, 2019
About the Author / Thomas Maurer
Thomas works as a Principal Program Manager & Chief Evangelist Azure Hybrid at Microsoft (Cloud + AI). He engages with the community and customers around the world to share his knowledge and collect feedback to improve the Azure hybrid cloud and edge platform. Prior to joining the Azure engineering team (Cloud + AI), Thomas was a Lead Architect and Microsoft MVP, to help architect, implement and promote Microsoft cloud technology.
If you want to know more about Thomas, check out his blog: www.thomasmaurer.ch and Twitter: www.twitter.com/thomasmaurer
To Establish a Remote Connection
- On the client workstation, click Start, click Network Connections, and then click the new connection that you created.
- In the User Name box, type your user name. If the network to which you want to connect has multiple domains, you may have to specify a domain name. …
- In the Password box, type your password.
- If you use a dial-up connection, check the phone number listed in the Dial box to make sure it is correct. …
- Click Dial or Connect (for VPN connections). Your computer establishes a connection to the remote access server. The server authenticates the user and registers your computer on the network.
Right-click the server, and then click Configure and Enable Routing and Remote Access to start the Routing and Remote Access Server Setup Wizard. Click Next. Click Remote access (dial-up or VPN) to permit remote computers to dial in or connect to this network through the Internet. Click Next.Sep 24, 2021
How to install routing and remote access on Server 2019?
Install Routing and Remote Access on Server 2019: Let’s install the Remote Access server role on the WS2K19-SRV02 server. Open Server Manager Console. 1. Click on Manage and select Add Role and Features. 2. On the Before you begin page, click Next. 3. Select Role-based or feature-based installation and click Next.
How to configure Lan routing on Windows Server 2019?
Configure and Enable LAN Routing on Windows Server 2019: To enable and configure LAN routing, open the Remote and Routing Access console using the Server Manager console. 13. Click on Tools and select Remote and Routing Access.
How do I enable routing and remote access in Windows 10?
Click Start, point to Administrative Tools, and then click Routing and Remote Access. In the left pane of the console, click the server that matches the local server name. If the icon has a red arrow in the lower-right corner, the Routing and Remote Access service isn’t enabled.
How to install remote access service in Windows Server 2016?
Open Server Manager Console. 1. Click on Manage and select Add Role and Features. 2. On the Before you begin page, click Next. 3. Select Role-based or feature-based installation and click Next. 4. Select a server from the server pool on which you want to install the Remote Access Service role, click Next. 5.
How do I install Remote Access and routing?
ProcedureOpen the Windows Server 2012 Server Manager.From the Server Manager Dashboard, select Manage > Add Roles and Features.Click Next to display the Select Server Roles window.Select the Remote Access check box. … Click Next until the Select Role Services page is displayed.Select Routing.More items…
How do I install Remote Access and routing in Windows 2016?
Steps: Enable routing on Microsoft Windows Server 2016 In Routing and Remote Access, right-click the server, and select Configure and Enable Routing and Remote Access. When the setup wizard launches, click Next. Select Custom configuration and click Next. Select LAN routing and click Next.
How can you install enable and configure Remote Access services on server?
Install the Remote Access roleOn the DirectAccess server, in the Server Manager console, in the Dashboard, click Add roles and features.Click Next three times to get to the server role selection screen.On the Select Server Roles dialog, select Remote Access, and then click Next.Click Next three times.More items…•
How do I configure my NAT server?
4:488:09How to Configure (NAT)Network Address Translation on Windows …YouTubeStart of suggested clipEnd of suggested clipRooting role installation is completed. Click close click tools click rooting and remote. AccessMoreRooting role installation is completed. Click close click tools click rooting and remote. Access right-click on server click configure and enable rooting and remote access click next on welcome wizard
How do I enable Remote Desktop on Windows Server 2019?
Open Server Manager from the Start menu. Click on the “Local server” on the left section. Click on the “Remote Desktop” disable button. Agree to Remote Desktop firewall exception warning and add users to allow by clicking on “Select Users“.
Can DHCP support Remote Access?
When you enable Dynamic Host Configuration Protocol (DHCP) to assign a static IP address to an onboard network interface during first-time setup, you can complete the configuration remotely by using an SSH client. If your system includes an e0M interface, the system broadcasts a DHCP request through it.
How do I enable Remote Access to my server?
Right-click on «Computer» and select «Properties». Select «Remote Settings». Select the radio button for «Allow remote connections to this computer». The default for which users can connect to this computer (in addition to the Remote Access Server) is the computer owner or administrator.
How do I access a remote server using IP address?
Remote Desktop to Your Server From a Local Windows ComputerClick the Start button.Click Run…Type “mstsc” and press the Enter key.Next to Computer: type in the IP address of your server.Click Connect.If all goes well, you will see the Windows login prompt.
What is the purpose of a Remote Access server?
A remote access server (RAS) is a type of server that provides a suite of services to remotely connected users over a network or the Internet. It operates as a remote gateway or central server that connects remote users with an organization’s internal local area network (LAN).
What is NAT and how do you configure it?
To configure dynamic NAT, the following steps are required: Configure the router’s inside interface using the ip nat inside command. Configure the router’s outside interface using the ip nat outside command. Configure an ACL that has a list of the inside source addresses that will be translated.
How do I find my NAT IP address Windows?
How to Find Out My NATed IP AddressOpen your computer’s command line interface. The nature of your operating system will dictate how you do this. … Query the IP address that your computer has. On the Windows machine, type in «ipconfig» and press the return key. … Check that your IP address is similar to 192.168. 0.1.
How can I access a server from outside the network?
Use a VPN. If you connect to your local area network by using a virtual private network (VPN), you don’t have to open your PC to the public internet. Instead, when you connect to the VPN, your RD client acts like it’s part of the same network and be able to access your PC.
What is Routing and Remote Access server 2016?
RRAS stands for Routing and Remote Access Service is a feature of Windows Server operating systems family that provides additional support for TCP/IP internetworking. RRAS makes it possible to create applications to administer the routing and remote access service capabilities of the operating system.
What types of Remote Access solutions can you deploy by using Windows Server 2016?
You can deploy the RAS Gateway a single tenant RAS Gateway virtual private network (VPN) server, a multitenant RAS Gateway VPN server, and as a DirectAccess server. RAS Gateway — Single Tenant.
How do I setup Remote Desktop on Windows Server?
Steps How to Windows Server Enable Remote Desktop (RDP)Launch the Start menu and open Server Manager. … Click on the Local Server on the left hand side of the Server Manager window. … Select the Disabled text. … Click on Allow remote desktop connections to this Computer on the System Properties window.More items…•
Is Ras the same as VPN?
Information sent over a VPN is secure, it«s both authenticated and encrypted, while information sent via RAS lacks these security features. Although RAS served a purpose in providing LAN access to remote users, its time has clearly passed. 1.
How to enable remote access?
To Enable the Routing and Remote Access Service. Click Start, point to Administrative Tools, and then click Routing and Remote Access. In the left pane of the console, click the server that matches the local server name . If the icon has a red arrow in the lower-right corner, the Routing and Remote Access service isn’t enabled.
How to grant remote access to a user?
Click Start, point to All Programs, point to Administrative Tools, and then click Active Directory Users and Computers. Right-click the user account that you want to grant remote access rights to, click Properties, and then click the Dial-in tab.
How to create a group VPN?
Create a group that contains members who are permitted to create VPN connections. Click Start, point to Administrative Tools, and then click Routing and Remote Access. In the console tree, expand Routing and Remote Access, expand the server name, and then click Remote Access Policies.
How to connect to a dial up network?
If they are, see your product documentation to complete these steps. Click Start, click Control Panel, and then double-click Network Connections. Under Network Tasks, click Create a new connection, and then click Next. Click Connect to the network at my workplace to create the dial-up connection, and then click Next.
Can you grant callbacks in Windows 2003?
Administrators can only grant or deny access to the user and specify callback options, which are the access permission settings available in Microsoft Windows NT 4.0. The remaining options become available after the domain has been switched to native mode.
How to install Remote Access on DirectAccess?
On the DirectAccess server, in the Server Manager console, in the Dashboard, click Add roles and features. Click Next three times to get to the server role selection screen. On the Select Server Roles dialog, select Remote Access, and then click Next.
What group does DirectAccess belong to?
For a client computer to be provisioned to use DirectAccess, it must belong to the selected security group . After DirectAccess is configured, client computers in the security group are provisioned to receive the DirectAccess Group Policy Objects (GPOs) for remote management.
How to configure deployment type?
On the Remote Access server, open the Remote Access Management console: On the Start screen, type, type Remote Access Management Console, and then press ENTER. If the User Account Control dialog box appears, confirm that the action it displays is what you want, and then click Yes.
How to select a server from the server pool?
On the Select destination server page, select the Select a server from the server pool option. Under Server Pool, select the local computer and select Next. On the Select server roles page, in Roles, select Remote Access, then Next. On the Select features page, select Next. On the Remote Access page, select Next.
How to start remote access?
Select Start service to start Remote Access. In the Remote Access MMC, right-click the VPN server, then select Properties. In Properties, select the Security tab and do: a. Select Authentication provider and select RADIUS Authentication.
How to install Remote Access Role in VPN?
On the VPN server, in Server Manager, select Manage and select Add Roles and Features. The Add Roles and Features Wizard opens. On the Before you begin page, select Next.
How many switches do you need to install VPN?
If you are installing the VPN server on a VM, you must create two External virtual switches, one for each physical network adapter; and then create two virtual network adapters for the VM, with each network adapter connected to one virtual switch.
What is NAS in a network?
A NAS is a device that provides some level of access to a larger network. A NAS using a RADIUS infrastructure is also a RADIUS client, sending connection requests and accounting messages to a RADIUS server for authentication, authorization, and accounting. Review the setting for Accounting provider: Table 1.
Can you use a VPN as a RADIUS client?
When you configure the NPS Server on your Organization/Corporate network, you will add this VPN Server as a RADIUS Client. During that configuration, you will use this same shared secret so that the NPS and VPN Servers can communicate. In Add RADIUS Server, review the default settings for: Time-out.
Can you assign a VPN to a pool?
Additionally, configure the server to assign addresses to VPN clients from a static address pool. You can feasibly assign addresses from either a pool or a DHCP server; however, using a DHCP server adds complexity to the design and delivers minimal benefits.
How to join a remote server to a domain?
To join the Remote Access server to a domain. In Server Manager, click Local Server. In the details pane, click the link next to Computer name. In the System Properties dialog box, click the Computer Name tab, and then click Change.
What happens when you configure a website on a remote server?
If the network location server website is located on the Remote Access server, a website will be created automatically when you configure Remote Access and it is bound to the server certificate that you provide. There are two certificate options for the network location server certificate: Private. Note.
What are DirectAccess settings?
The DirectAccess settings that are contained in the client computer Group Policy Object are applied only to computers that are members of the security groups that you specify when configuring Remote Access.
How many Group Policy Objects are required for remote access?
To deploy Remote Access, you require a minimum of two Group Policy Objects. One Group Policy Object contains settings for the Remote Access server, and one contains settings for DirectAccess client computers. When you configure Remote Access, the wizard automatically creates the required Group Policy Objects.
What domain is Remote Access Server?
The Remote Access server and all DirectAccess client computers must be joined to an Active Directory domain . DirectAccess client computers must be a member of one of the following domain types:
How to change the name of my computer?
On the Start screen, type explorer.exe, and then press ENTER. Right-click the Computer icon, and then click Properties. On the System page, click Advanced system settings. In the System Properties dialog box, on the Computer Name tab, click Change.
What port is TCP port 443?
Transmission Control Protocol (TCP) destination port 443, and TCP source port 443 outbound. When the Remote Access server has a single network adapter, and the network location server is on the Remote Access server, then TCP port 62000 is also required.
Part:1 Install Remote Access Server role on Windows Server 2019
Log into the Windows Server 2019 > Click Windows Start Icon >> Click Server Manager.
Part:2 Create Additional Loopback Network Adaptor On Windows Server 2019
Its for skipping the error while running Configuring Remote Access Wizard and the error will be like below.
Part:3 Configuring Remote Access Service on VPN Server
From Server Manager Choose Remote Access >> Right click the Server name >> Choose Remote Access Management.
Part:4 Allow Remote Access to our VPN server through Public Network Adaptor
For maintain the access to the VPN server over remote desktop we need to allow the remote access port over our public network adaptor itself through routing and remote access properties section.
Part:5 Allow VPN remote access for the Users
In this part we are giving a existing user on VPN server for remote access. Then only if we give the logins of these server users to remote VPN clients, they can successfully connect to server through VPN.
Part:6 Allow VPN ports on Windows Firewall
In this part we are allowing the ports used by the VPN server for communication on windows firewall. Otherwise the remote VPN clients won’t be able to communicate with the VPN server. Below are the ports we need to allow in VP server firewall.
Step:7 Test VPN Connection
Open Network and Sharing Center of your local PC/Laptop. Click on ‘ Set up a new Connection or Network ‘. Please note the screenshots are from a Windows 7 PC.
How to add a remote access service to a server?
1. Click on Manage and select Add Role and Features. 2. On the Before you begin page, click Next. 3. Select Role-based or feature-based installation and click Next. 4. Select a server from the server pool on which you want to install the Remote Access Service role, click Next. 5.
How to configure NAT and LAN routing?
To configure NAT and LAN routing, open the Remote and Routing Access console using the Server Manager console. 14. Click on Tools and select Remote and Routing Access. 15. Select and right-click on the local server name and then select Configure and Enable Routing and Remote Access. 16.
How many adapters does Windows Server 2019 have?
The Windows Server 2019 must have two Network Adapters, one configured for the internal local network (LAN) and another one configured to access the internet (Internet).
How to connect to VPN server on Windows 10?
Once you have done that, you should be able to connect to the VPN server from a Windows 10 client. To establish VPN connectivity, open the Windows Control Panel and then click on the Network and Internet option, followed by Network and Sharing Center. When the Network and Sharing Center opens, click on the Set Up a New Connection or Network link. …
How to create a VPN connection?
You will also need to provide a name for the connection that you are creating. Click the Create button to create the VPN connection. Enter your VPN server’s IP address. Now, go back to the Network and Internet screen within the Control Panel.
What is VPN server?
A VPN is one of the most popular tools for allowing users to work remotely. While there are numerous third-party VPNs available, you can also configure Windows Server to act as a VPN. In this article, I will show you how to configure Windows Server 2019 to act as a VPN server.
Can Windows Server 2019 be used as a VPN?
As you can see, it is relatively easy to configure Windows Server 2019 to act as a VPN. Even so, it is important to keep in mind that there is a lot more than you can do concerning security.
Can VPN server authenticate authentication?
Choose No to allow the VPN server to authenticate authentication requests on its own. Click Next, followed by Finish. When you do, you may see a message telling you that you need to manually open the necessary firewall ports. Be sure to do this if necessary.