
В этой статье мы пошагово опишем процедуру разворачивания службы удаленного доступа Direct Access на самой свежей серверной платформе Microsoft — Windows Server 2012 R2. Вообще говоря, служба Direct Access предполагает несколько сценариев работы, мы попытаемся рассмотреть наиболее общий сценарий организации сервиса DirectAccess.
Прежде чем приступить, вкратце напомним о том, что такое служба DirectAccess. Компонент DirectAccess впервые была представлена Micrisoft в Windows Server 2008 R2 и предназначался для организации прозрачного доступа удаленных компьютеров ко внутренним ресурсам сети компании. При подключении через DA пользователь может полноценно пользоваться корпоративными и доменными сервисами, а сотрудники ИТ-поддержки управлять таким компьютеров и поддерживать его актуальном с точки зрения безопасности состоянии. По своей сути DirectAccess во многом напоминает традиционное VPN подключение к корпоративной сети. Рассмотрим основные отличия DirectAccess от VPN:
- Для установки соединения с помощью DirectAccess пользователю не нужно запускать VPN клиент – подключение осуществляется автоматически при наличия доступа в Интернет
- Для организации соединения между клиентом DA и сервером нужно открыть только 443 порт
- Компьютер пользователя обязательно должен находится в домене AD, а это значит что на него действуют все доменные групповые политики (конечно есть трюки, позволяющие запускать VPN до входа в Windows, но это обычно практически не практикуется)
- Канал связи между удаленным ПК и корпоративным шлюзом шифруется стойкими алгоритмами с использованием IPsec
- Возможно организовать двухфакторную аутентификацию с использованием системы одноразовых паролей
В чем же основные отличия версии DirectAccess в Windows Server 2012 / 2012 R2 от версии Windows 2008 R2. Основное отличие – снижение требований к смежной инфраструктуре. Так, например:
- Сервер DirectAccess теперь не обязательно должен быть пограничным, теперь он может находиться за NAT.
- В том случае, если в качестве удаленных клиентов используется Windows 8 Enterprise, разворачивать внутреннюю инфраструктуру PKI не обязательно (за аутентификацию клиентов будет отвечать Kerberos-прокси, расположенный на сервере DA)
- Не обязательно стало наличие IPv6 во внутренней сети организации
- Поддержка OTP (One Time Password) и NAP (Network Access Protection) без необходимости развёртывания UAG
Требования и инфраструктура, необходимы для развертывания DirectAccess на базе Windows Server 2012 R2
- Домен Active Directory и права администратора домена
- Выделенный (рекомендуется) сервер DA под управлением Windows Server 2012 R2, включенный в домен Windows. Сервер имеет 2 сетевые карты: одна находится во внутренней корпоративной сети, другая – в DMZ сети
- Выделенная DMZ подсеть
- Внешнее DNS имя (реальное или через DynDNS) или IP адрес, доступный из интернета, к которому будут подключатся клиенты DirectAccess
- Настроить перенаправление трафика с порта TCP 443 на адрес сервера DA
- Развернутая инфраструктура PKI для выпуска сертификатов. В certificate authority нужно опубликовать шаблон сертификата Web Server и разрешено его автоматическое получение (auto-enrollmen) (Если в качестве клиентов будут использоваться только Windows 8 — PKI не обязателен).
- В качестве клиентов могут выступать компьютеры с Windows 7 и Windows 8.x редакций Professional / Enterprise
- Группа AD, в которой будут состоять компьютеры, которым разрешено подключаться к сети через Direct Access (допустим, эта группа будет называться DirectAccessComputers)


Установка роли Remote Access
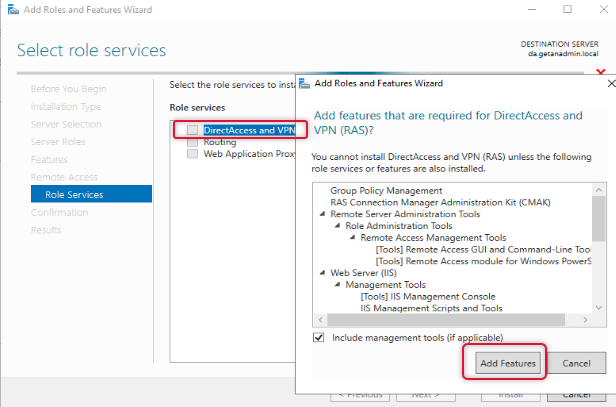
Запустим консоль Server Manager и с помощью мастера Add Roles and Features установим роль Remote Access.

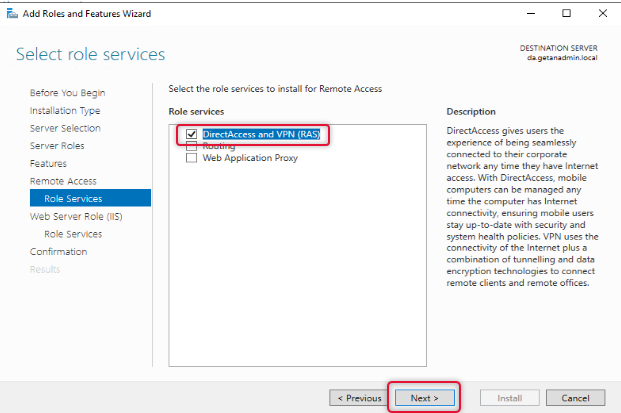
В составе роли Remote Access нужно установить службу DirectAccess and VPN (RAS).
")
Все остальные зависимости оставляем по умолчанию.
Настройка службы Direct Access в Windows Server 2012 R2
После окончания установки службы Remote Access, откройте оснастку Tools -> Remote Access Management.
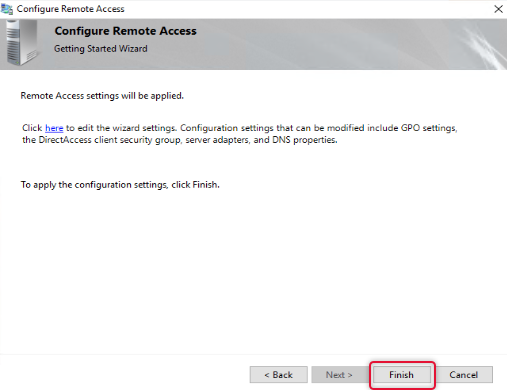
Запустится мастер настройки роли удаленного доступа. Укажем, что нам нужно установить только роль DA — Deploy DirectAccess only.

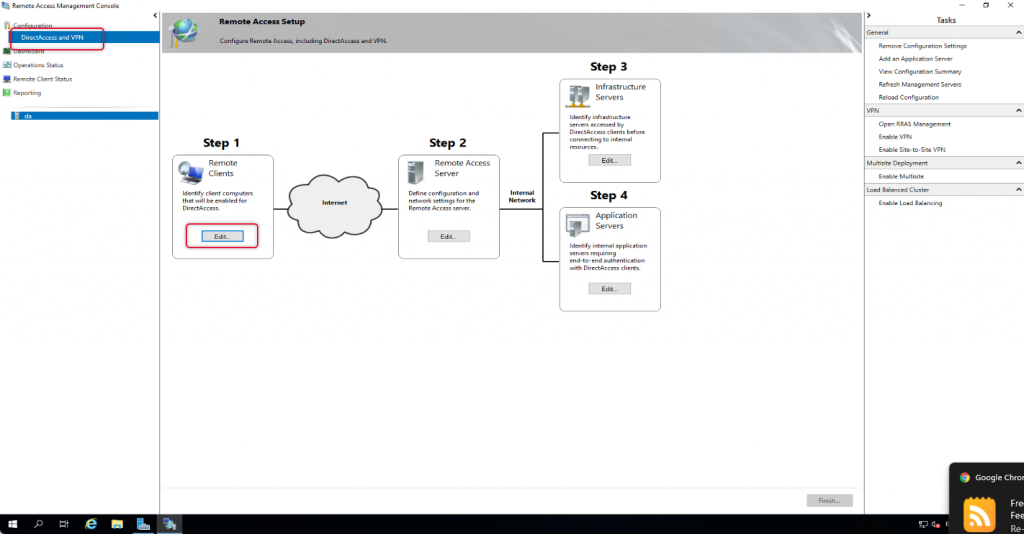
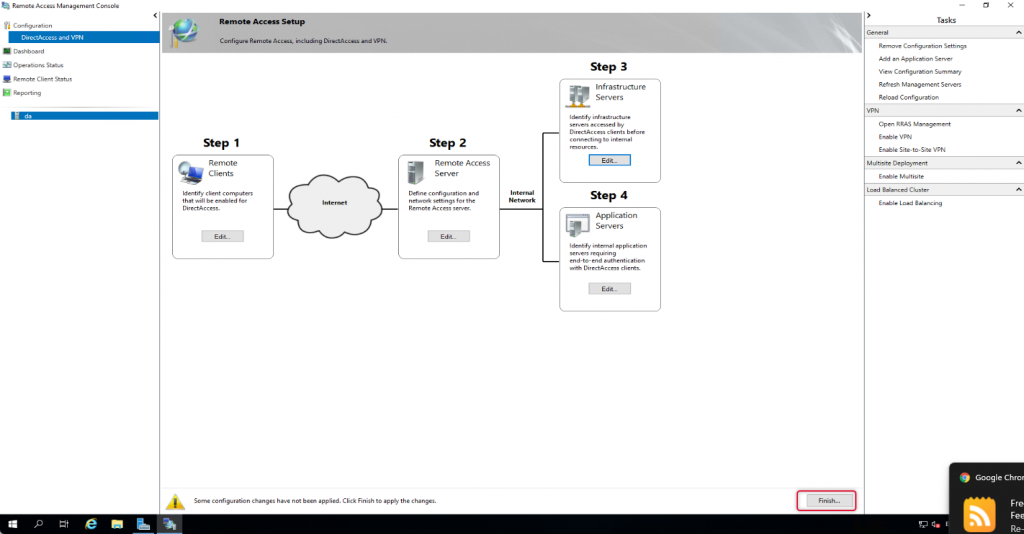
После этого должно открыться окно, в правой половине которого в графическом виде показаны четыре этапа (Step 1 – 4) настройки службы DA.

Первый этап (Step 1: Remote Clients).
Укажем, что мы разворачиваем полноценный DirectAccess сервер с возможностью доступа клиентов и их удаленного управления Deploy full DirectAccess for client access and remote management.

Далее, нажав кнопкуAdd нужно указать группы безопасности AD, в которой будут находиться учетные записи компьютеров, которым разрешено подключаться к корпоративной сети через Direct Access (в нашем примере это группа DirectAccessComputers).

Примечание. Опция Enable DirectAccess for mobile only – позволяет ограничить подключение через DA только для мобильных устройств (ноутбуки, планшеты). Реализуется функция за счет опроса клиентов по WMI. Опция Use force tunneling – означает, что удаленные клиенты при доступе к любым удаленным ресурсам (в том числе обычным веб-сайтам) всегда использовать сервера DA (т.е. весь внешний трафик клиента проходит через корпоративный шлюз).
Следующий шаг – нужно указать список внутренних сетевых имен или URL-адресов, с помощью которых клиент может проверить (Ping или HTTP запрос), что он подключен к корпоративной сети. Здесь же можно указать контактный email службы helpdesk и наименование подключения DirectAccess (так оно будет отображаться в сетевых подключениях на клиенте). В случае необходимости можно включить опцию Allow DirectAccess clients to use local name resolution, позволяющую разрешить клиенту использовать внутренние DNS-сервера компании (адреса DNS серверов могут получаться по DHCP).

Второй этап (Step 2: Remote Access Server)
Следующий шаг — настройка сервера Remote Access. Указываем, что наш сервер удаленного доступа представляет собой конфигурацию с двумя сетевыми картами — Behind an edge device (with two network adapters), одна их которых находится в корпоративной сети, а вторая подключена напрямую в Internet или DMZ-подсеть. Здесь же нужно указать внешнее DNS имя или IP адрес в Интернете (именно с этого адреса пробрасывается 443 порт на внешний интерфейс сервера DirectAccess), к которому должны подключаться клиенты DA.

Затем нужно указать какая сетевая карта будет считаться внутренней (Internal – LAN), а какая внешней (External – DMZ).

Свернем пока мастер настройки сервера Direct Access и сгенерируем сертификат сервера DA. Для этого создадим новую оснастку mmc, в которую добавим консоль Certificates, управляющую сертификатами локального компьютера (Computer Account)

В консоли управления сертификатами запросим новый персональный сертификат, щелкнув ПКМ по разделу Certificates (Local Computer) -> Personal -> Certificates и выбрав в меню All Tasks-> Request New Certificate
Запросим сертификат через политику Active Directory Enrollment Policy. Нас интересует сертификат на основе шаблона WebServers.

В настройках запроса нового сертификата на вкладке Subject заполним поля, идентифицирующие нашу компанию, а на вкладке Private Key укажем, что закрытый ключ сертификата можно экспортировать (Make private key exportable).

Сохраним изменения и запросим новый сертификат у CA.

Вернемся в окно настроек сервера DirectAccess и, нажав кнопку Browse, выберем сгенерированный сертификат.
На следующем шаге мастера выберем способ аутентификации клиентов Direct Access. Укажем, что используется аутентификация по логину и паролю AD (Active Directory credentials – username/password). Отметим чекбокс Use computer certificates (Использовать сертификаты компьютеров) и Use an intermediate certificate. Нажав кнопку Browse, нужно указать центр сертификации, который будет отвечать за выдачу сертификатов клиентов.
Совет. Напомним, что если в качестве клиентов будут выступать машины с Windows 8 – разворачивать свой центр сертификаиции не нужно. Если же отметить чекбокс Enable Windows 7 client computers to connect via DirectAccess (Разрешить клиентским компьютерам с Windows 7 подключаться с помощью DirectAccess), то PKI придется разверачивать обязательно, без него клиенты на Windows 7 работать не смогут.

Третий этап (Step 3: Infrastructure Servers)
Третий этап – настройка инфраструктурных серверов. Нам будет предложено указать адрес сервера Network Location Server, находящегося внутри корпоративной сети. Network Location Server — это сервер, с помощью которого клиент может определить, что он находится во внутренней сети организации, т.е. не требуется использовать DA для подключения. NLS – сервером может быт любой внутренний веб-сервер (даже с дефолтной страничкой IIS), основное требование – сервер NLS не должен быть доступен снаружи корпоративной сети.

Далее укажем список DNS серверов для разрешения имен клиентами. Рекомендуется оставить опцию Use local name resolution if the name does not exist in DNS or DNS servers are unreachable when the client computer is on a private network (recommended).

Затем укажем DNS-суффиксы внутренних доменов в порядке приоритета их использования.

В окне настройки Management ничего указывать не будем.
Четвертый этап (Step 4: Application Servers)
Этап настройки серверов приложений. На этом этапе можно настроить дополнительную аутентификацию и шифрование трафика между внутренними серверами приложений и клиентами DA. Нам это не требуется, поэтому оставим опцию Do not extend authentication to application servers.

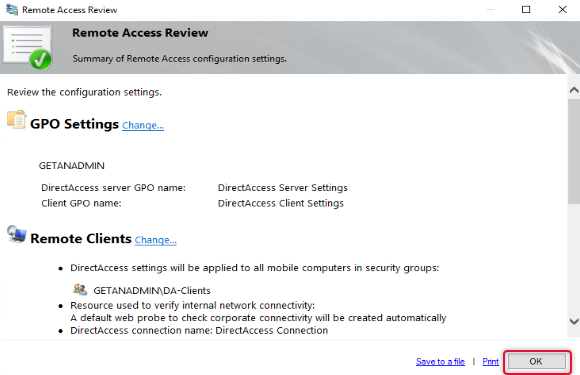
На этом мастер настройки роли Remote Access завершен, нам осталось сохранить изменения.

После окончания работы мастер создаст две новых групповых политик DirectAccess Client Settings и DirectAcess Server Settings, которые прикреплены к корню домена. Их можно оставить там, либо перелинковать на нужный OU.
Тестируем работу Direct Access на клиенте Windows 8
Чтобы протестировать работу Direct Access с клиента, добавим это компьютер (напомним, что это должен быть ПК с Windows 8.X Enterprise ) в группу DirecAccessCompurers, обновим на нем групповые политики (gpupdate /force).
Совет. Напомним, что в Windows Server 2012 появился функционал оффлайнового включения компьютера в домен через DirectAccess, без необходимости физически подключать компьютер клиента к корпоративной сети.
Отключаем тесовую машину от корпоративной сети и подключаемся в интернету через Wi-Fi. Система автоматически подключается к корпоративной сети через DirectAccess, о чем свидетельствует статус Connected значка Workplace Connection (именно так мы назвали наше подключение при настройке сервера) в списке сетей.

Наличие подключения к сети через DirectAccess можно проверить с помощью PowerShell команды:
Get- DAConnectionStatus
Если она возвращает ConnectedRemotely, значит подключение DA к корпоративной сети
This is a single server deployment where the default settings are used to deploy the server. It is recommended to enable a firewall at the server and client-side to make the remote access more secure. We don’t need a certificate authority in an Active Directory domain, but if it is there we can make use of it. In this deployment, a public hostname pointing to the DirectAccess server with a third-party certificate will be used. The client computers accessing DirectAccess must be Windows 8 Client operating system or later. The network location server in this scenario is the same server with that we are deploying the DirectAccess role. Also, the Network Access Protection server is not used and multi-factor authentication is not supported. As all services related to DirectAccess point to the same server, the installation of the DirectAccess role service will be simple and easy.
The server deployment is started with creating a security group to assign client computers that are a member of this computers group. After that, we are installing a remote access role and configuring DirectAccess alone Remote Access client, Remote Server, and Infrastructure is the components we are going to configure in it. Also, the DirectAccess client configuration is mostly dependent on Group Policy objects and the windows client computers need to be connected to the domain network before connecting from the remote network as the client computers need to be updated with group policy object settings. The client PC with group policy updated required for DirectAccess connected to domain network from any public network over the internet where the connection to the DirectAccess server is allowed to access.
What are we waiting for, lets’s start dipping in the water to get a rinse of how to deploy DirectAccess and configure of single server scenario. The demonstration will cover DirectAccess role installation and configuration and connecting from an external network using a windows 10 client computer. Let’s get started.
Create Direct Access Client Security Group
Before we start adding the Remote Access role on the DirectAccess server we are going to create a group to allow access to specific computers as a member and get the DirectAccess connectivity privileges.
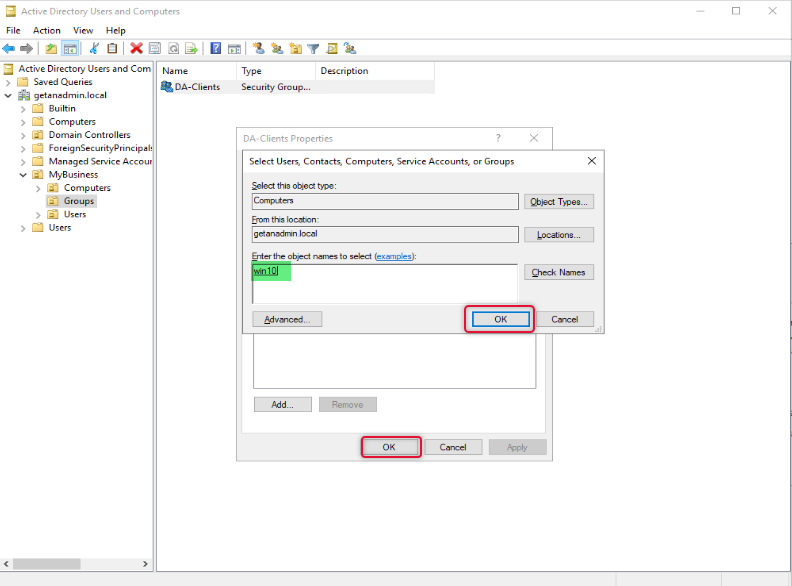
To add a security group, we are login into Domain Controller and launching “Active Directory Users and Computers” and this group is under the appropriate OU under the Domain hierarchy. In this case to identify the nature of the group we call the OU name “DA-Clients”.
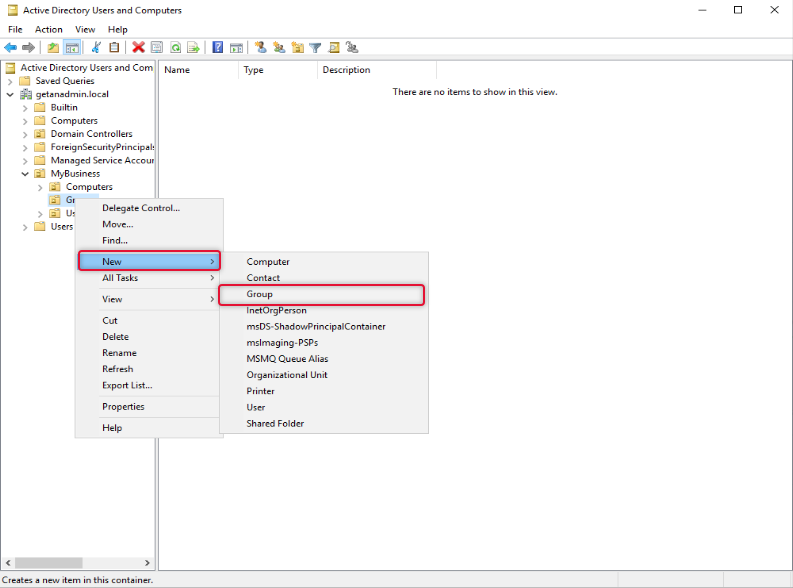
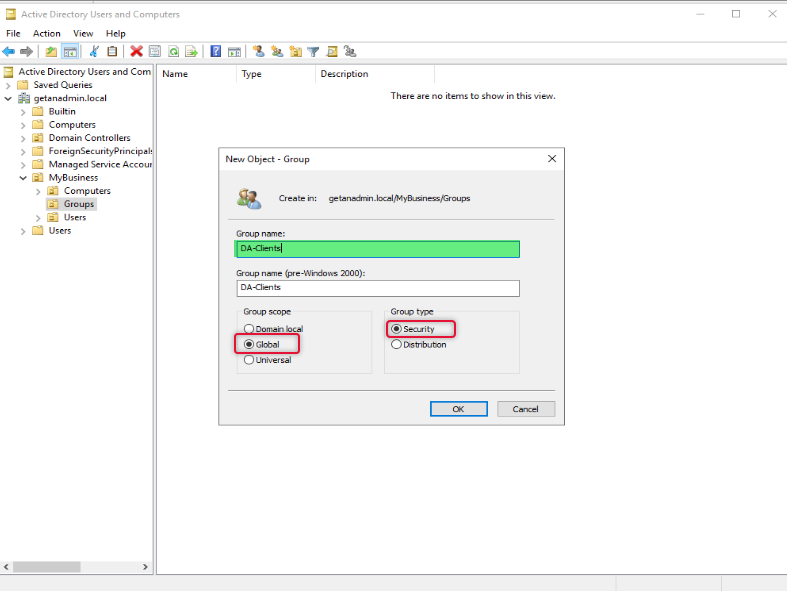
Type a name for the group and select scope as Global and type as Security and click OK.
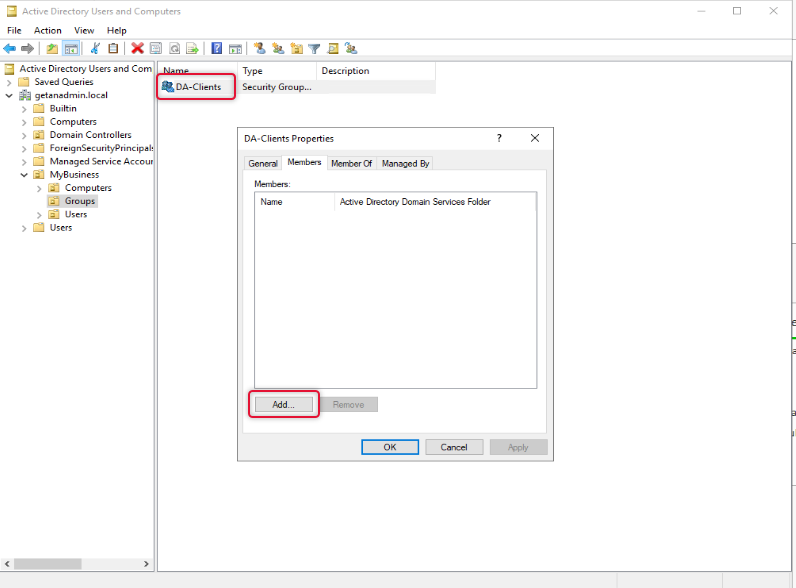
Once a group has been created double click the group object to go to its property and select the member’s tab and add the computers that you want to allow access to connect to DirectAccess.
On the Select object type select Computers as we are going to add computer objects as members.
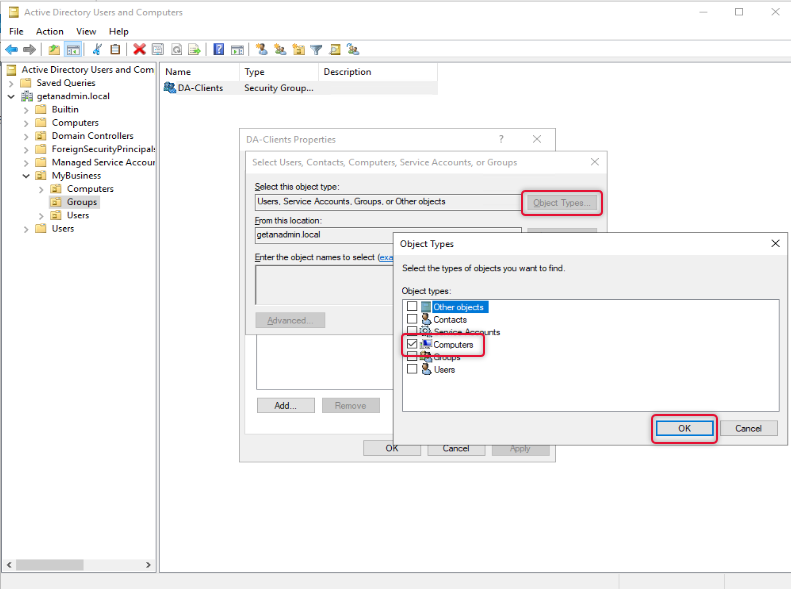
On the Enter object names to select box type names of the computers, you want to give access to and click OK twice to close the properties window.
We have completed creating a group and are ready to go to the next step which is to add the Remote Access role.
Add Remote Access Role Service
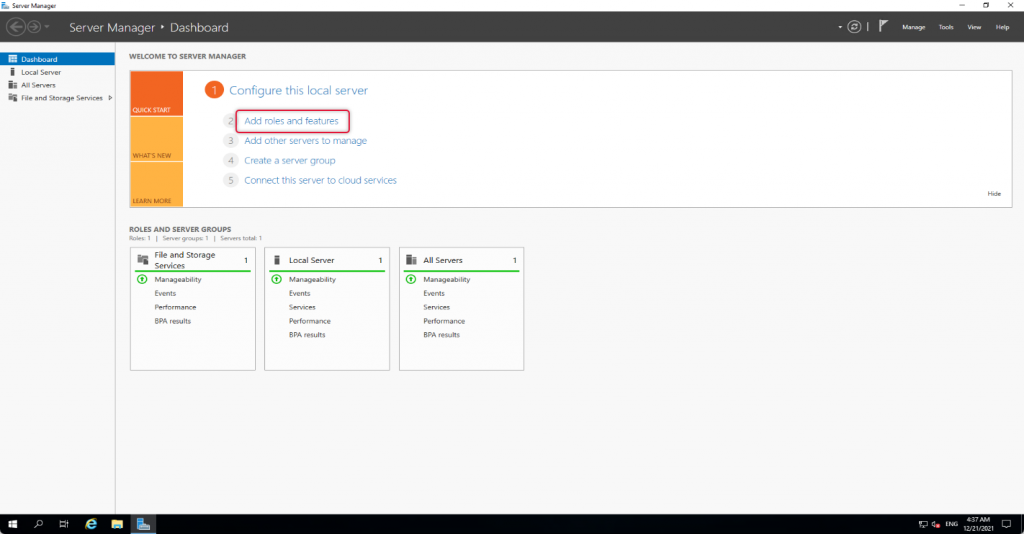
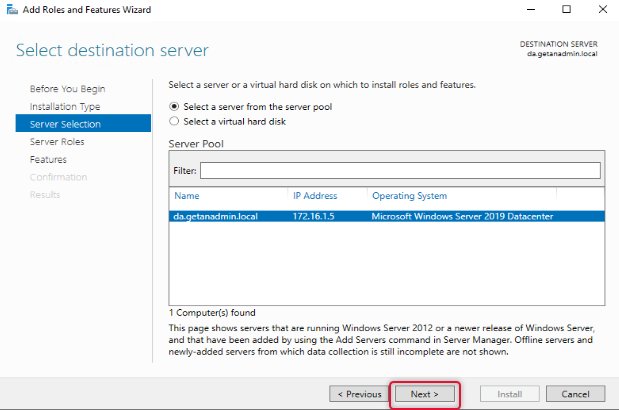
To add Remote Access role launch, Select Server Manager “Add roles and features”
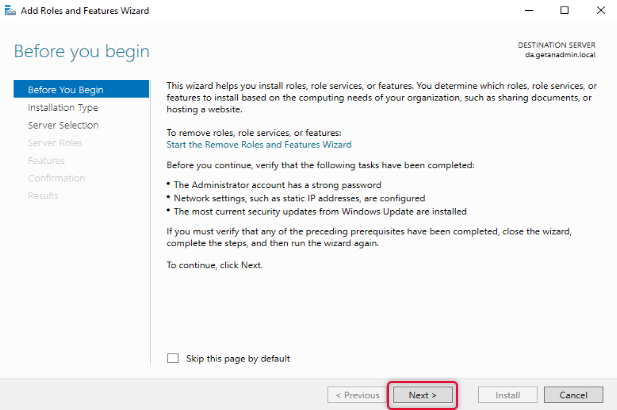
The wizard instructions give you a gist of how the Add roles and features wizard helps you install the roles or features to your local or remote computer. You may go through the instruction if you are new to adding roles and features to Windows Server. If you don’t want to see “before you begin page” anymore, click skip this page and click next to move on to the next page of the wizard.
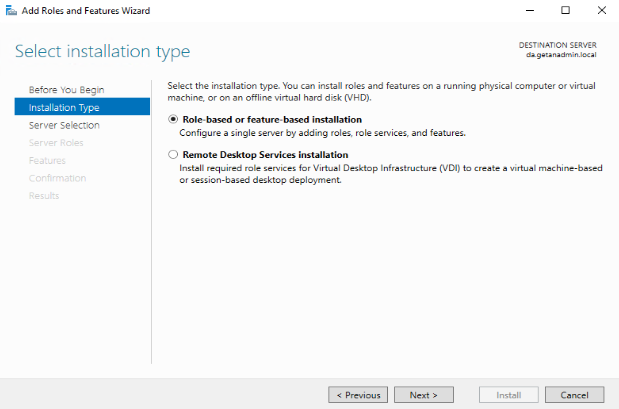
The Remote Access role comes under role-based or feature-based installation. So, click Role-Based or Feature-Based installation and click Next.
On the server selection, the local server is listed, and our intention is also to install the Remote Access role on the local server. Click Next to continue.
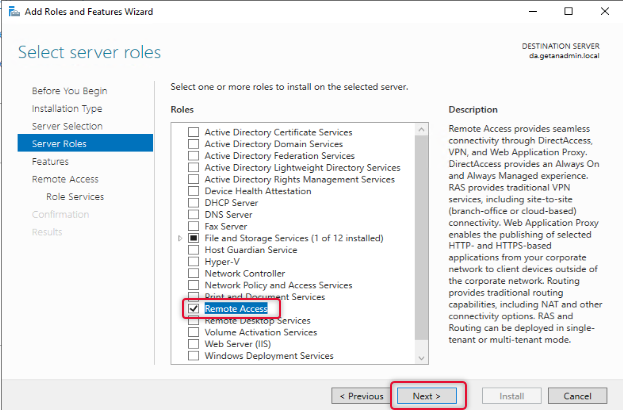
From the server roles list, select Remote Access and click Next.
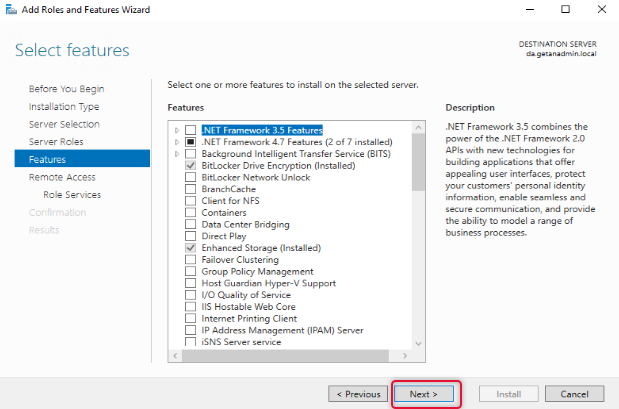
The next screen is to select features related to the role, leave the default selection, and click Next.
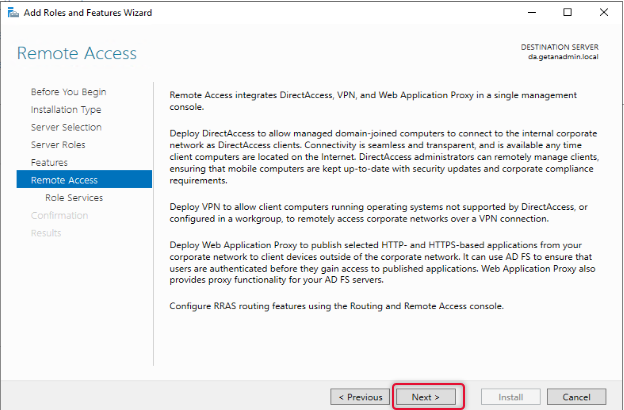
On the Remote Access page, the instruction for the Remote Access role would be given, go through the Remote Access instruction, and click Next to continue.
From the Remote Access role services list, select DirectAccess and VPN, and when you click on the role service, you will be prompted to choose the features to install, leave the default selection and click Add Features to return to the role services selection window.
When the role service features are selected click Next to continue.
On the web service, role services go through the instruction and click Next.
Under Web Server Role, leave the default role services and click Next.
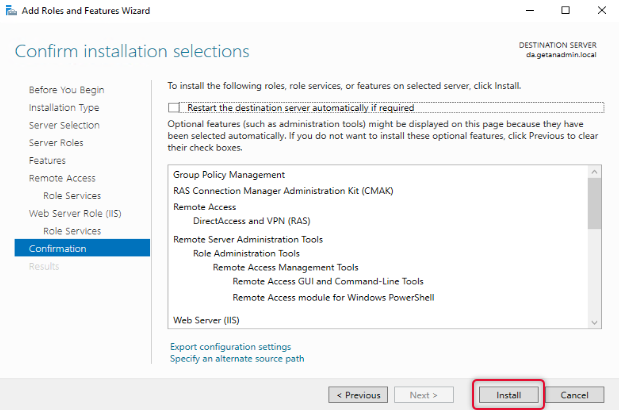
Click Install on the confirmation page to start the installation.
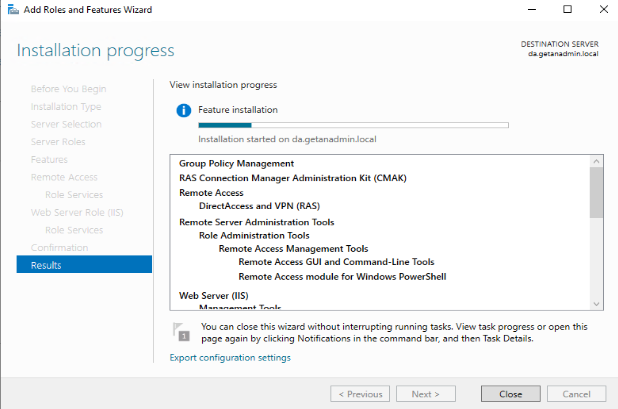
The view installation progress, let you know the installation progress of the installation, wait for the Remote Access role installation to complete.
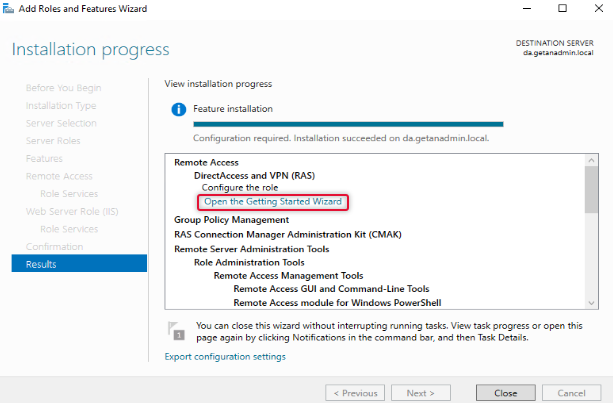
The Remote Access role has been added. Now, click on Open the getting started wizard to start the wizard.
Configure and Deploy DirectAccess Service
We are going to configure DirectAccess, so click on Deploy DirectAccess only.
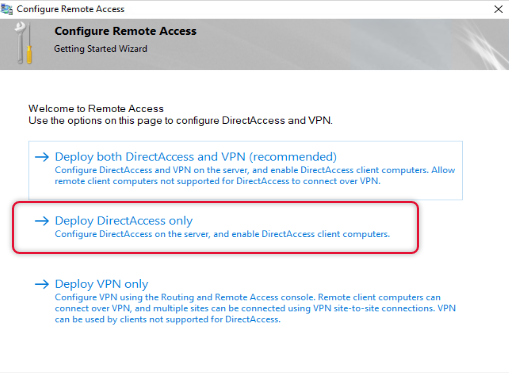
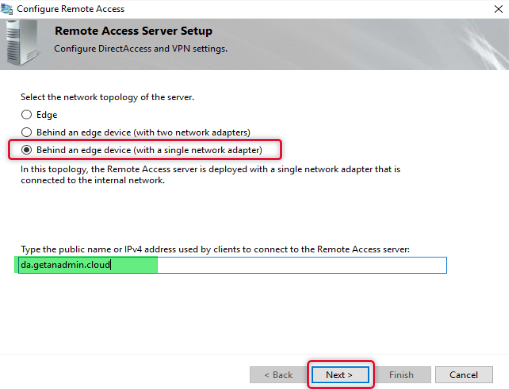
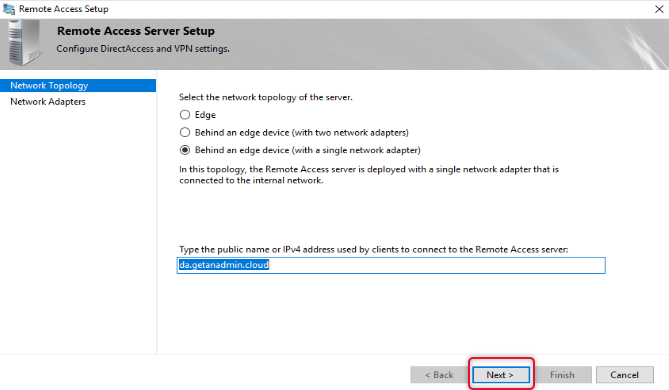
Every DirectAccess setup may not have the same network topology of the server, select the appropriate topology as per your network, if your remote access server is behind a firewall, choose behind an edge device. Type the public hostname of the DirectAccess server. You can create a host record on your domain registrar DNS and install a third-party certificate from a CA. I have created a hostname in the name of da.getanadmin.cloud and installed the CA certificate already.
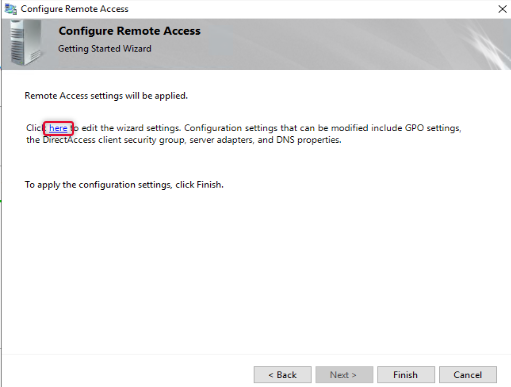
On clicking Next, you will be prompted to apply settings, before we apply settings, we need to configure a few more settings, to open the settings wizard, click the link on the as in the wizard.
First, we are going to configure Remote clients with a few settings.
The default group added to the remote clients is domain computers, to allow only certain computers to access the domain network we need to remove domain computers and add the group with computers that we need. Click Add to add a group to the list. You may remember we have created a security group previously for this purpose add that group and remove the Domain Computers group.
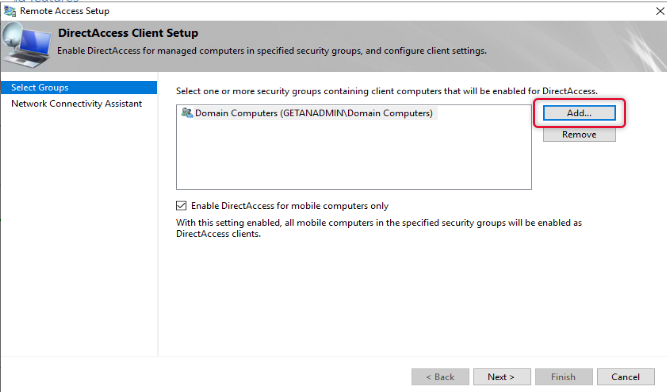
Once the security group with allowed computer members in it is added, remove the domain computers. Also, uncheck “Enable DirectAccess for mobile Computers Only”.
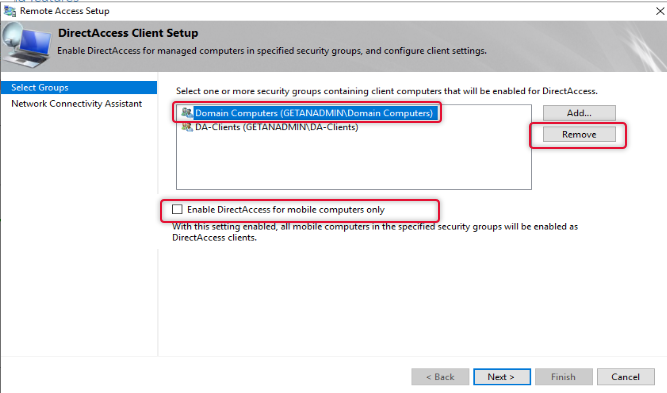
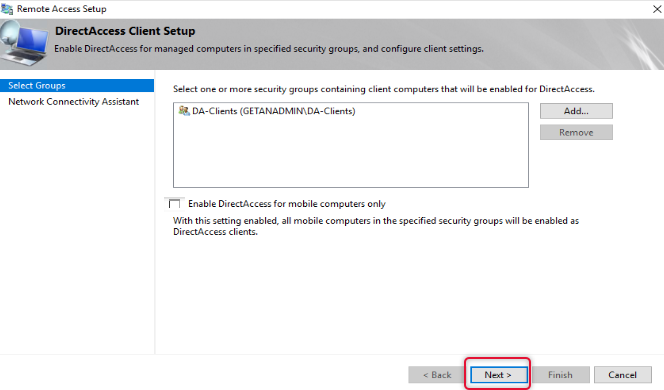
Now the group has been tidied up and click Next to continue.
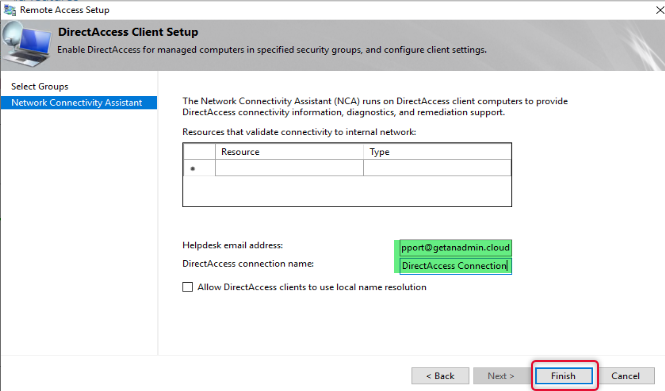
Type email address to get email related to the issue and logs from Remote client computers to contact the administrator and type a connection name and click finish.
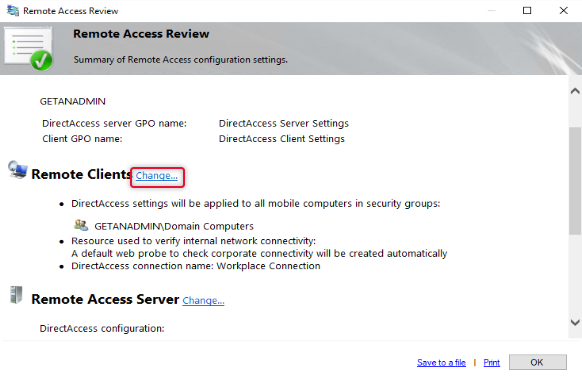
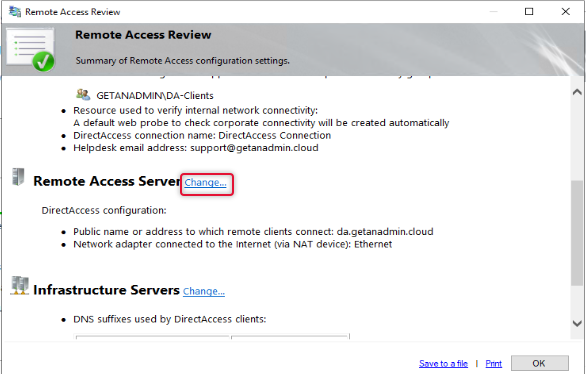
On the Remote Access review page click Change besides Remote Access Server.
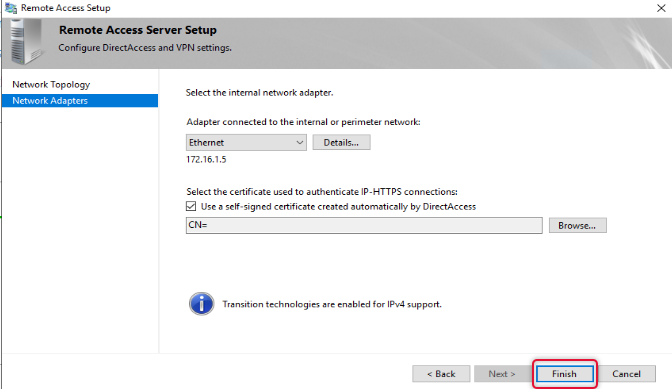
On the Remote Access Server settings, we have already configured the details click next on the network topology to get to the next page.
On the Network Adapters page leave the default settings and click Finish.
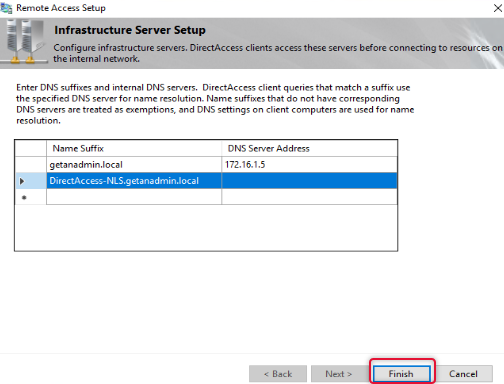
The Final setting, we are doing on the remote access review is to change the remote access infrastructure server. Click Change next to Infrastructure Servers
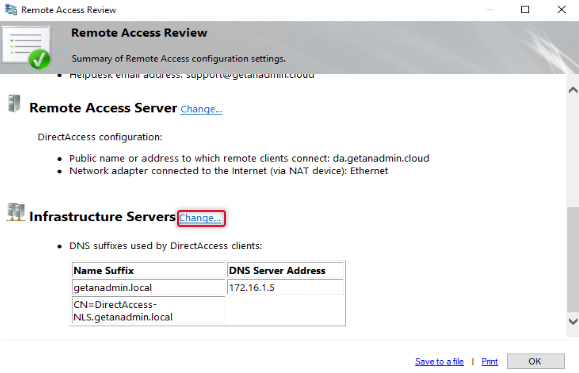
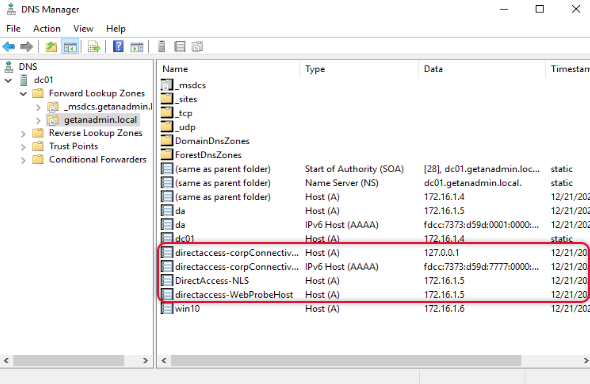
Here makes sure DNS IP address is specified for domain suffix and make sure there is a DNS host record available on the local DNS for the name DirectAccess-NLS. Click Finish to exit out of the infrastructure server configuration.
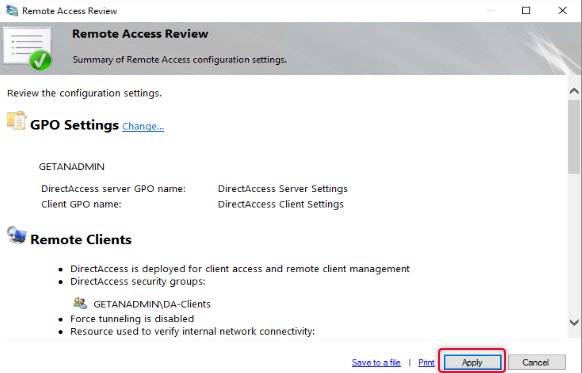
Click OK on the Remote Access review page to apply changes.
Click Finish to apply changes to return to the Remote Access Management console.
On the Remote Access management console, under configuration and Remote Client, click Edit to Edit the settings.
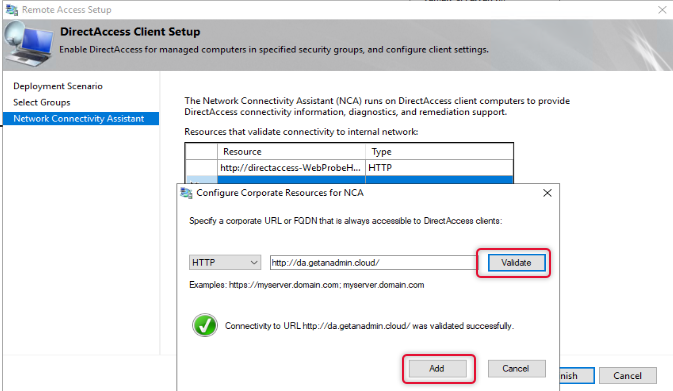
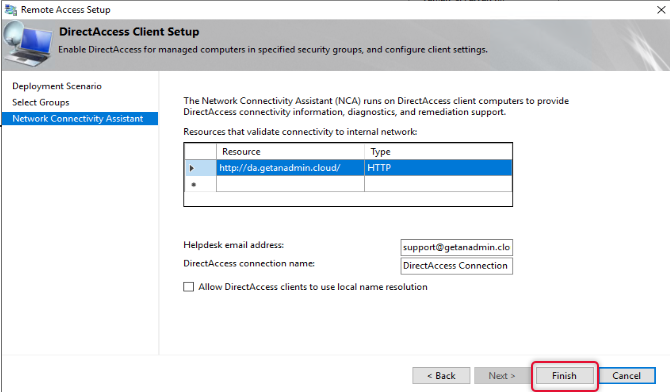
By Default, Network Connectivity Assistant settings will get Direct-AccessWebProbehost hostname on the resources list, we need to remove it and add the hostname we have added on the public DNS. Choose the protocol as HTTP on the dropdown list. And add the URL with the public hostname pointing to the DirectAccess server. Click Validate to validate the URL and click add.
Click Finish to exit out of Remote client settings.
Click Finish at the bottom of the Remote access setup to apply changes.
Click Apply to apply the configuration changes.
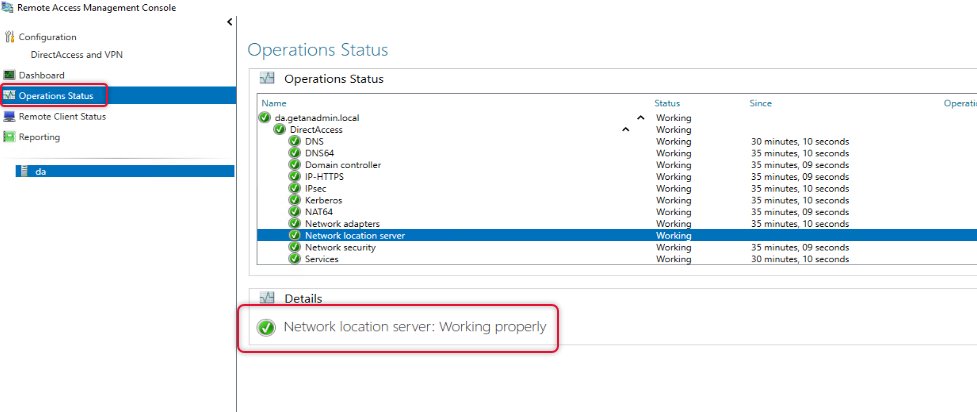
Once configuration changes are applied go to operation status and check all operations are working.
Go to Domain controller and open DNS Manager management console and check the highlighted hostnames are created.
Connect Windows 10 client from an external network
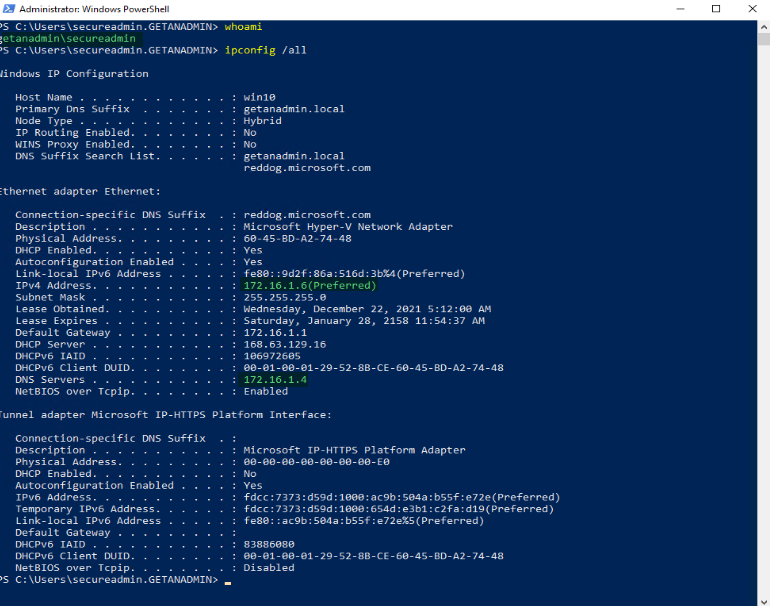
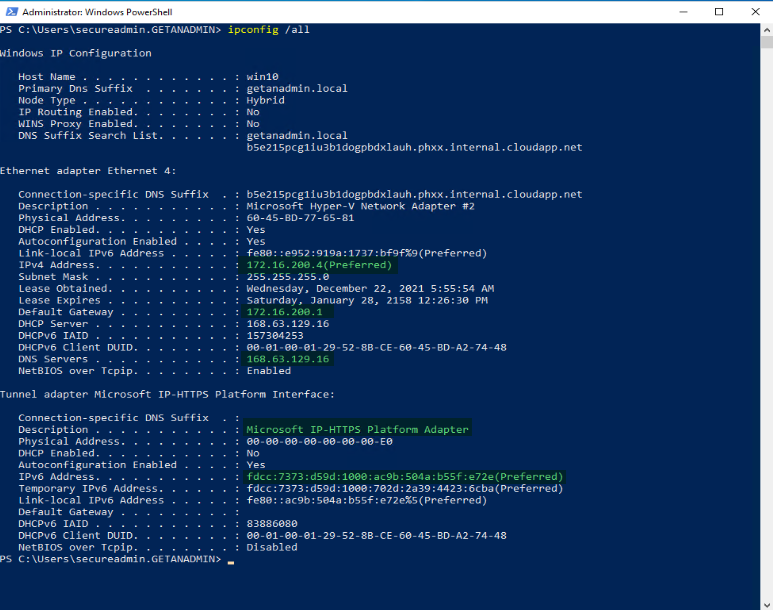
We have completed the server-side setup and now the time to access a windows client PC from an outside network using DirectAccess connected. Before we do log in to the client computer and check the server is in the domain network and the IP address of it by running ipconfig /all. We can run gpupdate /force to get the PC to get the DirectAccess group policy settings, but I recommend restarting the Windows client PC.
We can utilize some PowerShell commands to check if the settings are updated on the client’s computer. You can use these commands to troubleshoot DirectAccess in case remote clients are not connecting or unable to access resources from outside the network.
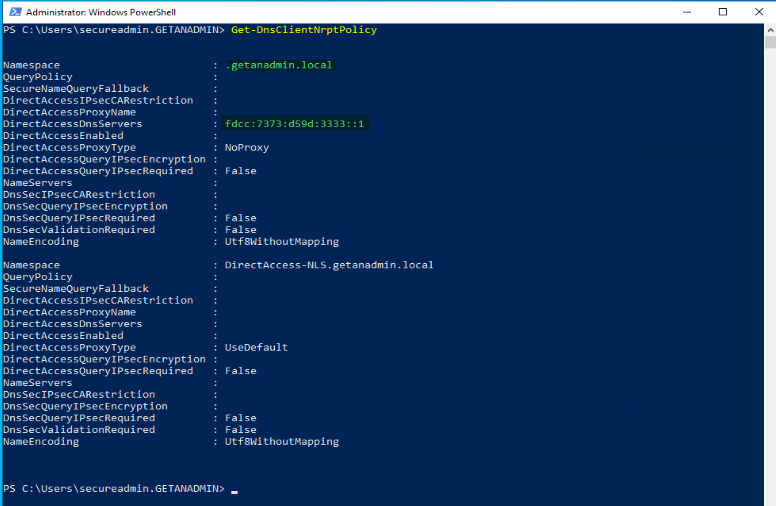
Get-DNSClientNRPTPolicy is the command to check the DirectAccess DNS IP address is assigned for the domain namespace.
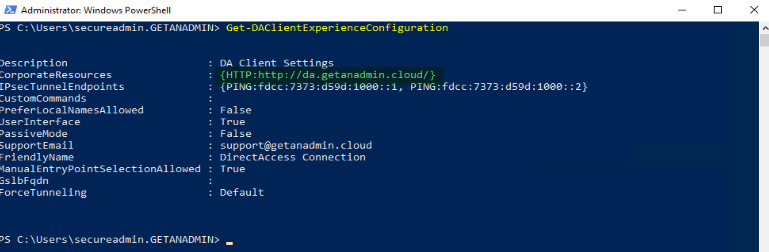
Get-DAClientExperienceConfiguration PowerShell command to check the URL that we mentioned in the remote client resource setup is displaying correctly.
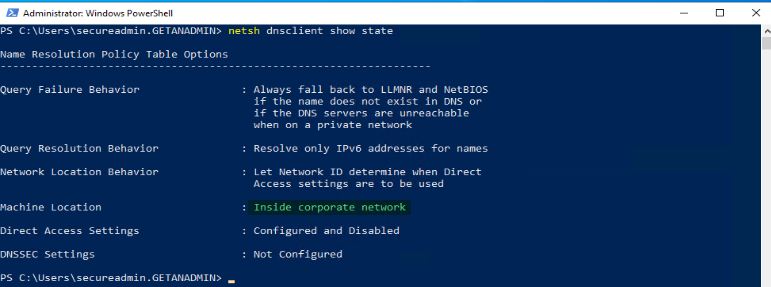
netsh dnsclient show state
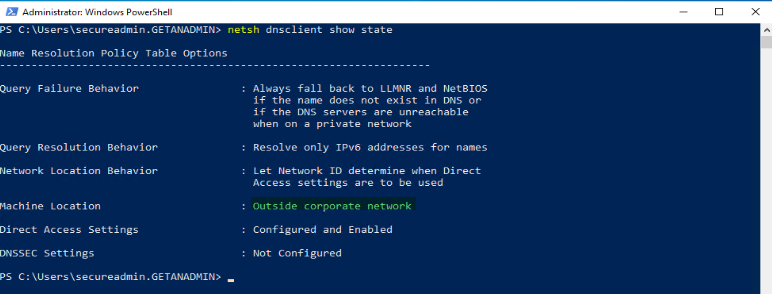
Command will show whether the windows client PC is inside or outside the network. In this case, we have not disconnected from the domain network, so it’s showing that the client PC is inside the network as Machine Location.
Now, we have disconnected the Windows Client PC from the domain network and connected it to a private network away from the domain network. You can see the different network and DNS IP addresses. Also, you can see the tunnel network adapter IP address for the Microsoft IP-HTTPS platform. The adapter will get only IPv6.
As you can see that the Machine Location is not Outside Corporate Network.
Click on the network link on the taskbar and find the Direct Access connection connected.
If you look under network & Internet settings you can see DirectAccess connection status.
Test domain network resources access
We can try to ping some servers inside the corporate network, and you can see it pining. I try to ping the domain controller and DirectAccess server and I can see a successful ping reply.
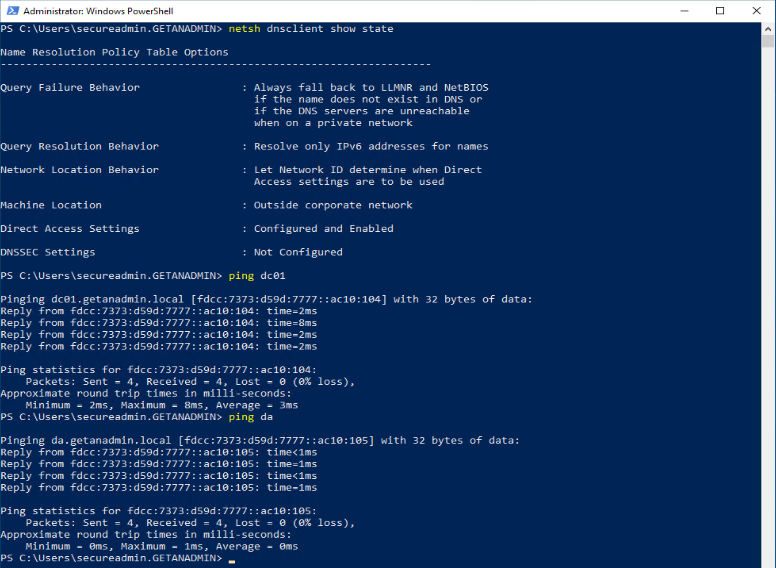
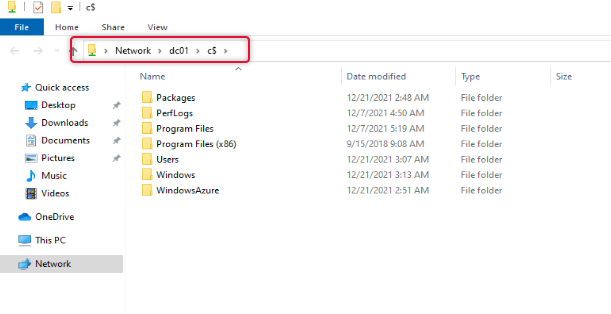
I also tried to access the file share on the DC01 and was able to get to the share as well.
Conclusion
In this article, we have discussed the complete installation and configuration to deploy DirectAccess. Also, we have tested with a remote client to access the resources inside the corporate network. The demonstration is completed here and if you have any queries or feedback that you want to share, please send a comment below. I look forward to seeing you another time with a different article.
In this article, we’ll step by step describe how to deploy the Direct Access (DA) remote connection service on Microsoft Windows Server. Before we get started, let’s take a quick look at what the Direct Access service is. The Direct Access component was first introduced by Microsoft in Windows Server 2008 R2 and was designed to provide transparent access for remote computers to internal company network resources. When connecting through a DA, the user can take full advantage of the enterprise and domain services, and the IT support staff can manage and keep the computers up to date in terms of security. At its core, Direct Access is a lot like a traditional VPN connection to the corporate network. You can also call it “always on VPN”.

Difference Between Direct Access and VPN
Let’s look at the basic difference between Direct Access and VPN:
- In order to establish the Direct Access connection, the user does not need to start the VPN client – the connection is made automatically when there is Internet access.
- To establish a connection between the DA client and the server, you need to open port 443.
- The user’s computer must be in an Active Directory domain.
- The communication channel between the remote PC and the corporate gateway is encrypted with robust algorithms using IPsec.
- It is possible to organize two-factor authentication using a one-time password system.
Difference Between the First Version of Direct Access and Latest
What are the major differences between the new Windows Server versions of Direct Access and the first version on Windows 2008 R2? The main difference is the reduced requirements for the related infrastructure. For example, here are some differences:
- The Direct Access server no longer needs to be an edge server, it can now be behind NAT.
- If you’re using Windows 8 Enterprise and later as the remote client, you don’t need to deploy an internal PKI infrastructure (client authentication will be handled by the Kerberos proxy located on the DA server).
- Having IPv6 on the internal network of the organization is not necessary.
- New Direct Access supports OTP (One Time Password) and NAP (Network Access Protection) without requiring Unified Access Gateway (UAG) deployment.
Direct Access Installation Requirements
Here are infrastructure requirements to deploy Direct Access based on Windows Server:
- Active Directory domain and domain administrator rights.
- A dedicated (recommended) DA server running Windows Server 2012 R2 and later, included in a Windows domain. The server has 2 network cards: one is on the internal corporate network and the other is on the DMZ network.
- Dedicated DMZ subnet.
- The external DNS name or IP address available from the Internet that Direct Access clients will connect to.
- Traffic redirection configuration from TCP port 443 to DA server address.
- Deployed PKI infrastructure for certificate issuance. The certificate authority must publish the Web Server certificate template and allow it to be auto-enrolled (Not needed for Windows 8 and above).
- Clients must run Windows Professional / Enterprise edition.
- AD Group that will consist of computers that are allowed to connect to the network via Direct Access.
Installing Remote Access Server Role
First we need to start the Server Manager console and use the Add Roles and Features wizard to install the Remote Access role.

As part of the Remote Access role, you must install the Direct Access and VPN (RAS) service.

Leave all other settings by default and restart the server after installation.
Configuring the Direct Access Service in Windows Server
Once the Remote Access service has been installed, open the Tools ⇒ Remote Access Management snap-in.

The remote access console will start. Click on DirectAccess and VPN ⇒ Run the Remote Access Setup Wizard. Now we only need to install Deploy DirectAccess only role.
This should open a window in the right half of which you can see the four steps (Step 1 – 4) of the DA service configuration graphically.

Step One: Remote Clients
Let’s say that we’re deploying full DirectAccess for client access and remote management.
Now you need to specify the AD security group that will contain the computer accounts that are allowed to connect to the corporate network via Direct Access (in this example, we will use alwayonvpn group).
Enable DirectAccess for mobile only option – allows you to limit connection via DA only for mobile devices (laptops, tablets). This feature is implemented by polling clients via WMI.
The Force Tunneling option – means that remote clients when accessing any remote resources (including regular websites) always use DA servers (all external client traffic goes through the corporate gateway).
On the next step we need to specify a list of internal network names or URLs from which the client can check (Ping or HTTP request) that he is connected to the corporate network. You can also specify the help desk email address and the name of the DirectAccess connection (so that it will appear on the client’s network connections).
If necessary, you can enable the Allow DirectAccess clients to use local name resolution option, which allows the client to use the company’s internal DNS servers (DNS server addresses can be obtained by DHCP).

Step Two: Remote Access Server
The next step is to configure the Remote Access server. In our example we will have an edge server (firewall) with two network cards, so we need to select – Behind an edge device (with two network adapters), one of which is on the corporate network and the other is connected directly to the Internet or DMZ subnet. You also need to provide the external DNS name or IP address on the Internet (which is where port 443 is pinged to the external interface of the DirectAccess server) that the DA clients should connect to.

Then you must specify which NIC will be considered Internal (LAN) and which External (DMZ).
Now we need to generate a DA server certificate. To do this, create a new mmc snap-in, and add the Certificates console that manages local computer certificates.

In the Certificate Management Console, request a new personal certificate by clicking on Certificates (Local Computer) ⇒ Personal ⇒ Certificates and selecting All Tasks ⇒ Request New Certificate…

Request a certificate through the Active Directory Enrollment Policy. We are interested in a certificate based on the Web Servers template.
In the new certificate request settings on the Subject tab, let’s fill out the fields that identify our company and on the Private Key tab, let’s specify that the certificate private key can be exported (Make private key exportable).
Save the changes and request a new certificate from CA. Request and generate a new certificate.
Return to the DirectAccess server settings window and click the Browse button to select the generated certificate. Specify our certificate.
In the next step of the wizard, we’ll select a method for authenticating Direct Access clients. Specify that authentication with Active Directory credentials (username/password) is used. Select the checkbox of Use computer certificates and Use an intermediate certificate. Click the Browse button to specify the certificate authority that will be responsible for issuing client certificates.
Step Three – Infrastructure Servers
The third stage contains configuration of infrastructure servers. We need to specify the address of the Network Location Server, which is located inside the corporate network. Network Location Server (NLS) – is a server through which the client can determine that it is on the internal network of the organization, i.e. you do not need to use DA to connect. NLS server can be any internal web server (even with a default IIS page), the main requirement is that the NLS server must not be accessible from outside the corporate network.

Now let’s specify a list of DNS servers for name resolution by clients. It is recommended to leave the option Use local name resolution if the name does not exist in DNS or DNS servers are unreachable when the client computer is on a private network (recommended).
Then specify the DNS suffixes of internal domains in order of priority of their use.
Management settings window we will keep default.
Step Four – Application Servers
In this step we will configure application servers. This phase allows you to configure additional authentication and traffic encryption between the back-end application servers and DA clients. In this example we do not need this, so let’s leave the option Do not extend authentication to application servers.
This completes the Remote Access role configuration wizard, so we just need to save the changes.
After you finish, the wizard will create two new group policies – DirectAccess Client Settings and DirectAccess Server Settings that are attached to the root of the domain. You can either leave them as they are, or link them to the desired OU.
Test Direct Access on the Windows Client
To test how Direct Access works from the client side, let’s add a computer with Windows Enterprise OS to our direct access group (alwaysonvpn) and update Group Policy via gpupdate /force on it.
Disconnect the laptop from the corporate network and connect to the Internet via public Wi-Fi. The system automatically connects to the corporate network via DirectAccess. The connection name will be displayed in Network & Internet Settings.
You can verify if there is a DirectAccess established using the PowerShell command:
Get- DAConnectionStatus
If it returns ConnectedRemotely, then the DA is connected to the corporate network
How DirectAccess Works
When a client provisioned for DirectAccess is outside of the corporate network, it will automatically attempt to establish a secure remote connection to the DirectAccess server over the Internet. The DirectAccess connection takes place at the machine level and requires no user interaction. Most commonly, the DirectAccess client will be on the IPv4 Internet, so an IPv6 transition technology will be selected and a tunnel will be established with the DirectAccess server.
Inside the IPv6 transition tunnel, authenticated and encrypted IPsec tunnels are established between the client and the server. It is over these tunnels that communication to resources on the corporate network takes place. The DirectAccess IPsec tunnels are defined as Connection Security Rules (CSR) in the Windows Firewall with Advanced Security on both the DirectAccess client and the server.
DirectAccess provides support only for Domain-joined clients that include operating system support for DirectAccess.
The following server operating systems support DirectAccess.
- You can deploy all versions of Windows Server 2016 as a DirectAccess client or a DirectAccess server.
- You can deploy all versions of Windows Server 2012 R2 as a DirectAccess client or a DirectAccess server.
- You can deploy all versions of Windows Server 2012 as a DirectAccess client or a DirectAccess server.
- You can deploy all versions of Windows Server 2008 R2 as a DirectAccess client or a DirectAccess server.
The following client operating systems support DirectAccess.
- Windows 10 Enterprise
- Windows 10 Enterprise 2015 Long Term Servicing Branch (LTSB)
- Windows 8 and 8.1 Enterprise
- Windows 7 Ultimate
- Windows 7 Enterprise
DirectAccess vs. VPN
- VPN connections are user initiated and therefore optional. It is up to the user to decide when they want to connect to the corporate network. By comparison, DirectAccess is seamless and transparent in nature, is completely automatic, and requires no user interaction to establish a connection.
- Many VPN protocols aren’t firewall friendly, which can impede the successful establishment of a VPN connection. DirectAccess can establish its secure remote connection using HTTPS, which is commonly allowed through most firewalls.
- VPNs often require investments in proprietary hardware and per-user licensing. DirectAccess can be deployed on existing virtual infrastructure and does not require additional user licensing.
- Proprietary software is commonly required to leverage all of the features provided by VPN solutions. This software must be deployed and managed by IT administrators. DirectAccess requires no additional third-party software to be installed. All settings for DirectAccess are managed through Group Policy Objects (GPOs) in Active Directory.
- A VPN connection can be established from any client machine with the VPN client software installed.This makes integration with a multifactor authentication solution an essential requirement, which makes the solution more complex and difficult to support. A DirectAccess connection can only be established from a client computer that has been provisioned for DirectAccess by IT, reducing the need to employ strong authentication for DirectAccess connections.
System Requirements
Windows Server 2016 and DirectAccess should be installed on a dedicated physical server for optimum performance. However, Windows Server 2016 and DirectAccess can be installed on a virtual machine hosted on any Microsoft Server Virtualization Validation Program (SVVP) validated hypervisor, including Microsoft Hyper-V, VMware, and many others. It is recommended that the server (physical or virtual) be provisioned with a minimum of four processor cores, 8GB of RAM, and 60GB of hard disk space.
For more information, please browse to : https://docs.microsoft.com/en-us/windows-server/remote/remote-access/directaccess/directaccess-deployment-paths-in-windows-server
For this demo purposes, i will be using 3 VM, consists of 2 Windows Server 2016 VM and 1 Windows 10 client VM which is all running in Hyper-V.
Infrastructure Requirement (this is based on the Isolated Environment) it might different in the Real Production implementation.
- 1 Domain Controller Server (DC-CLOUD)
- 1 Member Server (SUB-01 )
- 1 Client PC running Windows 10 (CLIENT-10)
01 – lets verify the network configuration for all our VM’s (Please Refer to the Pictures)
(SUB-01.Windows.ae)
1 – Open Network Connections by pressing Window Key + X and clicking Network Connections.

2 – Rename the network connections intuitively so they can be quickly identified in the future. Renaming them Internal and External should be sufficient. Network adapters can be renamed by right-clicking them and choosing Rename or by simply highlighting a network adapter and pressing.

3 – To configure the Internal network interface, right-click the Internal network connection and choose Properties. Highlight Internet Protocol Version 4 (TCP/IPv4) and then click Properties. Provide an IPv4 address and a subnet mask. DO NOT specify a default gateway! Provide the IP addresses for DNS servers on the corporate LAN as necessary.

02 – External Interface
1 – To configure the External interface, right-click the External adapter and choose Properties. Highlight Internet Protocol Version 4 (TCP/IPv4) and then click Properties. Provide an IPv4 address, subnet mask, and default gateway. DO NOT specify any DNS servers.

2 – Click Advanced. If Teredo support is required, click Add under the IP addresses section and specify the next consecutive public IPv4 address and subnet mask.

3 – Select the DNS tab and uncheck the box next to Register this connection’s addresses in DNS.

4 – Select the WINS tab and uncheck the box next to Enable LMHOSTS lookup. In addition, in the NetBIOS setting section select the option to Disable NetBIOS over TCP/IP.

Note : As the External network interface is public facing and connected to an untrusted network (public Internet or perimeter/DMZ network), it is recommended that all protocols and services other than IPv4 and IPv6 be disabled to reduce the attack surface of the DirectAccess server.
03 – Creating DirectAccess OU & Group in Active Directory
(DC-CLOUD.Windows.ae)
~*~ You need to create the OU & Group because we going to add CLIENT-10 into this group so that the client can have DirectAccess connection. ~*~
1 – Create a new OU – In the New Object – Organizational Unit dialog box, in the Name box, type “DirectAccess Clients”, and then click OK.

2- In the Active Directory Users and Computers console, expand Windows.ae, right-click DirectAccess Clients OU, click New, and then click Group.

3 – In the New Object – Group dialog box, in the Group name box, type DA Clients.

4 – Next, right-click DA Clients, and then click Properties.

5 – In the DA Clients Properties dialog box, click the Members tab, and then click Add and then click Object Types.

6 – Next, click Computers check box, and then click OK.

7 – In the Enter the object names to select (examples) box, type CLIENT-10, and then click OK.

8 – Verify that CLIENT-10 is displayed under Members, and then click OK.

04 – Installing the Remote Access server role
(SUB-01.Windows.ae)
1 – Open Server Manager, click Add Roles and Features. (Please Refer to the Pictures)

2 – On the Before You Begin page, click Next.

3 – On the Select installation type page, click Next.

4 – On the Select destination server page, click Next.

5 – On the Select server roles page, click Remote Access, and then click Next.

6 – On the Select Features page, click Next.

7 – On the Remote Access page, click Next.

8 – On the Select role services page, click DirectAccess and VPN (RAS) and Add Roles and Features Wizard dialog box, click Add Features, and then verify that DirectAccess and VPN (RAS) is selected.


9 – On the Select role services page, click Next.

10 – On the Confirm installation selections page, click Install.

11 – When the installation completes, click Close.

05 – Configure DirectAccess by running the Getting (Please Refer to the Pictures)
1 – Open Server Manager, click Tools, and then click Remote Access Management.

2 – In the Remote Access Management console, under Configuration, click DirectAccess and VPN, and then click Run the Getting Started Wizard.

3 – In the Getting Started Wizard, on the Configure Remote Access page, click Deploy DirectAccess only.

4 – On the Network Topology page, verify that Edge is selected, in the Type the public name or IPv4 address used by clients to connect to the Remote Access server text box, type 131.10.15.254, and then click Next.

5 – In the Configure Remote Access interface, click the here link.

6 – On the Remote Access Review interface, verify that two GPOs are created, DirectAccess Server Settings and DirectAccess Client settings, and then next to Remote Clients, click the Change.

7 – Next, select Domain Computers (Windows\Domain Computers), and then click Remove.

8 – Next, on the same interface, click Add, and then type DA Clients, and then click OK.

9 – Make sure you clear the Enable DirectAccess for mobile computers only check box, and then click Next.

10 – On the DirectAccess Client Setup interface, click Finish.
DirectAccess connection name: NewHelpTech connection

11 – On the Remote Access Review interface, verify that Windows\DA Clients listed under Remote Clients and then click OK.

12 – On the Configure Remote Access page, click Finish and wait for the configuration to finish.

13 – In the Applying Getting Started Wizard Settings dialog box, verify that the configuration was successful, and then click Close.


06 – DirectAccess connectivity to Client Windows 10 (Please Refer to the Pictures)
Verify DirectAccess Group Policy configuration settings for Windows 10 clients
1 – Switch to CLIENT-10.

2 – Restart CLIENT-10, and then sign in again as Windows\Administrator with the password of asd@123.

3 – Open a Command Prompt window, and then type the following commands, pressing Enter at the end of each line:
gpupdate /force
gpresult /R


Verify that DirectAccess Client Settings GPO displays in the list of Applied Policy objects for the Computer Setting, Close the Command Prompt window.
Move the client computer to the Internet virtual network (Please Refer to the Pictures)
1 – Open Network Connections by pressing Window Key + X and clicking Network Connections.

2 – In the Network Connections window, right-click Internal, and then click Disable.

3 – Right-click External, and then click Enable.

4 – Open the External IPv4 to verify the IP settings.

Verify connectivity to the DirectAccess server
1. On CLIENT-10, open a command prompt, type the following command, and then press Enter:
ipconfig

Notice the IPv6 address that starts with 2002. This is an IP-HTTPS address
2 – At the command prompt, type the following command, and then press Enter:
Netsh name show effectivepolicy

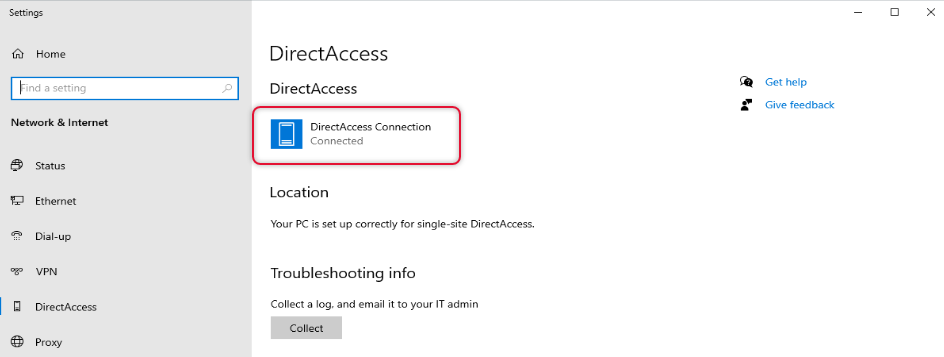
3 – Click Start, and then click Settings

4 – In Settings, select Network & Internet, and then click DirectAccess.

5 – Verify that Your PC is set up correctly for single-site DirectAccess is displayed under Location.

Notice the Collect button under Troubleshooting info
2 – Next, in the CLIENT-10, open PowerShell and type :
~*~ this command just to get the DirectAccess client settings ~*~
Get-DAClientExperienceConfiguration

3 – Now, its time for us to test the DirectAccess connectivity.
~*~ In CLIENT-10, open IE and then type : http://www.Windows.ae ~*~

DirectAccess Server (SUB-01.Windows.ae) : Monitoring DirectAccess connectivity
1 – click Remote Client Status, and then in the central pane, review the information
under the Connected Clients list.

Close the Remote Access Management Console
Common Issues and Troubleshooting Tips
| Common Issue | Troubleshooting Tip |
| You have configured DirectAccess, but users are complaining about connectivity issues. You want an efficient way to troubleshoot their issues. | Basic troubleshooting is integrated in the Network Connectivity assistance, so educate users how to access it and to determine what is preventing the client computer from communicating with the DirectAccess server. |
| The DirectAccess client tries to connect to the DirectAccess server by using IPv6 and IPsec with no success. | If you are using Teredo as the IPv6 transition technology, verify whether you have two public addresses on the external network adapter of the DirectAccess server. This is required for establishing |
that’s all for now.., any Doubts type a commend.. 🙂
В среде Windows Server 2008 R2 установка и настройка DirectAccess сопряжены с немалыми трудностями. Администратор должен осуществить весьма сложный процесс настройки, в том числе обеспечить выполнение требований к инфраструктуре открытых ключей public key infrastructure (PKI), получить сертификаты для серверов, настроить сервер сетевых расположений, позаботиться о том, чтобы целевые системы поддерживали протокол IPv6 и задействовать шлюз Forefront Unified Access Gateway (UAG). Теперь ситуация радикально изменилась. В среде Windows Server 2012 установка и настройка средств DirectAccess не составляют проблемы — если вы пользуетесь клиентами Windows 8
В среде Windows Server 2008 R2 установка и настройка DirectAccess сопряжены с немалыми трудностями. Администратор должен осуществить весьма сложный процесс настройки, в том числе обеспечить выполнение требований к инфраструктуре открытых ключей public key infrastructure (PKI), получить сертификаты для серверов, настроить сервер сетевых расположений, позаботиться о том, чтобы целевые системы поддерживали протокол IPv6 и задействовать шлюз Forefront Unified Access Gateway (UAG). Теперь ситуация радикально изменилась. В среде Windows Server 2012 установка и настройка средств DirectAccess не составляют проблемы — если вы пользуетесь клиентами Windows 8. Перед тем как приступать к описанию радикально усовершенствованного процесса установки, я сделаю шаг назад и расскажу вам о том, что же это такое — DirectAccess — и каким образом данное решение может помочь организации.
Что такое DirectAccess?
Когда я начинал свою трудовую деятельность на посту системного администратора VAX/VMS, мой рабочий день продолжался с 8 утра до 5 пополудни. Все это время я занимался рабочими системами (включая систему обработки электронной почты), и мне никогда не приходилось иметь дело с вычислительными системами за пределами офиса. Сегодня идея работы в офисе с 8 до 5 отмерла, а воображаемая линия, отделяющая работу от личной жизни, стала более размытой. Как ИТ-администраторам, так и конечным пользователям требуется возможность обращаться к системам и данным корпорации в любое время суток, и потому они должны постоянно располагать средствами сетевого соединения.
Традиционно существует два подхода к управлению доступом к корпоративным системам из-за периметра корпоративной сети.
Доступ по веб-протоколам, таким, как HTTP Secure (HTTPS). Такой доступ применяется при обращении к почтовым ящикам Microsoft Exchange с помощью ActiveSync, при обращении к сайтам SharePoint, которые публикуются в среде Web с соблюдением мер защиты, и даже при использовании дистанционного подключения настольных систем с помощью шлюза удаленных рабочих столов Remote Desktop Gateway, который инкапсулирует RDP-трафик в HTTPS.
VPN -туннели в среде Internet, соединяющие ту или иную систему с корпоративной сетью. При использовании этого метода пользователи вручную инициируют соединение с корпоративной сетью.
Применение протокола HTTPS — превосходное решение в тех случаях, когда оно доступно. Его достоинство в большинстве случаев состоит в том, что протокол «просто работает» и выполняется на множестве устройств. Однако HTTPS неприменим при использовании многих типов служб, таких, как бизнес-приложения. Кроме того, в ряде случаев организации не склонны задействовать этот протокол, даже когда он обеспечивает решение проблемы. В таких случаях можно воспользоваться традиционным «VPN-подходом». Но и он имеет свои недостатки.
Во-первых, пользователи должны вручную инициировать соединение, а это порой сопряжено с трудностями.
Во-вторых, пользователи остаются подключенными к инфраструктуре корпоративной сети лишь до тех пор, пока они поддерживают сеанс связи с VPN. В результате если пользователи не осуществляют соединения достаточно часто, их компьютерами нельзя управлять при выполнении таких операций, как установка пакетов обновлений, обновление корпоративных политик и программных средств.
Чтобы вооружить потребителей еще одним средством управления доступом, Microsoft включила в продукты Windows Server 2008 R2 и Windows 7 компонент DirectAccess (версии Enterprise и Ultimate). DirectAccess обеспечивает соединение клиента с корпоративной сетью, функционирующее постоянно и не требующее вмешательства со стороны пользователя. Когда пользователи обращаются к тому или иному ресурсу Internet, применяется их обычное соединение со Интернет. Когда же пользователям требуется связь с корпоративным ресурсом, применяется туннель DirectAccess, обеспечивающий для них транспарентный доступ к нужному корпоративному ресурсу из любой точки. Чтобы определить, относится ли целевой ресурс к категории корпоративных ресурсов, DirectAccess сопоставляет DNS-суффикс целевого ресурса с содержимым таблицы политик разрешения имен Name Resolution Policy Table. Эта таблица включает правила, идентифицирующие DNS-суффиксы ресурсов, которые могут быть доступны лишь при установлении соединения через корпоративную распределенную сеть.
Так же, как и VPN, DirectAccess создает туннель между компьютером и корпоративной средой, однако между этими технологиями существует важное различие. Незаметно для стороннего наблюдателя DirectAccess фактически создает два туннеля. Первый из них — инфраструктурный туннель; он возникает в момент включения системы. Этот туннель дает возможность ключевым системам ИТ-инфраструктуры взаимодействовать с данным компьютером и осуществлять функции управления. После регистрации пользователя создается второй туннель. Этот внутрисетевой туннель дает пользователю возможность обращаться к системам корпоративной сети. Каких-то действий со стороны оператора при этом не требуется, поэтому пользователь может обращаться к корпоративным ресурсам, не испытывая каких-либо затруднений. Отметим, что для управления системой можно задействовать только инфраструктурный туннель без подключения внутрисетевого канала связи, ибо при работе с последним пользователь не имел бы возможности обращаться к корпоративным ресурсам.
Как видите, технология DirectAccess чрезвычайно удобна для пользователей, но еще большие преимущества она дает сотрудникам ИТ-служб. При использовании этого решения все данные, передаваемые через Интернет, проходят проверку подлинности и шифруются с помощью протоколов Ipsec, что обеспечивает возможность «бесшовного» и в то же время надежно защищенного подключения компьютеров пользователей к корпоративной сети. Вдобавок, поскольку компьютеры пользователей подключаются к ключевым системам ИТ-инфраструктуры всякий раз, когда эти пользователи запускают их, управление последними осуществляется без каких-либо затруднений.
DirectAccess предусматривает применение протокола IPv6. Но хотя индустрия информационных технологий вне всякого сомнения движется к принятию этой версии IP, переход осуществляется чрезвычайно медленно, и во многих сетях, включая Интернет, применяется преимущественно версия IPv4. В итоге при подключении к Интернету средства DirectAccess используют реализованные в IPv6 технологии перехода с тем, чтобы устанавливать соединения между сервером DirectAccess и клиентами, применяющими версию IPv4. К числу часто используемых технологий перехода относятся Teredo и IP over HTTPS (IP-HTTPS); обе эти технологии дают возможность туннелировать пакеты IPv6 внутри пакетов IPv4. В принципе здесь можно задействовать и технологию перехода 6to4. Однако эта технология не работает, когда клиент располагается за устройством, осуществляющим трансляцию сетевых адресов Network Address Translation (NAT). Между тем, почти все клиенты с каналом в Интернете располагаются за NAT-устройствами того или иного типа, так что технология 6to4 редко применяется в реальных условиях эксплуатации.
Иными словами, DirectAccess — изумительная технология, но вероятность того, что вы сможете отправить в отставку свое решение на базе VPN, чрезвычайно мала. Поясню эту мысль на примере. В версии Server 2012 DirectAccess может взаимодействовать только с входящими в состав домена системами Windows 8 Enterprise и Windows 7 Enterprise. Для связи со всеми другими устройствами — скажем, с домашними системами, не входящими в состав домена, с системами Windows 8 и Windows 7, не работающми с редакцией Enterprise, с мобильными телефонами, с устройствами, функционирующими под управлением отличных от Windows операционных систем, — вам по-прежнему придется применять VPN. Моя рекомендация такова: когда вы можете использовать технологию DirectAccess, используйте ее. Во всех прочих случаях вам придется применять решение на базе VPN. Если вы затрудняетесь определить, чем VPN отличается от DirectAccess, предлагаю следующее услышанное мною где-то определение: VPN подключает пользователя к сети, а DirectAccess расширяет сеть так, что она включает в себя соответствующий компьютер и пользователя.
DirectAccess в среде Server 2012
Чтобы развернуть работоспособную систему DirectAccess в среде Server 2008 R2, вам несомненно понадобится шлюз удаленного доступа Forefront UAG. Он позволяет упростить процедуру настройки и обеспечивает взаимодействие с целевыми системами IPv4. Версия Server 2012 включает в себя все технологии продукта Forefront UAG, имеющие отношение к DirectAccess, такие, как DNS for IPv6 to IPv4 (DNS64) и Network Address Translation for IPv6 to IPv4 (NAT64). Таким образом, средства DirectAccess будут работать в сети Server 2012, причем для этого вам не придется устанавливать дополнительные продукты, такие, как Forefront UAG.
В системе Server 2012 впервые реализована новая обеспечивающая возможность сетевого соединения роль Remote Access. С помощью этой роли вы сможете управлять средствами DirectAccess и сетями VPN (в том числе сетями VPN «сайт — сайт») таким образом, как если бы они были объединены в одну службу.
Кроме того, в системе Server 2012 были реализованы средства поддержки нескольких узлов, а также средства учета пространственных отношений. Последнее означает, что вы можете разместить в различных географических пунктах несколько систем DirectAccess (это могут быть как отдельные серверы, так и массивы), и клиенты будут использовать сайт, расположенный от них на минимальном расстоянии (что определяется путем измерения времени отклика). Время отклика определяется путем зондирования с помощью HTTP, в ходе которого тестируются средства подключения ко всем устройствам DirectAccess, указанным в существующей политике. Если тот или иной сайт не проходит испытания, клиенты будут обращаться к другим сайтам DirectAccess. Средства отслеживания наличия нескольких сайтов представляют собой внутреннюю функцию Windows 8. Однако если у вас возникла необходимость оснащения этой функцией клиентов Windows 7, существует возможность в той или иной степени задействовать ее. Здесь имеются определенные ограничения.
Если все клиенты вашей сети функционируют под управлением системы Windows 8, для работы Server 2012 DirectAccess инфраструктура PKI не требуется. При использовании клиентов Windows 7 данная инфраструктура необходима для применения стандартов IPSec, но сегодня эти протоколы могут функционировать с помощью цифровых билетов Kerberos; предоставление последних возлагается на сервер-посредник Kerberos, устанавливаемый на контроллерах доменов (DC).
Одна из типичных проблем, возникающих при эксплуатации средств DirectAccess, — это проблема безопасности. Ведь при этом мы имеем дело с полностью автоматизированной технологией — компьютер в автоматическом режиме подключается к корпоративной распределенной сети через защищенный канал и всегда остается включенным. В целях проверки подлинности DirectAccess применяет следующие средства:
- сертификат компьютера и учетную запись компьютера (представленные в протоколе NTLM) для создания инфраструктурного туннеля;
- сертификат компьютера и учетную запись пользователя для создания внутрисетевого туннеля после регистрации пользователя средствами Kerberos.
Описанную процедуру можно определить как своего рода «полуторафакторную аутентификацию», поскольку сертификат привязан к системе и к пользовательскому паролю. Однако во многих организациях считается необходимым использовать двухфакторную аутентификацию, поэтому в сетях DirectAccess, где задействованы клиенты Windows 7, часто применяются смарт-карты. При работе с клиентами Windows 8 физические смарт-карты более не требуются (хотя их можно использовать, как и прежде), поскольку в распоряжении пользователя имеется новая функция Windows 8 «виртуальная смарт-карта», которая управляет реализованным в этой системе доверенным платформенным модулем (TPM). В результате процесс развертывания существенно упрощается, затраты снижаются, а уровень защиты данных повышается. Системы Server 2012 DirectAccess также позволяют применять одноразовые пароли.
Изменения со стороны DirectAccess
Разработчики Microsoft внесли в механизм функционирования DirectAccess в среде Server 2012 множество изменений, а потому во многом изменились и требования со стороны этого продукта. Ниже перечислены наиболее существенные изменения, касающиеся требований к IP-адресам, к службе Active Directory (AD), а также к серверам и клиентам.
Изменения требований к IP-адресам. В операционной среде Server 2008 R2 для функционирования службы DirectAccess требуется два смежных общедоступных адреса IPv4, поскольку определить тип NAT-устройства, за которым размещается клиент, сетевой протокол Teredo может лишь в том случае, если он располагает двумя IP-адресами. В системе Server 2012 сервер DirectAccess можно размещать за устройством NAT. Таким образом, если это NAT-устройство присутствует в демилитаризованной зоне (DMZ), соответствующий сервер DirectAccess можно развертывать с использованием частных IP-адресов. Это означает, что теперь мы можем при желании развертывать службу DirectAccess на домашних компьютерах.
Важно отметить, что хотя большинство систем DirectAccess размещаются за устройствами NAT, оптимальный вариант при работе в Интернете состоит в использовании протокола Teredo, который не поддерживает технологию NAT. Так что идеальное решение — задействовать два смежных общедоступных IP-адреса, но если это невозможно, вам придется воспользоваться IP-HTTPS. В большинстве случаев клиенты не имеют общедоступных IP-адресов, что исключает возможность применения переходного механизма 6to4. Но, как подсказывает мой опыт, даже когда такая возможность существует, скажем, в мобильных сетях, порой возникают проблемы.
Изменения требований к AD. В настоящее время один экземпляр службы DirectAccess может обслуживать сети, состоящие из нескольких лесов, — нужно только, чтобы между этими лесами существовали двусторонние отношения доверия. Хотя администратор должен по-прежнему готовить сценарии, предусматривающие обмен данными между лесами, все трудоемкие операции выполняются графическими средствами DirectAccess — при условии, что между лесом, где расположены серверы DirectAccess, и лесами, содержащими пользователей, поддерживаются двусторонние отношения доверия.
Изменения требований к серверам. Система Server 2012 полностью поддерживает вариант развертывания сервера Server Core для сервера DirectAccess. Любопытно, что сейчас Microsoft рекомендует размещать сервер DirectAccess в виртуальной машине (virtual machine, VM). Если этот сервер выполняется в виртуальной машине, по-прежнему существует возможность разгружать IPSec-трафик на сетевой адаптер (при условии, что последний позволяет осуществлять IPSec-разгрузку) и по-прежнему обеспечивается повышение производительности с помощью таких технологий, как масштабирование на стороне приема Receive Side Scaling.
Ранее специалисты Microsoft рекомендовали размещать DirectAccess на физических системах из-за высоких рабочих нагрузок, связанных с шифрованием. В среде Server 2008 R2 при использовании протокола HTTPS служба DirectAccess выполняет двойное шифрование, поскольку шифрованию подвергается сначала IPSec-трафик, а затем и HTTPS-трафик. В среде Server 2012 DirectAccess может вместо двойного шифрования выполнять шифрование IP-HTTPS NULL, тем самым снижая уровень непроизводительных затрат на стороне клиента и сервера DirectAccess. В конечном счете это означает сокращение объема потребляемых ресурсов и увеличение числа пользователей, обслуживаемых одним сервером, — как мне сказали, число пользователей возрастает до четырех раз. В среде Server 2012 протокол IP-HTTPS обеспечивает почти такую же производительность, как протокол Teredo.
Изменения требований к клиентам. При использовании клиентов Windows 7 для организации службы DirectAccess в средах Server 2012 и Server 2008 R2 не обойтись без установки отдельного помощника DirectAccess Connectivity Assistant (DCA), который представлен на системной панели задач значком, отображающим состояние подключения DirectAccess. Когда же для организации службы DirectAccess в среде Server 2012 используются клиенты Windows 8, необходимости в установке помощника DCA нет, поскольку средства взаимодействия с DirectAccess интегрированы с прочими сетевыми функциями Windows 8. Состояние подключения DirectAccess отображается наряду с иными соединениями (скажем, беспроводными) с помощью средств пользовательского интерфейса, отвечающего за управление сетью. Кроме того, данный интерфейс использует функции DirectAccess, которые обычно применяются для выяснения причин неполадок. Интерфейс DirectAccess позволяет экспортировать журналы DirectAccess в файл, который затем можно направить в службу поддержки. Кроме того, он дает пользователям возможность переопределять заранее заданный сайт DirectAccess и указывать сайт, к которому они хотели бы подключиться.
Подготовка вне сайта полезна в тех случаях, когда возникает необходимость устанавливать клиенты, не имеющие физического подключения к корпоративной сети. При использовании клиентов Windows 8 возможна полномасштабная подготовка вне сайта, включая установку на базе технологии Windows-To-Go. Такая установка невозможна, если в работе службы DirectAccess в среде Server 2012 задействованы клиенты Windows 7. Для загрузки установочного файла DirectAccess по-прежнему необходимо подключаться к корпоративному сетевому ресурсу, но это может оказаться так же просто, как подключиться к защищенному веб-узлу. Отметим, что настройка DirectAccess из-за пределов компании возможна в среде Server 2008 R2, но это решение сопряжено с большими затратами времени на «обходной маневр», в частности, на создание временного соединения VPN.
Настройка и управление DirectAccess в среде Server 2012
Не будет преувеличением сказать, что развертывание сервера DirectAccess в среде Server 2012 выполняется легко и быстро. Ниже я привожу полное описание развертывания односерверной системы DirectAccess для организации небольшого или среднего масштаба. Операция строится в предположении, что существует некоторое внешнее имя DNS и что это имя указывает на корректный IP-адрес. Процедура развертывания состоит из следующих этапов.
1. Установите роль Remote Access с применяемыми по умолчанию параметрами, для чего нужно выполнить команду:
Install-WindowsFeature RemoteAccess -IncludeManagementTools
2. Откройте консоль Remote Access Management.
3. Щелкните на пункте Getting Started Wizard. В результате будет запущен мастер экспресс-установки. Имеется также вариант запуска мастера для установки в режиме эксперта.
4. На странице Configure Remote Access выберите пункт Deploy DirectAccess.
5. На странице Remote Access Server Setup вы увидите предлагаемые варианты топологии, которые строятся на возможностях имеющегося в вашем распоряжении сервера DirectAccess. Скажем, если сервер оснащен всего лишь одним сетевым адаптером, к нему можно применить только один вариант топологии. К возможным типам топологии относятся Edge (где используются два сетевых адаптера — один для Интернета, второй для частной сети), Back (где сервер DirectAccess располагается за устройством NAT, с подключением к DMZ и к частной сети) и Single (где используется один сетевой адаптер с одним сетевым подключением). После того как вы подберете соответствующий тип топологии, нужно будет указать общедоступный IP-адрес или разрешимое извне имя DNS, которое будет использоваться клиентами для подключения к серверу DirectAccess.
6. Когда на дисплее появится изображение страницы с перечислением настроек, нажмите кнопку ОК. Служба DirectAccess настроена и готова к работе.
Наряду с настройкой сервера DirectAccess вам необходимо настроить клиенты. В процессе развертывания сервера DirectAccess программа автоматически создает объект групповой политики (GPO) DirectAccess Client Settings, содержащий настройки клиентов DirectAccess. Если вы хотите, чтобы клиент использовал службу DirectAccess, нужно присоединить его к соответствующему домену и применить упомянутый объект GPO. Задача может оказаться сложной, если клиент не подключен к корпоративной сети; в этом случае вам придется подключиться к домену в автономном режиме и применить соответствующую политику. При использовании клиента Windows 8 это можно сделать с помощью утилиты командной строки Djoin.exe.
Перед запуском данной утилиты нужно подготовить учетную запись соответствующего компьютера в AD и сохранить подготовленные данные в файле. Публикуемая ниже команда осуществляет подготовку учетной записи компьютера DAclientExample в домене savilltech.net, указывает, что необходимо применить объект групповой политики DirectAccess Client Settings, и сохраняет подготовленные сведения в файле clientda.txt:
Djoin.exe /provision
/domain savilltech.net
/machine DAclientExample
/policynames «DirectAccess Client Settings»
/savefile clientda.txt
На странице журнала приведенная выше команда разбита на несколько строк, однако в окне Cmd.exe следует вводить ее одной строкой. Сказанное относится и к следующей команде. После создания клиентом файла clientda.txt вы можете запустить публикуемую ниже команду с тем, чтобы запросить присоединение к домену в автономном режиме в следующий раз, когда будет запущен клиент:
djoin.exe /requestodj /loadfile clientda.txt
/windowspath %windir% /localos
Таким образом, при следующем запуске клиента он будет присоединен к домену savilltech.net, и к нему будет применен объект групповой политики DirectAccess Client Settings.
Надо сказать, что тем, кто использует компьютеры с Windows 7, придется совершить ряд дополнительных шагов. Однако я не стану описывать их здесь, ибо моя цель состоит в том, чтобы показать вам, насколько просто применить средства Server 2012 DirectAccess, когда вы работаете с Windows 8.
Процедуры установки серверов и клиентов DirectAccess, описанные в настоящей статье, применимы для несложных ситуаций. Вполне вероятно, что вы захотите внести в них некоторые изменения.
Так, возможно, вы захотите создать отдельную группу, содержащую учетные записи компьютеров, которые по вашему замыслу смогут взаимодействовать с DirectAccess (скажем, группу с именем DA_Clients). По умолчанию в этой роли выступает входящая в соответствующий домен группа Domain Computers; именно из этой группы средства DirectAccess будут развертываться на всех системах вашего домена.
Возможно, вы предпочтете вариант, предусматривающий применение объекта групповой политики DirectAccess Client Settings к некоторым заданным группам, а не к корню домена (последний вариант применяется по умолчанию, если перед запуском команд для установки службы DirectAccess вы зарегистрировались в качестве администратора домена). К счастью, по замыслу разработчиков объект групповой политики будет применяться к группе компьютеров, указанных в консоли Remote Access Management. Это означает, что DirectAccess будет контролироваться, если вместо группы Domain Computers вы укажете альтернативную группу компьютеров — даже если объект групповой политики «привязан» к корневому домену.
Такая индивидуализация возможна и желательна в большинстве случаев. Вы сможете с легкостью выполнить ее (а также изменить многие другие настройки) по завершении развертывания DirectAccess с помощью страницы Remote Access Setup, показанной на рисунке 1; эта страница является стартовой при настройке DirectAccess.

|
| Рисунок. Страница Remote Access Setup |
Страница Remote Access Setup поможет вам выполнить подстройку параметров, установленных в ходе первоначального развертывания, но кроме того, вы можете использовать эту страницу на протяжении всего жизненного цикла DirectAccess по мере изменения потребностей вашей компании. К примеру, с ее помощью вы можете добавлять серверы, изменять общедоступные имена, а также топологию. Кроме того, в вашем распоряжении имеется полный набор средств обеспечения выполнения автоматических заданий, таких, как применение объектов групповых политик и изменений настройки. Если бы вы работали с системой Server 2008 R2, вам пришлось бы встать в 2 часа ночи, чтобы успеть вручную применить GPO и изменения в настройке с помощью графического интерфейса пользователя.
Огромный шаг вперед
Как видите, в версии Server 2012 установку DirectAccess осуществить намного проще, чем в Server 2008 R2. Кроме того, заметно облегчается работа конечных пользователей, а также специалистов ИТ-подразделения, занимающихся управлением средствами DirectAccess; эти возможности намного превосходят то, чего вы могли бы добиться с помощью инициируемого вручную соединения с сетями VPN. Но помните: VPN еще понадобятся вам для управления системами, не оснащенными средствами для работы с DirectAccess. К счастью, среда Server 2012 оснащена замечательными средствами для взаимодействия с VPN.