
Распределенная файловая система DFS ( Distributed File System) – это технология, обеспечивающая возможности упрощения доступа к общим файловым ресурсам и глобальной репликации данных. Благодаря DFS распределённые по различным серверам общие ресурсы (каталоги и файлы) можно объединить в единую логическую UNC структуру, которая для пользователя выглядит, как единый сетевой ресурс. Даже при изменении физического местоположения целевой папки, это не влияет на доступ пользователя к ней.
Реализация служб DFS в Windows Server 2012 отличается от предыдущих версиях Windows. В первую очередь отметим, что технологии DFS в Windows Server 2012 реализованы в виде двух отдельных, независимых друг от друга служб — DFS Namespaces и DFS Replication , включенных в роль файлового сервера (File and Storage Services).
- DFS Namespaces (DFSN или DFS-N) – пространство имен DFS. Позволяет объединять в единую логическую структуру общие папки, расположенные на различных серверах организации. Каждое пространство имен для пользователя выглядит как единая сетевая папка с подкаталогами. Реальная структура данного пространства имен DFS является скрытой от пользователя, и может включать в себя различные сетевые папки, расположенные на различных серверах и сайтах.
- DFS Replication (DFSR или DFS-R) — служба DFS репликации. Позволяет организовать эффективную службу репликации каталогов (в том числе включенных в пространство имен DFS) между различными серверами и сайтами AD. Данная служба для репликации использует специальный алгоритм удаленного разностного сжатия – RDC- remote differential compression. Благодаря RDC, которая отслеживает изменения в файлах, при репликации копируются не файлы целиком (как в случае с FRS репликацией), а только их блочные изменения.
Установка служб DFS в Windows Server 2012
Установить службы DFS можно с помощью консоли Server Manager или же при помощи Windows PowerShell.
Как мы уже говорили, службы DFS являются элементами роли Files and Storage Services:

Но проще и быстрее установить все DFS службы и консоль управления DFS с помощью PowerShell:
Install-WindowsFeature FS-DFS-Namespace, FS-DFS-Replication, RSAT-DFS-Mgmt-Con

Совет. Естественно, службы и консоль управления DFS можно установить и по отдельности.
, где FS-DFS-Namespace – служба DFS Namespaces
FS-DFS-Replication – служба репликации DFS Replication
RSAT-DFS-Mgmt-Con– mmc консоль управления службами DFS — DFS Management Tools (также входит в состав Remote Server Administration Tools для Windows 10)
Настройка пространства имен DFS в Windows Server 2012
Перейдем к описанию процедуры настройки пространство имен DFS, для чего необходимо открыть панель управления DFS Management tool.
Создадим новое пространство имен (New Namespace).

Необходимо указать имя сервера, который будет содержать пространство имен (это может быть как контроллер домена, так и рядовой сервер).

Затем следует указать имя создаваемого пространства имен DFS и перейти в расширенные настройки (Edit Settings).

Здесь следует указать имя пространства имен DFS и права доступа к данному каталогу. Обычно рекомендуется указать, что доступ к сетевой папке разрешен Всем (Everyone), в этом случае права доступа проверяются на уровне файловой системы NTFS.

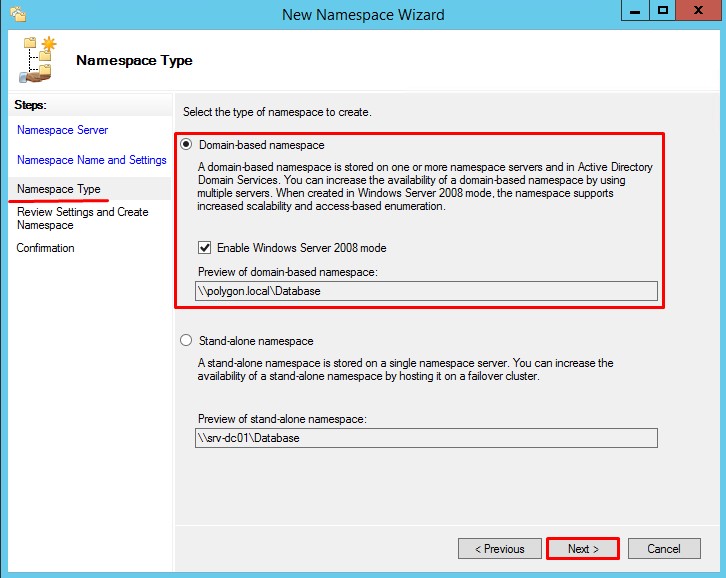
Далее мастер предложит указать тип создаваемого пространства имен. Это может быть Domain-based namespace (доменное пространство имен) или Stand-alone namespace (отдельное пространство имен). Domain-based namespace обладает ряд преимуществ, но для его работы нужен, собственно домен Active Directory и права администратора домена (либо наличие делегированных прав на создание доменных пространств имен DFS).

После окончания работы мастера в ветке Namespaces консоли управления DFS появится созданное нами новое пространство имен DFS. Чтобы пользователи при доступе к DFS каталогам видели только те каталоги, к которым у них имеется доступ, включим для данного пространства DFS Access-Based Enumeration (подробнее о данной технологии в статье Access-Based Enumeration в Windows). Для этого откройте окно свойств созданного пространства имен.

И на вкладке Advanced включите опцию Enable access-based enumeration for this namespace.

Чтобы посмотреть содержимое нового пространства DFS, просто наберите в окне проводника UNC путь: \\имя_домена_или_сервера\DFS
Добавление дополнительного DFS сервера
В доменное пространство имен DFS можно добавить дополнительный сервер (пункт меню Add Namespace Server), который его будет поддерживать. Делается это для увеличения доступности пространства имен DFS и позволяет разместить сервер пространства имен в том же сайте, в котором находится пользователи.
Примечание. Отдельно стоящие пространства имен DFS поддерживают только один сервер.
Добавление нового каталога в существующее пространство имен DFS
Теперь нужно добавить новый сетевой каталог в иерархию созданного нами пространства имен DFS. Нажмите кнопку Add Folder Target.

Укажите наименование каталога в DFS пространстве и его реальное местоположение на существующем файловом сервере (Folder targets).

Настройка DFS-репликации на Windows Server 2012
Технология репликации DFS-R предназначена для организации отказоустойчивости пространства имен DFS и балансировки нагрузки между серверами. DFS-R автоматически балансирует трафик между репликами в зависимости от их загрузки и в случае недоступности одного из серверов перенаправляет клиентов на другой сервер-реплику. Но прежде, чем говорить о DFS репликации и ее настройке в Windows Server 2012перечислим основные системные требования и ограничения:
- Служба DFS Replication должна быть установлена на всех серверах, которые планируется включить в группу репликации
- Все сервера в группе репликации должны находиться в одном лесу AD
- Уровень леса Active Directory должен быть как минимум Windows Server 2003 R2 (при установке первого домена контроллера на Windows Server 2012 схема обновляется автоматически).
- Функциональный уровень домена — как минимум Windows Server 2008
- Необходимо убедиться, что антивирусное обеспечение на файловых серверах совместимо с технологией репликации DFS
- Реплицируемые каталоги должны располагаться на томах с файловой системой NTFS (файловые системы ReFS и FAT не поддерживаются). Также не поддерживается репликация данных, хранящихся на on Cluster Shared Volumes
В консоли DFS Managment выберите нужный вам DFS Namespace и щелкните ПКМ по каталогу, для которого необходимо создать реплику и выберите пункт Add Folder Target.
И укажите полный (UNC) путь к сетевому каталогу другого сервера, в котором и будет храниться реплика.
На вопрос хотите ли вы создать группу репликации отвечаем Yes.

Запускается мастер настройки репликации. Проверяем имя группы репликации и каталог.


Указываем первичный (Primary) сервер. Именно этот сервер будет источником данных при инициальной (первичной) репликации.
 dfs сервер")
Затем выбираем тип топологии (соединения) между членами группы репликации. В нашем примере выбираем Full Mesh (все со всеми).

И, наконец, указываем расписание репликации и параметры bandwidth throttling – ограничение доступной для репликации полосы пропускания.

После окончания работы мастера, запуститься первоначальная синхронизация.
В случае необходимости, настройки расширенных параметры расписания репликации и максимальную полосу пропускания под данный трафик, можно задать в ветке Replication.

Опубликовано:
Что такое пространство DFS простыми словами и зачем оно нужно.
Инструкция написана на примере Windows Server 2012 R2 Full. Если используется версия Core, то читайте инструкцию Установка и настройка DFS с помощью Powershell.
Установка DFS
Открываем Диспетчер серверов. Он может быть запущен из панели быстрого запуска.
Нажимаем Управление — Добавить роли и компоненты.
В открывшемся окне оставляем Установка ролей и компонентов и нажимаем Далее.
В следующем окне выбираем нужный сервер (выбран по умолчанию, если работаем на сервере, а не через удаленную консоль) и нажимаем Далее.
Среди ролей находим Файловые службы и службы хранилища, раскрываем их и ставим галочки напротив следующих компонентов:
- Службы хранения;
- Файловый сервер;
- Пространство имен DFS.
* некоторые из служб уже могут быть установлены. В таком случае ставим галочки только напротив тех, которых не хватает.
** мастер может выдать предупреждение, что для установки службы потребуется установка дополнительных компонентов — соглашаемся.
Нажимаем Далее.
В следующем окне Выбор компонентов просто нажимаем Далее.
Откроется окно Подтверждение установки компонентов. Нажимаем Установить и после окончания процесса перезагружаем сервер.
Создание пространства имен
Открываем Диспетчер серверов. Выбираем Средства

И Управление DFS.
В открывшемся окне кликаем правой кнопкой по корневому разделу Управление DFS и выбираем Создать пространство имен:

В появившемся окне вводим или выбираем сервер пространства имен — это может быть сам файловый сервер.

Нажимаем Далее. Теперь вводим имя пространства, по которому пользователи будут к нему обращаться, например dfs:
Нажимаем Далее.
Теперь выбираем тип пространства. В доменной среде лучше оставить Доменное пространство имен:
В противном случае, ставим Изолированное пространство имен и нажимаем Далее.
На следующем шаге проверяем данные и нажимаем Создать.
Создание общей папки в пространстве DFS
Прежде чем настраивать DFS, создаем общую папку на самом файловом сервере.
Теперь в уже открытом инструменте Управление DFS раскрываем Пространства имен, кликаем правой кнопкой мыши по созданному пространству и выбираем Создать папку:
В открывшемся окне задаем имя общей папки DFS и нажмите кнопку Добавить:
Теперь выбираем среди общих папок на сервере нужную и нажимаем OK — еще раз OK — и еще раз OK. Среди списка папок в пространстве DFS появится наша новая папка.
Она будет доступна по пути \\путь к пространству DFS\имя шары или как в нашем примере \\fs1\share
Задача: Хочу разобрать и оформить как пошаговая заметка для себя, как разворачивается сервис DFS в Windows Server 2012 R2 Std
Сервис DFS (Distributed File System) — это роль в Windows Server (может быть развернута, как на рядовом контроллер домена, так и на отдельном сервере), которая предоставляет возможность объединения общих папок, находящихся на разных серверах, в одно или несколько логически структурированных пространств имен. Это делает возможным предоставлять пользователям виртуальное представление общих папок, где один путь ведет к файлам, расположенным на нескольких серверах, как показано на моем скриншоте ниже.
Пользователям не требуется подключать несколько дисков для доступа к своим файлам. Кроме того, задачи по обслуживанию сервера, обновлению программ и другие, которые обычно требуют отключения сервера, могут выполняться без отключения пользователей от ресурсов.
Цель: собственноручно сделать, как сделано на работе предыдущим системным администратором во всех нюансах и что можно сделать по правильному, а не лишь бы как, как и все что здесь сделано.
Тестовая лаборатория у меня на базе Debian 10 + Proxmox 6.4-13
- Hostname: srv-dc01.polygon.local
- OS: Windows Server 2012 R2 Std
- Roles: AD,DNS,DHCP
- Hostname: srv-gw.polygon.local
- OS: Windows Server 2008 R2 Ent
- Roles: gateway on
TMG
Шаг №1: Разворачиваю на домен контроллере srv-dc01 роль DFS:
Logon Domain Admins in srv-dc01
Win + X – Control Panel – View by: Small icons – Administrative Tools – Server Manager – (Dashboard) Add roles and features и следую за мастером
(Before You Begin) Нажимаю Next
(Installation Type) выбираю Role-based or feature-based installation и нажимаю Next
(Server Selection) выбираю Select a server from the server pool, т.е. текущую систему srv-dc01.polygon.local и нажимаю Next
(Server Roles) разворачиваю File and Storage Services – File and iSCSI Services – и отмечаю к установки роли:
DFS NamespacesDFS Replication
И нажимаю Next
(Features) все по умолчанию и нажимаю Next
(Confirmation) и нажимаю Install, а после Close
На заметку: Вообще можно не заморачиваться с установкой через GUI, а просто сделать все выше одной строкой через Powershell
Win + X – Command Prompt (Admin)
C:\Windows\system32>powershell
Windows PowerShell
Copyright (C) 2014 Microsoft Corporation. All rights reserved.
PS C:\Windows\system32> Install-WindowsFeature FS-DFS-Namespace, FS-DFS-Replication, RSAT-DFS-Mgmt-Con
Success Restart Needed Exit Code      Feature Result
------- -------------- ---------      --------------
True    No             NoChangeNeeded {}
FS-DFS-Namespace – служба DFS Namespaces
FS-DFS-Replication – служба репликации DFS Replication
RSAT-DFS-Mgmt-Con– mmc консоль управления службами DFS — DFS Management Tools (также входит в состав Remote Server Administration Tools для Windows 10)
Шаг №2: Произведем настройки пространства имен DFS:
Logon Domain Admins in srv-dc01
Win + X – Control Panel – View by: Small icons – Administrative Tools – DFS Management – и создаем новое пространство имен путем нажатия/вызова меню New Namespace
(Namespace Server) Server: Browse — Необходимо указать имя сервера, который будет содержать пространство имен (это может быть, как контроллер домена, так и рядовой сервер), указываю srv-dc01, OK, и нажимаю Next
(Namespace Name and Settings) Name: именую как Database, перехожу в Edit Settings (следует указать имя пространства имен DFS и права доступа к данному каталогу) выбираю Use Custom permissions: Customize и оставляю Authenticated users (Everyone удаляю) права Read, Change
Получается вот так:
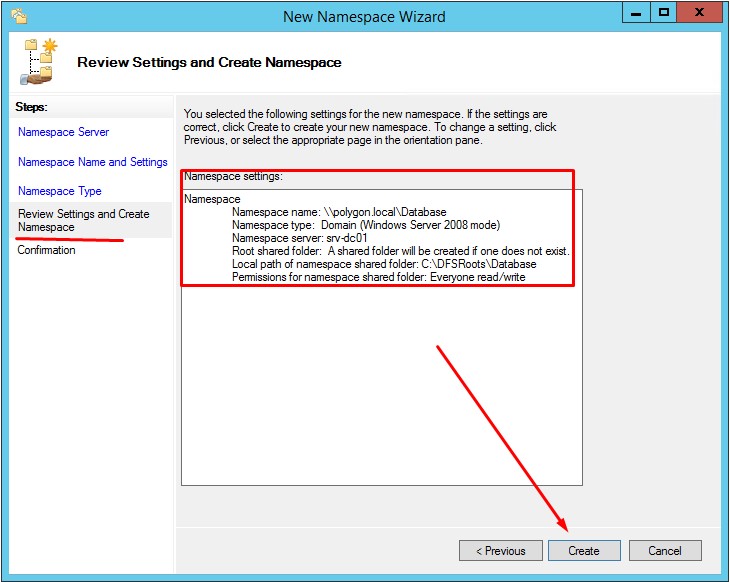
Namespace server: srv-dc01Shared folder: DatabaseLocal path of shared folder: C:\DFSRoots\DatabaseShared folder permissions: All users have read and write permissions
И нажимаю Next
(Namespace Type) выбираю Domain-based namespace
(Review Settings and Create Namespace) наблюдаю за результирующей и если все устраивает, то нажимаю Create
(Confirmation) главное в конце получать сообщение You have successfully completed the Namespace Wizard.
Шаг №3: Чтобы пользователи при доступе к DFS каталогам видели только те каталоги, к которым у них имеется доступ, включим для данного пространства DFS Access-Based Enumeration (подробнее о данной технологии в статье "Пошаговое руководство по использованию ABE на файловом сервере.").
Через правый клик на \\polygon.local\Database открываем Properties (Свойства), затем вкладка Advanced и отмечаем галочкой Enable access-based enumeration for this namespace

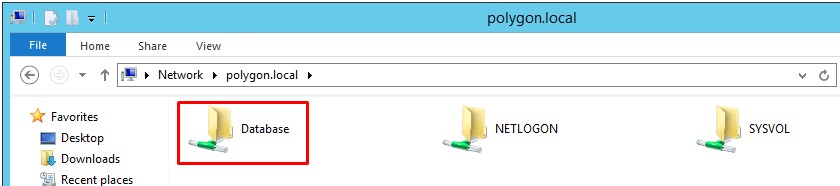
Шаг №4: Чтобы посмотреть содержимое нового пространства Database, просто наберите в окне проводника UNC путь: \\имя_домена_или_сервера\Database
Шаг №5: Создаю на сервере (расшаренный каталог), к примеру, srv-dc01 на логическом диск C: каталог db и через правый клик на нем открываю Properties (Свойства), на вкладке Sharing - Advanced Sharing…
Share this folder: отмечаю галочкойShare name: именую как db$ (символ доллара скроет расшаренный каталог)
нажимаю на Permissions и удаляю группу Everyone, а добавляю группу Authenticated Users с правами на чтение и запись.
после нажимаю Apply - OK

затем перехожу ко вкладке Security и добавляю учетные записи кому в этот каталог будет доступ, к примеру учетной записи, ekzorchik полный доступ, а для всех остальных нет, т.к. отключаем наследование.
Итого права доступа:

тем самым если в проводнике обратиться, как \\srv-dc01 расшаренного каталога db не появится, т.к. нужно явно указать \\srv-dc01\db$
Шаг №6: Добавляем в пространство имен Database расшаренный каталог из предыдущего шага (Шаг №5):
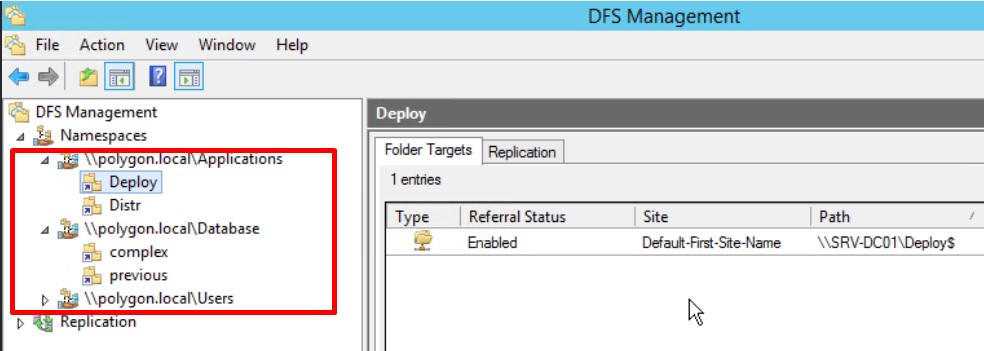
В оснастке DFS Management через правый клик мышью внутри созданного пространства имен Database через правый клик выбираю New Folder
Name: complexPreview of namespace: \\polygon.local\Database\complexFolder targets: Add - Browseи выбираюdb$, а после нажимаюOK, OK, OK
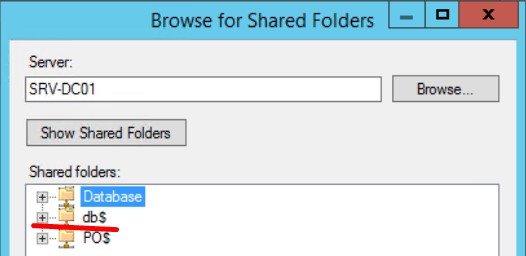
По итогу получаю в пространстве имен Database (\\polygon.local\Database) есть опубликованный каталог complex (\\polygon.local\Database\complex) который ссылается на \\srv-dc01\db$

Теперь при обращении по адресу в домене \\polygon.local\Database\complex я попадаю на \\srv-dc01\db$ где у меня располагается файловая база 1С 7.7. Т.е. имея общую ссылку ее можно через GPO назначить, а уже саму конечную часть изменять если нужно. К примеру, у меня перемещаемые профили через GPO подключены, общий диск компании.
\\polygon.local\users\Forwarded folder 2\%username%\Application Data\\polygon.local\users\Forwarded folder 2\%username%\Desktop\\polygon.local\users\Forwarded folder 2\%username%\My Documents\\polygon.local\users\Documents -> \\srv-shares04.polygon.local\Documents
На заметку: Советую на домен контроллере ни в коем случае не создавать и не расшаривать каталоги, лучше подключить LUN и на нем это делать.
На заметку: Если приходит допустим проверка, Вы как системный администратор просто выключаете ссылку на сервер в оснастке DFS Manager и у пользователя тут же пропадает/скрывается доступ к ресурсу.
По итогу очень практичная роль которую стоит использовать в рамках создания централизованных настроек предоставления доступа к ресурсам через GPO.
Пока на этом у меня все, будут нюансы будут и дополнения в виде пошаговых заметок, с уважением автор блога Олло Александр aka ekzorchik.
What is DFS?
To access a file share, clients use Universal Naming Convention (UNC) name to access the shared folder content as large companies have 100’s of file servers dispersed geographically across many branches/sites
So by using a namespace, DFS can simplify the UNC folder structure. In addition, DFS can replicate the virtual namespace and the shared folders to multiple servers within the organization. This also provides an additional benefit of fault tolerance for the network shares.
Role Service Description
DFS Namespaces Enables you to group shared folders that are located on different servers into one or more logically structured namespaces. Each namespace appears to users as a single shared folder with a series of subfolders. However, the underlying structure of the namespace can consist of numerous file shares that are located on different servers and in multiple sites.
DFS Replication Enables you to efficiently replicate folders (including those referred to by a DFS namespace path) across multiple servers and sites. DFS Replication uses a compression algorithm known as remote differential compression (RDC). RDC detects changes to the data in a file, and it enables DFS Replication to replicate only the changed file blocks instead of the entire file.
Practical Applications
DFS Namespaces Provide users with a centralized folder namespace through which to access and store files. You can host the underlying file shares on different servers and in different sites to improve availability and performance.
DFS Replication Synchronize folder contents efficiently between servers, across LAN or WAN network connections.
Open Server Manager and Add roles and features

Select Role Based or feature based installation

Select the server to install role/feature

Select the roles DFS Namespace and DFS Replication.

Also I am selecting File Server Resource Manager for my next article.
Click Next -> Select Install

Ref: How to configure File Server/Shares in Windows 2012 R2 Step by Step
Now open the Tools in Server Manager and select DFS Management.

Next, on the DFS console, right-click Namespaces, and then click New Namespace (A namespace is a virtual view of shared folders in your server)

In the New Namespace Wizard, on the Namespace Server page, under Server, type server name and then click Next.

In the Edit Settings box, under Local Path of shared folder: type C:\DFSRoots\techiemaster and select custom permission and add the user or security group, then click Ok.

Next, on the Namespace Type box, verify that Domain-based namespace is selected. Take note that the namespace will be accessed by \\techiemaster.local\fileserver, ensure also that the Enable Windows Server 2008 mode check box is selected, and then click next.

Note: Also Standalone namespace is available and it is Stored on a single namespace server. You can increase the availability of the standalone namespace by hosting it on a failover cluster.
Finally, Review and Click Create.

Namespace created Successfully.

Now, you need to enable access-based enumeration for the fileserver namespace.
So under Namespaces, right-click \\techiemaster.local\fileserver, and then click Properties

Note: Access-based enumeration hides folders in the namespace that users do not have permission to view.
In properties, navigate to Advanced and check Enable Access based enumeration for this namespace, then Click Apply.

Next Right click on \\techiemaster.local\fileserver and create New folder.

Enter the folder name and click Add to create a path of folder targets.

Click on New Shared Folder.

In the Create Share box, in the Local path of shared folder box, type C:\shares\technical, and select Administrator have full access; other users have read only permissions, then click OK.

With the same procedures I created one more folder named Sales which is stored on different server.

Now to verify, Start -> Run -> enter the UNC path
Eg. \\techiemaster.local\fileserver


Configuring DFS Replication
Click on the folder to replicate, then navigate to the tab Replication, then click Replicate Folder Wizard.

It will ask you to add another folder target to configure replication.

Click Yes and create a new shared folder which is same as previous New folder creation.
Then it shows popup saying a replication group can be used to keep these folder targets synchronized.
Click Yes and proceed.
Next, in the Replicate Folder Wizard, on both the Replication Group and Replicated Folder Name page, accept the default settings, and then click Next.


Then, select the primary member of this replication group.

Note: If the folders to be replicated already exists on multiple servers, the folders and files on the primary member will be authoritative during initial replication
Next, On the Topology Selection box, select Full Mesh, and then click Next.

Below are topologies available,
Hub & spoke – This topology requires three or more members in the replication group. In this topology spoke members are connected to one or two hub members. This topology works well in publication scenarios where data originates from the hub member and replicates out of the spoke members.
Full mesh – In this topology each member replicates with all other members of the replication group. This topology works well when there are ten or few members in the replication group.
No topology – Select this option if you want to create a custom topology after you finish this wizard. No replication will take place until you create the custom topology.
On the Replication Group Schedule and Bandwidth, I choose Full and then click next.
If you have plans to replicate only during weekends of particular days then you can select the option Replicate during the specified days and times.

Finally Review the settings and click create.

Now Click Close.

In the Replication Delay box click Ok.

Next, expand Replication and then click techiemaster.local\fileserver, on the right pane, under Memberships tab, verify that both the servers are listed

To make sure all replication process is running without any issue and also to verify that our second server is having same function on DFS, log on into the server, open DFS and right click namespace and click Add Namespace to Display.
In the Add Namespace to Display box, verify that domain is techciemaster.local and under Namespace: \\techiemaster.local\fileserver is listed and then click OK


Next, in the DFS console on the second server, you should see that both folders are listed.

Finally verify the share from through UNC path from any machines.

How to configure File Server/Shares in Windows 2012 R2 Step by Step
How to Configure File Server Resource Manager in Server 2012 R2 Step by Step
The Distributed File System (DFS) provides a simplified view of file resources in Windows Server across multiple servers and sites while enabling efficient replication of folder contents between servers. In this article, we are going to show you the installation and configuration of distributed files system (DFS) in Windows Server 2012 R2.
Install and Configure Distributed File System (DFS)
For the testing purpose of DFS configuration, at least you must have two Windows Serve 2012 R2 installed in your lab. Here I have installed both of them in Hyper-V. If you didn’t, just read Install Windows Server 2012 R2 post. The first Server is the domain controller (DC). It has installed Active Directory, DNS Server, DHCP Server and will install file server with DFS-N and DFS-R. The second server will be a member of the DFS Server.
Installing and configuring DFS-N
So let’s install the installing and configuring DFS Namespaces and replication roles in firs Server (DC). In the real world, don’t install too many roles in one server. So we are in the testing Lab.
1. Log in to DC Server as domain admin and go to server manager dashboard. I assume that you already can install Server roles and features.
2. Click Manage then click Add Roles and Features. On the add roles and features page, select Rule-based or feature-based installation and click Next.
3. On the Server Selection page do noting, just click Next.
4. On the Server Roles page expand the Files and Storage Services then expand File and iSCSI Services. Now select DFS Namespace, DFS Replication and File Server Resources Manager. Accept the default features as well then click Next.
5. On the Features, page leaves the default settings and click Next.
6. Click Install on the Confirmation page in order to install DFS. It will take a minute to complete the installation task.
7. When the installation process has finished, click Close and go for configuration.
OK, the Distributed File System installation has finished successfully.
Install Distributed File System (DFS) with PowerShell
Try to install the File Server, DFS-N and DFS-R on the member server. It is better to do it with the PowerShell command line. It will help you to understand the process of installing DFS with PowerShell.
The second server must be joined to a domain, change the default name and set static IP address.
1. Log in to a second server (FS2) as domain admin and open Windows PowerShell.
2. Type “get-windowsfeatures -name fs*” and hit enter to show the File Server and DFS components.
The result shows that no roles are installed yet.
3. So try to install with the following Install-WindowsFeature command.
Install-WindowsFeature -Name FS-DFS-Namespace,FS-DFS-Replication -IncludeManagementTools
When the installation finished successfully, execute the Get-WindowsFeature -Name fs* again to the changes result.
OK, the File Server and Distributed File System are installed on both servers. Now it’s time to create a namespace for servers.
Create a DFS NameSpace
1. On the DC Server open the DFS Management from Server Manager Dashboard and Tools menu.
2. On the DFS Management console click New Namespace on the Actions menu to open the New Namespace Wizard.
3. Type the server name you want to use it as namespace host and click Next. I set on dc1 server.
4. On the namespace setting page, type a name (public) then click Edit Settings.
5. Select Administrators have full access: other users have read and write permission on the Edit namespaces Settings page then click OK to apply changes.
On the Namespace setting page click Next.
6. Select the Domain-based namespace on the Namespace Type page then click Next.
7. Once review the information and click Create to create the namespace on Review Settings and Create namespace page.
8. Finally, click Close to close the namespace processing wizard page.
Remember, namespace creating should be done without errors.
The namespace created successfully. Now try to add another namespace server to replicate with each other.
Add a Namespace Server
Let’s add the second server (FS2) as the second file server in order to replicate the shared resources between file servers.
1. Go to DFS Management page, expand Namespaces then select the created namespace and Namespace Servers tab.
2. Click add a namespace server form action menu. Type the name of second files server and click Edit Settings.
3. Select the Administration have full access: other users have read and write permission on the edit permission settings page and click OK twice to add the namespace server without any errors.
The result should be like a screenshot.
Add Shared Folders to Root Namespace
We need a shared folder within our both file servers. This shared folder keeps shared files and resources. So let’s create the folders and share them.
1. From File and Storage Services on the Server Manager dashboard, right-click on the main page and click New Share to create a shared folder.
2. Select the Type a custom path on the Share Location page and type the location of the folder in which you want to share it then hit Next.
3. Specify the share name and description then click Next. I ask you the path does not exist, just click OK to create the folder.
4. Select Enable access-based enumeration option and click Next.
5. On the Permission page click Next. If you want to set permission to a domain user, click customize permissions and set permission for domain users group and domain admins group.
6. Click Next on Management Properties page. On the Quota page set a quota for the path if you want then click Next. On the Confirmation page click Create then click Close to complete the task.
Now you have successfully created a shared folder for DC server, but need to create the same folder for the second server (FS2) as well. Try to create a folder and simply share it like simple file sharing then set modify permission to domain admins group and domain users group.
Add Folder to DFS-N and Configure Replication
Try to add the two shared folders to the DFS namespace server. These tow folder will keep the shared resources and replicate.
1. From the DFS Management console, click New Folder from the action menu and add the shared folders of both file servers like the screenshot.
When done, just click OK and replication configuration will start.
2. For configuring replication between tow file servers click Yes on the Replication page.
3. Simply click Next on the Replication Group and Replication Folder Name page.
4. On Replication Eligibility page click Next.
5. Select the first server (DC1) as a primary member server and click Next.
6. Select the Full Mesh topology on the Topology Selection page and hit Next.
7. Leave the default setting on the Replication Group Schedule and Bandwidth then click Next.
8. Do note on the Review Settings and Create Replication Group only click Next to go to the next page.
9. On the Confirmation page. Click Close and close the page.
Finally, the configuration should finish successfully. Expand namespace to Files and see the result.
To test the replication between the first file server and second file server, just copy a file to a shared folder (Files) from the first server and see the file should be on the second server as well.
Install and Configure DFS on Windows Server 2016 – Video Tutorials
That is it a simple practice to install and configure Distributed File System on Windows Server 2012 R2. Hope you get something from distributed file system article and ask your related questions to the distributed file system through comment are.