
Windows Server 2019 contains a firewall program called Windows Defender Firewall with Advanced Security. The firewall filters incoming and outgoing traffic on your Windows Server 2019 instance to safeguard it from common network attacks. By default, the firewall is configured to allow access to all pre-installed system programs.
However, several programs may use multiple different ports for operation, and these will be automatically blocked because they don’t match with the rules in your firewall configuration. In this case, you need to open the specific port on Windows Server.
Prerequisites
- Deploy a Windows Server 2019 Instance on Vultr
- A Remote Desktop Connection App
Establish a connection to your server by logging in through any remote desktop app or click the console on your Vultr dashboard to access your server. After you connect you can start configuring your Windows server 2019 firewall rules.
Turn Windows Firewall ON
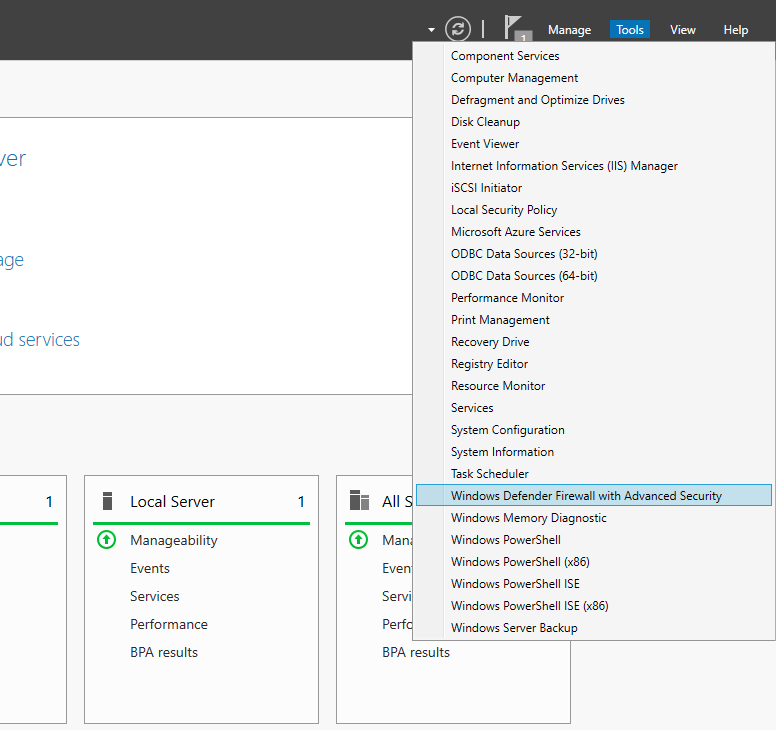
By default, Windows Defender Firewall is turned on, but in any case, you should confirm the current status and turn on firewall. To do this, click the tools node under server manager and select Windows Defender Firewall with Advanced Security from the drop down list.
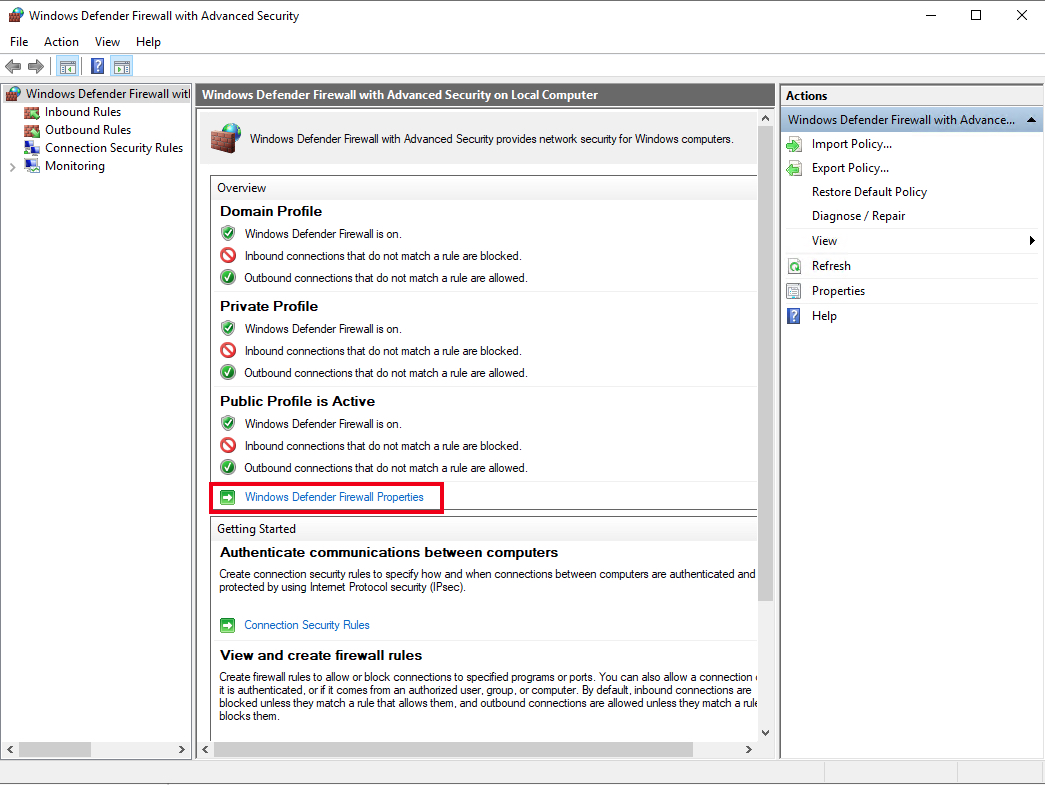
From the open group policy management window, check the current status of Windows Firewall profiles if it is set to ON; otherwise, click the Windows Defender Firewall properties option and turn the service on per profile.
Firewall Rules
Windows Firewall rules allow you to either permit or block specific incoming and outgoing network packets on your server. You can choose multiple parameters for each inbound or outbound rule. A rule can consist of a TCP or UDP port, program name, service, or a protocol to filter for every server profile.
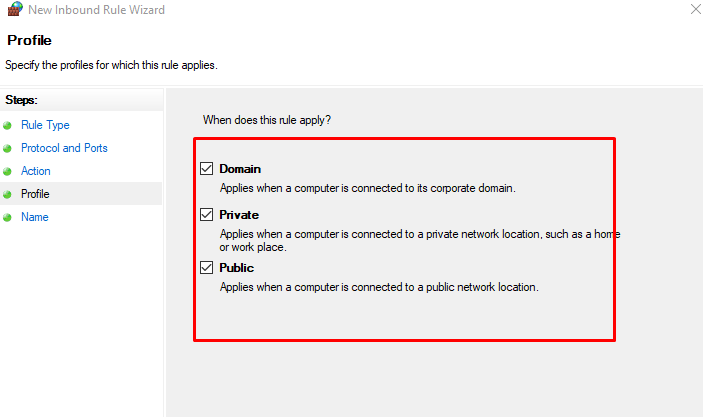
Windows server profiles are grouped into, Domain, Private and Public. Domain represents your server’s connection to a corporate domain network, Private applies to your home or workplace network connection, and Public represents non-secure public network locations.
Open an Inbound Port (Incoming connections)
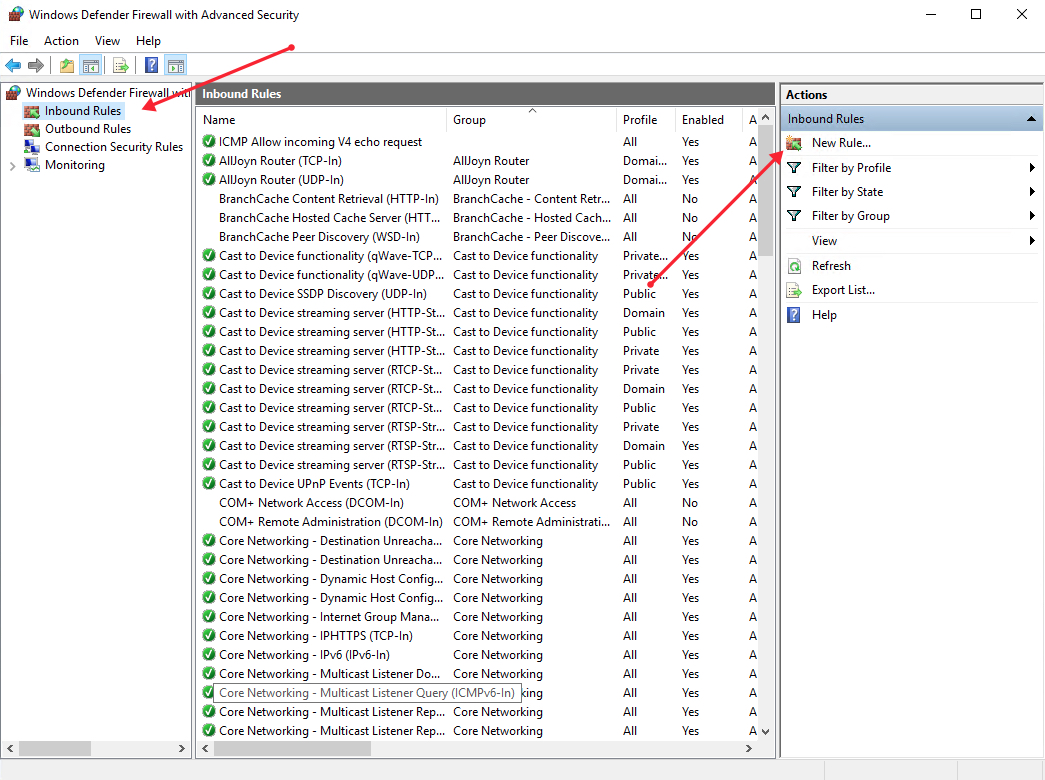
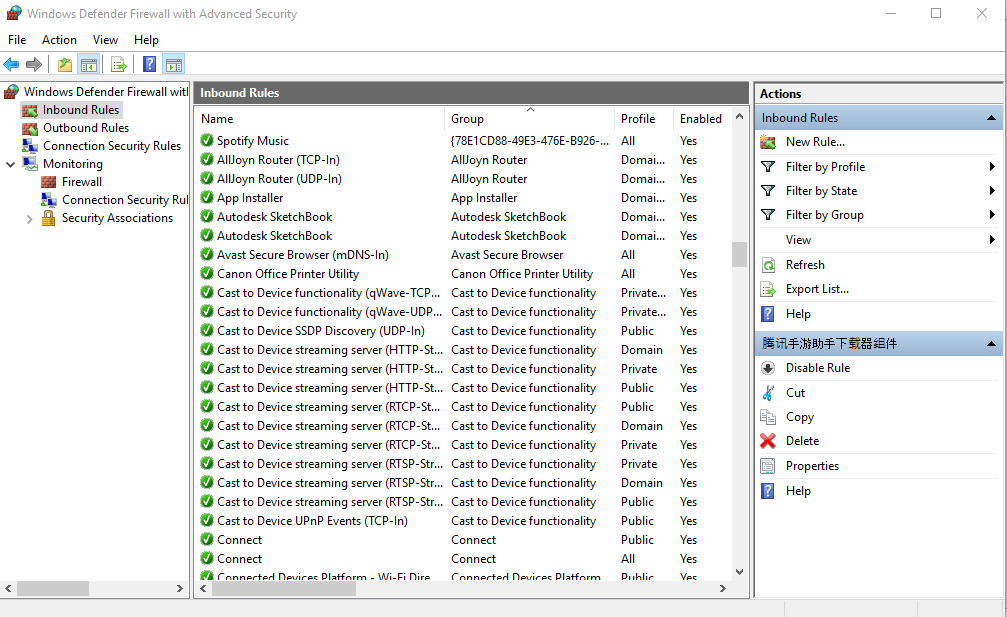
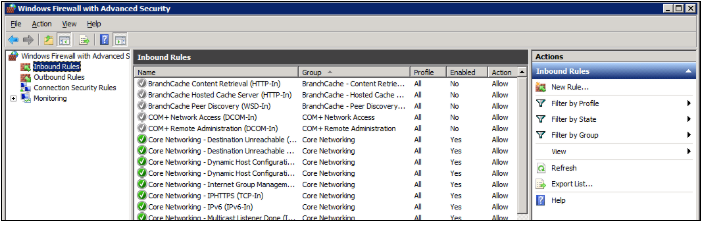
Launch windows defender firewall from the tools sub-menu under server manager. Then, select Inbound Rules on the left panel of the Firewall console.
A list of current rules will be displayed. Now, on the left Inbound Rules sub-menu under actions, click New Rule.
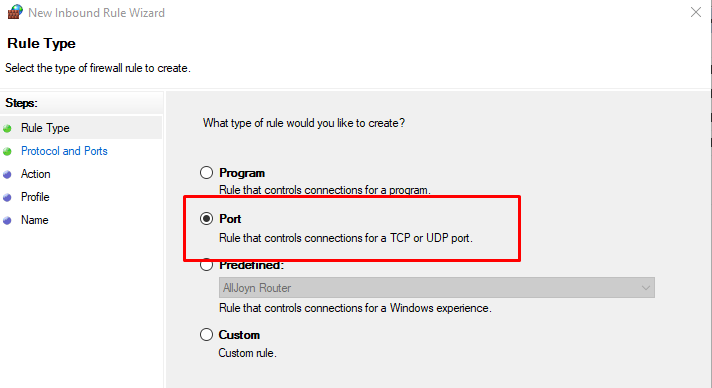
Select Port as the rule type in the rule wizard and click Next.

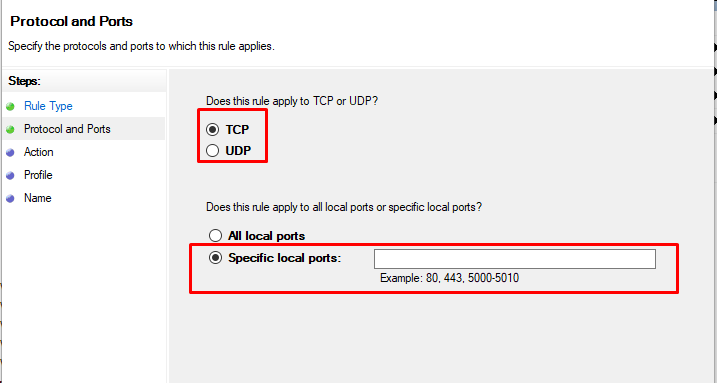
Now, choose whether the new rule applies to a TCP or UDP port on your server. Then, select specific ports and enter your target port number, you can enter a ports range, or multiple ports separated by - and , respectively, then click Next.
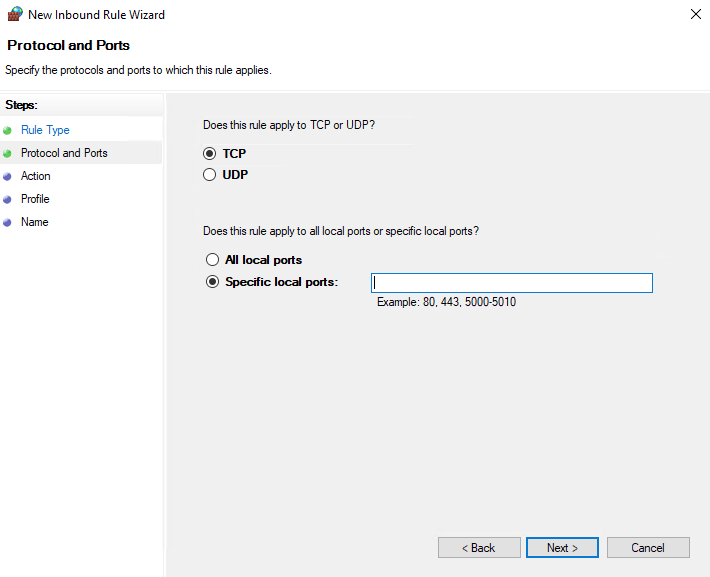
Define your TCP or UDP port rule.
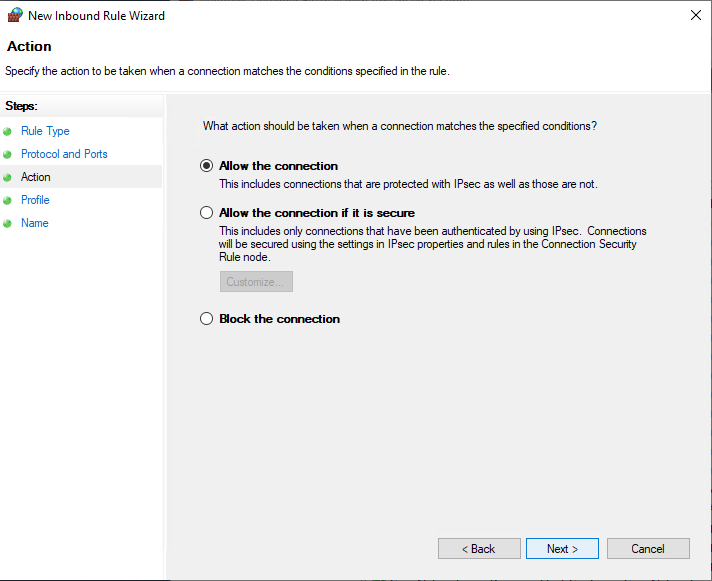
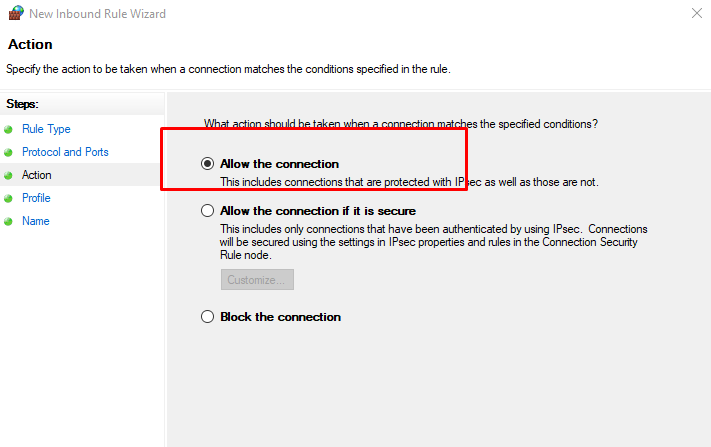
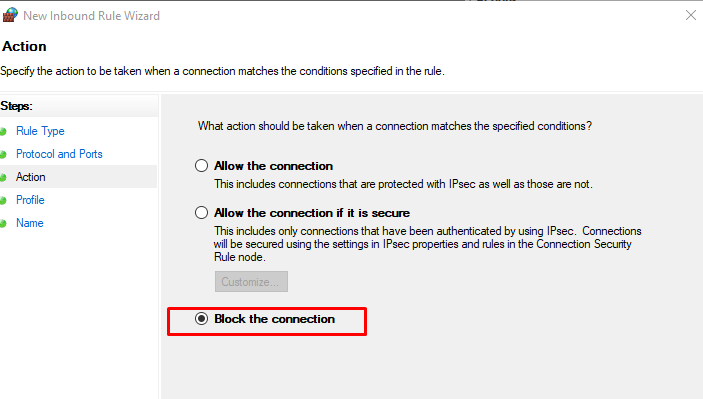
Allow the connectionwill allow incoming connections to the specified server portAllow the connection if it is securewill authenticate with IP security and either deny or allow the connection. For example,httpsconnections will be allowed andhttpblocked.Block the connectionwill block all incoming connections to your server through the specified port
In this case, choose Allow the connection to open the port.
Click Next to assign the new rule to one or more profiles. You can select between Domain, Private, and Public, or choose all to apply the firewall rule on multiple profiles.
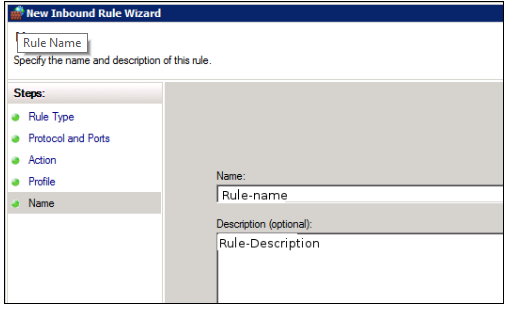
Next, give your new firewall rule a custom name and description for easy identification. Then, Click finish to enable the new rule. Your new Inbound (Incoming) port rule will be enabled, and all connections to the server that match the port will be accepted.
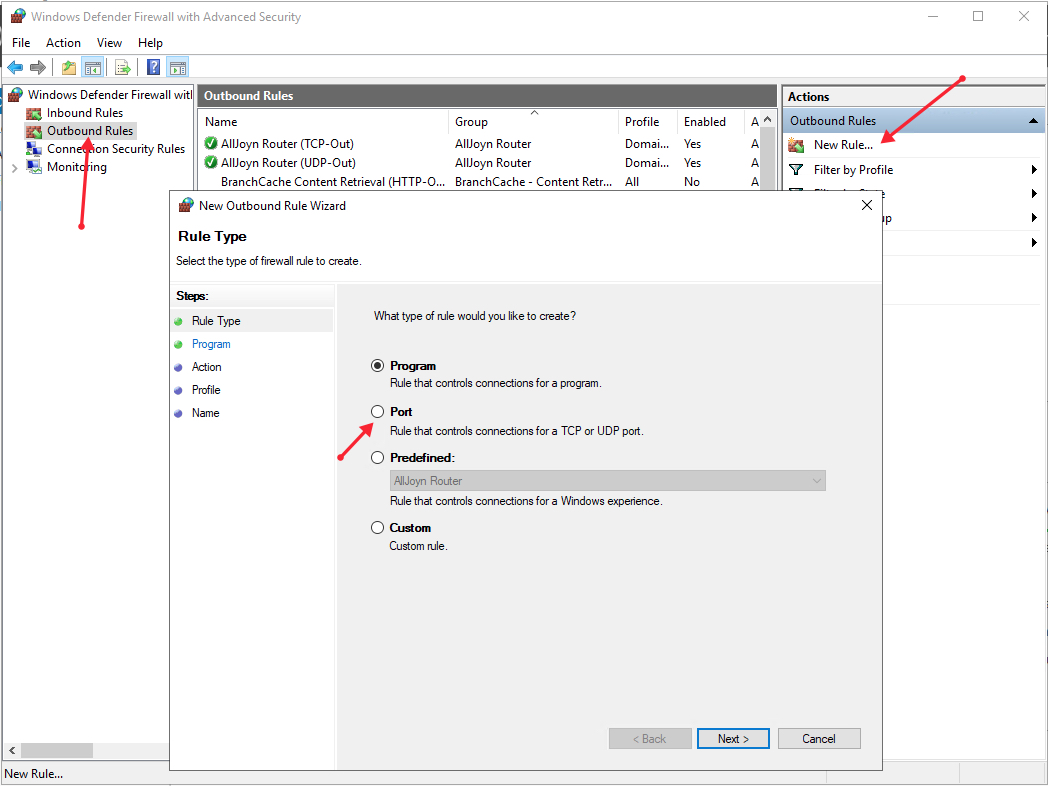
Open an Outbound Port (Outgoing connection)
From the Windows Defender Firewall console, click Outbound Rules on the left pane, and a list of available outgoing connection rules will be displayed.
Now, click New Rule on the right pane under the outbound rules node.
In the new outbound rule wizard, select Port as the rule type and click Next.
Now, let’s choose whether the new rule applies to a TCP or UDP port. Then, select specific remote ports and enter the target server port number; you can enter a range of ports, a single port, or multiple different ports you intend to open.
Next, on the Action page, select Allow the connection, then click next to select the server profile on which the rule should be enabled.
Give the new outbound rule a name and description that uniquely describes it. Then, click Finish to enable the outbound rule for the target port to be open on all selected server profiles.
Open a Port through Windows PowerShell
From the Windows start menu, open PowerShell. Then, edit the following command and replace it with your settings.
New-NetFirewallRule -Enabled:True -LocalPort 21 -Protocol TCP -Direction Inbound -Profile Domain -Action Allow -DisplayName example opening a port rule" New-NetFirewallRuleCreates a new Firewall rule.EnabledThis enables the new rule, by default, it will be set to True.LocalPortYour target port number.ProtocolSpecifies the protocol associated with your port number.DirectionSets your target direction to either Inbound (Incoming) or Outbound (Outgoing).ProfileAssigns the new rule to a server profile; you can choose domain, private, or public.Actiondefines the state for the new firewall rule, enter allow.DisplayNamesets a custom name for the new firewall rule
Your Output should be similar to the one below.
PS C:\Users\Administrator> New-NetFirewallRule  -Enabled:True  -LocalPort 21  -Protocol TCP  -Direction Inbound  -Profile Domain  -Action Allow  -DisplayName "example opening a port rule"


Name                  : {427a1b12-ece6-4d54-847d-de482b227c6c}
DisplayName           : example opening a port rule
Description           :
DisplayGroup          :
Group                 :
Enabled               : True
Profile               : Domain
Platform              : {}
Direction             : Inbound
Action                : Allow
EdgeTraversalPolicy   : Block
LooseSourceMapping    : False
LocalOnlyMapping      : False
Owner                 :
PrimaryStatus         : OK
Status                : The rule was parsed successfully from the store. (65536)
EnforcementStatus     : NotApplicable
PolicyStoreSource     : PersistentStore
PolicyStoreSourceType : Local
Congratulations, you just opened a network port on your Windows Server 2019. The server will accept incoming and outgoing connections through the selected ports, but the firewall will block connections from a profile that doesn’t match the port rule.
Многие программы, которые устанавливаются на виртуальный сервер, и работают через сетевые протоколы, могут использовать не стандартные порты для обмена пакетами. Брандмауэр по умолчанию будет блокировать запросы от подобных программ. К примеру, это могут быть игровые серверы, или бухгалтерские программы.
Если же подобные программы выдают ошибку из-за закрытого порта, то его можно открыть используя оснастку Windows Firewall. В операционной системе Windows 2012 кликаем правой кнопкой мышки на Start и из контекстного меню выбираем Control Panel Переходим в System and Security далее Windows Firewall.
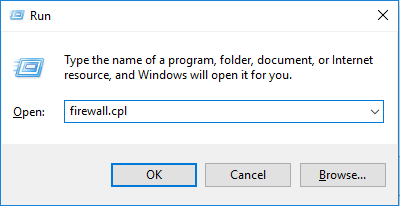
Или же, для версий ОС Windows 2016 и 2019, можно воспользоваться комбинацией клавиш Win+R и в окне Open прописать команду firewall.cpl.
В появившемся окне, с левой стороны, нажимаем на Advanced Settings и переходим к добавлению правил.
В новом окне, с левой стороны, выбираем вкладку Inbound Rules после этого в правой части окна, в колонке Actions выберем пункт New Rule…
После этого в появившимся окне New Inbound Rule Wizard, в пункте Rule Type, выбираем значение Port, и нажимаем Next.
После этого нужно указать нужный нам протокол, и нужный нам порт. В нашем случае это TCP и порт 40000. И нажимаем Next.
В следующем окне выберем Allow the connection и нажмем Next.
В пункте Profile отмечаем нужные профили брандмауэра и нажимаем Next.
В последнем окне Name, вводим имя и если нужно описание для данного правила, и жмем Finish.
Теперь необходимо таким же образом добавить UDP. С левой стороны, выбираем вкладку Inbound Rules после этого в правой части окна, в колонке Actions выберем пункт New Rule… И так далее по инструкции.
Если Вам будет необходимо добавить диапазон портов, то их можно добавить через тире.
Например: 40000-41000
Теперь мы можем наблюдать добавленные правила в списке правил для входящих подключений.
После запуска приложения, которое использует те порты, что были добавлены Вами, должно запуститься без ошибок.
Так же для этого можно использовать Power Shell и потратить менее времени.
К примеру можем использовать тот же 40000 порт.
Для протокола TCP:
netsh advfirewall firewall add rule name="New-Port" protocol=TCP localport=40000 action=allow dir=IN; Для протокола UDP:
netsh advfirewall firewall add rule name="New-Port" protocol=UDP localport=40000 action=allow dir=IN; По такой же аналогии можно открывать необходимые порты.
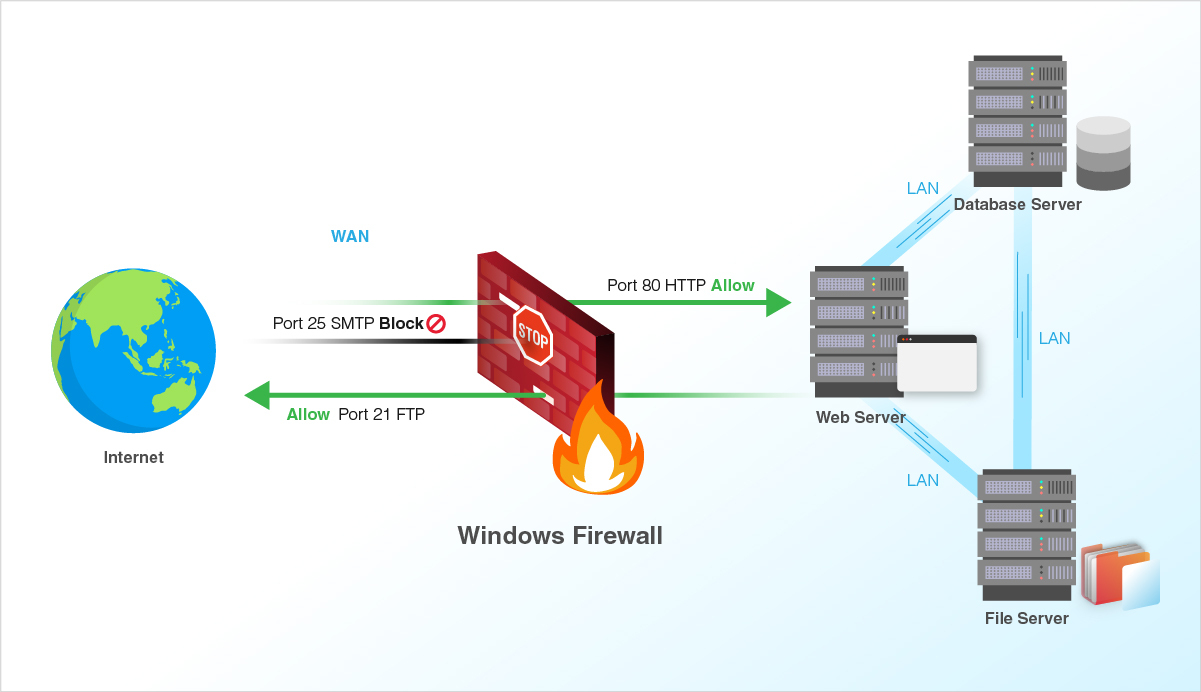
Firewall is an integral part of any system and can be used to protect a server against unauthenticated access from the outside world. It helps to prevent hackers from logging into servers on the network. Firewall can also be used to set up specific rules in-order to restrict access to specific ports of the system based on IP address.
The basic functionality of a firewall is to control the incoming and outgoing traffic and choose whether to block a particular connection or let it through based on the defined set of security rules.
We can use the below steps for managing Windows firewall settings.
-
Log in to the Windows server and open Firewall using any of the command
firewall.cplorWindows Firewallusing Search bar.
-
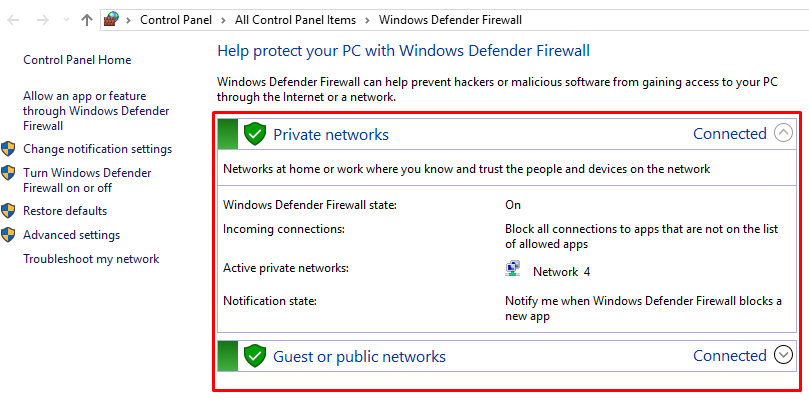
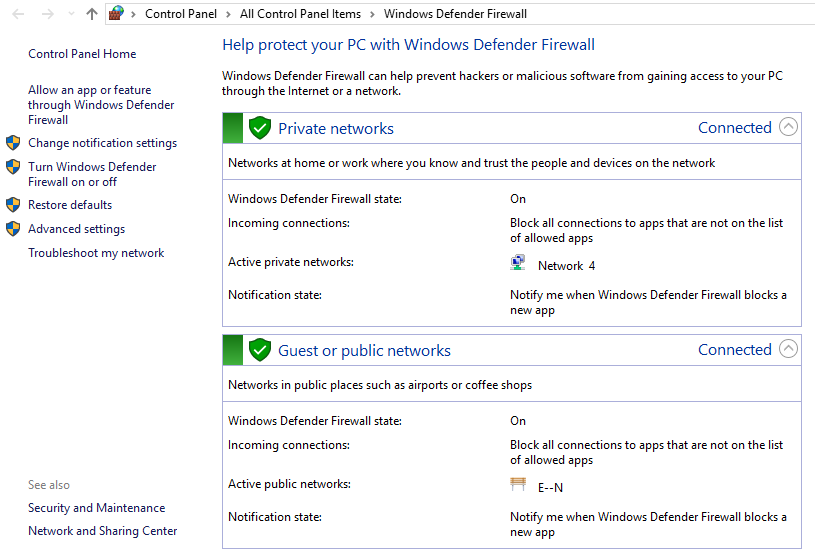
Under firewall settings, there are two sections called «Private networks» and «Guest or public networks» with green shields to the left of them, which say that the firewall is
active. If they are on red shields, then the firewall isdisabled. -
Click on either of these sections, it will prompt a drop-down menu with details about the current public or private networks.
-
Select the
Advanced Settingsoption from the left of the main menu, then you can manage and change the firewall’s advanced settings menu.
-
Inbound Rules : Which incoming connections are automatically allowed.
-
Outbound Rules : Which outgoing connections are automatically allowed.
-
Connection Security Rules : Baselines for which connections your computer will allow and which ones it will block.
-
Monitoring : This is an overview of your firewall’s basic monitoring guidelines.
-
Go to Control Panel, System and Security and Windows Firewall.
-
Select
Advanced settingsand highlightInbound Rulesin the left pane.
-
Right-click
Inbound Rulesand selectNew Rule. -
Add the
portyou need to open and clickNext.
-
Select the
protocol (TCP or UDP)and add theport numberand clickNext.
-
Select
Type of connectionas per your need in the next window and clickNext.
-
Open Port: Select
Allow the connectionto open a Port. -
Block Port: Select
Block the connectionto block a Port.
-
Select the
network typeand clickNext.
-
Name the rulesomething relates to the setting and clickFinish.
-
Go to Control Panel, System and Security and Windows Firewall.
-
Select
Advanced settingsand highlightInbound Rulesin the left pane.
-
Right-click the rule you want to configure, and then choose
Properties.Here you may need to select the Rule wisely as below:


-
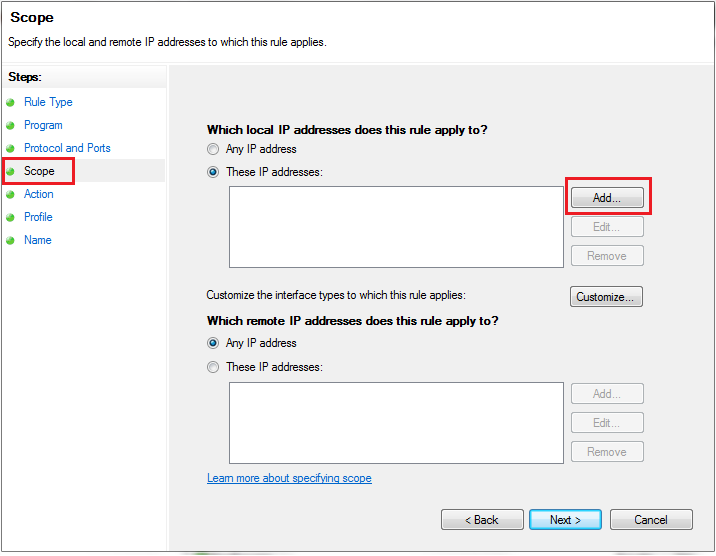
Allow Particular Network : Create a Firewall rule to Allow a port and use that rule’s properties to edit scope.
-
Block Particular Network : Create a Firewall rule to Block a port and use that rule’s properties to edit scope.
-
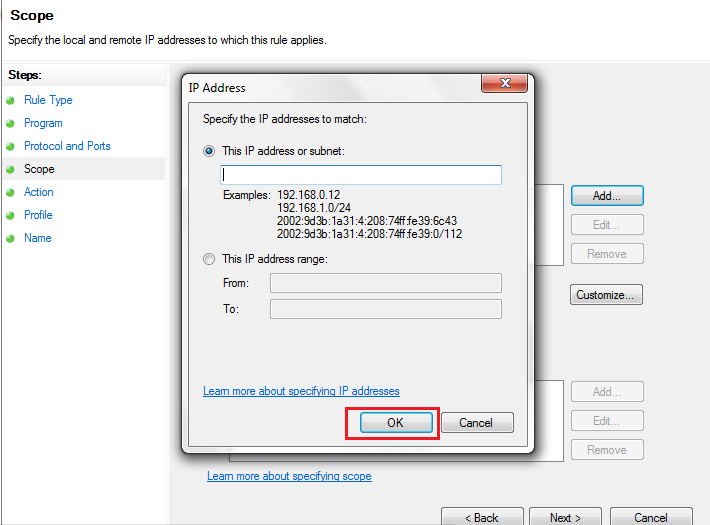
Click the
Scopetab. In the Remote IP Address group, selectThese IP Addresses.
-
Select one of the following two options, and then click
OK.
a. This IP Address or Subnet Type an IP address (such as 192.168.0.12) or a subnet using Classless Inter-Domain Routing (CIDR) notation (such as 192.168.0.0/24) that should be allowed for the firewall rule.
b. This IP Address Range Using the From and To boxes, type the first and last IP address that should be allowed to use the firewall rule and then click OK.
Related Feature on LayerPanel
- Firewall Overview
Related Tutorials
-
Basic Firewall Information and Rule Setting
-
Setting up Windows Firewall with Advanced Security on Windows Servers 2022
-
Setting up Windows Firewall for your Windows Cloud Servers 2016
-
Installing Telnet Client on Linux and Windows Cloud Servers
-
How to check if TCP / UDP port is open on Linux & Windows Cloud Servers
-
How to Enable & Disable Ping (ICMP Echo Requests) in Windows Server 2022 Firewall
-
How to Enable & Disable Ping (ICMP Echo Requests) in Windows Server 2019 Firewall
-
How to Enable & Disable Ping (ICMP Echo Requests) from IPTables on Linux Cloud Servers
-
Firewall Configuration using Iptables on Ubuntu 14.04
-
How to set up & configure firewall using FirewallD for CentOS 8
-
How to set up & configure Ubuntu Firewall (UFW) for Ubuntu 18
-
How to test Firewall Configuration with Nmap on Linux Cloud Servers
Hello! One of the protection mechanisms of the server is the implementation of the Firewall. Although there are third party options, Microsoft offers a Firewall integrated into the operating system. It is very efficient and highly configurable. Additionally, it can allow or block connections or redirect connection requests. Also, by customizing the rules it is possible to allow only authorized communications. On the other hand, port management is vital within the Firewall. Since they allow communication between the server and the external network. In fact, the vast majority of attacks are carried out through these ports. For this reason, the Firewall blocks most of the ports. However, it is occasionally necessary for an app to have access to one. In this case, the administrator must authorize the program’s access to the required port. So let’s see how to open a firewall port in Windows Server 2019/2016.
How to open the firewall port using the advanced settings.
In the first place it is necessary to enter the Control Panel and follow the next path:
- System and security
- Windows Defender Firewall
- Advanced Settings

The advanced settings of the Windows Firewall are immediately displayed. There are the entry and exit rules plus the security rules for connections. Finally, there are the firewall supervision options.

Clicking on the input rules will display the pre-configured Windows Server rules. As the name implies, they are related to incoming network connections and packets. Also, some rules are not activated by default. Therefore, you just need to double-click on them and then enable them.

Creating a new rule in the Windows Server Firewall.
By right-clicking on inboud rules, you can create a new rule.

There are several options for the creation of the rule. However, you should only select Port. Press Next to continue

Now it’s time to set your connection preferences:
- TCP: It is a connection-oriented protocol. In other words, its function is to create connections with the aim of sending data flow.
- UDP: It is a non connection-oriented protocol. Consequently, its development is based on the exchange of data grams.
On the other hand, it is possible to enable all ports for connection. This is obviously an unsecured option. Or you can configure specific ports.

Now it is time to determine what action the new rule will take:
- Allow connection through the port.
- Allow connection if secure. That is, allow data to be transmitted only if the connection is authenticated through Ipsec.
- Block connection through the port.

Please select the option corresponding to Allow connection and press Next. Now it is time to determine which profiles the new rule will be applied to.

Finally, you can assign a name and description to the new rule. This way it is easier to locate it later.

Back to the previous screen, you can see the new rule created.

Ultimately we have seen how to open a firewall port in Windows Server 2019/2016. In addition, the tutorial also serves to block a specific port. This way, the administrator can increase the functionality of the Firewall. All right, that’s it for now. Greetings!
— Advertisement —
Everything Linux, A.I, IT News, DataOps, Open Source and more delivered right to you.
Subscribe
«The best Linux newsletter on the web»
По умолчанию, в Windows Server 2019 брандмауэр настроен на блокировку входящего трафика ICMP. Сюда входят эхо-запросы, которые используются командой ping, и это может затруднить устранение неполадок в сети. Некоторые системы мониторинга используют команду ping для отслеживания доступности серверов.
В этом руководстве рассмотрим, как включить правило, чтобы сервер стал отвечать на ping используя графический интерфейс Windows Server 2019, а также включим разрешающее правило через PowerShell и netsh.
Обычно просто отключают Windows Firewall полностью, однако это не рекомендуется делать в производственной среде, так как брандмауэр Windows хорошо справляется с обеспечением базового уровня защиты системы. Разрешим только конкретное правило, необходимое для успешного выполнения команды ping.
Разрешить проверку связи через брандмауэр Windows
Сначала нам нужно открыть брандмауэр Windows, это можно сделать несколькими способами. Один из методов — просто нажать клавишу Windows, чтобы открыть меню «Start«, а затем начать вводить слово Firewall. Как показано ниже, брандмауэр Windows с расширенной безопасностью должен отображаться, выберите этот пункт.

Еще один быстрый способ: в PowerShell можно просто ввести «firewall» и нажать Enter. Откроется базовый интерфейс брандмауэра, а затем нажать кнопку «Advanced settings» в левой части. Откроется тот же интерфейс, что и через меню «Start«.
Следующий способ открыть Firewall — ввести в CMD такой текст: «firewall.cpl«
В Брандмауэре в расширенном режиме перейдите в Inboud Rules (Правила для входящих подключений).

В перечне правил в Inboud Rules, найдите «File and Printer Sharing (Echo Request — ICMPv4-In)» и активируйте его.
")
Еще один вариант. Активируем разрешающее правило командлетом Powershell
Set-NetFirewallRule -DisplayName "File and Printer Sharing (Echo Request - ICMPv4-In)" -enabled True
Полную справку со всеми параметрами можно получить, набрав команду в PowerShell
help New-NetFirewallRule
Вариант создания правила через netsh
netsh advfirewall firewall add rule name="ICMP Allow incoming V4 echo request" protocol=icmpv4:8,any dir=in action=allow
Примечание: Включение правила позволит получать ответы только на IPv4 запросы, если нужно получать ответы по IPv6, нужно разблокировать правило такое же правило, только с Echo Request — ICMPv6-In, перечисленное ниже. К тому же имеется несколько профилей: доменный, публичный, частный. Ненужные профили можно отключить в правиле, во вкладке Advanced.
После разблокировки правила сервер должен начать отвечать на запросы ping. С хоста виртуализации или другого пк в локальной сети протестируем ping’ом Windows Server 2019 по адресу 192.168.1.11 перед включением правила, а затем снова после его включения. Ниже видно, что время ожидания первых запросов истекло, так как входящие запросы ICMP были отключены по умолчанию в Windows Server 2019. После включения правила ICMP запросы ping успешно выполняются, что подтверждает ожидаемую работу.
Пример проверки связи:
Скачать видео.
Резюме
Стандартное правило брандмауэра — блокировать ICMP запросы, в итоге сервер не отвечает на ping. Включив это правило брандмауэра, мы включили команду ping в Windows Server 2019, которая поможет нам устранить неполадки в сети.