Настройка bios из windows lenovo

Вы можете использовать PowerShell для просмотра или изменения настроек BIOS/UEFI на компьютере Windows. В этой статье мы рассмотрим, как получить или изменить настройки BIOS компьютера через Windows PowerShell на обычном компьютере и на брендовых устройствах популярных производителей (HP, Lenovo, Dell, Toshiba).

Содержание:

  • Получаем информацию из BIOS/UEFI с помощью PowerShell
  • Получить и изменить настройки BIOS с помощью модуля Get-BIOS
  • Управление BIOS из PowerShell на компьютерах Lenovo
  • Доступ к настройкам BIOS из PowerShell на компьютерах Hewlett-Packard
  • Настройка BIOS на устройствах DELL из PowerShell

Получаем информацию из BIOS/UEFI с помощью PowerShell

Базовая информация о BIOS (UEFI) компьютера доступна в WMI классе Win32_BIOS. Вы можете вывести всю доступную информацию о BIOS с помощью командлета Get-WmiObject.

Get-WmiObject -Class Win32_BIOS

Get-WmiObject Win32_BIOS вывести версию BIOS

По умолчанию команда возвращает информацию о версии BIOS (SMBIOSBIOSVersion + Manufacturer), серийный номер и модель компьютера (SerialNumber, Version).

Полный список параметров BIOS, который доступен в WMI классе Win32_BIOS можно вывести командой:

Get-WmiObject -Class Win32_BIOS | Format-List *

Get-WmiObject -Class Win32_BIOS

Можно вывести только интересующие вас настройки BIOS. Например, версию BIOS, серийный номер компьютера, производителя и дату выпуска:

Get-WmiObject -Class Win32_BIOS | Select SMBIOSBIOSVersion, Manufacturer, SerialNumber, ReleaseDate

Можно получить информацию BIOS удаленного компьютера:

Get-WmiObject -Class Win32_BIOS -ComputerName MSK-WKS2210

Информация о BIOS компьютера хранится в реестре Windows. Вы можете получить нужную информацию BIOS напрямую из реестра с помощью PowerShell:

Get-ItemProperty -Path HKLM:\HARDWARE\DESCRIPTION\System\BIOS

nayti-parametry bios/uefi хранятся в реестре

Класс Win32_BIOS является универсальным и может быть использован для получения базовой информации о BIOS на любом устройстве Windows.

Однако, некоторые производители оборудования предоставляют специальные WMI классы для обращения к BIOS из Windows (необходимо, чтобы на компьютере были установлены родные драйвера от производителя).

Получить и изменить настройки BIOS с помощью модуля Get-BIOS

Для получения настроек BIOS/UEFI брендовые компьютеров Dell, HP, Lenovo, Toshiba можно использовать отдельный модуль из PSGallery, который называется Get-BIOS.

Установите модуль из онлайн галереии PowerShell (также вы можете установить PowerShell модуль офлайн):

Install-Module GetBIOS

Чтобы вывести настройки BIOS вашего компьютера, выполните команду:

Get-BIOS

get-bios вывести настройки BIOS с помощью PowerShell

На компьютерах Dell можно вывести описание настроек BIOS с помощью параметра:

Get-BIOS -ShowDescription

Также от этого же разработчика есть модуль, который позволяет изменить настройки BIOS на устройствах Dell/Lenovo/HP.

Install-Module SetBIOS

Для изменения настроек BIOS вашего устройства, нужно сформировать CSV файл в формате {Setting, Value}.

Чтобы применить CSV файл с натсройками BIOS, выполните команду:

Set-BIOS -Path "YourPath.csv"

Если BIOS защищен паролем, добавьте в параметр -Password.

Управление BIOS из PowerShell на компьютерах Lenovo

На компьютерах Lenovo текущие настройки BIOS хранятся в оттельном WMI классе. Вы можете вывести список параметров BIOS и их текущие значения так:

Get-WmiObject -class Lenovo_BiosSetting -namespace root\wmi | select-object InstanceName, currentsetting

Получить настройки BIOS на компьютере Lenovo из Powershell

Проверим, что на компьютере Lenovo установлен пароль для входа в BIOS:

(gwmi -Class Lenovo_BiosPasswordSettings -Namespace root\wmi).PasswordState

Если команда вернула 0, значит пароль для входа в BIOS не установлен.

проверить наличие пароля BIOS Lenovo_BiosPasswordSettings - data-lazy-src=

Изменить пароль BIOS на устройстве:

(gwmi -Class Lenovo_SetBiosPassword -Namespace root\wmi).SetBiosPassword("pap,oldPassword,newPassword,ascii,us")

Вы можете изменить некоторые параметры BIOS на компьютерах Lenovo. Например, включим на компьютере WOL:

$getLenovoBIOS = gwmi -class Lenovo_SetBiosSetting -namespace root\wmi
$getLenovoBIOS.SetBiosSetting("WakeOnLAN,Enable")
$SaveLenovoBIOS = (gwmi -class Lenovo_SaveBiosSettings -namespace root\wmi)
$SaveLenovoBIOS.SaveBiosSettings()

Сбросить настройки BIOS устройства Lenovo на заводские:

$DefaultSettings = Get-WmiObject -Namespace root\wmi -Class Lenovo_LoadDefaultSettings
$DefaultSettings.LoadDefaultSettings("CurrentBIOSPassword,ascii,us")

Доступ к настройкам BIOS из PowerShell на компьютерах Hewlett-Packard

На компьютерах/ноутбуках от HP можно использовать следующую команду для получения параметров BIOS, их значений и доступных опций:

Get-WmiObject -Namespace root/hp/instrumentedBIOS -Class hp_biosEnumeration | select Name, value, possiblevalues –AutoSize

Вы можете изменить некоторые настройки BIOS на компьютерах HP из PowerShell. Например, отключить загрузку компьютера с USB устройств.

$getHPBios = gwmi -class hp_biossettinginterface -Namespace "root\hp\instrumentedbios"
$getHPBios.SetBIOSSetting('USB Storage Boot','Disable')

Если для изменения настроек BIOS требуется указать пароль, вы можете использовать следующий скрипт:

$HPBIOSPassword = "<utf-16/>"+"P@$$w0rd"
$getHPBios = gwmi -class hp_biossettinginterface -Namespace "root\hp\instrumentedbios"
$getHPBios.SetBIOSSetting(‘Network (PXE) Boot','Disable',$HPBIOSPassword)

Если последняя команда вернула “Return 0”, значит она отработала успешно. Можно сделать простейший обработчик:

$ChangeBIOS_State = $bios.setbiossetting(Network (PXE) Boot', 'Disable' , $HPBIOSPassword)
$ChangeBIOS_State_Code = $ChangeBIOS_State.return
If(($ChangeBIOS_State_Code) -eq 0)
{
write-host "OK"
}
Else
{
write-host "Error - (Return code $ChangeBIOS_State_Code)" -Foreground Red
}

Если вы хотите включить в BIOS LAN/WLAN Switching на ноутбуке HP для автоматического отключения от Wi-FI при наличии Ethernet подключения, выполните команду:

$getHPBios.SetBIOSSetting('LAN/WLAN Switching','Enable')

Кроме того, вы можете установить на устройство Hewlet Packard расширение HP Client Management Script Library, CMSL (https://www.hp.com/us-en/solutions/client-management-solutions/download.html). В состав CMSL входят несколько PowerShell модулей, который позволяют получить или изменить настройки BIOS/UEFU, обновить прошивку и т.д.

Экспорт настроек BIOS в текстовый файл:

Get-HPBIOSSettingsList | Out-File -FilePath ‘C:\ProgramData\HP\CMSL\Logs\CurrentBIOSSettings.txt’

Включить WLAN Auto Switch:

Set-HPBIOSSettingValue -Name "LAN/WLAN Auto Switching" -Value Enable -Password BiosPass000rd

Настройка BIOS на устройствах DELL из PowerShell

На компьютерах DELL для просмотра и управления параметрами BIOS вы можете использовать WMI класс DCIM-BIOSService или более новый класс root\dellomci (доступен после установки пакета OMCI — Open Manage Client Instrumentation).

Чтобы вывести порядок использования загрузочных устройств в BIOS на компьютерах Dell, выполните:

Get-WmiObject -NameSpace root\dellomci Dell_BootDeviceSequence | sort bootorder | select BootDeviceName, BootOrder

класс dellomci для получения параметров bios на компьютерах DELL

Например, вы можете включить Wake on LAN в BIOS следующим образом:

(Get-WmiObject DCIM-BIOSService -namespace rootdcimsysman).SetBIOSAttributes($null,$null,"Wake-On-LAN","4")

Кроме того, для компьютеров Dell можно использовать официальный PowerShell модуль DellBIOSProvider, который устанавливается при установке драйверов либо вы можете установить его вручную командой:

Install-Module -Name DellBIOSProvider -Force

С помощью этого модуля вы можете получить порядок загрузки на компьютере Dell:

Get-Item DellSmbios:\BootSequence\Bootsequence

Проверить, задан ли пароль BIOS:

Get-Item -Path DellSmbios:\Security\IsAdminPasswordSet

Изменить пароль BIOS на устройстве Dell:

Set-Item -Path Dellsmbios\Security\AdminPassword –Value 0ldDellP@ss –Password Newde11P@ss

Мы рассмотрели, как получить и изменить настройки BIOS на устройствах Windows с помощью PowerShell. Это позволит вам стандартизировать настройки BIOS/UEFI на всех компьютерах в вашей сети (с помощью SCCM, Intune, MDT, и т.д.

Introduction#

This document will cover various topics on managing BIOS/UEFI for Lenovo Think PCs. As these products are aimed at commercial customers, there are unique scenarios which require special considerations to support large fleets of PCs in an enterprise environment. This document will focus on how to update and manage BIOS/UEFI settings using typical IT practices in such an environment. This document may contain references to Microsoft Deployment Toolkit [MDT] or System Center Configuration Manager [SCCM]; however, in general, the same principles will apply to other systems management solutions.

Updating BIOS#

Overview#

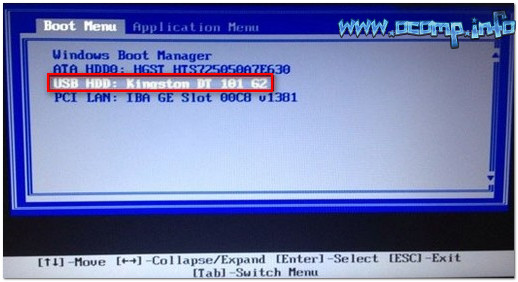
Updating or installing a new version of the BIOS can be done two ways: by manual install or through automation. The BIOS can be updated through different methods: in the OS (Windows), in WinPE (Windows Pre-execution Environment), by an EFI-bootable USB drive, or a DOS-bootable USB drive. In some organizations other aspects are to be considered when updating the BIOS, such as performing an update when a Supervisor Password is present or even a fully automated PXE deployment that can, with some management, update the BIOS in your organization in a tightly controlled environment.

Updating the BIOS has to be done carefully to ensure that it is applied to the system without issue. BIOS updates for Lenovo Think brand devices are best applied from a local resource, such as the C:\ drive or the system drive in the full running Operating System, or from the X:\ drive in WinPE. Applying the update from a network resource is not advised. Were the connection to be lost in the middle of an update, irreparable damage could be done to the BIOS, potentially rendering the device unusable.

OS#

Updating the BIOS in the Operating System can be done a few different ways: manually, by script, by software deployment push, or by a task sequence. Currently, each of the three Think brands have their own BIOS installation process.

ThinkPad Manual Installation#

ThinkPad uses the WINUPTP tool to apply the updates under the OS or WinPE. Under the OS, WINUPTP.exe can be used. Under WinPE and depending on the model the WINPEUPTP.exe or WINUPTP64.exe should be used. These come from the extracted files location of the BIOS update package from the support site. To manually install a ThinkPad BIOS update, navigate to the Lenovo Support page, enter in the model of ThinkPad, and download the BIOS Update for Windows (BIOS Update Utility). After it is downloaded, run the downloaded program to begin the extraction process.

![License Agreement](https://cdrt.github.io/mk_docs/img/guides/bios/bios1.png)

Step 1: Accept the EULA and click Next.

![Browse to save](https://cdrt.github.io/mk_docs/img/guides/bios/bios2.png)

Step 2: Leave the default location selected for extraction and click Next.

![Ready to Install](https://cdrt.github.io/mk_docs/img/guides/bios/bios3.png)

Step 3: Click Install. The program will extract to the default location on the hard drive.

![Install](https://cdrt.github.io/mk_docs/img/guides/bios/bios4.png)

Step 4: Once completed, the installer should have a check mark on the page. Leave the check box checked and click Finish. This should immediately prompt to begin the BIOS Update.

![Finish Install](https://cdrt.github.io/mk_docs/img/guides/bios/bios5.png)

Step 5: Select Update ThinkPad BIOS if not already selected and click Next.

![Install](https://cdrt.github.io/mk_docs/img/guides/bios/bios6.png)

Step 6: Follow the instructions on this screen and click Next.

![Install](https://cdrt.github.io/mk_docs/img/guides/bios/bios7.png)

Step 7: Follow the instructions and click Yes to continue.

![Install](https://cdrt.github.io/mk_docs/img/guides/bios/bios8.png)

Step 8: Wait while it prestages the new ROM image file. DO NOT POWER OFF THE SYSTEM at this point.

![Install](https://cdrt.github.io/mk_docs/img/guides/bios/bios9.png)

Step 9: Click OK to reboot the system immediately.

![Install](https://cdrt.github.io/mk_docs/img/guides/bios/bios10.png)

Step 10: After it reboots, the laptop will begin to write the prestaged BIOS image to the chip. At this point, DO NOT POWER OFF the laptop!!!

![Install](https://cdrt.github.io/mk_docs/img/guides/bios/bios11.png)

Step 11: When the BIOS update completes, it will reboot the computer.

![Install](https://cdrt.github.io/mk_docs/img/guides/bios/bios12.png)

Step 12: If an update for the Embedded Controller firmware is included in the update, the system will show the splash screen with text stating “Flashing Embedded Controller.” Allow this process to complete and the system will reboot to the OS.

ThinkPad Automated Installation#

To automate the ThinkPad BIOS update, the WINUPTP tool (including WINUPTP64 and WINPEUPTP) has a –s command line parameter to suppress any prompts or message boxes from displaying during installation of the update. WINUPTP also supports a –r command line parameter to force a reboot after prestaging the new BIOS image file. During the reboot, the computer may boot three times, once to apply the BIOS update to the ROM, once to potentially install an embedded controller update, and a final time to boot back into the operating system.

Assuming that the BIOS update is to be applied during a task sequence, from either MDT or SCCM, in the full operating system, there are a few items that need to be touched on. First, installing the BIOS update from a local hard drive is the safest choice. Since that is a requirement, use a copy command to copy the BIOS installer from the network to the local hard drive. Second, in a step to run an executable, call the WINUPTP tool with the –s command line parameter. The final step is to initiate a system reboot through the task sequence.

It is best practice to not use the –r command line parameter in a task sequence. When running task sequences, it is best practice to allow the task sequence to control the reboot and not allow the installing executable to do so. Allowing the task sequence to control the reboot will allow the task sequence to make all necessary changes to the computer, including setting up to resume the task sequence in the correct location after the reboot sequence has completed.

When updating a ThinkPad BIOS, if a Supervisor password is set and the “Flash BIOS Updating by End-Users” is set to factory default (Enabled), there are no additional steps to be taken to update the BIOS. If the “Flash BIOS Updating by End-Users” is not set to factory default (Enabled), then steps will need to be taken to switch the setting to Enabled using the Think BIOS Configuration Tool or the BIOS Settings VBScripts. After that is set to allow the update to be run, the BIOS can be updated. If needed, utilize the tools mentioned to change the setting back after applying the BIOS update.

WINUPTP Options#
Option Description WinPEUPTP Support?
/s or -s Silent update. No GUI, return to Windows after BIOS/ECFW update. Always Support
/r or -r Reboot after BIOS/ECFW update Support
/sr or -sr Reboot after BIOS/ECFW update. (Silent update) Support
/bcp or -bcp Clear customized logo. Support(*)
/w or -w Command line password. How to use: WINUPTP -w «Supervisor password» Support
/fbc or -fbc Clear MOR flag Support(*)
/m or -m Update model number Support
/f or -f No warning message for update BIOS/ECFW though less than 25% Battery capacity Support

(*) X13s is not supported for this feature.

WINUPT Return Codes#
Return Code Description*
0 BIOS update is successful and system reboots.(normal update)
1 BIOS update is successful and system does not reboot. (silent update)
-1 WINUPTP Option is undefined.
-3 This utility does not support this system or OS.
-4 This utility works on Administrator authority.
-5 BIOS image file does not match this system.
-6 EC image file is damaged.
-7 EC image file does not match this system.
-8 The custom start up image file is not support.
-9 BIOS image file is same as BIOS ROM.
-10 AC/Battery is detached or battery is not charged.

ThinkCentre Manual Installation#

ThinkCentre executes Flash.cmd from the extracted files location. To manually install a ThinkCentre BIOS update, navigate to the Lenovo Support page, enter in the model of ThinkCentre, and download the “Flash UEFI BIOS update (Flash from operating system version)”. After it is downloaded, run the downloaded program to begin the extraction process.

![](https://cdrt.github.io/mk_docs/img/guides/bios/bios13.png)

Step 1: Accept the EULA and click Next.

![License](https://cdrt.github.io/mk_docs/img/guides/bios/bios14.png)

Step 2: Leave the default location selected for extraction and click Next. This will extract the files and then automatically kick off the installation.

![Save File](https://cdrt.github.io/mk_docs/img/guides/bios/bios15.png)

Step 3: Click Yes to continue with the BIOS update.

![Install](https://cdrt.github.io/mk_docs/img/guides/bios/bios16.png)

Step 4: Press the “N” key and press.

![Install](https://cdrt.github.io/mk_docs/img/guides/bios/bios17.png)

Step 5: Press the “N” key and press . Once is pressed, a command window will pop up with yellow writing. Wait while it loads the ROM file into the BIOS update inbox. DO NOT POWER OFF THE SYSTEM at this point. The system will reboot on its own.

![Install](https://cdrt.github.io/mk_docs/img/guides/bios/bios18.png)

Step 6: Writing the new boot block.

![Install](https://cdrt.github.io/mk_docs/img/guides/bios/bios19.png)

Step 7: Writing the new image.

![Install](https://cdrt.github.io/mk_docs/img/guides/bios/bios20.png)

Step 8: Writing the new nvram block.

![Install](https://cdrt.github.io/mk_docs/img/guides/bios/bios21.png)

Step 9: Writing the new main block. After writing the main block, the computer will reboot on its own. It may restart a second time if it needs to program the embedded controller.

![Install](https://cdrt.github.io/mk_docs/img/guides/bios/bios22.png)

Step 10: Booting up.

ThinkCentre Automated Installation#

To automate the ThinkCentre BIOS update, the FLASH.CMD file can be executed with the /quiet command line parameter. FLASH.CMD executes WFlash2.exe with predetermined command line parameters attached. FLASH.CMD is designed to pass any command line parameters to the WFlash2.exe in the command file.

To update the BIOS in an automated solution use the command line parameter /quiet. The /quiet command line parameter will allow the update of the BIOS through WFlash2.exe without physical presence or other interaction.

Some versions of WFlash2.exe support the /sccm parameter. The /sccm parameter is intended for use in a task sequence and will suppress the reboot until the administrator chooses to do so. Check the readme.txt in the extracted BIOS folder or run WFlash2.exe /? to verify that the version of WFlash2.exe you are using supports this option.

If there is a Supervisor password controlling access to the BIOS and the Require Admin Pass when Flashing BIOS setting is set to NO, there is nothing to do to apply the BIOS update. In the event that there is a Supervisor password controlling access to the BIOS and the Require Admin Pass when Flashing BIOS setting is set to YES, WFlash2.exe has a command line parameter to allow input of the password for execution in an automated solution. The command line parameter is /pass:nnnnnn where nnnnnn is the password.

Example:

Flash.cmd /quiet /pass:Qwerty 

ThinkStation Manual Installation#

ThinkStation executes Flash.cmd or Flashx64.cmd from the extracted files location, depending on the operating system architecture. To manually install a ThinkStation BIOS update, navigate to the Lenovo Support page, enter in the model of ThinkStation, and download the «Flash UEFI BIOS update (Flash from operating system version)». After the package is downloaded, execute it to begin the extraction process.

![](https://cdrt.github.io/mk_docs/img/guides/bios/bios23.png)

Step 1: Click Next on the Welcome screen.

![Install](https://cdrt.github.io/mk_docs/img/guides/bios/bios24.png)

Step 2: Accept the EULA and click Next.

![Install](https://cdrt.github.io/mk_docs/img/guides/bios/bios25.png)

Step 3: Leave the default location selected for extraction and click Next.

![Install](https://cdrt.github.io/mk_docs/img/guides/bios/bios26.png)

Step 4: Click Install. The program will extract to the default location on the hard drive.

![Install](https://cdrt.github.io/mk_docs/img/guides/bios/bios27.png)

Step 5: Click Finish to complete the extraction. Navigate to the folder where the BIOS update was extracted and execute Flash.cmd (If the account does not have administrator rights, right click on the .cmd file and select “Run as Administrator”).

![Install](https://cdrt.github.io/mk_docs/img/guides/bios/bios28.png)

While the update executes, the keyboard and mouse will be inaccessible. This is to prevent any actions from interfering with the execution. After the command window closes, manually restart the computer. The computer will then reboot to the Lenovo splash screen a few times and will boot back into the operating system.

ThinkStation Automated Installation#

To automate the ThinkStation BIOS update, either AFUWIN.exe or AFUWINx64.exe can be executed with a set of command line parameters. Use the following command to perform the silent update:

X86: AFUWIN.exe  /P /B /N /R /SP /RTB /FIT /Q
    OR
X64: AFUWINx64.exe  /P /B /N /R /SP /RTB /FIT /Q

If there is a Supervisor password controlling access to the BIOS and the Require Admin Pass when Flashing BIOS setting is set to NO, there is nothing to do to apply the BIOS update. In the event that there is a Supervisor password controlling access to the BIOS and the Require Admin Pass when Flashing BIOS setting is set to YES, then steps will need to be taken to switch the setting to NO using the Think BIOS Configuration Tool or the BIOS Settings VBScripts. After that is set to allow the update to be run, the BIOS can be updated. If needed, utilize the tools mentioned to change the setting back after applying the BIOS update.

WinPE#

Besides a full Windows installation, the BIOS can be updated through WinPE as well. Updating the BIOS in WinPE would typically be completed by a task sequence in MDT or SCCM, but the updates can be applied by script as well. WinPE, while lightweight, has a couple of challenges when preparing to deploy a BIOS. WinPE requires optional components to create the underlying framework needed for the BIOS update installers to run. WinPE may also require network drivers be injected to make a connection to a centralized repository of BIOS updates for copying to a local drive.

When planning the build of the WinPE image, it is best to understand which Think branded product(s) will be updated, the method of getting BIOS updates to the local device, and the method of installing the update.

Note

  • The following examples will be using the Windows ADK for Windows 10, version 1607.
  • The optional components can be found in the installation of the Windows ADK, (C:\Program Files (x86)\Windows Kits\10\Assessment and Deployment Kit\Windows Preinstallation Environment).

All of the Think branded products will require the following optional components to be installed in the WinPE boot image.

Scripting:

\WinPEOCs\WinPE-Scripting.cab
\WinPEOCs\<Language>\WinPE-Scripting<Language>.cab

WMI:

\WinPEOCs\WinPE-WMI.cab
\WinPEOCs\<Language>\WinPE-WMI<Language>.cab

ThinkPad will require an additional optional component to be installed in the WinPE boot image. The ThinkPad BIOS Update tool runs some HTML components in the background, requiring the HTA Optional Component be installed.

HTA:

\WinPEOCs\WinPE-HTA.cab
\WinPEOCs\<Language>\WinPE-HTA<Language>.cab

During testing, the order of installation was determined to be of importance. The order was found to be:

  1. HTA – If deploying ThinkPad systems
  2. Scripting
  3. WMI

The default configuration for MDT will install the required optional components. SCCM will need the HTA Optional Component added to the WinPE boot image. The others will already be in the WinPE image.

ThinkPad has one other requirement for installing the BIOS while in WinPE. It requires the battery.inf to be loaded. This enables the installers to verify there is a fully charged battery and ensure that the system meets the requirements of the installer. The battery.inf can be loaded from %systemroot%\INF\ using the command drvload.

The command is as follows:

drvload %systemroot%\INF\Battery.inf

Configuring BIOS#

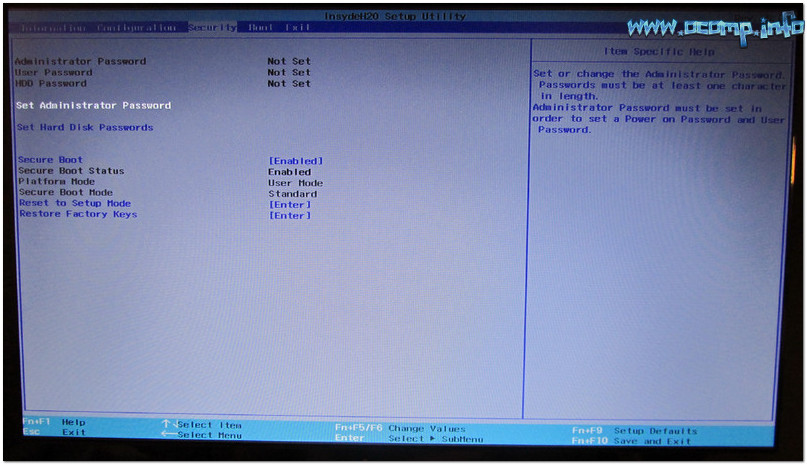
BIOS Security Settings#

With information security becoming a prime for organizations, Lenovo is actively and diligently working to protect customer data. One of the first layers of security we provide is within our hardware, specifically the BIOS. BIOS Security governs how accessible the operating system can be to users, administrators, and hackers. Lenovo currently stands on the premise that our BIOS should be highly secure, therefore we will err on the side of security over manageability. We strive to be more secure than other manufacturers while retaining a reasonable level of manageability.

Lenovo utilizes passwords to control access to different aspects of the computer. Passwords are not set from the factory unless requested by a customer and implemented for a specific custom model being ordered. Passwords can be utilized to protect the BIOS interface, power on of the computer, and hard disk.

The BIOS interface is protected by the Supervisor Password (SVP). The Supervisor password must be provided when any settings are changed via scripting. The Supervisor password must be entered when accessing the BIOS by physical means in order to provide access to various security settings.

The powering on of the device is protected by the Power-On Password (POP). This will allow the computer to power on directly to a password prompt but go no further until the correct password is entered. The computer will not prompt for any other type of boot via the F12 boot menu. This will limit the access to the OS and BIOS.

These passwords can be set manually through the BIOS interface itself or can be set/changed by script with the limitation of the Supervisor Password. Lenovo does not support the ability to set the initial password by script to limit the security exposure of locking both administrators and users out of a computer. Once the Supervisor password is set, it can be changed by script. Many customers opt to have Lenovo set the Supervisor password at the factory. Once the customer knows the preset password, they can change it during initial deployment of the computer in their environment.

For more information about BIOS Security around passwords, check https:\pcsupport.lenovo.com and search for the specific model. The User Guide in the documentation area will contain specifics on these passwords.

Lenovo leverages WMI through scripting API’s to detect if any of the BIOS passwords are set. The script returns the state of the following passwords: Supervisor (SVP), Power on (POP), User HDD, and User HDD and Master HDD. Using this information, an administrator can determine if a computer has passwords set in their environment.

Using the following PowerShell script, running as administrator, the return code will range from 0 to 7.

(gwmi -Class LenovoBIOSPasswordSettings -Namespace root\wmi).PasswordState

The result will map to one of the values in the table below:

0 No password set
1 Power on password set
2 Supervisor password set
3 Power on password and Supervisor password set
4 User HDD or User HDD and Master password set
5 Power on password and (User HDD or User HDD and Master password) set
6 Supervisor password and (User HDD or User HDD and Master password) set
7 Power on password, Supervisor password, and (User HDD or User HDD and Master password) set

Note

The information provided by the script will only return the state of the passwords, it will not return the actual passwords.

OS Optimized Defaults#

To make our BIOS compliant with the Microsoft Windows 8 and/or Windows 10 Certification Requirements, Lenovo has implemented a single setting, that when enabled and the default settings loaded, will set a group of settings to ensure the computer meets the requirements set forth by Microsoft and allow Windows 8 and newer operating systems to be installed on the hardware. When the setting is disabled and the default settings are loaded, the OS Optimized Defaults will set the settings in a state where they will not be compliant to the Microsoft Windows 8 and/or Windows 10 Certification Requirements and allow all (Windows 7 and prior) operating systems to be installed on the hardware.

The settings that OS Optimized Defaults controls are as follows:

ThinkPad CSM Support, UEFI/Legacy Boot, UEFI/Legacy Boot Priority, Secure Boot, and Secure Rollback Prevention
ThinkCentre CSM Support, Boot Mode, Boot Priority, and Secure Boot
ThinkStation CSM Support, Boot Mode, Boot Priority, and Secure Boot

Once Secure Boot is Enabled on a system, the setting cannot be changed to Disabled by script using the WMI BIOS Interface. It has to be manually disabled if there is a need. With security being a high profile topic in organizations, we took the step of only allowing our scripting to make the computer more secure, not less secure. Any action to make the computer less secure would have to be performed with physical presence.

WMI BIOS Interface#

Through WMI methods, Lenovo has provided the ability to read and configure some BIOS Settings via scripting. The settings available to be changed by scripts are limited to non-security settings. Lenovo provides VBScripts as well as an HTA Tool called Think BIOS Config tool to facilitate easier manipulation of BIOS settings from both a scripted context as well as a graphical context. These capabilities are implemented on most Think branded devices.

To find more information on a particular BIOS setting for a system such as name, explanation or default value, navigate to https://pcsupport.lenovo.com . Type in the Model or MTM of the system and select the correct one from the drop down list. Click on Documentation and then look for the User Guide in the list of documents. In the User Guide, there will be a full listing of settings, descriptions, available values, and default values to reference.

The Think BIOS Config tool is an HTA that can be run with an interface or directly from a command line to perform BIOS configurations. When double clicking the .hta file, it will run and provide a dynamic interface that shows all settings in the BIOS that are configurable by script for that computer.

Note

Think BIOS Config tool will ask for UAC elevation, since accessing the BIOS through WMI requires elevated privileges.

Each setting will show the current value associated with the setting. In drop down lists it will provide all possible values for that setting. When a value is changed for a setting, the setting name will turn red as a visual indicator that the setting is now different. To commit changes to be applied on the next reboot, use the Save Changed Settings button.

The interface also has the ability to create an .INI file with a full list of settings to use for other systems of the same model. The interface has the ability to import a previously created .INI file to configure a full set of settings or a subset of settings to be applied to a computer.

The Think BIOS Config tool has the ability to be run from a command line for System Administrators to change settings through a SCCM software push or SCCM or MDT task sequence for deploying an operating system.

Full documentation for the execution of the Think BIOS Config tool can be found in the User Guide which is included in the .zip file available in this blog post .

In addition to the Think BIOS Config tool, Lenovo has VBScripts to assist with changing and viewing BIOS Settings. The 5 scripts are ListAll.vbs, LoadDefaults.vbs, SetConfig.vbs, SetConfigPassword.vbs, and SetSupervisorPassword.vbs.

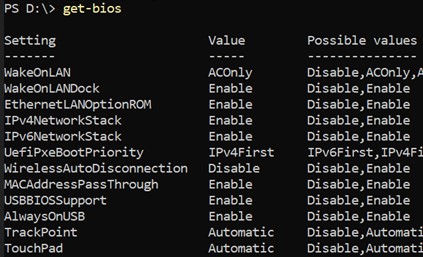
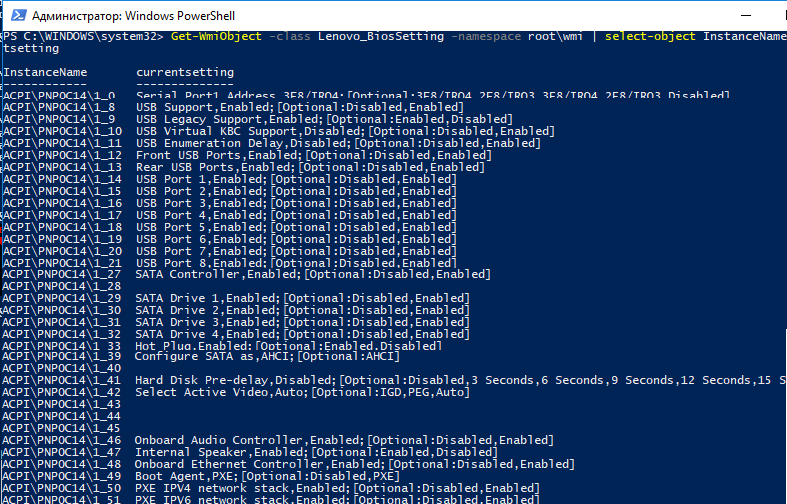
The ListAll.vbs script iterates through all settings, displaying the setting name, the current setting, and a list of all possible settings. The ListAll.vbs script is best used in an Administrator command prompt with cscript.

    Microsoft Windows [Version 10.0.15063]
    (c) 2017 Microsoft Corporation. All rights reserved.

    C:\WINDOWS\system32>cscript.exe ListAll.vbs

The LoadDefaults.vbs script will load the factory defaults for the computer. To find the defaults, reference the User Guide documentation for the specific model.

The SetConfig.vbs and SetConfigPassword.vbs are used to set individual settings. The only difference between the two scripts is that SetConfigPassword.vbs requires an extra parameter for the input of the Supervisor password to change the setting, when a Supervisor password is set on the BIOS.

The final script is the SetSupervisorPassword.vbs script. This script facilitates the change of the Supervisor password when one is currently set on the BIOS. This script does not allow for the initial setting of the BIOS Supervisor Password.

The provided VBScripts can also be incorporated into a software deployment through SCCM or through a SCCM or MDT task sequence for OSD.

For PowerShell examples, see Appendix B. Sample PowerShell commands in the BIOS Setup using Windows Management Instrumentation Deployment Guide .

OS Specific Considerations#

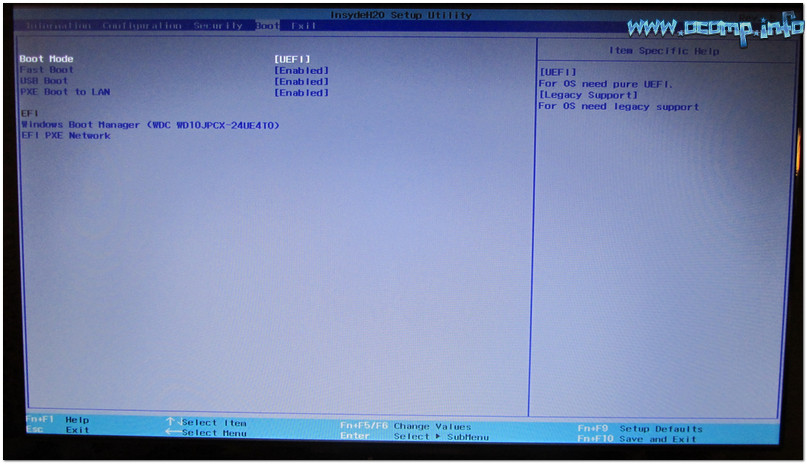
Specific BIOS considerations need to be taken when deploying an operating system, such as BIOS Mode, secure boot status, and other features that can enhance the experience provided by the operating system. Below, we have laid out suggested settings in the BIOS for getting the best performance, upgradability, and features for a specific operating system or group of operating systems.

Windows 10 x64 / Windows 8.1 x64 UEFI On the Restart tab in BIOS, set OS Optimized Defaults – Enabled and then load default settings. These settings will allow the hardware to run in UEFI mode These settings will allow for a GPT partition, Device Guard/Credential Guard (with supervisor password), and Secure Boot enabled, all of which will allow an organization to leverage the full potential of Windows 10 operating system.
Windows 7 x64 UEFI On the Restart tab in BIOS, set OS Optimized Defaults – Disabled and load the defaults. On the Startup Tab, set the UEFI/Legacy (Boot Mode) to UEFI Only. On the Config Tab, in the Network group, set both UEFI IPv4 Network Stack and UEFI IPv6 Network Stack to Enabled. Deploy Windows 7 x64 to the hardware with a GPT partition. This will enable an easier transition to Windows 10 in the future.
Windows 7 x86/ Windows 7 x64 Legacy On the Restart Tab in BIOS, set OS Optimized Defaults – Disabled and load the defaults. Doing this will allow the computer to create an MBR partition and run all hardware in Legacy Mode for the older operating system.

Common Terms and Acronyms#

BIOS – Basic Input/Output System

SCCM – Configuration Manager or System Center Configuration Manager

MDT – Microsoft Deployment Toolkit

OSD – Operating System Deployment

TPM – Trusted Platform Module

UEFI – Unified Extensible Firmware Interface

WMI – Windows Management Interface

Navigating the BIOS (Basic Input/Output System) is essential for performing various system-level tasks such as configuring hardware settings, updating firmware, managing boot sequences, and troubleshooting hardware issues. Whether you’re a seasoned IT professional or a casual user, knowing how to access the BIOS on your Lenovo device—be it a standard Lenovo laptop, a ThinkPad, or a Legion series gaming laptop—is crucial. This guide will walk you through the different methods to enter BIOS on Lenovo laptops running Windows 10 and Windows 11.

Table of Contents

  1. Understanding BIOS
  2. Why Enter the BIOS?
  3. Methods to Enter BIOS on Lenovo Devices
    • Method 1: Using the Novo Button
    • Method 2: Using Function Keys During Startup
    • Method 3: Through Windows Advanced Startup
  4. Model-Specific Instructions
    • Lenovo ThinkPad Series
    • Lenovo Legion Series
    • Standard Lenovo Laptops
  5. Troubleshooting: What to Do If You Can’t Access BIOS
  6. Additional Tips and Precautions
  7. Conclusion

Understanding BIOS

The BIOS is firmware embedded on a motherboard that initializes hardware during the booting process before handing control over to the operating system. It allows users to configure hardware settings, manage system security, and update firmware. Accessing the BIOS is often necessary for tasks such as:

  • Changing the boot order to install a new operating system
  • Enabling or disabling hardware components
  • Updating the BIOS firmware for improved system stability and performance
  • Troubleshooting hardware issues

Why Enter the BIOS?

Entering the BIOS can help you:

  • Install or Upgrade Operating Systems: Change the boot sequence to prioritize USB drives or optical discs.
  • Configure Hardware Settings: Adjust settings for CPU, RAM, and storage devices.
  • Manage Security Features: Set up passwords, enable Secure Boot, or configure TPM (Trusted Platform Module).
  • Update Firmware: Ensure your system runs the latest BIOS version for optimal performance and security.
  • Troubleshoot Hardware Issues: Diagnose and resolve hardware conflicts or failures.

Methods to Enter BIOS on Lenovo Devices

There are multiple ways to access the BIOS on Lenovo laptops, ThinkPads, and Legion series running Windows 10 or Windows 11. The method you choose may depend on your specific device model and configuration.

Method 1: Using the Novo Button

Many Lenovo laptops come equipped with a dedicated Novo button, a small pinhole that provides quick access to system recovery and BIOS settings.

Steps:

  1. Power Off Your Laptop:
    • Ensure your Lenovo device is completely shut down.
  2. Locate the Novo Button:
    • The Novo button is usually a small, recessed button located near the power button, on the side, or on the back of the laptop.
    • Look for a button with a curved arrow or the word “Novo.”
  3. Press the Novo Button:
    • Use a paperclip or a similar pointed object to press and hold the Novo button for a few seconds.
    • The laptop should power on and display the Novo Button Menu.
  4. Select BIOS Setup:
    • In the Novo Button Menu, use the arrow keys to navigate and select BIOS Setup.
    • Press Enter to enter the BIOS.

Method 2: Using Function Keys During Startup

If your Lenovo laptop doesn’t have a Novo button, you can access the BIOS by pressing specific function keys during the boot process.

Common Function Keys:

  • F1: Often used for Lenovo ThinkPad series.
  • F2: Commonly used for standard Lenovo laptops and some Legion models.
  • Delete: Occasionally used on certain models.

Steps:

  1. Power Off Your Laptop:
    • Ensure your device is completely shut down.
  2. Power On and Press the Function Key:
    • Turn on your Lenovo laptop.
    • Immediately start pressing the appropriate function key (F1, F2, or Delete) repeatedly until the BIOS screen appears.
    • Timing is crucial; start pressing the key as soon as the laptop starts to boot.
  3. Access the BIOS:
    • Once the BIOS screen appears, you can navigate through the settings using the keyboard.

Method 3: Through Windows Advanced Startup

Windows 10 and Windows 11 provide an advanced startup option that allows you to boot directly into the BIOS without using function keys.

Steps:

  1. Open Settings:
    • Press Windows + I to open the Settings app.
  2. Navigate to Recovery Options:
    • Go to Update & Security > Recovery.
  3. Advanced Startup:
    • Under the Advanced startup section, click Restart now.
    • Your computer will restart and present you with a menu.
  4. Troubleshoot:
    • Select Troubleshoot > Advanced options > UEFI Firmware Settings.
  5. Restart to BIOS:
    • Click Restart.
    • Your laptop will reboot directly into the BIOS.

Model-Specific Instructions

Different Lenovo models may have slight variations in the process to enter BIOS. Here’s how to access BIOS on specific Lenovo series:

Lenovo ThinkPad Series

ThinkPads are renowned for their robust build and are often used in professional environments. Accessing BIOS on ThinkPads may differ slightly from other Lenovo models.

Steps:

  1. Power Off the Laptop.
  2. Press the ThinkVantage Button or F1:
    • Older ThinkPad models have a ThinkVantage button. Pressing it during startup takes you to the BIOS.
    • On newer models, press and hold the F1 key while powering on the laptop.
  3. Enter BIOS:
    • Release the key when the BIOS screen appears.

Lenovo Legion Series

Lenovo’s Legion series caters to gamers and high-performance users. Accessing BIOS on Legion laptops is straightforward.

Steps:

  1. Power Off the Laptop.
  2. Press the Novo Button or F2:
    • Some Legion models feature the Novo button. Press it using a paperclip to access the Novo Button Menu, then select BIOS Setup.
    • Alternatively, press the F2 key repeatedly immediately after powering on the device.
  3. Access BIOS:
    • The BIOS interface should appear after selecting the appropriate option.

Standard Lenovo Laptops

For standard Lenovo laptops not falling under ThinkPad or Legion series, accessing BIOS follows the general methods outlined above.

Steps:

  1. Power Off the Laptop.
  2. Use the Novo Button or Function Keys:
    • Locate and press the Novo button to access BIOS via the Novo Button Menu.
    • If there’s no Novo button, use F2 or Delete keys during startup.
  3. Enter BIOS:
    • Select BIOS Setup from the Novo Button Menu or proceed with the function key method.

Troubleshooting: What to Do If You Can’t Access BIOS

If you’re having trouble entering the BIOS on your Lenovo device, consider the following troubleshooting steps:

1. Ensure Proper Timing

Press the function key repeatedly immediately after pressing the power button. Missing the right moment can prevent access to BIOS.

2. Use the Novo Button Correctly

Ensure you’re pressing and holding the Novo button long enough to trigger the Novo Button Menu. Use a pointed object like a paperclip for recessed buttons.

3. Disable Fast Startup in Windows

Fast Startup can sometimes interfere with accessing BIOS.

Steps:

  1. Open Control Panel:
    • Press Windows + X and select Power Options.
  2. Change Power Settings:
    • Click Additional power settings > Choose what the power buttons do.
  3. Change Settings:
    • Click Change settings that are currently unavailable.
  4. Disable Fast Startup:
    • Uncheck Turn on fast startup.
    • Click Save changes.
  5. Restart and Try Again:
    • Power off and attempt to access BIOS using the standard methods.

4. Disconnect External Devices

Peripheral devices can sometimes interfere with the boot process.

Steps:

  1. Remove All External Devices:
    • Disconnect USB drives, external hard drives, printers, etc.
  2. Attempt to Enter BIOS:
    • Power on the laptop and try accessing BIOS again.

5. Reset CMOS

If all else fails, resetting the CMOS can restore BIOS settings to default, potentially resolving access issues. Note: This is an advanced step and should be performed with caution.

Steps:

  1. Power Off and Unplug the Laptop.
  2. Access the Motherboard:
    • Open the laptop’s back panel to access the motherboard.
  3. Locate the CMOS Battery:
    • Find the CMOS battery—a small, round battery on the motherboard.
  4. Remove the CMOS Battery:
    • Carefully remove the battery and wait for about 5 minutes.
  5. Reinsert the Battery and Reassemble:
    • Place the battery back, close the laptop, and attempt to access BIOS again.

Warning: Opening your laptop may void the warranty. If unsure, seek professional assistance or contact Lenovo support.


Additional Tips and Precautions

  • Backup Important Data: Before making significant changes in BIOS, ensure your data is backed up to prevent potential loss.
  • Understand BIOS Settings: Altering BIOS settings can impact system stability. Only change settings you understand.
  • Update BIOS Carefully: Updating BIOS can fix issues but carries risks. Follow Lenovo’s official instructions meticulously.
  • Use a Stable Power Source: Ensure your laptop is plugged in during BIOS access and updates to prevent power loss.
  • Document Changes: Keep a record of any BIOS changes you make for future reference or troubleshooting.

Conclusion

Accessing the BIOS on Lenovo laptops, whether they’re ThinkPads, Legion series, or standard models, is a fundamental skill for managing and troubleshooting your device. By understanding the various methods—using the Novo button, function keys, or Windows Advanced Startup—you can confidently navigate the BIOS to configure settings, update firmware, and optimize your system’s performance.

Remember to proceed with caution when making changes in the BIOS, as incorrect settings can affect your laptop’s functionality. Always refer to Lenovo’s official documentation or seek professional assistance if you’re unsure about specific configurations. With the knowledge from this guide, you can effectively manage your Lenovo device’s BIOS, ensuring it runs smoothly and efficiently.

Содержание статьи:

  • Основные разделы и настройки
    • Как войти в BIOS
    • Кнопки управления
    • Разделы и вкладки
    • Как выбрать с какого устройства загружаться ноутбуку (Boot Menu)
  • Вопросы и ответы: 17

Доброго времени суток.

Работаешь себе за компьютером, работаешь, а тут… бац 😢, и необходимо переустановить систему, или включить функциональные клавиши, или отключить USB-порты и т.д. Без настройки BIOS уже не обойтись…

Я на блоге довольно часто касаюсь темы BIOS (так как целый ряд задач просто не решить без его настройки вовсе!), а обобщающей темы, в которой бы были разобраны все основные термины и параметры – пока нет.

Так, собственно и родилась эта статья…

Примечание: настройки BIOS приведены на примере ноутбука Lenovo B70.

Очень многие параметры, названия разделов и вкладок – будут аналогичны с другими марками и моделями ноутбуков. Думаю, что собрать всё многообразие марок и всевозможных версий в одной статье (или даже разделе сайта) – просто нереально…

*

Основные разделы и настройки

Как войти в BIOS

Полагаю, что первое, с чего следует начать эту статью — это с вопроса входа в BIOS (а то и настраивать будет нечего ✌).

В большинстве моделей ПК/ноутбуков, чтобы войти в BIOS нужно нажать кнопку F2 или Del (иногда F1 или Esc) сразу же после включения устройства.

На некоторых ноутбуках (например, Lenovo) есть специальная кнопка Recovery (которую нажимают вместо кнопки включения). После этого, обычно, появляется табличка (как на фото ниже) — для настройки BIOS нужно выбрать пункт BIOS Setup.

BIOS Setup

BIOS Setup

Также рекомендую ознакомиться со статьями на моем блоге, посвященных входу в BIOS (ссылки ниже).

👉 В помощь!

1) Как войти в BIOS на компьютере / ноутбуке.

2) Как войти в BIOS на ноутбуке Lenovo.

*

Кнопки управления

В BIOS все настройки приходится задавать при помощи клавиатуры (что несколько пугает начинающих пользователей, которые привыкли в Windows делать всё с помощью мышки).

Примечание: более современные версии BIOS (т.е. UEFI) — поддерживают управление с помощью мышки.

Также стоит отметить, что все настройки задаются на английском (правда, большинство настроек достаточно просто понять, что значат, даже тем, кто не учил английский).

И так, теперь о кнопках…

Обращаю внимание на то, что практически в каждой версии BIOS внизу экрана (либо справа) написаны все самые основные кнопки управления, с помощью которых он настраивается.

Кнопки управления снизу окна

Кнопки управления снизу окна / ноутбук Dell Inspiron

Если выделить в общем, то кнопки следующие:

  • стрелки →↓↑← — используются для перемещения курсора (изменения параметров);
  • Enter — основная клавиша для входа в разделы (а также для выбора определенных параметров, переключения пунктов);
  • Esc — выход из BIOS без сохранения настроек (или выход из определенного раздела);
  • +/PgUp или  -/PgDn — увеличение/уменьшение числового значения определенного параметра, либо его переключение;
  • F1 — краткая справка (только для страниц настроек);
  • F2 — подсказка по выделенному пункту (не во всех версиях BIOS);
  • F5/F6 — смена параметров выбранного пункта (в некоторых версиях BIOS так же могут использоваться для восстановления измененных настроек);
  • F9 — информация о системе (загрузка безопасных настроек);
  • F10 — сохранить все изменения в BIOS и выйти.

👉 Важно!

В некоторых ноутбуках, чтобы сработали функциональные клавиши (F1, F2… F12) необходимо нажимать сочетание кнопок Fn+F1, Fn+F2… Fn+F12. Обычно эта информация всегда указывается внизу (справа) окна.

*

Разделы и вкладки

Information

Основная вкладка в BIOS ноутбука которую вы видите, когда заходите. Позволяет получить основные сведения о ноутбуке:

  1. его марку и модель (см. фото ниже: Product Name Lenovo B70-80). Эта информация бывает крайне необходима, например, при поиске драйверов;
  2. версию BIOS (если задумаете обновлять BIOS информация крайне пригодится);
  3. серийной номер вашего устройства (есть не везде, да и информация почти бесполезная);
  4. модель процессора (CPU — Intel Core i3-5005U 2.00GHz);
  5. модель жесткого диска;
  6. модель CD/DVD привода и прочая информация.

information

information

Вообще, эту вкладку крайне рекомендуется посещать, когда вы хотите узнать информацию о вашем железе. Так же в тех случаях, когда подключили новое оборудование и не знаете, правильно ли оно определилось.

*

Configuration

Одна из основных вкладка для задания множества параметров. В разных ноутбуках вкладка содержит разные настройки, из основных параметров можно выделить:

  1. System Time/Date — задание даты и времени (часто в Windows время сбивается, а иногда его и нельзя установить вовсе, пока не настроена соответствующая вкладка в BIOS);
  2. Wireless — адаптер Wi-Fi, здесь его можно отключить (примечание: Enabled — включено, Disabled — выключено). Если вы не работаете с Wi-Fi сетями — рекомендуется отключить адаптер, так как он существенно расходует заряд батареи (даже когда вы не подключаетесь к Wi-Fi сети);
  3. Sata Conroller Mode — режим работы жесткого диска. Это довольно обширная тема. Здесь скажу, что от выбранного параметра — существенно зависит работа вашего жесткого диска (например, его скорость работы). Если не знаете, что выставить — то оставьте всё по умолчанию;
  4. Graphic Device Settings — параметр, позволяющий настраивает работу видеокарт (в ноутбуках, у которых две видеокарты: интегрированная и дискретная). В некоторых случаях (например, при работе с Windows XP, или когда вы хотите максимально экономить заряд батареи) здесь можно отключить дискретную видеокарту (примечание: наверняка произойдет снижение производительности в играх);
  5. Power Beep — включение/отключение динамика-пищалки. На мой взгляд для современного ноутбука в повседневном пользовании — это вещь бесполезная (была актуальна раньше, лет 10 назад);
  6. Intel Virtual Technology — аппаратная виртуализация, которая позволяет запускать на одном физическом компьютере несколько экземпляров операционных систем (гостевых ОС). В общем-то, не для начинающих пользователей;
  7. BIOS Back Flash — если вы захотите обновить свой старый BIOS на новую версию (т.е. прошить) — включите данную опцию;
  8. HotKey Mode — режим работы функциональных клавишей. Если опция включена: вместо привычных, скажем, F1-F12 для обновления странички в браузере или получения справки — вы сможете пользоваться мультимедиа возможностями — прибавлять или отключать звук, яркость и пр. Для использования привычных значений F1-F12 — нужно нажимать их совместно с клавишей Fn.

Configuration

Configuration

*

Security

Вкладка для задания безопасности (для некоторых пользователей — одна из основных). Здесь можно задать пароль администратора для доступа к настройкам BIOS или для доступа к жесткому диску.

👉 Важно!

Используйте эти пароли очень осторожно. Дело в том, что, если вы его забудете, в некоторых случаях придется обращаться в сервисные центры.

Также можно попытаться сбросить пароль и собственными силами, об этом я рассказывал здесь.

Основные пункта настроек этого раздела:

  1. Set Administrator Password — установить пароль администратора;
  2. Set Hard Dick Password — установить пароль для доступа к жесткому диску;
  3. Secure Boot — безопасная загрузка (включено/выключено). Кстати, Secure Boot отображается только в случае, если у вас установлен режим загрузки UEFI.

Security

Security

*

Boot

Раздел загрузки. Так же один из самых часто-используемых разделов, необходим практически всегда для редактирования при установке ОС Windows.

Так же здесь задается режим загрузки: UEFI (новый стандарт — для Windows 8/10), либо старый метод загрузки (Legacy, для ОС Windows 7, XP).

Примечание: новые пункты для редактирования очереди загрузки появятся после сохранения настроек и входа в это меню заново!

👉 Кстати!

Если включена поддержка старого режима, то можно (даже нужно!) менять приоритет загрузки устройств (например, сначала проверить USB-устройства, затем попробовать загрузиться с CD/DVD, затем с HDD).

👉 В помощь!

Как создать установочную флешку с Windows для UEFI режима загрузки и для Legacy — вы можете узнать из этой статьи

Основные настройки в этом меню:

  1. Boot Mode: режим загрузки, UEFI или Legacy (разницу описал выше);
  2. Fast Boot: режим быстрой загрузки (не будет показываться логотип, при загрузке будут поддерживаться только встроенные устройства: клавиатура, дисплей и пр.). Работает только при Boot Mode: UEFI.
  3. USB Boot: разрешить/запретить загружаться с USB-устройств.
  4. PXE Boot to LAN: опция включает загрузку компьютера по сети (первоначально будет производиться попытка загрузить операционную систему с сервера, используя локальную сеть. На мой взгляд, для большинства пользователей, бесполезная функция).

Boot

Boot

Примечание: стоит отметить что, в новой версии UEFI перестала работать возможность поднятия пунктов меню с помощью кнопки F6, но осталась возможность опускать другой пункт кнопкой F5.

*

Exit

Думаю, это слово знают все — переводится с английского, как выход. Так же этот раздел используется почти во всех ноутбуках (и ПК) для сброса настроек в оптимальные (или безопасные).

Основные пункты:

  1. Exit Saveng Changes — выйти и сохранить измененные настройки в BIOS;
  2. Exit Discarding Changes — выйти из BIOS без сохранения настроек;
  3. Discard Changes — отменить все изменения настроек, сделанных за текущий сеанс;
  4. Save Changes — сохранить изменения настроек;
  5. Load Defaults Changes — загрузить настройки BIOS по умолчанию (такими, какими они были при покупке вашего ноутбука). Обычно используются в случае нестабильной работы устройства, либо в случаях, когда пользователь что-то поменял и уже не помнит…
  6. OS Optimized Defaults — настройки, оптимизированные для конкретных ОС (далеко не во всех ноутбуках есть данная опция. Несколько упрощает и ускоряет настройку BIOS).

Exit

Exit

*

Чтобы не лазить в настройках BIOS и не выбирать (не выставлять) очередь загрузки, очень удобно пользоваться загрузочном меню, вызывая его только когда необходимо загрузиться с флешки (например). Приведу здесь справочную статью на эту тему (ссылка ниже).

👉 В помощь!

Горячие клавиши для входа в меню BIOS, Boot Menu, восстановления из скрытого раздела.

Вызвав Boot Menu, Вы увидите обычный список устройств, с которых можно загрузиться. Чаще всего в этом списке есть (пример на фото ниже):

  1. жесткий диск;
  2. USB-флешка, диск;
  3. возможность загрузиться по сети (LAN).

Загрузка с USB-флешки Kigston

Загрузка с USB-флешки Kingston

Для выбора устройства для загрузки используйте стрелочки и клавишу Enter. В общем-то, как и при обычной настройке BIOS.

*

На этом статью завершаю. За дополнения по теме — заранее благодарю!

Хорошего дня!

👋

Первая публикация: 26.03.2017

Корректировка: 15.01.2020

Способ 1: Горячая клавиша

На любом ноутбуке предпочтительным методом входа в BIOS является использование горячей клавиши. Во всех современных лэптопах Lenovo сейчас используется унифицированная клавиша F2. Нажимайте ее быстро несколько раз сразу же с включением ноутбука, чтобы тот вместо дальнейшей загрузки открыл БИОС.

Продолжение включения ноутбука вместо отображения BIOS в большинстве случаев означает, что клавиша для входа отличается. Попробуйте также нажать Fn + F2, F8 или Delete. Еще один вариант: нажмите F12 для отображения меню загрузки («Boot Menu»), откуда выберите «BIOS Setup».

В старых ноутбуках сразу же при включении может отображаться клавиша, отведенная под вход в БИОС. В новых моделях этой информации на экране уже нет.

Как зайти в БИОС на ноутбуке Леново-04

Способ 2: Специальная кнопка

У лэптопов Леново есть фирменная кнопка «NOVO», расположенная на корпусе. Она предназначена для входа в среду восстановления на случай, если устройство не загружается. Нажав ее, вы вызовете специальное меню, через которое сможете попасть в БИОС.

Расположение кнопки сильно зависит от модели ноутбука. У современных моделей ее можно найти на правой или левой грани нижней части корпуса. Рядом с ней всегда есть иконка в виде дугообразной стрелки влево, как на примере ниже. Скорее всего, это будет утопленная кнопка, нажать которую получится только при использовании стороннего предмета: разогнутой скрепки, ключа для открытия SIM-лотка смартфона и т. п. Не используйте слишком тонкие и ненадежные предметы, которые могут сломаться, такие как иголка, зубочистка.

Как зайти в БИОС на ноутбуке Леново-01

В отдельных устаревших моделях «NOVO» расположена рядом с кнопкой питания и имеет точно такой же значок.

Как зайти в БИОС на ноутбуке Леново-02

В результате нажатия этой кнопки отобразится меню, из которого выберите «BIOS Setup» и дождитесь перехода в базовое меню ввода-вывода.

Как зайти в БИОС на ноутбуке Леново-03

Способ 3: Среда восстановления

Современные Windows позволяют попасть в BIOS через среду восстановления. Это можно сделать и когда ОС работает нормально, и при ее отсутствии на ноутбуке (либо когда она повреждена, но ноутбук загружается с флешки без предварительной настройки БИОС).

  1. У нас на сайте есть отдельная статья со всеми методами входа в среду восстановления. Она предназначена для Windows 10, но одинаково актуальна и для Windows 11. Нажмите по ссылке ниже и выберите подходящую для себя инструкцию.

    Подробнее: Как запустить среду восстановления в Windows

  2. Оказавшись в среде восстановления, перейдите в раздел «Поиск и устранение неисправностей».
  3. Как зайти в БИОС на ноутбуке Леново-05

  4. Затем — в «Дополнительные параметры».
  5. Как зайти в БИОС на ноутбуке Леново-06

  6. Здесь нужный вам пункт называется «Параметры встроенного ПО UEFI».
  7. Как зайти в БИОС на ноутбуке Леново-07

  8. Будет предложено перезагрузить устройство для автоматического входа в БИОС. Согласитесь с этим.
  9. Как зайти в БИОС на ноутбуке Леново-08

Наша группа в TelegramПолезные советы и помощь

Понравилась статья? Поделить с друзьями:
0 0 голоса
Рейтинг статьи
Подписаться
Уведомить о
guest

0 комментариев
Старые
Новые Популярные
Межтекстовые Отзывы
Посмотреть все комментарии
  • Подготовка автоматического восстановления windows 10 сколько длится
  • Nginx php fpm windows
  • Hisense vidaa tv windows 10
  • Интеллектуальное управление приложениями windows 11 как отключить
  • Критические обновления для windows 10