
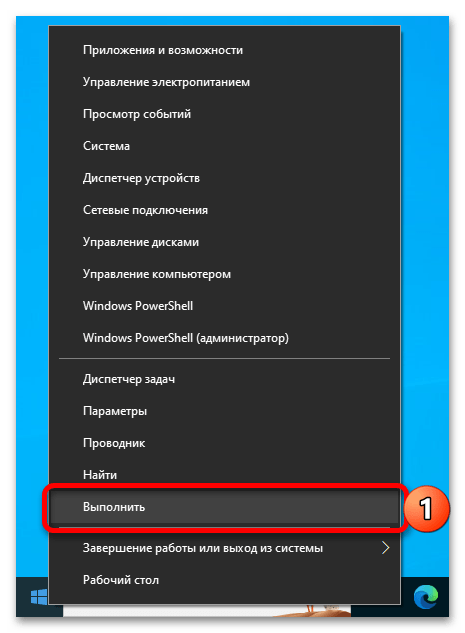
Способ 1: Параметры звука
Наиболее простым и удобным способом регулировки баланса звука в Windows 10 является использование одного из компонентов «Панели управления», также доступного и в обновленных «Параметрах». При этом вызвать его можно и напрямую, что мы и сделаем далее.
- Откройте окно «Выполнить». Это можно сделать через поиск, контекстное меню кнопки «Пуск» или с помощью клавиш «Win+R».

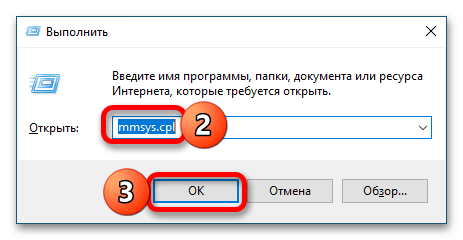
Введите указанную ниже команду и нажмите «ОК» или «Enter».
mmsys.cpl
Читайте также:
Как открыть окно «Выполнить» в Виндовс 10
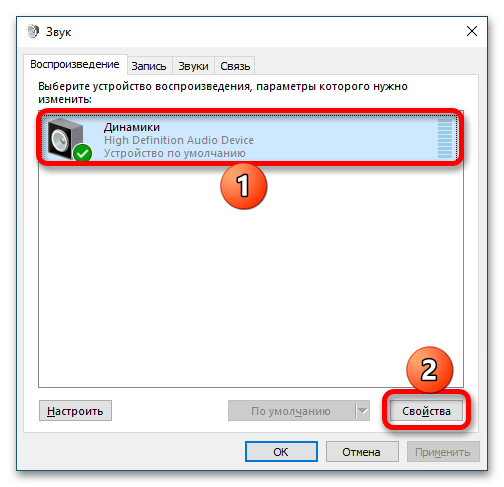
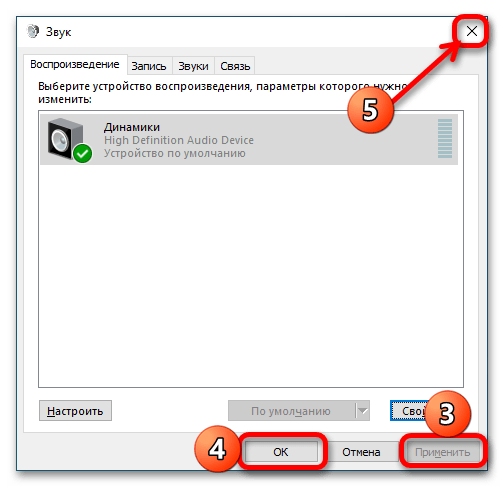
Полезные команды для оснастки «Выполнить» в Виндовс 10 - Выделите устройство, через которое воспроизводится звук (чаще всего это «Динамики» или «Наушники»; активное можно определить не только по зеленой галочке, но и по индикатору уровня громкости справа во время воспроизведения) и кликните по кнопке «Свойства».
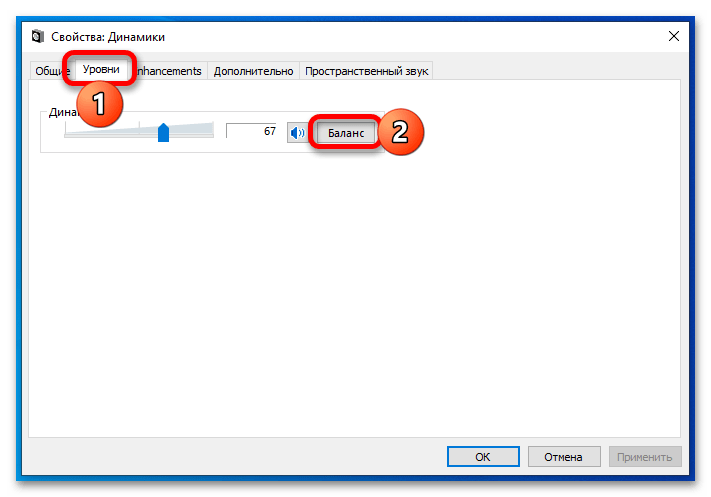
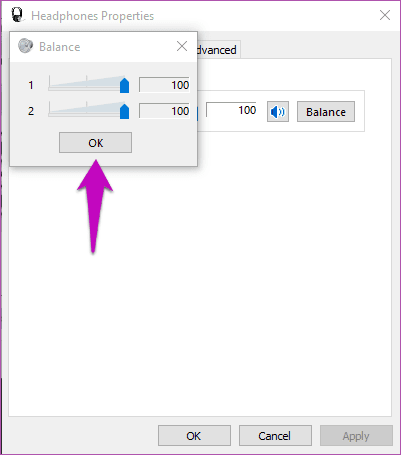
- Перейдите во вкладку «Уровни» открывшегося окна и нажмите на кнопку «Баланс».
- Отрегулируйте уровень громкости для левого и правого канала (а также остальных, если используется аудиосистема 2:1, 5:1, 7:1 или другого типа), после чего кликните «ОК» для сохранения внесенных изменений.
- Далее воспользуйтесь кнопками «Применить» и «ОК»,

после чего закройте более ненужные окна.

Баланс звука в колонках или наушниках будет изменен в соответствии с заданными вами параметрами. Если потребуется, аналогичным образом настройте другое подключенное к компьютеру аудиоустройство.
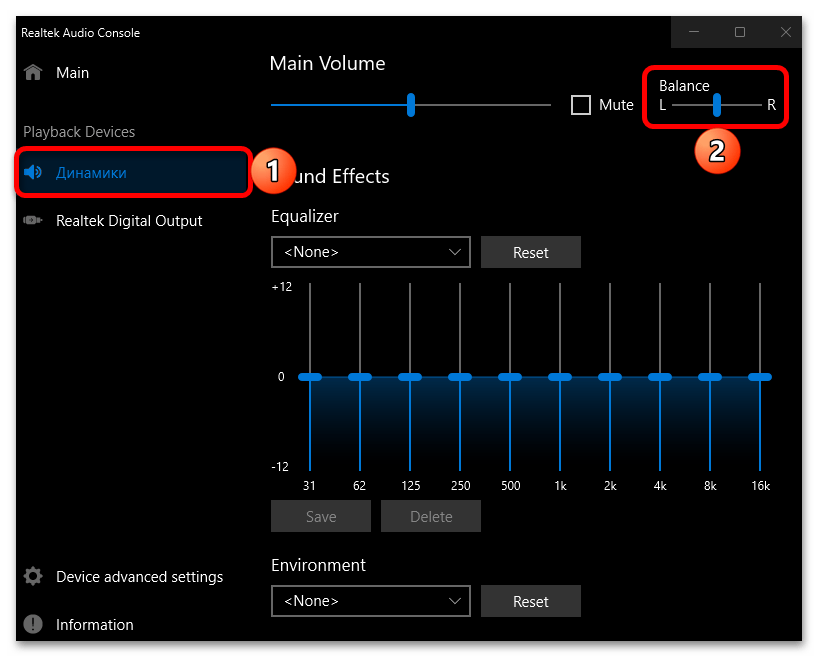
Способ 2: Диспетчер Realtek HD
На большинстве компьютеров и ноутбуков с Windows, помимо стандартного средства управления звуком, присутствует также «Диспетчер Realtek HD», предоставляющий более широкие возможности для настройки аудио, включая интересующий нас баланс.
Примечание: Если «Диспетчер Realtek HD» отсутствует в системе, выполните его установку, воспользовавшись для этого представленной по ссылке ниже инструкцией.
Подробнее: Как установить «Диспетчер Realtek HD» в Windows 10
Скачать Диспетчер Realtek HD
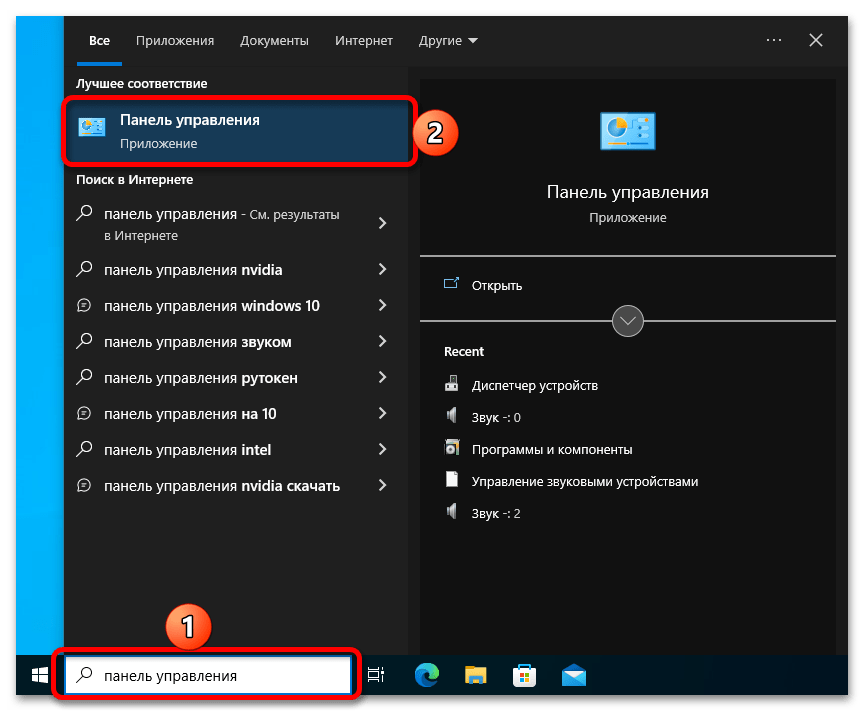
- Откройте «Панель управления». Проще всего это сделать, указав соответствующий запрос в системном поиске.

Читайте также: Как открыть «Панель управления» в Виндовс 10
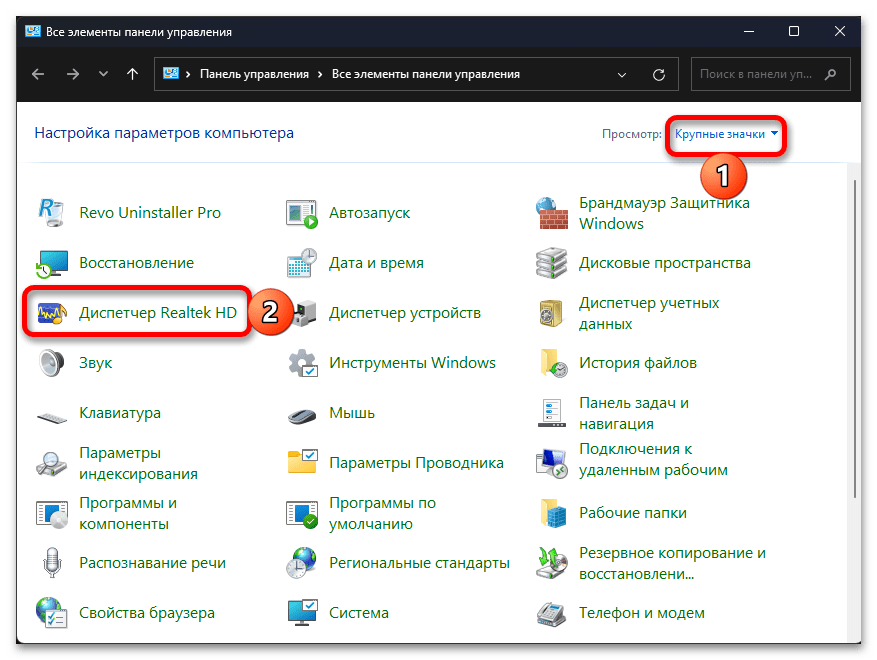
- Измените режим просмотра на «Крупные значки» и кликните по пункту «Диспетчер Realtek HD».
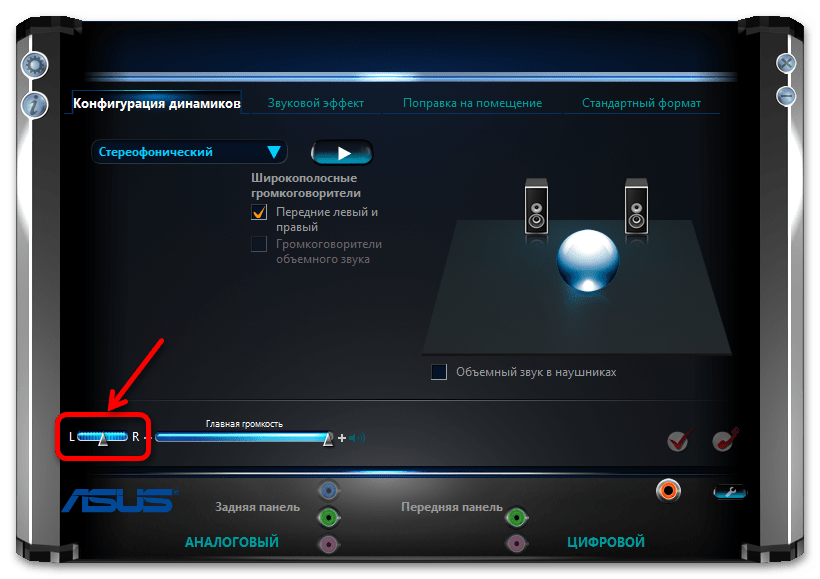
- В запустившемся интерфейсе приложения прежде всего убедитесь, что выбрано то устройство воспроизведения звука, баланс для которого требуется настроить. Внесите необходимые изменения, переместив бегунок между каналами «L» и «R» в соответствии с вашими требованиями.

Обратите внимание! У приложения «Диспетчер Realtek HD» есть несколько версий, в том числе адаптированных производителями материнских плат и ноутбуков. Их интерфейс и доступная функциональность могут довольно сильно отличаться, но элемент управления балансом звука обычно можно найти по соответствующим обозначениями вроде «L» и «R», «Баланс», «Balance», также он всегда располагается рядом с бегунком, отвечающим за уровень громкости.
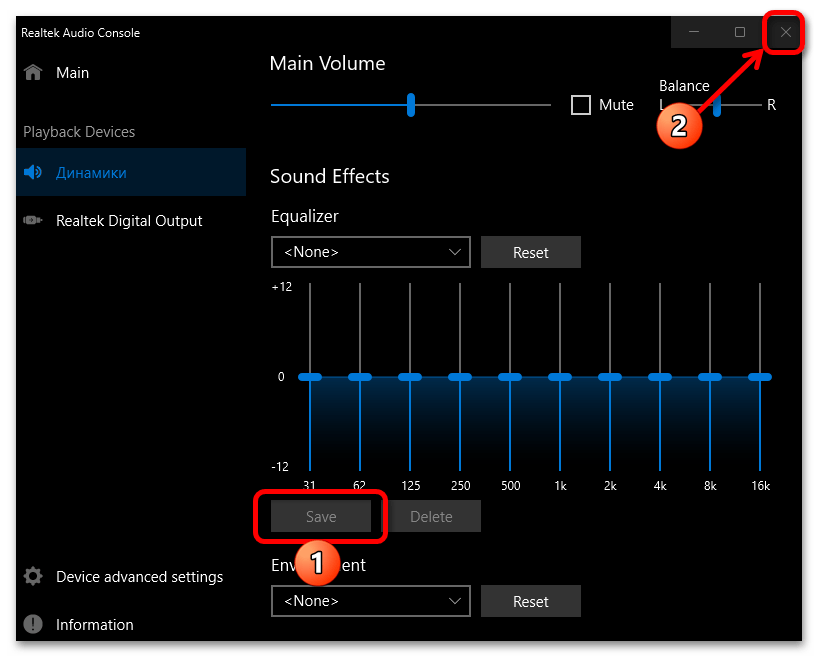
- Если баланс звука необходимо настроить для более чем одного устройства воспроизведения (например, не только динамиков, но и наушников), сделайте это, предварительно выбрав его в выпадающим списке или отдельной вкладке (зависит от версии «Диспетчера»).
- Сохраните внесенные изменения и закройте программу.

Наша группа в TelegramПолезные советы и помощь
Adjusting the left/right audio balance on Windows 10 system-wide is fairly straightforward and can be done in a few steps.
At the end of the article, you can find a section that lets you change audio balance in Windows 10 on an app-by-app basis.
System-Wide Windows 10 sound balance adjuster
Method 1: Use System settings
Step 1: Go to Settings -> System.
Step 2: Click on the Sound tab, then choose your sound output device (headphones, speakers etc.), then click on the Device Properties link.
Step 3: In the Device Properties window, adjust the Left and Right audio balance so that it’s comfortable with you.
Step 4: Close settings.
Method 2: Use the Control Panel Device settings
Step 1: Open Control Panel, click on Hardware and Sound.
Step 2: click on Manage audio devices, in the Sound category.
Step 3: In the Playback tab, double click on the sound output device (headphones, speakers etc.), that you use.
Step 4: In the Sound Device properties, click on the Levels tab, then on Balance. In the new window, adjust left and right audio balance to your liking.
Step 5: Click Ok on all the Windows to apply these settings.

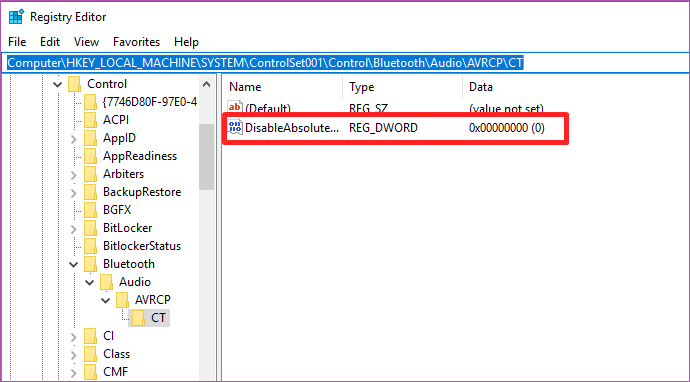
Method 3: Disable Windows Absolute Volume feature
For certain devices, it’s possible the left and right audio channels are locked together, meaning you can’t adjust them individually.

In this situation, changing the volume of the right channel will change the volume of the left channel as well, and vice versa.
This is caused by a Windows setting called Absolute volume. Fortunately, there is an easy way to disable it.
Step 1: Press Win + R to bring up a Run dialog.
Step 2: Type cmd and press Enter.
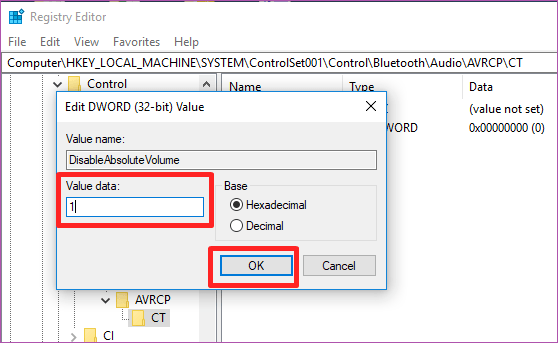
Step 3: In the Command Prompt window, copy and paste the following command:
reg add HKLM\SYSTEM\ControlSet001\Control\Bluetooth\Audio\AVRCP\CT /v DisableAbsoluteVolume /t REG_DWORD /d 1 /fStep 4: Press Enter to run the command.

Step 5: Restart your computer to bring the change into the system.
In case you are worried, you can reverse this change anytime you want.
Simply go through steps 1 to 3, but at step 3 copy and paste this text command:
HKLM\SYSTEM\ControlSet001\Control\Bluetooth\Audio\AVRCP\CT /v DisableAbsoluteVolume /t REG_DWORD /d 0 /fThen press enter and restart your computer.
Method 4: Use a simple hardware audio mixer
Hardware audio mixers are specialized devices that give you greater control over your headphones, speakers and similar devices.
Purely as an example, a $25 audio mixer from Saramonic will allow you to manually adjust the left / right audio balance on your sound device.

Simply connect your headphones or speakers to the audio mixer, and then connect the audio mixer to your computer.
Once that is done, just turn the knobs for each audio channel until you find the right settings for your ear.
Solutions if you can’t change left right audio balance with the above methods
Fix 1: Update the drivers for your headphones
If you’re using headphones and still have issues balancing the left/right audio channels, then do a firmware update for your headphones.
As with most devices, some issues aren’t caused by the actual hardware, but by faulty drivers.
Just search for “[your headphone model] firmware update”, find the link provided by your headphone manufacturer and install the firmware and see if that fixes anything.
Note: Sometimes you might need to restart your system for the changes to take effect.
Fix 2: Check the wiring on your headphones
If you’re using wired headphones, it’s possible the left/right audio balance might be messed up because of faulty wires and connections.
To test this, try all of the following tests at least a few times while listening to a sound source:
- Connect your headphones to the PC using a different 3.5 millimeter jack or USB port.
- If your headphones use a 3.5 jack, try twisting and turning the jack and listen to any distortions.
- If your headphones have hardware controls, be sure you aren’t accidentally activating them.

If you encounter any sort of distortions, then it’s possible your problems might be more hardware related.
Finally, double check you’re using the right headphone on the right ear, and left headphone on the left ear. Most headphones should have markings that indicate which ear piece is right and which is left.

This shouldn’t matter if you’re just listening to music, but movies and games usually have spatial audio to indicate where sound is coming from.
If your headphone orientation is flipped you might feel the need to change headphone orientation to compensate.
Fix 3: Disable Sound Enhancements in the Audio Devices Tab
In some cases, it’s possible your settings prevent adjusting the L/R audio balance individually.
For example, if you try to change the left balance, the right balance also changes to match the left balance.
In most cases, this should be an easy fix.
Step 1, 2 and 3: Here, follow the first three steps from Method 2 above until you reach the screen below:
Step 4: Click on Enhancements tab, and then activate Disable all enhancements.
Step 5: Click Apply, then go to Levels and try adjusting left / right sound balance again.
Fix 4: Change your audio quality settings
Step 1, 2 and 3: Here, follow the first three steps from Method 2 above until you reach the screen below:
Step 4: Click on Advanced tab, expand the Default Format tab and choose a different audio format. Be sure to also activate both options present in Exclusive mode.
Step 5: Click Apply, then go to Levels and try adjusting left / right sound balance again.
Fix 5: Run Windows Troubleshooter
Use Troubleshooter: Windows 10 has a built-in troubleshooter that can detect and fix issues with audio. Here’s how you can use it:
Step 1: Right-click on the speaker icon in the system tray and select “Troubleshoot sound problems“.
Step 2: Follow the prompts and apply any fixes recommended by the troubleshooter.
If this doesn’t work, then try checking with a different audio device. If you’re using headphones or external speakers, try using a different device to see if the issue persists. This can help you determine whether the problem is with your PC or the audio device you’re using.
Fix 6: Reinstall / Update drivers
Update Audio Drivers: Outdated drivers could cause issues with audio balance. You can update your audio drivers by:
Step 1: Right-click on the Start button and choose “Device Manager”.
Step 2: Expand “Sound, video and game controllers”, then right-click on your audio device and select “Update driver”.

Step 3: Follow the prompts to search for and install any available updates.
Reinstall Audio Drivers: If updating the drivers didn’t work, you could try reinstalling them. To do this:
Step 1: Go to “Device Manager” as before, right-click on your audio device, and select “Uninstall device”.
Step 2: Restart your PC. Windows should automatically reinstall the audio drivers on startup.
Adjust Windows 10 Sound balance on a per app basis
NirSoft SoundVolumeView
Download Link (scroll all the way to the bottom).
SoundVolumeView is a completely free program that gives you a huge amount of control over the sound settings of your computer.
For example, you can adjust your settings so that your sound volume is higher in Chrome, but lower in video game.
You can also use SoundVolumeView to adjust L/R balance in one program, but keep it different in another.
The interface is a bit clunky at first, but becomes easy to use once you understand the logic of it.
Here are the steps required to adjust sound balance on a per-app basis:
Step 1: Download SoundVolumeView and extract it into a folder.
Step 2: Open the SoundVolumeView.exe application.

Step 3: Click once on the app you want to change the L/R audio sound balance. Make sure the direction is Render (Capture usually means microphones).

Step 4: While the app is highlighted with the blue bar, click on Options -> Selected Channels. Channel 1 is left, while Channel 2 is right. Click on which channel you want to make louder/quieter.

Step 5: Move the bottom slider to the right until you can see the Channels Percent column. Notice how the sound balance is currently at 100% for each channel.

Step 5: Use the following commands to make certain channels louder/quieter:
- Decrease volume 1% – Ctrl+1
- Increase volume 1% – Ctrl+2
- Decrease volume 5% – Ctrl+3
- Increase volume 5% – Ctrl+4
- Decrease volume 10% – Ctrl+5
- Increase volume 10% – Ctrl+6
The image below shows how the left channel for the game Battlefield V is now at 70%, without affecting the sound balance for other programs.

Now follow the same steps above, but for the other channel.
That’s it. If you want to read more about SoundVolumeView and how it works, go to this link and scroll almost to the bottom. You should see a list of how-to and other guides for this program.
VB-CABLE- virtual audio cables
This software is much more technical and advanced than SoundVolumeView, but we’re putting it here just in case you’re a sound enthusiast.
In essence, VB-CABLE is a virtual audio device that works as a virtual audio cables. This gives you a ton of flexibility in how you can setup your sound systems.
Here is the download link in case you want to get crazy with this.
- Author
- Recent Posts
Paul Bonea is the founder of Datasourse (formerly Perfect Data) and is a fullstack digital marketing professional with a wealth of knowledge in SEO, PPC, Social Media, and Data Analytics.
Have you ever paid careful attention to the sound on a Windows 10 computer and found something was off? You may have tried to use a headphone, Bluetooth speaker, or any other audio device. However, the imbalance would be audible clearly. That means, one side of your headphone is louder than the other. At times, your audio devices are just simply producing distorted sounds when connected to your PC.

If the sound output of audio devices on your computer isn’t balanced, there is no need to throw them or reinstall Windows. You can correct or fix the imbalanced audio. This guide will enlighten you on how to get it done and ultimately optimize your listening experience.
What Messes up Your PC’s Audio Balance
1. OS Upgrade
Upgrading your PC’s operating system to a new Windows version could disorient some default settings you had previously put in place. With a new OS installed on your computer, there’s a possibility that your audio settings become distorted. Some users have reported sound imbalance after upgrading their PC to a new OS.
2. Special Audio Enhancements
Windows PCs come built-in with special audio enhancements that are designed to help your audio devices sound better. While these special audio enhancements truly help improve sound quality, they sometimes mess up the balance of audio devices connected to your PC.
3. Faulty Headphones/Speakers
Sometimes, it’s not your PC. The speakers of your audio devices are just faulty and need to be replaced. To be sure it’s not your PC that’s responsible for the audio imbalance, here are some ways to check (and adjust) the audio balance of your Windows 10 PC.
1. Disable Special Enhancements
If you notice some level of imbalance in the audio channels of your headphones or speakers, it could be as a result of some enhancement that your Windows PC might have activated by default.
Enhancements like Bass Boost, Surround Sound, Room Correction, etc. could distort the balance of your headphone channels. To correct this, disable all special enhancements attributed to your Bluetooth headphones.
Here’s how to do that.
Step 1: Right-click the speaker icon at the bottom-right corner of the taskbar and select Playback devices.
Step 2: Select your audio device and click on Properties.
Step 3: In the Enhancements section, check the ‘Disable all enhancements’ box. Click on Apply and then OK to save the changes.
If you do this correctly, the sound quality of your audio device should now be balanced. Otherwise, check method 2 below.
2. Adjust Left-Right Speaker Volumes
If disabling special enhancements doesn’t yield the desired result, proceed to check (and adjust) the volumes for each channel. Also, it is recommended that you use this method with every new headphone or speaker pair you plan to use with your computer. That should give you the sweet spot of output that the audio gear is capable of.
Step 1: Right-click the speaker icon located at the bottoms right corner of the display and select Playback devices.
Step 2: Moving forward, select the device whose audio balance you want to adjust and click Properties.
Step 3: On the new window that pops up, navigate to the Levels section and click Balance.
Step 4: Next, adjust the volume and balance of the left and right channels/speakers of your device to your taste.
Note
If the left and right channels of your audio device have different/unequal volumes, be sure to balance them out.
Step 5: Click OK to save the changes. You can play a video or music to confirm if indeed the changes have been effected.
3. Tweak the Registry Entry
Some manufacturers permanently lock down the left-right audio channels of their accessories, so you might be unable to adjust the volumes of the device (as in Step 4 above).
Windows also sometimes lock down the ability to adjust audio volume/balance by default. The good thing, however, is that it can be unlocked. Here’s how to disband the joint volume of your headphone channel by editing the Windows registry.
Step 1: Launch your Windows PC run function using the Windows + R keys on your keyboard.
Step 2: Type regedit in the provided dialog box provided and tap the Enter button on your keyboard.
Step 3: Navigate to the following path/location in the registry editor:
HKEY_LOCAL_MACHINE\SYSTEM\ControlSet001\Control\Bluetooth\Audio\AVRCP\CT
Step 4: At this location, double-click on the value named DisableAbsoluteVolume and change its value data to 1.
Step 5: Lastly, click OK to save the change and restart your PC.
Now that you’ve disabled absolute volume, you can now manually balance the audio channels of your Bluetooth headphone.
Note
Balance Should Be Restored
That’s it. You’re done adjusting the balance of your audio device(s). These tricks works for wired headphones, wireless speakers, soundbar, or whatever audio device is hooked up connected to your Windows PC.
Next up: Do you know that headphones that support aptX HD deliver immersive audio experience? Check out the best aptX HD wireless headphones money can buy you below.
Was this helpful?
Thanks for your feedback!
The article above may contain affiliate links which help support Guiding Tech. The content remains unbiased and authentic and will never affect our editorial integrity.
При воспроизведении различного типа аудио и просмотре видео, особенно в Интернете, пользователь может столкнуться со значительно различающимися уровнями громкости для разных источников. Например: громкая реклама и относительно тихое звучание основного контента, различный уровень громкости двух собеседников в видео и аналогичные ситуации.
Если подобные вещи мешают вашей работе за компьютером или ноутбуком, вы можете включить функцию выравнивания громкости (Loudness Equalization) в Windows 10 и проверить, поможет ли она решить проблему. Возможность может быть полезной как для тех, кого резко включающиеся громкие звуки заставляют подпрыгивать, так и для тех, кто плохо слышит и хотел бы выровнять всё воспроизводимое аудио по верхней границе громкости. В этой инструкции подробно о включении опции и нюансах, с которыми можно столкнуться при попытке её задействовать.
Включение функции Выравнивание громкости или Loudness Equalization
Прежде чем приступить, учитывайте: что для некоторых звуковых карт и на некоторых драйверах опция может быть недоступной: попробуйте установить оригинальные драйверы звука от производителя материнской платы или ноутбука, а если это не привело к появлению опции — последние доступные драйверы вашей звуковой карты из других источников.
И даже это не гарантирует наличие опции: например, для моей старой звуковой карты Creative она недоступна, на относительно новом Realtek HD и для HDMI звука от NVIDIA — есть. В этом случае можно проверить наличие опции в отдельном фирменном ПО для управления звуком, либо использовать сторонние бесплатные программы, такие как WALE (Windows Audio Loudness Equalizer).
Сами шаги по включению выравнивания громкости в Windows 10 выглядят следующим образом:
- Нажмите правой кнопкой мыши по значку динамика в области уведомлений и откройте Параметры звука.
- В разделе «Вывод» нажмите «Свойства устройства».

- На следующем экране в разделе «Сопутствующие параметры» нажмите «Дополнительные свойства устройства». Пункт может располагаться не внизу, как на изображении ниже, а в правой части окна.

- Перейдите на вкладку «Enhancements» (Улучшения) при её наличии.
- Включите опцию «Loudness Equalization» или Тонкомпенсация и примените настройки.

- Вместо шагов 1-3 можно открыть окно устройств записи и воспроизведения, выбрать нужное устройство воспроизведения и нажать по кнопке «Свойства».
- При следующих запусках контента с аудио, звук будет выравниваться, и, как заявляется в описании опции — в соответствии с особенностями человеческого слуха.


Субъективно, выравнивание производится по уровню громкости, выставленного для устройства вывода звука следующим образом: тихие звуки «подтягиваются» к установленному в Windows 10 уровню, а громкие остаются на прежнем уровне.
То есть после включения выравнивания, при том же установленном уровне громкости, всё начинает звучать несколько громче, чем обычно, но уже без резких перепадов. Для возврата привычной картины громкость в Windows 10 может потребоваться слегка убавить (при условии, что функция не была включена из-за проблем со слухом, когда, напротив, требуется поднять уровень всех звуков).