
Note:
- This tutorial is Windows-specific. For the Mac version, go here.
- This tutorial deals only with hooking Pd up with Microsoft’s in-built MIDI synth, GS Wavetable Synth. For an example of how to hook Pd up with a non-in-built DAW, go here
————————————-
In this tutorial, you will learn how to hook up Pd with Microsoft’s in-built MIDI synth: Microsoft GS Wavetable Synth.
———————————-
- Open Pd
- Go to Edit>Preferences, or press Ctrl+P
- Go to the MIDI tab, and under “Output Devices”, select “Microsoft GS Wavetable Synth”
- Test MIDI.
- Click on “Media” in toolbar>”Test Audio and MIDI”. The testone.pd window should open
- Check the box under MIDI OUT

- This should send a message to GS Wavetable Synth, and middle C’s (60)* should start playing in 500 millisecond intervals (120 BPM). Or in the case of XY, it will trigger a sequence of notes every 500 milliseconds
- You may notice the coloured box next to “NOTE IN” in your Reaktor 6 player will start pulsing to the beat
——————————–
* It won’t really be a middle C, but I just refer to it as such because 60 is middle C in MIDI. Discussed here.
Published
Configuration Knowledge Level
Configuration articles and guides for software and hardware. These settings are mandatory unless otherwise stated
Contents
- 1 Setting MIDI Devices in Windows (simple):
- 2 Setting MIDI Devices in Windows (advanced):
- 2.1 Install MIDI-OX and loopMIDI
- 2.1.1 Configure loopMIDI
- 2.1.2 Configure MIDI-OX
- 2.1 Install MIDI-OX and loopMIDI
- 3 Setting MIDI Devices in macOS:
- 4 Troubleshooting
Instructions for Windows and macOS users
We are using Roland JP-8000 in this guide, but this can be applied to any other synthesizer we have made the plug-in for as well.
Our focus is mostly based on Windows systems, which can not share MIDI devices between applications unless the driver is multiclient-compatible.
There are some tips and guides for masOS users as well, so be sure to read this through.
Setting MIDI Devices in Windows (simple):
If you plan to route MIDI messages from your DAW to the plug-in channel and send it to synthesizer from there, then you don’t need to read this, and you can proceed with the DAW guide that is relevant to you.
However, if you use the synth as a master keyboard in your rig or you want to delay compensate the MIDI output with the DAW, then check the advanced procedure below.
Setting MIDI Devices in Windows (advanced):
You can jump over this step, if your synthesizer is NOT used as a master keyboard in your RIG. However, we recommend adding at least one Virtual MIDI Out port for the connections.
Before we jump ahead to launch our DAW, lets do some tweaks in our system to ensure the plug-in can work with maximum efficiency. For that, we are going to need some additional tools.
- MIDI-OX for making routings behind the scenes and
- loopMIDI to create virtual MIDI ports.
We recommend installing old but trusty MIDI-OX application for Windows to make some virtual routings behind the scenes.
You can download MIDI-OX from here: http://www.midiox.com/zip/midioxse.exe
OR go to MIDI-OX website http://www.midiox.com and download the installer there.
Second application is loopMIDI by Tobias Erichsen which is perfect for creating Virtual MIDI cables inside your workstation.
You can download loopMIDI from here: https://www.tobias-erichsen.de/software/loopmidi.html
Install MIDI-OX and loopMIDI
Install both MIDI-OX and loopMIDI prior to running MIDI-OX. It is important to have both installed especially if you use a synthesizer which is used as a master keyboard in your setup!
This will allow us to clone the MIDI data from the physical MIDI interface ports to virtual ports and then later on route it inside MIDI-OX back to your DAW while the main port is assigned to the plug-in.
Example: MIDI from synth -> MOTU microLite port 1 -> MIDI-OX -> loopMIDI virtual port.
This configuration allows us to open the loopMIDI virtual port in the DAW while we use the MOTU microLite port 1 with the plug-in itself and there won’t be a crash!
Configure loopMIDI
Now that loopMIDI is installed, we can configure the ports. The reason why we are installing loopMIDI is so that we can loop back (clone) the MIDI data from the hardware MIDI port to the DAW via MIDI-OX.
This is pretty straight forward, but we will guide you through.
First up, open the loopMIDI settings dialog from the Windows menu bar with right click and choose Configure loopMIDI
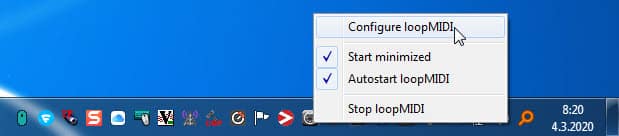
Right Click and choose Configure loopMIDI
Once loopMIDI opens up, it should look something like the image below.
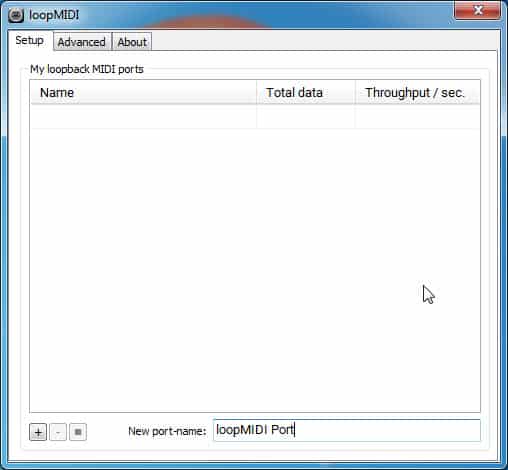
loopMIDI initial view
Click the New port name: field and type in your Virtual MIDI port connection name. In this example, we are going to type in “JP-8000 vMIDI In” and after that we click the + -sign to actually add it in.
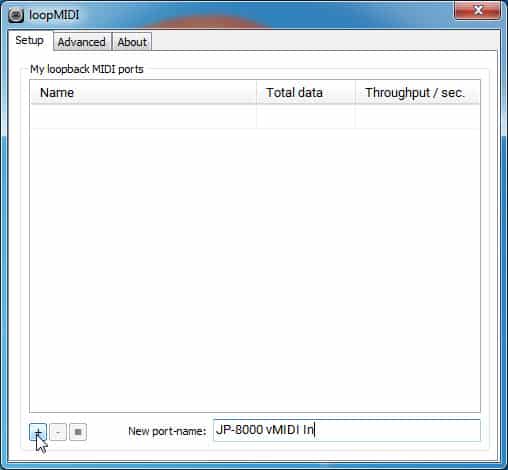
Type in your port name and click + to add it in
Next up we will add another port, and this is going to be called “JP-8000 vMIDI Out”. Remember to click the + -sign so it adds the port in the list.

Add another virtual port and click + to add it
Now we have added the ports we need, so this is how it should look like!
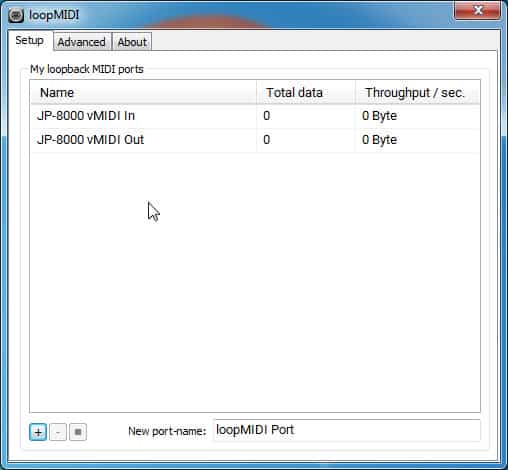
loopMIDI virtual ports configured
You can now close loopMIDI window. Right click on the loopMIDI icon in the menu bar and make sure it is set to “Start minimized” and “Autostart loopMIDI” so you don’t have to worry about it during next boot.

Finishing touches to loopMIDI setup
Configure MIDI-OX
MIDI-OX is the second application needed in order to loop back the MIDI data to the DAW without crashing it. Windows will usually crash, or more importantly, your DAW will crash when you try to open the MIDI port twice within the DAW.
There are few steps to take in MIDI-OX, but it will be worth the trouble to get data passing from the synthesizer to your DAW as well as in the plug-in without crashing your session.
Search MIDI-OX from Windows startup menu and open it
Search MIDI-OX and open it
Default view of MIDI-OX setup should look like when you first open it.

MIDI-OX Initial state
Click “View” menu item and choose “Port Routings…” This should open a blank routing sheet where we will make our connections.

Open Port Routings View
After the Port Routings is opened, we need open our Physical and Virtual MIDI ports for the MIDI-OX.
Click “Options” and then choose “MIDI Devices…”.

Select MIDI Devices from the menu
NOTE: There are no Input Ports and Output Ports defined yet in the MIDI Port Routing Window!
After MIDI Devices is opened up, we can see all of your Physical and Virtual MIDI ports which are in our disposal. Before selecting any ports, uncheck “Automatically attach Inputs to Outputs during selection.” or you will end up with massive connection spaghetti which isn’t what we are making here!
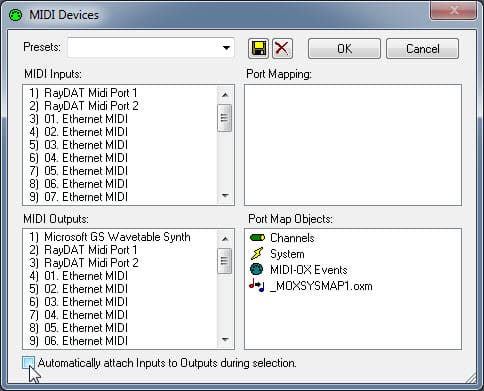
Uncheck “Automatically attach Inputs to Outputs during selection”
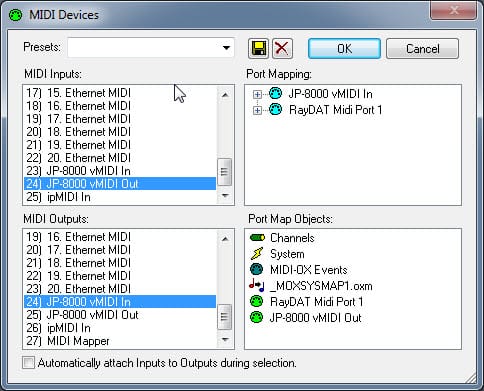
MIDI Inputs: I’ve chosen RayDAT Midi Port 1 where my JP-8000 MIDI Out is connected and loopMIDI port JP-8000 vMIDI Out.
You might wonder why it’s opposite to JP-8000 vMIDI In, but there is a reason for that. Once we do the routing in MIDIOX, the names would appear in opposite order, making it nuts to choose JP-8000 vMIDI Out in our DAW as a MIDI Input. That might not make sense at this point, but trust me, I’ve done this quite a few times now.
MIDI Outputs: I’ve chosen RayDAT Port 1 where my JP-8000 MIDI In is connected and loopMIDI port JP-8000 vMIDI In.
Same idea here with JP-8000 vMIDI In chosen at MIDI Outputs as explained above with MIDI Inputs.
Click OK after you have verified your port selections.
Click OK after Port selections
NOTE: Your MIDI input and MIDI output ports for your synth might be different to our example so we are only using them to refer where our JP is connected.
Once the MIDI ports are defined, MIDI-OX might automatically assign “MIDI-OX Event Port” to any of the Output Ports chosen.

In some cases, MIDI-OX might auto assign some connections..
In case there are pre-made connections in the window, right click one of the gray nodes in the wire and choose “Disconnect All”. This will clear all the pre-made connections so we can start from fresh!
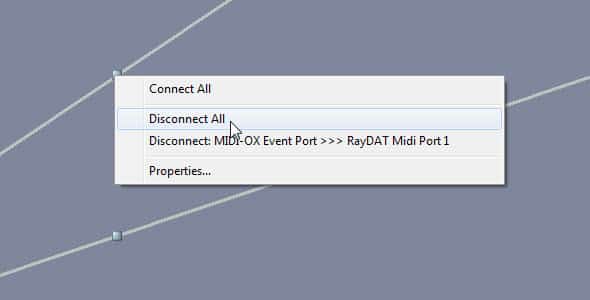
Click dot in the connection line and select Disconnect All
Drag a cable from “Input Ports” RayDAT MIDI Port 1 to “Output Ports” JP-8000 vMIDI In port.

Drag connection from Physical port to vMIDI In port
Drag a cable from “Input Ports” JP-8000 vMIDI Out to “Output Ports” RayDAT MIDI Port 1.

Drag connection from vMIDI Out port to Physical port
NOTE: In order to establish the connection, you must drag the wire on top of the MIDI plug icon!
Next up, we will modify the connection type so that we will block unnecessary data flow. Right click on the gray dot at the connection to reveal the menu and choose “Properties…”

Right click the dot in connection for Properties
From Properties window, let’s block Common (MTC …), Realtime (Clock, AS …) and Exclusive (SysEx) message by unchecking the boxes in System section.
We simply don’t need this data unless you send realtime clock info from your DAW to the synthesizer!
Click OK to close the Properties and do the same for each connection you’ve done!
Filter out unwanted messages
Now after all of the connections are done and we are ready to proceed, click the traffic light icon in MIDI-OX tool bar to toggle MIDI-OX in the taskbar tray.
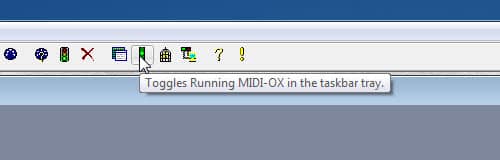
Run MIDI-OX in taskbar tray
You can now minimize the window and it will be sent to the taskbar tray.
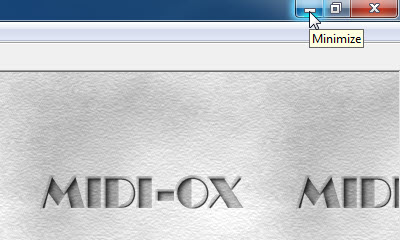
Minimize MIDI-OX to continue!

MIDI-OX sent to taskbar tray
TIP: If we are not mistaken, you should be able to add MIDI-OX in the Windows start up menu so it will launch automatically when you boot your system. All the connections will remain, IF the MIDI Devices are connected as they were while making this guide.
Setting MIDI Devices in macOS:
macOS can share MIDI devices between applications, so there are no additional steps required here!
However, you can add your device in the Audio- and MIDI-setup application to show up the real device names in your DAW MIDI device list.
You can see from the image below, how I’ve dragged connections from each of my synth to my MIDI interfaces where they are connected in / out at. This will result the DAW to display the MIDI port names as written above.

Connections made between MIDI Interface and Hardware
In the image below, is an example how I’ve done my Roland JP-8080 [1] definitions in Audio- and MIDI-setup. I have defined that my JP-8080 Transmits [2] MIDI messages from channels 1-3 and Receives [3] MIDI messages from channel 1-3 + receives Realtime Clock & MIDI Time Code.
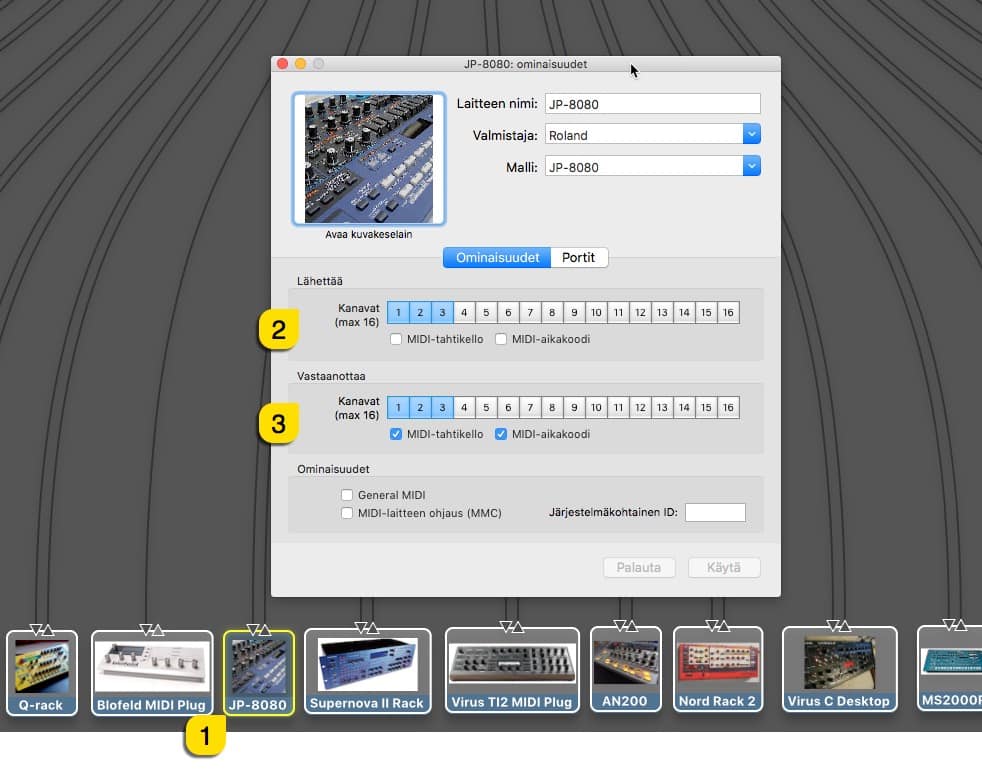
Hardware properties for MIDI and Clock
That is it for the MIDI setup tutorial. We hope you find this useful!
Troubleshooting
loopMIDI and MIDI-OX are both shipping their own user manuals, so please refer to their documentary to learn more about how they work.
Rate this article
In some cases virtual MIDI ports are required to send and receive MIDI data between a plug-in and a host application or between plug-ins.
If you need any help or have questions, please feel free to contact us!
Virtual MIDI on Mac
The OSX operating system provides virtual MIDI ports natively and can be enabled by following the steps below.
- Launch the «Audio MIDI Setup» application which you can find in the Applications > Utilities directory.
-
Open the MIDI Studio Window.

-
Double click the IAC Driver icon and enable the driver by checking the option «Device is online».
- Now you can add, remove and rename Ports to your preferences.
-
Restart your host application. You should now be able to select your virtual MIDI ports within your host and within the MP3244 or SQ4.


Virtual MIDI on Windows
The Windows operating system dose not provide virtual MIDI ports natively. There are several tools which can establish virtual MIDI ports.
To name two often mentioned tools:
- loopMIDI developed by Tobias Erichsen
- MIDI Yoke which is part of the MIDI OX Utility
loopMIDI is our favorit, since it is well maintained and very easy to setup. Find below a quick setup guide:
- Download and install loopMIDI: Download
-
Start loopMIDI and setup your virtual ports. You need one port for each connection.
-
To autostart your virtual MIDI ports you need to goto the traybar, right click the loopMIDI icon and activate autostart.
- Restart your host application. You should now be able to select your virtual MIDI ports within your host and within the MP3244 or SQ4.


Note: this document is subject to change over time.
Last modified: Jan 19, 2021 @ 9:37 am
This page is for WINDOWS ONLY. It covers a broad spectrum of Windows versions up through Windows 10. Looking for help with another operating system?
- For Linux, see the following article from the Rosegarden site: Improving Your Linux System for Creating Music
- For Mac users, I have a separate page for working with MIDI on OS X.
Contents
1 Introduction
1.1 A Note for Digital Audio Workstation Users
2 MIDI
2.1 MIDI Messages
2.2 Controllers vs. Synthesizers
2.2.1 The Windows Default Synthesizer (MS GS WaveTable Synth)
2.3 Virtual MIDI Ports
3 Audio Interfaces / Soundcards and Audio Drivers
3.1 Audio Drivers
4 Recommended MIDI-Related Software
4.1 Virtual MIDI Ports
4.2 Software Synthesizers
4.3 Software for Setting the Default MIDI Output Device
(Windows Vista and 7 Only)
4.4 MIDI Message Routers
4.5 Universal ASIO Drivers
5 Audio and MIDI Hardware
5.1 On-Board Sound
5.2 PCI Soundcards/Audio Interfaces
5.3 USB Audio Interfaces
5.4 USB MIDI Interfaces
6 Configuring MIDI Setups
6.1 Getting MIDI Input without a Physical Device
6.2 Sending MIDI Controller Messages to the Default Windows Synth 6.3 Sending MIDI to a Better Synthesizer
6.4 Sending MIDI Messages between Programs
6.5 Minimizing Latency
1 Introduction
The purpose of this document is to give examples of ways to configure commonly used MIDI setups on Windows and to clarify a number of misconceptions about the process that are common in the computer-related music community. Reasons for landing on a document like this include:
- Wanting to make MIDI aspects of legacy software work on later versions of Windows.
- Needing a better-performing MIDI synthesizer than the one Windows comes with.
- Trying to get two MIDI programs to talk when they can’t see each other.
- Confusion about the whole MIDI/audio thing (i.e. “what is this ASIO thing?”).
This document includes both general remarks and explanations about MIDI and audio devices as well as various MIDI-related software recommendations. Details on how to set up equipment and software for specific tasks can be found at the end under “Configuring MIDI Setups.”
1.1 A Note for Digital Audio Workstation Users
Those using Digital Audio Workstation (DAW) software may or may not find this document useful. Programs like Cakewalk Sonar and Steinberg Cubase are examples of DAWs for Windows. DAWs handle many aspects of the MIDI setup for synthesizers internally, both presenting a different interface and eliminating some of the difficulties faced when using stand-alone software synthesizers. The main applicable part of this document to DAWs would be the sections on audio devices and drivers.
If you have landed on this document after being stuck with no sound coming from your DAW, which is the most common problem I hear about, you likely have some settings related to your audio devices to work through. Unfortunately, those are often quite specific to the individual devices and programs. Make sure sound is being sent to the right places and being listened for in the right places, and check both hardware settings, driver settings for any devices, and settings within the DAW. Similarly, if devices aren’t being recognized, you probably have some driver issues to resolve – or your device simply might not work on the particular version of Windows you have (a common issue for older hardware on Windows 8/8.1). DAW-specific tutorials will probably offer you more help than I can in this document.
2 MIDI
MIDI stands for Musical Instrument Digital Interface. It is a protocol for communicating information between various devices and it has been around for over 30 years. For various reasons, many people new to MIDI stuggle with what exactly it is and, therefore, often misunderstand what it and programs using it can and cannot do. Here are some quick facts that are often stumbling points for people that are new to working with MIDI and audio, each of which will be addressed in more detail later:
- MIDI is a way of communicating between devices with certain message formats. For example, a MIDI controller can communicate to another device, perhaps a synthesizer, when a pitch should start and when it should end—much like the information communicated by a note on a paper score. In fact, a MIDI file is actually pretty close to a paper score in terms of the types of information it captures.
- MIDI is not sound! You cannot “hear” MIDI any more than you can “hear” a paper score
by itself. MIDI controllers do not create sound by themselves. Things that make sound from MIDI must interpret what they are told via the MIDI protocol. These devices are synthesizers, and they interact with audio devices to create sound. - Generally, your on-board sound chip and many external soundcards know nothing special
about MIDI and they are not MIDI synthesizers. - Windows actually does know something about MIDI, but as of Windows 8/8.1, the operating system doesn’t let you have a say about what it does in that regard. It leaves all managing of MIDI settings to individual applications (such as a DAW).
Note that a “MIDI device” does not have to be a piece of hardware. There are plenty of software “MIDI devices” that can be called as such simply because they show up in the device manager when running.
2.1 MIDI Messages
MIDI information is broken into messages, which are sent over some communication medium. Messages can refer to “programs” or patches (think of it as an instrument name), channels, pitches, and so on. Channels can be thought of like staffs on a digital music score. Some examples of MIDI messages include:
- Note on: start playing a particular pitch on a particular channel at a particular volume.
- Note off: stop playing a particular pitch on a particular channel.
- Program change: assign a new instrument to a channel.
Once again, these messages must be interpreted by a synthesizer in order to create sound. Sometimes MIDI messages are also called MIDI events.
MIDI-related programs that do not show up in the device manager when running are not MIDI
devices.
2.2 Controllers vs. Synthesizers
The difference between a MIDI controller and synthesizer is quite simple:
- A MIDI Controller is a device that allows a human to push some buttons or keys and generate MIDI messages or events. In: human ineraction. Out: MIDI messages. There is no sound involved.
- A MIDI synthesizer is a device that receives MIDI messages and produces sound. In: MIDI messages. Out: sound via an audio device or audio jack.
In a hardware-only setup, a MIDI controller (like a keyboard) would be physically connected to a MIDI synthesizer, to which speakers or headphones would then be connected. Perhaps some of the sound vs. MIDI confusion that the music community experiences is due to the fact that may keyboards actually include both of these elements: they are all-in-one MIDI controllers and synthesizers. However, any such device that features both “MIDI in” and “MIDI out” ports can usually be used as one or the other independently.
There is also a third category of devices that simply re-rout and/or re-interpret MIDI messages. As hardware, these devices are usually peripherals used to do specialized tasks like duplicating a stream of MIDI messages, merging MIDI message streams, or allowing a foot pedal to send messages down a regular MIDI cable (foot pedals meant for use with MIDI equipment typically have 1/4-inch TS or TRS plugs and send control voltage that has to be interpreted by something as a series of MIDI messages). Software also exists to re-rout, merge, and split MIDI messages.
2.2.1 The Windows Default Synthesizer (MS GS WaveTable Synth)
Windows comes with a MIDI synthesizer build into it: the Microsoft GS Wavetable synth. It is what allows you to double-click on a MIDI file, open it in some MIDI player, and hear the file interpreted as sound. Although this default Windows synthesizer has the redeeming point that it allows you to have a MIDI synthesizer with absolutely no setup required, it is the source of many complaints from the Windows-based music community.
- It sounds terrible. Is that an oboe, bassoon, or kazoo? It’s hard to tell sometimes.
- It lags like nobody’s business. In technical terms, the lag is referred to as latency. If you hook up a MIDI keyboard to talk to this synthesizer (although this in itself is an issue), you will experience high latency: there is a noticeable delay between the key going down and sound actually starting. The delay is big enough that it is completely intolerable for anyone trying to use MIDI input in a serious way. 100ms or more is not unusual.
- There is no easy MIDI-in setup. Even if you aren’t put off by the latency, there is no way to configure this synthesizer to directly take input from a MIDI controller unless the controller already has software that allows you to redirect its output. Often 3rd party software is needed to be able to play the default synthesizer from a keyboard or some similar device.
- It is more difficult on recent Windows versions to get away from this laggy kazoo synth and
use a better one. On Windows XP this was relatively easy and you could just point the operating system to that other synthesizer manually. Windows Vista and 7 started to hide that functionality; on Windows 7, you could still do it, but it meant diving into the registry or using 3rd party software. On Windows 8/8.1, it is actually impossible to change the default synthesizer in a simple and generalized way.
While it’s nice that Windows just goes and does the MIDI-to-synthesizer thing for you when you want to play a MIDI file with minimal effort, these points are quite a nuisance to many music people. Some solutions and workarounds are explained in later sections. However, due to the progressive lack of support for easily using other synthesizers, some extremely old MIDI editors may end up being chained to the default synthesizer on Windows 8. However, this does NOT mean you can’t set a different output device within other music software on Windows 8/8.1, and any reasonably modern piece of MIDI-related software will let you do so. The only programs I have ever personally seen that did not allow setting the output device actually predated Windows XP.
2.3 Virtual MIDI Ports
A virtual MIDI port is a piece of software that runs in the background to send/receive MIDI messages from other programs or hardware devices. When running, virtual ports will show up in the Windows device manager under “sound, video, and game controllers. Virtual MIDI ports allow communication between MIDI-related programs that are not perceived by Windows as MIDI devices (which is to say that they do not show up in device manager). In other words, these programs might be able to send and receive MIDI messages, but they can’t “see” each other directly—but they will both be able to see a virtual MIDI port and can, therefore, use it to communicate. Hardware ports can be used similarly, although it often requires using a MIDI cable to create an ungainly self-loop (connecting a device’s output to its own input).
3 Audio Interfaces / Soundcards and Audio Drivers
Typically the term “soundcard” is used to refer to audio hardware that sits inside the computer (on the motherboard or a PCI card), while the term “audio interface” is used for external devices connected by USB/firewire/etc. However, external devices are sometimes referred to as “external soundcards” and some internal devices are referred to as “audio interfaces.”
Soundcards or audio interfaces and on-board sound chips are responsible for producing the signals that go into your headphones/speakers and/or for taking audio input from a microphone or other audio device.
These devices do not necessarily have anything to do with MIDI. Some older sound cards have hardware-level support for MIDI (in other words, they had their own synthesizers), and a few
modern cards do as well, but it is rare (see the PCI cards section later on). Most modern ones do not. In other words, with a recent PC and sound card, you are likely to hear the
exact same default Windows synthesizer with your on-board sound and when you plug in an expensive external or PCI sound card. Both will lag terribly even if the latency on the
expensive card is a little less terrible. The fact that a sound card doesn’t act directly as a MIDI synthesizer doesn’t mean that the particular card used is unimportant. In fact, it is quite
important, and the drivers that the device has are one of the most important parts for getting low latency.
3.1 Audio Drivers
As with any device, sound cards require drivers to be usable. Not all of these drivers are equal in their performance. Several types of audio drivers are commonly seen for Windows sound devices, each representing a different protocol for communicating with the audio device.
- Windows DirectSound
- Windows Driver Model (WDM)
- MultiMedia Extensions (MME)
- Audio Stream Input/Output (ASIO)
- Windows Audio Session API (WASAPI)
Many devices will come with drivers in the first three categories listed above, and newer ones will also have WASAPI. Device-specific ASIO drivers, however, are typically only supplied with higher-end sound cards and those specifically intended for musical applications. Although some cards can yield perfectly reasonable performance with WDM and MME drivers, most require ASIO drivers to achieve their lowest latency performance with real-time MIDI and synthesizers. However, WASAPI drivers have become a more promising alternative in recent years in situations where ASIO drivers aren’t available.
ASIO drivers are also strictly required by some software synthesizers, which is problematic if the only sound devices available do not have their own ASIO drivers. “Universal ASIO drivers” exist to wrap other types of drivers as ASIO drivers, which will allow ASIO-less devices to be seen by software that will only use ASIO drivers. However, just because the non-ASIO drivers “look” like ASIO, it does not mean that they will perform well. The latency achieved this way will always be greater than what can be achieved with device-specific ASIO drivers.
A note for Windows 10 users: very recent hardware running Windows 10 with nothing but the on-board sound chip can sometimes demonstrate surprisingly good performance with nothing but WASAPI and sometimes even just WDM drivers and built-in sound chips. I have observed this with Microsoft’s Surface tablets, for which the built-in drivers and chip don’t struggle until under quite a heavy load. If you have a very new, high-spec machine running an up-to-date version of Windows 10, you may find that you don’t need special hardware and audio drivers to get the performance you need for simple MIDI applications (massive DAW setups are another matter and still warrant special hardware/drivers). However, you also need very recent software to get that performance out of it and older software may still require ASIO to behave properly. Newer software also often has support for WASAPI Exclusive Mode, which can deliver ASIO-like performance.
4 Recommended MIDI-Related Software
This section contains a list of programs that I have used extensively myself, frequently recommended to people who asked me for help, and advised students to use when setting up their laptops for MIDI-related coursework.
4.1 Virtual MIDI Ports
The following virtual MIDI ports have worked for me on Windows Vista, 7, 8, and 8.1.
Loopbe1
http://www.nerds.de/en/download.html
This program is freeware for 1 virutal port. There is also a paid version that offers 30 ports.
LoopMIDI
http://www.tobias-_erichsen.de/software/loopmidi.html
This is a freeware program that offers a custom number of virtual ports. Setup is a little bit more complicated than for loopbe1, since you need to create the ports yourself from LoopMIDI’s control panel.
4.2 Software Synthesizers
The following software synthesizers all use a virtual instrument format called sound fonts, or sf2 files. This format was defined by Creative Labs. To use the synthesizer, you need to load at least one sf2 file. If you don’t already have sound fonts, you can find some here:
http://www.synthfont.com/soundfonts.html
Note that instrument selection settings within the synthesizers can potentially be overridden by program
change messages.
SyfonOne and SynthFont
http://www.synthfont.com/Downloads.html
SyFonOne is a freeware, sound font-based synthesizer. Synthfont is a low-cost program that can be used to record MIDI files using sound fonts. These programs work with or without ASIO drivers, although performance is greatly improved with ASIO.
CoolSoft’S Virtual MIDI Synth
http://coolsoft.altervista.org/en/virtualmidisynth
This is a very easy-to-use sound font-based synthesizer and, if you do not have ASIO drivers, I highly recommend t as a lowest-possible-latency option. Setup is simple and the program’s performance is quite good. Unfortunately though, it can cause problems with some device-specific software, so your mileage may vary. For example, on Windows 8, the Korg Kontrol Editor would not work for me while I had this program installed. On Windows 10 those problems disappeared. This synthesizer is my go-to option when I need something with good performance when I only have my on-board sound chip to work.
Sforzando
https://www.plogue.com/products/sforzando/
Like the two programs above, Sforzando does not require special drivers to produce sound. It will load soundfonts, but requires that they be converted to another format before being used. This conversion only needs to happen once per soundfont file used.
SFZ and SFZ+
(July 2017) Update: dead links have been removed. Unfortunately it seems that these are no longer available for download from Cakewalk’s site.
SFZ uses only one file and allows you to configure the instruments per channel. SFZ+ allows for one sf2 and instrument selection per channel. These programs require ASIO drivers.
4.3 Software for Setting the Default MIDI Output Device
(Windows Vista and 7 Only)
Windows XP allowed changing the default MIDI output device under the regular audio settings. That part of the audio settings panel was removed in Windows Vista and later versions, although it was still possible to change the default output device through the registry up through Windows 7. The following programs wrap that functionality, providing a nice user interface instead of forcing the user to dig around in the registry. You may need to run the programs as an administrator to get them to work and/or reboot before changes will take effect.
On Windows 8, 8.1, and 10, there is still a registry entry for default MIDI output similar to what was present in Vista and 7, but as of Windows 8 it only affects Windows Media Player. Because of this, old software that relies on the default output device setting to know where to send MIDI messages will be tied to the default synthesizer. Tools that allow setting the default device on Vista and 7 typically do not work on 8 and later. However, CoolSoft has a new tool called CoolSoft MIDI Mapper that serves as a replacement for Windows 8 through 10 (see the last item in the list below).
PLW MIDI Mapper (Vista and 7 only)
http://sierrahelp.com/Utilities/SoundUtilities/PutzlowitschsVistaMIDI_Mapper.html
This is a control panel item that needs to be added manually. Placement of the file on 64-bit systems can be a bit tricky; sometimes it works right away when put in the right place, sometimes it doesn’t.
Vista MIDI (Vista and 7 only)
http://www.benryves.com/products/vistamidi
This is a stand-alone program for setting the default MIDI output device on Windows Vista that can also be used with Windows 7.
CoolSoft MIDI Mapper (8, 8.1, and 10)
http://coolsoft.altervista.org/en/forum/thread/427
This program re-adds the MIDI mapper functionality for more recent versions of Windows. My testing of it has been extremely limited but it has worked so far for me on one machine running the Windows 10 fall creator’s update, although my testing hasn’t been extensive (as the software standard has shifted to expect it, I now mostly set default devices within a given program’s own settings). Note: you may need to register on the site to gain access to the download links in the thread.
4.4 MIDI Message Routers
The following programs are useful for rounting MIDI messages from one device to another. Note that you do not need a virtual MIDI port to use these, although they are may certainly be used in conjunction with virutal MIDI ports.
Midi-Ox
http://www.midiox.com/
This is a great tool both for MIDI message routing and debugging device installation and connectivity issues, since not only lets you rout messages between devices but also shows you the messages it relays in a console.
HaskellOx
http://35.94.226.157/software
HaskellOx is a little program written by me using Haskell and Euterpea that was inspired by Midi-Ox. Although it isn’t nearly as powerful as MIDI-Ox, it can still connect MIDI devices together and can also be run without installation (so you can do things like run it from a flash drive). However, I haven’t done extensive testing with it to determine whether there are any latency issues when under a heavy message load. It’s a useful tool for casual applications. Note: the compiled executable may not be broadly compatible across multiple Windows versions. The complete source code is available for it, however, if you wish to compile it yourself: https://github.com/donya/haskellox. I also have a version for Java: https://github.com/donya/javaox, and another in Processing: https://github.com/donya/processingox
4.5 Universal ASIO Drivers
Universal ASIO drivers allow other types of drivers (WDM, MME, etc.) to be perceived by
programs as having the ASIO interface. However, it will not give true ASIO performance.
Latency will still be higher with one of these drivers than when using device-specific ASIO drivers.
ASIO4All
http://www.asio4all.com/
This is the most widely-used and easy to set up universal ASIO driver out there. It is also
well-documented. However, it causes the driver it wraps to be usable by only one program at a time. So, if you are using as synthesizer that needs ASIO, you can only get sound from that one program and no others. ASIO4All will also sometimes get invoked by programs that search through drivers upon startup (common with DAWs), which can cause problems with in-program changes to the audio setup.
Asio Multiclient Wrapper
http://vidance.com/asiomulti/asiomulti.html
This program gets around the one-device limit of ASIO4All to some extent. However, it is trickier to set
up and can cause conflicts with some DAW software (for example, Cakewalk Sonar X1 and X2 crashed
immediately on startup when I had it installed).
JACK Audio
http://jackaudio.org/
JACK is my driver-wrapping tool of choice these days for times when I can’t use device-specific ASIO drivers. Unlike ASIO4All, it doesn’t get invoked automatically by programs searching through drivers. Unfortunately, starting the ASIO wrapper isn’t always easy and can take a few tries before it can successfully get access to the intended driver. Sometimes it even requires logging off and on again so that JACK can be loaded as the first audio program. So, make sure you set it up in advance of when you need it. If you wait until the last minute, you risk getting in front of the audience and then having a dreaded technical difficulty delay.
You can set up JACK as follows:
- Install JACK and reboot. Then, open the Jack Control executable.
- Under the Setup window’s options, you want the server prefix to be “jackd -S”, the driver to
be “portaudio”, and the interface to be your driver of choice. Save the settings and close the
setup window but don’t close the main window. - Start the audio server with the “Start” button. You will need to keep this running while you
use your soft-synth. Your synth may crash if JACK is closed before the synth is. If JACK
crashes or gives an error when you try to start the server, check that there are no other
programs trying to use the same audio device. - Open your soft-synth and you should now see JACK (by the name JackRouter) as an ASIO
option.
5 Audio and MIDI Hardware
This section contains general information about different types of audio and MIDI hardware I have both used myself and commonly been asked about. With on exception discussed in this section, there are really too many options in this area with too many new ones coming out each year to compare pros and cons of specific makes and models in a document like this. Prices vary widely from fairly cheap (<$50) to mid-range ($200-300) to incredibly expensive ($1000+). If you are looking to build a music PC, determine your budget and connectivity needs (both PC-to-device connectivity and things like TRS/XLR/etc. connections) and then research your options extensively before buying.
Note that old hardware will not necessarily work on later versions of Windows just because it worked on XP. Make sure the manufacturer says that your version of Windows is supported. Some pieces of old audio hardware can be coerced into working with later Windows versions, but others cannot or will be unstable at best.
5.1 On-Board Sound
Nearly every moern motherboard comes with a built-in sound device. While suitable for casual audio, they are generally not suitable for serious audio and MIDI development, particularly for systems where real-time audio and MIDI I/O is involved. On-board sound devices also usually do not have their own ASIO drivers, which are required by many synthesizers. Tools like ASIO4All can allow on-board sound devices to be used by synthesizers that require ASIO, and this will sometimes yield a bit better latency than if the same synthesizer is set up to use another type of driver. However, the latency will most likely still be noticeable.
5.2 PCI Soundcards/Audio Interfaces
PCI-based sound cards usually offer an improvement in sound quality and connectivity over on-board sound. However, once again, many do not come with ASIO drivers. Cards with ASIO drivers are often at least partially intended for music development. Cards intended mainly for entertainment (home theater, gaming, etc.) will not necessarily offer much better performance for real-time MIDI I/O than on-board sound devices.
Many older Creative Labs sound cards intended for audio development had the added benefit
of hardware-level sound font support, meaning that the cards had a very easy-to-customize
MIDI synthesizer. Unfortunately, this type of feature is increasingly hard to find as DAWs
and PCs have become more powerful. A list of sound-font compatibile devices can be found
here:
http://support.creative.com/kb/ShowArticle.aspx?sid=5184.
5.3 USB Audio Interfaces
Although obviously not a possibility in a completely freeware-based setup, there are some cheap USB audio interfaces that come with their own ASIO drivers and can give good latency with synthesizers. However, be warned that you get what you pay for in many ways. Although there are some cheap options, they have lesser audio quality and usually can’t achieve as low latency performance as certain, more expensive alternatives.
Although not a perfect correlation, you do get what you pay for to some extent with audio interfaces. Extremely cheap audio interfaces often have sound quality caveats and do not necessarily come with ASIO drivers (i.e. you must make sure it is explicitly stated somewhere that ASIO drivers exist). On the other hand, mid to high-end USB audio interfaces intended for DAW users will almost certainly have ASIO. More expensive boxes also usually offer more diverse connections, better mic preamps, and so on. Some are portable, others are intended to stay put. Some offer MIDI in/out ports, while others do not. Bear in mind that you don’t necessarily need to have audio and MIDI connectivity rolled together in one box. While convenient and usually with good performance when in one box, it is still quite common to have separate audio and MIDI interfaces, particularly for mobile setups where size needs to be minimized and both features may not be needed at the same time.
The cheapest audio interface option I have explored is the Behringer UCA 202, which is the only specific interface I will discuss here. The UCA 202 is a lightweight, highly portable audio interface that comes with its own ASIO drivers. The device also allows usage of multiple driver types simultaneously (although only one program can be using the ASIO driver at any given time). This means that, for example, you can listen to videos or mp3s online or in Windows Media Player while working with SFZ/SFZ+ in the background. However, don’t expect totally blinding performance from the UCA 202. The sound quality is marginal and, when the device is under rather a lot of strain, it is prone to glitches in the audio: clicks, pauses, etc. As a result, I’ve found it somewhat unreliable for trying to record anything live, since it can take many tries to get a glitch-free result. Nevertheless, it is a great portable and incredibly cheap solution.
Unfortunately it seems that Behringer dropped its ASIO drivers for the UCA series some time ago, removing all download links on its site, and now recommends ASIO4All instead. This is extremely disappointing as the Behringer drivers worked far better. While the old Behringer drivers can be found elsewhere on the web for now, this bizarre change in Behringer’s support for the UCA series means I can’t recommend these devices as a budget solution for ASIO drivers anymore, since one may as well use ASIO4All with the built-in sound chip instead of using a USB interface – or use WASAPI drivers on newer systems. Sadly, I am not aware of any other devices in this price range that are good substitutes for the UCA series with the original Behringer drivers.
5.4 USB MIDI Interfaces
USB MIDI interfaces provide hardware MIDI ports for a PC. Some are simply cables (USB on one end and MIDI in/out on the other), while others are hubs or boxes that require MIDI cables to connect to external MIDI devices.
Generic USB-MIDI cables can be found online for just a few dollars. However, they are not guaranteed to work. The cheap cables are often sufficient for casual music purposes (what I would consider “weak real-time” applications), but, if they are listed as simply “class compliant” and do not have their own drivers supplied by the manufacturer, they may not work on all versions of Windows. It has been my experience that class-compliant USB-MIDI interfaces that work on XP up through Windows 7 will often behave strangely on Windows 8/8.1, if they even work at all. Examples of strange behavior include showing up in device manager but refusing to
send messages through (or sending bad data) even though the throughput lights blink as
they should. If you have Windows 8 or 8.1, make sure the manufacturer supplies compatible
drivers.
6 Configuring MIDI Setups
This section provides examples of specific setup problems and how to solve them with the tools described so far.
6.1 Getting MIDI Input without a Physical Device
Sometimes there are times when it’s useful to have a MIDI input device, but when a physical keyboard or other MIDI controller isn’t available. This is common when developing interactive MIDI applications on the go with a laptop. Although another good solution is to carry a small keyboard like a Korg nanoKey2 or a QuNexus, they are not the only option. From the list of software earlier in this document, you will need the following:
- A virtual MIDI port of your choosing
- Proxima Controller
Set Proxima Controller to use the virtual MIDI port as its output. Then, take input from the same virtual port in the application requiring MIDI input.
6.2 Sending MIDI Controller Messages to the Default Windows Synth
One may wonder who would want to do this given how laggy and awful the default synth is on Windows, but here is an example situation: suppose you have a small USB keyboard and need to use it to play some notes in a very relaxed way during a presentation with a laptop and don’t have room for a bulky external card. I have been in this position many times. Aside from your MIDI controller being installed and ready, you need one thing: a program for re-routing MIDI messages (MIDI-Ox or my Haskell Ox). Set the re-routing program to take input from the controller (which should show up as a device; if it doesn’t something is likely wrong with the controller’s installation) and have it send those messages to the Microsoft GS Wavetable Synth. And then, off you go with laggy kazoo fun.
6.3 Sending MIDI to a Better Synthesizer
You will need two things:
- A virtual MIDI port of your choosing
- A software synthesizer of your choosing
Many MIDI players and some simple score editors (particularly old ones) do not have their own audio engine/synthesizer and are designed to just sent out MIDI messages to “something.” By default, that “something” will end up being the Windows synthesizer unless the software is configured to do otherwise.
Not all old software can be configured to do otherwise unfortunately. However, those programs that can usually have an option somewhere for setting the MIDI output device. Use the virtual MIDI port as the output for the score editor or MIDI player. Set the synthesizer to take input from the same MIDI port.
6.4 Sending MIDI Messages between Programs
If two programs can send/receive MIDI messages but cannot “see” each other (they don’t show up as devices), you can allow them to talk through a virtual MIDI port like so:
Program 1 → Port → Program 2
NOTE: the port should have messages flowing through it in one direction only. In other words, one program should talk while the other listens. If the programs need to have a back-and-forth conversation over MIDI, you will need two virtual MIDI ports to avoid feedback problems:
Program 1 → Port 1 → Program 2
Program 1 ← Port 2 ← Program 2
MIDI interfaces with paired MIDI in/out ports can also be used this way: just connect the output to the input and then connect the programs appropriately. Again, bi-directional communication between the programs would require twice as many ports to avoid feedback.
6.5 Minimizing Latency
First, if you are attempting to minimize the latency of the Windows default synth, it is a lost cause. Your best bet is to use a different synthesizer and follow the instructions in the previous subsection.
CoolSoft’s VirtualMIDISynth allows you to have some control over the output latency without needing special drivers. To minimize the latency, go into Configuration > Options > Advanced Options and set the additional output buffer lower than the default (which is 250ms by default – really high!). I usually recommend starting with a value of 10 and testing playback with at least some chords in it to hear some MIDI polyphony. Some systems can go as low as 0-2ms latency with this synth, although this is somewhat rare and requires a pretty beefy machine (often a desktop tower and good audio hardware). Many lesser machines, however, will still work with 5-7ms. Depending on the particular machine and its settings higher latencies may be required to avoid distortion, clicks, and/or audio dropouts. On laptops in particular, the degree to which you can reel in the latency can be affected by power settings. High performance modes can typically function with lower latencies without audio glitching than battery saving modes are capable of.
If you are using ASIO drivers, you may need to adjust the buffer size to optimize the performance of the device on your system. The larger the buffer, the worse the latency will be, but the less likely you will be to have audio quality problems (clicks, audio dropouts, etc.). High-end audio devices meant for serious music development usually can have the buffer size set quite small. How powerful a PC the audio device is on also impacts this process. For a detailed explanation of the variables involved in minimizing latency, I recommend the following article: http://www.soundonsound.com/sos/jan05/articles/pcmusician.htm
If you do not have an audio device that comes with its own ASIO drivers but have a relatively recent machine running Windows 10 and have kept up with Windows Updates, then there is some good news: you may be able to get low latency out of WASAPI drivers as an alternative to using something like ASIO4All. Instructions for that are located on my post about Minimizing Audio Latency on Windows 10 with WASAPI.
Что сказать? — Приятного мало! Создатели от майкрософт видимо посчитали, что миди-синт в самой системе — прошлый век и исключили его из дистрибутива, тут уж ничего не попишешь.
Откровенно говоря, если бы не данный вопрос, я бы и не знал, что дело обстоит именно так. Я тоже занимаюсь написанием музыки, работаю с миди, но все это делаю через секвенсер Cubase, к которому можно «присобачить» неограниченное количество VST-синтезаторов, все ограничивается лишь мощностью компьютера и используемой звуковой карты. Таким образом все миди-команды (ноты) у меня играет назначенный мной синтезатор инструмента из числа имеющихся у меня звуковых библиотек.
Что можно попытаться сделать в данной ситуации — попробовать доустановить отсутствующий миди-синт в систему, возможно он обнаружится в числе устройств для воспроизведения миди. Если этого не случится, останется два варианта: — установка хост-секвенсора или… откат к использованию win-XP, больше вариантов не вижу.
P.S. В 2010 году у меня при переходе с ХР на 7-ку случилась интересная картинка: — Cubase встал без проблем, все егошние прибамбасы-плагины — тоже, а вот большинство VST — фигушки! В систему они так же встали как бы без проблем, а звука нет! Излалил я кучу форумов, знатоки мне посоветовали сменить мою карту Realtek на внешнюю M-audio UNO и по-дешевке подогнали мне ее. А там еще и USB-коннектор есть — прям мечта — можно на миди-клавиатуре играть в режиме реального времени!