Если вы ценитель чистого и качественного звука, как и я, то вам определённо нужно настроить вывод звука на всех плеерах напрямую на свои колонки и наушники через ASIO — Audio Stream Input/Output (ASIO), «ввод-вывод потоковых аудиоданных» — протокол передачи данных с малой задержкой.
Для использования вывода при помощи ASIO в одних только аудиоплеерах достаточно установить лишь саму основу — ASIO4ALL.
Для задействования ASIO в видеоплеерах нужно дополнильно установить примочку Multichannel DirectShow ASIO Renderer.
Рассматриваем Windows 7 (в Windows 10 всё должно работать/настраиваться аналогично).
0) Качество выходного потока звука.
Не забываем настроить колонки и наушники в Панели управления на максимальное качество потока. Это не влияет на ASIO, но влияет на все остальные источники звука — браузеры, игры и плееры, не поддерживающие вывод звука через ASIO:

а) — в настройках колонок (кнопка Настроить) ставим галочку о том, что они широкополостные (то есть не будут обрезатся самые низкие и высокие частоты (это нужно только на самых простеньких динамиках дешёвых ноутбуков):

б) далее уже в свойствах колонок (кнопка Свойства) в правой вкладке Дополнительно выбираем самую нижнюю строчку (максимальное качество):

1. ASIO4ALL — http://www.asio4all.org/
Качаем версию 2.13 — http://www.asio4all.org/downloads_11/ASIO4ALL_2_13_Russian.exe
Устанавливаем.
После успешной установки в аудиоплеерах появится соответствующая строчка при выборе устройства вывода (помимо наушников/динамиков и прочих WASAPI):
1) AIMP — http://www.aimp.ru/
Качаем с сайта Programki.net тут — http://www.aimp.ru/?do=download&os=windows
а) В Меню — Настройки самая первая вкладка — Воспроизведение


б) Выбираем выход через ASIO: ASIO4ALL v2

Теперь при первом старте воспроизведения должно появится сообщение об успешном начале работы ASIO4ALL

2) foobar2000 — http://www.foobar2000.org/
качаем стабильную версию 1.4.1 — http://foobar2000.org/getfile/25891646c05a0b038fabb2c06c03368a/foobar2000_v1.4.1.exe
Качаем с сайта Audiophile’s Software плагины:
- ASIO support (foo_out_asio.dll) 2.1.2 — Добавляет возможность вывода звука через ASIO.
- Bauer Stereo-to-Binaural (foo_dsp_bs2b.dll) 3.1.0 — Предназначен для улучшения прослушивания аудио стерео программ в наушниках (!).
- Resampler DSP (SSRC X) (foo_dsp_ssrcX.dll) 0.57 — Высококачественный DSP ресемплер для foobar2000.
Устанавливаем плеер.
Распаковываем содержимое (а именно сами dll и exe) скачанных плагинов в каталог —
C:\Program Files (x86)\foobar2000\components
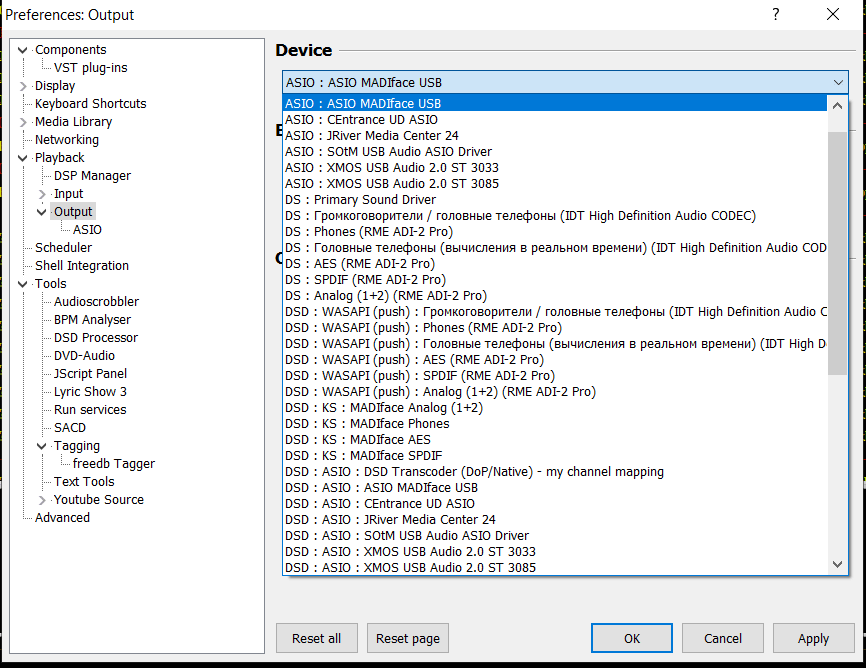
а) Запускаем и лезем в Настройки (File — Preferences) и выбираем вывод через ASIO:

б) Лезем в DSP Manager и добавляем/настраиваем плагины:

в) в настройках (кнопка
многоточее
) SSRC X выбираем профиль Otachan Ultra и Sample rate поставить 192000:

г) плагин Bauer Stereo-to-Binaural нужен при прослушивании музыки в
наушниках
(если это не специально записанная музыка для этого).
а) включаем все форматы на входе и на выходе:


б) включаем и настраиваем ресемплирование звука:


1) MPC-HC
Качаем либо сам плеер — https://mpc-hc.org/downloads/
или пак, содержащий его и все-все кодеки для вопсроизведения вадеофайлов — http://www.codecguide.com/download_k-lite_codec_pack_mega.htm
Или вообще качаем SVP — SmoothVideo Project (в него входит последняя версия MPC-HC 64 bit) — — https://www.svp-team.com/wiki/Main_Page
а) Запускаем, лезем в Настройки

б) Переходим в Воспроизведение -> Вывод и выбираем в выпадающем списке Рендер аудио нужный нам Multichannel ASIO Renderer Filter

в) при начале воспроизведения также появляется сообщение от ASIO4ALL

г) для изменения настроек данного плагина-фильтра кликаем правой кнопкой по области вопсроизведения (или лезем в меню) и находим там в Фильтрах нужный нам Multichannel ASIO Renderer Filter

д) и меняем качество дескритизации на максимальную:

е) предварительно не забываем также
И вот тут-то мы наконец и получаем ачишуительный звук в фильмах.
Last Updated:
March 8, 2024
ASIO4All is a free Windows tool that provides a generic high-performance audio driver for professional audio production in the absence of an audio interface with a dedicated driver.
If you are a Windows user and you are not using a dedicated audio interface (such as a Focusrite Scarlett 4i4), then you should download and install ASIO4All. Your audio performance will be significantly better than using native Windows audio drivers.
When you’re producing music on a computer using a DAW (such as Ableton Live, FL Studio, Reaper, etc), your computer needs a way to efficiently interface with your hardware.
This can include your microphones, instruments, speakers, headphones, etc. These all communicate with your audio and recording software. The piece of software that manages this communication in a computer is called an audio driver.
In the absence of a dedicated audio driver for windows, then ASIO4All is the next best thing!
Contents
- The Problem – The Windows Native Audio Driver is Not Efficient Enough
- The Solution
- Downloading and Installing ASIO4All on Windows 10
- ASIO4All for Mac?
- Should You Use ASIO4All with Dedicated Audio Interfaces?
- Pros of ASIO4All
- Cons of ASIO4All
- Summary
The Problem – The Windows Native Audio Driver is Not Efficient Enough
In Windows, the native audio driver that controls communication with your onboard soundcard is not optimized for professional audio production.
Pro audio demands that there be very little lag or ‘latency’ in the communication between audio devices and software. For example, if you play a note on your MIDI keyboard connected to a VST plugin, you should hear the output almost instantaneously with no perceptible delay.
The Windows native audio driver produces significant latency because it involves the software commands having to traverse several software layers to access the soundcard, making it unsuitable for audio production.
The Solution

ASIO
To overcome this problem with native Windows drivers, Steinberg introduced a proprietary driver called Audio Stream InputOutput or ASIO.
The ASIO driver bypasses all the software layers that the native Windows driver would have to go through, and instead connects directly with the soundcard. This enables far less latency and makes real-time professional-grade audio production possible.
ASIO has become the standard for professional audio production on Windows systems. Since Windows doesn’t provide an ASIO driver natively, audio interface manufacturers implement their own ASIO drivers for their products which must be downloaded and installed separately to make use of the interface.
What is ASIO4All?
ASIO4All is a free tool that provides a generic ASIO driver within Windows for your audio hardware and software to utilize instead of the native Windows driver.
If you don’t have an audio interface and still want to experiment with audio production, or if you’re traveling and only have the option of using your headphones with your laptop’s headphone jack for monitoring, then ASIO4All will meet your needs.
ASIO4All is essentially a ‘driver wrapper’; it packages the native Windows audio drivers to appear as an ASIO driver, thus enabling it to bypass the additional software layers and connect directly to the onboard soundcard.
Downloading and Installing ASIO4All on Windows 10
- Download ASIO4All for your system architecture from http://www.asio4all.org/
- Click on the downloaded file and install ASIO4All. Once installed you should see a triangle symbol appear in the taskbar for the ASIO4All settings. Click and open it.
- You should be presented with an interface that lists all the available audio devices on your system with a power button next to them. Audio devices that are unavailable (typically because they’re already in use by some other program) have a cross mark next to them.
- Set the power button to ‘on’ for all the devices you want to use with ASIO4All. For example, if you want to use your laptop’s inbuilt microphone and headphone jack, you may find their entry under the name of the soundcard manufacturer for your laptop (e.g. Realtek, Beats, etc.) marked as input and output.
- A slider at the bottom controls the buffer size. The buffer size essentially controls your latency, with a lower buffer size meaning lower latency but higher performance demands on your CPU. Experiment with the lowest buffer size you can achieve before your audio starts to crackle or glitch.
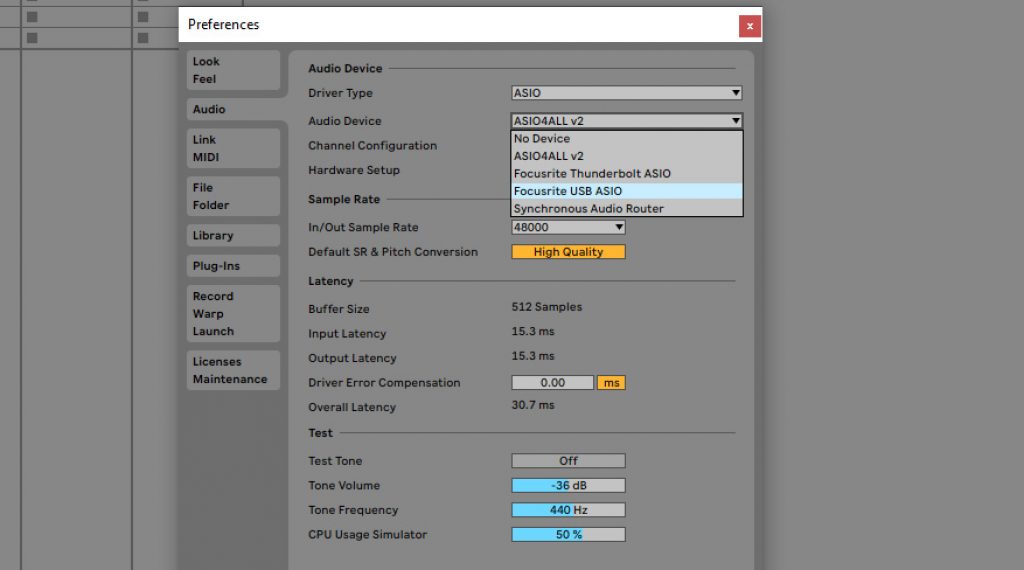
- On your DAW (or other audio application), to the settings to select the driver and audio device. Set the driver type to ASIO and set the device as ASIO4All. Select the inputs and outputs you had enabled in the ASIO4All settings. You should be good to go!
Note: ASIO4All cannot use an audio device if it’s already being used by some other program, like a browser or media player. Similarly, if a device is used by ASIO4All, it cannot be simultaneously used by some other program. Therefore, make sure to free up your devices in case you cannot access them with ASIO4All.
ASIO4All for Mac?
Instead of ASIO, Mac systems utilize Apple’s CoreAudio engine and driver system, which is built from the ground up keeping high-performance audio production in mind, so there is no need for any third-party driver to work with audio on Mac systems.
Even professional audio interfaces do not need any proprietary drivers to work with Mac. CoreAudio handles everything natively. Therefore ASIO4All or a similar equivalent isn’t necessary for Mac systems.
Should You Use ASIO4All with Dedicated Audio Interfaces?
If you have a dedicated audio interface like one from a manufacturer like Focusrite or Steinberg, they almost invariably come with their proprietary implementations of ASIO drivers which can be installed from a CD or downloaded from the internet. (For Mac systems, nothing needs to be downloaded.
Interfaces are designed to work with their own drivers. Either these are ‘plug and play’ or you download and install these when you are setting up your system for use with the audio interface.
In this case, there is no point in using ASIO4All over the included proprietary driver. ASIO4All will almost certainly have higher latency due to the overhead of driver wrapping and might conflict with the interface which is designed to work with its own drivers.
The purpose of ASIO4All is to provide an alternative in the absence of a dedicated soundcard and driver, so it becomes redundant to use one when you have a soundcard.
Pros of ASIO4All
- Far better performance than native Windows drivers with low latency.
- Doesn’t need a dedicated audio interface to make a Windows machine audio production capable.
- Useful for when you’re traveling and don’t have your soundcard with you.
Cons of ASIO4All
- Performance doesn’t match up to dedicated audio interfaces and drivers.
- Requires exclusive access of audio devices i.e. another program cannot use a device if it’s already being used by ASIO4All. So you cannot use your headphone jack to monitor your DAW while simultaneously playing a video on YouTube.
- ASIO4All is redundant if you have an audio interface with a dedicated ASIO driver.
Summary
In the absence of native support from Microsoft for high-performance audio drivers in Windows, ASIO4All is a great free tool to enable professional-grade audio production in any PC without immediately committing to buying a dedicated audio interface.
While in the long run, it is definitely recommended to get a dedicated audio interface (such as a
Focusrite Scarlett 4i4
) with its own optimized ASIO drivers, ASIO4All is a great alternative for those getting started with audio production, or to save time in a pinch.
Сегодня практически любой ноутбук может на равных конкурировать с традиционными CD-транспортами. Его лишь нужно правильно настроить.
Ваш персональный компьютер может располагать CD-приводом или не быть им оснащенным – так или иначе он способен хранить в своей памяти библиотеку аудиофайлов или же получать их путем стриминга с каких-либо ресурсов. В любом случае музыкальный сигнал формата PCM (или реже DSD) может быть выведен для цифроаналогового преобразования сторонними средствами. Чаще всего это делается посредством USB-соединения ПК с внешней звуковой картой или аудио-ЦАП. Музыку можно слушать и с выхода на наушники самого компьютера (его динамики рассматривать не будем), но в таком случае результат будет оставлять желать лучшего. Причин тому несколько, но самая главная – встроенная звуковая карта попросту не обеспечивает качества, соответствующего статусу Hi-Fi. Поэтому самый очевидный способ – доверить эту процедуру специализированному компоненту.
Но простое подключение USB-кабелем еще не гарантирует точной побитовой передачи аудио на внешний ЦАП. Этот режим работы должен быть соответствующим образом настроен.

Установка драйвера ASIO
Для чего нужен режим ASIO? При воспроизведении музыки вы должны изолировать аудиопоток от программных микшеров Windows. В данном случае вам они совершенно не нужны, поскольку могут выполнять дополнительный пересчет данных, причем не очень качественный с точки зрения канонов Hi-Fi. Протокол ASIO призван сделать путь между программным плеером и ЦАП максимально коротким. Поэтому сегодня любой уважающий себя производитель звуковых карт или ЦАП снабжает свою продукцию соответствующими ASIO-драйверами. После их установки можно приступать к настройке своего программного плеера. Они выполняются один раз и в дальнейшей доводке не нуждаются.
Первичная настройка Foobar2000
Для примера рассмотрим один из самых популярных плееров Foobar2000. Он занимает минимум места, бесплатен и при этом достаточно продвинут для сложной DSP-обработки аудиосигнала. Но сейчас мы поговорим не обо всех возможностях Foobar2000, а о его первичной настройке для работы в ASIO-режиме с вашей звуковой картой.
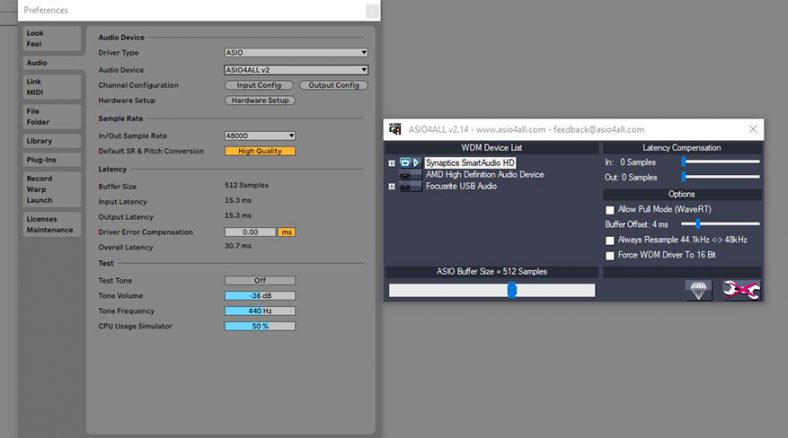
В платных аудиоплеерах наподобие Audiorvana или JRiver совместимость с ASIO прошита в исходном дистрибутиве, и плеер сам подхватывает доступные ASIO-подключения. Для Foobar2000 понадобится установка модуля ASIO support, которую нужно дополнительная скачать по адресу https://www.foobar2000.org/components/view/foo_out_asio. После этого в разделе плеера Preferences выбираем самую первую строку Components. Нажимаем Install и указываем программе на сохраненный файлик foo_out_asio.fb2k-component. После чего перезагружаем плеер, чтобы изменения вступили в силу.
Программная регулировка громкости
Многие пользователи предпочитают регулировать громкость непосредственно в программном плеере. Это весьма удобно, например, в случае прослушивания с помощью настольных систем с активными мониторами.
Если ваш аудиотракт работает в режиме ASIO, уменьшить громкость с помощью ползунка в углу экрана (на панели задач Windows) уже не получится. Придется использовать собственный регулятор уровня сигнала плеера (Volume Сontrol). При этом имейте в виду, что в случае программного изменения громкости побитовая передача данных оригинала на ЦАП не сохраняется. Это возможно только при максимальном положении громкости на отметке 100%.
Финальные штрихи
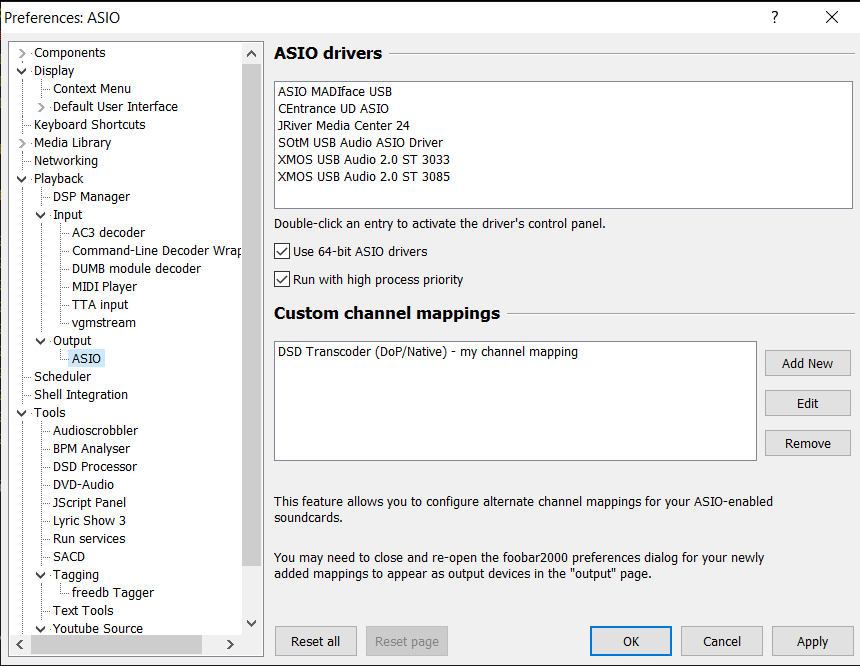
В подразделе Output->ASIO можно увидеть два отмеченных галочкой режима повышения производительности. Use 64-bit ASIO drivers и Run with high process priority. Обычно они включены по умолчанию, но нелишним будет их проверить.
Также можно проверить состояние консоли ASIO. Иногда доступ к ней возможен прямо в плеере, а порой ее ярлычок находится на упомянутой панели задач вместе со значками языка раскладки и др. Разрядность должна быть установлена на значениях 24 или 32 бит. Не стоит включать так называемый dither – эта опция нужна лишь для очень старых приемников аудиосигнала, чья разрядность ограничена 16 бит.
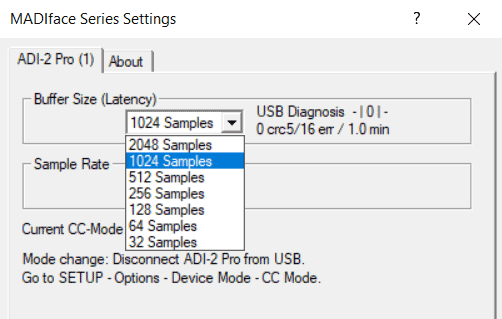
Что касается размера буфера ASIO, то если ваша система не испытывает выпадения сигнала или иных сбоев звука, лучше оставить значение по умолчанию. Его уменьшение повысит вероятность появления артефактов, а увеличение, соответственно, понизит. Ряд аудиофилов утверждает, что наилучшего звука можно добиться с минимальным значением размера буфера ASIO. Измерения характеристик аудиопотока этого предположения не подтверждают, но лучший прибор – наш слух, так что вы сможете определиться с оптимальным размером буфера ASIO самостоятельно.
Эту статью прочитали 92 629 раз
ASIO drivers are widely used by Windows 7 64-bit and 32-bit PCs. But after updating to Windows 10 from Windows 7, some ASIO-based devices might not work correctly. If your Windows 10 isn’t working correctly with the ASIO, it may be because both the ASIO4 support and the Microsoft website haven’t updated the drivers for the latest Windows update.
What is ASIO?
Audio Stream Input /Output, abbreviated as ASIO, is a protocol developed for the digital audio and sound card driver. ASIO driver helps in reducing latency between the sound card and audio applications. ASIO driver provides a smoother interface for accessing multiple audio devices than the normal audio path.
What is ASIO4ALL?
ASIO4ALL driver works as a proxy for the ASIO driver, which bridges the gap between your computer and connected audio devices. ASIO4ALL driver is useful for those ASIO devices that lack native drivers on their machine.
ASIO4ALL driver also offers low latency audio recording for the Windows-based PCs just like the Universal ASIO driver.
What is the Asio Driver?
ASIO driver is an essential driver for audio devices like Sound card and either Digital Audio Workstation to communicate with the computer and provide low latency recording correctly. For your Windows 10 to work correctly with the audio devices, the latest and compatible driver is required, either the ASIO4ALL driver or the Realtek ASIO driver. ASIO device driver also helps build a harmonious connection between your Digital Audio Workstation(DAW) and your computer’s sound card.
Note: For these DAWs to work, you need to have native support in your system for the ASIO driver.
Solution 1: Update ASIO drivers using the Device Manager
1. Open the inbuilt Device Manager from the Start menu or by typing in the keywords called devmgmt.msc in the Run dialog box. (Note: Press Windows + R keys for Run Dialogue Box).
2. Find the Universal ASIO driver inside the Devie Manager and Right-click on it.
3. Choose the Update driver option for the selected Universal driver.
4. To download and install the compatible Universal driver, choose either the “Search automatically for the updated driver software” or download and install the Universal ASIO driver manually.
Note: For searching the updated version of the Universal ASIO driver online, your Windows 10 PC needs a working Internet connection and no interruptions. If your internet is not working then download the network driver first.
5. Restart your computer for the ASIO driver to get in action after the installation.
This Device Manager driver updating method can solve your ASIO driver problem by downloading the latest compatible driver for your Windows 10 PC. But if you couldn’t get the latest compatible driver software then use a Universal ASIO driver named ASIO4ALL which you can find on ASIO’s official website.
You can also install the Windows 7 Universal driver on your Windows 10 machine manually in compatibility mode to fix this issue.
Solution 2: Download ASIO4ALL Driver Manually
If you cannot find the native compatible ASIO driver either from the ASIO’s official site or from the Device Manager, you may have to download the ASIO4ALL driver to get your ASIO devices back on track. Knowing the ASIO4ALL drivers for ASIO devices can also help in your audio-related projects.
1. Visit the Official Website of the ASIO4ALL drivers. (http://asio4all.org/)
2. Search for the compatible ASIO4ALL drivers on this official ASIO website.
Note: You may choose the language for your ASIO4All driver. You can also troubleshoot your current errors in the ASIO drivers by using this site.
Solution 3: Download ASIO driver Manually in Compatibility Mode
If the Device Manager is unable to install the drivers and you have still successfully downloaded the latest compatible ASIO drivers from the ASIO4ALL support, try installing the ASIO drivers manually by using the Compatibility Mode on your Windows 10 machine.
1. Download the Windows 7 based ASIO drivers from the official manufacturer’s website.
2. Open the downloaded driver’s Properties after right-clicking on it.
3. Click on the tab called Compatibility under the Properties window.
4. Tick the checkbox called Run this program in compatibility mode and select the Windows version you have used before with the driver (Windows 7 would be your first choice).
5. To successfully apply the driver installation changes, click the Apply button and then the OK button.
Solution 4: Using third-party driver-updating Tools
You can also consider some third-party driver-updating software or tools(free or premium as per your choice) to download and install the latest compatible ASIO driver.
1. Download and install any third-party driver updater software of your choice by browsing them over the internet.
2. Open the downloaded driver updater program and search for the missing or outdated driver for your device.
3. Download the latest driver via this third-party tool and install it on your PC.
4. Reboot your computer for the latest driver to take effects for the connected audio devices.
Understanding the ASIO and ASIO4ALL
If the terms ASIO and the ASIO4ALL are confusing you, follow on for a broader understanding of ASIO and ASIO4ALL.
Other related articles from techniedges:
- Download and Install Radeon RX 570 Drivers on Windows 10
- Standard SATA AHCI Controller Drivers for Windows 10
- Wacom Intuos Pro Driver Download For Windows 10
Универсальный драйвер Windows ASIO
Руководство по эксплуатации
-
Первые шаги

Настройка вашего аудио ПО Для того, чтобы использовать ASIO4ALL, вам необходимо настроить ваше аудио ПО соответствующим образом. Как вы это сделаете, зависит от вашего конкретного программного приложения. Как правило, вы всегда входите в меню аудио конфигурации и выбираете ASIO -> ASIO4ALL v2. Теперь должна быть кнопка для запуска…
больше
-
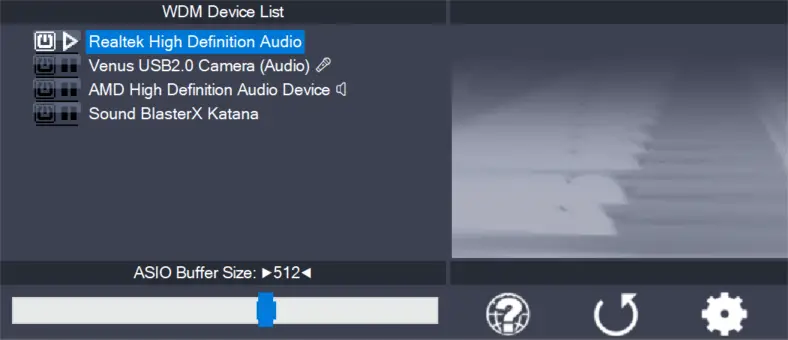
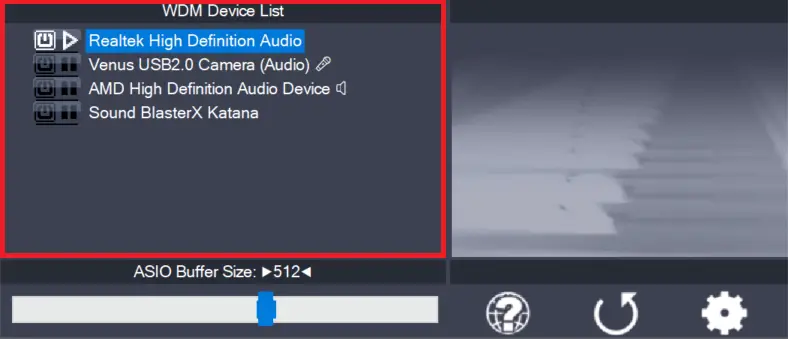
Список устройств WDM

Это список аудиоустройств, найденных в вашей системе. Выделите устройство, в которое вы хотите внести изменения. Примечание: все изменения параметров всегда применяются только к выделенному в данный момент устройству! Активируйте устройство, которое вы хотите использовать, нажав на кнопку рядом с именем устройства! На рисунке выше…
больше
-
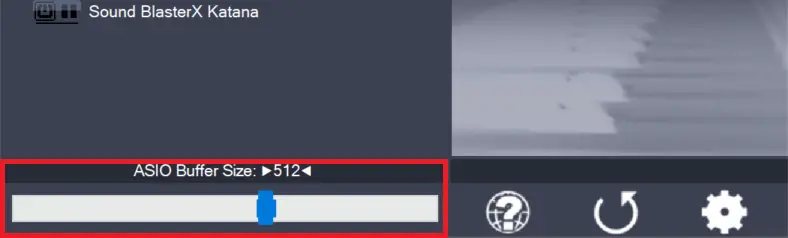
Размер буфера ASIO

Используйте ползунок, чтобы настроить размер буфера ASIO для текущего выделенного устройства. Меньший размер буфера означает меньшую задержку. Как только вы услышите потрескивание или звук начнет искажаться, вам нужно увеличить размер буфера. Размер буфера ASIO напрямую связан с задержкой звука. Таким образом, вы хотите получить здесь довольно маленькое значение. Вы можете…
больше