
Будь я работником макаронной фабрики, то сейчас ломал бы голову над тем, куда девать этак 500 упаковок макарон по полкило штука. К счастью, когда начальство решает премировать сисадмина “натурой”, получение в подарок фургона сухого пайка не грозит, хотя имеются неплохие шансы стать обладателем нескольких десятков килограмм откровенного лома. Однако в этот раз мне повезло – в качестве корпоративного подарка я получил пару новеньких WD Re 2004FBYZ на 2 терабайта каждый, и блок питания Thermaltake Smart DPS G 750W. Вот только что делать с дисками? Ставить в домашний комп – слишком расточительно даже для меня, все-таки Enterprise Class, да и нужды особой нет. Куда практичнее на их основе собрать NAS. Разумеется, не какую-нибудь файлопомойку, а высоконадежное хранилище – эдакий “черный ящик” для критически важных данных. Плюс к этому, можно совместить приятное с полезным – раз уж принято решение целиком перевести инфраструктуру на “умные” БП (а именно так Thermaltake позиционирует линейку Smart DPS), неплохо бы воочию увидеть, как это работает.
Но есть одна загвоздка – на данный момент фирменное приложение существует только под Windows. Для корпоративного ЦОДа эта операционная система хороша, но для домашнего файлового хранилища ужасна и крайне нерентабельна. Посему, я решил сделать два поста. В этом мы поднимем NAS на основе Windows Server 2008 r2 (убедившись, что “окошки” и “домашний NAS” – понятия несовместимые), и посмотрим, на что способна DPS G App 2.0. Во втором же соберем бюджетный NAS на основе NAS4Free, создав по-настоящему надежную систему.
Предисловие
Дабы не быть закиданным помидорами, сразу хочу предупредить – статья рассчитана, прежде всего, на непрофессионалов. Хотя почитать о Smart Power Management от Thermaltake будет интересно даже опытным админам и энтузиастам, основной материал ориентирован на людей, не желающих переплачивать за громкое имя, покупая готовые решения, и при этом далеких от системного администрирования (программистов, дизайнеров, веб-разработчиков и т.д.). Если ваша рука достаточно тверда, чтобы собрать компьютер из комплектующих, но при этом вы не хотите долго и муторно разбираться с серверным ПО, а консоль видели только в страшных снах – этот материал для вас. Если же захотели посмотреть на SPM Cloud, чтобы решить, насколько эта система может оказаться полезной именно вам, крутите пост до подзаголовка “Насколько умен интеллектуальный блок питания?”. Кстати, предупреждаю – под катом много фото и скриншотов.
Простенько, но со вкусом
Сразу оговорюсь – я не стремился собрать домашний NAS только лишь исходя из стоимости. Подбирая комплектующие, я ориентировался на то, насколько компоненты подходят для реализации поставленной задачи, при этом не забывая о качественных характеристиках. Можно ли собрать бюджетный NAS с меньшими затратами? Можно. Но при этом также можно потерять в производительности и удобстве, чего мне бы не хотелось. В итоге, получилось следующее.
Корпус. Роль корпуса для хранилища данных взял на себя Thermaltake Core V1 – симпатичный, цельнометаллический кубик с тихим 200 миллиметровым вентилятором за передней фальш-панелью.

Сзади имеются посадочные места еще под пару вентиляторов на 80 мм, благодаря чему сетевое хранилище можно будет сделать по-настоящему холодным.

Как и в других современных моделях, для блока питания здесь отведен нижний отсек. Защиту от пыли обеспечивает металлический фильтр.

Еще одним преимуществом Core V1 являются 4 съемные стенки (боковые, крыша и дно), что значительно облегчает процедуру сборки. Каждая панель крепится парой винтов, которые легко откручиваются вручную. Также мне весьма понравилась реализация корзин для дисков – каждый из четырех фиксирующих винтов получил собственный резиновый демпфер, неплохо гасящий вибрацию:

Материнская плата. Здесь мой выбор пал на GIGABYTE GA-J1800N-D2H со встроенным Intel Celeron. Мощности двухъядерного процессора с базовыми 2.41 GHz для сетевого накопителя данных хватит за глаза (хотя Windows Server загрузит его на 100%, но ведь “окошки” – не наша целевая платформа), он достаточно экономичен и не требует активного охлаждения (отпадает необходимость покупки кулера).

Несмотря на дешевизну, Gigabyte внедрили в продукт свои фирменные фишки: технологию High ESD, обеспечивающую защиту от электростатики для микросхем и LAN, а также Anti-Surge IC, предотвращающую выход системной платы из строя из-за скачков напряжения – все, что нужно для действительно надежной системы. Единственный спорный момент – расположение внутреннего USB-разъема вплотную к радиатору: с ним попросту неудобно работать.

Оперативная память. Ничего особенного – обычные Transcend 2Gb DDR-III 1333Mhz в форм-факторе SO-DIMM. Если где-то в чулане завалялся старый ноутбук, можете снять модули с него.

Блок питания. Добротный Thermaltake Smart DPS G 750W, рассчитанный на производительные ПК и серверные платформы, сертифицированный по стандарту 80 PLUS Gold. Для полноценного сервера или рабочей станции – в самый раз, для сборки NAS своими руками – слишком мощный, однако на время эксперимента можно себя побаловать, установив нитрос на малолитражку.

Разумеется, в устройстве подобного класса предусмотрено модульное подключение кабелей. Из встроенных – только коннекторы материнской платы и процессора (разделяемый 4+4 pin, что пришлось очень кстати при сборке).

Дополнительное удобство обеспечивают плоские кабели, хотя даже они уместились в компактном Core V1 с трудом – все же корпус на подобное не рассчитан. Среди них оказался и провод для подключения Thermaltake Smart DPS G 750W к внутреннему разъему USB. Очевидно, он обеспечивает взаимодействие бортового 32-битного микроконтроллера с сенсорами материнской платы, и необходим для полноценного функционирования Smart Power Management. Однако о том, насколько система мониторинга оправдывает себя и какие фичи предоставляет, мы поговорим несколько позже.
Охлаждение. Два тихих нерегулируемых TITAN DC FAN. Раз мы хотим собрать тихий NAS без лишних затрат, такой вариант станет оптимальным.

HDD. Хотя дареному коню в зубы не смотрят, считаю нужным все же сказать пару слов о виновниках торжества – сладкой парочке WD Re 2004FBYZ. Ведь, как ни крути, именно от качества жестких дисков зависит сохранность информации.

Если обратиться к спецификациям производителя, выглядит все очень вкусно. Так, винчестеры оборудованы акселерометрами и датчиками давления, на базе которых реализована технология Rotary Acceleration Feed Forward (RAFF), обеспечивающая защиту от линейной и угловой вибрации в реальном времени, что повышает как надежность, так и производительность. Будучи серверным решением, WD Re 2004FBYZ имеют и TLER (Time Limited Error Recovery), ограничивающую время коррекции во избежание ошибочного выпадения диска из RAID-массива. Добавьте к этому заявленное время наработки на отказ в 1.2 миллиона часов, и мы получим практически идеал.
Впрочем, о правдивости красивых слов и мудреных аббревиатур сложно судить, пока не попробуешь продукт самостоятельно. И здесь я могу сказать лишь то, что набираю эту статью на компьютере, внутри которого вот уже 6-ой год трудится пара терабайтных Caviar Black. Да и 2.5-дюймовый малыш в стареньком Dell Inspirion 1501, ныне отданном родителям, чувствует себя ничуть не хуже. Собственно, и перевод инфраструктуры именно на WD на текущем месте работы состоялся именно с моей подачи – с этим брендом у меня сложились давнишние и весьма продуктивные отношения. Я использую их диски уже не первый год, они никогда меня не подводили, и на сегодняшний день я не вижу ровным счетом ни одной причины изменять своим предпочтениям.
Флешка. Любой USB-накопитель объемом 8 Гб. Разумеется, оптимально подойдут компактные “затычки”, корпус которых практически не выступает над разъемом.
Теперь из этого добра нужно собрать сетевое хранилище – здесь все достаточно просто. Если вы хоть раз самостоятельно собирали компьютер, то справитесь без каких-либо затруднений. Отмечу лишь несколько ключевых моментов:
- Дополнительные кулеры следует ставить на выдув – тогда мы добьемся проточной циркуляции воздуха спереди назад и оптимального охлаждения;
- Когда будете устанавливать материнскую плату, следите за металлической перемычкой над отверстием USB 3.0 на задней панели – действуя неосторожно, ее можно загнуть и, таким образом, блокировать разъем;
- Корзины для дисков крепятся одним-единственным винтом, однако установлены они достаточно жестко и сразу могут не податься. Для извлечения корзины ее необходимо потянуть по направлению от корпуса и немного вниз;
- На материнской плате не предусмотрено подключение для внешних USB 3.0, можете смело прятать этот провод в нижний отсек корпуса.
Занимательная математика
Пожалуй, стоит взять небольшую пазу и посчитать, насколько бюджетной получилась наша сборка. Итак, приступим:
- Корпус: Thermaltake Core V1 – 3 764 руб.
- Блок питания: как бы ни был хорош Thermaltake Smart DPS G 750W, для небольшого файлового хранилища он слишком роскошен. В будущем я планирую поставить туда Chieftec HPS-350NS – 1560 руб.
- Материнская плата: GIGABYTE GA-J1800N-D2H – 4436 руб.
- Оперативная память: Transcend SO-DIMM 2Gb DDR-III 1333Mhz x 2 – 3040 руб.
- Охлаждение: TITAN DC FAN (80 мм, 2000 об/мин) x 2 – 404 руб.
- USB-накопитель: 300 рублей.
Итого: 13 504 рубля.
Я намеренно не учитывал HDD, чтобы сравнить с продукцией Synology. К примеру, DiskStation DS216+ обойдется вам в 28 173 рубля, при этом под капотом мы увидим весьма скромную начинку: Intel Celeron N3050 1.6 GHz, RAM – 1 Gb, все те же два посадочных места 3.5 мм для дисков. Если бы WD Re 2004FBYZ не достались мне даром, то я заплатил бы еще 17 660 рублей, а конечные затраты приблизились к 31 тысяче – стоимость “голой” платформы популярного бренда. Да, наша сборка менее компактна, зато более производительна и надежна, и это практически за полцены! А если есть разница, затем платить больше? На этом небольшое лирическое отступление завершено – время двигаться дальше и вводить в строй нашу машину!
Windows Server – самое ужасное решение для домашнего NAS
Даже если вы в глаза не видели *nix’ы, даже если при виде командной строки вас бросает в дрожь, даже если “окошки” кажутся привычными и вселяют чувство безопасности, не вздумайте поднимать личное файловое хранилище на основе Windows. Почему? Расскажу по ходу данного материала. Но сперва разберемся с установкой.
Ставить Windows Server 2008 r2 будем, разумеется, с флешки. Для создания загрузочного накопителя можно обратиться к следующей инструкции, или воспользоваться утилитой Windows USB/DVD Download Tool, которую также рекомендуют в официальном блоге Майкрософт. Тоже самое можно осуществить и с помощью Rufus, которая, к тому же, сможет проверить память на битые блоки (одного-двух проходов будет вполне достаточно), либо осуществить установку в режиме Windows To Go, что позволит запускать ОС непосредственно с девайса.
Однако последний вариант – не лучшая идея, учитывая особенности работы операционной системы и требуемое для нее дисковое пространство, поэтому давайте сделаем обычную загрузочную USB-флешку.
Теперь можно приступать к установке, и здесь мы видим первый подводный камень – размер. Хотите поставить редакцию Standart с визуальным интерфейсом? Будьте добры выделить 24 гигабайта. В случае с парой дисков, это – слишком расточительно. В остальном какие-либо нюансы отсутствуют: как и в версии для домашнего использования, все сводится к “Далее-Далее-Готово”.
Войдя в систему, вы увидите следующий довод “против” – необходимость активации. Я не планирую использовать Windows Server в качестве основы для NAS – все это, прежде всего, эксперимент, поэтому ограничусь триалом, который любезно предоставляют сами Microsoft. Запускаем regedit, ищем ключ реестра
HKEY_LOCAL_MACHINE\SOFTWARE\Microsoft\Windows NT\CurrentVersion\SoftwareProtectionPlatform\Activation\Manual
меняем его значение на единицу и перезагружаем машину. Теперь пробный период увеличился с 3-х до 30 дней. В общей сложности, его можно продлить до полугода при помощи сценария slmgr.vbs. Команда slmgr.vbs -dli поможет узнать, сколько времени осталось до окончания текущей лицензии, а slmgr.vbs –rearm сбросить период оценки (не более трех раз). Процесс можно автоматизировать, создав небольшой XML-файл.
Еще одно “фе” я бы хотел высказать в сторону “Центра обновлений”. К Windows Server 2008 r2 SP1 впоследствии было выпущено более 300 заплаток разного калибра. На установку их всех потребуется несколько часов, при этом патчи конфликтуют с добавлением ролей сервера. То есть, обновляться необходимо либо до, либо после, процесс отнимает уйму времени, и загружает систему по максимуму:

С обновлениями связан еще и прискорбный баг. После установки апдейтов вы можете обнаружить, что место на системном диске стало пропадать само собой. Если подметите утечку, зайдите в папку C:\Windows\Temp. Почти наверняка вы увидите такую картину:

Дело в сбое архивации логов обновлений – система плодит поврежденные архивы со страшной скоростью, после каждой ошибки запуская процедуру заново. Лечится это удалением всех файлов из папки C:\Windows\Logs\CBS, после чего можно спокойно почистить каталог Temp.

Однако двинемся дальше. И первое, что необходимо сделать – настроить автологин, благо NAS все равно будет находиться в домашней сети, а каждый раз вводить пароль – слишком утомительно. Отправляемся в “Пуск” –> “Выполнить”, и вбиваем команду control userpasswords2.

Выбрав группу “Администраторы”, снимаем галочку с “Требовать ввод имени пользователя и пароля”, сохраняем выбор.

Теперь разберемся с удаленным подключением. Проще всего воспользоваться встроенным менеджером рабочего стола. Для его активации пройдите в “Пуск” –> “Панель управления” –> “Система и безопасность” –> “Настройка удаленного доступа”, выберите второй или третий пункт (если планируете вывести NAS в интернет). Также стоит задать более простое и лаконичное имя компьютера на одноименной вкладке.
Альтернативой способен стать LiteManager – многофункциональная и бесплатная для частного пользователя программа, обладающая кучей полезных функций: передача файлов, прямой доступ к консоли, редактору реестра, диспетчеру задач, и рядом других. При установке серверной части на NAS задайте пароль доступа, который будет использоваться при входе:
Если планируете выпускать домашний NAS в интернет, можно дополнительно настроить IP-фильтр:
Убедитесь в том, что LM Server находится в автоматическом режиме запуска:
Также не забудьте задать статический адрес для нашей машины в свойствах адаптера:

где 192.168.1.1 – адрес роутера. Наконец, включите сетевое обнаружение и общий доступ к файлам и папкам в “Панель управления” –> “Сеть и интернет” –> “Центр управления сетями и общим доступом” –> “Изменить дополнительные параметры общего доступа”.
После описанных выше операций, можно со спокойной совестью подключить NAS к домашней сети. Если дальнейшее управление будет осуществляться через LM Viewer, установите приложение на свой компьютер и добавьте новое соединение, нажав на плюс на панели инструментов и заполнив необходимые поля:
где 192.168.1.250 – IP-адрес NAS. Либо воспользуйтесь встроенной в Windows утилитой подключения к удаленному рабочему столу.
Теперь давайте создадим раздел для хранения информации. Идем в “Диспетчер сервера” –> “Хранение” –> “Управление дисками”, щелкаем правой кнопкой мыши по неразмеченному пространству на системном диске, выбираем “Создать простой том” и, следуя подсказкам мастера, создаем основной раздел “Данные”, отформатированный в NTFS.

Можно приступать непосредственно к поднятию файлового сервера. Открываем в диспетчере “Роли” –> “Добавить роли”.

После приветственного окна мастера, появится список доступных. Нас интересуют “Файловые службы”:

В следующем окне ставим галочку напротив “Диспетчер служб файлового сервера”, по желанию можно включить “Службу Windows Search”.

В “Наблюдение за хранилищем” помечаем наш раздел “Данные”:

Здесь же, нажав кнопку “Параметры”, настраиваем наблюдение за томом. Для удобства, можно добавить отчеты о дубликатах и больших файлах.

В “Параметрах отчета” задаем путь для хранения записей:

Если подключили Windows Search, выбираем индексацию тома “Данные”:

Подтверждаем выбор и ждем окончания установки. После этого нам станут доступны возможности диспетчера управления файлами (расположен в “Пуск” –> “Администрирование”). Из всего спектра предлагаемых инструментов, для домашнего использования пригодится управление квотами.

Как видим, раздел “Данные” уже получил по умолчанию “мягкую” квоту. Это означает, что в случае его заполнения более, чем на 85%, нам придет оповещение, однако запись файлов в NAS по-прежнему будет доступна. Квоты можно задавать не только для разделов, но и для отдельных директорий. Давайте создадим на диске “E” папку “Music”, и зададим для нее предельный размер. Нажимаем “Создать квоту” и выбираем путь:

В “Настраиваемых свойствах” укажем лимит в 300 Гб и выберем вариант “Жесткая”, чтобы меломания не привела к ситуации, когда на диске не останется места для регулярных бэкапов и важных документов:

Добавим пороговое значение в 85% и зададим способ оповещения:

В результате получим:

После нажатия кнопки “Создать” система предложит сохранить настройки в шаблон. Впоследствии это позволит нам применять аналогичные правила к другим папкам в один клик.

Чтобы новая квота отобразилась в списке, следует перенастроить фильтр. Кликните по одноименной ссылке и выберите значения “Все”:
Теперь новая квота также видна на главном экране:

Другая опция, которая может оказаться полезной в том случае, если помимо вас файловое хранилище используют жена, дети и любимый кот – управление блокировкой файлов. Она позволяет исключить загрузку файлов определенных расширений в те или иные каталоги.

Давайте создадим директорию Backup и запретим захламлять ее музыкой и видео. Для этого достаточно щелкнуть по “Создать фильтр блокировки файлов”, выбрать нужный каталог и, в нашем случае, предустановленный шаблон “Блокировать файлы аудио и видео”.

В шаблоне указаны практически все наиболее распространенные форматы, однако вы всегда можете добавить новые в соответствующем разделе:

Щелкнув по “Изменить свойства шаблона”, попадаем в меню настройки.

Здесь, нажав кнопку “Изменить”, можно вызвать раздел добавления новых расширений и удаления существующих, а также ознакомиться с предустановленными:
Осталось сделать нашу папку доступной по сети. Для этого отправляемся в “Пуск” –> “Администрирование” –> “Управление компьютером” –> “Общие папки” –> “Общие ресурсы” и создаем новый. Далее просто следуем подсказкам мастера. Сперва указываем путь к папке:

На следующем шаге задаем ее параметры (можно оставить по умолчанию):

Настраиваем разрешения доступа. Для локальной сети можно открыть доступ для всех, для интернета – оставьте только администраторам:

Теперь папка “Music” будет доступна прямо с любого компьютера вашей домашней сети – достаточно набрать адрес \\NAS\Music в проводнике и авторизоваться. Аналогичную процедуру проделаем и для каталога Backup, а заодно проверим, как работает блокировка файлов, попытавшись загрузить в него фильм.

Отказано в доступе – все работает отлично.
Остался последний штрих – создание программного RAID-1. В этом нет ничего сложного: идем в “Диспетчер сервера” –> “Хранение” –> “Управление дисками”, щелкаем правой кнопкой по системному диску (“Диск 1” в нашем примере), и выбираем “Преобразовать в динамический диск”.
Затем поочередно щелкаем по каждому тому, выбирая в меню “Добавить зеркало”. Все разделы “отразятся” на второй диск и начнется ресинхронизация:

И здесь еще один довод “против”. Дело в том, что процесс ресинхронизации для HDD на 2 терабайта будет длиться более 5 часов. Диски будут сверяться полностью, независимо от того, сколько информации записано, а их загрузка будет стремиться к 100%. Конечно, WD Re способны выдержать и не такое испытание, вот только нормально использовать NAS в этот период вы не сможете: скорость записи/чтения значительно упадет.
Кстати о скорости: давайте оценим быстродействие массива в реальных условиях. Вот что получилось у меня при перекидывании дискографии Rammstein в сетевую папку:

Совсем неплохо, но можно реально лучше, в чем нам поможет убедиться NAS4Free. Бесплатная и нетребовательная к ресурсам операционка оптимальна для домашнего NAS и способна работать с файловой системой ZFS, где зеркалирование дисков реализовано куда более разумно и надежно. При этом процесс первичной синхронизации отсутствует в принципе. Именно поэтому я рекомендую NAS4Free для организации домашнего файлового хранилища. Впрочем, о ней мы поговорим в следующем посте, а теперь приступим к самому интересному.
Насколько умен интеллектуальный блок питания?
Вы любите квесты в реальности? Я вспомнил про них потому, что мое знакомство с DPS App и Smart Power Managment началось как раз с этакого миниквеста. Google услужливо подсказал страницу для скачивания приложения, нажав на заветную кнопку я увидел вот такую форму:

Ничего необычного – многие компании просят ваш E-mail для новостной рассылки. Однако введя свой адрес, вместо утилиты я получил:

Даже без переводчика ясно, что запрашиваемая страница не найдена. В чем же может быть дело? Оказывается, все работает немного не так. Сперва необходимо создать аккаунт в системе, подтвердить регистрацию, и лишь затем вы сможете скачать утилиту в разделе “Продукция”.

Еще один важный нюанс – если вы придерживаетесь золотого правила составления паролей, используя в том числе специальные знаки, то здесь от такой практики придется отказаться. Проблем с авторизацией на сайте не возникнет, однако DPS App попросту не примет кодовую фразу, отобразив ошибку:

Поэтому стоит ограничиться комбинацией латинских букв и цифр. Впрочем, не будем судить строго: пока система находится на стадии бета-тестирования, подобные баги вполне закономерны.
Теперь давайте наконец скачаем и установим само приложение. Обращаю внимание, что для его корректной работы требуется Microsoft .NET 4.5, Adobe Flash Player ActiveX, а также актуальная версия Java. После запуска утилита предложит войти в систему для синхронизации с SPM, что мы и сделаем.

Оборудование определяется автоматически (в ранних версиях серийный номер приходилось указывать вручную). После успешной авторизации появится вот такое окно:

Пугаться не стоит – программа хочет определить ваши координаты для отображения на интерактивной карте (о ней – чуть позже), однако позиционирование можно отключить.
Теперь посмотрим, а что, собственно, нам предлагает приложение. В ассортименте – целый набор сканеров, позволяющих контролировать следующие параметры:
- Общий вольтаж и напряжение по каждой из подключенных линий;
- Напряжение на центральном процессоре и видеокарте;
- Силу тока;
- Общую мощность.

С помощью круглых стрелочек можно включить режим графика, отображающего изменения в реальном времени:

Присутствует и датчик температуры БП, где можно выбрать единицы измерения по вкусу:

Также в DPS App доступно управление вентилятором Thermaltake Smart DPS G 750W. В режиме “Производительность” агрегат подберет оптимальные обороты, практически сравняв температуру компонентов блока питания с температурой окружающей среды. Опция “Zero fan” позволяет отключить вентилятор вовсе – хотя сам по себе блок питания чрезвычайно тихий, если ваши домочадцы так и не привыкли к убаюкивающим звукам исправного сервера, данная функция поможет сделать NAS практически бесшумным. Учитывая экономичность нашей системы, активное охлаждение может не понадобиться вовсе. Если же температура превысит критические 80°C, БП автоматически перейдет в интенсивный режим работы.

Пункт “Расходы” позволяет задать тарификацию на электроэнергию и, таким образом, узнать, во сколько вам обходится эксплуатация оборудования. К сожалению, на данный момент поддерживается только одна тарифная зона и только одна валюта – доллар США. Вследствие этого, инструмент годится лишь для использования в ознакомительных целях, о чем утилита любезно предупреждает.

Довольно занятной функцией является возможность отправки данных в социальные сети. Поддерживаются Фейсбук, Твиттер и его китайский аналог Weibo. При щелчке по соответствующей иконке на аккаунте публикуется скриншот открытого в данный момент счетчика. Также доступна отправка картинки на e-mail, но лишь в том случае, если на компьютере предварительно настроен почтовый клиент.

Вкладка “Рекорд” предоставляет куда более интересные возможности. Здесь можно выгрузить отчеты о работе блока питания по датам в формате CSV.

Показания снимаются с периодичностью в одну минуту. В таблице фиксируются все параметры, отображаемые на индикаторах – очень удобно для оценки эффективности системы.

Впрочем, давайте отвлечемся от приложения (весь доступный функционал мы разобрали, за исключением управления подсветкой, которой данная модель не оснащена), и посмотрим, какие возможности предлагает облачная платформа SPM. Но сперва зайдем в “Мой аккаунт” –> “Настройки”:

Если выставить статус “Публичный”, статистика будет отображаться на вкладке “Все выгрузки”, однако доступ к данным будут иметь только юзеры, добавленные в друзья. При включении же службы геолокации, местоположение вашего компьютера будет отображаться на интерактивной карте.

По замыслу разработчиков, Smart Power Managment должен стать не просто облачным сервисом мониторинга, но полноценной социальной платформой. Используя функции позиционирования, вы сможете заводить знакомства с другими пользователями и обмениваться опытом посредством личных сообщений. Учитывая, что целевая продукции Thermaltake – профессионалы и энтузиасты, в будущем такая система способна послужить прекрасной альтернативой тематическим группам и форумам, позволяя в пару кликов отыскать коллег и единомышленников по всему миру.
Перейдем к вкладке “Мои выгрузки”. Сюда загружаются сформированные приложением отчеты.

Щелкнув по ссылке “Загрузить данные…” попадаем в визуальный интерфейс. Тут представлена вся информация, сохраненная в текстовых отчетах, но уже в виде графиков. Можно просмотреть статистику по самому БП, CPU и видеокарте:

Наиболее же интересной является вкладка “Анализ”. Выбрав БП (а платформа позволяет добавить неограниченное количество устройств), попадаем на вот такую страничку:

Первые три вкладки позволяют узнать суммарное время использования блока питания, стоимость электроэнергии и количество затраченных кВт/ч соответственно. Щелкнув по иконке в виде дерева, мы можем оценить экологичность системы:

К сожалению, NAS проработал всего ничего, так что пока еще я не посадил ни единого дерева. Далее можно получить сводную статистику по расходу электричества и стоимости, а также узнать среднюю мощность за выбранный период:

Вкладка “Анализ потребляемой электроэнергии” подскажет, насколько БП подходит для файлового хранилища:

Как и следовало ожидать, нам удалось собрать домашний NAS, энергопотребление которого сопоставимо с обычной бытовой лампочкой.
Последняя вкладка позволяет сформировать план по энергосбережению на основе выбранных параметров. Здесь же можно настроить оповещения для мобильной версии приложения:

Помимо этого, Smart Power Managment позволяет осуществлять удаленное управление питанием компьютера или сервера. Все необходимые инструменты представлены в разделе Remote.

Имеется возможность полностью обесточить или перезагрузить систему (не пугайтесь, соответствующий сигнал будет подаваться на материнскую плату), а также планировать отключение по расписанию:

Перечисленный функционал доступен также в DPS G Mobile App, выпущенной для iOS и Android (Windows Phone закономерно обошли вниманием). И если просматривать статистику на экране смартфона не очень удобно, то реализация удаленного управления домашним NAS придется как нельзя кстати. Все внесенные ранее настройки полностью синхронизируются:

Наиболее же полезной функцией является оповещение об остановке вентилятора, либо перегреве блока свыше 60°C, после чего вы сможете тут же отключить систему, предотвратив выход БП домашнего NAS из строя.
Вместо заключения
Подведем итог. Мы выяснили, что использование Windows в домашнем NAS – это долго, дорого и крайне неудобно. Излишняя прожорливость, длительность настройки, обновления и ресинхронизации, наконец, баги и необходимость приобретения лицензии – все это делает “окошки” пожалуй самым худшим решением для файлового хранилища. Поэтому уже в следующем посте я расскажу о том, что такое NAS4Free и с чем ее едят.
Что же касается платформы Smart Power Managment, могу сказать, что решение уже отлично работает, предлагая вполне достаточный набор инструментов для мониторинга и управления электропитанием. Она способна стать неплохим подспорьем в ситуациях, когда использование профессиональных отраслевых решений является нерентабельным (например, в ходе построения IT-инфраструктуры небольших офисов). Умный БП способен пригодиться и частному пользователю: когда ваш компьютер работает в режиме 24/7, возможность отслеживать изменения удаленно придется весьма кстати, как и тревожная кнопка для отключения системы в экстренных случаях. Но лично мне бы хотелось увидеть более продвинутую систему тарификации с поддержкой нескольких зон и валют – это позволило бы с высокой точностью фиксировать затраты на электроэнергию и планировать бюджет без дополнительного ПО. Если же Thermaltake выпустит версию утилиты под Linux и FreeBSD, ей и вовсе не будет цены. Надеюсь, представители компании читают Хабр – быть может, мои идеи им понравятся и утилиту все же перенесут на *nix’ы.
My old Synology NAS for home use had started to show signs of wear and was in need of replacement. It had plenty of disk space and performed well enough — but the version I had lacked any real power or cloud connectivity. I decided it was time to repurpose one of my «home lab» servers to be a replacement and wanted to take a kick at the can of setting it up as a headless Windows Server 2019 File Server that I could connect up with Azure File Sync for some «cloud connected» storage. I came across a few interesting things took a bit of time to solve so I thought I’d share my experience making this server with you here – in case you come across these yourself in your travels.
In case you didn’t know — it does not have a GUI. This can pose some challenges when you complete the install and need to fine tune and configure it. I’m going to be managing this system (once it’s configured) using Windows Admin Center, but completing the setup will take a bit of wrangling. I’m not going to cover a vanilla install of Windows Server, so I pickup from just after the first logon where I have the opportunity to set the local Administrators password. The first stop in this manual install is your old friend SCONFIG.
As you can see – I have already enabled and configured some important settings here:
- I have changed the Computer Name (Option 2)
- I have enabled and configured Remote Management (Option 4)
- I have configured Windows Update to be Automatic and check for updates every day at 3am localtime (Option 5)
- I have Downloaded and installed updates (Option 6)
- I have gone ahead and input my product key and proceeded to activate Windows Server (Option 11)
This was the easy part – we have an (almost forgotten) tool with SCONFIG to get this part done. You’ll notice I didn’t join a domain – this is a simple NAS for some clients here in the house, I no longer have local domain controllers running for the family / lab.
Since this machine is essentially a Server and it will be running headless, it won’t be going to sleep or turning off monitors as it’s going to be headless after this configuration is complete. As such – I want to change the Power Profile to High Performance. It’s a bit harder with no GUI, but you can use the PowerCfg.exe tool to do this. To list off your settings it’s as simple as running PowerCfg /list and then you can copy the scheme GUID for High Performance and then run PowerCfg /Set 8c5e7fda-e8bf-4a96-9a85-a6e23a8c635c
Once I got around to wanting to configure a Storage Space and tried to list off my physical disks with a Get-PhysicalDisk command, I realized that my HP workstation was still missing drivers for the controller card. Doing some digging, I realized that I needed to download the drivers from the HP support site, transfer them via USB stick on to the system – but they required a GUI for the install. I extracted the drivers into C:\SWSetup folder and then found the docs about how to go about adding driver packages into the drive store. In my case – one command did the missing controller software install and updated my chipset drivers: pnputil /add-driver *.inf /subdirs /install
This server has an SSD for the main OS drive and a few spinning rust disks for data who had previously been part of a Windows Storage Space in an old configuration. I had to dig around to figure out how to clear out the old Storage Space information as it’s stamped on each disk – so unless you are using pristine / unused disks – you’ll want to remove any old unhealthy storage pools from the system. You can then delete them with a simple Get-StoragePool -HealthStatus Unhealthy | Remove-StoragePool. This should free up the disks to be included in a net new Storage pool and be configured into a new Storage Space. Storage Spaces is documented in the Deploy StorageSpaces on a stand-alone server doc from way back in the 2012 documentation space, but it still applies to 2019. You can list off your visible disks on the system even if you are repurposing hardware – you’ll want to ensure you are clean and starting from scratch. List off your disks with Get-PhysicalDisk and you should see all of them with a “CanPool” status of True.
To create you Storage Space from the CanPool disks, first off group them together as a variable with $PhysicalDisks = (Get-PhysicalDisk -CanPool $True) Then you can group them together into a Storage Pool so you can make a virtual disk with the redundancy you like. First make the Storage Pool with New-StoragePool -FriendlyName Storage – StorageSubsystemFriendlyName “Windows Storage*” -PhysicalDisks $PhysicalDisks
Because I am using old disks of mismatched sizes and want to gain all the space possible for my resilient storage, I am going to create a RAID 5 equivalent setup using the ResiliancySettingName of Parity with New-VirtualDisk -StoragePoolFriendlyName Storage -FriendlyName data -ResiliencySettingName Parity -UseMaximumSize
Finally it’s time to initialize the disk, create the volume and format the partition as NTFS with Get-VirtualDisk -FriendlyName data | Get-Disk | Initialize-Disk -Passthru | New-Partition -AssignDriveLetter -UseMaximumSize | Format-Volume -FileSystem ntfs
Next up – making some standard SMB Shares that my workstations can access the stored data. Since this is for home use, I only have regular Users and if you remember – I no longer have a domain in use, so I will need some local accounts created. You can read the full New-LocalUser command reference from the doc page. I create a secure password with $Password = Read-Host -AsSecureString and then create the local account with New-LocalUser «Mackenzie» -Password $Password -FullName «Mackenzie» -Description «Son» -PasswordNeverExpires
I went ahead and created a user for each member of the family and myself and proceeded to make a note to visit each family members machine to map drives to the server using their unique local user ID in order to authenticate to the server. This part made me cringe as a consultant who has designed over 140+ Active Directory domains for enterprise customers over the years. Maybe I should make this simpler and create a local domain for home again – but honestly this is a small setup, not something for a small / medium business so I’ll let it pass.
I create the necessary folder structure on the new E: drive, in this example it’s E:\shares\Documents that I want to share out with Change access to the Users group and Full access to the Administrators group. You can read the full New-SmbShare command reference from the docs page. For this I use New-SmbShare -Name «Documents» -Path «E:\shares\Documents» -ChangeAccess «Users» -FullAccess «Administrators»
Once the shares were made it was time to transfer the data. I decided to keep things simple and simply mapped a drive from the new server over to the old NAS and then proceeded to robocopy the files down to their new locations. Needless to say – this took a long time, multiple days in fact – but we made it in the end. Because this was a simple NAS for home use, there wasn’t a very complex security structure in place.
To review – I wanted to replace an aging home NAS device with a Windows Server 2019 file server running on some repurposed home lab hardware. Because Windows Server 2019 runs without a GUI I managed to figure out the following from the command line / PowerShell prompt:
- Configuring the basics with SCONFIG
- Changed the Power Profile to High Performance
- Added and Installed 3rd party drivers
- Deleted old Storage Space
- Created a new Storage Space / Virtual Drive / Resilient volume
- Created new Local Users
- Created new SMB shares
Now how about managing this server going forward? Well for that, you will have to wait for my next blog post.
Windows Storage Server NAS setup
can you do a how to setup Windows Storage Server as a NAS in the home for a competent DIY? Not just buying off the shelf but going to it diy. Windows Storage Server std can be bought off eBay for a reasonable price 200 stage. HDD are reasonable. surely it is a reasonable project for a well-versed person in windows? even a crossover person from Linux.
Here are some setup instructions from Seagate WSS NAS, but it will be the same process for any other Windows-based NAS. Either its Buffalo, Thecus or WD it will be the same setup.
Seagate Business Storage NAS Windows Server | How to Create a New User Account and a New Share
WSS NAS | How to Create Users and Shares_Workgroup
Getting started
This is Seagate created manual for configuring RAID and volumes etc. The very same setup will apply to Buffalo and Thecus NAS.
Installation
Your Windows WSS NAS’s installation is divided into two parts:
- Hardware setup
- Windows WSS NAS Setup Assistant
Windows WSS NAS Setup Assistant
The Windows Storage Sever 2012 R2 Essentials dashboard is a critical management tool for your WSS NAS. However, it is not available when you first log into the NAS. Follow the required steps in the Windows WSS NAS Setup Assistant to make certain that the dashboard is properly installed.
First login
You can access the WSS NAS using Remote Desktop Connection.
- From a PC on the same network as the WSS NAS, launch Remote Desktop Connection.
- Enter the default login: administrator
- Enter the default password: admin
- Choose Connect
Two popup windows appear when you first log into the NAS:
- Windows WSS NAS Setup Assistant
- Windows Networks (to the right).
You can choose Yes for the Windows Networks popup window.
Windows WSS NAS Setup Assistant: recommended and required
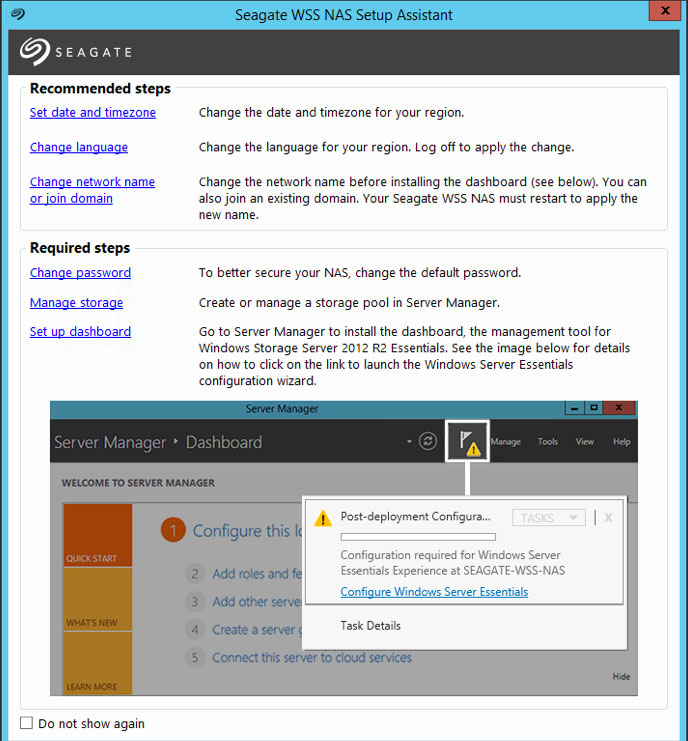
The Windows WSS NAS Setup Assistant launches automatically each time you boot the NAS. Once you complete the initial setup and confirm that the dashboard is available, you can choose to stop the Setup Assistant from launching by checking the box on the lower left: Do not show again.
The Windows WSS NAS Setup Assistant includes a list of recommended and required steps to complete the installation. If the recommended steps are applicable to you, make certain to complete them before moving to the required steps.
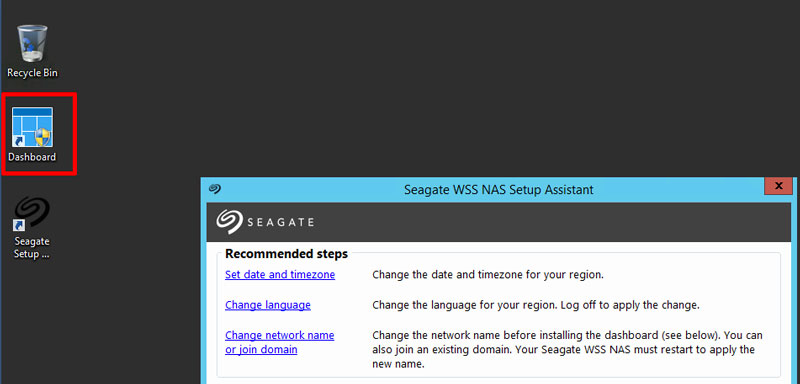
Recommended steps
- Set date and timezone–The default timezone is Pacific Standard Time (PST). Click this option to change the timezone for your region.
- Change language–The default language is English. Click this option to change the language for your environment.
- Change network name or join domain–The WSS NAS’s default network name is Windows-nas-wss. Click this option to change the network name. If applicable, you can also join your WSS NAS to a domain on your network.
Required steps
- Change password–A second administration account must be created when running the Windows Server Essentials wizard (see Setup dashboard below). However, the password for the default user, Administrator, remains admin unless it is changed. For security reasons, change the password.
- Manage storage–Models sold with hard drives can skip this step. For diskless models, choose this option to create a storage pool and choose the best storage space to protect your data. For further explanation and step-by-step instruction, see Manage storage: storage spaces below.
- Set up dashboard–Perform this step last. Click the link to launch the Server Manager and review the instructions at Dashboard setup: Configure Windows Server Essentials. The Windows Server Essentials configuration wizard walks you through creating a new domain for the WSS NAS. The domain is required to use the dashboard.
Manage storage: storage spaces
Windows Server 2012 introduced storage spaces to better optimize hard drive capacity and performance. Hard drives in your WSS NAS are collected into one or more storage pools that work together to manage and protect data. For further information on storage pools/spaces, see the Microsoft Technet overview.
Review the instructions below to create one or more:
- Storage pools–Combine the WSS NAS hard drives into one or more groups.
- Virtual disks–Use the storage pool’s available capacity to create virtual disks for the storage pool.
- Volumes–A volume appears on your WSS NAS as a disk. Add server folders to a volume to store and access data on the network.
Storage pools
You can create one or more storage pools using the hard drives in the WSS NAS. For enhanced storage capacity, Windows recommends combining all the hard drives into a single storage pool.
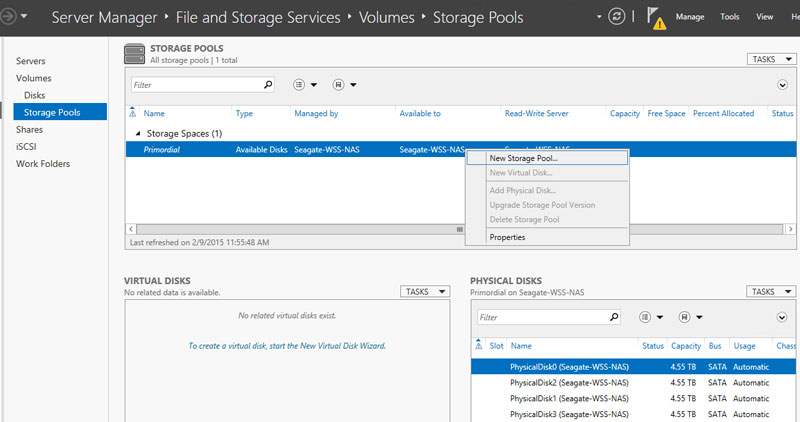
Create a storage pool
- From the Windows WSS NAS Setup Assistant, click the link Manage storage.
- In the Storage Pools window, right click Primordial below Storage Spaces.
- Choose New Storage Pool.

- Choose Next.
- At the Storage Pool Name window, enter a name for your storage pool and choose Next.
- Choose the hard drives for the new storage pool and choose Next.
- Review the Confirmation page and choose Create.
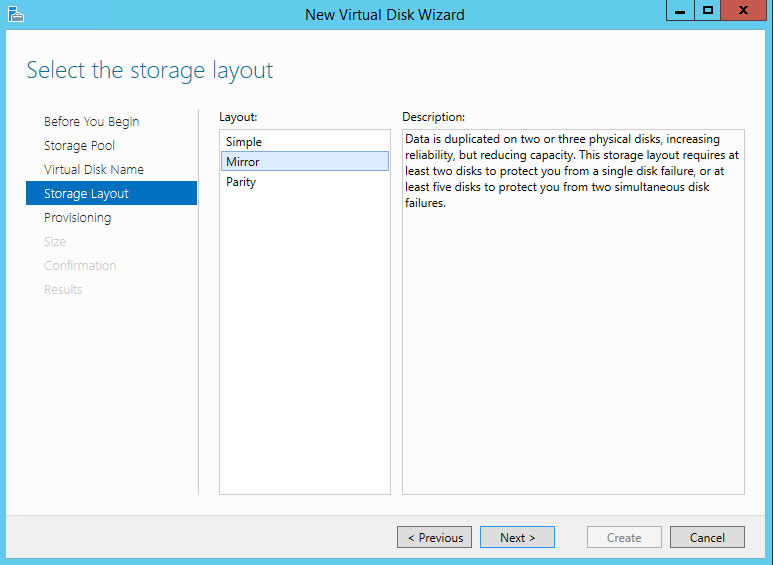
Virtual disks
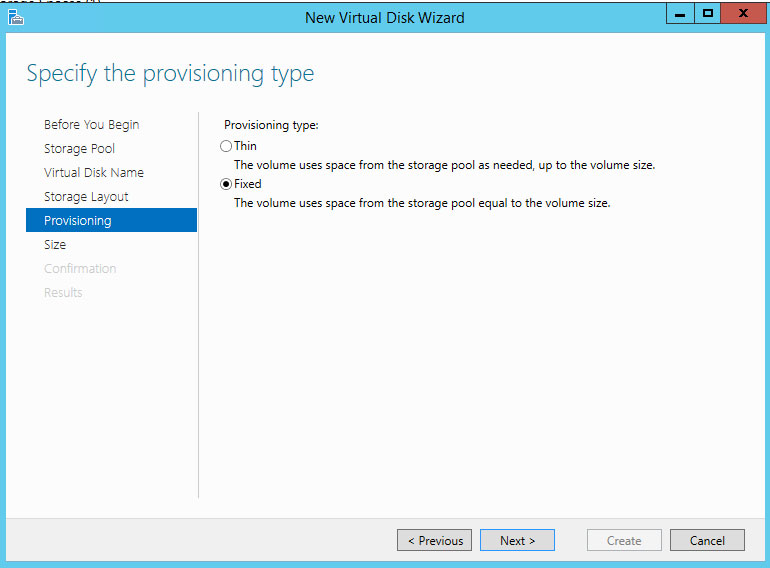
The New Virtual Disk wizard asks you to assign the following:
- A level of data protection
- A level of storage provisioning
Data protection
Use one of the resiliency types below:
- Mirror (recommended)–One or two extra copies of each file are written across a stripe that includes two or more hard drives. Mirroring hard drives reduces capacity by as much as 50% but it also offers enhanced performance when compared to parity.
- Parity–Parity information is written alongside data across a stripe that includes three or more hard drives. Parity offers greater capacity than mirroring but performance is reduced. Parity is a very good option for archival environments.
- Simple (No data protection)–Though it provides the best performance, choosing Simple can lead to data loss should a hard drive fail.
Storage provisioning
Windows Storage Server 2012 R2 Essentials offers two types of provisioning:
- Fixed (recommended)–Storage space is used based upon the total capacity assigned to the virtual disk.
- Thin–Storage space is used as it is needed, up to the volume size. The volume size can be expanded when adding an amount of hard drives equal to the storage pool.
Thin provisioning is an advanced storage configuration that can be used to great effect with enclosures that house a large amount of hard drives. Windows recommends using Fixed for the WSS NAS. To learn more about thin provisioning, see the Microsoft Technet overview.
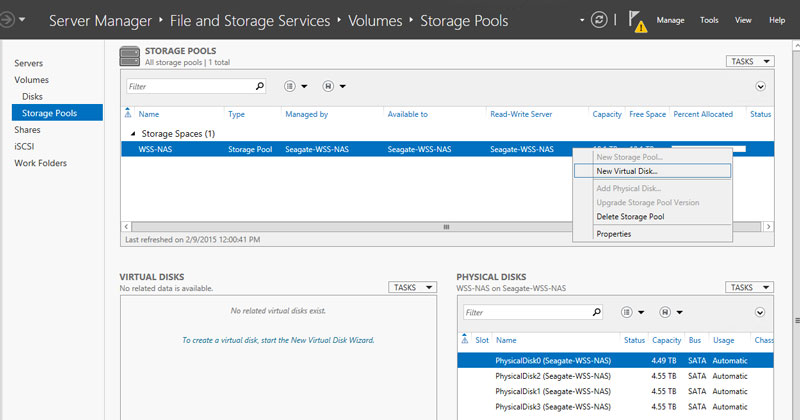
Create a storage pool
- In the Storage Pools window, right click the newly created storage pool. It is listed below Storage Spaces.
- Choose Next.
- If applicable, choose a storage pool and select Next.
- At the Virtual Disk Name window, enter a name and choose Next.
- Choose your level of data protection.
Important: Windows recommends mirror for performance and protection while parity is a good choice for archival environments. Windows does not recommend simple since it will not protect your data if a hard drive fails.
- Choose Next.
- Choose a provisioning type.
Important info: Windows recommends fixed for the WSS NAS.
- Choose Next
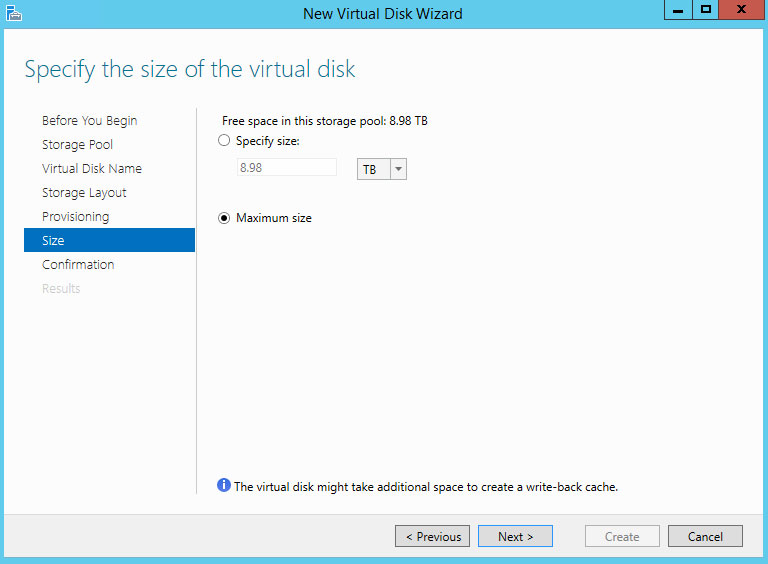
- Enter the capacity for the virtual disk. If you are creating a single virtual disk with fixed provisioning, you can choose Maximum size.
- Choose Next.
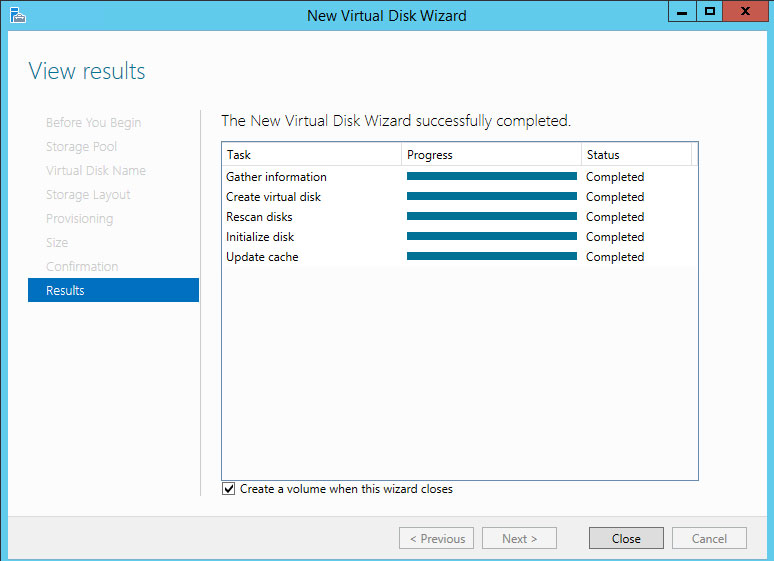
- Review the Confirmation page and choose Create.
Volume
The New Volume wizard may open automatically following the creation of a virtual disk. You can confirm that it launches automatically by reviewing the final step of the New Virtual Disk wizard. The box is checked next to Create a volume when this wizard closes.
Volume format
When creating the volume, you can format using:
- NTFS (recommended)
- ReFS
ReFS has many advantages, including efficient error correction and corrupt file handling. However, it is not possible to know if all client applications support ReFS. Therefore, Windows recommends NTFS.
To learn more about ReFS, see the Microsoft Technet overview.
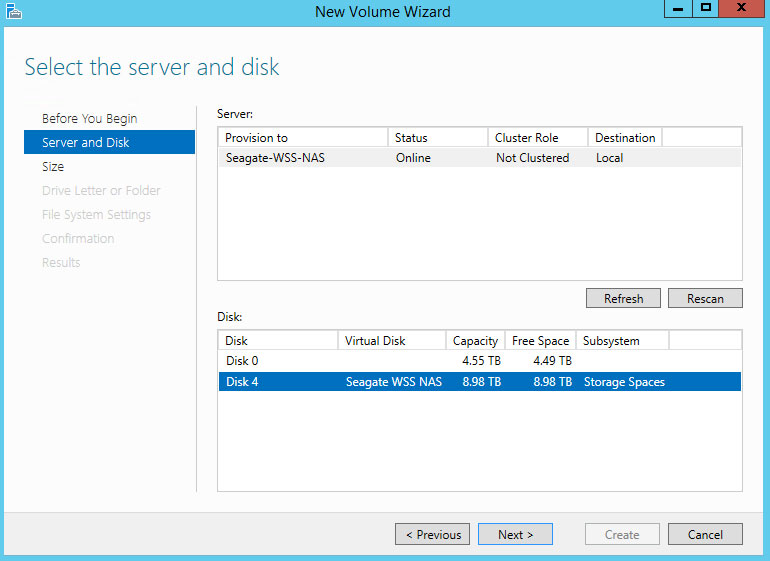
Create a volume
If the New Volume wizard is open, skip step 1.
- In Server Manager > File and Storage Services > Volumes > Storage Pools, right click on the virtual disk and choose New Volume.
- Choose Next.
- Click the virtual disk that will host the volume and choose Next.
- Enter the size of the volume. In this example, the full capacity is used for the volume.
- Choose Next.
- Choose the drive letter and select Next.
- Choose the file system. Windows recommends NTFS.
- Enter a name for the volume in the volume label field.
- Choose Next.
- Review the Confirmation window and choose Create.

The volume is visible in an Explorer window.

Dashboard setup: configure Windows Server Essentials
The dashboard is the central management tool for Windows Storage Server 2012 R2 Essentials. You can use the dashboard to add users, create user groups, review storage health and much more. To enable the dashboard, you must create a new domain for the WSS NAS. The Windows Server Essentials setup wizard helps you create the domain.
To learn more about domains, see the Microsoft Technet overview.
Important info: The network name for your WSS NAS cannot be changed after the Windows Server Essentials setup wizard. Consider changing the name before following the directions below. To change the name, go to System Properties > Computer Name and click Change.
Important info: If you intend to join the WSS NAS to an existing domain, you must do it before running the Windows Server Essentials setup wizard.
Follow the steps below to create a domain:
- From the Windows WSS NAS Setup Assistant, click the link Set up dashboard. The Server Manage launches.
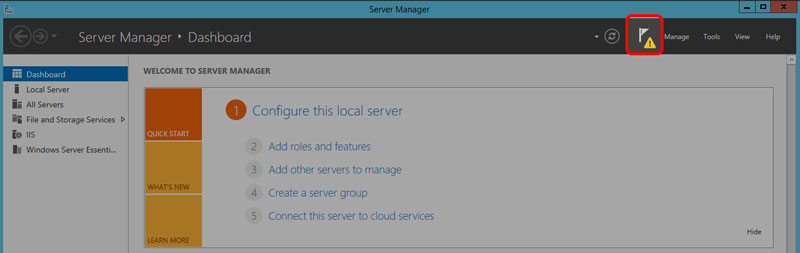
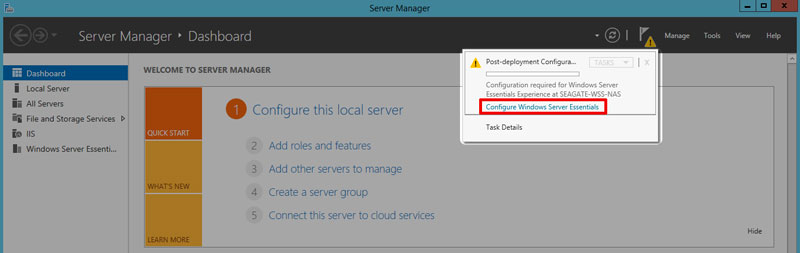
- Click the notification flag on the top right of Server Manager.
- Click the link Configure Windows Server Essentials.
- Click Next.
- Enter your company name (optional) and the name for the domain.
Important: PCs connected to the WSS NAS are associated with the domain name you choose in this step. It is very complicated to change.
- Click Next.
- Create a new administration account name and password for the WSS NAS domain. The credentials should be different than the default account.
Important: This is your domain’s administrator account. Use it to manage users, user groups, server folders, permissions and all features related to the WSS NAS.
- Click Next. The server must reboot one or more times to add the domain.
- Check the power button LED to determine when you can log in. When it is solid white, launch Remote Desktop from a PC on the network. Enter the new domain’s administrator credentials to log in.
Note: Preparing the dashboard can take up to 15 minutes.
- Launch Server Manager by clicking its icon on the lower left.
- Server Manager completes the update. Choose Next.
- (Optional) You can click the link to register your WSS NAS with Microsoft online services for business.
Review dashboard notifications
Following the domain creation, you can use dashboard to manage your WSS NAS. To begin, check Health Monitoring for notifications on the health of your WSS NAS. When first reviewing notifications, there are two messages to resolve. See the instructions below.
To launch dashboard, click twice on its icon, located on the upper left of the desktop.
Notification: Windows update
- In dashboard, go to Home > Health Monitoring.
- Right click the critical message and choose Troubleshoot this issue.
- The Windows Update Control panel opens. Windows recommends selecting Turn on automatic updates to receive the latest versions of software.
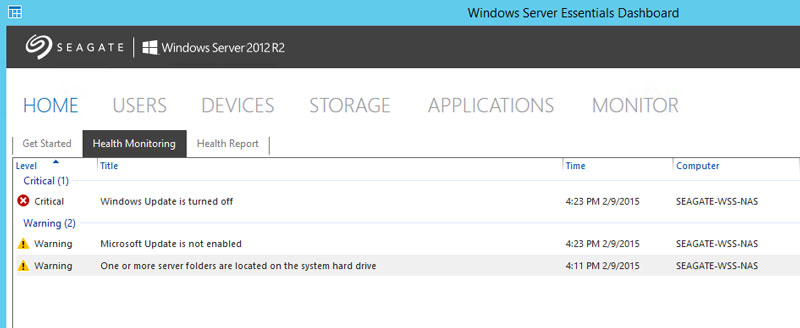
Notification: server folders
By default, the server folders remain on the system hard drive. It is recommended to move them to a larger volume.
-
- In the dashboard, go to Storage > Server Folders.
- Right click on any folder except Users.
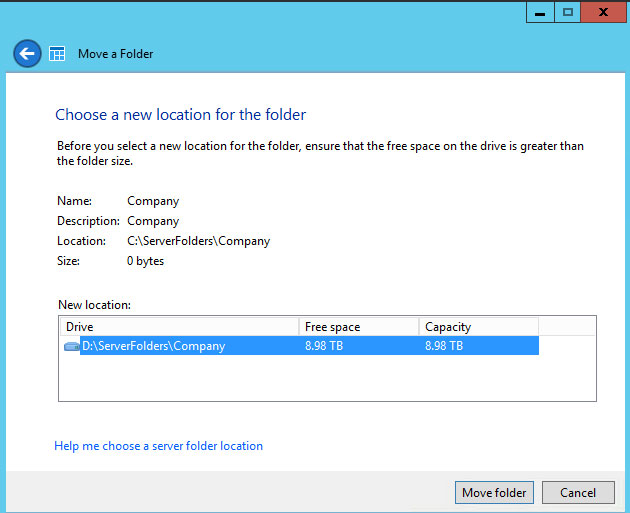
- Choose Move the folder.
- Choose Next.
- Choose the drive to store the folder and select Move folder.
- Choose Close.
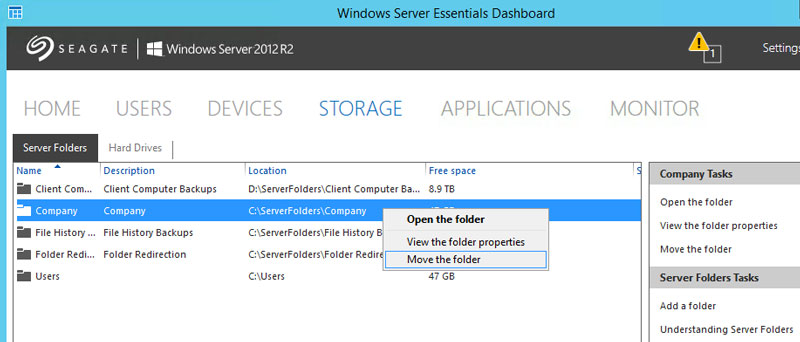
Repeat the steps for all folders except Users. The Users folder is always active and cannot be moved. Since it cannot be moved, dashboard notifications will continue to post warnings that folders are on the system hard drive. As long as you make certain to keep all other server folders on non-system volumes, the warning can be disregarded.
Some more info about Buffalo Windows NAS:
Windows based OS NAS – WSS NAS
All pages contain links to Amazon. These links will take you to some of the products mentioned in today’s article. As an Amazon Associate, we earn from qualifying purchases.
Preface
This tutorial is installed is the latest version. Since it makes it very stable, the software that can be installed is not installed.
First, ready to work
[Update system】
Nothing, he wants to use the latest.
Right click on the start button -> Settings -> Update and Security
Second, smaba
【Install】
Official website:https://www.samba.org/
Command process:
cd /source/
wget https://download.samba.org/pub/samba/samba-latest.tar.gz
tar -zxvf samba-latest.tar.gz
cd samba-latest
[Configuration]
Download this here is the ASP.NET Core I generated with VS2017 for demo!
mkdir /web/www
cd /web/www
wget https://files.cnblogs.com/files/project/webapp.tar.gz
tar -zxf webapp.tar.gz
Third, Supervisor
【Install】
Official website:http://www.supervisord.org/
Command process:
yum install -y supervisor
[Configuration]
1, copy file
mkdir /web/supervisor
cp /etc/supervisord.conf /web/supervisor
2, open supervisord.conf
vim /web/supervisor/supervisord.conf
3, add as follows
[program:webapp]
command=DOTNET Webapp.dll; command to be executed
directory=/web/www/          Directory for command execution
autostart=true                    ; Whether it is automatically started
autorestart=true                ; Whether it is automatically restarted
stderr_logfile=/var/log/WebApp.err.log; standard error log
 Stdout_logfile = / var / log / webapp.out.log; standard output log
【run】
supervisord -c /web/supervisor/supervisord.conf
Four, Nginx
【Install】
Official website:http://nginx.org/
Command process:
rpm -Uvh http://nginx.org/packages/centos/7/noarch/RPMS/nginx-release-centos-7-0.el7.ngx.noarch.rpm
yum install -y nginx
[Configuration]
1, copy file
mkdir /web/nginx
cp /etc/nginx/nginx.conf /web/nginx
cp /etc/nginx/mime.types /web/nginx
2, open nginx.conf
vim /web/nginx/nginx.conf
3, modified as follows
worker_processes  1;

events {
    worker_connections  1024;
}


http {
    include       mime.types;
    default_type  application/octet-stream;

    sendfile        on;

    keepalive_timeout  65;

    gzip  on;

    server {
        listen       80;
        server_name  localhost;

        location / {
            proxy_pass http://127.0.0.1:5000;
            proxy_http_version 1.1;
            proxy_set_header Upgrade $http_upgrade;
            proxy_set_header Connection keep-alive;
            proxy_set_header Host $host;
            proxy_set_header X-Real-IP $remote_addr;
            proxy_set_header X-Forwarded-For $proxy_add_x_forwarded_for;
            proxy_cache_bypass $http_upgrade;
        }
    }
}
View Code
【run】
nginx -c /web/nginx/nginx.conf
V. Effect Preview
AttachGenerally used orders
nginx
# nginx             //Start Nginx
# nginx -s reload   //Restart Nginx
# nginx -s stop     //Close Nginx
supervisor
supervisord
supervisorctl status    //View all task status
supervisorctl shutdown  //Close all tasks
supervisorctl start|stop|restart all          //Control all processes
supervisorctl start|stop|restart program_name //Control goal process
In essence, a NAS Server or (Network Attached Storage server) is a centralized device on your network that acts like a digital filing cabinet. It securely stores and manages a variety of data, including multimedia files like photos, videos, and music, along with documents and any other kind of file. This data can be easily accessed and shared by multiple users on the network.
If you have a spare computer you can repurpose it into a NAS Server with little effort. You do not need Server hardware.
- Why are NAS servers convenient?
- Choose your NAS Servers Operating System
- Easily Setup A Windows 10 NAS server
- Firstly you will need a few things to setup a Windows 10 NAS server
- Step #1 – Getting the software needed for setting up Ubuntu NAS
- Step #2 – Preparing Windows 10 installation medium via flash drive
- Step #3 – Installing Windows 10 from the flash drive on our NAS server
- Step #4 – Getting Windows 10 ready to be a NAS Server
- Change Windows 10 Power Management
- Setting Up Windows Remote Desktop (RDP)
- Adding User Accounts to the NAS for Data Control (Optional)
- Step #5 – Setting up a static IP address on the Windows NAS server
- For Example:
- Preforming a Ping Test
- Step #6 – Setting up a hard drives for NAS storage
- Step #7 – Setting up Windows File Sharing for the NAS server
- Step #8 – Connecting to the NAS server share
- The Conclusion
- What did you think of setting up a Windows 10 NAS server ?
Why are NAS servers convenient?
NAS servers either windows based or Linux based offer you massive storage on your local network, providing a flexible way to share, backup and access files as well as giving you redundancy in safeguarding your information using systems RAID.
Thus you don’t need to spend money on extra storage for multiple computers keeping costs down.
Choose your NAS Servers Operating System
Setting up a NAS is most cost-effective using a Linux operating system like Ubuntu or Mint. While Windows machines can also be used as a NAS, they typically require additional licensing fees, making them a less economical option compared to Linux.
Have a look at Setting up a simple NAS server on Linux Ubuntu if you are interested in using Linux instead of Windows to setup a NAS server
Easily Setup A Windows 10 NAS server
Previously we covered how to setup NAS servers on Linux so now lets look as using Microsoft Windows 10.
Setting up a NAS server for your home or business is actually fairly simple, you can have your own Windows NAS server up and running quickly. follow along as we will show you how to set up a simple NAS server for your home or business.
Simply follow these easy steps and you should have a NAS server setup on Linux in now time. It will take around 30 minutes, so lets get started!
Firstly you will need a few things to setup a Windows 10 NAS server
- An Spare PC, new or old capable of running at least Windows 10. It is not advised to use an old laptop here BUT if that’s all you have then go for it.
- Any small sized Hard drive,
- Usually an old PC will have at least one hard drive installed already. An SSD drive is perfect for this.
- It will only be used to install the Windows Operating system so anything around 100 gig or more is fine. 120Gig SSD’s are cheap and perfect for a NAS
- Some larger hard drives for the actual content you want to host on the server.
- Such as the Western Digital Red or Seagate IronWolf series will be perfect.
- Network capable LAN port and either CAT5e or CAT6 LAN cable for connecting your NAS to the local network.
- A copy of Microsoft Windows 10 Pro. It’s recommended to use Pro and not home as we would like to have Remote Desktop capabilities.
- Download the Windows 10 ISO file here using the official Microsoft Media Creation tool.
- A USB Flash Drive which we will use to install Windows 10 onto the PC with. 16 Gigabyte or more is fine.
- Rufus, a small Windows program that will help us to create a bootable flash drive that we will use to then install Ubuntu onto the NAS Server PC
- Note: If you are Downloading the Windows 10 ISO with the Microsoft Media Creation tool then you can also use that to flash the image to a USB flash drive.
Step #1 – Getting the software needed for setting up Ubuntu NAS
Download Microsoft Windows 10 Pro iso from Microsoft here, Please note you will need to purchase a valid License Key to use Windows.
Download Rufus – used to create the installation flash drive if you are not using
Step #2 – Preparing Windows 10 installation medium via flash drive
In the event that your NAS server doesn’t already contain a working version of Windows 10 you will First we need to prepare Windows for installation using flash drive.
Plug in the flash drive on a windows PC not on the NAS server PC then using Rufus select the USB flash drive and the Windows 10 ISO image you downloaded as shown below. Then press start to copy the ISO files to the flash drive and make it bootable.
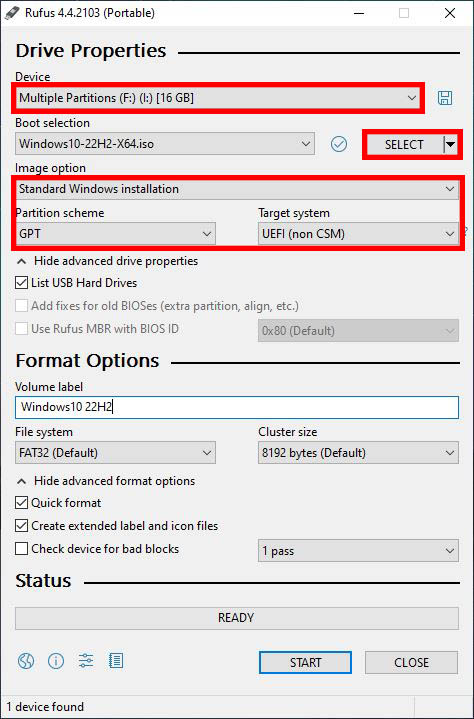
Rufus Configuration for Windows 10
Step #3 – Installing Windows 10 from the flash drive on our NAS server
Once Rufus is done we can move over to the NAS server and install Windows 10. Plug the flash drive into the USB port and power on the NAS server PC.
Now you will need to boot from the flash drive and to do so I’d highly advise consulting your motherboard manufacturer documentation. Most PC’s will have a shortcut key such as F2, F9, F10 or F12 to bring up a boot menu. Else you will need to configure the BIOS or UEFI to boot from flash drive. If you are using a UEFI bios then disable secure boot first to be able to boot from a flash drive…
You will know you have successfully booted when you reach the Windows 10 Installer screen…
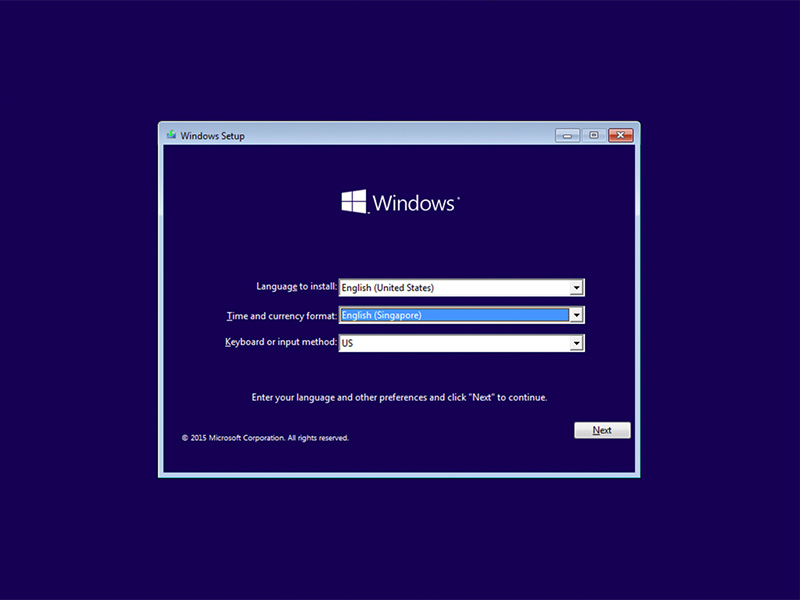
Microsoft Windows 10 Installer
From there follow the Windows 10 installer prompts to install Windows 10 on the NAS server PC. It’s pretty straight forward and will only take about 20~30 minutes depending on your NAS server hardware. When you reach the end of the installation you will be greeted with this screen as shown below. Restart the system and remove the USB flash drive.
Furthermore make sure that you select the correct Hard drive where Windows 10 will be installed on, this should not be one of your main storage drives and a smaller SSD if possible.
Step #4 – Getting Windows 10 ready to be a NAS Server
The very first thing we want to do after installing Windows is update the system. This will ensure that the NAS server is the latest versions and will help with security and stability of the overall NAS server. To update Windows 10 open Start > Settings (⚙) and navigate to Update and Security.
While we wait for updates to download, its a good idea to make some changes to the system.
Change Windows 10 Power Management
By default your NAS Server will turn off when idle for a extended period of time, as a server we want it to stay on forever. so we need to change the default windows power plan. In the settings app navigate to System > Power and Sleep and set Sleep to never. you can leave the screen truning off as default as most probably we wont use a screen connected to the PC in any case.
Setting Up Windows Remote Desktop (RDP)
We would like to access the NAS server over the LAN as in most cases there will be no physical monitor attached. Windows unlike Linux comes with a very nice out of the box solution for remote desktop access provided you are using the Pro version.
Note: On Linux you need to look at How to setup Remote Desktop (x11vnc server) on Linux Mint/Ubuntu
In Windows System Settings under System look for Remote Desktop, Make sure to enable this feature.
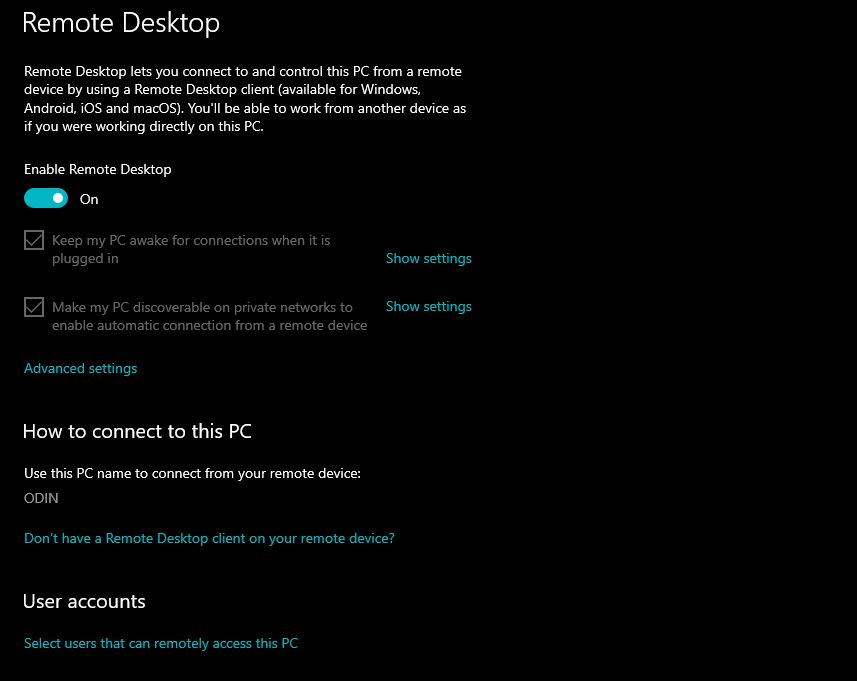
Pro TIp: If you want more than one users to have access to your NAS you can add them below using the Select Users that can remotely access this PC option.
Adding User Accounts to the NAS for Data Control (Optional)
By Default your user account are the only one that will have access to your shares and files. Its bad practice to give everyone admin level access a NAS server so what we will need to do next is add more standard user accounts. The way I like to do it is have a username for each person that will be using the NAS.
Therefore access to the NAS server can be controlled and User A cant access User B‘s data or files. You can also enforce better share restrictions if needed.
In the Settings App go to: Accounts > Family & other users > Add someone else to this PC
We will be adding local standard accounts for each person, this way you keep everything offline and there is no need for a Microsoft account for each user.
Make sure to select the “I don’t have this persons sign-in information” option

Next make sure to select Add User without Microsoft Account Option… DO NOT Create a new Microsoft Online account even though Microsoft would love to force you into creating one. This is a bad idea.
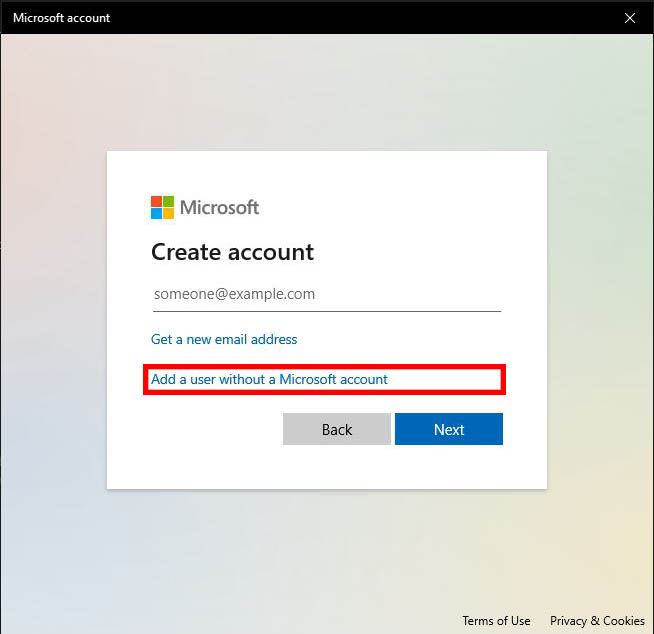
Fill in the Username, Unique for each user that you will give access to the server. These accounts and credentials will be used when we setup sharing later.

If you need to give any of these accounts remote Desktop access you can do that after creating local accounts.
Step #5 – Setting up a static IP address on the Windows NAS server
Setting up static IP addresses is required as we do not want the NAS servers IP to change on the network thus leading to us not being able to find it and shares to stop working… Its much easier to setup a Static IP on Windows than on a Linux NAS server for example: How to Setup a home network
In the Windows 10 Setting app head over to Network and Internet > Ethernet. While Wifi can technically be used its not advisable furthermore connecting with a physical LAN cable will give you higher speeds and more reliability.
Select your LAN Network Interface from the list.
Next, under Network Profile set the connection to Private. This will allow incoming LAN connection to be accepted by the NAS server and will also make the NAS server discoverable on the network by other computers.
Set metered connection to off. Unless you use some form of Internet on this connection that has a data plan and dont want to use it for updates…
Edit the IP settings next and fill out the information as follows. More on setting up Home networks here
For Example:
Note: Please change the IP addresses and ranges as per your environment For this Example I am using the following values that you need to change
- Set to Manual means we will be supplying the networking configuration and not use the DHCP servers issued data.
- IP Address is used to specify the NAS Server IP address on the network. Should be unique on the network.
- Subnet Prefix is usually 24 or 255.255.255.0.
- The gateway is your Routers address. Mine is 192.168.10.1
- Preferred DNS is usually also the routers address. But it can be set to use public DNS servers too such as 8.8.8.8
- IPv6 Disabled. We don’t need that for a simple LAN NAS Server
When done save and exit, The settings should be applied the moment you saved them and closed the box.
Preforming a Ping Test
To verify that you have internet and that everything is working. you can ping google using the following command in cmd. Open Start and type in cmd. start the app and then type in:
ping www.google.comLikewise the response we are looking for should look something like this: Note Received=100% with no loss. This means your internet is working
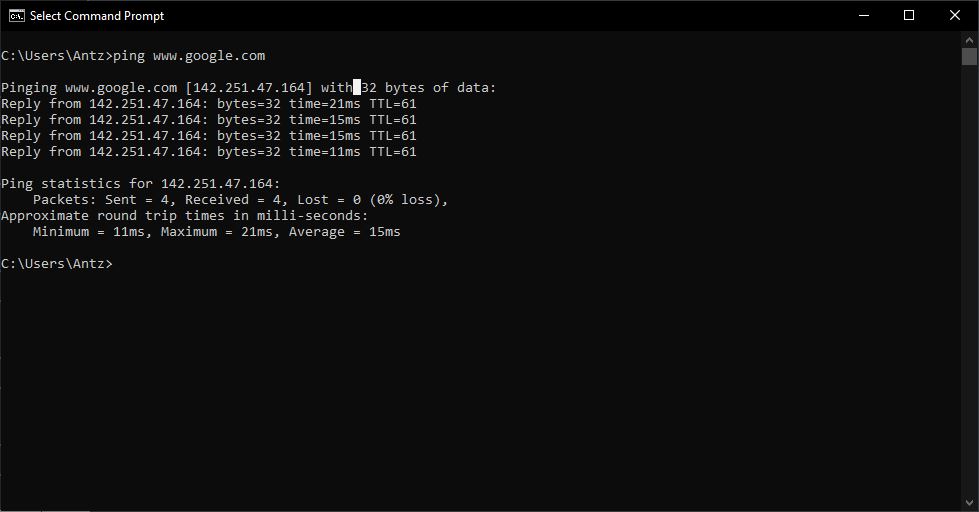
If you are getting a different output go double check your network settings and make sure you filled in your environments credentials that matched your networks setup. then try again. Else wise if you get a similar output as shown above you can continue.
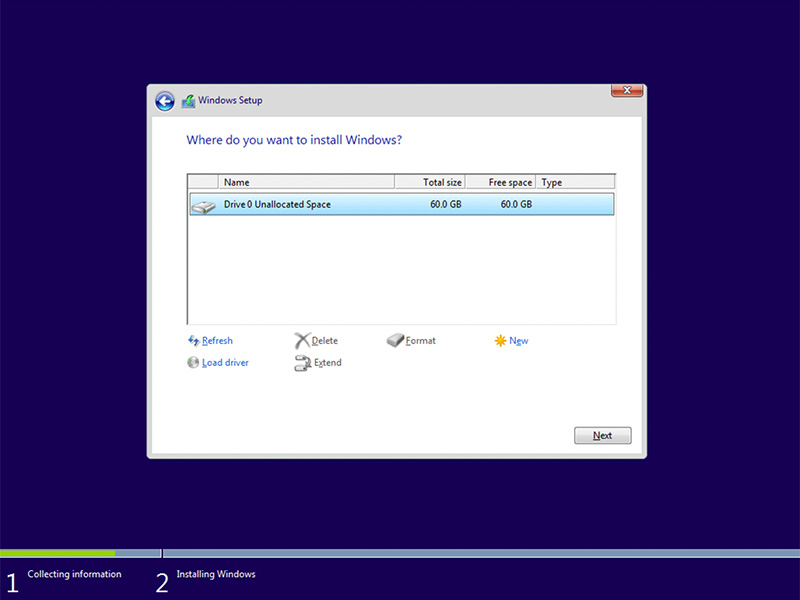
Step #6 – Setting up a hard drives for NAS storage
Its time it setup the additional hard drives for the NAS server, make sure that your hard drives are installed in the NAS server before we continue.
You can follow our guide here on how to install hard drives into a PC for detailed step by step instructions on how to install and format drives in Windows.
NOTE: If you have more then one Hard Drive you will need to repeat the following steps for each hard drive you want to use on this server.
Step #7 – Setting up Windows File Sharing for the NAS server
After all your NAS server hard drive are connected and setup its time to create the actual file shares for the NAS server.
Start by opening up Windows Explorer and then open the first hard drive you wish to add shares to. Right Click on the empty space and create a new folder.
Next Rename the folder to something like Movies then, Select the newly created folder and right click on it to open up that folders options
From the popup list right at the bottom select the “Properties” Option.
- Select the Shares Tab at the top of the Properties Window.
- Select the Share button Option
- Now you can add each user account that will have access to the NAS server, Select a user account from the dropdown then click add
- Set user permissions for each user. Read only means users cannot add, remove or change files
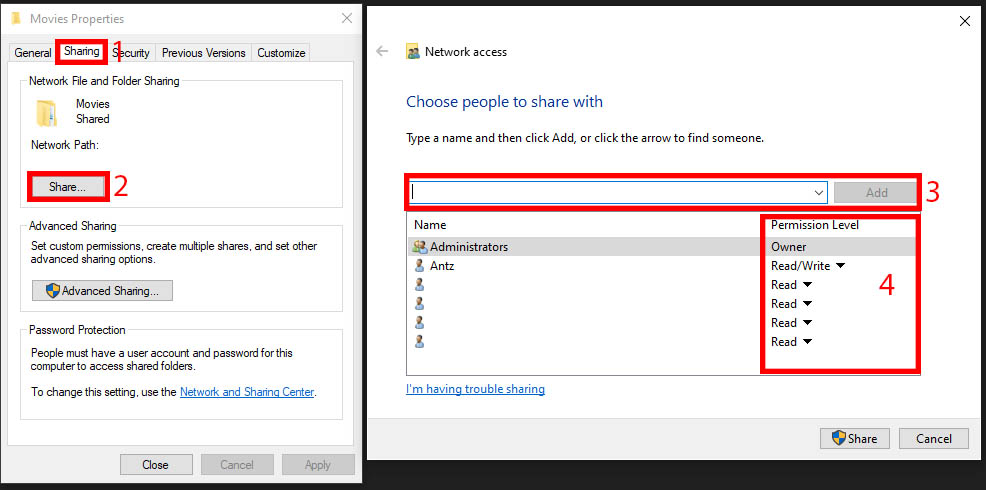
When Done hit Share and this Folder will now be shared on the NAS server.
Repeat the steps above or additional shares you would like as well as on other Drives…
For instance, I use one Hard Drive for Movies and then another one for TV series, additionally I also have a hard drive for music but you can put everything on one drive or choose to split the shares up. The choice is yours. furthermore you can also come back to this prompt windows to change and reconfigure any share you wish.
Step #8 – Connecting to the NAS server share
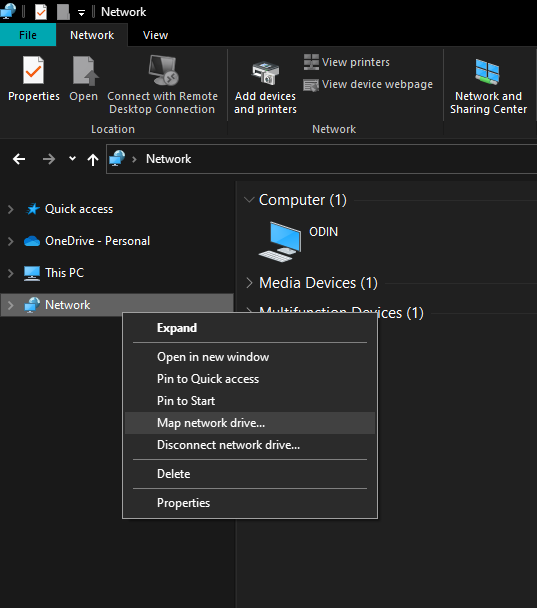
Lets connect to the NAS server. On a different Windows PC open up the file explorer app.
From the left panel locate the network category and right click on it, then select Map Network Drive as shown below:
Next select a drive letter and set the network path to your NAS share folder. What I like to do is assign a drive letter that is near the end at the alphabet because by default Windows will add new devices in alphabetical order as they are they.
I assign NAS drives starting in a reverse alphabetical order but that is completely optional. See below.
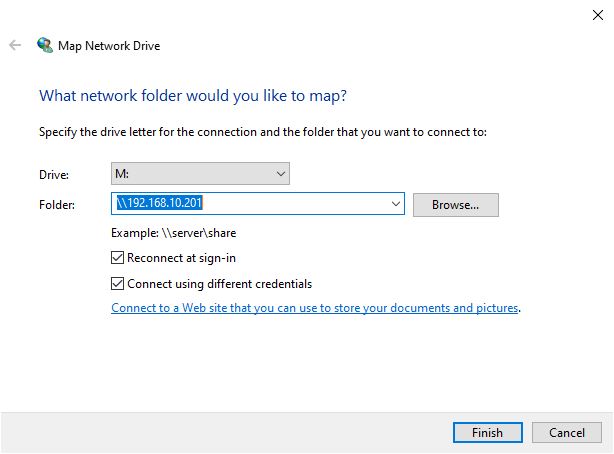
Once you have the IP entered for the NAS server click on Browse… to select which folders you want to map.
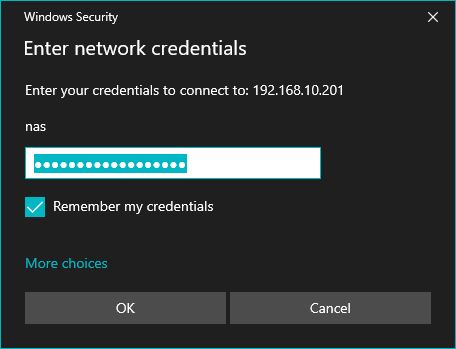
Click OK then Finish, Windows will ask you for the username and password next.
Enter your NAS server username and then the samba password you have set.
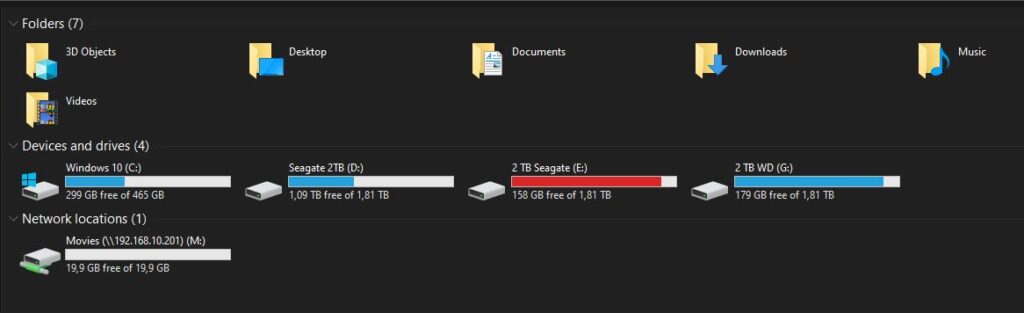
If the NAS server was setup correctly you should have access to the NAS servers mapped drive in Windows. It will now show up as a hard drive in Windows Explorer where you can now store, add, use and access files as long as the NAS server is online. As you can see below I have mapped out Movies as drive letter M: and its its now listed.
Remember that different users will need to use their credentials to Log onto the NAS server if you opted in to use multiple accounts.
The Conclusion
NAS servers are very useful, RAID would also come into play as redundancy for the server. This tutorial serves as a very basic setup mostly for home use.
If we gain traction on this article i will revisit a setup guide to setup RAID for the server for maximum data protection. Encryption can also be assigned to further safeguard the NAS. A guide can be found here : How to setup Windows Bitlocker Encryption
Have a look at Kodi next to set that up to work with you multimedia NAS server as a home entertainment system. Alternatively you there are other Linux distributions out there that;s sole purpose is to be a NAS. Some paid for and others free. Consider them maybe as well. Such as OpenMediaVault and TrueNAS
We also have a detailed guide on Setting up a simple NAS server on Linux Ubuntu should you wish to keeps costs down.