
При запуске Windows 10 или 8, вам будет предложено ввести пароль, чтобы иметь возможность войти в систему. Это позволяет защитить ваш компьютер, от несанкционированного доступа. Но если вы единственный человек, который использует компьютер, и вы не хотите, получать запрос на ввод пароля каждый раз, вы можете избавиться от этого процесса и войти в систему Windows автоматически без ввода пароля.
Начиная с Windows 10 версии 2004, которая выйдет весной 2020 г, также известной под кодовым именем «20H1», Microsoft изменила поведение по умолчанию для функции автоматического входа в систему. Теперь, если у вас включен какой-либо из параметров безопасности Windows Hello, вы не сможете автоматически войти в свою учетную запись.
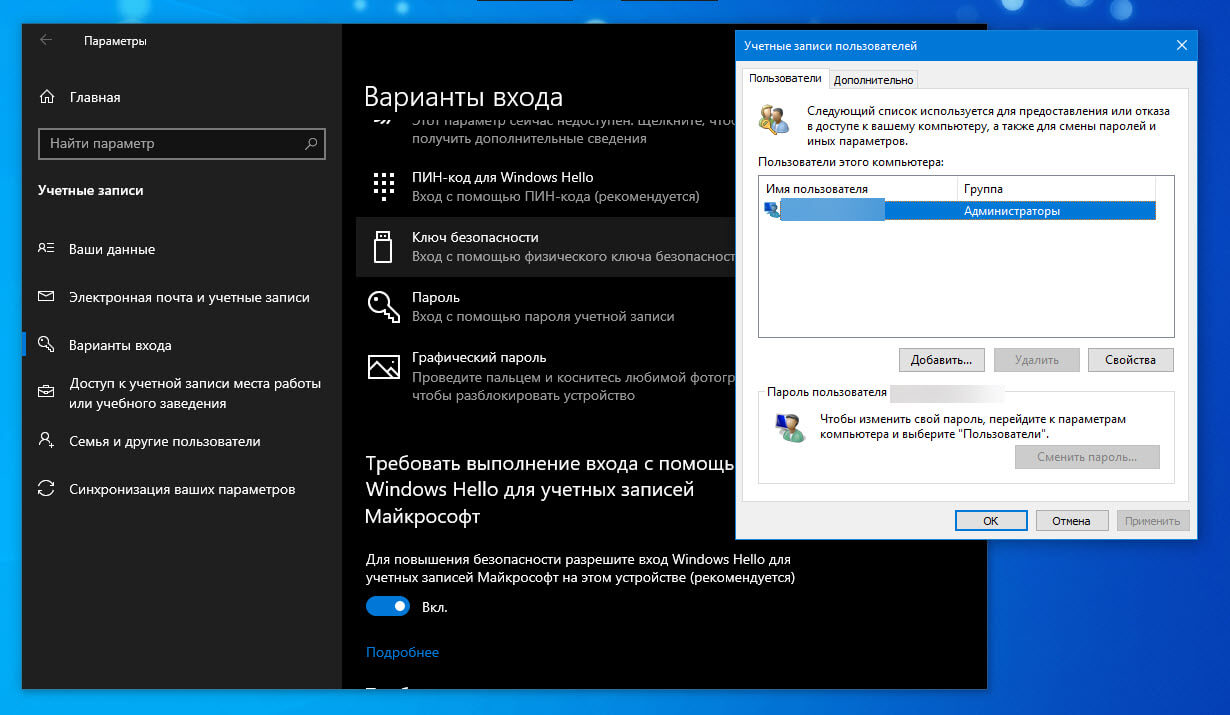
Начиная с Windows 10 build 19033, если вы установили PIN-код или другую безопасную функцию Windows Hello, Windows 10 скрывает параметр «Требовать ввод имени пользователя и пароля», чтобы использовать этот компьютер в классическом стиле control userpasswords2. Смотрите следующий скриншот:
В этой статье, мы рассмотрим три способа, с помощью которых вы можете отключить экран входа в систему и автоматически входить Windows 10 версии 2004 (20H1) и предыдущих версий без ввода пароля.
Способ 1.
Автоматический вход в Windows, с помощью команд — control userpasswords2 и netplwiz.
Чтобы отключить экран входа в систему, и автоматически входить Windows 10 версии 2004, выполните следующие действия:
Шаг 1: Откройте приложение «Параметры» самый быстрый способ нажать одновременно клавиши Win + I.
Шаг 2: Перейдите в раздел «Учетные записи» → «Варианты входа».
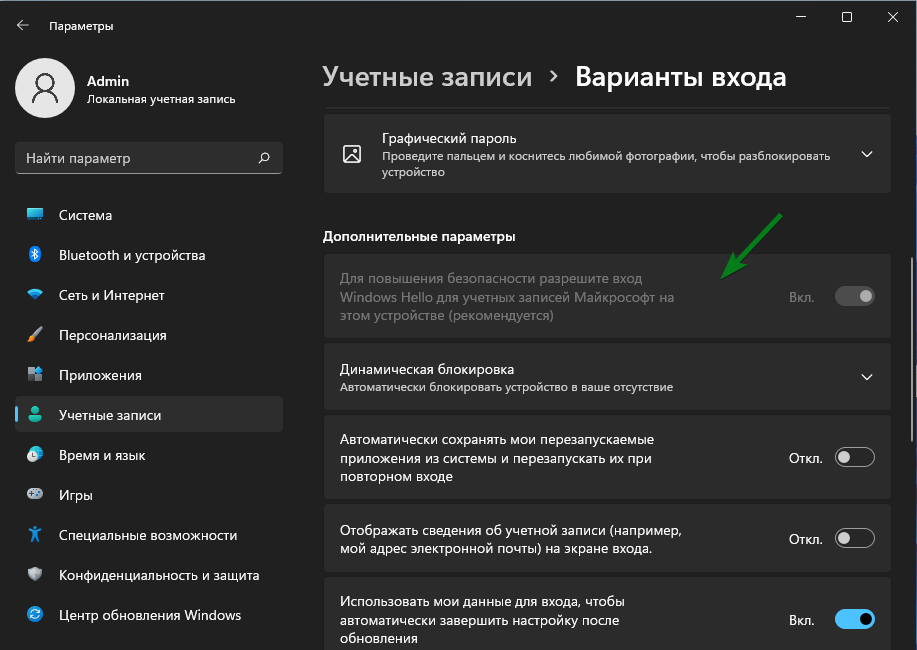
Шаг 3: Выключите опцию — «Требовать выполнение входа с помощью Windows Hello для учетных записей Microsoft».

Шаг 4: Нажмите сочетание клавиш Win + R открыв диалоговое окно «Выполнить», введите одну из двух команд, представленных ниже:
control userpasswords2 или,
netplwiz
или,
Перейдите в папку C:\Windows\SysWOW64 и запустите там Netplwiz.exe.
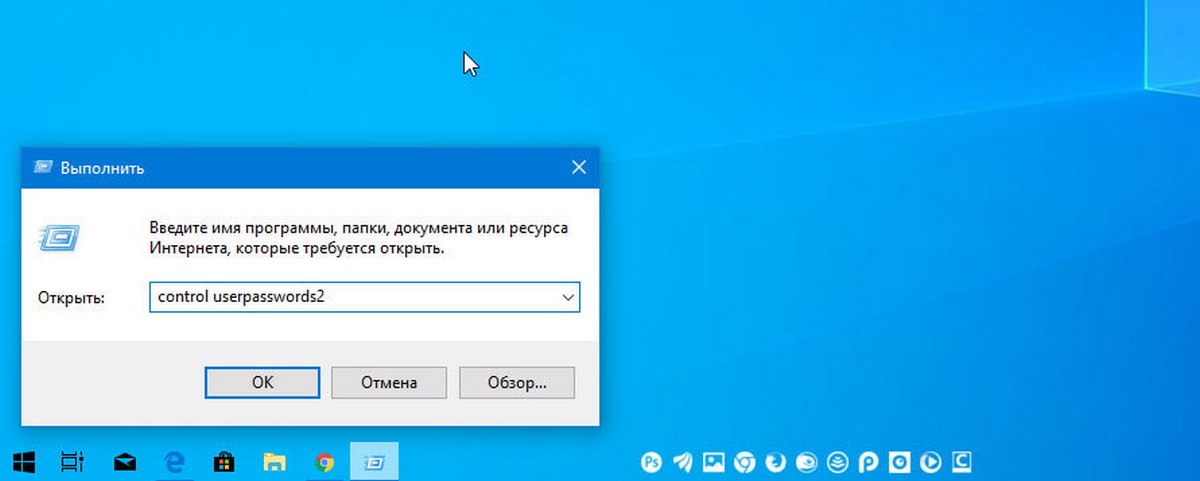
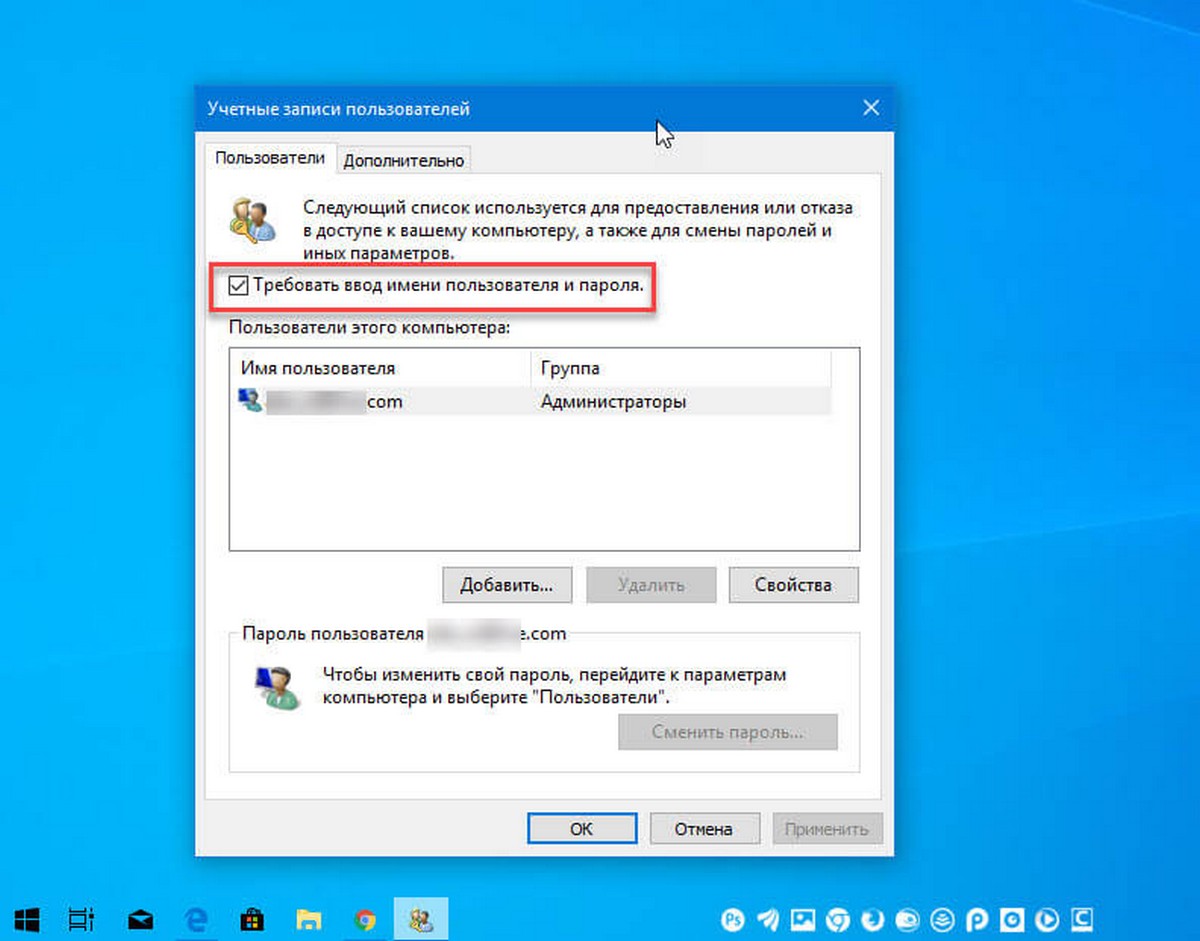
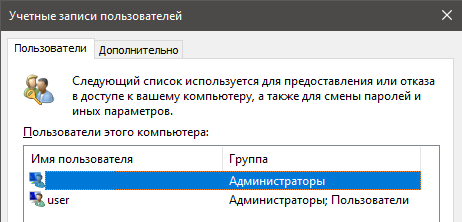
Шаг 5: Нажмите Enter, чтобы открыть окно «Учетные записи пользователей» и снимите флажок — «Требовать ввод имени пользователя и пароля», нажмите кнопку «Применить» → «OK».
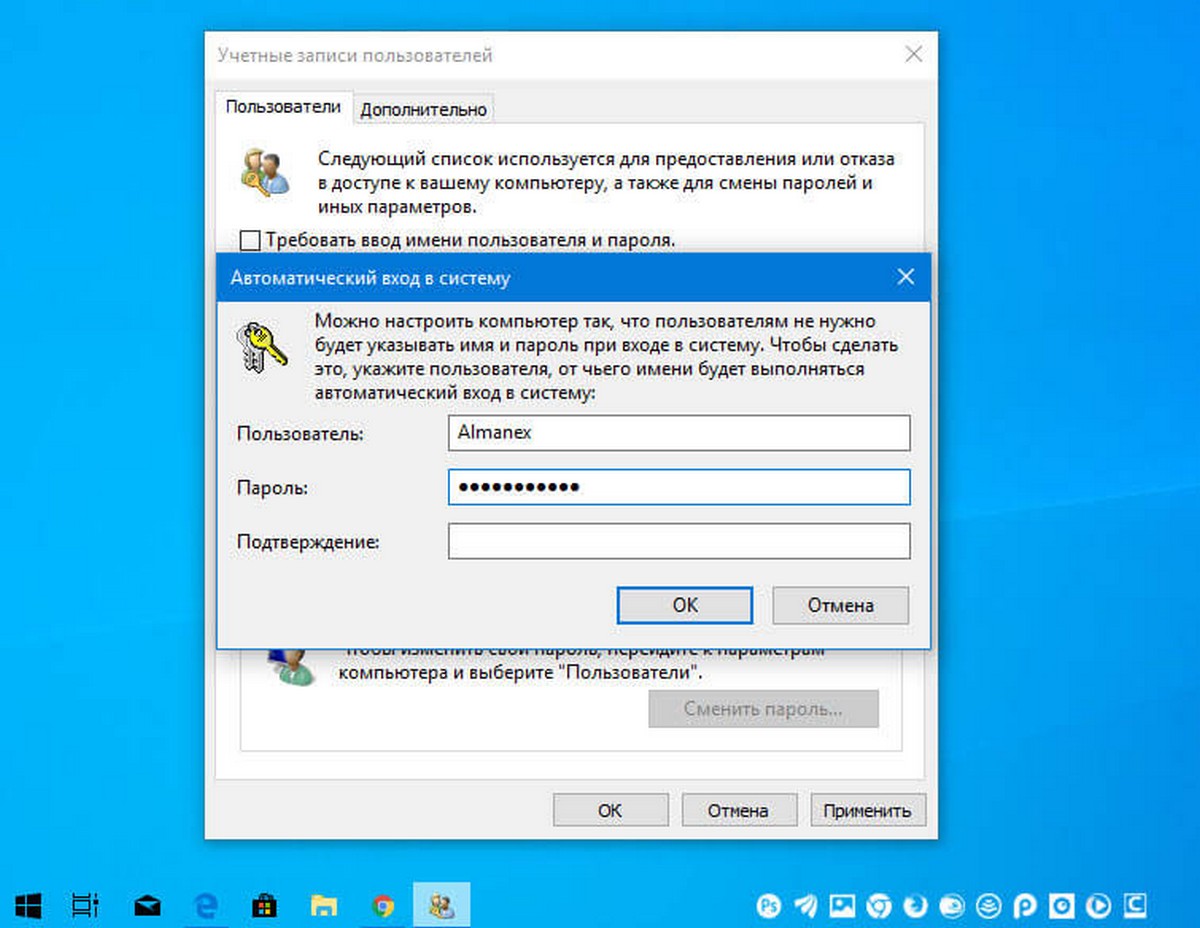
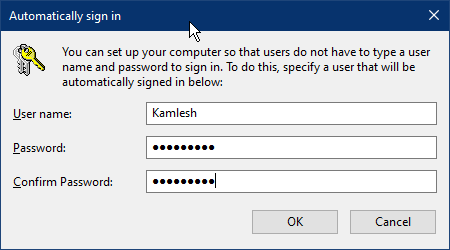
Это действие — открывает окно, в котором вы должны ввести свой пароль для учетной записи. Если учетная запись является локальной записью и не имеет пароля, просто оставьте это поле пустым.
Шаг 6: Перезагрузите компьютер.
После того, как вы сделаете это, вы обнаружите, что вы можете войти в систему Windows 10, 8 автоматически и вам ненужно вводить пароль или данные вашей учетной записи Microsoft.
Шаг 7: Осталось отключить запрос пароля после сна, ознакомится с инструкцией вы можете в нашей статье: Как отключить запрос пароля во время выхода из режима сна.
Способ 2.
Автоматический вход в Windows с помощью утилиты Microsoft «AutoLogon».
Microsoft Autologon это небольшая, бесплатная утилита предлагаемая Microsoft, которая может быть использована для настройки встроенного механизма автоматического входа в систему Windows 10. Подобно утилите netplwiz, вы можете сохранить учетные данные для любого локальной или MSA — учетной записи Microsoft. Наиболее важным преимуществом Autologon это шифрование пароля перед сохранением его в реестр.
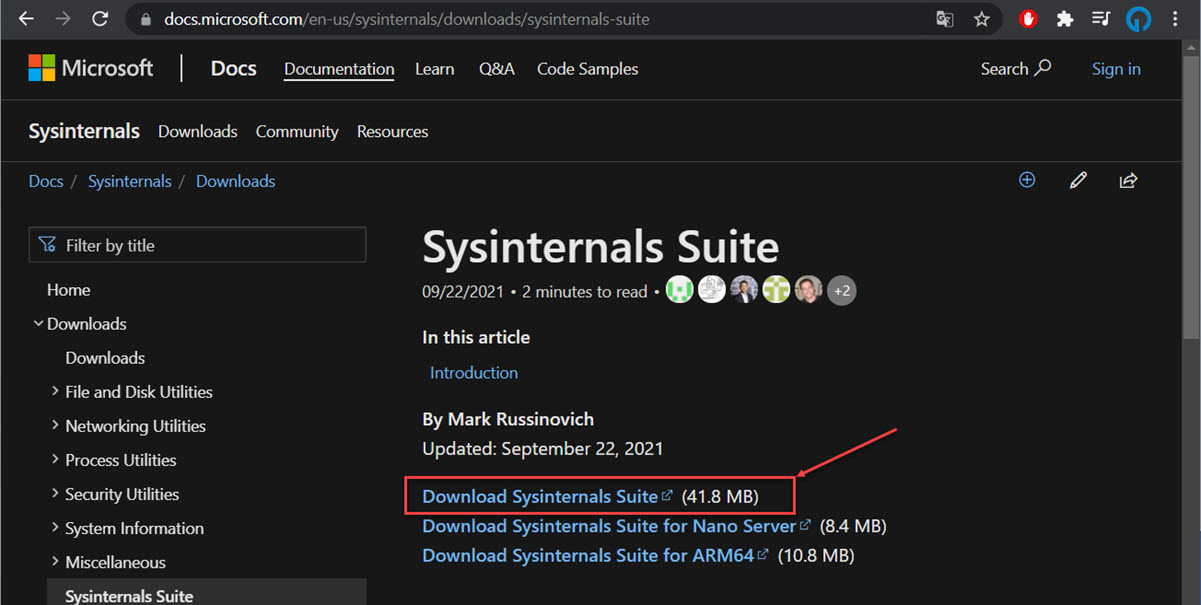
Шаг 1: Перейдите на страницу docs.microsoft.com и загрузите архив с утилитами Sysinternals. Архив содержит отдельные инструменты для устранения неполадок, а также утилиту «AutoLogon».
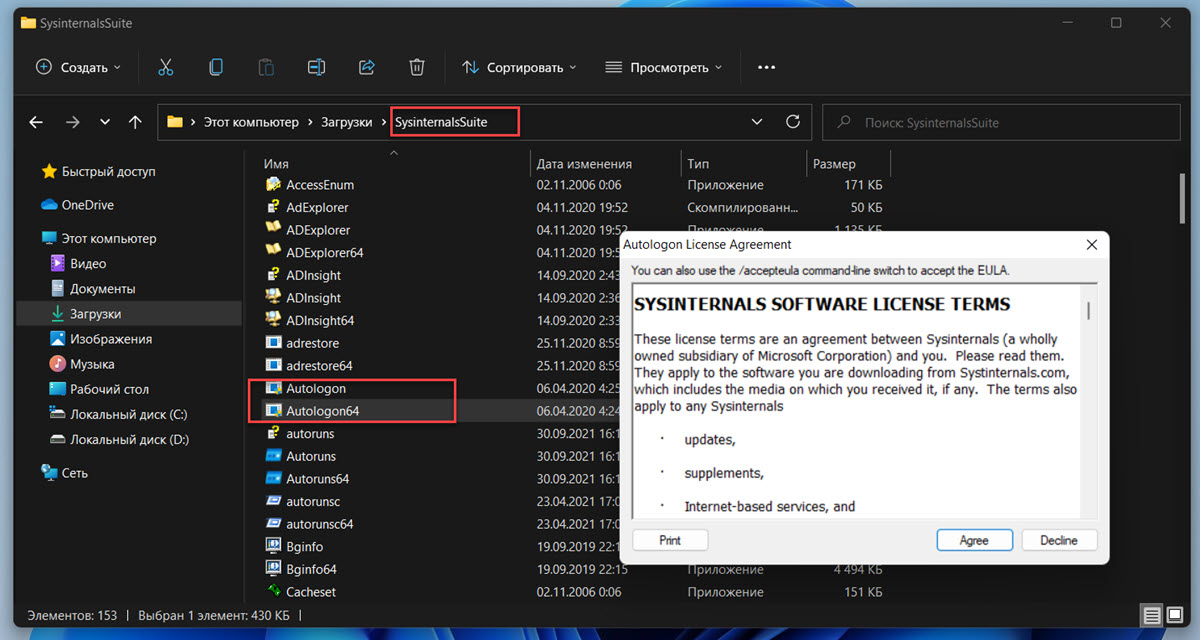
Шаг 2: Распакуйте архив и запустите файл Autologon.exe или Autologon64.exe в зависимости от разрядности вашей системы, чтобы установить его.
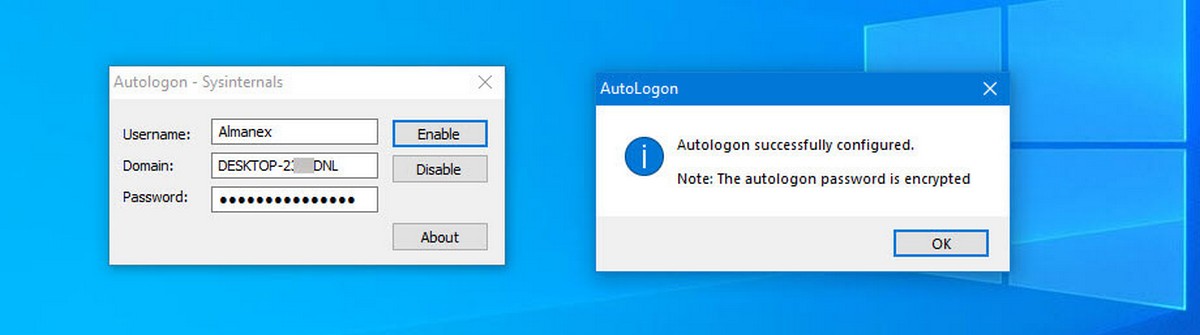
Шаг 3: После установки, запустите приложение и заполните необходимую информацию логин, пароль и нажмите кнопку «Enable», чтобы включить механизм обхода ввода пароля для выбранной учетной записи пользователя. На экране, появится сообщение подтверждающее, что Autologon успешно сконфигурирован.
Вы также можете использовать утилиту AutoLogon с помощью командной строки, используя приведенный ниже синтаксис:
autologon user domain password
Шаг 4: Перезагрузите ПК.
Способ 3.
Автоматический вход в Windows с помощью редактора реестра.
Как автоматически выполнить вход в учетную запись пользователя в Windows 10 версии 2004 «20H1» с помощью редактора реестра.
Шаг 1: Создайте точку восстановления системы, а затем нажмите Win + R на клавиатуре, чтобы запустить диалоговое окно «Выполнить». Введите regedit.exe и нажмите клавишу Enter, чтобы открыть редактор реестра.
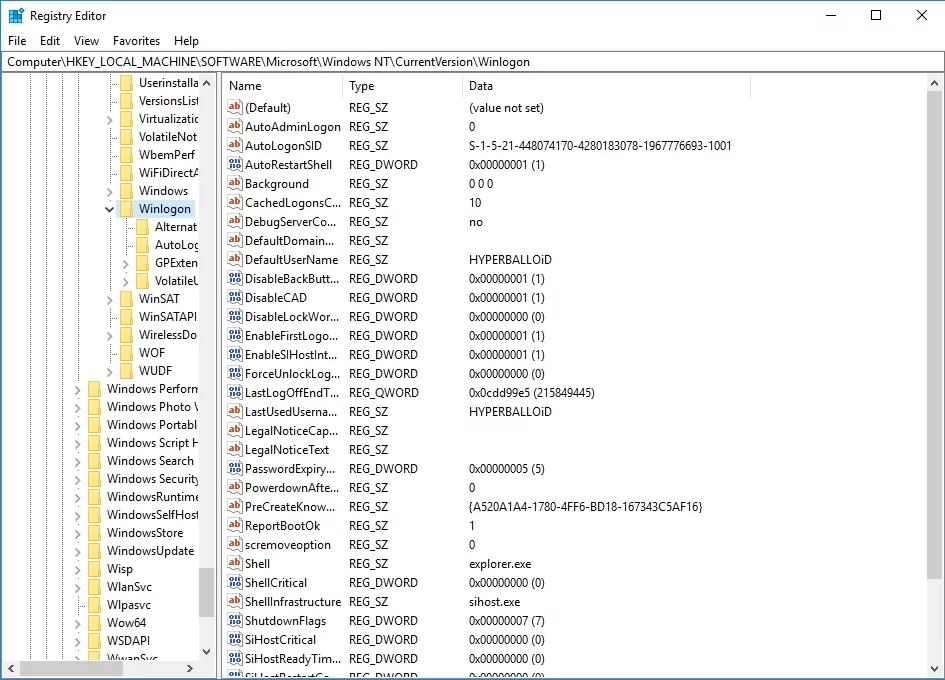
Шаг 2: Перейдите к следующему пути на левой боковой панели редактора реестра.
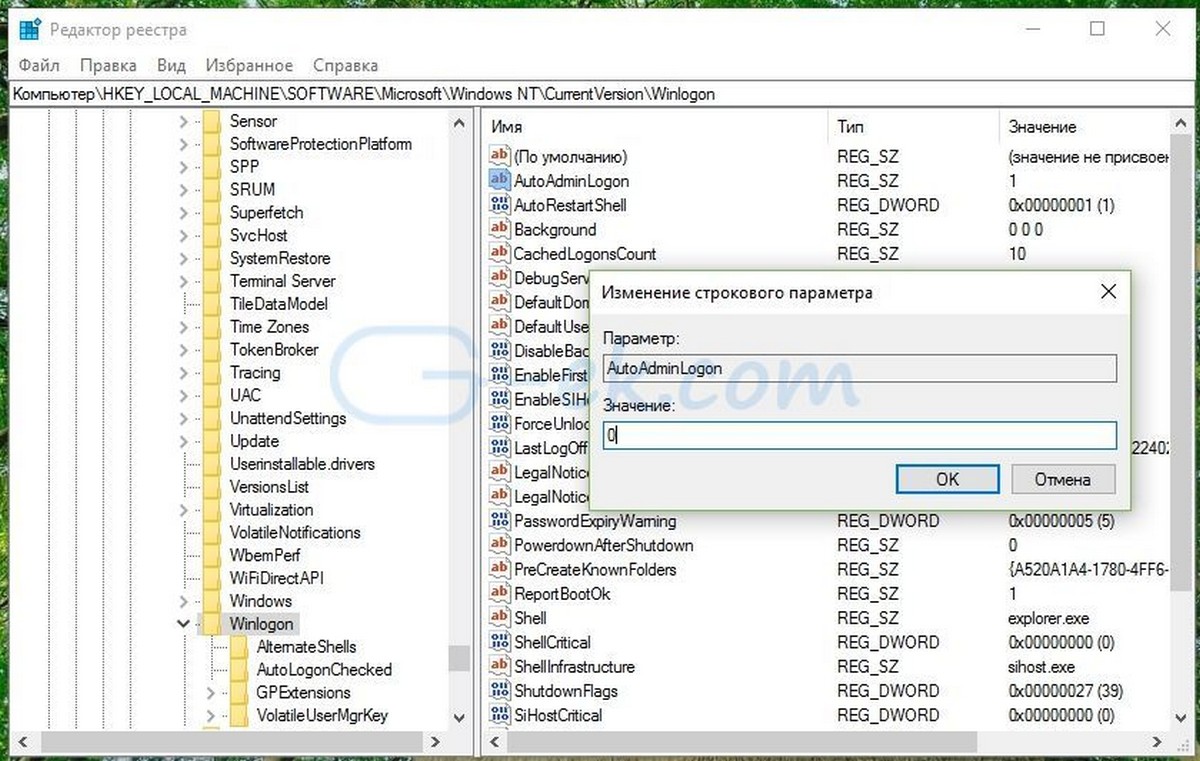
HKEY_LOCAL_MACHINE\SOFTWARE\Microsoft\Windows NT\CurrentVersion\Winlogon
Шаг 3: Теперь, с права найдите параметр «AutoAdminLogon» и измените его значение на 1.
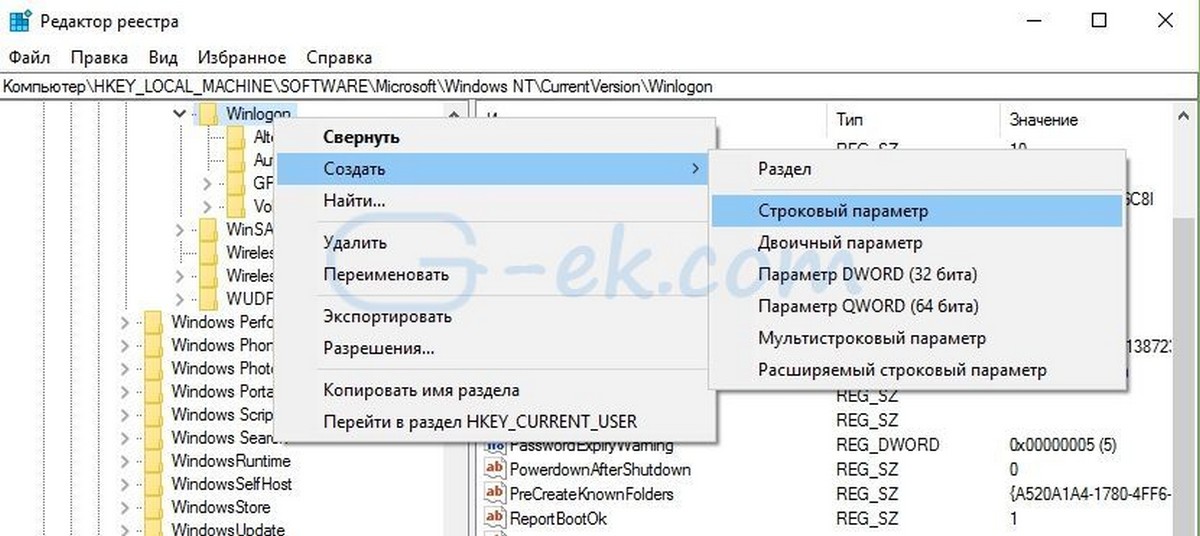
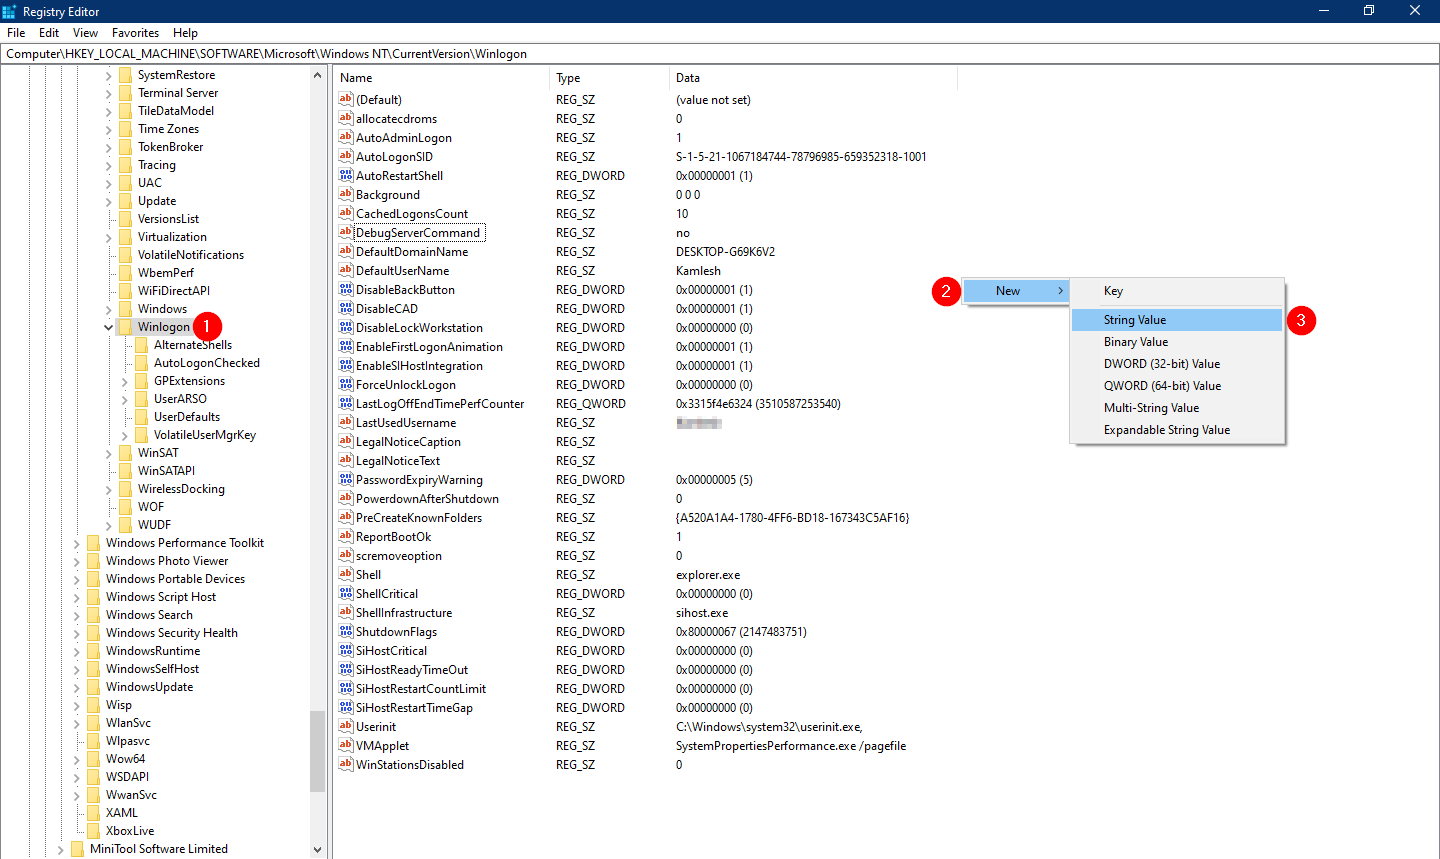
После этого, вам нужно создать несколько дополнительных строковых параметров для хранения значений данных учетной записи. Просто кликните правой кнопкой мыши на разделе Winlogon и выберите «Создать» → «Строковой параметр» и заполните их соответствующими значениями, в зависимости от присвоенного имени.
| Имя Строкового параметра | Значение |
| DefaultDomainName | Имя компьютера (для локальной учетной записи) или имя домена |
| DefaultUserName | Имя пользователя (как в C:\Users\<Имя пользователя>) |
| DefaultPassword | Пароль для выбранной учетной записи |
Если Строковой параметр уже существует, вам просто нужно изменить значение соответствующим образом.
Шаг 4: После того, как заполнены все значения сохраните настройки и закройте редактор реестра.
Должен отметить, что одним из недостатков использования редактора реестра для автоматического входа в систему, ваш пароль хранится в незашифрованном виде. Любой пользователь, имеющий доступ к реестру может посмотреть его. Поэтому рекомендуем вам использовать Способ с netplwiz или Autologon, ваш пароль будет надежно зашифрован и не будет хранится в редакторе реестра.
Чтобы отключить автоматический вход в систему с помощью этого метода, удалите значение DefaultPassword и установите для AutoAdminLogon значение 0.
Надеюсь, что этот совет будет полезен для вас.
Рекомендуем:
Сброс пароля Windows 10 с помощью встроенной учетной записи Администратора.
Как автоматически входить в Windows 11 минуя окно блокировки и ввод пароля
Table of contents
- How to Set Auto Login on Your Windows 10/11
- Method 1. Change your sign-in options using the Settings menu.
- Method 2. Configure your login settings via the User Accounts panel.
- Method 3. Enable Windows 11/10 auto login via Computer Management.
- Method 4. Modify your Windows Registry to enable automatic login.
- Conclusion
- FAQ
Generally, you shouldn’t use auto-login to sign in to Windows because that exposes all your confidential information to anyone with physical access to your PC. However, we’ve got you covered if you want to know how to set auto login in Windows 10 or 11 for various reasons. This guide offers numerous ways to set auto-login on your Windows PC. Let’s begin.
How to Set Auto Login on Your Windows 10/11
Here are 3 proven ways to bypass the Win 11/10 login screen:
The easiest way to let your OS boot right to the desktop is by changing your sign-in options in Settings.
To do that, take the following steps:
On Windows 10:
- Start menu -> Settings -> Accounts
- Sign-in options -> Require sign-in -> Set it to Never
- Go the PIN section below -> Click on the Remove button
If this method has been in vain and the annoying login screen persists, just work your way down—you have two more tricks up your sleeve.
On Windows 11:
- Use the
Windows + Ikeyboard shortcuts to open Settings. - Go to Accounts in the left panel and click on Sign-in options in the right sidebar.
- Under Additional settings, click the dropdown list next to If you’ve been away, when should Windows require you to sign in again? and set it to Never.
Also Read:How to Create a Local User Account on Windows 10/11?
Method 2. Configure your login settings via the User Accounts panel.
If you are tired of typing a password every time your PC boots, you can tweak your account settings to switch on the automatic logon feature in Windows 10.
Here is how to perform the trick:
- Type
Windows key + Ron your keyboard -> Typenetplwizinto the Run box -> Press Enter - Enter the User Accounts dialog box -> Select your user account
- Find the Users must enter a user name and password to use this computer option -> Uncheck it -> Apply
- You will see the Automatically sign in dialog box -> Type your password into the appropriate line -> Then confirm your password -> Click OK.
- After saving the changes, restart your PC to see if you can skip the login screen.
On Windows 11:
- Launch the Settings app using the
Windows + Ikeys and open Accounts -> Sign-in options. - Check if the For improved security, only allow Windows Hello sign-in for Microsoft Accounts on this device (Recommended) option under Additional settings is activated. If it is, toggle the button to turn it off. If the option is grayed out, log out of your account and log back in.
- You will be prompted for a password. Enter it and hit Yes.
- Now, hit the Windows + R hotkeys to launch the Run dialog box. Type or paste the command
netplwizand press the Enter key. - On the User Accounts window, uncheck the option Users must enter a username and password to use this computer.
- Click Apply and then OK.
- You’ll be prompted to enter your password to validate the change.
- The next time you start your Windows 11 computer, it should automatically log in.
Sometimes, auto login in Windows 11 may not work if any of the Windows Hello sign-in options (Facial recognition, Fingerprint recognition, or PIN) are enabled.
Therefore, you may need to disable Windows Hello and try to enable auto-login.
To do that:
- Select your current sign-in method, and click the Remove button.
- Select the Remove button again to confirm your action.
- Next, enter your password to confirm your identity and click OK.
- Once you’re done, repeat the steps above to enable automatic login on your Windows 11 PC.
You should disable auto logon if you want to undo the changes and password-protect your computer.
Just go the ‘Users must enter a user name and password to use this computer’ option and check it.
Method 3. Enable Windows 11/10 auto login via Computer Management.
This procedure works in both Windows 11 and Windows 10:
Caution
This method might cause data loss from the User Account you select. Therefore, proceed with caution.
In case of data loss, use Auslogics File Recovery to restore the files.
- Press the
Windows + Rhotkeys, type or pastecompmgmt.mscin the Run dialog box, and hit Enter. Alternatively, right-click the Windows key and select Computer Management. - Select Local Users and Groups -> Users in the left pane.
- Find the user you want to enable password-less login on the right sidebar, right-click it and select Set Password.
- You’ll get a warning that Resetting the password might cause irreversible loss of information for this user account. Click Proceed to enable auto login.
- In the popup window, leave the New password and Confirm password options empty.
- Click OK.
Pressing OK removes any password you had set earlier. This means the next time you restart your PC, you shouldn’t be prompted for a password.
Fix this issue quickly
You can try using a safe and totally free tool developed by the Auslogics team of experts.
A few simple steps to troubleshoot the issue:
Download the tiny Auslogics TroubleShooter tool.
Run the application (no installation is needed).
The app will check for the issue mentioned in the article. When the scan is done, check that this is the issue you were looking to solve and click ‘Apply now’ to apply the recommended fix.
You can use the app to troubleshoot other malfunctions for free by simply typing in a brief description of the issue your PC is experiencing. Or you can scan your PC for performance issues using the My Scanner tab.
Related
: How to Open Disk Management in Windows 11?
Method 4. Modify your Windows Registry to enable automatic login.
This tweak requires much caution. Editing your registry is quite risky – it may cause your system to fall apart, so there is no excuse for sloppiness in this kind of work.
To begin with, back up your important files to prevent permanent data loss.
You can migrate your data to another PC using a transfer cable or the HomeGroup feature.
You can also use a cloud solution, such as Google Drive, OneDrive, etc., or a portable storage device (an external drive will come in very handy for this purpose).
Our article provides more information on these methods, but remember that they all involve a substantial amount of manual work.
To save time and effort, you can use special backup software, such as Auslogics BitReplica.
In addition, we strongly advise you to back up your registry. Here is how to do that:
- Open Registry Editor by pressing the
Windows logo key +Rat once and typingregedit.exeinto the Run box. - In your Registry Editor, select the keys you wish to back up -> File > Export
- Choose where you want to place your backup file -> Choose the name for it -> Save
Here is how to restore the registry in Windows 10:
- Open Registry Editor -> Choose File -> Import
- Import Registry File -> Locate your backup file -> Open
Now you can edit your registry to set automatic logon:
- Go to your Registry Editor
- Locate the key HKEY_LOCAL_MACHINE\SOFTWARE\Microsoft\Windows NT\CurrentVersion\Winlogon
- Navigate to the entry named DefaultUserName -> Double-click on it
- Edit String -> Make sure you can find your account name in the Data value box.
- Now search for the DefaultPassword entry -> If you cannot find it, you should create such an entry.
- Right-click on the empty space -> New -> String Value -> Name it DefaultPassword -> Go to the Value data box and enter your password -> Click OK to save the changes.
- Find the entry named AutoAdminLogon -> Change its value from 0 to 1 -> Click OK for the changes to take effect.
Restart your PC to see if automatic login has been successfully enabled. If not, you should revert the registry changes you made to turn it off.
Related
: Ultimate Guide: Why and How to Defrag Windows Registry?
Conclusion
We hope our tips have proved useful to you. Go through the various points outlined in this guide and choose the one that works best for you.
Do you have any ideas or questions regarding this issue? We are looking forward to your comments!
FAQ
How do I automatically use my Windows logon name and password in Windows 11?
You can use Credential Manager to use your Windows logon name and password automatically. Just open your control panel and select User Accounts. Then, select Credential Manager, and enter the network address, login credentials, and password after selecting Add a Windows credential. Windows will use the credentials you add automatically for logins when needed.
How do I start Windows auto login?
Follow the steps below to start Windows login:
- Click
Windows key + Rto open the Run dialog box. - Type
netplwizand press Enter. - Then, uncheck ” Users must enter a user name and password to use this computer ” in the User Accounts window.
Click Apply and OK to complete the process.
Вы тут: Главная → Windows → Fix | Как включить автоматический вход в систему в Windows 11 и Windows 10
В версии Windows 10 2004 (20H1) произошло небольшое изменение, которое непременно поставит в тупик людей, привыкших включать автоматический вход в систему. Сегодня я разберу ситуацию и покажу варианты решения проблемы.
[+] Сегодня в программе
Проблема: в netplwiz нет флажка для автоматического входа
Испокон веков стандартный способ включения автоматического входа — апплет netplwiz также известный как control userpasswords2. Снимаете флажок Требовать ввод имени пользователя и пароля, вводите имя аккаунта и пароль — автоматический вход работает.
С появлением учетной записи Microsoft (MSA) появился нюанс – надо вводить почтовый адрес, а не имя учетной записи. Но с этим большинство разобралось уже, наверное.
Однако, как вы догадались из ↑картинки, в Windows 10 20H1 появились новые грабли – флажок может отсутствовать!
Эта история с двойным дном.
Почему нет флажка
В Windows 10 20H1 флажок исчезает, если в Параметры – Учетные записи – Варианты входа включена настройка Требовать выполнение входа с Windows Hello для учетной записи Майкрософт.
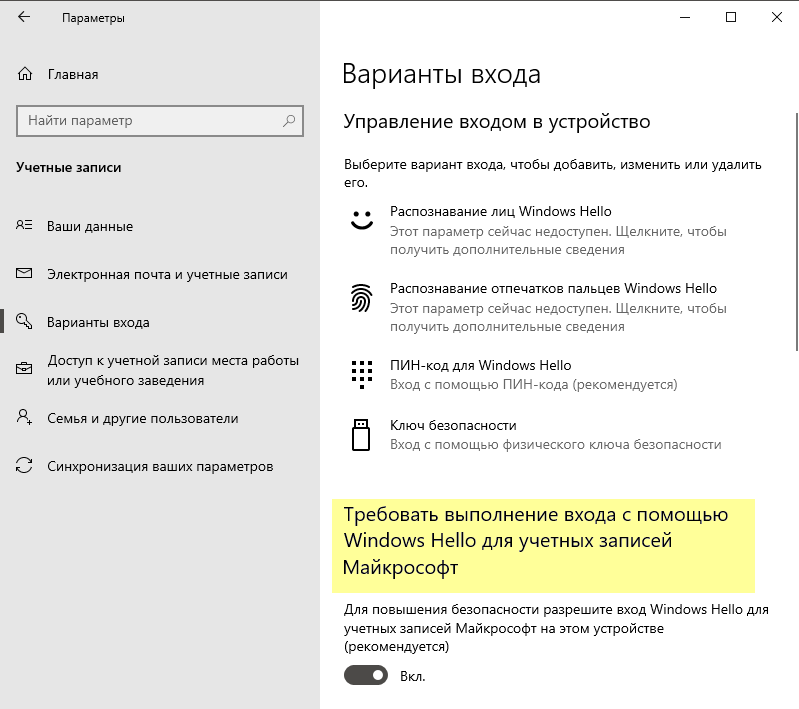
Логика просматривается, если вчитаться в текст. Лучше в английский, потому что в русском интерфейсе пропущено важное слово, искажающее смысл: разрешите вход только Windows Hello.
В сферу Windows Hello входят ПИН-код, биометрия и аппаратный ключ, но не вход с паролем. При включении настройки он исчезает из вариантов входа, как и графический пароль. Поэтому логично, что при включении параметра исчезает и настройка автоматическиого входа с паролем в netplwiz.
Исходя из описания, включение данной настройки рекомендуется. А это значит, что при чистой установке она включена, а флажка в netplwiz нет.
Если же вы обновлялись с предыдущей версии, настройка выключена (по крайней мере в 20H1). Так или иначе, для появления флажка в netplwiz достаточно выключить настройку в Параметрах.
Почему настройки нет в Параметрах или она заблокирована
Хорошо, когда настройка есть, но ее может не быть! 🤦♂️ Читая описание параметра в третий раз, можно заметить там аж два упоминания MSA.
Действительно, настройка доступна в Параметрах только при входе в систему с аккаунтом Microsoft!
Конечно, Windows давно и последовательно двигает пользователей к работе с аккаунтом Microsoft, и забота компании о его безопасности понятна. Не думаю, что в данном случае специально прятали от локальных учетных записей переключатель в Параметрах. Выглядит как дефект и безусловно претендует на высокое место в моей коллекции нестыковок Windows!
Upd. Я не ошибся, сочтя это поведение багом [UX]. В Windows 11 разработчики все-таки стали отображать настройку для локальных учетных записей, пусть и в заблокированном виде. Так хоть становится понятно, что для изменения нужна MSA.
К счастью, управлять параметром можно в реестре.
Как изменить настройку, не входя в аккаунт Microsoft
Понятно, что можно подключить MSA, подвинуть переключатель и перейти обратно к работе с локальной учетной записью. Но все проще!
В разделе реестра HKLM\SOFTWARE\Microsoft\Windows NT\CurrentVersion\PasswordLess\Device параметр DevicePasswordLessBuildVersion принимает два значения: 0 – выключено, 2 – включено.
Соответственно, для выключения настройки достаточно выполнить одну команду PowerShell от имени администратора:
# Require Windows Hello sign in for Microsoft Accounts: 0 - off, 2 - on
New-ItemProperty -Path "HKLM:\SOFTWARE\Microsoft\Windows NT\CurrentVersion\PasswordLess\Device" -Name DevicePasswordLessBuildVersion -Value 0 -Type Dword -Force
После этого вожделенный флажок для включения автовхода появится в классическом диалоге. И будет еще один пункт в твикерах и скриптах сборщиков 
Другие способы включения автоматического входа
Можно настроить все в реестре руками, следуя KB324737. Пароль будет храниться в открытом виде, хотя это не должно особо волновать людей, включающих автовход 
Autologon от Sysinternals, как и netplwiz, кодирует пароль при записи в реестр.
См. также старую добрую статью об автоматическом входе на OSZone.
Дискуссия и опрос
Не думал, что в 2020 буду объяснять настройку автоматического входа Это не значит, что я его рекомендую, впрочем. Просто в чате инсайдеров одного товарища уж очень бомбило (даже после того как он сообразил войти с MSA). Я уверен, что он будет не один такой, и это даже справедливо — UX получился совсем неочевидный.
Сам я нахожу MSA очень удобной, как минимум для синхронизации. А вот почему люди не хотят работать в Windows с аккаунтом Microsoft, мне не совсем понятно. Расскажите в комментариях, почему вы используете или принципиально не используете учетную запись Microsoft. Во втором случае не забудьте сообщить, входите ли на смартфон с учетной записью Apple или Google.
Количественный опрос привязан к анонсу этой записи в моем канале Telegram.
1 звезда
2 звезды
3 звезды
4 звезды
5 звезд
Если вы хотите использовать Windows 10 без пароля, то можете легко обойти процедуру его ввода и активировать систему автоматически. Рассказываем, как именно это настроить.

Автоматический вход в Windows 10 без пароля
- В Windows 10 одновременно нажмите клавиши [Win]+ [R], чтобы открылось диалоговое окно «Выполнить».
- Здесь введите команду netplwiz и подтвердите свое действие, нажав на «ОК». Откроется окно «Учетные записи пользователей». Щелкните мышью по нужной учетной записи.
- Снимите галочку около записи «Требовать ввод имени пользователя и пароля» и нажмите на «ОК».
- Затем вам будет предложено ввести пароль для учетной записи пользователя.
- Нажав на кнопку «ОК», вы сохраните ваши настройки. Теперь система запомнит имя вашей учетной записи, и вы сможете автоматически входить в нее.
Что делать, если при автоматическом входе появляются другие пользователи
Если на вашем компьютере есть несколько учетных записей пользователей, они могут появляться при запуске Windows. Чтобы заходить непосредственно в свою учетную запись, вам нужно внести небольшие изменения в реестр.
- Одновременно нажмите клавиши [Win] + [R], чтобы снова открылось диалоговое окно «Выполнить».
- Введите здесь «regedit» и подтвердите, нажав на «ОК». Запустится редактор реестра.
- Слева перейдите по следующему пути:
- «HKEY_LOCAL_MACHINE\SOFTWARE\Microsoft\Windows NT\CurrentVersion\Winlogon».
- Справа двойным щелчком откройте ключ «DefaultUserName» и введите здесь нужного пользователя.
- Кнопка «ОК» сохранит ваши настройки. Новые настройки вступают в силу при следующем запуске Windows.
Читайте также:
- Windows 11: проверяем системные требования
- Настраиваем VPN сразу на роутере: как это сделать?
Была ли статья интересна?
Do you want to quickly boot into your Windows 10 desktop by skipping the login screen? Do you want to skip password typing each time you turn on your PC? It is possible to configure Windows 10 to boot into the desktop without entering the account password automatically. You can set your Windows user accounts to log in without prompting for a password.
What is the Benefit of Automatically Login into Windows 10 without a password?
If you are using Windows PC at home, you can set auto-login into your Windows PC. Since you and your family members will be users on your PC, setting a password and remembering them is not compulsory. By removing the password and settings auto-login into your Windows 10 PC, you can save a couple of minutes.
You can apply a similar method on Windows 7 and Windows 8 PC also. You can apply the auto-login method to both the local user account and the Microsoft account. This means that whether you’re using a local user account or an online Microsoft account, you can enable automatic login on your Windows 10 computer or laptop.
What is the Loss of an Automatically Login in Windows 10 without a password?
Gentle Warning: It is always recommended to set a strong password for your Windows PC so an unknown person can not access your data. Before enabling automatic login, you should be aware that you may invite unknown trouble. Anyone who has access to your computer may steal your data, and even you will not be aware of that. If you share your computer with your friend or others, it is not recommended to enable automatic login because without knowing the password, he/she may change or copy your important data.
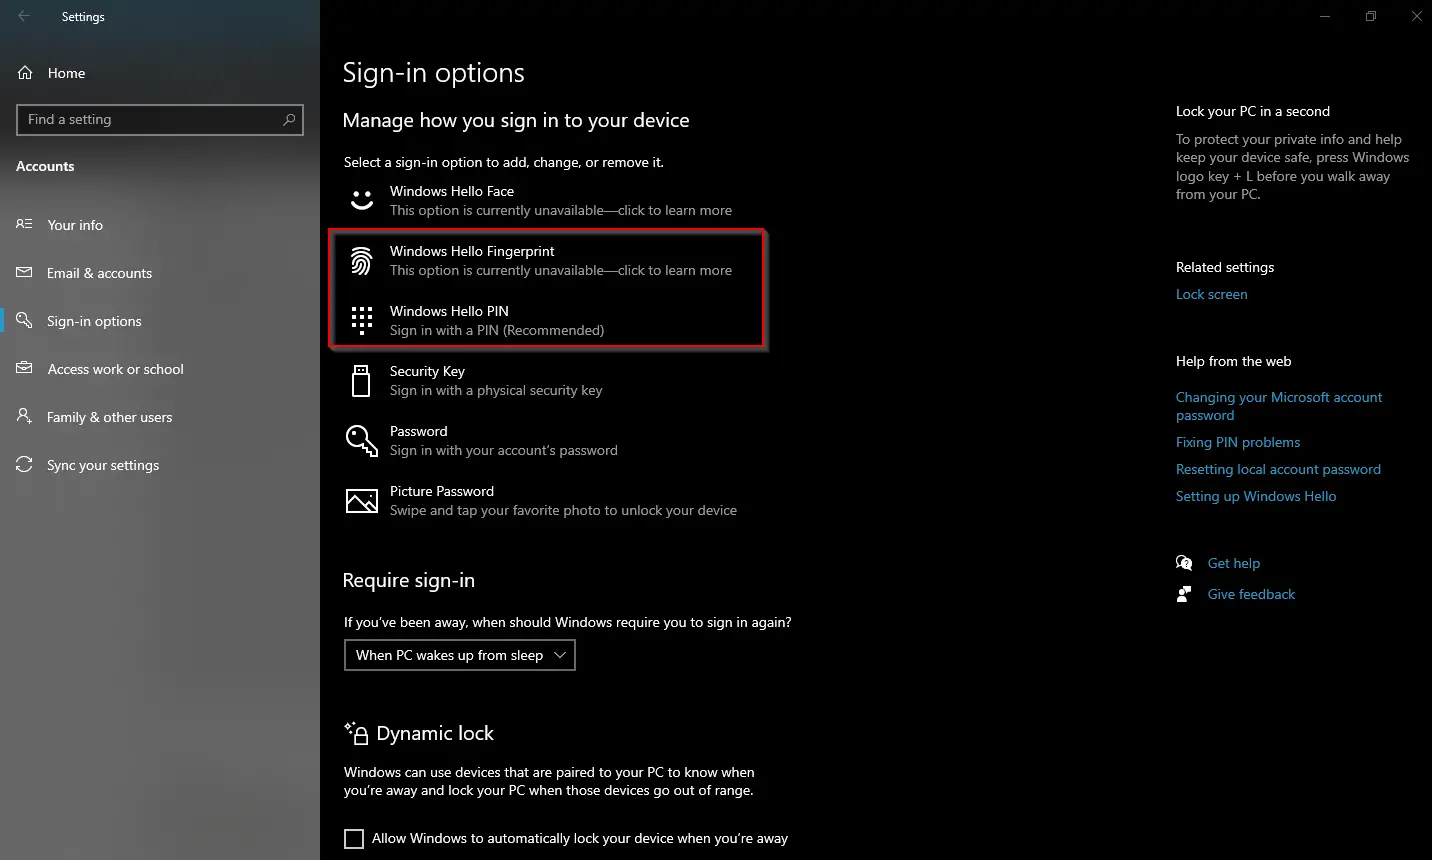
Note: The automatic login may not work if you have enabled Windows Hello PIN or Windows Hello Fingerprint. Once you have decided to enable automatic login into Windows 10, navigate to Settings > Accounts > Sign-in options, and then remove these two sign-in options.
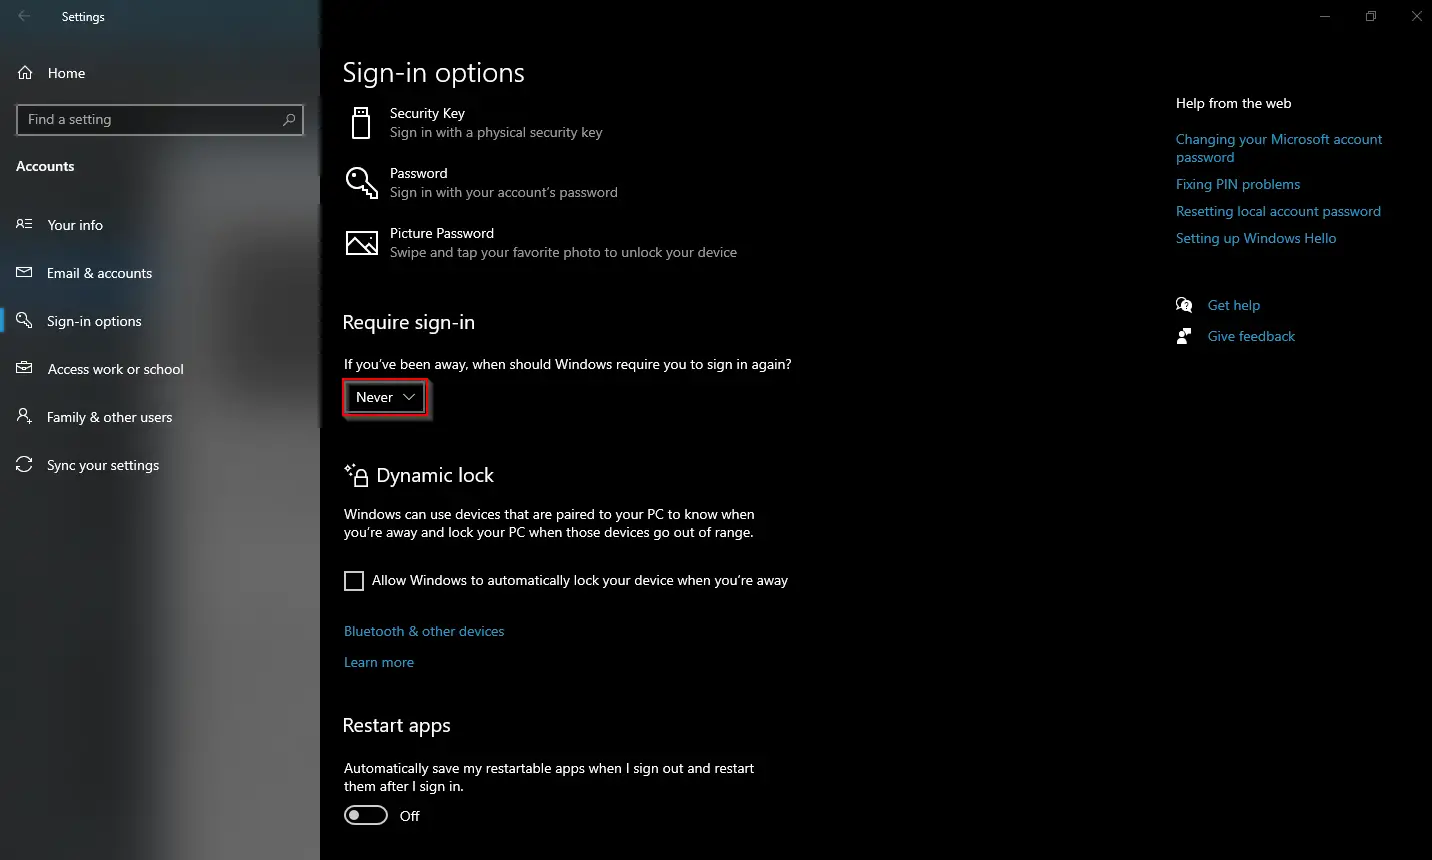
Furthermore, if you don’t want Windows 10 to ask for a password after waking up from sleep, in the above Settings page, select the Never option from the drop-down under Require sign-in section.
There are at least three ways through which you can enable auto or automatic login in Windows 10. These are the following:-
- Allow Automatic login using Netplwiz
- Enable Automatic login via Windows Registry
- Turn on Automatic login through Autologon
- Allow Automatic login through Control Userpasswords2
Note: The checkbox “Users must enter a user name and password to use this computer” was available in Windows 10 before Microsoft released version 2004 for Windows 10 OS. The Windows 10 version 2004 (or May 2020 Update) and newer versions don’t show the required “Users must enter a user name and password to use this computer” checkbox to some users. If, after running “control userpasswords2” or “netplwiz” commands, you find the checkbox is missing, refer to our ultimate guide on how to restore the “Users must enter a user name and password to use this computer” checkbox on Windows 10.
How to Enable Automatic Login in Windows 10 using Netplwiz?
This is the easiest way to enable Automatically Login in Windows 10 using the Netplwiz command. Perform the following steps to configure the same:-
Step 1. Open the Run command box by simultaneously pressing the Windows and R keys. In the Run dialog box, type the following and click the OK button:-
Netplwiz
Step 2. Then, on the resulting User Accounts dialog, select the user name and uncheck the option “Users must enter a user name and password to use this computer.”
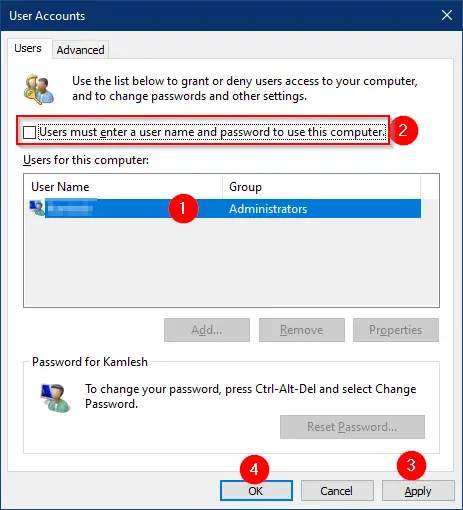
Step 3. Next, click Apply.
Step 4. It will open the “Automatically sign in” dialog box. Type your user account password and re-type it to confirm.
Step 5. After that, click OK.
Step 6. Again, click OK.
Once you complete the above steps, the “Automatically sign-in” feature is activated, which means Windows 10 will no longer prompt you to enter the password after booting.
How to Enable Automatic Login in Windows 10 using Registry Editor?
To enable “Automatically sign in” or “Automatic login” in Windows 10 using Windows Registry, perform the following steps:-
Step 1. First, click on the Start button and then type regedit.
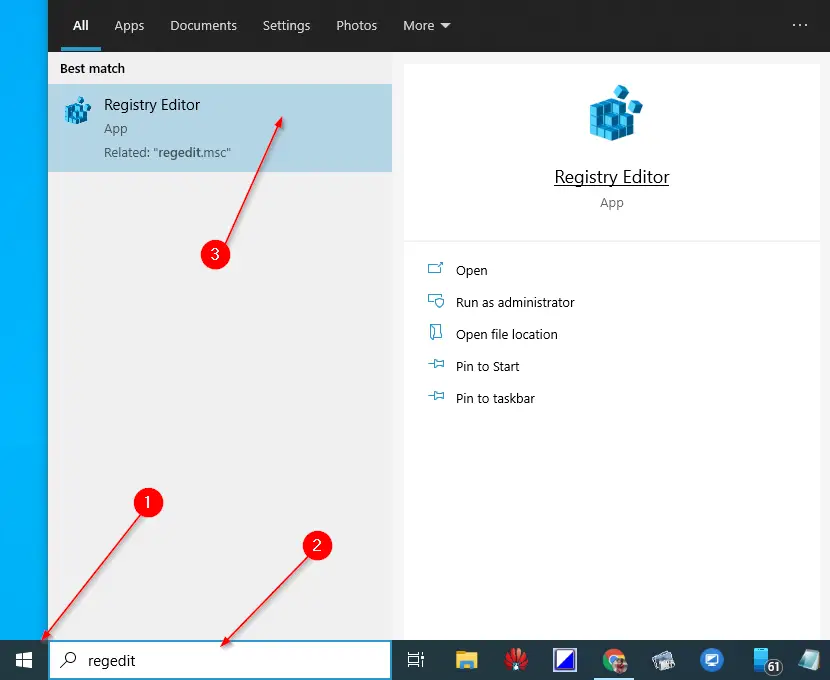
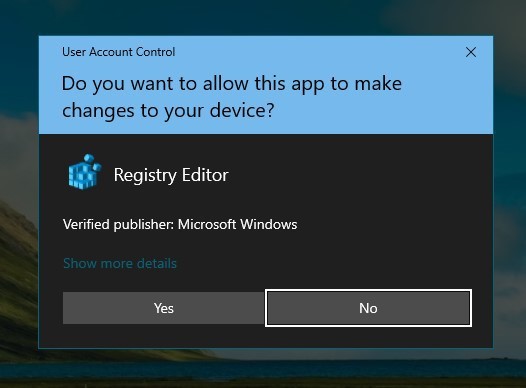
If the User Account Control dialog prompts, click Yes to proceed.

Step 2. In the Registry Editor window that opens, browse or steer for the following key:-
Computer\HKEY_LOCAL_MACHINE\SOFTWARE\Microsoft\Windows NT\CurrentVersion\Winlogon
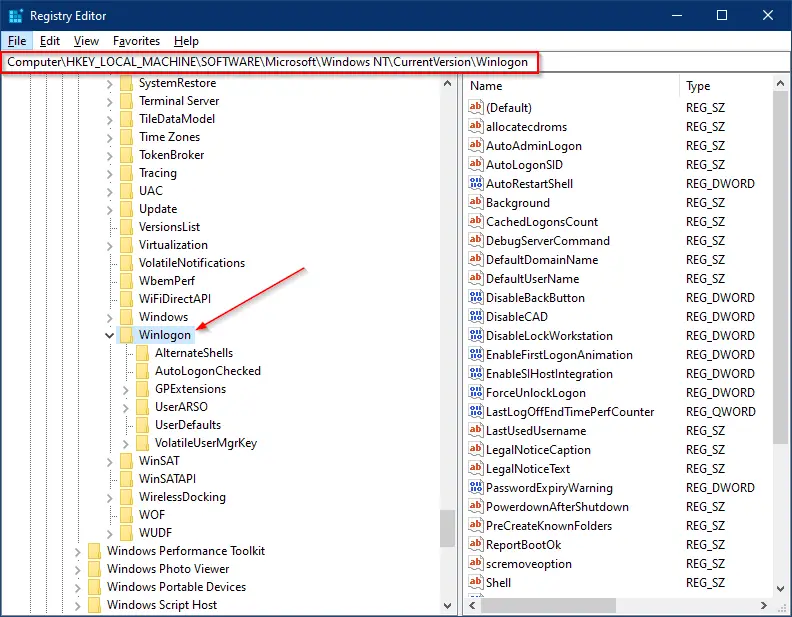
Step 3. On the right side pane of the Winlogon key, look for the entry DefaultUserName.
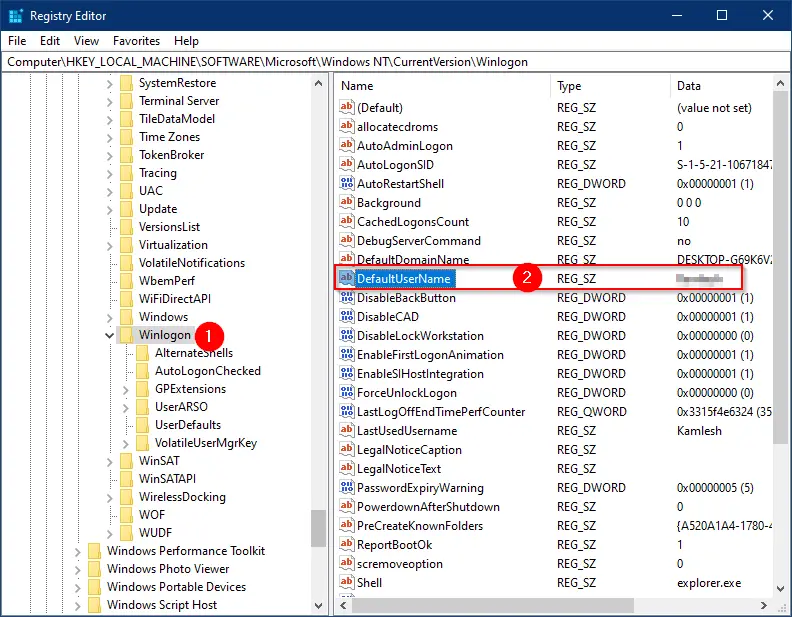
Step 4. Double-click on DefaultUserName and see your Microsoft account or local user account name should appear under the Value data box.
Step 5. Once you check the user name in the Value data, you can close the Edit String dialog box.
Step 6. Now, on the right-side pane of Winlogon, look for the entry DefaultPassword. If the DefaultPassword entry doesn’t exist, right-click on free space, select New, and then String Value. Rename the newly created String Value to DefaultPassword.

Step 7. Double-click on the DefaultPassword and enter your account password (You have already checked the account name in step 4 above) in the Value data box.

Step 8. Click OK.
Step 9. Now, on the right-side pane, look for the entry AutoAdminLogon.
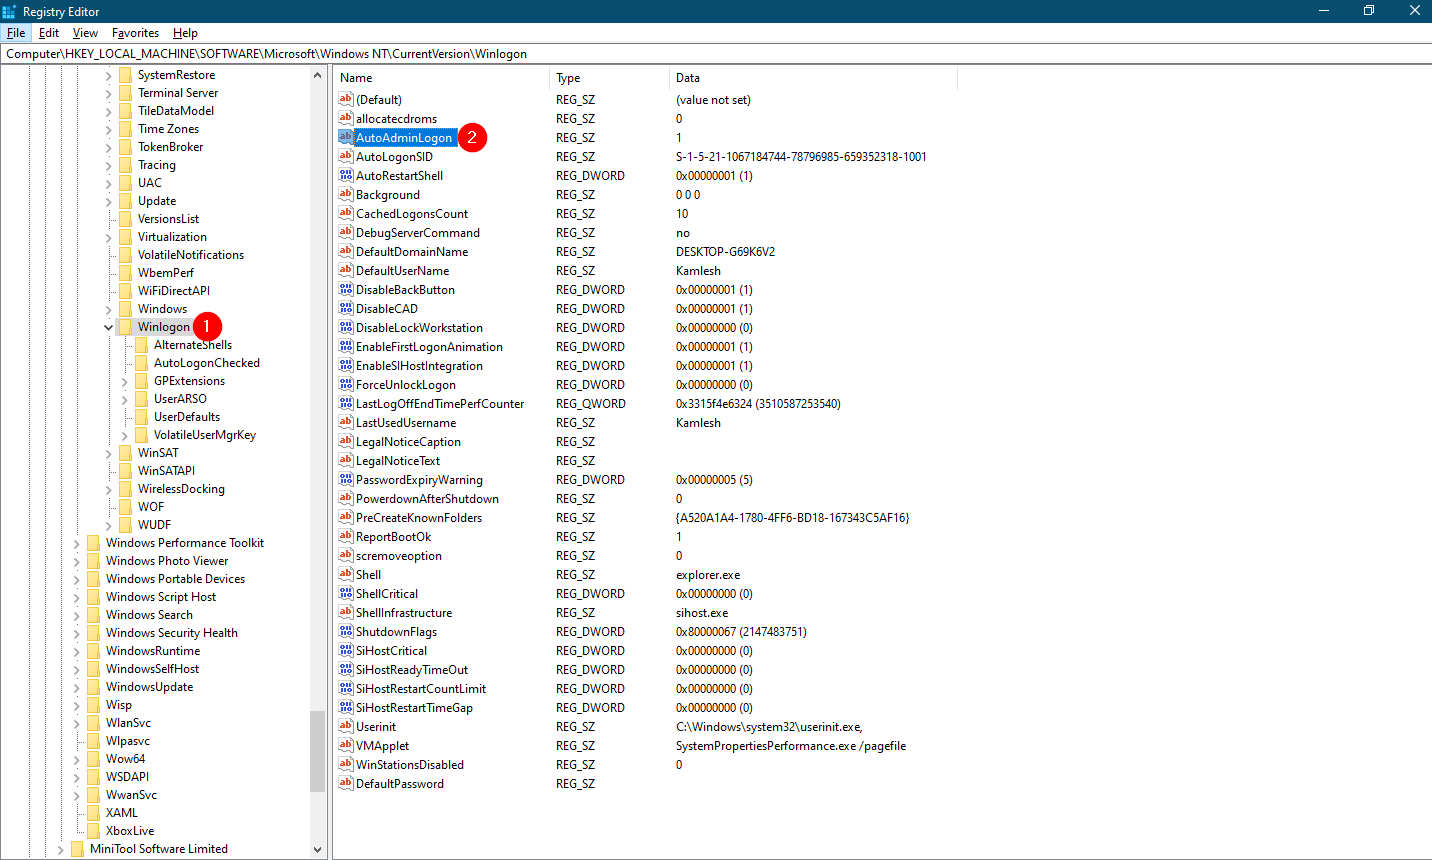
Step 10. Double-click on AutoAdminLogon and change its Value data from 0 to 1.
Step 11. Click OK.
Step 12. Close the Registry Editor.
Step 13. Reboot your computer or laptop.
Your Windows 10 machine will automatically login into your account without asking you to enter the password.
How to Enable “Automatically sign in” through Autologon?
Autologon is a freeware utility to automate the login process in Windows 10. It is specially designed by Microsoft to help you skip the lock and login screen in Windows 10.
To enable or allow “Automatically sign in,” download the Autologon tool and extract it into a folder using WinRAR or any other app. Double-click on Autologon (for 32-bit OS) or Autologon64 (for 64-bit OS) to open it.
Enter your username and password, and then click on the Enable button.
Once you enable Autologon, your Windows 10 machine will automatically login into your account without asking you to enter the password.
To disable Autologin on your Windows 10 PC, enter the password in the Password box and click the Disable button.
Download Autologon
You can download the Autologon tool from the official website.
How to Enable Automatically Sign in Windows 10 using Control Userpasswords2?
This is another easiest way to enable “Automatical Login” or “Automatically sign-in” to Windows 10 using the Control Userpasswords2 command. Perform the following steps to configure it:-
Step 1. Press and hold the Windows logo and press the R key from the keyboard to launch the Run dialog box. In the resulting Run dialog box, type the following and click the OK button:-
Control Userpasswords2
Step 2. In the resulting User Accounts dialog box, select the user name and uncheck the checkbox “Users must enter a user name and password to use this computer.”
Step 3. Click the Apply button.
Step 4. The “Automatically sign in” dialog box opens.
Step 5. Type your account password and then confirm it by retyping it.
Step 6. Click OK.
Step 7. Again, click the OK button.
Once you complete the above steps, when you reboot your Windows 10 machine, it will automatically login into your account without asking you to enter the password.
Conclusion
In conclusion, enabling automatic login in Windows 10 can save you time, especially if you are the sole user of your computer or laptop. It is an easy process that you can do by either using Netplwiz or the Windows Registry Editor. However, it is essential to note that this convenience comes with a security risk. Without a password prompt, anyone can access your computer and its contents, including personal and confidential information. Therefore, it is essential to weigh the benefits and risks before deciding to enable automatic login. If you do decide to go ahead, ensure you take extra measures to protect your computer and the data on it.