

When you connect to a Ethernet or wired network for the first time, Windows automatically creates a network profile and assigns generic names like Network 1, Network 2, etc. finally stores it on your computer as a known network. A wireless network profile will use the SSID of the wireless network (ex: router) . Some users and administrators may dislike the non-descriptive network connections names and want to rename , delete or clear redundant network profiles (names). After Windows 7 , Microsoft removed Netork Profile rename option therefore you will not find any option whatsoever in the Settings app or Control Panel to change the network name. It is still possible to edit network profile names to make them more descriptive but the only effective way to Rename or remove the connections in Windows 11, Windows 10 and Windows 8 is by using the registry editor. (valid in all Windows versions)
What is New (Thursday, September 28, 2023)
1.[FIXED] – Deleted network profile leaves leftover in a registry key
2.[FIXED] – Can’t upper/lower letter in renaming
3.[ADDED] – Multiple selection feature in the List with Ctrl key
4.[ADDED] – x64 version
5.[ADDED] – High contrast support
6.[ADDED] – Manage Known Networks has been added (Under the menu button)
7.[ADDED] – Some code Improvements
How to Change the Active Network Profile Name
You can check the current name in the Network and Sharing Center on Windows , press the Windows + R keys to open the Run dialog, type one of the following commands and press Enter.
control.exe /name Microsoft.NetworkAndSharingCenter
explorer.exe shell:::{8E908FC9-BECC-40f6-915B-F4CA0E70D03D}
The name of the network is displayed at the very top of the page.

Windows Users have three main options to change a network name ;
1. Using Local Security Policy (It is only available in professional versions of Windows)
2. Using the Windows Registry
3. Using Network Profile Name Changer which is a Portable freeware
Delete / Rename Network Connections In Windows by using Registry
Go to the following key
HKEY_LOCAL_MACHINE\SOFTWARE\Microsoft\Windows NT\CurrentVersion\NetworkList\Profiles
The Profiles folder will provide a list of all the network connections with a unique ID , Each network location is represented by a subfolder therefore you need to click on each to check the ProfileName until you find the network name that you want to change. To rename a network location, click on the corresponding subfolder and edit the key named ProfileName. Input the new name for the network location. You can also delete individual subfolders to remove Network connections.

Using Network Profile Name Changer to Delete / Rename Network Connections
Registry way is not Straightforward for Novice Windows users , to simplify the whole Process you can use Network Profile Name Changer.
1. After download and unzipping , run the program , It will list all you Network Profiles
2. Choose one of the Network Profile then use Rename or Delete button

You can also right click any network profile and perform the same action from the context menu or double click any of the listed Item to rename it.

With the context menu, you can rename any network Profile, change a Network Profile from Public to Private or vice versa, open a network Profile registry key or delete a network Profile easily.
Note: If you delete all Network profiles or if the profile you have edited, cannot be recognized by the system, turn off the adapter you connect to the internet and turn it on again, or disconnect and reconnect to the internet, the problem will be solved.
Supported languages: English ,Turkish , German , Hungarian , Polish , Bulgarian , French , Korean , Brazilian (Portuguese) , Russian , Japanese , Italian , Arabic , Chinese (Simplified) , Swedish , Romanian , Greek , Spanish , Danish , Dutch (Nederlands)
Supported operating systems: Windows 11 , Windows 10 , Windows 8.1 , Windows 8 , Windows 7 (x86 & x64) , Vista
File: NetPnc_x64.exe │ Virustotal
MD5: db0f223584c85edd6f0f12cfd0375fcb
SHA1: f72832558afd4de2437ed88d43ee901dbe8c765b
File: NetPnc.exe │ Virustotal
MD5: 90b5d3a5daadade73a2922ff3fa428de
SHA1: 29343856c961fbae2a2148efa92ae0e0094ed1b2
Changing filenames in Windows 10 is quite simple but this can translate into a very tedious task if you need to edit the names of multiple files at once.
This can also be termed as a sheer waste of time. To change filenames with ease, swiftness and accuracy, using Easy File Renamer is the best option. This software lets you rename files the way you want by adding simple rules and then executing them instantly from the word go. Download EFR from the following link:
Change File Names, Download Easy File Renamer
EFR is a digitally protected software
How to Use Easy File Renamer for Windows 10
Step 1: Using Easy File Renamer is simple and intuitive. To get started, launch the program and you’ll be greeted with this extremely user-friendly UI.
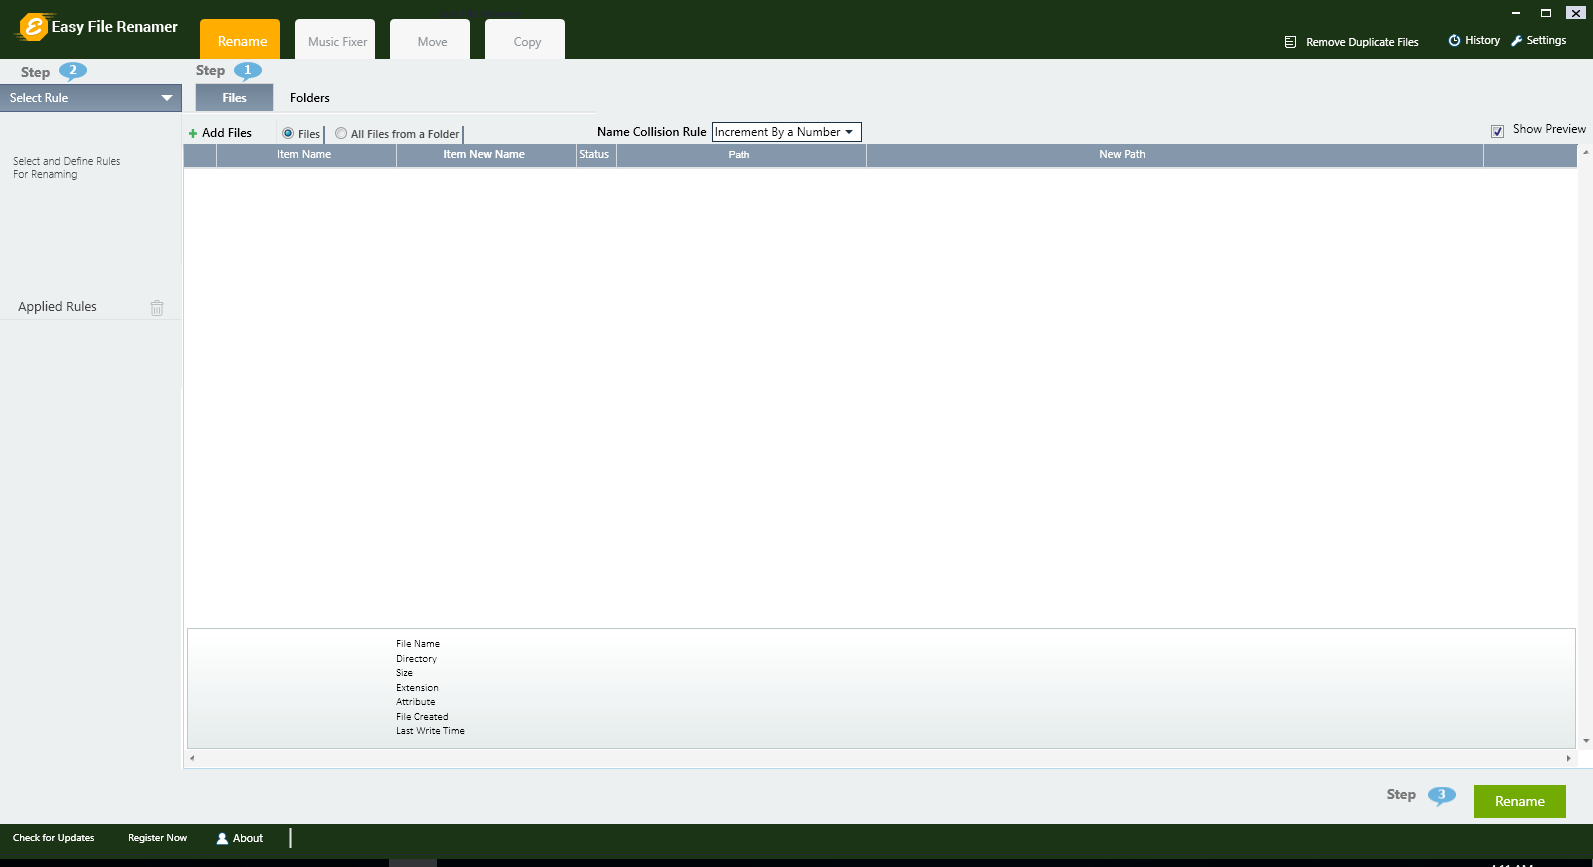
Step 2: You can bulk rename files in Windows 10 as well as folders by simply choosing which option you want to go with.

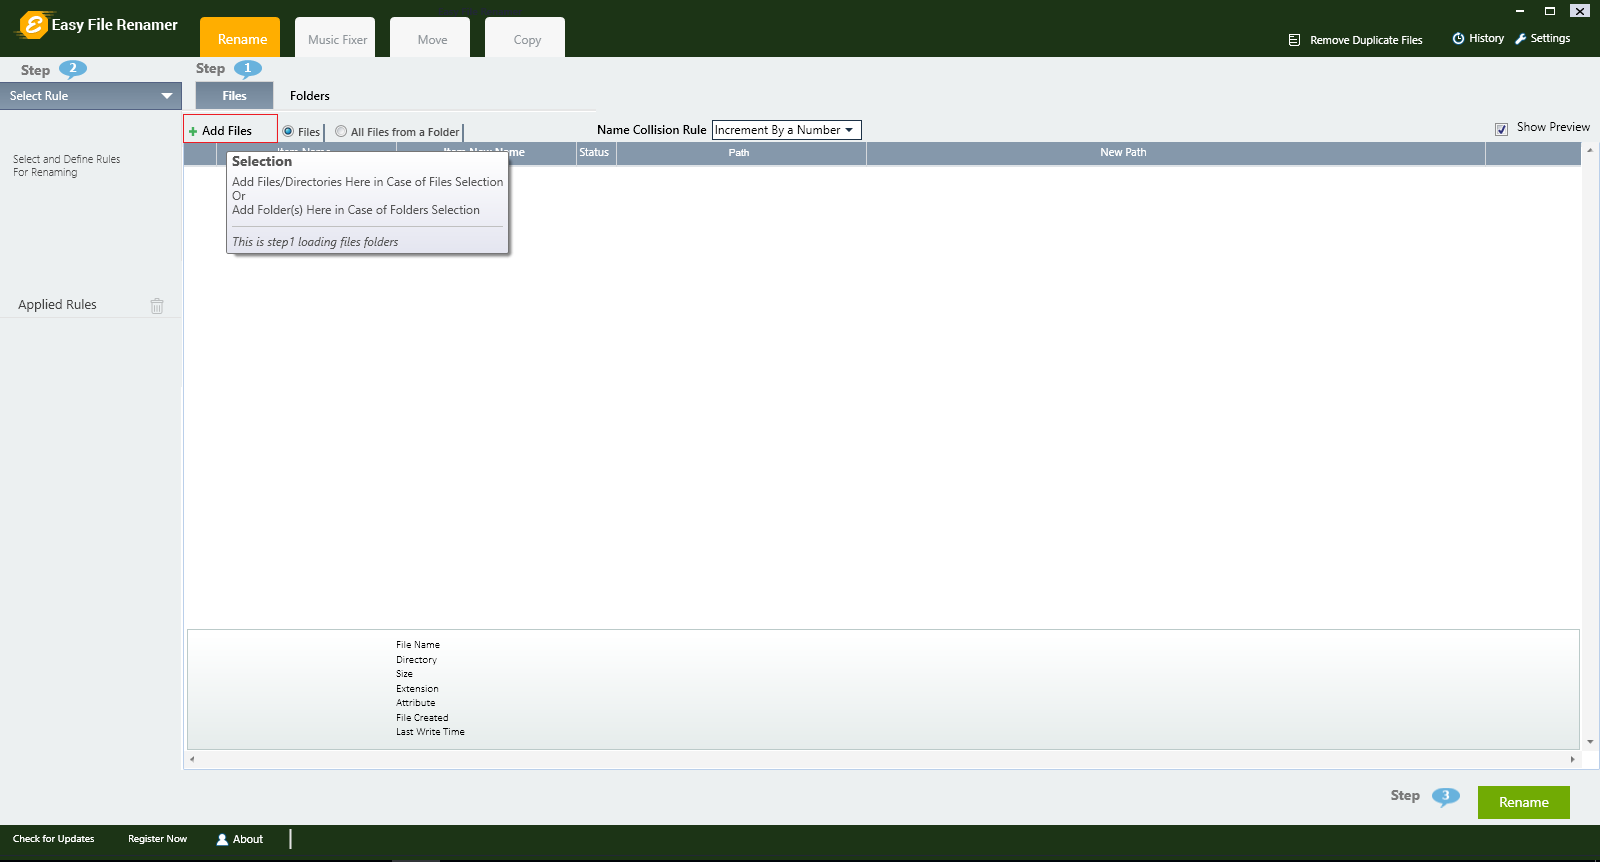
Step 3: Click the Add Files option to navigate to the files you want to rename and select them. Easy File Renamer will automatically add the selected files to the queue.
Step 4: The renaming rules employed by Easy File Renamer are simple and straightforward. There are 8 different ways in which you can rename files. You can learn more about how these rules work and how you even mix rules to create your own unique set of rules by watching this video.

Rename by Name in Windows 10
Using the rename by name rule, you can rename files to anything you want and all files will have a numerical number at their end.
Rename by Removing Text in Windows 10
This option allows the users to remove a specified text from any portion of the filename.
Rename by Replacing Text in Windows 10
This renaming rule allows users to find pre-determined text and replace it with specific text in the filename.
Rename by Suffix or Prefix in Windows 10
Using the rename by Suffix or Prefix rule lets you add text to the start or at the end of the filename. You can even do the same for file extension as well.
Rename by Numbering in Windows 10
Using the rename by numbering rule allows you to add up your desired numbering combination to the start/ end of a filename.
Rename by InsertAt in Windows 10
If you want to add a certain word or a character to the name then using the InsertAt rule can help you do so in a few clicks.
Rename by Lowercase & Uppercase in Windows 10
Converts capital letter(s) to lowercase and vice versa. If you want all parts/ certain parts of filenames to be uppercase/ lowercase you can easily do so by using Easy File Renamer in Windows 10.
Step 5: You also have the option to add multiple rules as well as easily remove a certain rule to undo its effects.

Step 6: After choosing the ideal combination of rules simply click on the big green Rename button on the bottom right corner of Easy File Renamer user interface.
Step 7: Easy File Renamer will prompt you to confirm whether you want to initiate the renaming of files. Simply click on Yes and the rest will be taken care of by Easy File Renamer.


How to Change Long File Path Names on Windows 10
The Long File Path error occurs when you try to edit, move, or delete a file/ folder that exceeds the maximum character limit of Windows 10 which is 260 characters. This is why all filenames are kept under 255 characters but if you’ve somehow got a file that has more than 260 characters in it’s filename, deleting it isn’t going to be as simple as you think. This is the exact reason why we are here to tell you how you can change Long File Path names easily and quickly.
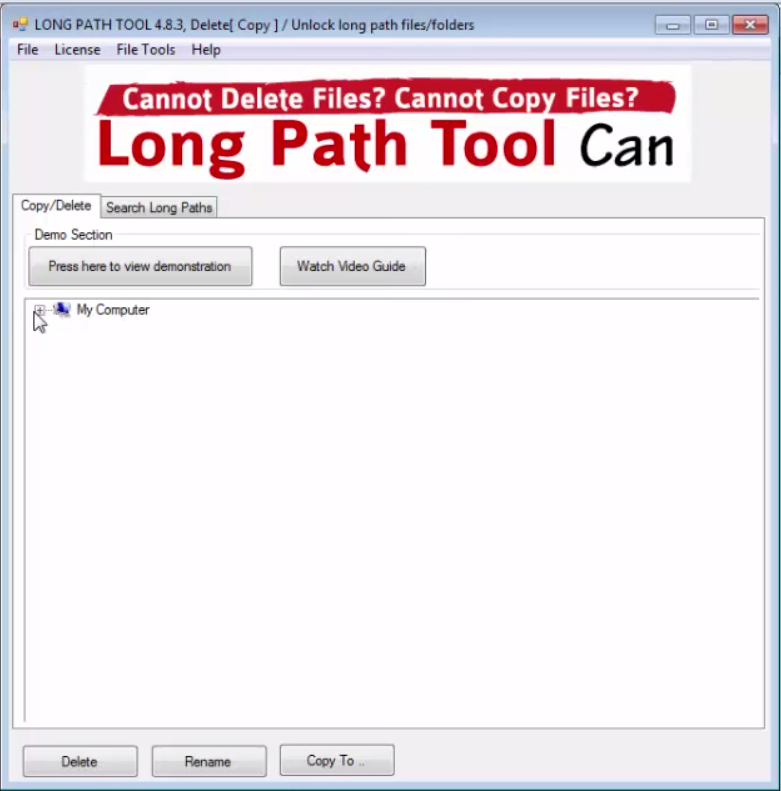
Step 1: Download the Long Path Tool from longpathtool.com and install it on your PC. You’ll be greeted with a simple and easy to use GUI.
Step 2: Navigate to file or folder in which the file you can’t rename, delete or move is located.

Step 3: If you want to delete the file or folder simply select it and click on Delete and the file/ folder will be deleted instantly. Similarly, select it and click Rename if you want to rename it. If you don’t want to rename or delete it, you can simply make a copy of it anywhere on your computer by making use of the Copy To feature.

Если текущее имя пользователя Windows, отображаемое при входе или в меню Пуск вам не по душе, его сравнительно легко можно изменить как для локальной учетной записи, так и для локальной учетной записи Майкрософт. Если вы также хотите поменять имя папки пользователя — здесь сложнее, но и эту тему мы также затронем.
В этой пошаговой инструкции подробно о том, как переименовать пользователя Windows 11 или Windows 10 с локальной учетной записью или учетной записью Майкрософт, а также кратко об изменении имени папки пользователя.
Как переименовать локального пользователя
Если требуется переименование локальной учетной записи пользователя, сделать это можно одним из следующих способов.
Управление учетными записями пользователей
Первый вариант — использование утилиты управления учетными записями пользователей, порядок действий будет следующим:
- Нажмите правой кнопкой мыши по кнопке «Пуск», выберите пункт «Выполнить» (или нажмите клавиши Win+R на клавиатуре), введите
netplwiz
или
control userpasswords2
и нажмите Enter.
- В открывшемся окне выберите нужного пользователя и нажмите кнопку «Свойства».

- Задайте новое имя пользователя и нажмите «Ок», затем — «Ок» в окне управления учетными записями.
- Выйдите из системы и снова зайдите — имя вашего пользователя будет изменено.


Учитывайте, что несмотря на то, что имя пользователя изменится, название его папки останется прежним.
Локальные пользователи и группы
Второй способ подойдет только для Pro (Профессиональная) и Enterprise (Корпоративная) версий Windows 11/10. Необходимые шаги:
- Нажмите клавиши Win+R на клавиатуре, введите
lusrmgr.msc
и нажмите Enter.
- В окне «Локальные пользователи и группы» перейдите в раздел «Пользователи», нажмите правой кнопкой мыши по имени пользователя, которое нужно изменить и выберите пункт «Переименовать».

- Укажите новое имя пользователя, закройте окно, выйдите из системы и снова зайдите.

Командная строка
Ещё одна возможность — изменение имени пользователя в командной строке Windows:
- Запустите командную строку от имени администратора.
- Введите команду
wmic useraccount where name='старое_имя' rename новое_имя
и нажмите Enter.

- Закройте командную строку, выйдите из системы и вновь зайдите, уже под новым именем.

Изменение имени пользователя для учетной записи Майкрософт
Если вы используете учетную запись Майкрософт, изменение имени выполняется на соответствующем сайте:
- Зайдите на страницу вашей учетной записи Майкрософт https://account.microsoft.com/ с вашими учетными данными.
- Нажмите по вашему имени или перейдите на вкладку «Сведения».

- Нажмите «Изменить имя» и укажите новые имя и фамилию (необязательно).


После применения сделанных настроек они, через некоторое время (не сразу и, возможно, после перезагрузки) будут синхронизированы с вашим устройством, и вы увидите, что имя пользователя в Windows также изменилось.
Изменение имени папки пользователя
Изменить имя папки пользователя, если оно вам не нравится, в принципе, возможно, но часто приводит к неожиданным результатам: от неработоспособности некоторых программ, для которых были прописаны абсолютные пути, до невозможности зайти в Windows из-за ошибок профиля пользователя.
Простой и безопасный способ
Если вам нужен простой и безопасный способ, рекомендую использовать следующий подход:
- Создайте новую локальную учетную запись с нужным именем (рекомендую использовать латиницу), для нее будет создана папка с тем же именем, сделайте нового пользователя администратором. Подробно о том, как это сделать в статьях: Как создать пользователя Windows 11, Как создать пользователя Windows 10.
- Зайдите под вновь созданным пользователем, и, если нужно, прикрепите учетную запись Майкрософт (это можно сделать в Параметрах).
- Убедившись, что всё работает как нужно и перенеся все данные из старого профиля (например, хранящиеся в папках Документы, Изображения, Рабочий стол), удалите старого пользователя и работайте с новой учетной записью и новым именем папки.
Рискованный метод
Способ переименования папки текущего пользователя без создания нового выглядит иначе (и, ещё раз предупреждаю, небезопасный):
- Выйдите из текущей учетной записи и зайдите в систему с другой учетной записью Администратора (не с той, для которой мы изменяем имя папки), можно включить скрытую учетную запись Администратор.
- При желании измените имя пользователя, для которого меняется имя папки одним из способов, описанным ранее.
- Перейдите в папку C:\Пользователи (C:\Users\) и переименуйте папку нужного пользователя тем же способом, которым вы переименовываете другие папки.
- Запустите редактор реестра и перейдите в раздел
HKEY_LOCAL_MACHINE\SOFTWARE\Microsoft\Windows NT\CurrentVersion\ProfileList
- В подразделах этого раздела найдите такой, где для параметра с именем ProfileImagePath задан путь к изменяемой папке, дважды нажмите по этому параметру и измените путь на нужный.

- Закройте редактор реестра, перезагрузите компьютер и попробуйте вновь зайти в учетную запись, для которой менялся путь к папке.

Несмотря на то, что этот метод описан на официальном сайте Майкрософт , он остается крайне ненадежным и, если на почти чистой системе обычно работает, на ОС с множеством установленных программ зачастую вызывает неожиданные проблемы.
Иногда бывает достаточным изменить старые пути на новые в реестре, выполнив поиск по старому имени папки, а иногда даже это не позволяет избежать проблем: от необходимости повторно настраивать OneDrive и проблем с WinGet до, уже упоминавшихся проблем с профилем пользователя. О случаях неудачных попыток вы можете прочесть, например, в комментариях к статье Как изменить имя папки пользователя в Windows 10.
Регистрация
Пожалуйста, введите Ваш e-mail, чтобы зарегистрироваться.
Регистрируясь на нашем сайте вы соглашаетесь с правилами и политикой конфиденциальности.
Получать новости
Восстановление доступа к аккаунту
Пожалуйста, введите Ваш e-mail, чтобы начать процедуру восстановления.
Изменение почты
Пожалуйста, введите Ваш e-mail, чтобы начать процедуру восстановления.
Код подтверждения
Письмо с проверочным кодом было отправлено на ваш e-mail: . Введите код в поле ниже.
Не получили письмо? Не забудьте заглянуть в папку со спамом и проверить правильно ли указан адрес электронной почты.
Повторная отправка письма возможна через: 01:00