
The Error 0x80300002 is often caused by partition errors or corrupted Windows installation media due to which you won’t be able to complete your Windows installation. Installing Windows has been an easy task, thanks to the Windows Installer. Equipped with a user-friendly interface, one can install their Windows DVD in no time. However, sometimes the process might demand some work before you can get the newly installed Windows on your computer.
Windows Installer errors are not common and rarely occur. The errors related to Windows Installer are usually caused by the hardware connected to your PC in which case the Installer is not to blame but the media or hardware you’re utilizing is at fault.
Windows Installer errors don’t occur every day but when they do, it usually is due to —
- Corrupted Windows installation media. If the media that you are using to install Windows on your system is corrupt, it can cause the error to pop up.
- Incorrect partition. If you’ve selected a wrong partition for Windows installation, it can prompt you with this error.
- Changes made prior. If you’ve made changes to your older Windows prior to installing Windows, it can also cause the error to show up.
With that said, use the following solutions to resolve your issue:
Solution 1: Disconnect any External Hardware
The error can sometimes be caused by external hardware connected to your system. A few users have reported that their error was due to the external hardware that was connected to their system and was resolved once the hardware was disconnected. Hence, to start off, make sure there’s no extra hardware connected to your system except your installation media.
Solution 2: System Restore
If you’ve made any changes prior to the installation of the Windows again, the error can be caused due to it. In such a case, you’ll have to make use of System Restore. It is a Windows feature that lets the users restore their system to a point prior to the emergence of the error. Therefore, use system restore and then try to install Windows. Here’s how to restore your system:
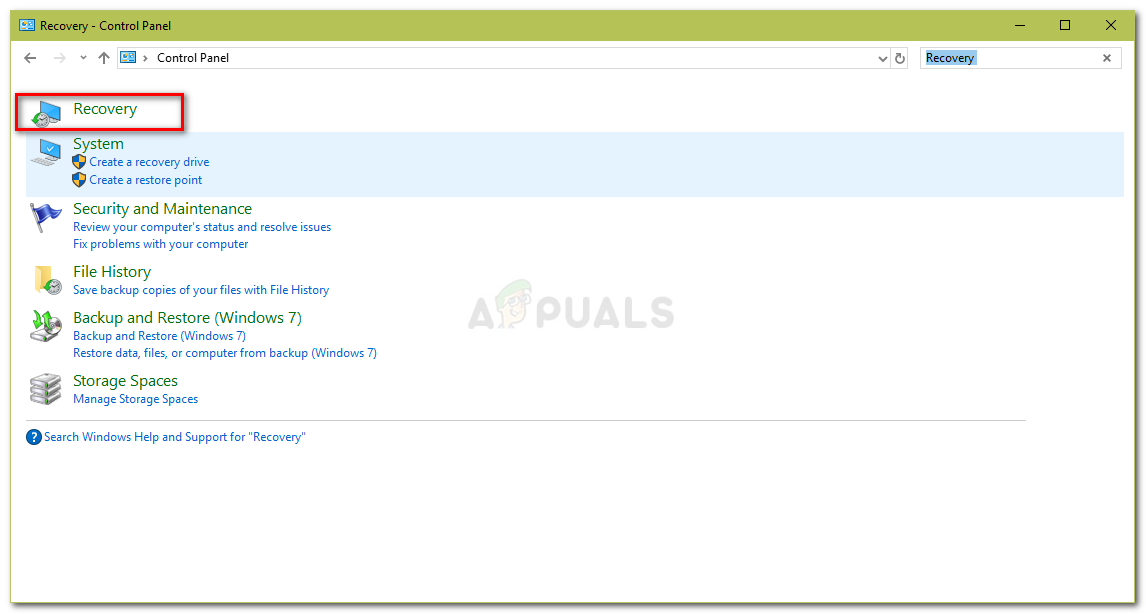
- Open Start Menu and go to Control Panel.
- Type in Recovery in the search and click it.

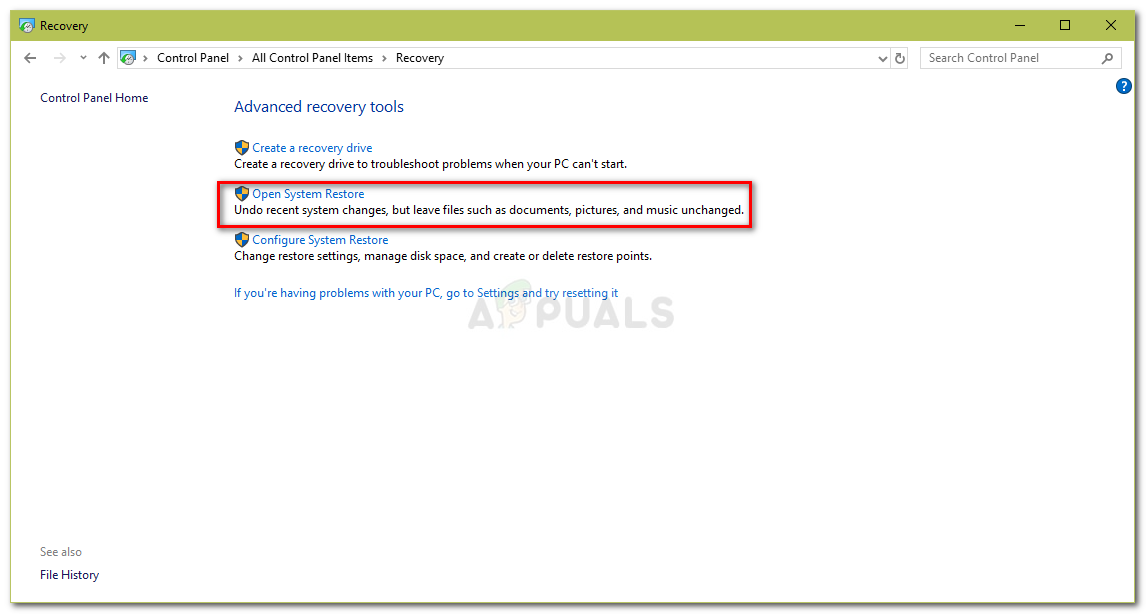
Control Panel – Recovery - There, select ‘Open System Restore’.
System Restore – Control Panel - Select a point back and then hit Next.
- Follow through the steps to restore your system.
- Try to install your Windows again.
Solution 3: Deleting Partitions
Before you proceed and implement this solution, please make sure you’ve backed up any important information that is stored on your system. The error can sometimes be caused by bad partitions in which case you’ll have to delete the partitions and then install the Windows. Here’s how to delete your partitions:
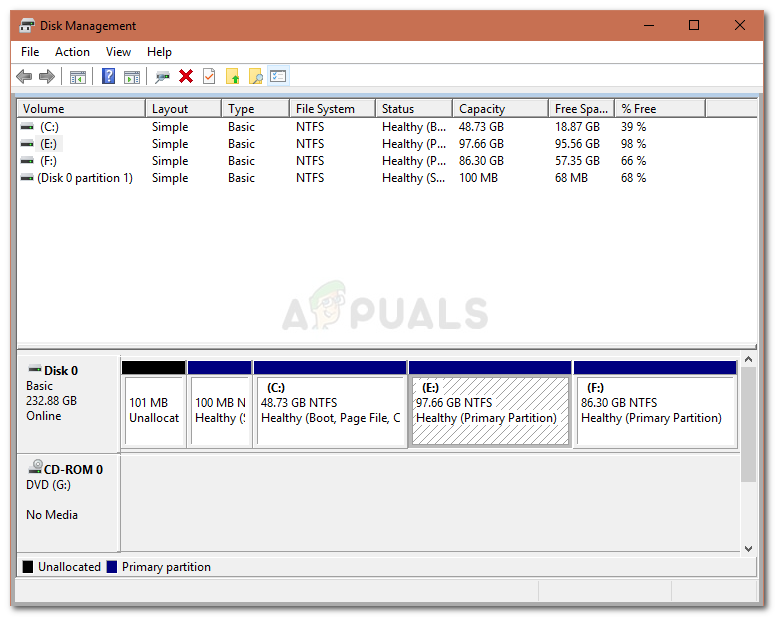
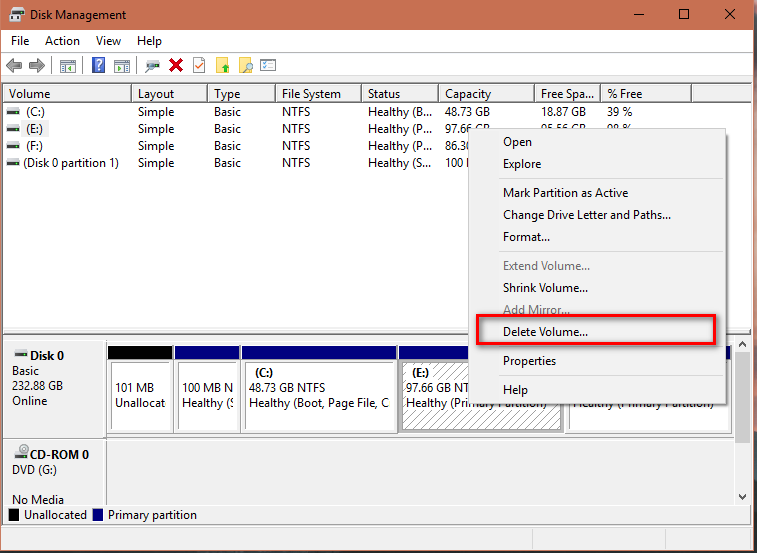
- Go to Start Menu and type in ‘Disk Management’.
- Under Best match, ‘Create and format hard disk partitions’ will be listed, open it.
- This will open up Windows Disk Management.

Windows Disk Management - There, you’ll see your disk drives. Right-click on the partitions and select ‘Delete Volume’.

Deleting Partitions for Windows Installation - Now insert your Windows Installation Media, and follow through the on-screen steps.
- Once asked to select the partition where you want to install Windows, select Drive Options.
- Using the unallocated space, create a new partition.
- You can make 2 partitions, one for your Windows (System Partition) and the other as a Primary partition.
- Finish the installation.
Solution 4: Connect your Hard Disk to a different PC
Another thing you can do to resolve the issue is unplugging your hard disk from your system and connecting it to a different computer. Besides the error, this is something you should if you can’t see any partitions when asked for the System partition. Once connected to a different system, set up NTFS partition using Windows Installer and then go through the installation process.
Solution 5: Faulty Hardware
Lastly, if the above-mentioned solutions didn’t work for you, there’s only one possible reason for this. Something in your PC is corrupted or fried. In such a case, you’ll have to replace the hardware and then try to install your Windows.
Kevin Arrows
Kevin Arrows is a highly experienced and knowledgeable technology specialist with over a decade of industry experience. He holds a Microsoft Certified Technology Specialist (MCTS) certification and has a deep passion for staying up-to-date on the latest tech developments. Kevin has written extensively on a wide range of tech-related topics, showcasing his expertise and knowledge in areas such as software development, cybersecurity, and cloud computing. His contributions to the tech field have been widely recognized and respected by his peers, and he is highly regarded for his ability to explain complex technical concepts in a clear and concise manner.
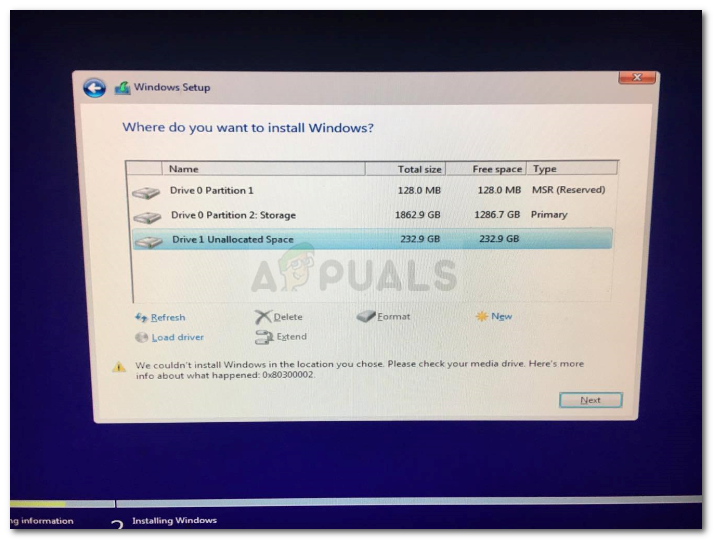
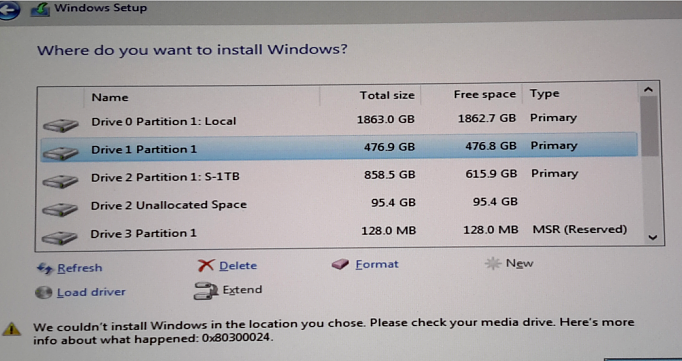
Installing a Windows 10 upgrade is definitely not an easy task since the process is not always smooth sailing and you could encounter some errors when doing so. This isn’t unusual since there are various software configurations and hardware configurations as well as services it depends on in order to properly work. So if any of them malfunctions or becomes corrupted, it will affect the process which will result in errors like the error code 0x80300002. When you encounter this kind of Windows Update error, you will see the following error message on your screen:
“We couldn’t install Windows in the location you choose. Please check your media drive. Here’s more info about what happened: 0x80300002”
You can encounter this kind of error if there is corruption in the partition table of the drive where the installation is in progress. In addition, corruption on the Media device could also cause this problem. So if you encounter this error when running Windows Setup, read on as this post will guide you in fixing it.
There are several ways to resolve this issue. The first thing you can do is to verify the compatibility between the BIOS and the installation media. You could also try recreating all the partitions as well as recreating the bootable USB drive. For more detailed information, follow the given options below.
Option 1 – Check if the BIOS is compatible with the installation media
The first thing you can do to fix the error is to check if there are any compatibility issues between the BIOS and the installation media you’re using. This is actually one of the most likely reasons why you’re getting the error since this is a complicated point for the Windows installation process. If the installation media is based on GPT, then your BIOS must be based on UEFI. So if you have your bootable media with the MBR partitioning, you need to set your BIOS to Legacy.
- In the Windows Search box, type “command prompt” and from the search results that appear, right-click on Command Prompt and select the “Run as administrator” option.
- After that, execute this command: exe /convert /allowfullOS
- Now, wait until the process is completed since you can track its process on your screen.
- Once it’s done, go to Settings > Update & Security > Advanced Startup options and from there, click on Restart Now. This will restart your computer and give you advanced options.
- Next, select Troubleshoot > Advanced Options where you will see further options including System Restore, Startup Repair, Go back to the previous version, Command Prompt, System Image Recovery, and UEFI Firmware Settings.
- Now select the “Legacy” option. This will take you to the BIOS. Boot Mode is typically available under Boot > Boot Configuration. Once you’re there, set it to Legacy and then save the changes you’ve made. After that, your computer will restart.
Option 2 – Try recreating a new bootable drive
- Insert your USB drive into your PC.
- Tap the Win + R keys to open the Run dialog box and type in “cmd” and tap Enter to open the Command Prompt. Alternatively, you can also search for “cmd” in the Cortana search box to open Command Prompt.
- Once you’ve opened CMD, type in this command to open the DISPART utility – diskpart
- After that, you should see a new black and white window that would say, “DISKPART>”.
- Next, type in “list disk” in the command line and tap Enter to see the list of all the Storage devices as well as your hard disk connected to your PC. Here, you have to identify your disk’s number.
- Type in this command where “X” is the disk number you have identified and then tap Enter – disk X
- Type in this command and hit Enter to clear the table records and all the visible data on the drive – clean
- Now you have to recreate a new primary partition of the drive so you’ll have to type in this command and tap Enter right after – create part pri
- A new primary partition has been created so you have to select it by typing this command and tapping Enter – select part 1
- Now you have to format it to make it visible to normal users by typing – format fs=ntfs quick
Note: If your platform supports the Unified Extensible Firmware Interface or UEFI, replace the “NTFS” with “FAT32” in the command on Step 10.
- After that, type in this command and tap Enter after – active
- Finally, type this command and hit Enter to exit the utility – exit
- After you prepare the image for the operating system, save it to the root of your USB Storage device.
Option 3 – Try to recreate all the partitions
If none of the first two options given above worked, then you can try to recreate all the partitions instead. All you have to do is restart the Windows installation process and wait until you get to the part that says, “Where do you want to install Windows?”. From there, you will see options like delete, format, extend, create new partitions, and many more. Now you have to select the Delete all the partitions options and then use the “New” button to create new partitions. Just make sure that you have one primary partition at least where you can install Windows 10. After that, continue the installation of Windows on the new partition. Keep in mind that when you create a new partition, it also recreates the partition table configuration which means that the chances of getting an error are very unlikely.
Do You Need Help with Your Device?
Our Team of Experts May Help
Troubleshoot.Tech Experts are There for You!
GET HELP
Troubleshoot.Tech experts work with all versions of Microsoft Windows including Windows 11, with Android, Mac, and more.
Share this article:
You might also like
Bluetooth troubleshooting, I believe firmly that each one of us who has Bluetooth sooner or later had some issues with it, after all, it seems that it is in nature of radio transmitters to from time to time due to nature of signal and nature of Windows loose communication between them and can cause device which seems to work properly but can not establish the connection.
Most of the time Bluetooth issues are like that, the signal gets lost, the connection is broken, and establishing it again can be sometimes real pain, luckily for you, we have experience in this field and are here to help you and provide you with tips how to solve Bluetooth connection issues based on our own struggles.
-
Check if BlueTooth is ON
Yes, this seems stupid and sounds a lot like is it plugged in but here me out. Due to lost connections and different power plans setting inside your Windows, your Bluetooth receiver might be actually turned OFF thus preventing your other device to find your computer. Checking to see if Bluetooth has been by some accident turned OFF and switching it back ON should be the first thing to do and this could be a simple solution for your problem.
-
Restart the BlueTooth device.
Yup, another of these have you tried turning it OFF and turn it back ON advice which seems like tech cliche but in the case of Bluetooth, this can actually solve your problem. Radio signals and radio connections are not the same kinds of beasts like cable ones and sometimes Bluetooth device remembers certain information and can cause conflict. Turning it OFF and then back ON will clear its memory and cache and you will be ready for a new start hopefully solving your issue along the way.
-
Check power supply
If your Bluetooth device does not have a battery indicator, it would be wise to check on the battery status of the device. Sometimes we forget to charge batteries, sometimes someones have drained them. Checking the battery or just checking if the power supply is working properly should not be overlooked and it definitely should be on your to-do list of quick solutions.
-
Restart PC
Sometimes most simple solutions work and if restarting your Bluetooth device did not work, maybe restarting your PC will. When you restart the PC, you clear the cache and many other things that could potentially be the reason for connection issues.
-
Checks BlueTooth device distance from computer or interference from obstacles
The Bluetooth device operates via radio waves, and like wi-fi, if the distance from the computer is too large or you have some thick walls in between signal will degrade and be almost useless. Be aware that your PC might catch device waves and detect them but the signal itself could be too weak for the connection to work properly. Take the device and move it closer to the PC to see if the problem will go away, if it does issue was in distance or walls.
-
Reinstall or update device drivers.
Sometimes the issue could be in Windows update and old drivers, make sure that all of your drivers are updated with the latest version and that Windows itself has the most recent update in it. Trying to reinstall device cold also solve some the issue.
-
Remove and Pair deice again
if you tried all previous steps, try removing the device from Windows and then pairing it again. This could solve the issue since Windows itself could have mistakenly saved it like something else and can not recognize it.
-
Use Windows troubleshooter
If everything else failed, right-click and go to troubleshoot. Windows troubleshooter will try to find the issue and direct you to a solution.
If sadly none of these things do work, you should contact the device manufacturer since it is a very good chance that the problem is one of a hardware nature.
Read More
The Sysfader iexplore.exe Application Error — What is it?
To understand Sysfader iexplore.exe application error, first, it is important to learn what is Sysfade.exe file.
Sysfader.exe is basically an IE (Internet Explorer) application file that provides cool animation effects. These animation effects include fading menus in and out, animated windows and etc. It is responsible for the graphical enhancements for animated pages.
The Sysfader iexplore.exe application error occurs when this file fails to execute properly and open animated websites on Internet Explorer.
The error code is displayed in the following format:
“SysFader: iexplore.exe – Application Error
The instruction at “0×00000000″ referenced memory at “0×00000000″. The memory could not be “read”.”
Solution
Error Causes
The Sysfader iexplorer.exe application error may be triggered due to many causes. These include:
- Sysfader.exe file corrupted by malware and spyware
- Recently upgraded Internet Explorer which resulted in the Sysfader iexplorer.exe application error due to incompatibility issues with the system program.
- Issues with IE configuration
- Damaged registry files
- Damaged DLL files
- Obsolete and bad registry entries
Due to Sysfader iexplorer.exe application error, your Internet Explorer browser may crash. Furthermore if the error is not fixed timely, it may result in even more severe PC problems like system slowdown, system crash and failure.
This happens especially when Sysfader iexplorer.exe application error is related to the registry.
The registry saves all the activities performed on the computer. This also includes junk files, invalid registry entries, bad registry keys, cookies, temporary internet files, and files of the programs uninstalled.
If the registry is not cleaned frequently, these obsolete files overload the RAM causing great deal of damage to the registry. When you try to upgrade your browser, the installation fails and results in browser incompatibility issues because of the previous files of the uninstalled program saved in the registry.
Furthermore, the error code may also pop up due to the Sysfader.exe file corrupted by malicious software like spyware and adware on your system if you don’t run an antivirus on your system regularly.
Further Information and Manual Repair
To prevent IE web browser and your PC from coming crashing, here are some solutions that you can try to resolve the Sysfader iexplorer.exe application error:
- Repair and restore the registry by changing the configuration settings in the Registry Editor Window. This is accessible by typing ‘Regedit’ in the Run window. However, to edit the configuration settings manually and restore the registry, you should be technically sound. If not then making the changes would be slightly complex and time-consuming for you.
- However, another alternative to this is to download Restoro. Restoro is a powerful, advanced, and highly functional PC repair tool that includes multiple utilities such as a registry cleaner and a system optimizer. The registry cleaning feature scans your entire PC for registry issues triggering error codes like Sysfader iexplorer.exe.It wipes out all the unnecessary and obsolete files and fixes the damaged dll files thus simultaneously restoring the registry. The antivirus utility scans for and removes viruses and spyware from your PC which as we explained earlier could be the reason for Sysfader error code.
With Restoro, it takes only a few seconds to resolve this error and repair the registry. If you have system slowdown issues, it takes care of that too.
It has simple navigations and a user-friendly interface which makes it very easy to operate even if you are not technically sound. It is safe, efficient, and compatible on all Windows versions including Vista, XP, Windows 7, 8, 8.1, and 10.
Click here to download Restoro and resolve Sysfader iexplorer.exe application error on your PC today!
Read More
If you encounter errors 1603 and 0x00000643 on your Windows 10 computer while trying to install or update your Google Chrome browser. Although most errors can be fixed by some simple troubleshooting steps, that is not the case for these two errors since they have pretty specific solutions.
To resolve errors 1603 and 0x00000643 on your Chrome browser, here are some solutions you need to check out.
Option 1 – Try to run Microsoft Install and Uninstall Troubleshooter
Running the Microsoft Install and Uninstall Troubleshooter could help you fix errors 1603 and 0x00000643 in Chrome as well as the following issue in your Windows 10 computer:
- Corrupted registry keys on 64-bit operating systems.
- Corrupted registry keys that control the updated data.
- Problems that:
- Prevent new programs from being installed.
- Prevent new programs from being installed.
- Problems that block you from uninstalling a program through Add or Remove Programs (or Programs and Features) in Control Panel.
To use the Microsoft Install and Uninstall Troubleshooter, refer to the given steps below.
- First, right-click on the downloaded MicrosoftProgram_Install_and_Uninstall.meta.diagcab file and run it with administrative privileges.
- Next, it will offer you two scenarios to troubleshoot namely, “Installing” or “Uninstalling” and you have to select Installing to resolve the current errors.
- After that, it will show you a list of available programs on your computer. From there, select Google Update Helper and then click Next.
- It will then start to troubleshoot the problem and will automatically apply the fixes for you. It will offer you to uninstall Chrome if it turns out that it’s the root cause of the problem.
- After that, you need to download Google Chrome again and then reinstall it.
Option 2 – Try to clean reinstall Chrome
There are instances when programs leave files behind after you’ve uninstalled them and the same thing can happen to Chrome so before you reinstall Chrome, you have to make sure that you have deleted the User Data folder. To do so, refer to the following steps:
- Hit the Win + R keys to open the Run dialog box.
- Next, type “%LOCALAPPDATA%GoogleChromeUser Data” in the field and hit Enter to open the User Data folder.
- From there, rename the default folder and name it something else, e.g. “Default.old”.
- After that, install Google Chrome again and check if the issue is now fixed.
Option 3 – Try running the Chrome Cleanup tool
You might want to run Google Chrome’s built-in Malware Scanner & Cleanup tool as it could also help in getting rid of any unwanted ads, pop-ups, and even malware, as well as unusual startup pages, toolbars, and anything else that might overtake the network and could affect the performance of the browser.
Option 4 – Try to run the Network Troubleshooter
- Open the Search bar on your computer and type in “troubleshoot” to open the Troubleshoot settings.
- Next, scroll down and select the “Network Adapter” option from the right pane.
- Then click on the Run Troubleshooter” button.
- After that, your computer will check for any possible errors and will pinpoint the root cause of the problem if possible.
Option 5 – Reset Chrome
Resetting Chrome can also help you fix the error. This means that you will be restoring its default settings, disabling all the extensions, add-ons, and themes. Aside from that, the content settings will be reset as well and the cookies, cache, and site data will also be deleted. To reset Chrome, here’s what you have to do:
- Open Google Chrome, then tap the Alt + F keys.
- After that, click on Settings.
- Next, scroll down until you see the Advanced option, once you see it, click on it.
- After clicking the Advanced option, go to the “Restore and clean up option and click on the “Restore settings to their original defaults” option to reset Google Chrome.
- Now restart Google Chrome.
Read More
As you know, each one of the applications that you use in your Windows 10 computer has its own set of permissions by default. These applications either allows or denies the interactions between a few other applications, depending on their own needs. This is why you might suddenly encounter a message that says,
“This app wants to access your pictures”
or
“This app wants to access your account info”
both of which are followed by two buttons that will ask you to Allow or Deny the action. You can always click on any of the given options. This will determine the permission of the application.
Users in Windows 10 are given the option to either allow or deny applications in accessing their account information like name, picture and other account information. Thus, in this post, you will be guided on how you can change the Privacy settings of these apps to allow or deny them permission to access not just your account info but for all users, as well as specific apps in Windows 10.
The user account information is part of the Privacy data in Windows 10 that you can control easily using the Settings app. In fact, you can revoke or grant access permission for your account information, all the users and specific applications to do that, follow each one of the instructions provided below carefully.
Allow or deny apps permission to account info for yourself:
Step_1: The first thing you have to do is open Settings. From there, select Privacy.
Step_2: After that, scroll and look for Account info and select it.
Step_3: Now turn off the toggle button for the “Allow apps to access your account info” option if you want to deny apps permission to your account info. But if you want to allow them access, simply turn the toggle button on. Keep in mind that when you allow access or permission, you can select which apps can access your picture, name, and other account info by simply using the settings on the page you’re currently in.
Now if you want to allow or deny apps to access your account info for all the users, here’s what you have to do:
Step_1: First, open Settings and click on the icon for Privacy.
Step_2: Next, scroll down until you see the Account info located on the left side and then click on it.
Step_3: After that, click on the Change button under the “Allow access to account info on this device” section. If you want to deny account info access for all other users, then turn the toggle button off. Doing so will automatically disable not just the account info access for all users but also for all the apps as well.
On the other hand, if you want to allow or deny account info access to specific apps, you can do so by following these steps:
Step_1: As you did earlier, go to Settings and click on the Privacy icon.
Step_2: After that, scroll down and select Account info located on the left side.
Step_3: Now turn on or off the toggle button under the “Choose which apps can access your account info” section if you want to deny or allow specific apps permission to access Account Info. If you’ve turned on the toggle button under the “Allow apps to access your account info”, all the apps get access permissions by default.
Read More
WeatherGenie is a Browser Extension that allows users to check the current weather in any town at any time. This extension adds the “Weather:” search option to your new tab, and changes your default search engine to Yahoo.com. It also ads system Registry Entities that allow it to run each time the computer is restarted, several task schedulers are also added to allow it to run at various times during the day.
While installing this extension monitor browsing data from your computer. You may also see additional injected ads, sponsored links, and pop-up ads through your browser sessions.
Weather games have been marked as a Browser Hijacker by several anti-virus scanners and are therefore not recommended to keep on your computer. It is flagged as potentially unwanted for optional removal.
About Browser Hijackers
Browser hijacking is a very common type of online fraud where your web browser settings are altered to allow it to do things you do not intend. Browser hijackers could do a variety of things on your PC. Often, hijackers will force hits to sites of their preference either to increase targeted traffic generating higher ad earnings, or to gain a commission for every user visiting there. Even though it might seem naive, all browser hijackers are harmful and thus always regarded as security risks. As soon as the malware attacks your computer or laptop, it begins to mess things up a whole that slows your system down to a crawl. In the worse case, you might be pushed to tackle serious malware threats too.
How you can know whether the web browser is hijacked?
Symptoms that an internet browser is hi-jacked include:
1. you notice unauthorized modifications to your web browser’s home-page
2. bookmark and the new tab are also changed
3. the essential web browser settings are modified and unwanted or insecure sites are put into the trusted sites list
4. you’re getting new toolbars you have never witnessed before
5. you’ll notice random pop-ups start showing on a regular basis
6. web pages load slowly and at times incomplete
7. you can’t navigate to particular web pages, such as security software-related websites.
How does a PC get infected with a browser hijacker?
There are a number of ways your PC can become infected with a browser hijacker. They usually arrive by way of spam e-mail, via file-sharing networks, or by a drive-by download. They can be included with toolbars, BHO, add-ons, plugins, or browser extensions. Other times you might have mistakenly accepted a browser hijacker as part of a software bundle (generally freeware or shareware). A good example of some popular browser hijackers includes Conduit, Anyprotect, Babylon, SweetPage, DefaultTab, RocketTab, and Delta Search, but the names are regularly changing.
The existence of any browser hijacker on your system might substantially diminish the browsing experience, record your internet activities that lead to critical privacy concerns, diminish overall system performance and cause software instability as well.
The best ways to get rid of browser hijackers
Some browser hijacking can be simply reversed by identifying and eliminating the corresponding malware software from your control panel. But, many hijackers are harder to find or eliminate as they could get themselves connected with certain crucial computer files which allow them to operate as a necessary operating-system process. Besides, browser hijackers could modify the Computer registry so it could be very tough to repair manually, especially if you’re not a very tech-savvy individual.
You can go for automatic browser hijacker removal by just installing and running a reliable anti-malware application. SafeBytes Anti-Malware discovers all kinds of hijackers – such as WeatherGenie – and eliminates every trace quickly and efficiently. Utilize a pc optimizer together with your antivirus software to repair various registry issues, remove system vulnerabilities, and improve your computer performance.
How To Get Rid Of Malware That Is Blocking Anti-Malware Installation?
Practically all malware is detrimental and the effects of the damage may vary based on the specific type of malware. Some malware goes to great lengths to stop you from downloading or installing anything on your PC, particularly anti-virus software programs. If you’re reading this, chances are you’re stuck with a malware infection that is preventing you to download or install the Safebytes Anti-Malware program on your system. Refer to the instructions below to get rid of malware through alternative ways.
Remove malware in Safe Mode
Safe Mode is actually a special, basic version of Windows where only bare minimum services are loaded to stop viruses and also other problematic programs from loading. In the event the malware is blocking internet access and affecting your computer, starting it in Safe Mode enables you to download anti-malware and run a scan whilst limiting possible damage. In order to enter into Safe Mode or Safe Mode with Networking, press the F8 key while the PC is starting up or run MSConfig and locate the “Safe Boot” options in the “Boot” tab. Once you’re in Safe Mode, you can attempt to install your anti-malware software without the hindrance of the malware. After installation, run the malware scanner to get rid of most standard infections.
Switch to an alternative internet browser
Some malware mainly targets specific internet browsers. If this is your situation, use another internet browser as it can circumvent the computer virus. The best solution to avoid this problem is to opt for a web browser that is well known for its security features. Firefox contains built-in Phishing and Malware Protection to help keep you safe online.
Make a bootable USB anti-virus drive
Here’s yet another solution which is using a portable USB anti-virus software that can scan your system for malware without needing installation. Follow these steps to employ a USB flash drive to clean your corrupted computer system.
1) Download the anti-malware on a virus-free PC.
2) Insert the USB drive on the same computer.
3) Double-click the Setup icon of the anti-malware program to run the Installation Wizard.
4) Choose the flash drive as the location for saving the file. Follow the instructions to complete the installation process.
5) Now, transfer the flash drive to the infected computer.
6) Run the Safebytes Anti-malware directly from the flash drive by double-clicking the icon.
7) Click on “Scan Now” to run a scan on the affected computer for viruses.
Top Features of SafeBytes Anti-Malware
Today an anti-malware tool can protect your computer or laptop from various forms of online threats. But how do choose the best one amongst several malware protection software that is available in the market? Perhaps you might be aware, there are several anti-malware companies and tools for you to consider. A few of them are great but there are many scamware applications that pretend as genuine anti-malware software waiting to wreak havoc on the computer. When searching for an anti-malware tool, pick one which provides dependable, efficient, and complete protection against all known computer viruses and malware. One of the highly recommended software is SafeBytes AntiMalware. SafeBytes carries a superb history of excellent service, and customers are happy with it.
Safebytes is one of the well-established PC solutions companies, which offer this comprehensive anti-malware tool. When you have installed this software, SafeByte’s sophisticated protection system will ensure that absolutely no viruses or malware can seep through your computer.
SafeBytes anti-malware takes PC protection to a whole new level with its advanced features. The following are a few of the great ones:
Active Protection: SafeBytes provides complete and real-time security for your PC. It will inspect your personal computer for suspicious activity at all times and shields your personal computer from illegal access.
Robust Anti-malware Protection: Safebytes is based on the best virus engine within the industry. These engines can find and eliminate threats even during the early stages of a malware outbreak.
Fast Scan: SafeBytes’s high-speed malware scanning engine reduces scanning times and extends battery life. Simultaneously, it’ll effectively identify and remove infected computer files or any online threat.
Internet Security: SafeBytes checks and provides a unique safety ranking to every website you visit and block access to web pages considered to be phishing sites, thus safeguarding you from identity theft, or known to contain malicious software.
Very Low CPU and Memory Usage: SafeBytes is a lightweight tool. It consumes a very small amount of processing power as it runs in the background so you are free to use your Windows-based PC the way you would like.
Premium Support: For any technical issues or product assistance, you could get 24/7 professional assistance via chat and email.
To conclude, SafeBytes Anti-Malware is pretty great for securing your laptop or computer against all sorts of malware threats. Malware problems will become a thing of the past when you put this software program to use. So if you’re looking for a comprehensive antivirus program that’s still easy to use, SafeBytes Anti-Malware is exactly what you will need!
Technical Details and Manual Removal (Advanced Users)
To remove WeatherGenie manually, navigate to the Add/Remove programs list in the Control Panel and choose the program you want to remove. For internet browser extensions, go to your browser’s Addon/Extension manager and choose the plug-in you wish to disable or remove. You’ll probably also want to reset your browser to its default configuration settings.
In order to ensure the complete removal, manually examine your hard drive and Windows registry for all of the following and eliminate or reset the values as needed. Please keep in mind that only experienced users should attempt to manually edit the registry because deleting any single critical system file results in a serious problem or even a system crash. In addition, certain malware is capable of replicating or preventing deletion. It is advisable that you do the removal process in Safe Mode.
Files:
%UserProfile%\Application Data\Microsoft\%random%.exe
%System Root%\Samples
%windows%\system32\drivers\Search.weather-genie.com.sys
%User Profile%\Local Settings\Temp
%Documents and Settings%\All Users\Start Menu\Programs\Search.weather-genie.com
%Documents and Settings%\All Users\Application Data\
%Program Files%\Search.weather-genie.com
C:\ProgramData\%random numbers%\
Search And Delete:
doguzeri.dll
3948550101.exe
3948550101.cfg
Registry:
HKEY_LOCAL_MACHINE\SOFTWARE\Microsoft\Windows NT\CurrentVersion\Image File Execution Options\msseces.exe Debugger = svchost.exe
HKEY_LOCAL_MACHINE\SOFTWARE\Microsoft\Windows\CurrentVersion\Uninstall\Search.weather-genie.com
HKEY_CURRENT_USER\Software\Microsoft\Windows\CurrentVersion\Internet Settings WarnOnHTTPSToHTTPRedirect = 0
HKEY_LOCAL_MACHINE\SOFTWARE\Microsoft\Windows\CurrentVersion\Internet Settings WarnOnHTTPSToHTTPRedirect = 0
HKEY_LOCAL_MACHINE\SOFTWARE\Microsoft\Windows NT\CurrentVersion\SystemRestore DisableSR = 1
HKEY_LOCAL_MACHINE\SOFTWARE\Microsoft\Windows NT\CurrentVersion\Image File Execution Options\ekrn.exe Debugger = svchost.exe
HKEY_LOCAL_MACHINE\SOFTWARE\Microsoft\Windows NT\CurrentVersion\Image File Execution Options\msascui.exe Debugger = svchost.exe
HKEY_LOCAL_MACHINE\SOFTWARE\Microsoft\Windows\CurrentVersion\Run 3948550101
HKEY_CURRENT_USER\Software\Microsoft\Windows\CurrentVersion\Run\xas
HKEY_CURRENT_USER\Software\Search.weather-genie.com
Read More
Error 103 — What is it?
The error 103 may occur either due to issues in your Google Chrome browser or system issues. If error 103 occurs when using Chrome, this means there is a conflict between Google Chrome and the antivirus program running on your PC.
It is displayed in either of the following formats:
‘Chrome error 103 connection aborted’, ‘Chrome error 103 err_connection_aborted’ or ‘Error 103 (net: ERR_CONNECTION_ABORTED): Unknown error.
However, if this is a system error code, it may be displayed in the following format ‘The semaphore cannot be set again’ or as ‘ERROR_TOO_MANY_SEM_REQUESTS’ or as the value 0x67.
Solution
Error Causes
The error 103 is triggered due to multiple reasons such as:
The conflict between Google Chrome and anti-viruses arises because when the web browser attempts to update, the anti-virus programs on your PC may view the update as a threat.
Due to this, the connection to the internet is terminated and the error 103 message is displayed on your computer screen. And besides, this keeps you from upgrading your Google Chrome browser too.
Other causes include:
- Viral infection
- Missing Windows component called ‘expand.exe’
- Registry overlaps
- Incompatible drivers
Further Information and Manual Repair
Here are some of the easy and efficient ways to resolve error 103. Choose a method according to the error 103 messages displayed on your screen.
Method 1: Check for the ‘Expand.exe’ Windows component
This method is workable if the error 103 is triggered due to browser issues. To get started, follow these steps.
First, go to the start menu, and in the search bar type ‘expand.exe’. If you are able to find it, move it to the following directory C:\Windows\system32. However, if you are unable to locate it, then copy the file from Windows installation CD. Once you copy the file to the directory, reinstall the updated version of Google Chrome.
Method 2: Change the Location of the Temporary File
If the error still persists, try method 2.
Go to the start menu and open the Run window. Now type C: and press OK. Then go to File, then New, and then Folder. Now create a temporary folder and name it ‘test’. After that go back to the start menu and open the Run window again. Now enter the following text in the text field:cmd.exe then press OK. In the command prompt type set TMP=C:\test.
After that try reinstalling Google Chrome by typing the following in the command prompt: start ChromeSetup.exe.
Method 3: Update Drivers
If the error message 103 is generated due to system issues, then try updating drivers. Sometimes the error may occur due to incompatible drivers.
Method 4: Perform an Entire PC Scan for Viruses
To resolve error 103, perform an entire PC Scan for viruses. Sometimes the error may occur due to viral infection. Removing viruses may fix the error.
Method 5: Clean and Restore the Registry
If the error is triggered due to registry issues, then it is advisable to download Restoro.
This is a multi-functional PC repair tool integrated with powerful utilities including an anti-virus, a registry cleaner, Active X controls, and class scanner, and a system optimizer. The registry cleaner feature wipes out all the unnecessary files including cookies, junk files, and bad registry keys that corrupt the registry. It cleans and restores the registry instantly.
The anti-feature removes all viruses and spyware while the system optimizer utility ensures your system works at its optimum speed.
It can be downloaded on all Windows versions. It is safe and efficient. This software is a one-stop solution for all PC-related errors.
Click here to download Restoro.
Read More
What is Windows Update Error 0xC1900209? Before you can install any updates on your Windows 10 computer, there are a lot of conditions that have to be fulfilled and one of these conditions is software compatibility. It is one of the important factors in installing Windows Updates. So if one of the software in your computer is not compatible with the new Windows Update for your OS, then the Windows 10 setup will not proceed and will block the installation of the new update. This both applies to the cumulative updates and feature updates. In such cases, you will get the following error message when you run Windows Update:
“0xC1900209, Incompatible software is blocking the upgrade process. Uninstall the application and try the upgrade again.”
This error message comes under the umbrella of the Windows 10 pre-upgrade validation using Setup.exe. And for you to identify the incompatible app, you need to grab a Windows 10 install image using the Windows Media Creation tool to download the suitable Windows 10 version and mount it. After that, execute the setup.exe file that’s located in the root folder of the Windows 10 install image. Once you execute the setup file, the upgrade wizard will give you a list of incompatible apps.
Once you have determined which software is not compatible with the Windows Update, there are two options you can try to resolve the Windows Update error 0xC1900209 – you can either try to update the conflicting software or uninstall it. For more details, follow the given options below.
Option 1 – Try to update the conflicting software
If you are using an older version of the software that’s in conflict with the Windows Update, you might want to update it to its latest version and then try to apply the updates again to your Windows 10 computer. You can update the concerned software by visiting the official website of the software or any of its distribution sources. On the other hand, you can also use the Check for updates feature of that particular software if it’s available.
Option 2 – Try to uninstall the conflicting software
If updating the problematic program didn’t work, the next option you can try is to uninstall it. All you have to do is follow these steps to uninstall it successfully:
- Tap the Win + R keys to open the Run dialog box.
- Then type “appwiz.cpl” in the field and tap Enter to open the Programs and Features in Control Panel.
- Next, arrange the list of installed programs in the order of the installation date.
- After that, look for the problematic program and right-click on it, and then select Uninstall.
- Once the uninstallation process is done, restart your computer and see if the Windows Update error 0xC1900209 is fixed or not.
Read More
The latest steam beta update has introduced code that will prevent downloading and installing previous game versions via the steam client.

For many people that are playing online games, this is not such a big deal since they always must have the latest version in order to play their games but for other ones, this has arrived as a bit of a problem. Many people preferred older game versions since often updates can change certain mechanics inside the game making it different as an experience or introduce some elements that not everyone likes.
So far, people could use the steamDB site to find depo of the game versions you would like to play and download it but if this beta code goes live that will not be an option anymore. Now, playing old games without updates could also be used for nostalgic reasons and these people have also been cut off with this update.
It is important to point that update is still in beta client only but users have already started to voice their opinions asking Valve not to place it live. In the end, it will all depend on Valve’s decision will they listen to their customers or decide to push updates on live service.
Read More
Error Code 0x80d02002? — What Is It?
Error Code 0x80d02002 is one of the common errors encountered by Windows users upgrading to Windows 10 or installing new Windows updates. This error results in program lock-ups, system crashes, and freezes, or slow PC performance. It can also cause possible loss of private data on your device.
Some of the common error messages involving Error Code 0x80d02002 include:
- Something went wrong, Please try again later. Windows update error dt_000 – 0x80d02002
- Error(s) found: Code 0x80d02002 Windows update encountered an unknown error.
Windows update ran into a problem. - Windows Update Cannot Check For Updates – 0x80d02002
- 0x80d02002 – Windows could not search for new updates. An error occurred while checking for new updates for your computer. Some updates were not installed.
- There were some problems installing updates, but we’ll try again later If you keep seeing this and want to search the web or contact support for information, this may help – 0x80d02002
While upgrading to Windows 10, depending on the state of your computer, you might encounter other error messages, including error code 0xc000021a.
Solution
Error Causes
Error Code 0x80d02002 normally occurs when a user updates their system, upgrades to Windows 10 from Windows 7 or Windows 8/8.1, or installs new Windows updates. There are several reasons why this error happens which includes:
- Internet connection problems
- Blocked system ports
- Conflict on system level
Further Information and Manual Repair
In trying to fix Error Code 0x80d02002, you can employ manual repair methods to effectively and efficiently solve the issue. However, keep in mind that one tiny error made in using the command prompt can result in data loss or put your computer in a no-boot situation. In such cases, you can seek help from a Windows professional or consider using an automated tool whenever necessary.
You can try doing the following manual repair methods in an attempt to fix Error Code 0x80d02002:
Method One: Reset Windows Update Components
In trying to fix Error Code 0x80d02002, you may try resetting manually and check the Windows update components by doing the following steps:
- Right-click on the Start button then select Command Prompt (Admin) from the list to open a Command Prompt window.
- Once the Command Prompt window appears, type or copy and paste the following commands all at once then hit Enter:
net stop wuauserv
net stop cryptSvc
net stop bits
net stop msiserver
ren C:WindowsSoftwareDistribution SoftwareDistribution.old
ren C:WindowsSystem32catroot2 catroot2.old
net start wuauserv
net start cryptSvc
net start bits
net start msiserver
pause
- Exit the Command Prompt then check if the issue is resolved.
Method Two: Check If The Region Is Correct
- On the Start screen, type Region. Afterward, click on Settings then hit
- Under the Format tab, choose English (United Kingdom).
- Select Language Preferences then click on Add a language. Afterward, add “your language.”
- After you’ve added your preferred language, choose it then click on Move Up to make it the first language. Close now the Language window.
- On the Region window, select Additional Settings and see if the values are the same.
- Select the Location tab then change the Home Location to “your country,” then hit
Method Three: Perform an SFC Scan
Check if there are system files that need to be repaired by running an SFC Scan. Follow the steps below:
- Type CMD in the search bar then right-clicks on it. Select Run as Administrator. This will open a Command Prompt window in elevated mode.
- In the next window, select
- Once the Command Prompt window appears, type the command: sfc /scannow
- Leave the Command Prompt window open and wait for the process to complete. This might take a while depending on how fast or slow your device is.
- When everything’s fine, the message saying “Windows Resource Protection did not find any integrity violations” will appear.
Method Four: Disable Skype or Antivirus
There are times when Skype or your installed antivirus can conflict in updating your system. You can disable first your antivirus or Skype as you update your system and enable them once again when you successfully update your system.
Method Five: Download A Powerful Automated Tool
Can’t seem to put up with the long and technical manual repair process? You can still fix this error by downloading and installing a powerful automated tool that will surely get the job done in a jiffy!
Read More
100sOfRecepies is a Browser Extension developed by MindSpark Inc. that provides users with hundreds of recopies for breakfast, lunch, dinner, and dessert. This extension may appear very handy at the start, however, it may monitor your browser activity, and send it back to the developer to better serve ads. This extension injects itself into the System Registry allowing it to run each time your computer is restarted.
While browsing the internet with this extension installed you may see additional ads, sponsored links, and pop-up ads displayed in your browser.
Many anti-virus scanners have detected this extension as a Browser Hijacker and are therefore not recommended to keep on your computer.
About Browser Hijackers
Browser hijacking is actually a form of an unwanted program, often a web browser add-on or extension, which causes modifications in browser settings. They are made to disrupt web browser programs for various reasons. Usually, it’ll force users to predetermined sites which are aiming to increase their advertisement income. Nevertheless, it’s not that harmless. Your internet safety is compromised and it is also very annoying. In a much worst case, your browser could be hi-jacked to download malware that may do a great deal of damage to your laptop or computer.
Major symptoms that your web browser has been highjacked
The typical symptoms that indicate having this malware on your computer are:
1. the browser’s home page is changed
2. bookmark and the new tab are also modified
3. the default search engine is changed and the browser security settings have been lowered without your knowledge
4. find new toolbars which you did not add
5. unstoppable flurries of pop-up ads show up on your personal computer screen
6. your web browser gets slow, buggy crashes often
7. Inability to navigate to certain websites, particularly anti-malware and also other security software webpages.
How does a browser hijacker infect a computer?
There are several ways your computer can become infected with a browser hijacker. They generally arrive by way of spam e-mail, via file sharing websites, or by a drive-by-download. They could also come from add-on software, also known as browser helper objects (BHO), web browser plug-ins, or toolbars. Some browser hijackers spread in user’s computer systems using a deceptive software distribution technique known as “bundling” (generally through freeware and shareware). An example of some well-known browser hijacker includes Babylon, Anyprotect, Conduit, DefaultTab, SweetPage, RocketTab, and Delta Search, but the names are continually changing.
Browser hijackers could record user keystrokes to gather potentially valuable information that leads to privacy issues, cause instability on computers, drastically disrupt the user experience, and eventually slow down the PC to a point where it will become unusable.
Browser Hijacker Malware – Removal
Some browser hijacking could be quite easily stopped by discovering and eliminating the corresponding malware program from your control panel. But, most hijackers are hard to get rid of manually. No matter how much you try to remove it, it can come back over and over. Moreover, browser hijackers could modify the Computer registry so that it could be very tough to restore all of the values manually, particularly when you are not a very tech-savvy person.
Can’t Install Safebytes Anti-malware due to the presence of Malware? Try This!
All malware is bad, but certain kinds of malicious software do a lot more damage to your PC than others. Some malware sits in between your computer and the internet connection and blocks some or all sites which you want to check out. It would also block you from adding anything to your machine, especially anti-virus programs. So what to do when malicious software keeps you from downloading or installing Anti-Malware? Do as instructed below to eliminate malware through alternate ways.
Eliminate malware in Safe Mode
In the event the malware is set to load at Windows start-up, then booting in safe mode should avoid it. Just the minimum required applications and services are loaded when you boot your computer in Safe Mode. Listed below are the steps you need to follow to start your computer into the Safe Mode of your Windows XP, Vista, or 7 computers (go to Microsoft website for instructions on Windows 8 and 10 computers).
1) At power-on/startup, press the F8 key in 1-second intervals. This will invoke the “Advanced Boot Options” menu.
2) Choose Safe Mode with Networking with arrow keys and hit Enter.
3) When this mode loads, you should have an internet connection. Now, use your internet browser to download and install Safebytes.
4) As soon as the software program is installed, allow the scan run to remove viruses and other threats automatically.
Switch over to an alternate web browser
Malicious program code could exploit vulnerabilities on a particular web browser and block access to all anti-virus software sites. The best way to overcome this problem is to choose a browser that is known for its security measures. Firefox contains built-in Malware and Phishing Protection to keep you secure online.
Install and run anti-malware from the Thumb drive
To effectively get rid of the malware, you might want to approach the issue of running an anti-virus program on the affected PC from a different perspective. Do these simple measures to clear up your infected computer by using a portable antivirus.
1) On a virus-free PC, download and install Safebytes Anti-Malware.
2) Insert the pen drive on the same PC.
3) Run the setup program by double-clicking the executable file of the downloaded software, with a .exe file format.
4) When asked, select the location of the USB drive as the place where you want to put the software files. Follow the instructions on the screen to finish off the installation process.
5) Now, transfer the USB drive to the infected computer system.
6) Double-click the EXE file to open the Safebytes program right from the thumb drive.
7) Simply click “Scan Now” to run a scan on the affected computer for viruses.
Protect Your Computer and Privacy With SafeBytes Anti-Malware
To help protect your computer or laptop from a variety of internet-based threats, it’s important to install an anti-malware application on your personal computer. However, with countless numbers of antimalware companies in the marketplace, nowadays it’s tough to decide which one you should buy for your laptop. Some of them are excellent, some are ok types, while some will affect your PC themselves! You need to be careful not to pick the wrong product, particularly if you purchase a premium application. Amongst few good applications, SafeBytes Anti-Malware is the strongly recommended software for security-conscious people.
Safebytes is one of the well-established computer solutions firms, which provide this complete anti-malware software program. Through its cutting-edge technology, this software protects your personal computer against infections caused by different types of malware and similar internet threats, including adware, spyware, trojans horses, worms, computer viruses, keyloggers, potentially unwanted programs (PUPs), and ransomware.
SafeBytes carries a plethora of wonderful features which can help you protect your computer from malware attack and damage. Here are some of the good ones:
Robust Anti-malware Protection: By using a critically acclaimed anti-malware engine, SafeBytes provides multi-layered protection which is made to catch and remove threats that are concealed deep in your PC.
Active Protection: SafeBytes offers complete and real-time security for your PC. It’ll check your PC for suspicious activity at all times and shields your PC from unauthorized access.
Website Filtering: Through its unique safety rating, SafeBytes informs you whether a website is safe or not to visit it. This will assure that you’re always certain of your safety when browsing the online world.
Lightweight Utility: SafeBytes is really a lightweight application. It consumes an extremely small amount of processing power as it runs in the background therefore you will not observe any computer performance issues.
24/7 Premium Support: Skilled technicians are at your disposal 24/7! They will immediately fix any technical issues you may be experiencing with your security software.
Technical Details and Manual Removal (Advanced Users)
If you’d like to carry out the removal of 100sOfRecepies manually rather than using an automated software tool, you may follow these simple steps: Navigate to the Windows Control Panel, click on the “Add or Remove Programs” and there, select the offending program to uninstall. In cases of suspicious versions of web browser extensions, you can easily remove them through your browser’s extension manager. You may also want to reset your web browser settings, as well as delete browsing history, temporary files, and internet cookies.
To ensure the complete removal, find the following Windows registry entries on your system and delete them or reset the values appropriately. Please keep in mind that only advanced users should try to manually edit the registry because incorrect file removal leads to a major problem or even a PC crash. In addition, certain malware is capable of replicating itself or preventing deletion. It is recommended that you carry out the removal procedure in Safe Mode.
Files:
%Documents and Settings%\All Users\Application Data0sOfRecipes Toolbar virus
%program files %\internet explorer\ 100sOfRecipes Toolbar\[random].mof
%program files (x86)%0sOfRecipes Toolbar \
%programData%\suspicious folders\
%windows%\system32\driver0sOfRecipes Toolbar
%app data%\ 100sOfRecipes Toolbar virus\
Registry:
[HKEY_LOCAL_MACHINE\SOFTWARE\Microsoft\MATS\WindowsInstaller\EAF386F0-7205-40F2-8DA6-1BABEEFCBE8914.07.30.07.52.18]ProductName=100sOfRecipes Toolbar
[HKEY_LOCAL_MACHINE\SOFTWARE\Wow6432Node\Microsoft\Tracing\Muvic_RASAPI32]
[HKEY_LOCAL_MACHINE\SOFTWARE\Wow6432Node\Microsoft\Tracing\Muvic_RASMANCS]
[HKEY_LOCAL_MACHINE\SOFTWARE\Wow6432Node\Microsoft\Windows\CurrentVersion\Uninstall\EAF386F0-7205-40F2-8DA6-1BABEEFCBE89]
DisplayName=100sOfRecipes Toolbar
[HKEY_USERS\S-1-5-21-3825580999-3780825030-779906692-1001\Software\Microsoft\Windows\CurrentVersion\Uninstall\50f25211-852e-4d10-b6f5-50b1338a9271]
DisplayName=100sOfRecipes Toolbar
Read More
Copyright © 2023, ErrorTools. All Rights Reserved
Trademark: Microsoft Windows logos are registered trademarks of Microsoft. Disclaimer: ErrorTools.com is not affiliated with Microsoft, nor claims direct affiliation.
The information on this page is provided for information purposes only.
В первый раз с толкнулся с новой для себя ошибкой 0x80300024 при чистой установке Windows 10 1809 на компьютер с SSD диском.
В окне установке Windows 10 при попытке выбрать раздел диска, на который нужно установить операционную систему появляется ошибка:
В русской версии установщика Windows 10 ошибка выглядит так:

Итак, что нужно попробовать сделать при появлении этой ошибки для нормальной установки Windows:
- Если в вашем компьютере установлено несколько жестких дисков, то попробуйте открыть корпус компьютера и физически отключить шлейфы всех дисков, кроме того, на который вы планиуете установить Windows. Если вы не хотите (или не можете) раскручивать корпус своего ноутбука, вы можете временно отключить все дополнительные диски в настройках своего BIOS/UEFI (обычно эта опция доступна в настройках SATA, зависит от модели оборудования и версии BIOS/EFI). В моем случае мне помогло отключение второго и третьего HDD, а установку Windows 10 я выполнил на оставшийся SSD диск;
List disk – вывод всех подключенных к компьютеру дисков (HDD/SSD/USB).
Запомните номер диска, который вы хотите очистить (проще всего идентифицировать ваши жесткие и SSD диски по их размеру).
Select Disk 0 – выберите диск, который вы хотите очистить (в моем примере номер диска 0).
Выведите список разделов: list part (Если вы увидите, что у первого раздела есть большое смешение (Offset) более 1024 Кб, вы точно на верном пути!).
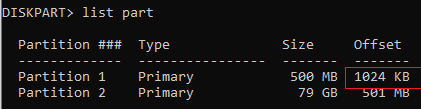
Clean — удаление структуры разделов и данных на выбранном диске.
Exit – завершите Diskpart.
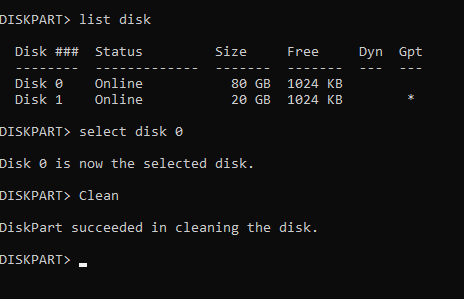
Переключитесь в окно установщика Windows 10, обновите список разделов и попробуйте установить операционную систему в неразмеченное пространство.
В этой инструкции подробно о том, что делать, если при установке Windows вам сообщают, что невозможно установить Windows в раздел диска, а в подробностях — «Установка Windows на данный диск невозможна. Возможно, оборудование компьютера не поддерживает загрузку с данного диска. Убедитесь, что контроллер данного диска включен в меню BIOS компьютера». Похожие ошибки и способы их исправить: Установка на диск невозможна, выбранный диск имеет стиль разделов GPT, Установка на данный диск невозможна, на выбранном диске находится таблица MBR-разделов, Нам не удалось создать новый или найти существующий раздел при установке Windows 10.
Если же все-таки выбрать этот раздел и нажать «Далее» в программе установки, вы увидите ошибку сообщающую, что нам не удалось создать новый или найти существующий раздел с предложением просмотреть дополнительные сведения в файлах журнала программы установки. Ниже будут описаны способы исправить такую ошибку (которая может возникать в программах установки Windows 10 — Windows 7).
По мере того, как все чаще на компьютерах и ноутбуках пользователей встречается разнообразие в таблицах разделов на дисках (GPT и MBR), режимов работы HDD (AHCI и IDE) и типов загрузки (EFI и Legacy), учащаются и ошибки при установке Windows 10, 8 или Windows 7, вызванные этими параметрами. Описываемый случай — как раз одна из таких ошибок.
Примечание: если сообщение о том, что установка на диск невозможна сопровождается информацией об ошибке 0x80300002 или текстом «Возможно, этот диск скоро выйдет из строя» — это может быть вызвано плохим подключением диска или кабелей SATA, а также повреждениями самого накопителя или кабелей. Данный случай не рассматривается в текущем материале.
Содержание
- Исправление ошибки «Установка на данный диск невозможна» с помощью настроек БИОС (UEFI)
- Сторонние драйвера контроллера дисков AHCI, SCSI, RA >
- Причины появления ошибки
- Методология устранения ошибки 0X8030002F
- Замена установочного носителя
- Установка без эксплуатирования привода
- Смена параметров работы SATA режима
- Форматирование установочной области
- Вход в ОС при включении компьютерного устройства
- Подведение итогов
- Рекомендуем к прочтению
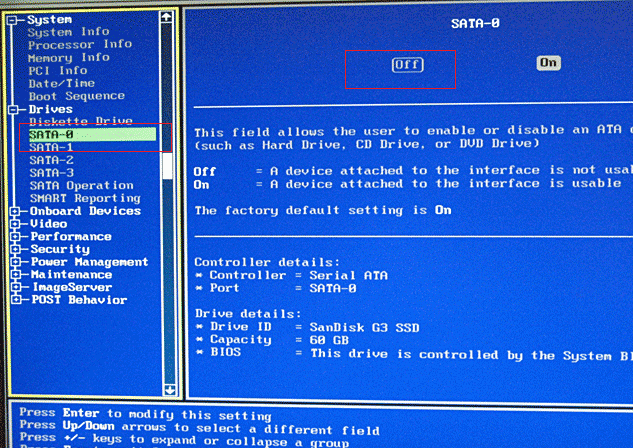
Исправление ошибки «Установка на данный диск невозможна» с помощью настроек БИОС (UEFI)
Чаще всего указанная ошибка происходит при установке Windows 7 на старых компьютерах с БИОС и Legacy загрузкой, в тех случаях, когда в БИОС в параметрах работы SATA устройств (т.е. жесткого диска) включен режим AHCI (или какие-либо режимы RAID, SCSI).

Решение в данном конкретном случае — зайти в параметры БИОС и изменить режим работы жесткого диска на IDE. Как правило, это делается где-то в разделе Integrated Peripherals — SATA Mode настроек БИОС (несколько примеров на скриншоте).

Но даже если у вас не «старый» компьютер или ноутбук, этот вариант также может сработать. Если же вы устанавливаете Windows 10 или 8, то вместо включения IDE режима, рекомендую:
- Включить EFI-загрузку в UEFI (если она поддерживается).
- Загрузиться с установочного накопителя (флешки) и попробовать установку.
Правда в этом варианте вам может встретиться другой тип ошибки, в тексте которой будет сообщаться, что на выбранном диске находится таблица MBR-разделов (инструкция по исправлению упомянута в начале этой статьи).
Почему такое происходит я и сам не до конца понял (ведь драйвера AHCI включены в образы Windows 7 и выше). Более того, воспроизвести ошибку я смог и для установки Windows 10 (скриншоты как раз оттуда) — просто изменив контроллер диска с IDE на SCSI для виртуальной машины Hyper-V «первого поколения» (т.е. с БИОС).

Будет ли появляться указанная ошибка при EFI-загрузке и установке на диск, работающий в IDE-режиме, проверить не смог, но допускаю подобное (в этом случае пробуем включить AHCI для SATA дисков в UEFI).
Также в контексте описываемой ситуации может оказаться полезным материал: Как включить режим AHCI после установки Windows 10 (для предыдущих ОС все аналогично).
Сторонние драйвера контроллера дисков AHCI, SCSI, RA >
В некоторых случаях проблема вызвана специфичностью оборудования пользователя. Наиболее распространенный вариант — наличие кэширующих SSD на ноутбуке, многодисковые конфигурации, RAID-массивы и SCSI карты.
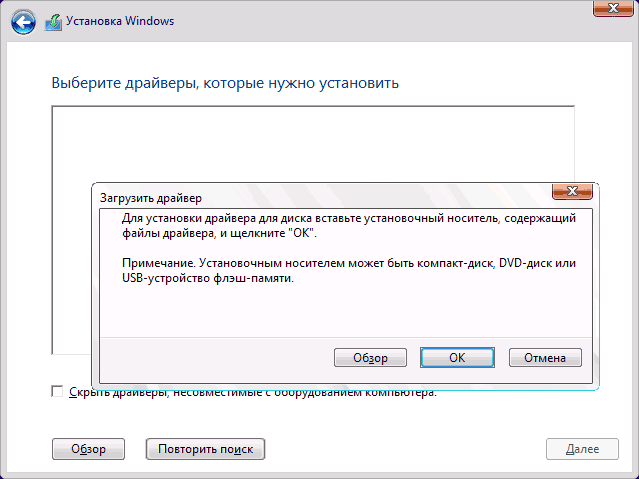
Эта тема затронута у меня в статье Windows не видит жесткий диск при установке, а суть сводится к тому, что, если у вас есть основания предполагать, что особенности оборудования являются причиной ошибки «Установка Windows не данный диск невозможна», первым делом следует зайти на официальный сайт производителя ноутбука или материнской платы, и посмотреть, а есть ли там какие-то драйвера (как правило, представленные в виде архива, а не установщика) для SATA-устройств.
Если есть — загружаем, распаковываем файлы на флешку (там обычно присутствуют inf и sys файлы драйвера), а в окне выбора раздела для установки Windows нажимаем «Загрузить драйвер» и указываем путь к файлу драйвера. А уже после его установки, становится возможной и установка системы на выбранный жесткий диск.
Если предложенные решения не помогают, пишите комментарии, будем пробовать разобраться (только упоминайте модель ноутбука или материнской платы, а также какую ОС и с какого накопителя устанавливаете).
А вдруг и это будет интересно:
Почему бы не подписаться?
Рассылка новых, иногда интересных и полезных, материалов сайта remontka.pro. Никакой рекламы и бесплатная компьютерная помощь подписчикам от автора. Другие способы подписки (ВК, Одноклассники, Телеграм, Facebook, Twitter, Youtube, Яндекс.Дзен)
13.01.2019 в 15:04
Здравствуйте, у меня такая проблема что биос на ноуте (доводьно старом) выглядит совсем не так как на фото, может это из-за версии? Можно ее как то обновить?
14.01.2019 в 12:04
Разные БИОС от разных производителей по-разному выглядят и навряд ли вы добьетесь чтобы было как на скриншоте. Но суть на всех одна и та же (за редкими исключениями), просто найти аналогичные пункты достаточно.
16.01.2019 в 10:35
Перепробовал все возможные варианты, но ошибка «Установка Windows на данный диск невозможна. Возможно, оборудование компьютера не поддерживает загрузку с данного диска. Убедитесь, что контроллер данного диска включен в меню BIOS компьютера» осталась. Возможен ли выход из строя SSD?
16.01.2019 в 13:18
Вряд ли. Скорее драйвер какой-то нужен, особенное если SSD M2 Возможно, на сайте материнки.
17.01.2019 в 06:30
Здравствуйте, столкнулся с такой проблемой. Купил ссд , имеется винт на 1 Тб. Если выбирать винт когда устанавливает виндовс то все отлично она идет. Если выбирать ссд то пишет ошибку. Невозможно установить и т.д. До этого писало что разделы gpt я их преобразовал в mbr. И стало писать типа просто не поддерживает запуск с данного устройства. Материнка msi.
05.03.2019 в 11:59
День добрый, у меня появилась очень похожая проблема. Так то компьютер у меня старый (775+xeon5440+asus p5q turbo) и чтобы хоть как-то увеличить комфорт работы, было решено купить ssd crucial bx500. Вот только радость от покупки закончилась очень быстро, тк как только я пришёл домой и начал ставить на него систему, возник миллион проблем: со стилем разделов (из gpt в мбр переделал), и та самая ошибка, описанная в этой статье. ни с флешки, ни с диска, ни в ahci, ни в ide не хочет ставиться. я даже пробовал просто перекинуть с жёсктого на ssd винду, и то не получилось. Буду очень признателен за любую помощь
06.03.2019 в 09:19
Здравствуйте.
Два вопроса:
1. Если у вас на компе несколько физических дисков, то BX500 отображается в списке устройств для установки (в программе установки, там где выбираем разделы) первым по списку? Если нет, то просто перекиньте шлейфы SATA между дисками, снесите в программе установки все разделы с Crucial, выберите незанятое пространство, жмякните «далее», установка должна пойти.
2. Обычно когда пишут «установка на данный диск невозможна», там еще пояснение можно открыть. Что там в пояснении, если первый метод не сработает.
07.03.2019 в 19:52
Аналогичная проблема. Материнская плата gigabyte z77 ds3h биос прошит до последнего f 11. Ssd wd green 240. Не хочет ставить виндовс 10 ни в achi ни в ide. В формате диска gpt просит формат mbr. Когда перевожу в mbr пишет установка на данный диск невозможна. Возможно оборудование данного компьютера не поддерживает загрузку с данного диска.
08.03.2019 в 08:37
А если в GPT режиме накатить систему, загрузившись с флешки не в Legacy а в UEFI режиме (ну и флешку под EFI-загрузку создать).
11.03.2019 в 12:32
Здравствуйте, подскажите пожалуйста мне. Решил воткнуть ссд м2 через адаптер pci-e 16 порт. Вроде все сначала шло хорошо. Копировались файлы и тп. После перезагрузка, после перезагрузки виндовс 10 начала устанавливаться по новой. Я нажал отмену. Думаю ладно попробую еще раз. Хотел установить ее второй раз, отформатировал ссд. Диск 0, раздел 1. Убрал все hdd чтобы не мешали. Но вылазит эта ошибка что невозможно установить, не подключен контроллер. Материнская плата gigabyte z68ap . Я пробовал и ahci и ide и загрузку efi nonefi auto ничего не помогает и диск форматировал 10 раз. И переключить его на мде или как там.
11.03.2019 в 13:49
Пробовали удалить все разделы с диска, ничего не форматировать вручную, а просто выбрать незанятое пространство и нажать далее? Не идёт?
13.03.2019 в 03:47
А можно где-то с вам связаться и переговорить? А то тут сами понимаете не совсем удобно. Да удалял, видит как свободный диск. Дело в том что в самом биос его не видно. Он не отображается как подключение устройство типо как жесткий диск и двд привод. А при установке виндовс 7. Его вот же в списке дисков нету. При установке 10 есть, но что то не идет загрузка. Бывает так что половина загрузится винды, а половина нет.
13.03.2019 в 10:43
Только здесь, ну или по почте — info собака ремонтка.про
14.11.2019 в 04:00
Блин.. лучше бы здесь продолжали, чтобы и другие могли прочесть… у меня такая же проблема… пришли к решению в итоге?
14.11.2019 в 13:13
Человек больше не писал (ни на почту ни куда-либо еще). Если подробно изложите ситуацию, постараюсь подсказать. Можно и скрины/фото куда-то выложить и дать ссылку, чтобы посмотреть можно было.
16.04.2019 в 19:48
Здравствуйте.
Материнская плата GA-890FXA-UD7
M.2 диск подключен в PCIe через адаптер.
При установке Windows 10 пишет:
Установка Windows на данный диск невозможна. Выбранный диск имеют стиль разделов gpt.
Установка Windows в данную область жесткого диска невозможна.
Данный раздел является MSR разделом.
Установка Windows на данный диск невозможна.
Возможно оборудование данного компьютера не поддерживает загрузку с данного диска.
Убедитесь что контроллер данного диска включен в меню BIOS компьютера.
Как их подружить?
Заранее спасибо!
17.04.2019 в 11:11
Здравствуйте.
Вообще, на AMD не проделывал такое, но на старых Intel-овских платах существует такая проблема: загрузка с дисков на PCI-E адаптерах невозможна (в чем можно убедиться в БИОС — там этот диск в списке устройств загрузки будет отсутствовать обычно).
Решение описывать долго, это тема отдельной большой статьи и на разном оборудовании может отличаться. Для Intel вот здесь хорошая инструкция, на английском: audiocricket.com/2016/12/31/booting-samsung-sm961-on-asus-p6t-se-mainboard/
Возможно, кто-то и на русском где-то писал такое.
21.06.2019 в 18:46
Спасибо тебе. Я так с этими установками замучился! Думал уже в сервис звонить, всё заработал)
08.07.2019 в 23:10
Здравствуйте! Сначала при установке 10 винды возникала ошибка с мбр. Перевел в гпт. Теперь пишет про эту ошибку (описанную в статье) или 80070057. В биосе при этом режим работы из вариантрв только AHCI и тип загрузки Legacy…больше ничего. Может как то быть с этим связано? Спасибо за ответ!
04.08.2019 в 21:44
Столкнулся с проблемой: купил ssd m2, у меня acer a715-71g-56bd, виндоус на этот диск не устанавливается. Говорит, что в биосе, возможно, не включён контроллер. Установил последний драйвер, все равно ничего не поменялось. Hdd диск я вытащил.
05.08.2019 в 10:36
А какую версию Windows ставите? Не 7-ку случайно?
Что касается драйвера, там на оф. сайте под ваш ноутбук есть SATA AHCI Driver. Распакуйте его на флешку с установкой Windows и из папки с 64-битными драйверами подсуньте драйвер при установке на этапе выбора разделов.
14.09.2019 в 01:04
ноутбук Asus e403s
Никак не могу решить данную проблему
Думаю это все из за того что память на этом ноутбуке распаяна прямо на плате
14.09.2019 в 10:32
А что пишут, когда нажимаете по сообщению, что установка невозможна (там дополнительная информация должна быть, и уже по ней — поищите).
16.09.2019 в 13:18
Установка Windows на данный диск невозможна. Возможно, оборудование компьютера не поддерживает загрузку с данного диска. Убедитесь, что контроллер данного диска включен в меню BIOS компьютера
Но в BIOS нет настроек sata тк там и нет порта sata (память прямо на плате распаяна)
16.09.2019 в 14:27
А вот оно что… сорри, что сразу не обратил внимание по модели ноутбука.
Решение: идем сюда asus.com/us/Laptops/E403SA/HelpDesk_Download/ и скачиваем в разделе Others драйвер, распаковываем его на ту же загрузочную флешку.
При ошибке указываем файл драйвера из папки на загрузочной флешке.
17.09.2019 в 02:05
если в Please select OS мы выбираем others то там только Bios
В Win 10 64bit там несколько файлов
Intel Serial IO controller driver
Intel® Dynamic Platform and Thermal Framework Drive
Intel(R) Serial IO GPIO Driver
Intel(R) Trusted Execution Engine Interface
ЗЫ
Заранее прошу прощение если туплю
17.09.2019 в 10:33
Intel Serial IO controller driver из 10-ки возьмите
17.09.2019 в 12:25
Ошибка продолжает выскакивать
(пробовал и остальные драйвера из Others устанавливать)
17.09.2019 в 14:03
А куда вы их устанавливаете и где? Т.е. вы именно взяли тот драйвер и именно распаковали, а потом, когда выбор диска для установки нажали «обзор» и указали файл .inf драйвера в папке или как-то иначе?
17.09.2019 в 16:03
При установке win 10 при выборе диска я нажал на Загрузка потом нажал на обзор и указал место куда скачал файлы драйвера (на флешку файлы sys inf cat exe ini), затем высветился доступный для установки драйвер и я нажал далее, драйвер установился.
Но ничего не поменялось
17.09.2019 в 16:04
Тогда странно, всё правильно сделано… должно было сработать.
Возможно, стоит в поддержку производителя написать, что они скажут.
Примечание: после отправки комментария он не появляется на странице сразу. Всё в порядке — ваше сообщение получено. Ответы на комментарии и их публикация выполняются ежедневно днём, иногда чаще. Возвращайтесь.
Переустановка Windows – систематически каждое компьютерное устройство нуждается в подобной процедуре, в силу устаревания версии программного обеспечения, возникновения определённых неисправностей или другой, технической или потребительской, необходимости. Ранее обусловленная процедура выполнялась исключительно в сервисных центрах, или специалистами, с выездом на дом к клиенту, однако, в нынешнее время большинство пользователей ПК решают эту задачу собственными силами. Всё дело в том, что переустановка ОС не относится к критически сложным задачам, выполнить инсталляцию Windows в силах каждого пользователя компьютерного устройства, при имении определённых знаний и навыков работы с программным обеспечением, и условии наличия установочного диска или флешки. Нередкими являются ситуации, когда на определённом моменте установки возникают ошибки, требующие оперативного решения. В этой статье расскажем о вариантах решения проблематики, когда при установке Windows на экране появляется ошибка 0X8030002F, с ориентировкой на причины, способные спровоцировать подобный прецедент.
Как устранить ошибку 0x8030002f при установке Windows.
Причины появления ошибки
Прежде чем перейти к методологии решения проблемы с установкой ОС, необходимо разобраться в фактах, которые зачастую провоцируют возникновение сбоя, ограничивают возможности потребителя в процессе выполнения задачи. Чаще всего прецедент объясняется специалистами отсутствием определённых компонентных составляющих, необходимых для корректной инсталляции Windows на установочном модуле. Согласно программной терминологии, компьютерные специалисты говорят об отсутствии файла с прообразом boot или install в формате wim, что свидетельствует о невозможности дальнейшей установки ОС.
Простыми словами, причина может скрываться как под несовершенством программной версии, устанавливаемой на персональный или портативный компьютер, так и определёнными механическими повреждениями диска, флешки, или разъёмов для их чтения, с последующим соответствующим выливанием в проблему невозможности устройством распознать или найти обусловленные установочные компоненты. Рассмотрим варианты устранения неполадки, заключающейся в появлении окна с шифром 0X8030002F при установке Windows 7, которая чаще, чем последующие версии ОС, подвергается подобным ошибкам при инсталляции.
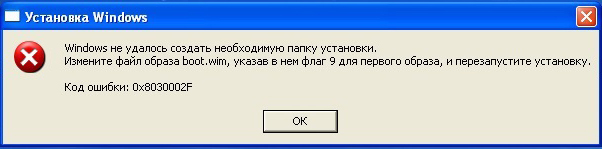
Методология устранения ошибки 0X8030002F
Программная ошибка 0X8030002F при установке Windows 7, как правило, возникает на фоне механического повреждения диска, причём дефекты могут быть неявными, не определяться визуально пользователем. Соответственно, начинать работу по устранению неисправности надо с исключения причин механического характера, заключающихся в повреждении установочных элементов и разъёмов на ПК для их считывания, и только после этого переходить к попытке устранения проблемы программными методами. Рассмотрим по порядку, что делать с обусловленной ошибкой, чтобы завершить корректно установку ПО с ориентировкой на возможность дальнейшей эксплуатации лэптопа.
Замена установочного носителя
Вопрос, как устранить сбой установки ОС на компьютерном устройстве, при воспроизведении системой ошибки с шифром 0X8030002F, предполагает первоначальное исключение причины прецедента в механических неполадках самого носителя, используемого для переустановки Windows. Для начала потребуется проверить целостность носителя посредством его тщательного визуального осмотра: в ситуациях, когда на диске имеются явные сколы, грязевые скопления или другие дефекты, исправляем ошибку посредством замены установочного элемента качественным накопителем. В ситуации, когда визуальные изъяны на накопителе не выявлены, проверить его работоспособность можно посредством проверки на ином компьютерном устройстве. Если другой лэптоп воспринимает ОС, значит, проблематика кроется не в накопителе, исправить ошибку методом его замены не удастся, необходимо искать причину в самом ПК.
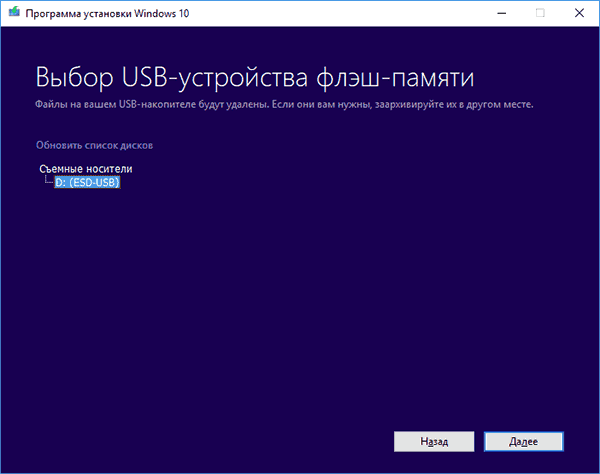
Установка без эксплуатирования привода
Второй, наиболее популярной причиной появления обусловленной ошибки выступает некорректность работы привода, в силу его поломки. Проверить этот момент можно посредством установки нового, заведомо рабочего диска в привод, с «чистым» прообразом ОС. Если проблема с появлением ошибки 0X8030002F при установке Windows 7 не устранилась, стоит попробовать инсталлировать операционную систему с флешки. В ситуации, если устанавливать систему начинали с флеш-карты, и получили отрицательный результат, попробуйте сменить USB разъём, или же в качестве альтернативы, попытайтесь установить ПО с диска. Если смена портов и установочных разъёмов не дала результата, а накопитель стопроцентно рабочий, переходите к следующим вариантам решения проблемы.
Смена параметров работы SATA режима
Устранить код ошибки 0X8030002F при установке Windows 7 можно попытаться посредством ручной смены настройки параметров, применяемых базовыми микропрограммами BIOS. Для каждой из версий систем и компьютерных устройств вход в BIOS рознится, что обуславливает потребность поиска варианта открытия режимного элемента на конкретном лэптопе: для этого могут применяться как разные комбинации клавиш, так и команды F2, F10 или F12. В результате пользователю надо зайти в параметры SATA Mode, в которых снять задачу с позиции AHCI, поменяв команду на пункт контроллера ADE, с обязательным сохранением внесённых изменений. Дальше процедура переустановки Windows осуществляется по стандартному регламенту.
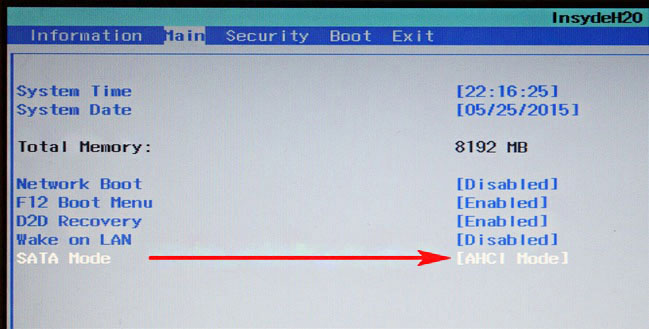
Форматирование установочной области
Прежде чем приступить к повторной попытке инсталляции ОС Windows, необходимо отформатировать диск компьютера, на который будет устанавливаться программное обеспечение. По умолчанию, независимо от условия, предусматривается установка Виндовс 7, или более поздней версии операционной системы, с этой целью используется информационная область диска C. Форматирование диска, предшествующее установке ОС, или выполненное в процессе инсталляции ПО, значительно повысит вероятность успешного результата, а также минимизирует риски возникновения ошибки с шифром 0X8030002F.
Вход в ОС при включении компьютерного устройства
Ещё один вариант решения проблемы с инсталляцией ОС предусматривает вход в систему непосредственно при включении компьютерного устройства. С этой целью надо выключить компьютер, после чего при загрузке лэптопа зайти в консоль Windows, вызвать командную строку, посредством нажатия комбинации кнопок Shift и F10, где в адресном пункте прописать команду cmd. Практически стопроцентный позитивный результат инсталляции ОС гарантируется специалистами при использовании метода прописывания команд в адресных полях консоли Windows в следующем порядке:
- Остановить процесс посредством введения директивы net stop wuauserv.
- Зайти в корневой каталог программного обеспечения командой CD %systemroot%/SoftwareDistribution.
- Обусловить правки обновления предписанием Ren Download/Download.old.
- Восстановить процесс обновления директивой net start wuauserv.
Зачастую после выполнения описанных манипуляций переустановка Windows будет выполнена корректно, без возникновения дополнительных системных ошибок.
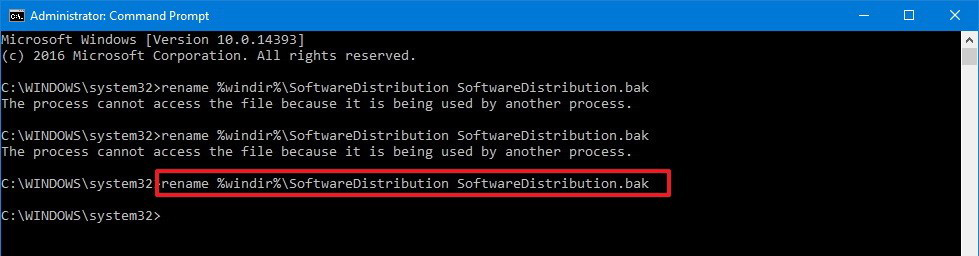
Подведение итогов
Ошибка с маркировкой 0X8030002F, появляющаяся при установке Windows свидетельствует о невозможности завершения начатой инсталляции, причём причины прецедента зачастую обуславливаются неисправностями, механическими или техническими, накопителя или разъёмов, через которые подключается диск или флешка.
Первоочерёдными методами решениями проблемы является замена нерабочих инструментальных элементов на действующие, и только потом, если проблема не устранилась, приступать к программным вариантам ликвидации ошибки, методом проверки дистрибутива и вмешательства в настройки ПК. Описанные в статье методы помогут решить проблему, инсталлировать операционную систему, восстановить пользовательские возможности. Для неуверенных потребителей ПК всегда остаётся открытым альтернативный вариант – обращение в сервисный центр, где специалисты смогут выполнить переустановку системы, правда, не бесплатно.
Содержание
- Как исправить ошибку при установке Windows 10 0x80300002?
- Причины и решения ошибки при установке Windows 10 0x80300002
- Знакомство с ошибкой 0x80300002 при установке Windows 10
- Проведение первичной диагностики ошибки установки Windows 10 0x80300002
- Проблемы с диском: проверка и исправление
- Проверка и обновление драйверов для устранения ошибки 0x80300002
- Использование иные методы для успешной установки Windows 10 без ошибки 0x80300002
Как исправить ошибку при установке Windows 10 0x80300002?
Windows 10 – это операционная система, которая предлагает пользователю удобный и интуитивно понятный интерфейс, а также множество полезных функций. Однако, при установке этой операционной системы, некоторые пользователи могут столкнуться с ошибкой 0x80300002, которая прерывает процесс установки.
Эта ошибка может появиться по нескольким причинам. Одной из них является проблема с жестким диском. Если на вашем компьютере уже установлена другая операционная система или разделы на жестком диске имеют некорректные настройки, то возникает ошибка 0x80300002 при установке Windows 10.
Кроме того, неправильная конфигурация BIOS или проблемы с подключением к компьютеру внешних устройств, таких как USB-накопители или DVD-приводы, также могут вызывать данную ошибку.
Однако, не стоит паниковать, так как существуют способы устранения данной ошибки. Один из них – это проверка и настройка разделов на жестком диске, а также исправление возможных ошибок. Другой способ – это обновление BIOS и проверка правильности подключения устройств к компьютеру.
В данной статье мы рассмотрим более подробно каждую причину возникновения ошибки 0x80300002 при установке Windows 10, а также предложим эффективные решения для ее устранения. Если вы столкнулись с этой проблемой, вам стоит уделить внимание данным советам и рекомендациям, чтобы успешно завершить установку операционной системы Windows 10.
Причины и решения ошибки при установке Windows 10 0x80300002
Ошибка 0x80300002 при установке Windows 10 может вызывать немало неудобств и приводить к задержкам в работе. Чтобы разобраться с этой проблемой, необходимо понять возможные причины и найти эффективные способы ее решения.
Одной из возможных причин ошибки 0x80300002 является проблема с жестким диском. Это может быть связано с его повреждением, неправильным подключением или неподходящими параметрами разделов. Если вы сталкиваетесь с этой ошибкой, первым шагом должно быть проверка вашего жесткого диска.
Если вы уверены, что проблема в жестком диске, существуют несколько способов ее решения. Сначала проверьте подключение кабелей и убедитесь, что они надежно и правильно подключены к вашей материнской плате. Если все в порядке с подключением, попробуйте отформатировать жесткий диск и создать новые разделы с помощью инструментов управления дисками в Windows. Если проблема не исчезает, возможно, вам потребуется заменить жесткий диск.
- Проверьте подключение кабелей
- Отформатируйте жесткий диск и создайте новые разделы с помощью инструментов управления дисками
- Рассмотрите замену жесткого диска
Если вы запутались в параметрах BIOS, рекомендуется сбросить его настройки по умолчанию. Это можно сделать путем удаления батарейки на материнской плате на короткое время или с помощью специальной опции сброса в BIOS. После сброса настроек BIOS, установите параметры загрузки в соответствии с требованиями для установки Windows 10.
- Сбросьте настройки BIOS на значение по умолчанию
- Настройте параметры загрузки согласно требованиям для установки Windows 10
Знакомство с ошибкой 0x80300002 при установке Windows 10
Если вы пытались установить операционную систему Windows 10 на свой компьютер или ноутбук и столкнулись с ошибкой 0x80300002, не паникуйте. В этой статье мы расскажем, что означает данная ошибка и как можно ее исправить.
Ошибка 0x80300002 возникает при выборе раздела на жестком диске для установки Windows 10. Она указывает на проблему с разделом диска, который вы выбрали для установки операционной системы. Эта ошибка может возникнуть по нескольким причинам, таким как неправильный формат раздела, недостаток свободного места на диске или проблемы с драйверами.
Для исправления ошибки 0x80300002 вам могут потребоваться некоторые действия. Во-первых, убедитесь, что раздел, на который вы пытаетесь установить Windows 10, правильно отформатирован. Чтобы это сделать, вы можете использовать инструмент управления дисками в системе. В нем вы сможете проверить, какой формат имеет выбранный вами раздел и, при необходимости, отформатировать его в поддерживаемый формат.
В случае, если у вас есть другие разделы на жестком диске, вы также можете попробовать выбрать другой раздел для установки Windows 10. Иногда проблема может быть связана с конкретным разделом, и выбор другого раздела может помочь вам успешно установить операционную систему.
Если эти шаги не помогли исправить ошибку 0x80300002, то возможно, проблема кроется в драйверах. Убедитесь, что у вас установлены все необходимые драйверы для вашего жесткого диска и материнской платы. Обновите драйверы до последней версии и повторите попытку установки Windows 10.
В случае, если все приведенные выше рекомендации не помогли устранить ошибку 0x80300002, рекомендуется обратиться к специалистам или поискать помощь на форумах и ресурсах, посвященных установке операционных систем. Там вы сможете получить более подробные инструкции и решения для данной проблемы.
Проведение первичной диагностики ошибки установки Windows 10 0x80300002
Ошибка при установке операционной системы Windows 10 с кодом 0x80300002 часто вызывает затруднения у пользователей. Эта ошибка указывает на проблемы с диском или разделами на жестком диске компьютера. При возникновении данной ошибки необходимо провести первичную диагностику, чтобы определить причину и найти решение проблемы.
Первым шагом в проведении диагностики ошибки 0x80300002 является проверка жесткого диска на наличие повреждений. Для этого можно воспользоваться встроенной утилитой проверки диска Windows — CHKDSK. Запустите командную строку от имени администратора и выполните следующую команду: chkdsk /f. Эта команда выполнит проверку и исправление ошибок на диске. После завершения проверки перезагрузите компьютер и повторите попытку установки Windows 10.
Если ошибки при установке Windows 10 продолжают возникать после проверки диска, следующим шагом является проверка разделов на жестком диске. С помощью инструментов диспетчера дисков Windows можно просмотреть состояние разделов и выполнить необходимые операции. Откройте диспетчер дисков, нажав комбинацию клавиш Win + X и выбрав «Диспетчер дисков». Проверьте, что разделы на диске распознаются правильно и не содержат ошибок.
Если проблема с разделами обнаружена, можно попробовать удалить все разделы на жестком диске перед установкой Windows 10. Однако, учтите, что при этой операции все данные на диске будут удалены. Если вы не хотите потерять данные, сначала сделайте их резервную копию. Выберите каждый раздел на диске и нажмите кнопку «Удалить том», чтобы удалить разделы. После удаления разделов попробуйте снова установить Windows 10.
Если ни один из описанных выше методов не помогает устранить ошибку 0x80300002 при установке Windows 10, возможно, проблема связана с аппаратной несовместимостью. В этом случае рекомендуется обратиться к производителю компьютера или оборудования для получения дополнительной поддержки и советов. Они могут предложить специальные драйверы или обновления BIOS, которые помогут решить проблему.
Проблемы с диском: проверка и исправление
Одна из самых распространенных проблем с диском – появление ошибок чтения/записи. Это может произойти по разным причинам, например, из-за повреждения файловой системы, физических повреждений диска или неправильного подключения. Чтобы проверить диск на наличие ошибок, вы можете воспользоваться встроенной в Windows утилитой «Проверка диска». Она позволяет сканировать диск на ошибки и исправлять их. Если вы обнаружили ошибки, рекомендуется сделать резервную копию данных и затем выполнить исправление.
Еще одной распространенной проблемой с диском является его фрагментация. Фрагментация происходит, когда файлы на диске находятся в разных местах, что замедляет процесс чтения и записи данных. Чтобы исправить это, в Windows также есть утилита «Дефрагментация диска», которая позволяет переупорядочить файлы и ускорить работу диска. Эту операцию рекомендуется выполнять периодически для поддержания оптимальной производительности диска.
- Проверка диска на наличие ошибок
- Исправление ошибок на диске
- Дефрагментация диска для улучшения производительности
Проверка и обновление драйверов для устранения ошибки 0x80300002
Ошибка 0x80300002, возникающая при установке операционной системы Windows 10, может быть вызвана несовместимостью драйверов с устройствами компьютера. Чтобы решить эту проблему, необходимо выполнить проверку и обновление драйверов устройств.
Первым шагом для устранения ошибки 0x80300002 является проверка драйверов устройств на наличие обновлений. Для этого можно воспользоваться программой управления драйверами или встроенным в операционную систему менеджером устройств.
Программы управления драйверами, такие как Driver Booster или Driver Easy, предлагают автоматическое обновление драйверов на компьютере. Они сканируют систему на наличие устаревших драйверов и предлагают загрузить и установить последние версии. Это позволяет решить проблемы совместимости и обеспечить более стабильную работу операционной системы.
Если вы предпочитаете воспользоваться встроенным менеджером устройств, необходимо пройти по следующему пути: нажмите правой кнопкой мыши на кнопку «Пуск» и выберите «Устройства и принтеры». Выберите нужное устройство и щелкните правой кнопкой мыши, затем выберите «Обновить драйвер». Операционная система сама попытается найти и установить необходимые обновления.
В некоторых случаях может потребоваться скачать драйверы с официального сайта производителя устройства. Перейдите на сайт производителя и найдите раздел поддержки или загрузки драйверов. Укажите модель устройства и операционную систему, чтобы скачать соответствующие драйверы. Затем установите их вручную, следуя инструкциям производителя.
Проверка и обновление драйверов устройств является важным шагом для устранения ошибки 0x80300002 при установке Windows 10. Это позволяет обеспечить полную совместимость устройств с операционной системой и обеспечить стабильную работу компьютера.
Использование иные методы для успешной установки Windows 10 без ошибки 0x80300002
Ошибка 0x80300002 при установке Windows 10 может вызвать некоторые неудобства и привести к задержке в процессе установки операционной системы на вашем компьютере. Однако, не отчаивайтесь! В данной статье мы рассмотрим несколько альтернативных методов, которые помогут вам успешно установить Windows 10, обойдя эту ошибку.
Первым шагом для решения проблемы является проверка физического состояния вашего жесткого диска. Ошибка 0x80300002 может быть вызвана неправильной работой или повреждением диска. Убедитесь, что ваш жесткий диск находится в исправном состоянии, проверив его на наличие физических повреждений или ошибок с помощью специального программного обеспечения.
Если ваш жесткий диск находится в исправном состоянии, можно попробовать изменить тип раздела при установке Windows 10. Ошибка 0x80300002 может возникать из-за неправильной настройки разделов на вашем диске. Чтобы это исправить, выберите опцию «Дополнительные параметры» при установке Windows 10 и измените тип раздела на «GPT». Это может помочь избежать ошибки и успешно установить операционную систему.
Если все вышеперечисленные методы не привели к положительным результатам, можно попробовать использовать другие инструменты для установки Windows 10. Например, вы можете создать загрузочный USB-накопитель с помощью программы Rufus или использовать другие подобные инструменты, которые позволят вам установить операционную систему без ошибки 0x80300002.
Важно помнить, что перед использованием альтернативных методов необходимо резервирование всех важных данных, чтобы избежать их потери в случае возникновения проблем. Кроме того, следует обратиться за помощью к специалисту, если вы не уверены в своих навыках или опыте работы с установкой операционных систем.
В итоге, ошибка 0x80300002 не является неразрешимой проблемой при установке Windows 10. С применением альтернативных методов и тщательной проверкой вашего оборудования вы сможете успешно установить операционную систему и наслаждаться ее преимуществами без лишних проблем.
При установке операционной системы Windows пользователи могут столкнуться с разными сложностями. Одна из таких проблем – ошибка с кодом 0x80300002, которая может возникнуть на этапе установки. Данная ошибка указывает на наличие проблемы с разделами диска, что приводит к невозможности завершить процедуру установки.
Несмотря на то, что эта ошибка может показаться сложной и запутанной, существуют несколько простых и эффективных способов ее устранения. В этой статье мы рассмотрим несколько стандартных решений, которые помогут вам исправить ошибку 0x80300002 и успешно установить операционную систему Windows без лишних трудностей.
Перед началом выполнения каких-либо действий по исправлению ошибки 0x80300002 важно резервировать все важные данные на вашем компьютере. Это поможет вам избежать случайного удаления или повреждения файлов, которые могут быть важны для вас. Используйте внешний накопитель данных или облачные сервисы для создания резервных копий важных файлов и папок.
При установке операционной системы Windows пользователи иногда сталкиваются с ошибкой 0x80300002. Эта ошибка может возникать по разным причинам и может быть вызвана как аппаратными, так и программными проблемами. В данном разделе будут рассмотрены наиболее распространенные причины возникновения ошибки 0x80300002 и представлены возможные способы ее решения.
Одной из основных причин возникновения ошибки 0x80300002 является несоответствие требованиям жесткого диска. К примеру, данная ошибка может произойти, если размер раздела, на который вы пытаетесь установить Windows, недостаточен для корректной работы операционной системы. Также ошибка может возникнуть, если жесткий диск содержит битые сектора или если на нем находятся файлы, которые не могут быть прочитаны.
Для решения проблемы можно использовать несколько способов. Во-первых, стоит убедиться, что размер раздела, на который вы пытаетесь установить Windows, достаточно большой. В случае необходимости, увеличьте размер раздела или выберите другой раздел на жестком диске.
Во-вторых, проверьте жесткий диск на наличие битых секторов. Для этого можно воспользоваться специальными программами, например, CHKDSK. Если программа обнаружит битые сектора, попытайтесь восстановить или заменить поврежденные участки диска.
Также стоит обратить внимание на наличие файлов, которые не могут быть прочитаны, на жестком диске. В этом случае, удалите эти файлы или переместите их на другой диск перед установкой операционной системы Windows.
В некоторых случаях ошибка 0x80300002 может быть вызвана проблемами с драйверами оборудования. Проверьте, что все драйверы на вашем компьютере обновлены до последней версии. Если это не помогает, попробуйте отключить или заменить проблемное оборудование и повторить установку Windows.
| Причины ошибки | Возможные решения |
|---|---|
| Недостаточный размер раздела для установки Windows | Увеличить размер раздела или выбрать другой раздел |
| Битые сектора на жестком диске | Восстановить или заменить поврежденные участки диска |
| Наличие файлов, которые не могут быть прочитаны | Удалить или переместить эти файлы |
| Проблемы с драйверами оборудования | Обновить драйверы или заменить проблемное оборудование |
Неправильно подключенный жесткий диск
При установке операционной системы Windows может возникнуть ошибка 0x80300002, которая связана с неправильным подключением жесткого диска.
Данная ошибка может возникнуть, когда проблемы возникают с подключением жесткого диска к системной плате или с настройками BIOS. Такая ситуация может произойти в результате, например, неправильной сборки компьютера или после каких-либо изменений внутренней конфигурации системного блока.
Чтобы исправить ошибку 0x80300002, рекомендуется провести следующие действия:
- Проверить правильность подключения жесткого диска. Убедитесь, что кабель SATA/IDE, отвечающий за подключение жесткого диска, надежно прикреплен к системной плате и самому диску. При необходимости переподключите кабель, следуя инструкциям производителя.
- Проверить настройки BIOS. Зайдите в BIOS вашего компьютера и убедитесь, что диск опознан и правильно настроен в разделе «Boot Order» (порядок загрузки). В данном разделе должен быть указан ваш жесткий диск как первый в списке загрузки.
- Проверить наличие обновлений BIOS. Посетите официальный веб-сайт производителя вашей системной платы и проверьте наличие обновлений для BIOS. Если обновления доступны, загрузите и установите их согласно инструкциям.
После проведения данных действий, перезагрузите компьютер и повторите установку операционной системы Windows. В большинстве случаев, исправление неправильного подключения жесткого диска позволяет успешно устранить ошибку 0x80300002 и продолжить установку.
Если ошибка все еще не исчезает, рекомендуется обратиться за помощью к профессионалам или специалистам технической поддержки для более детальной диагностики и устранения возможных проблем с вашей системой.
Проблемы с жестким диском, которые могут вызывать ошибку 0x80300002 при установке Windows
При установке операционной системы Windows может возникнуть ошибка 0x80300002, которая указывает на проблемы с жестким диском. Эта ошибка может возникнуть из-за нескольких возможных причин, таких как повреждения файловой системы, проблемы с драйверами или неисправности физического диска.
Одной из возможных причин ошибки 0x80300002 является повреждение файловой системы на диске. Файловая система отвечает за организацию и управление файлами на жестком диске, и если она повреждена или испорчена, это может привести к ошибке при установке операционной системы. В таком случае рекомендуется использовать специальные инструменты, такие как CHKDSK, для проверки и восстановления целостности файловой системы.
Другой возможной причиной ошибки 0x80300002 может быть проблема с драйверами жесткого диска. Драйверы — это программное обеспечение, которое позволяет операционной системе взаимодействовать с оборудованием компьютера, включая жесткий диск. Если драйверы устарели или повреждены, это может вызвать ошибку при установке Windows. В этом случае рекомендуется обновить драйверы жесткого диска до последней версии.
Кроме того, ошибка 0x80300002 может быть связана с неисправностью физического жесткого диска. Возможно, что диск содержит поврежденные секторы или другие физические проблемы, которые препятствуют его правильной работе. В таком случае рекомендуется выполнить проверку диска с помощью специализированных программ, таких как CrystalDiskInfo или HD Tune, для определения состояния и целостности диска.
| Возможные причины ошибки 0x80300002 |
|---|
| Повреждение файловой системы на диске |
| Проблемы с драйверами жесткого диска |
| Неисправность физического жесткого диска |
Проблема с драйверами SATA
Один из распространенных вопросов, возникающих при установке операционной системы Windows, связан с ошибкой 0x80300002. Эта ошибка указывает на проблемы с драйверами SATA, что может привести к невозможности установить Windows на жесткий диск.
Проблема с драйверами SATA может возникнуть в результате несовместимости между операционной системой Windows и контроллером SATA. В таких случаях необходимо обновить или установить правильные драйверы, чтобы операционная система могла распознать и использовать жесткий диск.
Во время установки Windows можно попытаться подключить внешний носитель с драйверами SATA и указать путь к этому носителю во время установки. Если у вас нет внешнего носителя, вы можете попробовать использовать утилиту командной строки DISM для добавления драйверов в установочный образ Windows.
В случае, если ни один из этих методов не помогает, можно попробовать обновить BIOS компьютера, так как это также может решить проблему с драйверами SATA. Однако, перед обновлением BIOS следует быть осторожным и следовать инструкциям производителя, чтобы избежать потенциальных проблем.
Итак, если вы столкнулись с ошибкой 0x80300002 при установке Windows, причиной может быть проблема с драйверами SATA. Попробуйте обновить или установить правильные драйверы, используя внешний носитель или утилиту командной строки DISM. Если это не помогает, рассмотрите возможность обновления BIOS компьютера.
Недостаточное пространство на жестком диске
При установке операционной системы Windows может возникнуть ошибка 0x80300002, связанная с недостаточным пространством на жестком диске. Эта ошибка указывает на то, что доступное на диске место недостаточно для завершения установки.
Когда вы устанавливаете Windows, требуется определенное количество свободного пространства на жестком диске. Это связано с необходимостью загрузки и размещения на диске файлов операционной системы, а также создания системных разделов. Если доступный объем памяти на диске недостаточен, возникает ошибка 0x80300002, и установка Windows не может быть завершена.
Для решения проблемы с недостаточным пространством на жестком диске можно предпринять несколько действий:
- Освободить место на диске, удалив ненужные файлы и программы. Проведите анализ содержимого диска и удалите все, что больше не нужно.
- Перенести файлы на другой диск или в облако. Если на основном диске недостаточно места, можно передать некоторые файлы на другой диск или в облачное хранилище.
- Оптимизировать использование дискового пространства. Проверьте, есть ли на диске излишне занимающие место временные файлы или дубликаты. Удалите их с помощью специальных приложений или встроенных средств операционной системы.
- Добавить дополнительный жесткий диск или расширить объем текущего хранилища. Если у вас есть возможность подключить или установить дополнительный жесткий диск, это поможет увеличить доступное пространство и избежать ошибки 0x80300002.
Проверяйте доступное пространство на жестком диске перед установкой операционной системы, чтобы избежать ошибки 0x80300002. Надлежащая организация хранилища данных поможет сохранить производительность компьютера и избежать проблем, связанных с ограниченным пространством на диске.
Использование неправильного типа раздела для установки Windows
Одна из распространенных ошибок при установке операционной системы Windows связана с выбором неправильного типа раздела для установки. Эта ошибка, обозначаемая кодом 0x80300002, возникает, когда пользователь выбирает неподходящий раздел для установки Windows.
При установке Windows можно выбрать из разных типов разделов, таких как основной раздел, расширенный раздел, раздел системы и прочие. Ошибка 0x80300002 может возникать, если пользователь выбирает, например, раздел системы вместо основного раздела, или наоборот.
Чтобы исправить ошибку 0x80300002 и успешно установить Windows, важно сделать правильный выбор типа раздела. Для этого следует обратиться к документации или руководству пользователя вашего компьютера и узнать, какой тип раздела рекомендуется для установки Windows на вашем конкретном устройстве.
Если вы не уверены, какой тип раздела выбрать, рекомендуется обратиться за помощью к специалисту или производителю вашего компьютера. Они смогут предоставить вам конкретные инструкции и рекомендации, основываясь на особенностях вашего устройства и требованиях операционной системы Windows.
Помимо выбора правильного типа раздела, также следует убедиться, что раздел достаточно большой для установки Windows и все необходимые файлы и приложения. При необходимости можно изменить размер раздела или создать новый раздел с подходящими параметрами.
Важно отметить, что приведенные рекомендации и советы могут зависеть от конкретной модели и настроек вашего компьютера. Поэтому, перед внесением изменений, рекомендуется всегда обратиться за помощью к профессионалам или производителю вашего устройства.