
Цель работы: Научиться применять сетевые утилиты командной строки Windows.
Содержание
Теория
Подготовительная часть
Порядок выполнения задания
Варианты Скачать журнал группы с вариантами
Web-ресурсы
Теория
Утилитами называются сравнительно небольшие программы, предназначенные для решения каких-либо узкоспециализированных задач. В данной работе рассматриваются утилиты операционной системы Windows, используемые для диагностики сетевых подключений. Обзор утилит мы совместим с изучением основ теории компьютерных сетей.
Утилита ipconfig
Для связи с сетью компьютеры оснащаются сетевыми интерфейсами, к которым относятся
Ethernet платы, Wi-Fi и WiMAX модули. Указанные интерфейсы должны иметь IP адреса. Пример такого адреса – 192.168.0.1. Компьютер может иметь не одну плату, а две или три, и каждая из них будет иметь свой IP адрес. Если имеется WiMAX модуль, то и он будет иметь свой IP адрес. Таким образом, компьютер может иметь несколько адресов. Адреса необходимы для организации пересылки сообщений по сети. Адреса должны быть уникальными, т.е. неповторяющимися. Ведь если в сети находятся два компьютера с одинаковыми адресами, то кому из них будет адресовано сообщение с указанным адресом? Отметим также, что IP адреса разбиты на две категории: приватные и публичные. Приватные адреса имеют силу лишь для своей локальной сети и в глобальной сети они не видны. Примером такого адреса является 192.168.0.1. Существуют сотни тысяч, а может быть, миллионы локальных сетей, в которых встречаются компьютеры с одинаковыми приватными адресами, и они никак не конфликтуют между собой из-за совпадения адресов. Публичные же адреса уникальны для всей глобальной сети.
Компьютеры образуют сети, которые также имеют свои адреса. Например, компьютер с адресом 192.168.0.1 находится в сети с адресом 192.168.0.0. У адреса сети и адреса компьютера, как видим, совпадают первые три числа. Сколько же на самом деле должно совпадать чисел определяет так называемая маска подсети. Для нашего примера эта маска имеет вид 255.255.255.0. Такое значение маски чаще всего и встречается в локальных сетях. Более подробно об IP адресации и, соответственно, о маске подсети будет изложено в теоретической части данного курса.
Сами компьютерные сети не изолированы друг от друга. Для связи их между собой используются специализированные компьютеры, называемые маршрутизаторами. Такие сетевые устройства имеют как минимум два сетевых интерфейса, один из которых принадлежит одной сети, другой же является частью второй сети. Маршрутизатор, перенаправляя сообщения с одного своего интерфейса на другой, обеспечивает межсетевой трафик. Если маршрутизатор имеет три платы, то он будет находиться на границе трех сетей. Широкое распространение получили двухточечные сети, которые образуют два маршрутизатора, соединенные общим кабелем. Интерфейсы обеих маршрутизаторов, присоединенные к разным концам одного кабеля, должны иметь адреса, относящиеся к одной и той же сети. Более часто встречаются тупиковые сети. Такие сети связаны лишь с одним маршрутизатором (отсюда и название сети — тупиковая). Компьютеры, находящиеся в такой сети, отправляют сообщения, адресованные в другие сети, на интерфейс этого маршрутизатора. Компьютеры, следовательно, должны знать адрес интерфейса маршрутизатора своей сети. Такой адрес носит название основной шлюз. Маршрутизатор полученные от компьютеров тупиковой сети сообщения перенаправляет дальше, передавая их своим соседям-маршрутизаторам по двухточечным каналам связи. Таким образом, сообщение последовательно перемещается по следующим сетям: тупиковая сеть, двухточечная сеть 1, двухточечная сеть 2, …, двухточечная сеть N, тупиковая сеть. Если же маршрут перемещения изучать по узлам, то он будет таким: компьютер (отправитель сообщения), маршрутизатор 1, маршрутизатор 2, …, маршрутизатор N-1, компьютер (получатель сообщения).
Подытоживая вышесказанное, отметим, что таким образом для настройки сетевого интерфейса компьютера необходимо назначить ему IP адрес, маску подсети и указать основной шлюз.
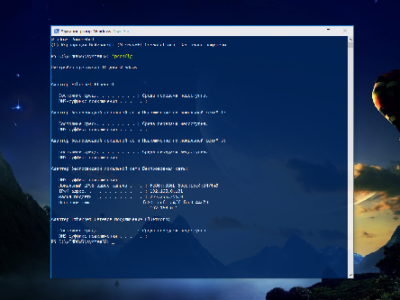
Программа ipconfig предназначена для получения информации о настройках сетевых интерфейсов. Выполняется данная утилита в окне командной строки. Для этого необходимо нажать кнопку Пуск и выбрать пункт «Выполнить…». Далее следует ввести cmd и нажать Enter. В открывшемся окне командной строки

следует ввести команду ipconfig и нажать Enter. Пример результата выполнения данной утилиты:
C:\Users\Анатолий>ipconfig
Настройка протокола IP для Windows
Ethernet adapter Сетевое подключение Bluetooth:
Состояние среды. . . . . . . . : Среда передачи недоступна.
DNS-суффикс подключения . . . . . :
Адаптер беспроводной локальной сети Беспроводное сетевое соединение:
DNS-суффикс подключения . . . . . : Home
Локальный IPv6-адрес канала . . . : fe80::595:5d8d:56f5:500c%41
IPv4-адрес. . . . . . . . . . . . : 192.168.0.206
Маска подсети . . . . . . . . . . : 255.255.255.0
Основной шлюз. . . . . . . . . : 192.168.0.10
Ethernet adapter Подключение по локальной сети:
Состояние среды. . . . . . . . : Среда передачи недоступна.
DNS-суффикс подключения . . . . . :
Туннельный адаптер isatap.{DDDBA9F8-664B-4B57-B2D0-93DE69D2FBE7}:
Состояние среды. . . . . . . . : Среда передачи недоступна.
DNS-суффикс подключения . . . . . :
Туннельный адаптер Подключение по локальной сети* 3:
Состояние среды. . . . . . . . : Среда передачи недоступна.
DNS-суффикс подключения . . . . . :
Туннельный адаптер isatap.{73A36F53-6EE2-4F00-B90B-D11719558242}:
Состояние среды. . . . . . . . : Среда передачи недоступна.
DNS-суффикс подключения . . . . . :
Туннельный адаптер isatap.Home:
Состояние среды. . . . . . . . : Среда передачи недоступна.
DNS-суффикс подключения . . . . . :Home
В данном примере команда выполнялась на ноутбуке. Связь с «внешним миром» осуществлена с помощью беспроводной сети. IP адрес интерфейса ноутбука — 192.168.0.206, маска — 255.255.255.0, шлюз — 192.168.0.10. Интерфейсы ноутбука и маршрутизатора находятся в одной сети 192.168.0.0. Сетевой кабель не подключен (по Ethernet адаптеру среда передачи недоступна).
Утилита ping
Компьютеры и другие узлы сети помимо IP адресов имеют так называемые доменные адреса. Такие адреса удобны пользователям сети, так как они легче запоминаются. К примеру доменный адрес mаil.ru запомнить намного проще чем его IP аналог в виде 94.100.180.70. За соответствие доменных и IP адресов отвечает DNS служба. Когда с компьютера исходит запрос на какой-либо сетевой ресурс по его доменному адресу, то DNS служба позволяет определить соответствующий этому ресурсу IP адрес.
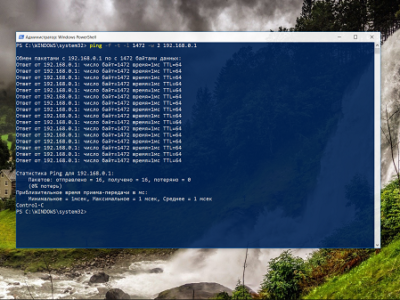
Утилита ping позволяет проверить доступность какого-либо удаленного узла по сети. С этой целью на указанный узел отправляется сообщение в виде запроса, и утилита переходит в режим ожидания прихода ответного сообщения. По истечении некоторого времени посылается повторное сообщение. По результатам обмена сообщениями выводится статистика о качестве связи между двумя узлами. Для пингования удаленного узла можно использовать либо его IP адрес, либо его доменное имя.
Команда ping 127.0.0.1 позволяет проверить настройку самого сетевого интерфейса. Адрес 127.0.0.1 является служебным и узлам сети не назначается. DNS аналог этого адреса: localhost. Сетевой интерфейс при использовании данного адреса пингует сам себя
ping 127.0.0.1
Обмен пакетами с 127.0.0.1 по с 32 байтами данных:
Ответ от 127.0.0.1: число байт=32 время<1мс TTL=128
Ответ от 127.0.0.1: число байт=32 время<1мс TTL=128
Ответ от 127.0.0.1: число байт=32 время<1мс TTL=128
Ответ от 127.0.0.1: число байт=32 время<1мс TTL=128
Статистика Ping для 127.0.0.1:
Пакетов: отправлено = 4, получено = 4, потеряно = 0
(0% потерь)
Приблизительное время приема-передачи в мс:
Минимальное = 0мсек, Максимальное = 0 мсек, Среднее = 0 мсек
В рассмотренном случае сетевой интерфейс настроен без ошибок, потери отсутствуют. Параметр TTL переводится как «время жизни» (time to life). Его создает узел, отправляющий в сеть свое сообщение. Маршрутизаторы, передавая данное сообщение из одной сети в другую, убавляют TTL на единицу. Если на каком-то маршрутизаторе TTL будет убавлено до нуля, то сообщение будет уничтожено. Маршрутизатор, удаливший из сети сообщение, извещает об этом отправителя, указывая свой адрес.
Второй вариант использования ping – это проверка состояния тупиковой сети, в которой находится сам узел. С этой целью пингуется основной шлюз:
ping 192.168.0.10
Обмен пакетами с 192.168.0.10 по с 32 байтами данных:
Ответ от 192.168.0.10: число байт=32 время=11мс TTL=64
Ответ от 192.168.0.10: число байт=32 время=10мс TTL=64
Ответ от 192.168.0.10: число байт=32 время=9мс TTL=64
Ответ от 192.168.0.10: число байт=32 время=8мс TTL=64
Статистика Ping для 192.168.0.10:
Пакетов: отправлено = 4, получено = 4, потеряно = 0
(0% потерь)
Приблизительное время приема-передачи в мс:
Минимальное = 8мсек, Максимальное = 11 мсек, Среднее = 9 мсек
В данном примере маршрутизатор доступен. Он в свои ответные сообщения помещает TTL (64) отличное от TTL (128) сетевого интерфейса компьютера.
Для проверки доступности удаленного хоста, как правило, применяются доменные адреса:
ping esstu.ru
Обмен пакетами с esstu.ru [212.0.68.2] с 32 байтами данных:
Ответ от 212.0.68.2: число байт=32 время=7мс TTL=57
Ответ от 212.0.68.2: число байт=32 время=8мс TTL=57
Ответ от 212.0.68.2: число байт=32 время=10мс TTL=57
Ответ от 212.0.68.2: число байт=32 время=7мс TTL=57
Статистика Ping для 212.0.68.2:
Пакетов: отправлено = 4, получено = 4, потеряно = 0
(0% потерь)
Приблизительное время приема-передачи в мс:
Минимальное = 7мсек, Максимальное = 10 мсек, Среднее = 8 мсек
Удаленный узел доступен. В данном случае мы видим, что DNS служба определила IP адрес узла в виде 212.0.68.2.
Утилита имеет несколько опций, из которых рассмотрим лишь одну: -i, позволяющую задать значение TTL:
ping -i 1 esstu.ru
Обмен пакетами с esstu.ru [212.0.68.2] с 32 байтами данных:
Ответ от 192.168.0.10: Превышен срок жизни (TTL) при передаче пакета.
Ответ от 192.168.0.10: Превышен срок жизни (TTL) при передаче пакета.
Ответ от 192.168.0.10: Превышен срок жизни (TTL) при передаче пакета.
Ответ от 192.168.0.10: Превышен срок жизни (TTL) при передаче пакета.
Статистика Ping для 212.0.68.2:
Пакетов: отправлено = 4, получено = 4, потеряно = 0
(0% потерь)
Здесь TTL был принят равным 1 и сообщение с пингом было уничтожено на шлюзе (192.168.0.10). В следующем примере TTL=2
ping -i 2 esstu.ru
Обмен пакетами с esstu.ru [212.0.68.2] с 32 байтами данных:
Ответ от 192.168.1.1: Превышен срок жизни (TTL) при передаче пакета.
Ответ от 192.168.1.1: Превышен срок жизни (TTL) при передаче пакета.
Ответ от 192.168.1.1: Превышен срок жизни (TTL) при передаче пакета.
Ответ от 192.168.1.1: Превышен срок жизни (TTL) при передаче пакета.
Статистика Ping для 212.0.68.2:
Пакетов: отправлено = 4, получено = 4, потеряно = 0
(0% потерь)
На этот раз сообщение дошло до маршрутизатора (192.168.1.1), который был вторым за шлюзом. Так, постепенно меняя значение TTL, можно получить список всех маршрутизаторов, находящихся между компьютером и удаленным узлом 212.0.68.2.
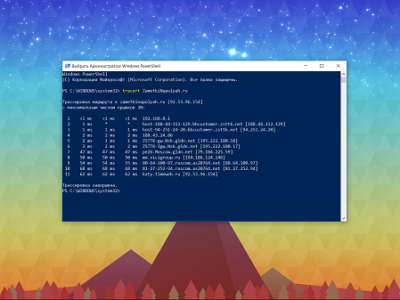
Утилита tracert
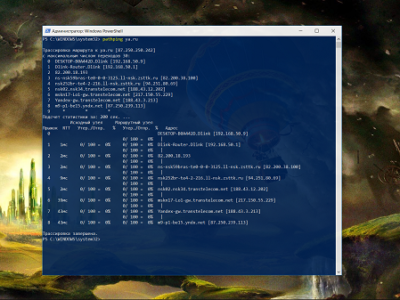
Эта утилита, последовательно применяя пинг с увеличивающимся TTL, позволяет получить список промежуточных маршрутизаторов:
tracert esstu.ru
Трассировка маршрута к esstu.ru [212.0.68.2]
с максимальным числом прыжков 30:
1 1 ms 1 ms 1 msWRT54GL [192.168.0.10]
2 3 ms 2 ms 2 ms 192.168.1.1
3 8 ms 4 ms 5 ms ULND-BRAS3.sib.ip.rostelecom.ru [213.228.116.203]
4 17 ms 5 ms 8 ms 213.228.114.27
5 8 ms 3 ms 3 ms core-gi-0-2.burnet.ru [212.0.64.90]
6 7 ms 5 ms 6 ms ws-70-71.burnet.ru [212.0.70.71]
7 8 ms 4 ms 3 ms 86.110.127.129
8 8 ms 4 ms 4 ms 212.0.68.2
Трассировка завершена.
Между двумя узлами в данном случае находится 7 маршрутизаторов. Трансляция сетевых адресов (NAT) реализуется на маршрутизаторе с адресом 192.168.1.1. Пояснение: Данный адрес является приватным и он назначен ближнему интерфейсу роутера. Дальний его интерфейс имеет публичный адрес, так как он находится в одной сети с интерфейсом следующего маршрутизатора (213.228.116.203). Следовательно на данном роутере настроен NAT, позволяющий подменять в сообщениях приватные адреса публичными.
Утилита pathping
Утилита pathping сочетает в себе черты команд ping и tracert, позволяя получить дополнительную информацию, которую не обеспечивают две последние. Команда определяет процент потерь сообщений на всех переходах, выявляя самые медленные и ненадежные участки маршрута.
pathping esstu.ru

Трассировка маршрута к esstu.ru [212.0.68.2]

с максимальным числом прыжков 30:

0  EXPHOME.Home [192.168.0.206]


1  WRT54GL [192.168.0.10]


2  Broadcom.Home [192.168.1.1]


3  ULND-BRAS3.sib.ip.rostelecom.ru [213.228.116.203]


4  213.228.114.27

5  core-gi-0-2.burnet.ru [212.0.64.90]


6  ws-70-71.burnet.ru [212.0.70.71]


7  86.110.127.129


8  212.0.68.2
Подсчет статистики за: 200 сек. ...
Исходный узел Маршрутный узел
Прыжок RTT Утер./Отпр. % Утер./Отпр. % Адрес
0 EXPHOME.Home [192.168.0.206]
0/ 100 = 0% |
1 6мс 0/ 100 = 0% 0/ 100 = 0% WRT54GL [192.168.0.10]
0/ 100 = 0% |
2 8мс 0/ 100 = 0% 0/ 100 = 0% Broadcom.Home [192.168.1.1]
0/ 100 = 0% |
3 11мс 0/ 100 = 0% 0/ 100 = 0% ULND-BRAS3.sib.ip.rostelecom.ru [213.228.116.203]
0/ 100 = 0% |
4 11мс 0/ 100 = 0% 0/ 100 = 0% 213.228.114.27
0/ 100 = 0% |
5 10мс 0/ 100 = 0% 0/ 100 = 0% core-gi-0-2.burnet.ru [212.0.64.90]
0/ 100 = 0% |
6 15мс 0/ 100 = 0% 0/ 100 = 0% ws-70-71.burnet.ru [212.0.70.71]
0/ 100 = 0% |
7 --- 100/ 100 =100% 100/ 100 =100% 86.110.127.129
0/ 100 = 0% |
8 12мс 0/ 100 = 0% 0/ 100 = 0% 212.0.68.2
Трассировка завершена.
В настройках некоторых маршрутизаторов может стоять запрет на выдачу ответа на пришедший пинг. В данном примере маршрутизатор с подобной настройкой имеет адрес 86.110.127.129. Попытка отправить пинг на этот адрес убеждает нас в справедливости этого утверждения:
ping 86.110.127.129

Обмен пакетами с 86.110.127.129 по с 32 байтами данных:

Превышен интервал ожидания для запроса.

Превышен интервал ожидания для запроса.

Превышен интервал ожидания для запроса.

Превышен интервал ожидания для запроса.
Статистика Ping для 86.110.127.129:
Пакетов: отправлено = 4, получено = 0, потеряно = 4
(100% потерь)
Утилита arp
Сетевые интерфейсы, такие как Ethernet, Wi-Fi и WiMAX, имеют вшитые в их микросхемы адреса. Пример подобного адреса: 70-F3-95-A6-FE-0C. Эти адреса, называемые аппаратными, физическими или MAC, должны добавляться к сообщениям, прежде чем они будут переданы через сеть. Не все сети используют такие адреса, но в тупиковых они, как правило, применяются. Узел, собирающийся отправить сообщение M другому узлу, должен предварительно узнать MAC адрес получателя сообщения. Для решения данной проблемы узел применяет технологию ARP. Как работает ARP? Узел отправляет ARP запрос всем узлам своей сети. В запрос узел «вкладывает» IP адрес получателя сообщения M. На запрос отвечает лишь тот, у кого требуемый IP адрес. В своем ответе он сообщает свой MAC адрес. И лишь после этого первый узел ему сможет отправить свое сообщение M. В данном случае мы рассмотрели перессылку сообщения M, относящегося к внутрисетевому трафику. Если же оба узла находятся в разных сетях, то узел должен своё сообщение перенаправить маршрутизатору своей сети. Это означает, что к сообщению должен быть добавлен MAC адрес сетевого интерфейса маршрутизатора. В таком случае, ARP запрос узла адресуется маршрутизатору. Таким образом, основной шлюз, указываемый при настройке сетевой платы узла, необходим для определения MAC адреса интерфейса маршрутизатора. Для уменьшения ARP трафика компьютеры в течении некоторого времени хранят в своей памяти таблицу с IP и MAC адресами тех устройств, с которыми они в последнее время обменивались сообщениями.
Утилита arp позволяет получить таблицу соответствия IP адресов и MAC-адресов. Ниже приведен вывод, полученный командой arp, выполненной с ключом –a
arp -a

Интерфейс: 192.168.0.206 --- 0xe
  адрес в Интернете      Физический адрес      Тип
  192.168.0.10          20-aa-4b-2a-d5-21     динамический
  192.168.0.255         ff-ff-ff-ff-ff-ff     статический
  224.0.0.22            01-00-5e-00-00-16     статический
  224.0.0.252           01-00-5e-00-00-fc     статический
  239.192.152.143       01-00-5e-40-98-8f     статический
  239.255.255.250       01-00-5e-7f-ff-fa     статический
  255.255.255.255       ff-ff-ff-ff-ff-ff     статический
В данном случае мы видим, что основной шлюз (192.168.0.10) имеет MAC адрес 20-aa-4b-2a-d5-21.
Утилита netstat
Когда мы говорим: «компьютеры обмениваются сообщениями», то это не совсем точное утверждение. На самом деле обмен происходит между сетевыми приложениями. В оперативной памяти компьютера одновременно могут находиться и выполняться несколько программ, получающих сообщения из сети или отправляющие их в сеть. Как же сообщения, приходящие из сети в компьютер, распределяются между этими приложениями? На этот случай в сообщениях предусмотрены дополнительные адреса, называемые портами. Здесь уместно привести аналогию с обычной почтовой корреспонденцией. Для того чтобы письмо было доставлено в многоквартирный дом (компьютер), на конверте письма указывается номер дома (IP адрес компьютера). Затем письма необходимо разложить по почтовым ящикам согласно номерам квартир. Номер квартиры, присутствующий на конверте письма, и есть аналог портов. Далее жильцы (т.е. сетевые приложения) забирают эти письма (сообщения).
Распределение потока сообщений, приходящих из сети на компьютер, по разным портам называется демультиплексированием. И, напротив, сбор сообщений от разных приложений в единый поток и отправляемый в сеть называется мультиплексированием.
Когда приложение хочет обменяться сообщениями с другим удаленным приложением, оно должно знать не только IP адрес компьютера данного приложения, но и номер порта, которое то приложение использует. Эта связка из двух адресов (IP адрес и порт) называется сокетом.
Как же приложение, собирающее отправить свое сообщение, выясняет номер порта, используемое адресатом? Здесь следует упомянуть про клиент-серверную архитектуру, применяемую в сетевых технологиях. Одно из приложений является сервером, получающим запросы от клиентов, обрабатывающим их и отправляющим клиенту результаты обработки запросов. Клиенты же являются инициаторами соединения между ними и сервером, отправляя серверу свои запросы. При разработке подобных сетевых приложений программисты заранее определяют номера портов, которые их сервера будут использовать. Клиенты, соответственно, при своих запросах на сервер должны использовать этот порт. Сервер, будучи запущенным, должен постоянно находиться в оперативной памяти своего компьютера, ожидая прихода из сети сообщений от клиентов на «прослушиваемый» им порт.
Возможны конфликтные ситуации, вызванные применением одного и того же порта разными серверными программами. Если запускаемый сервер обнаружит, что его порт использует другое приложение, то он не сможет выполнять свои функции в своем обычном режиме. В то же время другой сервер, занимающий этот порт, будет получать сообщения от чужих клиентов, что может приводить к ошибкам его исполнения. Следовательно, важно распределять порты таким образом, чтобы серверные программы не конфликтовали между собой из-за совпадения используемых ими портов. За распределение портов отвечает организация IANA (Internet Assigned Numbers Authority, Администрация адресного пространства Интернет).
Таким образом, оба приложения (клиент и сервер) устанавливают между собой соединение, используя два сокета. Сокеты можно условно представить в виде двух розеток, соединенных между собой неким виртуальным каналом связи. Когда одно приложение «помещает» в сокет свое сообщение, то оно доставляется на другой конец канала — на второй сокет, и попадает, таким образом, другому приложению.
Команда netstat позволяет получить список сокетов. Ниже приведен вывод этой команды, полученный c использованием опций -a, -n и -o.
netstat -ano
Активные подключения

  Имя    Локальный адрес        Внешний адрес          Состояние       PID
  TCP    0.0.0.0:80             0.0.0.0:0              LISTENING       2944
  TCP    0.0.0.0:135            0.0.0.0:0              LISTENING       892
  TCP    0.0.0.0:443            0.0.0.0:0              LISTENING       2944
  TCP    0.0.0.0:445            0.0.0.0:0              LISTENING       4
  TCP    0.0.0.0:2869           0.0.0.0:0              LISTENING       4
  TCP    0.0.0.0:5357           0.0.0.0:0              LISTENING       4
  TCP    0.0.0.0:26143          0.0.0.0:0              LISTENING       4
  TCP    0.0.0.0:45662          0.0.0.0:0              LISTENING       2920
  TCP    0.0.0.0:49152          0.0.0.0:0              LISTENING       576
  TCP    0.0.0.0:49153          0.0.0.0:0              LISTENING       1020
  TCP    0.0.0.0:49154          0.0.0.0:0              LISTENING       724
  TCP    0.0.0.0:49155          0.0.0.0:0              LISTENING       660
  TCP    0.0.0.0:49160          0.0.0.0:0              LISTENING       640
  TCP    0.0.0.0:61741          0.0.0.0:0              LISTENING       2944
  TCP    127.0.0.1:5939         0.0.0.0:0              LISTENING       2580
  TCP    127.0.0.1:10000        0.0.0.0:0              LISTENING       2920
  TCP    127.0.0.1:49156        127.0.0.1:49157        ESTABLISHED     2952
  TCP    127.0.0.1:49157        127.0.0.1:49156        ESTABLISHED     2952
  TCP    127.0.0.1:49158        127.0.0.1:49159        ESTABLISHED     2952
  TCP    127.0.0.1:49159        127.0.0.1:49158        ESTABLISHED     2952
  TCP    192.168.0.206:139      0.0.0.0:0              LISTENING       4
  TCP    192.168.0.206:54842    64.4.23.171:40013      ESTABLISHED     2944
  TCP    192.168.0.206:54844    157.56.53.42:12350     ESTABLISHED     2944
  TCP    192.168.0.206:54845    173.252.121.3:5222     ESTABLISHED     2944
  TCP    192.168.0.206:54850    191.235.188.99:443     ESTABLISHED     2944
  TCP    192.168.0.206:54893    64.4.61.132:443        ESTABLISHED     2944
  TCP    192.168.0.206:54919    157.56.194.7:443       ESTABLISHED     2944
  TCP    192.168.0.206:55125    185.39.80.24:80        ESTABLISHED     3684
  TCP    192.168.0.206:57762    137.116.224.167:443    TIME_WAIT       0
  TCP    192.168.0.206:57770    81.19.104.81:443       TIME_WAIT       0
  TCP    192.168.0.206:57792    192.168.0.10:1780      TIME_WAIT       0
  TCP    192.168.0.206:57793    192.168.0.10:1780      TIME_WAIT       0
  TCP    192.168.0.206:57822    81.19.104.81:443       TIME_WAIT       0
  TCP    192.168.0.206:57845    176.119.71.119:62348   ESTABLISHED     2920
< дальнейший вывод был пропущен>
Cокеты обозначаются в виде IP_адрес:порт (с двоеточием между адресами). Например, 192.168.0.206:54842. Виртуальный канал связи, существующий между двумя сетевыми приложениями, обозначен парой сокетов. Например, 192.168.0.206:54842 и 64.4.23.171:40013. Первый сокет открыт на компьютере, другой на удаленном узле. Адрес в виде 0.0.0.0 означает любые IP адреса. Если в качестве номера порта присутствует 0, то это означает любые значения портов. В колонке «Состояние» отображается состояние соединения:
- LISTENING – ожидание подключения;
- ESTABLISHED– соединение установлено, идет обмен сообщениями;
- TIME_WAIT–время ответа превышено.
Первый тип состояния (LISTENING) означает, что сетевое приложение ждет установления соединения по определенному порту. Например, сокет 0.0.0.0:443 означает, что какое-то удаленное приложение может отправить на компьютер сообщение на порт 443 с целью установить виртуальное соединение.
В последней колонке (PID) выводятся номера процессов. Под процессами понимаются приложения. Из вывода мы видим, что процесс 2944 ждет подключения по портам 80, 443 и 61741. Как выше было сказано, какая-то программа с другого узла может отправить запрос на установление соединения с процессом 2944. Такая программа своё сообщение может адресовать на любой из указанных трех портов. Чтобы выяснить, какая программа запущена под видом процесса 2944, вызовем диспетчер задач (Ctrl+Alt+Delete). В окне диспетчера перейдем на вкладку Процессы и войдем в меню Вид. Далее выберем строчку Выбрать столбцы и активируем чекбокс ИД процесса (PID). Щелкнем по OK. Затем отсортируем таблицу по столбцу ИД процесса (PID), щелкнув по его названию. Находим запись, соответствующую процессу 2944.

В данном случае мы видим, что этим процессом является сетевое приложение Skype. Приведенный выше вывод netstat показывает, что данная программа поддерживает связь с шестью удаленными skype приложениями других пользователей. Для каждого соединения был создан отдельный сокет.
Подготовительная часть
В начало
Все команды выполняются в окне командной строки и дублируются с помощью пакетного файла. Правила запуска окна командной строки были рассмотрены выше (рис. 1). Отметим лишь, что команды в окне вводятся с клавиатуры и выполняются нажатием на клавишу Enter. Предыдущие команды можно вызвать для редактирования и повторного выполнения с помощью клавиши Стрелка вверх. Скриншоты окна помещайте в файл отчета со всеми необходимыми комментариями.
Рассмотрим приемы работы с пакетным файлом. Для этого Вам потребуется специализированный текстовый редактор PSPad. С помощью поисковых машин Интернета (Google, Яндекс и т.п.) найдите сайт разработчика данного редактора. Скачайте дистрибутив редактора и инсталлируйте его на своем компьютере. Также рекомендуется с данного сайта скачать русификатор, который следует распаковать в папку Lang.
Запустите PSPad и в его окне выполните команду Файл/Новый. Выберите тип файла MS-DOS Batch (второй вариант Windows Shell Script ). В созданный файл введите строку текста ipconfig > 1.txt

Сохраните файл на рабочий стол под именем script. На рабочем столе файл имеет вид
Для его выполнения выполните двойной щелчок по нему мышью. На рабочем столе появится новый файл в виде
Для открытия файла 1.txt следует вернуться в окно PSPad. В меню Кодировка PSPad’а выберите OEM Russian (866) и затем откройте файл 1.txt (Файл/Открыть…). Важно соблюдать порядок действий: вначале выбирать OEM Russian (866) и после открывать файл. Из данного файла некоторые фрагменты вывода можно скопировать в файл отчета по лабораторной работе.
Поменяйте строку в скрипте на ipconfig /all > 2.txt

Красный уголок у названия скрипта предупреждает, что файл был изменен, но не сохранен. Сохраните файл. Уголок должен исчезнуть. При выполнении команды ipconfig /all вывод будет помещен в текстовый файл 2.txt. Запустите с рабочего стола скрипт и просмотрите в PSPad’е содержимое файла 2.txt.
Порядок выполнения задания
В начало
- Скачайте заготовку отчета.
- В окне командной строки выполните команду ipconfig. Скрин окна (Alt+Print Scr) поместите в отчет (Ctrl+V). Вывод команды ipconfig перенаправьте в текстовый файл, используя пакетный файл. Запишите в отчет информацию об IP адресе сетевого адаптера, маске сети и шлюзе по умолчанию.
- Для получения более подробной информации о настройках адаптера запустите в окне командной строки утилиту ipconfig с ключом /all. Скрин окна поместите в отчет.
- Повторите команду ipconfig /all с выводом в текстовый файл и запишите в отчет информацию о физическом адресе сетевой платы.
- Применив команду ping, проверьте настройку платы, доступность основного шлюза и доступность удаленного узла. Адреса удаленных узлов выбирайте по своему варианту. Скрины и выводы поместите в отчет.
- Используя опцию -i команды ping определите адреса первых трех маршрутизаторов находящихся между вашим компьютером и удаленным узлом. Адреса и скрины поместите в отчет.
- Применив команду tracert, получите список роутеров на маршруте от вашего компьютера до удаленного узла. Определите адрес роутера, на котором действует NAT.
- Используя pathping, изучите состояние линков на маршруте от вашего компьютера до удаленного узла и определите самые «узкие места» (т.е. самые медленные участки).
- Получите таблицу ARP вашего компьютера. Выпишите в отчет MAC адрес основного шлюза.
- Командой netstat, выполненной с ключами –a, –n и –o, получите список соединений, действующих на Вашем компьютере.
- Определите имя любого приложения, установившего соединение с удаленной программой. Свой вывод обоснуйте соответствующим скрином.
Варианты
В начало
- infpol.ru
- vk.com
- one.one.one.one
- yandex.ru
- ok.ru
- mail.ru
- rambler.ru
- wikipedia.org
- youtube.com
- stepik.org
- java.com
- cisco.com
- edu.ru
- elementy.ru
- bgtrk.ru
- gmail.com
- habrahabr.ru
- gosuslugi.ru
- informika.ru
- narod.ru
Web-ресурсы
В начало
- Работа с сетью в командной строке Windows
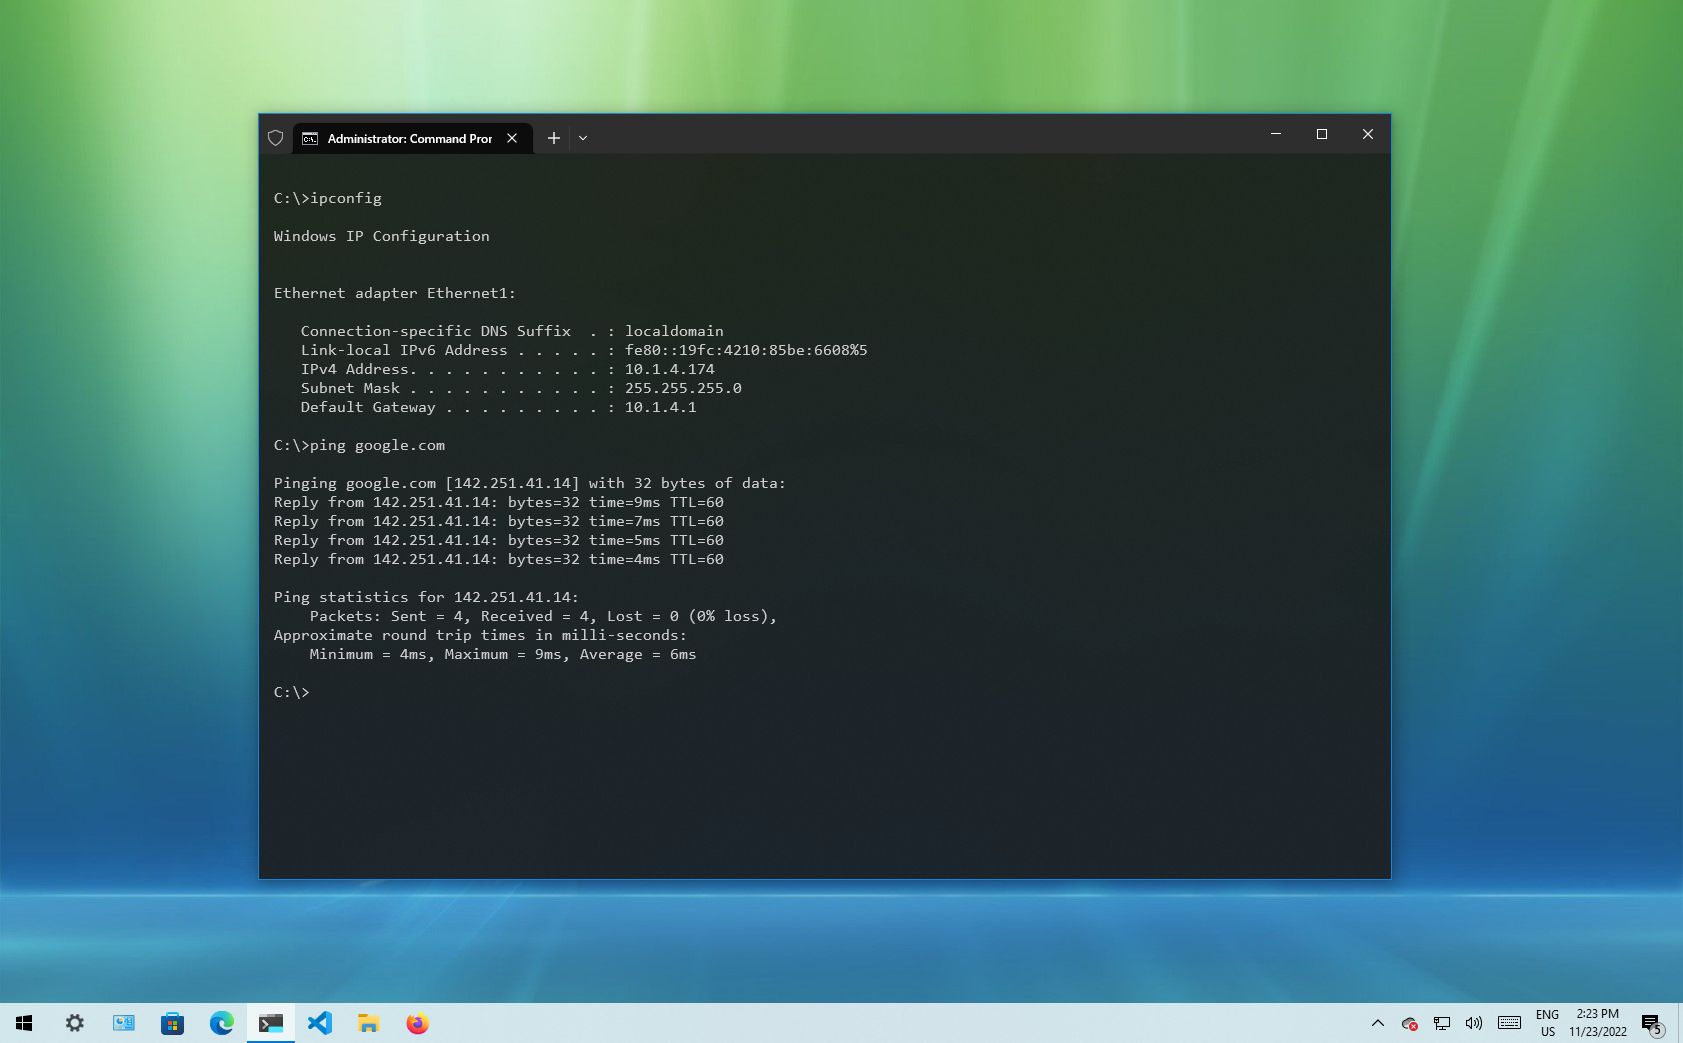
(Image credit: Future)
Windows 10 makes it easy to connect to a network and the internet using a wired or wireless connection. However, sometimes, you may still need to manually manage settings or troubleshoot connectivity problems, which is when the built-in command-line tools can come in handy.
Regardless of the issue, Windows 10 will likely have a Command Prompt tool to help you resolve the most common problems. For instance, ipconfig and ping are among the most important tools for viewing network settings and troubleshooting connectivity issues. If you are dealing with a routing problem, the route command can display the current routing table to examine and determine related problems, and with the nslookup tool, you can diagnose DNS problems.
You also have tools like arp to troubleshoot switching problems and determine the MAC address from an IP address. The netstat command-line tool allows you to view statistics for all the connections. And you can use the netsh tool to display and change many aspects of the network configuration, such as checking the current configuration, resetting settings, managing Wi-Fi and Ethernet settings, enabling or disabling the firewall, and a lot more.
This guide highlights eight Command Prompt tools that should help you manage and troubleshoot networking problems on your device and across the network.
1. IPConfig
On Windows 10, ipconfig (Internet Protocol configuration) is among the most common networking tools that allow you to query and show current TCP/IP (Transmission Control Protocol/Internet Protocol) network configuration. The command also includes options to perform different actions, such as refreshing Dynamic Host Configuration Protocol (DHCP) and Domain Name System (DNS) settings.
Display network configuration
To get started with ipconfig on Windows 10, use these steps:
All the latest news, reviews, and guides for Windows and Xbox diehards.
- Open Start.
- Search for Command Prompt, right-click the top result, and select the Run as administrator option.
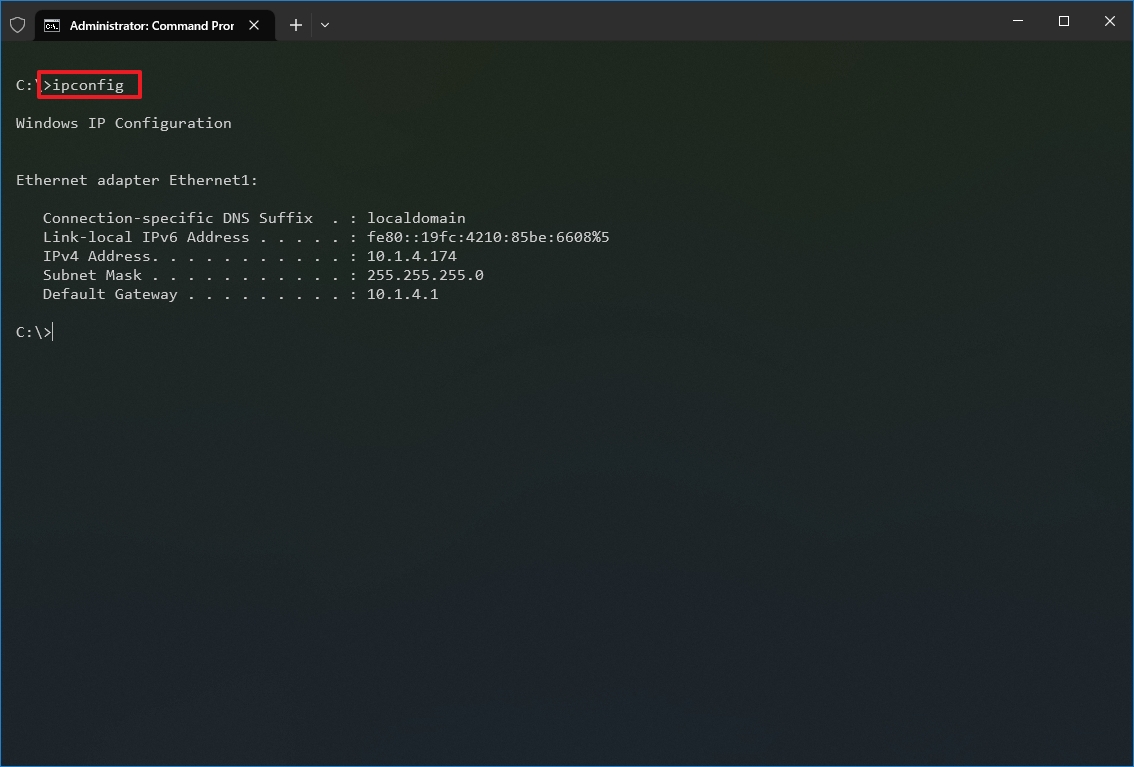
- Type the following command to view a summary of the TCP/IP network configuration and press Enter: ipconfig
- Quick tip: In Command Prompt, you can use the CLS command to clear the screen after you no longer need the information to continue running commands without clutter.
- Type the following command to view the complete TCP/IP network configuration and press Enter: ipconfig /all
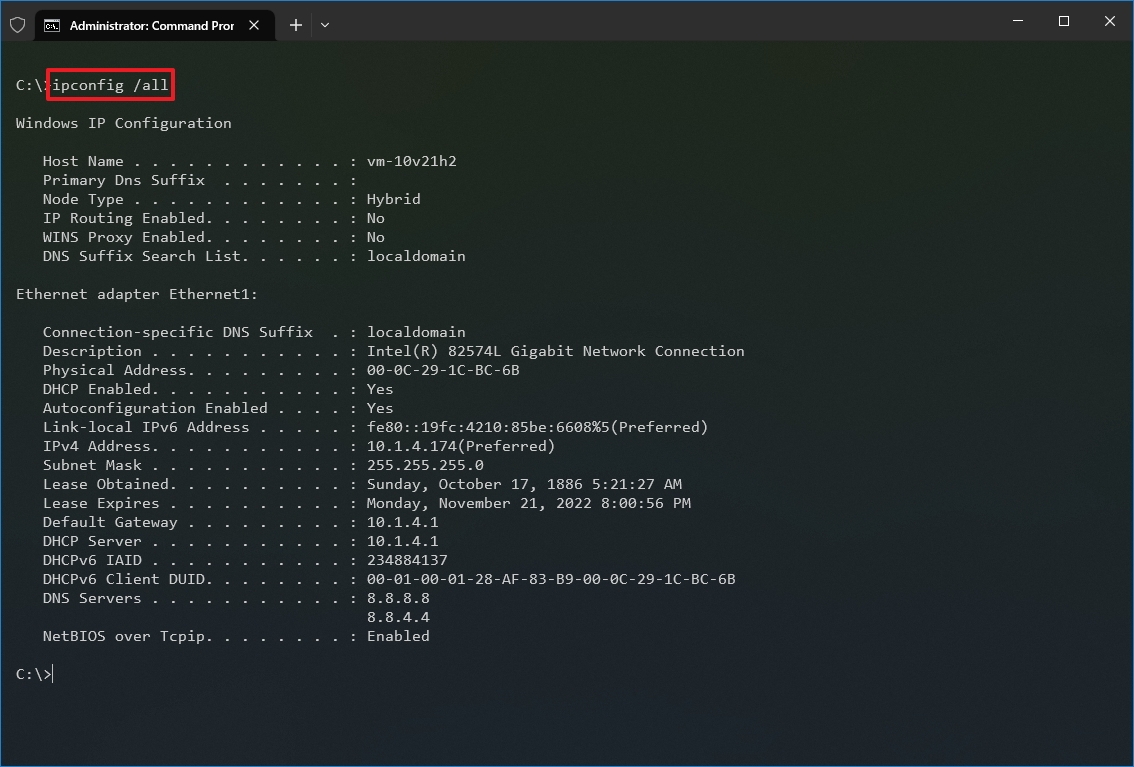
Once you complete the steps, you will have an overview of the PC’s entire TCP/IP configuration.
Refresh network settings
To release and renew the network configuration with Command Prompt, use these steps:
- Open Start.
- Search for Command Prompt, right-click the top result, and select the Run as administrator option.
- Type the following command to remove the current network configuration and press Enter: ipconfig /release
- Type the following command to reconfigure the network configuration and press Enter: ipconfig /renew
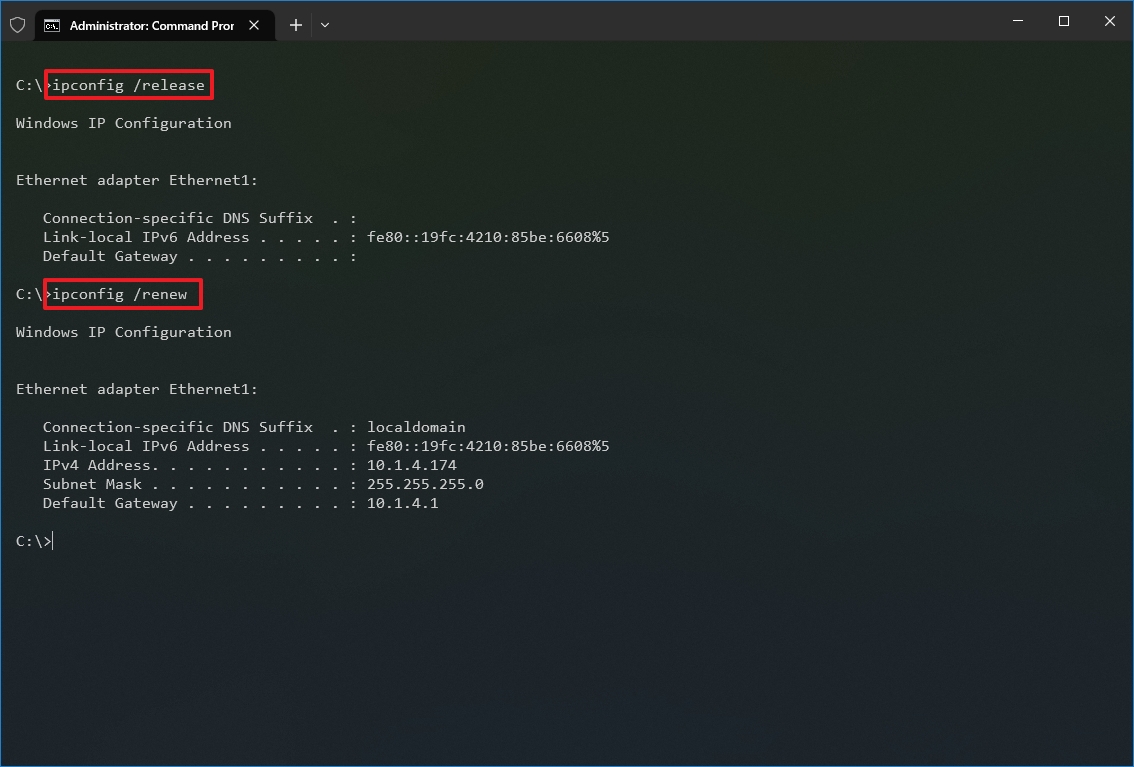
After you complete the steps, the first command will clear the current configuration, and the second command will fetch new settings from the DHCP server to resolve connectivity issues. If the dynamically assigned settings have not expired in the server, it is common to see the same IP address reconfigured on the device.
Refresh DNS settings
To flush and rebuild the current DNS cache entries on Windows 10, use these steps:
- Open Start.
- Search for Command Prompt, right-click the top result, and select the Run as administrator option.
- Type the following command to clear the DNS system cache on the device and press Enter: ipconfig /flushdns
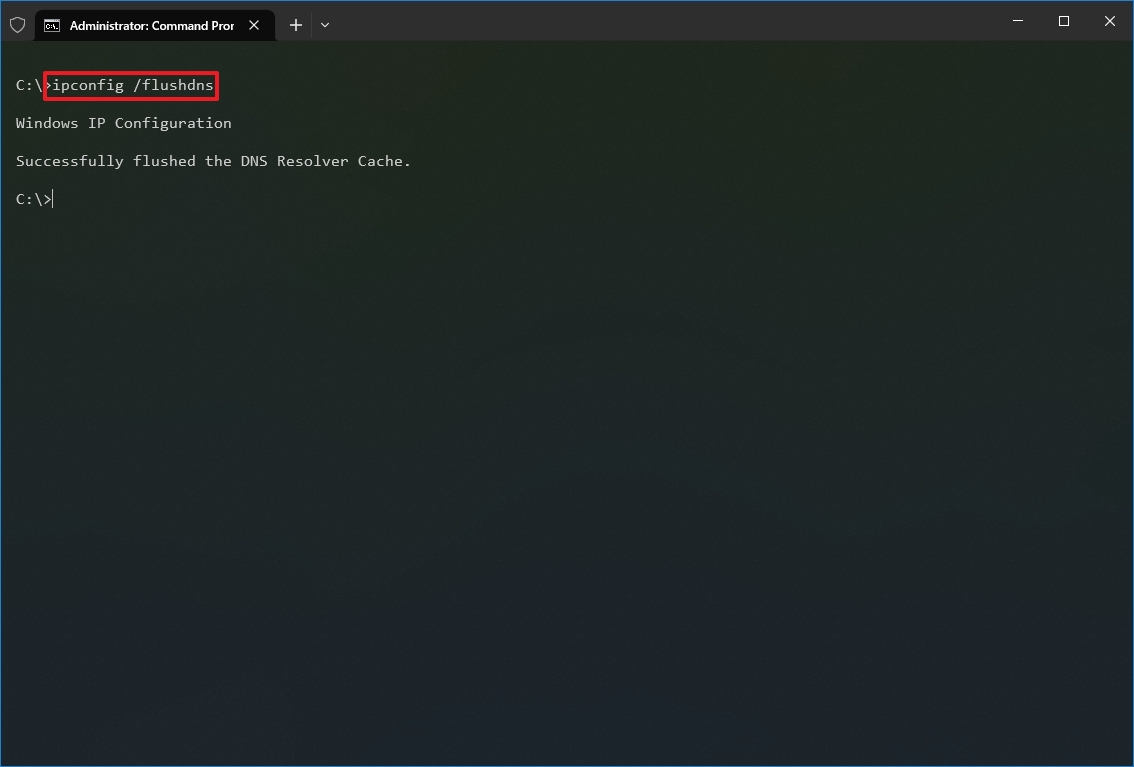
Once you complete the steps, the entries stored in the DNS cache of Windows 10 will be deleted and refreshed. Usually, this command will come in handy when you cannot connect to another computer or website using the host or domain name due to outdated information in the local cache.
2. Ping
Ping is another essential networking tool because it allows you to send ICMP (Internet Control Message Protocol) echo request messages to test the IP connectivity with other devices, whether it is another computer in the network or internet service.
Test device connectivity
To test the network connectivity with the ping command on Windows 10, use these steps:
- Open Start.
- Search for Command Prompt, right-click the top result, and select the Run as administrator option.
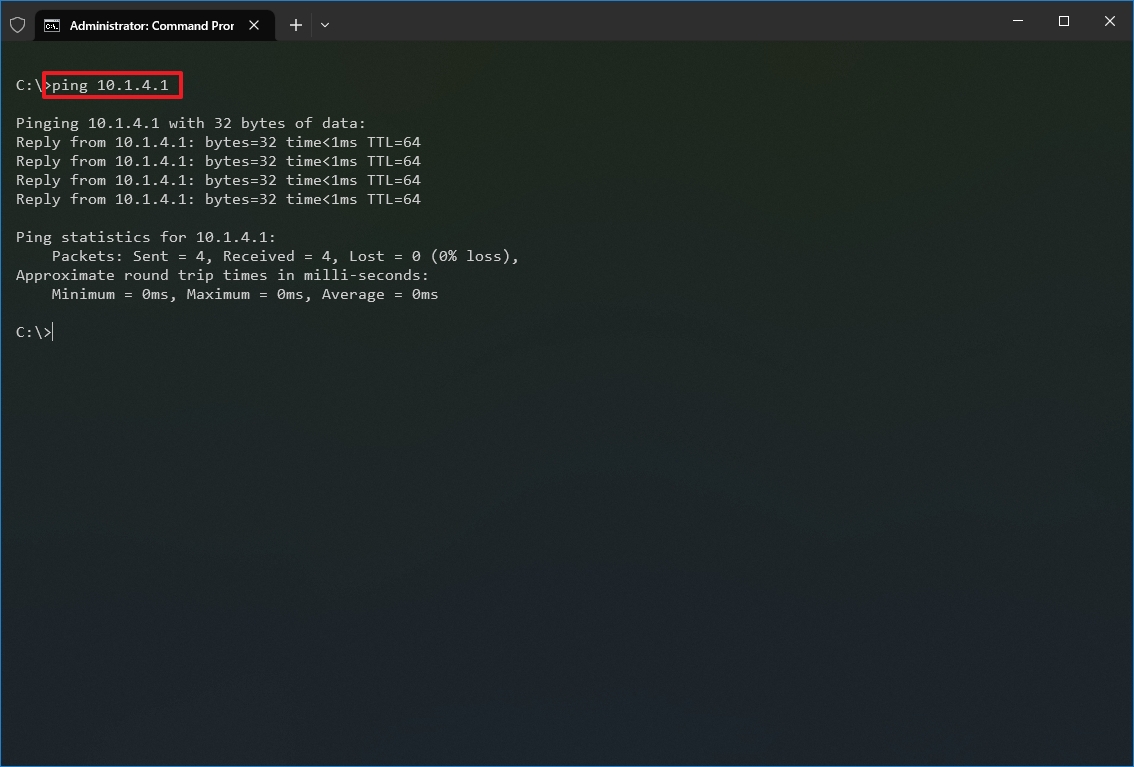
- Type the following command to send ICMP echo requests to test connectivity and press Enter: ping IP-OR-DOMAIN
In the command, replace IP-OR-DOMAIN with the actual IP address or domain name of the computer or service you want to test. For example, this command tests the communication between the local device and router: ping 10.1.4.1
- Quick tip: If you use the -a option (for example, ping -a 10.1.4.1), the command will also resolve the address to a hostname.
- (Optional) Type the following command to test the local computer networking stack and press Enter: ping 127.0.0.1 or ping loopback
- Quick note: The 127.0.0.1 is a well-known address, and it is referred to as the loopback address. When you run the command, if you get a reply, it means that the networking stack on Windows 10 is up and running. This is the same as pinging the device using its own network address.
Once you complete the steps, receiving four successful echo replies from the destination means the device can talk with the remote host. If the request times out, there is a problem between the host and the remote device.
If you are dealing with connectivity problems, start pinning the local computer to ensure the network stack is working. Then test the router’s connection to ensure the issue is not in the local network. Then try to ping a website to find out whether there is a problem with the internet connection or the remote host.
You should also know that the ping command will always time out if the remote device or service blocks the ICMP protocol.
Diagnose packet loss activity
The ping command includes many options that you can access with the «ping /?» command, and one of these options is the ability to set the time you want to run the tool, which can come in handy to examine packets lost when you are troubleshooting connectivity problems.
To run the ping command for a specific period, use these steps:
- Open Start.
- Search for Command Prompt, right-click the top result, and select the Run as administrator option.
- Type the following command to continue pinging until stopped and press Enter: ping IP-OR-DOMAIN -t
In the command, replace IP-OR-DOMAIN with the actual IP address or domain name of the computer or service you want to test. For example, this command tests the communication between the local device and router: ping 10.1.4.1 -t
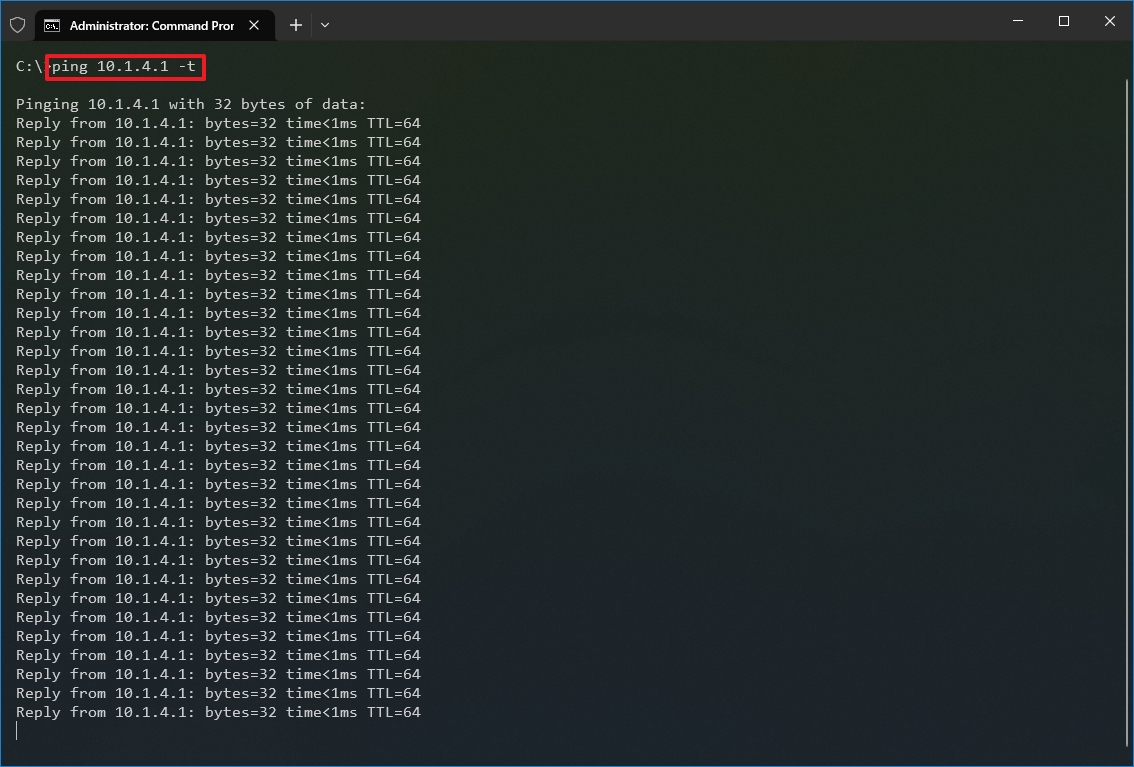
- Use the «Control + C» keyboard shortcut to stop the ping.
After you complete the steps, you will be able to see the successful and lost requests that can give you a clue on how to continue troubleshooting and resolving the connectivity problem. Administrators usually use the ping command in a local network to find out when a service goes down quickly. Also, the tool can be used as a quick way to know when the server is up and running again when restarting a server remotely.
3. Tracert
Windows 10 also includes tracert (Trace Route), a diagnostic tool to determine the network path to a destination using a series of ICMP echo requests. However, unlike the ping command, each request includes a TTL (Time to Live) value that increases by one each time, allowing to display of a list of the route the requests have taken and their duration.
To trace the route to a destination with Command Prompt on Windows 10, use these steps:
- Open Start.
- Search for Command Prompt, right-click the top result, and select the Run as administrator option.
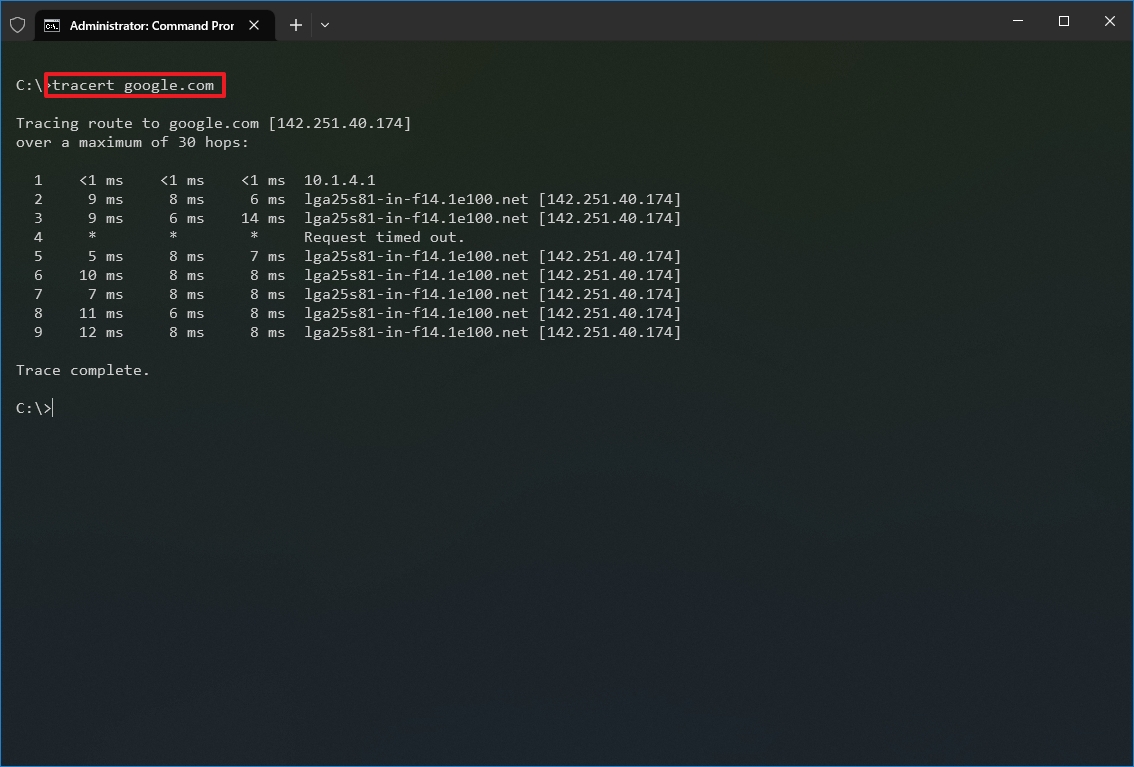
- Type the following command to understand the path taken to the destination and press Enter: tracert IP-OR-DOMAIN
In the command, replace IP-OR-DOMAIN with the actual IP address or domain name for the destination you want to troubleshoot. For example, this command allows you to view the path the packets are taking to reach Google.com: tracert google.com
- (Optional) Type the following command to adjust the hop counts to the destination and press Enter: tracert -h HOP-COUNT IP-OR-DOMAIN
In the command, replace IP-OR-DOMAIN with the actual IP address or domain name for the destination you want to troubleshoot and HOP-COUNT for the number of hops you want to trace. For example, this command puts the limit of 5 hops (nodes) to the destination: tracert -h 5 google.com
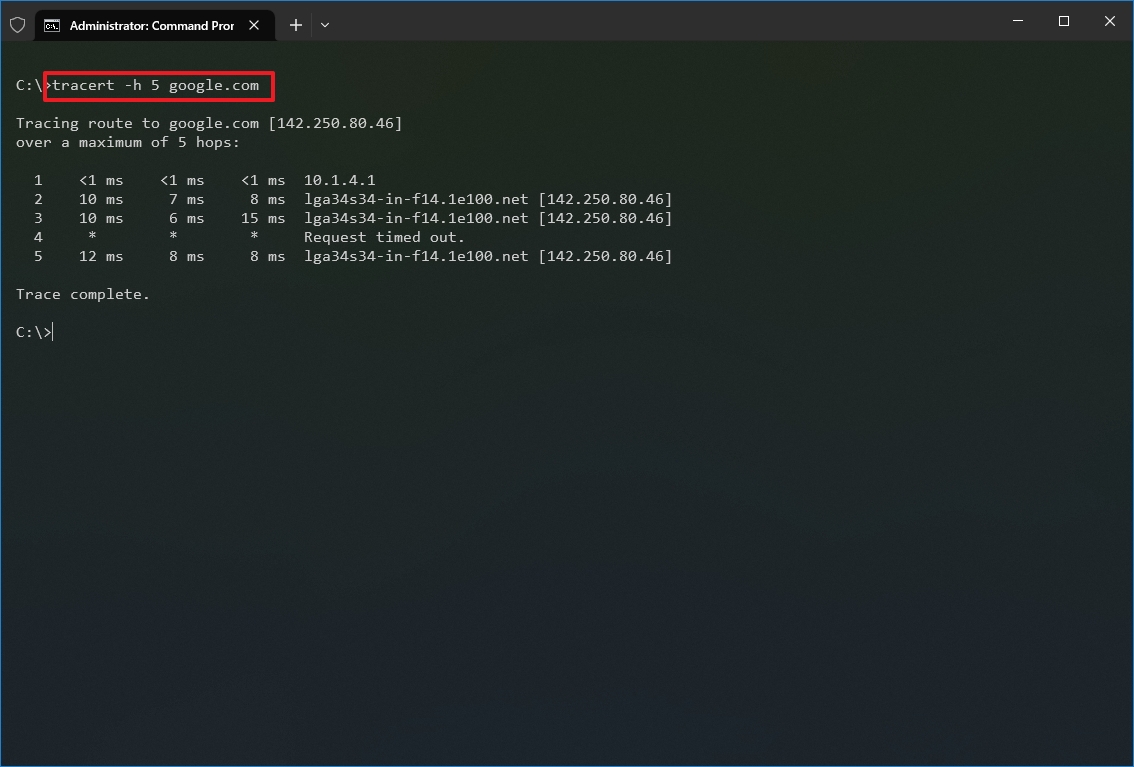
Once you complete the steps, you will know if the destination is reachable or if there is a networking problem along the way.
Similar to the ping tool, tracert includes several options, which you can view with the «tracert /?» command.
4. NSLookup
The nslookup (Name Server Lookup) tool can show valuable details to troubleshoot and resolve DNS-related issues. The tool includes an interactive and non-interactive modes. However, you will be using the non-interactive mode more often than not, which means you will type the full command to obtain the necessary information.
You can use this command to display the default DNS name and address of the local device and determine the domain name of an IP address or the name servers for a specific node.
To get started with nslookup on Windows 10, use these steps:
- Open Start.
- Search for Command Prompt, right-click the top result, and select the Run as administrator option.
- Type the following command to look up the local DNS name and address and press Enter: nslookup
- Quick note: This command also happens to open the nslookup interactive mode.
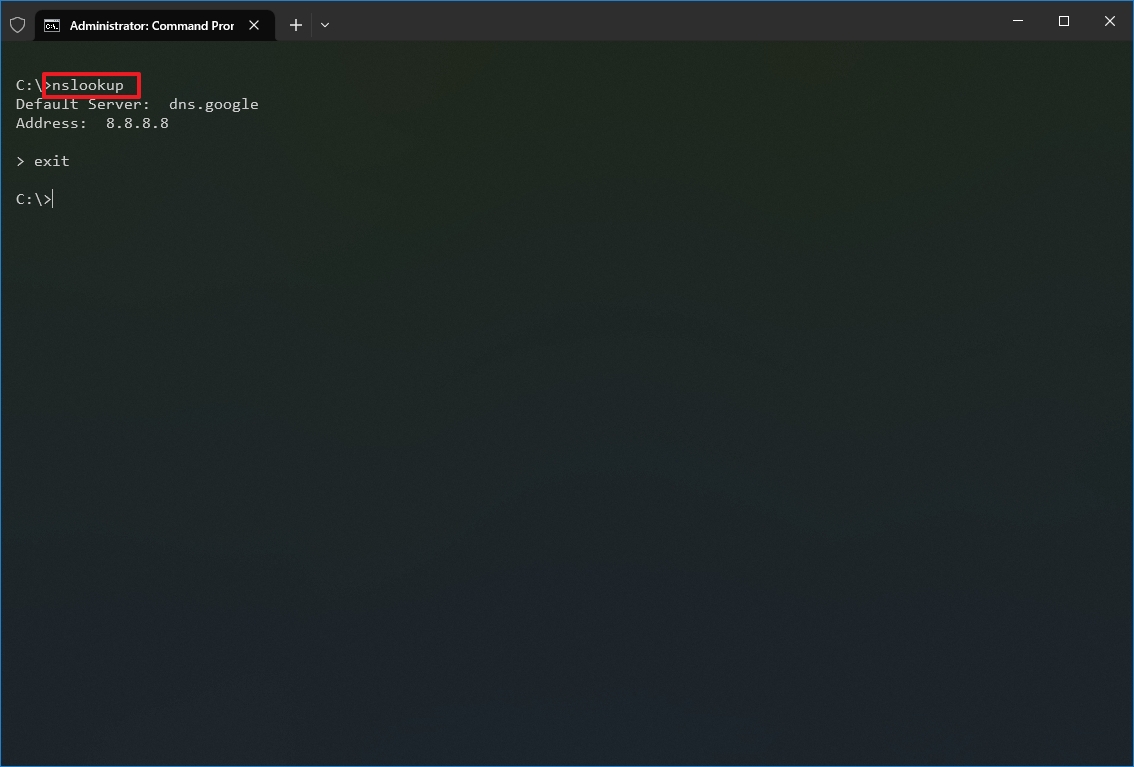
- Confirm the current DNS information.
- Type the following command to exit the interactive mode and press Enter: exit
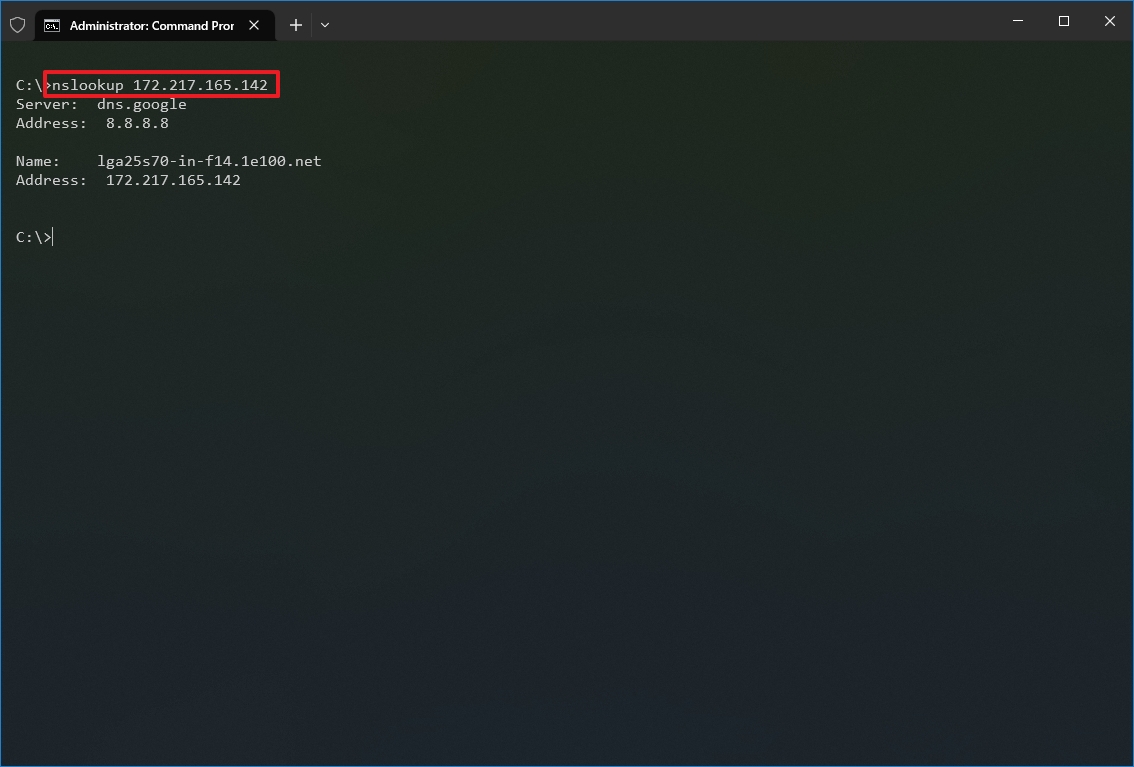
- Type the following command to determine the name and address of a specific server and press Enter: nslookup IP-ADDRESS
In the command, replace the IP-ADDRESS with the address of the remote device. For example, this command looks up the IP address 172.217.165.142 address: nslookup 172.217.165.142
- Type the following command to determine the address of a specific server and press Enter: nslookup DOMAIN-NAME
In the command, replace the DOMAIN-NAME with the address of the remote device. For example, this command looks up the IP address Google.com address: nslookup google.com
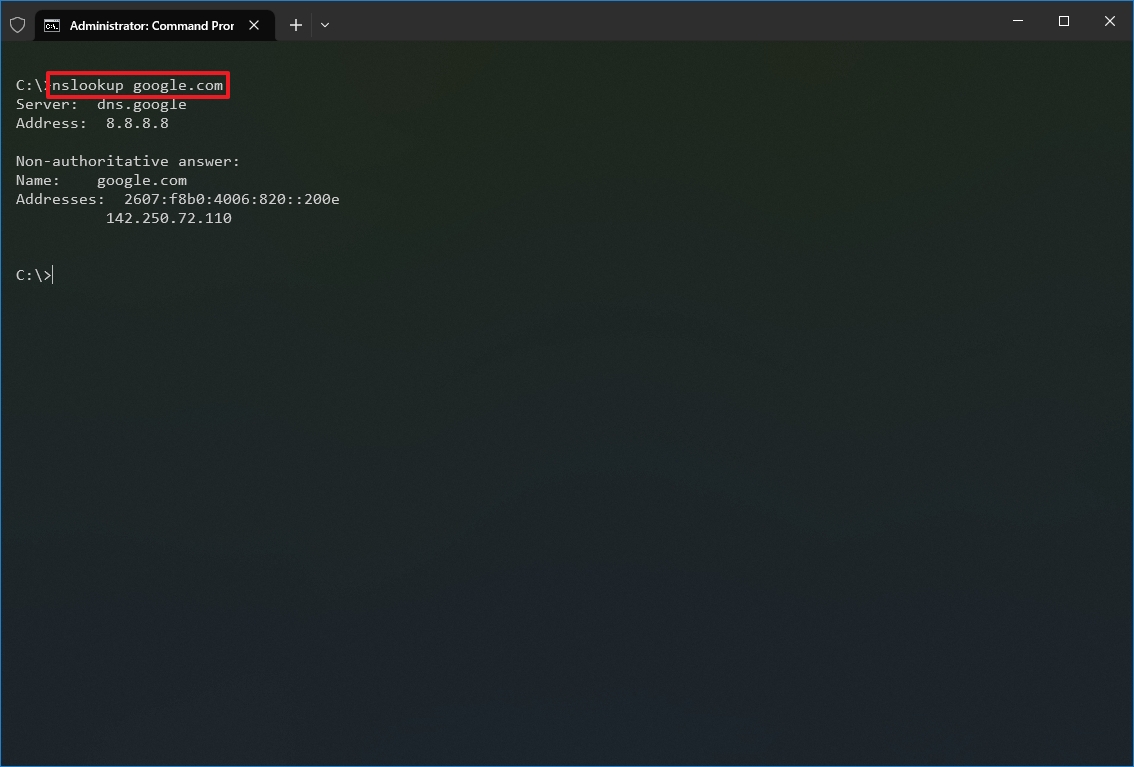
After you complete the steps, depending on the command, you will know whether the device has a DNS resolver and the IP address or domain and vice versa of the remote host.
5. NetStat
The netstat (Network Statistics) tool displays statistics for all network connections. It allows you to understand open and connected ports to monitor and troubleshoot networking problems for Windows 10 and apps.
When using the netstat tool, you can list active network connections and listening ports. You can view network adapter and protocol statistics. You can even display the current routing table and much more.
To get started with netstat, use these steps:
- Open Start.
- Search for Command Prompt, right-click the top result, and select the Run as administrator option.
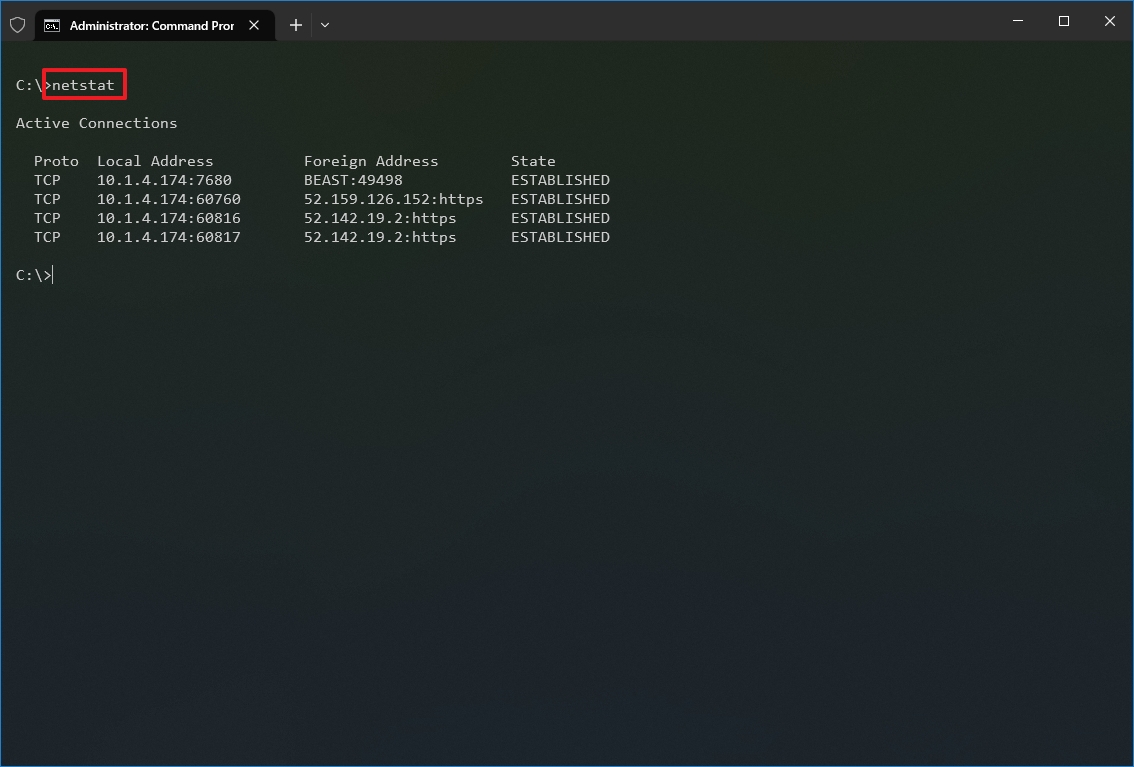
- Type the following command to show all active TCP connections and press Enter: netstat
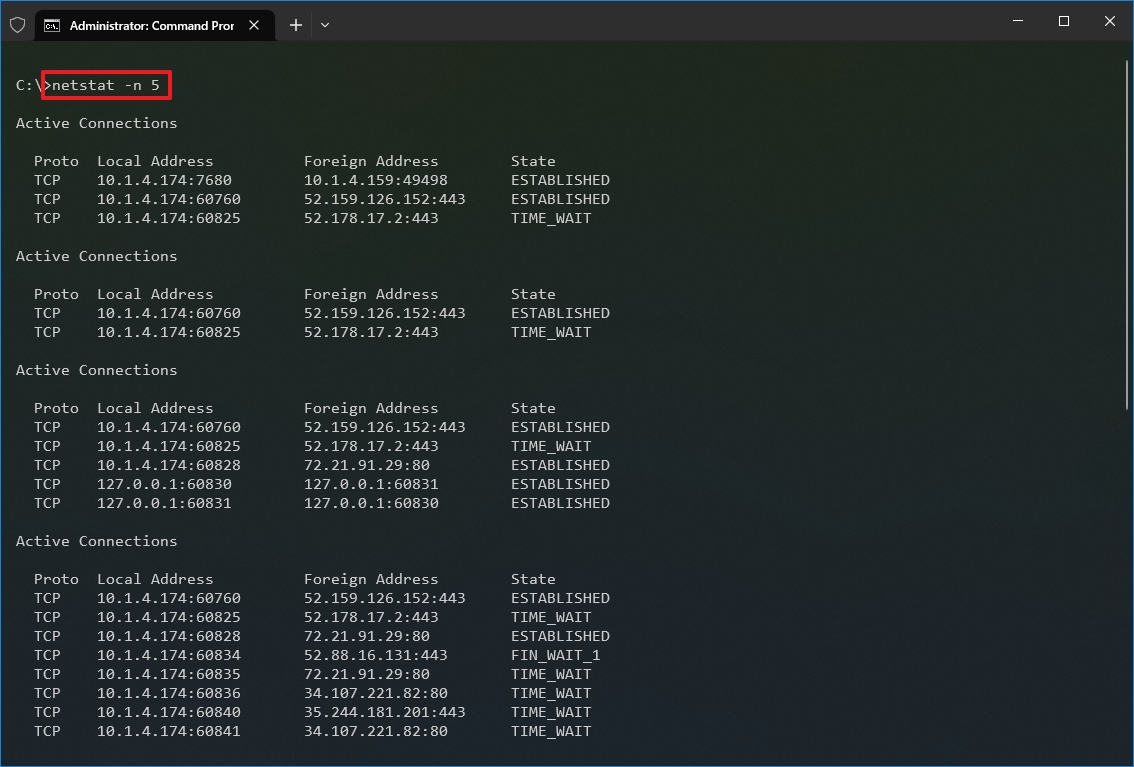
- (Optional) Type the following command to display active connections showing numeric IP address and port number instead of trying to determine the names and press Enter: netstat -n

- (Optional) Type the following command to refresh the information at a specific interval and press Enter: netstat -n INTERVAL
In the command, make sure to replace INTERVAL for the number (in seconds) you want to redisplay the information. This example refreshes the command in question every five seconds: netstat -n 5
- Quick note: When using the interval parameter, you can terminate the command using the «Ctrl + C» keyboard shortcut in the console.
Once you run the command, it will return a list of all active connections in four columns, including:
- Proto: Displays the connection protocol, including TCP or UDP.
- Local Address: Displays the device’s IP address followed by a semicolon with a port number of the connection. The double-semicolon inside brackets indicates the local IPv6 address. The «0.0.0.0» address also refers to the local address.
- Foreign Address: Shows the remote computer’s IP (or FQDN) address with the port number after the semicolon port name (for instance, https, http, microsoft-ds, wsd).
- State: Shows whether the connection is active (established), if the port has been closed (time_wait) and if the program has not closed the port (close_wait). Other statuses available include closed, fin_wait_1, fin_wait_2, last_ack, listen, syn_received, syn_send, and timed_wait.
6. ARP
Windows 10 maintains an arp (Address Resolution Protocol) table, which stores IP to Media Access Control (MAC) entries that the system has resolved. The arp tool lets you view the entire table, modify the entries, and use it to determine a remote computer’s MAC address.
Usually, you do not need to worry about MAC addresses, but there are scenarios when this information may come in handy. For example, when troubleshooting network problems at the data link layer (switching) or when restricting access or filtering content through the network for specific devices.
To get started with arp on Windows 10, use these steps:
- Open Start.
- Search for Command Prompt, right-click the top result, and select the Run as administrator option.
- Type the following command to view the current arp table cache on Windows 10 and press Enter: arp -a

- Type the following command to determine the MAC address of a remote device and press Enter: arp -a IP
In the command, make sure to replace IP with the address of the destination. For example, this command reveals the physical address of the 10.1.4.120 destination: arp -a 10.1.4.120

- Confirm the MAC (physical) address for the remote device.
After you complete the steps, you will be able to view the entire arp table and MAC address of a specific IP address.
If you want to know all the available options, use the «arp /?» command to list the available options with their corresponding descriptions.
7. Route
The route tool displays the routing table that allows Windows 10 to understand the network and communicate with other devices and services. The tool also offers some options to modify and clear the table as needed.
Like the arp tool, you typically do not have to worry about the routing table, but the command-line tool will come in handy when troubleshooting related problems.
To view or flush the routing table available on Windows 10, use these steps:
- Open Start.
- Search for Command Prompt, right-click the top result, and select the Run as administrator option.
- Type the following command to view the routing table known to Windows 10 and press Enter: route print

- Confirm the routing table information.
- (Optional) Type the following command to clear the routing table and press Enter: route -f
- Quick note: When running this command, the device will lose network connectivity since the system no longer understands the network topology. After running the command, restart the machine to allow the networking stack to rebuild the routing table. Usually, you should not have to clear the table unless you modify some of the entries and you need to reset the table.
Once you complete the steps, you will understand the routing table and how to clear the information.
You can also use the «route /?» command to view a list of available options, including options to change networking metrics, specify a gateway, add a new route, and much more. However, modifying these settings is usually not recommended unless you understand how the network works.
8. Netsh
On Windows 10, netsh (Network Shell) is a legacy command-line tool that allows you to display and change virtually any network configuration. For instance, you can use the tool to view the current network configurations, manage wireless connections, reset the network stack to fix most common problems, enable or disable the firewall, and a lot more.
To get started with the netsh command-line tool, use these steps:
- Open Start.
- Search for Command Prompt, right-click the top result, and select the Run as administrator option.
- Type the following command to view a list of the available commands (contexts) and press Enter: netsh /?
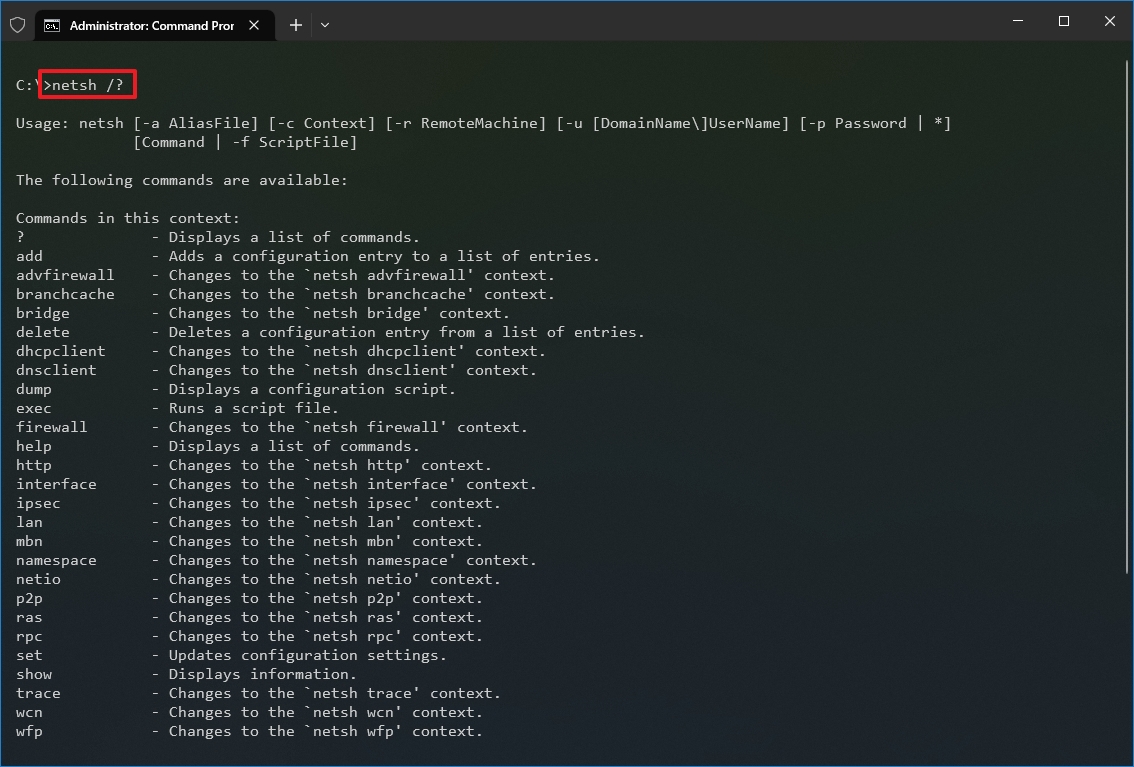
- Type the following command to view the list of available subcommands (subcontexts) for a specific option and press Enter: netsh CONTEXT-COMMAND
In the command, change the CONTEXT-COMMAND for the command that includes additional options. For example, this command shows the commands available to manage the firewall with netsh: netsh advfirewall /?
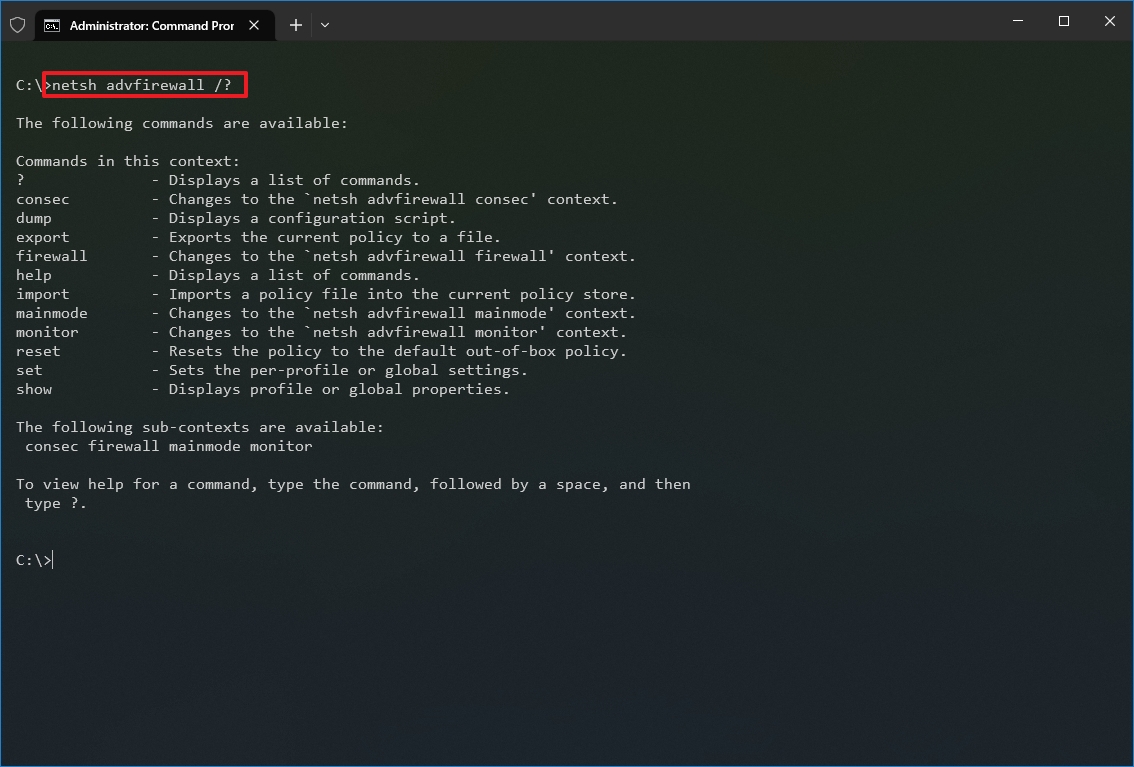
Once you complete the steps, you will know how to navigate the netsh contexts and subcontexts command to manage networking settings.
Reset system network stack
To reset the network stack to resolve common connectivity problems, use these steps:
- Open Start.
- Search for Command Prompt, right-click the top result, and select the Run as administrator option.
- Type the following command to reset the winsock stack and press Enter: netsh winsock reset
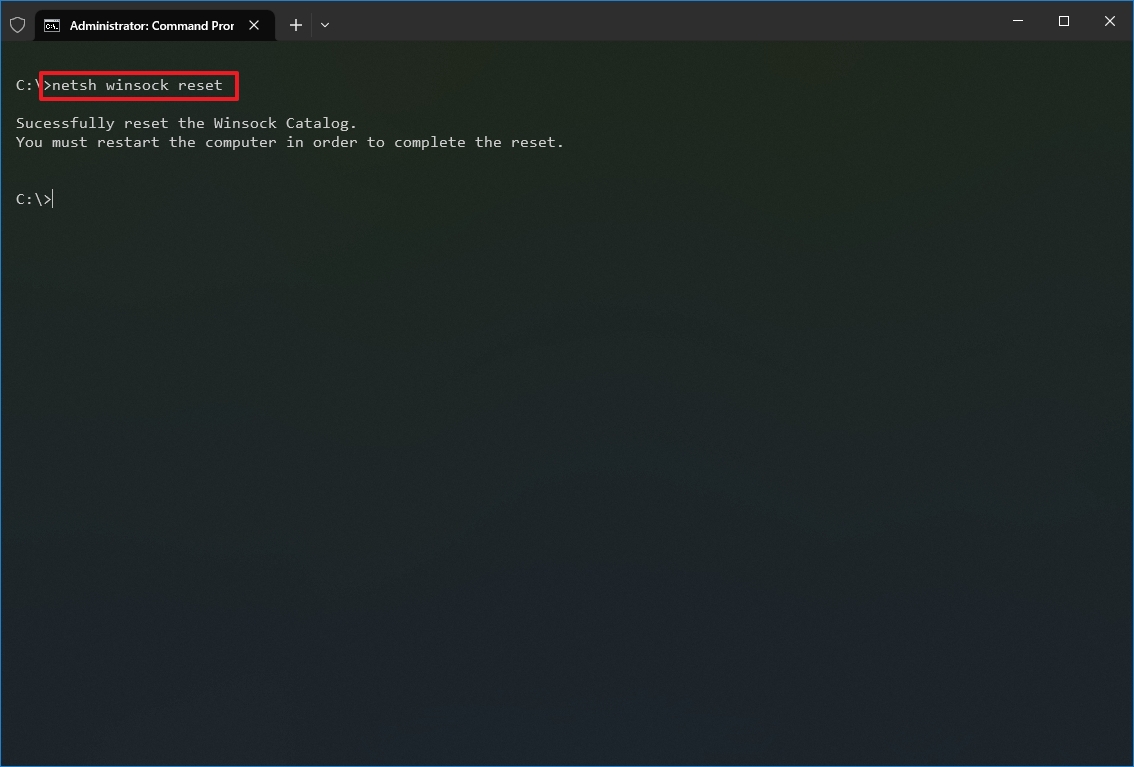
- Restart your computer.
After you complete the steps, the winsock configuration will reset, hopefully fixing the problems connecting to a network and the internet.
Export and import network configuration
To export the network configuration with netsh on Windows 10, use these steps:
- Open Start.
- Search for Command Prompt, right-click the top result, and select the Run as administrator option.
- Type the following command to export the current configuration for all the network adapters and press Enter: netsh -c interface dump>PATH\TO\EXPORTED.txt
In the command, replace the PATH\TO\EXPORTED.txt with the path and name of the file to store the configuration. For example, the following command exports the settings to the netshconfig.txt file: netsh -c interface dump>c:\netshconfig.txt
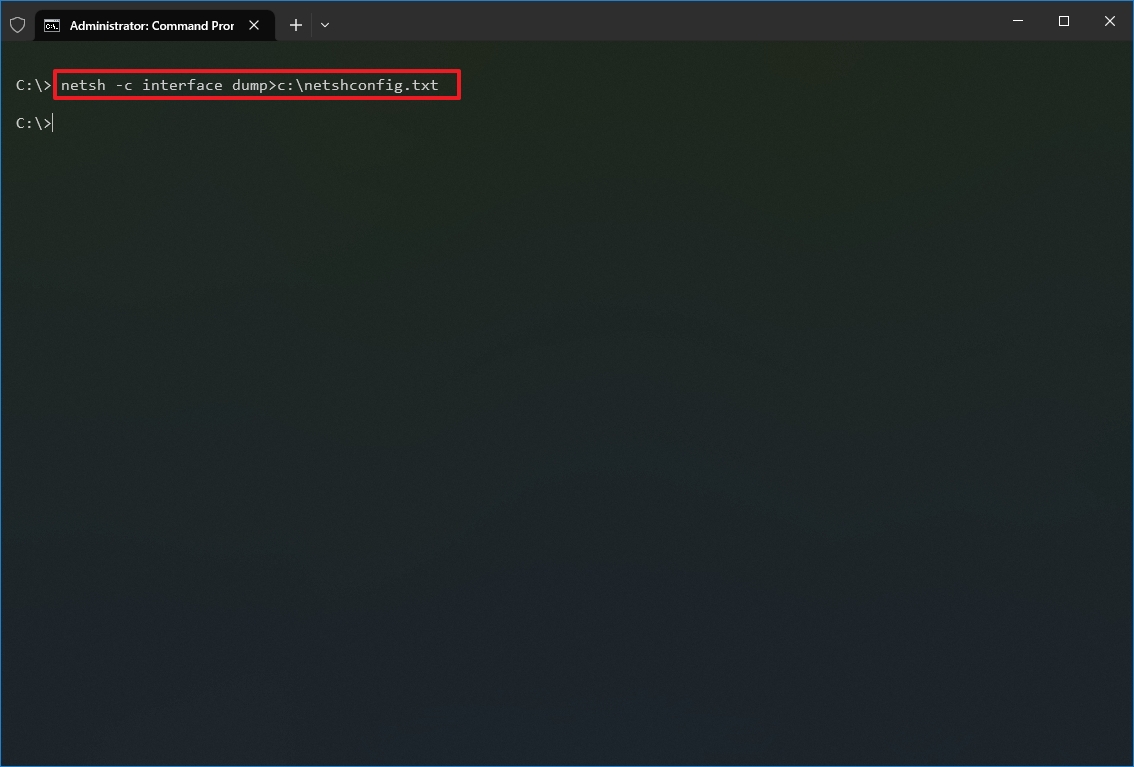
Once you complete the steps, you can open the file with any text editor to view the exported configuration.
Import network configuration
To import the network configuration settings with netsh, use these steps:
- Open Start.
- Search for Command Prompt, right-click the top result, and select the Run as administrator option.
- Type the following command to import the network configuration and press Enter: netsh -c interface dump>PATH\TO\IMPORTED.txt
In the command, replace the PATH\TO\EXPORTED.txt with the path and name of the file you want with the exported configuration. For example, the following command imports the settings from the netshconfig.txt file: netsh -f c:\netshconfig.txt
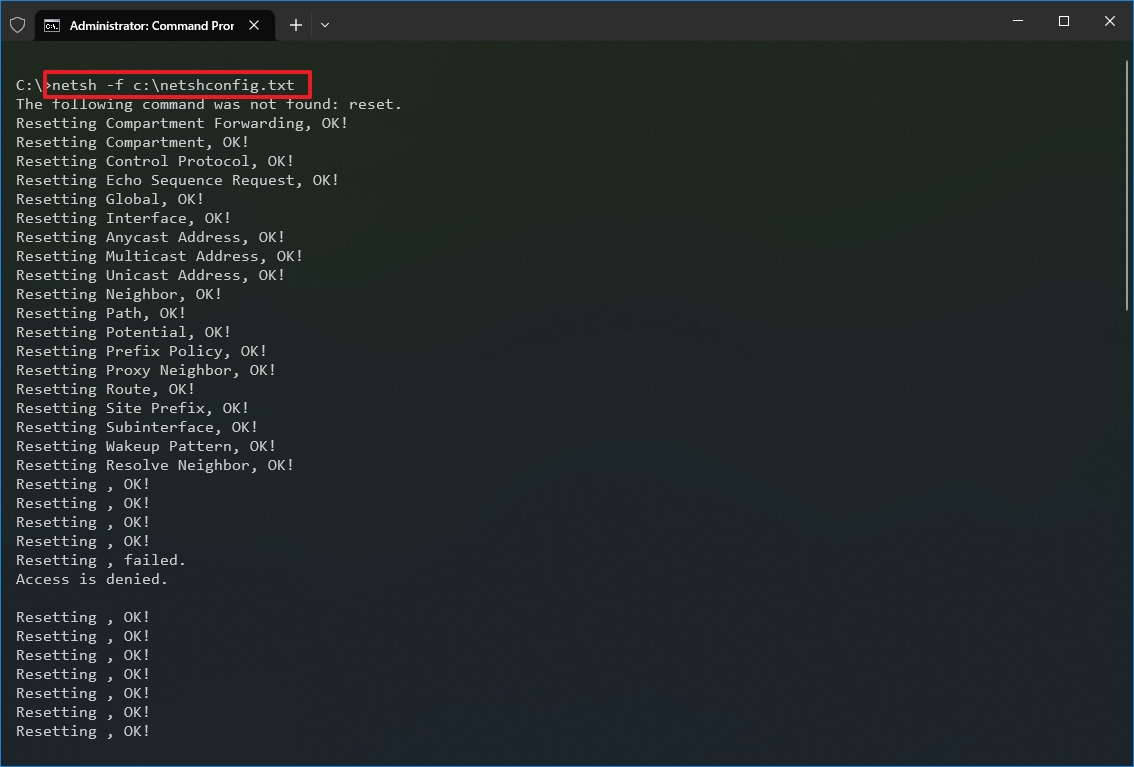
After you complete the steps, the new networking configuration will be imported and applied to Windows 10.
Enable and disable firewall
To enable the Windows 10 firewall with netsh, use these steps:
- Open Start.
- Search for Command Prompt, right-click the top result, and select the Run as administrator option.
- Type the following command to enable the default firewall and press Enter: netsh advfirewall set currentprofile state on
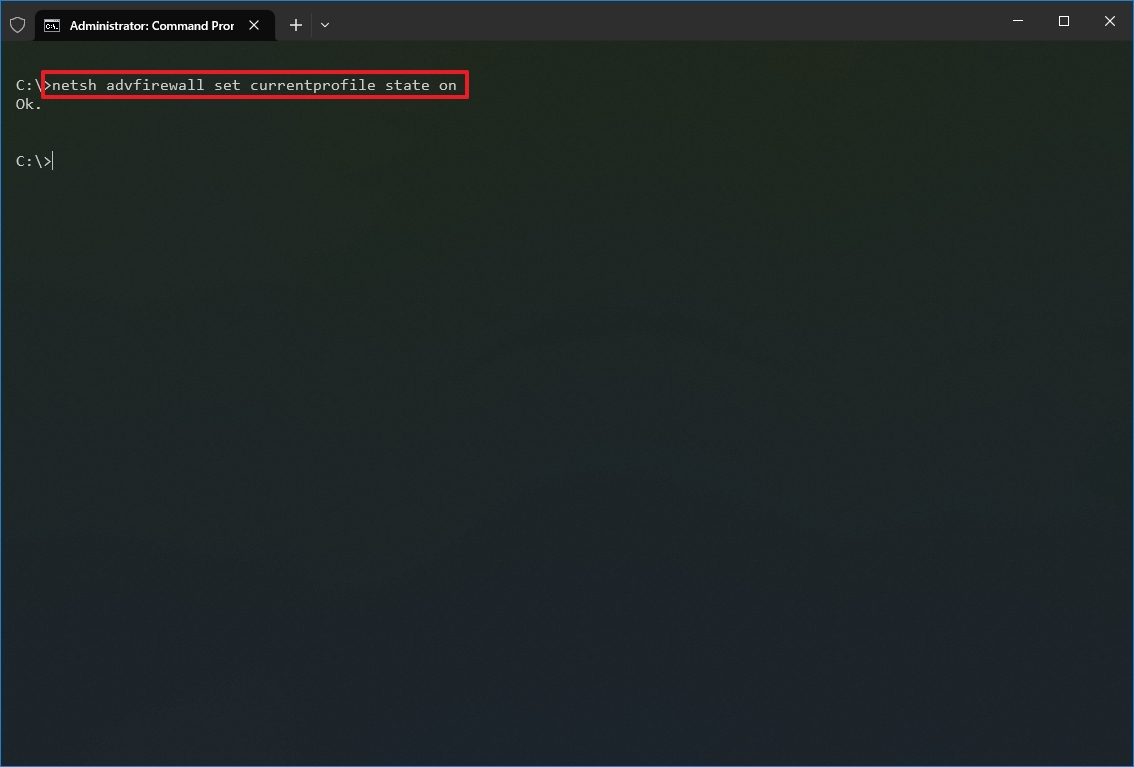
Once you complete the steps, the Windows Defender Firewall will enable on the device.
Disable firewall
To disable the Windows 10 firewall with netsh, use these steps:
- Open Start.
- Search for Command Prompt, right-click the top result, and select the Run as administrator option.
- Type the following command to disable the default firewall and press Enter: netsh advfirewall set currentprofile state off

Once you complete the steps, the Windows Defender Firewall will be disabled on the device.
On Windows 10, there are many tools you can use to change settings and troubleshoot networking issues using Command Prompt, PowerShell, and graphical applications. However, in this guide, we only focus on getting you started with some of the most common tools available in Command Prompt.
More resources
For more helpful articles, coverage, and answers to common questions about Windows 10 and Windows 11, visit the following resources:
- Windows 11 on Windows Central — All you need to know
- Windows 10 on Windows Central — All you need to know
Mauro Huculak has been a Windows How-To Expert contributor for WindowsCentral.com for nearly a decade and has over 15 years of experience writing comprehensive guides. He also has an IT background and has achieved different professional certifications from Microsoft, Cisco, VMware, and CompTIA. He has been recognized as a Microsoft MVP for many years.
Last Updated :
01 Mar, 2024
In networking there are various commands that can be used to check the connectivity of the networking devices and it is also required at time of troubleshooting of devices. We will be discussing few of the networking commands such as color help, ipconfig ,ipconfig/all ,nslookup ,tracert commands.
Commands
- First press windows+R button.
- In the search option write cmd . Then your command prompt will get open.
Color Help
This command is used to change the color of the command prompt. It gives various colors and the user can change accordingly. You have to type color help and then choose from the appeared screen by starting the command with color A or color 3. It helps in making the command prompt user friendly and making the screen according to user choice.

ipconfig
This networking commands is used to the IP configuration details. This command provides you the details like IPv4 address ,Subnet Mask or Default Gateway.
- Subnet mask-It can be understood as the boundary of our internet connection.
- Default Gateway-It is the address of the router to which our computer first hits when the device we want to connect is out of our local network.

ipconfig/all
This command can be understood as the updated version of the ipconfig command. This command tells us the physical address of our device. It tells us various details of our computer such as IPv4,IPv6 default Gateway ,subnet mask ,also it tells to which devices our device is connected ,configuration details of the devices to which are devices are connected.
It also tells us about the DHCP(Dynamic Host Configuration Protocol)-The main use of DHCP is to automatically assign IP addresses to our devices .

ipconfig /all
nslookup
This command is use to transform the given searched words into their corresponding IP addresses. Such as if i search for geeks for geeks website then our browser don’t search for geeks for geeks. It search’s the corresponding IP address associated to the geeksforgeeks site.

In the above command I have searched for geeksforgeeks IP address and the nslookup command gives me the corresponding IP address.
ping
Ping command is used to get to know if the particular site can be reached by the ping command. The ping command checks this by sending the packets of data to the destination address and if the data returns to us in the given time frame then it means that the particular website can be reached .We can do this by writing the ping and we write the IP address of the site we want to search. Like here i will check for geeksforgeeks site. If we write the wrong IP address or wrong destination the message will appear that their is 100% loss in the data packets sent.

Here we searched for geeksforgeeks site by giving its correct IP address and it shows that this particular website can by reached by your particular computer.
tracert
This command can be understood as trace root. Which tells that our computer reaches or hits which-which server for reaching the particular root. Here again we will search for geeksforgeeks site and it tells us the path taken by our computer to reach the root server. It tells us in maximum of 30 hops (30 node to node delivery).
We can search by giving the IP address and destination site name also.

Netstat Command
It is a command line tool that is identify and display the connections and ports connected to our computer when we write netstat command on CLI(Command Line Interface).

It tells us active connections with our computer and it tells us local address ,foreign address and the state of the device.
In local address first 8 digits specify the local address of our computer and and last 5 digits tells the port number to which our computer is connected .
In netstat command there are various subcommands such as netstat -n, netstat -a,netstat -b, netstat -f.
SystemInfo Command
This Command is used to display all the necessary information about our System such as configration ,version ,hostname, processor details network card details etc.

These are the basic and helpful networking commands which will help you in troubleshooting and managing your network devices. These commands helps you being productive, efficient and managing your network connectivity effectively. It tells us the correct IP address and if that IP can be reached by our computer and what are the paths being taken to reach the destination address.
Windows comes packed with several useful network utilities. These programs can get you critical information about your network connection and help diagnose problems. There are four TCP/IP network utilities that every Windows user should know about:
- Netstat
- Tracert
- IPconfig
- NSlookup
Let’s see what these utilities do and how they’re commonly used.

A Refresher on TCP/IP
All four utilities are TCP/IP network programs. What does that mean?
TCP/IP is short for Transmission Control Protocol Internet Protocol. A protocol is a set of rules and specifications that determine how a process works.
For example, at work it might be protocol to first make an appointment with your boss’ personal assistant instead of barging into their office at random times of day. Similarly, TCP/IP describes how the various devices connected to each other on the internet can communicate in an orderly fashion.
Learning to Love the Command Line
While 99% of computer interfaces these days are graphical, there will always be a need for text-based command line tools. For the most part, these TCP/IP utilities work through the command line. That means you need to type in the name of the utility and the action you want it to take.
In Windows this has always been achieved through the Command Prompt, but that’s being phased out. The preferred command line interface today is Windows PowerShell.

To access the Powershell:
- Right-click on the Start Button
- Select Windows PowerShell (Admin)
Now you can type your commands into the command line in PowerShell to your heart’s content. If you want to walk the path of the PowerShell master, it begins with a single step. That is, Using PowerShell for Home Users – A Beginner’s Guide by our very own Guy McDowell.
Now let’s begin to know them better.
What is Netstat?
Netstat or Network Statistics is a powerful information utility that gives you important insights into what your network connection is doing at any given moment. It gives you basic statistics on key network activity. This includes which ports are open and in use and what connections are open and running.
Netstat isn’t just a Windows application, it’s on Linux, Unix and Mac as well. It started life on Unix and has become a fundamental weapon in the network administrator’s toolbox.
There is a graphical alternative in the form of Microsoft TCPView, but knowing how to use netstat will always be useful. There are many use cases for the program, but one common purpose these days is the detection of malware. Malicious software such as trojans often open a port and wait to be contacted by their creators for further instructions. With netstat you can quickly see if there’s a suspicious connection from your computer to the network.
Important Netstat Commands
Netstat is one of the easiest TCP/IP utilities to use. All you have to do is type “netstat” (without the quotes) and you’ll get the standard list of active connections. Which should look something like this:

This is fine for a normal overview of your network connections, but you can modify the output by using modifiers. For example, “netstat -a” displays all active ports and “netstat -b” will show you the executable file responsible for each listening port. Here are more key commands:
- Netstat -e – displays details of packets that have been sent
- Netstat -n – lists currently connected hosts
- Netstat -p – allow to specify what type of protocol you want to check
- Netstat -r – provides a list of routing tables
- Netstat -s – gives statistics on IPv4, IPv6, ICMP, TCP, etc
What is Tracert?
Tracert is short for traceroute. It’s a network utility that shows you information about every stop along the way from your computer’s network interface to the destination device.
When you use Tracert, the application sends special Internet Control Message Protocol (ICMP) packets which compel the devices at each hop to send back information. Specifically, it asks them to relay the exact time the packet arrived and then uses that information to calculate the travel time between each hop.
There are three main uses for Tracert:
- To see where a packet gets lost.
- To determine where packets are delayed.
- To see the IP addresses of each hop along the packet’s route.
Next, let’s see the Tracert command in action.
Important Tracert Commands
The most basic form of the Tracert command requires the name of the utility as well as the network destination. The destination can be expressed as either an IP address or a website URL. For example: Tracert www.google.com.
The output of the command looks like this:

Tracert also has a small number of options, here’s the list:
- Tracert -d: Tells Tracert not to resolve addresses to host names
- Tracert -h: Maximum_hops – lets you change the default number of hops, e.g. -h 30
- Tracert -j host-list: Specifies the LSR (loose source route) along the host list
- -w timeout: Lets you set how long Tracert waits at each hop before considering it a timeout. E.g. Tracert -w 1000
It’s a simple tool, but can be incredibly useful if you’re playing network detective!
What is IPconfig?
One of the most useful network TCP/IP utilities, IPconfig shows you the current configuration of network devices in your computer. It can also be used to manually force certain actions relating to your network connections.

IPconfig is particularly useful if your computer has an IP address assigned to it dynamically. Since it lets you quickly see what IP address your system currently has.
Important IPconfig Commands
IPconfig is generally used with a parameter, which either displays network information or performs a network-related task. Here are some of the most important commands to know:
- IPconfig /all: Shows you all physical and virtual network adapter connection information.
- IPconfig /flushdns: Resets the DNS resolver cache. Good for solving DNS-related problems.
- /IPconfig /renew: Forces a new IP address to be assigned.
IPconfig is the go-to utility for general internet connection troubleshooting, so it’s worth memorizing its key commands.
What is NSLookup?
NSlookup is short for nameserver lookup. A “nameserver” is a key type of server in the DNS (domain name system). It is in effect a DNS server and that means it’s a network device that connects the URL you type into your browser with the IP address of the server that hosts the content.
Usually this process is hidden from you as the user, but NSlookup lets you do two things:
- Find which IP address is behind a particular website address.
- To find the URL connected to a specific IP address.
So if you only have either a web address or an IP address, you can use NSlookup to find the other part of the puzzle. You can combine this with the information from other tools, such as Tracert or Netstat to determine which web servers are attached to the IP addresses they report.
Important NSLookup Commands
There are three main NSLookup commands you should know. The first is just “nslookup”. This shows you the current name server and its IP address.

Note that NSlookup is still running and you are at its command line, not PowerShell. If you want to go back to PowerShell, type exit and press enter.
However, let’s stick around for a second and ask our nameserver to give us the address for Google.com. Just type google.com and press enter.

As you can see, this gives us the IP address 172.217.170.46. Type that into your web browser and you’ll be taken straight to the Google search engine. You can also do a reverse search and enter an IP address, which should then return the URL of the server associated with it.
Now you’re familiar with four of the fundamental TCP/IP utilities that will help you understand what’s going on in your network and pull back the curtain on the mystery that is the internet. Have fun!
Related Posts
- HDMI Cable Types and Specifications Explained
- Flat vs Round Ethernet Cables: What’s Different and Which Is Better?
- USB-C vs HDMI: What’s Different and Which Is Best for Video Output?
- What Is Bluetooth 5 and How to Upgrade?
- What Is Mesh Network Topology?

Утилита WinMTR, где скачать и как пользоваться? Как проверить качество интернет соединения при помощи WinMTR?
- 10.07.2018
- Компьютерные сети, Полезные программы, Сетевые утилиты и программы
Привет, посетитель сайта ZametkiNaPolyah.ru! В этой публикации мы обстоятельно поговорим о том, как использовать сетевую утилиту WinMTR для проверки качества интернет соединения и других каналов связи. WinMTR — это программа,…
Команда ipconfig – утилита для проверки и настройки протокола IP и сетевых подключений в Windows. Как узнать настройки сетевого адаптера?
- 10.07.2018
- Команды и утилиты Windows, Компьютерные сети, Полезные программы, Сетевые утилиты и программы
Привет, посетитель сайта ZametkiNaPolyah.ru! Публикация о команде ipconfig — это продолжение рубрике, в которой я рассказываю о том, как пользоваться стандартными сетевыми утилитами в операционных системах семейства Windows. Команда ipconfig…
Команда pathping в Windows. Стандартная сетевая утилита, позволяющая проверить потери пакетов в Интернете
- 07.07.2018
- Команды и утилиты Windows, Компьютерные сети, Полезные программы, Сетевые утилиты и программы
Привет, посетитель сайта ZametkiNaPolyah.ru! Продолжаем разбираться со стандартными сетевыми утилитами Windows на очереди команда Pathping, которая позволяет оценить потери до удаленного узла, а также понять где эти потери происходят, как…
Пинг — сетевая утилита командной строки Windows. Команда Ping для теста и проверки удаленного узла или сервера
- 02.07.2018
- Команды и утилиты Windows, Компьютерные сети, Полезные программы, Сетевые утилиты и программы
Привет, посетитель сайта ZametkiNaPolyah.ru! Эта запись будет про простую, но очень полезную стандартную сетевую утилиту ping и о том, как ею пользоваться из командной строки Windows. Возможности команды ping скромны,…
Команда tracert в Windows. Зачем нужна и как пользоваться сетевой утилитой tracert?
- 01.07.2018
- Команды и утилиты Windows, Компьютерные сети, Полезные программы, Сетевые утилиты и программы
Привет, посетитель сайта ZametkiNaPolyah.ru! Продолжим разбираться с полезными командами и утилитами командной строки Windows, на этот раз давайте разберемся с сетевой утилитой tracert, мы поговорим зачем нужна команда tracert и…