

In Windows 10/11, the Start menu is represented by two folders. One folder is for all users, and the other is only for the currently logged-in user.
The Start Menu folder for all users is C:\ProgramData\Microsoft\Windows\Start Menu\Programs.
The Start Menu folder location specific to your account is C:\Users\your-user-name\AppData\Roaming\Microsoft\Windows\Start Menu\Programs.
To access these locations quickly, we can use the following run commands (to open the Run dialog box, press Windows key + R).
Run the following command to open the location containing start menu programs available to all users:
shell:Common Programs
The following run command opens the start menu folder contains programs specific to your account:
Shell:Programs
And this is how we locate the Start menu folder in Windows 10/Windows 11 operating system.
To rearrange a setting on your Computer the best practice is to access its concerned root folders then edit dealing with the items existing here. The condition also matches in the matter of the Start menu. If you are looking to renovate and clean the Start menu then after navigating to the locations where all the respective files and folders are placed you can perform these tasks pretty shortly.
The folders and files concerned to Start Menu in Windows 10 are placed at 2 separate locations; The first one is per user whereas the other address is for all users. When you navigate to both the locations, you can easily trace out the contrast amongst the two – per user will showcase the items of the individual user and all users will showcase the items that are available for everyone.
Suppose, two members of a family are using the same PC with two separate accounts and both of them has their own preference of Start Menu items and by going to the location, they can individually customize their likings.
So, remembering the things, let us interpret the steps for How to Find Start Menu Folder Location in Windows 10 to renovate according to your vantage, clear clutter furthermore place items with a short method and explore yourself to another world of customization.
Method to Find Start Menu Folder Location in Windows 10
- Jointly strike Win and R keys to permit the Run to appear on screen where you can input these address accordingly –
Per user Location
C:\Users\[username]\AppData\Roaming\Microsoft\Windows\Start Menu
- But this address will permit you to access you the exact location when the [username] will be replaced/substituted by the actual username of your computer.
All users Location
C:\ProgramData\Microsoft\Windows\Start Menu
The Start Menu locations do not comprise the Metro apps and in any circumstance, if you are fervent to deal with them, you must execute it. We covered many articles on Start Menu and we hope that along with this, you can also find your queries answered there.
Many users prefer to maintain every single thing on their machine and want to maintain things in their perfect places and also adopt all the significant measures to keep the locations tidy and clean. Hence, once such example that people are occupied is to edit, organize and clean the Start Menu.
The Windows lock screen is the first thing you see when you turn on your PC or wake it up from sleep mode. It displays stunning images from around the world and useful information like the date, time, and notifications. If you want to use these images as wallpaper or admire them in all their glory, this guide will show you how to find the Windows 10 or 11 lock screen images folder location and the actual location of the images in the world.
Also see: How to Find Current Wallpaper Location in Windows 11
Finding the Windows 11 or 10 lock screen images folder location
If you want to extract or copy the lock screen images and use them somewhere else, here’s where you can find them:
- Press the Windows + R to open the Run dialog box.
- Type in the following command and press Enter:
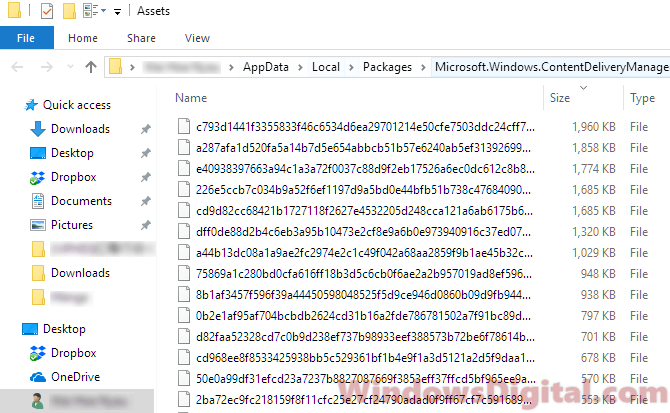
C:\Users\yourusername\AppData\Local\Packages\Microsoft.Windows.ContentDeliveryManager_cw5n1h2txyewy\LocalState\Assets
Replace “yourusername” with your actual username in Windows 11 or 10.
- In the folder, you should see a list of files with random characters and no extensions.

- Sort the list of files by size. Copy files that are at least 500KB in size to any folder you like.
- Right-click each file and select Rename. Add .jpg extension to their names.

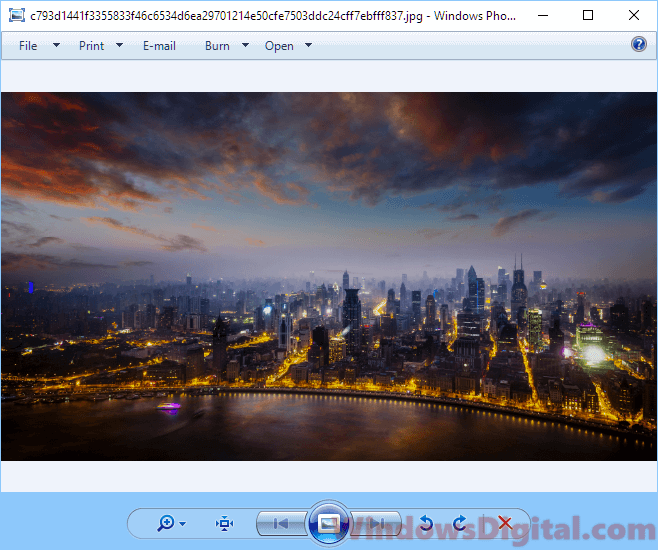
- After adding the JPG extension, you should be able to view the images in any photo app.
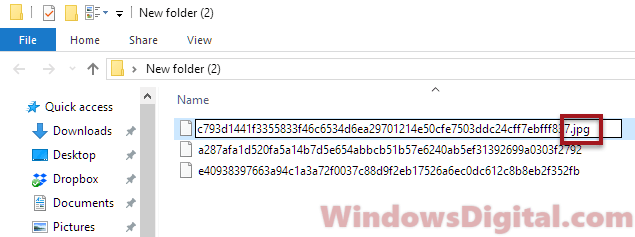
Note: Before being able to add any extension to any file, make sure you’ve enabled the option to view file extensions by going to File Explorer > View > Options > Change folder and search options > View > uncheck “Hide extensions for known file types“.
The Windows 10 or 11 lock screen images folder location contains only spotlight images that have already been downloaded and viewed at least once on your PC. Any new spotlight photos you see in the Windows lock screen will be added to this folder. Alternatively, you can find the Windows 10 or 11 spotlight images collection online and add them to the folder to allow them to also appear in your lock screen.
Finding the actual location of the Windows 10 or 11 lock screen images in the world
If you are astounded by the stunning photos that appear in the Windows 10 or 11 lock screen and want to find out the actual location of where these photos were taken in the world, here are a few methods to do so:
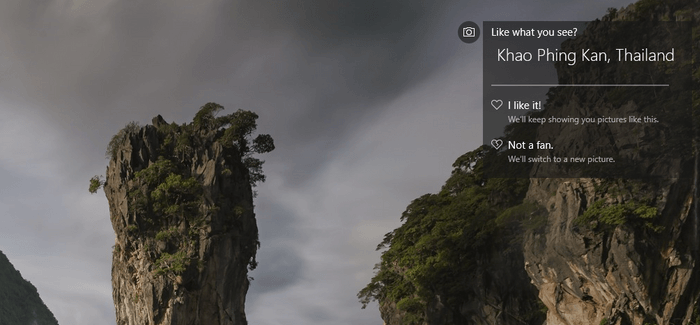
View image location info from Windows lock screen
When you’re on the Windows 10 or 11 lock screen, on the top right corner of the screen, there should be actual location info of the current photo with a Like what you see title and options of either I like it or Not a fan. This feature becomes available since Windows 10 v1607 update. If you don’t see the info panel, you may want to run Windows Update to update your Windows 11 or 10.
Check the image file properties
Another method to view the actual location of the lock screen images taken is by viewing the file properties. Locate the image files and change the extension to JPG. Right-click the image you want to check the actual location of, select Properties, and then go to the Details tab. You should be able to see the actual location info about the photo under Description.
However, not all images have the location info in the description properties. Some will show an empty description in the Details tab.
Use Google Reverse Image Search
If none of the methods above work to show the location info of the image, you can try to use Google Reverse Image search. Using Google reverse image search can help to find related photos from all around the web and extract the info from relevant websites where the photo was hosted. It works most of the time. To do a reverse search, follow the steps below:
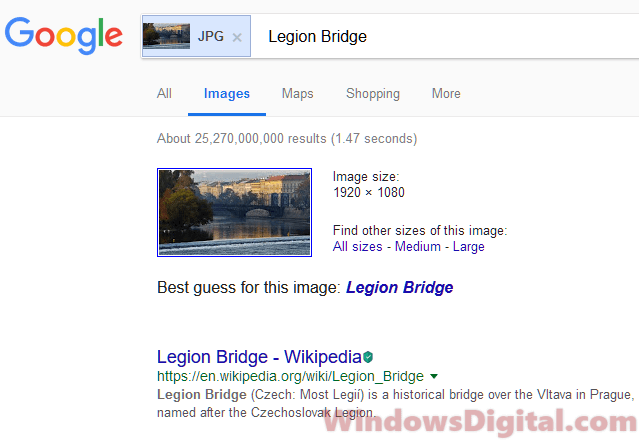
- Locate the image you want to search and add the JPG extension to the image file.
- Go to images.google.com (or see: How to Google Reverse Image Search on Windows 11).
- Upload the image.
- Click on Show matches.
- It should then show relevant info of the uploaded image in a search result.
There are also other reverse image search engines available, such as TinEye and Bing Visual Search, which you can try if Google doesn’t yield the desired results.
One last thing
Keep in mind that while these methods usually give accurate location info about lock screen images, there might be exceptions. Some images are artistically enhanced or might blend elements from different places. So, the data you get might sometimes be more about general inspiration than an exact location. Always double-check the information if you really need to know the precise spot.
Если вам потребовалось поместить какую-то папку на панель задач для быстрого доступа или закрепить папку на начальном экране, простой метод, работающий для исполняемых файлов и их ярлыков — правый клик и выбор нужного пункта контекстного меню не сработает, однако способ существует.
В этой простой инструкции подробно о том, как закрепить папку на панели задач Windows 10 или поместить её в виде плитки в меню Пуск (закрепить на начальном экране). На близкую тему может быть полезным: Настройка меню Пуск Windows 10.
Как поместить папку на панель задач Windows 10 или добавить её в виде плитки в меню Пуск
Windows 10 не дает прямой возможности закрепить папку на панели задач, однако, как мы помним, есть возможность разместить на ней ярлык программы. Мы можем создать ярлык, который будет открывать нужную нам папку и уже его поместить в панель задач. Для этого потребуется выполнить следующие простые шаги (4-й шаг можно пропустить, если что-то останется не ясным, ниже есть видео инструкция):
- На рабочем столе или в какой-либо папке нажмите правой кнопкой мыши в свободном месте и выберите пункт меню «Создать» — «Ярлык».
- В мастере создания ярлыков в поле «Укажите расположение объекта» введите explorer.exe а затем после пробела — путь к нужной папке (путь легко скопировать в адресной строке проводника или посмотреть в свойствах папки). Если путь содержит пробелы, возьмите его в кавычки. Нажмите «Далее».

- Введите желаемое имя ярлыка папки, это имя будет отображаться при наведении указателя мыши на значок папки в панели задач. Нажмите «Готово».
- Будет создан ярлык папки на рабочем столе или в какой-то другой папке. Возможно, вы захотите поменять его значок, прежде чем помещать в панель задач. Для этого нажмите правой кнопкой мыши, выберите пункт «Свойства» и на вкладке «Ярлык» нажмите «Сменить значок». Затем выберите какой-то из стандартных значков или свой файл в формате .ico
- Нажмите правой кнопкой мыши по значку ярлыку папки и выберите пункт «Закрепить на панели задач» или «Закрепить на начальном экране».

- Значок папки появится в выбранном вами расположении и будет при нажатии открывать нужную папку.


Обратите внимание: после того, как вы закрепили нужную вам папку в нужном месте Windows 10, изначально созданный нами ярлык можно удалить, на работу уже закрепленных элементов это не повлияет.
Чтобы в дальнейшем убрать папку с панели задач или начального экрана, нажмите по ней правой кнопкой мыши и выберите пункт меню для открепления.
Видео инструкция
Думаю, кто-то из читателей, привыкших настраивать элементы системы по своему усмотрению и оставлять рабочий стол чистым, найдет материал полезным.
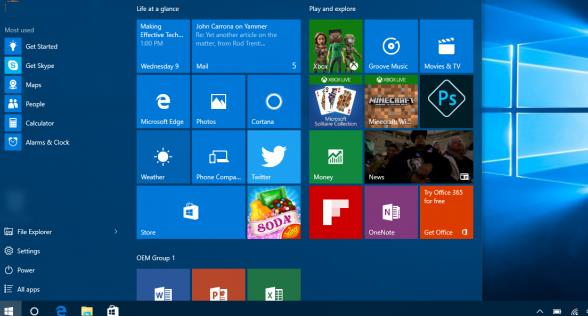
В домене Active Directory вы можете централизованно управлять макетом начального экрана (Start Layout) меню Пуск и панели задач на компьютерах пользователей Windows 10 с помощью групповых политик. Это позволяет назначить одинаковые настройки, вид и местоположение значков и ярлыков в меню Пуск и панели задач пользователям различных подразделений компании в зависимости от используемых програм и убедиться, что все рабочие места настроены одинаково.
Содержание:
- Экспорт/импорт макета меню Пуск в Windows 10 с помощью PowerShell
- Распространение макета начального экрана пользователям с помощью GPO
- Partial Lockdown – частичная блокировка макета начального экрана Windows
- Управление закрепленными ярлыкам в панели задач с помощью GPO
Экспорт/импорт макета меню Пуск в Windows 10 с помощью PowerShell
Самый простой способ получить макет стартового меню Пуск в Windows 10 — вручную настроить внешний вид и элементы рабочего стола на эталонном ПК. Создайте ярлыки (плитки) для необходимых приложений, закрепите и сгруппируйте их, удалите ненужные элементы. Затем вы можете экспортировать текущее описание элементов стартового меню в xml файл.
Экспортировать текущие настройки можно с помощью PowerShell командлета Export-StartLayout:
Export-StartLayout –path c:\ps\StartLayoutW10.xml

Вы можете вручную импортировать данный шаблон стартового меню на другом компьютере Windows 10 с помощью командлета Import-StartLayout:
Import-StartLayout –LayoutPath c:\ps\StartLayoutW10.xml –MountPath c:\
Примечание. Параметр MountPath указывает на путь, куда смонтирован .wim файл образа системы.
Основной недостаток командлета Import—StartLayout – он импортирует макет начального экрана не к профилю текущего пользователя, а к профилю пользователя по умолчанию (в каталоге C:\Users\Default\AppData\Local\Microsoft\Windows\Shell\ появляется файл Layoutmodification.xml). Данный XML макет начального экрана применится только к новым пользователя при первом входе в систему
Распространение макета начального экрана пользователям с помощью GPO
Чтобы распространить файл с макетом меню Пуск на компьютеры домена с помощью групповых политик (GPO), нужно скопировать полученный XML файл в каталог Netlogon на котроллере домена. Затем откройте консоль управления доменными групповыми политиками Group Policy Management Console (GPMC.msc) и создайте новую или отредактируйте существующую политику и назначьте ее на OU с пользователями.
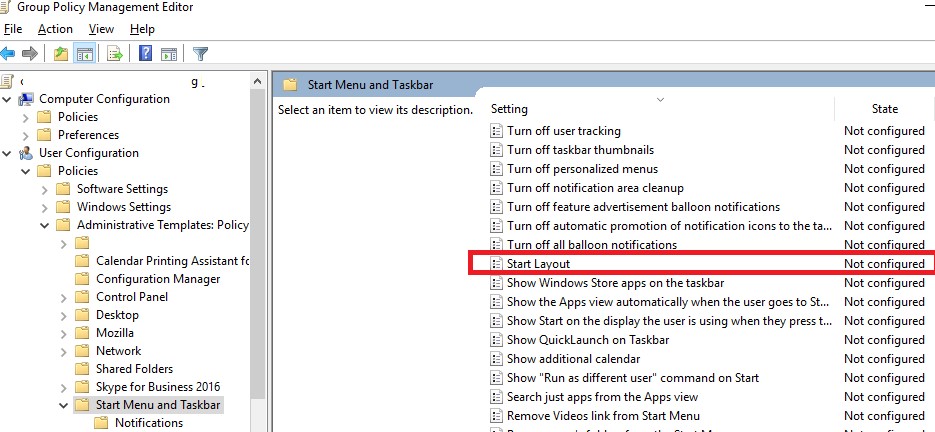
В редакторе GPO найдите политику с именем Start Layout (Макет начального экрана) в секции User Configuration -> Policies -> Administrative Templates -> Start Menu and Taskbar (также вы можете привязать макет меню Пуск к компьютеру, для этого нужно настроить политику в секции Computer Configuration).
Примечание. Эту политику можно настроить с любого компьютера при наличие следующих файлов административных шаблонов: StartMenu.admx и StartMenu.adml (в Windows 10 / Windows Server 2016 они уже имеются).
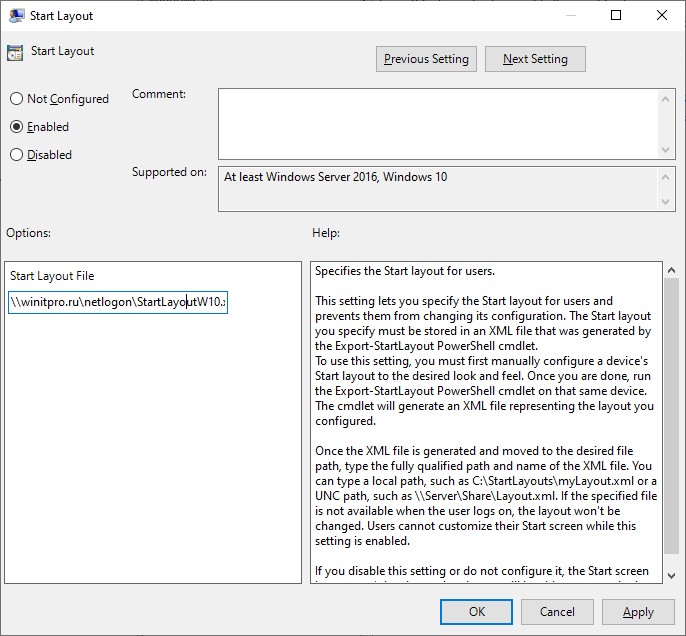
Откройте политику, включите ее (Enabled) и в поле Start layout file укажите UNC путь к xml файлу, содержащему макет стартового экрана Windows 10 на контроллере домена (например, \\domain.ru\netlogon\StartLayoutW10.xml).
Если вы хотите применить политику Start Layout, только к определенным группам пользователям или компьютерам, вы можете использовать Security Filtering или WMI фильтры GPO.
Важно. По умолчанию при задании параметров стартового меню и таскбара пользователей с помощью GPO, пользователи не могу изменять его элементы (удалять ярлыки, добавлять собственные). Чтобы разрешить пользователю менять элементы макета, нужно воспользоваться возможность частичной блокировки макета начального экрана (Partial Lockdown), описанной в секции ниже.
Partial Lockdown – частичная блокировка макета начального экрана Windows
Режим Partial Lockdown, появился в Windows 10 версии 1511, и позволяет указать группы плиток стартового меню, которые пользователи не могут изменить. Т.е. вы можете разрешить пользователяи изменять любые ярлыки, значки и плитки кроме определенной группы ярлыков корпоративных приложений.
Чтобы указать заблокированные группы начального экрана, нужно отредактировать XML файл с макетом с помощью любого текстового редактора (для редактирования XML файла удобно использовать Notepad++).
Откройте ваш файл StartLayoutW10.xml и найдите в нем секцию <DefaultLayoutOverride>. Чтобы заблокировать определенную группу ярлыков, нужно в атрибуты данной секции изменить на <DefaultLayoutOverride LayoutCustomizationRestrictionType=”OnlySpecifiedGroups”>.
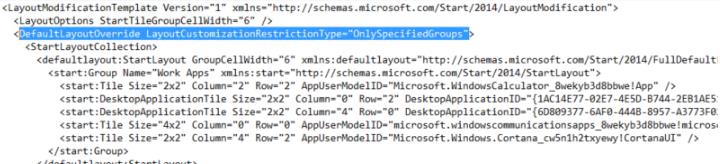
Сохраните изменения в xml файле и распространите его на пользователей. Таким образом, будут заблокированы для редактирования пользователями только группы плиток (ярлыков), указанные в XML файле.
Partial Lockdown работает как в Windows 10 Enterprise так и в Pro (начиная с 1703).
В Windows 10 есть небольшой глюк, когда назначенный ярлык Internet Explorer не появляется после применения XML файла макета через GPO.
Для решения проблемы нужно отредактировать XML файл и исправить строку для ярлыка IE следующим образом:
<start:DesktopApplicationTile Size="2x2" Column="2" Row="2" DesktopApplicationLinkPath="%ALLUSERSPROFILE%\Microsoft\Windows\Start Menu\Programs\Internet Explorer.lnk" />
И затем через GPO нужно скопировать ярлык “Internet Explorer.lnk” в каталог %ALLUSERSPROFILE%\Microsoft\Windows\Start Menu\Programs\.
Управление закрепленными ярлыкам в панели задач с помощью GPO
Начиная с Windows 10 1607 вы можете управлять закрепленными ярлыками в панели задач через тот же самый XML файл с макетом начального экрана. Чтобы добавить собственные закрепленные ярлыки в XML макет, который распространяется через GPO, отредактируйте XML файл. После тега </DefaultLayoutOverride> нужно добавить следующий код:
<CustomTaskbarLayoutCollection PinListPlacement="Replace"
xmlns:taskbar="http://schemas.microsoft.com/Start/2014/TaskbarLayout">
<defaultlayout:TaskbarLayout>
<taskbar:TaskbarPinList>
<taskbar:DesktopApp DesktopApplicationLinkPath="%APPDATA%\Microsoft\Windows\Start Menu\Programs\System Tools\File Explorer.lnk" />
<taskbar:DesktopApp DesktopApplicationLinkPath="%ALLUSERSPROFILE%\Microsoft\Windows\Start Menu\Programs\Internet Explorer.lnk" />
</taskbar:TaskbarPinList>
</defaultlayout:TaskbarLayout>
</CustomTaskbarLayoutCollection>
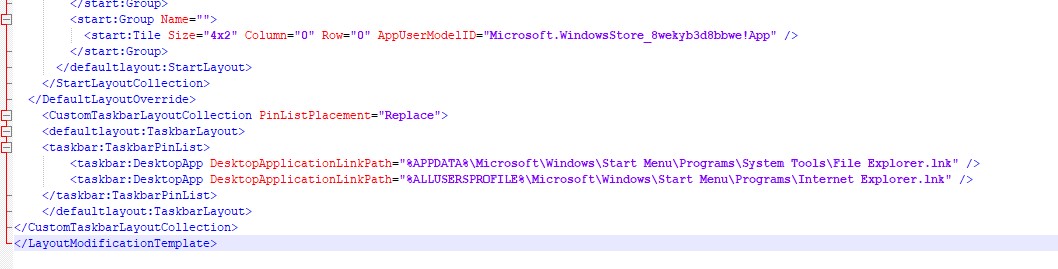
В данном примере мы добавим в панель задач два ярлыка: File Explorer и Internet Explorer. После применения политики на компьютере пользователя, в таскбаре появятся два закрепленных ярлыка.
В старых версия Windows 10 (до 1607) ярлыки приложений в панели задач настраивается по другому. Попробуем разобраться как.
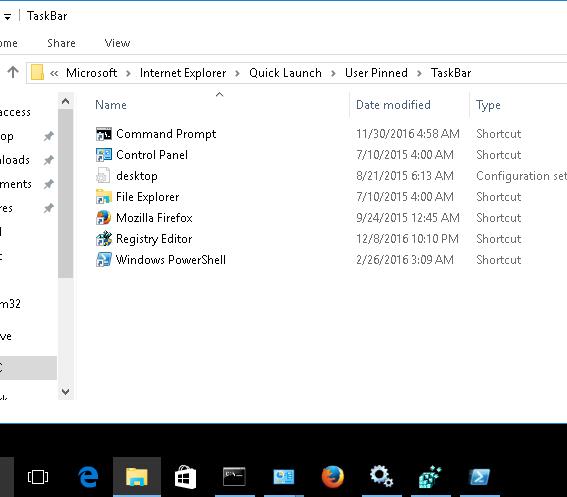
Список закрепленных в панели задач ярлыков хранится в Windows 10 в каталоге %APPDATA%\Microsoft\Internet Explorer\Quick Launch\User Pinned\TaskBar.
При этом параметры закрепленных в панели задач приложений хранятся в закодированном виде в ветке реестра HKEY_CURRENT_USER\Software\Microsoft\Windows\CurrentVersion\Explorer\Taskband.
Для распространения настроек таскбара на компьютеры компании, нужно экспортировать содержимое данной ветки в reg файл:
reg export HKCU\Software\Microsoft\Windows\CurrentVersion\Explorer\Taskband c:\ps\PinnedItem.reg
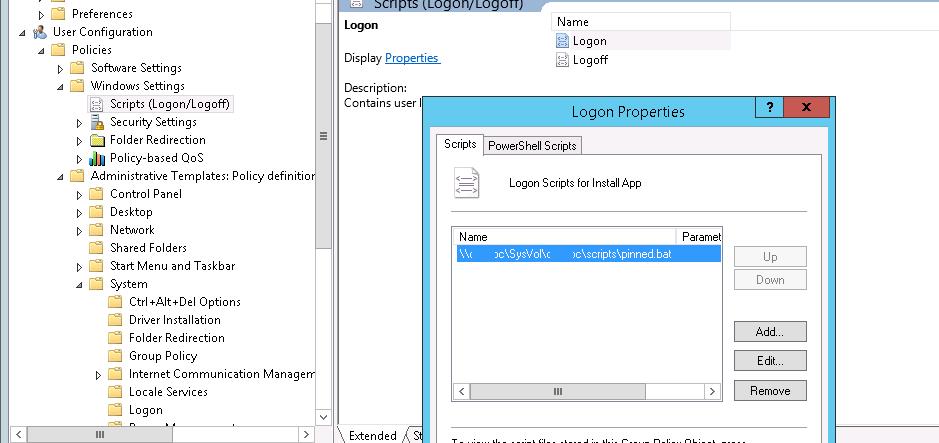
Этот reg файл и каталог с ярлыками (%APPDATA%\Microsoft\Internet Explorer\Quick Launch\User Pinned\TaskBar) нужно скопировать в общедоступную сетевую папку (например в Netlogon). И в редакторе доменной групповой политики (User Configuration- > Policies -> Windows Settings -> Scripts (Logon/Logoff) -> Logon) добавить логон скрипт с кодом:
@echo off
set Logfile=%AppData%\pinned.log
 if not exist "%Logfile% (
IF EXIST "%APPDATA%\Microsoft\Internet Explorer\Quick Launch\User Pinned\TaskBar" GOTO NOTASKDIR
del "%APPDATA%\Microsoft\Internet Explorer\Quick Launch\User Pinned\TaskBar\*" /S /Q
:NOTASKDIR
xcopy /E /Y "\\domain.ru\netlogon\PinnedItem " "%APPDATA%\Microsoft\Internet Explorer\Quick Launch\User Pinned"
regedit.exe /s "\\domain.ru\netlogon\PinnedItem.reg "
echo PinnedItemImported on %date% at %time% >> %LogFile%
taskkill /IM explorer.exe /f
start explorer.exe
}
Примечание. В скрипт добавлена проверка наличия файла %AppData%\pinned.log. Если файл имеется, значит данный скрипт уже выполнялся на этом компьютере и второй раз его применять не нужно, чтобы пользователь мог удалить или добавить собственные ярлыки в таскбаре.
Теперь при входе пользователя в систему ему будет применен “корпоративный” набор закрепленных иконок приложений в панели задач.