
Updated by
Cici on Jan 23, 2025
Don’t worry if you lost the product key of the Windows operating system. On this page, we’ll be presenting you with 5 methods and detailed steps to guide you to recover the lost product key on Windows 11/10/8/7 successfully on your own.
As we know that Windows product keys are widely used for Windows operating system activation or reactivation after reinstalling or migrating the OS. However, if you lost or failed to save the product key, how will you be able to find it on your computer?
Don’t worry. Here, we’ll list 5 reliable methods that you can follow anyone with the respective guide steps to recover lost product key on Windows 11/10/8/7 successfully. Let’ see.
5 Methods to Recover Lost Product Key on Windows:
- #1. Check the COA Sticker
- #2. 1-Click Windows Product Key Finder
- #3. Powershell Command
- #4. CMD Command
- #5. Notepad
Note that the methods are listed from easy to complex. For the easiest methods, Method 1 and Method 2 are recommended. For a more complex Windows built-in method, you may try Method 3, Method 4, and Method 5.
Here the following, we’ll take the latest Windows 11 as an example to show you the whole process. Let’s go and follow the respective methods to start finding your missing or lost Windows product key now.
Read Also: Find Windows 11 Product Key Using CMD
Method 1. Find Product Key of Windows 11/10/8/7 from COA Sticker
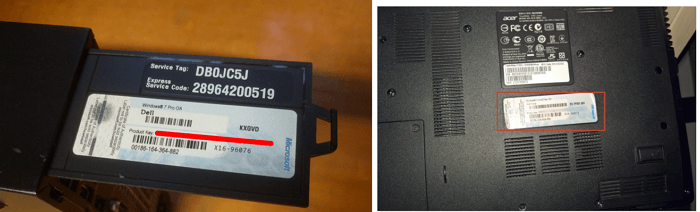
COA Sticker, known as Certificate of Authenticity Sticker, is widely used on computers that are shipped with Windows operating system by multiple computer manufacturers. The COA sticker verifies that the laptop or desktop computer is shipped with an authentic copy of Windows. Also, the stick is printed with a product key of the current computer operating system.
Therefore, if your computer is installed with the original Windows, you can directly check the Windows COA stick and find the missing product key:
Step 1. Check the back case or the keyboard area of your computer.
Currently, most COA stickers are pasted at the back of the computer.
Step 2. Find the lost product key of your Windows computer.
Usually, it’s a serial of numbers printed under the Product Key area on the COA sticker.
Note that if you upgrade Windows OS, the original product key printed on the COA sticker may not work. And you can follow Method 2, 3, 4, 5 to find the current key on your computer.
Method 2. Recover Lost Product Key on Windows 11/10/8/7 with Product Key Finder
The other easy way to recover lost product key on Windows 11/10/8/7, and even older Windows PC is turning to reliable product key finder software — EaseUS Key Finder for help.
With this product key finder, you can simply recover the lost product key on a Windows computer within one click. See what else you can do with this software:
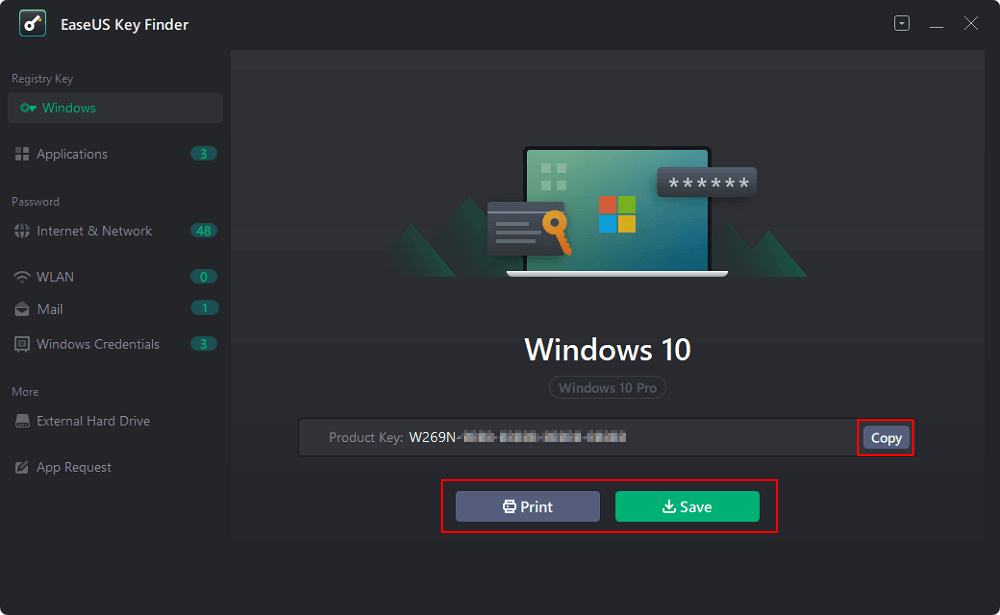
Step 1. Click «Windows» tab under the Registry Key.
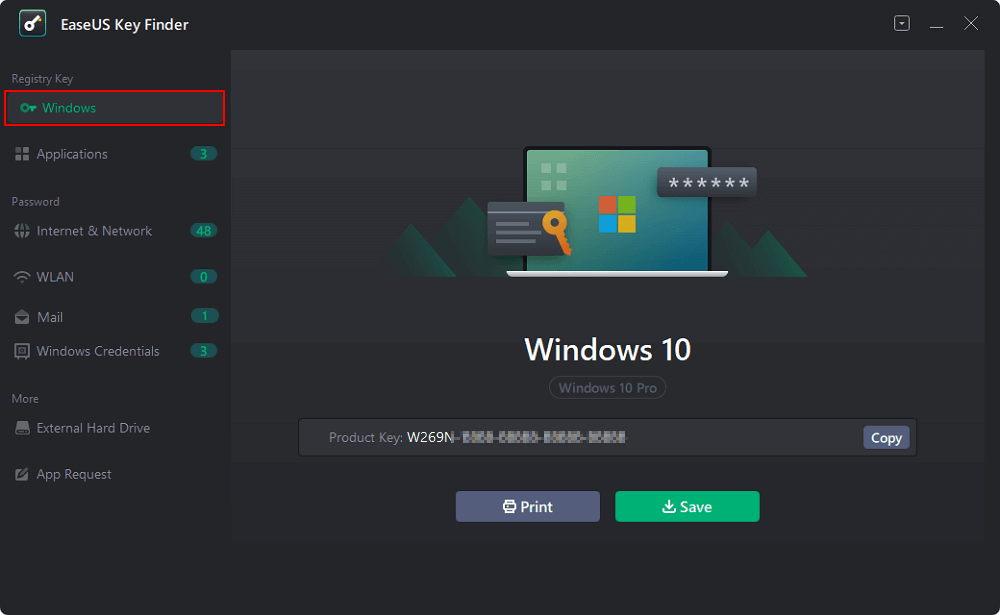
Step 2. Check Windows product key on the right side. Click «Copy» to paste. Or select other two options:
«Save» — Save to local as a PDF file.
«Print» — Click to print key file.
Method 3. Find Lost Product Key on Windows 11/10/8.1 via Powershell Command
On some latest Windows computers, the product key of Windows OS is not printed on the COS sticker. Some product keys are stored in the PC’s hardware like UEFI firmware or BIOS by the manufacture.
Users can directly use and even reinstall the same edition of Windows on the computer. In this case, you can try to run the Windows PowerShell command to find the product key. Here are the steps:
Step 1. Right-click the Windows icon at the start menu and select «Windows PowerShell».
Step 2. Type the command line into Windows PowerShell:
(Get-WmiObject -query ‘select * from SoftwareLicensingService’).OA3xOriginalProductKey

Step 3. Wait for Windows PowerShell to present you with the embedded license key of the current Windows OS on your PC.
Method 4. Run CMD Command to Find Lost Product Key On Windows
The other similar way to PowerShell Command is to run the CMD command on a Windows computer and recover the lost product key. This is especially useful in finding product keys on old Windows 7 computers.
Of course, this also works on Windows 11/10/8 new computers. Let’s see the detailed steps:
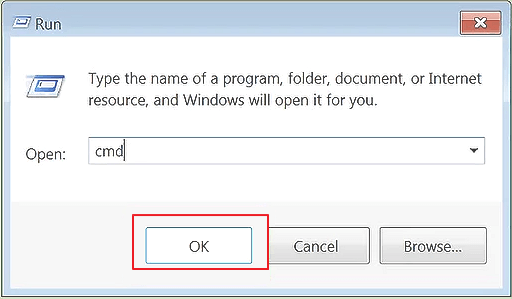
Step 1. Type cmd in the search box, right-click «Command Prompt« and select «Run as Administrator».
Step 2. Type the command line in the CMD window and hit Enter:
wmic path softwarelicensingservice get OA3xOriginalProductKey
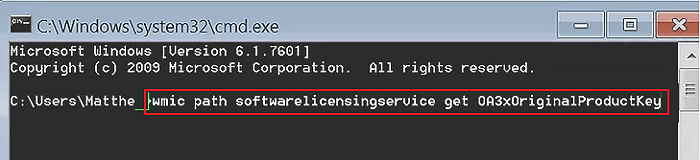
Step 3. Wait for the prompt to find your product key on a computer.
Method 5. Find Lost Product Key on Windows via Notepad
The last effective way that you can try is to run Notepad with certain commands and save the file as a product key finder.
It will automatically find the product key of your current OS. Here are the steps:
Step 1. Create a new notepad and paste the following content into the notepad:
Set WshShell = CreateObject(«WScript.Shell»)
MsgBox ConvertToKey(WshShell.RegRead(«HKLM\SOFTWARE\Microsoft\Windows NT\CurrentVersion\DigitalProductId»))
Function ConvertToKey(Key)
Const KeyOffset = 52
i = 28
Chars = «BCDFGHJKMPQRTVWXY2346789»
Do
Cur = 0
x = 14
Do
Cur = Cur * 256
Cur = Key(x + KeyOffset) + Cur
Key(x + KeyOffset) = (Cur \ 24) And 255
Cur = Cur Mod 24
x = x -1
Loop While x >= 0
i = i -1
KeyOutput = Mid(Chars, Cur + 1, 1) & KeyOutput
If (((29 — i) Mod 6) = 0) And (i <> -1) Then
i = i -1
KeyOutput = «-» & KeyOutput
End If
Loop While i >= 0
ConvertToKey = KeyOutput
End Function
Step 2. Go to File > Save As > Change the «Save as type» to «All Files».

Step 3. Name the notepad as productkey.vbs.
Step 4. Save the file to your desktop.
Step 5. Double-click the productkey file and you’ll be showing the product of your current operating system.
Recovering Lost Product Key on Windows Is Easy, Go and Find It Now
On this page, we included 5 methods that can help you recover lost product keys on Windows 11, 10, 8, 7 and even older versions of Windows.
Among the 5 methods, COA sticker and 1-click Product Key Finder — EaseUS Key Finder are the two easiest tricks that you can apply to recover a lost Windows serial key.
The other three methods, though a bit more complex, are still reliable that you can follow carefully to find the missing key. As long as the Windows product key is important, go and follow to find it now.
Applies ToWindows 11 Windows 10 Windows 8.1 Windows 7 Microsoft account dashboard
A Windows product key is a 25-character code used to activate Windows. It looks like this:
-
PRODUCT KEY: XXXXX-XXXXX-XXXXX-XXXXX-XXXXX
Locate your product key for Windows 10 or Windows 11
Depending on how you got your copy of Windows 10 or Windows 11, you’ll need either a 25-character product key or a digital license to activate it. A digital license is a method of activation in Windows 10 and Windows 11 that doesn’t require you to enter a product key. Without one of these, you won’t be able to activate your device.
Where to find your product key depends on how you got your copy of Windows.
Select any of the following to see more information:
The product key is preinstalled on your PC, included with the packaging the PC came in, or included on the Certificate of Authenticity (COA) attached to the PC. For more info, contact your hardware manufacturer, and for pictures of authentic product keys and COA labels, see How to tell your hardware is genuine.
The product key is on a label or card inside the box that Windows came in. For more info, contact the retailer that sold you Windows 10 or Windows 11. How to tell your software is genuine.
Find your product key in the confirmation email you received after buying Windows 10 or Windows 11 in a digital locker accessible through the retailer’s website.
The product key is in the confirmation email you received after buying your digital copy of Windows. Microsoft only keeps a record of product keys if you purchased from the Microsoft online store. You can find out if you purchased from Microsoft in your Microsoft account Order history.
If you upgraded to Windows 11 for free from Windows 10, or upgraded to Windows 10 for free from Windows 7 or Windows 8.1, you should have a digital license instead of a product key.
If you bought Windows 10 or Windows 11 Pro upgrade in the Microsoft Store app, you’ll receive a digital license instead of a product key in the confirmation email that was sent to confirm the purchase. That email address (MSA) will contain the digital license. You can use the digital license for activation.
For more information about digital licenses and product keys in Windows 10 and Windows 11, see the “Methods of Activation” section in Activate Windows.
Locate your product key for Windows 7 or Windows 8.1
A product key is usually required when uninstalling or reinstalling Windows 7 or Windows 8.1. Generally, if you bought a physical copy of Windows, the product key should be on a label or card inside the box that Windows came in. If Windows came preinstalled on your PC, the product key should appear on a sticker on your device. If you’ve lost or can’t find the product key, contact the manufacturer. To ensure your product key is genuine, see How to tell your software is genuine and How to tell your hardware is genuine.
Related links
For info about how to tell if your copy of Windows is genuine Microsoft software, see the How to tell page.
Need more help?
Want more options?
Explore subscription benefits, browse training courses, learn how to secure your device, and more.
Если для переустановки системы или иных целей вам требуется ключ продукта Windows 11, вы легко можете его посмотреть несколькими способами.
В этой пошаговой инструкции несколько способов узнать ключ продукта Windows 11 — OEM ключ предустановленной системы или Retail ключ установленной системы, если вы приобретали его. Заранее отмечу, что ключ часто и вовсе не требуется, о чем в последнем разделе статьи.
OEM и Retail ключ Windows 11 в ShowKeyPlus
Самый простой и быстрый способ посмотреть ключ продукта Windows 11, как OEM (хранящийся в UEFI ПК и ноутбуков с предустановленной системой) так и Retail (тот, который вы вводили самостоятельно при установке ОС) — простая бесплатная программа ShowKeyPlus. Порядок действий:
- Зайдите в магазин приложений Microsoft Store, используйте поиск, чтобы найти и установить ShowKeyPlus. Если вариант с Microsoft Store вам не подходит, можно использовать загрузку с GitHub — https://github.com/Superfly-Inc/ShowKeyPlus/releases

- Запустите приложение.
- Получите информацию о ключе продукта Windows 11 (и, возможно, других версий ОС, о чем подробнее ниже).


В отчете программы на вкладке «Home» вы увидите следующую важную в контексте рассматриваемой темы информацию:
- Installed Key — ключ продукта установленный в настоящий момент системы: это может быть Retail-ключ продукта, а может быть и «универсальный» ключ, в случае если при установке он не вводился и используется цифровая лицензия, привязанная к оборудованию.
- OEM Key — ключ продукта предустановленной при покупке системы (может отсутствовать), хранящийся в UEFI. Это может быть не только Windows 11, но и одна из предыдущих версий системы. Как правило, с помощью этого ключа (даже если он от предыдущей ОС) можно установить Windows 11 на этом же компьютере или ноутбуке.
- OEM Edition — система, которая была установлена на текущем компьютере производителем изначально, не обязательно Windows
Как посмотреть OEM-ключ продукта с помощью командной строки или PowerShell
Если на вашем устройстве была предустановлена Windows 11, 10, 8 или 8.1, вы можете посмотреть ключ предустановленной системы в командной строке. Для этого:
- Запустите Терминал Windows от имени администратора (сделать это можно через контекстное меню кнопки «Пуск»), командную строку от имени администратора, Windows PowerShell от имени администратора.
- В командной строке используйте команду (впрочем, она же будет работать и в PowerShell)
wmic path softwarelicensingservice get OA3xOriginalProductKey

- В PowerShell использовать следующий вариант команды
(Get-WmiObject -query "select * from SoftwareLicensingService").OA3xOriginalProductKey

Просмотр ключа продукта установленной Windows 11 с помощью скрипта PowerShell
Вы можете получить ключ продукта установленной Windows 11 вручную с помощью следующего скрипта PowerShell:
- Создайте текстовый файл с этим кодом и сохраните его (сохраняем в кодировке ANSI/Windows) с расширением ps1
#Main function Function GetWin11Key { $Hklm = 2147483650 $Target = $env:COMPUTERNAME $regPath = "Software\Microsoft\Windows NT\CurrentVersion" $DigitalID = "DigitalProductId" $wmi = [WMIClass]"\\$Target\root\default:stdRegProv" #Get registry value $Object = $wmi.GetBinaryValue($hklm,$regPath,$DigitalID) [Array]$DigitalIDvalue = $Object.uValue #If get successed If($DigitalIDvalue) { #Get producnt name and product ID $ProductName = (Get-itemproperty -Path "HKLM:Software\Microsoft\Windows NT\CurrentVersion" -Name "ProductName").ProductName $ProductID = (Get-itemproperty -Path "HKLM:Software\Microsoft\Windows NT\CurrentVersion" -Name "ProductId").ProductId #Convert binary value to serial number $Result = ConvertTokey $DigitalIDvalue $OSInfo = (Get-WmiObject "Win32_OperatingSystem" | select Caption).Caption If($OSInfo -match "Windows 11") { if($Result) { [string]$value ="ProductName : $ProductName `r`n" ` + "ProductID : $ProductID `r`n" ` + "Installed Key: $Result" $value #Save Windows info to a file $Choice = GetChoice If( $Choice -eq 0 ) { $txtpath = "C:\Users\"+$env:USERNAME+"\Desktop" New-Item -Path $txtpath -Name "WindowsKeyInfo.txt" -Value $value -ItemType File -Force | Out-Null } Elseif($Choice -eq 1) { Exit } } Else { Write-Warning "Запускайте скрипт в Windows 11" } } Else { Write-Warning "Запускайте скрипт в Windows 11" } } Else { Write-Warning "Возникла ошибка, не удалось получить ключ" } } #Get user choice Function GetChoice { $yes = New-Object System.Management.Automation.Host.ChoiceDescription "&Yes","" $no = New-Object System.Management.Automation.Host.ChoiceDescription "&No","" $choices = [System.Management.Automation.Host.ChoiceDescription[]]($yes,$no) $caption = "Подтверждение" $message = "Сохранить ключ в текстовый файл?" $result = $Host.UI.PromptForChoice($caption,$message,$choices,0) $result } #Convert binary to serial number Function ConvertToKey($Key) { $Keyoffset = 52 $isWin11 = [int]($Key[66]/6) -band 1 $HF7 = 0xF7 $Key[66] = ($Key[66] -band $HF7) -bOr (($isWin11 -band 2) * 4) $i = 24 [String]$Chars = "BCDFGHJKMPQRTVWXY2346789" do { $Cur = 0 $X = 14 Do { $Cur = $Cur * 256 $Cur = $Key[$X + $Keyoffset] + $Cur $Key[$X + $Keyoffset] = [math]::Floor([double]($Cur/24)) $Cur = $Cur % 24 $X = $X - 1 }while($X -ge 0) $i = $i- 1 $KeyOutput = $Chars.SubString($Cur,1) + $KeyOutput $last = $Cur }while($i -ge 0) $Keypart1 = $KeyOutput.SubString(1,$last) $Keypart2 = $KeyOutput.Substring(1,$KeyOutput.length-1) if($last -eq 0 ) { $KeyOutput = "N" + $Keypart2 } else { $KeyOutput = $Keypart2.Insert($Keypart2.IndexOf($Keypart1)+$Keypart1.length,"N") } $a = $KeyOutput.Substring(0,5) $b = $KeyOutput.substring(5,5) $c = $KeyOutput.substring(10,5) $d = $KeyOutput.substring(15,5) $e = $KeyOutput.substring(20,5) $keyproduct = $a + "-" + $b + "-"+ $c + "-"+ $d + "-"+ $e $keyproduct } GetWin11Key - Запустите PowerShell от имени администратора и используйте команду Set-ExecutionPolicy RemoteSigned чтобы разрешить выполнение локальных скриптов. Это можно сделать и без команд: Параметры — Конфиденциальность и защита — Для разработчиков, в разделе «PowerShell» отметить пункт «Измените политику выполнения так, чтобы можно было выполнять локальные сценарии PowerShell без подписи».
- Введите полный путь к файлу скрипта в окне PowerShell и нажмите Enter.
- Если всё пройдет успешно, вы увидите версию Windows (может отображаться Windows 10 вместо 11), ключ продукта и предложение сохранить его в текстовый файл.


Скрипт VBS для просмотра ключа установленной системы
Второй вариант — создать текстовый файл с расширением .VBS, в кодировке ANSI (Windows) и следующим кодом:
Set WshShell = CreateObject("WScript.Shell")
regKey = "HKLM\SOFTWARE\Microsoft\Windows NT\CurrentVersion\"
DigitalProductId = WshShell.RegRead(regKey & "DigitalProductId")
Win11ProductName = "Версия Windows 11: " & WshShell.RegRead(regKey & "ProductName") & vbNewLine
Win11ProductID = "ID продукта: " & WshShell.RegRead(regKey & "ProductID") & vbNewLine
Win11ProductKey = ConvertToKey(DigitalProductId)
ProductKeyLabel ="Ключ Windows 11: " & Win11ProductKey
Win11ProductID = Win11ProductName & Win11ProductID & ProductKeyLabel
MsgBox(Win11ProductID)
Function ConvertToKey(regKey)
Const KeyOffset = 52
isWin11 = (regKey(66) \ 6) And 1
regKey(66) = (regKey(66) And &HF7) Or ((isWin11 And 2) * 4)
j = 24
Chars = "BCDFGHJKMPQRTVWXY2346789"
Do
Cur = 0
y = 14
Do
Cur = Cur * 256
Cur = regKey(y + KeyOffset) + Cur
regKey(y + KeyOffset) = (Cur \ 24)
Cur = Cur Mod 24
y = y -1
Loop While y >= 0
j = j -1
winKeyOutput = Mid(Chars, Cur + 1, 1) & winKeyOutput
Last = Cur
Loop While j >= 0
If (isWin11 = 1) Then
keypart1 = Mid(winKeyOutput, 2, Last)
insert = "N"
winKeyOutput = Replace(winKeyOutput, keypart1, keypart1 & insert, 2, 1, 0)
If Last = 0 Then winKeyOutput = insert & winKeyOutput
End If
a = Mid(winKeyOutput, 1, 5)
b = Mid(winKeyOutput, 6, 5)
c = Mid(winKeyOutput, 11, 5)
d = Mid(winKeyOutput, 16, 5)
e = Mid(winKeyOutput, 21, 5)
ConvertToKey = a & "-" & b & "-" & c & "-" & d & "-" & e
End Function
После этого достаточно будет запустить файл, чтобы получить сведения о Windows 11, включая ключ продукта.

Обратите внимание, что в поле «Версия Windows 11» может быть указано: Windows 10 — это не проблема: почему-то на дату написания статьи в реестре Windows 11 хранится именно такая информация о версии.
Другие программы просмотра ключа продукта
На всякий случай ещё две программы, которые позволяют посмотреть ключ продукта Windows 11 или другой версии системы:
- NirSoft ProduKey — к программе негативно относятся некоторые антивирусы, но в качестве угрозы определяют именно возможность утащить ключи различных продуктов Майкрософт. Так или иначе, гарантий полной безопасности тут дать не могу.

- OEM Product Key Tool — https://neosmart.net/OemKey/ — утилита для просмотра OEM-ключа продукта, изначально для Windows 10, но работает и для Windows При отсутствии OEM-ключа сообщит об ошибке.

Во многих сценариях установки и переустановки Windows 11 ключ продукта пользователю не требуется:
- Если на ПК или ноутбуке была предустановлена Windows 11 — 8 от производителя, то ключ хранится в UEFI и именно он будет автоматически использован при чистой установке Windows 11 (в случае, если вы устанавливаете систему в UEFI-режиме).
- Если вы ранее получили Windows 11 путем обновления с предыдущей версии системы или как-то иначе, при этом система активирована с помощью цифровой лицензии (можно посмотреть в «Параметры» — «Система» — «Активация», подробнее: Как проверить статус активации Windows 11), то при чистой установке на этом же компьютере ключ вводить не обязательно: если вы нажмите «У меня нет ключа продукта», выберите ту же редакцию системы, которая была ранее установлена, то после установки и подключения к Интернету она будет активирована автоматически (так как серверы Майкрософт «помнят» о том, что на этом оборудовании была соответствующая лицензия).
Если вы обнаружили, что ваш ключ Windows 11 тот же, что у многих других, и легко ищется в Интернете, это говорит лишь о том, что система использует цифровую лицензию с привязкой к оборудованию, а ключ лишь определяет редакцию ОС (Pro, Домашняя).
Все способы:
- Способ 1: «Командная строка»
- Способ 2: «Windows PowerShell»
- Способ 3: Фирменное программное обеспечение
- Вопросы и ответы: 3
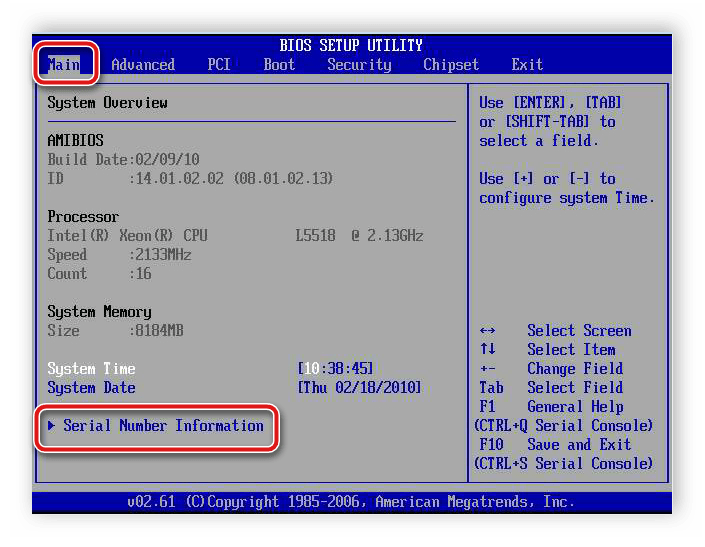
Важно! В этой статье речь будет идти о просмотре серийного номера компьютера средствами операционной системы Windows 10, что не предполагает такие методы, как просмотр надписи на наклейке устройства и поиск информации в BIOS. Поэтому, в случае необходимости, рекомендуем обратиться за помощью к другой статье на нашем сайте. Несмотря на то, что в ней речь идет о ноутбуке, перечисленные способы в большинстве своем будут полезны и для владельцев стационарных компьютеров.
Подробнее: Как узнать серийный номер ноутбука
Способ 1: «Командная строка»
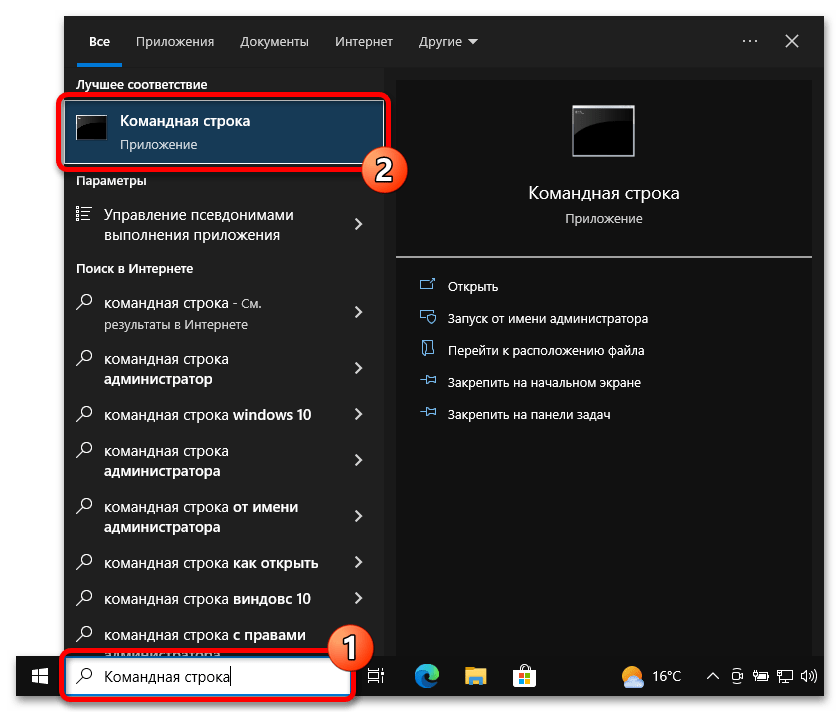
Наиболее распространенный способ просмотра серийного номера устройства — выполнение специального запроса в «Командной строке» операционной системы. Первостепенно необходимо будет запустить саму консоль. Сделать это можно многими способами, например, выполнив поиск по системе. Для этого установите курсор в поисковую строку на панели задач и введите запрос «Командная строка». Затем в результатах выдачи кликните по одноименному приложению.
Читайте также: Все способы запуска «Командной строки» в Windows 10
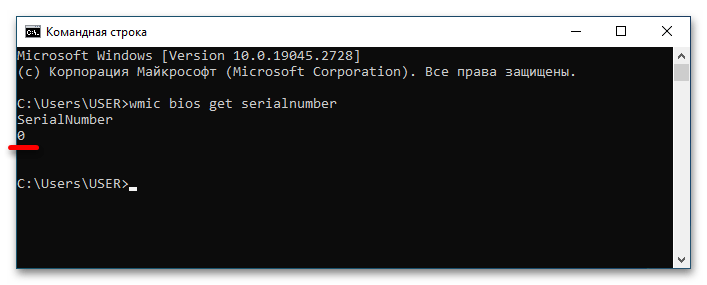
После того как на экране появится черное окно консоли, необходимо ввести вручную или скопировать приведенную ниже команду и нажать по клавише Enter:
wmic bios get serialnumber
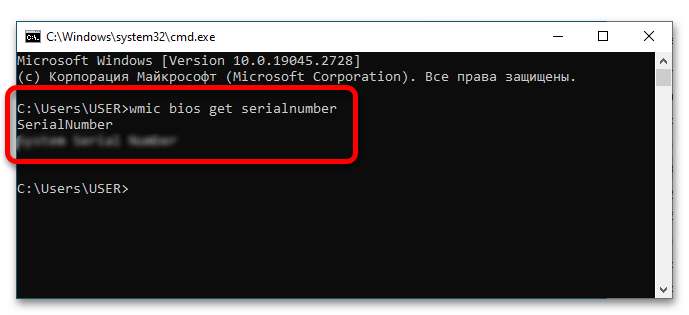
Обратите внимание! Этот способ подразумевает обращение системы к утилите ввода и вывода (BIOS), в которой серийный номер должен быть прописан поставщиком оборудования. Если в консоли после выполнения команды указан «0» (ноль), это означает, что нужных данных нет, тогда этот способ становится попросту бесполезным.
Способ 2: «Windows PowerShell»
«Windows PowerShell» тоже позволяет просмотреть серийный номер компьютера путем ввода специальной команды, более того, в отличие от «Командной строки», доступны две версии запроса.
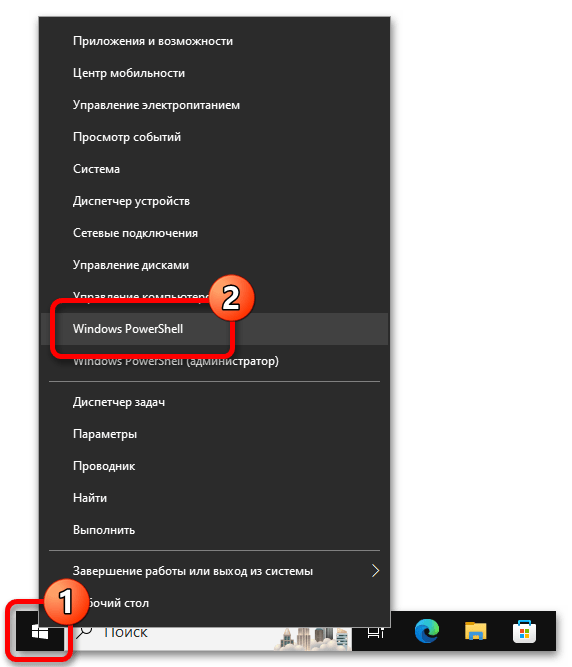
Для начала следует открыть непосредственно «PowerShell» любым доступным способом. В последних версиях Windows 10 проще всего это сделать через контекстное меню кнопки «Пуск». Для этого сначала нажмите по ней правой кнопкой мыши, а затем щелкните по строке «Windows PowerShell».
Читайте также: Все способы запуска «PowerShell» в Windows 10
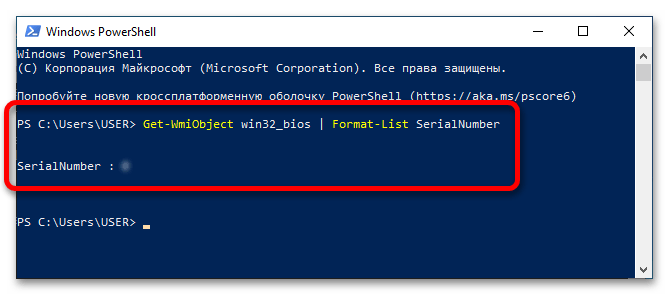
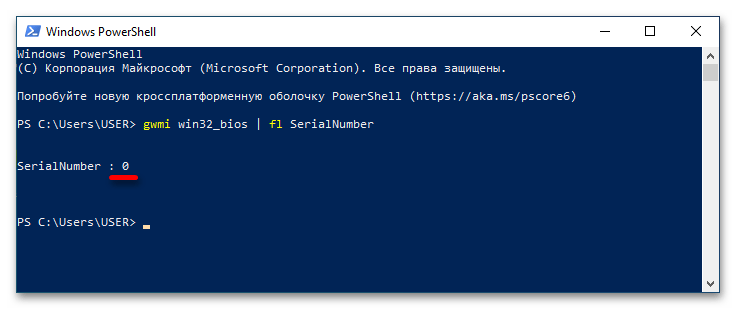
После появления окна вызываемого приложения дождитесь, пока отобразится строка запроса, в данном случае это «PS C:\Users\USER>», но у вас она может отличаться. Затем скопируйте и вставьте приведенную ниже команду и нажмите Enter:
Get-WmiObject win32_bios | Format-List SerialNumber
Если после выполнения команды по каким-то причинам серийный номер компьютера не выведется на экран, рекомендуется повторить попытку, только на этот раз отправить другой запрос, приведенный ниже:
gwmi win32_bios | fl SerialNumber
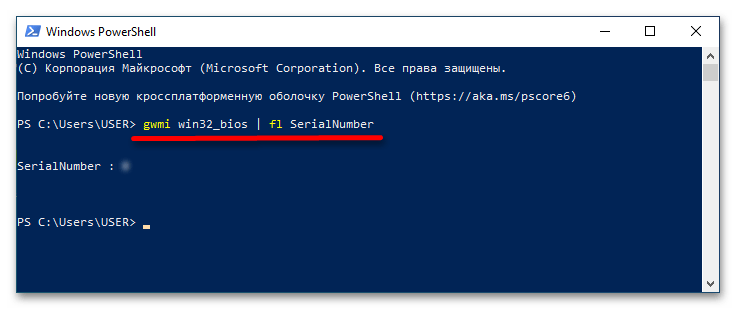
Важно! Как и в случае с «Командной строкой», после выполнения команды в Windows PowerShell следует обращение в BIOS для получения нужной информации. Если ее там не оказалось, в результатах будет отображаться «0» (ноль). В таком случае этот способ выполнения поставленной задачи неэффективен.
Способ 3: Фирменное программное обеспечение
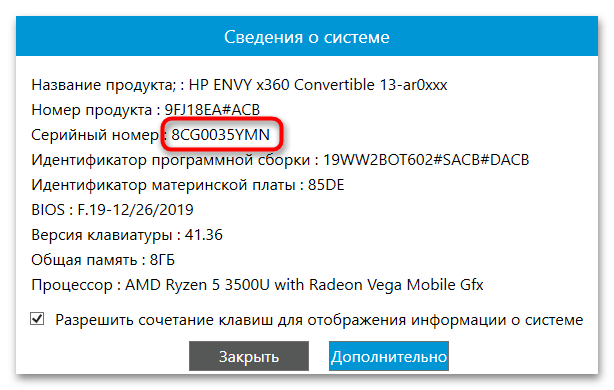
Современные компьютеры зачастую имеют фирменное программное обеспечение для настройки отдельных компонентов устройства и просмотра дополнительной информации о нем. С помощью таких приложений можно узнать в частности и серийный номер. Например, компьютеры от HP поставляются с предустановленной утилитой «HP System Event Utility», которая подходит для выполнения поставленной задачи.
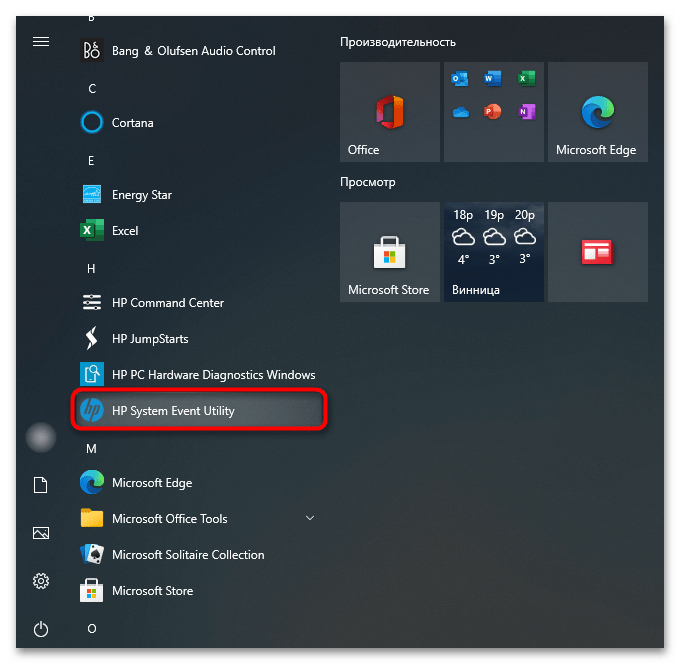
Достаточно просто найти ее в списке приложений меню «Пуск» и запустить. На экране сразу откроется информационное окно, в котором будет находиться серийный номер компьютера.
Примечание! В случае отсутствия фирменной программы на компьютере, загружать ее рекомендуется только с официальных ресурсов производителя компьютера, иначе имеется риск проникновения вредоносного ПО в операционную систему.
Читайте также: Методы удаления вируса с компьютера под управлением Windows 10
Наша группа в TelegramПолезные советы и помощь
Quick Tips
- Use Command Prompt: Open Command Prompt and type wmic path softwarelicensingservice get OA3xOriginalProductKey to retrieve your Windows product key.
- Registry Method: Navigate to HKEY_LOCAL_MACHINE\SOFTWARE\Microsoft\Windows NT\CurrentVersion\SoftwareProtectionPlatform in the Registry Editor to find your product key.
- Third-Party Tools: Use reliable third-party software like ProduKey or ShowKeyPlus to quickly find and back up your product key.
1. Using Command Prompt
Step 1: Press the Windows key, type Command Prompt, and click on Run as administrator.
Select Yes in the prompt.
Step 2: Type the following command and press Enter.
wmic path softwareLicensingService get OA3xOriginalProductKey

There you go. You will be shown your Windows product key when you press Enter. Pretty straightforward, right? There’s one more command line way to find the product key, but with Windows PowerShell.
2. Using Windows PowerShell
Step 1: Press the Windows key, type Windows PowerShell, and select Run as Administrator.
Select Yes in the prompt.
Step 2: Enter the following command and press Enter.
powershell "(Get-WmiObject -query 'select * from SoftwareLicensingService').OA3xOriginalProductKey"

There you go. This method is as easy as pie. We recommend you copy the above command, but if you are typing it, ensure you leave spaces and add dots, as shown above.
If Windows PowerShell begins behaving strangely, check out different ways to fix PowerShell popping up on Windows.
3. Using Registry Files
Step 1: Press the Windows key, type Registry Editor, and click on Run as administrator.
Select Yes in the prompt.
Step 2: Enter the below address into the Registry’s address bar.
Computer\HKEY_LOCAL_MACHINE\SOFTWARE\Microsoft\Windows NT\CurrentVersion\SoftwareProtectionPlatform
Step 3: In the right side panel, under Name, you will find BackupProductKeyDefault; right beside it, you will see your Windows product key.

Note: You may find the product key coming from the Command Prompt or PowerShell different from the product key coming from the Registry Editor. It might happen because you have upgraded or changed your Windows version.
1. What is a product key finder?
The product key finder is a tool for displaying Microsoft Windows product keys and other important information.
2. Are Windows keys stored in BIOS?
The Windows key is stored in the BIOS and invoked when there is an event that restores your operating system. The BIOS key is used to activate Windows automatically if you use the same edition of Windows.
3. Is the product ID the same as the product key?
They are not. The product ID is used to determine the level of service you are entitled to, whereas the product key is used to pair your license with your PC and validate its authenticity.
4. Is Windows 10 illegal without activation?
The installation of Windows without a license is acceptable. Activating it through unsolicited means without purchasing the key is, however, unlawful.
Although there are third-party tools that let you find your Windows product key, they pose the risk of a privacy breach. Besides, it is also worth considering that you can do it on your own without the need for a third-party tool.
Was this helpful?
Thanks for your feedback!
The article above may contain affiliate links which help support Guiding Tech. The content remains unbiased and authentic and will never affect our editorial integrity.