
Пройдите тест, узнайте какой профессии подходите
Работать самостоятельно и не зависеть от других
Работать в команде и рассчитывать на помощь коллег
Организовывать и контролировать процесс работы
Быстрый ответ
Необходим быстрый ответ? Вот краткое руководство:
Вместо username введите ваше имя пользователя MySQL, database_name замените на имя базы данных, а file.sql — на название файла. После этого вам потребуется ввести пароль. Команда переносит данные из file.sql напрямую в database_name, что обеспечивает быстродействие при работе с большими наборами данных.

Простота и надёжность — наше кредо!
Зачем усложнять, если можно применять простой и надёжный способ? Он снижает риск возникновения ошибок, что особенно важно при работе с крупными файлами SQL. Данная методика обеспечит гладкую и безопасную работу с данными.
Доскональная проверка — залог успеха
Стоит удостовериться в совместимости .sql файла с вашей версией MySQL перед началом работы. Убедитесь также, что файл целиком и неповрежден, и содержит всю необходимую информацию. Это позволит избежать внезапных ошибок и некорректного восстановления данных.
Права доступа
Злата часть — аккредитация. Убедитесь, что MySQL-сервер имеет доступ к файлу, и у пользователя базы данных есть нужные привилегии для импорта. Не помешает вспомнить систему привилегий MySQL, чтобы исключить внезапное возникновение сообщений типа «доступ запрещён».
Визуализация
Представим импорт на примере загрузки товаров в торговый автомат.
Процесс загрузки (🖥️💾):
Результат:
Таким образом, импорт — это процесс наполнения автомата сладостями!
Пошаговый импорт через консоль MySQL
Предпочитаете контролируемый подход? Используйте команду source внутри консоли MySQL для пошагового выполнения. Сначала выберите нужную базу данных:
Затем запустите файл:
Этот метод позволяет игнорировать ошибки без прерывания весь процесс. Так вы можете сфокусироваться на отладке в дальнейшем.
Особенности операционных систем
Не забывайте о специфике записи путей в различных ОС:
Работа с большими файлами
Если у вас большой SQL-файл, переместите его на корень диска C:\ для удобства доступа. К тому же, возможно разбиение большого файла на части для простоты работы.
Командная строка – ваш надежный инструмент
Предпочитаете работать через командную строку? Здорово! Ошибки и номера строк появляются прямо в процессе выполнения, что облегчает отладку. Пользователи MySQL-консоли могут потребовать логи для выявления и исправления ошибок.
Полезные материалы
- MySQL :: MySQL 8.0 Reference Manual :: 13.2.9 LOAD DATA Statement — Официальное руководство MySQL по команде LOAD DATA.
- How to import an SQL file using the command line in MySQL? – Stack Overflow — Советы комьюнити Stack Overflow по импорту .sql файлов через командную строку.
- How To Import and Export Databases in MySQL or MariaDB | DigitalOcean — Практическое руководство по импорту и экспорту баз данных в MySQL и MariaDB.
- MySQL :: MySQL Workbench Manual :: 6.5.1 Table Data Export and Import Wizard — Подробная инструкция по работе с инструментом MySQL Workbench.
- Import and export — phpMyAdmin 5.1.4 documentation — Рекомендации по использованию phpMyAdmin для импорта и экспорта данных.
- Importing Data into MariaDB – MariaDB Knowledge Base — Материалы о импорте данных в MariaDB, применимые и к MySQL.
- Technical help document — Советы по использованию HeidiSQL для экспорта и импорта данных SQL.

Are you struggling with importing MySQL database efficiently? Look no further! In this comprehensive step-by-step guide, we’ll walk you through the process of importing MySQL databases seamlessly.
From understanding the basics of importing databases to tackling common challenges and optimizing performance, we’ve got you covered. You’ll find clear instructions, helpful tips, and best practices to ensure a smooth importing process.
Table Of Contents
- Understanding the MySQL Import Process
- What are the Methods for Importing MySQL Databases?
- Method 1: Import SQL Database using Command Line
- Method 2: Import SQL Database using phpMyAdmin
- Method 3: Import SQL Database using MySQL Workbench
- Troubleshooting Common Issues During the Import Process
Understanding the MySQL Import Process
Before diving into the practical aspects of importing MySQL databases, it’s important to have a solid understanding of the overall import process. MySQL provides various tools and methods for importing databases, each serving different purposes and catering to specific needs. By familiarizing yourself with these tools and techniques, you can choose the most appropriate approach for your import requirements.
One of the primary tools for importing MySQL databases is the MySQL command-line client, which allows you to execute SQL statements and import data from external files. Additionally, MySQL Workbench, a visual database design tool, offers a user-friendly interface for importing and managing databases. phpMyAdmin, a web-based interface, also simplifies the import process with its graphical interface. Understanding how these tools work together can streamline your import process and improve efficiency.
When importing MySQL databases, it’s essential to consider factors such as data volume, structure, and compatibility with the target database. By carefully planning and preparing for the import process, you can avoid common pitfalls and ensure a successful migration. With a clear understanding of the MySQL import process, you’ll be better equipped to handle various challenges that may arise during the import process.
Important: Before initiating the import process, it’s important to prepare the database to ensure a smooth and successful migration. Start by backing up your existing database to prevent data loss in case of any unforeseen issues during the import process. Create a backup file that can be easily restored in case of emergencies, providing an added layer of security and peace of mind.
What are the Methods for Importing MySQL Databases?
With the database prepared for import, it’s time to delve into the step-by-step process of importing MySQL databases. There are several methods to import an SQL database into MySQL, including using the Command line, phpMyAdmin, MySQL Workbench, and various database management tools like DBeaver, HeidiSQL, and Navicat. Follow these instructions carefully to ensure a seamless and efficient data migration.
Method 1: Import SQL Database using Command Line
Many database administrators and developers prefer using the command line to import SQL database files into MySQL due to its efficiency, especially for handling large files or automating repetitive tasks. In order to import via the command line, use the following steps:
1. Open Command Prompt or Terminal
On Windows, open Command Prompt, or on macOS/Linux, open Terminal.
2. Navigate to MySQL Directory (Skip this step if your OS wasn’t Windows)
Change to the directory where MySQL is installed. This is often required to access the MySQL command-line tools. Replace path with your actual MySQL installation path.
cd path/to/mysql/bin3. Login to MySQL Server
Use the mysql command to log in to your MySQL server. Replace username with your MySQL username.
mysql -u username -pAfter entering the command, you will be prompted to enter your password.

4. Create a Database (if needed)
If the database to which you want to import does not exist, create it using:
CREATE DATABASE mydatabase;Replace mydatabase with your desired database name.
5. Select Database
Use the following command to select the database where you want to import the SQL database file.
USE mydatabase;
6. Import SQL Database File
Execute the following command to import your SQL database file:
SOURCE path/to/your/file.sql;Replace path/to/your/file.sql with the path to your SQL database file.

Method 2: Import SQL Database using phpMyAdmin
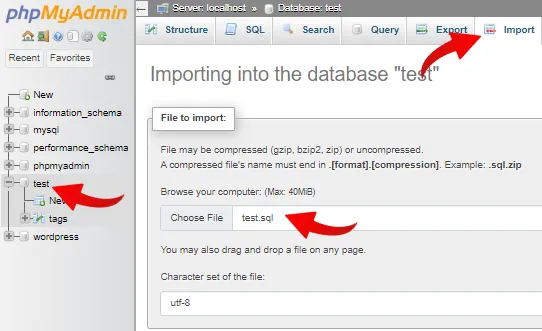
1. Log in to phpMyAdmin and Select the Database
Access your phpMyAdmin interface through your web browser. Click on the database you want to import the SQL database file into. If it doesn’t exist, create it using the phpMyAdmin interface.

3. Import Tab
Click on the ‘Import’ tab in the top menu.

4. Upload the SQL File
Click on the ‘Choose File’ button and select the SQL database file from your local machine.

5. Start the Import
After selecting the database file, scroll down and click on the ‘Go’ button to start the import process.

Method 3: Import SQL Database using MySQL Workbench
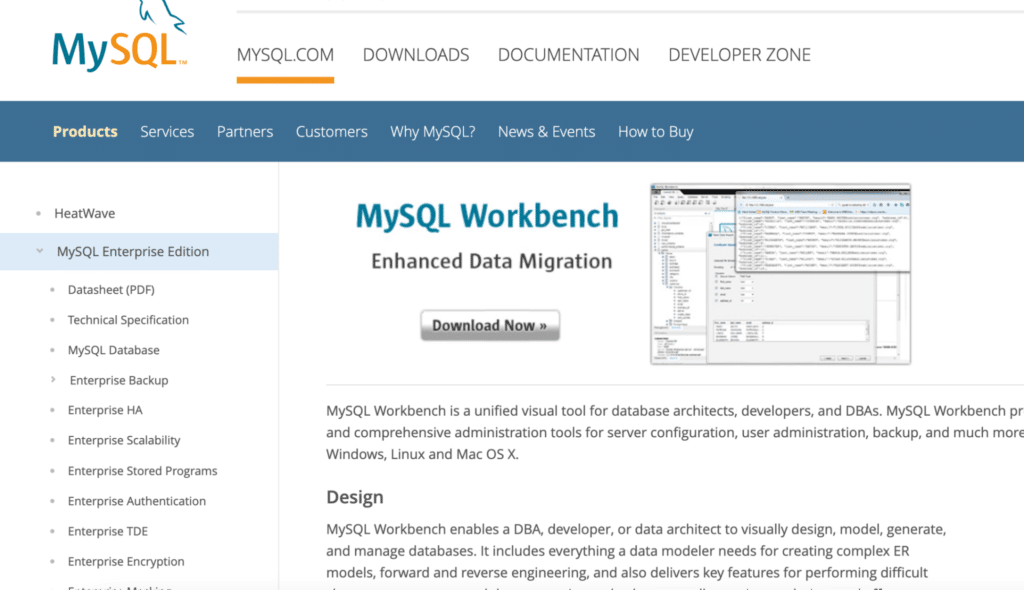
MySQL Workbench is a unified visual tool for database architects, developers, and DBAs. It provides data modeling, SQL development, and comprehensive administration tools for server configuration and user administration.
1. Open MySQL Workbench and Connect to the Database
Establish a connection to your MySQL database server.
2. Open Data Import/Restore
Go to the “Server” menu and select “Data Import”.

3. Import from SQL File
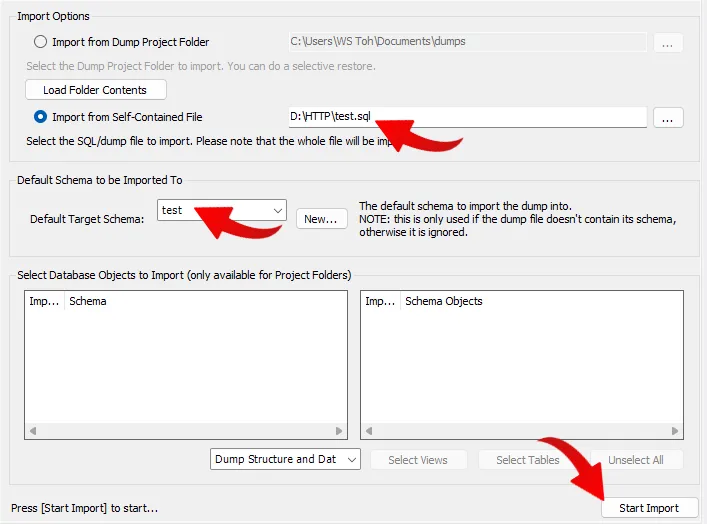
A new screen with various data import choices will appear. Choose the path where your SQL script is located first. It may be contained in a single file or a folder with several SQL files for various tables. Select the suitable option. Choose the option “Import from Self-Contained File”. Then browse and select your SQL file.

4. Select the Target Schema (Target Database)
Choose the database into which you want to import the data. If the database does not exist, you can create it within MySQL Workbench.

5. Start Import
Click on the “Start Import” button to begin the import process.
By following these steps meticulously and paying attention to details, you can import MySQL databases efficiently and accurately. Remember to take backups and keep track of the import progress to avoid any unexpected issues that may arise during the process.
Troubleshooting Common Issues During the Import Process
Despite careful planning and preparation, you may encounter some common issues during the import process. These issues can range from syntax errors in the SQL database file to conflicts with existing data in the target database. By being prepared to troubleshoot these issues proactively, you can minimize downtime and ensure a successful import.
If you encounter syntax errors or warnings during the import process, review the SQL file for any typos or incorrect syntax. Make necessary corrections and re-import the database file to resolve the issue. In case of conflicts with existing data, consider dropping or truncating the target tables before importing the data to avoid duplication or inconsistency.
Another common issue during database import is running out of memory or disk space. Ensure that you have sufficient resources available to accommodate the import process and consider optimizing the import settings for better performance. By addressing these common issues promptly and effectively, you can overcome challenges and complete the import process successfully.
Database administrators and developers must know how to import MySQL databases efficiently. This article walks you through the MySQL import procedure, preparation, and troubleshooting to guarantee a successful migration. You can optimize your import process, maintain data integrity, and increase performance by adhering to best practices and remaining up to date with database management trends.
Unleash the Power of Windows VPS
Experience seamless performance and reliability with our cutting-edge Windows VPS solutions. Scale your business with ease and enjoy full control.
Get Your VPS Now
Welcome to a tutorial on how to import SQL files. So you have downloaded an SQL file from the Internet, and don’t know how to import it?
There are 3 common ways to import an SQL file into MYSQL:
- Run
mysql -u USER -p DATABASE_NAME < PATH/TO/FILE.sqlin the command line (or terminal). - Use MySQL Workbench to import SQL files.
- Use a web-based database manager such as phpMyAdmin.
Let us walk through these methods step-by-step in this guide – Read on!
TABLE OF CONTENTS
IMPORT SQL FILE IN COMMAND LINE
The easiest method, doesn’t even need to install any tools – Just use the command line to import SQL files.
IMPORT COMMAND EXAMPLE
D:\http\>mysql -u root -p test < d:\http\test.sql
Enter password:

D:\http\>
Yep, it’s that simple, just run the command mysql -u USER -p DATABASE < PATH/FILE.SQL.
WINDOWS “UNKNOWN COMMAND”
D:\http\>mysql -u root -p test < d:\http\test.sql
'mysql' is not recognized as an internal or external command,
operable program or batch file.
For Windows users, if you get the “MySQL is not recognized” error, you will need to add the MySQL folder to the system path.
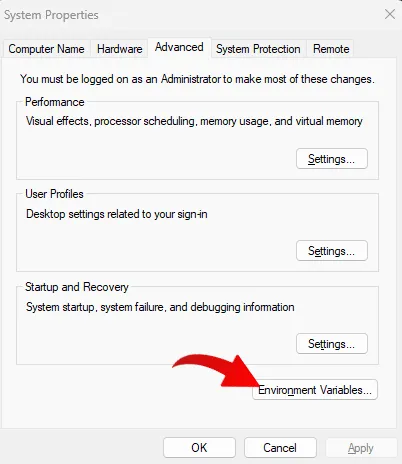
START > SEARCH FOR “SYSTEM ENVIRONMENT”
ENVIRONMENTAL VARIABLES
SYSTEM VARIABLES > PATH
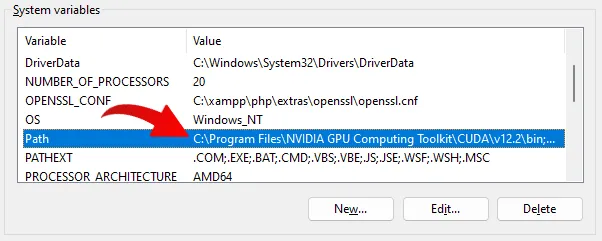
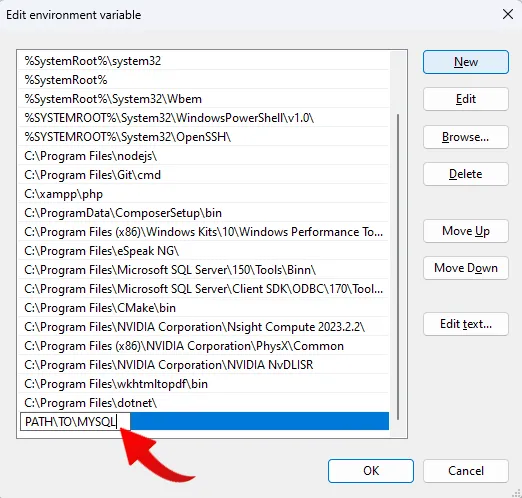
ADD MYSQL TO THE PATH
IMPORT SQL FILE WITH MYSQL WORKBENCH
If you are uncomfortable with the command line or have to manage multiple databases, Oracle offers a free management tool called MySQL Workbench.
DOWNLOAD & INSTALLATION
You can get the latest version of MySQL Workbench from the official MySQL website. Installation is very straightforward, just launch the installer and hit “next”.
HOW TO IMPORT WITH MYSQL WORKBENCH
ADD MYSQL CONNECTION
Launch MySQL Workbench. Add a connection to your database, then click on it.
SERVER > DATA IMPORT
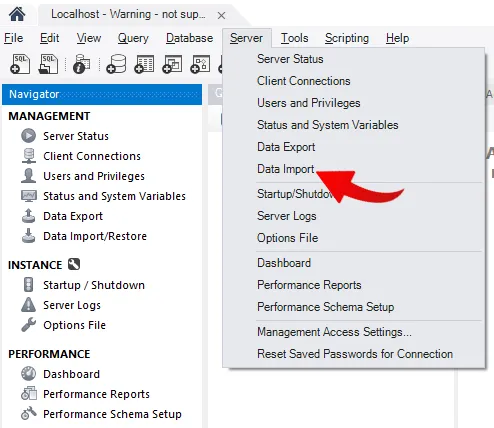
After connecting to your database, Server > Data Import.
SELECT FILE > SELECT DATABASE > START IMPORT
Lastly, just choose the SQL file to import, and where to import it into.
PHPMYADMIN IMPORT SQL FILE
This final method is another tool that is made in PHP – If you have installed the XAMPP server, then you already have it.
DOWNLOAD & INSTALLATION
If you have installed the XAMPP server, simply access http://localhost/phpmyadmin. If not, you can also get the latest version of phpMyAdmin from their official website. There is no installation required, just unzip it into your “public HTML” folder.
HOW TO IMPORT WITH PHPMYADMIN
You can probably figure this one on your own… Select a database > Import > Choose File > Go.
UPLOAD FILE SIZE LIMIT
php.ini
upload_max_filesize = 100M
post_max_size = 100M
Please take note that phpMyAdmin is limited by the upload limit set in the php.ini file – You will want to avoid large SQL files, or at least zip them before uploading. Alternatively, you can change the limits in php.ini .
WHICH IS THE BEST METHOD?
Well, everyone has their preferences – Some prefer to not install anything and import SQL files in the command line, while a few like to use the Workbench to manage multiple databases at the same time. All 3 methods work fine, just test it out yourself and stick with the one you are most comfortable with.
LINKS & REFERENCES
- MySQL Shell
- MySQL Import
- MySQL Dump
- MySQL Workbench
- phpMyAdmin
THE END
Thank you for reading, and we have come to the end of this guide. I hope that it has helped you in your project, and if you want to share anything with this guide, please feel free to comment below. Good luck and happy coding!
Несмотря на то, что есть phpMyAdmin (и куча других помощников для работы с mysql), часто, для экспорта и импорта удобнее пользоваться консольными командами mysql. Процесс импорта экспорта происходит намного быстрее и нет необходимости заморачиваться с временем работы скрипта и размером файла (это актуально когда Ваш дамп базы достаточно большой).
Импорт данных в БД
Открываем консоль Windows (Win + R и вводим cmd).
Первый вариант импорта. Вводим команду в консоль:
mysql -u user_login -p user_pass db_name < path/to/file/dump_file_name.sql
где user_login — имя пользователя БД, user_pass — пароль пользователя, path/to/file/dump_file_name.sql — путь и имя файла содержащего дамп БД для импорта (Например: C:/my_file.sql).
Второй вариант импорта, вводим команду в консоль:
mysql -u user_login -p user_pass -h host_name
где user_login — имя пользователя БД, user_pass — пароль пользователя, host_name — имя хоста (обычно localhost).
Выбираем БД в которую необходимо импортировать:
use db_name
где db_name — имя БД в которую необходимо импортировать имеющийся дамп.
И импортируем командой:
source path/to/file/dump_file_name.sql
где path/to/file/dump_file_name.sql — путь и имя файла содержащего дамп БД для импорта (Например: C:/my_file.sql).
Экспорт данных из БД
Делаем экспорт посредством удобного mysqldump :
mysqldump -u user_login -p user_pass db_name > path/to/file/dump_file_name.sql
где user_login — имя пользователя БД, user_pass — пароль пользователя, path/to/file/dump_file_name.sql — путь и имя файла который будет содержать данные экспорта БД (Например: C:/my_file.sql).
Are you looking to import a MySQL database?
Whether you’re a beginner or an experienced professional, this guide will walk you through various methods to import your MySQL database efficiently.
We’ll cover everything from basic import techniques to advanced strategies, ensuring you have the knowledge to handle any import scenario.
MySQL Database Import: Understanding the Basics
What is a MySQL database import?
A MySQL database import is the process of loading data from an external source into a MySQL database. This can involve transferring entire databases, specific tables, or data sets from one MySQL server to another or from a backup file into a live database.
Why import databases in MySQL?
Importing databases in MySQL serves several purposes:
- Data migration: Moving data between different servers or environments
- Backup restoration: Recovering data from a previous backup
- Development and testing: Creating replicas of production databases for testing
- Data consolidation: Merging data from multiple sources into a single database
Common scenarios for database import
- Server upgrades or migrations
- Replicating production data in development environments
- Restoring data after system failures
- Transferring data between different database management systems
Key challenges in database import processes
- Ensuring data integrity during the transfer
- Managing large datasets efficiently
- Handling different character encodings and data formats
- Resolving conflicts with existing data or schema
Difference between MySQL import and restore
While both processes involve bringing data into a MySQL database, they differ in their purpose and execution:
- Import: Typically refers to bringing in new data or merging data from external sources. It may involve transforming or mapping data to fit the target schema.
- Restore: Specifically relates to recreating a database from a backup. It aims to return the database to a previous state exactly as it was when the backup was created.
Preparing for MySQL Database Import
Creating a backup of your existing database
Before importing new data, it’s crucial to back up your current database to prevent data loss. Use the following command:
mysqldump -u [username] -p [database_name] > backup.sql
Choosing the right import method for your needs
Consider these factors when selecting an import method:
- Data size: Command-line methods are often better for large datasets
- User interface preference: GUI tools like MySQL Workbench may be more user-friendly
- Technical expertise: Command-line methods require more MySQL knowledge
- Automation requirements: Command-line methods are easier to script and automate
Setting up the necessary tools and permissions
- Ensure MySQL is installed and running
- Verify you have the necessary user permissions for import operations
- Install any required tools (e.g., MySQL Workbench, phpMyAdmin)
Considerations for importing large MySQL databases
- Use compressed dump files to reduce transfer time
- Consider splitting large dumps into smaller chunks
- Optimize your MySQL server configuration for import operations
- Use the –quick option with mysqldump to reduce memory usage
Method 1: Importing MySQL Database Using Command Line
Step-by-step guide for command line import
- Open your terminal or command prompt
- Navigate to the directory containing your SQL dump file
- Connect to your MySQL server:
mysql -u [username] -p
- Create a new database (if necessary):
CREATE DATABASE [database_name];
- Select the database:
USE [database_name];
- Import the SQL file:
source [filename].sql;
ormysql -u [username] -p [database_name] < [filename].sql
Useful MySQL commands for import operations
- SHOW DATABASES;: List all databases
- SHOW TABLES;: List all tables in the current database
- DESCRIBE [table_name];: Show the structure of a specific table
- SELECT COUNT(*) FROM [table_name];: Verify the number of imported records
Troubleshooting common command line import issues
- “Access denied” errors: Check user permissions
- “Unknown database” errors: Ensure the database exists or create it
- Syntax errors: Verify the SQL file’s content and format
When to use command line import (pros and cons)
Pros:
- Fast and efficient for large datasets
- Easy to automate and script
- Provides more control over the import process
Cons:
- Requires command-line knowledge
- Less visual feedback during the import process
- Potentially intimidating for non-technical users
Importing specific tables from a MySQL dump file
To import only specific tables:
- Open the dump file and locate the desired table definitions
- the relevant CREATE TABLE and INSERT statements
- Create a new SQL file with these statements
- Import the new file using the method described above
Method 2: Importing MySQL Database with MySQL Workbench
MySQL Workbench is a visual database design and management tool that provides a user-friendly interface for various MySQL operations, including database import.
Step-by-step guide for importing using MySQL Workbench
- Open MySQL Workbench and connect to your MySQL server
- Go to “Server” > “Data Import”
- Choose “Import from Self-Contained File”
- Browse and select your SQL dump file
- Select the target schema or create a new one
- Click “Start Import” to begin the process
Tips for optimizing large database imports
- Use the “Advanced” options to enable “Use Bulk Insert” for faster imports
- Consider splitting the import into multiple transactions
- Monitor server resource usage during import and adjust as needed
Handling errors during MySQL Workbench import
- Check the output console for specific error messages
- Verify file permissions and database user privileges
- Ensure the SQL file is compatible with your MySQL version
Method 3: Importing MySQL Database via phpMyAdmin
Introduction to phpMyAdmin
phpMyAdmin is a web-based MySQL administration tool that offers an intuitive interface for database management tasks, including imports.
Step-by-step guide for phpMyAdmin import
- Log in to phpMyAdmin
- Select the target database from the left sidebar
- Click the “Import” tab in the top menu
- Choose the SQL file to import
- Select appropriate options (e.g., character set, format)
- Click “Go” to start the import process
Handling file size limitations in phpMyAdmin
- Check your PHP configuration for upload_max_filesize and post_max_size
- Consider splitting large files into smaller chunks
- Use compression (e.g., gzip) to reduce file size
Comparing phpMyAdmin to other import methods
phpMyAdmin vs. Command Line:
- Easier for beginners, but potentially slower for large imports
- Provides a visual interface but may have file size limitations
phpMyAdmin vs. MySQL Workbench:
- Web-based, making it accessible from any browser
- May have fewer advanced features compared to MySQL Workbench
Advanced MySQL Import Techniques
Scheduling regular MySQL database imports
Use cron jobs (Linux) or Task Scheduler (Windows) to automate regular imports:
- Create a shell script or batch file with your import command
- Schedule the script to run at desired intervals
Automating imports for up-to-date analysis
Combine scheduled imports with data processing scripts to maintain current analytics:
- Set up a cron job for regular imports
- Create a script to process the imported data
- Schedule the processing script to run after each import
Using Coefficient
For easy data analysis, consider connecting MySQL to Google Sheets or importing MySQL data into Excel. These methods allow for real-time data access and analysis directly in spreadsheet applications.
MySQL Imports to Spreadsheets
Coefficient offers a unique approach to database imports:
- Connect Coefficient to your MySQL database
- Use the “Import from” feature in the Coefficient sidebar
- Select tables or write custom SQL queries
- Import data directly into your spreadsheet
This method allows for easy data manipulation and analysis within familiar spreadsheet tools.
Best Practices for MySQL Database Import
Ensuring data integrity during import
- Verify data types and constraints before import
- Use transactions to ensure all-or-nothing imports
- Validate imported data against source data
Optimizing import performance
- Disable foreign key checks during import:
SET FOREIGN_KEY_CHECKS=0;
- Increase innodb_buffer_pool_size for better performance
- Use bulk insert statements when possible
Security considerations for database imports
- Use encrypted connections for remote imports
- Limit import user privileges to necessary operations only
- Sanitize and validate all imported data
Handling character encoding problems during import
- Specify the correct character set in your import command:
mysql –default-character-set=utf8mb4 -u [username] -p [database_name] < [filename].sql
- Ensure the source and target databases use compatible character encodings
- Use the SET NAMES command before import if necessary
Troubleshooting Common MySQL Import Issues
Resolving syntax errors in SQL files
- Check for missing semicolons at the end of statements
- Verify that all reserved words are properly escaped
- Ensure compatibility between the SQL file version and your MySQL server version
Dealing with large dataset imports
- Use the –max_allowed_packet option to increase the allowed packet size
- Split large imports into smaller batches
- Consider using LOAD DATA INFILE for faster imports of large datasets
Addressing permission and user privilege issues
- Verify that the importing user has necessary privileges:
SHOW GRANTS FOR ‘username’@’hostname’; - Grant additional privileges if needed:
GRANT ALL PRIVILEGES ON database_name.* TO ‘username’@’hostname’;
Import MySQL Databases with Ease
Importing MySQL databases is crucial for effective data management. But handling large imports and keeping data synchronized across systems can be challenging.
Ready to take your MySQL data management to the next level?
Coefficient connects MySQL directly to your spreadsheets, offering automated data syncing and dynamic reporting. Streamline your database management today.