
Learn how to set up a local connection between winforms and mySQL.
XAMPP is a free and open source cross-platform web server solution stack package developed by Apache Friends, consisting mainly of the Apache HTTP Server, MariaDB database, and interpreters for scripts written in the PHP and Perl programming languages.
If you use xampp, you probably know how easy is to create and maintain databases with the integrated module of phpmyadmin. You may find easily to work with PHP, but, if you have .NET knowledge you can start working with it too.
MySQL offers a connector a easy connector that will allow you to execute queries to phpmyadmin from your winform.
In this article we’ll learn how to access a database created in phpmyadmin using winforms in C# easily.
Requirements
- Visual Studio (any version).
- MySQL .NET Connector Extension.
- XAMPP Distribution (we’ll assume that you know how to use mysql and xampp).
Implementation
This task is more easy than you think, to achieve a succesfully implementation follow these steps :
- Add the reference to the MySQL connector to your winform project.
- Create your database (ignore if you already have any) in MySQL with PHPMyAdmin.
- Start to execute queries.
Add the reference to the MySQL connector to the project
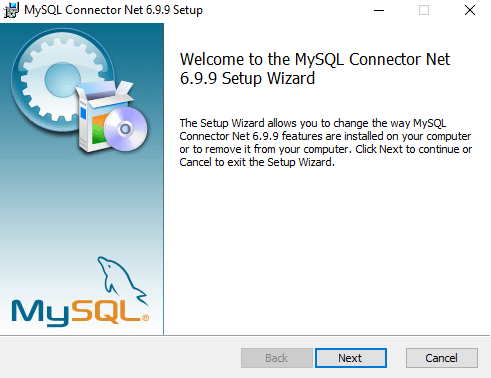
To get started, you need obligatory the .NET MySQL extension installed in your system as we need to add the reference in our project later. You can choose one of the latest version in the official website of MySQL.
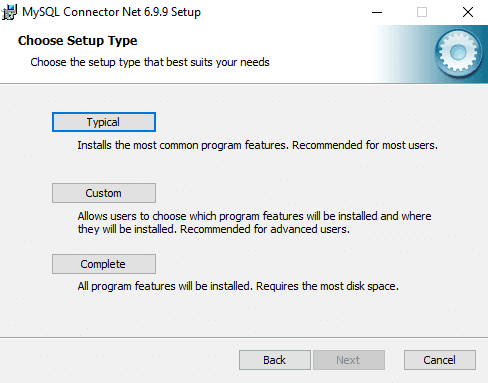
You can choose wether a complete installation or typical.
After the installation, we are going to proceed to create an empty Winforms project in Visual Studio as you usually do.
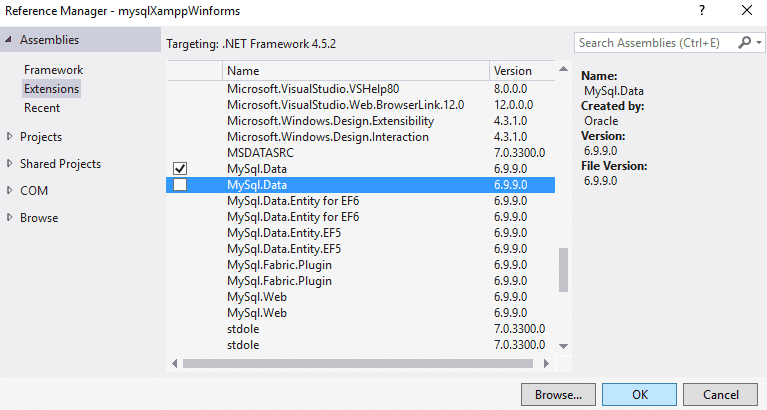
Now we need to add the reference to the mysql connector in our project. Locate the solution explorer in the right top corner of Visual Studio when your project is open, use right click on References and then select Add Reference from the context menu.
In the shown menu, navigate to Extensions and select the checkbox from the list the MySql.Data (MySql.Data.dll) and then click on OK.
Now we’ll be able to connect to execute queries to MySQL with C#.
Creating a test database in phpmyadmin (localhost)
As mentioned before, we assume that you already have Xampp installed on your system and you know how to use it.
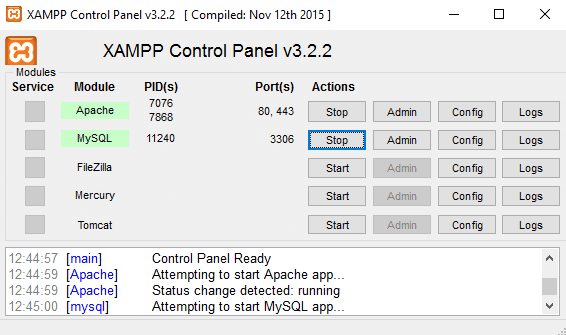
First, do not forget to enable the apache and mysql services in the xampp panel (which is recommended in Administrator mode).
Now navigate in your browser to http://localhost/phpmyadmin and go to the databases area.
Create a database (in this example our database will be test) and create a table named user.
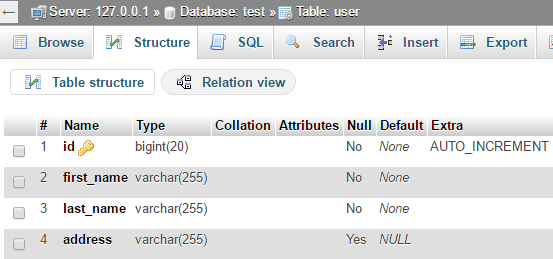
Note
Remember to enable the autoincrementable option to the id field, otherwise you’ll need to add an id everytime you insert a row.
Now that our database «test» contains at least one table «user», we can start executing queries.
Using C# to connect and execute queries
Now comes the fun part ! we’ll write some code to interact with the MySQL database. Primary, don’t forget to add the using statement of the reference in your class :
using MySql.Data.MySqlClient;You can understand how works the connection and how to execute a query with the following snippet :
// Change the username, password and database according to your needs
// You can ignore the database option if you want to access all of them.
// 127.0.0.1 stands for localhost and the default port to connect.
string connectionString = "datasource=127.0.0.1;port=3306;username=root;password=;database=test;";
// Your query,
string query = "SELECT * FROM user";

// Prepare the connection
MySqlConnection databaseConnection = new MySqlConnection(connectionString);
MySqlCommand commandDatabase = new MySqlCommand(query, databaseConnection);
commandDatabase.CommandTimeout = 60;
MySqlDataReader reader;

// Let's do it !
try
{
    // Open the database
    databaseConnection.Open();

    // Execute the query
    reader = commandDatabase.ExecuteReader();

    // All succesfully executed, now do something

    // IMPORTANT :
    // If your query returns result, use the following processor :

    if (reader.HasRows)
    {
        while (reader.Read())
        {
            // As our database, the array will contain : ID 0, FIRST_NAME 1,LAST_NAME 2, ADDRESS 3
            // Do something with every received database ROW
            string[] row = { reader.GetString(0), reader.GetString(1), reader.GetString(2), reader.GetString(3) };
        }
    }
    else
    {
        Console.WriteLine("No rows found.");
    }

    // Finally close the connection
    databaseConnection.Close();
}
catch (Exception ex)
{
    // Show any error message.
    MessageBox.Show(ex.Message);
}
And that’s it ! Basically, you just need to change the query and start testing. You can read more about the connection string and all the available properties here.
Basic examples of queries
In these examples we are going to execute the most basic tasks to execute (CRUD):
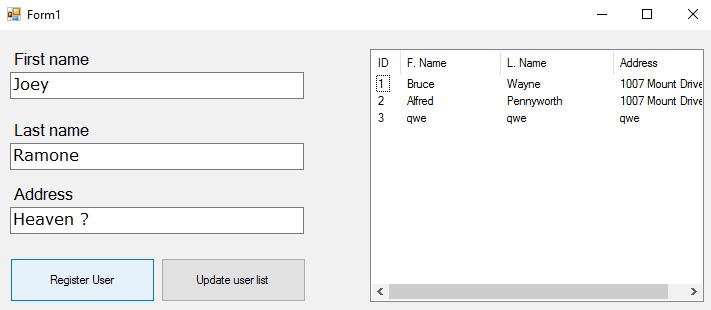
Note that we’ll use a simple listView component (with 4 columns : id,first name, last name and address), 3 textBox and 2 Buttons.
Create
In the following snippet, we’ll create a register in the test database :
private void SaveUser()
{
    string connectionString = "datasource=127.0.0.1;port=3306;username=root;password=;database=test;";
    string query = "INSERT INTO user(`id`, `first_name`, `last_name`, `address`) VALUES (NULL, '"+textBox1.Text+ "', '" + textBox2.Text + "', '" + textBox3.Text + "')";
    // Which could be translated manually to :
    // INSERT INTO user(`id`, `first_name`, `last_name`, `address`) VALUES (NULL, 'Bruce', 'Wayne', 'Wayne Manor')

    MySqlConnection databaseConnection = new MySqlConnection(connectionString);
    MySqlCommand commandDatabase = new MySqlCommand(query, databaseConnection);
    commandDatabase.CommandTimeout = 60;

    try
    {
        databaseConnection.Open();
        MySqlDataReader myReader = commandDatabase.ExecuteReader();

        MessageBox.Show("User succesfully registered");

        databaseConnection.Close();
    }
    catch (Exception ex)
    {
        // Show any error message.
        MessageBox.Show(ex.Message);
    }
}
Show
In the following snippet we’ll list all the users in the test database in a listview (if available or show in the console) :
private void listUsers()
{
    string connectionString = "datasource=127.0.0.1;port=3306;username=root;password=;database=test;";
    // Select all
    string query = "SELECT * FROM user";

    MySqlConnection databaseConnection = new MySqlConnection(connectionString);
    MySqlCommand commandDatabase = new MySqlCommand(query, databaseConnection);
    commandDatabase.CommandTimeout = 60;
    MySqlDataReader reader;

    try
    {
        databaseConnection.Open();
        reader = commandDatabase.ExecuteReader();
        // Success, now list

        // If there are available rows
        if (reader.HasRows)
        {
            while (reader.Read())
            {
                                     ID                              First name                  Last Name                    Address
                Console.WriteLine(reader.GetString(0) + " - " + reader.GetString(1) + " - " + reader.GetString(2) + " - " + reader.GetString(3));
                // Example to save in the listView1 :
                //string[] row = { reader.GetString(0), reader.GetString(1), reader.GetString(2), reader.GetString(3) };
                //var listViewItem = new ListViewItem(row);
                //listView1.Items.Add(listViewItem);
            }
        }
        else
        {
            Console.WriteLine("No rows found.");
        }

        databaseConnection.Close();
    }
    catch (Exception ex)
    {
        MessageBox.Show(ex.Message);
    }
}
Update
Update the fields of a row with id :
private void updateUser()
{
    string connectionString = "datasource=127.0.0.1;port=3306;username=root;password=;database=test;";
    // Update the properties of the row with ID 1
    string query = "UPDATE `user` SET `first_name`='Willy',`last_name`='Wonka',`address`='Chocolate factory' WHERE id = 1";

    MySqlConnection databaseConnection = new MySqlConnection(connectionString);
    MySqlCommand commandDatabase = new MySqlCommand(query, databaseConnection);
    commandDatabase.CommandTimeout = 60;
    MySqlDataReader reader;

    try
    {
        databaseConnection.Open();
        reader = commandDatabase.ExecuteReader();

        // Succesfully updated

        databaseConnection.Close();
    }
    catch (Exception ex)
    {
        // Ops, maybe the id doesn't exists ?
        MessageBox.Show(ex.Message);
    }
}
Delete
Delete a row with ID (x) :
private void deleteUser()
{
    string connectionString = "datasource=127.0.0.1;port=3306;username=root;password=;database=test;";
    // Delete the item with ID 1
    string query = "DELETE FROM `user` WHERE id = 1";

    MySqlConnection databaseConnection = new MySqlConnection(connectionString);
    MySqlCommand commandDatabase = new MySqlCommand(query, databaseConnection);
    commandDatabase.CommandTimeout = 60;
    MySqlDataReader reader;

    try
    {
        databaseConnection.Open();
        reader = commandDatabase.ExecuteReader();

        // Succesfully deleted

        databaseConnection.Close();
    }
    catch (Exception ex)
    {
        // Ops, maybe the id doesn't exists ?
        MessageBox.Show(ex.Message);
    }
}
Have fun !
Provide feedback
Saved searches
Use saved searches to filter your results more quickly
Sign up
Как удаленно подключиться к базе данных, размещенной на нашем хостинге?!
Сегодня мы попробуем создать небольшое приложение WindowsForms на языке C# и подключиться к нашей базе данных (БД) MySQL на удалённом сервере хостинга. Чтобы наше приложение могло подключаться удалённо, для начала нам нужно разрешить удалённый доступ по IP адресу.
Настройка доступа
— Для настройки подключения к MySQL извне необходимо зайти в Панель управления и перейти в раздел «Базы данных MySQL».
— Нажмите кнопку «Доступ по IP» → «Добавить IP» и укажите IP-адрес, с которым вы выходите в сеть. Узнать свой IP-адрес можно на сайте inet.from.sh
— Также в форме можно указывать IP-адреса с символом % в октетах. Например, для разграничения доступа с IP-адресов одной подсети:
192.168.1.%
Пример настройки доступа по IP-адресу в панели ISP manager:
Если всё настроено, то мы можем приступать к написанию нашего приложения.
Создадим наше приложение: «Файл» → «Создать» → «Проект» → «Приложение Windows Forms» и нажмём «ОК».
Для работы с MySQL нам необходимо подключить ссылку MySql.Data и в исходном коде добавить пространство имён MySql.Data.MySqlClient
— В обозревателе решений жмём правой кнопкой мыши в разделе «Ссылки» → «Добавить ссылку»
— В открывшемся окне переходим в раздел «.NET», находим и выделяем компонент «MySql.Data» и нажимаем «ОК»
— Далее в исходном коде нашей формы добавляем пространство имён
using MySql.Data.MySqlClient;Небольшое отступление
При переустановки системы столкнулся с такой проблемой, как отсутствие MySql.Data. Проблема эта решилась после установки официального коннектора для работы с базами данных MySql на платформе .NET.
Переходим по ссылке и скачиваем наш коннектор.
Подготовительная часть завершена, теперь приступим к написанию нашего кода подключения.
Для проверки подключения нам необходимо добавить на нашу форму кнопочку. Переходим в конструктор нашей формы и из панели элементов перетаскиваем нашу кнопочку на форму
Двойной щелчёк мыши по созданной нами кнопке создаёт событие нажатия на кнопку и переводит нас в исходный код нашей формы.
Событие нашей кнопки:
private void button1_Click(object sender, EventArgs e)
{

}
Остальной код мы будем писать внутри скобок, но для начала рассмотрим несколько способов создания строк подключения.
Первый способ
Можно просто создать строковую переменную и указать в ней все данные для подключения, например:
string myConnectionString = "Database=DBNAME;Data Source=IPADRESS;User Id=DBUSER;Password=DBPASSWORD";
Где:
DBNAME — это имя базы данных Вашей MySql;
IPADRESS — IP адрес Вашей базы (обычно совпадает с IP адресом сайта);
DBUSER — Имя пользователя базы данных;
DBPASSWORD — Пароль пользователя БД.
Способ второй
MySqlConnectionStringBuilder mysqlCSB = new MySqlConnectionStringBuilder();
mysqlCSB.Server = "192.168.0.1";  // IP адоес БД
mysqlCSB.Database = "test_db";    // Имя БД
mysqlCSB.UserID = "root";        // Имя пользователя БД
mysqlCSB.Password = "rootpass";   // Пароль пользователя БД
mysqlCSB.CharacterSet = "cp1251"; // Кодировка Базы Данных
Какой способ подключения использовать Вам решайте сами, а мы для примера воспользуемся первым способом.
Не буду дальше расписывать весь код, а просто приведу пример подключения к БД
private void button1_Click(object sender, EventArgs e)
{
    string myConnectionString = "Database=db_name;Data Source=192.168.0.1;User Id=root;Password=rootpass";
    MySqlConnection myConnection = new MySqlConnection(myConnectionString);
    try
    {
        myConnection.Open(); // Открываем соединение
        // --- код запроса и т.п. --- //
        MessageBox.Show("Подключение прошло успешно!");
        myConnection.Close(); // Закрываем соединение
    }
    catch (Exception ex)
    {
        MessageBox.Show(ex.Message, "Ошибка");
    }
}
В предоставленном ниже проекте реализованы оба способа подключения и небольшой пример запроса к БД, и вывод данных в DataGridView, который также можно найти в «Панеле элементов» и перетащить его на форму.
Исходный код:
Скачать файл: windowsformsmysql.zip [29,37 Kb] (cкачиваний: 261)
P.S. — файл MySql.Data.dll также можно скачать с нашего сайта и подключить его непосредственно к приложению, чтобы в дальнейшем не возникало проблем с отсутствием нужных библиотек.
Скачать библиотеку:
Скачать файл: mysql.data.zip [121,48 Kb] (cкачиваний: 128)
After testing out Java for a couple of weeks, this weekend I decided to try out .NET. I am a big fan of web applications but recently I’ve taken an interest towards Java and Windows Forms Applications. So, the first thing that came to my attention was the Windows Application Forms in C#.
So, basically I’ve used Visual Studio 2012 and for database I’ve used EasyPHP Dev Server because MySQL is my most favorite database.
GUI Design
For GUI design, I kept it simple – some panels, labels and textboxes along with buttons.
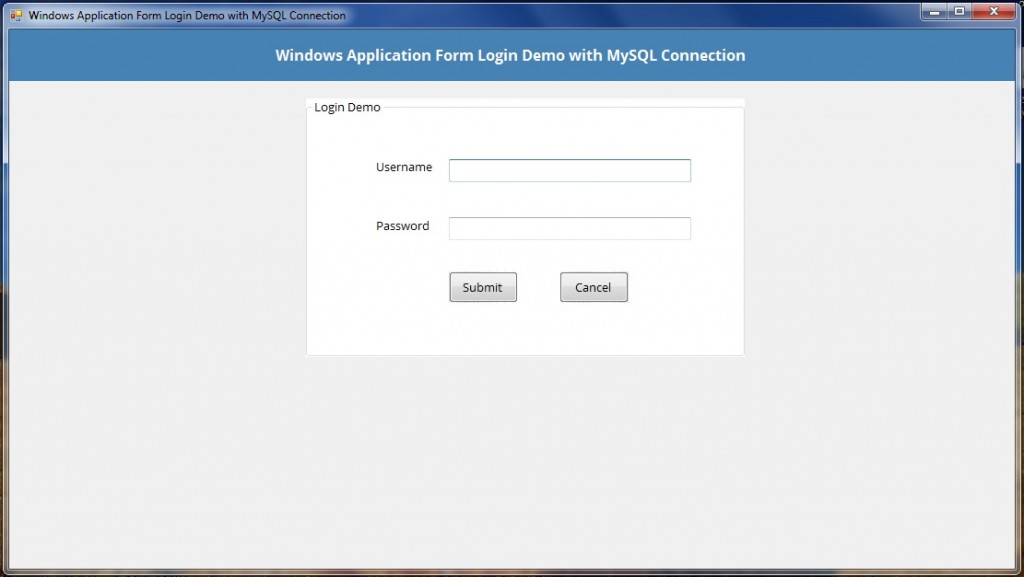
So, that cares of the simple GUI.
MySQL Database Connection
Before making the MySQL database connection, you need to download MySQL .NET Connector which you can download from here. After downloading the connector for the .NET and MONO platform, you need to extract it. Then you will need to add these two files – mysql.data.dll and mysql.web.dll as reference in your project. These two files are basically ADO .NET MySQL Driver.
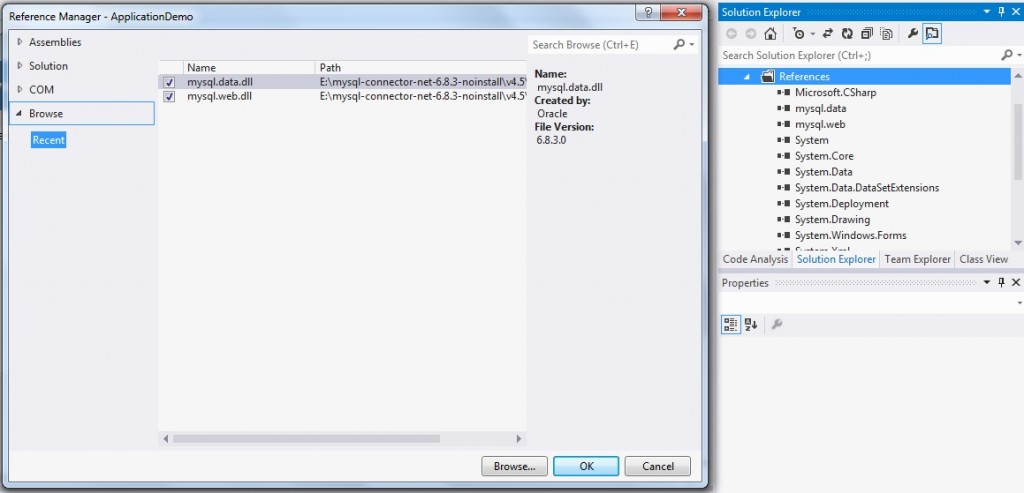
After the addition of these two references you can write the code. The most important function in Login is that of the “Submit” button. So, here’s the simple code that I used.
using System;
using System.Collections.Generic;
using System.ComponentModel;
using System.Data;
using System.Drawing;
using System.Linq;
using System.Text;
using System.Threading.Tasks;
using System.Windows.Forms;
using MySql.Data.MySqlClient; // required for MySQL connection after addition of MySQL References
namespace ApplicationDemo
{
public partial class Form1 : Form
{
private string conn;
private MySqlConnection connect;
public Form1()
{
InitializeComponent();
}
private void db_connection()
{
try
{
conn = "Server=localhost;Database=netdemo;Uid=root;Pwd=;";
connect = new MySqlConnection(conn);
connect.Open();
}
catch (MySqlException e)
{
throw;
}
}
private bool validate_login(string user, string pass)
{
db_connection();
MySqlCommand cmd = new MySqlCommand();
cmd.CommandText = "Select * from login where username=@user and password=@pass";
cmd.Parameters.AddWithValue("@user", user);
cmd.Parameters.AddWithValue("@pass", pass);
cmd.Connection = connect;
MySqlDataReader login = cmd.ExecuteReader();
if (login.Read())
{
connect.Close();
return true;
}
else
{
connect.Close();
return false;
}
}
private void submit_Click(object sender, EventArgs e)
{
string user = username.Text;
string pass = password.Text;
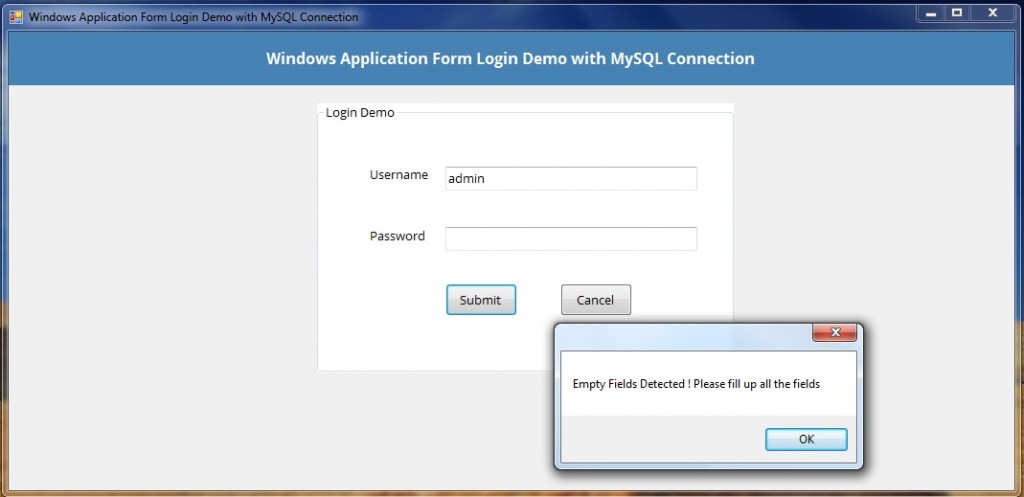
if (user == "" || pass == "")
{
MessageBox.Show("Empty Fields Detected ! Please fill up all the fields");
return;
}
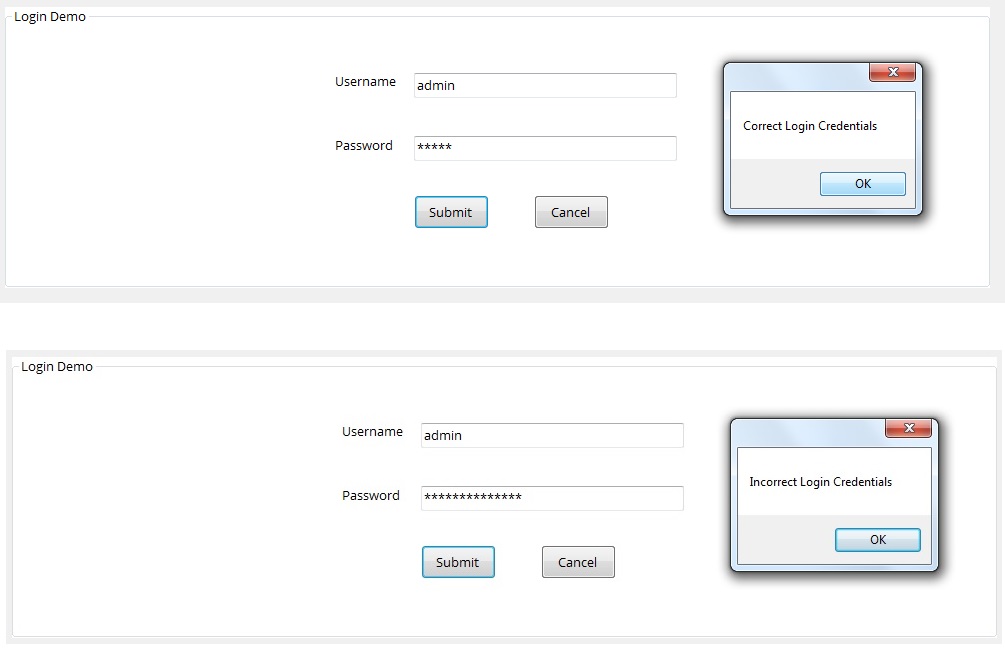
bool r = validate_login(user, pass);
if (r)
MessageBox.Show("Correct Login Credentials");
else
MessageBox.Show("Incorrect Login Credentials");
}
}
}
So from above the name of the MySQL database is netdemo and the name of the table is login.
Validation and Output
For a little added security, I’ve added a validation parameter. If both or one of the textbox is empty while submitting the form, it will display a error message like the one below.
For the correct username and password, it will show a message box of “Correct Login Credentials” and for an incorrect combo it will display a message box of “Incorrect Login Credentials”.
So, that’s it for this one. Stay tuned for more Application Development Tutorials.
C#,Windows Form, WPF, LINQ, Entity Framework Examples and Codes
Here in this article, I will show you how to create a login form in C# and connect with MySql in 4 steps.
Step 1:
Add MySql Reference to C# Window Form Project
Step 2: Open MySql, click on a New Database. Give database name as “dbLogin” and create a Table in database, You can give any name what you want, here I named it “tblUser” . There are three columns in the table that name are “id“, “usr” and “pwd” like the following,
In following pic is shown MySql Database Details. and you see the “usr” and “pwd” columns. You use only two passwords for this login form.
MySql Database
Step 3: Now lets open Visual Studio, then start a new Windows Form Application and give any name you want.
Step 4:
Source code:
|
1 2 3 4 5 6 7 8 9 10 11 12 13 14 15 16 17 18 19 20 21 22 23 24 25 26 27 28 29 30 31 32 33 34 35 36 37 38 39 40 41 42 43 44 45 46 47 48 49 50 51 52 53 54 55 56 57 58 59 60 61 62 63 |
using System; using System.Collections.Generic; using System.ComponentModel; using System.Data; using System.Drawing; using System.Linq; using System.Text; using System.Threading.Tasks; using System.Windows.Forms; using MySql.Data; using MySql.Data.MySqlClient; namespace cce_login_form_mysql { public partial class Form1 : Form { MySqlConnection con; MySqlCommand cmd; MySqlDataReader dr; public Form1() { InitializeComponent(); con = new MySqlConnection(«Server=localhost;Database=dbLogin;user=cce;Pwd=123123;SslMode=none»); //Server=myServerAddress;Database=myDataBase;Uid=myUsername;Pwd=myPassword; } private void Form1_Load(object sender, EventArgs e) { this.Text = «www.csharp-console-examples.com»; } private void button1_Click(object sender, EventArgs e) //Log In Button { string user = txtUser.Text; string pass = txtPass.Text; cmd = new MySqlCommand(); con.Open(); cmd.Connection = con; cmd.CommandText = «SELECT * FROM tblUser where usr='» + txtUser.Text + «‘ AND pwd='» + txtPass.Text + «‘»; dr = cmd.ExecuteReader(); if (dr.Read()) { MessageBox.Show(«Login sucess Welcome to Homepage https://csharp-console-examples.com»); } else { MessageBox.Show(«Invalid Login please check username and password»); } con.Close(); } //Exit Button private void button2_Click(object sender, EventArgs e) { Application.Exit(); } } } |
Output:
**The conventional way of any login form will contain password displayed in a special character which is for security purposes. To bring that concept into your login form, select the Properties option of TextBox in which you could find the option Password Char where you can give your desired special character (in my case, I have used * asterisk). By making this change, if you run your application, it will display only the special symbol when you enter a password.