
Последнее обновление: 22.02.2024
При установке сервера MySQL также устанавливается консольный клиент для работы с базами данных. Например, в Windows в меню Пуск можно найти
программу MySQL x.x Command Line Client. Это и есть собственно консольный клиент:
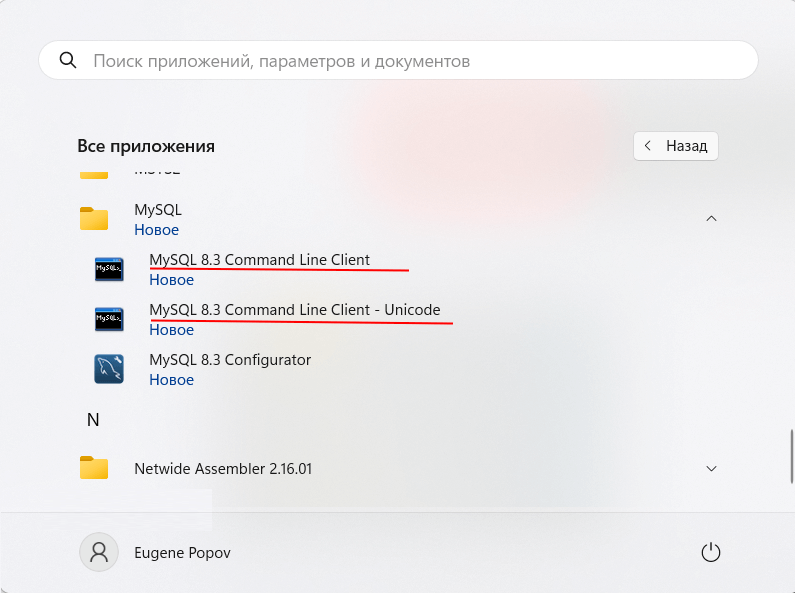
Причем клиент устанавливается сразу в двух вариантах — с поддержкой Unicode и без.
Запустим MySQL Command Line Client — Unicode. Вначале нам отобразится предложение ввести пароль:
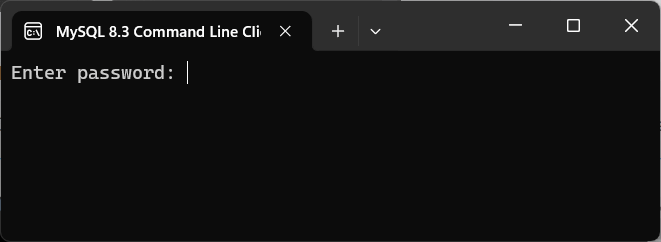
Здесь необходимо ввести пароль, который был установлен при установке MySQL для пользователя root.
И после удачного подключения можно будет отправлять серверу команды через данный консольный клиент.
Для начала посмотрим, какие базы данные есть на сервере по умолчанию. Для этого введем команду show databases;
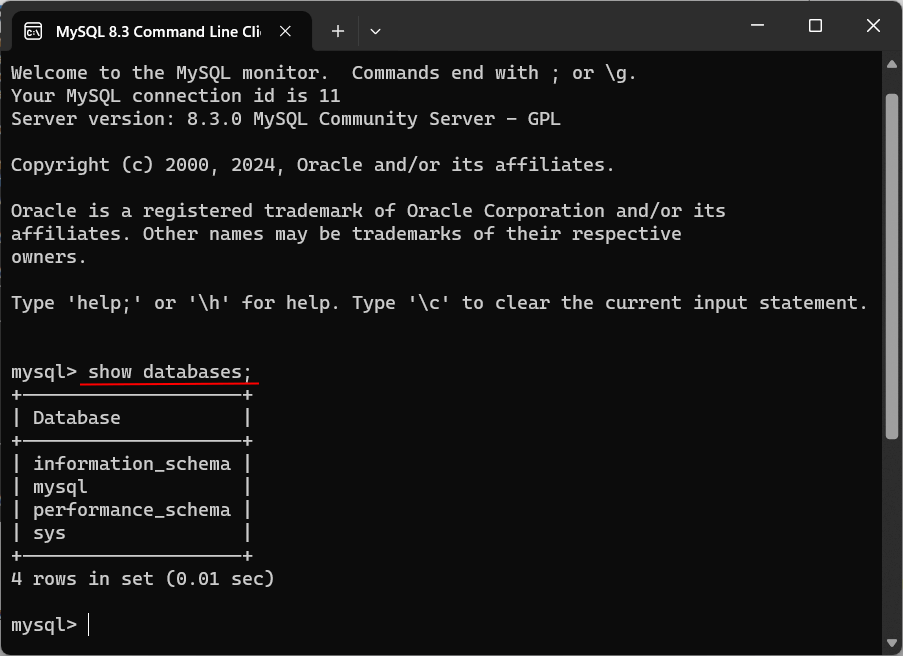
После выполнения этой команды мы увидим, что на сервере по умолчанию уже есть ряд баз данных, которые выполняют административные функции.
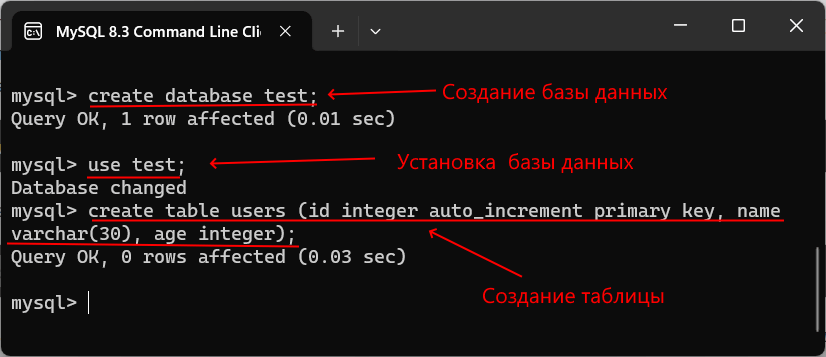
Теперь создадим базу данных с помощью следующей команды языка SQL:
create database test;
Для создания базы данных применяется команда create database, после которой указывается название бд. То есть в
данном случае база данных будет называться «test».
Чтобы обращаться к какой-нибудь определенной базе данных, вначале надо установить нужную базу данных в качестве текущей.
Для этого нужно выполнить команду use, после которой указывается название базы данных. Например, для подключения ранее созданной базы данных
test введем следующую команду:
use test;
Затем создадим в этой базе данных таблицу с помощью команды:
create table users (id integer auto_increment primary key, name varchar(30), age integer);
Данная команда создает таблицу users, в которой будет три столбца — id, name и age. id будет хранить уникальный числовой идентификатор пользователя
и будет автоматически генерироваться базой данных, name будет хранить имя пользователя, а age — его возраст.
После этого мы можем добавлять и получать данные из выше созданной таблицы. Вначале добавим в таблицу одну строку с помощью следующей команды:
insert into users (name, age) values ('Tom', 34);
И в конце получим добавленные данные:
select * from users;
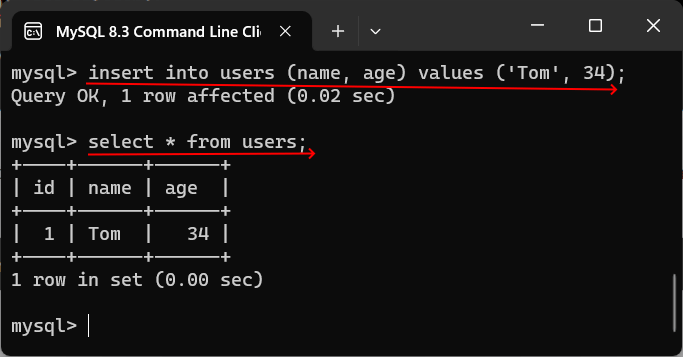
Таким образом в общих чертах мы можем работать с консольным клиентом MySQL Command Line Client.
In this section, I’ll tell you how to Download and install MySQL command line client on Windows.
MySQL (from MariaDB 10.4.6) is a simple SQL shell (with GNU readline capabilities). It supports interactive and non-interactive use. When used interactively, query results are presented in an ASCII-table format. When used non-interactively (for example, as a filter), the result is presented in tab-separated format. The output format can be changed using command options.
Now I’ll tell you step by step procedure to download MySQL and install command line client on Windows.

STEP – 1 :- First download the MySQL command line client according to your system type i.e whether it has a 32Bit operating System or 64Bit from the link given below. (To check the System type just go to settings of This PC there you can see the system type of your system.)
|
MySQL 32 Bit Version — Latest |
|
|
MySQL 64 Bit Version — Latest |
|
|
If above links not working then click here — (Above Links are direct download links) |
STEP – 2 :- After downloading the file first unzip the file if it is rar file using any software like winrar or winzip then just run the setup.
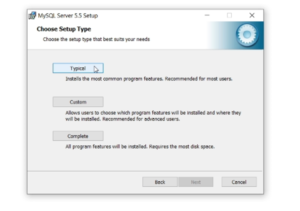
STEP – 3 :- click Next > Accept the terms and conditions > Choose setup Type as Typical > and click install. The installation process starts. (NOTE – The installation may take a while so wait for the installation to end)
STEP – 4 :- After the installation finished the MySQL configuration wizard appears. Click next and choose a standard configuration as a configuration type and click Next.

STEP – 5 :- Tick the “include bin directory in windows PATH” checkbox and move ahead.

STEP – 6 :- Type your root password as a security option and move ahead.

STEP – 7 :- Click Execute. Now sit back and relax MySQL is being configured in your system. After the configuration process is finished click finish and voila MySQL is installed on your PC!

Search for MySQL in the start menu there you will find it and run it type your root password that you have setup during the installation and you are good to go.

You have successfully installed MySQL command line client in your System.
MySQL is a popular open-source relational database application, and it is used for many servers worldwide. How you access the database depends on the operating system you use to connect.
This guide walks you through using the Windows Command line to connect to a MySQL database.
Prerequisites
- A Windows-based system with an administrator account.
- A local MySQL installation.
- A text editor (optional).
Starting MySQL from Windows Command Line
The Windows command line, also known as the Command Prompt, is a text-based interface used to execute various system commands and perform administrative tasks. It is one method of connecting to MySQL from Windows.
To open the command prompt, hold the Windows key and press R on your keyboard to open the Run command box. Type in cmd and press Enter to open the Windows Command Prompt.
A black command-line interface starts, with white text and a cursor for you to type.

After opening the Command Prompt, follow the steps below to connect to MySQL.
Step 1: Verify MySQL Is Running on Windows
Before connecting, ensure that the MySQL service is running. Follow the steps below:
1. In the Command Prompt, run the following command to display the list of all the running services:
net start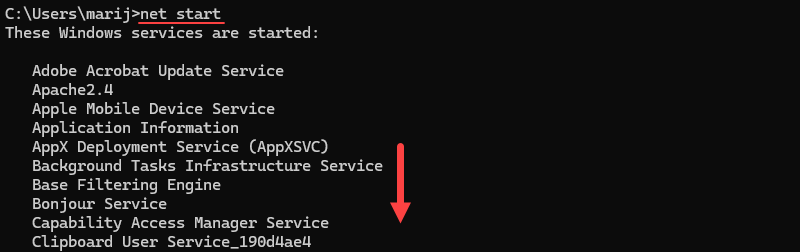
If MySQL is not on the list, you can start it using the Services panel.
2. Use the following command to open Services:
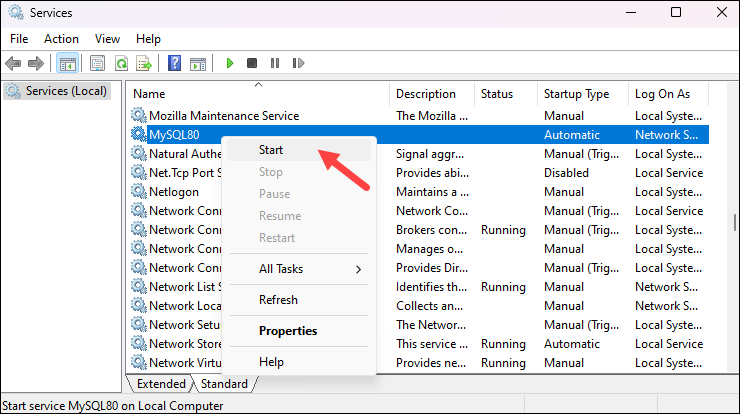
services.mscA new window will launch and display the list of services available on your system.
3. Scroll down to find MySQL and check the status column. If the status is Stopped, right-click the MySQL service and select Start to start the service.
Step 2: Run MySQL Server Command-Line Client
The MySQL Server command-line client is a tool that allows users to interact with the MySQL database server using text-based commands. It is similar to the Windows Command Prompt.
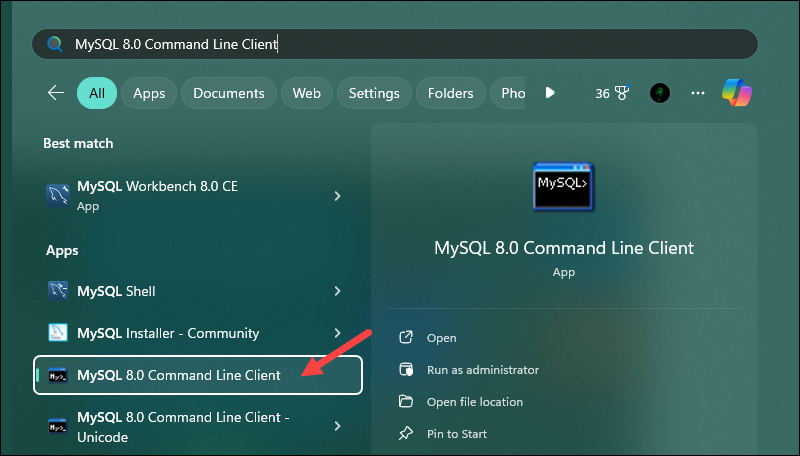
To open the MySQL command-line client, press the Windows key and type:
mysql 8.0 command line clientReplace 8.0 with the MySQL version you installed on your system and click the Command Line Client app from the left pane to open it.
A new window opens, allowing you to enter your administrator password and connect to the MySQL server.
Step 3: Connect to Local MySQL Server
There are two ways to connect to a local MySQL server via the command line:
- Using the dedicated MySQL Command Line Client described in the previous step.
- Using the Windows Command Prompt/Windows PowerShell.
Connect Using the MySQL Command Line Client
Follow the steps outlined in the previous section to open the MySQL Command Line Client and provide your administrator password to log in to the MySQL server:
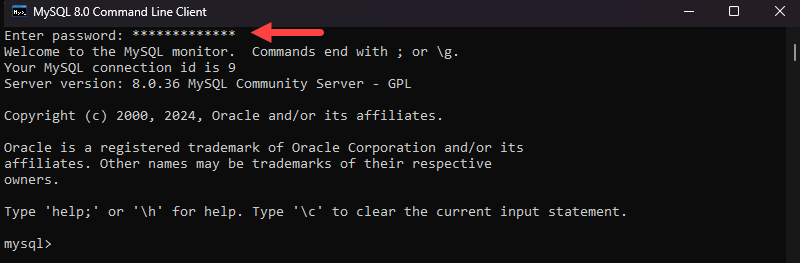
After connecting, you can start managing your database in the same window.
Connect Using Windows Command Prompt
Open the Windows Command Prompt or Windows PowerShell and use the syntax below to connect to MySQL:
mysql -u [username] -pReplace [username] with the username for your MySQL installation. For example, to log in as root, run the following command:
mysql -u root -p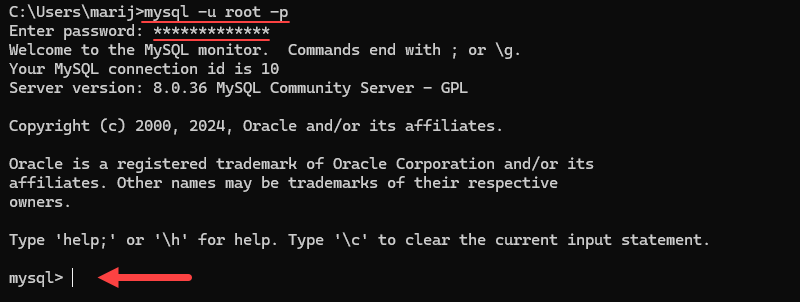
MySQL prompts you for your root password. Enter the password to connect to the MySQL server.
Step 4: Get a List of Databases on MySQL Server
Listing all databases in MySQL provides a clear view of all the databases available on the MySQL server. The action is especially useful in multi-database environments where multiple projects or applications are hosted on the same server.
To list all databases, connect to the MySQL server and run the following command:
SHOW DATABASES;
The command outputs the list of all databases on the MySQL server.
Step 5: How to Select and Edit Database
Selecting a database in MySQL is a key operation that involves choosing a specific database to work with and later making changes to its structure or data. Editing a database involves creating new tables, updating records, optimizing database performance, etc.
Select a Database
To select a database, connect to the MySQL server and use the following syntax:
USE [database_name];For example, to select a database named mysql, run the following command:
USE mysql;
The output states that the database has been changed. After selecting a database, you can start making edits.
Create a Table
To create a new table in MySQL, use the syntax below:
CREATE TABLE table_name (
    id INT AUTO_INCREMENT PRIMARY KEY,
    column1_name DATA_TYPE,
    column2_name DATA_TYPE
);
Replace the table, column names, and data types for the columns according to your needs. For example:
CREATE TABLE users (
id INT AUTO_INCREMENT PRIMARY KEY,
name VARCHAR(100),
email VARCHAR(100),
created_at TIMESTAMP DEFAULT CURRENT_TIMESTAMP
);
The statement creates a table named users with four columns:
id— An auto-incremented integer that serves as the primary key.name— A variable-length string that holds up to 100 characters.email— A variable-length string that holds up to 100 characters.created_at— A timestamp that defaults to the current date and time when a new row is created.
Add Data
After creating a new table, populate it with data. Use the INSERT INTO statement to add data to a table in MySQL. The syntax is:
INSERT INTO table_name (column1, column2, column3, ...) VALUES (value1, value2, value3, ...);For example, to insert data into the table we created above, use the following statement:
INSERT INTO users (name, email) VALUES ('John Doe', '[email protected]');
The statement inserts a new row into the users table with the name column set to John Doe and the email column set to [email protected]. It automatically assigns values to the other columns id and created_at based on their default settings.
Step 6: Create Windows Shortcut to Log in to MySQL
A handy way to quickly log in to your MySQL server in Windows is to create a login shortcut with your credentials and save it as a .bat file. Batch files are often used to automate repetitive tasks and execute multiple commands in sequence.
Follow the steps below to create a login shortcut:
Warning: Create a shortcut only if you are certain that no one else will have access to your computer. Login credentials are sensitive data that unauthorized persons can use to tamper with your MySQL database.
1. Open a text editor such as Notepad.
2. Paste the following:
cmd /K "C:\Program Files\MySQL\MySQL Server X.X\bin\mysql.exe" -u[username] -p[password]- Replace
[username]with the username you want to use to connect and[password]with your login password. - Make sure to change the path from
C:\Program Files\MySQL\MySQL Server X.X\bin\mysql.exeto the actual mysql.exe file location on your system.
3. Press Ctrl+S to launch the Save dialog.
4. Select All files as the file type and type mysql.bat in the name field. Save the shortcut on your desktop (or another place that’s easy to find).
The file is a small Windows executable file you can double-click to log into MySQL using the specified username and password.
Conclusion
After following the steps in this guide, you should be able to connect to a MySQL database using the Windows command line. Once you have logged into the MySQL server, the commands are the same regardless of the system you are using.
Next, see how to tune your MySQL database for the best performance. Alternatively, if you are not a MySQL fan, check out how to use PostgreSQL from the command line.
Was this article helpful?
YesNo
When we are working with database, we usually use UI to interact with database such as MySQL Workbench, PgAdmin 3, 4, … But when we want to do something deeper with databases such as granting permission for people to access our database, what did we do?
So, in this article, we will guidle you how to use command line to interact with database.
Let’s get started.
Table of contents
- Connect to MySQL through command line
- Common perations with command line
- Import and export sql file
- Wrapping up
Connect to MySQL through command line
In order to use command line for MySQL, we have two way:
- Use
MySQL Command line Client. - Use
Command Line promptin Windows or other OSes.
We will choose Command Line prompt to do.
-
Windows + R–> cmd
This error comes up when user execute
mysqlcommand on default command prompt. The user should execute this command wheremysql.exefile exists. -
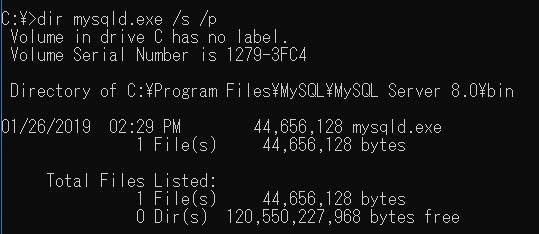
cd \ -
dir mysqld.exe /s /pIt will search our directories and list the directory where
mysqld.exeis located. -
After doing above step, we have the path of
mysqld.exe.So, we will change to this path:
cd path_name.
-
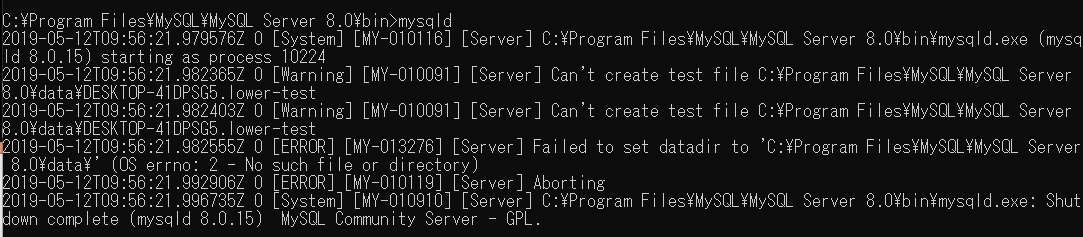
Type command
mysqldto test.
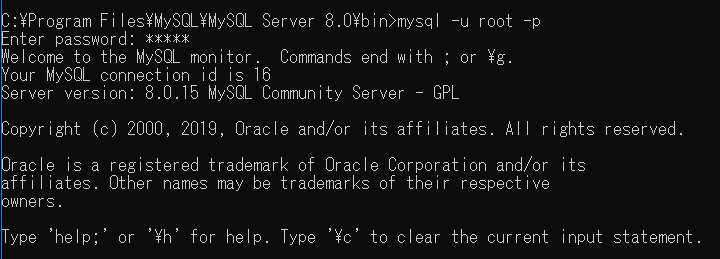
-
Log in to mysql command line in localhost.
-
If we want to log in mysql database in remote database, we can do like these steps
mysql -u <username> -p -h <ip_address> -P <port> -D <db_name>For example:
mysql -u sample -p -h 123.23.45.1 -P 3306

Common operations with command line
-
List all databases
Then, we have:
-
Create database
  CREATE DATABASE [IF NOT EXISTS] database_name
  [CHARACTER SET charset_name]
  [COLLATE collation_name]
For example:
CREATE DATABASE testdb; -
Remove database
  DROP DATABASE [IF EXISTS] database_name;
  DROP SCHEMA [IF EXISTS] database_name;
For example:
DROP DATABASE IF EXISTS testdb; -
Select one databases to implement
-
List all tables in one database
-
List all tables in another database
show tables in another_database;OR
SELECT TABLE_NAME FROM information.schema.TABLES WHERE TABLE_SCHEMA = 'another_database'; -
Delete table
DROP TABLE IF EXISTS table_name; -
Get information of current user
OR
OR
  SELECT user, host, db, command
  FROM information_schema.processlist;
So, we have the current user is
root@localhost. -
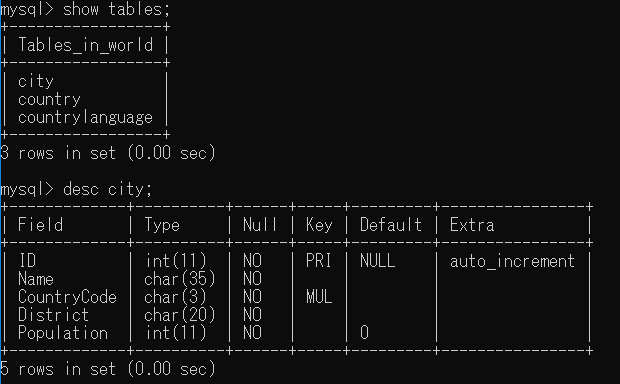
Show the fields or schema of a database table
Use
desccommand in MySQL Command Line Client.Assuming that we have three tables such as
city,country,countrylanguage, we want to see that structure of the city table.We will do the following image:
-
List column names in database table without the table formatting
-
Start MySQL with
-sNoption:
-sNoption means:-s, --silent: Be more silent. Print results with a tab as separator, each row on new line.-N, --skip-column-names: Don’t write column names in results.
-
Implementing with query
mysql> SELECT column_name FROM information_schema.columns WHERE table_schema = 'YOUR_DATABASE_NAME' AND table_name = 'YOUR_TABLE_NAME';Or
  SELECT column_name
  FROM information_schema.columns
  WHERE table_schema = 'YOUR_DATABASE_NAME'
  AND table_name = 'YOUR_TABLE_NAME';
OR we can do with the following command:
SHOW COLUMNS FROM table_name; SHOW COLUMNS FROM database_name.table_name; SHOW COLUMNS FROM table_name IN database_name; SHOW FULL COLUMNS FROM table_name; // lists all privileges and some information in this column. -
-
Show all users in MySQL database
All information of user, host is saved in
mysql.usertable. So, we can use a common select query to get all users in MySQL.Before listing all users, we can have glance to
mysql.usertable with commanddesc mysql.user;. Then, we have:SELECT * FROM mysql.user;Or
SELECT host, user FROM mysql.user; -
Create user account in MySQL
CREATE USER user_account IDENTIFIED BY password;- The
user_accountis in the format'username'@'hostname'. - The
passwordmust be in clear text. MySQL will encrypt the password before saving the user account into theusertable.
Assuming that we want to create other user, not root, such as
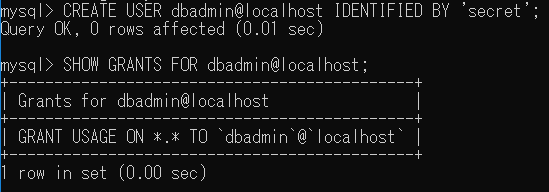
dbadmin, we have:
When we use command
SHOW GRANTS FOR dbadmin@localhost;to get all privileges ofdbadmin@localhost, we only seeGRANT USAGE ON *.* TO `dbadmin@localhost`. It means thatdbadminuser account can only login to database server and has no other privileges.*.*means thatdatabase.table. - The
-
Perform user to connect from any host
CREATE USER dbadmin@'%' IDENTIFIED BY 'secret';It means that we allow
dbadminuser account to connect to the database server from any host.If we want to allow
dbadminuser account to connect from any subdomain of themysql.orghost, we can use%as follows:CREATE USER dbadmin@'%.mysql.org' IDENTIFIED BY 'secret'; -
Grant privileges for a user account
The reason why we do need to note is that after creating a new user account, the user doesn’t have any privileges. So, we have to grant the permission for a user with
GRANTstatement.GRANT privilege,[privilege],.. ON privilege_level TO user [IDENTIFIED BY password] [REQUIRE tsl_option] [WITH [GRANT_OPTION | resource_option]];-
First, specify one or more privileges after the GRANT keyword. If you grant the user multiple privileges, each privilege is separated by a comma. (see a list of privilege in the table below).
-
Next, specify the privilege_level that determines the level at which the privileges apply. MySQL supports global ( .), database ( database.*), table ( database.table) and column levels. If you use column privilege level, you must specify one or a list of comma-separated column after each privilege.
-
Then, place the user that you want to grant privileges. If user already exists, the GRANT statement modifies its privilege. Otherwise, the GRANT statement creates a new user. The optional clauseIDENTIFIED BY allows you set a new password for the user.
-
After that, you specify whether the user has to connect to the database server over a secure connection such as SSL, X059, etc.
-
Finally, the optional WITH GRANT OPTION clause allows you to grant other users or remove from other users the privileges that you possess. In addition, you can use the WITH clause to allocate MySQL database server’s resource e.g., to set how many connections or statements that the user can use per hour. This is very helpful in the shared environments such as MySQL shared hosting.
The followings are steps that we need to grant all privileges for a user.
-
Create a user in MySQL.
CREATE USER dbadmin@localhost IDENTIFIED BY 'secret'; -
Display all privileges that assign to
dbadmin@localhost.SHOW GRANTS FOR dbadmin@localhost; -
Grant permission for a user
-
Grant all privileges to the dbadmin@localhost user account.
GRANT ALL ON *.* TO 'dbadmin'@'localhost' WITH GRANT OPTION;*.*means that dbadmin can access all database and all objects in the databases.WITH GRANT OPTIONmeans that allows dbadmin@localhost to grant privileges to other users. -
Grant all privileges on specific database.
GRANT ALL ON world.* TO dbadmin@localhost; -
Grant all privileges for specific user at any host.
GRANT ALL ON *.* TO 'dbadmin'@'127.0.0.1' WITH GRANT OPTION; -
Grant some specific privileges such as
CREATE,SELECT,INSERT,UPDATE,DELETEandDROPon specific database.GRANT SELECT, UPDATE, DELETE ON world.* TO dbadmin@localhost;
-
-
Suddenly, we want to revoke given privileges from a user. We can do this by utilizing the command:
REVOKE [permission type] ON [database name].[table name] FROM 'non-root'@'localhost'; -
Finally, we want the changes to take effect immediately flush the privileges by typing the following command:
FLUSH PRIVILEGES;
-
-
Remove user in MySQL
Before removing any users from MySQL, we need to see MySQL have which user account.
SELECT host, user FROM mysql.user;Then, we will remove the
dbadminaccount.DROP USER [IF EXISTS] user, ...;The
DROP USERcommand removes all privileges from all grant tables before removing the user account.And we need to remember that when a user account is logged in and has active session running. If you drop the user account, it won’t stop the open sessions. The active session will continue until user exits.
It’s important to note that if you don’t terminate the active sessions, the removed user, if connected to the database server, still can perform all operations until the session ends.
Typically, in this case, you should shutdown user’s session immediately right before executing the
DROP USERstatement.- First, you need to identify the process id of the user by using the
SHOW PROCESSLISTstatement. - Second, you kill this process by using
KILL id_our_session_db. -
Third, you execute
DROP USERstatement to remove user account dbadmin@localhost:DROP USER dbadmin@localhost;
- First, you need to identify the process id of the user by using the


Import and export sql file
-
Import sql file
We will use
mysqlcommand to import the database that are exported and stored as an SQL file.-
First, login into MySQL
-
Second, create a new database to receive data from that database
create database <db-name> -
Finally, import the SQL file in that new database
mysqlimport -u <username> -p <db-name> < <name-sql-file>.sql
-
-
Export sql file
Use
mysqldumputility to export database.mysqldump -u <username> -p <db-name> > <name-sql-file>.sql
Wrapping up
- Use command line to improve the speed of implementing with MySQL, and enhace the knowledge about MySQL.
Refer:
https://tableplus.io/blog/2018/08/mysql-how-to-drop-all-tables.html
http://www.mysqltutorial.org/mysql-show-users/
http://www.mysqltutorial.org/mysql-grant.aspx
http://www.mysqltutorial.org/mysql-show-columns/
http://mysqlblog.fivefarmers.com/2015/03/31/command-line-prompt/
https://dev.mysql.com/doc/refman/8.0/en/mysqlimport.html
https://www.digitalocean.com/community/tutorials/how-to-import-and-export-databases-in-mysql-or-mariadb
Summary: in this tutorial, you will learn how to connect to MySQL Server using mysql command-line client and MySQL Workbench.
Once you have the MySQL Server installed, you can connect to it using any client program such as mysql command-line client and MySQL workbench.
Connect to MySQL Using mysql command-line client
The mysql is a command-line client program that allows you to interact with MySQL in interactive and non-interactive modes.
The mysql command-line client is typically located in the bin directory of MySQL’s installation directory such as C:\Program Files\MySQL\MySQL Server 8.0\bin on Windows.
To invoke the mysql program, you open the Command Prompt on Windows or Termina on Unix-like systems and navigate to the bin directory of the MySQL installation directory:
C:\Program Files\MySQL\MySQL Server 8.0\bin>Code language: plaintext (plaintext)The Command Prompt is a command-line interpreter program available in Windows. The Command Prompt program allows you to interact with the computer through text-based commands for tasks like running programs, managing files, and configuring system settings.
If the bin directory is included in the PATH, you can use the mysql command from the Command Prompt without the need to navigate to the bin directory.
On Windows, the PATH is an environment variable that contains a list of directories. Windows OS uses these directories to locate executable files, making it easier to run applications from the Command Prompt without specifying the full file path.
To connect to the MySQL Server, you type this command on Command Prompt:
mysql -u root -pCode language: SQL (Structured Query Language) (sql)In this command:
-u root means that you connect to the MySQL Server using the user root.
-p instructs mysql to prompt for a password.
You type the password for the root user and press Enter:
Enter password: ********Code language: SQL (Structured Query Language) (sql)If everything is OK, you will connect to the MySQL Server and see the following command:
mysql>Code language: SQL (Structured Query Language) (sql)To display available databases in the current server, you enter the SHOW DATABASES statement terminated by a semicolon (;) and press the Enter key:
show databases;Code language: SQL (Structured Query Language) (sql)The mysql program will return the following output:
+--------------------+
| Database           |
+--------------------+
| information_schema |
| mysql              |
| performance_schema |
| sys                |
+--------------------+
4 rows in set (0.01 sec)Code language: SQL (Structured Query Language) (sql)
Here are the steps that occur behind the scenes:
- First, the mysql command-line client sends the query to the MySQL Server.
- Second, the MySQL server executes the query and sends the result back.
- Third, the mysql command-line client displays the result.
Connect to MySQL database server using MySQL Workbench
Step 1. Launch the MySQL Workbench.
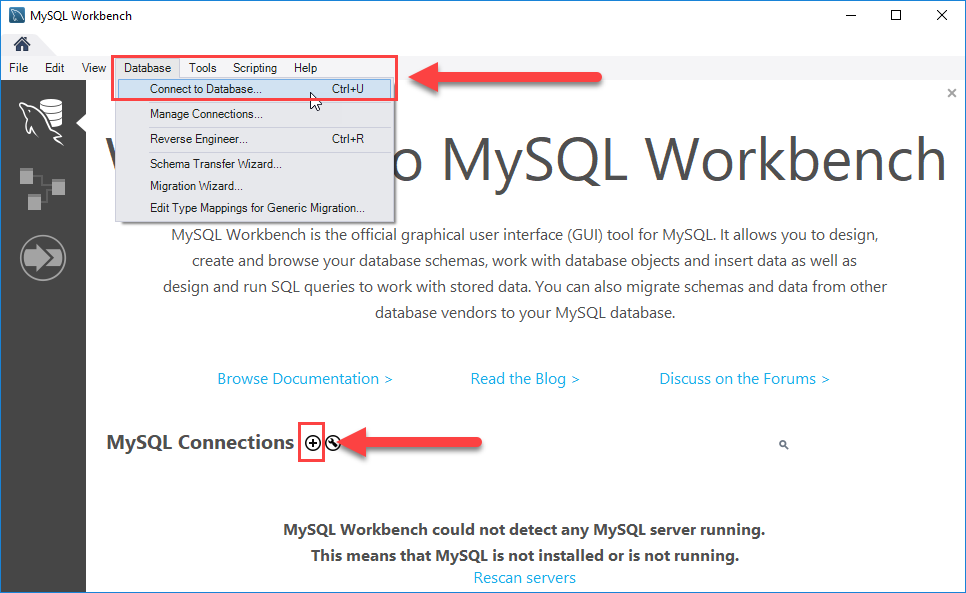
You can connect to a MySQL Server using the Database > Connect to Database… menu or click the + button that is located next to the MySQL Connections.
Click the + button next to the MySQL Connections to continue.
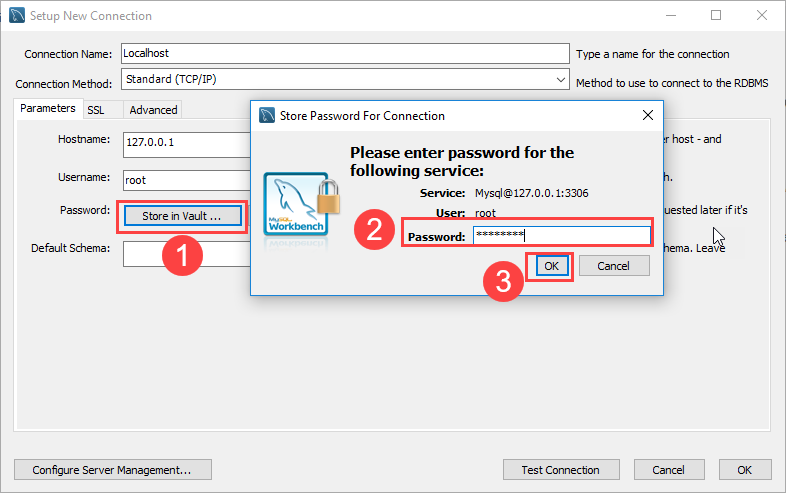
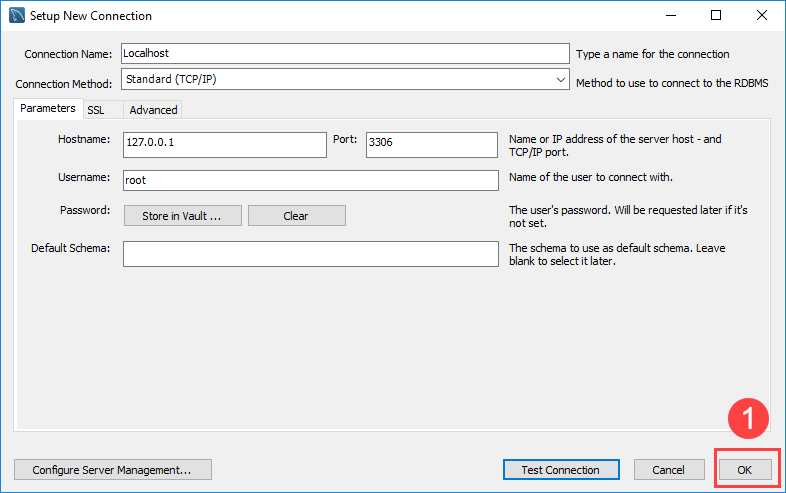
Step 2. Enter the connection name e.g., Localhost. You can name it whatever makes sense to you. By default, the username is root. If you use a different user account, you can change it in the Username textbox.

Step 3. Click the Store in Vault ... button to enter the password for the provided user account. A window will display. You enter the password and click the OK button.
Step 4. Click the Test Connection button to test if the connection to the MySQL Server is successful or not. Then click the OK button if the connection is established successfully.
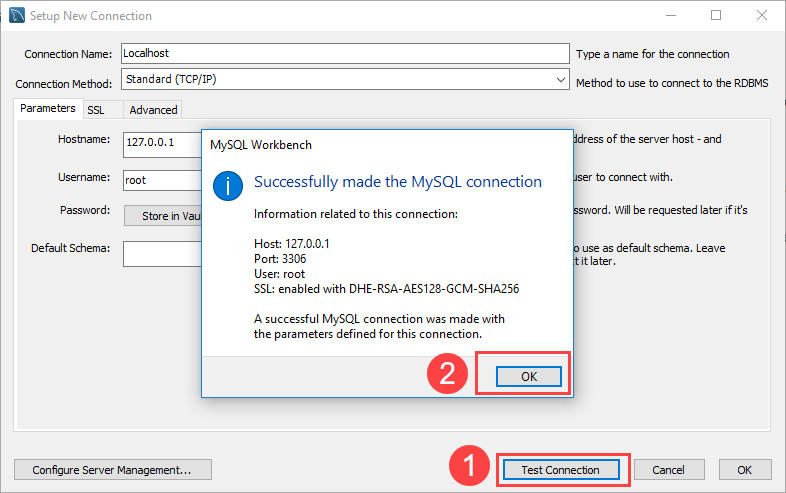
Step 5. Click the OK button to save the connection.
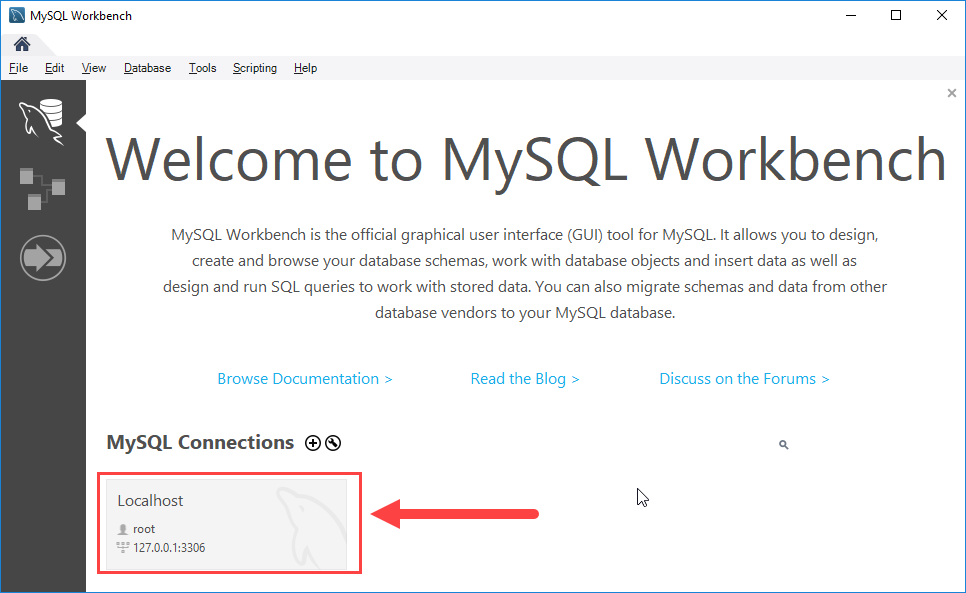
Step 6. Click the newly created connection under MySQL Connections to connect to the MySQL Server:
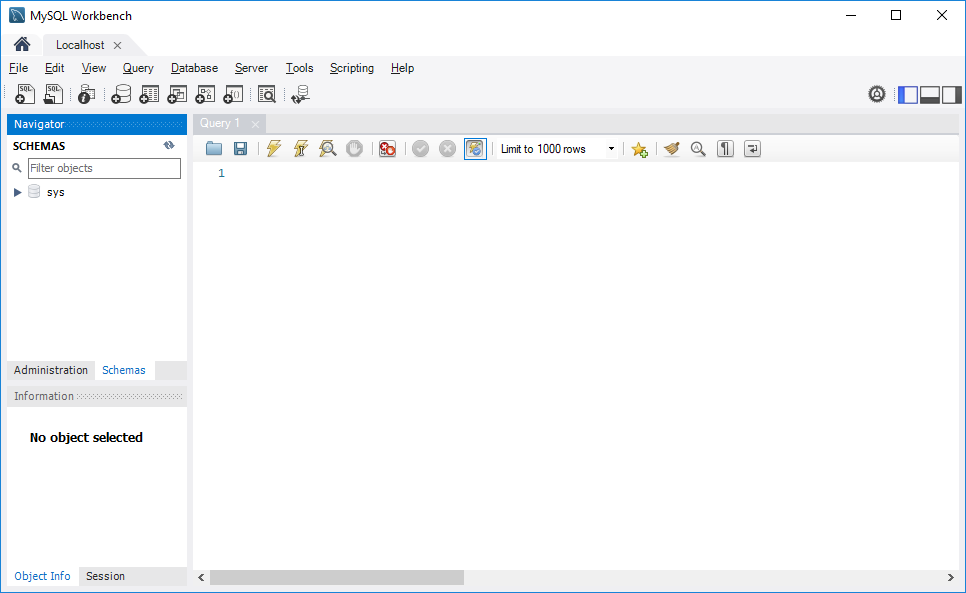
Step 7. MySQL Workbench display with the current schemas and a pane for entering queries:
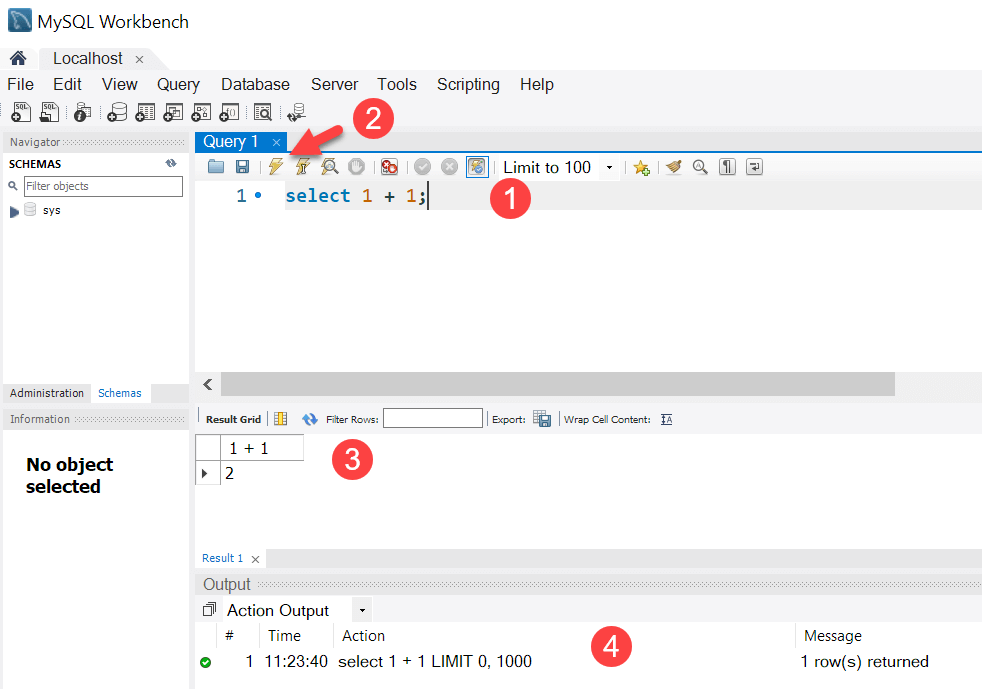
To execute a query from the MySQL Workbench, you enter the query in the query tab (1) and click the Execute button from the toolbar (2).
MySQL Workbench will send the query to the MySQL Server and get the result back (3 + 4):
In this tutorial, you have learned how to connect to the MySQL Server using mysql command-line client and MySQL Workbench.
Was this tutorial helpful?