
Время на прочтение8 мин
Количество просмотров37K
В статье описаны общие принципы построения приложений, с использованием подхода MVC, на примере внедрения в приложение, использующее много лет Code Behind подход.
Не будет:
• Классического Unit Test;
• Принижения влияния Code Behind;
• Неожиданных открытий в MVC.
Будет:
• Unit Test и Stub;
• MVC;
• Внедрение подхода на базе существующего продукта.
Введение
Перед тем, как начать использовать данных подход, я прошел большой путь обычного разработчика корпоративных систем. По пути мне встречались абсолютно шаблонные события и вещи, как простые, так и более сложные. Например, разработка закончена, функциональность отправлена на тестирование, кликается, далее валится масса ошибок, от простых недочетов, до грубых нарушений. Более сложный случай: функциональность принята, пользователи активно участвуют в обратной связи и приводят к необходимости менять функционал. Функционал поменяли, пошли по тому же пути и перестал работать старый функционал, да и новый оставляет желать лучшего. Кое как прищёлкивая быстрорастущую функциональность начинается постоянная правка багов. Сначала это были часы, потом недели, сейчас я знаю, что и месяцы не предел. Когда это занимало часы или дни, ошибки закрывались, все более – менее текло. Но стоило начать переоткрывать ошибки – начинался ад. Отдел тестирования постоянно ругается, разработчики постоянно правят ошибки и делают новые в разрабатываемом функционале. Все чаще приходит обратная связь, от реальных пользователей, полная негатива. А функционал рос и рос, я искал методы и подходы, как можно себе упростить жизнь. При этом меня давно посещала идея, задействовать при разработке пользовательского интерфейса тестирование на уровне разработчика. Желание заложить пользовательские сценарии привело меня к осознанию факта наличия проблемы: отсутствия хоть сколько-то объективных критериев готовности продукта от разработчика. И я начал мыслить несколько шире, а что, если постараться заложить все положительные сценарии использования в некоторые правила, постоянно проверять наборы правил, ведь это хоть какая-то гарантия того, что пользователь на следующем выпуске не будет ошарашен отвалившимся функционалом, а тестировщики будут задействованы по назначению. Именно этим правилам и предрекалось стать критерием окончания работы над функционалом для себя, для разработчика.
Формализация
Начались поиски инструментов, для формализации правил. Весь код логики взаимодействия с пользователем и данными находился в формах. Конечно же, были отделены слои работы с базой данных, сервисы, ремоутинги и многое, многое другое. Но пользовательский интерфейс оставался перенасыщен логикой. Логикой, никак не связанной с отображением. Первым, и вполне логичным шагом, мне показалось использовать средства для визуального тестирования форм. Набираем правило их кликов – вводов и преобразуем это в тест. Для примера это прекрасно умеет делать Visual Studio 2013 Ultimate, вернее один из её шаблонов. Я бодро создал несколько тестов и понял, что создавать таким образом тесты, а потом запускать, огромная беда. Требовалось кучу времени чтобы полностью загрузить всю систему, дойти до нужных диалогов и вызвать соответствующие события. Это требовало работу всех звеньев цепи, что местами было невозможно. Все действия я предпринимал абсолютно отделив для себя Unit Testing, при этом его постоянно использовал для сервисов и логики, которая вращалась на сервере, ведь у неё не было форм, соответственно Code Behind. Параллельно работая с ASP.NET MVC мне все больше нравился подход с отделением логики от представлений. Упрощенно, вызывая контроллер ASP.NET MVC мы просто дергаем его публичный метод, который возвращает представление с некоторыми изменениями. Я начал думать, как эту модель переложить на WinForms и пришел к выводу, что используя события на представлениях я буду вызывать методы контроллеров. Я принял правило, что у меня всегда есть класс-контроллер, который привязывается к событиям класса, реализующего интерфейс представления. Тем самым я убрал весь код логики из Code Behind в код контроллера, а контроллер подлежал тестированию с помощью обычных Unit Tests, реализуя Stubs для классов менеджеров данных и самих представлений. Позже я научился тестировать и сами представления, исключительно с помощью Unit Tests. Далее я хочу показать пример того, как я пришел к этому.
Пример
Описание задачи
Все описанное выше я рассмотрю на примере реализации формы изменения исключений при импорте данных. Исключения это просто сущность с тремя полями, необходимая для чтения текстовых файлов в системе. С точки зрения пользователя данная форма должна позволять добавлять, изменять, удалять исключения. После добавления нового исключения оно должно добавляться в конец списка. При удалении исключения фокус должен переходить на первый элемент списка. При этом форма вызывается из контекста никак не реализующего MVC.
Формализация представления
Воспитанный на огромном количестве форм, в корпоративных приложениях, я пришел к выводу, что тоже буду использовать стандартный подход к интерфейсу: панель управления с кнопками — действиями над исключениями, список исключений, в виде таблицы, и базовой кнопкой закрыть. Соответственно для отображения в интерфейсе мне понадобится:
• Весь список исключений, для построения таблицы;
• Исключение в фокусе;
• Событие смены исключения в фокусе;
• Событие добавления;
• Событие удаления;
• Событие нажатия кнопки закрыть;
• Метод открытия;
• Метод закрытия;
• Метод обновления представления.
В дальнейшем я понял, что для реализации более дружественного интерфейса мне понадобится еще несколько вещей:
• Доступность создания;
• Доступность удаления;
• Список всех выделенных исключений, для массового удаления.
Преобразовав все это в код, я получил интерфейс представления:
public interface IReplaceView
{
        bool EnableCreate
        {
            get;
            set;
        }

        bool EnableDelete
        {
            get;
            set;
        }

        List<ReplaceSymbol> Replaces
        {
            set;
        }
        ReplaceSymbol FocusedReplace
        {
            get;
            set;
        }

        List<ReplaceSymbol> SelectedReplaces
        {
            get;
            set;
        }

        event EventHandler Closing;

        event EventHandler Creating;

        event EventHandler Deleting;

        event EventHandler FocusedChanged;

        void Open();

        void Close();

        void RefreshView();
}
Формализация контроллера
Вся формализация контроллера заключается в том, что он должен принимать менеджер данных и собственно само представление, которое поддерживает интерфейс, представленный выше. Преобразовав в код, получил:
public class ReplaceController : IReplaceController
{
        private IReplaceView _view = null;

        private IReplaceStorage _replaceStorage = null;

        public ReplaceController(IReplaceView view, IReplaceStorage replaceStorage)
        {
            Contract.Requires(view != null, "View can’t be null");
            Contract.Requires(replaceStorage != null, "ReplaceStorage can’t be null”);

            _view = view;
            _replaceStorage = replaceStorage;
        }
}
В данном контроллере для проверки параметров я использую контракты, но для статьи это не имеет никакого значения.
Тестирование
Создавая и формализуя можно позабыть о том, зачем все это затевалось. Все ради одного, повысить качество работы за счет получения адекватного критерия оценки завершенности работ. Поэтому сразу же начал формализовать правила в тесты. Для реализации интерфейсов, принимаемых контроллером в конструктор реализуем просто стабы.
Загрузить пустой список исключений
При этом должна быть доступна кнопка создания исключений, недоступна кнопка удаления исключений, элемент в фокусе должен быть null, а список выбранных элементов пустой, но не null. Преобразовав в код получил:
[TestMethod]
public void LoadEmptyReplaces()
{
      var emptyReplaces = new List<ReplaceSymbol>();

      var storage = new StubIReplaceStorage()
      {
           ReplaceSymbolsGet =
           () =>
           {
               return emptyReplaces;
           },
      };

      ReplaceSymbol focusedReplace = null;
      var loadedReplaces = new List<ReplaceSymbol>();
      var selectedReplaces = new List<ReplaceSymbol>();
      var enableCreate = false;
      var enableDelete = false;

      var view = new StubIReplaceView()
      {
            FocusedReplaceGet =
            () =>
            {
                 return focusedReplace;
            },
            FocusedReplaceSetReplaceSymbol =
            x =>
            {
                 focusedReplace = x;

                 if (x != null)
                 {
                      selectedReplaces.Add(x);
                 }
            },
            ReplacesSetListOfReplaceSymbol =
            x =>
            {
                 loadedReplaces = x;
            },
            EnableCreateSetBoolean =
            x =>
            {
                 enableCreate = x;
            },
            EnableDeleteSetBoolean =
            x =>
            {
                 enableDelete = x;
            },
            SelectedReplacesGet =
            () =>
            {
                 return selectedReplaces;
            },
      };

      var controller = new ReplaceController(view, storage);
      controller.Open();
      view.FocusedChangedEvent(null, null);

      Assert.IsNotNull(loadedReplaces, "После создания контроллераи и его открытия список замен не должен быть null");
      Assert.IsTrue(loadedReplaces.Count == 0, "После создания контроллера и его открытия список замен не должен быть пустым, так как в него загружен пустой список");
      Assert.IsNull(focusedReplace, "После создания контроллера и его открытия активной замены быть не должно");
      Assert.IsNotNull(selectedReplaces, "После создания контроллера список замен не может быть null");
      Assert.IsTrue(selectedReplaces.Count == 0, "После создания контроллера и его открытия в список выбраных замен должен быть пустой");
      Assert.IsTrue(enableCreate, "После создания контроллера должна быть доступна возможность создавать замены");
      Assert.IsFalse(enableDelete, "После создания контроллера не должно быть доступно удаление, так как список замен пустой");
}
Другие правила
После чего, формализуя остальные правила, я получил список тестов, который сразу же позволял оценить готовность функционала контроллера к работе. Ни разу не запустив самого клиента.
Реализация представления
После этого я создал само представление, реализующее вышеуказанный интерфейс. Для него я так же создал небольшие тесты, используя забавный класс PrivateObject, который позволяет вызывать приватные методы, реализованные в объекте. Например, тест на удаление я получил такой:
[TestMethod]
public void DeleteOneReplaceView()
{
      var replaces = GetTestReplaces();

      var storage = new StubIReplaceStorage()
      {
            ReplaceSymbolsGet =
            () =>
            {
                 return replaces;
            },
      };

      var controller = new ReplaceController(_view, storage);
      Task.Run(() => { controller.Open(); }).Wait(WaitTaskComplited);

      var privateObject = new PrivateObject(_view);
      privateObject.Invoke("RiseDeleting");

      Assert.IsTrue(replaces.Count == 2, "После удаления одной замены должны остаться еще две");
      Assert.IsNotNull(_view.FocusedReplace, "После удаления замены фокус должен перейти на первую замену");
      Assert.AreEqual(replaces.First().Source, _view.FocusedReplace.Source, "После удаления замены фокус должен перейти на первую замену из оставшегося списка");
      Assert.IsTrue(_view.SelectedReplaces.Count == 1, "После удаления замены должна быть выбрана первая из оставшегося списка");
      Assert.AreEqual(_view.FocusedReplace.Source, _view.SelectedReplaces.First().Source, "После удаления замены фокус должен перейти на первую замену из оставшегося списка");
      Assert.IsTrue(_view.EnableCreate, "После удаления замены должна быть доступна возможность добавлять замены");
      Assert.IsTrue(_view.EnableDelete, "После удаления замены должна быть возможность удалить первую из оставшегося списка");
}
После чего формализуя остальные правила, я получил список тестов, который сразу же позволял оценить готовность функционала представления к работе. Опять же, ни разу не запустив самого клиента. Постепенно реализуя каждый из кусочков функционала я добился картины:
После, сделал вызов в коде контроллера с уже реальным менеджером и представлением.
_replaceView = new ReplaceView();
_replaceController = new ReplaceController(_replaceView, _importer);
Запустил все приложение и увидел конечный результат работы. Все работало точно так, как я закладывал. Отдел тестирования доволен, клиенты довольны, положительная обратная связь получена. Что еще необходимо?

Очень буду рад любым замечаниям или своим рассказам о том, как вы справляетесь с Windows Forms. Первые отзывы правильно замечают, что своим пыхтением я пришел к MVP, это абсолютно верно.
Спасибо за внимание! Надеюсь, вы не зря потратили время на меня.
Briefly and clearly about MVC implementation, without lengthy discussion or minor details
- Download demo — 10.5 KB
- Download source — 33.6 KB
Introduction
This article is used to demonstrate the MVC Pattern in .NET using C#/WinForm.
Here a simple «User Information Manager» application which is organized according the
the Model-View-Controller(MVC) pattern.
The application displays a list of contacts and allows you to add, modify, and delete
existing contacts. The idea is to separate the user interface into View (creates
the display, calling the Model as necessary to get information) and Controller
(responds to user requests, interacting with both the View and Controller as necessary).
The main advantage of MVC pattern is Loose Coupling. All the layers are separated
with their own functionality. It is easy to replace a layer with some other type
of layer. In other words, MVC pattern is to break up UI behavior into separate pieces
in order to increase reuse possibilities and testability. I am using Visual Studio
2010 Ultimate with .NET 4.0 for creating this Application.
Background
Model-View-Controller as the name applies considers three pieces:
- Model: it should be responsible for the data of the application domain
- View: it presents the display of the model in the user interface
- Controller: it is really the heart of the MVC, the intermediary that ties the Model and the View together, i.e. it takes user input, manipulates the model & causes the view to update
For more information about MVC, please see the following article from Wikipedia
The Solution
The User Information Manager is an application where you can store your customers’ contact
information. The application displays a list of contacts and
allows you to add, modify, and delete existing contacts. All customers have an ID, first
name, last name and sex. The screen that operator of this app uses to maintain his list
of customers could look something like this:

List of customers can be viewed, added, removed and updated (currently is contains only V.I.P Members,
but if you want to become a member of the club, just ask » src=»http://www.codeproject.com/script/Forums/Images/smiley_smile.gif» /> …. and no problems, it’s free).
After a new user is added, his ID cannot change anymore.
The Class Diagram
In the design of a system, a number of classes are identified and grouped together in a class diagram which helps to determine the relations between objects.

The Description of Components
Part of Controller
In order to detach logic from the View, we have to make a View feel as helpless as possible, so we’d prefer to make the Controller do all the hard work and just hand the View some simple commands that do not require any further processing.
According to our design, we do this by defining an interface, IUsersView, which the View must implement.
This interface contain only the signatures of properties/methods we need to use.
using System;
using WinFormMVC.Model;

namespace WinFormMVC.Controller
{
    public interface IUsersView
    {
        void SetController(UsersController controller);
        void ClearGrid();
        void AddUserToGrid(User user);
        void UpdateGridWithChangedUser(User user);
        void RemoveUserFromGrid(User user);
        string GetIdOfSelectedUserInGrid();
        void SetSelectedUserInGrid(User user);

        string FirstName     { get; set; }
        string LastName      { get; set; }
        string ID    { get; set; }
        string Department    { get; set; }
        User.SexOfPerson Sex { get; set; }
        bool CanModifyID     {      set; }
    }
}
Now we have a fairly good interface with number of methods.
Even if the MVC pattern formally declares that the Controller should receive the events and act upon the View, is often more practical and easier to have the View subscribe to the events and then delegate the handling to the Controller.
Finally I show the actual realization of the Controller (see the UsersController class). He hooks up the Model (User class) with View (UserView class).
public class UsersController
{
    //Notice we only use the interfaces. This makes the test more
    //robust to changes in the system.
    IUsersView _view;
    IList      _users;
    User       _selectedUser;

    //The UsersController depends on abstractions(interfaces).
    //It's easier than ever to change the behavior of a concrete class.
    //Instead of creating concrete objects in UsersController class,
    //we pass the objects to the constructor of UsersController
    public UsersController(IUsersView view, IList users)
    {
       _view = view;
       _users = users;
       view.SetController(this);
    }

    public IList Users
    {
       get { return ArrayList.ReadOnly(_users); }
    }

    private void updateViewDetailValues(User usr)
    {
       _view.FirstName   =  usr.FirstName;
       _view.LastName    =  usr.LastName;
       _view.ID  =  usr.ID;
       _view.Department  =  usr.Department;
       _view.Sex =  usr.Sex;
    }

    private void updateUserWithViewValues(User usr)
    {
       usr.FirstName     =  _view.FirstName;
       usr.LastName      =  _view.LastName;
       usr.ID    =  _view.ID;
       usr.Department    =  _view.Department;
       usr.Sex   =  _view.Sex;
    }

    public void LoadView()
    {
       _view.ClearGrid();
       foreach (User usr in _users)
       _view.AddUserToGrid(usr);

       _view.SetSelectedUserInGrid((User)_users[0]);
    }

    public void SelectedUserChanged(string selectedUserId)
    {
       foreach (User usr in this._users)
       {
           if (usr.ID == selectedUserId)
           {
               _selectedUser = usr;
               updateViewDetailValues(usr);
               _view.SetSelectedUserInGrid(usr);
               this._view.CanModifyID = false;
               break;
           }
       }
    }

    public void AddNewUser()
    {
       _selectedUser = new User(""   /*firstname*/,
       ""  /*lastname*/,
       "" /*id*/,
       ""/*department*/,
       User.SexOfPerson.Male/*sex*/);

       this.updateViewDetailValues(_selectedUser);
       this._view.CanModifyID = true;
    }

    public void RemoveUser()
    {
       string id = this._view.GetIdOfSelectedUserInGrid();
       User userToRemove = null;

        if (id != "")
        {
            foreach (User usr in this._users)
            {
                if (usr.ID == id)
                {
                    userToRemove = usr;
                break;
                }
            }

            if (userToRemove != null)
            {
                int newSelectedIndex = this._users.IndexOf(userToRemove);
                this._users.Remove(userToRemove);
                this._view.RemoveUserFromGrid(userToRemove);

            if (newSelectedIndex > -1 && newSelectedIndex < _users.Count)
            {
                this._view.SetSelectedUserInGrid((User)_users[newSelectedIndex]);
            }
        }
    }
}

public void Save()
{
   updateUserWithViewValues(_selectedUser);
   if (!this._users.Contains(_selectedUser))
   {
       //Add new user
       this._users.Add(_selectedUser);
       this._view.AddUserToGrid(_selectedUser);
   }
   else
   {
       //Update existing user
       this._view.UpdateGridWithChangedUser(_selectedUser);
   }
   _view.SetSelectedUserInGrid(_selectedUser);
   this._view.CanModifyID = false;

}
}
The controller class is very important and central to the application. It’s really important to keep it light, agile and loosely coupled to other components of the program.
Part of View
This section will focus on the scenario of loading the View with the list of users.
As said before our View must implement the IUsersView interface. A subset of the implementation is shown in the following code :
namespace WinFormMVC.View
{
    public partial class UsersView : Form, IUsersView
    {
The SetController() member function of UsersView allows us to tell the View to which Controller instance it must forward the events and all event handlers simply call the corresponding «event» method on the Controller. As you can see here, UsersView also depends on abstractions…
public void SetController(UsersController controller)
{
    _controller = controller;
}
We also use realisation of several methods from the IUsersView interface which use the User object:
public void AddUserToGrid(User usr)
{
    ListViewItem parent;
    parent = this.grdUsers.Items.Add(usr.ID);
    parent.SubItems.Add(usr.FirstName);
    parent.SubItems.Add(usr.LastName);
    parent.SubItems.Add(usr.Department);
    parent.SubItems.Add(Enum.GetName(typeof(User.SexOfPerson), usr.Sex));
}

public void UpdateGridWithChangedUser(User usr)
{
    ListViewItem rowToUpdate = null;

    foreach (ListViewItem row in this.grdUsers.Items)
    {
        if (row.Text == usr.ID)
        {
            rowToUpdate = row;
        }
    }

    if (rowToUpdate != null)
    {
        rowToUpdate.Text = usr.ID;
        rowToUpdate.SubItems[1].Text = usr.FirstName;
        rowToUpdate.SubItems[2].Text = usr.LastName;
        rowToUpdate.SubItems[3].Text = usr.Department;
        rowToUpdate.SubItems[4].Text = Enum.GetName(typeof(User.SexOfPerson), usr.Sex);
    }
}

public void RemoveUserFromGrid(User usr)
{

    ListViewItem rowToRemove = null;

    foreach (ListViewItem row in this.grdUsers.Items)
    {
        if (row.Text == usr.ID)
        {
            rowToRemove = row;
        }
    }

    if (rowToRemove != null)
    {
        this.grdUsers.Items.Remove(rowToRemove);
        this.grdUsers.Focus();
    }
}

public string GetIdOfSelectedUserInGrid()
{
    if (this.grdUsers.SelectedItems.Count > 0)
        return this.grdUsers.SelectedItems[0].Text;
    else
        return "";
}

public void SetSelectedUserInGrid(User usr)
{
    foreach (ListViewItem row in this.grdUsers.Items)
    {
        if (row.Text == usr.ID)
        {
            row.Selected = true;
        }
    }
}

public string FirstName
{
    get { return this.txtFirstName.Text; }
    set { this.txtFirstName.Text = value; }
}

public string LastName
{
    get { return this.txtLastName.Text; }
    set { this.txtLastName.Text = value; }
}

public string ID
{
    get { return this.txtID.Text; }
    set { this.txtID.Text = value; }
}


public string Department
{
    get { return this.txtDepartment.Text; }
    set { this.txtDepartment.Text = value; }
}

public User.SexOfPerson Sex
{
    get
    {
        if (this.rdMale.Checked)
            return User.SexOfPerson.Male;
        else
            return User.SexOfPerson.Female;
    }
    set
    {
        if (value == User.SexOfPerson.Male)
            this.rdMale.Checked = true;
        else
            this.rdFamele.Checked = true;
    }
}

public bool CanModifyID
{
    set { this.txtID.Enabled = value; }
}

        ...
}
Part of Model
This User class is a Model class. In this example, the User is an extremely simple domain class with no behavior, whereas in a realworld Domain Model you would probably have much more functionality in the domain classes.
The model is independent of the user interface. It doesn’t know if it’s being used from a text-based, graphical or web interface.
The Model only holds the in-memory state in a structured format. As you can see, the class contains only private data members and the public interfaces (properties) available to the client code
using System;

namespace WinFormMVC.Model
{
 public class User
 {
   public enum SexOfPerson
   {
      Male   = 1,
      Female = 2
   }

   private string    _FirstName;
   public string FirstName
   {
    get { return _FirstName; }
    set
    {
     if (value.Length > 50)
      Console.WriteLine("Error! FirstName must be less than 51 characters!");
     else
      _FirstName = value;
    }
   }

   private string _LastName;
   public string LastName
   {
     get { return _LastName; }
     set
     {
      if (value.Length > 50)
       Console.WriteLine("Error! LastName must be less than 51 characters!");
      else
       _LastName = value;
    }
   }

   private string _ID;
   public string ID
   {
    get { return _ID; }
    set
    {
      if (value.Length > 9)
        Console.WriteLine("Error! ID must be less than 10 characters!");
      else
       _ID = value;
    }
   }

   private string _Department;
   public string Department
   {
       get { return _Department; }
       set { _Department = value; }
   }

   private SexOfPerson _Sex;
   public SexOfPerson Sex
   {
       get { return _Sex; }
       set { _Sex = value; }
   }


   public User(string firstname, string lastname, string id, string department, SexOfPerson sex)
   {
       FirstName   = firstname;
       LastName    = lastname;
       ID  = id;
       Department  = department;
       Sex = sex;
   }
 }

}
Part of Client
And now it’s good time to show how we use the MVC paradigm effectively, i.e. our code’s components of MVC architecture (please see UseMVCApplication.csproj)
using System.Collections;
using  WinFormMVC.Model;
using  WinFormMVC.View;
using  WinFormMVC.Controller;

namespace UseMVCApplication
{
static class Program
{
    /// The main entry point for the application.
    [STAThread]
    static void Main()
    {
        //Here we are creating a View
        UsersView view = new UsersView();
        view.Visible = false;

        //Here we are creating a list of users
        IList users = new ArrayList();

        //Here we are add our "commoners" in the list of users
        users.Add(new User("Vladimir",   "Putin",
     "122",    "Government of Russia",
            User.SexOfPerson.Male));
        users.Add(new User("Barack",     "Obama",
             "123",    "Government of USA",
             User.SexOfPerson.Male));
        users.Add(new User("Stephen",    "Harper",
            "124",    "Government of Canada",
            User.SexOfPerson.Male));
        users.Add(new User("Jean",       "Charest",
            "125",    "Government of Quebec",
             User.SexOfPerson.Male));
        users.Add(new User("David",      "Cameron",
            "126",    "Government of United Kingdom",
            User.SexOfPerson.Male));
        users.Add(new User("Angela",     "Merkel",
            "127",    "Government of Germany",
            User.SexOfPerson.Female));
        users.Add(new User("Nikolas",    "Sarkozy",\
            "128",    "Government of France",
            User.SexOfPerson.Male));
        users.Add(new User("Silvio",     "Berlusconi",
            "129",    "Government of Italy",
            User.SexOfPerson.Male));
        users.Add(new User("Yoshihiko",  "Noda",
            "130",    "Government of Japan",
            User.SexOfPerson.Male));

        //Here we are creating a Controller and passing two
        //parameters: View and list of users (models)
        UsersController controller = new UsersController(view, users);
        controller.LoadView();
        view.ShowDialog();
        }
    }
}
Why is it good?
- The main advantage of using the MVC pattern is that it makes the code of the user interface more testable
- It makes a very structured approach onto the process of designing the user interface, which in itself contributes to writing clean, testable code, that will be easy to maintain and extend
The Model-View-Controller is a well-proven design pattern
to solve the problem of separating data (model) and user interface (view)
concerns, so that changes to the user interface do not affect the data handling,
and that the data can be changed without impacting/changing the UI. The MVC
solves this problem by decoupling data access and business logic layer from UI
and user interaction, by introducing an intermediate component: the controller.
This MVC architecture enables the creation of reusable components within a
flexible program design (components can be easily modified)
History
- 10th Mayl 2012: Initial post
winforms-mvc — A library for MVC pattern in c# Windows Forms Application
MVC for C# Windows Forms
MVC Usage
To use the MVC framework, you’ll have to make some changes to the class containing the Main method, defaults to Program.cs in WinForms applications.
static class Program
{
	[STAThread]
	static void Main()
	{
		Application.EnableVisualStyles();
		Application.SetCompatibleTextRenderingDefault(false);

		AppManager.Start<TController>(); // replaced: Application.Run(formObject); where generic type TController is your starting controller
	}
}
AppManager
The AppManager class is initially used to keep the STA (Single Threaded Apartment) thread running, because WinForms applications run on one single thread. The AppManager singleton can be used to «travel» to different forms using the Load method from this class. The Load method requires a generic type which inherits the abstract Controller class. When the entered generic type is Loadable, it will execute the successhandler of the controller. If the controller was not able to load, the application will prompt a message to the user and exits the application when the message closes using the failedhandler. Both success and failed handlers can be overridden.
Because the AppManager is a singleton, we can use all the functionality of the AppManager instance anywhere in our application once the instance is initialized using Start<TController>.
Example:
AppManager.Instance.Load<LoginController>();
Controllers
Controllers are used to handle events or other functionalities that should be processed on the backend. I use this MVC framework for pushing and pulling of data on the controller. When the view submits the data entered in it’s form, the data will be send to the controller through events (callbacks) and the controller will insert them in the prefered type of repository.
Every controller must inherit the abstract Controller class or any other unsealed class that is derived from that class.
Example:
public class LoginController : Controller
{

	private LoginView _view;

	public override View
	{
		get
		{
			return _view;
		}
	}

	public LoginController()
	{
		_view = new LoginView();
		_view.LoginAttempt += OnLoginAttemptHandler;
	}

	public override bool Loadable()
	{
		return AppManager.Instance.User == null;
	}

	protected void OnLoginAttemptHandler(LoginAttemptEventArgs e) { /* ... */ }

}
Views
A Form is defined as a view in this MVC framework. This way we are not only benefitting from the built in designer of Visual Studios, but also the other libraries which alter or extend the designer of the winforms. A view does not know where the data is comming from, it has no relation to anything other than the models.
When data, which was entered or created in the view, should be submitted to the backend, the view has to create an event which the controller can subscribe too to handle the submitted data (eg. store in dbo).
Example:
public partial class LoginView : Form, IView
{

	public event LoginAttemptEventHandler LoginAttempt;

	public LoginView() { /* ... */ }

	public Form Form
	{
		get
		{
			return this;
		}
	}

	public String Title
	{
		get
		{
			return Text;
		}
		set
		{
			Text = value;
		}
	}

	private void buttonLogin_Click(object sender, EventArgs e)
	{
		string email = null; // the entered email address
		string password = null; // the entered password

		bool flag = false; // checks if the entered fields are valid
		/*
			...
			...
			...
		*/

		if (flag)
		{
			OnLoginAttempt(new LoginAttempt(email, password));
		}
	}

	protected void OnLoginAttempt(LoginAttemptEventArgs e)
	{
		if (LoginAttempt != null)
		{
			LoginAttempt(e);
		}
	}

}
07.01.2020, 12:19. Показов 5987. Ответов 7
Доброго времени, уважаемые форумчане.
Пишу приложение которое умеет:
1. Извлекать данные из xml файлов.
Xml файлы:
2 файла с ценами ингредиентов (2 типа ингредиентов, по файлу на каждый).
очень много xml файлов рецептов в которых перечисляются ингредиенты и их количество.
2. Отображать рецепты по категориям (в меню приложения можно выбрать категорию и приложение отобразит только рецепты нужной категории)
3. Отображать материалы для изменения их цен.
В будущем планируется прикрутить сравнение цен приготовления по рецептам для того чтобы понимать что выгоднее готовить, а так же все что придёт в голову.
Наступил момент когда обычное накидывание методов завело в дебри багов и мне посоветовали присмотреться к паттерну MVC.
После прочтения теории по данному паттерну пришло понимание что:
Модель — отвечает за хранение данных и работу непосредственно с этими данными (изменение, вычисление и т.д).
Представление — отвечает за отображение данных пользователю.
Контроллер — посредник между пользователем и моделью(данными). Он передает команды пользователя которые должны повлиять на данные из модели.
Таким образом возникает цепь:
Пользователь использует контроллер который управляет моделью которая обновляет представление которое видит пользователь.
Но я понятия не имею каким образом использовать этот паттерн на практике. То-есть в теории все понятно, но как это реализуется в коде абсолютно не понятно.
Буду безмерно благодарен любой помощи. Если нужна какая-либо дополнительная информация о проекте, пожалуйста, напишите, я дополню. Я бы вывалил весь свой код с удовольствием, но мне посоветовали так не делать т.к там без 50грамм не разобраться.
P.S Я новичок, поэтому отдельная просьба — по возможности используйте слэнг и терминологию по минимуму
Добавлено через 4 часа 29 минут
Уточню свой вопрос…
Я не пойму что именно из моего проекта может относиться к модели, к контроллеру, а что к представлению.
Пожалуйста, набросайте пару идей, просто из головы, пусть просто гипотетические, но по правилам MVC.
In this article I will explain with an example, how to call (consume) MVC Web API in Windows Forms (WinForms) Application using C#.
The Web API 2 Controller method will fetch records from database using Entity Framework in ASP.Net MVC.
The Web API 2 Controller method will be called using
WebClient
class in Windows Forms Application to populate DataGridView control.
Database
Here I am making use of Microsoft’s Northwind Database. You can download it from here.
Entity Framework Model
Once the Entity Framework is configured and connected to the database table, the Model will look as shown below.
Model
The
CustomerModel
class consists of the following property.
public class CustomerModel
{
///<summary>
/// Gets or sets Name.
///</summary>
public string Name { get; set; }
}
Web API Controller
In order to add a Web API Controller you will need to Right Click the
Controllers
folder in the
Solution Explorer
and click on
Add
and then
Controller
.
Now from the
Add Scaffold
window, choose the
Web API 2 Controller – Empty
option as shown below.
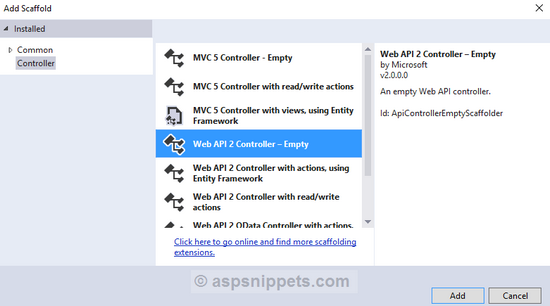
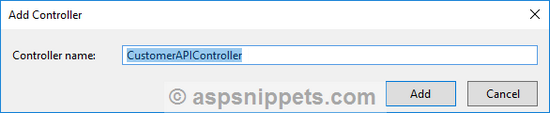
Then give it a suitable name and click OK.
The next task is to register the Configuration for Web API in the
Global.asax
file so that the Web API is available for accessing on Web.
In order to do so open
Global.asax
file and add the following line.
System.Web.Http.GlobalConfiguration.Configure(WebApiConfig.Register);
Make sure you add it in the same order as shown below.
public class MvcApplication : System.Web.HttpApplication
{
protected void Application_Start()
{
AreaRegistration.RegisterAllAreas();
System.Web.Http.GlobalConfiguration.Configure(WebApiConfig.Register);
RouteConfig.RegisterRoutes(RouteTable.Routes);
}
}
The next step is to code the Web API Controller. The Web API Controller consists of a method named
GetCustomers
which accepts an object of
CustomerModel
.
The records of the Customers are fetched using Entity Framework and are filtered using the
StartsWith
function based on the value of the
Name
property.
Finally the records are returned as Generic List Collection.
This method is decorated with
Route
attribute which defines its Route for calling the Web API method and
HttpPost
attribute which signifies that the method will accept Http Post requests.
public class CustomerAPIController : ApiController
{
[Route(«api/CustomerAPI/GetCustomers»)]
[HttpPost]
public List<Customer> GetCustomers(CustomerModel customer)
{
NorthwindEntities entities = new NorthwindEntities();
return (from c in entities.Customers.Take(10)
where c.ContactName.StartsWith(customer.Name) || string.IsNullOrEmpty(customer.Name)
select c).ToList();
}
}
Form Design
The Form consists of a TextBox, a Button and a DataGridView control.
Namespaces
You will need to import the following namespaces.
using System.Net;
using System.Text;
using System.Web.Script.Serialization;
Note: In order to use the
System.Web.Script.Serialization
namespace, you will need to add reference of
System.Web.Extensions
assembly to your project, for more details refer here.
Calling the Web API using WebClient class and populating the DataGridView
The
PopulateDataGridView
method is called inside the
Form Load
event handler and on the
Click
event handler of the
Search
button.
Inside the
PopulateDataGridView
method, the value of the
Name
TextBox is wrapped into a JSON object which is then serialized into a JSON string.
The URL of the Web API along with its Controller method and the serialized JSON string is passed to the
UploadString
method of the
WebClient
class.
The
UploadString
method of the
WebClient
class calls the Web API’s Controller method i.e. the
GetCustomers
method and returns the JSON string which is then de-serialized to Generic List of
Customer
class objects.
Finally the Generic List of
Customer
class objects is used to populate the DataGridView.
private void Form1_Load(object sender, EventArgs e)
{
this.PopulateDataGridView();
}
private void btnSearch_Click(object sender, EventArgs e)
{
this.PopulateDataGridView();
}
private void PopulateDataGridView()
{
string apiUrl = «http://localhost:26404/api/CustomerAPI»;
object input = new
{
Name = txtName.Text.Trim(),
};
string inputJson = (new JavaScriptSerializer()).Serialize(input);
WebClient client = new WebClient();
client.Headers[«Content-type»] = «application/json»;
client.Encoding = Encoding.UTF8;
string json = client.UploadString(apiUrl + «/GetCustomers», inputJson);
dataGridView1.DataSource = (new JavaScriptSerializer()).Deserialize<List<Customer>>(json);
}
public class Customer
{
public string CustomerID { get; set; }
public string ContactName { get; set; }
public string City { get; set; }
}
Screenshot
Downloads