
MULTIPLE_IRP_COMPLETE_REQUESTS — это сообщение синего экрана смерти, который появляется из-за того, что драйвер попытался вызвать функцию IoCompleteRequest() для завершения IRP, но так как пакет был завершен, то это вызвало появление ошибки. В большинстве случаев это происходит в ситуации, когда два разных драйвера пытаются завершить один и тот же пакет. Первый запрос выполняется успешно, но второй оканчивается неудачей, что и вызывает синий экран смерти MULTIPLE_IRP_COMPLETE_REQUESTS.
Данная проблема обычно возникает у пользователей LogMeIn Hamachi, которые пытаются с помощью этого программного обеспечения создать виртуальную локальную сеть. Если быть более точным, то проблема возникает с драйвером hamdrv.sys., который и проделывает все вышесказанное в первом абзаце. Именно на примере утилиты LogMeIn Hamachi и его драйвера hamdrv.sys. мы и рассмотрим методы решения этой проблемы.
Исправляем синий экран смерти MULTIPLE_IRP_COMPLETE_REQUESTS
Метод №1 Обновление LogMeIn Hamachi
Так как разработчики этого программного обеспечения уже давно знают об этой проблеме, то они выпустили обновление(еще в 2014 году), исправляющий эту ошибку. Все что вам нужно сделать, так это пройти на официальный сайт LogMeIn Hamachi, скачать последнюю версию и установить ее. Однако, прежде чем вы начнете устанавливать новую версию, вы должны удалить старую, которая вызывает проблемы:
- Нажмите на клавишу Win и впишите в поисковик «Программы и компоненты».
- Найдите в списке программ LogMeIn Hamachi, нажмите на нее правой кнопкой мыши и выберите «Удалить».
- После удалений Hamachi, перезагрузите свой компьютер.
- Затем устанавливайте новую версию.
Метод №2 Полное удаление LogMeIn Hamachi
Если предыдущий метод с обновлением LogMeIn Hamachi не помог, то вероятно что-то другое с этой утилитой вызывает синий экран смерти MULTIPLE_IRP_COMPLETE_REQUESTS. В этом случае, вам нужно просто найти альтернативу этой программе, так как она может быть несовместима с вашей конфигурацией. Повторите шаги по удалению из предыдущего метода для удаления LogMeIn Hamachi.
Метод №3 Обновление BIOS
Если ничего из вышеуказанного вам не помогло в исправлении синего экрана MULTIPLE_IRP_COMPLETE_REQUESTS, то можно попробовать обновить BIOS. Такие ошибки могут происходить не только по вине драйверов, но и из-за устаревшей версии BIOS.
- Для начала вам нужно определить вашу версию BIOS. Для этого нажмите клавиши Win+R, впишите msinfo32 и нажмите Enter.
- Найдите строчку «Версия BIOS» и занесите данные с нее, например, в Блокнот.
- Затем пройдите на сайт производителя своей материнской платы, перейдите в раздел загрузок и посмотрите последнюю версию BIOS. Если она новее записанной версии в Блокноте, а оно скорее всего так и будет, то скачайте установщик и запустите его. Далее обновление BIOS должно пройти в автоматическом режиме.
Заметка: на более-менее современных материнских платах все происходит именно так, как описано в третьем методе. Но на старых платах обновление происходит через сам БИОС, т.е. вы создаете загрузчик на флешке с новой версией BIOS, выставляете приоритет загрузки в БИОС на внешнее устройство, а затем загружаетесь через это устройство. Убедитесь, каким именно образом обновляется ваш BIOS, а затем обновляйте его уже отталкиваясь от этого.
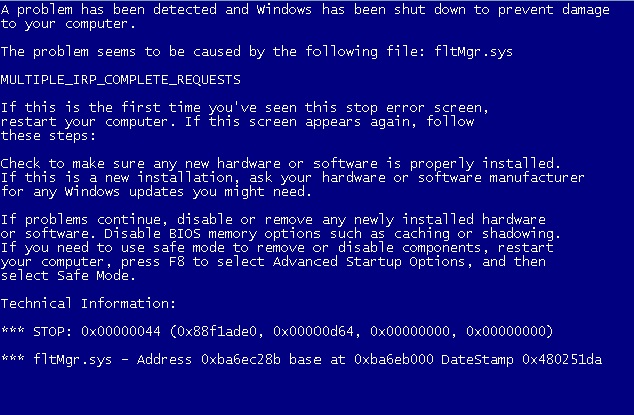
In this article, we will be discussing various solutions to MULTIPLE_IRP_COMPLETE_REQUESTS. The error is assigned the value of 0x00000044 which is a little complicated in nature than many other BSODs. This specific issue roots from multiple drivers attempting to complete one particular packet (or IRP).
While that is the main reason, there could be several other causes behind it. Some common ones could be the problems with device drivers, lack of regular updates or even the low disk space. Here you can see some of the most common reasons behind this error and other such BSODs as well as the solutions to fix them.
MULTIPLE_IRP_COMPLETE_REQUESTS BSOD ERROR in Windows 10 Solutions
Here is how to fix MULTIPLE_IRP_COMPLETE_REQUESTS BSOD ERROR in Windows 10 –
1] Block your PC from shutting down automatically
If you are confronting blue screen of death, then you probably have faced force shutdown a few many times. The automatic restart is generally helpful to the computer since it would reduce the damage that is being caused to it. However, sometimes the forced shutdown can be so frequent that it would hardly let the users work properly. If that is the case with you, you can try out the following steps to block out such automatic restarting of the PC.
Step-1: Begin by right-clicking on This PC icon and choose Properties.
Step-2: Choose “Advanced system settings” option from the subsequent window. From the next dialog that follows, go to the Advanced tab and in the Recovery section, hit Settings.
Step-3: When the Startup & Recovery wizard comes into view, head right to the System failure section. and unmark the box corresponding to ‘Automatically restart’.
Step-4: Click OK and restart to commit the changes.
2] Update all the device drivers
Every device driver is integral to the smooth functioning of your computer. They are the connecting keys that make hardware components work. Besides, as you have read in the beginning, driver conflicts are the primary causes of the Multiple IRP Complete Request Blue Screen error. Therefore, you need to make sure that all your device drivers are updated timely and regularly.
While most of the drivers are updated automatically with the monthly updates that Microsoft makes available, there can be instances where certain drivers are skipped out. To check and update them, here are the steps that you need to follow –
- Hit Windows + R hotkeys to call Run window. In it, type devmgmt.msc and click on OK button in it.
- From the wizard which comes up on the screen, click and expand the devices with a yellow exclamation mark. The mark is an indication of a device driver having an issue.
- Right-click on them and select “Update driver“.
- Let the system carry out the driver updates after you follow the on-screen instructions for the same.
- If the problem still persists, try reinstalling the driver.
3] Use the Blue screen troubleshooter to fix MULTIPLE_IRP_COMPLETE_REQUESTS
Detecting and fixing the roots of error may not be possible all the time for everyone, particularly if they are beginners. This is when the troubleshooters come handy. These are functions that are responsible for easily detecting the basic problems that might be causing a particular kind of error. Such a function for blue screen errors is the Blue screen troubleshooter available in Windows 10. This is one of the first things that you should try whenever confronting a BSOD. Here is how you use it –
- Launch Windows Settings => Troubleshoot => Blue screen.
- When you click on Blue screen, the option will expand. It will show a button namely Run the troubleshooter.
- Click on it to initiate the Blue screen troubleshooter.
4] Scan for security threats with Windows Security
It is a great thing that Windows now comes with its own security application that you can rely upon. We are talking about Windows Security. You can use the same to detect and clear out any potential virus and malware attacks on your system. This ensures that you do not face any kind of errors due to malicious activities or viruses or vulnerabilities on your computer. In order to scan for any malware here is how you can use the Windows Security –
- Open up the Windows Security app.
- Then, in the interface, select “Virus & Threat protection” => Scan => Full Scan.
- Hit the Scan now button to initial threat detection.
- The scanning may be a lengthy process. Once it is over, hit the Clean threats button when the system shows the list of detected malicious activities, apps, or files.
5] Start your device in Safe Mode
When you start a device in Safe mode, only the most integral and critical components, drivers, and files will be up and working. This will prevent any external applications, drivers, or unnecessary system components from interrupting the functioning of the computer. This can, therefore, potentially prevent blue screens and other errors from happening. To start your device in Safe mode, here are the steps to follow –
- Select the Restart button in the Start menu while pressing the Shift key.
- You will be led to Advanced Repair screen.
- There, select Troubleshoot => Advanced options => Startup Settings.
- Hit the Restart button after noting the number corresponding to ‘Safe Mode’ option. It would generally be F4 or F8.
- Press the respective key as the PC restarts to enter the Safe mode.
6] Ensure your PC has all the recent updates
Microsoft releases monthly patches that contain various fixes for the bugs and problems, vulnerabilities, detected. These updates are critical for the problem-free functioning of your computer. To check and ensure that your device has all the latest updates, here is what you must do –
- Call the Settings app with the shortcut Windows + I.
- Click Update & Security => Windows Update => Check for updates.
- Press on Download option with the listed latest updates to get them.
7] Remove multiple apps performing the same functions on your PC
Having multiple applications on your PC that performs same or similar functions can sometimes affect the system adversely. This is because their requests may create conflicts. So, make sure that you do not have any similar applications on your PC. This is true for third-party antivirus software as well. Since you already have Windows Security in your system, you should try uninstalling the third-party security tools as they might be creating conflicts. In order to uninstall any application, here are the steps that you need to follow –
- Search and launch Control Panel and navigate right to the Programs and Features section.
- Select the apps you’d like to uninstall (the similar ones).
- Hit Uninstall button you can find on the top.
- Lastly, confirm uninstalling.
8] Detach the hardware components resulting in the MULTIPLE_IRP_COMPLETE_REQUESTS
If you started facing a blue screen of death errors after recently connecting or adding any hardware components, there are chances that these errors are being caused by them. To check and confirm the same, you can temporarily detach or disconnect the components that you recently added. Then see whether the issue is resolved. In case you stop receiving the blue screen errors after disconnecting the hardware devices all components, they could be the ones accountable for the erroneous situation. If that is the case, you should try getting an update for the device or hardware. You can do this by going to the manufacturer’s website and finding an update for the same. If you are still receiving the errors, you may reattach as they might not be the problem.
9] Use System File Checker to solve
System File Checker is a function in Windows that can ensure that every integral system components and files are in place. Sometimes, when some important system files go missing, it may cause a ton of problems on the computer. Running the function is pretty easy and you just need to put a simple command in the Command Prompt. Here is what you need to do –
- Open the command prompt as an administrator.
- Run the command:
SFC /SCANNOWand hit Enter. - Wait for the scan to over and see the result.
10] Undo all recent changes with System Restore
System restore, as the name suggests, can restore your computer to a point where everything was functioning normally and you were not facing any kind of error. However, for this to work you need to have a previously created restore point. In this context, note that when you perform a System restore, all the recent changes made by you will be erased. So if you have any important stuff on your system, make sure you have a backup for the same.
- To use the system restore function, simply search ‘system restore’ and launch the wizard.
- Select a restore point and go through the on-screen instructions.
11] Clean up and make space in your system with Disk Cleanup
Very often, many of the problems showing up in your system is a result of lack of space on the disk. You should take time to clean up your PC now and then. Also, there can be a pile of temporary files, otherwise called as junk files, on your system. These result from normal browsing or usage of the computer. Thankfully, you can use the Disk Cleanup utility on Windows to get rid of such unnecessary stuff occupying disk space. To use the function, here are the sequence of steps that you must follow along –
- Search ‘cleanmgr’ and from the results, launch Disk Cleanup.
- Then, from the small pop up that appears, select C: drive, which accumulates most of the junk. Hit the OK button.
- Perform a click on Clean up system files button on the following wizard.
- In the consequent step, the system will calculate the space it can retrieve through disk cleanup.
- Check all the boxes and hit OK.
- Finally, restart Windows 10 PC and hopefully, you will get rid of MULTIPLE_IRP_COMPLETE_REQUESTS error.
12] Solve the problems rooting from issues in system memory
It is needless to say that Random Access Memory plays a very crucial role in the functioning of your computer every moment. Any sort of errors or bad sectors for interruptions in the memory area can severely affect the overall working of your PC. To check whether MULTIPLE_IRP_COMPLETE_REQUESTS is resulting from RAM issues, you can use the Memory Diagnostic Tool.
- Search ‘Memory diagnostic’ and launch it from the results.
- Then, to diagnose the error, choose the first option “Restart now and check for problems (recommended).
- The system will carry out two rounds of restart and the required memory scans. Any issues found will be automatically fixed.
13] Run the Disk checking utility to fix MULTIPLE_IRP_COMPLETE_REQUESTS
The check disk utility is something that can help you ensure that the system integrity is in place. This function has helped many users to work around many of the blue screen error. So, it might be worth trying in your case as well. Like in case of the System file checker, you just need to pass a simple command in the command prompt to utilize this.
- First of all, get access to an elevated Command Prompt and give permission to make changes.
- Then, in the window at the command line, type in the below syntax and hit Enter. Once the scan gets over, you will see the result right away.
chkdsk C: /f /r /x
14] Get rid of problematic Windows Update files
There have been several instances when some of the patches released by Microsoft had some sort of bugs. They unintentionally ended up causing various kinds of errors including MULTIPLE_IRP_COMPLETE_REQUESTS.
Also, such situations may come up when your system did not properly install the latest updates due to troublesome internet connections or any such cause. A way to figure this out is checking whether you started facing blue screen error after receiving the latest patch. If so, try uninstalling the latest update and see whether the problem has been resolved.
- Open Windows Settings app with the shortcut “Win + I”.
- Navigate to the Update & Security => Windows Updates => View Update history => Uninstall updates.
- This will call the Installed updates section of Control panel, where you have to select the patches you want to uninstall. Look for the latest ones.
- Finally, click on the Uninstall button on the top.
Methods:
1] Block your PC from shutting down automatically
2] Update all the device drivers
3] Use the Blue screen troubleshooter
4] Scan for security threats with Windows Security
5] Start your device in Safe Mode
6] Ensure your PC has all the recent updates
7] Remove multiple apps performing the same functions on your PC
8] Detach the hardware components
9] Use System File Checker to solve
10] Undo all recent changes with System Restore
11] Clean up and make space in your system with Disk Cleanup
12] Solve the problems rooting from issues in system memory
13] Run the Disk checking utility
14] Get rid of problematic Windows Update files
That’s all!!
The MULTIPLE_IRP_COMPLETE_REQUESTS error in Windows 10 and 11 is a Blue Screen of Death (BSOD) error that occurs when multiple drivers attempt to complete the same IRP (I/O Request Packet). This typically happens due to driver conflicts, hardware issues, or corrupt system files. If you are facing this error, don’t worry. In this guide, we will provide a comprehensive list of solutions to fix the MULTIPLE_IRP_COMPLETE_REQUESTS error and restore your system to normal operation.
How can I fix MULTIPLE_IRP_COMPLETE_REQUESTS error?
1. Restart Your PC
Before trying any advanced troubleshooting methods, start with a simple system restart. Temporary glitches or conflicting processes can sometimes cause the MULTIPLE_IRP_COMPLETE_REQUESTS error. Restarting your PC may help resolve the issue.
2. Disconnect External Devices
Hardware peripherals such as USB drives, external hard disks, or printers may trigger the error. To rule out any conflicts:
- Disconnect all external devices.
- Restart your PC and check if the error persists.
- If the error disappears, reconnect the devices one by one to identify the culprit.
3. Update or Roll Back Drivers
Faulty or outdated drivers are one of the primary causes of this BSOD error. Follow these steps to update or roll back your drivers:
Update Drivers:
- Press
Win + Xand select Device Manager. - Expand Display adapters, Network adapters, or any other category where drivers might be outdated.
- Right-click on the driver and select Update driver.
- Choose Search automatically for drivers and let Windows find and install the latest version.
- Restart your PC and check if the issue is resolved.
Roll Back Drivers:
If the error started after a recent driver update, rolling back might help:
- Open Device Manager.
- Right-click on the problematic driver and select Properties.
- Go to the Driver tab and click Roll Back Driver.
- Restart your computer and check if the error persists.
4. Run Windows Memory Diagnostic Tool
Memory issues can trigger the MULTIPLE_IRP_COMPLETE_REQUESTS error. To check your RAM:
- Press
Win + R, typemdsched.exe, and hit Enter. - Select Restart now and check for problems.
- Your PC will restart, and the Windows Memory Diagnostic Tool will check for RAM issues.
- If errors are detected, consider replacing the faulty RAM module.
5. Perform a System File Check (SFC and DISM)
Corrupt system files can also lead to BSOD errors. Run SFC and DISM scans to fix them:
Run SFC Scan:
- Open Command Prompt as an administrator.
- Type the following command and press Enter:
sfc /scannow - Wait for the scan to complete and follow any repair instructions.
Run DISM Scan:
- Open Command Prompt as an administrator.
- Type the following commands one by one and press Enter:
DISM /Online /Cleanup-Image /ScanHealth DISM /Online /Cleanup-Image /RestoreHealth - Restart your PC after the process is complete.
6. Check for Windows Updates
Keeping Windows updated is crucial for system stability. To check for updates:
- Press
Win + Ito open Settings. - Go to Windows Update and click Check for updates.
- Install any available updates and restart your PC.
7. Uninstall Recently Installed Applications
If you recently installed an application before encountering this BSOD error, try uninstalling it:
- Press
Win + Ito open Settings. - Navigate to Apps > Installed apps.
- Locate the recently installed software, click on it, and select Uninstall.
- Restart your computer and check if the issue is resolved.
8. Perform a Clean Boot
A clean boot helps determine if background services are causing the issue:
- Press
Win + R, typemsconfig, and press Enter. - In the System Configuration window, go to the Services tab.
- Check Hide all Microsoft services, then click Disable all.
- Go to the Startup tab and click Open Task Manager.
- Disable all startup programs and restart your PC.
9. Check Hard Drive for Errors
Corrupt sectors on your hard drive may cause BSOD errors. To check your disk:
- Open Command Prompt as an administrator.
- Type the following command and press Enter:
chkdsk /f /r - Type Y to schedule the scan at the next restart.
- Restart your PC and let Windows check for errors.
10. Restore Your System to a Previous State
If the issue started recently, you can restore your PC to an earlier state:
- Press
Win + R, typerstrui, and press Enter. - Click Next, then select a restore point before the error occurred.
- Click Next, then Finish to restore your system.
11. Reset Windows
If all else fails, resetting Windows might be the best option:
- Press
Win + Ito open Settings. - Go to System > Recovery.
- Click Reset this PC and choose Keep my files or Remove everything.
- Follow the on-screen instructions to reset Windows.
Conclusion
The MULTIPLE_IRP_COMPLETE_REQUESTS error in Windows 10 and 11 can be frustrating, but following these solutions should help you resolve the issue. Start with simple fixes like restarting your PC, updating drivers, and running system scans. If necessary, perform advanced troubleshooting like clean booting, checking for hardware faults, or resetting Windows. If the problem persists, consider seeking professional assistance to diagnose potential hardware failures.
The Blue Screen of Death (BSOD) is one of the most infamous issues plaguing Windows operating systems, and the MULTIPLE_IRP_COMPLETE_REQUESTS error is no exception. This particular error can be perplexing for users, as it often points to deeply rooted problems within system drivers or software conflicts. Understanding this error and effectively troubleshooting it can save users a lot of time and frustration. In this article, we will dive deep into the MULTIPLE_IRP_COMPLETE_REQUESTS BSOD, exploring its causes and providing you with comprehensive step-by-step solutions to rectify the issue.
Understanding the MULTIPLE_IRP_COMPLETE_REQUESTS Error
Before we begin exploring the solutions, it is essential to understand what the MULTIPLE_IRP_COMPLETE_REQUESTS error actually means. The acronym IRP stands for I/O Request Packet, which is a data structure that the Windows operating system uses to communicate between layers of drivers. The MULTIPLE_IRP_COMPLETE_REQUESTS error indicates that the system has encountered multiple requests for the same operation that were completed, likely due to a driver malfunction or conflict.
When the system detects more than one IRP completion for a single I/O request, it triggers this BSOD error as a defensive measure. The error can occur in various scenarios, including:
- Conflicting drivers or outdated system drivers.
- Hardware problems, particularly with RAM or hard drives.
- Corrupted system files or configurations.
- Issues arising from third-party software, including antivirus programs.
- Rogue updates or improper installations.
Identifying the cause of the MULTIPLE_IRP_COMPLETE_REQUESTS error is crucial to applying an effective solution. Therefore, let’s break down the troubleshooting process.
Step-by-Step Solutions to Fix MULTIPLE_IRP_COMPLETE_REQUESTS BSOD
1. Check for Hardware Issues
Hardware problems can often lead to driver errors and conflicts. Begin by checking your hardware components for any issues.
a. Inspect RAM
Faulty RAM is a common cause of various BSOD errors. You can run a memory test using Windows’ built-in Memory Diagnostic Tool:
- Press
Windows + Rto open the Run dialog. - Type
mdsched.exeand press Enter. - Choose
Restart now and check for problems. - The system will restart and test your memory. Follow the prompts after testing to check for any issues.
If any errors are found, you may need to replace the faulty memory module.
b. Check Hard Drive Health
Hard drive failures can also lead to BSOD issues. You can check the health of your hard drive using the CHKDSK command:
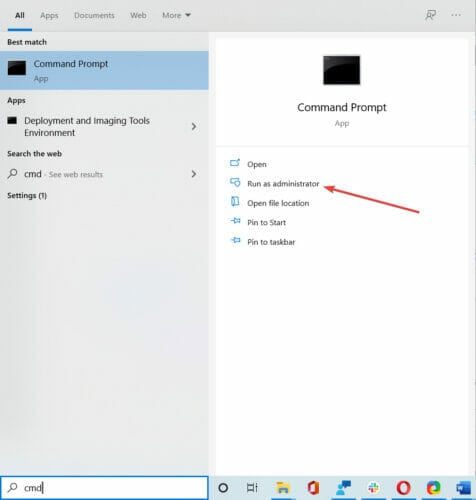
- Open Command Prompt as administrator (search for «cmd», right-click, and select «Run as administrator»).
- Type
chkdsk C: /f /rand press Enter. ReplaceC:with the desired drive letter. - You’ll be prompted to schedule the check for the next system restart. Type
Yand then restart your computer.
This process may take some time, depending on the size of your hard drive and the number of errors. You should fix any detected issues before proceeding.
2. Update Device Drivers
Outdated or corrupt drivers are one of the primary reasons for the MULTIPLE_IRP_COMPLETE_REQUESTS error. Performing driver updates can resolve the issue.
a. Update Drivers Through Device Manager
- Right-click the Start button and select
Device Manager. - Expand each device category (e.g., Display adapters, Network adapters) and right-click on your hardware component.
- Select
Update Driver. - Choose either
Search automatically for updated driver softwareorBrowse my computer for driver softwareif you have a downloaded driver.
b. Use the Manufacturer’s Website
For critical components, such as graphics cards and motherboards, it’s often best to download drivers directly from the manufacturer’s website. This ensures you receive the most recent, compatible versions.
3. Uninstall Recently Installed Software
If the BSOD began appearing after the installation of new software, that program may be the culprit.
- Go to
Settings>Apps>Apps & features. - Locate the recently installed software, click on it, and select
Uninstall. - Follow the prompts to remove the software completely.
Restart your computer to see if the issue persists.
4. Run System File Checker (SFC) and DISM
Corrupted system files can also lead to the MULTIPLE_IRP_COMPLETE_REQUESTS error. The System File Checker and Deployment Imaging Service and Management Tool (DISM) can help repair these files.
a. Run System File Checker
- Open Command Prompt as administrator.
- Type
sfc /scannowand press Enter. - The scan will begin, and you should wait until it completes. If it detects issues, it will attempt to fix them.
b. Run DISM Tool
If SFC didn’t solve the problem, try the DISM tool:
- Open Command Prompt as administrator.
- Type
DISM /Online /Cleanup-Image /RestoreHealthand press Enter. - This process may take some time. Once completed, restart your computer.
5. Check for Malware
Malware infections can also lead to driver conflicts causing BSOD errors. To ensure your system is not compromised, you’ll want to perform a thorough malware scan:
- If you haven’t already, install a reputable antivirus or anti-malware program (Windows Defender is a good option).
- Perform a full system scan. Quarantine or remove any detected threats.
- After the malware scan, restart your system to resolve any issues caused by malicious software.
6. Disable Third-Party Antivirus Software
Sometimes, third-party antivirus software can interfere with system drivers, leading to BSOD errors. Disabling or uninstalling the antivirus temporarily may help identify if it is causing the MULTIPLE_IRP_COMPLETE_REQUESTS error.
- Right-click on the antivirus icon in the system tray.
- Select the option to disable it temporarily or open the settings to turn it off entirely.
- Monitor your system for any BSOD occurrences. If the problem resolves, consider switching to another antivirus solution or contacting the current software’s support team for assistance.
7. Use Safe Mode
Booting into Safe Mode can help to troubleshoot the MULTIPLE_IRP_COMPLETE_REQUESTS error. Safe Mode loads a minimal set of drivers, helping to isolate the problem.
- Restart your computer and repeatedly press
F8until the Advanced Boot Options menu appears. - From here, select
Safe Mode. - Once in Safe Mode, monitor your computer for any BSOD occurrences. You can also try uninstalling updates or drivers that might have triggered the error.
8. Perform a System Restore
If the MULTIPLE_IRP_COMPLETE_REQUESTS error appeared recently, a system restore may help revert your computer to an earlier working state.
- Type
System Restorein the Windows search bar and selectCreate a restore point. - Under the
System Protectiontab, clickSystem Restore. - Follow the on-screen instructions to choose a restore point.
Keep in mind that any programs or system changes made after the chosen date will be lost.
9. Update Windows
Keeping your Windows operating system up-to-date is vital for security and stability. Microsoft often releases patches to fix bugs and improve system performance.
- Go to
Settings>Update & Security>Windows Update. - Click on
Check for updates. - Install any available updates and restart your computer.
10. Check for Disk Errors with System Tools
If you still cannot fix the MULTIPLE_IRP_COMPLETE_REQUESTS BSOD after trying the above methods, it may be time to perform deeper disk checks.
- Open Command Prompt as administrator.
- Type
chkdsk /f C:(replaceC:with your appropriate drive letter). - If you receive a message indicating the drive is in use, type
Yto schedule a disk check for the next time the system restarts.
11. Reset Windows
If all else fails, you may need to perform a Windows reset. This is a more drastic measure, as it restores Windows to its default state, which will remove all applications and drivers but may keep personal files.
- Go to
Settings>Update & Security>Recovery. - Under
Reset this PC, clickGet started. - Choose whether to keep your files or remove everything.
Following this process will give your system a fresh start, resolving any underlying software issues.
Conclusion
The MULTIPLE_IRP_COMPLETE_REQUESTS BSOD can be a complex error to diagnose and repair, but following the above steps systematically will help you troubleshoot and fix the issue effectively. Start with simpler solutions such as updating drivers and scanning for malware before moving on to more complex remedies like system restores or resets.
Always ensure that your hardware is functioning correctly, and keep your software up-to-date. If the problem persists after all interventions, consider seeking help from a professional technician or support forums. By following the outlined steps, you should be well on your way to resolving the MULTIPLE_IRP_COMPLETE_REQUESTS error and restoring your Windows 10 system to optimal performance.
Windows 10 is a complex operating system – serving millions of PCs all around the world and running on thousands of different hardware combinations.
Unfortunately, this complexity also means there are bound to be errors due to various reasons that can be hard to diagnose.
One of such problems is the MULTIPLE_IRP_COMPLETE_REQUESTS Blue Screen of Death error.
A BSoD happens as the last resort – when the OS does not know what else to do, it decides to simply crash and inform the user of the problem.
This error can be caused due to various reasons, it could be anything from bad drivers to a faulty hard disk, so diagnosing it isn’t simple.
We can, however, give a shot at the most common solutions and see if they work.
The stop code MULTIPLE_IRP_COMPLETE_REQUESTS can be quite problematic. Speaking of these kinds of errors, here are some similar issues that users reported:
- MULTIPLE_IRP_COMPLETE_REQUESTS Blue Screen of Death – This is a blue screen error, and if you encounter it, you should be able to fix it by using one of our solutions.
- MULTIPLE_IRP_COMPLETE_REQUESTS ntoskrnl.exe, classpnp.sys, wdf01000.sys, hal.dll, usbport.sys, acpi.sys, ntfs.sys, nvlddmkm.sys – Sometimes a specific file can cause this error to occur. To fix this issue, you need to do a bit of research and find out how is this file related to your hardware or software. Once you find the problematic hardware or software, the issue should be resolved.
- MULTIPLE_IRP_COMPLETE_REQUESTS Windows 10, Windows Server 2003, Windows Server 2008 r2 – This error can occur on other versions of Windows, but even if you don’t use Windows 10, you should be able to apply some of our solutions to it.
How can I fix MULTIPLE_IRP_COMPLETE_REQUESTS error?
1. Use a dedicated software to fix the BSoD
You need to address any BSoD seriously and immediately as they can also lead to hardware failure. Don’t worry because we offer a lot of good solutions below and we will get to the bottom of this.
However, before trying the solutions below, you should try a quicker and easier one that involves using a third-party specialized solution to fix BSOD issues.
2. Check your antivirus
In some cases, your antivirus can cause MULTIPLE_IRP_COMPLETE_REQUESTS error to appear, and in order to fix it, it’s advised to check your antivirus settings.
Sometimes certain features of your antivirus can cause this problem to appear, and in order to fix the issue, you just need to disable those features.
If disabling these features doesn’t help, you might have to completely disable your antivirus.
In some cases, you might even have to completely remove your antivirus and check if that solves the problem.
If disabling the antivirus didn’t fix your issue, your next step would be to completely remove your antivirus.
Keep in mind that Windows 10 has Windows Defender as its default antivirus, so even if you remove your antivirus, you’ll still have some form of basic protection.
Once you remove your antivirus, check if the problem is still there. If not, you should perhaps consider switching to a different antivirus solution.
3. Update your drivers
Another cause for MULTIPLE_IRP_COMPLETE_REQUESTS can be your drivers. Sometimes this issue can be caused by outdated drivers, and a way to solve the problem is to update the main drivers on your PC.
This usually includes your graphics card, network, and chipset drivers. To do so, just visit your hardware manufacturer’s website and download the latest drivers for your device.
Doing this manually can be a bit tedious since you need to download each driver manually.
However, you can use a dedicated tool to update all your drivers with just a couple of clicks in just a few seconds.
This kind of tool will automatically update your drivers for you, so you won’t have to search for them manually. Once your drivers are up to date, check if the problem is still there.
4. Perform SFC and DISM scans
4.1 Perform a SFC scan
- Start Command Prompt as an administrator. To do that, just type cmd in Windows search and click on Run as administrator below the results.

- Now run the sfc /scannow command.

- The System File Checker scan will start. This scan can take about 15 minutes, so don’t interfere with it.

After the scan is completed, check if the problem is still there. If the problem is still there, or if you weren’t able to run the SFC scan at all, we suggest you try DISM scan.
4.2 Perform a DISM scan
- Open Command Prompt as an administrator.
- Now enter the following command and press Enter to run it:
DISM /Online /Cleanup-Image /RestoreHealth
- DISM scan will now start. Keep in mind that this scan can take about 20 minutes, so don’t interfere with it.

According to users, sometimes corrupted system files can cause this issue to appear. However, you can fix the issue simply by performing an SFC scan. To do that, just follow the steps above.
After both scans are finished, check if the problem is still there.
5. Run CHKDSK to fix this problem
- Open Command Prompt as administrator. To see how to do that properly, check our previous solution.
- When Command Prompt opens, enter the following command and press Enter (Replace the X with the letter that represents your system drive. In most cases that would be C):
chkdsk /f :X
- You’ll be asked to schedule a scan, so press Y to do so.

Using CHKDSK to fix this error is another way as it can easily fix many types of errors including errors like KERNEL_DATA_INPAGE_ERROR in Windows 10.
After running the command, you have to restart your PC and let it scan your system drive. This process can take about 20-30 minutes, but after it’s finished the problem should be completely resolved.
6. Remove the problematic software
Sometimes third-party applications can interfere with your system and cause MULTIPLE_IRP_COMPLETE_REQUESTS error to appear.
According to users, applications such as LogMeIn Hamachi, AsRock, and EasyTune software can cause this issue to appear.
If you’re using any of these applications, we advise you to remove them and check if that solves the problem.
Although you can remove these applications using the Settings app, we strongly recommend using dedicated uninstaller software to remove them.
Uninstaller software is designed to completely remove all files and registry entries associated with the application you’re trying to remove.
As a result, the application will be removed in its entirety and there won’t be any leftover files available to interfere with your system.
Keep in mind that other applications can also cause this issue, so be sure to perform a detailed inspection of your system.
7. Reset your BIOS to the default
In some cases, your BIOS settings can cause a MULTIPLE_IRP_COMPLETE_REQUESTS error to appear.
This is usually caused by your settings, but you can fix the issue simply by resetting BIOS to the default.
This is quite simple to do, and you just need to enter BIOS and choose the option to load the default settings.
This procedure might differ depending on the version of BIOS you’re using.
So in order to see how to properly enter and reset BIOS to default, we suggest that you check your motherboard manual for detailed instructions.
8. Update your BIOS
Another way to fix the MULTIPLE_IRP_COMPLETE_REQUESTS error is to update your BIOS.
Before we start, we have to mention that BIOS update can be a risky procedure, so if you decide to update it, keep in mind that you’re doing that at your own risk.
We already wrote a short guide on how to flash your BIOS, but since this is just a general guide, we advise you to check your motherboard manual for detailed instructions on how to update your BIOS.
Be sure to carefully follow the instructions in the instruction manual in order to avoid causing permanent damage to your system. Once your BIOS is up to date, check if the problem is resolved.
These solutions should at the least help you figure out what is exactly going wrong with your Windows, and in some cases also be able to fix these issues.
We have solved errors and provided methods to fix NTFS_File_System Error on Windows 10 in the past so you can expect these solutions to work for you.
We hope that our guide helped you fix the MULTIPLE_IRP_COMPLETE_REQUESTS ntoskrnl.exe issue and if you have any suggestions, leave them in a comment below.