
Skip to content
In the previous post I collected and posted here a bunch of direct links to MUI language packs for Windows 10. It is useful for users who need to install them on multiple PCs. They will save their Internet bandwidth and time by not downloading them again on each PC. Instead, they can save the offline package and use it for future installs. In this article, we shall see how to install these downloaded language packs.
First, make sure that you have the correct language pack matching your OS (32-bit or 64-bit). Installing the CAB MUI language packs requires few steps.
Follow these simple instructions to install the CAB files:
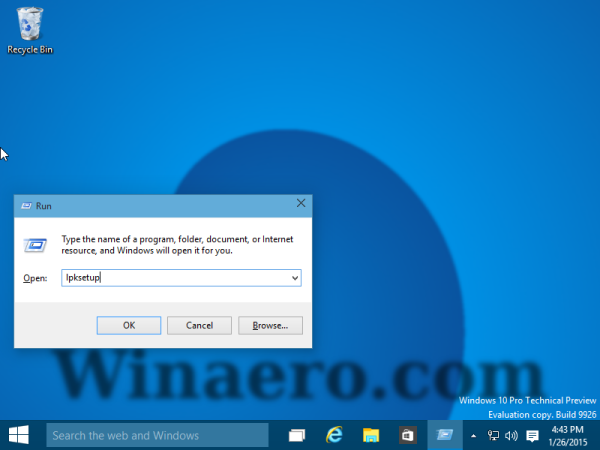
- Press Win + R keys together on the keyboard to bring up the Run dialog.
Tip: see the ultimate list of all Windows keyboard shortcuts with Win keys. - Type the following in the Run box:
lpksetup.exe

Press Enter.
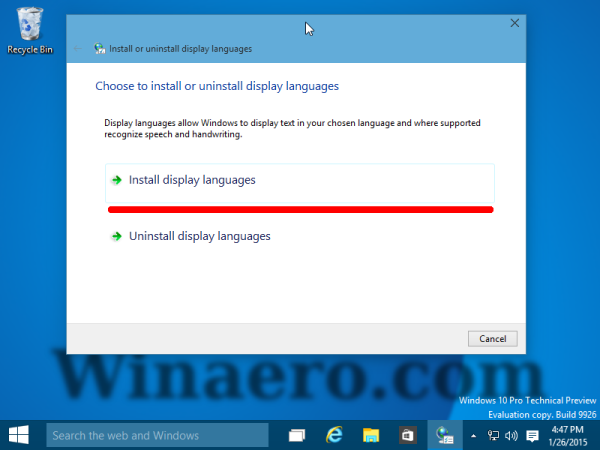
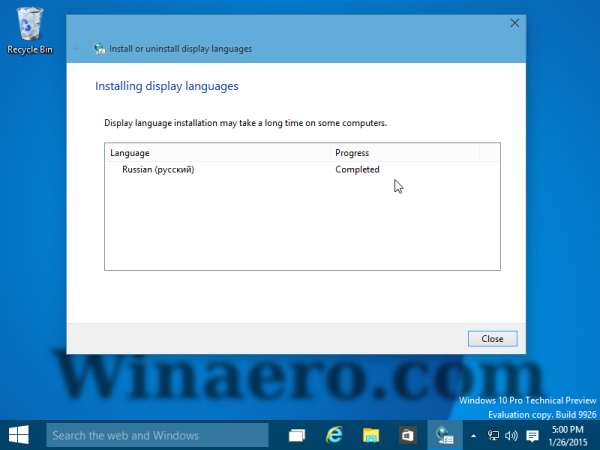
- The «Install or Uninstall display languages» wizard will appear on the screen.
Click the Install display languages button.
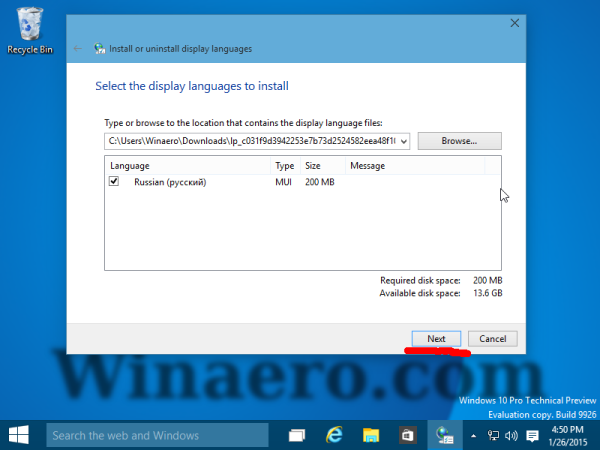
- In the next page of the wizard, click Browse and pick the *.cab file of the MUI language you downloaded.
- Click the Next button:
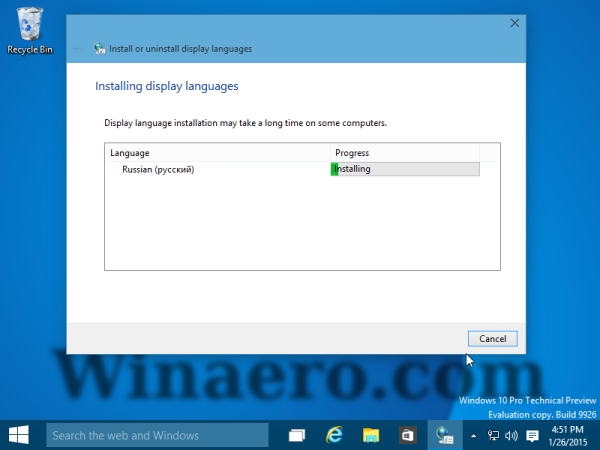
Wait till it is installed. This can take a considerable amount of time and disk space.
A System Restore point will also be created first.
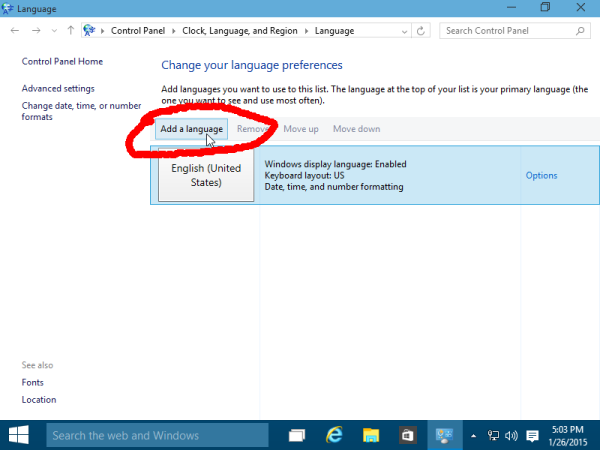
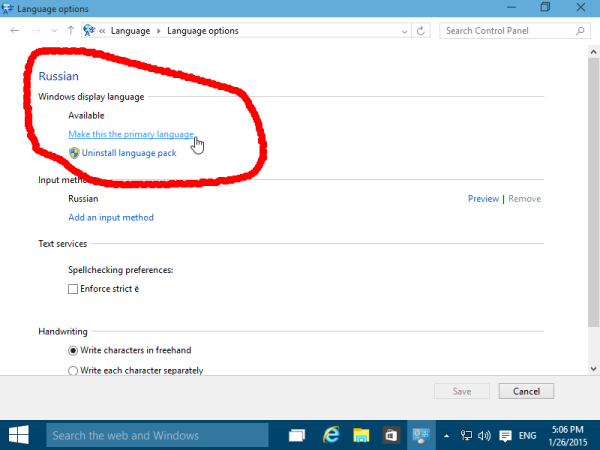
- To switch to the installed language pack for your user account, you have to open the following Control panel applet:
Control Panel\Clock, Language, and Region\Language
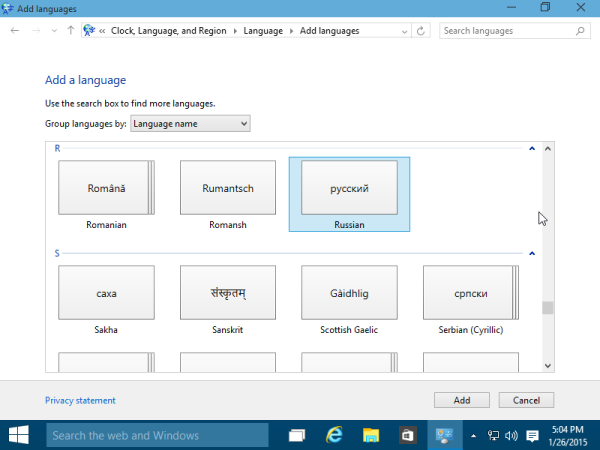
- Click here «Add a language and add the language you installed:
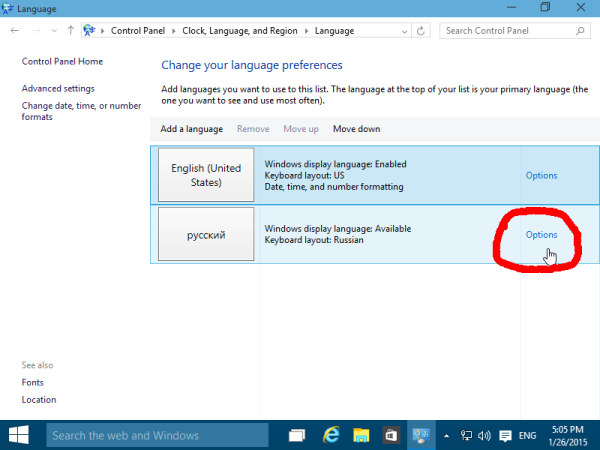
- Click the Options link on the right side of the just installed language.
There, you will find the ability to activate it as the main display language.
Log out and log in again for the language to change.

That’s it. Now you know how to deal with downloaded *.cab files for MUI language packages.
Support us
Winaero greatly relies on your support. You can help the site keep bringing you interesting and useful content and software by using these options:
If you like this article, please share it using the buttons below. It won’t take a lot from you, but it will help us grow. Thanks for your support!
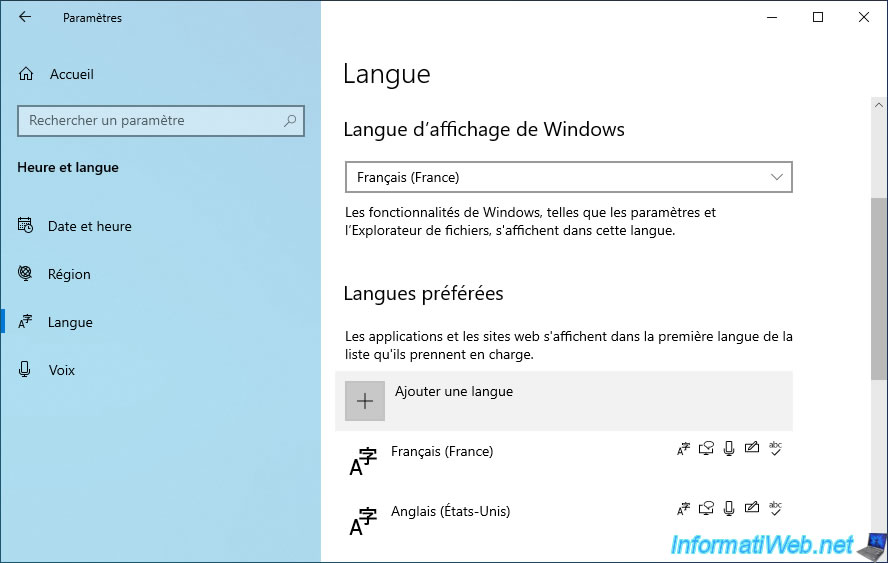
On Windows 10, it’s possible to change the language through the Windows 10 «Settings» application.
- Download and install a language pack
- Language changed
- Change regional settings
- Add a regional language
1. Download and install a language pack
For this tutorial, we downloaded an iso of Windows 10 in English and we will translate this installation of Windows into French.
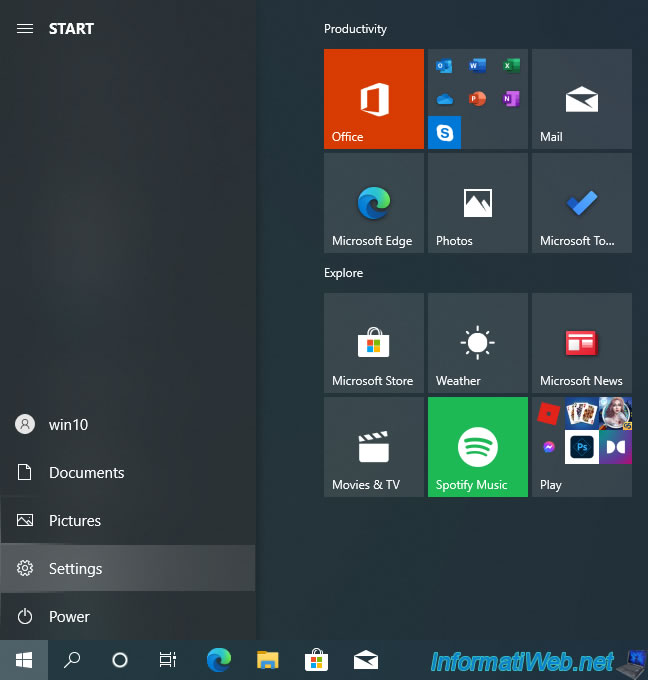
To begin, open the start menu and click on «Settings».
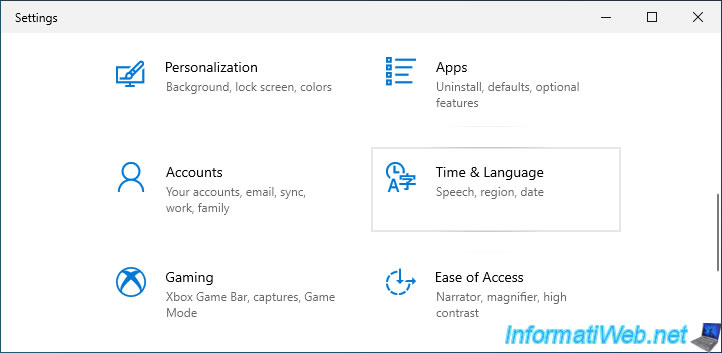
Then, click on : Time & Language.
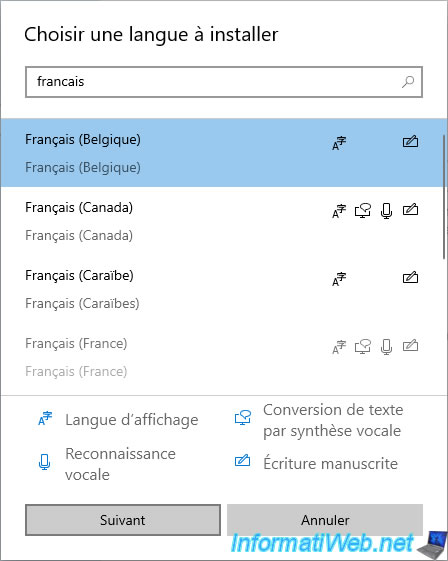
In the «Language» tab, locate the «Preferred Languages» section and click on : Add a language.
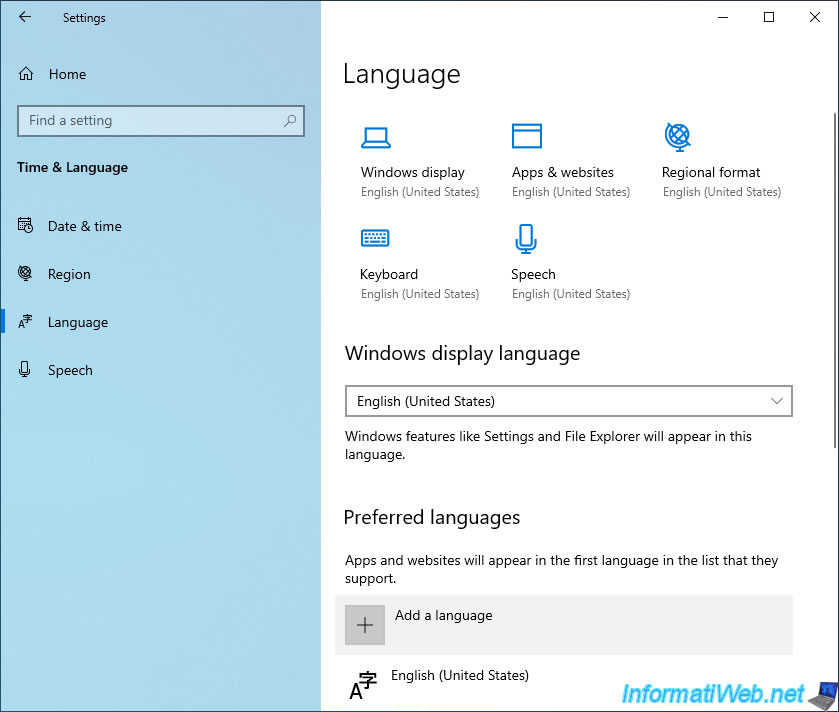
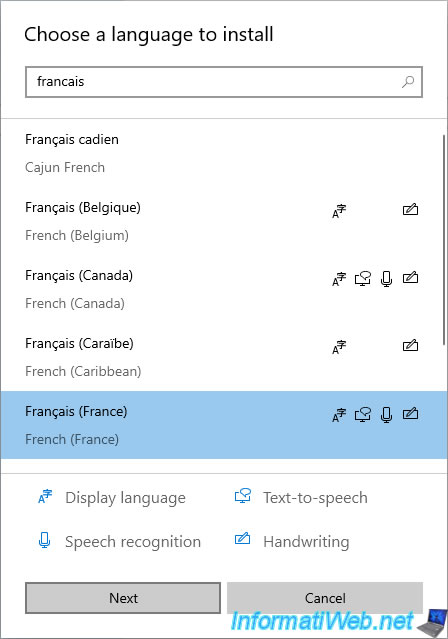
Select your language and country from the «Choose a language to install» list that appears.
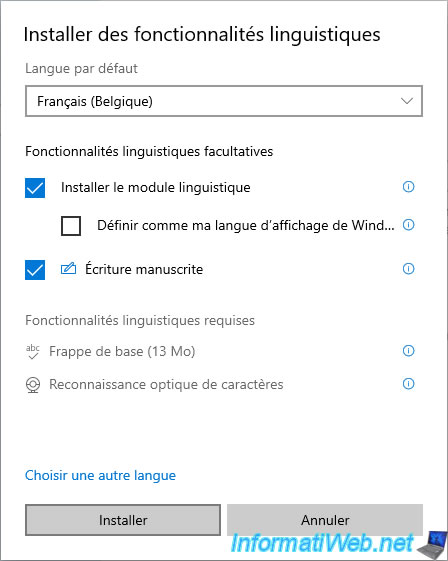
Note that depending on the language and country chosen, it’s possible that some features remain in the language in which Windows was installed.
In our case, we are in Belgium, but only 2 out of 4 features will be translated in this case.
So, we first selected «French (France)» which allows everything to be translated (including voice recognition).
Note that you can see it easily thanks to the icons present or not to the right of the desired language.
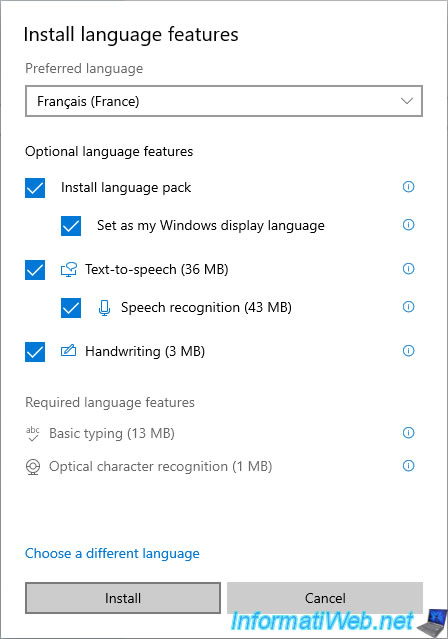
Once the language you want, click Next.
Depending on the language selected, the features may be more or less complete.
In any case, don’t forget to check the «Set as my Windows display language» box before clicking on Install.
The new language appears with the «Pending» status.
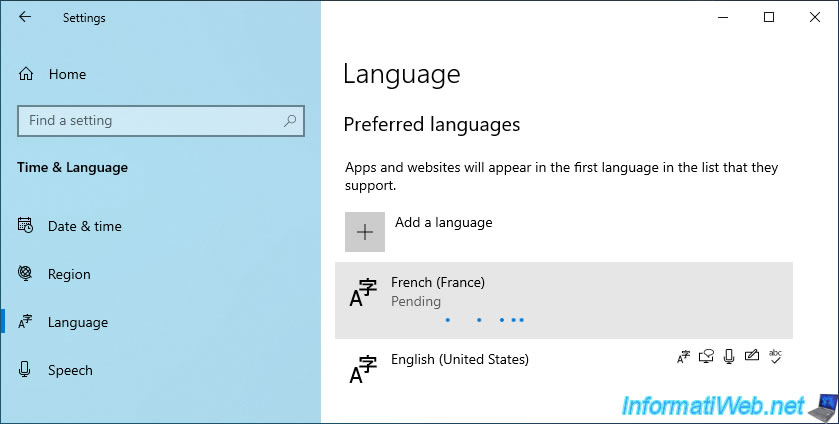
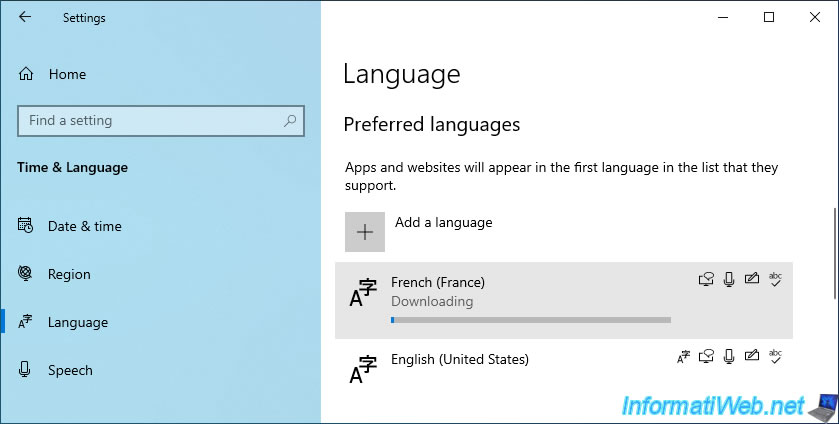
A little later, the downloading and installation of this language will begin.
Once the language is downloaded and installed, Windows will ask you to log off and log on again.
Click on : Yes, sign out now.
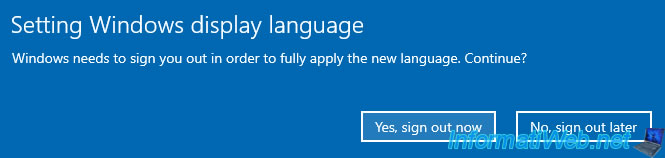
The session closes.
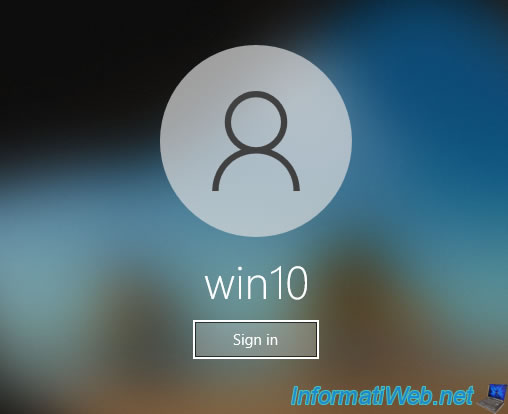
2. Language changed
At this time, the language may not have changed on the home screen yet.
Click on «Sign in» and enter your password if necessary.
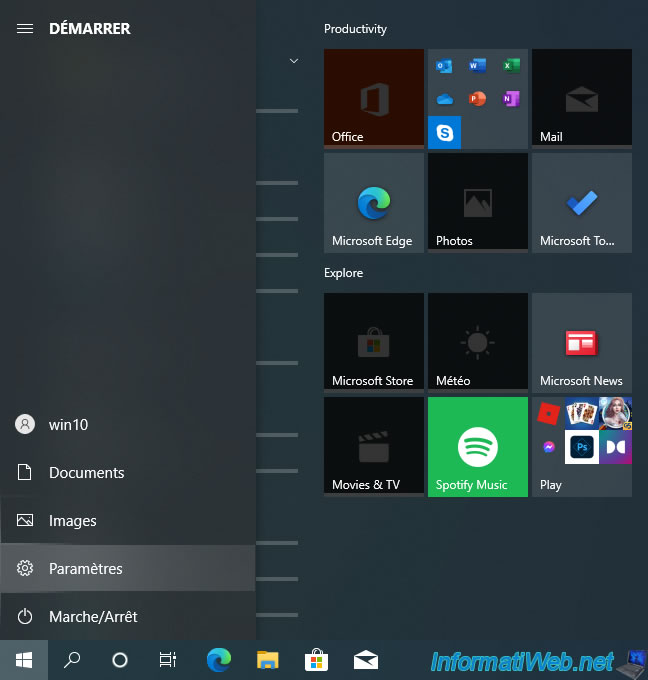
Open the start menu and you will see that the language has changed.
Click on : Settings.
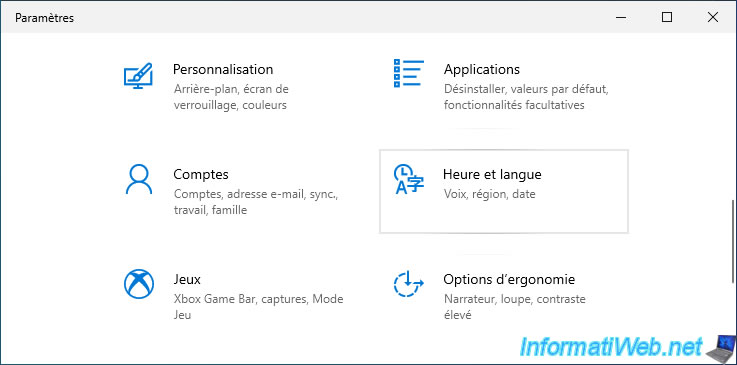
Then, go to : Time & Language.
Note : if the language has not changed, restart your computer once and the problem will be solved.
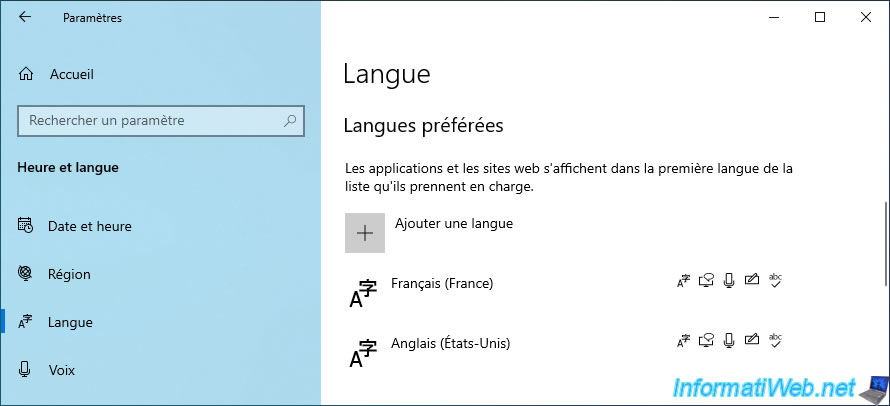
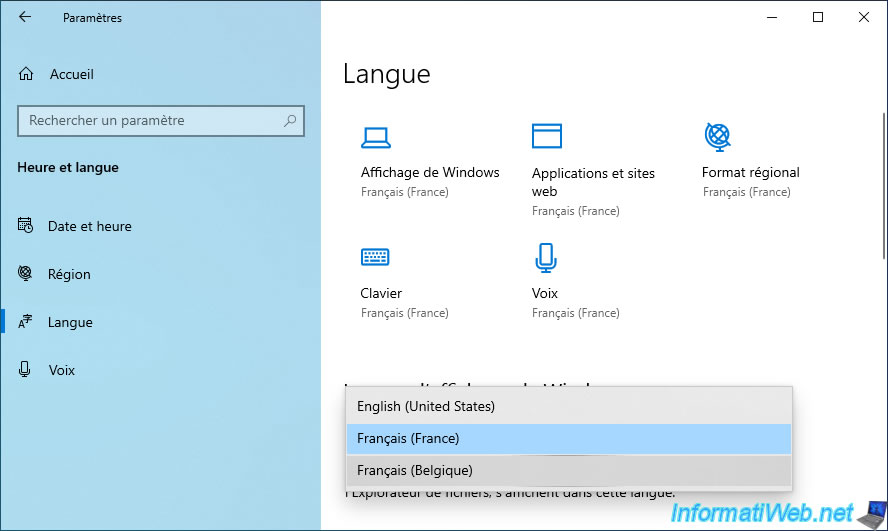
As you can see at the top, all 5 options are set to «French (France)» :
- Windows display
- Apps & websites
- Regional format
- Keyboard
- Speech

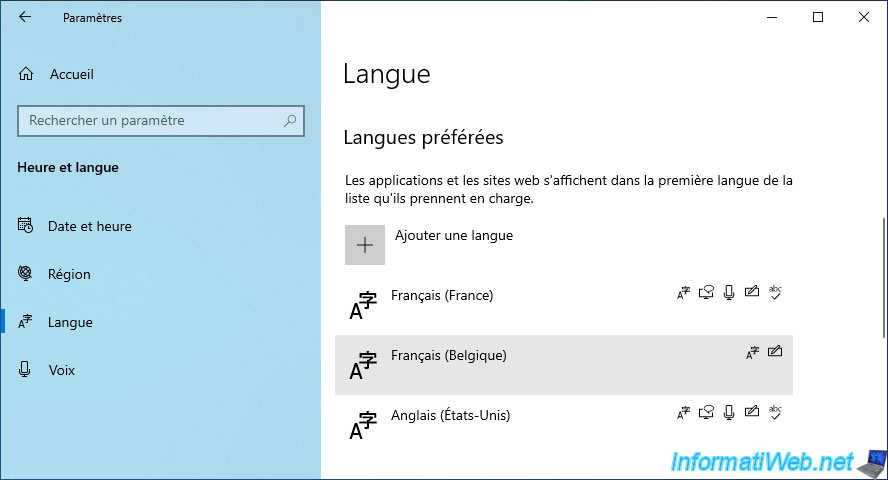
In the list of preferred languages, you will see that the downloaded language has 5 icons.
It’s for this reason that the language has changed for the 5 options displayed at the top.
If you go to the «Speech» tab (on the left), you will see that the speech language will also have changed (if it’s available in the downloaded language pack).
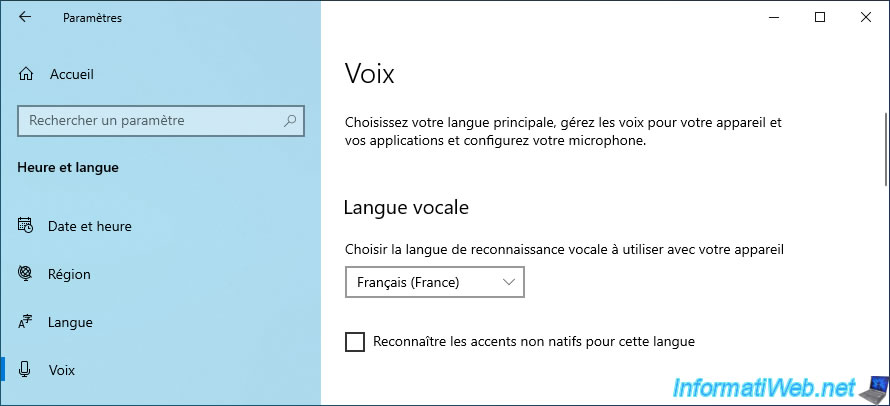
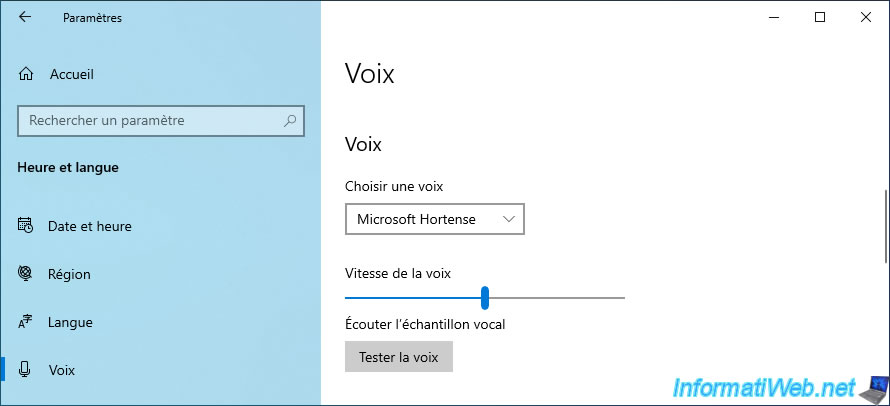
Further down you will find an option to change the voice.
However, since several languages have been installed, some voices are in one language and others are in another language.
To find out which ones are in your language, select a voice and click the «Test Voice» button to find out.
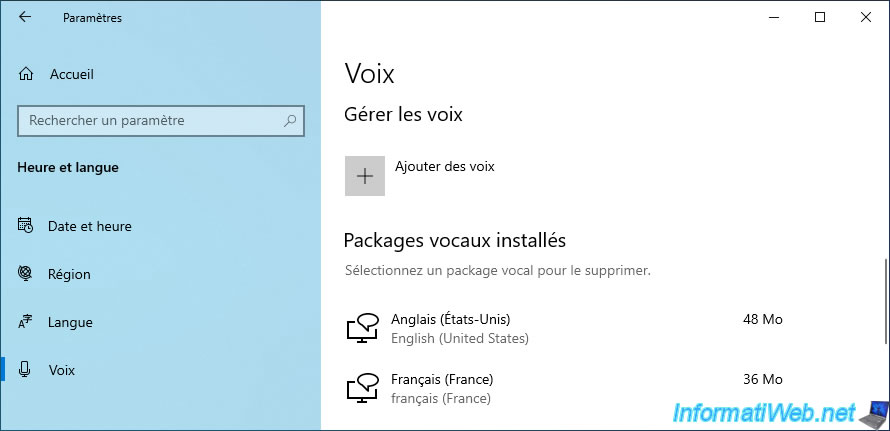
Further down, you can see which voice packages are installed.
In our case :
- English (United States)
- French (France)
3. Change regional settings
Although Windows has automatically changed the language in various places, there are still a few settings that need to be changed manually.
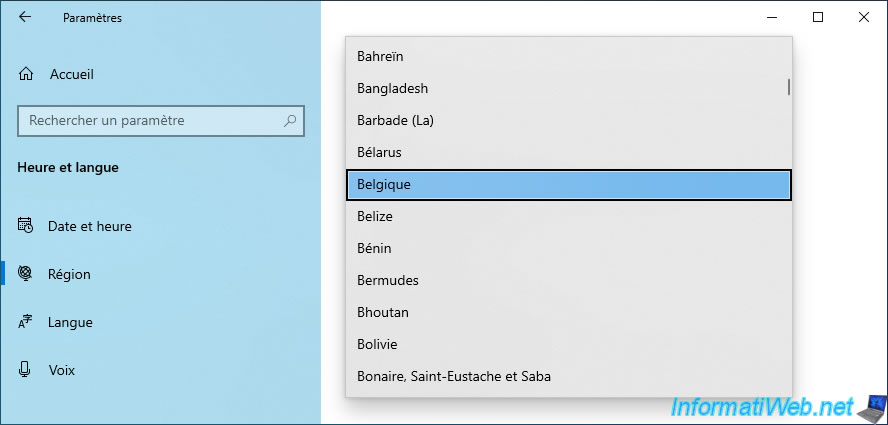
To do this, go to the «Region» tab.
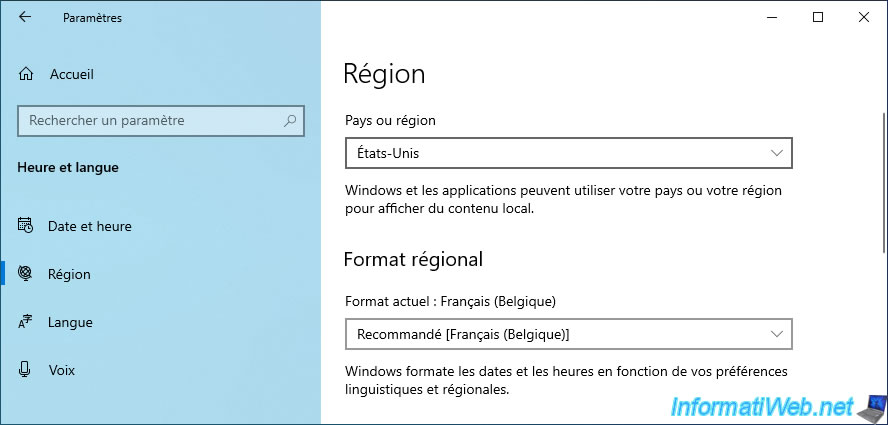
In the «Country or region» list, select your country.
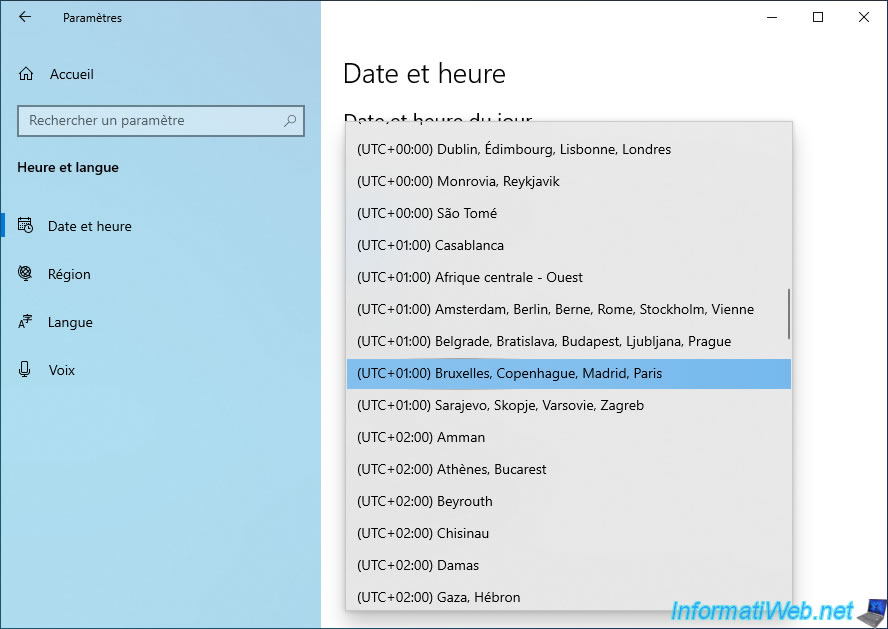
Then, in the «Date & time» tab, you will probably need to change the time zone to use.
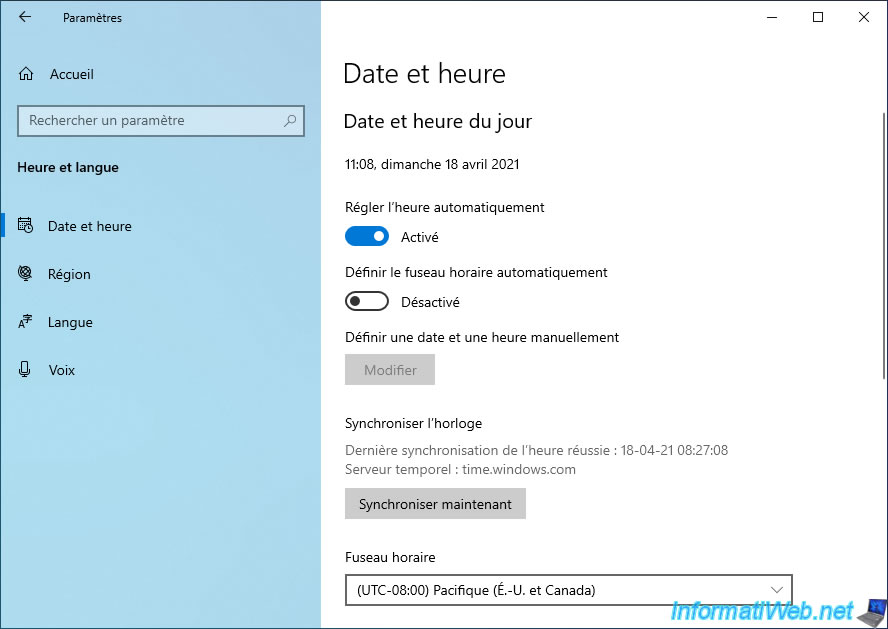
Select your time zone.
In the case of Belgium and France, you will have to select : (UTC+01:00) Brussels, Copenhagen, Madrid, Paris.
Then, if necessary, click «Sync now» to get the correct time.
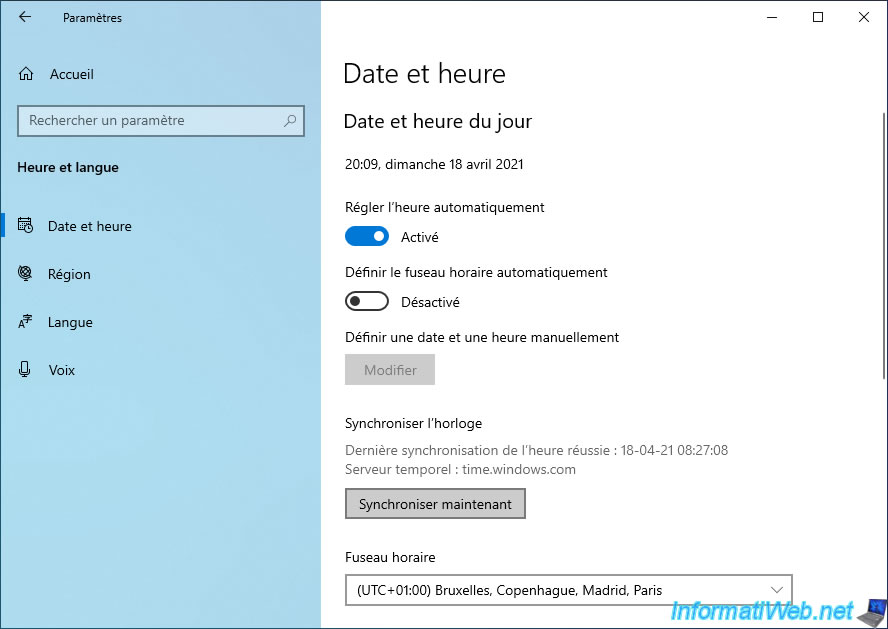
Now, everything is good.
4. Add a regional language
As mentioned before, in our case, we are in Belgium, but we first installed the «French (France)» language so that all Windows 10 features are in French.
In our case, we therefore click on «Add a language» again.
This time, we select «French (Belgium)» and we click on Next.
We only click on : Install.
Once the language is downloaded and installed, it will appear in the list of preferred languages.
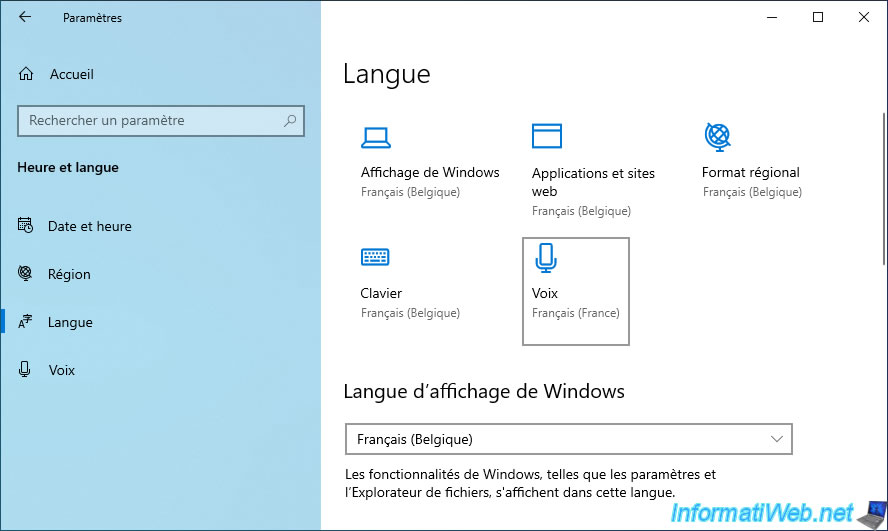
We select «French (Belgium)» as the new Windows display language.
And as you can see, most of the features are now in «French (Belgium)» except the voice which remains in the previous display language («French (France)» in our case).
The ability to use a computer in your preferred language is essential for many users around the world. This is particularly true in a globalized society where people communicate and work across diverse cultures and languages. Windows 10 and Windows 11 have made significant advancements in supporting multilingual capabilities through the installation of the Multilingual User Interface (MUI). This article will guide you through the process of installing and configuring MUI in both operating systems.
Understanding Multilingual User Interface (MUI)
The Multilingual User Interface (MUI) is a technology developed by Microsoft that allows users to select their preferred language for the operating system. MUI is particularly useful in environments where users may speak different languages, enabling them to work with Windows in a way that is comfortable and familiar.
With MUI, Windows can display its interface, including menus, dialog boxes, and messages, in multiple languages. This feature not only benefits individual users but also organizations that operate in different linguistic regions.
Prerequisites for MUI Installation
Before diving into the installation steps, it’s essential to ensure your system meets certain prerequisites. Here are some fundamental requirements:
-
Supported Versions: MUI is available in Windows 10 (versions 1809 and later) and Windows 11. Make sure you are using a supported version.
-
Windows Language Packs: To enable MUI, you will need to download the language packs corresponding to your preferred languages.
-
Administrator Privileges: You will require administrative privileges to install language packs and make changes to the system settings.
-
Internet Access: While some language packs can be installed from disk, downloading them from Windows Update is often easier and more efficient.
Step-by-Step Guide to Install MUI in Windows 10
Step 1: Access Settings
- Click on the Start button or press the Windows key on your keyboard.
- Open Settings (the gear icon).
Step 2: Navigate to Time & Language
- In the Settings window, click on Time & Language.
- Select Language from the menu on the left.
Step 3: Add a Language
- Click on the Add a language button.
- A list of available languages will appear. Scroll through or use the search bar to find the language you want to install.
- Select your desired language and click on Next.
Step 4: Select Language Features
- On the next screen, you can select which features you want to install. Ensure that the Install language pack option is checked.
- You may see additional options such as Set as my Windows display language, Speech, or Handwriting. Choose the features you prefer.
- Click on Install to download and install the selected language pack.
Step 5: Change Display Language
- After the language pack is installed, you will return to the Language settings page. Here, you should see your newly added language listed.
- To set it as the display language, click on the language, then click on Options.
- Scroll down to the Windows display language section. Click on the drop-down menu and select the newly installed language from the list.
Step 6: Sign Out and Back In
For changes to take effect, you may need to sign out and back into your account or restart your computer.
Step 7: Verify Language Installation
After signing back in, the Windows interface should now display in your selected language. Check various menus and options to ensure that everything is correctly translated.
Step-by-Step Guide to Install MUI in Windows 11
Installing MUI in Windows 11 is quite similar to the process in Windows 10, with some differences in the interface layout. Follow the steps below:
Step 1: Open Settings
- Click on the Start button or press the Windows key.
- Go to Settings (the gear icon).
Step 2: Go to Time & Language Settings
- In the Settings window, select Time & Language from the left-hand menu.
- Click on Language & Region.
Step 3: Adding a New Language
- Under the Preferred languages section, click on Add a language.
- A window will pop up with a list of languages. Use the search bar to find the language you want or scroll through the list.
- Select the desired language and click Next.
Step 4: Install Language Pack
- Choose the features you wish to install, ensuring that Install language pack is selected.
- If you want the language to be the display language, select Set as my display language.
- Click Install to download and proceed with the installation.
Step 5: Set the Language as Display Language
- After installation is complete, click on the language again in the Preferred languages section.
- To set it as your display language, select Options under the language entry and verify the settings.
Step 6: Sign Out or Restart
You might need to sign out or restart your device for the changes to take effect.
Step 7: Confirming Installation
Once you are back in, check the Windows interface to ensure that it is reflecting your chosen language.
Handling Common Issues
While installing MUI can be a straightforward process, users sometimes encounter issues. Below are some common problems and tips for troubleshooting:
Language Pack Fails to Download
- Ensure that your internet connection is stable. Try disconnecting and reconnecting, or check your firewall settings.
- If the language pack still doesn’t download, try running Windows Update to fix any underlying issues.
Language Changes Not Taking Effect
- Double-check that the newly adopted language is set as the display language.
- If it isn’t working, consider signing out of your account and logging back in or restarting the computer.
Missing Options in Installed Language
Sometimes, certain features of the language pack may not be fully installed.
- Go back to Language settings and check under your language’s options to see if any additional features need to be installed.
- Use the Language Preferences to modify settings or attempt a repair.
Additional Customizations
After installing MUI, you may want to customize additional settings to enhance your multilingual experience. Here are some tips:
Changing the Region Format
Windows allows you to change the regional format, which affects date formats, currency, and other regional settings.
- In the Time & Language settings, click on Language & Region.
- Under the Region section, you can set your region which will influence how information is displayed.
Speech Recognition and Input Methods
For users conducting business or personal tasks using speech-to-text or other input methods, ensure that these are configured correctly.
- In the Language settings, click on your preferred language and select Options.
- Add or enable speech capabilities and adjust input methods according to your needs.
Managing Installed Languages
If you have multiple languages installed, you can easily switch between them.
- In Language & Region settings, order your preferred languages. Windows will use the first language as the primary.
- You can also use the Language Bar from the taskbar to switch between languages quickly.
Best Practices for Multilingual Computing
To get the most out of MUI and enhance your experience working in multiple languages, consider the following best practices:
Keep Language Packs Updated
Regularly check for updates for your installed language packs through Windows Update. Microsoft continuously improves localization quality, and staying updated will ensure you get the best translations and features.
Familiarize Yourself with Language Settings
Take time to explore the language settings of Windows. Familiarity with the available options will allow you to troubleshoot minor issues on your own.
Leverage Additional Resources
In addition to built-in language support, consider using online resources for translation or language learning. Tools like Microsoft Translator, Duolingo, or Babbel can enhance your language skills and understanding.
Engage with Language Communities
Join online communities and forums focused on multilingualism. Engaging with others out there will help you learn more about optimally using MUI and even exchanging tips on language-specific challenges.
Conclusion
The Multilingual User Interface is a powerful feature in Windows 10 and Windows 11 that makes the operating system more accessible and user-friendly for a diverse audience. Installing MUI can unlock new productivity levels by enabling you to use your preferred language in all aspects of the OS.
By following the steps and best practices outlined in this guide, you can enjoy a fully localized experience tailored to your linguistic needs. Whether you are an individual user or part of a broader organization, the benefits of multilingual computing are substantial and well worth the investment of time to configure. Embrace the capabilities of MUI and leverage the power of technology to connect and work effectively, regardless of the language you choose to use.
Skip to content
Surefire ways to install different language packs on your PC
2 min. read
Updated on
updated on
Readers help support Windows Report. We may get a commission if you buy through our links.
Read our disclosure page to find out how can you help Windows Report sustain the editorial team. Read more
Key notes
- If you want to install a new MUI pack on Windows 10, the best option is to use the Settings app.
- You can also download and install the pack from third-party websites.

MUI (Multilingual User Interface) packages are language packs for Windows. These packs enable you to add new display languages to the Windows OS for alternative users.
Then multiple users can select alternative display languages if required, and any Windows version can host software in any other language. This is how you can download and install MUI packs for Windows 10.
How can I install MUI packs on Windows 10?
1. Using the Settings app
- Enter region into the Cortana search box and press Enter to open the Region and language settings.
- Now you can add new MUI language packs to Windows by clicking the Add a language button.

- Now choose an MUI pack to install from there.
- The MUI pack will now be listed in the Region & language settings. Click the pack and then press its Options button.

- Press the Download button under the Download language pack to download and install the pack.

- When it’s installed, you can select the MUI pack listed on Region & language settings and click the Set as default button.
- Restart Windows 10 to apply the new setting to the user account.


2. Using the install or uninstall Display Languages Wizard
Another option will be to download and install the language pack of your choice from third-party websites. This can sometimes provide you with rare language options that might not be available when you use the option above.
However, you must create a restore point before installing the language. This will help you restore your PC if anything goes wrong. You may encounter errors such as MUI_NO_VALID_SYSTEM_LANGUAGE.
- May 2025 Patch Tuesday finally brings Recall & other AI features to Copilot+ PCs
- Microsoft releases Windows 10 (KB5058379/ KB5058392 / KB5058383/ KB5058387) May 2025 Patch Tuesday
- Microsoft extends Microsoft 365 apps support on Windows 10 to 2028
- Microsoft pushes Windows 11, but this project wants you to switch to Linux instead
- Microsoft addresses Windows 10 broken jump lists and says it’s now fixed
So those are two ways to download and install an MUI pack in Windows 10. Note that Windows Store apps might not change to the new language settings until updated.
Feel free to let us know in the comments below if you encounter any issues installing the MUI pack.
Matthew Adams
Windows Hardware Expert
Matthew is a freelancer who has produced a variety of articles on various topics related to technology. His main focus is the Windows OS and all the things surrounding it.
He is passionate about the tech world, always staying up-to-date with the latest and greatest. With an analytical view, he likes problem-solving, focusing on errors and their causes.
In his free time, he likes to read and write about history and tries to always develop new skills.
Was this page helpful?
Let us know if you managed to solve your tech problem reading this article.
We’re happy to hear that!
You can subscribe to our newsletter to stay up to date with the latest news and best deals!
Do you have a suggestion?
We know how frustrating could be to look for an universal solution.
If you have an error which is not present in the article, or if you know a better solution, please help us to improve this guide.
Applies ToWindows 11 Windows 10 Windows 8.1 Windows 7
Используйте функцию Добавления языка, чтобы установить другой язык для Windows 11 для просмотра меню, диалоговых окон и поддерживаемых приложений и веб-сайтов на этом языке. Для этого выполните указанные ниже действия.
-
Перейдите в раздел Предпочитаемые языки и выберите Добавить язык.
-
В поле Выберите язык для установки введите и выберите имя языка, который требуется установить, а затем нажмите кнопку Далее.
-
В разделе Установка языковых компонентов выберите компоненты, которые вы хотите использовать, а затем нажмите кнопку Установить.
Чтобы использовать Microsoft Office на предпочитаемом языке, скачайте языковой пакет Microsoft 365.
В Windows 11 можно скачать и установить любой из следующих языков.
|
Язык |
Исходное имя |
Необходимый основной язык |
|---|---|---|
|
Африкаанс |
Африкаанс |
Английский (США) |
|
Албанский |
shqip |
Английский (США) |
|
Амхарский |
አማርኛ |
Английский (США) |
|
Арабский |
العربية |
Любой язык |
|
Армянский |
Հայերեն |
Английский (США) |
|
Ассамский |
অসমীয়া |
Английский (США) |
|
Азербайджанский (латиница) |
Azərbaycan |
Английский (США) |
|
Бенгальский (Индия) |
বাংলা (ভারত) |
Английский (США) |
|
Баскский (Баскский) |
euskara |
Испанский (Испания) |
|
Белорусский |
беларуская мова |
Русский |
|
Боснийский (латиница) |
bosanski |
Английский (США) |
|
Болгарский |
Български |
Любой язык |
|
Каталанский |
català |
Испанский (Испания) |
|
Чероки (чероки) |
ᏣᎳᎩ ᎦᏬᏂᎯᏍᏗ |
Английский (США) |
|
китайский (упрощенное письмо); |
中文(简体) |
Любой язык |
|
китайский (традиционное письмо); |
中文(繁體) |
Любой язык |
|
Хорватский |
hrvatski |
Любой язык |
|
Чешский |
čeština |
Любой язык |
|
Датский |
dansk |
Любой язык |
|
Нидерландский |
Nederlands |
Любой язык |
|
Английский |
Английский |
Любой язык |
|
Эстонский |
eesti |
Любой язык |
|
Филиппинский |
Filipino |
Английский (США) |
|
Финский |
suomi |
Любой язык |
|
Французский |
français |
Любой язык |
|
Галисийский |
galego |
Испанский (Испания) |
|
Грузинский |
ქართული |
Английский (США) |
|
Немецкий |
Deutsch |
Любой язык |
|
Греческий |
Ελληνικά |
Любой язык |
|
Гуджарати |
ગુજરાતી |
Английский (США) |
|
Иврит |
עברית |
Любой язык |
|
Хинди |
हिंदी |
Английский (США) |
|
Венгерский |
magyar |
Любой язык |
|
Исландский |
íslenska |
Английский (США) |
|
Индонезийский |
Bahasa Indonesia |
Английский (США) |
|
Ирландский |
Gaeilge |
Английский (США) |
|
Итальянский |
italiano |
Любой язык |
|
Японский |
日本語 |
Любой язык |
|
Каннада |
ಕನ್ನಡ |
Английский (США) |
|
Казахский |
Қазақ |
Английский (США) |
|
Кхмерский |
ខ្មែរ |
Английский (США) |
|
Конкани |
कोंकणी |
Английский (США) |
|
Корейский |
한국어 |
Любой язык |
|
Латышский |
latviešu |
Любой язык |
|
Литовский |
lietuvių |
Любой язык |
|
Люксембургский |
Lëtzebuergesch |
Французский |
|
Македонский |
македонски јазик |
Английский (США) |
|
Малайский (Малайзия, Бруней-Даруссалам и Сингапур) |
Bahasa Melayu |
Английский (США) |
|
Малаялам |
മലയാളം |
Английский (США) |
|
Мальтийский |
Malti |
Английский (США) |
|
Маори |
Te Reo Māori |
Английский (США) |
|
Маратхи |
मराठी |
Английский (США) |
|
Непали |
नेपाली |
Английский (США) |
|
Норвежский (букмол) |
norsk (bokmål) |
Любой язык |
|
Норвежский (нюнорск) |
norsk (nynorsk) |
Норвежский (букмол) |
|
Ория |
ଓଡିଆ |
Английский (США) |
|
Персидский (фарси) |
فارسی |
Английский (США) |
|
Польский |
Polski |
Любой язык |
|
Португальский (Бразилия) |
português |
Любой язык |
|
Португальский (Португалия) |
português |
Любой язык |
|
Панджаби (арабское письмо) |
پنجابی |
Английский (США) |
|
Кечуа |
runasimi |
Испанский (Мексика) |
|
Румынский |
română |
Любой язык |
|
Русский |
Русский |
Любой язык |
|
Шотландский гэльский |
Gàidhlig |
Английский (США) |
|
Сербский (кириллица, Босния и Герцеговина) |
српски |
Английский (США) |
|
Сербский (кириллица, Сербия) |
српски |
Сербский (латиница) |
|
Сербский (латиница) |
srpski |
Любой язык |
|
Словацкий |
slovenčina |
Любой язык |
|
Словенский |
slovenski |
Любой язык |
|
Испанский |
Español |
Любой язык |
|
Шведский |
svenska |
Любой язык |
|
Тамильский (Индия и Шри-Ланка) |
தமிழ் |
Английский (США) |
|
Татарский |
Татар |
Русский |
|
Телугу |
తెలుగు |
Английский (США) |
|
Тайский |
ไทย |
Любой язык |
|
Турецкий |
Türkçe |
Любой язык |
|
Украинский |
українська |
Любой язык |
|
Урду |
اردو |
Английский (США) |
|
Уйгурский |
ئۇيغۇرچە |
Китайский (упрощенное письмо) (Китай) |
|
Узбекский (латиница) |
O’zbekcha |
Английский (США) |
|
Валенсийский |
valencià |
Испанский (Испания) |
|
Вьетнамский |
Tiếng Việt |
Английский (США) |
|
Валлийский |
Cymraeg |
Английский (США) |
Можно ли вторично распространять языковой пакет?
Если вы представляете правительство или государственное учреждение, связанный с правительством или финансируемый им культурный или языковой совет или учреждение либо аккредитованное образовательное учреждение, вы можете вторично распространять этот пакет среди лицензированных пользователей программного обеспечения в той же форме, в какой вы его получили от корпорации Майкрософт.
Нужна дополнительная помощь?
Нужны дополнительные параметры?
Изучите преимущества подписки, просмотрите учебные курсы, узнайте, как защитить свое устройство и т. д.