
Меняем MTU на сервере Windows с помощью командной строки. На тестовом сервере операционная система Windows Server 2016.
MTU (Maximum Transmission Unit) — максимальный размер полезного блока данных одного пакета. Если размер блока превышает MTU, то он может быть передан протоколом с использованием фрагментации.
Основные значения MTU в байтах:
- Ethernet — 1500
- 16 Mbps Token Ring — 17914
- 4 Mbps Token Ring — 4464
- FDDI — 4352
- IEEE 802.3/802.2 — 1492
- PPPoE (WAN Miniport) — 1480
- X.25 — 576
Зачем уменьшать MTU
Иногда бывает полезно уменьшить MTU на компьютере, чтобы ускорить скорость работы по сети. Классический случай, когда дома стоит роутер и на нём указан MTU 1480. Если на домашнем компьютере указано значение MTU 1500, то большие пакеты при передачи данных могут фрагментироваться. Тормозит потоковое видео или аудио, к примеру.
Уменьшаем MTU с помощью командной строки
Командная строка запущена под администратором.
Посмотреть текущее значение MTU:
netsh interface ipv4 show subinterfaces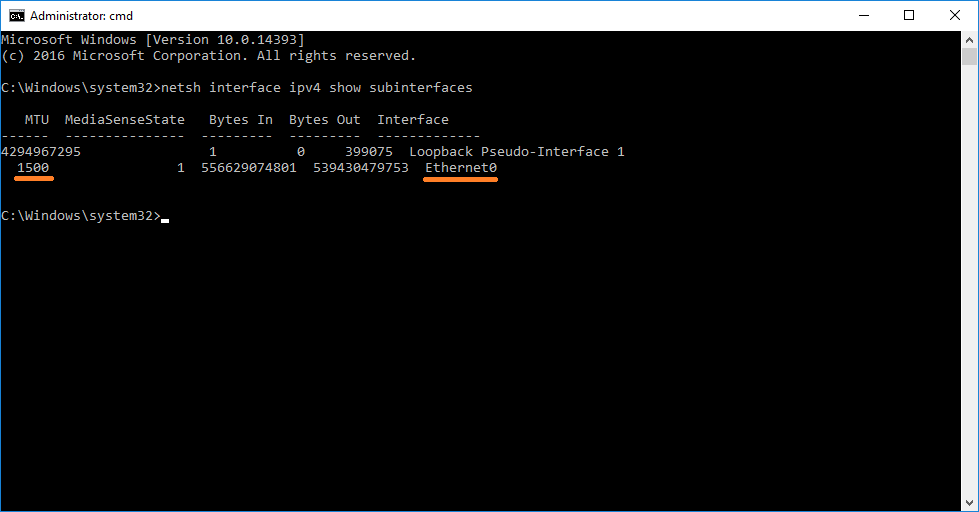
У меня на интерфейсе Ethernet0 указано MTU 1500.
Установить значение MTU 1452 на интерфейсе Ethernet0:
netsh interface ipv4 set subinterface "Ethernet0" mtu=1452 store=persistent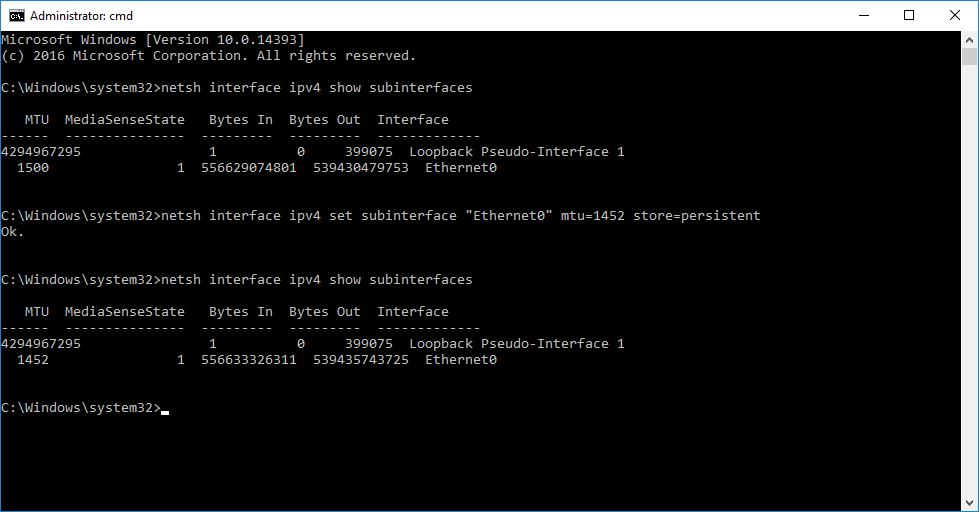
Перезагружаем компьютер. Всё.
Сброс MTU на значение по умолчанию:
netsh interface ipv4 resetПерезагружаем компьютер.
Определить минимальное значение MTU
Вычислить минимальное значение MTU между компьютером и узлом сети можно с помощью команды ping.
ping example.com -f -l 1500Здесь:
- -f — запрещает фрагментировать пакеты
- -l — размер пакета
Если пинг не проходит, то уменьшаем размер пакета.
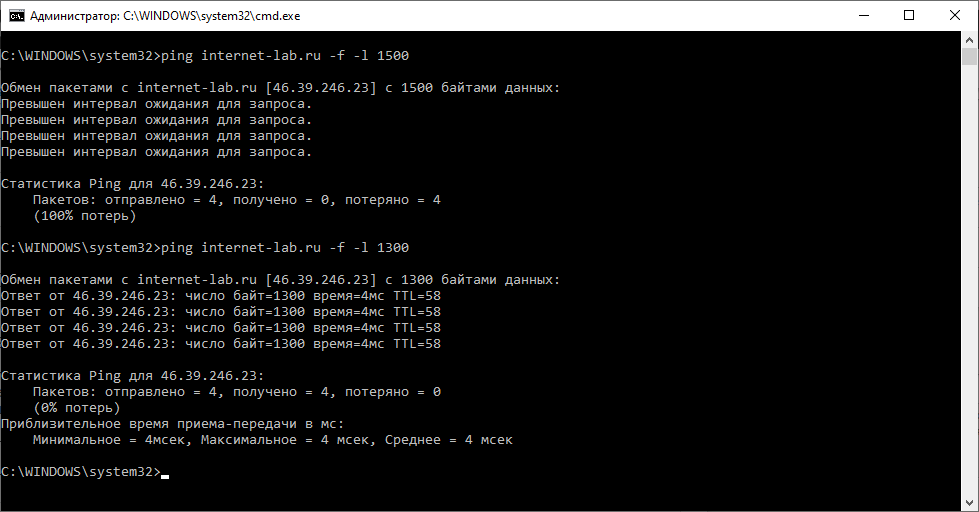
У меня 1500 не проходит, а 1400 проходит. Истина где-то посередине. Методом научного пинга находим максимальный размер пакета, который проходит без фрагментации.
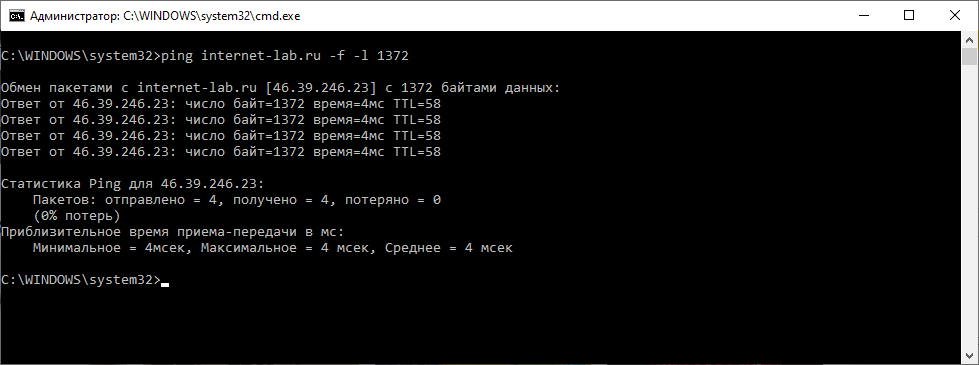
У меня получилось 1372. Прибавляем 28 байт (8 байт ICMP заголовок и 20 байт IP). 1372+28=1400.
Оптимальный размер MTU 1400.

Troubleshooting an application issues which could possibly be network related. I found myself needing to make some adjustment to the maximum transmission unit (MTU) setting of my server. As such what better time to post a quick technical short on how to go about doing this.
How To Change The MTU – Windows Server 2016
Requirements:
- Logon and Administrator permission on Server
- Network Connectivity
- Time to reboot
Procedure:
From the desktop of your Windows Server 2016 server open an Administrative command prompt by Right-Clicking on the start button and select – Command Prompt (Admin).

Once in the command prompt you we be using netsh to determine the IDX of the installed interface devices. this is performed by using the following command: netsh interface ipv4 show interfaces

Take note of the IDX interface that you would like to change the MTU on as this is what we need to specify when changing the MTU settings.
Using netsh again you issue the following command: netsh interface ipv4 set subinterface “number-goes-here” mtu=1400 store=persistent
Please note that the subinerface will be the IDX number from the first netsh command and that the MTU setting is a value less than the original 1500.
Now you can reboot to have the changes take effect. I have also noticed the disabling the interface and re-enabling also works.
-
Tags
howto, Microsoft, MTU, netsh, Network, Server 2016, Windows, Windows Server, Windows Server 2016
Problem:
How to set MTU on Windows Servers. Windows Server 2012 VPN fragments packets after it applies encryption! This issue causes latency and causes the VPN to disconnect clients -no good!
Background:
The default packet size
is 1500. Now consider how IPsec encryption adds a number
of bytes to the original packet. This
process leads to post-fragmentation conditions. In other words, packets are fragmented after
encryption. This condition degrades or
disrupts VPN performance.
Solution:
Adjust maximum
segment size (MSS) on the outside interface so packet size is less that the
default 1500 MTU.
Packet fragmenting
occurs when a packet is larger than its default MTU. TCP fragments the original data and sends it
avoid encrypted packet. According to
Cisco, ESP overhead adds a maximum of 73 Bytes to each packet. Therefore, we can adjust the MSS to a
conservative 1400.
PowerShell:
Step 1: Identify external interface.
PS

C:\Users\thedude> netsh int ipv4 sh int
Idx Met
MTU State Name
— ———-
———- ———— —————————
1
50 4294967295 connected
Loopback Pseudo-Interface 1
29
30 Default connected
RAS (Dial In) Interface
12
5 1500 connected
Inside
14
5 1500 connected
Outside
Step 2. Modify external interface MSS.
PS
C:\Users\thedude> netsh int ipv4 set subint
«Outside» mtu=1350 store=persistent
Step 3. Confirm MSS:
PS
C:\Users\thedude> netsh int ipv4 sh int
Idx Met
MTU State Name
— ———-
———- ———— —————————
1
50 4294967295 connected
Loopback Pseudo-Interface 1
29
30 Default connected
RAS (Dial In) Interface
12
5 1500 connected
Inside
14
5 1400 connected Outside
That’s It!
References:
MT
VPN
Windows Server
In the previous parts we’ve configured our network infrastructure with DCB and set QoS policies to ensure traffic bandwidth. But there is more!
In this part I’m going to shown known and unknown tips and tricks that optimizes your network infrastructure.
Part 1: RDMA, DCB, PFC, ETS, etc
Part 2: Configuring DCB in Windows
Part 3: Optimizing Network settings
Part 4: Test DCB and RDMA (coming)A
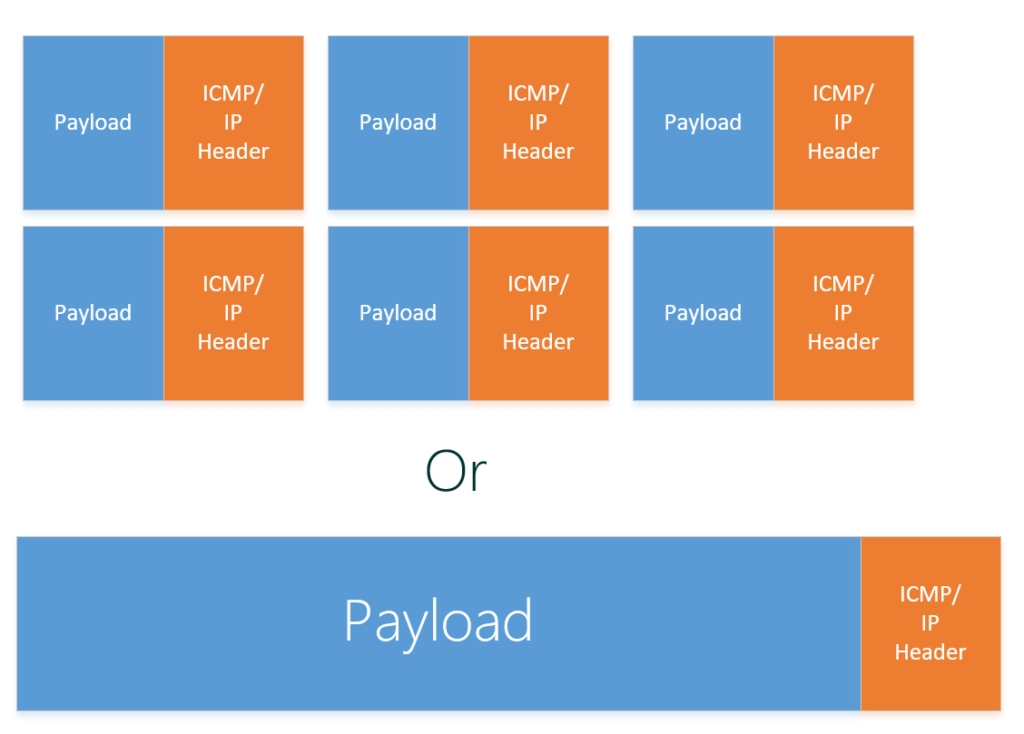
Jumbo Frames
Traditionally, Ethernet has a maximum frame size of 1500 bytes. An Ethernet packet larger than 1500 bytes is called a jumbo frame. When a network device gets a frame that is larger than the configured MTU, the data is fragmented into smaller frames or dropped. With jumbo frames, the ethernet packet can hold more data which makes data receiving more efficient as normally you would have to send 6 packets to transfer the same amount of data.
Jumbo Frames are always under debate, if it really makes a difference and need to be enabled.
I’m not going into research here, but see this blogpost for some performance tests.
In short, jumbo frames enhance IOPS and latency by 20-30% and decrease CPU usage.
I don’t see a reason not to enable it, which is fairly easy:
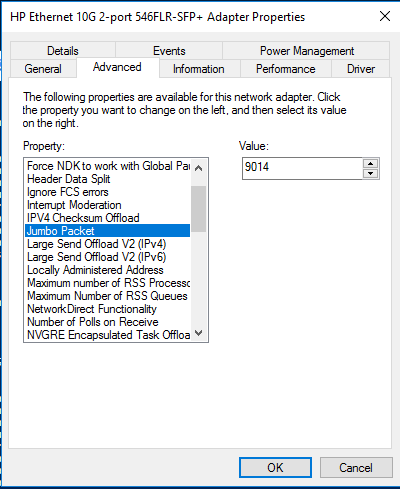
Our beloved Powershell can also do this for you:
Set-NetAdapterAdvancedProperty -Name «NIC1» -RegistryKeyword ‘*JumboPacket’ -RegistryValue ‘9014’
Do not forget to enable jumbo frames on the switch as well.
You can test jumbo frames by sending jumbo frames:
Ping -f -l 8000 192.168.0.2
The “-f” parameter does not allow packets to be fragmented.
The “-l” parameter specifies the size of the packet, in this case we use a large packet (jumbo frame).
If you get reply’s everything works great!
NUMA Node Assignment
(Text from Mellanox)
Non-uniform memory access (NUMA) nodes are servers with more than one system bus. These platforms can utilize multiple processors on a single motherboard, and all processors can access all the memory on the board. When a processor accesses memory that does not lie within its own node (remote memory), data must be transferred over the NUMA connection at a rate that is slower than it would be when accessing local memory. Thus, memory access times are not uniform and depend on the location (proximity) of the memory and the node from which it is accessed.
Basically what the above text describes is that a server’s hardware is fragmented in even pieces. Based on where the processor, memory and PCI slots is located on the motherboard its “assigned” to each other into a NUMA node. This way I/O is optimized and happens in the same “region” although I/O can cross NUMA nodes when needed, the latency will just be higher. Typically a NUMA node is formed on a physical processor socket, so if you have a two socket machine you would have two NUMA nodes.

To figure out how many NUMA nodes you have you could use the following Powershell cmdlet:
Get-VMHostNumaNode
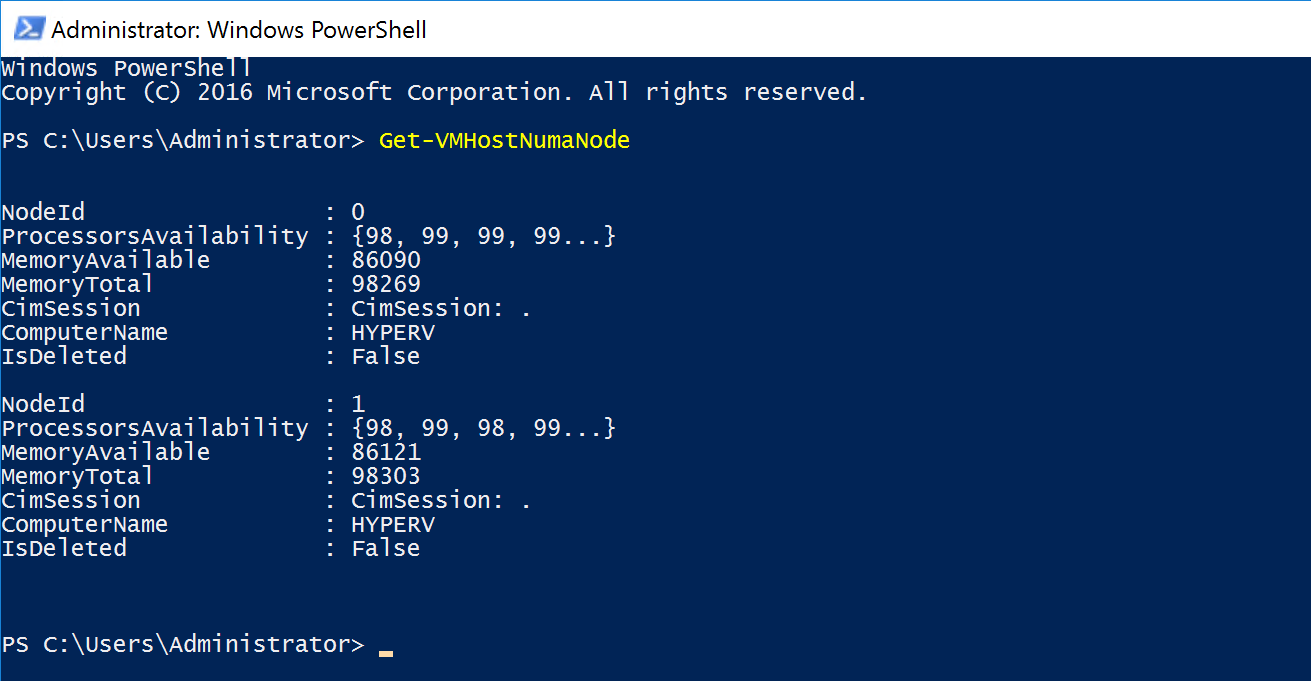
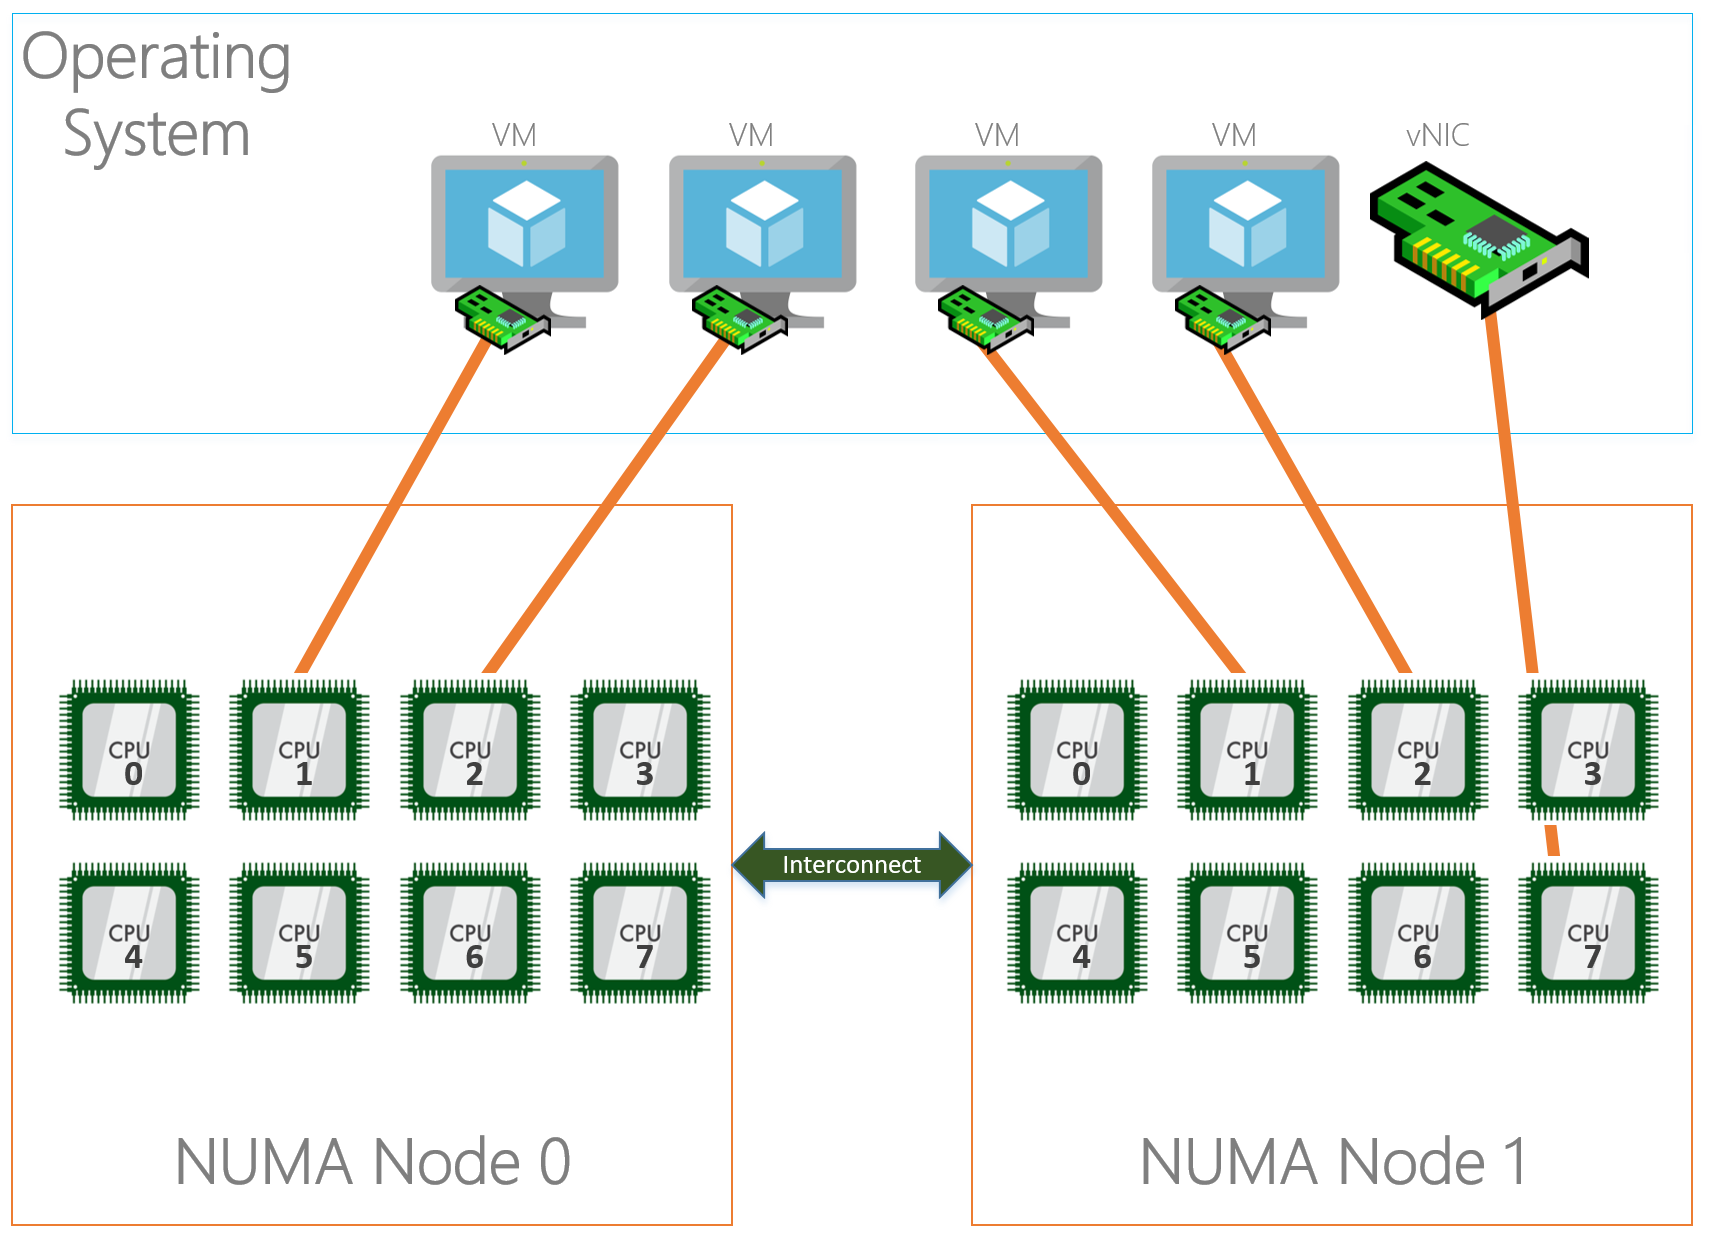
Physically the PCI-e slots are bound to a NUMA node, but that doesn’t mean that the NICs in the operating system are bound to the same NUMA nodes. By default all NICs seem to bind to NUMA node 0.
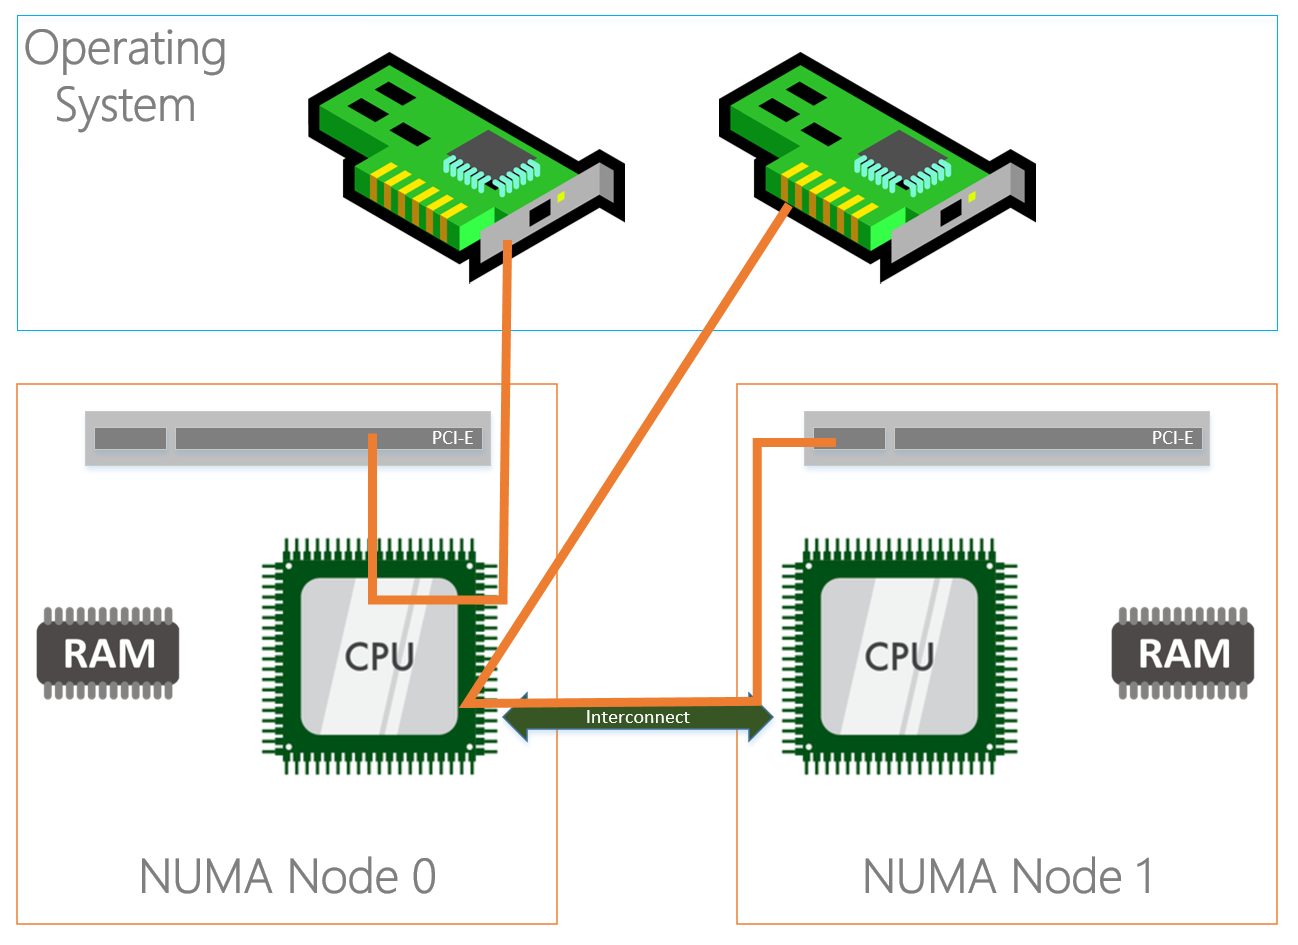
As you can see in the diagram above, the NIC (in the OS) on the left is physically installed in the PCI-e slot located in NUMA Node 0 and the CPU in the same NUMA node is processing I/O. The NIC on the right is physically located in NUMA Node 1 but the CPU in NUMA node 0 is processing I/O which is not optimal because both NICs are interrupting the same processor while we have another processor that can be used as well. On top of that the I/O’s also have to travel over the interconnect which causes latency.
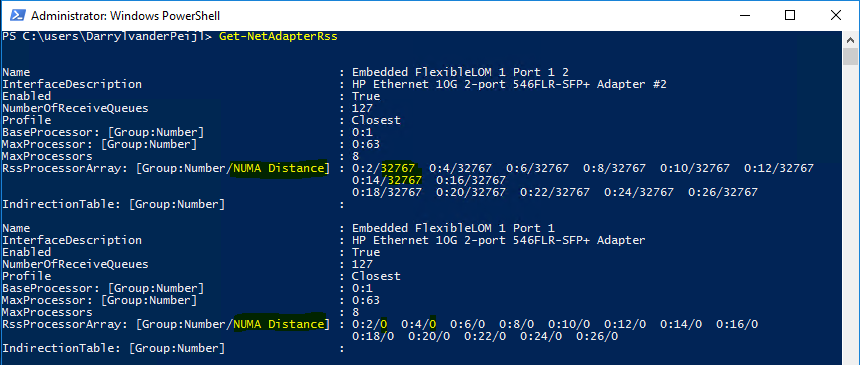
You can view this latency by using the Get-NetadapterRss cmdlet:
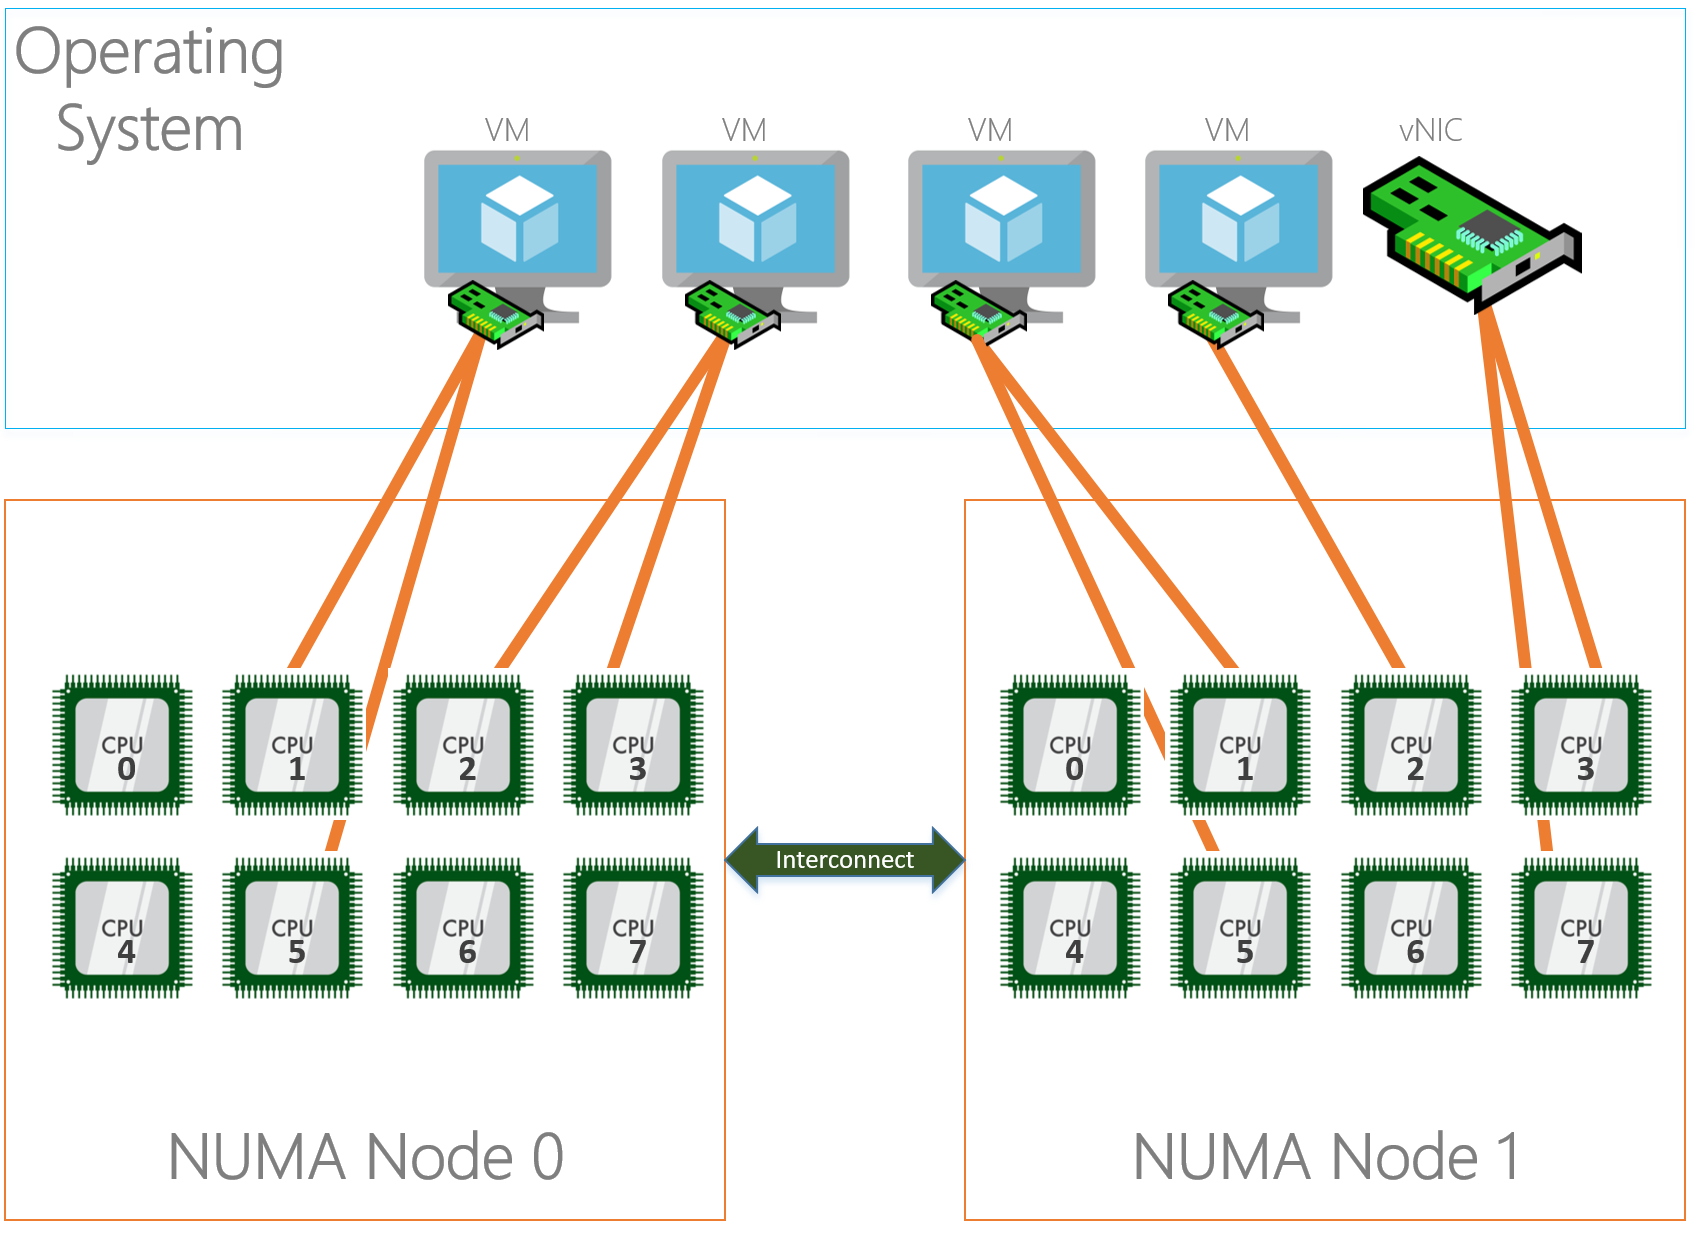
Modern NICs allow assigning to a specific NUMA node in the operating system which overcomes the situation outlined above. In the example below we used a Mellanox ConnectX-3 Pro adapter.
Set-NetAdapterAdvancedProperty -Name «NIC1» -RegistryKeyword ‘*NumaNodeId’ -RegistryValue ‘0’
Set-NetAdapterAdvancedProperty -Name «NIC2» -RegistryKeyword ‘*NumaNodeId’ -RegistryValue ‘1’
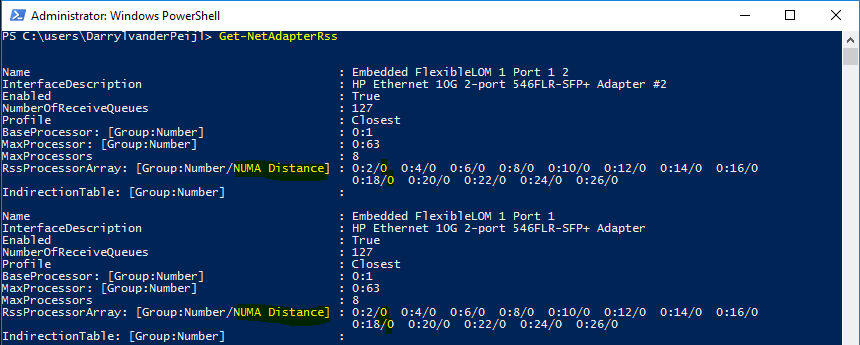
After changing the NUMA node assignment, you can see that the latency is reduced:
“But hey, SMB Direct (RDMA) doesn’t use the processor right?”
Correct, if you’re using RDMA your SMB traffic already bypasses the processor but it still applies for any other traffic (Including traffic of your virtual machines!). If you are not using RDMA this could help a lot.
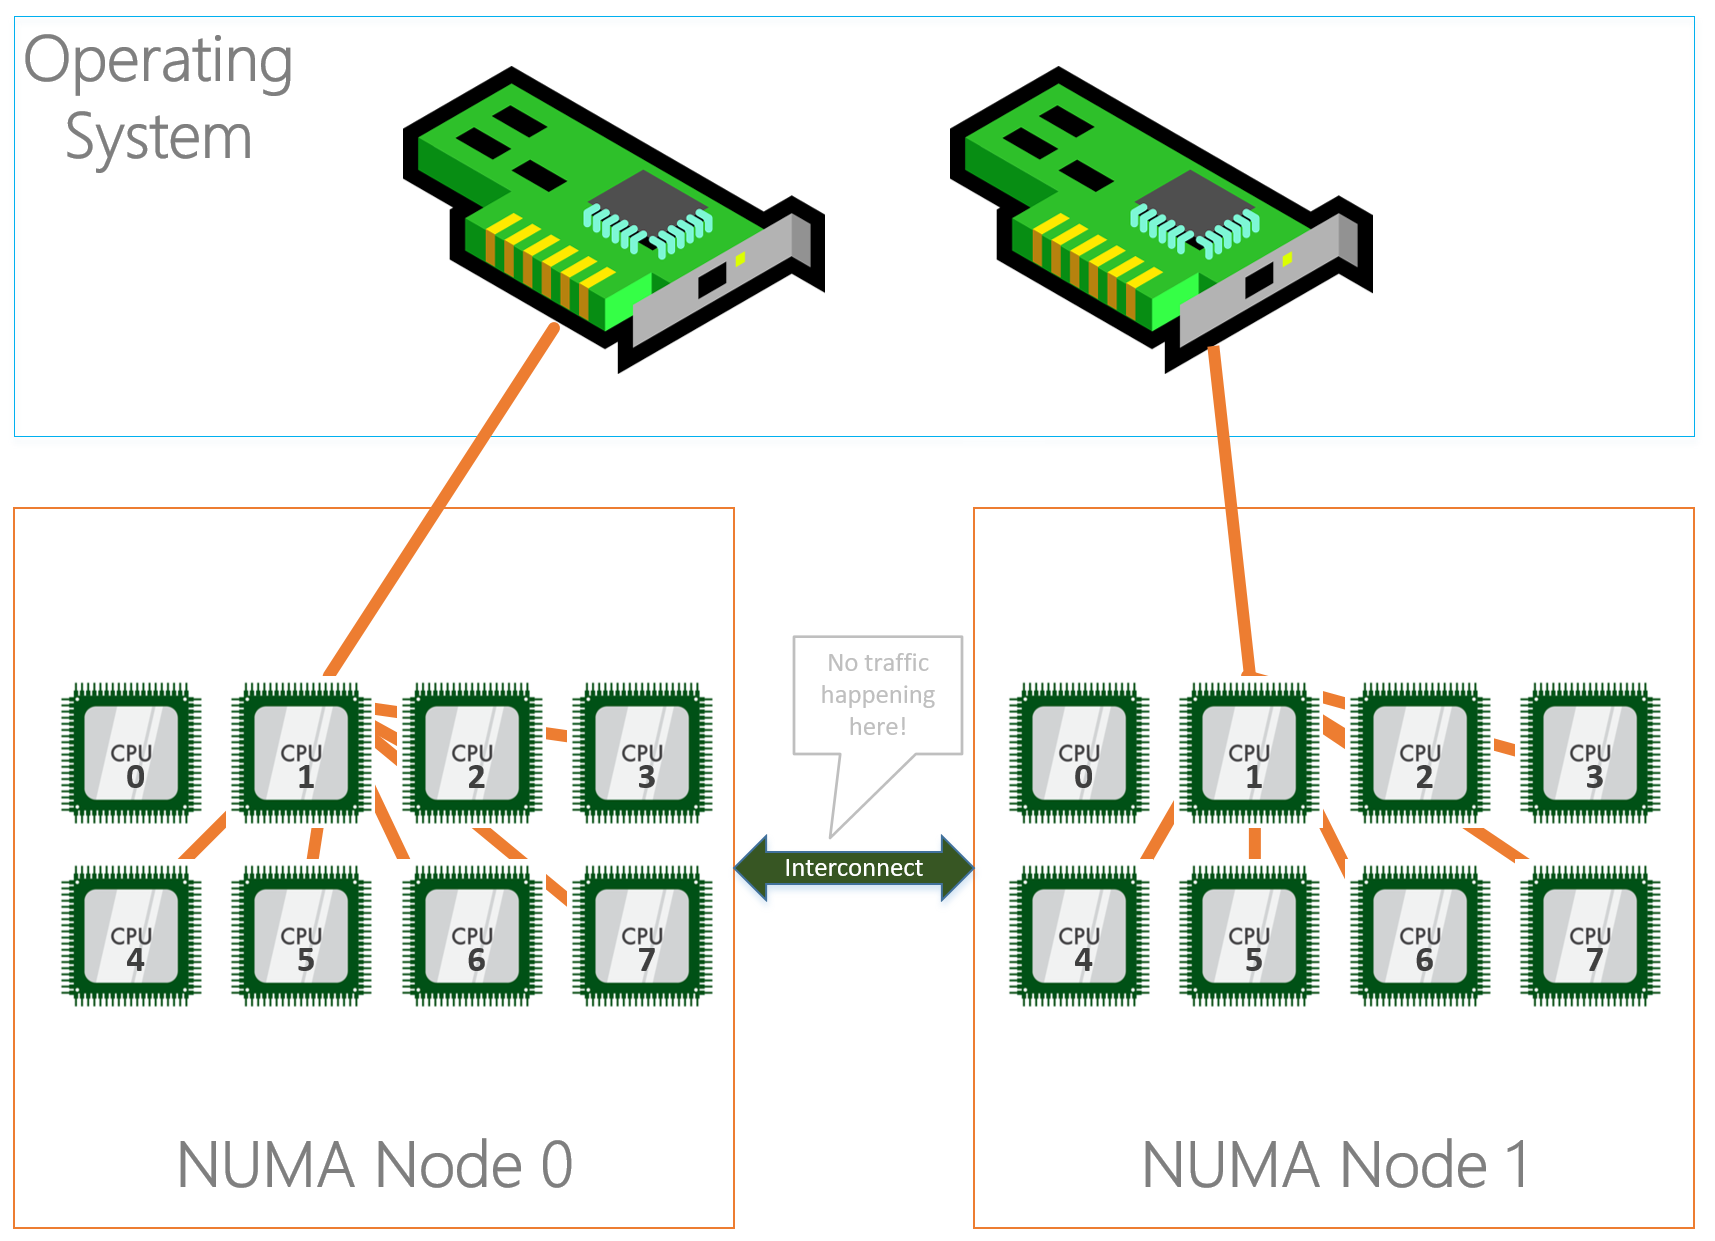
Receive Side Scaling
Receive Side Scaling (RSS) is a very important aspect in networking on Windows. RSS makes sure that incoming network traffic is spread among the available processors in the server for processing. If we do not use RSS, network processing is bound to one processor which will limit approximately at 4GBps. Nowadays every NIC has RSS enabled by default, but the configuration is not optimized. Every NIC is configured with “Base Processor” 0, meaning it will start processing on processor 0 together with the others NICs but more importantly it’s the default processor for Windows processes as well.
To optimally configure RSS we want to start at processor 1 so we don’t interfere with processes landing default on processor 0. On the other hand, we also want to keep the NUMA node assignment as discussed above in mind so that RSS traffic is not using a processor in NUMA node 1 while the NIC is bound to NUMA node 2. This will have the same latency consequences as described above.
To configure RSS, for the physical NICs and the virtual NICs you can use the Set-NetAdapterRss cmdlet.
When you specify the “-NumaNode” parameter, it automatically changes the “Processorgroup” to the right number. We specify the “-BaseProcessorNumber” parameter to let RSS start on processor 1 instead of 0.
Set-NetAdapterRss -Name NIC1 -BaseProcessorNumber 1 -NumaNode 0
Set-NetAdapterRss -Name NIC2 -BaseProcessorNumber 1 -NumaNode 1
Set-NetAdapterRss -Name «vEthernet (SMB1)» -BaseProcessorNumber 1 -NumaNode 0
Set-NetAdapterRss -Name «vEthernet (SMB2)» -BaseProcessorNumber 1 -NumaNode 1
The examples assume we have an equal amount of NICs and NUMA nodes and uses all processors in a NUMA node for one NIC, but it could be that you have more NICs than NUMA nodes and you have to spread for example 4 NICs amongst two NUMA nodes. In this case you can specify a range of processors the NIC may use using the “-MaxProcessorNumber”, which specifies the fixed processor where the range ends from the “BaseProcessorNumber” or the “-MaxProcessors”, which is a count of how many processors it may use from the “BaseProcessorNumber”.
Examples to make it more clear:
Set-NetAdapterRss -Name NIC1 -NumaNode 0 -BaseProcessorNumber 1 -MaxProcessorNumber 6
This example uses processor 1 as start and the range stops at processor 6.
Set-NetAdapterRss -Name NIC1 -NumaNode 0 -BaseProcessorNumber 8 -MaxProcessors 4
This example uses processor 8 as start and the range stops at processor 11.
Virtual Machine Queuing
With the entrance of virtualization on servers and RSS we hit some limitations because RSS wasn’t built for this “new world”. Long story short, when having a virtual switch on the system where physical adapters are bound to, RSS is disabled. This caused scalability issues that needed to be solved… hello VMQ.
(Text from VMQ Deepdive)
The real benefit of VMQ is realized when it comes time for the vSwitch to do the routing of the packets. When incoming packets are indicated from a queue on the NIC that has a VMQ associated with it, the vSwitch is able the direct hardware link to forward the packet to the right VM very very quickly – by passing the switches routing code. This reduces the CPU cost of the routing functionality and causes a measurable decrease in latency.
Unlike RSS where incoming traffic is spread among processors, VMQ will create a queue for each mac-address on the system and link that queue to a processor core. This means that a mac-address, which translates to a NIC of a VM or a host vNIC does not have more process power than 1 processor core. This limits the network traffic speed in the same way it does when we do not enable RSS to about 4GBps.
Some NICs have the capability to enable ‘dVMQ’ which stands for Dynamic VMQ. With this, queues can be reassigned to a different CPU at run time based on CPU load and system power balancing helping with a ‘noisy neighbor’.
When configuring RSS, VMQ follows this configuration. You can also manually configure VMQ using the “Set-NetAdapterVMQ” with the same parameters as the RSS cmdlet uses.
Virtual Machine Multi Queuing
New in Windows Server 2016 is a technology called VMMQ. The name doesn’t leave anything to a surprise, with Virtual Machine Multi Queuing multiple queues can be assigned to a VM NIC or Host vNIC. This helps us to get around the restriction of VMQ where we only have the ability to use one physical core per VM, if 4GBps of network traffic to your VM isn’t enough 🙂
VMMQ can be enabled using Powershell.
For a specific VM:
Set-VMNetworkAdapter «VM Name» -VMMQEnabled $True
For a Host vNIC:
Set-VMNetworkAdapter «SMB1» -ManagementOS -VMMQEnabled $True
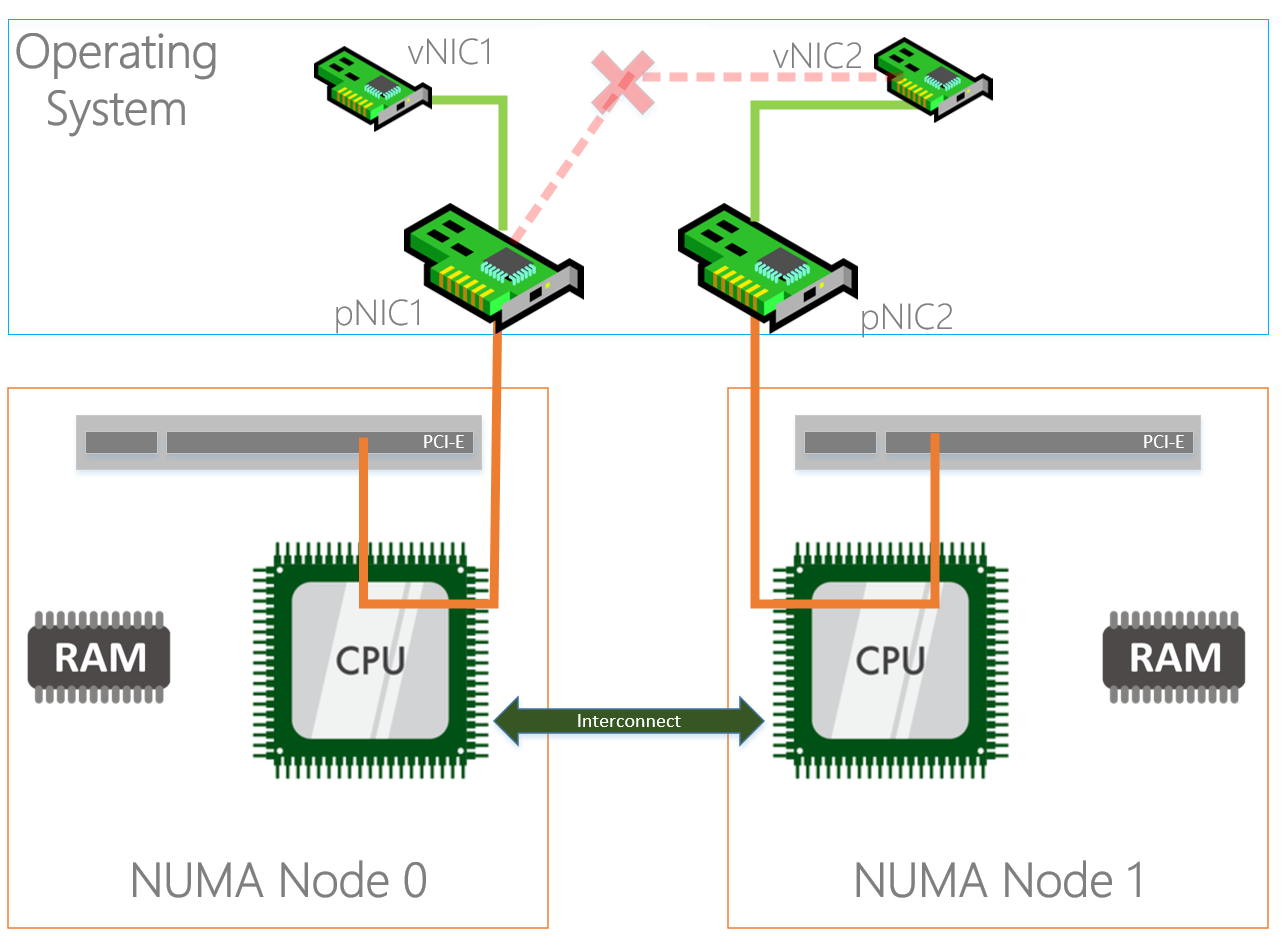
VM Network Team Mapping
After you have bound your physical NICs to a NUMA node, configured RSS and VMQ to use the right NUMA node and processors there is one more step to take.
By default an algorithm is in place to affinitize a vNIC to a Physical network adapter when they are in a team (LBFO or SET). This algorithm does not always do the things you want, If I have two storage NICs created on my vSwitch I would like them affinitized both on a different physical adapter.
Below you will see an example of PerfMon where on “Cluster2-Node1” everything is affinitized properly but on the other two nodes you can see that one of the two physical adapters is doing no traffic at all. This is because both the vNICs are affinitized on one physical adapter.
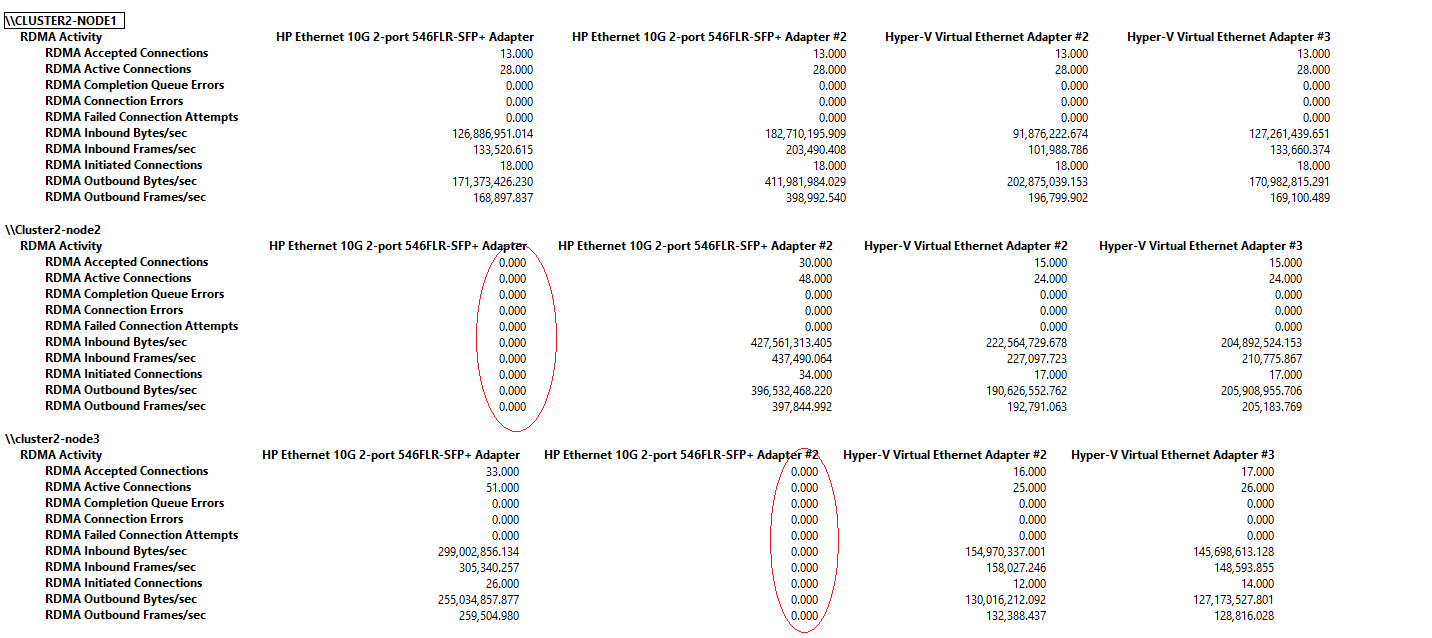
You can affinitize a vNIC to a pNIC using the following Powershell cmdlets:
Set-VMNetworkAdapterTeamMapping -VMNetworkAdapterName SMB1 –ManagementOS –PhysicalNetAdapterName NIC1
Set-VMNetworkAdapterTeamMapping -VMNetworkAdapterName SMB2 –ManagementOS –PhysicalNetAdapterName NIC2
With the above outlined settings and configurations you come along way optimizing your network environment on Windows Server 2016. If you follow the steps, all network related settings are aligned and optimized. Do not forget to test your environment.
—
Thank you for reading my blog.
If you have any questions or feedback, leave a comment or drop me an email.
Darryl van der Peijl
http://www.twitter.com/DarrylvdPeijl
Setting proper MTU values on your server
This article is based on setting the proper MTU on your machine if you are having basic networking issues with your machine. The reason on clamping the MTU on our network is to ensure stability on our network.
It can help to have a basic understanding on what an MTU does. An MTU (Maximum Transmission Unit) is the largest packet or frame size allowed through a network before fragmentation is required. A mismatch in MTU between your server and our local switches can cause issues with packets being reassembled resulting in packet-loss and other connectivity issues.
Luckily setting your MTU is easy, this tutorial will show you how to do it across both Windows and Linux based platforms.
Your servers MTU should be set to 1440 for all servers on the Tempest network
Windows
You can edit the MTU for your machine via the command prompt. Our example was taken from Windows Server 2019, however the process should be similar for other versions.
Finding interface and checking current MTU
We can use the command netsh interface ipv4 show subinterface to view interfaces giving an output similar to the following:
You can also find your interface name in your Network Connections (Control Panel > Network and Internet > Network Connections)

In this example our Ethernet 2 is the interface that we use primarily, and as you can see the MTU is currently set to 1500 and will need changing.
Setting the correct MTU in Windows
We will be using the netsh command again to set the MTU to 1440.
netsh interface ipv4 set subinterface "Ethernet 2" mtu=1440 store=persistentRemember to change Ethernet 2 to whatever your network device/ethernet adapter is named.
You may need to restart your Windows server for these changes to take affect.
You are then able to run the command netsh interface ipv4 show subinterface again to check the changes.

Linux
You can use ip route to find your interface name on Linux systems
Setting MTU temporarily (not recommended, useful for debugging)
There are several ways you can do this, one of them by using the package net-tools and ifconfig.
ifconfig <interfacename> mtu 1440Other options include using ip link or modifying /etc/network/interfaces which you can set as follows
ip link set mtu 1440 dev <interfacename>Setting MTU permanently (recommended)
To make the setting permanent for your interface, edit the configuration file:
/etc/network/interfaces (Debian/Ubuntu Linux file)
/etc/sysconfig/network-scripts/ifcfg-eth0 (CentOS/RedHat Linux )
Example File For Debian / Ubuntu:
auto lo
iface lo inet loopback

auto eth0
iface eth0 inet static
address 192.168.1.2
netmask 255.255.255.0
gateway 192.168.1.254
mtu 1440
Example File For RedHat CentOS
DEVICE=eth0
BOOTPROTO=static
BROADCAST=192.168.1.255
HWADDR=FF:FF:FF:FF:FF:FF
IPADDR=192.168.1.111
NETMASK=255.255.255.0
NETWORK=192.168.1.0
MTU=1440
ONBOOT=yes
TYPE=Ethernet
Restarting your network service(s)
If you are using Redhat you can use the command service network restart
If you are using Debian / Ubuntu you should use systemctl systemctl restart networking
Updated on: 22/03/2023