
We try to cater to two different types of users for our pre-built packages:
- Developers using MSYS2 directly: These users generally prefer the latest software and updates, typically using newer hardware and keeping their Windows operating system updated.
- End-users of bundled applications: These applications include pre-built packages from the MSYS2 repository, and the users may run very outdated versions of Windows on equally outdated hardware.
In some cases we can’t please both groups at the same time, so we have to find compromises.
Current Policy
The GUI Installer: Requires 64-bit Windows 10 / Windows Server 2019.
Msys/Cygwin Packages: Requires 64-bit Windows 8.1 / Windows Server 2012 R2.
Mingw Packages: Requires 64-bit Windows 8.1 / Windows Server 2012 R2.
Upstream software may impose additional requirements.
Mingw Toolchains: MINGW32/MINGW64 environments allow targeting Windows 7+ still. All others allow targeting Windows 8.1+.
Hardware Requirements: We try to follow the minimum hardware requirements of the oldest Windows versions we support. Upstream software may impose additional requirements.
Resources for Unsupported Windows Versions
We no longer support these configurations, but here’s a list of resources that might help you get things running either way.
GUI Installer on Windows 8.1: The last GUI installer version that worked on Windows 8.1 is
2024-01-13. Use the old installer and then use pacman to update.
Windows 7 and 8.0: The last installer version that worked on Windows 7 and 8.0 is 2022-10-28. Switching to msys2-runtime-3.4 should keep the Cygwin parts working. Many Mingw packages will no longer work though (Python for example).
32-bit Windows: The last working archive is available at https://repo.msys2.org/distrib/i686 and there is a community maintained repo at https://github.com/jeremyd2019/msys2-build32.
Changelog
Various changes affecting the supported Windows versions and hardware for both pre-built packages and programs built using our toolchains.
2024-05-07: The GUI installer dropped support for running on Windows 8.1.
2024-05-03: msys2-runtime
was updated to Cygwin 3.5 which dropped support for Windows 7 and 8.0 and will no longer run there.
2023-12-13: We will no longer add new 32-bit Mingw packages to the repo unless needed, and will start dropping 32-bit packages without users.
2023-01-15: Dropped active support for Windows 7 and 8.0 in general.
2022-12-26: Default _WIN32_WINNT bumped to Windows 8.1 for UCRT environments. MINGW32/MINGW64 environments still default to Windows 7.
2022-12-16: The GUI installer dropped support for running on Windows 7 and 8.0.
2022-10-18: New minimum hardware requirements for pre-built packages matching the minimum requirements of Windows 8.1 (CPUs from ~2006/7+).
2020-05-17: 32-bit MSYS2 no longer actively supported. Both packages and the installer will no longer be updated.
Windows 7 and later compilation and development guide
Warning
The MinGW toolchain we use in this guide no longer supports targeting Windows Vista or earlier.
Please refer to one of the MSVC guides for how to target older Windows versions with Visual Studio.
This video covers quick demonstrations of these subjects;
-
Environment Configuration
-
Building RetroArch
-
Packaging RetroArch
Be sure to read instructions that are given in this page.
Environment configuration
We recommend MinGW-W64 from MSYS2. You can download MSYS2 installer from here.
Follow the installation instructions and once finished start the MSYS2 shell.
You may need to add «Full Control» permission to your MSYS folder (for example, C:\msys64) or run the shell as Administrator.
MSYS2 shell is a maintenance shell. We are going to use this shell to install the toolchain and other packages. First order of business is to update MSYS2. Start the MSYS2 MINGW64 or MINGW32 Shell (mingw64.exe or mingw32.exe), It is important to use this particular shell (MINGW) because the makefile uses it to detect the target platform as Windows.
Once we’re in the shell, run the following commands:
pacman --noconfirm -Sy
pacman --needed --noconfirm -S bash pacman pacman-mirrors msys2-runtime
Close MSYS2 shell and start it again, and:
Restart MSYS2 once again. Now we can start installing the packages we actually need.
For 32-bit builds:
pacman -S --noconfirm --needed wget git make mingw-w64-i686-toolchain mingw-w64-i686-ntldd mingw-w64-i686-zlib mingw-w64-i686-pkg-config mingw-w64-i686-SDL2 mingw-w64-i686-libxml2 mingw-w64-i686-freetype mingw-w64-i686-python3 mingw-w64-i686-ffmpeg mingw-w64-i686-drmingw
For 64-bit builds:
pacman -S --noconfirm --needed wget git make mingw-w64-x86_64-toolchain mingw-w64-x86_64-ntldd mingw-w64-x86_64-zlib mingw-w64-x86_64-pkg-config mingw-w64-x86_64-SDL2 mingw-w64-x86_64-libxml2 mingw-w64-x86_64-freetype mingw-w64-x86_64-python3 mingw-w64-x86_64-ffmpeg mingw-w64-x86_64-drmingw
You might want to install Qt too if you want to be able to use the desktop GUI.
For 32-bit builds:
pacman -S --noconfirm --needed mingw-w64-i686-qt5 mingw-w64-i686-openssl
For 64-bit builds:
pacman -S --noconfirm --needed mingw-w64-x86_64-qt5 mingw-w64-x86_64-openssl
The NVIDIA CG toolkit package hasn’t been updated for a while so you need to download that package manually and install with pacman. You can download the packages from sourceforge at the following locations: 32-bit / 64-bit. Alternatively you can use the following commands directly:
For 32-bit builds:
wget http://sourceforge.net/projects/msys2/files/REPOS/MINGW_GCC_4_9/i686/mingw-w64-i686-nvidia-cg-toolkit-3.1-2-any.pkg.tar.xz/download -O mingw-w64-i686-nvidia-cg-toolkit-3.1-2-any.pkg.tar.xz
pacman -U mingw-w64-i686-nvidia-cg-toolkit-3.1-2-any.pkg.tar.xz
For 64-bit builds:
wget https://sourceforge.net/projects/mingw-w64-archlinux/files/x86_64/mingw-w64-nvidia-cg-toolkit-3.1-2-any_4.pkg.tar.xz/download -O mingw-w64-x86_64-nvidia-cg-toolkit-3.1-2-any.pkg.tar.xz
pacman -U mingw-w64-x86_64-nvidia-cg-toolkit-3.1-2-any.pkg.tar.xz
If you encounter any errors, you may try the following procedure instead:
pacman -S mingw-w64-x86_64-crt
pacman -S mingw-w64-x86_64-nvidia-cg-toolkit
Once these packages are installed close MSYS2 shell and open MinGW-w32 shell or MinGW-w64 shell depending on the platform you want to build for.
You’ll need gcc and make:
pacman -S make
pacman -S gcc
RetroArch Compilation
Building RetroArch
The first step is to obtain RetroArch’s source tree.
You can find the repository directly at GitHub
Start the MINGW64 or the MINGW32 shell depending on what you want to compile and run the following commands:
git clone https://github.com/libretro/RetroArch.git retroarch
For subsequent builds you will need to pull the changes from the repo
To compile RetroArch, run the following commands inside RetroArch’s source tree:
./configure
make clean
make -j4
For development purposes you might want to run a debug build instead. In such case use the following commands:
./configure
make clean
make DEBUG=1 GL_DEBUG=1 -j4
To facilitate debugging you can get an integrated crash handler by replacing the configure step with (debug builds only):
./configure --enable-drmingw
After a few minutes you should be able to find retroarch.exe under that directory. To start the newly compiled retroarch you can use:
Packaging RetroArch
You might not be able to start your own build outside that environment. You might want to try to get all the required DLLs by running the following script in your destination RetroArch folder (not the git repo folder):
for i in $(seq 3); do for bin in $(ntldd -R *exe | grep -i mingw | cut -d">" -f2 | cut -d" " -f2); do cp -vu "$bin" . ; done; done
If Qt is enabled for your build (detected automatically by default), the following is also needed:
windeployqt --no-patchqt --no-translations retroarch.exe
for i in $(seq 3); do for bin in $(ntldd -R imageformats/*dll | grep -i mingw | cut -d">" -f2 | cut -d" " -f2); do cp -vu "$bin" . ; done; done
If you really want to get the required libraries for distribution or for personal use on other devices and LDD doesn’t work for you for whatever reason, then you can try Dependency Walker.
Tip
If you’re building frequently you may want to add ccache to the mix to speed up the build process.
Install ccache via the package manager and the prepend the ccache symlink directory to your build environment path as shown below.
For further instructions check the documentation
Install ccache for 32-bit builds:
pacman -S --noconfirm --needed make mingw-w64-i686-ccache
Install ccache for 64-bit builds:
pacman -S --noconfirm --needed mingw-w64-x86_64-ccache
Configure paths for 32-bit builds:
export PATH=/mingw32/lib/ccache/bin/:$PATH
Configure paths for 64-bit builds:
export PATH=/mingw64/lib/ccache/bin/:$PATH
Build with both ccache and the -j5 flag to specify five concurrent tasks:
Tip
You can add this to /etc/profile under both the 32-bit and 64-bit setups by adding ${MINGW_MOUNT_POINT}/lib/ccache/bin to the front of the PATH variables found in MINGW32) and MINGW64), around line 50 of profile, to ensure the proper binaries are loaded for each development environment.
From our own buildbot, the times with and without ccache are the following:
Without ccache:
real    2m7.645s
user    0m2.585s
sys     0m11.527s
With ccache:
real    0m25.466s
user    0m2.902s
sys     0m9.952s
Tip
You can also strip the debug symbols of the build product to save some space.
Strip retroarch:
Core Compilation
Fetching Cores
You can find the cores on libretro’s GitHUB organization.
We have an all-in-one tool to fetch and compile cores which you can use to streamline the process.
You can obtain the tool by using these commands:
git clone https://github.com/libretro/libretro-super.git
cd libretro-super
Then you can fetch one or all the cores by using libretro-fetch.sh
Fetch all cores:
Fetch one core:
./libretro-fetch.sh *corename*
Note
Replace corename with the name of the core you want to fetch, for example gambatte
Building Cores
libretro-super
The easiest way to build all the cores is to use libretro-build.sh from within libretro-super’s source tree:
In case you only want to build one and/or more cores instead of all, you can specify the cores you want to build after the first command in no particular order:
./libretro-build.sh snes9x2010 fceumm
Once compilation has finished, you can find the libretro cores inside dist/win.
Manual Fetching and Compilation
Get the core’s source tree. As an example we’ll use fceumm
git clone https://github.com/libretro/libretro-fceumm.git
Then compile the core:
cd libretro-fceumm
make -f Makefile.libretro
If the Makefile.libretro is not present, as in the libretro-atari800 core, you might try the following:
cd libretro-atari800
make
Optionally strip the build product:
strip fceumm_libretro.dll
Most cores will build with these instructions. You might need to browse to a subdirectory in some cases.
MSYS2, an independent rewrite of MSYS, is a port of a collection of standard Unix and Linux utilities that you can put on Windows. Based on modern Cygwin and MinGW-w64, MSYS2 aims for superior interoperability within Windows software. And it provides just that via shells, dev tools, and version control system programs. Because it allows for tools such as GCC, it’s quite useful as a way of compiling Windows versions of Unix-like programs, by using MinGW-w64 toolchains.
If you’re wondering, the name is a shortening of Minimal SYStem 2, and minimalist is what this program is all about. Granted, you have to know standard Unix commands, but if you do, the interface is a breeze, and commands are quick and responsive. And because MSYS2 offers a package management system — a port of Arch Linux’s Pacman — package installation is incredibly easy, and it adds many powerful features, including dependency resolution, simple complete system upgrades, and package building that’s straightforward.
Installation and setup are also not that complicated. MSYS2 is available in both 32-bit and 64-bit variants, and depending on which you download and install, that’s where you’ll find your executable — either MSYS2 will be installed in C:\msys32 or it’ll be installed in C:\msys64. You’ll also find a folder called «MSYS2 32/64 bit» in your Start Menu, where you’ll find the shortcut to launch your MSYS2 shell. Click this, and you’ll launch your Bash shell. The shortcut, after all, actually doesn’t use Windows’ default console window. Instead, it uses a terminal emulator named mintty to run everything.
From there, if you enable System Variables, you can actually access MSYS2 tools from anywhere, including both Windows Command Prompt and the Run (win key + R) box, meaning you can start dropping Unix commands in Windows Command Prompt and using it a sort of Unix shell.
If you’re a diehard Unix fan, this may not quite be enough for you, but if you’re like Windows and me, just doesn’t quite cut it. You want some more than adequate Unix-like tools integrated into your Windows system, MSYS2 is a helpful program that’s relatively easy to set up, easy to use. It quickly integrates Unix-like commands and packages into any modern Windows station. And since it’s free to use and download and insanely lightweight, it’s at least worth the try if you’re on the fence.
Последнее обновление: 01.01.2023
Установка компилятора
Рассмотрим создание первой простейшей программы на языке Си с помощью компилятора GCC, который на сегодняшний день является одим из
наиболее популярных компиляторов для Cи и который доступен для разных платформ. Более подобному информацию о GCC можно получить на официальном сайте проекта https://gcc.gnu.org/.
Набор компиляторов GCC распространяется в различных версиях. Для Windows одной из наиболее популярных версий является пакет средств для разработки от
некоммерческого проекта MSYS2. Следует отметить, что для MSYS2 требуется 64-битная версия Windows 7 и выше (то есть Vista, XP и более ранние версии не подходят)
Итак, загрузим программу установки MSYS2 с официального сайта MSYS2:
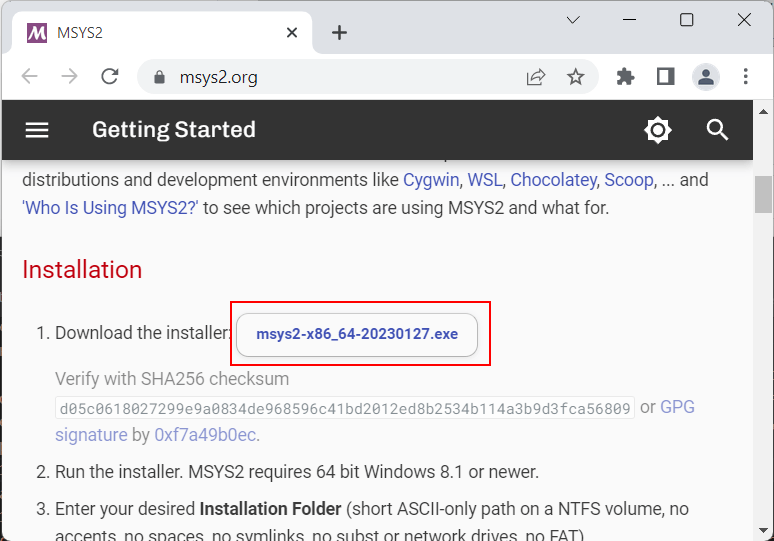
После загрузки запустим программу установки:
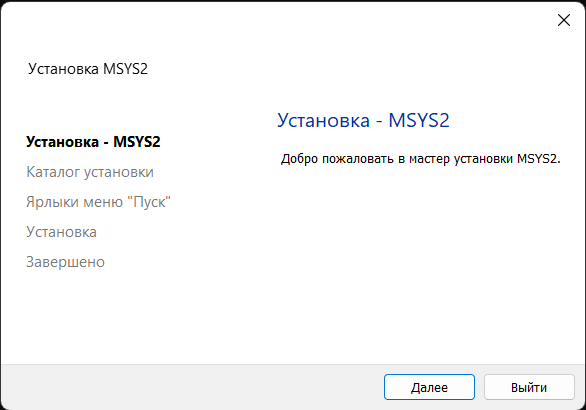
На первом шаге установки будет предложено установить каталог для установки. По умолчанию это каталог C:\msys64:
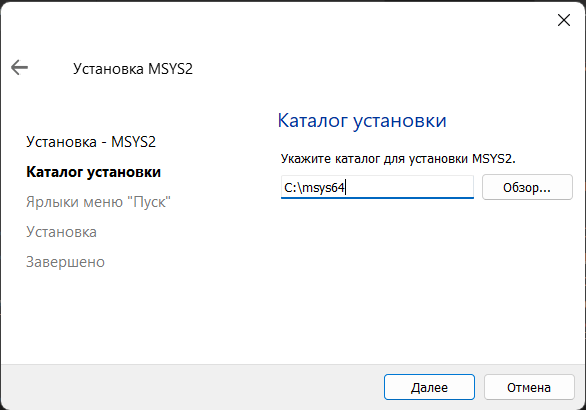
Оставим каталог установки по умолчанию (при желании можно изменить). На следующем шаге устанавливаются настройки для ярлыка для меню Пуск, и затем собственно будет произведена установка.
После завершения установки нам отобразить финальное окно, в котором нажмем на кнопку Завершить
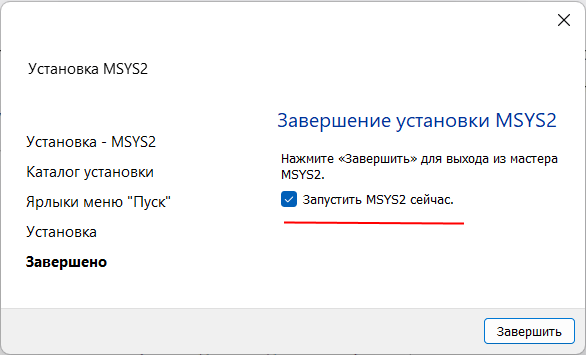
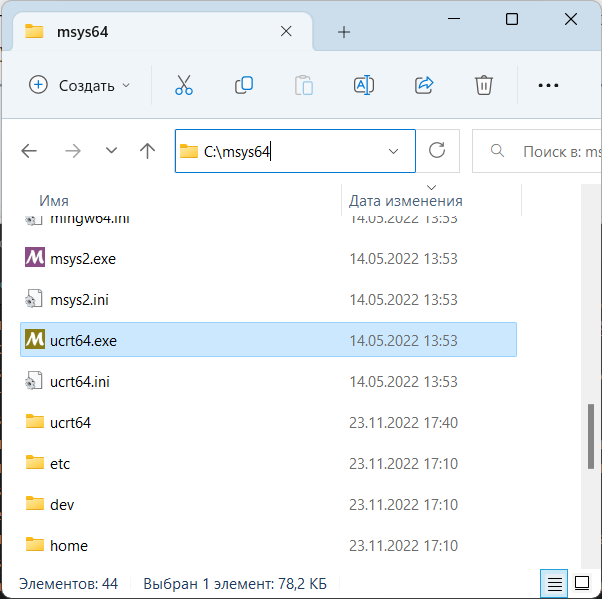
После завершения установки запустится консольное приложение MSYS2.exe. Если по каким-то причинам оно не запустилось,
то в папке установки C:/msys64 надо найти файл usrt_64.exe:
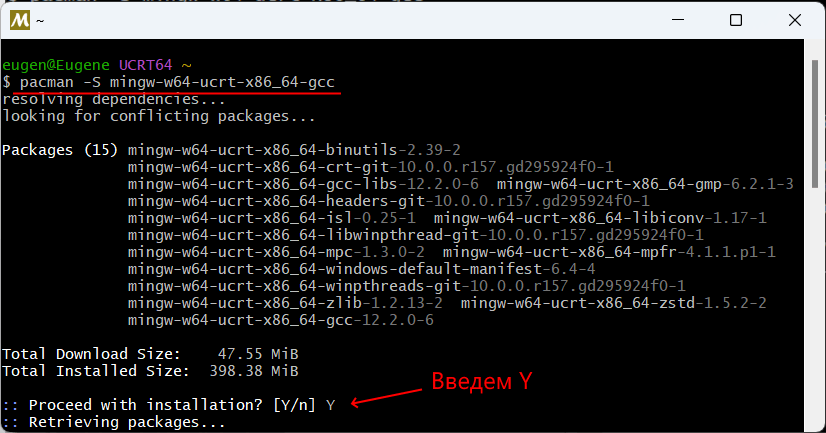
Теперь нам надо установить собственно набор компиляторов GCC. Для этого введем в этом приложении следующую команду:
pacman -S mingw-w64-ucrt-x86_64-gcc
Для управления пакетами MSYS2 использует пакетный менеджер Packman. И данная команда говорит пакетному менелжеру packman установить пакет mingw-w64-ucrt-x86_64-gcc,
который представляет набор компиляторов GCC (название устанавливаемого пакета указывается после параметра -S).
и после завершения установки мы можем приступать к программированию на языке Си. Если мы откроем каталог установки и зайдем в нем в папку C:\msys64\ucrt64\bin,
то найдем там все необходимые файлы компиляторов:
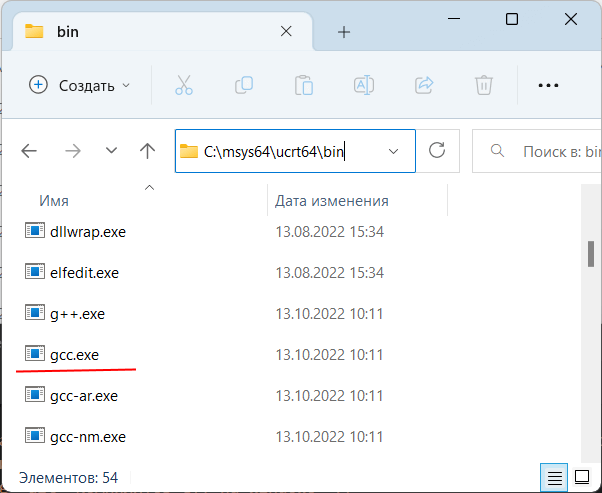
В частности, файл gcc.exe как раз и будет представлять компилятор для языка Си.
Далее для упрощения запуска компилятора мы можем добавить путь к нему в Переменные среды. Для этого можно в окне поиска в Windows ввести «изменение переменных среды текущего пользователя»:
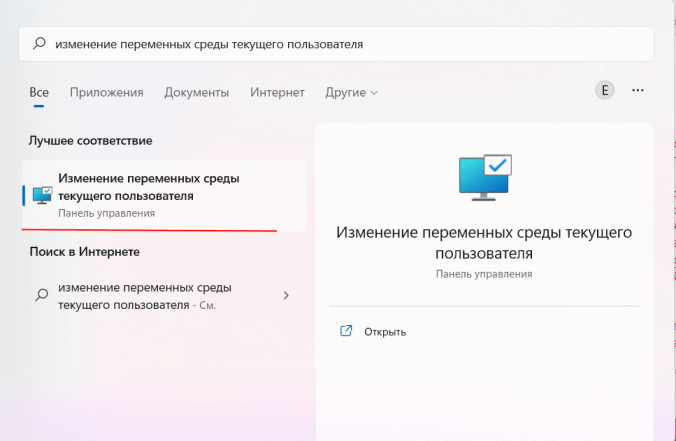
Нам откроется окно Переменныех среды:
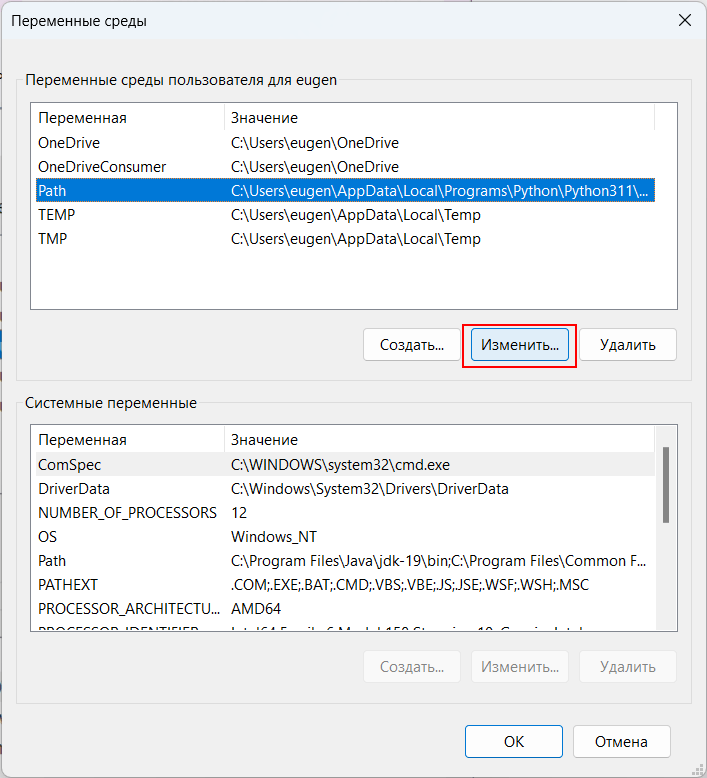
И добавим путь к компилятору C:\msys64\ucrt64\bin:

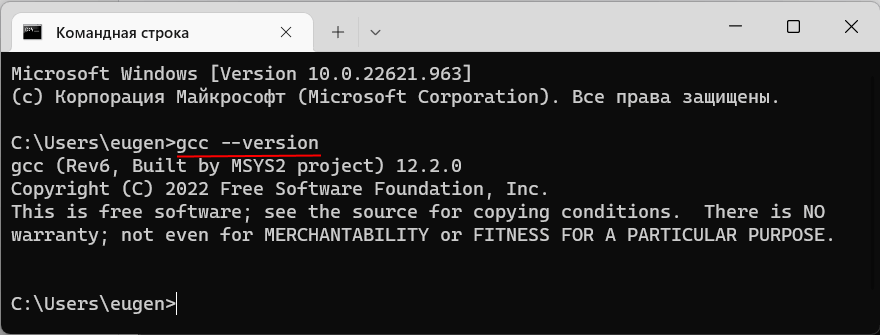
Чтобы убедиться, что набор компиляторов GCC успешно установлен, введем следующую команду:
В этом случае нам должна отобразиться версия компиляторов
Создание первой программы
Итак, компилятор установлен, и теперь мы можем написать первую программу. Для этого потребуется любой текстовый редактор для набора исходного кода.
Можно взять распространенный редактор Visual Studio Code или даже обычный встроенный Блокнот.
Итак, создадим на жестком диске папку для исходных файлов. А в этой папке создадим новый файл, который назовем hello.c.
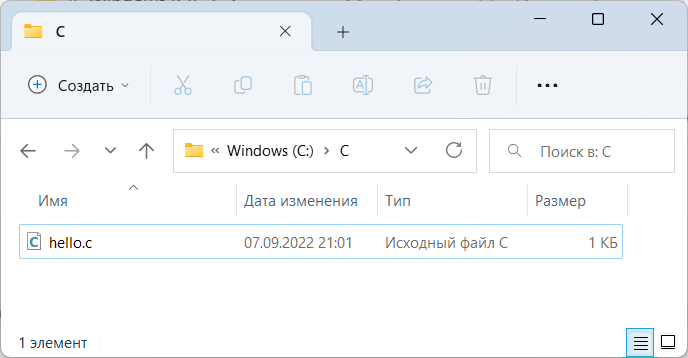
В моем случае файл hello.c находится в папке C:\c.
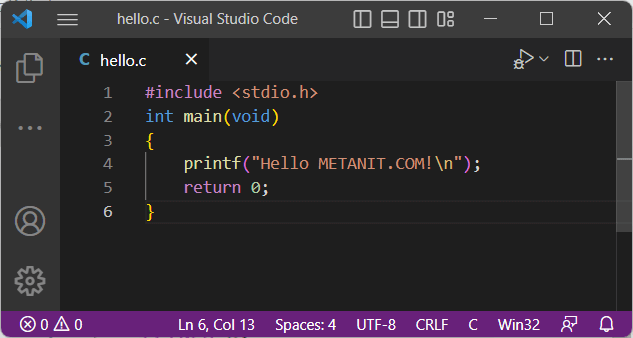
Теперь определим в файле hello.c простейший код, который будет выводить строку на консоль:
#include <stdio.h>			// подключаем заголовочный файл stdio.h
int main(void)						// определяем функцию main
{									// начало функции
	printf("Hello METANIT.COM!\n");	// выводим строку на консоль
	return 0;						// выходим из функции
}									// конец функции
Для вывода строки на консоль необходимо подключить нужный функционал. Для этого в начале файла идет строка
#include <stdio.h>
Директива include подключает заголовочный файл stdio.h, который содержит определение функции printf, которая нужна для вывода строки на консоль.
Далее идет определение функции int main(void). Функция main должна присутствовать в любой программе на Си, с нее собственно и начинается
выполнение приложения.
Ключевое слово int в определении функции int main(void) говорит о том, что функция возвращает целое число.
А слово void в скобках указывает, что функция не принимает параметров.
Тело функции main заключено в фигурные скобки {}. В теле функции происходит вывод строки на консоль с помощью функции printf, в которую передается выводимая строка «Hello METANIT.COM!».
В конце осуществляем выход из функции с помощью оператора return. Так как функция должна возвращать целое число, то после return указывается число 0.
Ноль используется в качестве индикатора успешного завершения программы.
После каждого действия в функции ставятся точка с запятой.
Теперь скомпилируем этот файл. Для этого откроем командную строку Windows и вначале с помощью команды cd перейдем к папке с исходным файлом:
Чтобы скомпилировать исходный код, необходимо компилятору gcc передать в качестве параметра файл hello.c:
После этого будет скомпилирован исполняемый файл, который в Windows по умолчанию называется a.exe. И мы можем обратиться к этому файлу
и в этом случае консоль выведет строку «Hello METANIT.COM!», собственно как и прописано в коде.
Стоит отметить, что мы можем переопределить имя компилируемого файла с помощью флага -o и передав ему имя файла, в который будет компилироваться программа.
Например:
В этом случае программа будет компилироваться в файл hello.exe, который мы также запустить.
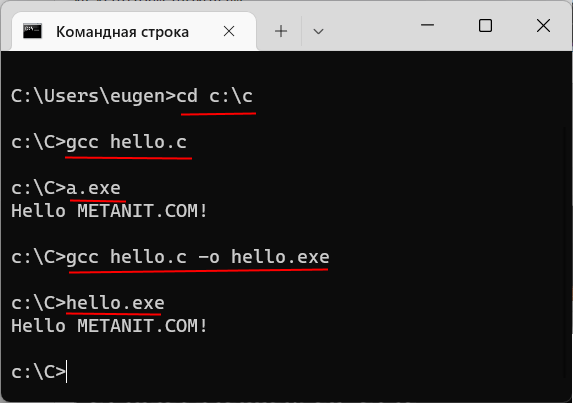
Чтобы не приходилось вводить две команды: одну для компиляции программы и другую для ее запуска, мы можем объединить команды:
gcc hello.c -o hello.exe & hello
Эта команда сначала компилирует код в файл hello.exe, а потом сразу запускает его.
2025-02-21
Changes:
- The usual round of package updates
2024-12-08
Changes:
- The usual round of package updates
- Fix installer UI when dark mode is enabled #84 #89
- Includes fix for rare pacman related hangs (regression in the last release)
2024-11-16
Changes:
- The usual round of package updates
- The MINGW32 shortcut is no longer installed
2024-07-27
Changes:
- The usual round of package updates
2024-05-07
Changes:
- The usual round of package updates
- The GUI installer no longer works on Windows 8.1. Use the installer from https://github.com/msys2/msys2-installer/releases/tag/2024-01-13 instead.
- Provide a .tar.zst archive in addition to the .tar.xz archive (similar size, faster to unpack, 0.7 sec vs 2.7sec). The .tar.xz archive is now deprecated.
2024-01-13
Changes:
- The usual round of package updates
2023-10-26
Changes:
- The usual round of package updates
2023-07-18
Changes:
- The usual round of package updates
2023-05-26
Changes:
- The usual round of package updates
2023-03-18
Changes:
- The usual round of package updates