
Реализация DI в PHP
Jason-Webb 13.05.2025
Когда я начинал писать свой первый крупный PHP-проект, моя архитектура напоминала запутаный клубок спагетти. Классы создавали другие классы внутри себя, зависимости жостко прописывались в коде, а о. . .
Обработка изображений в реальном времени на C# с OpenCV
stackOverflow 13.05.2025
Объединение библиотеки компьютерного зрения OpenCV с современным языком программирования C# создаёт симбиоз, который открывает доступ к впечатляющему набору возможностей. Ключевое преимущество этого. . .
POCO, ACE, Loki и другие продвинутые C++ библиотеки
NullReferenced 13.05.2025
В C++ разработки существует такое обилие библиотек, что порой кажется, будто ты заблудился в дремучем лесу. И среди этого многообразия POCO (Portable Components) – как маяк для тех, кто ищет. . .
Паттерны проектирования GoF на C#
UnmanagedCoder 13.05.2025
Вы наверняка сталкивались с ситуациями, когда код разрастается до неприличных размеров, а его поддержка становится настоящим испытанием. Именно в такие моменты на помощь приходят паттерны Gang of. . .
Создаем CLI приложение на Python с Prompt Toolkit
py-thonny 13.05.2025
Современные командные интерфейсы давно перестали быть черно-белыми текстовыми программами, которые многие помнят по старым операционным системам. CLI сегодня – это мощные, интуитивные и даже. . .
Конвейеры ETL с Apache Airflow и Python
AI_Generated 13.05.2025
ETL-конвейеры – это набор процессов, отвечающих за извлечение данных из различных источников (Extract), их преобразование в нужный формат (Transform) и загрузку в целевое хранилище (Load). . . .
Выполнение асинхронных задач в Python с asyncio
py-thonny 12.05.2025
Современный мир программирования похож на оживлённый мегаполис – тысячи процессов одновременно требуют внимания, ресурсов и времени. В этих джунглях операций возникают ситуации, когда программа. . .
Работа с gRPC сервисами на C#
UnmanagedCoder 12.05.2025
gRPC (Google Remote Procedure Call) — открытый высокопроизводительный RPC-фреймворк, изначально разработанный компанией Google. Он отличается от традиционых REST-сервисов как минимум тем, что. . .
CQRS (Command Query Responsibility Segregation) на Java
Javaican 12.05.2025
CQRS — Command Query Responsibility Segregation, или разделение ответственности команд и запросов. Суть этого архитектурного паттерна проста: операции чтения данных (запросы) отделяются от операций. . .
Шаблоны и приёмы реализации DDD на C#
stackOverflow 12.05.2025
Когда я впервые погрузился в мир Domain-Driven Design, мне показалось, что это очередная модная методология, которая скоро канет в лету. Однако годы практики убедили меня в обратном. DDD — не просто. . .
Вопрос от пользователя
Здравствуйте.
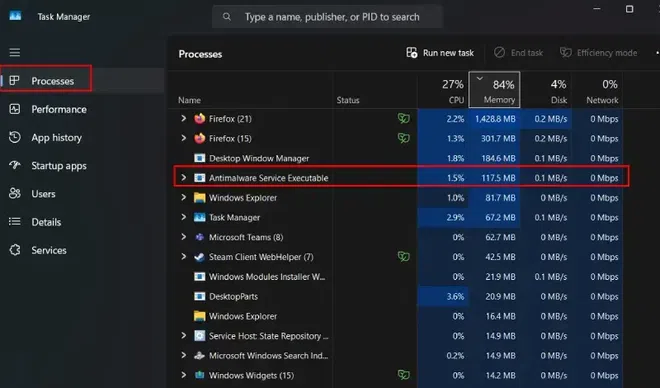
У меня на ноутбуке постоянно идет загрузка процессора до 30-60% службой Antimalware Service Executable. Из-за этого ноутбук постоянно шумит (идет гул от вентилятора) и сильно выдувает воздух сбоку. Можно ли как-то отключить этот процесс (пробовал через диспетчер задач — но он мне сообщает, что вам отказано в доступе)? Что можно сделать?
Здравствуйте.
Этот процесс призван защищать вашу систему от разного рода угроз (является часть защитника Windows). Чаще всего причиной высокой нагрузки ЦП от него — является проверка и сканирование вашей системы.
Для снижения нагрузки от этого процесса: можно подождать некоторое время, пока проверка будет завершена, а можно в ручном режиме отключить его (правда, в этом случае, я очень рекомендую защитить свою систему альтернативным антивирусным продуктом).
Ниже рассмотрим, как это сделать…
*
Как отключить Antimalware Service Executable
Кстати, хочу отметить, что этот процесс не только здорово нагружает процессор, но и жесткий диск, и оперативную память (и, если у вас не SSD накопитель — это может быть настоящим кошмаром).
Перед тем, как отключать процесс Antimalware Service Executable, проверьте еще раз в диспетчере задач, точно ли он нагружает вашу систему.
Примечание: для входа в диспетчер задач воспользуйтесь сочетанием кнопок Ctrl+Alt+Del или Ctrl+Shift+Esc.
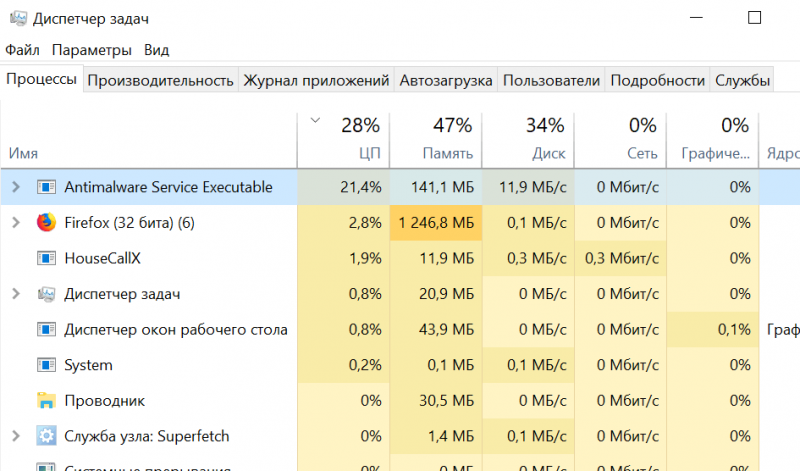
Antimalware Service Executable нагружает ЦП
*
📌 Способ №1
Заходим в панель управления Windows, открываем раздел «Система и безопасность», затем ссылку «Администрирование» (актуально для Windows 7/8/10/11). После чего откройте «Управление компьютером» (см. скрин ниже, на нем всем показано).
Примечание: альтернативный способ — нажать сочетание кнопок Win+R, и ввести команду compmgmt.msc в окно выполнить.
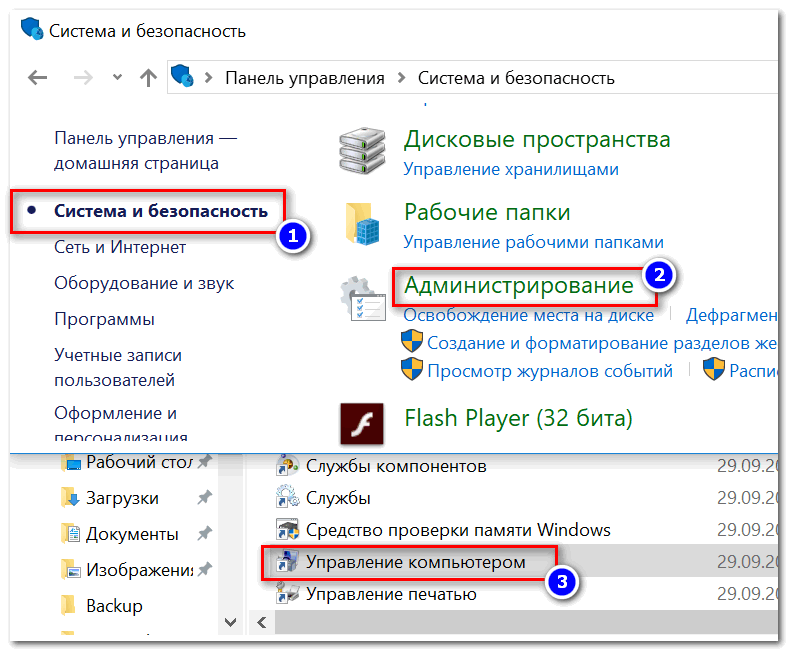
Открываем управление компьютером
Далее в управление компьютером откройте вкладку: «Планировщик заданий -> Библиотека планировщика заданий -> Microsoft -> Windows -> Windows Defender» (см. скрин ниже, обозначение 1 и 2).
Далее на всех четырех задачах в этой вкладке нажмите поочередно «Завершить», а затем «Отключить» (обозначение 3 и 4 на скрине ниже).
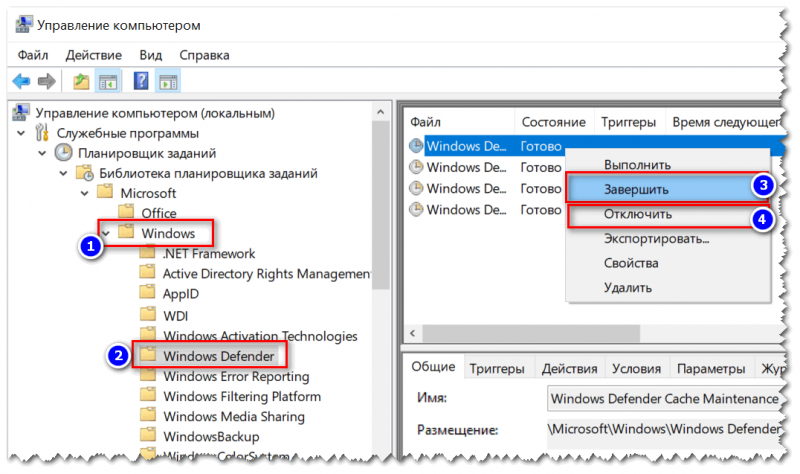
Управление компьютером — отключаем проверку
Таким образом у вас все задачи должны быть отключены (как в примере ниже).
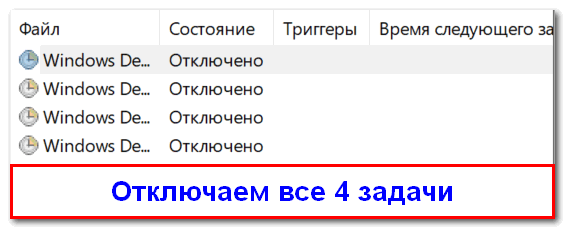
Отключаем все 4 задачи
*
📌 Способ №2
Необходимо сначала открыть редактор групповых политик. Для этого необходимо:
- зажать сочетание кнопок Win+R;
- ввести команду gpedit.msc в строку «Открыть». Пример представлен ниже.
Примечание: редактор групповых политик можно открыть не во всех версиях Windows. Если у вас не получается это сделать — прочитайте эту заметку, там я показал разные способы его запуска.
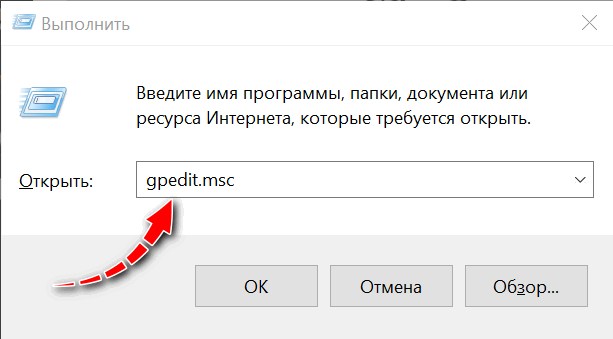
gpedit.msc — запускаем редактор групповых политик
В редакторе групповой политики откройте раздел: «Локальный компьютер -> Конфигурация компьютера -> Административные шаблоны -> Компоненты Windows -> Антивирусная программа «Защитник Windows».
Далее откройте параметр «Выключить антивирусную программу защитник Windows» и включите этот параметр.
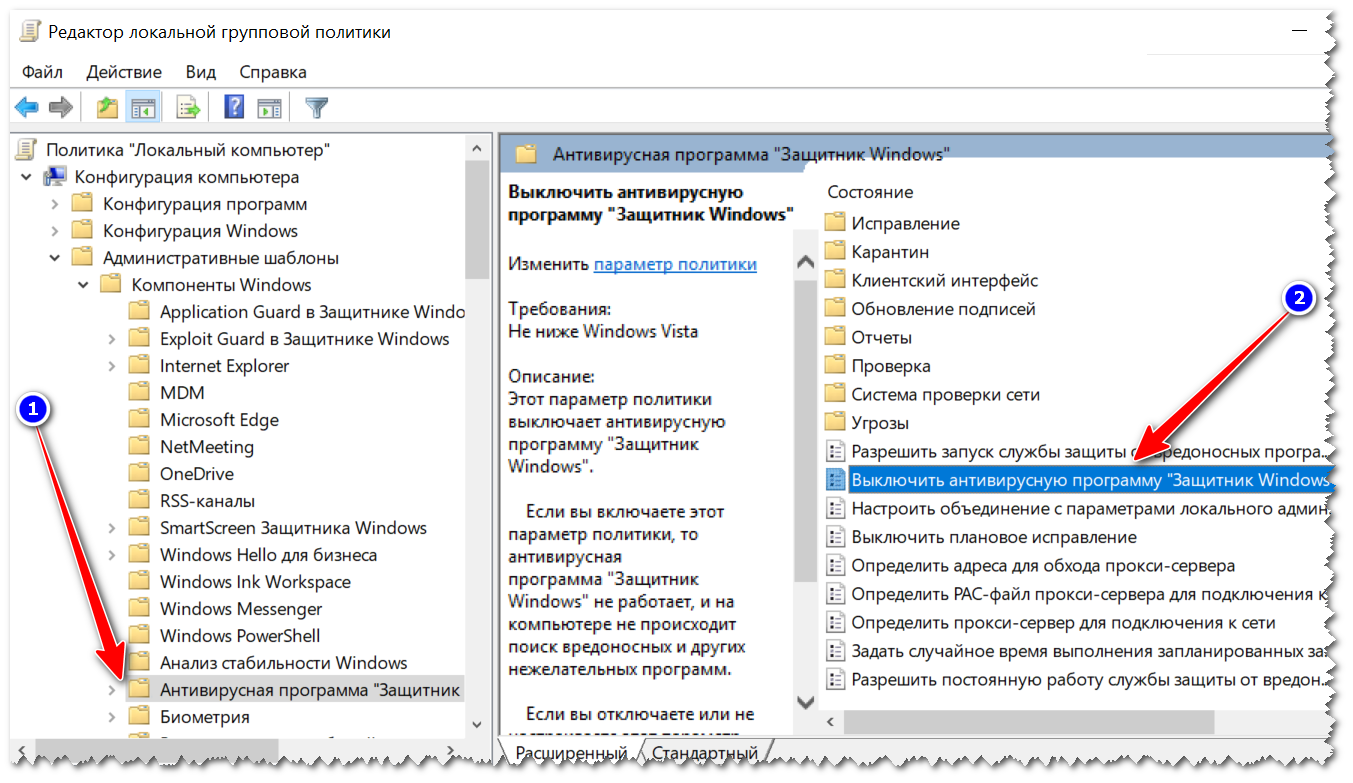
Отключаем защитника
Всё, теперь защитник должен быть выключен!
*
PS
Первое
Также рекомендую вам ознакомиться с еще одной похожей статьей про полное отключение защитника в Windows 11/10 (в 8 — аналогично) — https://ocomp.info/otklyuchit-zashhitnik-windows-10.html. Там предложено несколько способов его отключения: через панель управления, через реестре, и редактор групповой политики (пригодится всем, кому предложенные выше два способа не подошли).
Второе
После отключения защитника Windows (или его отдельных функций), я рекомендую установить какой-нибудь классический антивирус для защиты от вредоносного ПО. 👉 Рекомендую мою подборку —>
*
Дополнения и вопросы — можно оставить ниже, в комментариях.
Всего доброго!
👍
Первая публикация: 19.04.2018
Корректировка заметки: 3.11.2022
If you’re noticing that your computer is running slower than usual, and you do not know the reasons for this sluggish performance, then this article will give you the answers to this slow performance of your Windows computers.
If you’ve heard about the antimalware service executable in Windows then might be this service hogging your CPU or disk resources, which causes performance degradation. Basically, this component of Windows Defender is designed to offer real-time protection against threats, but it can sometimes consume more system resources than expected.
In this blog post, we’ll dive into why the Antimalware Service Executable can lead to high CPU and disk usage and provide you with step-by-step solutions on how to stop Antimalware Service Executable from high CPU Disk usage.
What is Antimalware Service Executable
The Antimalware Service Executable, also known as «msmpeng.exe", is a background process run by Windows Defender, which is now known as Microsoft Defender Antivirus in newer versions of Windows. This service is responsible for scanning files for malware when accessing them, performing background system scans to check for dangerous software and malware threats, and implementing real-time protection. It ensures that threats are identified and dealt with swiftly.
However, this service can sometimes use a large amount of CPU and disk resources, which might affect the overall performance of your computer. This is typically noticed during full system scans or when updates are being installed.
Why Does Antimalware Service Executable Use So Much CPU and Disk?
There are many reasons that this process can cause high CPU & Disk Usage and for better understanding reasons are mentioned below:-
- Full System Scan: When Windows Defender performs a system scan, it can use up a lot of resources.
- Frequent Updates: Windows Defender constantly checks for updates, which might cause brief spikes in CPU usage.
- Corrupted Files: If there are corrupted system files, the process may get stuck, consuming excessive resources.
Should You Disable the Antimalware Service Executable?
Deciding whether to disable the Antimalware Service Executable (MsMpEng.exe) is an important consideration that depends largely on your specific circumstances and the security measures you have in place. Here are some points to consider:
- Security Risk: Disabling it reduces your system’s defenses unless you have another robust antivirus.
- Alternative Antivirus: If another antivirus is installed, Windows Defender should turn off automatically.
- Performance Concerns: If the service is significantly slowing down your PC, consider disabling it temporarily during high-demand tasks.
- Caution: Generally, keep it enabled for continuous protection unless you’re sure of your alternative security measures.
Recommendation: Generally, it’s advisable not to disable core security features unless absolutely necessary, especially if no alternative security measures are in place. Regularly update your system and security software to minimize performance issues related to security scans and updates.
How to Stop Antimalware Service Executable — 3 Methods
In this article, we’ll explore three methods to stop or manage the Antimalware Service Executable process. Additionally, we’ll explain six more effective ways to fix this issue without compromising your device’s security. Whether you’re looking to temporarily stop the process or adjust settings to optimize your computer’s performance, we’ve got you covered.
Method 1. Disable Windows Defender Antivirus (Not Recommended for Users)
Disabling Windows Defender Antivirus will completely stop Antimalware Service Executable from running. However, doing so can make your computer more vulnerable to malware. It’s generally not recommended unless you have a third-party antivirus solution in place.
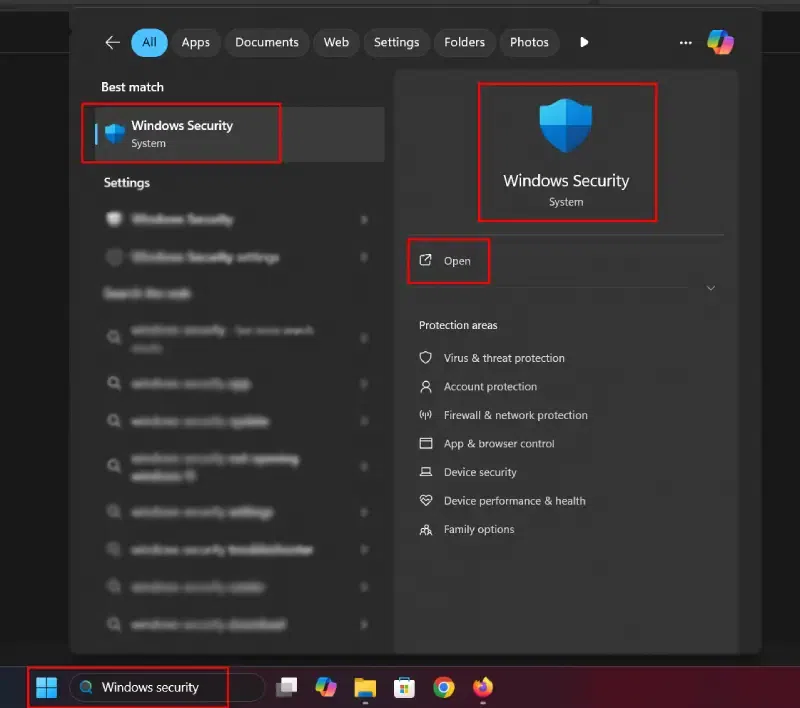
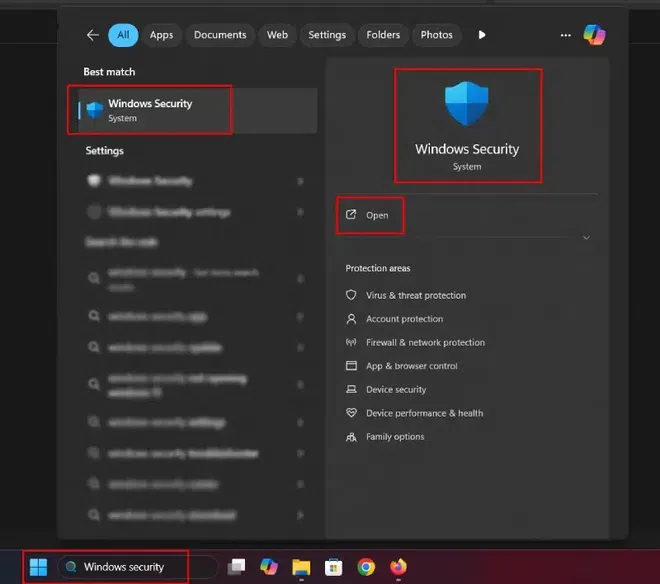
Step 1: Open Windows Security
- Press Start and type Windows Security, then click on it.
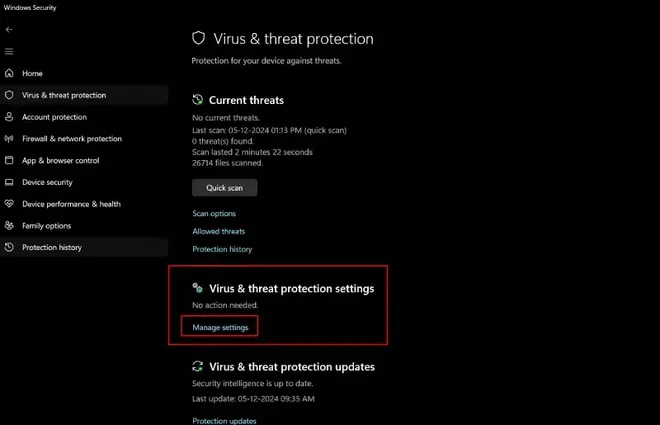
Step 2: Go to Virus & Threat Protection Settings > Manage Settings
- Click Virus & Threat Protection, then scroll down to Virus & Threat Protection Settings and click Manage Settings.
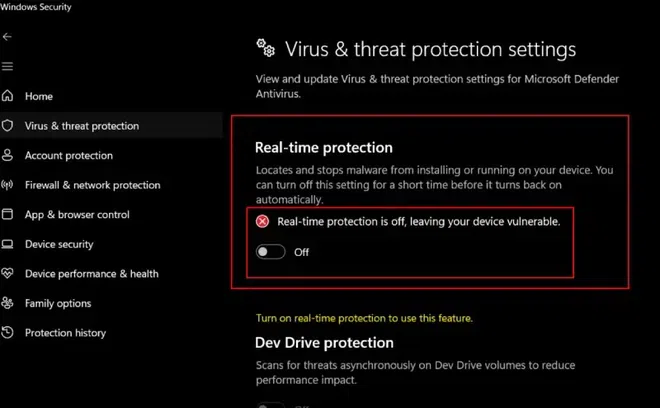
Step 3: Turn Off Real-Time Protection
- Windows will turn Real-Time Protection back on after a short period to keep your computer secure.
- Under Real-Time Protection, toggle the switch to Off. This will stop the Antimalware Service Executable process temporarily.
Note: When you’ll turning off the Real-Time protection an administration dialogue box will appear saying would you like to make the changes in your settings, click yes on it to turn real time protection off.
Step 4: Disable Windows Defender Permanently (Advanced)
- If you want to stop Antimalware Service Executable permanently, you’ll need to disable Windows Defender via the Group Policy Editor or Registry Editor.
Option 1: For Group Policy Editor
Step 1: Press Windows + R, type gpedit.msc, and press Enter.
Step 2: Navigate to Computer Configuration > Administrative Templates > Windows Components > Microsoft Defender Antivirus.
Step 3: Double-click Turn off Microsoft Defender Antivirus, select Enabled, and click Apply.
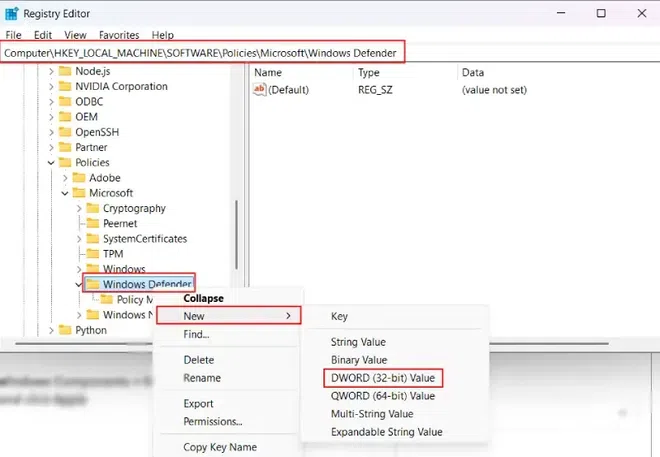
Option 2: For Registry Editor
Step 1: Press Windows + R, type regedit, and press Enter.
Note: When you’ll pressing Enter, an administration dialogue box will appear saying would you like to make the changes in your settings, click yes on it to turn real time protection off.
Step 2: Navigate to (HKEY_LOCAL_MACHINE\SOFTWARE\Policies\Microsoft\Windows Defender)
Step 3: Right-click on the Window Defender, select New > DWORD (32-bit) Value, and name it DisableAntiSpyware.
Step 4: Set the value to 1 to disable Windows Defender permanently.
Warning: Disabling Windows Defender entirely makes your system vulnerable, so it’s crucial to install and enable a third-party antivirus software before doing so.
Method 2. Disable Windows Defender Service (More Advanced)
If you want to stop Antimalware Service Executable but prefer not to disable Windows Defender entirely, you can stop the Windows Defender service via Services. This will prevent the service from running in the background, which in turn stops the process.
Step 1: Open Services
- Press Windows + R, type services.msc, and press Enter.
Step 2: Find Windows Defender Antivirus Service
- In the «Services» window, find and double-click on «Security Center» (or «Windows Defender Security Center» in newer versions).
Step 3: Stop the Service or Set the Service to Disabled
- In the «Properties» window, set the «Startup type» to «Disabled,» then click «Apply» and «OK.«
- Restart your computer to apply the changes.
Note: This method may be temporarily effective, but Windows Defender will often restart itself after a system reboot. You might need to repeat this process or combine it with other methods.
Method 3. Adjust Windows Defender’s Scheduled Scan Time
If you don’t want to completely disable Antimalware Service Executable, but you find its impact on your system during certain times annoying (such as during work or gaming hours), you can adjust the scheduled scan time. This prevents Antimalware Service Executable from running scans during specific periods, which can reduce its performance impact.
Step 1: Open Task Scheduler
- Press Windows + R, type taskschd.msc, and press Enter to open the Task Scheduler.
Step 2: Navigate to Windows Defender’s Tasks
- In the left-hand panel, expand the Task Scheduler Library.
- Navigate to:
Microsoft > Windows > Windows Defender
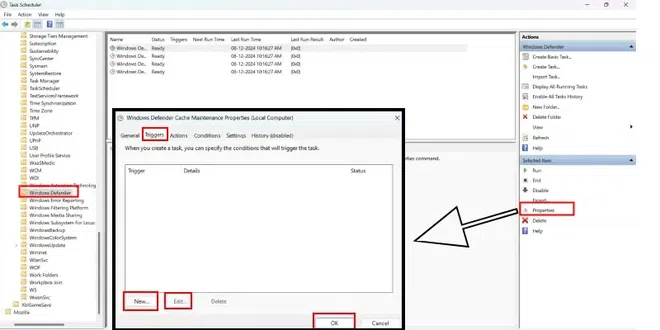
Step 3: Modify the Task for Windows Defender
- You will see several tasks related to Windows Defender. Right-click on Windows Defender and select Properties.
Step 4: Change the Trigger
- Go to the Triggers tab and click Edit.
- You can change the scheduled time for the scan to a time when you’re less likely to be using the computer, or disable the task entirely by unchecking the Enabled box.
Step 5: Save Changes
- Click OK to save the changes. If you’ve disabled the task, Antimalware Service Executable will not perform scheduled scans.
How to Minimize the High CPU and Disk Usage from Antimalware Service Executable
Antimalware Service Executable is a key component of Windows Defender, the built-in antivirus tool designed to protect your system from malware and other security threats. However, under certain circumstances, it can consume a significant amount of system resources, leading to slower performance and longer load times. The good news is that you don’t have to disable your antivirus protection to resolve this issue. This process is the same for both Windows 10 and Windows 11, and there are several steps you can take to reduce the CPU and disk usage without compromising your system’s security.
1. Add Exclusions for High-Usage Files or Folders
One of the simplest ways to reduce high CPU and disk usage caused by the Antimalware Service Executable is to add exclusions. By excluding files or folders from being scanned, you can reduce the scanning load and minimize resource usage. To do this follow the given below steps:-
Step 1: Open Windows Security
- To begin, open the Start menu and typing Windows Security in the search box. Then, click on the Windows Security app from the search results.
Step 2: Navigate to Virus & Threat Protection Settings
- Once Windows Security is open, click on Virus & Threat Protection.
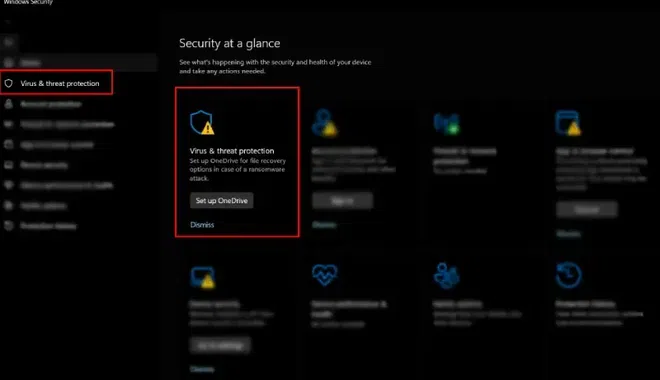
Step 3: Virus & Threat Protection > Manage Settings
- Then you’ll see Virus & Threat Protection settings under that there will be Manage Settings click on it.
Step 4: Manage Settings > Add Exclusions
- Scroll down until you see the Exclusions section. Click on Add or Remove Exclusions. Now, you can add files, folders, or even file types that you want Windows Defender to skip while scanning. This helps reduce the workload on the CPU by not scanning certain files or folders repeatedly.
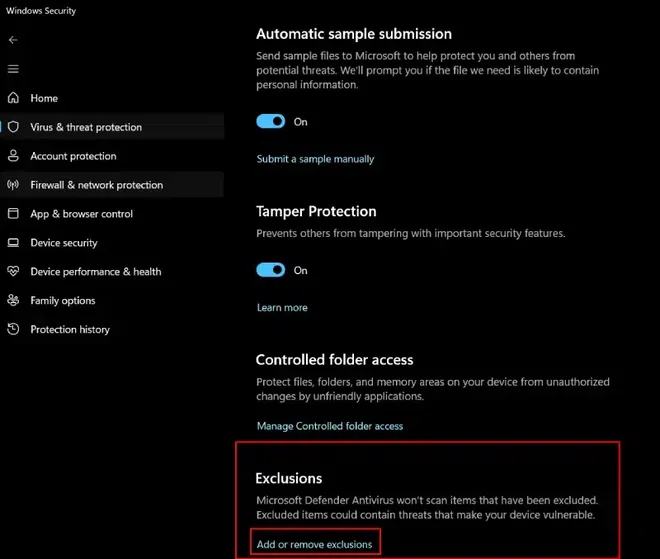
Note: When you’ll clicking on Add or Remove Exclusion an administration dialogue box will appear saying would you like to make the changes in your settings, click yes on it to turn real time protection off.
Step 5: Select File or Folder to Add or Remove Exclusion
- Add this MsMpEng.exe file in the exclusion (or the relevant path to MsMpEng.exe on your system).
Important Note: Excluding MsMpEng.exe may expose your system to risks, so it’s recommended to exclude it only for temporary troubleshooting purposes and to re-enable protection as soon as possible. Be cautious when excluding files. Only exclude those that you are sure are safe to prevent any security risks.
2. Adjust Windows Defender Scan Schedule
Scheduling Windows Defender to perform scans at times when you’re not using the computer can significantly reduce CPU usage. By adjusting the scan schedule, you can ensure the antivirus software doesn’t run during peak usage hours.
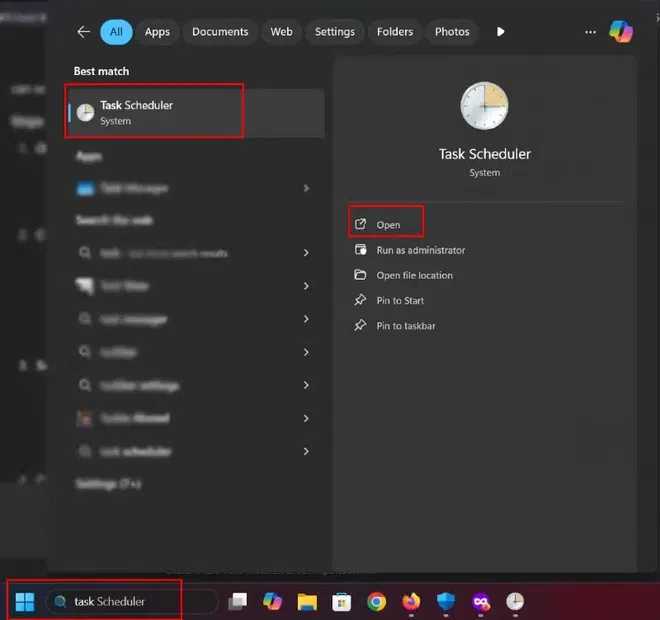
Step 1: Open Task Scheduler
- Press Windows Key + S, type Task Scheduler, and press Enter.
- This opens the Task Scheduler application.
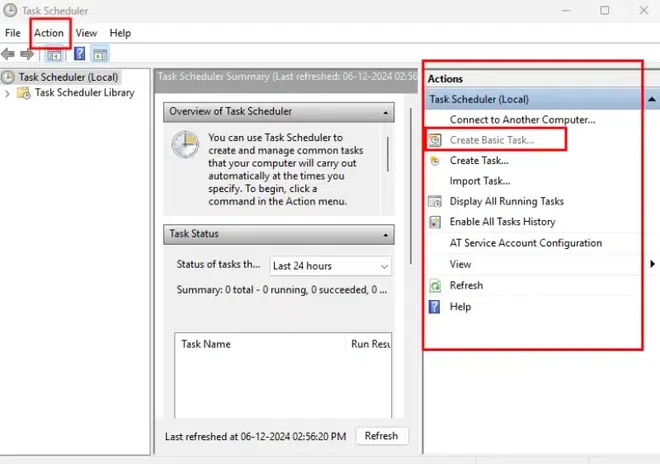
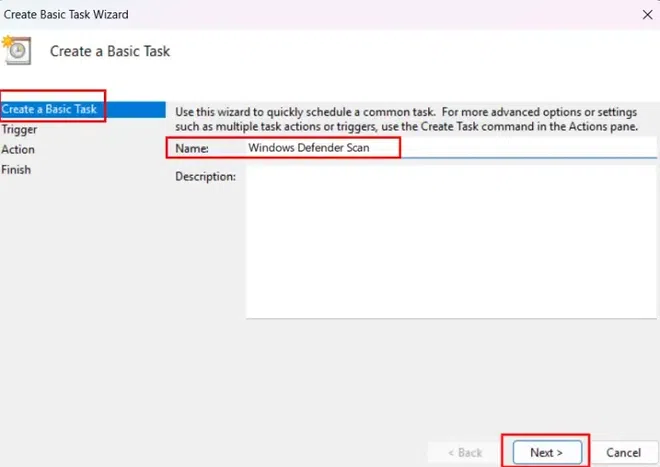
Step 2: Create a Basic Task
- In the Task Scheduler window, click on Action in the top menu, then choose Create Basic Task.
Step 3: Enter a name for the task
- Enter a name for the task (e.g., «Windows Defender Scan») and an optional description, then click Next.
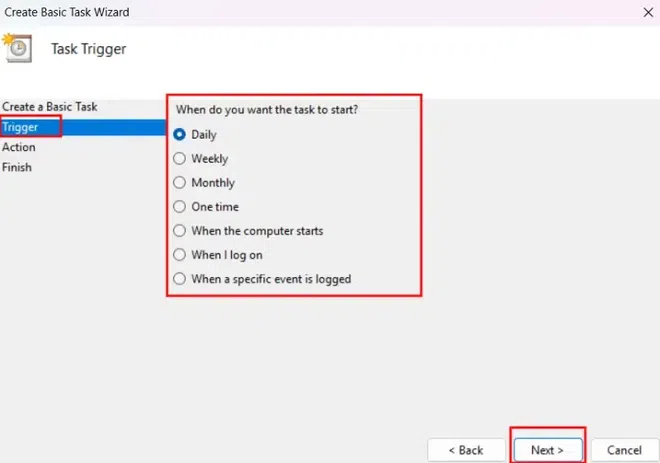
Step 4: Set the Trigger
- Choose Daily, Weekly, or Monthly based on when you want the scan to run. Click Next.
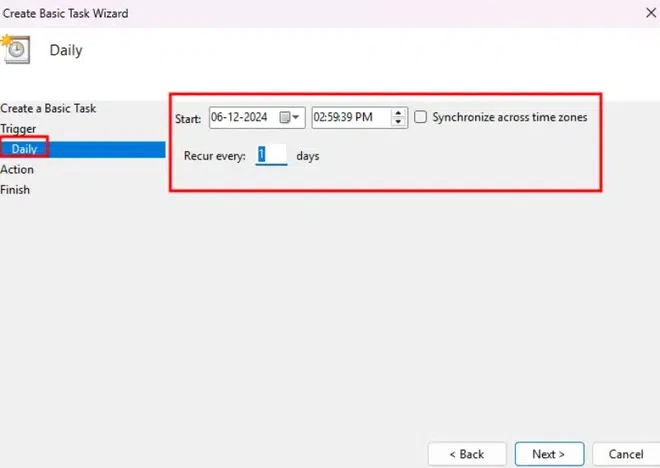
Step 5: Set the start date and time for the scan
- Set the start date and time for the scan. Also, how many times you want this to recur every days.
Step 6: Choose the Action
- Select Start a Program and click Next.
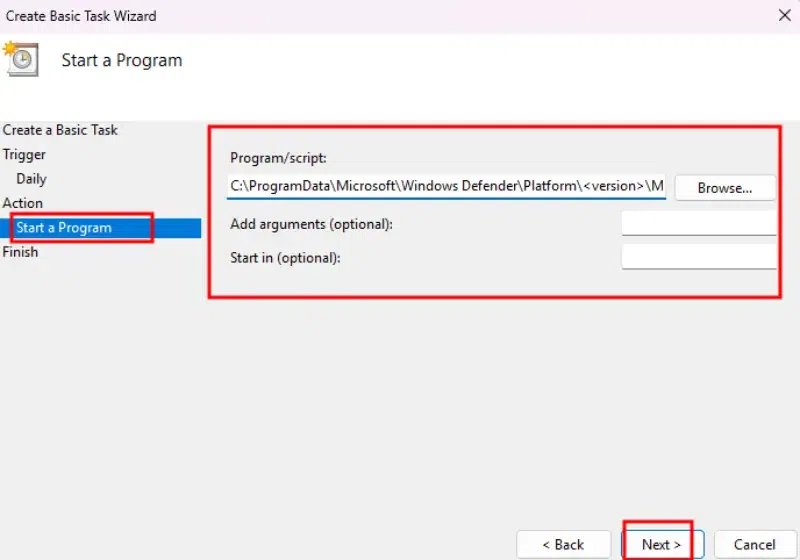
Step 7: Set the Program to Run
- Click Browse and go to the following path
C:\ProgramData\Microsoft\Windows Defender\Platform\<version>\MpCmdRun.exe
Note: Replace
<version>with the appropriate version number of the folder you have
- After selecting MpCmdRun.exe, click Open.
Step 8: Add Arguments for the Scan
- In the Add arguments (optional) field, enter the following arguments based on the type of scan you want:
- For a Quick Scan:
-scan -quick - For a Full Scan:
-scan -full - For a Custom Scan:
-scan -custom
- For a Quick Scan:
- Finish the Setup:
- Click Next, review your task settings, and click Finish.
Task Scheduler Configuration Example:-
- The task will now run at the scheduled time (e.g., daily or weekly) with the specified scan type.
Additional Tips
- Windows Update Scans: Windows Defender usually updates automatically with Windows Update. You can manually check for updates under Settings > Privacy & Security > Windows Security > Virus & Threat Protection > Check for Updates.
- Using PowerShell: You can also run a scan using PowerShell, but scheduling it through Task Scheduler is the most straightforward method.
3. Update Windows and Windows Defender
An outdated version of Windows Defender or the Windows operating system can sometimes cause performance issues. Keeping both up-to-date ensures that you are using the latest versions, which often include bug fixes and optimizations that improve performance.
Step 1: Open Settings and Check for Updates
- Click on the Start menu and select Settings. Navigate to Update & Security and click on Check for Updates. If there are any available updates, make sure to install them.
Step 2: Update Windows Defender
- To update Windows Defender specifically, go to Virus & Threat Protection in Windows Security and click Check for Updates under the Virus & Threat Protection Updates section.
- By keeping both Windows and Windows Defender up-to-date, you’ll prevent potential bugs that might cause the service to consume unnecessary system resources.
4. End Task the Antimalware Service Executable Process Using Task Manager
If you’re looking for a quick fix, ending the Antimalware Service Executable process from the Task Manager can temporarily stop it from consuming too much CPU. Keep in mind that this is only a temporary solution and the process will restart the next time you boot your system.
Step 1: Open Task Manager
- Press Ctrl + Shift + Esc simultaneously to open the Task Manager. Alternatively, right-click the Taskbar and select Task Manager.
Step 2: Locate the Antimalware Service Executable Process
- Under the Processes tab, scroll down and look for Antimalware Service Executable under the Background Processes section.
Step 3: End Task
- Right-click the Antimalware Service Executable process and select End Task.
Note: This will immediately stop the process from running, temporarily freeing up your system resources. Remember that it will restart once the system reboots.

5. Perform a Clean Boot
A clean boot starts Windows with only the essential system services and drivers, helping you troubleshoot the cause of the high CPU usage. By disabling non-essential services, you can identify if a third-party software or service is causing the issue.
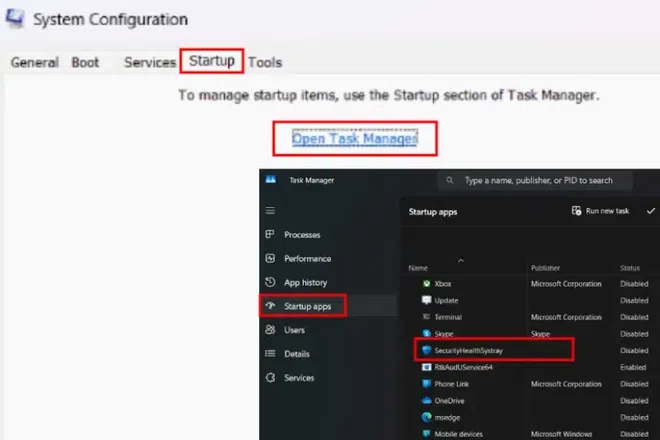
Step 1: Open System Configuration
- Press Windows + R, type
msconfigin the Run dialog, and press Enter. This will open the System Configuration window.
Step 2: Disable Non-Microsoft Services
- Go to the Services tab and check Hide all Microsoft services. Then click Disable All. This ensures that only essential services are running, preventing other services from using up CPU resources.

Step 3: Disable Startup Programs
- Next, click the Startup tab and select Open Task Manager. In the Task Manager, disable all unnecessary startup programs by right-clicking each one and selecting Disable.
Step 4: Restart the Computer
- Once you’ve completed these steps, restart your computer. A clean boot will help identify if a third-party program is causing the high CPU usage.
6. Check for Malware
Sometimes, malware can disguise itself as Antimalware Service Executable, consuming excessive CPU and disk resources. Running a full malware scan with Windows Defender or a trusted third-party antivirus can help identify and remove the issue.
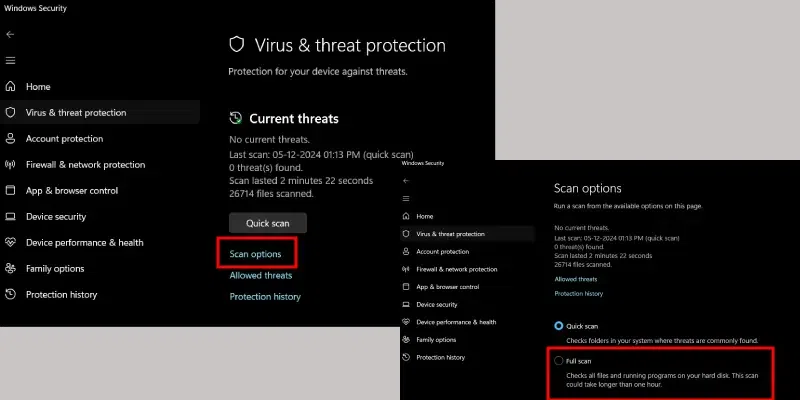
Step 1: Open Windows Security
Open Windows Security by typing it in the Start menu and selecting the app.
Step 2: Run a Full Scan
- Under Virus & Threat Protection. Click on Scan Options and select Full Scan. Then, click Scan Now. A full scan will take longer, but it will thoroughly check your system for malware or any other security threats.
Conclusion
To stop high CPU and disk usage by the Antimalware Service Executable, try updating Windows Defender and scheduling scans during off-peak hours. Adjust real-time protection settings or exclude specific folders to reduce strain. Perform a full system scan to check for malware, and consider adjusting power settings for better performance. If the issue persists, try resetting Windows Defender or using a third-party antivirus. These steps should help reduce resource usage while maintaining effective protection.
Hi
To try to disable the MSE when Windows starts, I created this bat file:
@echo off
taskkill /im msseces.exe /f /t
taskkill /im MsMpEng.exe /f /t
net stop MsMpSvc
sc config "MsMpSvc" start= disabled
Next, I created a scheduled task
<?xml version="1.0" encoding="UTF-16"?>
<Task version="1.3" xmlns="http://schemas.microsoft.com/windows/2004/02/mit/task">
  <RegistrationInfo>
    <Date>2014-10-26T11:08:46.4219135</Date>
    <Author>Pippo\Balubeto</Author>
  </RegistrationInfo>
  <Triggers>
    <BootTrigger>
      <Enabled>true</Enabled>
    </BootTrigger>
  </Triggers>
  <Principals>
    <Principal id="Author">
      <UserId>S-1-5-18</UserId>
      <RunLevel>HighestAvailable</RunLevel>
    </Principal>
  </Principals>
  <Settings>
    <MultipleInstancesPolicy>IgnoreNew</MultipleInstancesPolicy>
    <DisallowStartIfOnBatteries>false</DisallowStartIfOnBatteries>
    <StopIfGoingOnBatteries>true</StopIfGoingOnBatteries>
    <AllowHardTerminate>true</AllowHardTerminate>
    <StartWhenAvailable>false</StartWhenAvailable>
    <RunOnlyIfNetworkAvailable>false</RunOnlyIfNetworkAvailable>
    <IdleSettings>
      <StopOnIdleEnd>true</StopOnIdleEnd>
      <RestartOnIdle>false</RestartOnIdle>
    </IdleSettings>
    <AllowStartOnDemand>true</AllowStartOnDemand>
    <Enabled>true</Enabled>
    <Hidden>false</Hidden>
    <RunOnlyIfIdle>false</RunOnlyIfIdle>
    <DisallowStartOnRemoteAppSession>false</DisallowStartOnRemoteAppSession>
    <UseUnifiedSchedulingEngine>false</UseUnifiedSchedulingEngine>
    <WakeToRun>false</WakeToRun>
    <ExecutionTimeLimit>P3D</ExecutionTimeLimit>
    <Priority>7</Priority>
  </Settings>
  <Actions Context="Author">
    <Exec>
      <Command>D:\Users\Public\Documents\balubeto\MSE_disabled.bat</Command>
    </Exec>
  </Actions>
</Task>
so that it goes running with the System’s rights when the system starts up.
When, however, I rebooted the system, the MSE service is still active. How come?
Where did I do wrong?
Thanks
Bye