
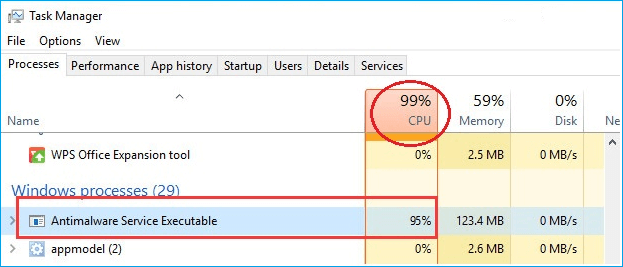
Windows 10 часто преподносит «сюрпризы», которые сильно влияют на производительность слабых компьютеров. Одним из таких сюрпризов может быть процесс Antimalware Service Executable, способный полностью загрузить процессор, оперативную память или жесткий диск.
Почему так происходит и как это исправить – поговорим в сегодняшней статье.
Зачем нужен процесс Antimalware Service Executable
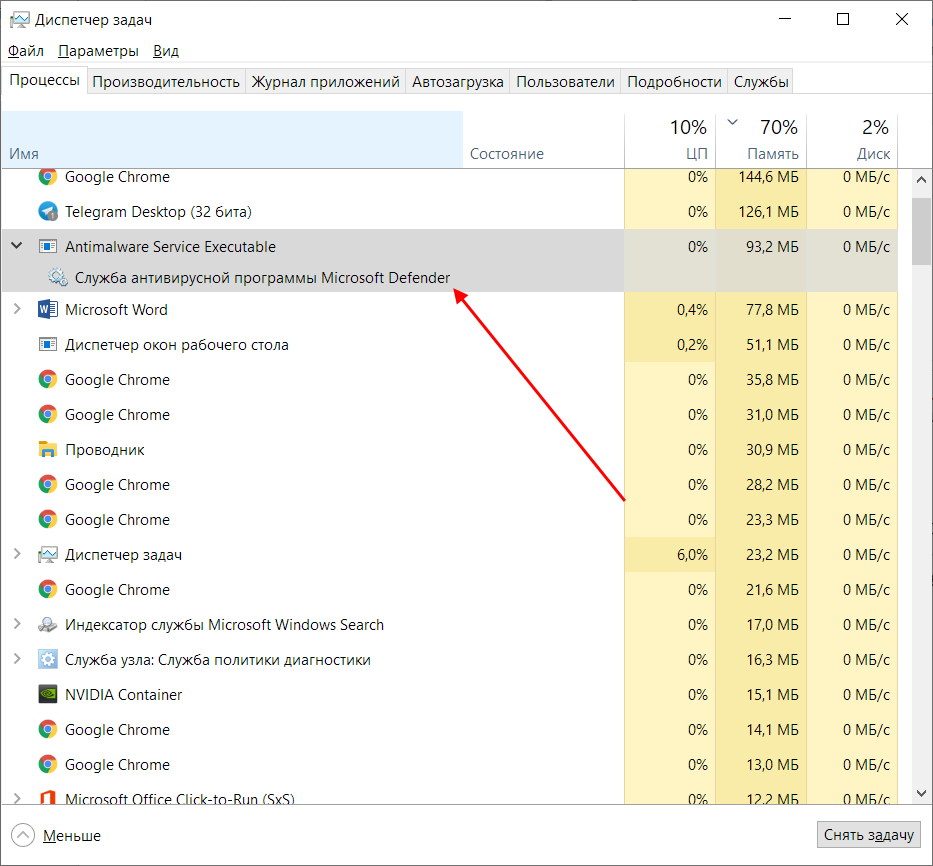
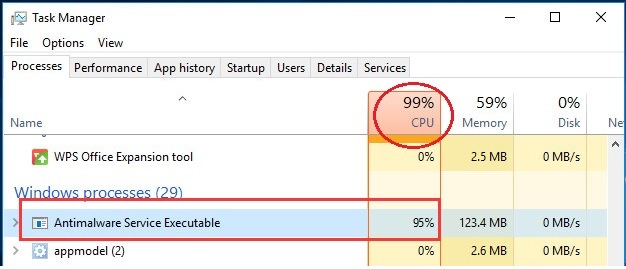
Antimalware Service Executable – задача, предназначенная для защиты операционной системы в реальном времени. Иными словами – это и есть Защитник Windows 10, который был разработан для устранения вирусов и вредоносного ПО. По умолчанию он встроен в систему и использует службу «Антивирусная программа Microsoft Defender». Если вы откроете «Диспетчер задач» (сделать это можно с помощью комбинации клавиш «CTRL+SHIFT+ESC»), то увидите данный процесс.
Когда Защитник проверяет компьютер на наличие угроз, он проводит полную проверку и анализирует все файлы. Такой процесс требует много ресурсов, поэтому многие процессоры часто не справляются с ним, вследствие чего начинают сильно тормозить: компьютер зависает, долго думает и будто отключается.
Почему так происходит, если любое другое антивирусное средство делает все то же самое, что и Защитник Windows? Ответ прост – разработчики не оптимизировали работу утилиты. На мощных компьютерах она никак не повлияет на производительность системы, а на слабых и даже средних машинах процесс может сильно грузить систему.
Если вы заметили высокую нагрузку на процессор или жесткий диск, то не стоит беспокоиться, ведь проблему еще можно исправить. Для начала рекомендую воспользоваться следующими инструкциями.
Комьюнити теперь в Телеграм
Подпишитесь и будьте в курсе последних IT-новостей
Подписаться
Исправляем проблему с Antimalware Service Executable
Существует несколько способов устранения проблемы с Antimalware Service Executable, однако ни один из них не гарантирует, что процесс перестанет грузить систему. Давайте рассмотрим каждый из них и попытаемся сделать все возможное.
Способ 1: Через планировщик заданий
Суть в следующем: по умолчанию Защитник Windows анализирует систему рандомно: нет какого-то определенного времени, когда он начнет сканирование. Вы можете играть, смотреть фильм, заниматься важными делами, но процессу нет до этого никакого дела – он будет работать тогда, когда захочет. Мы же можем задать точное время сканирования, тем самым минимизировав нагрузку на систему в рабочее время. Например, если вы находитесь за компьютером с 9 утра до 6 вечера, то работу Защитника стоит перенести на вечер или раннее утро.
Меняем расписание проверок:
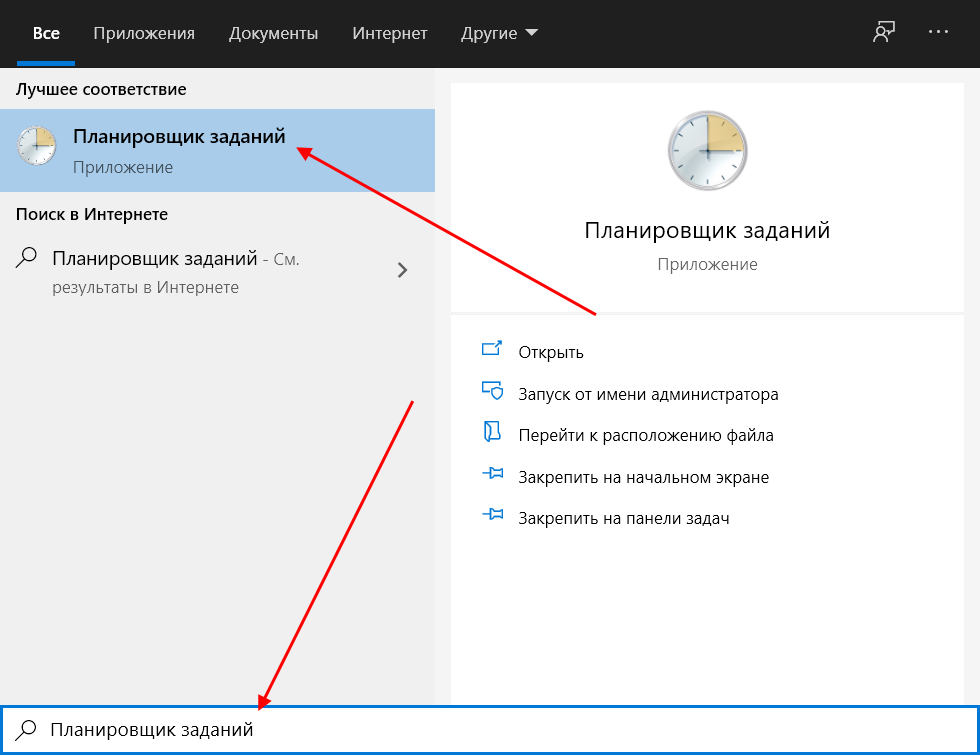
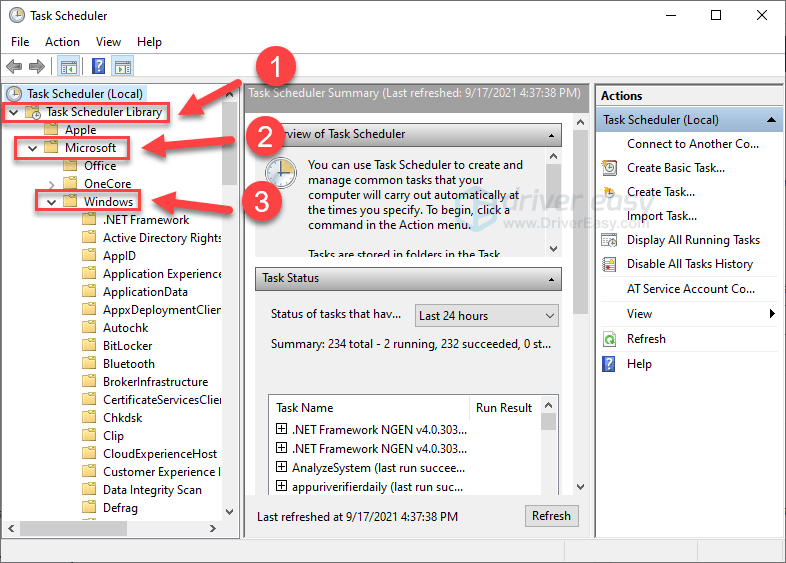
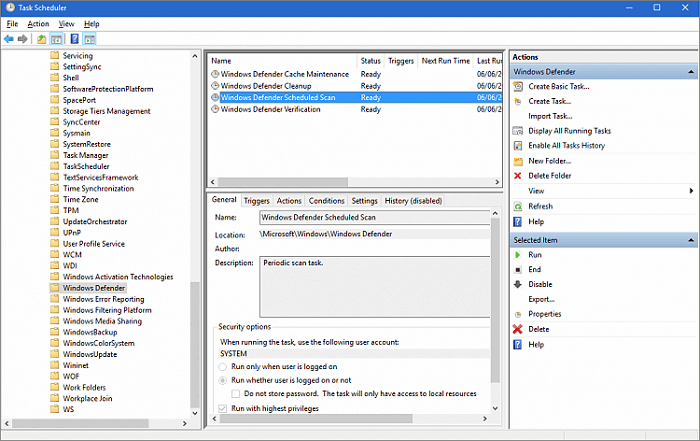
- Открываем меню «Пуск», вводим запрос «Планировщик заданий» и открываем соответствующую утилиту.

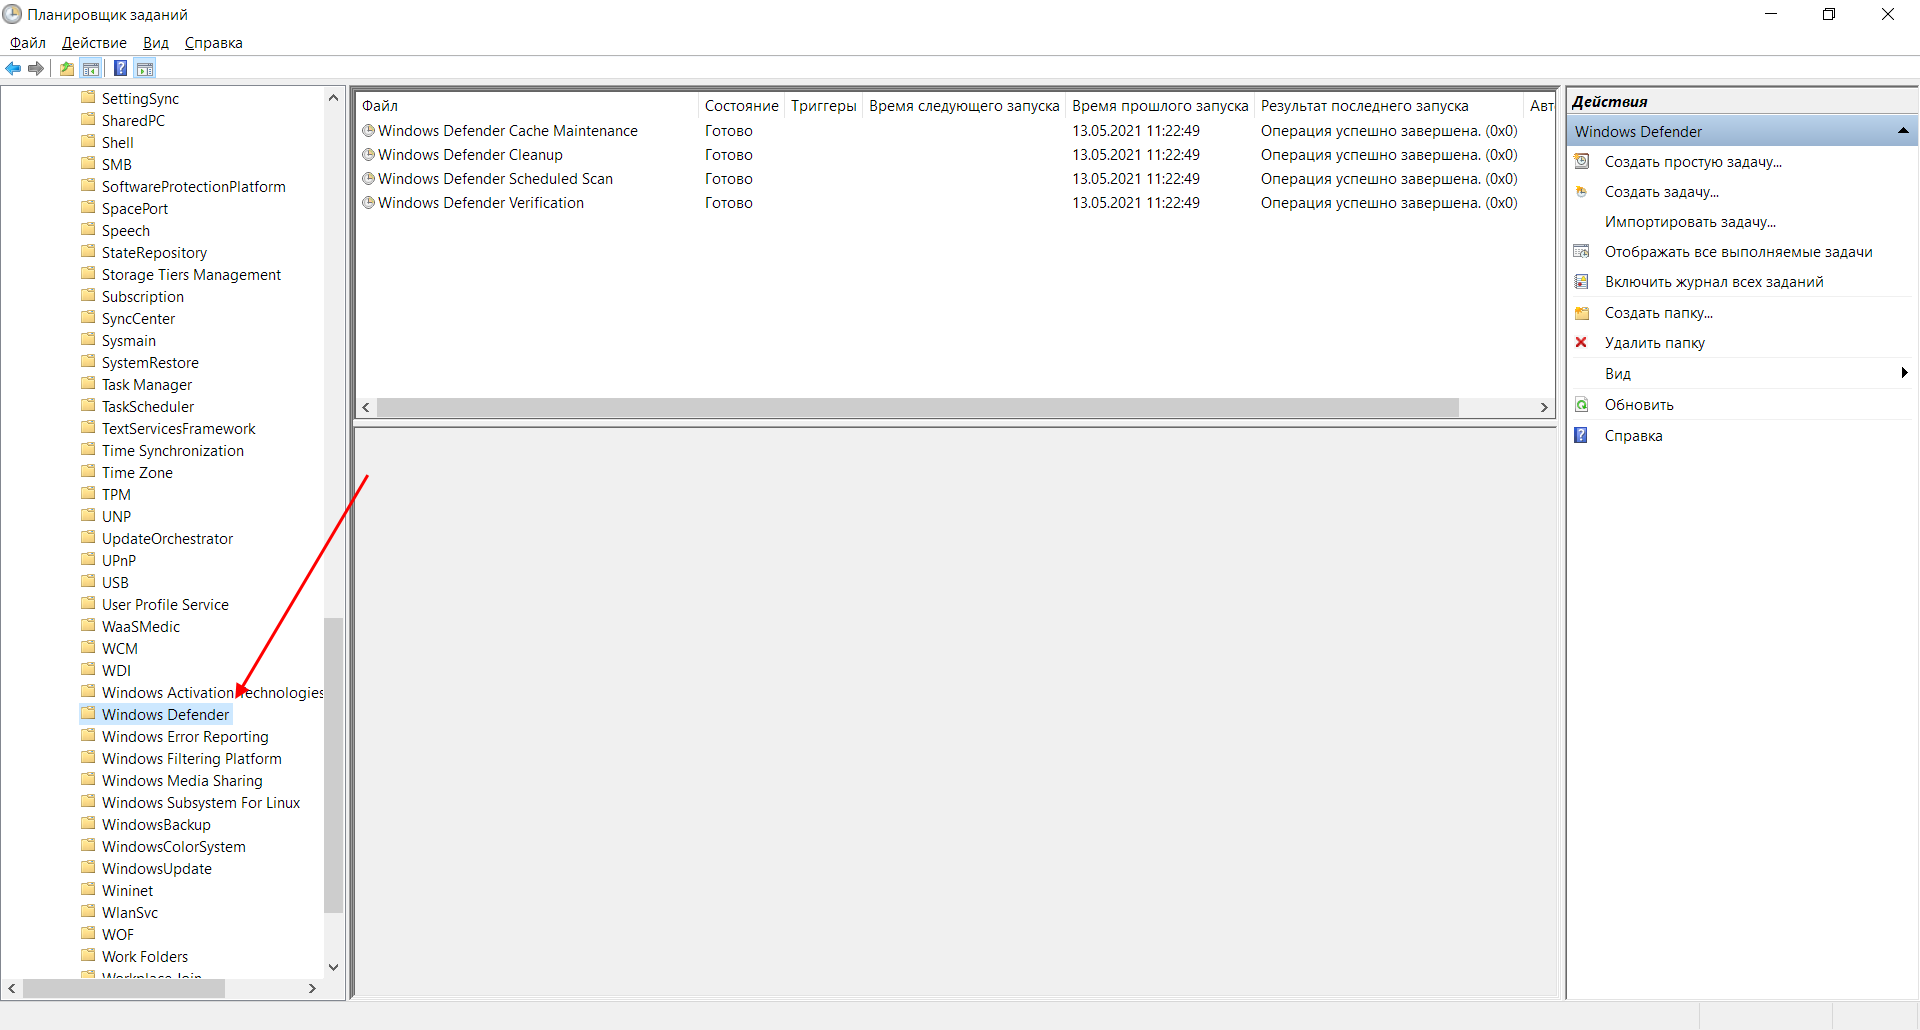
- В отобразившемся окне обращаем внимание на левую часть – там расположены папки различных программ. Нас интересует следующий путь: «Библиотека планировщика заданий» -> «Microsoft» -> «Windows» -> «Windows Defender».
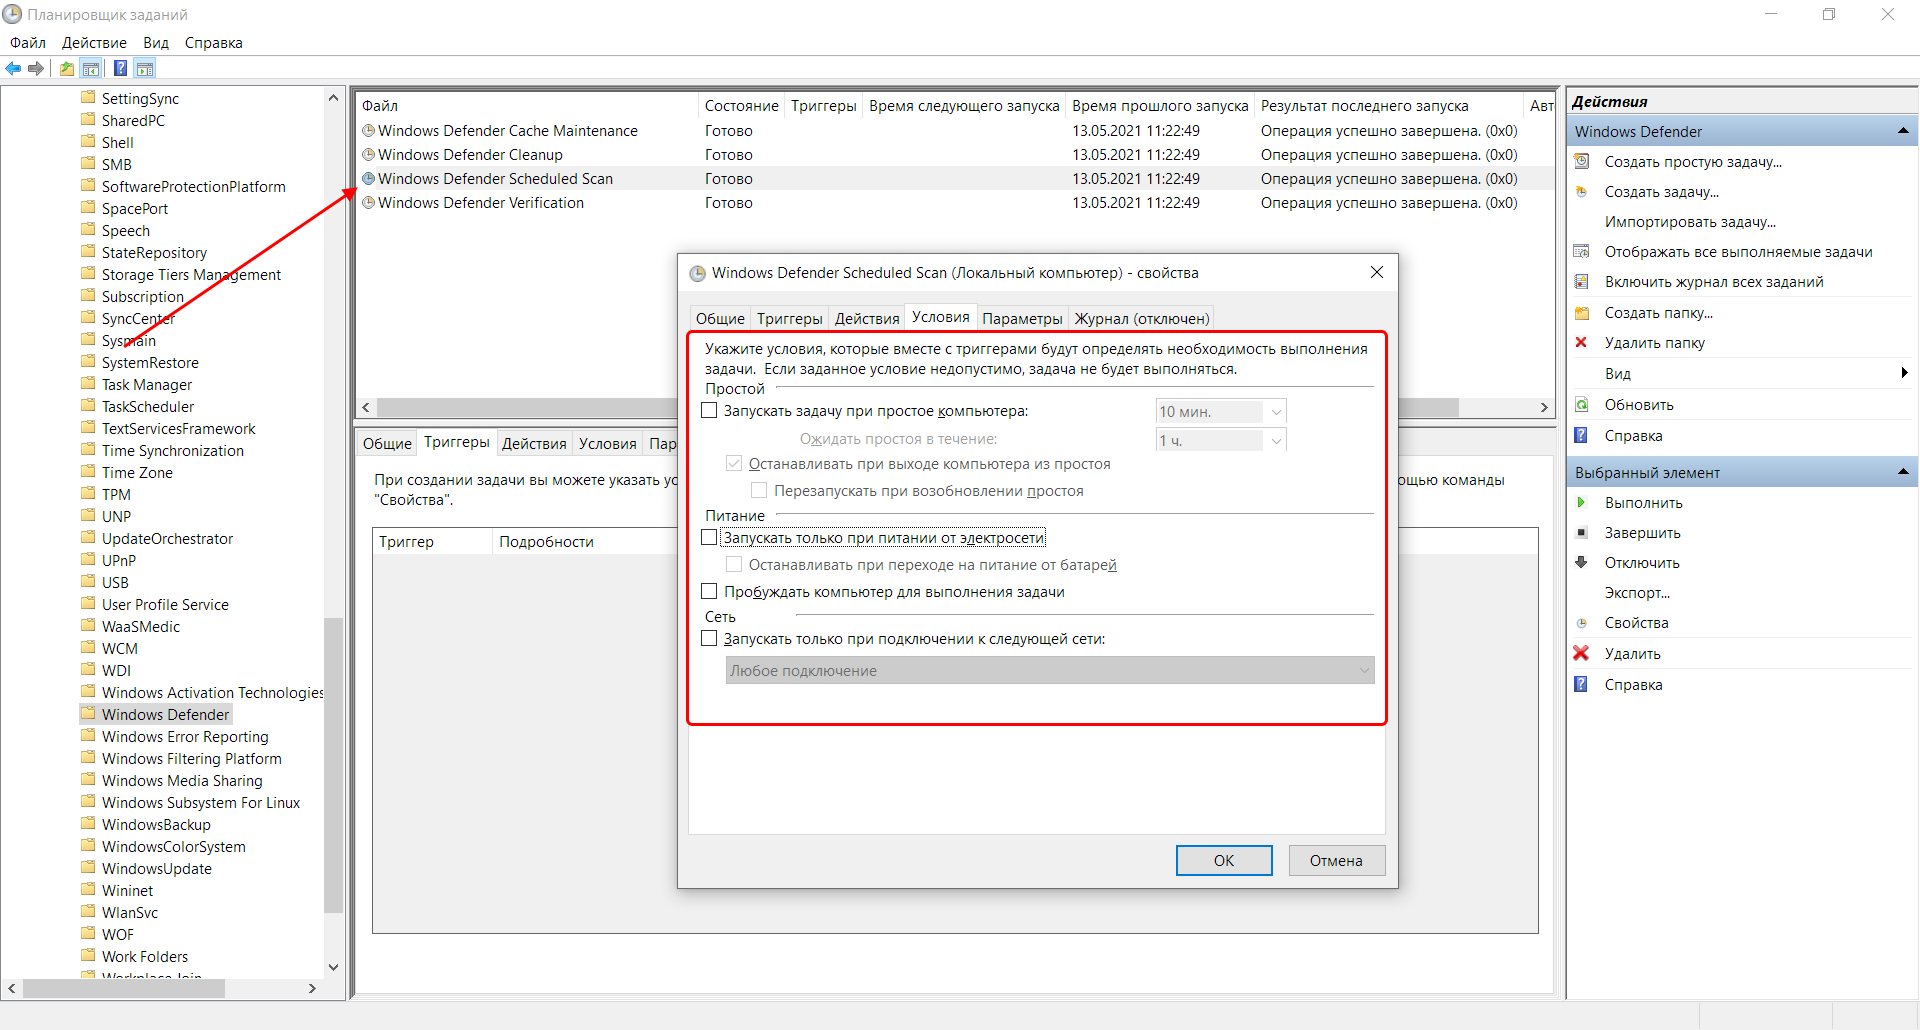
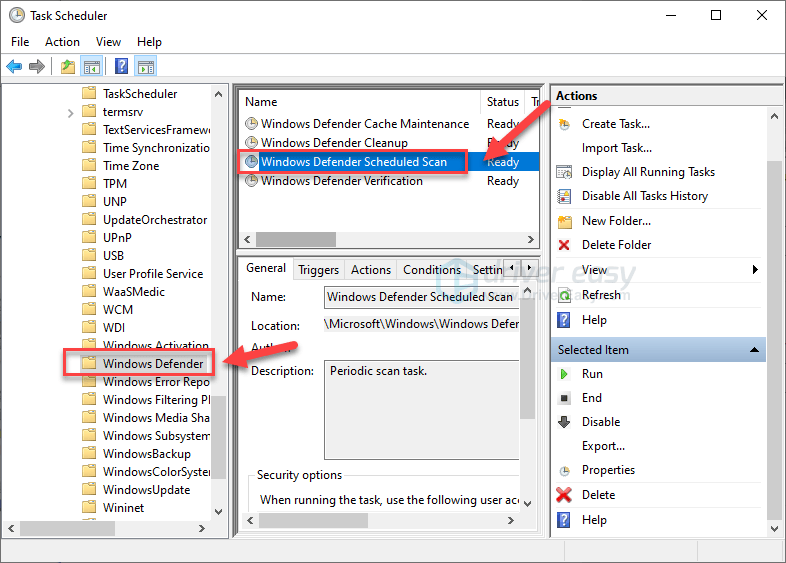
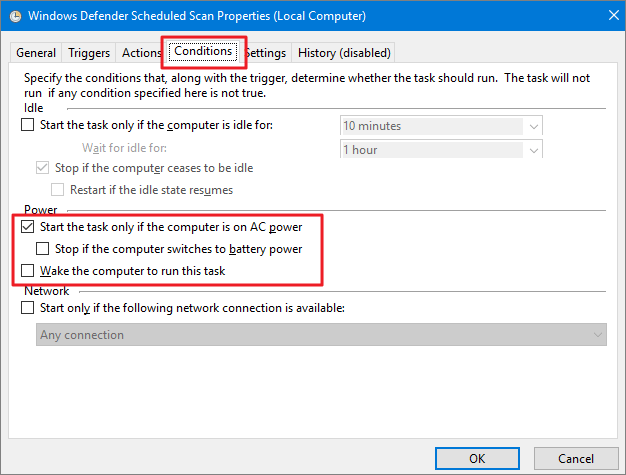
- Здесь находятся различные задачи, исполняемые Защитником. В первую очередь нас интересует Windows Defender Scheduled Scan – кликаем по нему двойным щелчком мыши и переходим в раздел «Условия», отключаем там все доступные опции.
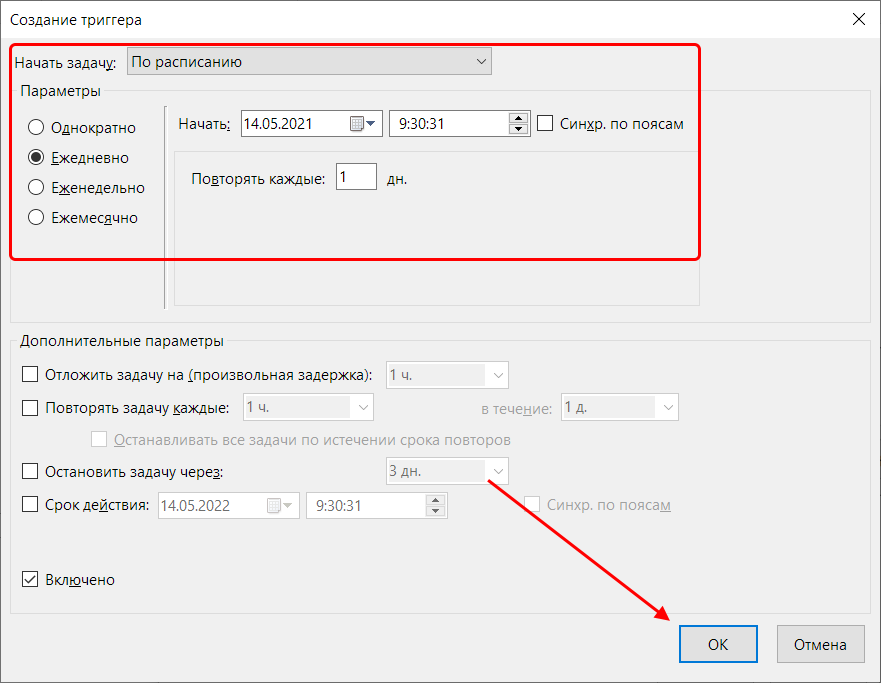
- Теперь нам нужно создать триггер, который будет вызывать задачу в определенное время суток. Для этого переходим в раздел «Триггеры» и нажимаем «Создать…».
- Осталось указать необходимое время запуска и сохранить внесенные изменения.

Подождите закрывать Планировщик Заданий – нужно провести аналогичные настройки и для других задач. Все, что мы сделали, выполните также для Windows Defender Cache Maintenance, Windows Defender Cleanup, Windows Defender Verification.
Способ 2: С помощью списка исключений
Сканирование подразумевает анализ всех файлов, которые есть в системе. В их список входят файлы самого Защитника Windows – именно в этом и кроется проблема. Когда антивирусник сканирует собственные данные, компьютер начинает подтормаживать. Чтобы это исправить, мы можем просто исключить папку Защитника из списка сканируемых файлов. Сделать это можно следующим образом:
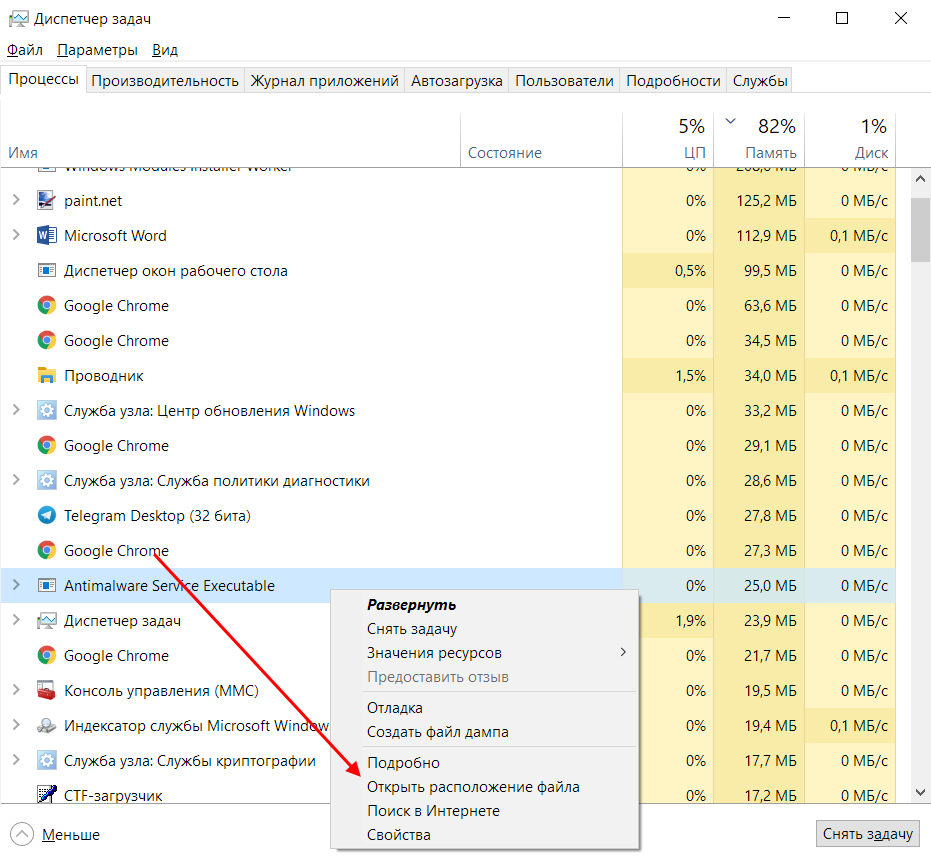
- Для начала узнаем, где хранятся файлы Windows Defender. Для этого кликаем правой кнопкой мыши по панели задач и переходим в «Диспетчер задач» либо используем комбинацию клавиш «CTRL+SHIFT+ESC». Затем находим процесс Antimalware Service Executable, кликаем по нему правой кнопкой и выбираем «Открыть расположение файла».
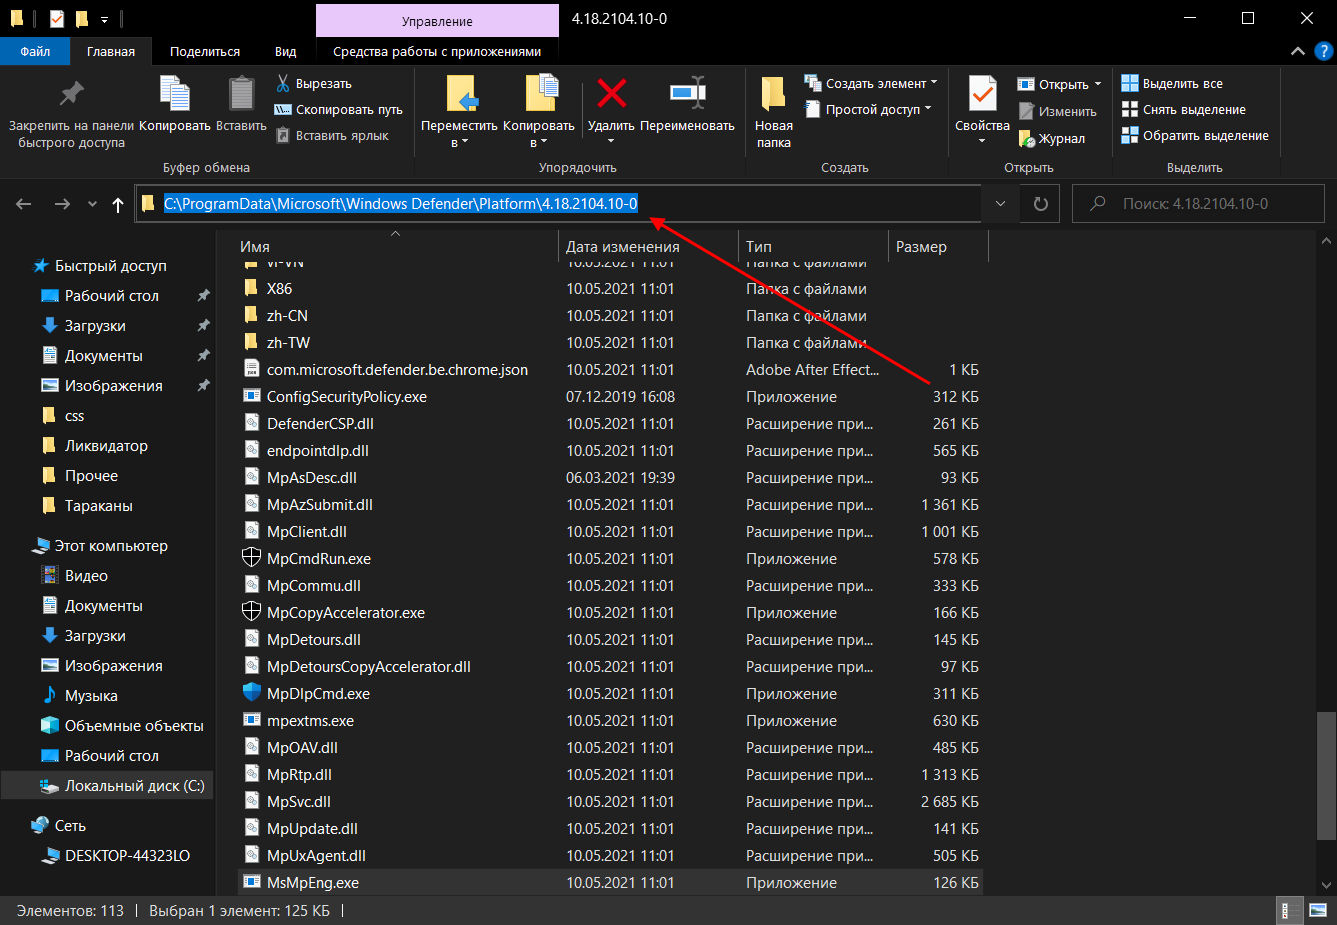
- В результате перед нами отобразится папка с файлом MsMpEng.exe, отвечающим за процесс. Копируем адрес папки через верхнюю строку запроса.
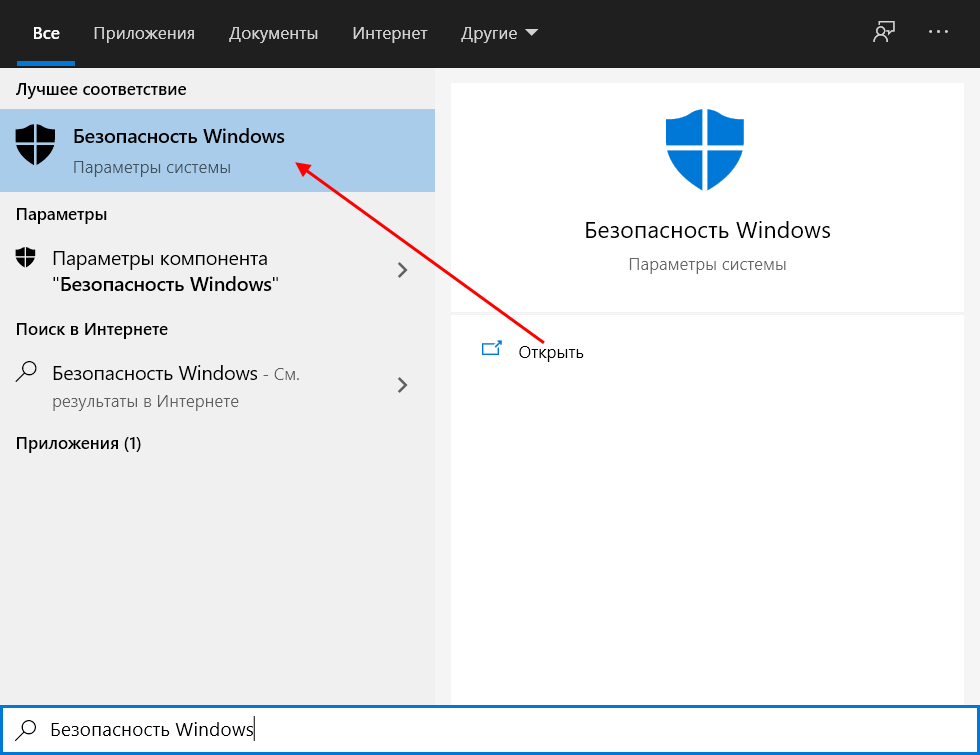
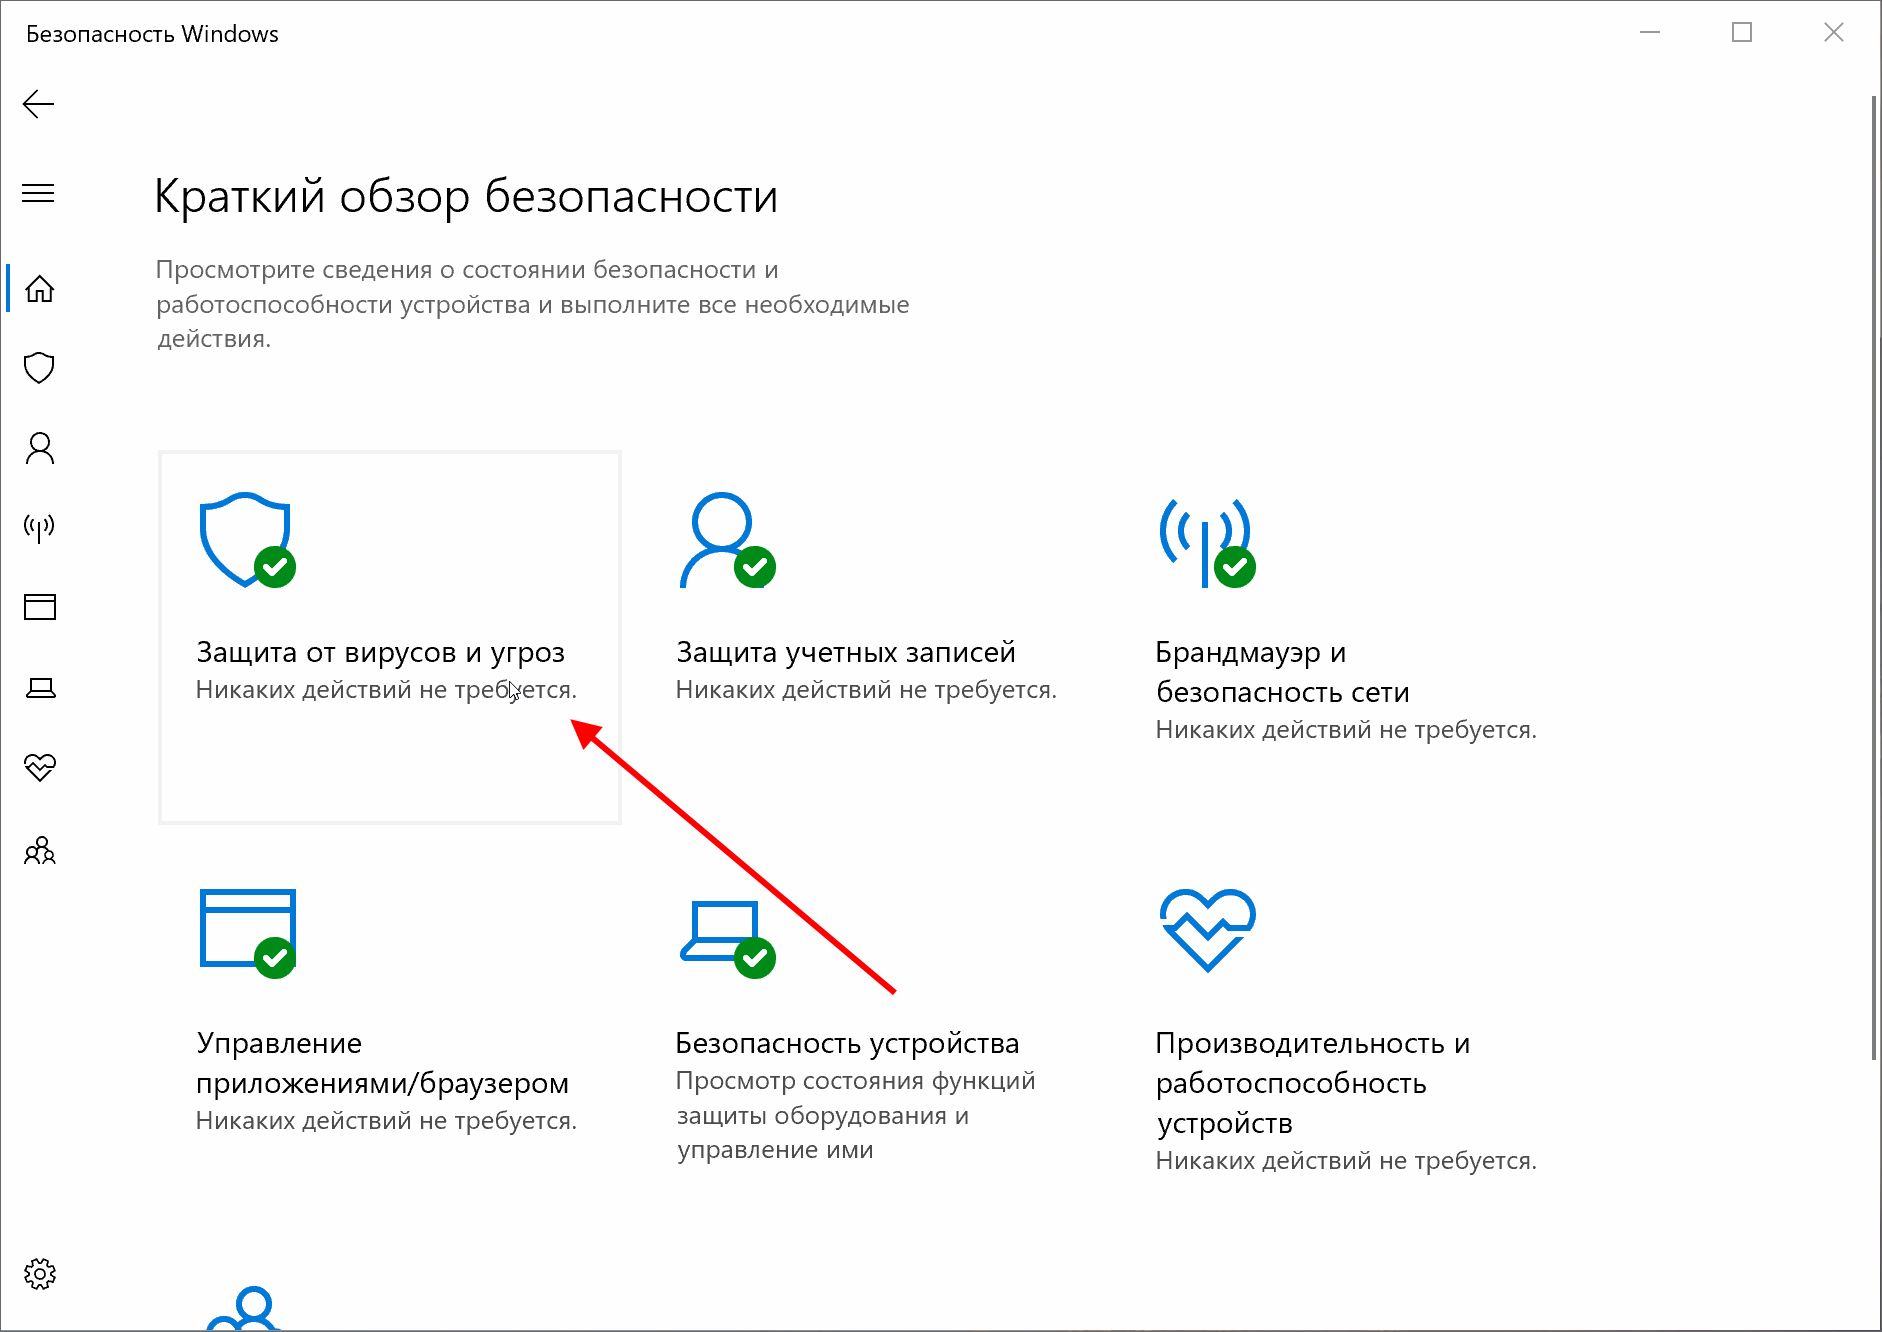
- Переходим в меню «Пуск», вводим запрос «Безопасность Windows» и открываем его.
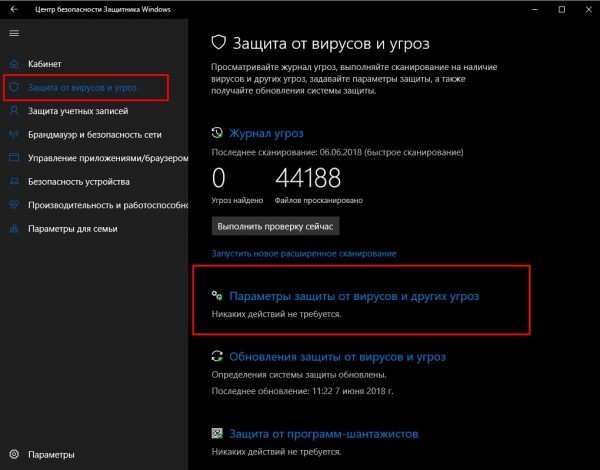
- Следующим шагом выбираем «Защита от вирусов и угроз».
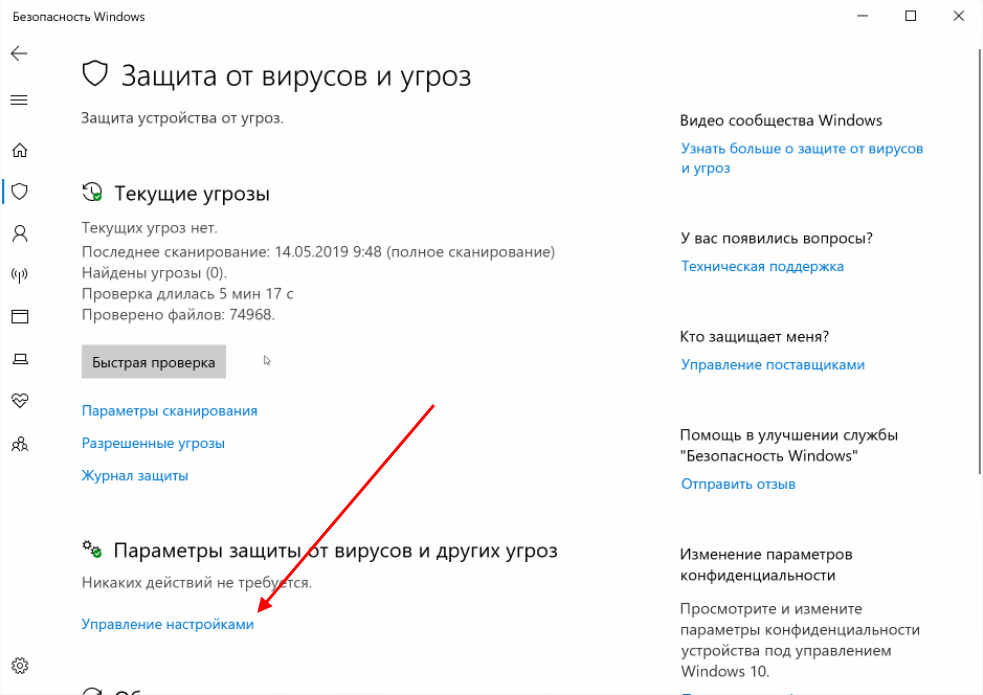
- Пролистываем немного вниз и переходим в «Управление настройками».
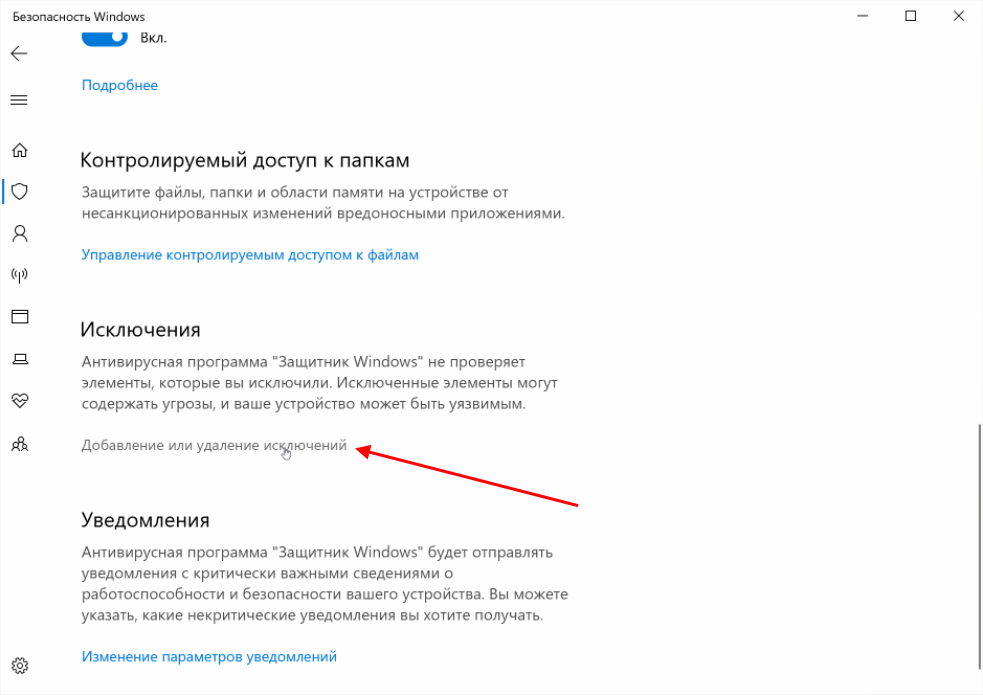
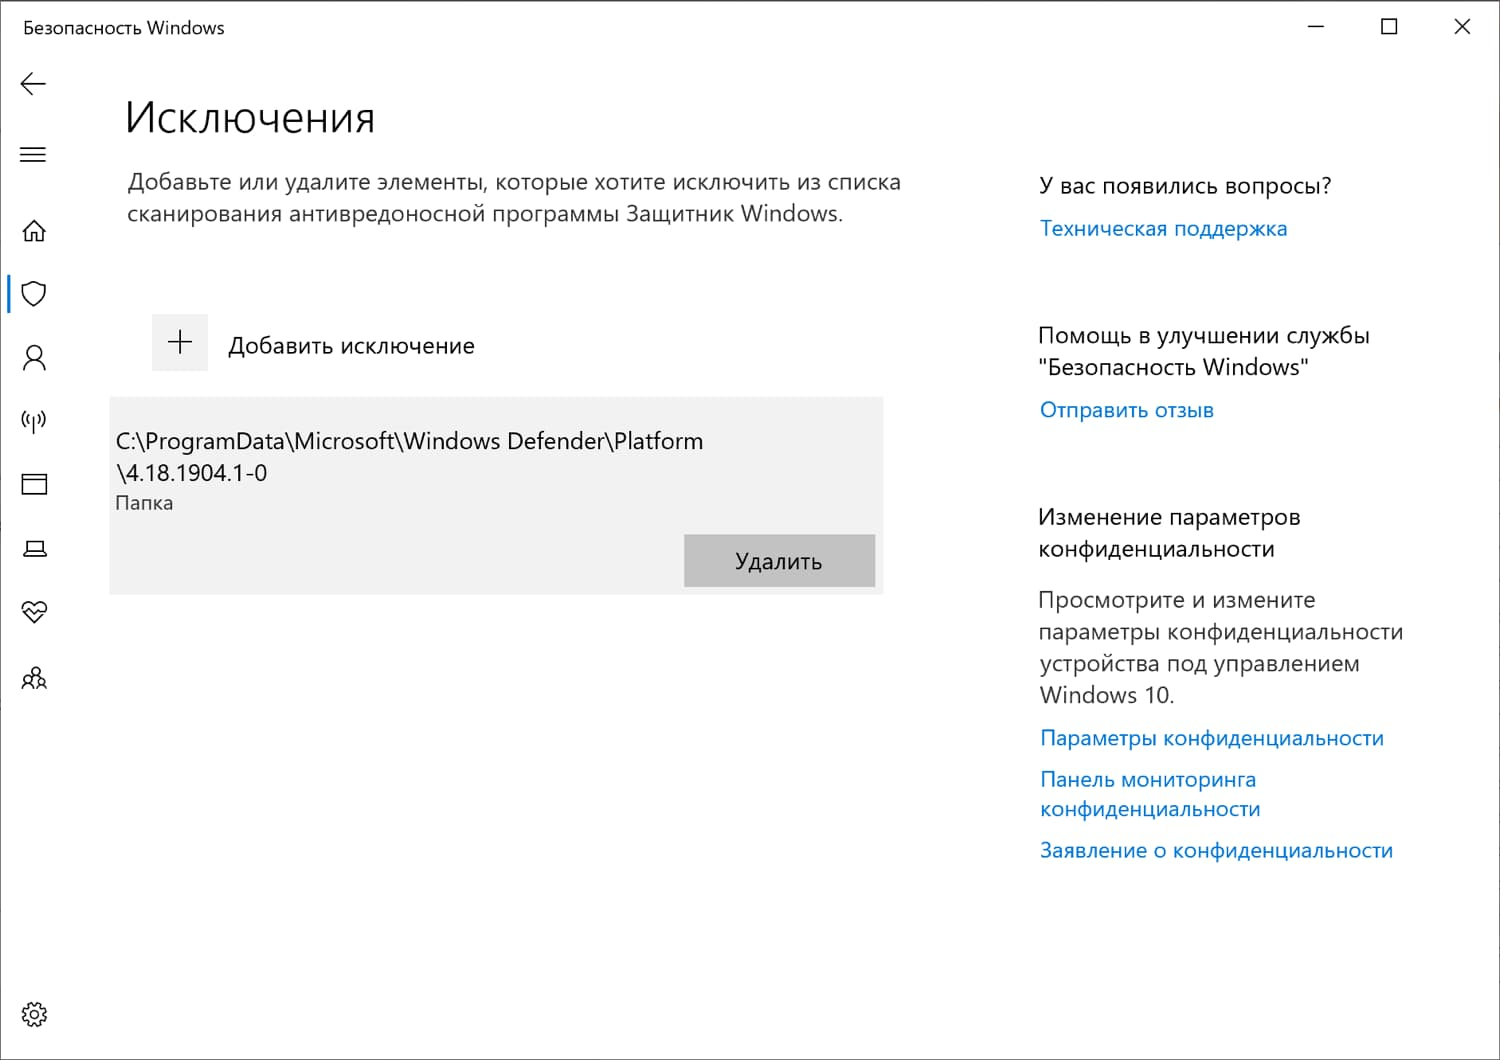
- Находим раздел «Исключения» и прямо под ним нажимаем на кнопку «Добавление или удаление исключений».
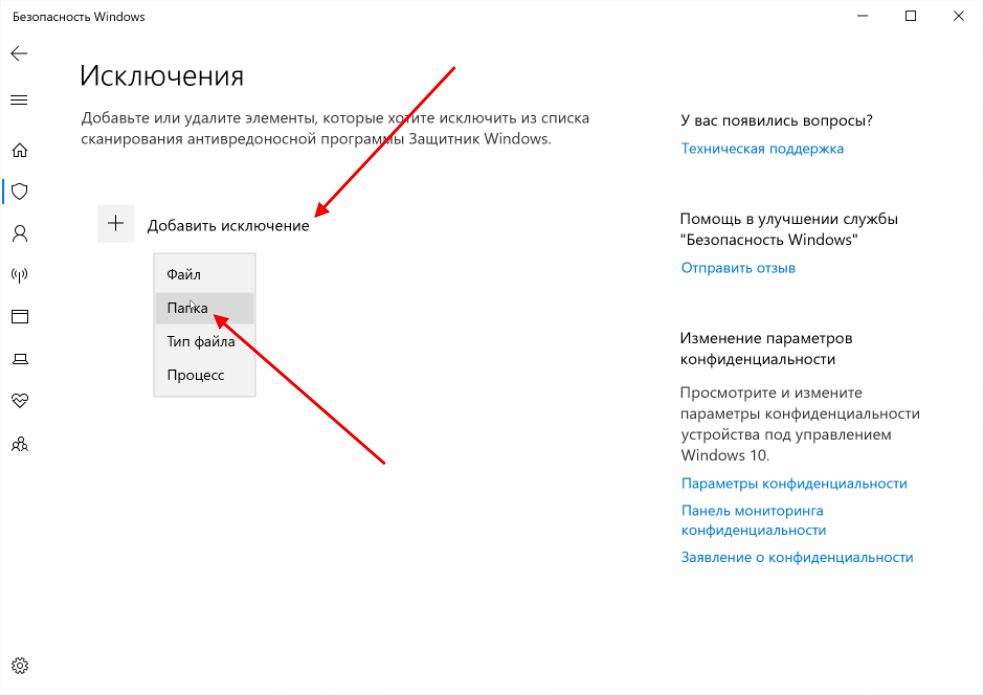
- Выбираем «Добавить исключение» -> «Папка».
- Вставляем скопированный путь и жмем «Выбор папки». Таким образом мы исключаем проверку всех файлов Windows Defender.
Аналогичным образом мы можем исключить любые другие файлы системы.
Способ 3: Проверка на вирусы
Частая причина высокой нагруженности Защитника Windows – вирусная активность. Хоть программа и предназначена для защиты от вирусов, ей не всегда удается их устранить. В таких случаях процессор или оперативная память начинает сильно загружаться. Исправить это можно сторонними антивирусными средствами, например Dr.Web CureIt! или Malwarebytes Free.
Как отключить Защитник Windows 10
Если ни один из вышеперечисленных способов не подошел, рекомендуется переходить к радикальным мерам – полному отключению антивирусника Windows. Данный способ стоит использовать только тогда, когда есть альтернативное решение Защитнику. Когда вы его отключите, ваша система станет уязвима к различным видам атак, поэтому важно иметь под рукой сторонний антивирусник.
Вариант 1: Временное отключение Защитника
Данный способ подойдет для тех, кто все же решился оставить Защитник Windows, но хочет избавиться от торможения системы на время. Сделать это можно следующим образом:
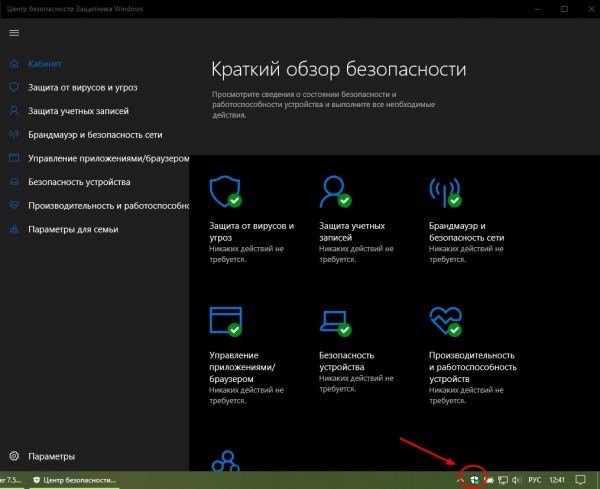
- Переходим в параметры антивирусника через панель задач.
- В отобразившемся окне переходим в раздел «Защита от вирусов и угроз». Затем открываем «Параметры защиты от вирусов и других угроз».
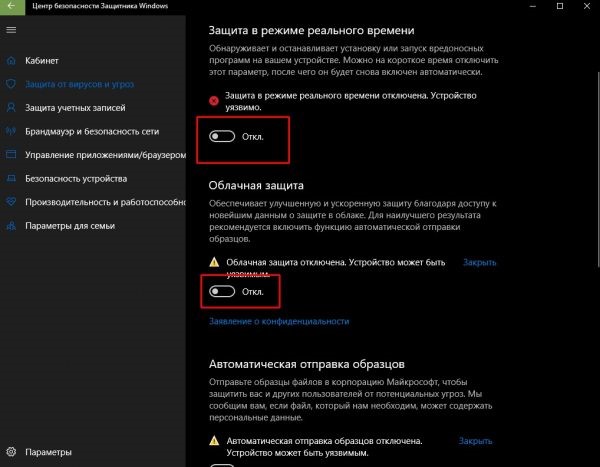
- Переводим все ползунки в значение «Откл.».
Антивирусник будет отключен, и процесс перестанет потреблять ресурсы компьютера. После того как система перезагрузится, Defender снова станет активным.
Вариант 2: Полное отключение
Для полного отключения нам потребуется зайти в редактор реестра и настроить некоторые параметры. Строго следуйте инструкции, потому как изменение различных данных реестра может привести к серьезным системным проблемам.
Отключаем Защитник:
- Используем комбинацию клавиш «WIN+R», вводим запрос regedit и жмем «ОК».
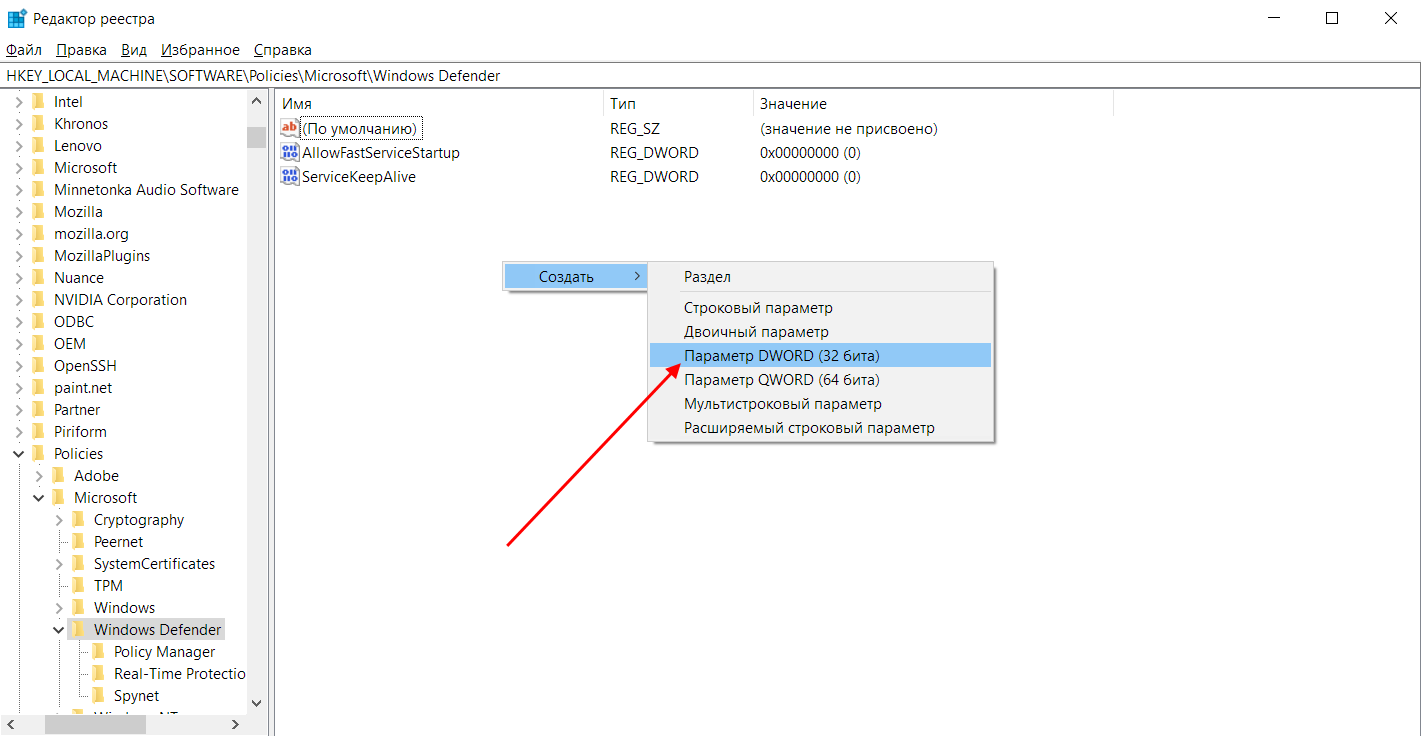
- Далее переходим по пути HKEY_LOCAL_MACHINE\SOFTWARE\Policies\Microsoft\Windows Defender.
- Кликаем правой кнопкой мыши по пустому полю и выбираем «Создать» -> «Параметр DWORD (32 бита)».
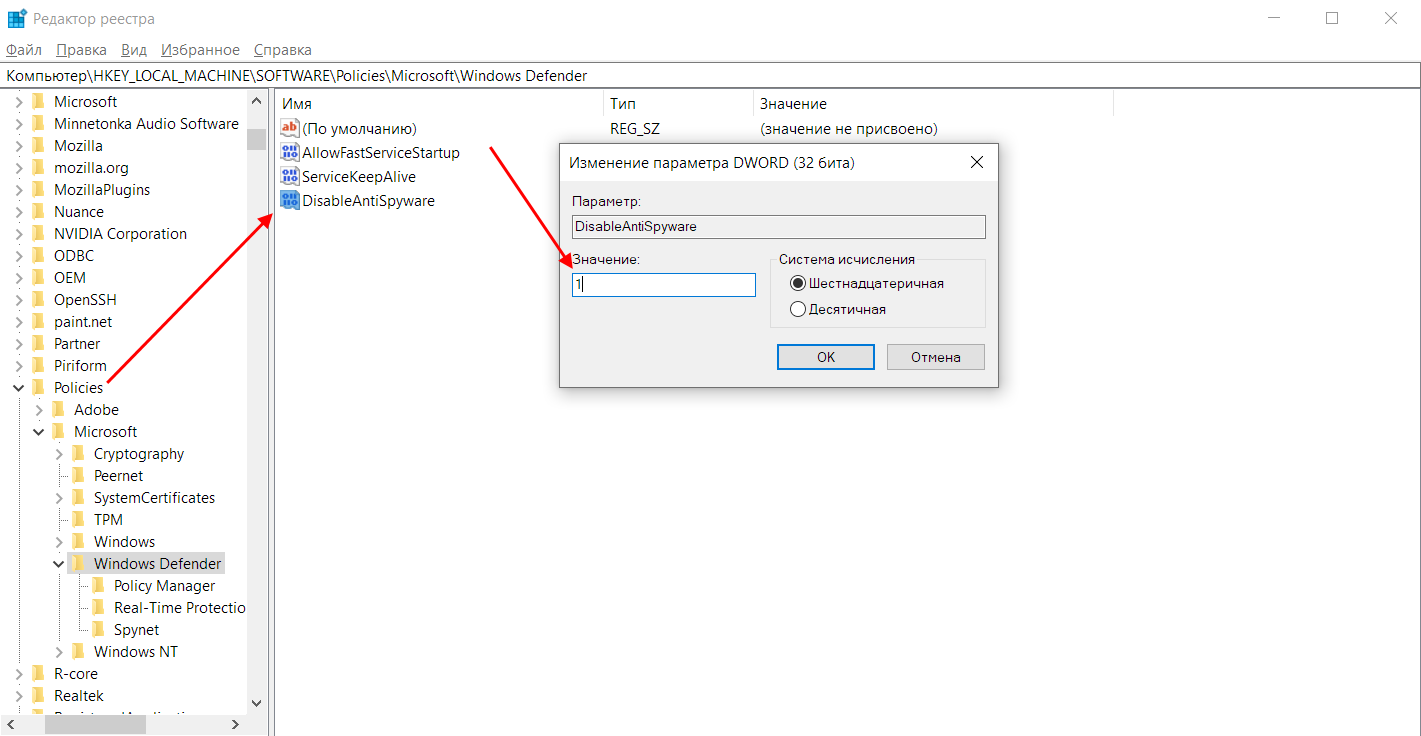
- Задаем новому параметру имя DisableAntiSpyware и открываем его. В отобразившемся окне указываем значение «1» и выбираем шестнадцатеричную систему исчисления.
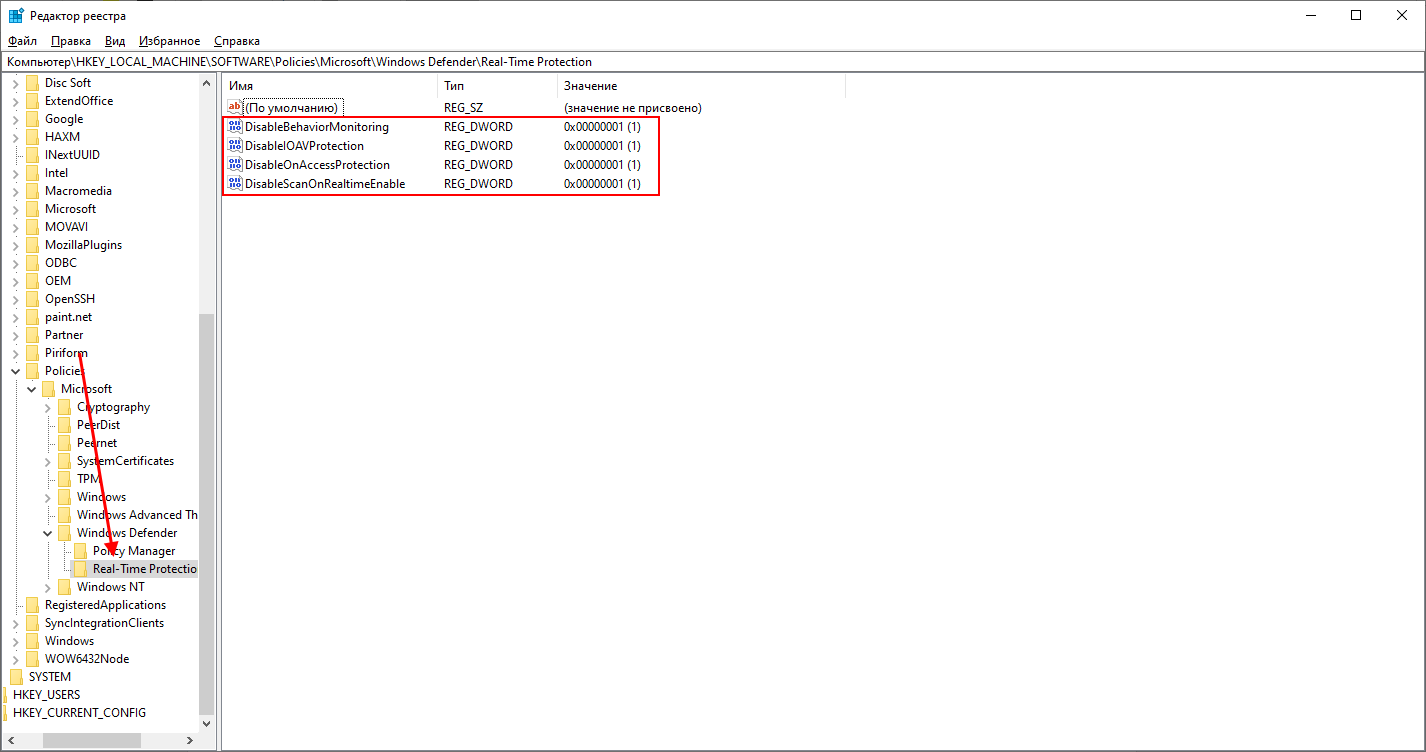
- Теперь переходим в папку «Real-Time Protection». В ней создаем 4 параметра DWORD (32 бита): DisableBehaviorMonitoring, DisableOnAccessProtection, DisableScanOnRealtimeEnable, DisableIOAVProtection. Всем параметрам выставляем значение «1».


Перезагружаем компьютер и проверяем работоспособность Windows Defender.
Защитник Windows 10 – это отличное решение для тех, у кого нет средств на приобретение платного антивирусника. Несмотря на то, что у многих пользователей возникают проблемы с ним, основную работу он все же выполняет. Да, у Защитника есть ряд проблем, но, потратив немного времени на рассмотренные выше инструкции, можно добиться хорошего результата.
The Antimalware Service Executable process (also known as MsMpEng.exe) plays an integral role in Windows Defender service. The process is responsible for allowing Windows Defender to monitor potential threats. However, it is also infamous for consuming lots of system resources rather than its fair share of processing power. So, why does it cause so much CPU usage? Well, there are two main reasons:
- The Antimalware Service Executable process constantly scans files, connections & other programs in real-time to provide overall protection.
- Its Full Scan feature slows down the entire system performance, and you may face lags, delays, and frequent hangs, while the CPU continues to occupy more resources than ever.

So, if you find an Antimalware Service Executable process running in your Task Manager & occupying high memory on Windows 10, just remember, it is not a virus, and you can perform plenty of workarounds to fix the high disk usage caused by MsMpEng.exe service.
Here’s one user sharing concerns about the aforementioned error on Reddit Forum:

How To Fix MsMpEng.exe On Windows 10 High Disk Usage Issue
You’ll be pleased to know that the following methods can quickly resolve the issue:
METHOD 1- Turn Off Windows Defender Or Replace It
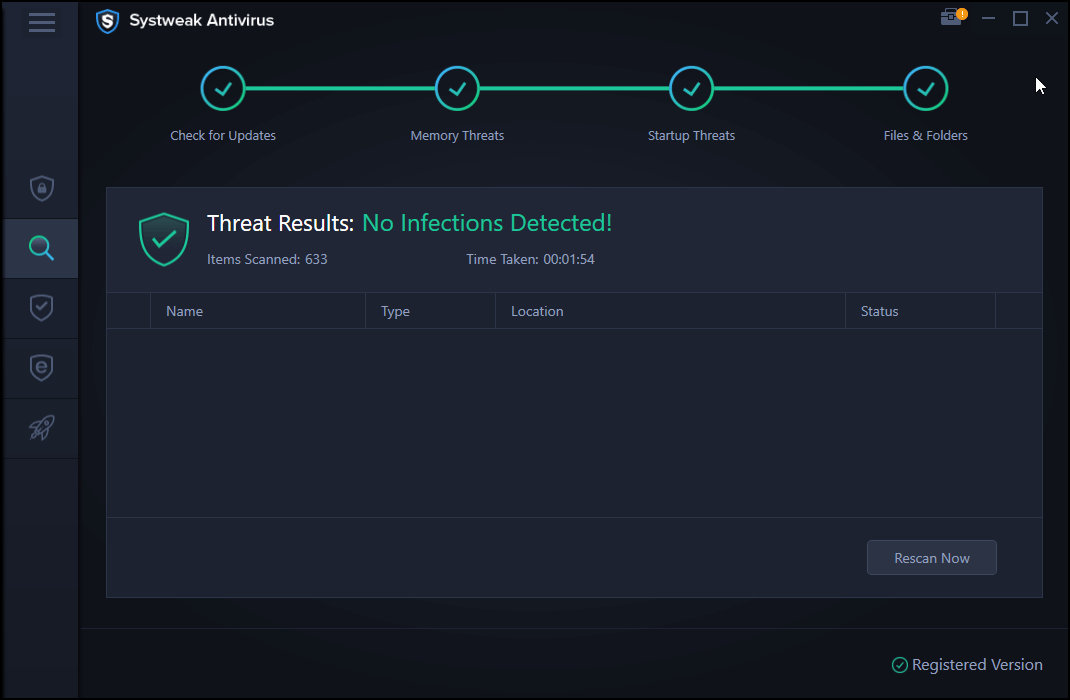
Turning off Windows Defender might help resolve the high disk usage caused by the Antimalware Service Executable process. But this will make your system unprotected. Hence, we suggest installing third-party Antivirus Software like Systweak Antivirus that can help you cover multiple kinds of threats, viruses, malware & malicious content. The antivirus software also scores excellent when it comes to false positives (blocking unharmful applications as being potentially threatening).
Unlike other security solutions for Windows 10, Systweak Antivirus scans the system thoroughly and rapidly. The threat database gets regularly updated; hence no existing or new threat can harm your system. To enjoy real-time protection with Systweak Antivirus, install it now!
Know more about Systweak Antivirus, right here!
METHOD 2- Use Group Policy Editor To Stop MsMpEng.exe Process
Another helpful fix to get rid of the Antimalware Service Executable High CPU Usage issue on Windows 10 is through Group Policy Editor. You just need to make certain tweaks, just follow the steps mentioned below:
- Launch Run window (Press Windows key + R) altogether.
- Type gpedit.msc in the dialog box and hit the Enter button.

- Once the Group Policy Editor window appears, you need to follow the path:
Computer Configuration/Administrative Templates/Windows Components/Windows Defender Antivirus/Real-time Protection
- You need to double-click on the entry: Turn off real-time protection.

- On the next window (Turn off Windows Defender Antivirus), choose the Enable option.

- Hit the Apply button, followed by OK to complete the process!
Now that you have successfully disabled Windows Defender, you’ll be able to resolve high disk usage caused by the MsMpEng.exe service.
METHOD 3- Add Antimalware Service Executable To Exclusion List
Windows Defender checks every file on the computer during security scans, including the Antimalware Service Executable process. This can result in exciting interactions and system lags. To prevent the error, you can exclude the process from scanning.
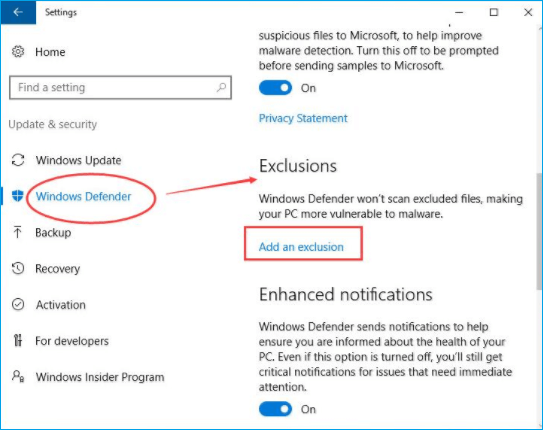
- Launch system settings & navigate to Update & security module.
- Hit the Windows Defender option and Under the Exclusions header, click on the Add an exclusion button.
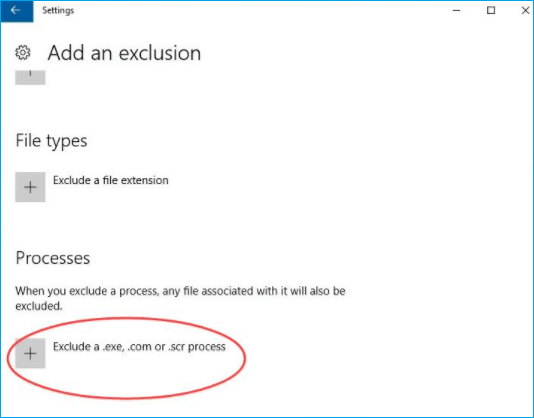
- Head towards the Processes tab and click on the (+) Exclude a .exe, .com, or .scr process.

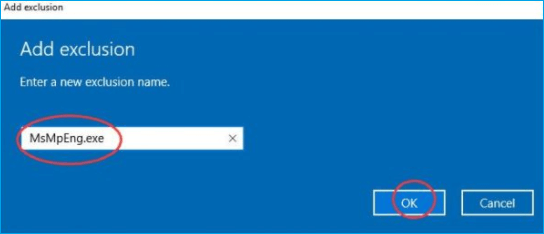
- Enter the executable file name: MsMpEng.exe & press the OK button.

Hopefully, you’ll be able to resolve the high disk usage problem on Windows 10.
METHOD 4- Repair Corrupted/Missing System Files
Sometimes identifying and repairing corrupted and missing system files can help resolve the high CPU usage on Windows 10 caused due to the Antimalware Service Executable process. You can either run the SFC /scannow command line in the Command Prompt to do so or install a third-party PC Cleaner Tool like Advanced System Optimizer. Its Smart PC Care feature can help you scan your entire hard drive, locate potentially harmful files, and repair them quickly so that you can resolve common PC errors without any hassles.
Hopefully, you shouldn’t experience the annoying high disk usage problem on Windows 10 caused due to the Antimalware Service Executable process!
RELATED ARTICLES:
- How To Fix Avast Service High CPU Usage Errors?
- How To Fix WMI Provider Host High CPU Usage In Windows 10?
- What Is Lsass.exe & How To Fix Lsass.exe High CPU Usage Issue?
- How To Fix Windows Shell Experience Host Process High CPU Usage?
Antimalware Service Executable — это системный процесс Windows, связанный с встроенным антивирусом Microsoft Defender. Его основная задача — обеспечивать защиту устройства в реальном времени. Однако нередко этот процесс вызывает значительные нагрузки на процессор и оперативную память, что может замедлить работу компьютера. Разбираем, почему это происходит и как минимизировать проблему.

Antimalware Service Executable (MsMpEng.exe) — ключевой компонент Microsoft Defender, который выполняет сканирование файлов, процессов и программ в реальном времени для обнаружения угроз. Этот процесс автоматически запускается при включении компьютера и работает в фоновом режиме.
Основные функции:
- Сканирование файлов в реальном времени.
- Установка обновлений антивирусных баз.
- Проведение запланированных проверок системы.
Хотя такая активность необходима для безопасности, ее интенсивность иногда вызывает высокую загрузку системы. Причинами повышенной загрузки являются:
- Сканирование в реальном времени. Во время выполнения ресурсоемких операций, таких как копирование больших файлов или установка программ, Defender активно сканирует их на наличие угроз.
- Запланированные проверки. Если автоматическая проверка системы запущена в неподходящий момент, она может значительно замедлить работу компьютера.
- Конфликты с другими антивирусами. Одновременная работа нескольких антивирусных программ может привести к конкуренции за системные ресурсы.
- Обновление антивирусных баз. В процессе загрузки и установки обновлений Defender может временно увеличивать нагрузку на процессор и диск.
- Ошибки в работе Defender. Иногда сбои в работе программы или поврежденные файлы базы данных могут стать причиной чрезмерной активности Antimalware Service Executable.
Способы устранения проблемы
Обнаружение причин высокой нагрузки от Antimalware Service Executable — лишь первый шаг. Эффективное решение потребует применения различных методов настройки системы и оптимизации работы Microsoft Defender. Рассмотрим ключевые действия подробнее:
Настройка запланированных проверок
Запланированные проверки Microsoft Defender часто становятся причиной скачков нагрузки. Чтобы минимизировать их влияние на производительность:
- Откройте «Планировщик заданий», введя его название в поиске Windows.
- Перейдите в раздел: «Библиотека планировщика заданий → Microsoft → Windows → Windows Defender».
- В настройках задач «Scheduled Scan» выберите удобное время выполнения, например, ночные часы.
- Убедитесь, что проверки не пересекаются с другими ресурсозатратными задачами.
Исключение безопасных файлов из сканирования
Для снижения нагрузки целесообразно исключить файлы или папки, которые проверяются регулярно, но не представляют угрозу:
- В «Параметрах» Windows перейдите в «Обновление и безопасность → Безопасность Windows → Защита от вирусов и угроз».
- Откройте «Управление настройками» в разделе «Параметры защиты от вирусов и угроз».
- Добавьте в исключения пути к файлам или папкам, например, директории с программами, которые проверялись ранее.
Ограничение защиты в реальном времени
Если Defender создает проблемы в критические моменты (например, при обработке больших объемов данных), временное отключение защиты в реальном времени может помочь:
- Перейдите в «Безопасность Windows».
- В разделе «Защита от вирусов и угроз» отключите опцию защиты в реальном времени.
- После завершения ресурсоемкой задачи обязательно включите функцию обратно.
Обновление антивирусных баз
Сбой обновления баз Defender может вызвать постоянную активность процесса. Для проверки и исправления:
- Откройте командную строку от имени администратора.
- Введите команду: MpCmdRun.exe -SignatureUpdate.
- Дождитесь завершения процесса. Это устранит возможные проблемы с устаревшими базами.
Обновление системы Windows
Многие проблемы, связанные с Defender, решаются обновлением системы:
- В «Параметрах Windows» выберите «Обновление и безопасность».
- Нажмите «Проверить наличие обновлений» и установите доступные пакеты.
- Убедитесь, что используются последние версии как операционной системы, так и встроенного антивируса.
Рассмотрение альтернативных решений
Если Defender систематически вызывает проблемы, возможно, стоит рассмотреть использование стороннего антивирусного ПО. Многие решения предлагают сравнимую или более высокую степень защиты с меньшим влиянием на производительность. При установке нового антивируса Defender будет автоматически отключен, что снизит конкуренцию за системные ресурсы.
Когда стоит обратиться к специалисту
Если описанные методы не помогают и система продолжает испытывать сильные нагрузки, возможно, проблема связана с вирусной активностью или ошибками в системе. В таких случаях рекомендуется обратиться к ИТ-специалисту для более глубокого анализа.
Частые вопросы
— Почему Antimalware Service Executable грузит систему?
Высокая нагрузка обычно связана со сканированием в реальном времени, запланированными проверками или обновлениями баз данных. Также причиной могут быть конфликты с другим антивирусным ПО.
— Можно ли отключить Antimalware Service Executable?
Этот процесс является частью Microsoft Defender, поэтому его отключение приведет к потере встроенной антивирусной защиты. Однако можно оптимизировать его работу через настройки.
— Как добавить файлы в исключения?
Перейдите в «Параметры → Обновление и безопасность → Безопасность Windows → Защита от вирусов и угроз → Управление настройками», затем выберите «Добавить или удалить исключения» и укажите нужные файлы или папки.
— Может ли другой антивирус заменить Microsoft Defender?
Да, установка стороннего антивируса автоматически отключит Microsoft Defender, что снизит нагрузку на систему.
— Почему обновление Windows помогает?
Обновления устраняют баги и улучшают совместимость программ, включая Microsoft Defender, что может снизить нагрузку.
Вывод
Antimalware Service Executable выполняет важную функцию защиты системы, но иногда его активность может замедлить работу компьютера. Для минимизации нагрузки важно правильно настроить параметры Defender, исключить ненужные файлы из проверки и регулярно обновлять систему. Эти действия помогут сохранить баланс между безопасностью и производительностью, обеспечивая стабильную работу Windows 10.
If you noticed that the Antimalware Service Executable process takes up a high CPU on Windows, rest assured – you’re not alone. Many Windows users also report this problem. More importantly, you can fix this problem by yourself without asking a technician for help.
In this article, you’ll learn what Antimalware Service Executable exactly is and how to fix its high CPU usage issue.
What is Antimalware Service Executable?
You may know Windows Defender in your Windows, it’s an antivirus software built in Windows. Antimalware Service Executable is one of the background-running services in Windows Defender. It’s also known as MsMpEng.exe, you can find this on the Details tab in your Task Manager.
Antimalware Service Executable is running to scan the malware and spyware when you access them. It will detect if there’s anything harmful. Besides, it also takes a background scan of your system for any viruses or worms. Its scanning relies heavily on your computer’s CPU, that’s why you find it’s eating the CPU usage on your Windows. Couldn’t we solve this problem for the safety of our Windows? No, you can solve it. Move on to the next part, please.
Fixes for ‘Antimalware Service Executable high CPU‘:
- Change Windows Defender’s schedule
- Add Antimalware Service Executable to Windows Defender exclusion list
- Check Real-time protection settings
Fix 1: Change Windows Defender’s schedule
The error is mainly due to its real-time protection feature. So we can change Windows Defender’s schedule to fix it.
- On your keyboard, press the Windows logo key and R at the same time to invoke the Run box. Type taskschd.msc and press Enter.
- Double-click on Task Scheduler Library > Microsoft > Windows.

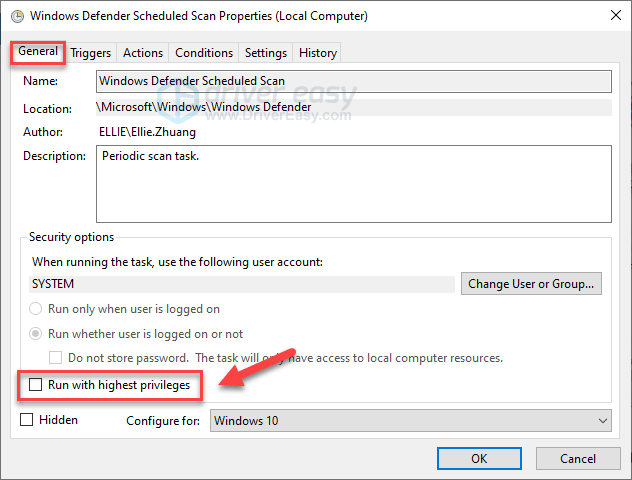
- Double-click Windows Defender in Windows. Then double-click Windows Defender Scheduled Scan.
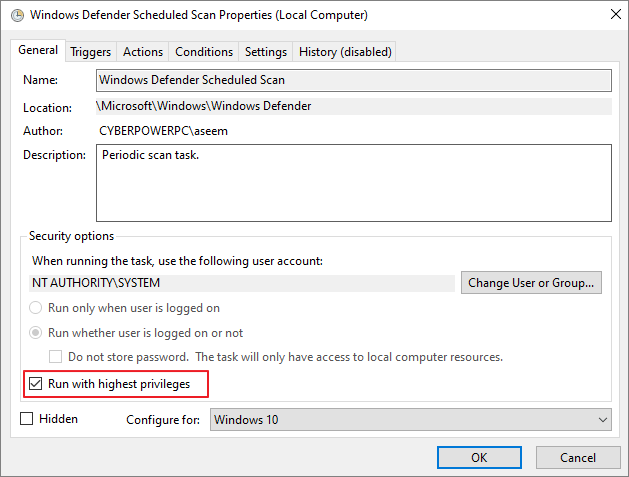
- Uncheck Run with highest privileges.

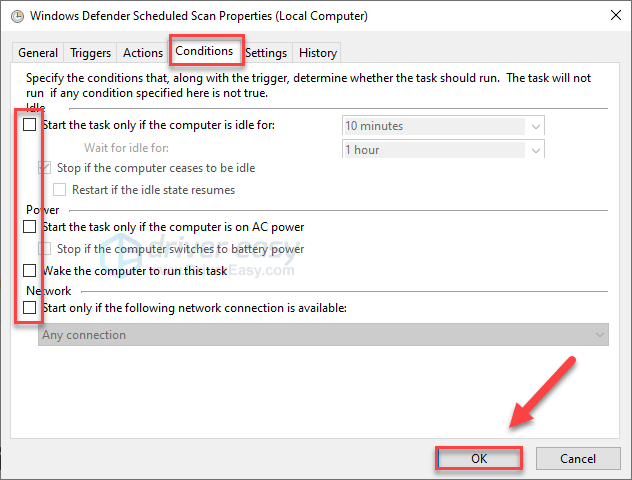
- Uncheck all the items in the Conditions section. Then click OK.
- With the steps above, your error should be fixed now.
If unfortunately, it doesn’t work, please don’t be frustrated, try the following method.
Fix 2: Add Antimalware Service Executable to Windows Defender exclusion list
High CPU usage can signal issues with Windows Defender real-time scanning. A troubleshooting step is to add the Antimalware Service Executable to Defender’s exclusion list. This prevents scanning of the file, potentially stopping unnecessary scans causing high CPU.
Below we’ll show you how to do this.
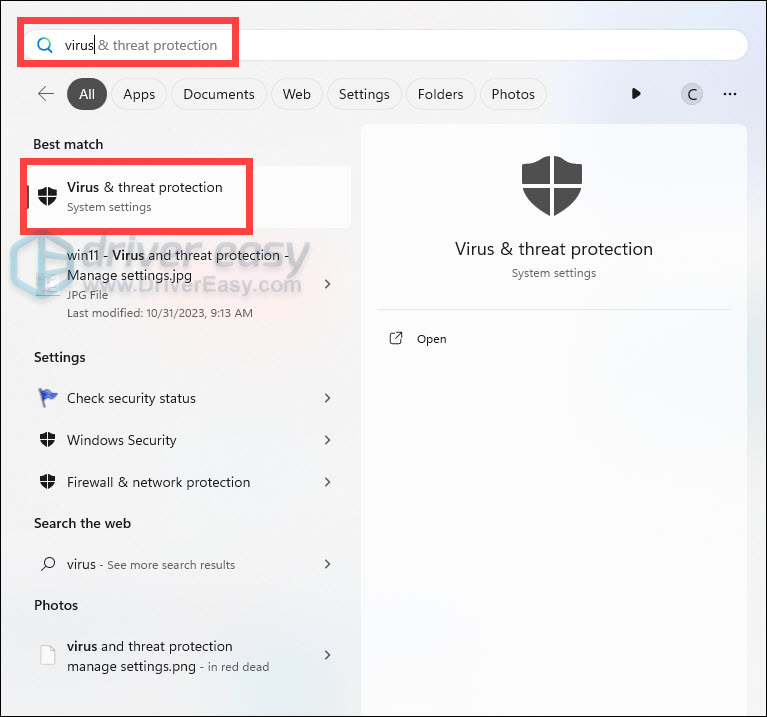
- On your keyboard, press the Windows logo key to open the Start menu. Type virus, and click Virus & threat protection from the list of results.

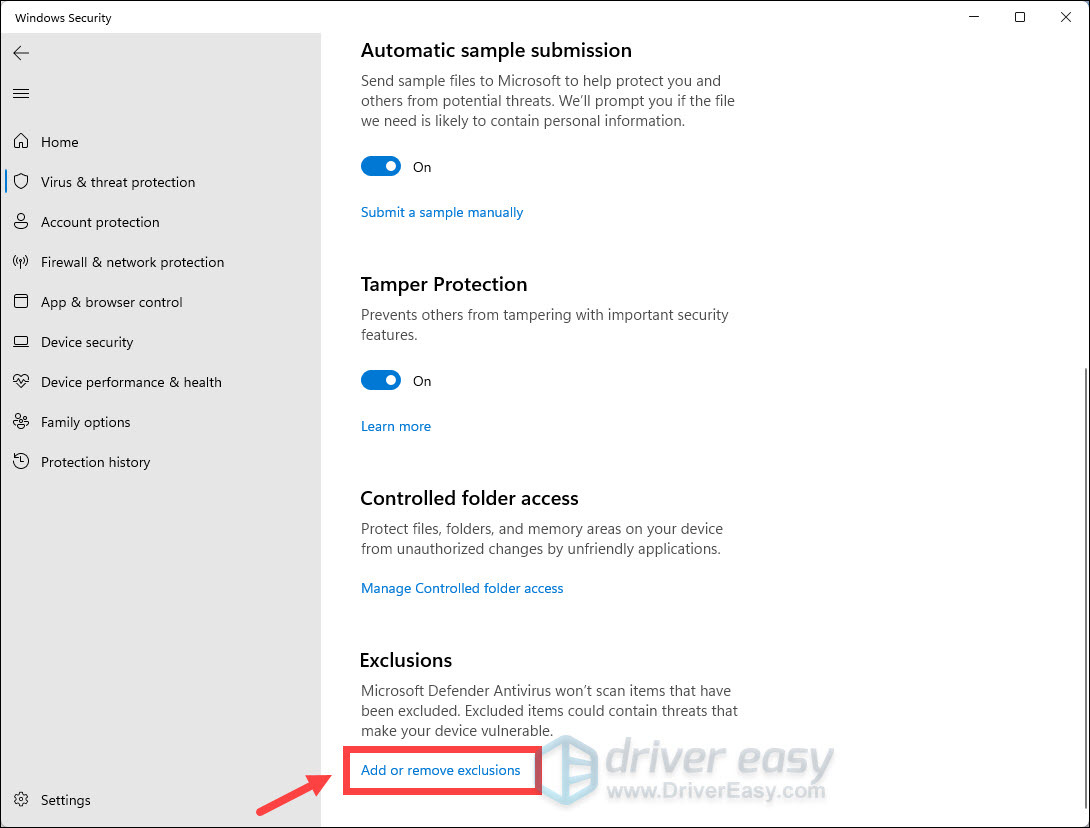
- Find Manage settings under Virus & threat protection settings and click on it.

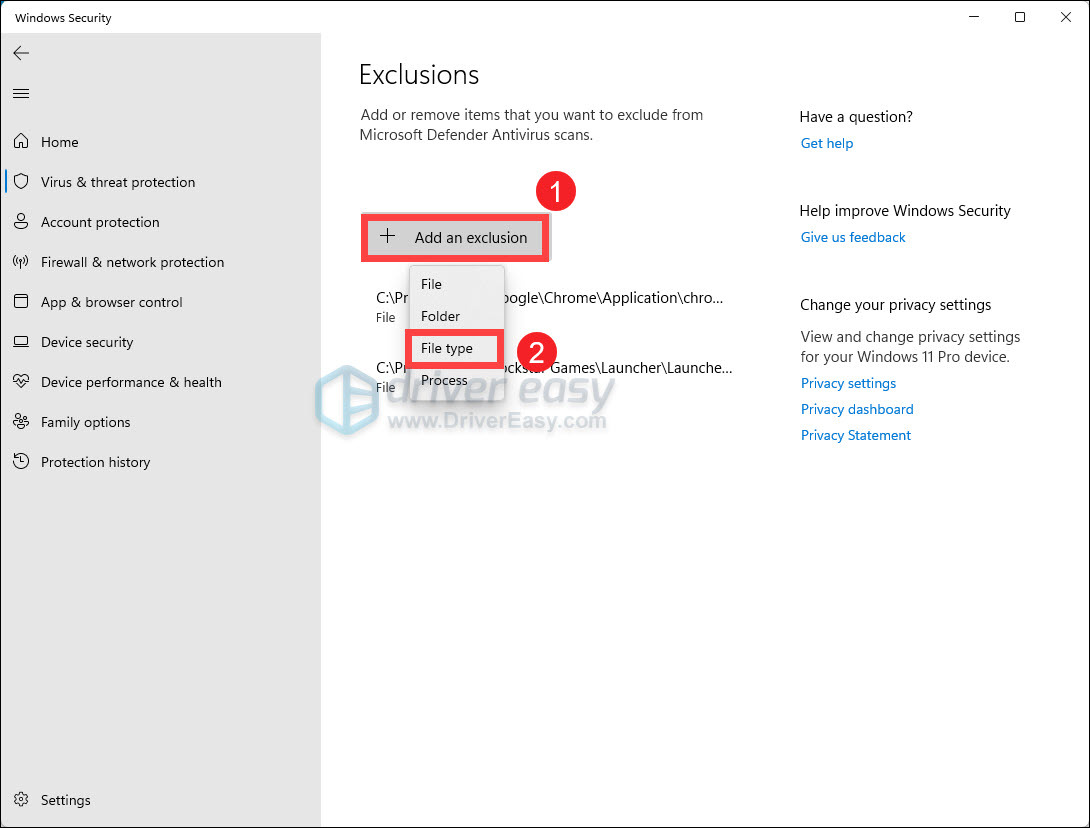
- Scroll to the bottom and click Add or remove exclusions.

- When you’re asked for permission, click Yes to proceed.
- Click Add an exclusion. From the drop-down menu, select Folder.
- Then select the following path:
C:\Program files\Windows Defender

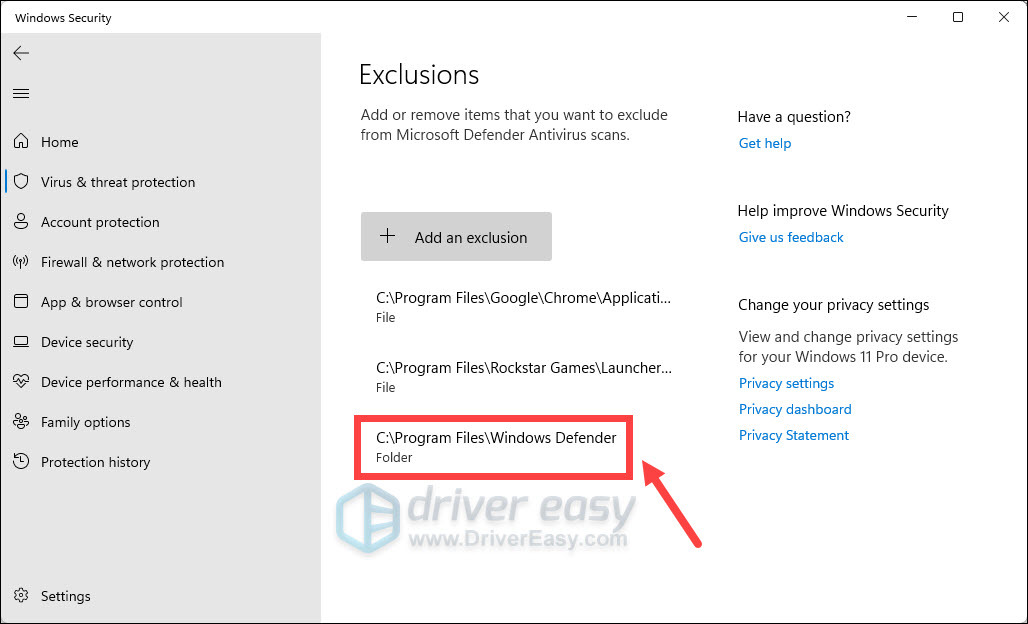
Then restart your computer and check if it still consumes high CPU and RAM resources.
Fix 3: Check real-time protection settings
Another workaround for this issue is turning off the real-time protection.
- On your keyboard, press the Windows logo key to open the Start menu. Type virus, and click Virus & threat protection from the list of results.
- Find Manage settings under Virus & threat protection settings and click on it.
- Scroll a little bit and click on the switch to turn Off Real-time protection.
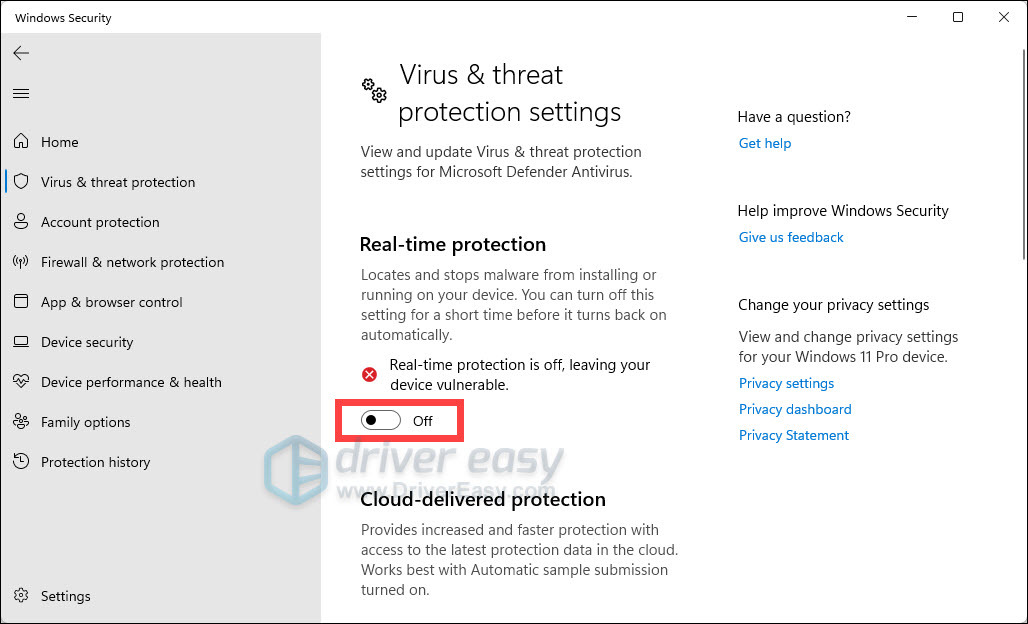
Turning off Real-time protection leaves your device vulnerable, so make sure you re-enable the setting after the troubleshooting.
Still Running Slow?
If, after trying the above, your PC is still running slow, we highly recommend you scan your Windows OS for faulty files or missing system components.
System File Checker is a Windows built-in tool that can help you scan for and repair any corruptions of your system files. Follow the instructions to see how to use it:
- Press the Windows logo key and R on your keyboard to invoke the Run box.
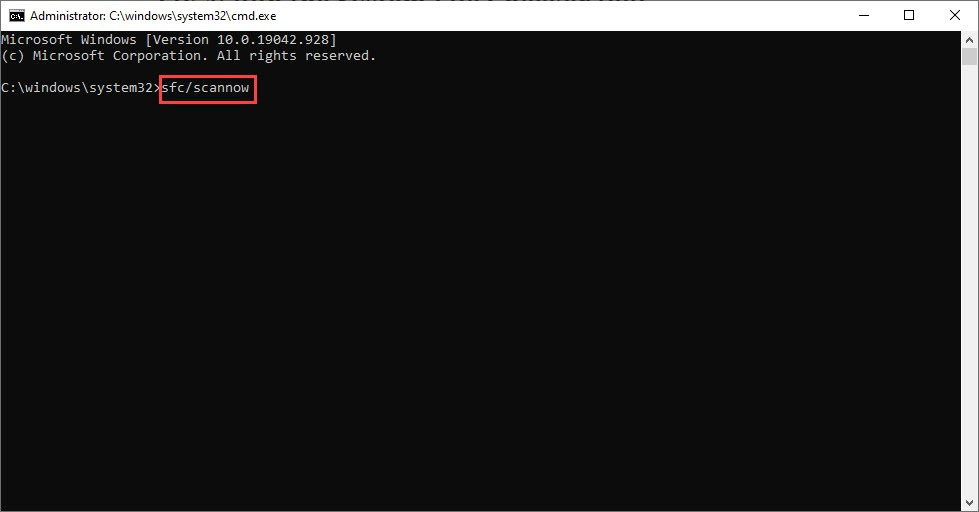
- On your keyboard, type cmd and press Ctrl, Shift and Enter at the same time to run Command Prompt as administrator.
- You’ll be prompted for permission. Click Yes to open Command Prompt.
- Type sfc/scannow, then press Enter.

- The System Files Checker tool will automatically scan for corrupt or missing files and fix them, if there’s any.
- Restart your PC to see if the problem persists.

That’s it for this guide. Hopefully, it helped. Feel free to leave a comment below if you have any questions or suggestions.
212
212 people found this helpful
Updated on Apr 28, 2025
If you found that the Antimalware Service Executable high disk usage occurs on Windows 11/10, take it easy, you’re not alone. Many Windows users are encountering Antimalware Service Executable high memory problems.
In this article, you’ll learn everything about Antimalware Sevice Executable and how to fix Antimalware Service Executable high CPU issue.
Besides, at the end of this article, we recommend a free partition management tool to help you easily create, resize, clone, move, merge, and format partitions to improve computer performance.
| Fixe Antimalware Service Executable High Memory | Step-by-step Troubleshooting |
|---|---|
| Fix 1. Disable Real-Time Protection | Turn off the real-time protection to solve the Antimalware Service Executable high CPU usage…Full steps |
| Fix 2. Change Windows Defender’s Scheduling Options | Change Windows Defender’s schedule is another method to solve the Antimalware Service Executable…Full steps |
| Fix 3. Add Antimalware Service Executable to Exclusion List | Press the Windows logo key + I at the same time to open the Settings window. Click «Update & security»…Full steps |
| Fix 4. Disable Windows Defender | Press Windows Key + R to open the Run Dialog Box. In the Run Dialog Box, type regedit and click «OK»…Full steps |
| Fix 5. Update All Device Drivers | You can also try to fix Antimalware Service Executable high CPU issue by updating all your device drivers…Full steps |
Read Also: 100% Disk Usage in Windows 10
The Antimalware Service Executable (Msmpeng.exe) process is part of Windows Defender, a built-in antivirus feature that comes with Windows 11/10. You can find this on the Details tab in your Task Manager.
Antimalware Service Executable provides real-time scanning and is responsible for checking files for malware whenever you access them. It also performs background system scans to check for dangerous software, install antivirus definition updates, and does anything else a security application like Windows Defender needs to do.
Its scanning relies heavily on your computer’s CPU; that’s why you find Antimalware Service Executable high CPU, huge disk, memory, RAM, and even network bandwidth, draining computer resources, especially after getting a Windows 11/10 update. Go to the next part to solve antimalware service executable high memory Windows 11.
Windows 10 Free Partition Manager
EaseUS Partition Master Free, a well-designed disk management tool for beginners and experts to manage partitions and to extend your capableness.
How to Stop Antimalware Service Executable High Disk Usage [5 Ways]
If the Antimalware Service Executable process takes up a high CPU on your Windows 10, don’t worry. We have easy solutions for you to deal with it. Now, read this article in-depth and try the five easy methods to fix the windows antimalware service executable high memory/CPU usage.
Fix 1. Disable Real-Time Protection
Fix 2. Change Windows Defender’s Scheduling Options
Fix 3. Add Antimalware Service Executable to Windows Defender’s Exclusion List
Fix 4. Disable Windows Defender in Registry
Fix 5. Update all Available Device Drivers
Showing fix 1 and fix 3, this video guide released by A2MTech is help to disable antimalware service executable high memory/CPU/Disk on Windows 10.
If you think this video is helpful, don’t hesitate to share it with your friends. Click the buttons below can quickly share this article.
Fix 1. Disable Real-Time Protection
Antimalware Service Executable high disk usage issue is large because of the real-time feature, which will constantly scan your Windows computer no matter what you do. It acts quickly and consumes much CPU storage, which leads to high CPU and memory usage.
The most probable fix to the Antimalware Service Executable high CPU issue is turning off the real-time protection. After this, the Windows Defender won’t work, and your computer will be vulnerable. So, use this method only as a temporary solution.
Step 1. Click the «Start menu > Settings > Update & security».
Step 2. Select «Windows security > Virus & threat protection > Manage settings».
Step 3. Switch the «Real-time protection» setting to Off.

Fix 2. Change Windows Defender’s Scheduling Options
Change Windows Defender’s schedule is an effective way because the real-time protection feature mainly causes the error. Follow the details below and fix the Antimalware Service Executable high disk usage issue.
Step 1. Press Windows key + R at the same time to invoke the Run box. Type taskschd.msc and press Enter.
Step 2. Double-click on «Task Scheduler Library» > «Microsoft» > «Windows».
Step 3. Find and expand «Windows Defender». Then double-click «Windows Defender Scheduled Scan».
Step 4. Uncheck «Run with highest privileges» on the property window.
Step 5. Uncheck all the items in the «Conditions» section. Then click «OK».
With the steps above, your error should be fixed now. If, unfortunately, it doesn’t help you, make sure to try the second solution below.
Fix 3. Add Antimalware Service Executable to Windows Defender’s Exclusion List
Step 1. Press the Windows logo key + I at the same time to open the Settings window. Click «Update & security».
Step 2. Click «Windows Defender». Then click «Add an exclusion» in Exclusions.
Step 3. Click «Exclude a .exe, .com or .scr process».
Step 4. Type MsMpEng.exe. Then click «OK».
Alongside enabling Windows’ built-in virus-defending utility, you can also turn to thrid-party virus-cleaning software for help. TotalAV is one of the famed and reliable anti-virus software that you can rely on to scan and clean up all malware, virus, and even online threats from your PC:
TOTALAV
TotalAV is an Award Winning Antivirus and Security Software. It Provides Real-Time Protection from Viruses, Malware & Online Threats.
Fix 4. Disable Windows Defender in Registry
When your Windows defender got corrupted by being overworked due to continuous file scanning, the Antimalware Service Executable high CPU issue may be settled by disabling Windows defender.
Step 1. Press Windows Key + R to open the Run Dialog Box.
Step 2. In the Run Dialog Box, type regedit and click «OK» to open the Registry Editor.
Step 3. In the navigation pane on the left, double-click the folders to navigate to HKEY_LOCAL_MACHINE\SOFTWARE\Policies\Microsoft\Windows Defender.
Step 4. If you find a registry entry named DisableAntiSpyware, double-click it and set its value data to 1.

Note: If you do not see a registry entry named DisableAntiSpyware, right-click in the main Registry Editor pane and select «New» > «DWORD (32 bit) Value». Name this new registry entry DisableAntiSpyware. Double click it and set its value data to 1.
Fix 5. Update all Available Device Drivers
Is your Windows 10 still running slow after trying the above? You can also try to update all your available device drivers. The latest drivers can keep your computer running stable and quickly.
You can manually update your device drivers manually by going to the manufacturer’s website and searching for the exact device’s most recent correct driver. Make sure to choose drivers that are compatible with your variant of Windows system versions.
Run Computer Without Antimalware Service Executable High CPU/RAM/Disk Usage Issue
Windows Defender is a free and valuable tool to protect your computer from a virus attack, but it can certainly eat up your CPU. By following the methods in this article, you’ll be able to fix the Antimalware Service Executable high disk usage issue and keep your computer running at full speed.
Bonus Tip: How to Partition Hard Drives on Windows 11/10/8/7 for Free
When we use a computer, we all want it to perform at its best. Disk management is an important way to enhance system performance. EaseUS Partition Master Free makes it effortless to partition hard drives and take full advantage of your disk space. It provides other one-stop partition and disk management solutions for Windows 11/10/8/7, for instance:
- Resize/move partitions (the Pro version allows to move space from D drive to C drive directly), create, format, delete, and merge partitions
- Completely wipe out all the data on the hard disk to prevent information from being leaked or recovered
The following steps show how to resize and move partitions effortlessly and securely with this renowned partition management software.
Step 1. Launch EaseUS Partition Master to check for free space at the Partition Manager section.
- If your hard drive has unallocated space, jump to Step 3 to create partition.
- If the hard drive has no unallocated space, continue with Step 2.
Step 2. Shrink a disk partition to create unallocated space.
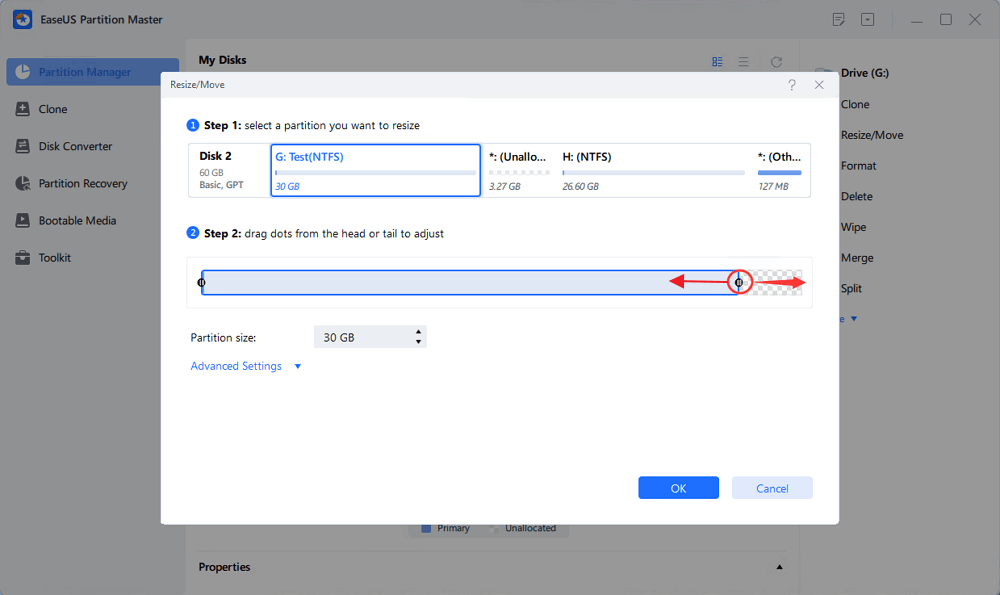
Right-click on the target drive partition with a lot free space and select «Resize/Move».
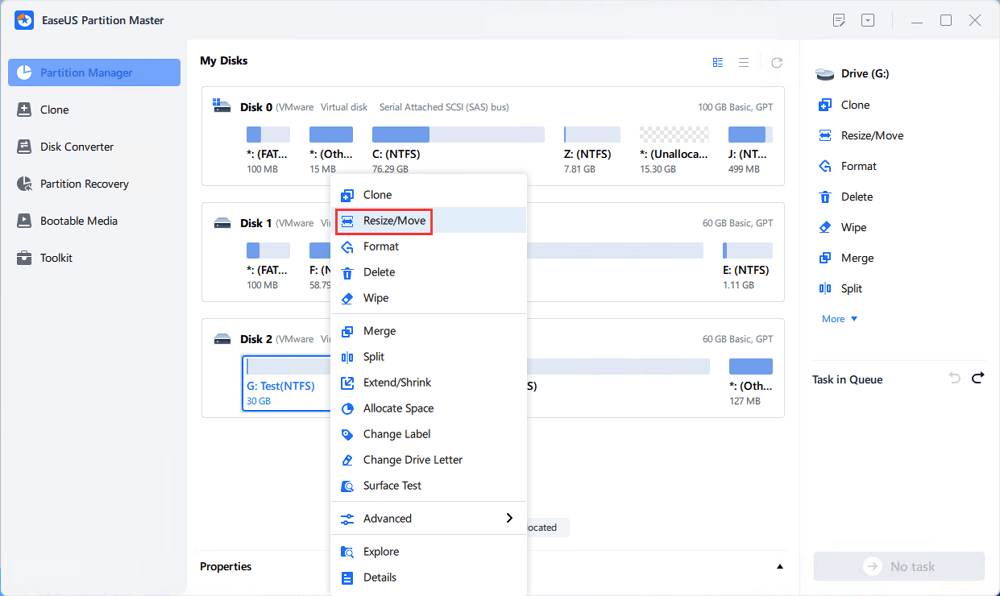
Drag either end of the partition rightwards or leftwards to shrink the partition size so as to get ample unallocated space. You can visually know how much space you’ve decreased in the «Size of partition» area. Click «OK».
Click «Execute xx Task» and then «Apply» to save all the changes.

Go back to Partition Manager, there should be unallocated space appearing on the same disk and you can continue with the next step to create new partition on your hard drive.
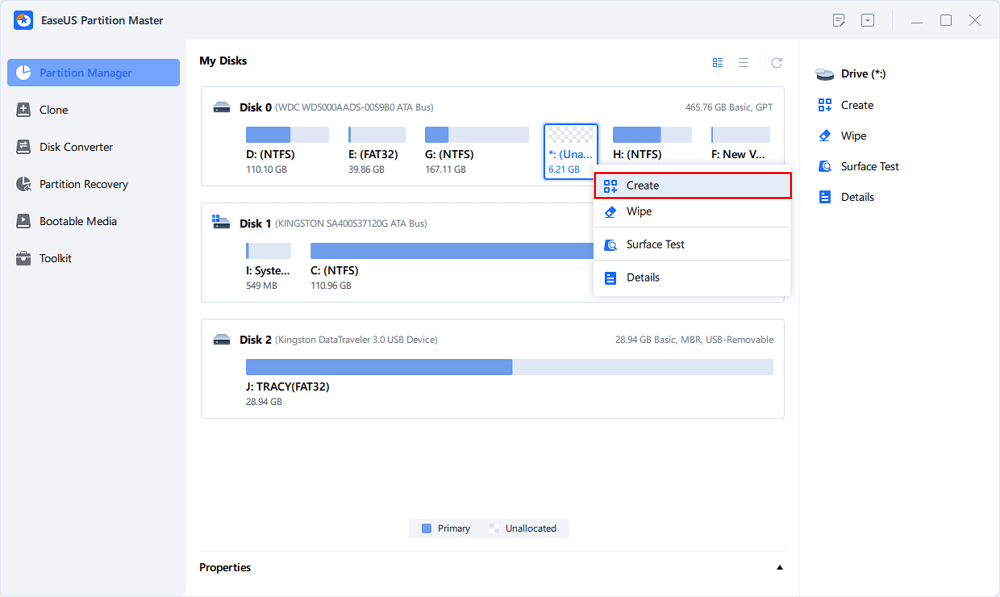
Step 3. Create a new partition with unallocated space on the target hard drive.
Right-click on the unallocated space and choose «Create».
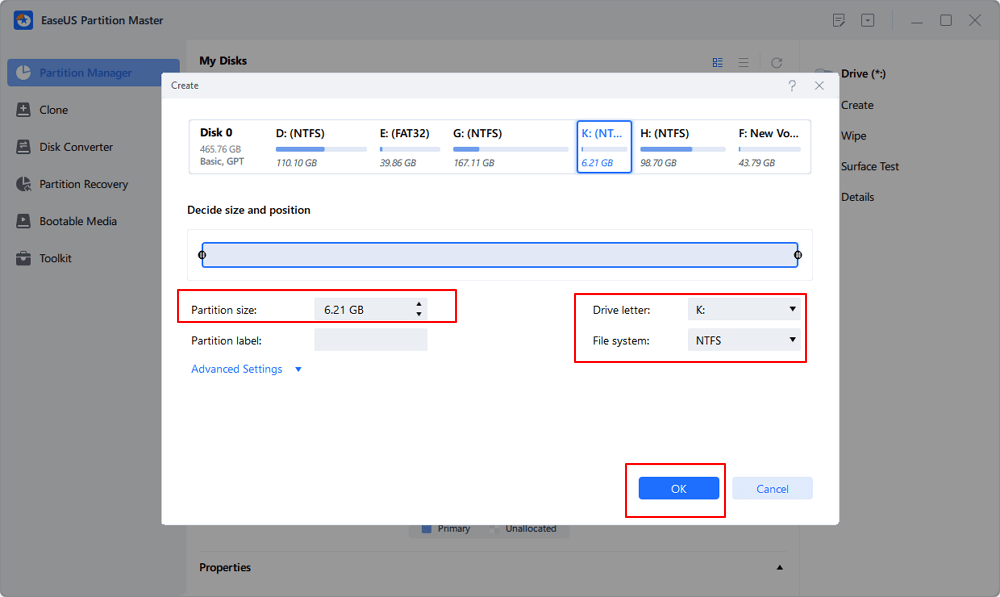
Customize the partition size, partition drive letter, partition label, file system (NTFS, FAT32, EXT2/3/4, exFAT) and more in the Advanced Settings. Click «OK».
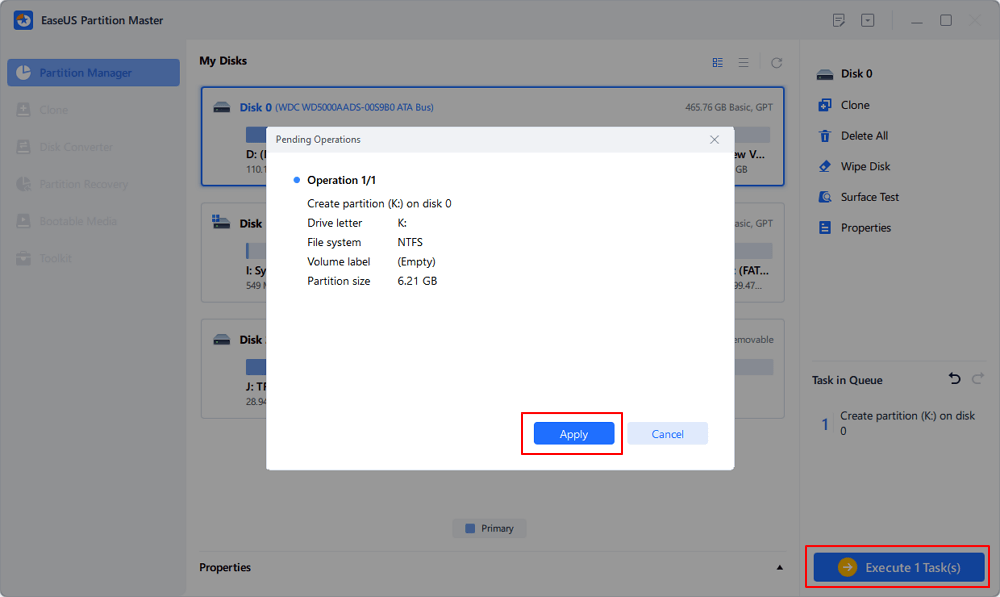
Finally, click «Execute * Task» and «Apply» to complete creating partition with the unallocated space on your disk. Repeat the steps to partition a hard drive and get many more partitions.
Read More About Antimalware Service Executable High Memory/CPU/RAM
Here are the five top frequently asked questions related to the antimalware service executable high disk usage issue. If you also have any of these problems, you can find the methods here.
Why is Antimalware Service Executable Using So Much?
Antimalware service executable high disk CPU is mostly caused by the real-time feature that can constantly scan files, connections, and other related applications in real-time. Whenever you download new files or any software or access any files, antimalware keeps scanning everything to check whether it is malicious or not. It acts quickly, which leads to the problem of high memory and high CPU usage.
Is It OK to Disable Antimalware Service Executable?
If you are suffering from antimalware service executable high CPU usage, disk, or memory usage problem on your Windows, you can turn off the real-time protection.
After doing that, Windows Defender will be disabled as well as Antimalware Service Executable. If your computer is unprotected, viruses can easily get into it. We do not recommend that at all.
How to Stop/Disable Antimalware Service Executable from Disk?
- Type Task Scheduler in the Search button. Click to expand «Task Scheduler Library > Microsoft > Windows».
- Click «Windows Defender» in Windows. Then double-click «Windows Defender Scheduled Scan».
- Uncheck «Run with highest privileges».
- Uncheck all the items in the Conditions section. Then click «OK».
Why Is My Disk Usage at 100?
If you see a very high disk usage, that means something else is not quite right. First, you can check your disk usage by opening the Task Manager in Windows 10. You’ll see a quick overview of CPU, memory, disk, and network utilization on the main process tab.
To fix Windows 10 100% disk usage issue, you can:
- Restart your system
- Check anti-virus software
- Update windows 10
- Check disk error
- Stop the superfetch service
- Clean up junk files and running memory
- Reset virtual memory and increase the ram
- Perform a clean boot on windows 10
- Upgrade the hard drive to a larger one