
Introduction
Are you looking for a reliable and efficient way to install Windows 7 on your Intel 100 series motherboard? Look no further than the MSI Smart Tool. This innovative software creates an Intel 100 series compatible Windows 7 installation on a USB storage device or ISO file, allowing you to install Windows 7 from a USB device or SATA ODD. In this article, we will delve into the features and benefits of the MSI Smart Tool, and provide a step-by-step guide on how to use it to install Windows 7 on your Intel 100 series motherboard.
What is MSI Smart Tool?
The MSI Smart Tool is a system tool designed by MSI (Micro-Star International) to create an Intel 100 series compatible Windows 7 installation on a USB storage device or ISO file. This tool allows users to install Windows 7 from a USB device or SATA ODD, making it a convenient and efficient way to install the operating system. The MSI Smart Tool is compatible with Intel 100 series motherboards and supports Windows 7 installation on USB storage devices with a capacity of 8GB or more.
Features of MSI Smart Tool
The MSI Smart Tool offers several features that make it an ideal choice for installing Windows 7 on Intel 100 series motherboards. Some of the key features of the MSI Smart Tool include:
- Compatibility with Intel 100 series motherboards: The MSI Smart Tool is specifically designed to work with Intel 100 series motherboards, ensuring a seamless installation process.
- Support for USB storage devices: The MSI Smart Tool allows users to create an Intel 100 series compatible Windows 7 installation on a USB storage device with a capacity of 8GB or more.
- Support for SATA ODD: The MSI Smart Tool also supports installation from a SATA ODD, providing users with flexibility and convenience.
- Easy-to-use interface: The MSI Smart Tool has a user-friendly interface that makes it easy to create an Intel 100 series compatible Windows 7 installation on a USB storage device or ISO file.
Benefits of Using MSI Smart Tool
The MSI Smart Tool offers several benefits that make it an ideal choice for installing Windows 7 on Intel 100 series motherboards. Some of the key benefits of using the MSI Smart Tool include:
- Convenience: The MSI Smart Tool allows users to create an Intel 100 series compatible Windows 7 installation on a USB storage device or ISO file, making it easy to install the operating system.
- Efficiency: The MSI Smart Tool is designed to work quickly and efficiently, reducing the time and effort required to install Windows 7.
- Flexibility: The MSI Smart Tool supports installation from a USB device or SATA ODD, providing users with flexibility and convenience.
- Compatibility: The MSI Smart Tool is specifically designed to work with Intel 100 series motherboards, ensuring a seamless installation process.
How to Use MSI Smart Tool
Using the MSI Smart Tool is a straightforward process that requires a few simple steps. Here’s a step-by-step guide on how to use the MSI Smart Tool:
Step 1: Download and Install the MSI Smart Tool
To use the MSI Smart Tool, you need to download and install the software on your computer. You can download the MSI Smart Tool from the MSI website or from other reputable sources.
Step 2: Create an Intel 100 Series Compatible Windows 7 Installation
Once you have installed the MSI Smart Tool, you can create an Intel 100 series compatible Windows 7 installation on a USB storage device or ISO file. To do this, follow these steps:
- Insert a USB storage device with a capacity of 8GB or more into your computer.
- Launch the MSI Smart Tool and select the USB storage device as the target device.
- Select the Windows 7 installation media as the source device.
- Click on the «Create» button to create an Intel 100 series compatible Windows 7 installation on the USB storage device.
Step 3: Install Windows 7 from the USB Device or SATA ODD
Once you have created an Intel 100 series compatible Windows 7 installation on a USB storage device or ISO file, you can install Windows 7 from the device or SATA ODD. To do this, follow these steps:
- Insert the USB storage device or SATA ODD into your computer.
- Restart your computer and enter the BIOS settings.
- Set the USB storage device or SATA ODD as the first boot device.
- Save the changes and exit the BIOS settings.
- Your computer will now boot from the USB storage device or SATA ODD and install Windows 7.
Step 4: Complete the Installation Process
Once you have installed Windows 7 from the USB device or SATA ODD, you need to complete the installation process. To do this, follow these steps:
- Follow the on-screen instructions to complete the installation process.
- Select the language and keyboard layout for your region.
- Create a user account and set up the password.
- Install any necessary drivers and software.
- Complete the installation process by restarting your computer.
Conclusion
Introduction
The MSI Smart Tool is a powerful and efficient tool for installing Windows 7 on Intel 100 series motherboards. However, like any software, it may have some questions and concerns that users may have. In this article, we will address some of the most frequently asked questions about the MSI Smart Tool, providing users with a better understanding of the software and its capabilities.
Q: What is the MSI Smart Tool?
A: The MSI Smart Tool is a system tool designed by MSI (Micro-Star International) to create an Intel 100 series compatible Windows 7 installation on a USB storage device or ISO file. This tool allows users to install Windows 7 from a USB device or SATA ODD, making it a convenient and efficient way to install the operating system.
Q: What are the system requirements for the MSI Smart Tool?
A: The MSI Smart Tool requires a computer with a compatible Intel 100 series motherboard and a USB storage device with a capacity of 8GB or more. The software also requires a Windows 7 installation media and a SATA ODD (if using).
Q: How do I create an Intel 100 series compatible Windows 7 installation using the MSI Smart Tool?
A: To create an Intel 100 series compatible Windows 7 installation using the MSI Smart Tool, follow these steps:
- Insert a USB storage device with a capacity of 8GB or more into your computer.
- Launch the MSI Smart Tool and select the USB storage device as the target device.
- Select the Windows 7 installation media as the source device.
- Click on the «Create» button to create an Intel 100 series compatible Windows 7 installation on the USB storage device.
Q: Can I use the MSI Smart Tool to install Windows 7 on a computer with a different motherboard?
A: No, the MSI Smart Tool is specifically designed to work with Intel 100 series motherboards. If you have a different motherboard, you may need to use a different tool or method to install Windows 7.
Q: What happens if I try to install Windows 7 on a computer with a non-compatible motherboard?
A: If you try to install Windows 7 on a computer with a non-compatible motherboard using the MSI Smart Tool, the software may not work properly or may not install at all. In this case, you may need to use a different tool or method to install Windows 7.
Q: Can I use the MSI Smart Tool to create a Windows 7 installation on a USB storage device with a capacity of less than 8GB?
A: No, the MSI Smart Tool requires a USB storage device with a capacity of 8GB or more to create an Intel 100 series compatible Windows 7 installation. If you try to use a smaller USB storage device, the software may not work properly or may not install at all.
Q: How do I troubleshoot issues with the MSI Smart Tool?
A: If you experience any issues with the MSI Smart Tool, try the following troubleshooting steps:
- Check the system requirements to ensure that your computer meets the minimum requirements.
- Ensure that the USB storage device is properly connected and has enough capacity.
- Try reinstalling the MSI Smart Tool or updating to the latest version.
- Contact MSI support for further assistance.
Q: Is the MSI Smart Tool compatible with other operating systems?
A: No, the MSI Smart Tool is specifically designed to work with Windows 7 and is not compatible with other operating systems.
Conclusion
The MSI Smart Tool is a powerful and efficient tool for installing Windows 7 on Intel 100 series motherboards. By understanding the system requirements, creating an Intel 100 series compatible Windows 7 installation, and troubleshooting issues, users can get the most out of the MSI Smart Tool. If you have any further questions or concerns, feel free to contact MSI support for further assistance.
Updated on Apr 28, 2025
MSI (Micro-Star International) laptops can deliver an unrivaled gaming experience. You can try booting your MSI from USB when MSI laptop black screen or doesn’t work as expected. Booting from USB on an MSI motherboard will prevent crashes and failure to boot.
In the tutorial, EaseUS Software will guide you on how to make your MSI boot from USB on Windows 11/10. We also provide some additional troubleshooting to help you solve the problem of being unable to boot MSI from bootable USB.
| ⏱️Duration | 3-6 minutes of reading |
| 💻Applies to | Get the MSI boot from USB on Windows 11/10/8/7 |
| ⛏️ Tools |
✔️USB ✔️Professional tool — EaseUS Partition Master ✔️MSI laptop or desktop |
| 🖌️ Stages |
1️⃣Stage 1. Access the Boot Device Menu 2️⃣Stage 2. Select Boot from the USB 3️⃣Stage 3. Set Up MSI to Boot from USB 4️⃣Stage 4. Enable MSI to Boot from USB 5️⃣Stage 5. Adjust Boot Priority in MSI BIOS |
Preparations for MSI Boot From USB
If you want to boot your computer from USB and install Windows on your MSI laptop, you need to do the following preparations to ensure that the boot process goes smoothly:
Stage 1. Prepare the USB
Please prepare at least 16GB of free space on the USB and format USB to FAT32:
- Right-click on the Windows icon and find Disk Management.
- Locate the USB drive, right-click, select «Format,» and set it to FAT32 format.
Stage 2. Make a Windows Bootable USB
There are two scenarios for making a Windows bootable USB:
- Create Bootable Installation USB: If you want to install Windows from USB to solve the problem of system crash or boot error, download the Windows ISO file and burn it to USB.
- Create Bootable USB: If you only want to run a boot computer on MSI without installing Windows — you can create a bootable USB drive by cloning your Windows system to USB. Or use a Windows installation tool or third-party tool to create a bootable USB.
Whatever your reason for wanting to create a bootable USB, we’ll give you a detailed guide:
Guide 1. Creating a Bootable Installation USB
Often, we need bootable media to get into the system when it crashes, so we prefer to use EaseUS Partition Master Professioanl to create bootable installation media and then reinstall Windows OS on MSI.
Download the Windows ISO file: https://www.microsoft.com/en-us/software-download/windows11
Download the ISO burning tool:
The tool provides easy-to-use methods, even if you are a novice, you can finish mastering the operation skills:
Steps to create a bootable installation USB:
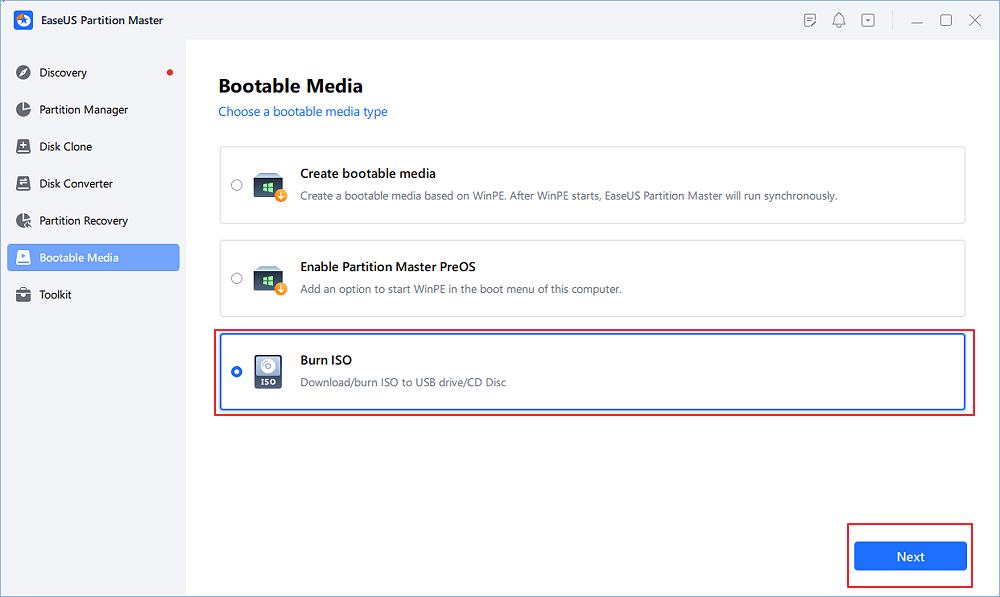
Step 1. Launch EaseUS Partition Master and go to the Bootable Media section. Click «Burn ISO» and click «Next».
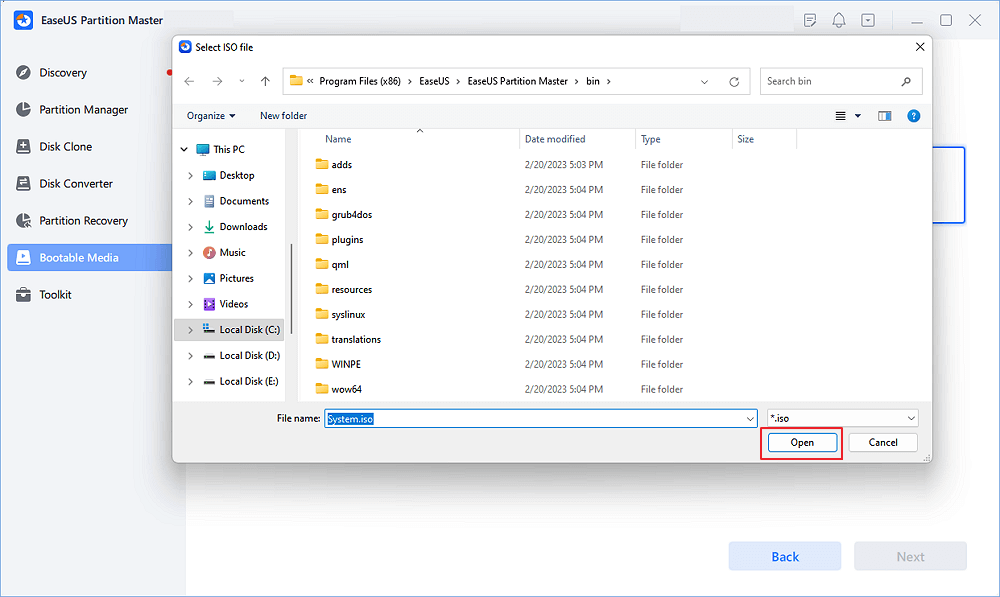
Step 2. Select the ISO image that you have downloaded on your PC, and click «Open».
Step 3. Click «Next» and select the target USB as destination and click «Burn» to execute the operation.
Guide 2. Creating a Bootable USB
To create a bootable drive, you can use EaseUS Partition Master to migrate Windows OS to USB.
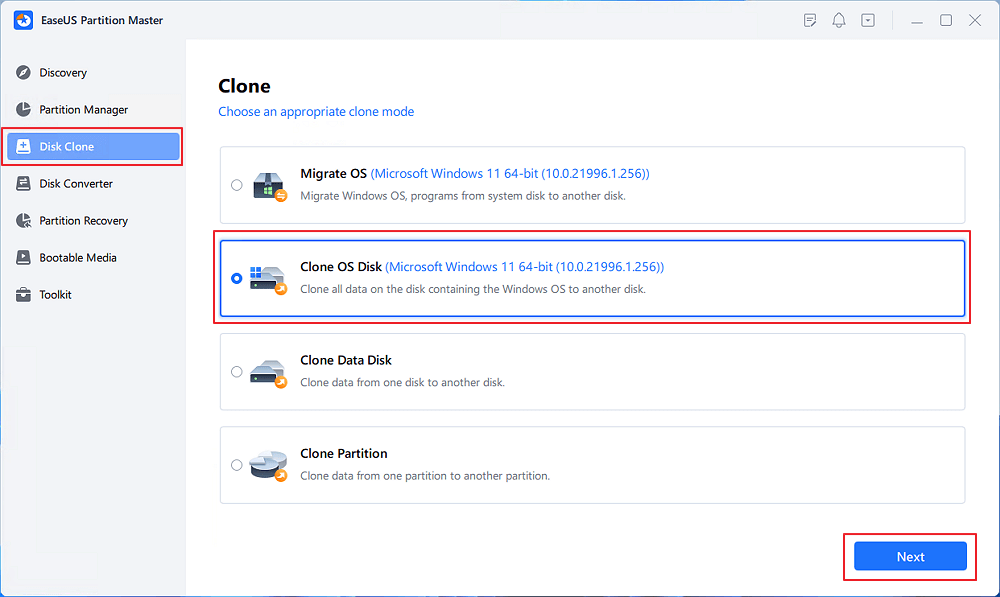
Step 1. Launch EaseUS Partition Master, go to the Disk Clone tab, select «Clone OS Disk» and click «Next».
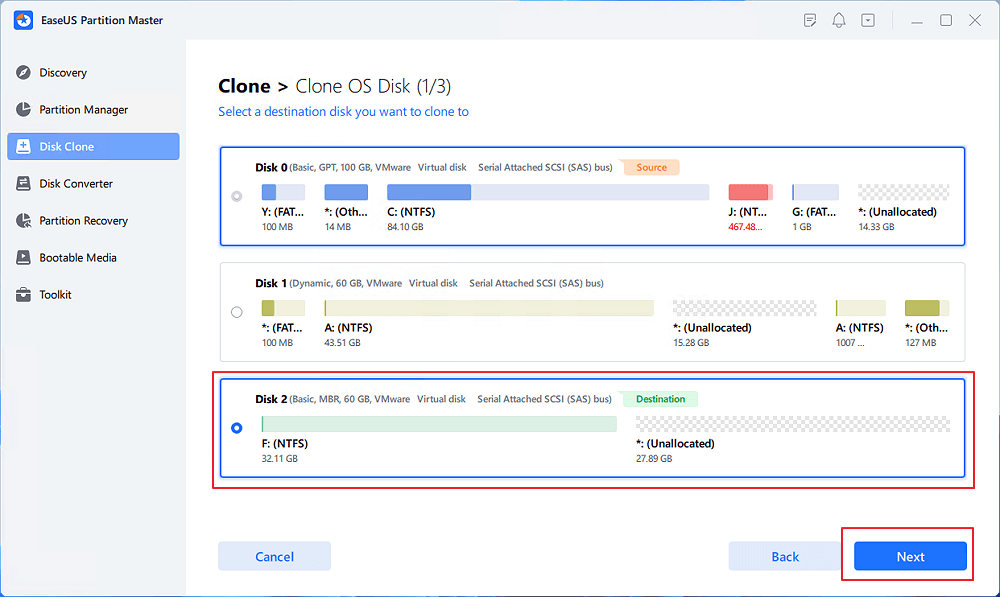
Step 2. Select the target new drive where you want to clone the OS to, and click «Next».
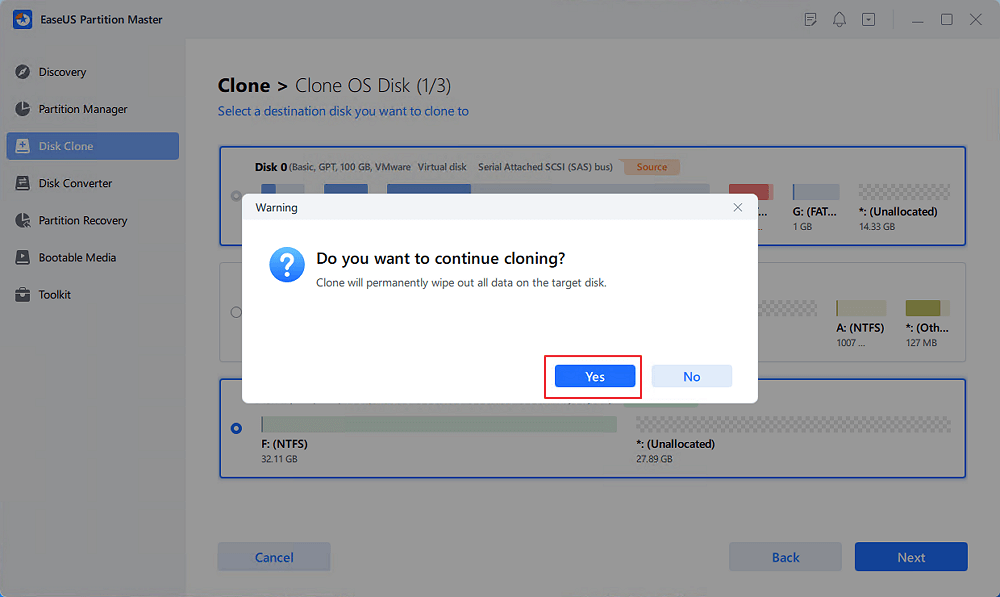
Click «Yes» to confirm that you want to continue the OS disk cloning process.
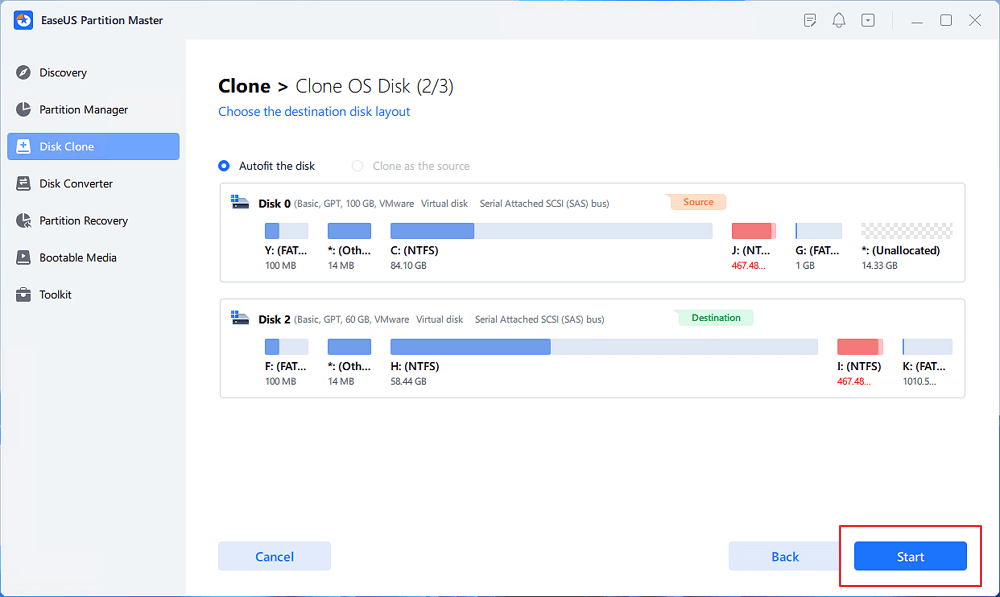
Step 3. View the disk layout, and click «Start» to begin the OS cloning process.
Step 4. When the process completes, you’ll see a confirming message, asking «if you want to start up computer from the clone target disk».
- Reboot Now means to reboot your PC and configure the computer to boot OS from the new disk immediately.
- Done means you want to make the changes later.

Furthermore, you can also use EaseUS OS2Go — a program specifically designed for Windows bootable purposes.
Read more: How to create a bootable USB
When you are ready with the above, read on, and we will use the bootable USB to boot your MSI laptop now. And if you think this guide is useful, share it with others in need.
How to Boot from USB on MSI Motherboard
In this section, we provide a detailed guide to boot your MSI laptop from USB in 5 stages as follows:
Stage 1. Access the Boot Device Menu
1️⃣. Open the laptop, and when the MSI logo appears, press F11 repeatedly.
2️⃣. Open the boot menu and select bootable USB flash drive.
Stage 2. Select Boot from the USB
1️⃣. Find the bootable USB drive in the boot menu and select it.
2️⃣. Press Enter to start making the USB boot the MSI laptop.
Stage 3. Set Up MSI to Boot from USB
1️⃣. Reboot the MSI laptop.
2️⃣. After the MSI logo appears, press F11 repeatedly to open the Boot menu.
3️⃣. In the Boot menu, select Boot from USB under the Set Boot option.
4️⃣. Press Enter to begin booting the MSI laptop from the USB drive.
Stage 4. Enable MSI to Boot from USB
Once you have successfully set USB as a bootable drive, you can use it to boot your computer:
1️⃣. Shut down the MSI computer.
2️⃣. Press and hold the Esc key and the Power button to boot the MSI.
3️⃣. Keep holding the Esc key until BIOS SETUP UTILITY appears.
4️⃣. Under the Boot option, select the USB drive and Press and hold Enter to boot the MSI system from USB.
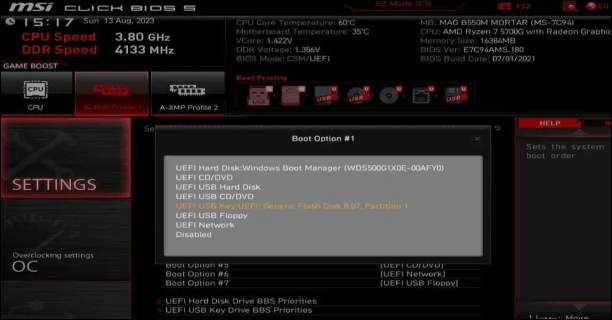
Stage 5. Adjust Boot Priority in MSI BIOS
Now that you have booted your MSI laptop from the USB drive, the next step is to adjust the boot priority. Once you’ve set the boot order in BIOS, you can permanently set the USB drive to the highest priority and build your system: in the presence of a USB, the system will boot from that USB first. Otherwise, the system will boot from the second boot item.
1️⃣. Turn on your MSI notebook and press Del/F2 repeatedly.
2️⃣. Go to the MSI BIOS setup menu.
3️⃣. Set the boot order of the USB:
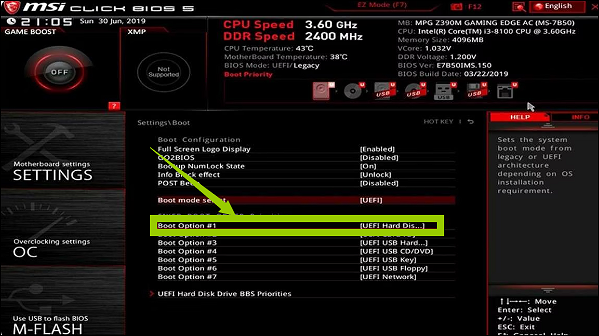
- MSI BIOS loads to EZ mode by default. Please drag and drop the USB drive to the first position of «Boot Priority.»
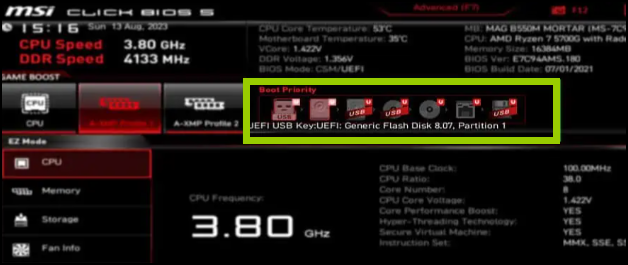
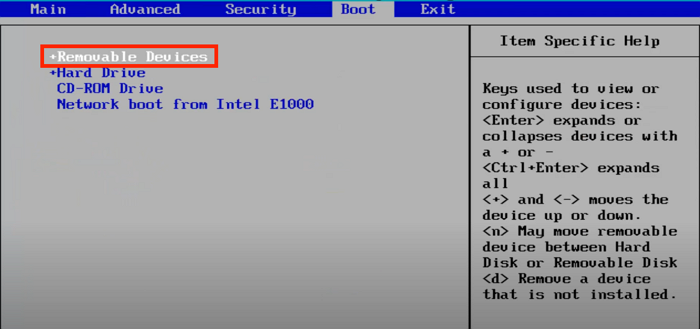
- Please press F7 to switch to the advanced mode interface: select Settings>Boot and set USB as the boot option 1.
4️⃣. After setting the boot priority for your MSI laptop, press F10 to save the changes and exit the BIOS.
If you want to reinstall Windows via the created bootable USB, please follow the above steps to set USB as a boot order and refer to the following article to reinstall Windows.
How to Install Windows 10 from USB Drive
This tutorial will concentrate on installing Windows 10 from USB. When your computer does not use the OS installation CD, you can install Windows 10 via EaseUS Partition Master or Windows Media Creation Tool.
Bonus Tip: Fix Unable to Boot MSI from Bootable USB
It is not difficult to burn Windows ISO to USB using EaseUS Partition Master, then set the USB boot sequence on an MSI laptop so that MSI can boot from USB. But sometimes, the BIOS fails to detect the MSI bootable USB. Why? This section gives some quick troubleshooting:
1. First, please check the cables and power supply board and solve any other hardware problems, such as USB port corruption or USB drive corruption.
2. Disable Fast Boot and Safe Boot: These will prevent USB from being detected or prevent you from booting with an unauthenticated device.
3. Different system configurations: The USB’s target system (Legacy/CSM/UEFI) and partition style (MBR/GPT) must match your current system configuration. If the partition style does not match, please convert MBR to GPT and vice versa.
4. Outdated BIOS: You can fix the unbootable USB by updating the BIOS.
5. In addition, resetting the CMOS battery can clear all non-default BIOS settings and may allow your MSI to boot.
6. Bootable USB creation failure: Please use a professional tool when creating a bootable USB.
Hope these tips can solve your problem! Besides, don’t hesitate to share this tutorial with others if you think it’s useful:
Conclusion
If your MSI laptop system crashes and your computer won’t boot, try booting from a USB flash drive and reinstalling Windows OS.EaseUS Partition Master provides two methods for creating bootable installation media and a USB. Additionally, this tutorial provides quick fixes if the bootable USB you created does not appear in the BIOS.
FAQs About MSI Boot from USB
This section will provide more information about booting MSI from a USB drive. Please read on to solve more of your doubts.
1. How to boot into MSI BIOS?
The MSI motherboard BIOS controls the boot process. If you are familiar with the MSI boot menu key, you can easily enter the BIOS:
Reboot your computer and Press and hold Delete/F2 for BIOS while the system is booting.
After changing the BIOS settings, press Esc to save the changes and exit.
2. How to boot Windows 10 from USB in MSI?
Before booting from USB, please set USB as bootable media and connect it to your MSI computer:
Step 1. Reboot your computer and hit Delete repeatedly to enter the BIOS setup.
Step 2. Navigate to the Boot tab in BIOS setup and select UEFI.
Step 3. After saving the settings, reboot and press «F11» repeatedly to enter the boot menu.
3. How to install Windows from USB in MSI?
Please use EaseUS Partition Master to create bootable installation media first and then boot from the installation CD:
Step 1. Reboot your computer, enter the boot menu when the MSI logo appears, and select Boot from USB.
Step 2. Set the language, date, etc., and click Next.
Step 3. Select Install Now and follow the on-screen instructions to continue the installation.
В комплекте с материнскими платами MSI всегда идет диск с программным обеспечением. В нем можно найти программы для настройки кулеров, управление RGB подсветка (если поддерживается) и много всего прочего. Из всего ассортимента хочу выделить MSI smart tool. Что это за программа, рассмотрим в рамках данной статьи.
Назначение программы
MSI Smart Tool используется для создания загрузочного диска Windows 7. Кроме создания самого загрузчика операционной системы, программа также записывает драйвер Intel RST (технология Intel® для быстрого хранения данных, используемая в процессорах 6-го поколения) и xHCI (чтобы Windows 7 при установке не просил драйвер USB 3.0). Воспользовавшись MSI Smart Tool, можно установить Windows 7 на жесткий диск или твердотельный накопитель без лишних хлопот.
Как использовать программу?
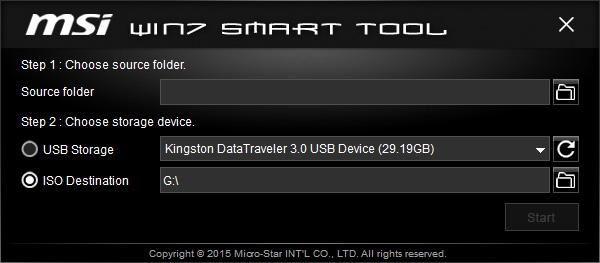
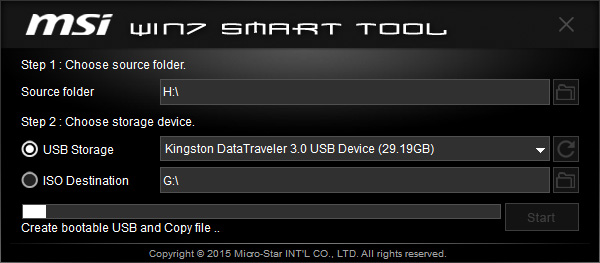
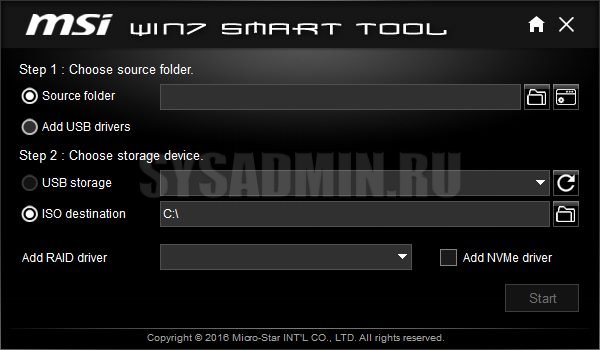
Программа достаточно проста в использовании. Представляет собой окно, с возможностью выбора источника для записи (папка с данными или ISO образ, смонтированный на виртуальный привод) и USB накопителя.
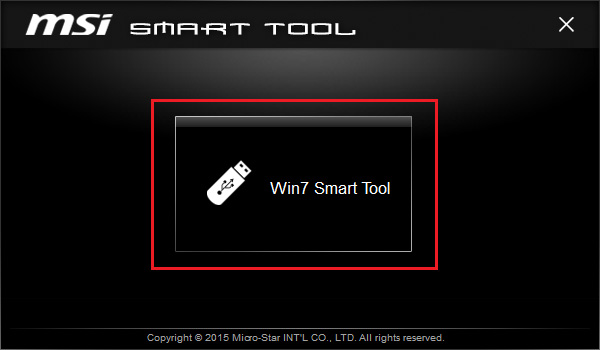
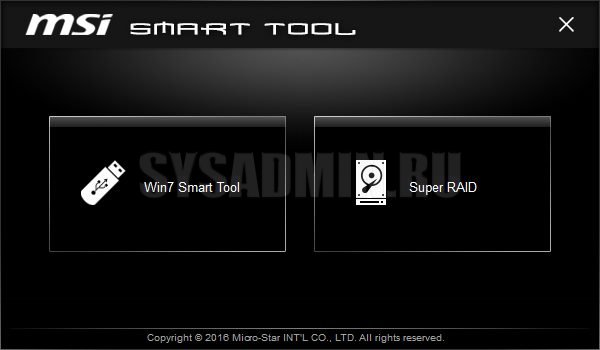
Запустите MSI Smart Tool и нажмите на кнопку Win7 Smart Tool.
В появившемся окне нужно подтянуть USB накопитель и указать источник записи.
Сделаем это:
- Нажмите правой кнопкой мыши по ISO образу Windows 7, выберите «Открыть с помощью» — «Проводник».
- Подключите флешку к компьютеру.
- Теперь нажмите обновить USB Storage чтобы программа определила флешку.
- В Source folder выберите виртуальный диск, на который смонтировали образ ОС. В моем случае это H:\.
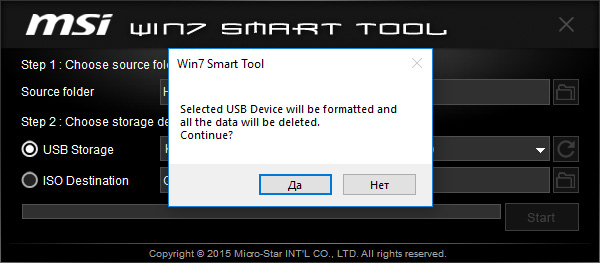
- Нажмите Start и согласитесь с удалением файлов на носителе.

- Ждите окончания записи.
В целом это все. Сделать такой носитель можно с помощью множества программ, часть из них описаны в статьях: загрузочная флешка Windows 7 и Windows 10. А пользоваться MSI Smart Tool или аналогом, решать только вам!
- Содержание статьи
- Общая информация
- Утилита от ASRock — Win 7 USB Patcher
- Утилита от Gigabyte — Windows Image Tool
- Утилита от MSI — MSI Smart Tool
- Комментарии к статье ( 81 шт )
- Добавить комментарий
Те люди, которые решили поставить Windows 7 на компьютеры, выпущенные на чипсетах, которые были выпущены после 2015 года, могут столкнуться с весьма неприятным явлением в виде отсутствия возможности установить данную операционную систему с USB носителя — будь то флешка, или же подключенный через USB оптический привод.
Общая информация
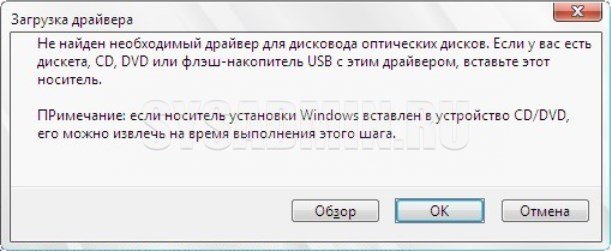
Связано это с тем, что в новых чипсетах Intel, начиная с 100 серии (B150, H110, H170, Q150, Q170, Z170) убрана поддержка Enhanced Host Controller Interface, и поэтому USB разъемы любой версии попросту не работают в установщике Windows. Выражается это в следующем сообщении:
Не найден необходимый драйвер для дисковода оптических дисков. Если у вас есть дискета, CD, DVD или флеш-накопитель USB с этим драйвером, вставьте этот носитель.
Примечение: если носитель установки Windows вставлен в устройство CD/DVD его можно извлечь на время выполнение этого шага.
Тем не менее, многие производители материнских плат решили позаботиться о своих пользователях, и выпустили соответствующие утилиты, которые интегрируют драйвера в установщик Windows 7.
Утилита от ASRock — Win 7 USB Patcher
Поддерживаются материнские платы на следующих чипсетах AMD*:
A320, B350, B450, X370, X470, X570
Поддерживаются материнские платы на следующих чипсетах Intel*:
B150, H110, H170, Q150, Q170, Z170
B250, H270, Q250, Q270, Z270
X299
B360, H310, H370, Q360, Q370
Система на кристалле (SoC) Intel:
J3000, N3000
* По информации производителя программного обеспечения.
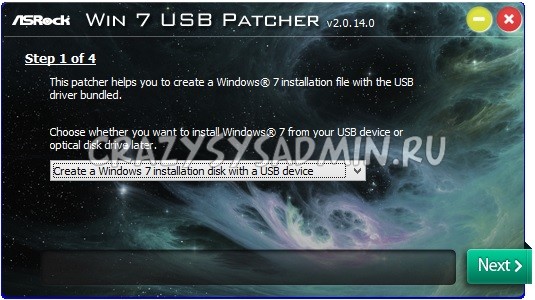
Компания ASRock специально выпустила утилиту «Win 7 USB Patcher», которая добавляет в образ установщика Windows все необходимые драйвера. Скачать её можно либо с сайта ASRock, выбрав один из вариантов под нужную вам платформу — Intel 100, 200/AMD AM4 или Intel N3000, J3000.
Пользоваться данной утилитой достаточно легко:
- Запускаем исполняемый файл, и выбираем нужное действие:
- Create a Windows 7 installation disk with a USB device — Создать установочный диск Windows 7 для USB устройства;
- Create a Windows 7 installation disk with a CD — Создать установочный диск Windows 7 для CD;
- Create a Windows 7 installation ISO file for CD — Создать установочный ISO образ для CD;
Выбрав нужный пункт, отправляемся дальше, нажав кнопку «Next».

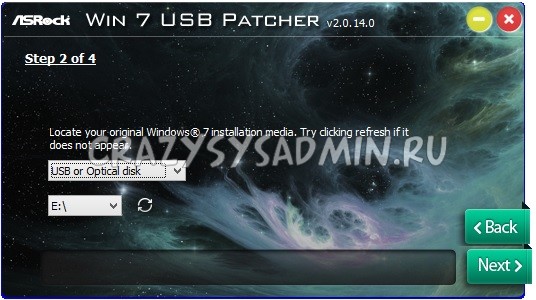
- Теперь предстоит задача выбрать источник с установочными файлами Windows, с которым будет работать программа. На выбор доступно:
- USB or Optical disk — USB или оптический диск;
- Source Directory — Папка Source из установочных файлы Windows;
- ISO File — файл образа ISO

После указания установочных файлов нужно нажать кнопку «Next».
- В следующем шаге нужно указать место, куда произойдет сохранение модифицированных файлов установщика Windows 7. Выбрав нужный диск, USB накопитель или ISO файл (предложенные варианты зависят от сделанного выбора в шаге 1, который можно изменить, перейдя к нему путем нажатия кнопки «Back»), нажимаем кнопку «Next».
- Теперь осталось только нажать кнопку «Start» и ждать завершения процедуры модификации файлов Windows.
- После завершения достаточно лишь только начать установку Windows 7 на проблемном компьютере — теперь установщик видит как и USB 2.0 порты, так и USB 3.0.
Поддерживаются материнские платы на следующих чипсетах Intel*:
B150, H110, H170, Q150, Q170, Z170
B250, H270, Q250, Q270, Z270
X299
* По информации производителя программного обеспечения.
Кампания Gigabyte так же выпустила утилиту под названием «Windows Image Tool», скачать которую можно по этой ссылке.
Для её использования, достаточно просто распаковать содержимое архива в любую папку, и запустить исполняемый файл под названием WindowsImageTool.
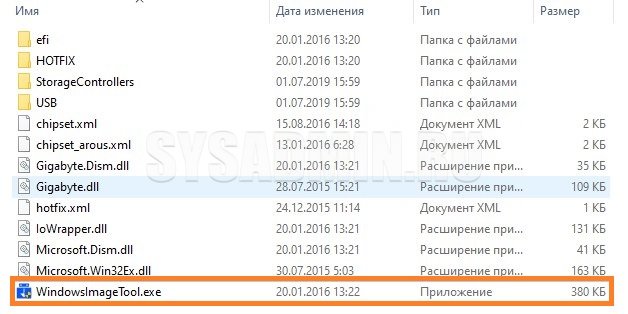
Запуск программы потребует права администратора, так что если она их затребует, разрешите их.
К сожалению, программа не умеет работать с ISO образами напрямую, и требует либо оптический привод и/или наличие USB накопителя.
Интерфейс программы довольно просто — в первом выпадающем списке нужно выбрать исходный установочный образ Windows 7 (который может быть, как на DVD диске, так и на USB), во втором выпадающем списке нужно выбрать «пунк назначения», куда будет сформирован новый установочный образ Windows 7, при этом это может быть только USB носитель (флешка).
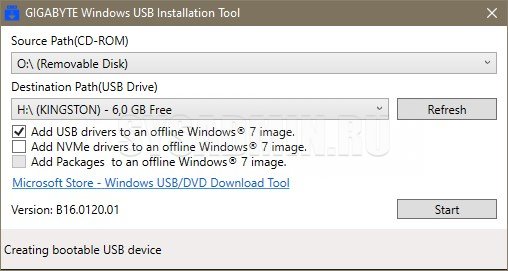
Как только будут выбраны все нужные диски, нужно обязательно убедится, что стоит галочка у пункта «Add USB drivers to an offline Windows 7 image», и нажать на кнопку «Start».
По завершению процесса вместо кноки «Start» станет активна кнопка «Close». После этого, нужно извлечь флешку и приступать к установке Windows на нужном компьютере.
Поддерживаются материнские платы на следующих чипсетах AMD:
X399
Поддерживаются материнские платы на следующих чипсетах Intel*:
B150, H110, H170, Q150, Q170, Z170
* По информации производителя программного обеспечения.
MSI в свою очередь подготовила утилиту «MSI Smart Tool», которая может выполнять множество полезных для обладателя плат MSI действий, и среди них — подготовка образа Windows 7 для установки на материнские платы Intel с последним версиями чипсетов серий 1ХХ/2XX.
Скачать её можно в разделе загрузок нужной материнской платы MSI (Раздел «Утилиты»), или же с нашего сайта (см. ниже).
Скачать MSI Smart Tool (v1.0.0.25)
Скачать MSI Smart Tool (v1.0.0.37)
После скачивания запускаем исполняемый файл, и устанавливаем программу.
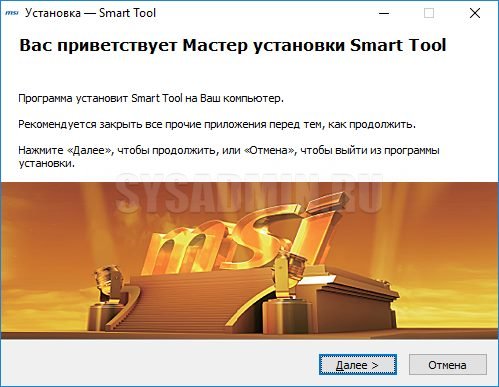
После установки запускаем её, и видим перед собой предупреждающее сообщение, в котором говориться для какой цели была создана данная программа, а так же указание не вытаскивать флешку во время работы программы.

В программе выбираем пункт «Win7 Smart Tool».
Затем задаем в пункте Source Folder путь к файлу образа, или же к папке с распакованным образом. В разделе «Choose storage device» выбираем либо флеш-носитель («USB Storage»), либо создание образа ISO («ISO Destination»). По завершению указания всех нужных путей нажимем кнопку Start, и ждем завершения процедуры.
По окончанию процедуры появится соответствующее уведомление:
Creates a bootable USB with Windows 7 installer
О, нет
ссылка на загрузку не доступна
Количество загрузок:113,505 (109 за последнюю неделю)
Операционная система:Windows XP/7/8/10/11
Последняя версия:1.0.0.45
Сообщить о неточности
Описание
Cкриншот
Create a bootable USB drive from Windows 7 installation in the DVD or ISO file format. Install it onto the Intel 100 series motherboard. It requires a minimum of the 8GB USB flash drive. The utility also creates software RAID in the Windows system equipped with at least 3 hard-disk drives.
Скачать MSI Smart Tool 1.0.0.45 бесплатно с сайта. Это бесплатное программное обеспечение принадлежит MSI. По умолчанию название для установочного файла Smart Tool.exe.
Эта бесплатная программа устанавливается на Windows XP/7/8/10/11, 32-бит версию. Версия 1.0 наиболее популярна среди пользователей. MSI Smart Tool относится к категории Системные утилиты.
От разработчика:
MSI Smart Tool creates an Intel 100 series compatible Windows 7 installation into USB storage or ISO file. It allows you to install Windows 7 from USB device or SATA ODD for Intel 100 Series motherboard. USB storage needs 8GB or more capacity and it will be formatted during the process.
Мы предлагаем оценить другие программы, такие как Smart Phone Upgrade Tool, Smart PDF Tools Pro или Smart Tools, которые часто используются вместе с MSI Smart Tool.
Обновлено: