
MSI is one of the best laptop brands worldwide. It makes some of the best gaming laptops available on the market, and its business laptops are pretty impressive, too. The boot menu is an important feature of your computer. This article from EaseUS will describe what the MSI boot menu is and how to access it. Hurry up and learn.
The MSI boot menu, also known as the startup menu, is a menu that holds responsibility for booting your computer. The MSI boot menu is essentially the Advanced boot options menu. By default, you do not see it when you usually boot your computer. But if you are careful, you can find a prompt on your computer screen that tells you which button to press for easy access to the boot menu.
When you experience startup or operation problems on MSI computers, you can use the boot menu to access Startup Settings, BIOS, Safe Mode, and many other startup methods to help you access and repair Windows.
Tips to Access MSI Boot Menu
The boot menu is related to the computer booting process. The following describes how to boot: To confirm that the hardware is prepared, POST first detects the peripherals and devices; Then, the computer accesses the BIOS firmware, chooses which boot device should be used as its top priority, and reads the selected boot device to launch the operating system.
But sometimes, you need to open the boot menu and change the boot order. This is because your computer might not boot into the operating system, or you need to change the boot device. At this time, you need to access the MSI boot menu.
To access the MSI boot menu, you have 2 choices:
- Way 1. Press and hold F11 to access the MSI boot menu when the computer turns on and choose the boot device.
- Way 2. Access the BIOS menu by holding the BIOS key — Del when your computer turns on, select Boot > Boot mode and then choose LEGACY+UEFI & UEFI; select Boot Option#1 to select UEFI HARD DISK or HARD DISK; and finally, select UEFI Hard disk Driver BBS Priority or Hard disk driver BBS Priority to designate Boot Option#1 as the boot device.
By following the 2 methods above, you can enter the MSI boot menu. You may also like the following topic:
What If You Cannot Access MSI Boot Menu
Generally speaking, it’s easy to access the MSI BIOS or boot menu. However, some claim they cannot access the MSI BIOS or boot menu. There are three ways you can handle this situation.
Way 1. Use a PS/2 Keyboard
An MSI motherboard user provides this method. He claimed that USB keyboards have an issue because the computer does not recognize them until the OS loads. The MSI boot menu key and MSI BIOS key are inoperable.
To resolve this issue, you only need to swap from the current USB keyboard to the PS/2 keyboard. You can use this technique if you have a PS/2 keyboard. If you don’t have one of those keyboards, try the methods below.
Way 2. Enter UEFI Firmware Settings
Use this method if your PC won’t boot into Windows. Please refer to the steps below:
Step 1. Turn on and off your computer 3 times to enter Windows Recovery Environment.
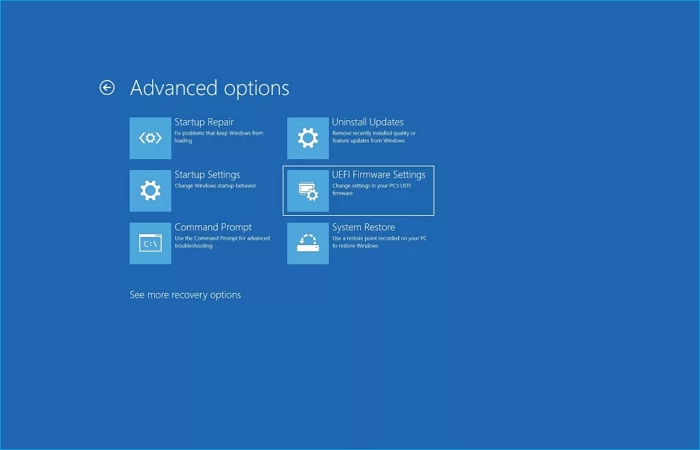
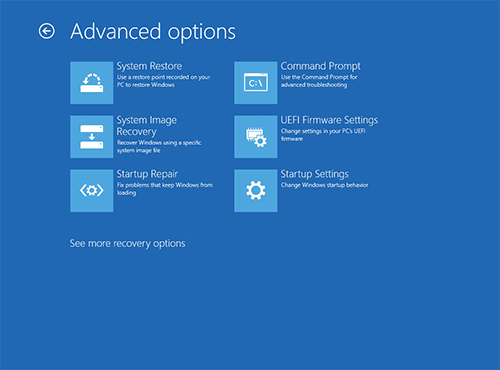
Step 2. Go to Troubleshoot > Advanced Options > UEFI Firmware Settings.
Step 3. To access BIOS and modify UEFI settings, click Restart.
Way 3. Turn Off Fast Startup
If you can boot into Windows, apply this method. Perform the steps below:
Step 1. Open Control Panel.
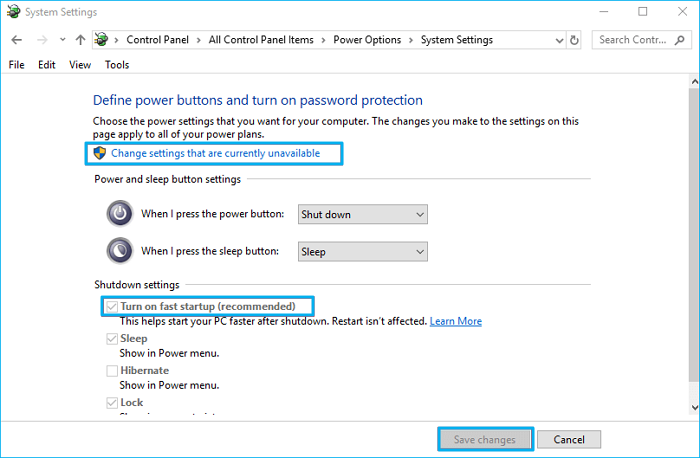
Step 2. Head for System and Security > Power Options > Choose what power buttons do.
Step 3. Uncheck the Turn on fast startup option by clicking Change settings that are currently unavailable, and then click Save changes.
If you can’t enter the MSI boot menu, you can use the methods above to help you get into the boot menu.
If you like this post and find it useful, you can share it on your social platforms.
Concluding Thoughts
What is the MSI boot menu? Have you gotten your answer now? After reading this post, you can learn what the boot menu of an MSI laptop is, how to access MSI boot menus, and what to do if you cannot access the MSI boot menu. Sincerely hope you can get what you want in this article when you search on the Internet.
-
Home
-
Partition Manager
- How to Access MSI Boot Menu
By Linda | Follow |
Last Updated
Do you know how to access MSI boot menu? What are the MSI boot menu key and MSI BIOS key? In this post, MiniTool Partition Wizard shows you how to do that. In addition, it also offers solutions to fix MSI boot menu key and MSI BIOS key not working issue.
Boot menu is always related to computer booting process. The booting process is as follows: POST first detects the peripherals and devices to make sure the hardware is ready; next, the computer accesses the BIOS firmware and then assigns to boot from the boot device with the first priority; finally, read the assigned boot device to enter the operating system.
Sometimes, you need to open boot menu and change the boot order for the following two reasons:
- The computer doesn’t boot into operating system. You need to check the boot menu.
- You need to change the boot device, for example, you want to boot MSI from USB.
Anyway, you need to access the MSI boot menu. To access MSI boot menu, here are two ways:
- Upon powering on the PC, please start hitting the MSI boot menu key—[F11]—continuously to enter the boot device selection.
- Upon powering on the PC, hit the MSI BIOS key—[Del]—key continuously to enter the BIOS menu; navigate to [Boot] > [Boot mode select] and select [LEGACY+UEFI] & [UEFI]; select [Boot Option#1] to choose [UEFI HARD DISK] or [HARD DISK]; finally, select [UEFI Hard disk Driver BBS Priority] or [Hard disk driver BBS Priority] and set [Boot Option#1] as the boot device.
Through the above ways, you can boot into the operating system you want to enter.
In general, entering MSI BIOS or MSI boot menu is very simple. But some people report that they can’t enter MSI BIOS or MSI boot menu. In this case, there are 3 ways for you to solve this problem.
Way 1: Use PS/2 Keyboard
This solution is provided by a MSI motherboard user. He said there is a problem with USB keyboards that the USB keyboards are not recognized by the computer until the OS starts to load. Therefore, the MSI boot menu key and MSI BIOS key are not working.
To solve this problem, you just need to switch the current USB keyboard to the old PS/2 keyboard. If you have a PS/2 keyboard, you can try this method. If you don’t have such a keyboard, just try the following ways.
Way 2: Turn Off Fast Startup
If you can boot into Windows, you can use this method. Please refer to the following steps:
- Boot into Windows and then open Control Panel.
- Navigate to System and Security> Power Options > Choose what power buttons do.
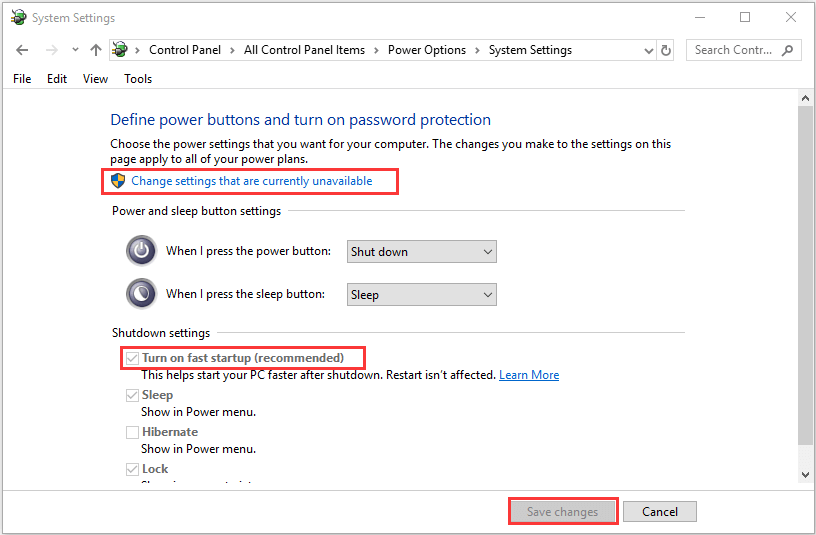
- Click Change settings that are currently unavailable, uncheck Turn on fast startupoption and hit Save changes.
How to Enter Lenovo Boot Menu & How to Boot Lenovo Computer
Way 3: Enter UEFI Firmware Settings
If your computer can’t boot into Windows, you can use this method. Please refer to the following steps:
- Power on and off your computer continuously 3 times to enter Windows Recovery Environment.
- Navigate to Troubleshoot > Advanced options > UEFI Firmware Settings.
- Click Restart to enter BIOS and change UEFI settings.
After performing the above methods, your keyboard can respond to your commands in computer booting process.
What Is Dell Boot Menu and How to Enter It on Windows 10
About The Author
Position: Columnist
Linda has been working as an editor at MiniTool for 5 years. She is always curious about computer knowledge and learns it crazily. Her articles are simple and easy to understand. Even people who do not understand computer can gain something. By the way, her special focuses are disk management, data recovery and PDF editing.
MSI (Micro-Star International) is one of the best laptop brands globally, manufacturing some of the best gaming laptops in the market, along with decent business laptops. The Boot Menu is an essential feature of a computer. This article will introduce the MSI Boot Menu and how to access it from a utility standpoint. Let’s dive right in.
What is the MSI Boot Menu?
The MSI Boot Menu, also referred to as the Boot Menu, is a menu responsible for booting up your computer. The MSI Boot Menu is essentially an Advanced Boot Options menu. By default, you won’t see it during a normal startup of your computer. However, if you pay close attention, you’ll find a prompt on your screen indicating which key to press to easily access the Boot Menu.
This image displays the MSI (Micro-Star International) boot menu. In this menu, users can select which device to boot their computer from, such as a hard disk drive, CD/DVD drive, USB device, or from the network. Typically, one can access this menu by pressing a specific key (like F11 or F12) during the computer’s startup process.
When your MSI computer encounters issues with starting up or running, you can use the Boot Menu to access boot settings, BIOS, Safe Mode, and various other boot methods to help you access and troubleshoot Windows.
Boot into the MSI Boot Menu Prompt
The boot menu is related to the computer’s boot process, which goes something like this: First, the Power-On Self Test (POST) checks peripherals and hardware to ensure everything is ready. Next, the computer accesses the BIOS firmware, which selects the preferred boot device, and reads data from that device to load the operating system.
However, there might be times when you need to access the boot menu and change the boot order. This can be the case when your computer doesn’t boot the operating system, or you need to change the boot device. This is when you’d want to access the MSI boot menu.
To enter the MSI Boot Menu, you have two options:
- Method 1: Press F11 while starting up to enter the MSI Boot Menu, then select your boot device.
- • Method 2: Press the BIOS key (usually Del) while starting up to enter the BIOS menu, then select Boot > Boot Mode, and choose LEGACY + UEFI & UEFI. Select Boot Option #1 and choose the UEFI hard drive or hard disk. Finally, under Boot Option #1 for UEFI HDD BBS Priorities or HDD BBS Priorities, set the boot option as the boot device.
These are the 2 ways you can access the MSI boot menu. You might also be interested in:
MSI Screen Stuck? How to Fix?
Is your MSI laptop stuck on the MSI splash screen? Learn how to fix the MSI stuck screen issue in this comprehensive article.
What to do if you can’t access the MSI Boot Menu
It’s usually easy to get into the MSI motherboard BIOS or boot menu, but some people have reported difficulty accessing them. Try each of these three methods to resolve the issue.
Method 1: Use a PS/2 Keyboard
This is a method provided by a user with an MSI motherboard. He claims that USB keyboards have an issue where they aren’t recognized by the computer before the operating system loads. Neither the MSI boot menu key nor the MSI BIOS key works.
To fix this, all you need to do is switch out your current USB keyboard for a PS/2 keyboard. If you have one of these keyboards lying around, give it a try. If not, read on.
Method 2: Enter UEFI Firmware Settings
Use this method if you can’t start your computer from Windows. Follow these steps:
Step 1. Boot your computer three times to access the Windows Recovery Environment.
2. Next, go to Troubleshoot > Advanced options > UEFI Firmware Settings.

Step 3: To access the BIOS and change UEFI settings, click Restart.
Method 3: Disable Fast Startup
If you can start Windows, you can use this method. Follow these steps:
Step 1: Open the Control Panel
Step Two: Click “System and Security” > “Power Options” > “Change what the power buttons do.”
Step 3: Click “Change settings that are currently unavailable,” then uncheck the box next to “Turn on fast startup.” Click “Save changes.”

If you can’t enter the MSI Boot Menu, the above methods can help you access the Boot Menu.
If you enjoyed this article and found it helpful, please share it on your social media platforms.
I’m sorry, it seems like you have entered a blank message. Please provide the English content you would like translated, and I’ll be glad to assist you.
Conclusions
What is the MSI Boot Menu? Have you found the answer? After reading this article, you will understand what the MSI boot menu is on an MSI laptop, how to access it, and what to do if you cannot access it. We sincerely hope that you can find what you are looking for in this article during your online search.
What Is A Boot Menu Key?
A Boot Menu Key is a secret key on a computer keyboard. It helps the boot menu when starting the computer. It helps access the boot menu when starting the computer. You can normally get it through using keys like F11, F8, or ESC, but it might be different for each model. When pressing that key at the time of startup, it helps to pick a temporary boot device, like a USB drive or DVD, instead of the usual way for the computer to start. It is handy for things such as installing a new operating system, fixing problems, or varying settings like BIOS or UEFI without making permanent changes to your system.

To access the MS boot menu, click F11 at the time of startup on MSI computers. It operated the MSI boot menu key. It offers a menu for choosing a boot device. That feature is common for MSI computers for modifying boot options.
1. Power On and POST:
On your computer, the system will start the Power on the self-test process. It ensures the working of hardware.
2. Look for the message:
Check the message showing how to put CLICK BIOS II. It prompts with instructions such as “Press the DEL key to enter Setup Menu, and F11 to enter Boot Menu.”
3. Press DEL for Setup Menu or F11 for Boot Menu:
When a message is shown, press the defined key (DEL for Setup Menu or F11 for Boot Menu). Take that action before the operating system starts loading.
4. Message Disappears Before Responding:
You miss the window if the message does not show before responding. Here you need to restart the system.
5. Restart Options:
Restart the system by turning it OFF and then again ON.
Alternatively, press the RESET button on your computer.
6. Forced Restart Shortcut:
For an alternative, force restart by simultaneously pressing <Ctrl>, <Alt>, and <Delete> keys. This keyboard shortcut triggers a system restart.
By following these steps, we make sure to catch the initial message prompting us to enter CLICK BIOS II. Defines your motherboard manual for certain instructions related to the MSI model, as the process can vary slightly based on the motherboard and BIOS version.
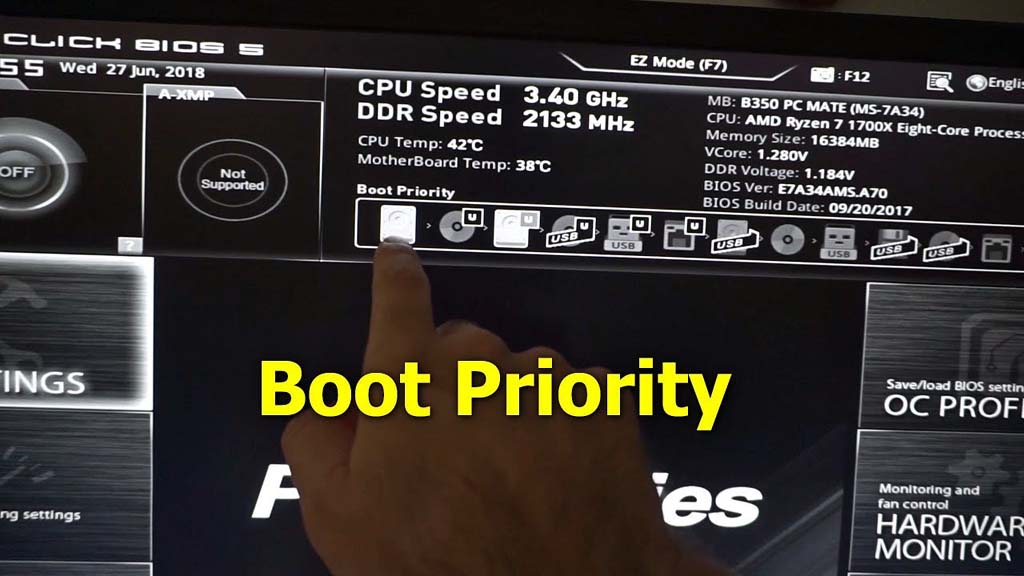
Overview of the Key Features!
Put CLICK BIOS II for MSI system open user-friendly interfacing with different parts and options. Here’s an overview of the key features:
1. Temperature Monitor:
It shows the temperature of the processors and mainboard. Monitoring temperature is important to ensure optimal system performance and avoid overheating.
2. System Information:
It has details like time, date, CPU name, CPU frequency, DRAM frequency, DRAM capacity, and BIOS version. This view helps users track essential system parameters.
3. BIOS Menu Selection:
It offers multiple options:
SETTINGS:
- It configures chipset features and boots devices.
OC (Overclocking):
- Set frequency and voltage settings to enhance performance. Caution is advised for general users due to potential instability.
ECO:
- Access energy-saving settings.
BROWSER:
- Enter MSI Winki web browser.
UTILITIES:
- Access utilities for backup and updates.
SECURITY:
- Apply security features to avoid unauthorized changes and protect the system.
4. Boot Device Priority Bar:
It helps users to set boot priority by moving device icons. It is best for defining the order in which the system is used for bootable operating systems.
5. Boot Menu:
It is a button for opening the boot menu. It helps users choose a device for system booting.
6. Mode Selection:
It is used for load presets for energy saving and overclocking. That feature offers a fast method for customizing system performance based on preferences.
7. Menu Display:
That part offers access to BIOS settings and information that helps users set different features for the system.
8. Language Selection:
It helps users select the language for BIOS settings, making sure users have a friendly experience.
CLICK BIOS II offers a good interface and empowers users to manage system settings, monitor performance, and configure their computing experience.
Final Words!
The knowledge of MS Boot Menu Key is important for choosing temporary boot devices and configuration settings. The Boot Menu offers flexibility at the time of startup, making it easy to troubleshoot, install the operating system, or access essential options. CLICK BIOS II improves this functionality. It offers a user-friendly interface with detailed features for proper system management. Always refer to the motherboard manual for model-specific instructions.
Author: Henry
https://www.theengineeringknowledge.com
I am a professional engineer and graduate from a reputed engineering university also have experience of working as an engineer in different famous industries. I am also a technical content writer my hobby is to explore new things and share with the world. Through this platform, I am also sharing my professional and technical knowledge to engineering students.
Follow me on: Twitter and Facebook.
An essential feature of a computer is the Boot Menu, which allows users to access essential settings and functions.
When it comes to changing the boot order, troubleshooting system problems, or performing advanced tasks, knowing how to access the Boot Menu is an essential skill.
The purpose of this comprehensive guide is to provide a detailed, step-by-step walkthrough of how to access the MSI Boot Menu on MSI (Micro-Star International) computers.
There is no doubt that MSI is a renowned brand in the computer industry, producing high-quality laptops and desktop computers.
It is no surprise that MSI computers are popular with gamers, professionals, and everyday users alike due to their reliable hardware and wide range of models.
MSI Boot Menu access is critical for performing tasks such as installing a new operating system, recovering from a system failure, or configuring various system settings.
By following this guide, you will be able to access the MSI Boot Menu without any difficulty. We will explore the specific keys to tap during the boot process, alternative keys to try if the primary keys do not work, and how to navigate the Boot Menu once it is accessible.
Also, we will discuss the options you may encounter in the Boot Menu and how to make changes and save your settings.
What is MSI Boot Menu?
MSI Boot Menus, also known as BIOS Boot Menus and UEFI Boot Menus, enable users to access and modify various system settings during booting.
With a menu interface, users can control critical boot-related options and functions, allowing them to customize their computer’s startup behavior.
The Boot Menu can typically be accessed by pressing a particular key or combination of keys on the keyboard during the early stages of the boot process.
Users can access the Boot Menu to perform tasks such as changing the boot order (the sequence in which the computer checks for bootable media), entering Safe Mode in order to troubleshoot, adjusting BIOS settings (Basic Input/Output System) or UEFI settings, and so on.
The MSI Boot Menu is particularly relevant to owners of MSI computers. As a manufacturer of quality laptops and desktops, Micro-Star International (MSI) is well known for its gaming-oriented hardware and advanced features.
On MSI computers, the Boot Menu provides users with access to critical system settings, which allows them to customize their computer’s behavior.
The MSI Boot Menu allows users to optimize their system’s performance, troubleshoot issues, install a new operating system, or boot from external devices.
It is a useful tool for advanced users, IT professionals, and gamers who often need fine-grained control over the boot process and the settings on their system.
Depending on your MSI computer’s model and BIOS version, the specific options and layout of the MSI Boot Menu may vary.
In order to understand the available options and their functionalities, it is recommended that you consult the user manual or MSI’s official documentation for your particular model.
How to Get MSI Boot Menu Key From Windows
To access the MSI Boot Menu key within the Windows operating system, a slightly different approach is required as opposed to accessing it during the boot process.
The following steps will guide you through the process of accessing the MSI Boot Menu key on Windows:
Step 1: Open the Start Menu
You can access the Start Menu by clicking on the “Start” button located at the bottom-left corner of the Windows taskbar.
Step 2: Click on the Power Icon
On the Start Menu, locate and click the Power icon. Typically, it appears as a small circle with a vertical line as the icon.
Step 3: Choose the Restart Option
In the Power menu, select the “Restart” option while holding down the “Shift” key on your keyboard. Upon clicking this button, the system will restart.
Step 4: Enter Advanced Startup Options
Once your MSI computer has restarted, it will boot into the Advanced Startup Options menu. From this menu, you can access a number of troubleshooting and recovery options, including the Boot Menu.
Step 5: Select Troubleshoot:
To troubleshoot, select the “Troubleshoot” option from the Advanced Startup Options menu.
Step 6: Choose Advanced Options:
Click on the “Advanced options” link under the Troubleshooting menu. By clicking on this link, you will be directed to a list of advanced system options.
Step 7: Select UEFI Firmware Settings:
Select “UEFI Firmware Settings” or “BIOS Firmware Settings” from the Advanced options menu. By selecting this option, you will be able to access the MSI Boot Menu.
Step 8: Restart to Access Boot Menu:
In order to change the firmware settings in your UEFI, you will need to restart your computer. You can restart your computer by clicking the “Restart” button.
Step 9: Access the MSI Boot Menu:
As soon as your MSI computer is restarted, it will boot directly into the MSI Boot Menu. In this menu, you can access a variety of options and settings relating to how the system boots, how devices are configured, and more.
Step 10: Navigate and Modify Boot Settings:
By using the arrow keys on your keyboard, navigate through the Boot Menu options. A number of settings can be modified, including boot order, UEFI Secure Boot enable/disablement, system clock adjustment, and more.
You can find assistance with specific settings in the documentation provided on your computer or by reading the on-screen instructions.
Step 11: Save and Exit:
As soon as you have made any changes to the Boot Menu, save your settings and exit the program. In most cases, there will be an option to save and exit, often referred to as “Save and Exit,” “Exit and Save Changes,” etc.
If you choose this option, your modifications will be applied and your MSI computer will be restarted.
Conclusion
Accessing the MSI Boot Menu is an essential skill for MSI owners, as it allows them to customize system settings, troubleshoot issues, and perform essential tasks.
Our guide provides a step-by-step explanation of how to access the MSI Boot Menu key in Windows. We discussed the importance of the MSI Boot Menu as well as how it enables users to control key boot-related functions and options.
Due to MSI’s reputation for producing high-quality hardware and advanced features, the Boot Menu is particularly relevant to owners of MSI computers.
We outlined the steps involved in obtaining the MSI Boot Menu key from Windows by opening the Start Menu, clicking on the Power icon, selecting Restart while holding the Shift key, entering the Advanced Startup Options menu, selecting Troubleshoot, selecting Advanced Options, selecting UEFI Firmware Settings, restarting to access the Boot Menu, navigating and modifying boot settings, and finally saving and exiting the Boot Menu.