
Many users have been complaining about the issue of MSI Afterburner not working in game. If you are also encountering the case on your Windows 10/11 PC, how can you get rid of it? It is easy to solve this issue if you follow the solutions mentioned by MiniTool Solution in this post.
MSI Afterburner Not Working Windows 10/11
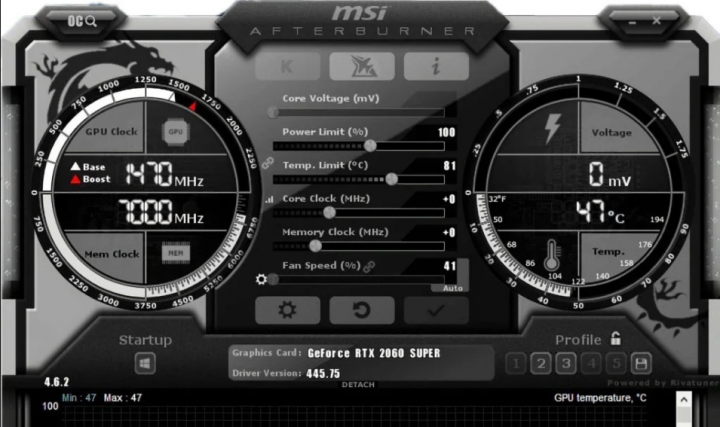
MSI Afterburner is one of the most used graphics card software that is designed to monitor your hardware in real-time, overclock your GPU, set custom fan curves, modify a GPU’s core clock & memory clock speeds, control the GPU’s fan speed, and more. For most gamers who prefer to monitor the performance stats during games, MSI Afterburner is a must-have.
However, sometimes MSI Afterburner doesn’t work on your Windows 10/11 PC, for example, MSI Afterburner doesn’t apply overclock on startup. This is mainly due to game overlays, integrated graphics cards, general misconfigurations, and others. Now, let’s move on towards fixing this issue.
Fixes for MSI Afterburner Not Working on PC
Disable NVIDIA Overlay
If you use NVIDIA Overlay on your PC, MSI Afterburner may be not working – the overlay offered by MSI Afterburner cannot run properly. To fix this issue, disable NVIDIA Overlay by following the steps below.
Related article: How to Disable NVIDIA Overlay in GeForce Experience?
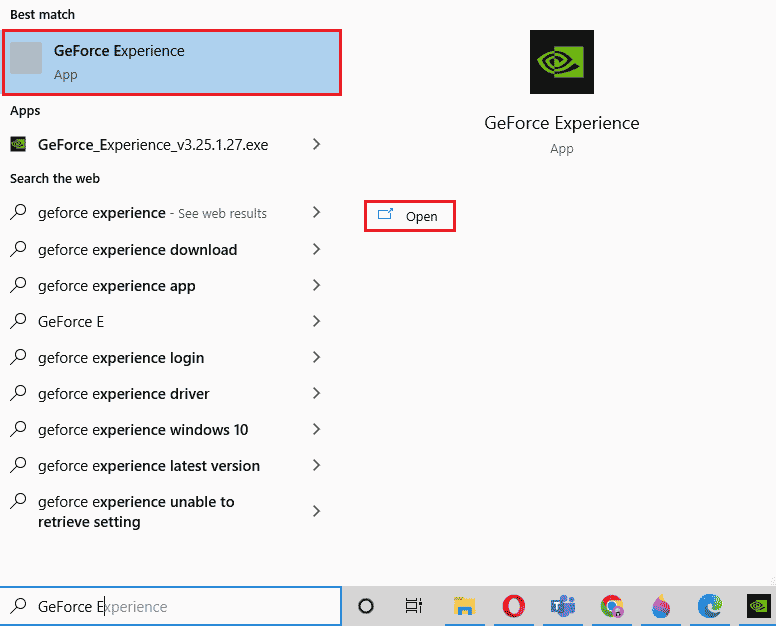
Step 1: Type GeForce Experience in the search box and click the result.
Step 2: Click the gear icon at the top-right corner to open the Settings menu.
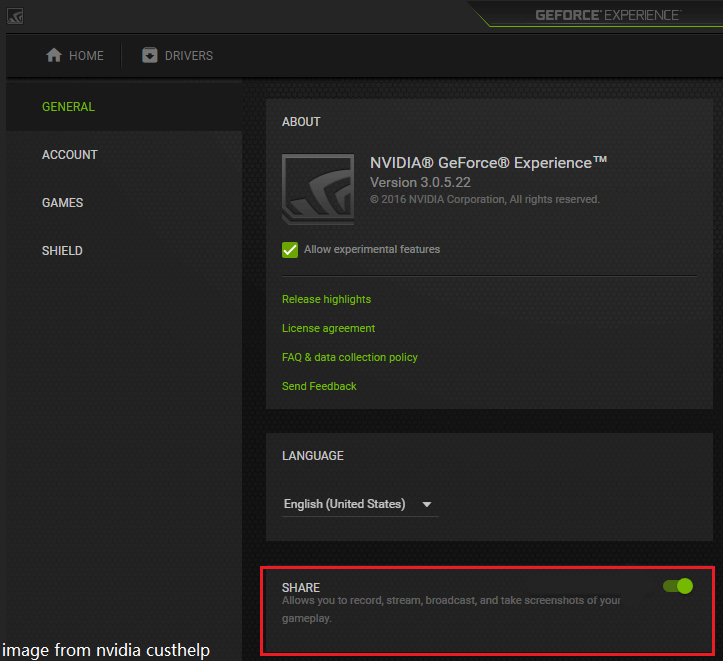
Step 3: Go to the General tab, locate the Share option with Allows you to record, stream, broadcast, and take screenshots of your gameplay, and move the slider to the left to disable it.
Step 4: Save the change and see if MSI Afterburner can work properly.
Disable Steam Overlay
Steam Overlay is yet another overlay that can lead to MSI Afterburner not working in game. To fix your issue, disable it.
Step 1: Go to the desktop, locate the Steam shortcut, right-click on it to open it on your Windows 10/11 PC.
Step 2: Navigate to the Library tab, locate the problematic game, right-click on it and choose Properties.
Step 3: Under the General tab, clear the box of Enable the Steam Overlay while in-game.
Step 4: Apply the change.
Run MSI Afterburner in Compatibility Mode
If you are using an old version of Windows 10, MSI Afterburner may not work on your PC. You can run this app in compatibility mode for old systems.
Step 1: Right-click on MSI Afterburner and choose Properties.
Step 2: Navigate to the Compatibility tab, check the box of Run this program in compatibility mode for and choose a Windows version based on your situation.
Add a Game Manually and Set Its Detection Level to High
If MSI Afterburner doesn’t work in a specific game, you can manually add this game and set the detection level to high.
Here’s what you should do:
Step 1: Launch RivaTuner on your PC. (RivaTuner is a free overclocking and hardware monitoring program. Rivatuner Statistics Server (RTSS), initially a companion software to RivaTuner, is bundled with MSI Afterburner.)
Step 2: Click the Add button at the bottom-left corner in the main window, locate the game’s installation folder and add the .exe file.
Step 3: Locate Application detection level and set it to High.
Disable the Integrated Graphics Card
Using the external and integrated graphics card at the same time can cause MSI Afterburner not working. Besides, if your onboard graphics card is enabled even you are using an external one, the issue still appears. So, you can choose to disable the integrated graphics card to fix the issue.
Step 1: Reboot your PC and press F2, Del, or another key (the key varies depending on different PC vendors) to enter BIOS.
Step 2: Go to the Security tab to find Onboard Devices Configuration or a similar one.
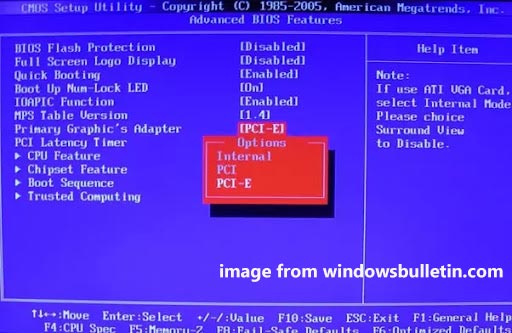
Step 3: Locate Primary Graphics Adapter and press Enter. Choose PCI-E using the arrow keys.
Step 4: Exit, save the change and reboot your computer.
Uninstall and Reinstall MSI Afterburner
If these solutions above cannot work to fix MSI Afterburner not working, you can choose to uninstall this program for your Windows 10/11 PC via Control Panel. Then, go to download the latest version of MSI Afterburner online and install it on the computer.
Further Reading: Some Cases of MSI Afterburner Not Working
- MSI Afterburner Not Showing Readings: If nothing is shown, go to uninstall MSI Afterburner from your PC, remove junk files and clean up your system. Besides, upgrade your GPU driver to the latest version and reinstall MSI Afterburner.
- MSI Afterburner Not Downloading: If you cannot install the latest version of this app, you can install an old version and then upgrade it.
- MSI Afterburner Sliders Not Working: You can uninstall this app completely including deleting its settings and then reinstall it.
- MSI Afterburner not applying overclock: Disabling the integrated graphics card is useful to fix this issue. Besides, set the external graphics card to a default one.
MSI Afterburner is a popular graphics card software. It helps in enhancing the performance of monitoring the device information. The application is useful in overlocking and changing the default settings in the graphics card. Amid all these pros, people using the application have been facing MSI Afterburner not working Windows 10 issue. Sometimes, it resists opening and at other times it is unable to change the clock speed of the device. If you are also facing the same issue then you would be delighted to know that we have brought an insightful guide for you that will help you with ways to fix MSI Afterburner not working on your system.

Table of Contents
Whether there is a single feature that you are unable to use or the whole application you are struggling with, there are a few reasons that cause this issue and you should be aware of these. So, let us discuss these reasons in brief:
- Multiple overlays running on your system at the same time can be the reason behind MSI Afterburner not working side by side. These overlays usually include that of Steam and NVIDIA and disabling them is the best possible solution.
- A built-in graphics card is the second reason causing the MSI Afterburner installation failed issue which can be resolved by disabling the integrated graphics card in BIOS and providing permission to an external graphics card for handling all graphics-related functions on your system.
Many methods help to fix MSI Afterburner not overclocking or not opening problem. Before jumping onto the methods, check if your cable connection is correct. Using the wrong port, for instance, GPU port for display might not work in Afterburner, therefore, make sure that the right cable is connected to the right one.
We have listed easy to complex methods in an ordered list to help you with fixing this issue. So, without waiting any further, let us start with the first one:
Method 1: Perform Clean Boot
The last resort for all your problems related to MSI Afterburner is to perform a clean boot on your system. Clean boot will restart the system with only important programs, leaving out all the buggy and corrupt applications. Read our guide on How to Perform Clean boot in Windows 10 to do the same.

Also Read: Fix AMD Radeon WattMan Crash on Windows 10
Method 2: Modify Compatibility Settings
Another method to help you with overcoming the MSI Afterburner not working side by side on your desktop is if the app is not set for compatible mode. So, try running it in compatibility mode and see if the issue resolves then:
1. Right-click on the MSI Afterburner app and select the Properties option.
2. Navigate to the Compatibility tab and check the box for Run this program in compatibility mode for.

3. Then, check the Run this program as an administrator option under the Settings section. Finally, select Apply and then click OK to save the changes made.

Method 3: Update Windows
You can also eradicate MSI Afterburner not working by updating your Operating System. Always ensure if you have updated your Windows Operating System and if any updates are pending in action, use our guide How to Download and Install Windows 10 Latest Update
Also Read: Fix AMD Error Windows Cannot Find Bin64 –Installmanagerapp.exe
Method 4: Update Graphics Driver
If the graphics driver of your system is outdated or is corrupt with bugs, then it may lead to interruption in MSI Afterburner overlocking. Therefore, updating them regularly is a must, you can know more about them with the help of our guide on 4 Ways to Update Graphics Driver in Windows 10.
Method 5: Disable IO driver
In case a low-level IO driver is enabled for the application, it might cause MSI Afterburner not working Windows 10 issue. Therefore, make sure that it is disabled. To do so, open the properties of MSI Afterburner and follow the steps mentioned below:
1. Double-click on the MSI Afterburner shortcut.
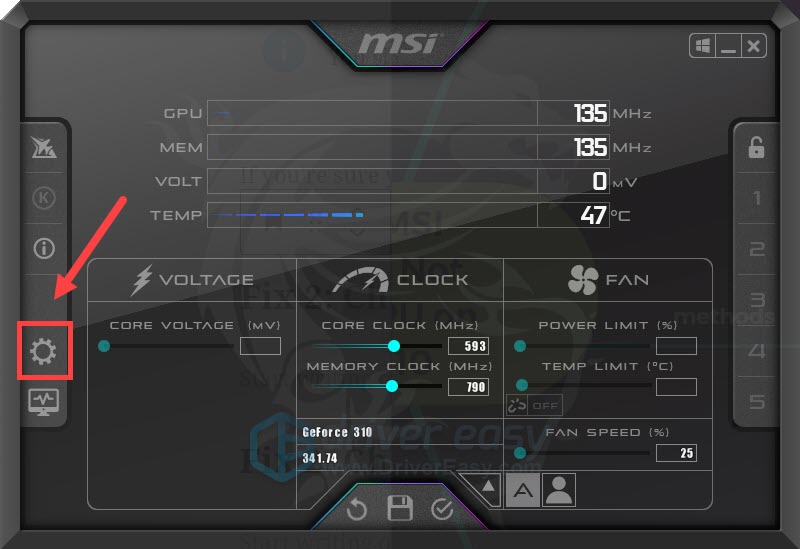
2. Click on the Settings icon.

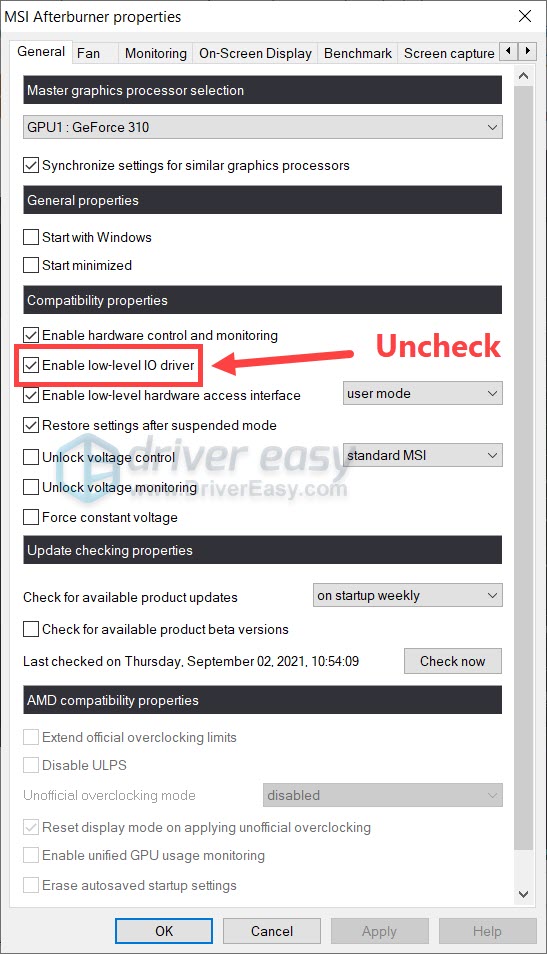
3. Click on the box for Enable low-level IO driver to disable it.

4. Now that the IO driver is disabled, restart your system and run the MSI Afterburner application and see if the error is resolved.
Also Read: Fix AMD Catalyst Control Center Missing
Method 6: Tweak On-Screen Display Settings
If CPU temperature has been disabled for your system, that may be what is causing the MSI Afterburner to not open. So, disable it in Active hardware monitoring graphs in MSI Afterburner settings.
1. Launch the MSI Afterburner app.
2. Click on the settings of the MSI Afterburner app.

3. Click on the Monitoring tab, enable CPU temperature, and then click OK.

Method 7: Set Detection Level to High
If the issue of MSI Afterburn not being able to work is due to a particular game then tweaking executable settings of the game can be of help. So, try it out using the given steps:
1. Press the Windows key, type RivaTuner Statistics Server, and click on Open.

2. Click on the plus button at the bottom left of the window after the main window opens.
3. Navigate to C:\Program Files location path to browse for the game’s executable.
4. After adding the game executable to the program. Set the detection level to high.
Also Read: Fix NVIDIA Control Panel Missing in Windows 10
Method 8: Disable NVIDIA Overlay
As discussed earlier, multiple overlay tools running in the background can be causing MSI Afterburner not working side by side. Therefore, disabling them can be of help and you can take the following steps to perform the method on your system:
1. Hit the Windows key, type GeForce Experience, and click on Open.
2. Click on the settings icon.

3. Then, click on General.
4. Disable Allows you to record, stream, broadcast, and take screenshots of your gameplay.
5. Finally, click on Apply.
Method 9: Disable Steam overlay
NVIDIA overlay is not the only one to disable to get rid of the MSI Afterburner not working Windows 10 issue. You also need to disable Steam overlay which can interrupt the working of MSI Afterburner.
1. Press the Windows key, type steam and click on Open.

2. Click on LIBRARY.

3. Right-click on the game to open Properties.

4. In the GENERAL tab, clear the box for Enable the Steam Overlay while in-game.

5. Now that the Steam overlay is disabled, check if MSI Afterburner installation failed issue is resolved.
Also Read: Fix Graphics Card Not Detected on Windows 10
Method 10: Disable Graphics Card
Disabling the onboard graphics card and enabling an external graphics card to carry out display functions of the system helps in resolving the MSI Afterburner not opening issue. To open the BIOS settings read our guide on How to enter BIOS on Windows 10 and then follow the stated steps to disable the graphics card:
1. Navigate to the Advanced tab and select Onboard Devices Configuration.

2. Now, select Primary Graphics Adapter and press the Enter key.
3. Next, select Exit and click on Exit Saving Changes.

Once your system has rebooted, check if the problem is resolved.
Method 11: Disable ULPS Setup
In AMD crossfire setups, disabling ULPS saves voltage which assists in the smooth and uninterrupted working of MSI Afterburner. Here is how you can disable the ULPS setup:
1. Hit the Windows + R keys simultaneously to open the Run dialog box.
2. Type regedit and press Enter key to launch the Registry Editor.

3. Click on the Edit tab and select Find.
4. Type EnableULPS in the box and click on Find Next.

5. Double click on EnableULPS.
6. Set the value from 1 to 0.
7. Now, search for the next EnableULPS value for cards by pressing F3.
Method 12: Hardware Modification
Another method to resolve MSI Afterburner overlocking issue is by enabling hardware modification, which has been proven to be effective in many cases. Below are the steps on how to allow the device for modifications:
1. Open the MSI Afterburner app by double-clicking on the shortcut.
2. Here, tweak FAN settings.

Also Read: How to Disable or Uninstall NVIDIA GeForce Experience
Method 13: Reinstall Afterburn Application
If for some reason MSI Afterburner installation failed on your device then try reinstalling the app. To do this, delete the pre-installed MSI Afterburner file, and follow the steps mentioned below for the same:
1. Hit the Windows key, type Control Panel, and click on Open.

2. Set View by > Large icons, then click on Programs and Features setting.

3. Right-click on the MSI Afterburner app and click on Uninstall.

4. Then, restart the PC after clicking on Finish when the uninstaller completes the process.
5. Visit the Afterburner official site and click on the Download Afterburner button.

6. Follow the on-screen instructions to complete the installation on your PC.
7. Finally, after reinstalling the Afterburner on your computer. Check whether Afterburner not working Windows 10 issues is fixed.
Also Read: Fix Hearthstone Lagging in Windows 10
Frequently Asked Questions (FAQs)
Q1. What will happen if I uninstall MSI Afterburner?
Ans. Uninstalling MSI Afterburner will lead to the graphics card on your system running on the stock. Also, data stored in the app will be lost on uninstalling.
Q2. Does MSI Afterburner impact the performance in any way?
Ans. Yes, MSI Afterburner helps in enhancing the performance of your system by resolving the lagging issues, if any. Also, it improves performance by overlocking and optimization of the PC.
Q3. Can MSI Afterburner show CPU temperature?
Ans. Yes, MSI Afterburner can monitor CPU temperature by providing accurate data. Also, it helps in monitoring other temperature changes in your system too.
Q4. Does MSI work with every brand of graphics card?
Ans. Yes, MSI Afterburner works with every graphics card on your system. It is free of charge and works for all brands.
Q5. Why am I unable to overclock in MSI Afterburner?
Ans. If you are facing any issue with MSI Afterburner overclocking not working then it can be due to the enabled onboard graphics card, try to disable it to resolve the issue.
Recommended:
- How to Install Fallout 3 Mods on Windows 10
- How to Cancel Xbox Game Pass on PC
- Fix Nexus Mod Manager Not Opening on Windows 10
- 7 Ways to Fix MSI Gaming App Not Opening
MSI Afterburner is a great application for peak performance of the system and to monitor the operating services. But, at times the application might act up and stop working. We hope that our guide helped resolve this issue and you were able to fix MSI Afterburner not working on Windows 10. Let us know which one of these 14 methods was the most helpful for you. If you have any further queries or suggestions to give, please leave them below in the comments section.
Not seeing your graphics card in MSI Afterburner? Everything on it greys out? You’re surely not alone—many players are reporting the same issue.
But don’t worry, it’s usually not that hard to fix.
Try these fixes:
You might not need to try them all. Simply work your way down until you find the one that does the trick.
- Check your cable connection
- Change properties of MSI Afterburner
- Check if you have Vanguard
- Update all your drivers
- Check for Windows updates
- Perform a clean boot
- Try another version of Afterburner
Fix 1: Check your cable connection
First you need to be sure that you have the right display port. If you’re using the wrong port, say you have your monitor hooked up with the integrated graphics, your GPU might not show up in Afterburner since you’re not using it for display.

You should also rule out the possibility of faulty cables.
If you’re sure you got the right port, you can continue to the troubleshooting below.
Fix 2: Change properties of MSI Afterburner
According to some players, a possible fix of the issue lies in the compatibility settings of Afterburner. You can follow suit and see if it works in your case.
- Open MSI Afterburner. In the left pane, click the gear icon to open properties.

- In the Compatibility settings section, uncheck the box next to Enable low-level IO driver.

- Restart your PC and check the results in MSI Afterburner.
If this trick doesn’t help you. take a look at the next one below.
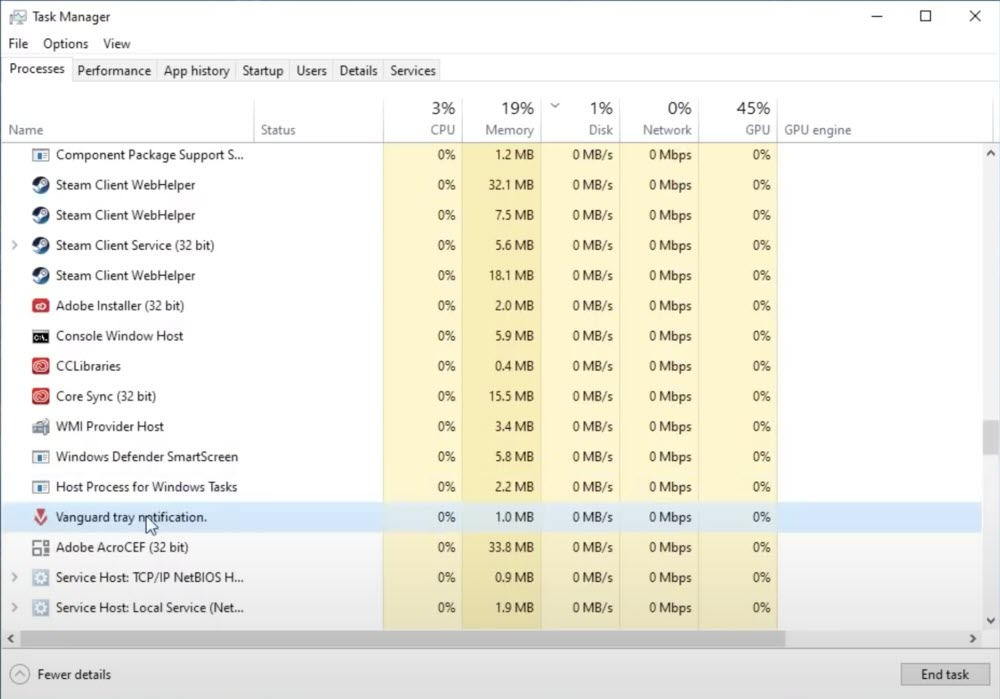
Fix 3: Check if you have Vanguard
If you’re into Valorant, you might be familiar with Vanguard, the anti-cheat program. Records show that Vanguard is a big time trouble maker that is responsible for many game issues. And many players reported that it has something to do with Afterburner not detecting GPU. So if you have Vanguard on your system, you can try to disable/uninstall it and see if Afterburner works properly.
If you don’t have Vanguard, simply move on to the next fix.
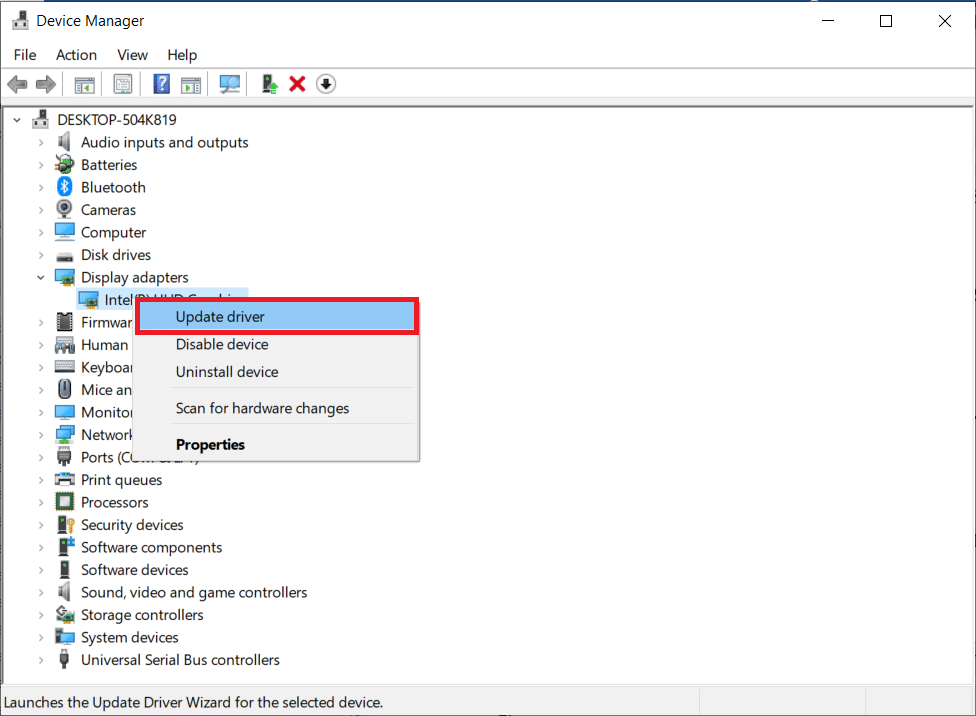
Fix 4: Update all your drivers
If you’re not seeing your GPU in MSI Afterburner, chances are you might be using a buggy or outdated graphics driver. In fact, for your rig to function properly, you should always make sure you have all the drivers up to date.
You can update drivers manually, by visiting the graphics, motherboard manufacturers one by one, finding the latest correct installers and installing step by step. But if you don’t have the time or patience to update manually, you can do it automatically with Driver Easy.
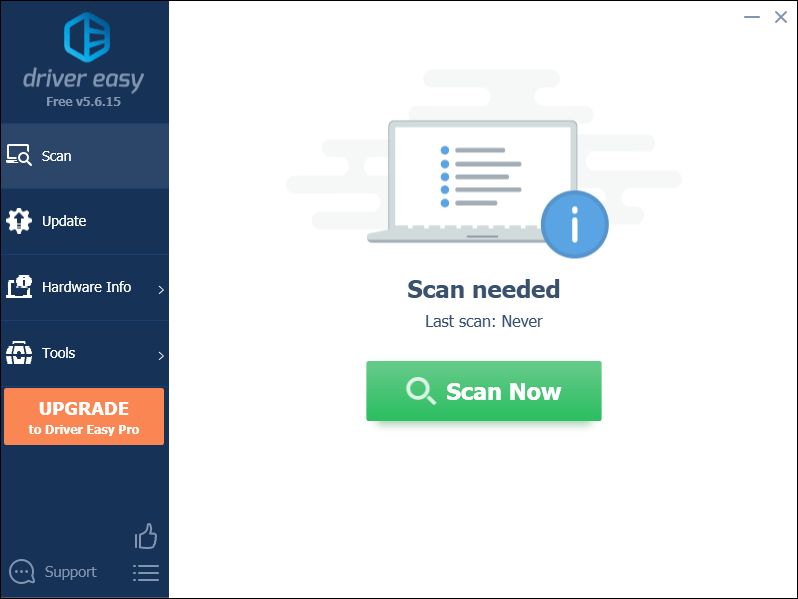
- Download and install Driver Easy.
- Run Driver Easy and click the Scan Now button. Driver Easy will then scan your computer and detect any problem drivers.

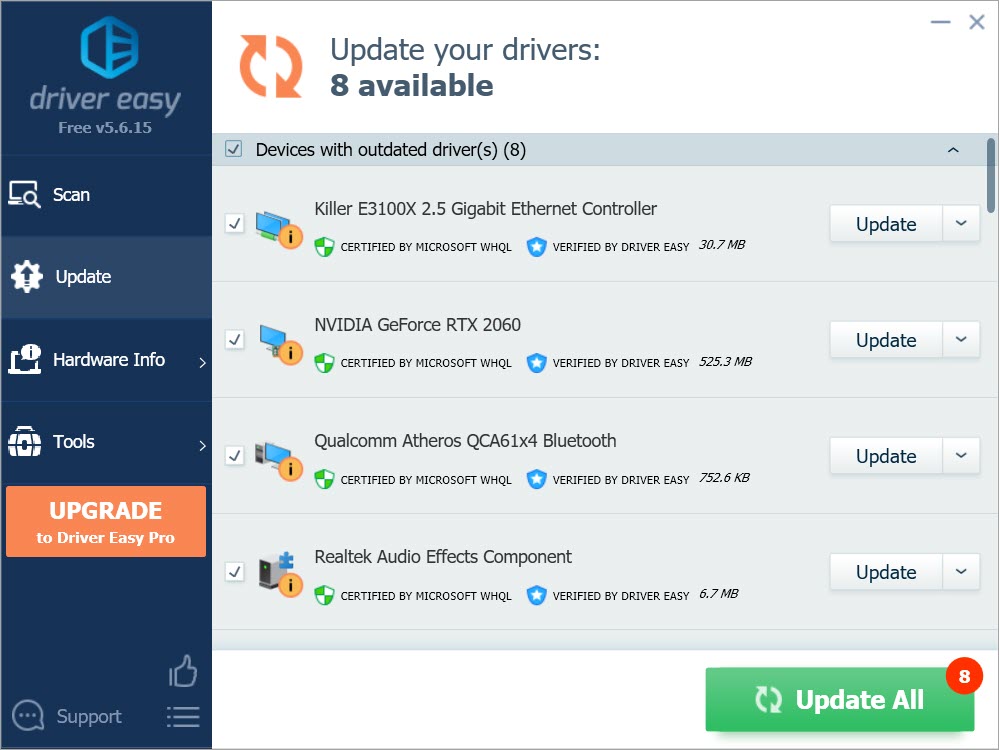
- Click Update All to automatically download and install the correct version of all the drivers that are missing or out of date on your system.
(This requires the Pro version – you’ll be prompted to upgrade when you click Update All. If you don’t want to pay for the Pro version, you can still download and install all the drivers you need with the free version; you just have to download them one at a time, and manually install them, the normal Windows way.)
If you need assistance, please contact Driver Easy’s support team at support@drivereasy.com.
After updating all your drivers, restart your PC and check if Afterburner is working properly.
If the latest drivers don’t give you luck, you can continue to the next method.
Fix 5: Check for Windows updates
Windows updates help you avoid most of the software compatibility issues. You should always make sure you’re on the latest system.
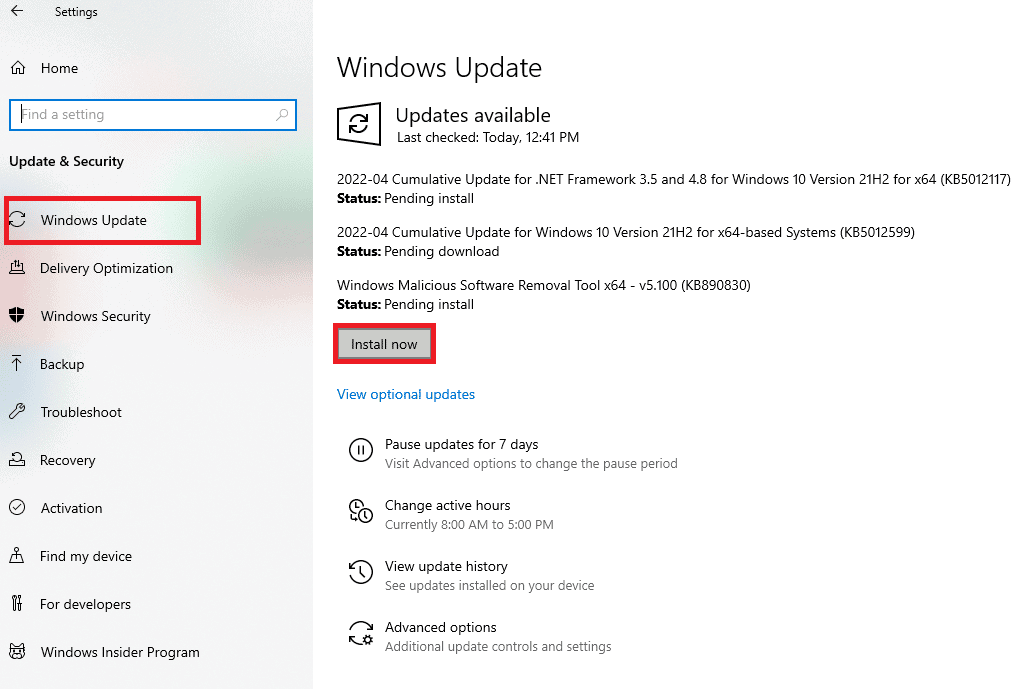
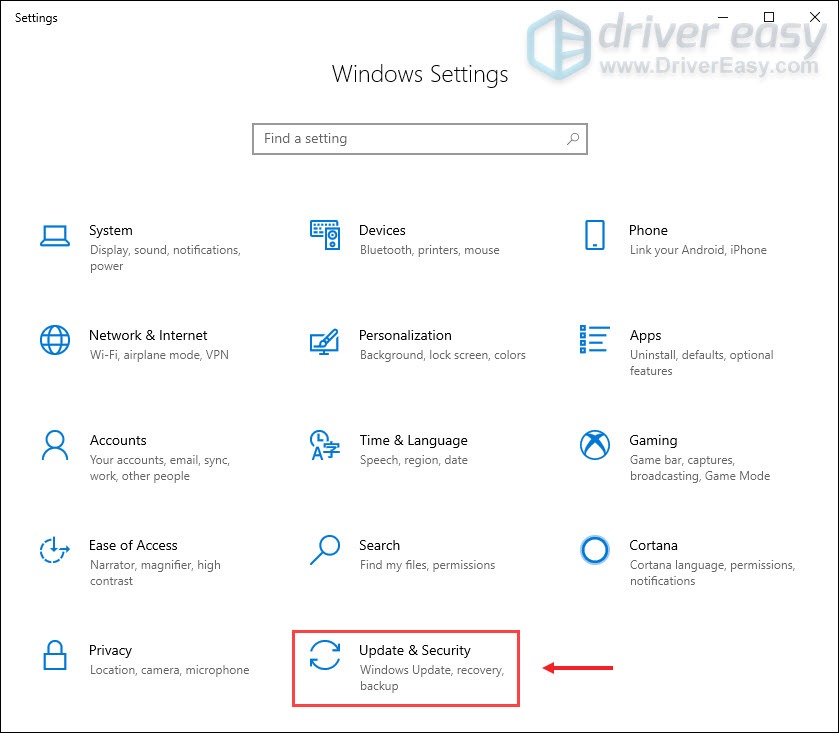
- On your keyboard, press Win+I (the Windows logo key and the i key) to open the Windows Settings app. Click Update & Security.

- Click Check for updates. Windows will then download and install the available patches. It might take some time (up to 30 mins).

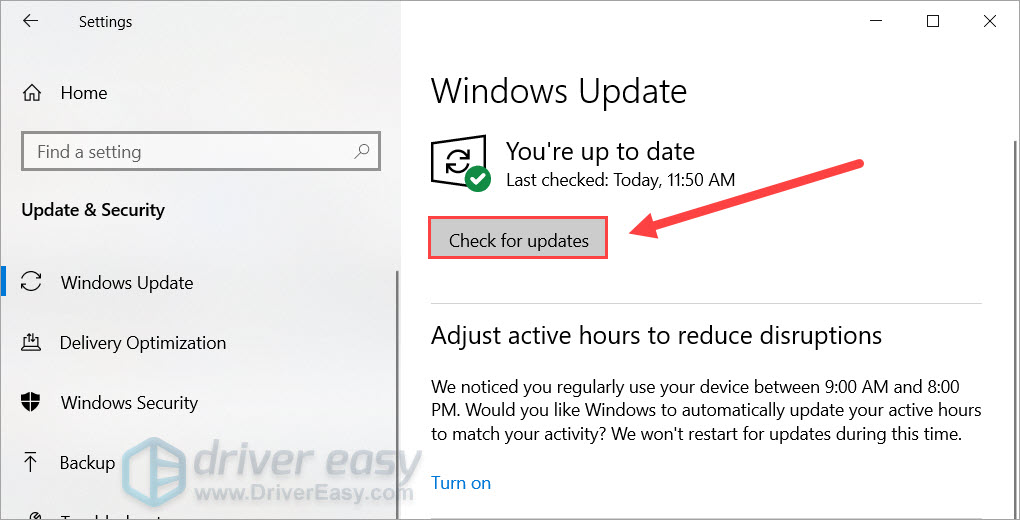
To confirm you’ve installed all the system updates, repeat these steps until it prompts “You’re up to date” when you click Check for updates.
Once done, restart your computer and check if MSI Afterburner is running correctly.
If the issue lingers on, you can continue to the next fix.
Fix 6: Perform a clean boot
In addition to Vanguard, you should check if there’re other interferences in your system. You can start by doing a clean boot, which only starts the PC with the minimum set of services and programs.
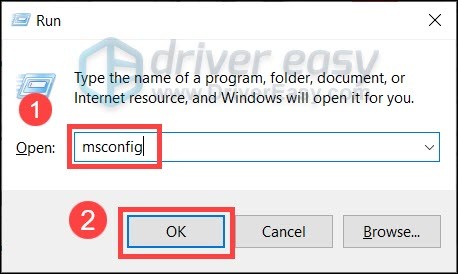
- On your keyboard, press Win+R (the Windows logo key and the r key) at the same time to invoke the Run box. Type or paste msconfig and click OK.

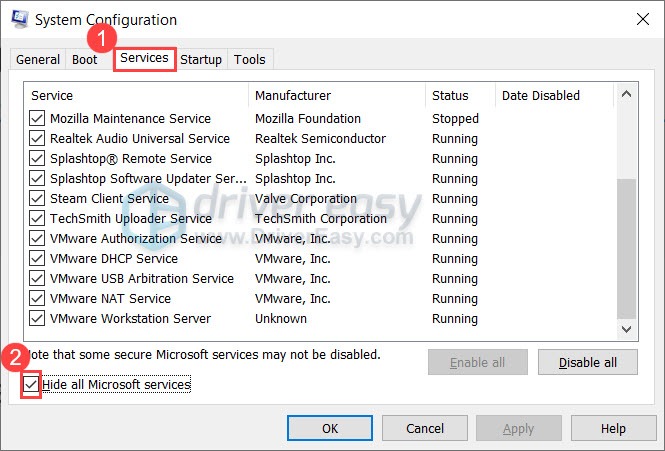
- In the pop-up window, navigate to the Services tab and check the box next to Hide all Microsoft services.
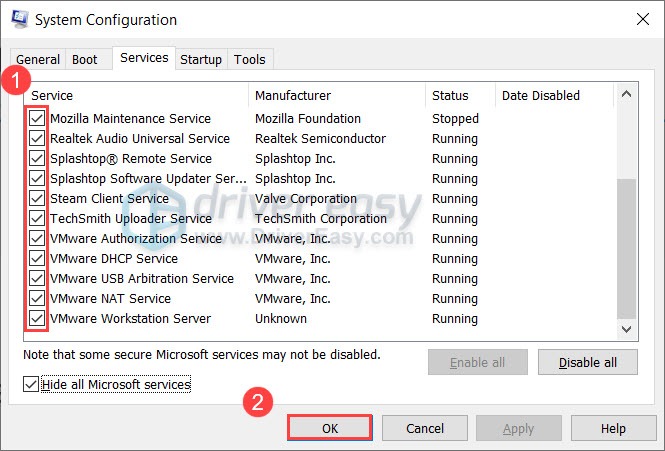
- Uncheck all the services EXCEPT those belong to your hardware manufacturers, such as Realtek, AMD, NVIDIA, Logitech and Intel. Then click OK to apply the changes.
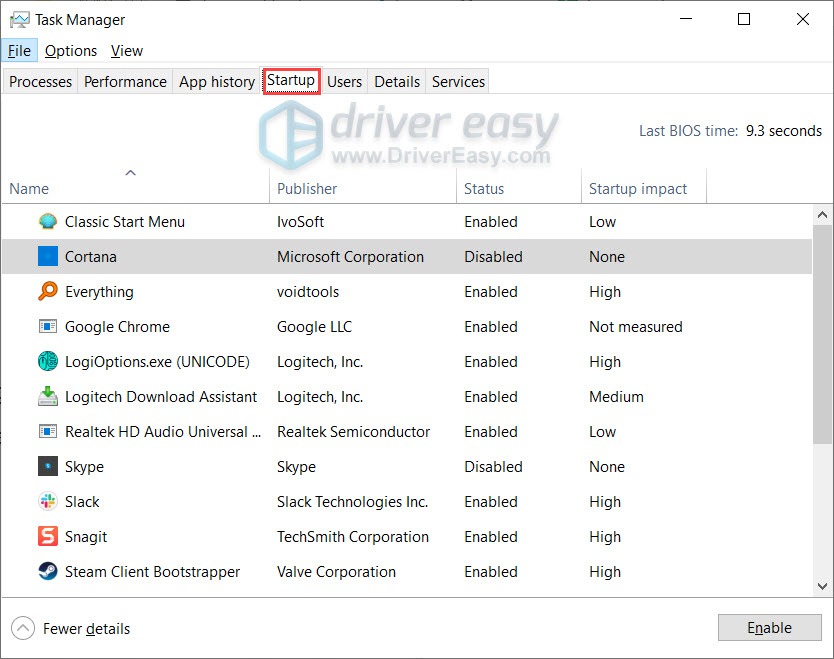
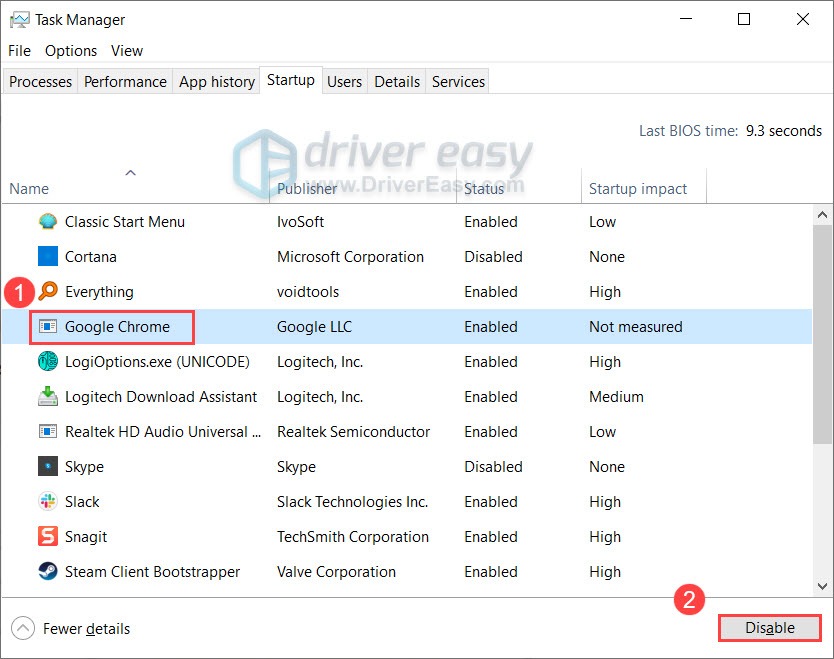
- On your keyboard, press Ctrl, Shift and Esc at the same time to open Task Manager, then navigate to the Startup tab.
- One at a time, select any programs you suspect might be interfering, and click Disable.
- Restart your PC.
If Afterburner works after the clean boot, you can root out the offenders by repeating the steps and disabling only half of the services and programs.
If the issue persists, you can try the next solution below.
Fix 7: Try another version of Afterburner
If none of the fixes can help you, you can try to reinstall MSI Afterburner. This should reset profiles and fix possible issues during installation. Instead of installing the same version, this time you can try the previous and beta ones, which can be easily found on Guru3D.com.
Hopefully this post helps you get MSI Afterburner working again. If you have any questions or ideas, feel free to drop a line in the comments below.
12
12 people found this helpful
- Home
- Windows Tips
- Fix msi afterburner not working
If you’re looking to overclock a GPU or undervolt it, you will have heard of an app called MSI Afterburner. Most guides mention this app as an easy and reliable way to overclock a GPU or undervolt it. It supports both Nvidia and AMD GPUs, and can also be used to control the fan speed of a GPU as well as monitor its temperature.
If you’re trying to use MSI Afterburner to change how the hardware on your system works, and you’re unable to change anything or the various controls aren’t working, here’s what you can do.
There are two common problems that users experience in MSI Afterburner; they’re unable to access the graph for customizing the fan speed, or the sliders that control the clock speeds do not work.
1. Ctrl+F not working
You can bring up the fan speed control by tapping the Ctrl+F keyboard shortcut however, your GPU must have its own fan in order to be able to use this feature.
Check GPU fan
To check if your GPU has its own fan, you can look at the packaging or box it came in, or you can Google its model number.
- Right-click the taskbar and select Task Manager from the context menu.
- Go to the Performance tab on the Task Manager.
- Select GPU – 1 from the column on the left.
- At the top right of the GPU 1 graph, note down the model of your GPU.
- Visit the manufacturer’s website for the GPU and check the specifications of your model to see if it has a fan of its own. Normally, GPUs used in laptops do not have their own fan.
Enable hardware modification
If you’ve confirmed that your GPU has its own fan that MSI Afterburner should be able to control, you may need to enable the fan control itself.
- Click the settings button on the main MSI Afterburner interface.
- Go to the Fans tab (if the Fans tab is absent, the app cannot detect your GPU fan).
- Enable the “Enable user defined software automatic fan control” option.
- Tap Ctrl+F and you will see the fan curve.
If there is no GPU fan to control, you can use other apps to control the fans on a Windows 10 system.
2. Sliders inactive
The sliders on MSI Afterburner may be inactive for two reasons; a problem with the app, a restriction with the hardware. To fix a problem with the app, uninstall it.
- Open the Control Panel.
- Go to Programs>Uninstall a program.
- Select MSI Afterburner from the list of installed apps.
- Click the Uninstall button at the top.
- During the uninstallation process, MSI Afterburner will ask if you want to keep your settings. Make sure you select NO.
- Once the app has been uninstalled, install it again and you will be able to control the Memory clock and the Core clock at the very least.
Other inactive sliders
It is possible that the GPU model you have doesn’t allow you to change the core voltage and core power consumption for the chip. In that case, the sliders for these two items will not work. These sorts of restrictions are normally found in GPUs used in laptops and there’s no way around them.
Conclusion
MSI Afterburner is easy to use but it is restricted by the hardware that is installed on your system. Often, there isn’t much that can be done other than to look for a different app to customize how the GPU works, or to upgrade hardware.

Fatima Wahab
Fatima has been writing for AddictiveTips for six years. She began as a junior writer and has been working as the Editor in Chief since 2014.
Fatima gets an adrenaline rush from figuring out how technology works, and how to manipulate it. A well-designed app, something that solves a common everyday problem and looks
Are you looking for a solution to fix MSI Afterburner not working on Windows 10? If yes then stay with us. If you’re wondering to overclock a GPU or undervolt it, then there is an app known as MSI Afterburner. Some guides mention this app is an easy and efficient way to overclock a GPU or undervolt it. It is compatible with both AMD GPUs or Nvidia, and can also be used to control the speed of a GPU fan or measure its temperature.
If you want to use or set up MSI Afterburner to change how the hardware on your PC works, and you can’t anything or different controls aren’t working, come let’s check what you can do. Come let’s check how to fix MSI Afterburner not working!
Contents
- 1 Troubleshoot MSI Afterburner Not Working On Windows 10:
- 1.1 Ctrl+F Won’t Work
- 1.1.1 Turn On Hardware Modification to fix MSI Afterburner Not Working
- 1.2 Sliders inactive
- 1.3 Conclusion:
- 1.1 Ctrl+F Won’t Work
Troubleshoot MSI Afterburner Not Working On Windows 10:
There are two common issues that users face in MSI Afterburner. The first one is that they can’t access the graph for customizing the speed of the fan, or the sliders that control the speed of the clock do not work. Here are different ways to fix MSI Afterburner not working issue!
Ctrl+F Won’t Work
You can also bring up the fan speed control after clicking the Ctrl+F keyboard shortcut. However, your GPU must have its own fan to use this feature.
Check GPU fan
If you want to check that if your GPU has its own fan, you can view it at the box or packaging whenever it came in, or also you can Google its version number. Follow the steps to fix MSI Afterburner not working!
- Right-tap the taskbar and choose Task Manager from the context menu.
- Head over to the Performance tab on the Task Manager.
- Choose GPU – 1 from the column on the left.
- From the top right of the GPU 1 graph, write down the version of your GPU.
- Head over to the manufacturer’s website for the GPU. You can then examine the specifications of your version to view if it has a fan of its own. Normally, GPUs used in PCs do not have their own fan.
Turn On Hardware Modification to fix MSI Afterburner Not Working
If you’ve confirmed that your GPU has its own fan that MSI Afterburner should be able to control, you may need to enable the fan control itself. Follow the steps to fix MSI Afterburner not working!
- Tap the settings button on the main MSI Afterburner interface.
- Head over to the Fans tab (when the Fans tab is absent, the app can’t detect your GPU fan).
- Turn on the “Enable user-defined software automatic fan control” option.
- Click Ctrl+F and you’ll then view the fan curve. To fix MSI Afterburner not working dive down below!
When there is no GPU fan to control, you can then use many other apps to control the fans on a Windows 10 PC.
Sliders inactive
MSI Afterburner sliders may be inactive because of two reasons. Initially, there is an issue with the app, a restriction with the hardware. To resolve the issue with the app, uninstall it.
- Head over to the Control Panel.
- Move to Programs>Uninstall a program.
- Then choose the MSI Afterburner from the list of installed apps.
- Tap the Uninstall button located at the top.
- During the whole uninstallation process, MSI Afterburner will ask if you want to keep your settings. Make sure you can then choose NO.
- When you successfully uninstall the app. You can then again install it and you can also control the Memory clock and the Core clock at the very least.
To fix MSI Afterburner not working dive down below!
Other inactive sliders
There might be a chance that the GPU version you have doesn’t let you modify the core power consumption or core voltage for the chip. In this situation, these two items’ sliders will not work. These types of restrictions are found in GPUs used in PCs and there’s no alternative method around them.
Conclusion:
I hope you can now understand how to fix MSI Afterburner not working issue. MSI Afterburner is simple to use but it is restricted by the hardware that is installed on your PC. Well, there is not much that can be done rather than to look for another app to customize how the GPU works, or to upgrade hardware.
For further queries and questions let us know below!
Also Read:
- How to Make Minecraft Use GPU – Tutorial