
В этой статье мы расскажем, как использовать утилиту msconfig для настройки и диагностики Windows. Мы рассмотрим основные функции msconfig, способы её запуска и сценарии использования для улучшения производительности вашей системы.
Приобрести оригинальные ключи активации Windows всегда можно у нас в каталоге от 1099 ₽
msconfig — инструкция и настройка
Msconfig — это встроенная утилита, предназначенная для выявления причин некорректной работы системы, приложений, выбора варианта загрузки Windows и диагностики системы. Многие начинающие пользователи ПК по ошибке ищут, где скачать msconfig, не зная, что она уже установлена по умолчанию в Windows. Ниже перечислены несколько способов её запуска на различных версиях Windows.
Способы запуска msconfig
Первый способ (Подходит для Windows Vista, 7, 8, 10) — Самый быстрый
Если у вас Windows Vista, 7, 8, 8.1 или 10, просто нажмите на меню “Пуск” и введите msconfig. Нажмите Enter.
Второй способ (Windows XP, Vista, 7, 8, 10)
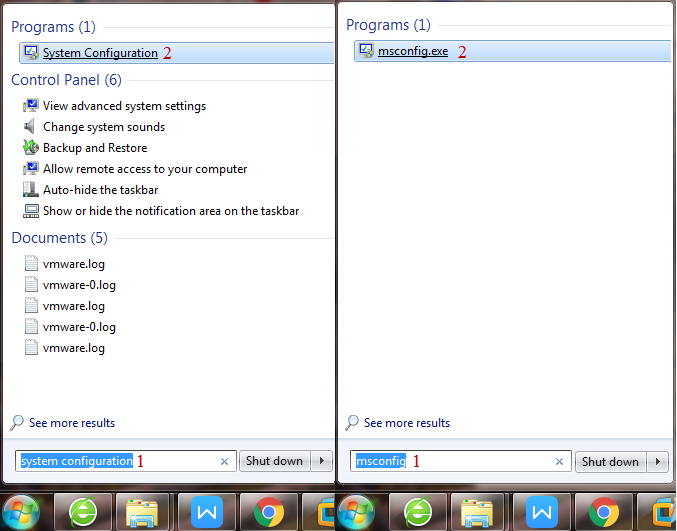
Заходим в меню Пуск — Все программы — Стандартные. Выбираем «Командная строка».
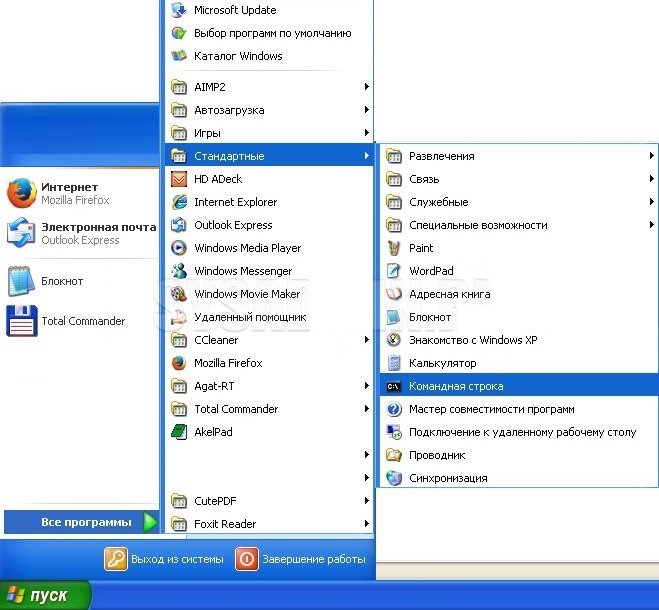
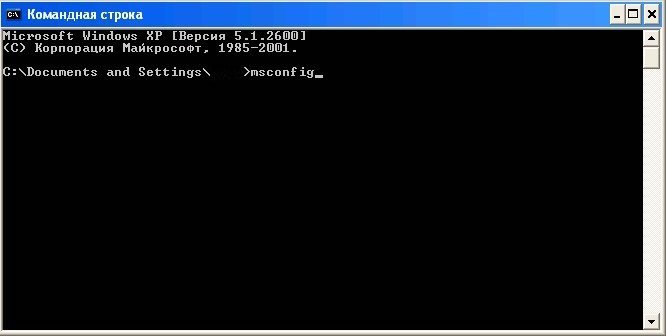
Появится черное окно командной строки, в котором вводим msconfig и нажимаем Enter.
Третий способ (Windows XP, Vista, 7, 8, 10)
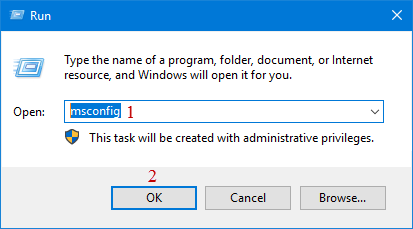
Нажимаем «Пуск», затем «Выполнить» и вписываем msconfig. Нажимаем Enter.
Четвертый способ (Windows XP, Vista, 7, 8, 10)
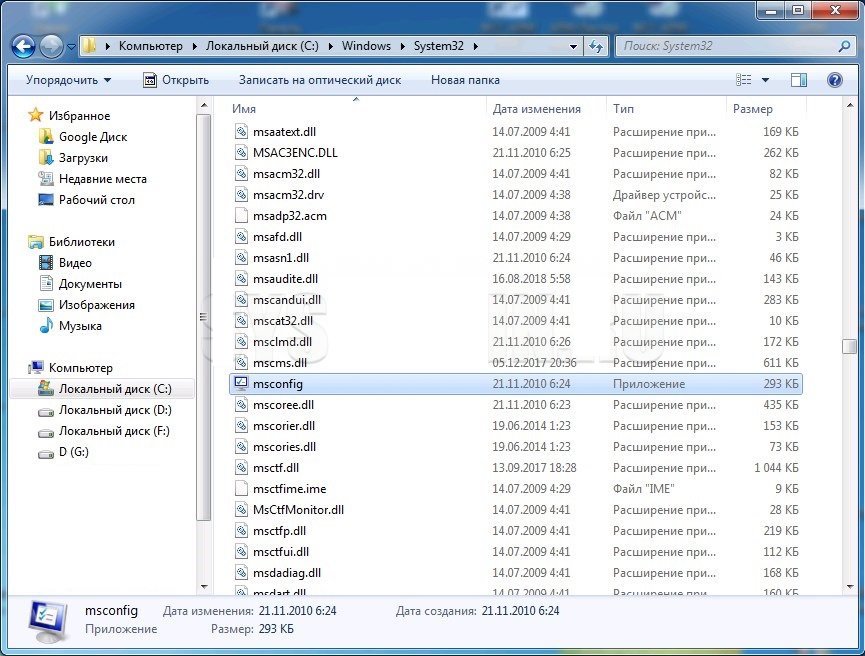
Заходим в проводник по адресу C:\Windows\System32 и находим файл msconfig.exe.
Утилита msconfig
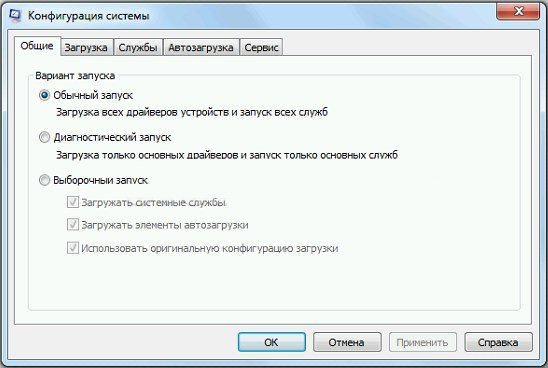
Интерфейс msconfig состоит из пяти вкладок: Общие, Загрузка, Службы, Автозагрузка, Сервис. Рассмотрим каждую из них подробно.
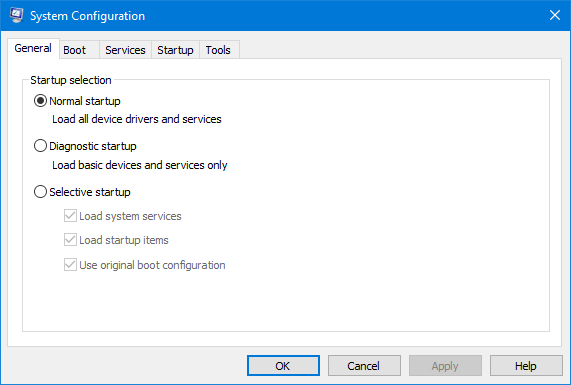
Общие
— Обычный запуск: загружаются все драйверы, службы системы и приложения автозагрузки.
— Диагностический запуск: загружаются только основные драйверы и системные службы.
— Выборочный запуск: позволяет гибко настроить загрузку системы, включая выбор загрузки системных служб и автозагрузок.
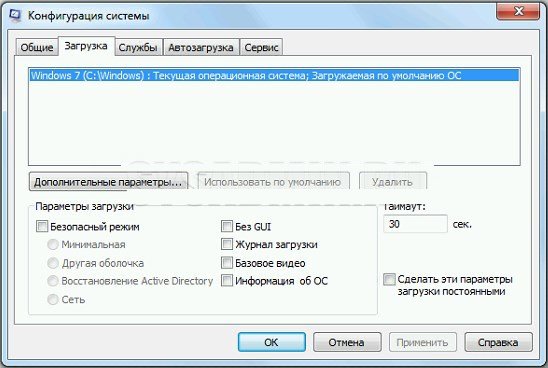
Загрузка
Эта вкладка позволяет управлять параметрами загрузки ОС: выбирать систему по умолчанию, указывать таймаут выбора ОС и использовать дополнительные параметры загрузки (например, ограничить количество ядер процессора или объем памяти).
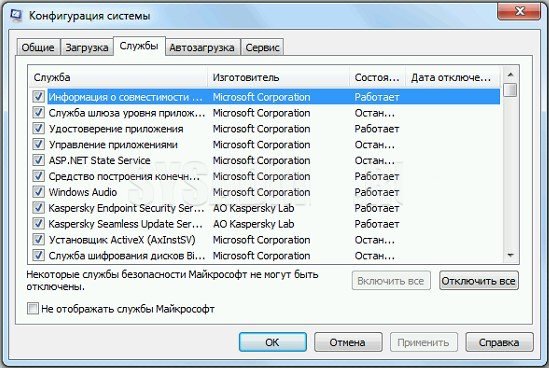
Службы
На этой вкладке можно включать и отключать системные и сторонние службы. Для удобства можно скрыть службы Microsoft, чтобы видеть только сторонние.
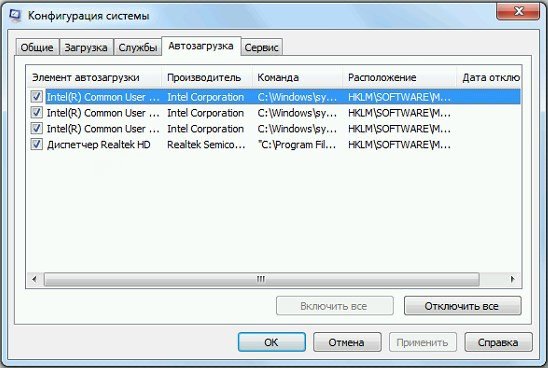
Автозагрузка
Эта вкладка позволяет управлять приложениями, которые запускаются вместе с системой. Отключение ненужных приложений помогает сократить время загрузки системы.
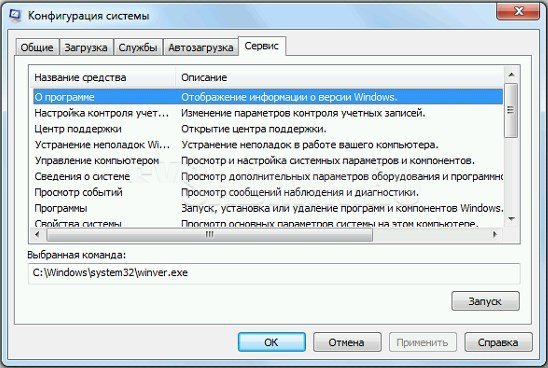
Сервис
Здесь находится список утилит для администрирования и диагностики системы. Вы можете запускать их прямо из окна msconfig.
Если после внесения каких-либо изменений нажимать кнопку “OK”, то появится такое окошко:
Основные сценарии использования msconfig
Отладка и поиск проблем
Msconfig помогает диагностировать проблемы с загрузкой и работой системы. Можно использовать диагностический запуск и выборочную загрузку, чтобы поочередно включать службы и приложения и выявить причину неполадок.
Тестирование
С помощью msconfig можно ограничить количество активных ядер процессора или объем оперативной памяти, чтобы протестировать производительность системы или приложений в таких условиях.
Регулярно проверяйте вкладки «Службы» и «Автозагрузка», чтобы отключать ненужные службы и приложения, которые замедляют загрузку системы.
Лицензионный ключ активации Windows 10 от
Readers help support Windows Report. We may get a commission if you buy through our links.
Read our disclosure page to find out how can you help Windows Report sustain the editorial team. Read more
If you’re looking to tweak your startup programs or troubleshoot your system, knowing how to open MSConfig on Windows 7 is essential. Here are some quick and easy methods to access this powerful tool.
How do I open MSConfig in Windows 7?
- Click the Start button on the taskbar.
- Type msconfig or system configuration in the search box.
- Press Enter or click on the System Configuration in the search result.
This method is quick and easy, especially if you’re already used to using the Start Menu’s search function.
2. Using the Run dialog box
- Press the Windows + R keys simultaneously to open the Run dialog box.
- Type msconfig and press Enter or click OK.


Using the Run dialog is one of the most straightforward ways to open msconfig, suitable for users who prefer keyboard shortcuts.
3. Using the Command Prompt
- Click the Start button type cmd in the search box.
- Right-click on Command Prompt and select Run as administrator.
- In the Command Prompt, type msconfig and press Enter.
This method is great if you’re already working in the Command Prompt and want to switch quickly to msconfig. Of course, you may also use PowerShell in exactly the same way.
4. Using Control Panel
- Click the Start button and select Control Panel.
- In the Control Panel, select View by: Small icons or Large icons to see more options.
- Click on Administrative Tools.
- Double-click on System Configuration.
Opening msconfig via the Control Panel is beneficial for users who may not be as familiar with shortcuts or command lines.
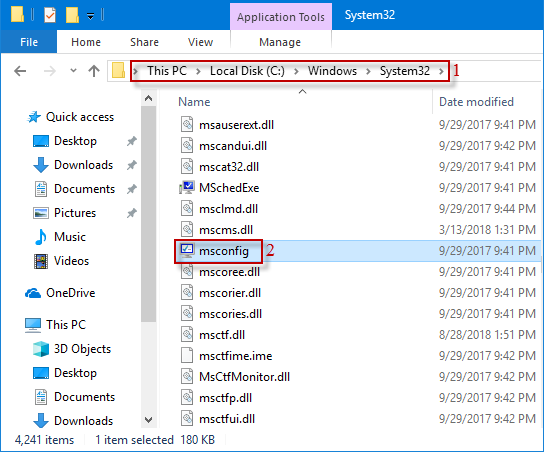
5. Using File Explorer
- Open File Explorer by clicking its icon on the taskbar.
- Navigate to This PC and then go to Local Disk (C:) (or the drive you have Windows installed).
- Open the Windows folder and then the System32 folder.
- Locate and double-click on msconfig.exe.
This method might be more involved, but it’s helpful if you want to know exactly where the executable file is located.
Each of these solutions provides a different way to open msconfig based on what you might find easiest or most convenient. You might also be interested in finding out how to open MSConfig in Windows 10.
Did you disabled some services in MSConfig accidentally? Click the highlighted guide to learn how to get them back.
If our guide helped you open MSConfig on Windows 7, let us know in the comments below.
Claudiu Andone
Windows Toubleshooting Expert
Oldtimer in the tech and science press, Claudiu is focused on whatever comes new from Microsoft.
His abrupt interest in computers started when he saw the first Home Computer as a kid. However, his passion for Windows and everything related became obvious when he became a sys admin in a computer science high school.
With 14 years of experience in writing about everything there is to know about science and technology, Claudiu also likes rock music, chilling in the garden, and Star Wars. May the force be with you, always!
Before you start
Objectives: Learn where to find msconfig and about different options that we can configure in it.
Prerequisites: you should know how to start or stop a service on the computer.
Key terms: msconfig, Windows 7, run, options, boot, startup,
msconfig Tool
To open msconfig tool in Windows 7, we can enter “msconfig.exe” in Search, and then select it. We can use msconfig to configure startup type, boot options, service startup, and the startup of other applications.

General Tab
General Tab
In the General tab we can select the startup type for our computer. As we can see, we can have the normal startup, diagnostic startup and selective startup. In diagnostic startup the system will be booted but with basic device drivers and basic services. In selective startup we can choose if we want to load system services and startup items (which are visible in the Startup tab).
Boot Tab
On the Boot tab we can manage different operating system boot options.

Boot Tab
Here we can choose the default operating system that will be booted. In our case we only have one OS installed, but if we had more dual-boot or multi-boot, we would see other installations here. Also, we can select to start our OS in Safe mode (Safe boot option). The Safe boot modes are:
- Minimal – safe mode.
- Alternate shell – safe mode with command prompt.
- Active Directory repair – Active Directory restore mode.
- Network – safe mode with networking.
Other boot options are:
- No GUI boot – removes the graphical moving bar and / or Windows animation (Windows Welcome screen) during start-up.
- Boot log – set up a boot logger that will log everything that is loaded during the boot process, for troubleshooting purposes. Log file is available after the boot in C:\Windows\ntbtlog.txt.
- Base video – boot with base video drivers using lowest resolution and color depth. This is also known as VGA mode in advanced boot options.
- OS boot information – shows driver names as drivers are being loaded during the startup process.
We can also set the number of seconds in which the boot menu is displayed (the timeout option). We can also make all those settings permanent for all future reboots, not just one single reboot.
On the Advanced settings we can specify the number of CPUs to be used, maximum memory, and debug port and baud rate for remote debugging.
Advanced Options
Services Tab
On the Services tab we can see a list of services and their status (running or stopped).

Services Tab
Note that we can’t start or stop a service here, but we can enable or disable it. When we disable a service, it won’t start the next time we boot. When we enable it, it will start when the machine reboots. This won’t stop or start the service immediately. The great thing here is that we can hide all Microsoft services by checking the “Hide all Microsoft services” option. This gives us a great view of the third party services and their status.
Startup Tab
On the Startup tab we can see all the items that start during the user or computer boot.

Startup Tab
We can see the item name, manufacturer, path to the executable, and the location of the registry key or shortcut that causes the application to run. We can clear the check box for a startup item to disable it on the next startup. Startup is a great place for viruses and other malware to plant them self, so this is a good place to check if we have some suspicious startup items. Keep in mind that some startup items are important for our system, and disabling those items can lead to undesired results. We should always check the name of the executable on the Internet and find out why it is used, if its malware or not, and if we can safely disable it.
Tools Tab
Under the Tools tab, we can find and launch virtually all of the support and troubleshooting tools that we might need to manage our system.

Tools Tab
When we select a specific tool, we will also see the command that is used to start the selected item.
System Configuration is a useful application. It can allow you to manage Windows startup, change the startup process and select startup services and programs as well as start a series of useful managers, but before that, you have to launch it. In this article, we’ll show you six ways to open System Configuration in Windows 10/7.
- Way 1: by searching
- Way 2: by launching Run dialog box
- Way 3: through Command Prompt
- Way 4: via Windows PowerShell
- Way 5: via Control Panel
- Way 6: by opening File Explorer
Way 1: Open the System Configuration tool by searching
In Windows 10, type system configuration or msconfig in search box of the taskbar, and then click the System Configuration displayed on search result to open the System Configuration application.
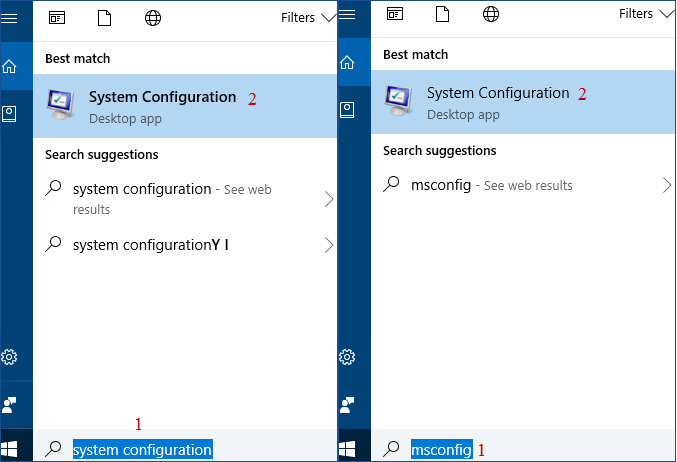
In Windows 7, click Start menu, type system configuration or msconfig in the Search field, and then click on its shortcut to launch the System Configuration tool.
Way 2: Open the System Configuration tool by launching a Run dialog box
In Windows 10/7, launch Run dialog box, type msconfig, and then click on OK or press Enter to immediately open the System Configuration application.
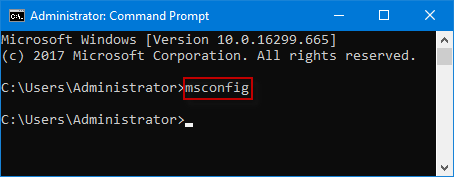
Way 3: Open the System Configuration application through Command Prompt
In Windows 10/7, open Command Prompt window, type msconfig, and press Enter to open the System Configuration tool.
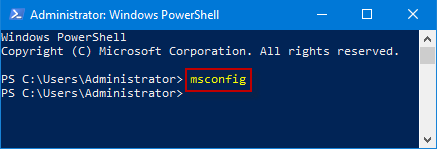
Way 4: Open the System Configuration tool via Windows PowerShell
In Windows 10/7, launch Windows PowerShell window, type msconfig, and press Enter. The System Configuration utility should open immediately.
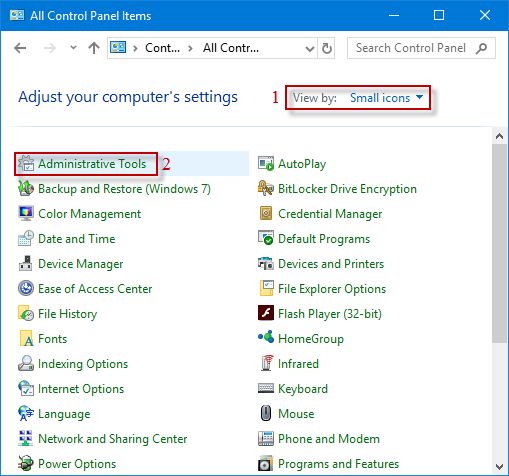
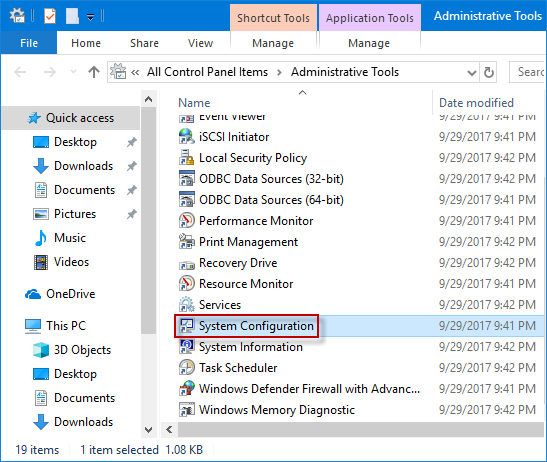
Way 5: Open the System Configuration tool via Control Panel
In Windows 10/7, open Control Panel, when Control Panel window brings out, choose the View by: Small icons/Large icons, find and click Administrative Tools.
In the Administrative Tools window, find and double-click the System Configuration Shortcut to launch the System Configuration utility.
Way 6: Open the System Configuration tool by opening File Explorer
In Windows 10, open File Explorer and navigate to This PC\Local Disk (C:)\Windows\System32 folder. In System32 window, slide the mouse wheel to find and double-click msconfig application to access it.
access system configuration utility launch system configuration window