
Have you ever faced ms-windows-store:purgeCaches error in reset Microsoft Store application procedure? It’s likely Yes then you are in the right location here as we are telling every possible way to fix this Store issue in Windows 10. When you encounter any Windows 10 store app not working problem the first suggestion for you is to clean it with WSReset.exe. But sometimes this command itself becomes a cause showing ms-windows-store:purgeCaches error.
You find this issue when Microsoft Store is not working and you have tried Wsreset to resolve it. It throws an error message instead of solving the problem. However, you can fix ms-windows-store:purgeCaches in Windows 10 by following some tweaks –
ms-windows-store:purgeCaches in Windows 10 Solutions
Here is how to Fix ms-windows-store:purgeCaches in Windows 10 –
Solution-1: Registry hack
Step-1: Hit Win+R hotkeys to open Run dialog. When it appears, type regedit in the text field and Press Enter. If you see a UAC prompts up, make a click on Yes.
Step-2: Navigate the following path –
HKEY_CURRENT_USER\Software\Classes\Local Settings\Software\Microsoft\Windows\CurrentVersion\AppModel\Repository\PackagesStep-3: Once you reach the path, do a right click on Packages located in the left pane and Select Permissions…
Step-4: Select Advanced on the Permission window from the bottom right corner.
Step-5: Now check the box beside “Replace all child object permission entries with inheritable permission entries from this object “located on the lower part of the Window.
Note- Before changing, make sure that the Owner is System.
Step-6: In the end, perform a click on Apply and thereafter OK. Finally, Reboot your PC.
Hopefully, it will resolve the issue when the PC gets started.
Solution-2: Run Windows 10 Store troubleshooter
ms-windows-store:purgeCaches error also occurs due to corrupted files. In that case, Windows Store app troubleshoot may help to resolve it.
Read How to Get at Troubleshooters On Windows 10 to Resolve Issues
- Go to the taskbar search box and write down troubleshoot and Press Enter.
- It will open up Troubleshooting Settings page. Now move to the right pane and scroll down and Locate Windows store Apps under Find and fix other problems.
- Now make a click on it and when expanded Select Run the troubleshooter.
The system will automatically resolve the issue once it finds the error.
Solution-3: Use PowerShell command to Reinstall Store
You might face complication while using PowerShell command as it is little tough compared to other solutions. Therefore follow the steps carefully –
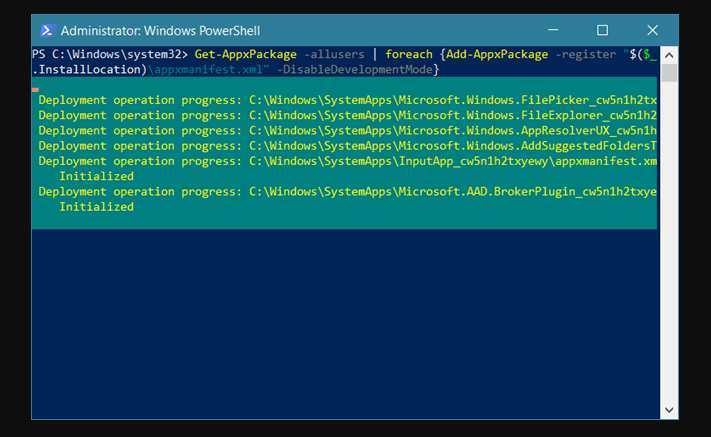
- Press Win+X jointly to open WinX menu. Once the result showed up, make a click on Windows PowerShell (admin). Now a UAC will prompt up asking your confirmation, click on Yes to continue.
- Copy the following command and paste it into PowerShell Window and Press Enter –
Get-AppXPackage | Remove-AppxPackage
Get-AppxPackage -AllUsers | Remove-AppxPackage
Kindly do not paste both the commands at the same time but do one after another. This method will remove or uninstall Microsoft Store from your computer. Once it is done, Reboot your PC.
- When you PC get restarted, open elevated PowerShell again by following the above step. This time paste this following text after blinking cursor –
Get-AppXPackage | Foreach {Add-AppxPackage -DisableDevelopmentMode -Register “$($_.InstallLocation)AppXManifest.xml”}The PowerShell command will bring back your Microsoft Store again. Finally, Reboot your system to save the changes you made and fix ms-windows-store:purgeCaches in Windows 10.
Solution-4: Try DISM Tool
To fix ms-windows-store:purgeCaches, you can use DISM Command. Here’s how –
- Type cmd in the search box located next to Start button. Once the result came into view, make a right click on “Command Prompt” Desktop app and choose “Run as administrator” from the options.
- Now type the following command one by one after C:\WINDOWS\system32> and press Enter each time –
DISM.exe /Online /Cleanup-image /ScanhealthDISM.exe /Online /Cleanup-image /Restorehealth
- When completed, exit the Command Prompt black Window and Reboot your system.
Run Disk cleanup
Running Disk Cleanup might help you to fix ms-windows-store:purgeCaches issue.
Press Windows logo key type “cleanmgr” and hit Enter.
Select C (the system drive), click OK, on the pop up and let the system to detect the removable items.
Once the Disk Cleanup wizard appears, press “Clean up System files”.
Wait for few minutes for the subsequent window, check all the boxes under Files to delete and then click OK.
That’s it. Hope these ways will help you to resolve ms-windows-store:purgeCaches issue.

ms-windows-store:purgecaches is a setting feature that wipes or purges the locally stored cache for Windows Store that builds up over time.
The given error code usually appears when there is an issue with the Windows Store to which users usually react after using the wsreset.exe utility. However, the error message that annoys users is: “ms-windows-store:PurgeCaches, The application didn’t start.”
However, there are lots of other cases where the error appears and they are all related to errors and Windows Store. In our examination, the error increased in frequency after a Windows 10 update, and sometimes it can be caused by Windows 10 upgrading process.
If you’re facing the same “ms-windows-store:PurgeCaches, this guide delivers a series of reliable troubleshooting steps. Here are some methods that other users in the same situation have used to fix the issue. If you want to fix the issue you can then follow the methods given below. Let’s get to it!
Also See: Different Ways To Fix Error 0x80070141 – Device is Unreachable
Contents
- 1 How To Fix ‘ms-windows-store:purgecaches’ Windows Error
- 1.1 Fix 1: Repairing Permissions Through Registry Editor
- 1.2 Fix 2: Helpful Command
- 1.2.1 Further;
- 1.3 Fix 3: Update Windows Completely To Fix ms-windows-store:purgecaches
- 1.3.1 Alternatively;
- 1.4 Fix 4: Reinstall Windows Default Apps Via PowerShell
- 1.4.1 Further;
- 1.5 Method 5: Use New Account To Resolve Things
- 1.6 Method 6: Permissions Resetting To Fix ms-windows-store:purgecaches
- 1.7 Conclusion:
How To Fix ‘ms-windows-store:purgecaches’ Windows Error
Fix 1: Repairing Permissions Through Registry Editor
Well, the error occurs because Windows can’t reset the app cache, we can fix the issue with a registry method. Come let’s check how to fix ms-windows-store:PurgeCaches error after repairing the Packages permissions via Registry Editor:
- Hit Windows key + R to open a Run box. Then, input “regedit“, press Enter. Then select Yes at the User Account Control (UAC) prompt to open Registry Editor with Administrative privileges.
- In the Registry Editor, simply use the left pane to move to the following location:
HKEY_CURRENT_USER \ Software \ Classes \ Local Settings \ Software \ Microsoft \ Windows \ CurrentVersion \ AppModel\ Repository \ Packages - Right-tap on the Packages key and select Permissions.
- Then head over to the following window, tap on the Advanced button.
- Tap on the Change button located at the top of the Advanced Security Settings for Packages. Then make sure that the Owner is set as System. In case, if it is not set to System, input System in the other box, then tap on Check Names, and then click on OK.
- When the Owner is set to System, move all the way down under the screen and then check the box linked with Replace all child object permission entries with inheritable permission entries from this object.
- Then, tap Apply and then Ok. At last, quit Registry Editor and then reboot your PC to view if the issue is fixed at the next startup.
If you’re still facing the same error “ms-windows-store:PurgeCaches, then head over to the other method.
Fix 2: Helpful Command

Microsoft professionals recommend this solution, and it is helpful for many people, besides other generic responses users usually receive. This solution is very simple and helpful as you will initially execute the inbuilt Windows Apps troubleshooter which will try to examine and fix ms-windows-store:purgecaches. Then you’ll try to execute a Powershell command which tries to reregister your Windows Store app. Follow the steps carefully:
- All you need to do is to search for Settings in the Start menu. Then tap on the first result which appears. You can also tap directly on the gear button under the lower left part of the Start menu.
- Now specify the Update & security section under the Settings window and then tap on it.
- Head over to the Troubleshoot tab and view under the Find and resolve other issues.
- Windows Store Apps troubleshooter should be right there under it. So make sure you should tap on it and follow the steps on the screen.
- Also, you can repeat the whole process for the Internet Connections troubleshooter. Then check if it is your Internet connection that is causing the issue with Windows Store.
Further;
The other part of this solution consists of executing this PowerShell command which reregisters the Windows Store. Keep in mind that no Windows app updates are executing in the meantime.
- Head over to the PowerShell by right-tapping on the Start menu button and choosing the Windows PowerShell (Admin) option just to open the tool with administrator privileges. If you view Command Prompt at that spot, you can then search for it manually.
- Now copy and paste the given command and make sure you tap Enter afterward.
$manifest = (Get-AppxPackage Microsoft.WindowsStore).InstallLocation + ‘\AppxManifest.xml’ ; Add-AppxPackage -DisableDevelopmentMode -Register $manifest
- You can then restart your PC and check to view if the Windows Store issue has been fixed.
Also See: How To Fix 0x80071771 Error On Windows 10
Fix 3: Update Windows Completely To Fix ms-windows-store:purgecaches
The thing is that many of us only started to face the error ‘ms-windows-store:purgecaches’ after a certain variant of Windows has been released. Hopefully, those who face problems with that build can find out that a new build was soon launched which managed to deal with the issues efficiently. All you need to do is to install all pending updates on your PC and check if the issues have been fixed. Follow the steps to fix ms-windows-store:purgecaches:
- Head over to the PowerShell by right-tapping on the Start menu button. Or else choosing the Windows PowerShell (Admin) option just to open the tool with administrator privileges. If you view Command Prompt at that spot, you can then search for it manually.
- In the Powershell console, input in “cmd” and wait until the Powershell switch to the cmd-like environment.
- In the “cmd” console, head over to the command and then tap Enter afterwards: ‘wuauclt.exe /updatenow’
- Let this command execute for an hour and check back to view if any updates were found and/or installed without any problem.
Alternatively;
- Search for Settings in the Start menu and then tap on the first result which appears. You can also tap directly on the gear button located at the lower left part of the Start menu.
- Now locate the Update & security section under the bottom part of the Settings window and then tap on it.
- You can now stay in the Windows Update tab. Then tap on the Check for updates button under the Update status section. You can do this to check if there is a new variant of Windows available online.
Fix 4: Reinstall Windows Default Apps Via PowerShell
This technique is very advanced as it involves lots of details and its implementation can be quite lengthy. However, if you follow the steps carefully, you will end up with a properly working Windows Store service just by reinstalling the Windows default apps. Follow the steps to fix ms-windows-store:purgecaches:
- Right-tap the WindowsApps folder located in C:\Program Files. Then tap Properties, and then tap the Security tab. Tap the Advanced button. The “Advanced Security Settings” window will also appear. Here you want to modify the Owner of the key.
- Tap the Change link located next to the “Owner:” label The Select User or Group window will appear.
- Choose the user account via the Advanced button. Or you can simply input your user account in the area which says ‘Enter the object name to select’ and then tap OK. Add your user account.
- Mandatory, to modify the owner of all subfolders and files in the folder. Simply choose the check box “Replace owner on subcontainers and objects” in the “Advanced Security Settings” window. Then tap OK to modify the ownership.
- Head over to the Security tab of the WindowsApps folder’s Properties window. Then tap on Edit just to modify permissions and choose your personal user account you set the ownership to. Modify permissions to Full Control and apply the changes.
Further;
After performing all the above steps, now use Powershell to reinstall these apps. This is probably the simplest part of this method so consider yourself almost there.
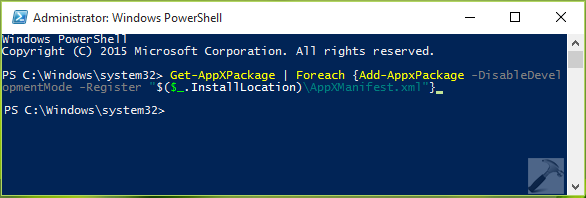
- Head over the PowerShell by right-tapping on the Start menu button and choosing the Windows PowerShell (Admin) option just to open it with admin privileges.
- Then ctrl+c and ctrl+v this command and make sure you tap Enter: Get-AppXPackage | Foreach {Add-AppxPackage -DisableDevelopmentMode -Register $($_.InstallLocation)\AppXManifest.xml}
- Then to view if the issue has been fixed.
Also See: Different Ways To Fix Windows 7 Error 1079
Method 5: Use New Account To Resolve Things
This unusual method has saved many users from losing their minds over this annoying error ‘ms-windows-store:purgecaches’. Whenever it appears, Windows Store and wsreset appear to stop working on your account. They sometimes start work on your new account and executing wsreset fixes Windows Store for both users! This is quite simple to do so make sure you don’t skip this fix!
- Head over to the Settings either by tapping on the gear icon. Or else simply by searching for it in the search bar located next to the Start menu.
- Then open the Accounts section in Settings. Then choose the Family and other users option. Select the Add someone else to this PC option located there. Then tap on the Sign-in without using the MS account option which is usually not recommended but it’s enough for your current purposes.
- Now create a Local account and proceed further with the on-screen steps. Input a username for this new account.
- If you like this account to be password-protected. You can simply add a character password, a password hint, and proceed by tapping Next.
- Tap the Finish button just to finish creating a new account. Simply log in through this account after restarting your PC. Then try to execute the “wsreset” command by typing this work in the Start menu button and tapping the first result. Check to view if the issue is fixed.
Method 6: Permissions Resetting To Fix ms-windows-store:purgecaches
In some situations, some permissions probably need to be reset to the Windows folders just to get rid of this problem. To do that:
- Hit “Windows” + “R” to open the Run prompt.
- Input in “cmd” and hit “Ctrl” + “Shift”+ “Enter” to provide administrative rights
- Input in the following command and hit “Enter” to run it.
icacls "C:\Program Files\WindowsApps" /reset /t /c /q
- Check to view if the issue persists.
Conclusion:
ms-windows-store:PurgeCaches is no doubt the most common error but it is simple or easy to fix. Here I have mentioned the solutions to resolve it. Also, if you have any sort of suggestions, queries, or questions then let us know below. Or else, if you find it helpful then share it with others.
Also Read:
- How Do I Troubleshoot VPN Error 720 – Tutorial
There might different instances when you find the Windows Store or other built-in apps not working on Windows 10. Most common symptoms for such issues include, automatic minimization of apps, apps not responding or doesn’t open when you try to do so, apps crashes abruptly. For fixing these problems, users are generally recommended to reset app cache by running wsreset.exe command.
However, while resetting app cache, we came around this message so far:
Page Contents
ms-windows-store:PurgeCaches
Class not registered
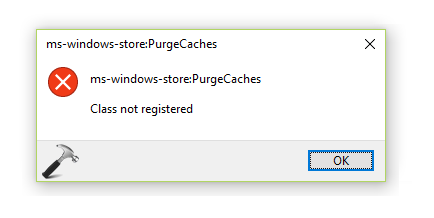
If you’re encountering this message even when opening Windows Store, we’ll try to help you in this article to fix it. You might also encounter with similar error messages such as:
ms-windows-store:PurgeCaches. The app didn’t start.
ms-windows-store:PurgeCaches. Element not found.
ms-windows-store:PurgeCaches. Invalid value for registry.
Here are the fixes you can try to get rid of these error messages:
FIX : ‘ms-windows-store:PurgeCaches. Class Not Registered.’ In Windows 10
FIX 1 – Reset Apps Using Settings App
Windows 10 includes the minimal GUI way to reset apps on the go. So if you’re facing this problem with any particular app, you can easily reset the concerned app and bring it to its initial configuration. Here’s how:
Steps to reset apps to defaults in Windows 10

If you’re facing this issue with Settings app itself, this method isn’t feasible for you. Check the FIX 2 & 3 for that case.
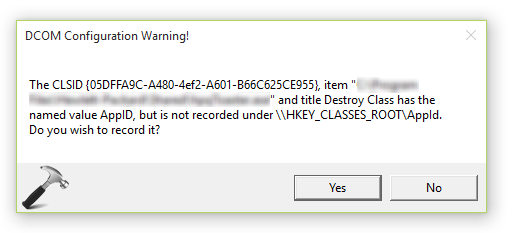
FIX 2 – Register The Classes Using Component Services Snap-in
The ‘class not registered‘ term in the error message indicates that local variables in the container are not connecting and you need to register classes using Component Services snap-in. The relevant steps for this are mentioned in FIX 1 of this link:
Steps to register class components using Component Services snap-in
.
FIX 3 – Re-register All Apps
You can also fix this issue by re-registering the particular or all apps at once. Here is how-to guide for that:
Steps to re-register apps in Windows 10
After trying above mentioned fixes, the issue should no longer exist. Hope this helps!
Related: ms-windows-store:PurgeCaches. The remote procedure call failed.
RELATED ARTICLES
It is frequently recommended to reset your App Cache using wsreset.exe tool to maintain a clean environment, and possibly fix various Metro UI hindrances. However, what if the error generates in this troubleshooting procedure itself? Well, one thing’s for sure, you will have to upfront the following error statement and interpret the gibberish (like it’s that easy).
Prior to proceeding this piece for the solution, let be advised to first Scan and Fix your system’s concealed disorders which most probably is eliciting the inconsistencies:
- Step 1 : Download Systimizer – PC Cleaner & Internet Booster (Works on Windows 10, 8, 7 & XP)
- Step 2 : Click “Scan” to find system issues
- Step 3 : Click “Fix” to repair all anomalies
“ms-windows-store:PurgeCaches
the remote procedure call failed”
OR
“ms-windows-store:PurgeCaches
Make sure your typed the name correctly, and then try again”
Fortunately, the cure is much easier than taking language classes and understanding these puzzling sentences. This article serves as a troubleshooting guide to rectify the formerly described problem and quit this annoying suffering. But, more on the steps later; first familiarize yourself with this powerful entity more.
Wsreset
Wsreset.exe is a Windows 8.x tool that resets Windows Store without affecting user’s account settings or any of the installed apps. Developed by Microsoft itself, this handy utility is immensely used as a troubleshooting entity to clear all cache stored by Store and refresh app installation instantly. This procedure helps demolish any accumulation of unnecessary data housed in the system, that would otherwise affect the Store’s speed, and generate App installation/upgrade errors in the process.
Everything works smooth when all is in order. Unfortunately, we all know better. If you are pulling your hair over this frustrating dilemma, execute the methods illustrated below and find an effective solution.
Solution 1: Use AppsDiagnostic.diagcab
Microsoft provides with a self-built Store troubleshooter that analyzes your system and fixes any issues related to the error-prone Metro UI. To download this program, visit their official website and download AppsDiagnostic.diagcab from the concerned page. Run this software and see if it detects any resolvable problems. Otherwise, proceed to the other solutions.
Solution 2: Create full Permissions
Wsreset.exe troubles can often be traced back to incorrect permissions set to the current user. This results in inaccessibility to the utility, reporting corresponding errors as a consequence. To check whether you have ensured the full rights, enter Registry Editor and manually change permissions:
- Open Run box by pressing Windows + R keys
- Type regedit and hit Enter
- In the Registry Editor box, navigate to the following directory
- HKEY_CURRENT_USER\Software\Classes\Local Settings\Software\Microsoft\Windows\CurrentVersion\AppModel\Repository\Packages
- Right-click Packages and choose Permissions
- Click Advanced button displayed in front of For special permissions or advanced settings. click Advanced
- Ensure Owner is set as SYSTEM by looking at the top
- If not, perform the following sub-steps to change this to SYSTEM:
- Click Change link
- Enter SYSTEM under Enter the object name to select
- Click Check Names and notice your typed entry getting underlined
- Click OK
- Check Replace all child object permission entries with inheritance permission entries from this object
- Click Apply, and then OK
Try with the wsreset tool again and see if granting permissions resolved your case. If it did not, continue with the following methods.
Solution 3: Re-register Store App
Redoing Store registration will verify that all licensing and other vital requirements are correctly enabled to operate the software. This is most likely to resolve your error.
To re-register Store App, perform these steps:
- Open Command Prompt from the WinX menu (Windows + X keys)
- Enter the following command
- Powershell –ExecutionPolicy Unrestricted Add-AppxPackage –DisableDevelopmentMode –Register $Env:SystemRoot\WinStore\AppxManifest.xml
Repeat the problematic activity and verify this resolution. If you are still left staring at the horrible words, it’s time you perform a PC Refresh, and start with a relatively cleaner slate. This is guaranteed to remove your error.
To Refresh your Windows without losing your files, proceed with the steps mentioned below:
- Open side bar menu by pressing Windows + I keys
- Click Change PC settings located at the bottom
- Click General from the left pane
- Scroll down to reach Refresh your PC without affecting your files
- Click Get started button
- Follow on-screen instructions
By Timothy Tibbettson 06/19/2023 |
If your Windows Store isn’t working and you’re getting the error message ms-windows-store:PurgeCaches, we have a solution. We discovered this error while posting a fix for You’ll Need a New App to Open This Ms-Default-Location, and the fix is the same, so here it is.
Odds are you got here because, at some point, you may have removed the Windows Store and or Store apps with tweaking or privacy apps, Apps & Features, Powershell, or a program uninstaller and forgot about it — until you need one of those apps.
Press the Windows key + S and begin typing in Powershell until you see Windows Powershell. Right click on that and Run as administrator.
1: Type in Get-AppxPackage -allusers Microsoft.WindowsStore | Foreach {Add-AppxPackage -DisableDevelopmentMode -Register «$($_.InstallLocation)AppXManifest.xml»} followed by the enter key.
Hopefully, that fixed your problem, but there’s a good chance you got an error or errors that look something like this:
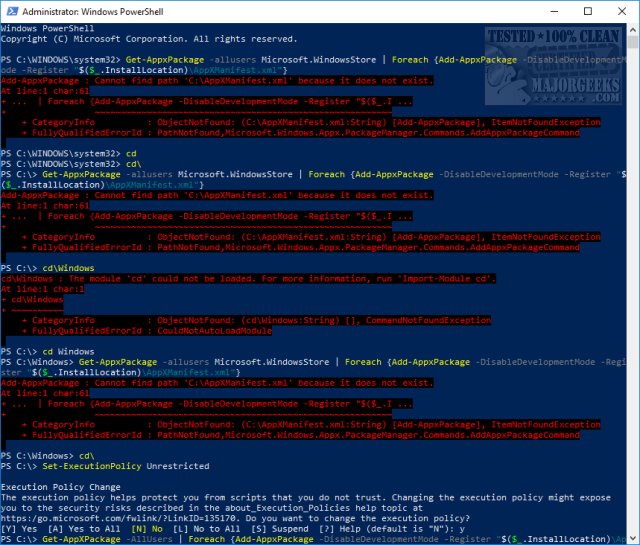
There are numerous possible errors however the most common, recurring words you might see are Can not find path C:\AppXManifest.xml or ObjectNotFound (C:\AppXManifest.xml:String). Because of this, we’re going to use Set-ExecutionPolicy Unrestricted and try it again and, finally, one other possibility.
2: This one worked for us. Press the Windows key + S and begin typing in Powershell until you see Windows Powershell. Right click on that and Run as administrator. Type in Set-ExecutionPolicy Unrestricted followed by enter.
Again, type in Get-AppxPackage -allusers Microsoft.WindowsStore | Foreach {Add-AppxPackage -DisableDevelopmentMode -Register «$($_.InstallLocation)AppXManifest.xml»} followed by the enter key.
3: Press the Windows key + S and begin typing in Powershell until you see Windows Powershell. Right click on that and Run as administrator. Type in Set-ExecutionPolicy Unrestricted followed by enter.
Again, type in Add-AppxPackage -DisableDevelopmentMode -Register $Env:SystemRootWinStoreAppxManifest.XML followed by the enter key.
4: This is worth a try if all else failed. Open PowerShell or Command Prompt as administrator. Type in wsreset.exe. and enter. If the «You’ll Need a New App to Open This Ms-Default-Location» error repeats, there’s one more thing to try.
If that didn’t fix the problem, open PowerShell as admin, and type in icacls «C:\Program Files\WindowsApps» /reset /t /c /q. Once completed, run wsreset.exe again, and press enter.
This was a tough error to fix, and we hope we solved your problem.
comments powered by Disqus