
In the previous chapter, you learned about creating a login using Windows user account. Here, you will learn to create a login using SQL Server user.
At the time of installing SQL Server, if you select Mixed Mode, then you must provide a password for the built-in System Administrator or sa account. It is highly recommended to create a strong password for the sa account; otherwise disable this account as it is mapped to the sysadmin server role and has administrative rights on the whole server. Hence it is vulnerable to attack by hackers.
Create a New Login with SQL Server Authentication
The login created using SQL Server authentication mode is independent of Windows user accounts. Login and password are created and stored in the syslogins table in the master database. Passwords are not stored as plain text.
To create a new login using SQL Server authentication, follow the steps:
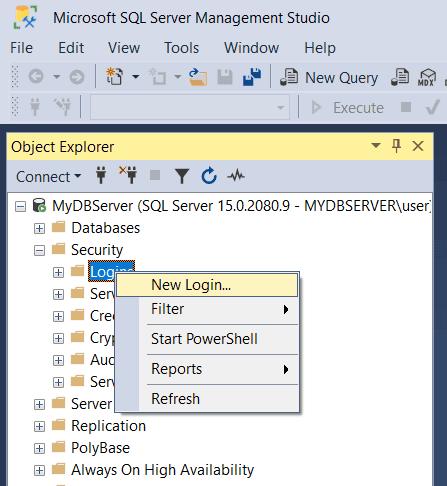
Open SQL Server Management Studio. In the object explorer, expand the Security node. and right-click on the Logins node and select New Login.
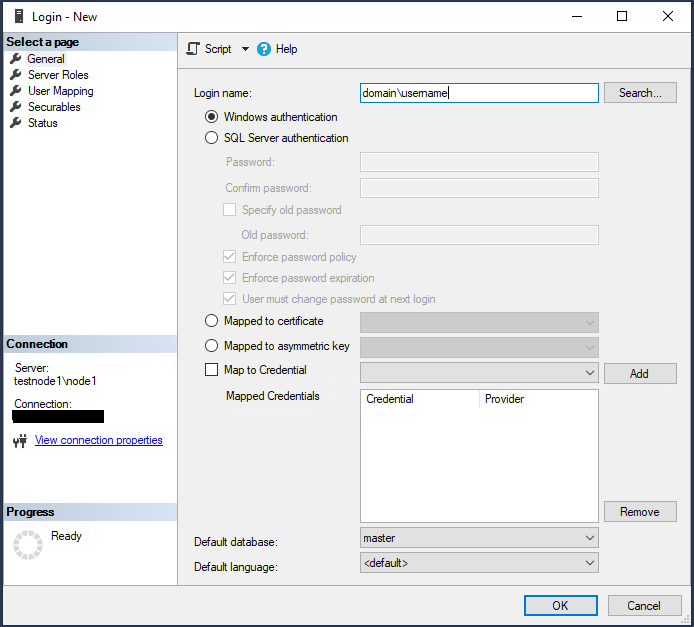
In the Login – New window, enter a new user name. Select SQL Server authentication radio button, enter a password, and re-enter the same password in the confirm password field, as shown below.
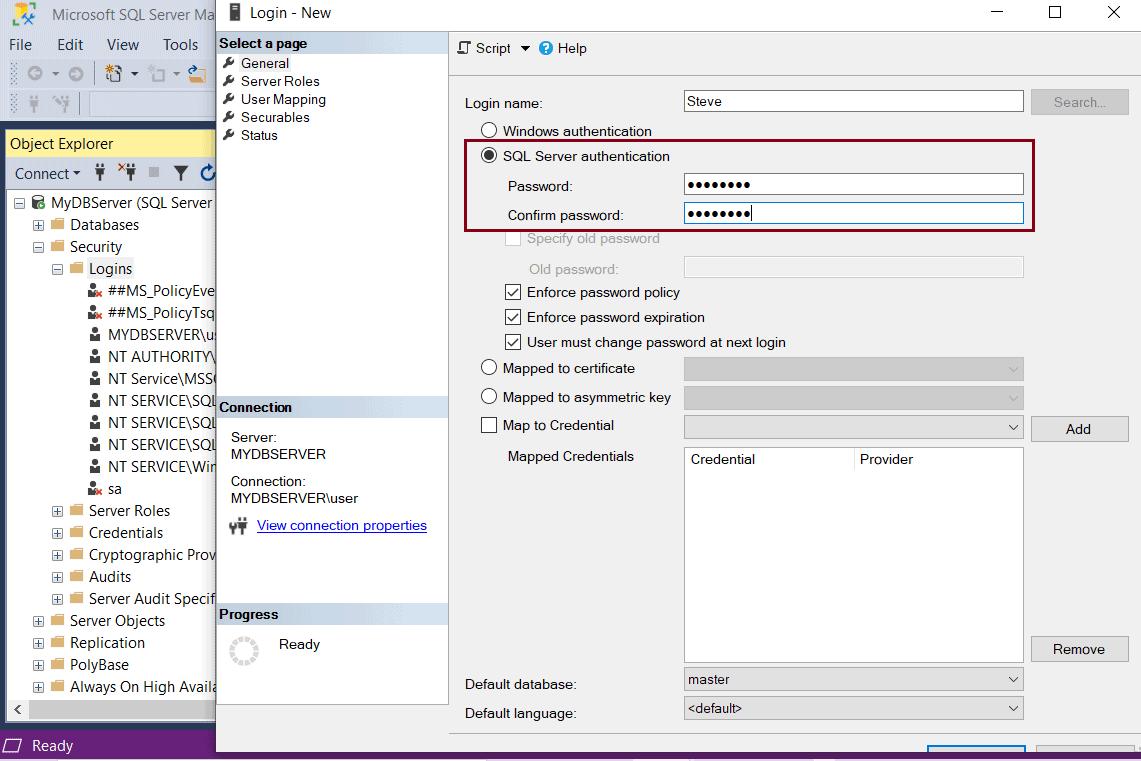
Select three optional password policies:
- Enforce password policy: The Windows password policies of the computer are enforced for SQL Server Logins.
- Enforce password expiration: The maximum password age policy of the computer is enforced.
- User must change password at next login: If this option is selected, the user is required to change their SQL Server login password the next time they login.
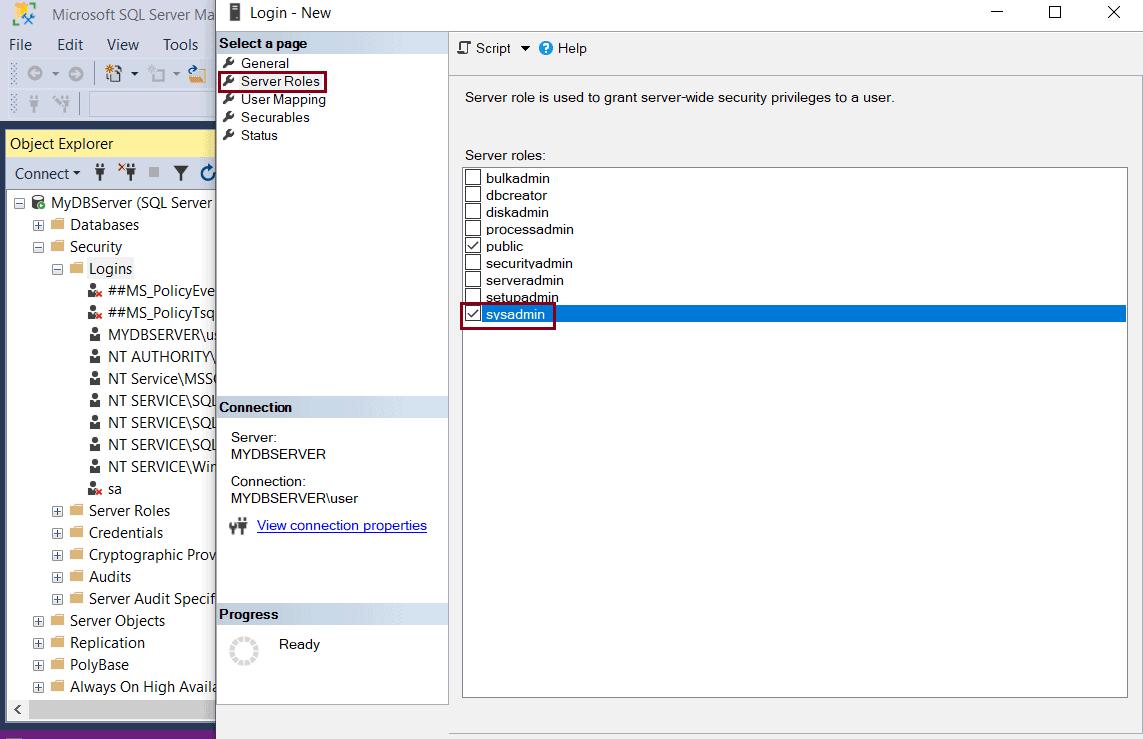
Select the Server Roles tab. In the new window, assign a server-level role to the login being created. By default, public is selected. You can add any role to the login by selecting the checkbox next to the role. In the figure below, sysadmin is selected along with public. With sysadmin server role, user can perform any activity on the server and has full control.
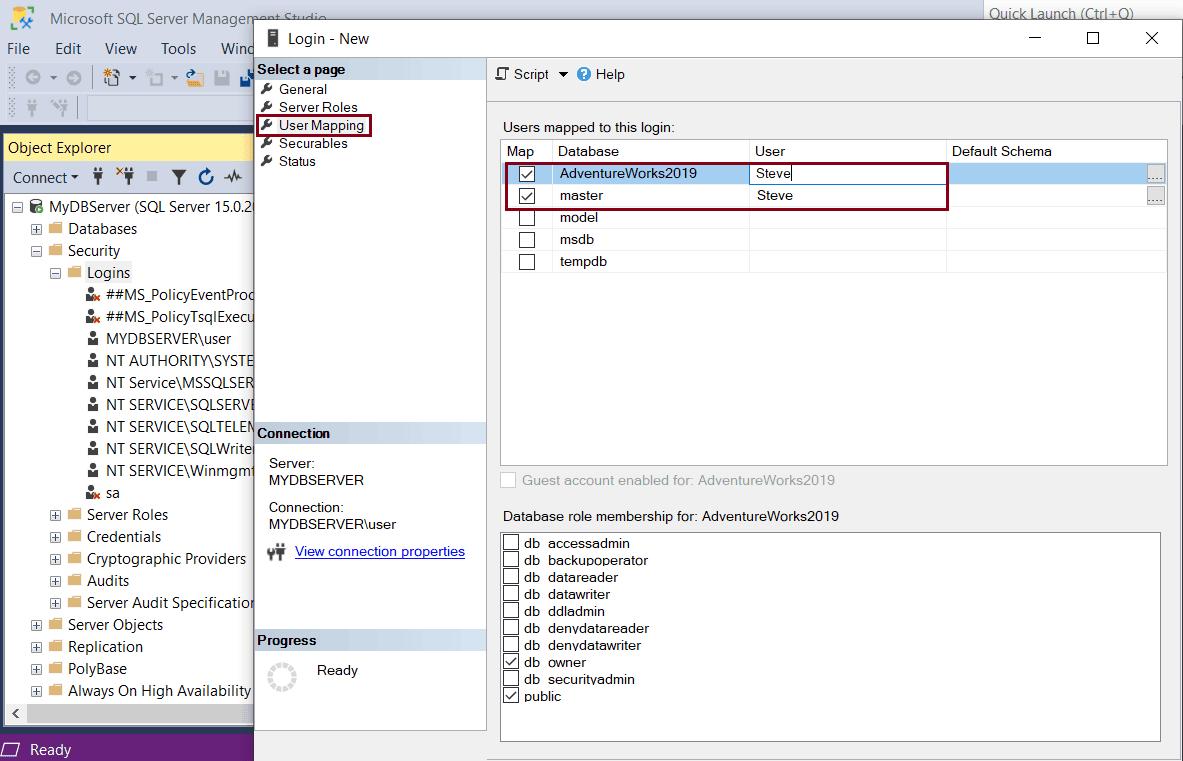
Click on User mapping tab. You can create a user to a database while creating a new login under user mapping tab. In the new window, a list of all databases in the server instance is displayed. Select the database(s) for which you want to map the login. You can select multiple databases. Just select the check box next to the database name. The login name is now displayed in the User column, next to the selected database, as shown below.
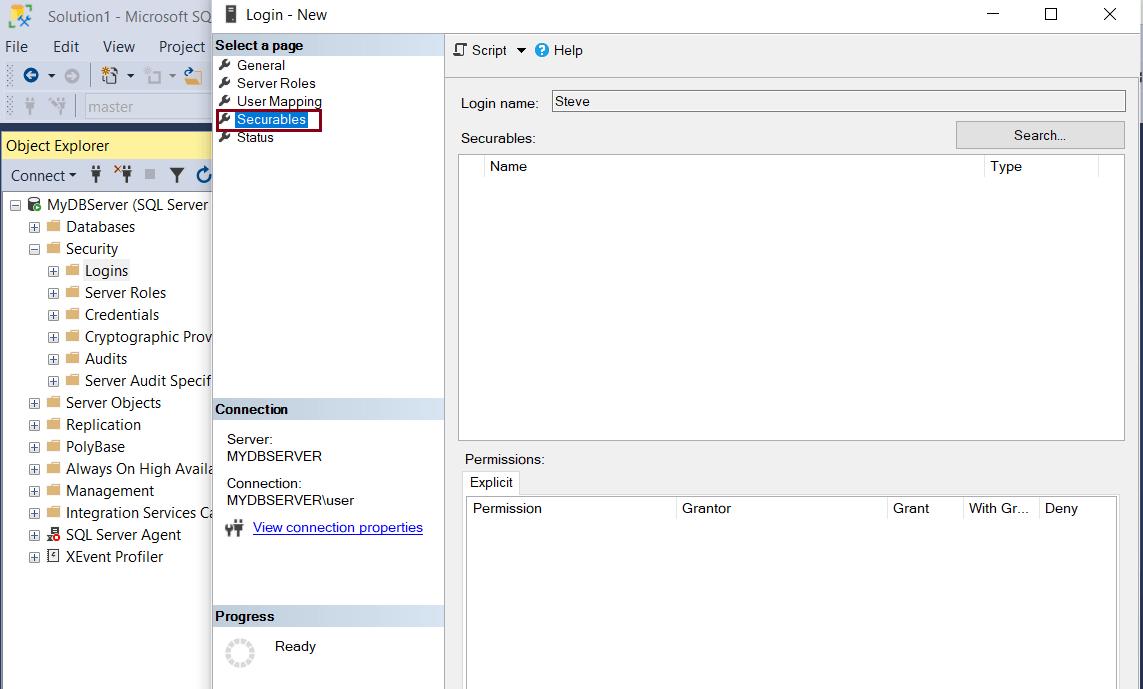
Click on the Securables tab. In the new window, select the Search button. In the pop-up, select The Server <Your Server name> and click OK. This is an optional step. You may skip this step and set the permissions later.
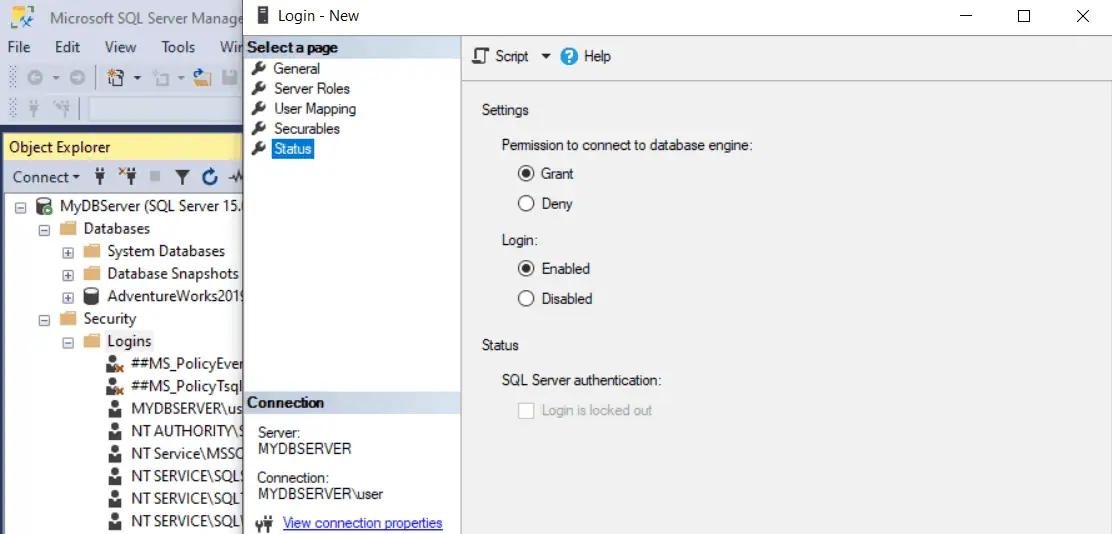
Finally, check the status screen. Grant and Enabled should be selected.
Click Ok to create the new login. This will add a new SQL Server login under the Logins node, as shown below.

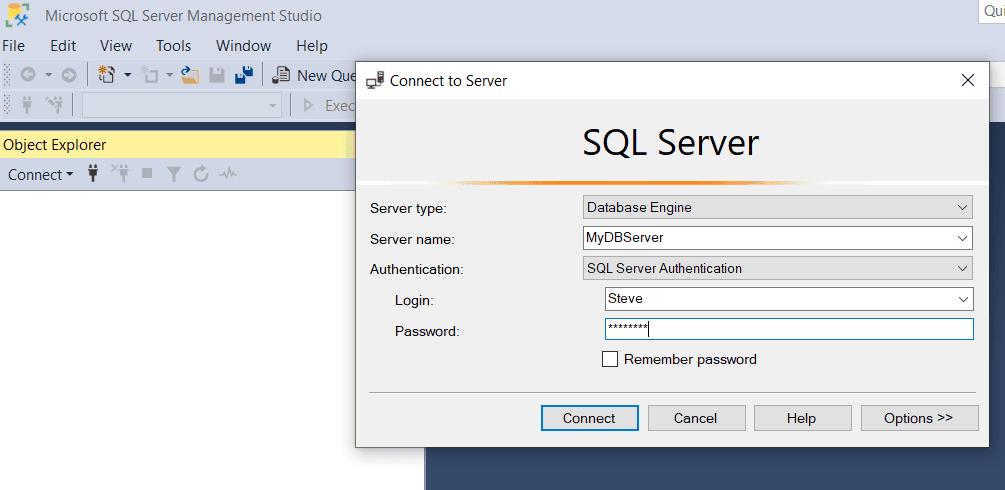
You can now login to SQL Server SSMS with the new login:
Advantages of SQL Server Authentication:
- Allows SQL Server to support older applications and applications built on mixed OS.
- Allows access to web-based applications where users create their own identities.
- Allows users to connect from unknown domains.
Disadvantages of SQL Server Authentication
- Users using Windows must provide an additional set of login/password to connect to SQL Server.
- SQL Server authentication cannot use Kerberos security protocol.
- Windows offers additional password policies that are not available for SQL Server logins.
- For many applications, login and password have to be passed over the network during connection to the database server. Though encrypted, these are vulnerable to attacks.
- Some applications store the encrypted password in the client system. This is an added security risk.
Trouble shoot
If you get an error while using a new SQL Server login, then check the following:
1. Enable Mixed mode authentication (SQL Server authentication & Windows authentication) in SQL Server instance property.
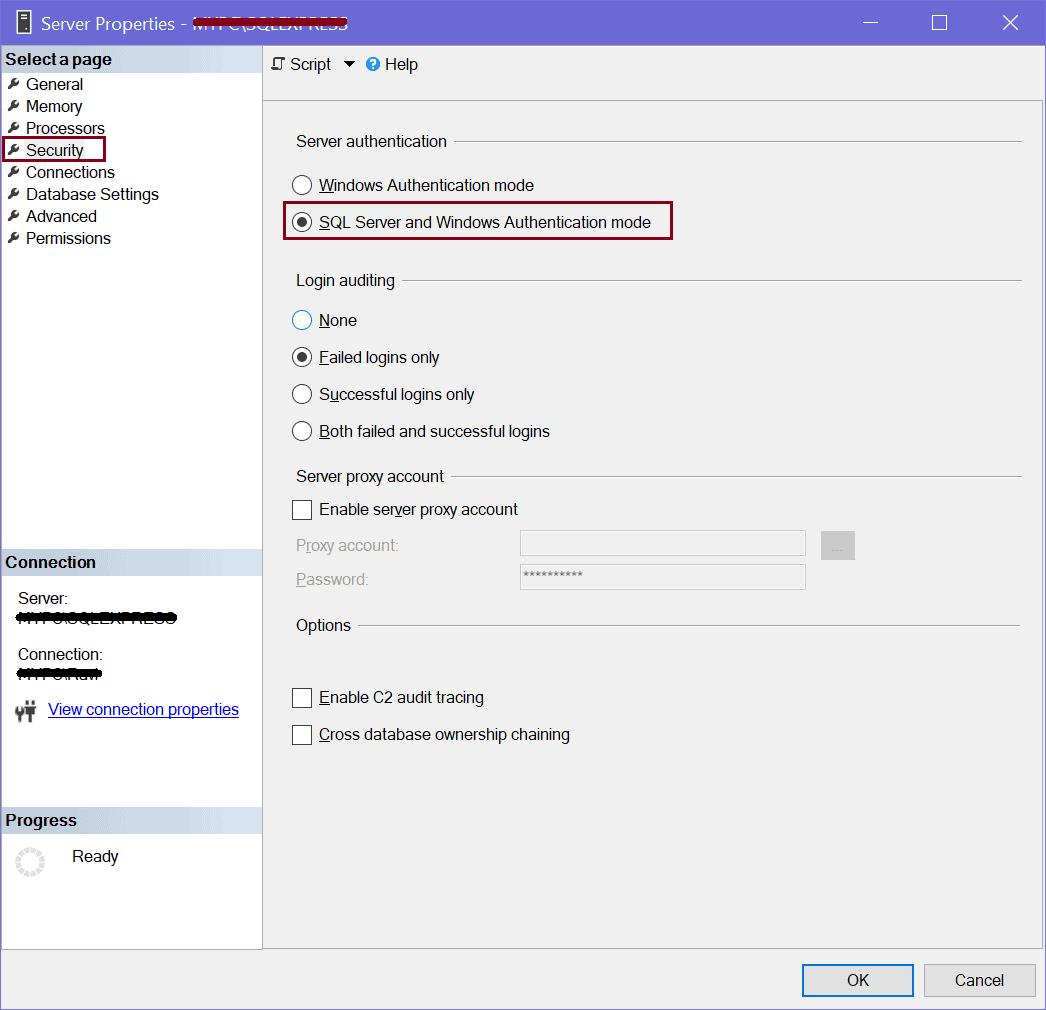
Open Management Studio, right-click on the SQL Server instance & click properties. Go to Security tab.
Under Server Authentication, check SQL Server and Windows Authentication Mode radio button, as shown below.
2. Check if TCP/IP protocol is enabled. Restart SQL Server.
3. Sometimes having the password expiration check box selected gives an error when you try to login with the new login. You can try creating a login with Password Expiration unchecked.
Problem
One of the best ways to keep SQL Server secure is to use Windows Authentication. This requires the integration of Active Directory (AD) security objects like Users and Groups into SQL Server. The purpose of this tip is to provide a scalable and manageable approach that takes into consideration the ever-increasing number of instances and databases that you need to manage in your environment and how this security approach can make managing SQL Server security much easier.
Solution
For the purpose of this tip, I will use the following SQL Server instance names: INS001 and INS002.
We will use the AdventureWorks sample database to apply our security settings. Below you can see that this has been restored as AdvWorks.
Just a word of warning, I will be using a domain controller later on in the tip.
Configure Active Directory Groups and Users
In my local Active Directory «MyDomain.local», I have setup a folder called SqlServerUsersAndGroups with the following Users and Groups:

These groups and users should be sufficient for our demonstration.
Users now have to be assigned to their corresponding Active Directory groups. Right click on MsSqlUser001 and select «Add to a group…» as shown below:
Choose SqlReaderGroup for MsSqlUser001 as shown below:

For MsSqlUser002 add to SqlDeveloperGroup and for MsSqlUser003 add to SqlDBAGroup.
Step 1: Administrating access at the SQL Server Instance Level
SQL Server security has many layers and one of them is at the instance level. For every AD object (user or group) that needs access to the SQL Server instance a login is required within SQL Server. For the scalability of SQL Server access, I strongly recommend only adding Active Directory groups and avoid user logins. Using just groups provides a very robust approach when managing access to hundreds of users. Furthermore, one user can have multiple group memberships in AD.
Creating SQL Server Logins
The following SQL command adds the three AD groups mentioned earlier to the SQL Server instance:
USE [master]
GO

CREATE LOGIN [MYDOMAIN\SqlDBAGroup]       FROM WINDOWS
CREATE LOGIN [MYDOMAIN\SqlDeveloperGroup] FROM WINDOWS
CREATE LOGIN [MYDOMAIN\SqlReaderGroup]    FROM WINDOWS
GO
Once the command is run, your Logins folder in SSMS should look like this where we can see the three new logins:
Remember to do this for all of the SQL Server instances (INS001, INS002).
Create SQL Server Roles and Add Members
For the SqlDBAGroup, we will can use Server Roles to give permission at the server level. You have the option to either use the Fixed Server-Level Roles or create your own custom Server-Level Role. One benefit is that with the custom role, you can design very specific privileges precisely for your system. You can learn more about User Defined Server Roles here.
Let’s create a User Defined Server-Level Role that has the ability to create and drop databases as well as administer logins. Additionally, it needs the ability to connect to server and view definitions. The following code will grant these permissions.
USE [master]
GO

CREATE SERVER ROLE [udsr_dba] – User Defined Server Role DBA
GO

GRANT ALTER ANY DATABASE    TO [udsr_dba]
GRANT ALTER ANY LOGIN       TO [udsr_dba]
GRANT ALTER ANY SERVER ROLE TO [udsr_dba]
GRANT CONNECT ANY DATABASE  TO [udsr_dba]
GRANT CONNECT SQL           TO [udsr_dba]
GRANT CREATE ANY DATABASE   TO [udsr_dba]
GRANT VIEW ANY DATABASE     TO [udsr_dba]
GRANT VIEW ANY DEFINITION   TO [udsr_dba]
GRANT VIEW SERVER STATE     TO [udsr_dba]

GO
Add SqlDBAGroup to the new user defined server role udsr_dba as follows:
ALTER SERVER ROLE [udsr_dba] ADD MEMBER [MYDOMAIN\SqlDBAGroup]GO
Step 2: Database Level Security
One level below SQL Server instance security is database level security. The difference between the two is that instance security defines rights and permissions for the whole SQL Server instance, whereas database security is specific to an individual database and can provide specific permissions to each database object, such as a table, stored procedure, view, etc.
The SQL Server database security has two types of objects «Users» and «Roles». By default, these look as follows in the AdvWorks database:
Create Database Users
The way Database Security works is that a SQL Server login maps to database user in a database. Database users in turn can have role membership in none, many, or several database roles. Database users also can own none, one or many schemas in the database, but this is not a direct security feature. Owning a schema also grants ownership to schema objects and suppresses permission checking.
Let’s illustrate database security in practice by adding our new logins to database AdvWorks and assign them their corresponding roles:
USE [AdvWorks]
GO

CREATE USER [SqlDBA]       FOR LOGIN [MYDOMAIN\SqlDBAGroup]
CREATE USER [SqlDeveloper] FOR LOGIN [MYDOMAIN\SqlDeveloperGroup]
CREATE USER [SqlReader]    FOR LOGIN [MYDOMAIN\SqlReaderGroup]
GO
Once created, the list of database users will look like this:
Create Database Roles
Our AdvWorks database has corresponding users for every new SQL Server login but the only permission in the AdvWorks database these users have now is the default «Public» role.
In order to grant data access, let’s create database roles with custom access levels and assign membership to those roles:
USE [AdvWorks]

CREATE ROLE [db_sql_reader]
CREATE ROLE [db_sql_developer]
CREATE ROLE [db_sql_dba]
GO
Assign Permissions to Roles
To make this case realistic and to differentiate the db_sql_reader role from db_datareader, I would like this role to have read access to all objects in SalesLT schema and avoid the dbo schema as it contains system information that is more relevant to a DBA. In addition, it would be beneficial to grant permissions to execute stored procedures.
This can be done by allowing a general grant execute and grant select to the SalesLT schema for the db_sql_reader role:
USE [AdvWorks]
GRANT EXECUTE ON SCHEMA::[SalesLT] TO [db_sql_reader]
GRANT SELECT  ON SCHEMA::[SalesLT] TO [db_sql_reader]
GO
The db_sql_developer developer database role needs full access to the database, but assigning developers the db_owner database role will give more permissions than developers need, so we will limit permissions with the role.
The permission developers typically need are the following: select, delete, update, insert and execute on the SalesLT schema:
USE [AdvWorks]
GRANT EXECUTE ON SCHEMA::[SalesLT] TO [db_sql_developer]
GRANT SELECT  ON SCHEMA::[SalesLT] TO [db_sql_developer]
GRANT INSERT  ON SCHEMA::[SalesLT] TO [db_sql_developer]
GRANT UPDATE  ON SCHEMA::[SalesLT] TO [db_sql_developer]
GRANT DELETE  ON SCHEMA::[SalesLT] TO [db_sql_developer]
GO
The db_sql_dba database role requires access to error logs and other system data located in dbo schema and be done as follows:
USE [AdvWorks]
GRANT EXECUTE ON SCHEMA::[dbo] TO [db_sql_dba]
GRANT SELECT  ON SCHEMA::[dbo] TO [db_sql_dba]
GRANT INSERT  ON SCHEMA::[dbo] TO [db_sql_dba]
GRANT UPDATE  ON SCHEMA::[dbo] TO [db_sql_dba]
GRANT DELETE  ON SCHEMA::[dbo] TO [db_sql_dba]
GO
Once the code has been executed, the database roles folder should look as follows:
Assign Roles to Users
It is time now to assign database users to respective database roles. I would recommend assigning only one corresponding database role to a database user to keep a one-to-one relationship. Keep one-to-many relationships between users and groups in Active Directory.
USE [AdvWorks]

ALTER ROLE [db_sql_dba]       ADD MEMBER [SqlDBA]
ALTER ROLE [db_sql_developer] ADD MEMBER [SqlDeveloper]
ALTER ROLE [db_sql_dba]       ADD MEMBER [SqlDBA]
GO
You can check the database role membership by right clicking on a database user and selecting properties. For example, we can see this for user SqlDeveloper below that has access to the role db_sql_developer.

This completes the setup of database and server security.
Verification of SQL Server Security Settings
Table access verification can be performed with the help of system store procedure sp_table_privileges. This store procedure returns the list of all table permissions. You can find more details on the sp_table_privileges store procedure here.
The below T-SQL script returns table privileges for all tables in the database
CREATE TABLE #TempTablePrivileges
(
  TABLE_QUALIFIER nvarchar(255),
  TABLE_OWNER nvarchar(255),
  TABLE_NAME nvarchar(255),
  GRANTOR nvarchar(255),
  GRANTEE nvarchar(255),
  PRIVILEGE nvarchar(255),
  IS_GRANTABLE nvarchar(255)
)

USE AdvWorks
GO

INSERT INTO #TempTablePrivileges
EXEC sp_table_privileges @table_name = '%%'

SELECT * FROM #TempTablePrivileges

DROP TABLE #TempTablePrivileges
The script returns all table privileges including system ones like dbo and INFORMATION_SCHEMA and sys. If you are only looking for user defined table permissions, exclude these results from the query above. This tip has not granted any specific table privileges; hence this query should not return any user defined table permissions.
Schema privileges can be checked using sys.database_permissions in with the query below:
USE AdvWorks

SELECT
   permission_name,
   state_desc,
   obj.name AS schema_name,
   prin.name AS principal_name,
   type_desc AS principal_type
FROM sys.database_permissions as db_perm
JOIN sys.schemas as obj ON db_perm.major_id = obj.schema_id
JOIN sys.database_principals prin ON prin.principal_id = db_perm.grantee_principal_id
WHERE class = 3 -- SCHEMA ONLY
We can check actual access rights of each individual server login by switching to a specific login and then trying to execute a statement. To do this, we use the EXECUTE AS statement.
See the code example below:
USE AdvWorks

EXECUTE AS LOGIN = 'MYDOMAIN\MsSqlUser001'
GO

SELECT * FROM [dbo].[BuildVersion]

REVERT;
More detailed information on EXECUTE AS can be found here. In our case, the select permission will be denied to MsSqlUser001 as it is only a member of SqlReaderGroup in Active Directory and this group is only given read and execute permissions to the SalesLT schema in our database. Therefore, select permissions is denied on dbo schema as shown below:

Migrating database from one SQL Server instance to another
Now that security architecture is done for SQL Server INS001, we can demonstrate a migration of the AdvWorks database to instance INS002. This instance, in our case is installed on the same virtual machine node. Such migrations typically performed in large database development projects where the same database is copied between Development, Test and Production SQL Server instances. Before you proceed, please check that the security set-up of your server instances is identical as shown in step 1.
The simplest method to migrate a database is using backup and restore. If you do not know how to back up your database from one instance to another, you can find more help in this tip.
Restore this database to INS002.
Here is a sample database restore script:
USE [master]
RESTORE DATABASE [AdvWorks]
FROM DISK = N'C:\MSSQL\Backup\AdvWorks.bak'
WITH FILE = 1,
MOVE N'AdventureWorksLT2012_Data' TO N'C:\MSSQL\DATA\AdventureWorksLT2012.mdf',
MOVE N'AdventureWorksLT2012_Log' TO N'C:\MSSQL\DATA\AdventureWorksLT2012_log.ldf',
NOUNLOAD,
STATS = 5
GO
Change the folder path to suit the environment you have created. More help on database restores can be found in this tip.
If the SQL Server logins have been created before we restore the AdvWorks database in INS002, the database users will be correctly mapped to their corresponding SQL server logins. If not, you will need to manually assign users to logins as follows which can be done with this script.
USE [AdvWorks]
GO

ALTER USER [SqlReader]    WITH LOGIN=[MYDOMAIN\SqlReaderGroup]
ALTER USER [SqlDeveloper] WITH LOGIN=[MYDOMAIN\SqlDeveloperGroup]
ALTER USER [SqlDBA]       WITH LOGIN=[MYDOMAIN\SqlDBAGroup]
GO
Next Steps
- Adding Users to Azure SQL Databases
- Querying Active Directory Data from SQL Server
- Querying Active Directory Data from SQL Server
- How to Setup Row Level Security for SQL Server
- SQL Server Security Audit Report
Windows authentication is a method of validating user credentials on a SQL Server using the Windows operating system. This type of authentication allows users to access a SQL Server database using their Windows login credentials, providing a more secure and convenient method of authentication compared to traditional SQL Server authentication. In this blog post, we will explore the challenge of connecting Windows authentication on SQL Server and discuss various methods to accomplish this.
The Challenge of Connecting Windows Authentication on SQL Server
Connecting Windows authentication on SQL Server can be a daunting task for some users. Here are a few challenges you may encounter:
- Lack of understanding of how Windows authentication works on SQL Server
- Difficulty in configuring Windows authentication on SQL Server
- Problems with user permissions and access
- Compatibility issues with different versions of SQL Server and Windows
Video Tutorial:
Method 1: How to Connect Windows Authentication on SQL Server using SQL Server Management Studio (SSMS)
SQL Server Management Studio (SSMS) is a powerful tool for managing and administering SQL Server databases. Here’s how you can connect to a SQL Server using Windows authentication in SSMS:
Pros:
– Simple and straightforward method
– Utilizes the familiar interface of SSMS
Cons:
– Requires installation of SSMS
– Limited to the functionality provided by SSMS
Steps:
1. Launch SQL Server Management Studio.
2. In the “Connect to Server” window, select “Windows Authentication” as the authentication type.
3. Enter the name of the SQL Server instance you want to connect to.
4. Click “Connect” to establish a connection using Windows authentication.
Method 2: How to Connect Windows Authentication on SQL Server using Integrated Security=True
If you prefer to connect to a SQL Server using Windows authentication programmatically, you can use the “Integrated Security=True” parameter in your connection string. Here’s how:
Pros:
– Flexibility to connect programmatically
– Can be used in various programming languages
Cons:
– Requires knowledge of connection strings and programming
– Needs to be implemented in each application that connects to SQL Server
Steps:
1. Open your application’s source code.
2. Locate the connection string used to connect to the SQL Server.
3. Add “Integrated Security=True” to the connection string.
4. Recompile and run your application to establish a connection using Windows authentication.
Method 3: How to Connect Windows Authentication on SQL Server using SQLCMD
SQLCMD is a command-line tool provided by Microsoft for interacting with SQL Server. It can also be used to connect to a SQL Server using Windows authentication. Here’s how:
Pros:
– Lightweight and easy to use
– Ideal for scripting and automation tasks
Cons:
– Limited to command-line interface
– Not as user-friendly as other methods
Steps:
1. Open Command Prompt or PowerShell.
2. Execute the command “sqlcmd -S {SQL Server} -E,” replacing “{SQL Server}” with the name of the SQL Server instance.
3. Press Enter to establish a connection to SQL Server using Windows authentication.
Method 4: How to Connect Windows Authentication on SQL Server using ODBC
ODBC (Open Database Connectivity) is a standard interface for connecting to various databases, including SQL Server. You can configure an ODBC data source to connect to a SQL Server using Windows authentication. Here’s how:
Pros:
– Allows central management of database connections
– Offers support for various programming languages and applications
Cons:
– Requires additional configuration for ODBC data source
– May not be suitable for users unfamiliar with ODBC
Steps:
1. Open the ODBC Data Source Administrator on your Windows machine.
2. Go to the “System DSN” or “User DSN” tab, depending on your requirements.
3. Click “Add” to create a new ODBC data source.
4. Select the appropriate SQL Server driver and click “Finish.”
5. Enter the details for the SQL Server instance and enable the Windows authentication option.
6. Test the connection to ensure successful authentication using Windows credentials.
Alternatives: What to Do If You Can’t Connect Windows Authentication on SQL Server
If you encounter difficulties connecting to SQL Server using Windows authentication, here are a few alternative solutions:
1. Use SQL Server authentication: Instead of relying on Windows authentication, you can create SQL Server logins and use SQL Server authentication to connect to the database. This method requires a separate username and password for authentication.
2. Check user permissions: Ensure that the user account you are using has the necessary permissions to connect to the SQL Server instance. Verify that the user is a member of the appropriate Windows security groups or SQL Server roles.
3. Update SQL Server and Windows: If you are experiencing compatibility issues, ensure that you are using the latest versions of both SQL Server and Windows. Upgrading to newer versions may provide better compatibility and support for Windows authentication.
Bonus Tips
Here are a few bonus tips to help you connect Windows authentication on SQL Server more effectively:
1. Double-check firewall settings: Ensure that the necessary ports are open and accessible through your firewall to establish a connection between the client and SQL Server.
2. Enable trusted connections: In some cases, you may need to enable trusted connections in your application or connection string to use Windows authentication.
3. Test with different user accounts: If you are encountering issues with a specific user account, try connecting with a different user account to isolate the problem and verify if it is related to the user account or the overall setup.
5 FAQs about Connecting Windows Authentication on SQL Server
Q1: Can I use Windows authentication with SQL Server Express edition?
A1: Yes, Windows authentication is supported in SQL Server Express edition. You can connect using Windows authentication by following the methods mentioned in this blog post.
Q2: Is Windows authentication more secure than SQL Server authentication?
A2: Windows authentication provides an additional layer of security as it leverages the user’s Windows login credentials. It eliminates the need to remember and manage separate SQL Server passwords, reducing the risk of password-related vulnerabilities.
Q3: Can I switch from SQL Server authentication to Windows authentication?
A3: Yes, you can switch from SQL Server authentication to Windows authentication by modifying the authentication mode in SQL Server. However, be aware that this change can have implications for existing applications and users using SQL Server logins.
Q4: What should I do if I forgot the Windows authentication password?
A4: Windows authentication does not involve a separate password for SQL Server access. Instead, it relies on the user’s Windows login credentials. If you have forgotten your Windows login password, you will need to reset it using the appropriate methods for your Windows operating system.
Q5: Can I use Windows authentication in conjunction with SQL Server roles and permissions?
A5: Yes, Windows authentication can be used in conjunction with SQL Server roles and permissions. After connecting with Windows authentication, you can configure the necessary permissions and assign roles to individual users or groups for better access control.
In Conclusion
Connecting Windows authentication on SQL Server provides a secure and efficient method for accessing databases. By following the methods outlined in this blog post, you can establish a connection using Windows login credentials, enhancing the overall security and user experience. However, it is essential to consider the specific requirements and challenges of your setup to choose the most suitable method for your environment. Remember to test the connection and ensure proper user permissions to avoid any potential problems.
В этой статье мы рассмотрим средства SQL Server для обеспечения безопасности и лучшие практики, связанные с настройкой и обеспечением безопасности в этой СУБД.
Содержание:
- Аутентификация в SQL Server
- Авторизация в SQL Server
- Роли приложений
- Фильтрация данных в SQL Server
- Схемы в SQL Server
- Шифрование данных средствами SQL Server
- Использование Group Managed Service Accounts для SQL Server
- Оценка уязвимостей SQL Server через SSMS
- Аудит активности в SQL Server
- Общие рекомендации по безопасности SQL Server
Для начала вспомним базовые концепции безопасности SQL Server. MSSQL управляет доступом к объектам через аутентификацию и авторизацию.
- Аутентификация — это процесс входа в SQL Server, когда пользователь отправляет свои данные на сервер. Аутентификация устанавливает личность пользователя, который проходит аутентификацию;
- Авторизация — это процесс определения того, к каким защищаемым объектам может обращаться пользователь, и какие операции разрешены для этих ресурсов.
Многие объекты SQL Server имеют свои разрешения, которые могут наследоваться от вышестоящего объекта. Разрешения могут быть предоставлены отдельному пользователю, группе или роли.
Аутентификация в SQL Server
Аккаунт SQL Server можно разделить на 2 части: Имя входа и Пользователь.
- Имя входа – это глобальный логин для всего экземпляра SQL Server. С помощью него вы проходите процесс аутентификации;
- Пользователь – это участник базы данных, привязанный к определенному Имени Входа.
Например, ваше имя входа на сервер может быть domain\username, а пользователь в базе данных, привязанный к этому имени входа может называться domain_databaseUser. Практически всегда имя входа и пользователь в базе данных совпадают по названию, но нужно иметь в виду что они могут и различаться, иметь разные имена.
SQL Server поддерживает 2 режима аутентификации:
- Аутентификация Windows (Windows Authentication) – аутентификация осуществляется с помощью системы безопасности Windows. Пользователям, которые уже аутентифицированы в Windows и имеют права на SQL Server не нужно предоставлять дополнительные учетные данные.
- Смешанный режим аутентификации (Mixed Mode Authentication) – в этом режиме помимо аутентификации Windows поддерживается аутентификация самого SQL Server через логин и пароль.
Microsoft рекомендует использовать аутентификацию Windows, если есть такая возможность. Для аутентификации посредством логина и пароля, данные (логин и пароль) передаются по сети, хоть и в зашифрованном виде. При Windows аутентификации по сети передаётся серия зашифрованных сообщений, в которых не участвует пароль пользователя.
Но некоторые приложения, особенно старые, не поддерживают аутентификацию Windows, поэтому при установке режима аутентификации стоит учитывать какие приложения будут подключаться к серверу.
SQL Server поддерживает три типа Login Name (имен входа):
- Локальная учетная запись пользователя Windows или учетная запись домена/доверенного домена.
- Группа Windows. Предоставление доступа локальной группе Windows или группе из AD домена. Позволяет предоставить доступ ко всем пользователям, которые являются членами группы.
- Логин SQL Server (SQL Server authentication). SQL Server хранит имя пользователя и хэш пароля в базе данных master, используя методы внутренней аутентификации для проверки входа в систему.
SQL Server автоматически интегрируется с Active Directory. Если вы хотите раздать права доменной учетной записи, вам нужно использовать NetBios имя домена и логин учетной записи. Например для пользователя username в домене domain.local будет верным “domain\username”.
Авторизация в SQL Server
Для авторизации SQL Server использует безопасность на основе ролей, которая позволяет назначать разрешения для роли или группы Windows/домена, а не отдельным пользователям. В SQL Server есть встроенные роли сервера и баз данных, у которых есть предопределенный набор разрешений.
В SQL Server есть 3 уровня безопасности, их можно представить, как иерархию от высшего к низшему:
- Уровень сервера – на этом уровне можно раздать права на базы данных, учетные записи, роли сервера и группы доступности;
- Уровень базы данных включают в себя схемы, пользователи базы данных, роли базы данных и полнотекстовые каталоги;
- Уровень схемы включают такие объекты, как таблицы, представления, функции и хранимые процедуры.
Встроенные роли сервера
| Роль | Описание |
| sysadmin | Участник роли имеет полные права ко всем ресурсам SQL Server. |
| serveradmin | Участники роли могут изменять параметры конфигурации на уровне сервера и выключать сервер. |
| securityadmin | Участники роли управляют логинами и их свойствами. Они могут предоставлять права доступа GRANT, DENY и REVOKE на уровне сервера и на уровне базы данных, если имеют к ней доступ.
securityadmin мало чем отличается от роли sysadmin, потому что участники этой роли потенциально могут получить доступ ко всем ресурсам SQL Server. |
| processadmin | Участники роли могут завершать процессы, запущенные в SQL Server. |
| setupadmin | Участники роли могут добавлять и удалять связанные серверы с помощью TSQL. |
| bulkadmin | Участники роли могут запускать BULK INSERT операции. |
| diskadmin | Участники роли могут управлять устройствами резервного копирования. На практике эта роль практически не применяется. |
| dbcreator | Участники роли могут создавать, изменять, удалять и восстанавливать базы данных. |
| public | Каждый логин SQL Server находится в этой роли. Изменить членство public нельзя. Когда у пользователя нет разрешения для объекта, к которому он получает доступ, пользователь наследует разрешения public роли для этого объекта. |
Схема ролей SQL Server:
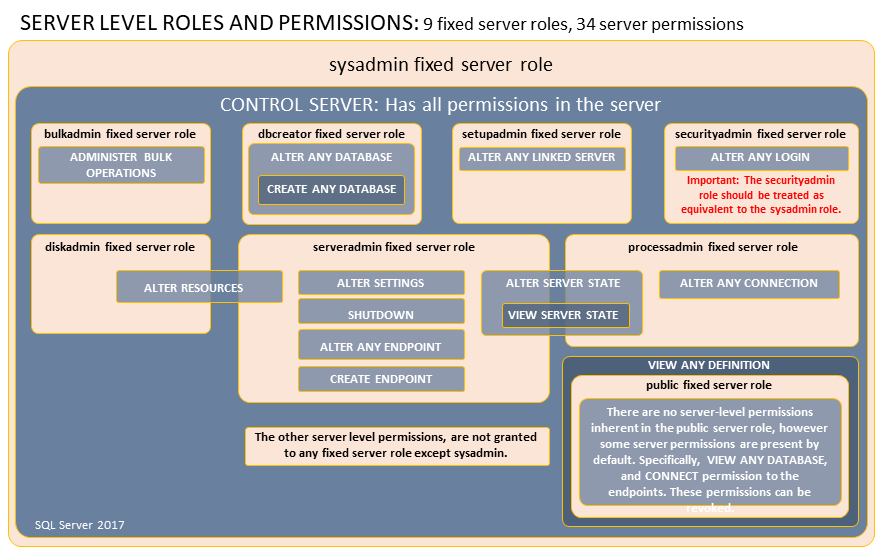
На практике использования серверных ролей не особо распространено, потому что часто пользователю нужен уникальный набор разрешений. Исключением могут быть роль sysadmin для системных администраторов и роль public.
Встроенные роли базы данных
| Роль | Описание |
| db_owner | Участники роли могут выполнять все действия по настройке и обслуживанию базы данных, включая удаление. |
| db_securityadmin | Участники роли могут менять членство других ролей. Участники этой группы потенциально могут увеличить свои права до db_owner, поэтому стоит считать эту роль эквивалентной db_owner. |
| db_accessadmin | Участники роли могут управлять доступом к базе данных для существующих на сервере логинов. |
| db_backupoperator | Участники роли могут выполнять резервное копирование базы данных. |
| db_ddladmin | Участники роли могут выполнять любую DDL команду в базе данных. |
| db_datawriter | Участники роли могут создавать/изменять/удалять данные во всех пользовательских таблицах в базе данных. |
| db_datareader | Участники роли могут считывать данные со всех пользовательских таблиц. |
| db_denydatawriter | |
| db_denydatareader | Участникам роли запрещен доступ к пользовательским таблицам базы данных. |
Так же стоит отдельно выделить специальные роли в базе данных msdb.
| db_ssisadmin
db_ssisoperator db_ssisltduser |
Участники этих ролей могут администрировать и использовать SSIS (SQL Server Integration Services). |
| dc_admin
dc_operator dc_proxy |
Участники этих ролей могут администрировать и использовать сборщик данных. |
| PolicyAdministratorRole | Участники этой роли имеют полный доступ к политикам SQL Server |
| ServerGroupAdministratorRole
ServerGroupReaderRole |
Участники этих ролей имеют полный доступ к зарегистрированным группам серверов. |
| SQLAgentUserRole SQLAgentReaderRole SQLAgentOperatorRole | Участники этих ролей имеют полный доступ заданиям агента SQL Server |
Заметка: имейте в виду, что участники ролей dc_ssisadmin и dc_admin могут повысить свои права до уровня sysadmin.
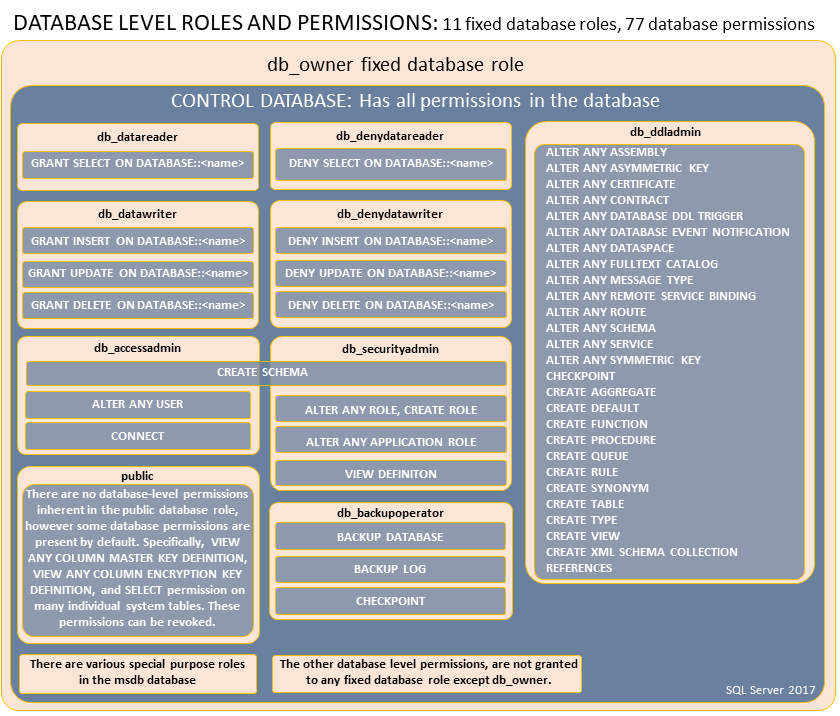
Схема по встроенным ролям баз данных в SQL Server:
Роли приложений
Роль приложения – это объект базы данных (такой же, как и обычная роль базы данных), который позволяет с помощью аутентификации через пароль менять контекст безопасности в базе данных. В отличие от ролей баз данных, роли приложений по умолчанию находятся в неактивном состоянии и активируются, когда приложение выполняет процедуру sp_setapprole и вводит соответствующий пароль.
В отличие от обычных ролей, роли приложений практически никогда не используются. Как исключение, их применение можно найти в multi-layer приложениях.
Фильтрация данных в SQL Server
Фильтрация данных в SQL Server через хранимые процедур/представления/функции можно отнести к реализации принципу наименьших привилегий, так как вы предоставляете доступ не ко всем данным в таблице, а лишь к некоторой их части.
Например, можно предоставить пользователю права только на SELECT из представления и запретить прямой доступ к таблицам, которые используются в представлении. Таким образом вы предоставите доступ только к части данных из таблицы, задав фильтр where в представлении.
Фильтрация данных через Row-Level Security
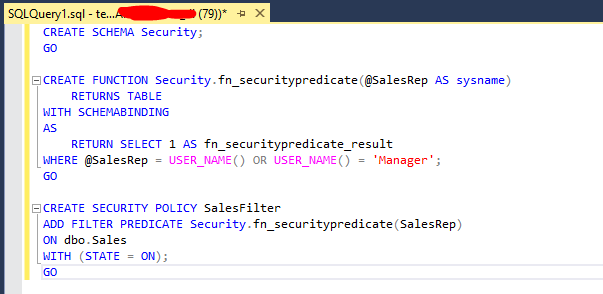
Безопасность на уровне строк или Row-Level Security (RLS) позволяет фильтровать данные таблицы для разных пользователей по настраиваемому фильтру. Это осуществляется через SECURITY POLICY в T-SQL
На данном скриншоте политика настраивается таким образом, что пользователь Sales1 будет видеть строки таблицы, в которых значение столбца Sales равняется имени пользователя (Sales1), а пользователь Manager будет видеть все строки.
Схемы в SQL Server
У некоторых объектов SQL Server (таблицы, процедуры, представления, функции) есть схема. Схемы можно представить, как контейнеры для различных объектов (или пространство имён/namespace, если вы знакомы с программированием).
Например, если у пользователя есть права на select из схемы, то пользователь так же может делать select со всех объектов этой схемы. То есть объекты, принадлежащие схеме, наследуют её разрешения. Когда пользователи создают объекты в схеме, объекты принадлежат владельцу схемы, а не пользователю. Разрешения не наследуются от схемы пользователями. Т.е. у пользователей со схемой dbo по умолчанию, нет разрешений которые предоставлены этой схеме – они должны быть явно указаны.
Главное отличие схем от ролей в том, что разрешения на схемы могут быть предоставлены ролям. Например, у роли testrole могут быть разрешения select со схемы schema1 и разрешения на select/update на схеме schema2. Объект может принадлежать всего одной схеме, но права на него могут быть у нескольких ролей.
Встроенные схемы
В SQL Server есть встроенные системные схемы:
- dbo
- guest
- sys
- INFORMATION_SCHEMA
Схема dbo является схемой по умолчанию для новых баз данных, а пользователь dbo является владельцем схемы dbo. По умолчанию, новые пользователи в базе данных имеют схему dbo в качестве схемы по умолчанию. Другие встроенные схемы нужны для системных объектов SQL Server.
Шифрование данных средствами SQL Server
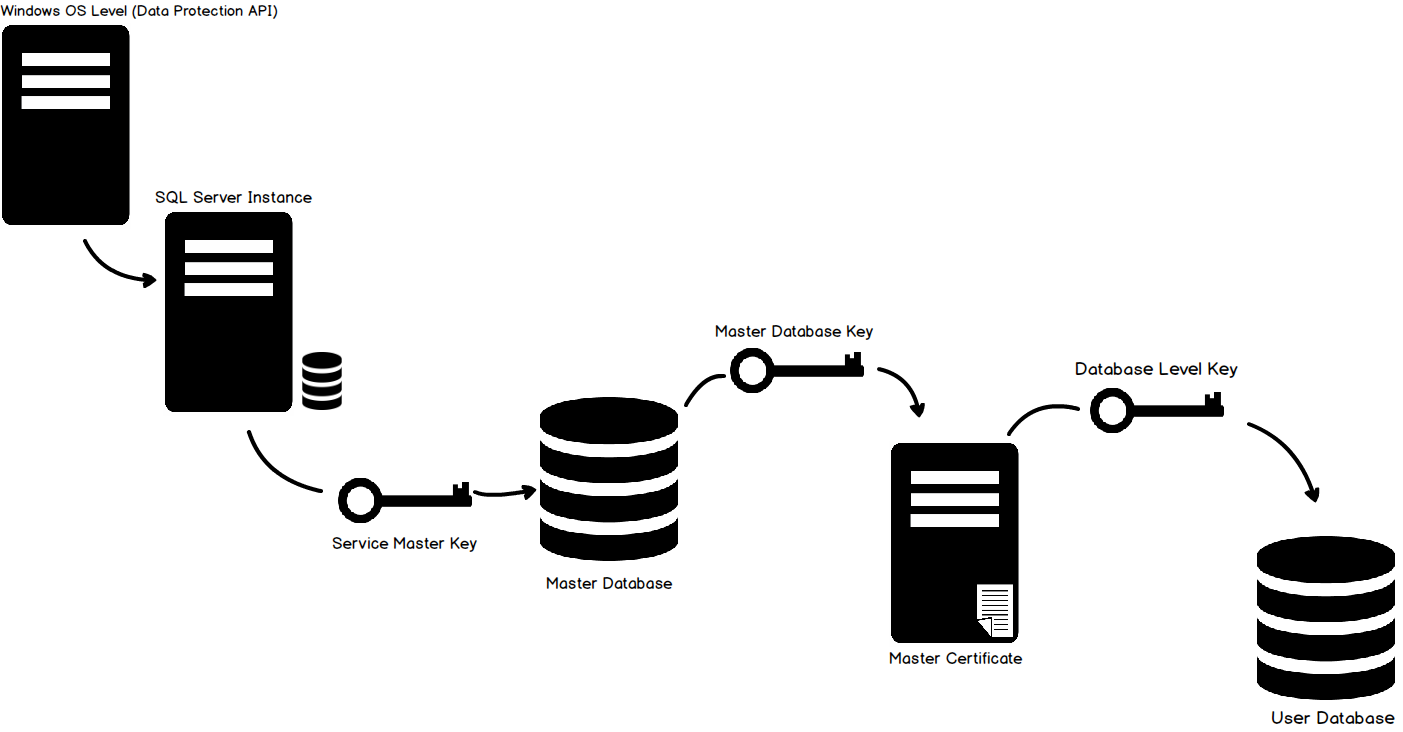
SQL Server может шифровать данные, процедуры и соединения с сервером. Шифрование возможно с использованием сертификата, асимметричного или симметричного ключа. В SQL Server используется иерархичная модель шифрования, то есть каждый слой иерархии шифрует слой под ним. Поддерживаются все известные и популярные алгоритмы шифрования. Для реализации алгоритмов шифрования используется Windows Crypto API.
Самыми распространенными типами шифрования являются TDE (Прозрачное шифрование данных) и Always Encrypted.
Прозрачное шифрование данных
Прозрачное шифрование данных или Transparent Data Encryption шифрует всю базу целиком. При краже физического носителя или .mdf/.ldf файла, злоумышленник не сможет получить доступ к информации в базе данных.
Диаграмма, для того чтобы представить весь процесс
Базовое шифрование базы данных через T-SQL:
USE master;
GO
CREATE MASTER KEY ENCRYPTION BY PASSWORD = 'password';
go
CREATE CERTIFICATE ServerCert WITH SUBJECT = 'DEK Certificate';
go
USE AdventureWorks2012;
GO
CREATE DATABASE ENCRYPTION KEY
WITH ALGORITHM = AES_128
ENCRYPTION BY SERVER CERTIFICATE ServerCert;
GO
ALTER DATABASE AdventureWorks2012
SET ENCRYPTION ON;
GO
Always Encrypted
Эта технология позволяет хранить шифрованные данные в SQL Server без передачи ключей шифрования самому SQL Server. Always Encrypted так же как и TDE шифрует данные в базе данных, но не на уровне базы, а на уровне столбца.
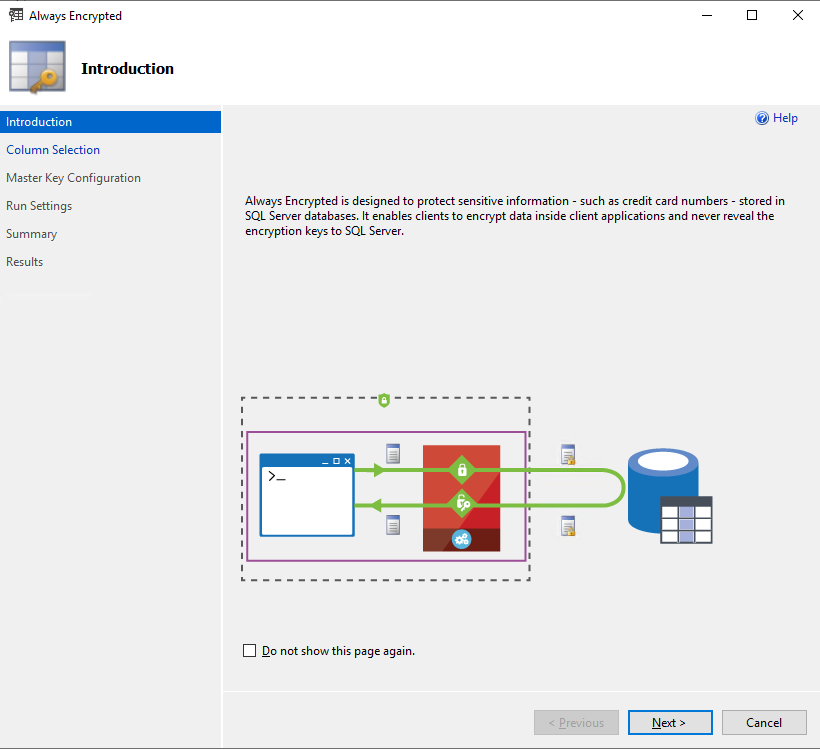
Для шифрования Always Encrypted использует 2 ключа:
- Column Encryption Key (CEK)
- Column Master Key (CMK)
Все процессы шифрования и дешифрования данных происходят на клиенте, в базе данных хранятся только зашифрованное значение ключа шифрования (CEK).
Always Encrypted так же позволяет ограничить доступ к данным даже для DBA, таким образом давая возможность не беспокоиться о том, что администратор получит доступ к данным, к которым не должен.
Когда стоит использовать шифрование SQL Server?
Шифрование данных это одна из важных мер обеспечения безопасности, но шифрование может быть требовательно к ресурсам сервера и иногда может быть лишним.
Если пользователи обращаются к данным через общедоступную сеть, то для обеспечения безопасности может потребоваться шифрование, но если данные передаются по защищенной интрасети или ВПН, то необходимости в шифровании данных нет. Так же стоит рассмотреть возможность шифрования данных, если есть угроза кражи физического носителя с базами данных.
Внедрение шифрования должно быть хорошо спланировано: нужно учесть дополнительную нагрузку на сервер, могут ли приложения, которые работают с вашим сервером внедрить поддержку шифрования данного типа на своей стороне и многие другие нюансы.
Использование Group Managed Service Accounts для SQL Server
Групповые управляемые учетные записи службы или gMSA – это специальная учетная запись, которая автоматически управляется Active Directory. gMSA это развитие технологии MSA, так как MSA было невозможно использовать в кластерных сценариях.
gMSA исключает необходимость вручную менять пароли для учетной записи. При настройке gMSA вы указываете на каких серверах будет работать gMSA аккаунт, как часто Active Directory будет менять пароль, и кто имеет право на просмотр пароля. На серверах, на которых будет установлен gMSA не нужно указывать пароль при указании соответствующей учетной записи gMSA.
Имейте в виду, что версия Windows Server для работы с gMSA должна быть не ниже 2012.
Оценка уязвимостей SQL Server через SSMS
В SQL Server Management Studio есть функция оценки уязвимостей для базы данных.
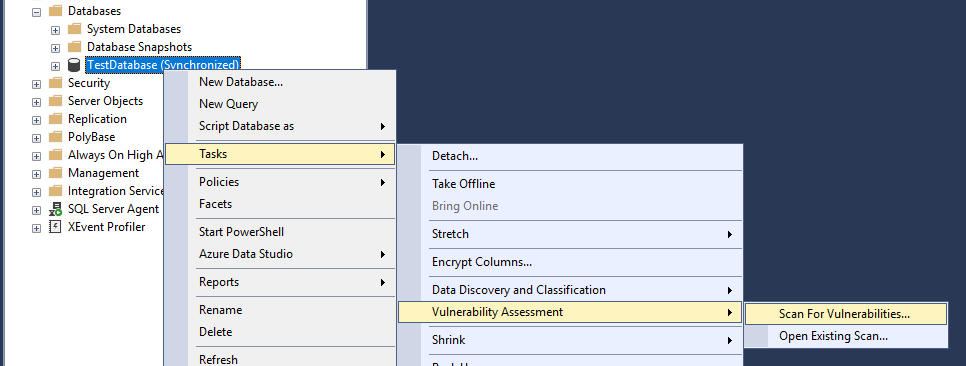
Выберите базу данных -> Tasks -> Vulnerability Assessment -> Scan For Vulnerabilities.
Сканнер оценит базу данных на предмет популярных ошибок в конфигурации безопасности и даст соответствующие рекомендации.
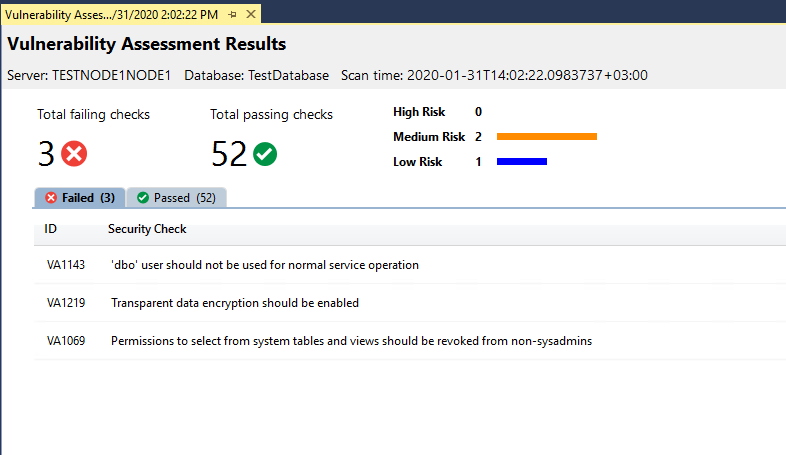
Обязательно стоит пройтись этим сканнером по вашим базам данных. Он может выявить скрытые проблемы, которых не видно на первый взгляд.
Аудит активности в SQL Server
SQL Server предоставляет возможность вести аудит любой пользовательской активности в экземпляре сервера.
Это очень мощный инструмент, который позволяет полностью контролировать действия ваших пользователей/разработчиков.
Рассмотрим базовую настройку аудита:
В SSMS, во вкладке Security -> Audits создайте новый аудит.
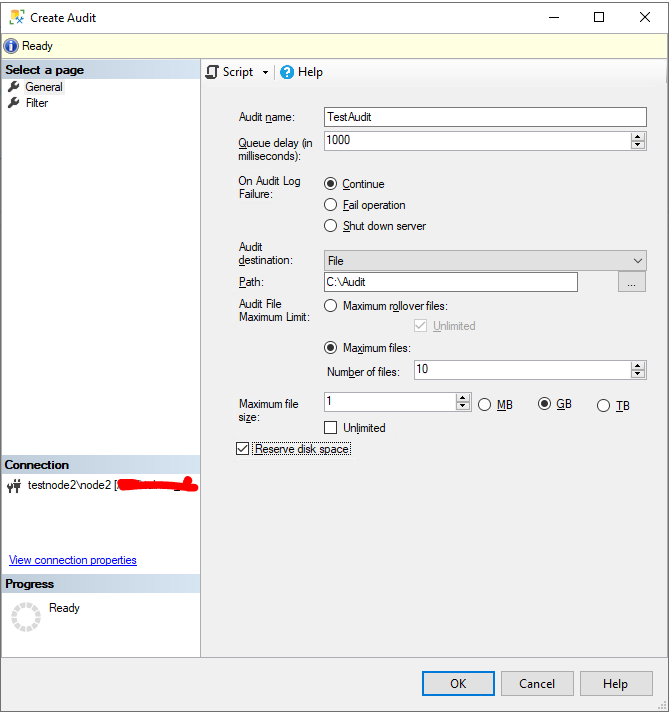
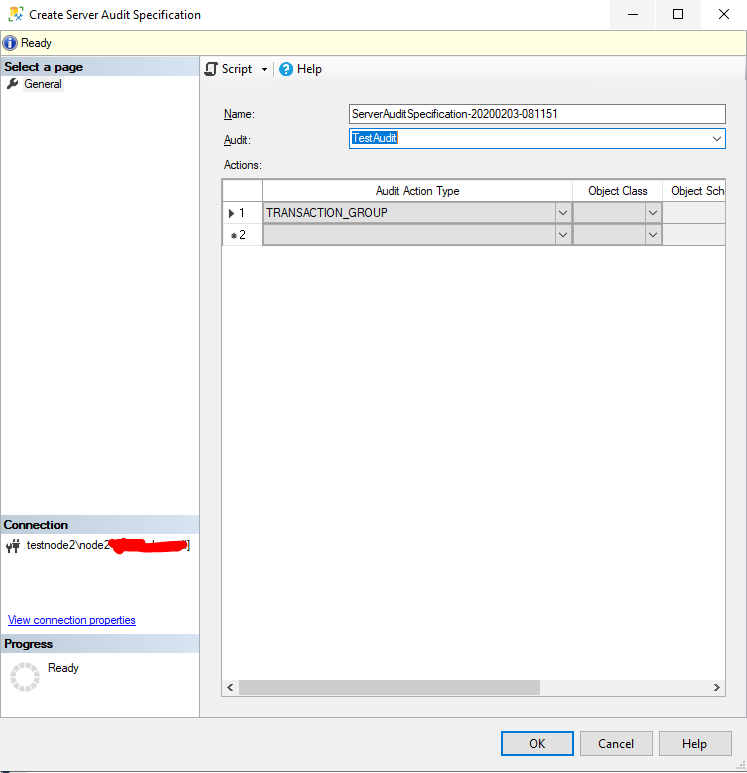
Затем, для аудита нужно создать Спецификацию (Audit Specification), для указания событий, которые будут отслеживаться.
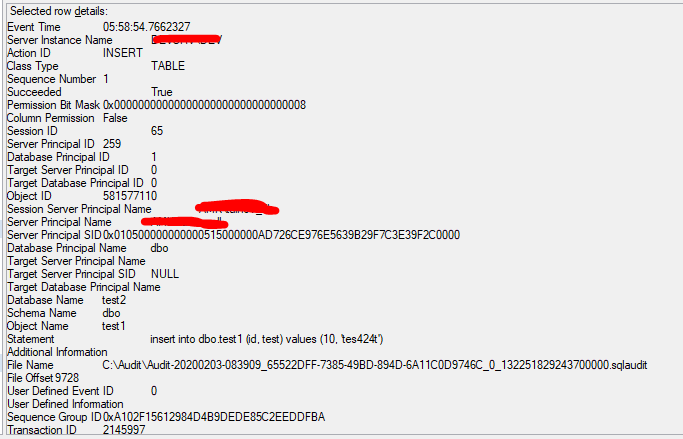
После того как вы создадите и активируете аудит, в журнале аудита можно будет посмотреть события, которые зафиксированы процедурой аудита.
Общие рекомендации по безопасности SQL Server
Всегда следуйте принципу наименьших привилегий. В том числе настройте аккаунт службы SQL Server с помощью gMSA. Ни в коем случае не используйте доменный аккаунт с привилегиями администратора домена.
Принцип наименьших привилегий
Когда вы заводите новых пользователей, рекомендуется использовать принцип LUA (Least-privileged User Account или Аккаунт с Наименьшими Правами). Этот принцип является важной частью безопасности сервера и данных.
Для пользователей с административными правами рекомендуется выдавать разрешения только на те операции, которые им будет необходимы. Встроенные серверные роли стоит использовать только тогда, когда набор их разрешений полностью совпадает с задачами пользователя.
Предоставление прав ролям, а не пользователям
Когда пользователей становится много, управлять их разрешениями становится сложнее, и также становится сложнее не допустить ошибки в предоставлении прав.
Рекомендуется предоставлять разрешения ролям, а пользователей добавлять в роли. Таким образом вы добьетесь большей прозрачности, так как все пользователи той или иной роли будут иметь одинаковые права. Добавить или удалить пользователей из роли проще, чем воссоздать отдельные наборы разрешений для отдельных пользователей. Роли могут быть вложенными, но так делать не рекомендуется, из-за меньшей прозрачности и потенциального ухудшения производительности (если вложенных ролей станет слишком много).
Можно предоставить права пользователю на схему. В этом случае пользователи сразу смогут работать с вновь созданными объектами в этой схеме, в отличии от ролей, когда при создании нового объекта, роли нужно будет раздать на него права.
Authentication is the process of verifying that a principal—a user or process that needs access to SQL Server databases—is who or what it claims to be. A principal needs unique identification so that SQL Server can determine which permissions the principal has, if any. Correct authentication is a necessary first step in providing secure access to database objects.
SQL Server supports two paths to authentication: Windows Integrated Authentication and SQL Server authentication. The path you use depends on the network environment, types of applications that will access the database, and the types of users of those applications.
- Windows Authentication: This form of authentication relies on Windows to do the heavy lifting—validating identity when the user logs in to Windows. Permissions to access SQL Server objects are then assigned to Windows logins. This type of authentication is available only when SQL Server runs on a version of Windows that supports Windows NT or Kerberos authentication, which has pretty much been standard since Windows 2000.
- SQL Server Authentication: SQL Server can take care of authentication entirely on its own. In this case, you can create unique user names—called logins in SQL Server—and passwords. A user or application connects to SQL Server and supplies those credentials for access. Permissions are then assigned to that login either directly or through membership in a role.
Configuring authentication in SQL Server isn’t a simple either/or choice between these two types. You can configure authentication in either of two ways:
- Mixed Mode Authentication: The server supports both SQL Server and Windows authentication.
- Windows Only Mode: The server supports only Windows authentication.
Microsoft strongly recommends using Windows authentication whenever possible. Windows has robust authentication options, including password policies, but Windows authentication isn’t always practical in real applications. SQL Server authentication can hook into some of those Windows authentication features, but it just isn’t as secure.
Windows Authentication
If you configure your SQL Server to operate in Windows authentication mode, SQL Server assumes a trust relationship with Windows Server. It assumes that Windows authenticated the user when they logged in to Windows. SQL Server then checks the user account, any Windows groups, and any SQL Server roles the user may be a member of to determine whether that user is allowed to work with various SQL Server objects.
Windows authentication has several advantages over SQL Server authentication, including:
- A single login by the user, so she doesn’t have to log into SQL Server separately
- Auditing features
- Simplified login management
- Password policies (on Windows Server 2003 and later)
Another big advantage of Windows authentication is that any changes you make to Windows users and groups are automatically reflected in SQL Server, so you don’t have to administer them separately. However, if you make changes to a Windows user while they are connected to SQL Server, those changes won’t become effective until the next time the user connects to SQL Server.
Configuring SQL Server Security Settings
When you install SQL Server, you can select the authentication mode that the server instance will allow. Later you can change the setting in the Server Properties dialog box available in SQL Server Management Studio. These settings apply to all databases and other objects in the SQL Server instance. So if you need to use SQL Server authentication for any database, you have to set mixed mode for the server.
Figure 2.1 shows the Server Properties dialog box in Management Studio with the Security page selected. To open this dialog box, right-click the server instance name in the Object Explorer, and select Properties from the pop-up menu, and go to the Security page. You change the authentication mode simply by clicking the appropriate radio button and clicking OK to commit the change.
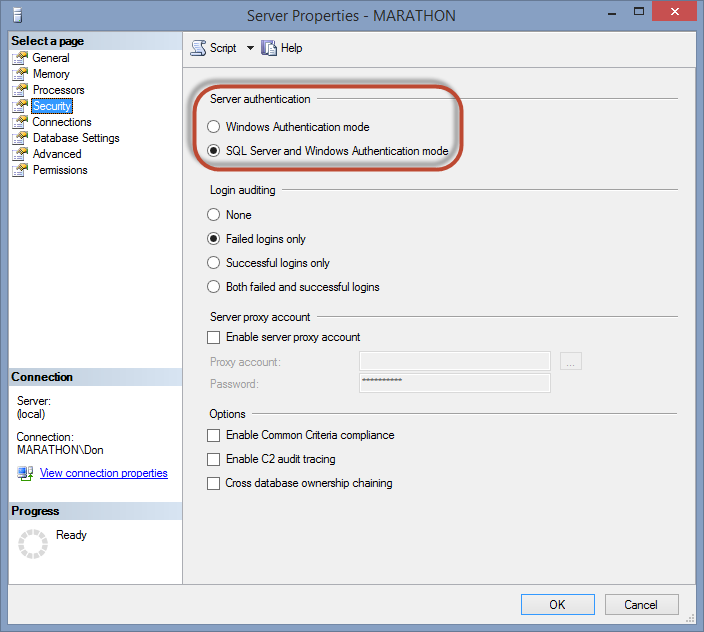
Figure 2.1. Configuring the authentication mode for the SQL Server instance.
Adding a Windows Login
To use Windows authentication, your users will need a valid Windows login account before they can access SQL Server. You can then grant permissions to a Windows group to connect to SQL Server, or you can grant permissions to individual Windows users if you don’t want to grant collective permissions.
One of the nice things about using Management Studio to manage security is that you can set up logins and provide database access at the same time. To enable a Windows login to access SQL Server and the AdventureWorks2012 database, use the following steps, which assume that the local machine already has a JoeStairway login defined.
- Open SQL Server Management Studio and make sure that the Object Explorer window is visible and that you are connected to a SQL Server instance.
- Expand the tree view of the server’s objects, then expand the Security section. You’ll see several child nodes, as shown in Figure 2.2.
Figure 2.2. The security section of a server’s Object Explorer, where you can define logins.
- Right-click the Logins node and select New Login from the pop-up menu to open the Login – New dialog box.
- Make sure that the Windows authentication radio button is selected.
- You can select the Windows login in either of two ways. The first way is to directly type in the domain or machine name, then a backslash and the Windows login name for the user.The second, and generally easier, way is to click the Search button to open the Select User or Group dialog box. Type the user name and click the Check Names button to find the exact name. If the user is found, the full name will appear in the box, as shown in Figure 2.3. Click OK to select that user.

Figure 2.3. Finding a Windows login to add to SQL Server.
- Back in the Login – New dialog box, set the AdventureWorks2012 database as the login’s Default Database. This is the database that is used when the user connects to the server and doesn’t specify a database. It doesn’t limit the user to accessing only that database.Figure 2.4 shows the resulting login for the Windows JoeStairway user on a machine named Marathon, with a default database set to the sample AdventureWorks2012 database.

Figure 2.4. The Login – New dialog box enables a Windows login to access a SQL Server instance.
TIP:
Never leave the default database set to the master database. I speak from painful experience: It is far too easy to connect to a server and forget to change the database. If you then run a script that creates hundreds of database objects in the master database, you’ll have a very tedious job deleting those objects manually to clean up the master database.
- Next, give the user access to a database. Select the User Mapping page from the list on the left side of the dialog box. Grant the user access to the AdventureWorks2012 database by checking the box next to the database name. SQL Server automatically maps the user to a user with the same name in the database, as you can see in the third column in the table, although you can change the user name if you want. Assign Sales as the user’s default schema in the database, either by typing it in the Default Schema column or clicking the ellipsis (…) button to select it from a list. The dialog box should look like Figure 2.5.
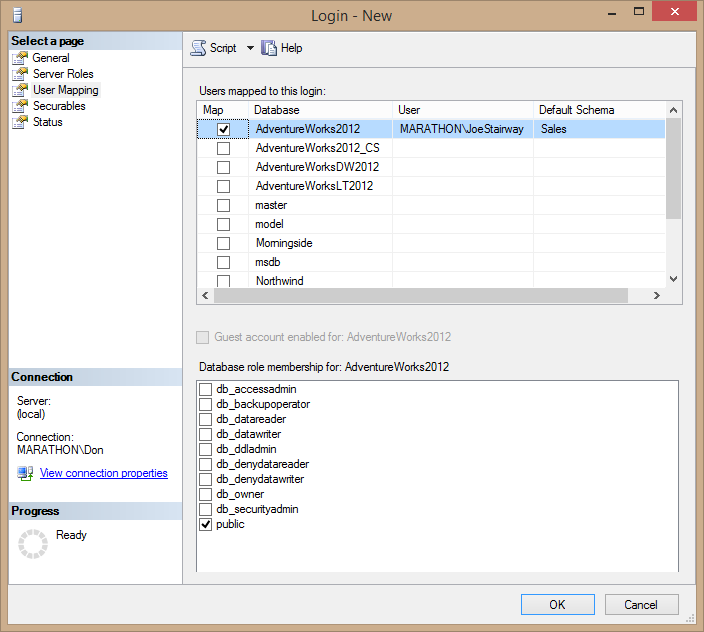
Figure 2.5. Granting a Windows login access to the AdventureWorks2012 database.
Tip:
There is a difference between setting a default database for a login and granting access to the database. A default database simply means that SQL Server attempts to change the context to that database when the user logs in without specifying a database. But this doesn’t grant any kind of permissions to do anything in the database, or even allow access to the database. This means that it is possible to assign a default database that the user can’t access at all. For the user to do anything useful once a database is accessed, you’ll need to explicitly grant the user permissions.
- By default, new Windows logins have access to the server. But if you want to explicitly deny a login access to the server, select Status from the list of pages on the left side of the Login – New dialog box and select the Deny radio button. You can also temporarily disable the login by selecting the Disabled button. Figure 2.6 shows these options.
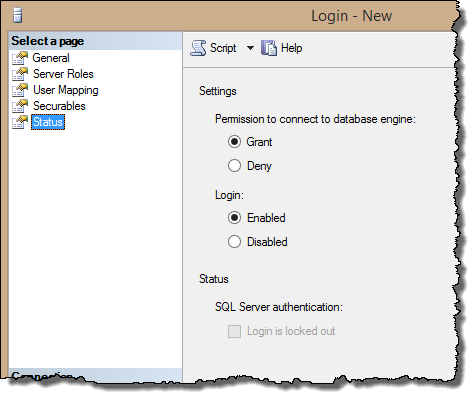
Figure 2.6. Options to grant or deny access to the server and to temporarily disable a login account.
- Click OK to create the user.
You can also add a Windows group to SQL Server in the same way. In that case, any member of the group will have access to the database server, with whatever access you give the group to objects in a database.
SQL Server Authentication
When you use SQL Server logins for authentication, client applications have to provide a valid user name and password in order to connect to a database. These SQL Server logins are saved in SQL Server, without reference to Windows. When logging in, if no account matches the user name and password, SQL Server raises an error and the user cannot access SQL Server.
Even though Windows authentication is more secure, you may elect to use SQL Server logins instead in some situations. SQL Server authentication is easier to administer for simple applications that don’t have extensive security needs, and it allows you to avoid getting tangled up with Windows security. And if the client is running on older versions of Windows (basically, anything older than Windows 2000) or a non-Windows operating system, you’ll have to use SQL Server logins.
To create a SQL Server login, use the same Login – New dialog box as for Windows logins. But instead of selecting a Windows login, type a unique login name without a domain or machine name, and supply a password. For example, Figure 2.7 shows how to create a new SQL Server login Casper and make AdventureWorks2012 his default database.
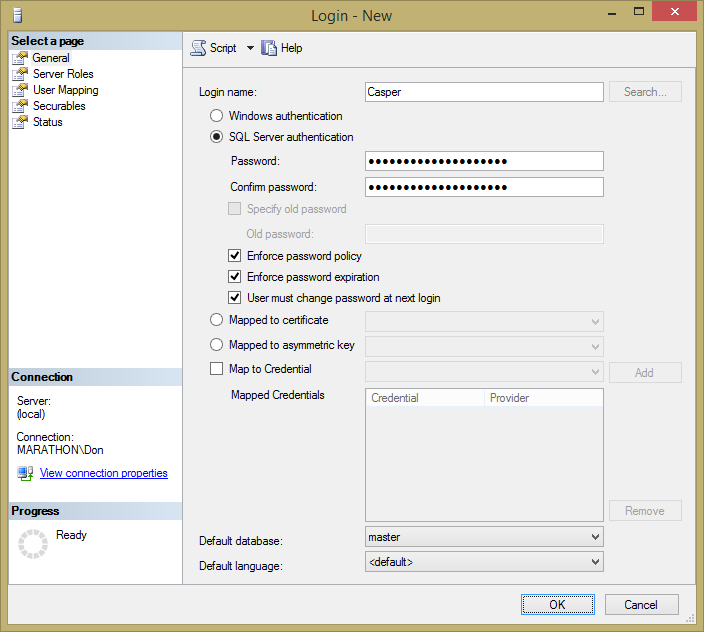
Figure 2.7. Creating a SQL Server login.
All of the other options for user mapping and status are the same SQL Server logins as they are for Windows logins.
SQL Server Logins via Transact-SQL
You can also perform the same actions with Transact-SQL code. The CREATE LOGIN code in Listing 2.1 creates a SQL Server login Topaz with a fairly strong password:
CREATE LOGIN Topaz WITH PASSWORD = 'yBqyZIPT8}b]b[{5al0v';
GO
Listing 2.1. Code for creating a new SQL Server login with T-SQL.
Then, to grant Topaz access to the AdventureWorks2012 database, use the CREATE USER statement and assign a default schema, as shown in Listing 2.2.
USE AdventureWorks2012;
GO
CREATE USER Topaz FOR LOGIN Topaz
    WITH DEFAULT_SCHEMA = HumanResources;
GO
Listing 2.2. Code to create a database users associated with a SQL Server login.
Tip:
As with the Level 1 Stairway, you’ll probably need to make some changes to the code samples if you want to run them in your local instance of SQL Server. The code in Listing 2.2 assumes that you have the AdventureWorks2012 database installed. Later code samples assume that you are running the code on a machine named Marathon and have a JoeStairway user in Windows. Feel free either to name your machine Marathon or create a user with that name, or change the code as appropriate.
Like Windows logins, you can map the server login Topaz to some other name in a database. The code in Listing 2.3 maps Topaz to the TopazD user in the AdventureWorks2012 database:
DROP USER Topaz;
GO
CREATE USER TopazD FOR LOGIN Topaz WITH DEFAULT_SCHEMA = HumanResources;
GO
Listing 2.3. Code to drop an existing user then add a database user with a name different from login name.
Beware of the sa Login
If you configure your SQL Server to support SQL Server logins, there is one built-in SQL Server login that you need to watch out for—the sa login—which you may have noticed hanging around in the Logins node in Object Explorer. The sa, or system administrator, login is included mainly for backward compatibility with older versions of SQL Server. The sa login is mapped to the sysadmin fixed server role, and anyone who logs in to SQL Server as sa is a full system administrator, with irrevocable rights over the entire SQL Server instance and all the databases in it. This is a powerful login, indeed.
You can’t modify or delete the sa login. If you select Mixed Mode authentication when you install SQL Server, you’re prompted for a password for the sa user. Without a password, anyone can log in as sa with no password, and play “let’s administer the server.” Needless to say, this is the last thing you want your users doing. Log in using the sa login only as a backdoor if other system administrators are unavailable or have forgotten their Windows passwords. If that happens, you probably need new admins!
Never, EVER, use the sa login for access to a database in an application. Doing so could give a hacker admin-level control over your database server if the hacker is able to get control of the application. In the distant past, this has been an easy way to attack servers and is a horrible practice. Instead, either set up a custom Windows or SQL Server login for the application to use, and give that login the absolute minimum permissions necessary to run the application (which implements the principle of least privilege).
Tip:
In fact, you should consider disabling the sa login entirely, using the Status page of the Login Properties dialog box that you saw earlier. That way an attacker can’t use this all-powerful login to gain control of your server instance, whether you have a strong sa password or not.
Password Policy and Enforcement
In versions of SQL Server before 2005, there was no easy way for a system administrator to enforce password policies that could help make a system more secure. For example, SQL Server had no way to force users to create strong passwords of a minimum length and a mix of alphanumeric and other characters. If someone wanted to create a login with a single letter for a password, you couldn’t configure SQL Server to prevent it. Likewise, there was no way to cause passwords to expire on a regular basis, such as every three months. Some people rightly saw this as a major reason not to use SQL Server logins.
More recent versions of SQL Server can hook into the password policies of Windows Server 2003, Windows Vista, or later versions. The passwords are still stored in SQL Server, but SQL Server makes a call into the NetValidatePasswordPolicy() Windows API method, which was first introduced in Windows Server 2003. This API function applies the Windows password policy to SQL Server logins and returns a value that indicates whether the password is valid. SQL Server calls this function when a user creates, sets, or resets a password.
You can define the Windows password policies via the Local Security Settings applet among the Windows Control Panel’s Administrative Tools. The Password Policy section is shown in Figure 2.8 with the default settings. The applet has a separate Account Lockout Policy section, shown in Figure 2.9, which goes into effect when a user makes too many unsuccessful login attempts. By default, the lockout policy is disabled in a fresh Windows install.
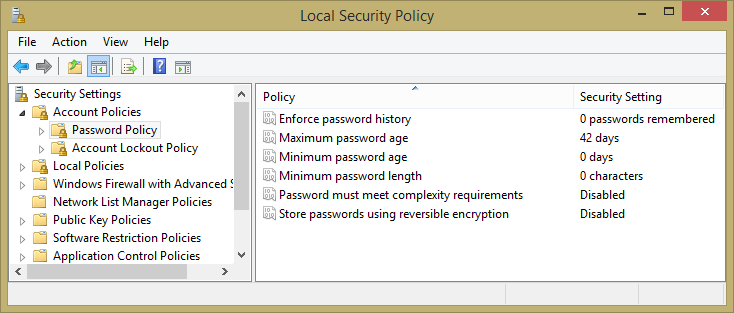
Figure 2.8. The Windows Local Security Policy applet, showing the default password policies.

Figure 2.9. The Windows Local Security Policy applet, showing the default account lockout policies.
Table 2.1 lists the password policies along with the default values and some notes about how they work.
| Category | Policy Name | Default | Notes |
| Password Policy | Enforce password history | 0 passwords remembered | Prevents users from reusing old passwords, such as alternating between two passwords. |
| Minimum password length | 0 characters | Use this to require longer passwords to make them harder to break. | |
| Password must meet complexity requirements | Disabled | Minimum mix of alphanumeric and other characters, and does not contain the user name. | |
| Password Expiration | Maximum password age | 42 days | Number of days before a user is prompted to change their password. |
| Minimum password age | 0 Days | Number of days before a user is allowed to change a password. | |
| Account Lockout Policy | Account lockout duration | Not applicable | Time in minutes that the account is locked out if the lockout threshold is enabled. |
| Account lockout threshold | 0 invalid login attempts | Maximum number of unsuccessful login attempts before the account is locked out. | |
| Reset account lockout counter after | Not applicable | Time in minutes after which the counter of unsuccessful attempts is reset; enabled when the lockout threshold is enabled. |
Table 2.1. Windows password policy settings.
You can enable or disable password policy enforcement when you create a login. The Login – New dialog box has a section under the login name that is enabled when you create a SQL Server login, shown in Figure 2-10.
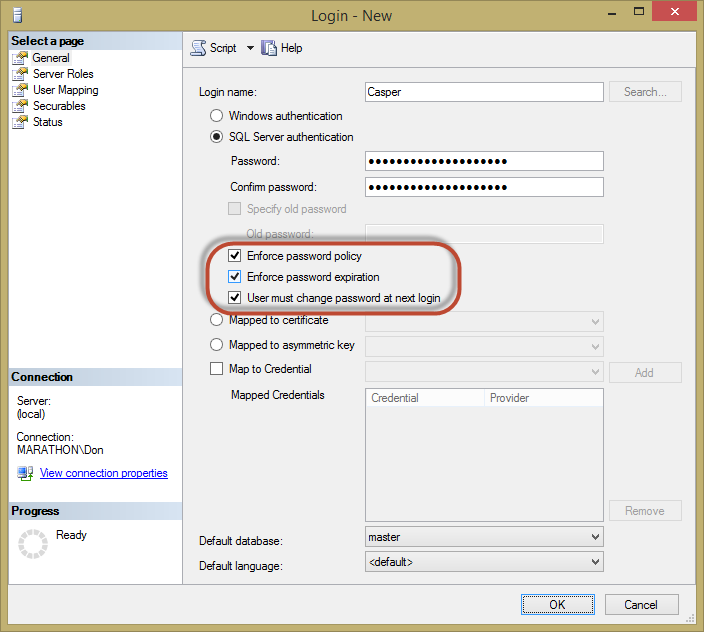
Figure 2-10. Enforcing password policies for a new login.
Password policies apply when you use Transact-SQL to create logins as well. For example, if you are running SQL Server on Windows 2003 Server or later and have password policies enabled, the code in Listing 2.4 will fail.
USE master;
GO
CREATE LOGIN SIMPLEPWD WITH PASSWORD = 'SIMPLEPWD';
GO
Listing 2.4. Attempting to create a login with a password that violates password policy.
The reason this code fails is that the password can’t be the same as the user name.
You can control the policies when you create or alter logins. The code in Listing 2.5 turns off the options to check expiration and policy.
ALTER LOGIN Topaz WITH PASSWORD = 'yBqyZIPT8}b]b[{5al0v',
    CHECK_EXPIRATION = OFF, CHECK_POLICY = OFF;
Listing 2.5. Code that changes a login to disable password policy for this login only.
The CHECK_EXPIRATION option controls whether SQL Server checks the age of the password against policy and CHECK_POLICY applies to the other policies. A MUST_CHANGE option is available that forces the user to change the password at the next login.
If a user makes too many unsuccessful attempts to log in, exceeding the number set in the account lockout policy, an administrator can reset the account using the UNLOCK option, as demonstrated in Listing 2.6.
ALTER LOGIN Topaz WITH PASSWORD = 'yBqyZIPT8}b]b[{5al0v' UNLOCK
Listing 2.6. Code to unlock a login that was locked because of too many failed login attempts.
You can enable the Enforce Password Policy when running SQL Server on versions of Windows before Windows Server 2003. But SQL Server uses default settings of a minimum length of six characters, checks that the password doesn’t match all or any part of the login name, and is a mix of uppercase letters, lowercase letters, numbers, and other characters. You cannot change these defaults. But hopefully you aren’t running SQL Server on such an old version of Windows, if only because of the vast security improvements since then!
Summary
In this level of the Stairway to SQL Server Security, you’ve learned about a number of the authentication options available in SQL Server. Windows Integrated authentication is the most secure but is not always feasible, and Microsoft has made SQL Server authentication better and more secure over the years. But if you used mixed mode authentication, don’t forget to give the sa login a very strong password or, even better, disable it! Like most security objects, you can create and change them using either the nice GUI interface in Management Studio or T-SQL code. And if you’re running SQL Server on a modern version of Windows, you can hook into the password policies of the local security policy.