
Eclipse Mosquitto is one of the world’s most popular open-source MQTT brokers. Among its many installation options, it can also run on Windows. This article will explain how to install and configure a free open-source version of Mosquitto MQTT Broker on Windows, including how to install Mosquitto as a Windows service. Then, I will explain how to run Mosquitto on Windows and test it using the popular command line tools: mosquitto_sub and mosquitto_pub.
How to install Mosquitto Broker on Windows
To install Mosquitto on Windows, select the desired installation file from mosquitto.org (64-bit or 32-bit), download it, and run it.
This file is a Mosquitto Windows 10 and Windows 11 tested package (including Windows for ARM). Compatibility with older Windows versions is possible but not guaranteed.
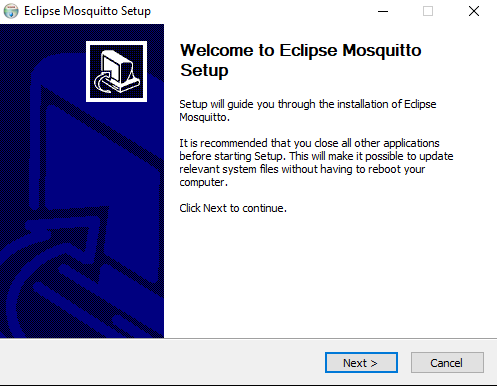
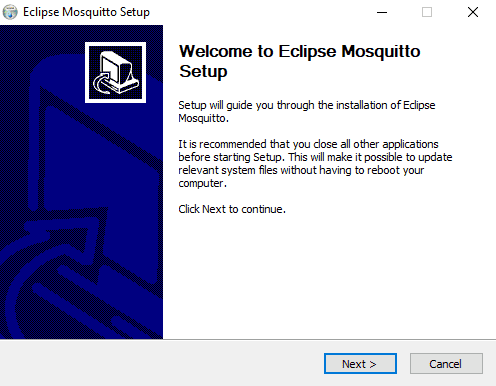
The Eclipse Mosquitto Setup wizard will start. Click Next to continue the installation.
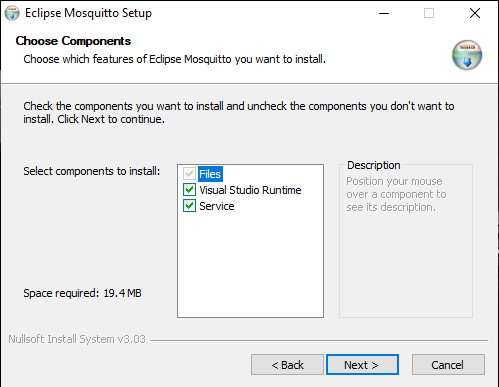
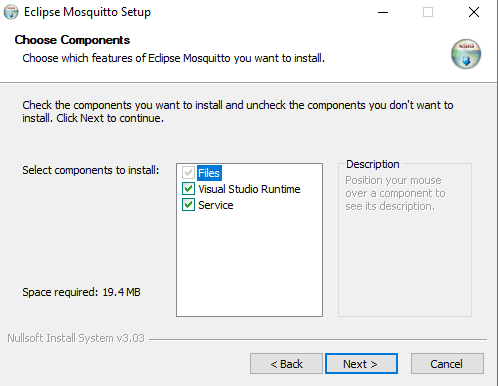
Select the components to install. If you want to start Mosquitto automatically when Windows starts, install the Service component. It will install the broker as a Windows service. See the “How to run Mosquitto MQTT Broker as a Service on Windows” section.
You will also need Visual Studio Runtime because Mosquitto depends on specific libraries and components provided by it. You might not want to install this component if you already have it, but if you are unsure, leave this option as it is and continue to the next step.
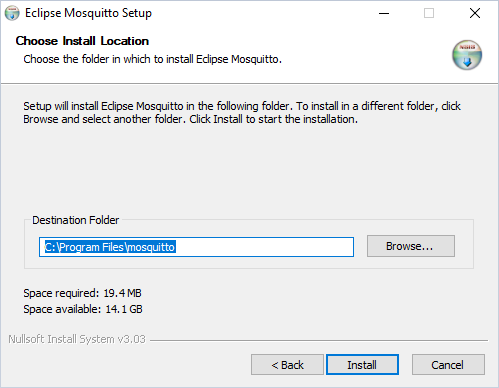
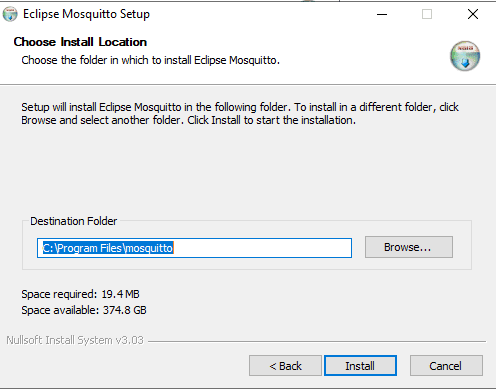
Select the installation folder for Eclipse Mosquitto or leave the default value (C:\Program Files\mosquitto for a 64-bit executable and C:\Program Files (x86)\mosquitto for 32-bit) and click Install.
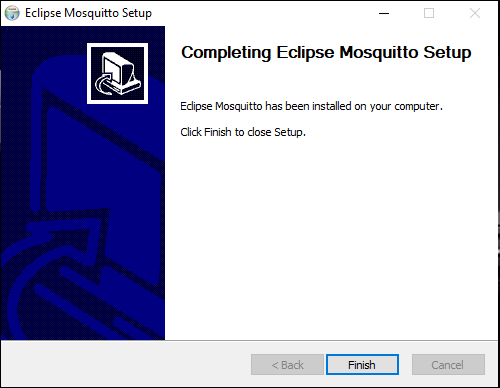
After the installation process is complete, you will see a corresponding message. All required files for operating Mosquitto will be automatically saved to your chosen installation folder.
Click Finish in the setup wizard. Now, you can start using MQTT Mosquitto Broker on Windows.
If you want to install Mosquitto broker without running the graphical part of the installer, you can do so by running the installer from the command line (also referred to as cmd or Command Prompt) with the /S switch (silent mode):
mosquitto-2.0.15-install-windows-x64.exe /SUse the /D switch to change the installation folder:
mosquitto-2.0.15-install-windows-x64.exe /S /D=:\"Program Files"\mosquittoAs an alternative to cmd, you can use PowerShell. Note that PowerShell uses a slightly different syntax than the command line. For example, running the mosquitto command in cmd (inside of the Mosquitto installation folder) has its equivalent in PowerShell, which is: .\mosquitto. This difference is, however, irrelevant as soon as you add Mosquitto to the system path (more on how to do this below). Then you can use the mosquitto command in both PowerShell and cmd.
After installing Mosquitto broker, you can check how to run it and which command line options it supports. To do this, navigate inside the folder where Mosquitto is installed (installation folder) and run the following command:
mosquitto -h
Note: Mosquitto is not automatically globally visible in cmd. So, to work with it using the mosquitto command, you must either be inside of the installation folder or add the installation folder to the PATH environment variable and restart the Command Prompt (see the following section).
Please note: There is a more powerful Mosquitto version – Pro Edition for Eclipse Mosquitto™, which is available as part of the Cedalo MQTT Platform. To test it and it advanced functionality, sign up for a free cloud or on-prem trial here.
Your Mosquitto Windows installation is now complete. The next sections will explore how to add the mosquitto command to the system path, how to run Mosquitto in foreground and background (as a daemon service), and how to test its basic capabilities using a command line MQTT client.
Making Mosquitto command globally available. Adding Mosquitto to system path
You can use Mosquitto directly from the installation folder by navigating to this folder in the Command Prompt and typing mosquitto. However, if you want to use the broker from any location in the command line, you need to add it to your system path (specifically to the PATH environment variable).
To add Mosquitto to your system path, copy the installation folder’s path, which contains mosquitto.exe.
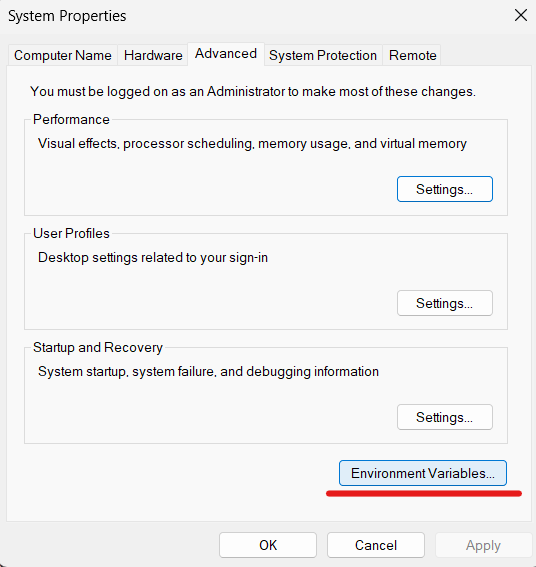
Right-click on My Computer or This PC on your desktop or in File Explorer, and choose Properties.
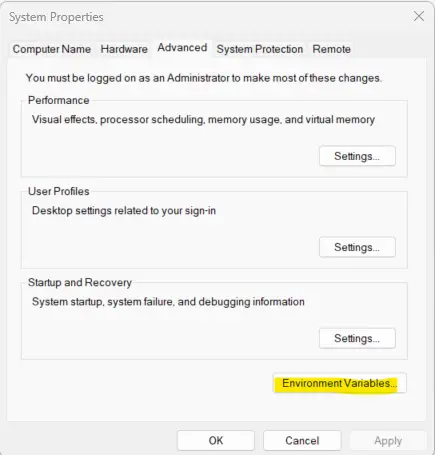
Click on Advanced system settings.
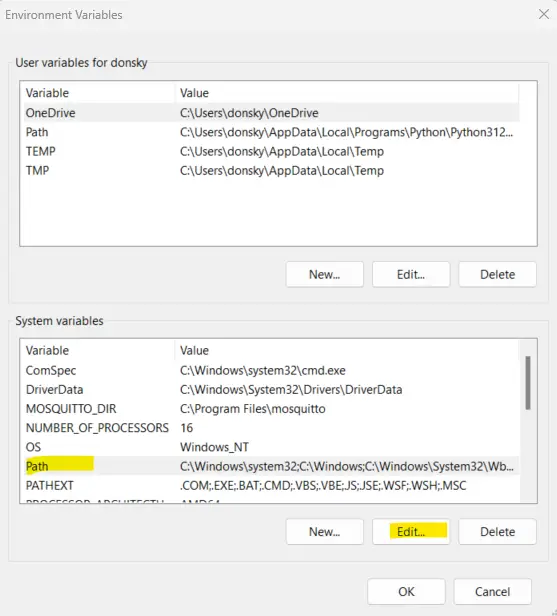
Click on Environment Variables, as you can see in the image below.
In the “System variables” section, find the variable called Path and click Edit.
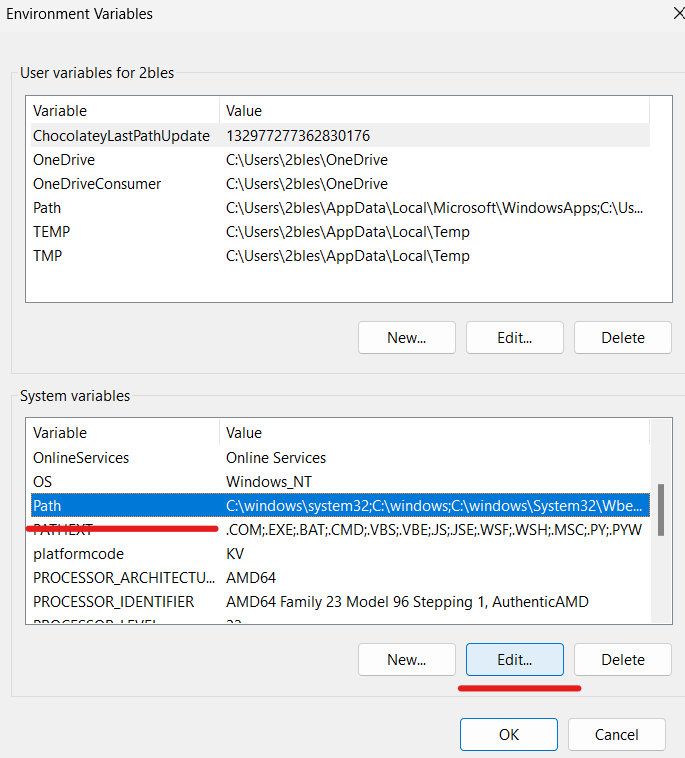
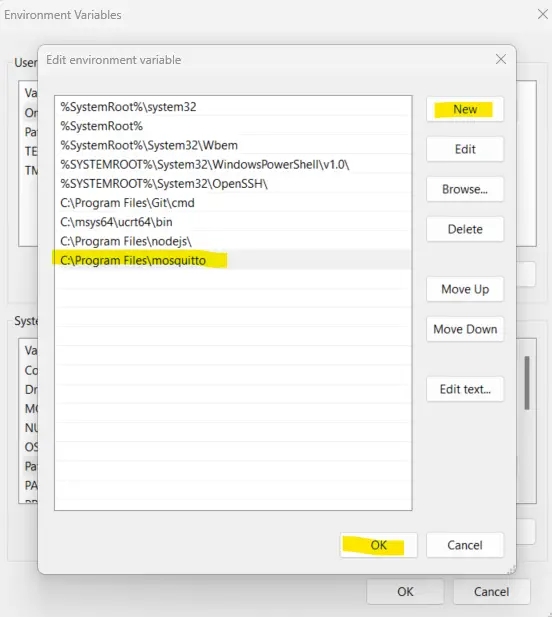
Now, the “Edit environment variable” window will open. Click on New and insert the path to your Mosquitto installation folder you copied earlier. Click OK:
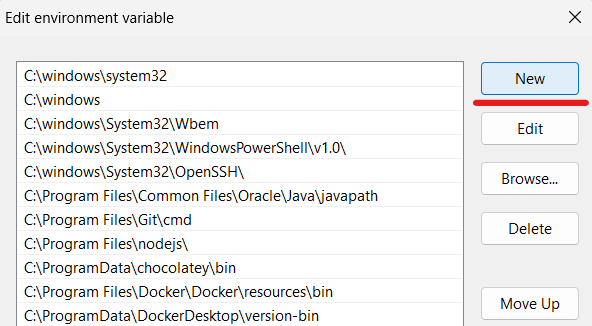
In case you don’t see the “New” button, then in the “Variable value” box, scroll to the end and add a semicolon (‘;’) in case there isn’t one. Then paste the path to the Mosquitto installation folder and click OK.
Restart your command line application (by closing and opening the cmd window), and you should be able to issue commands like mosquitto -h from any location.
Other sections of this guide assume that you have added Mosquitto to your system path as described above. If you did not, then you must run all the Mosquitto-related commands (mosquitto, mosquitto_passwd, mosquitto_pub, mosquitto_sub) from the folder where you installed the broker.
The next sections will explore how to start the Mosquitto broker in Windows.
How to Run Mosquitto MQTT Broker as a Service on Windows
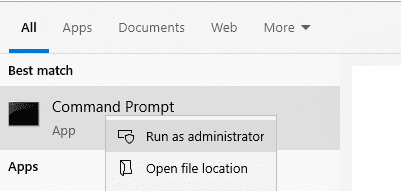
Most of the commands from this section must be executed with administrative permissions. To do this, you must run Command Prompt as administrator by right-clicking on the command line icon and choosing the “Run as administrator” option.
By default (if the “Service” option was ticked during installation), Mosquitto is installed as a Windows service to run in the background and automatically start on Windows startup. It will also automatically start immediately after the installation. Note that in this case, Mosquitto will use the mosqutto.conf config file from the installation directory.
To check if Mosquitto is running in the background, execute the sc query mosquitto command in cmd. Note that PowerShell sc is not a service control command but an alias for Set-Content. Therefore, in PowerShell, you must use Get-Service -Name mosquitto instead.
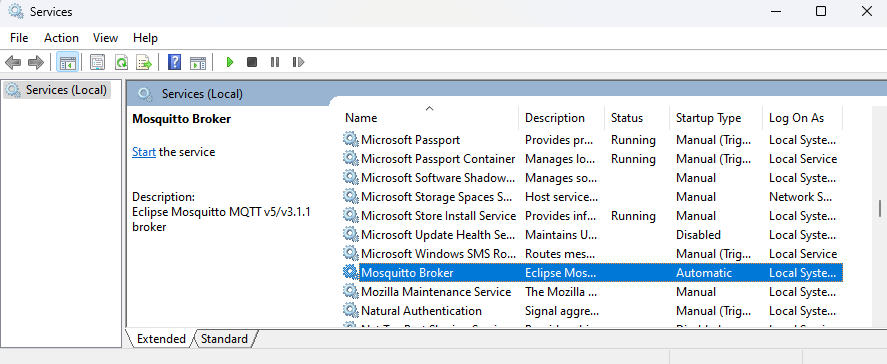
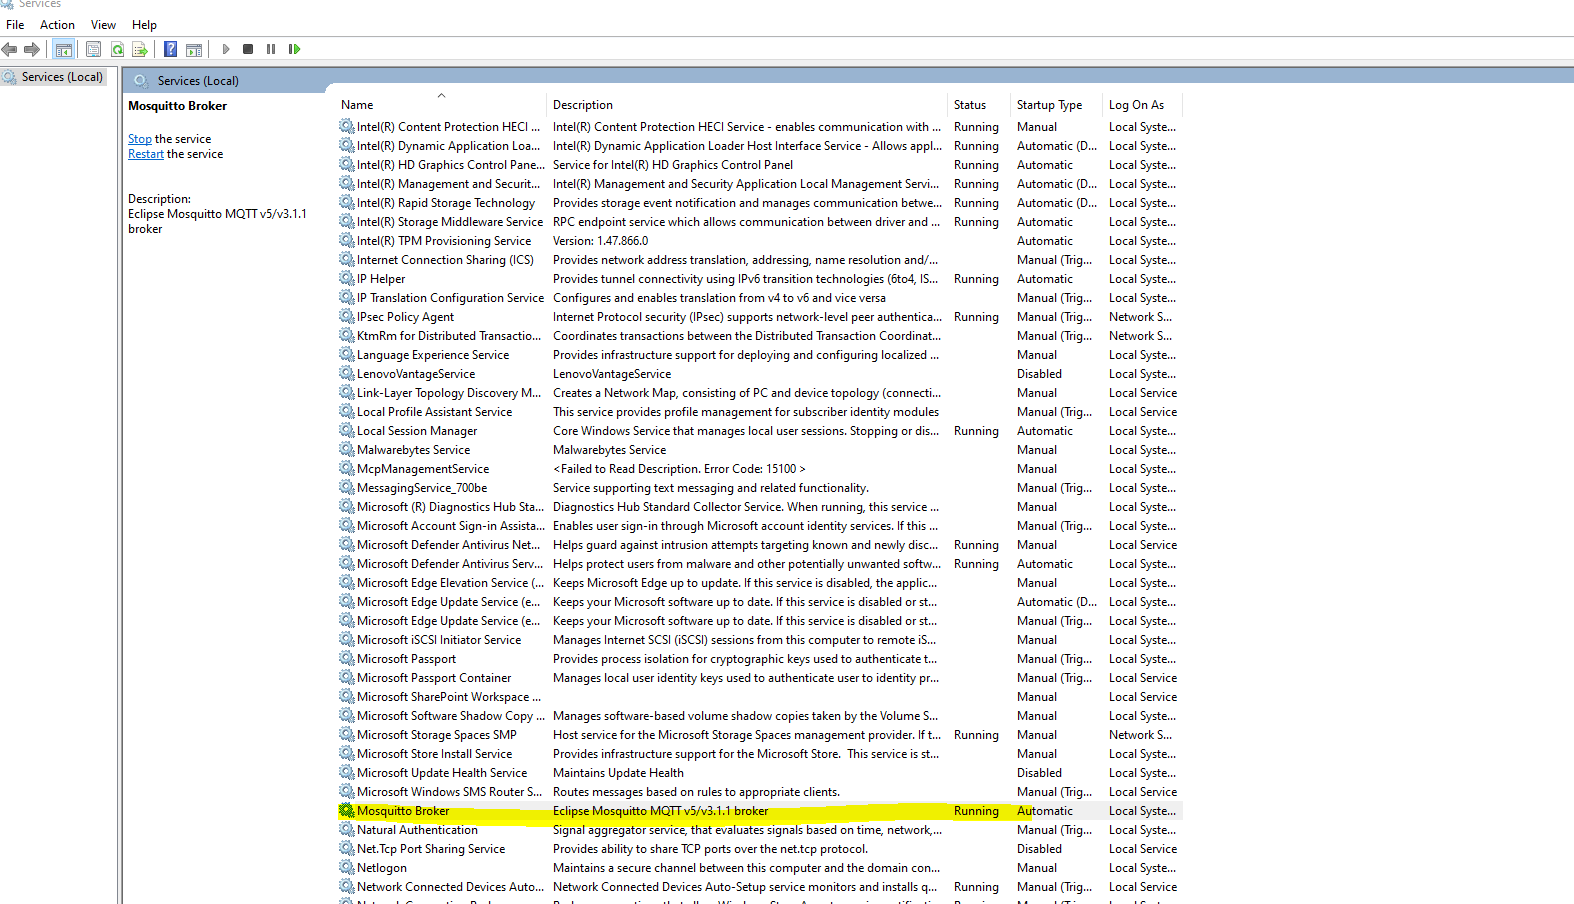
You can also view the status and manage services via a dedicated GUI application. To access the Services application: open Windows search and type services.msc or simply Services and press enter. Then, find the service named Mosquitto Broker. You will see the current state of the services in the “Status” column. In case the status is not “Running…”, right-click on it, and start it as shown below:
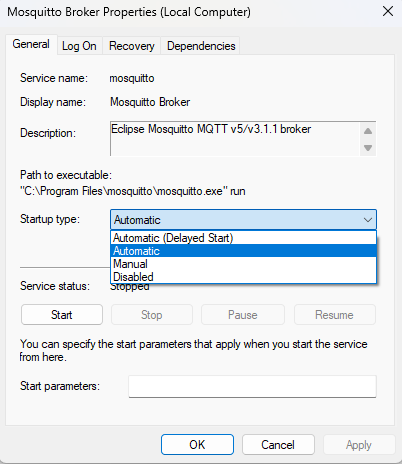
Mosquitto service is configured to start on every Windows startup automatically. You can change this behavior in service properties by right-clicking the “Mosquitto Broker” entry in “services.msc” and selecting “Properties”:
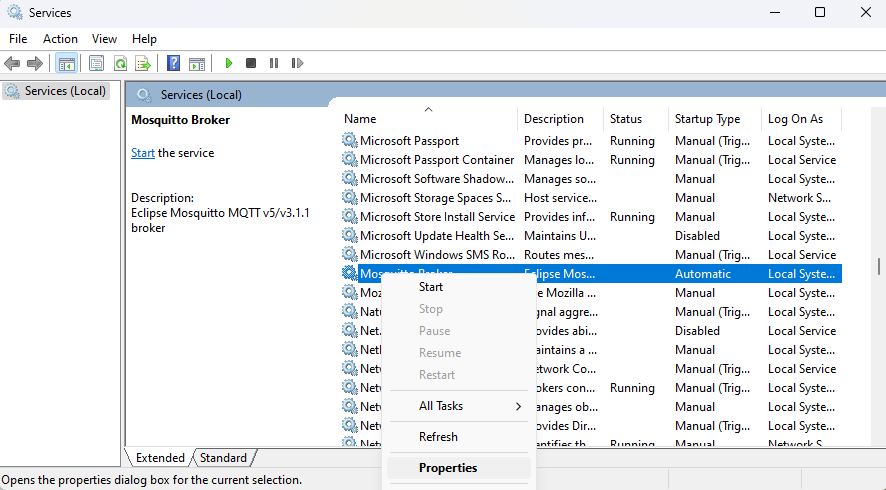
Then, change the “Startup type” field to the desired value (“Manual” will not start the service after the system restart, and “Disabled” will turn the service off completely), and press OK.
Alternatively, you can manage Mosquitto service using sc or net commands from the command line. Note that you will have to open the command line as an administrator. For PowerShell, you will have to use one of Start-Service, Stop-Service, Get-Service, Restart-Service to manage the service.
Example:
Starting the service.
With cmd:
sc start mosquittoWith PowerShell:
Start-Service mosquittoStopping the broker:
With cmd:
sc stop mosquittoWith PowerShell
Stop-Service mosquittoRemoving Mosquitto Windows service:
For cmd enter the following two commands one by one:
sc stop mosquitto
mosquitto uninstall
Alternatively:
sc stop mosquitto
sc delete mosquitto
For PowerShell:
Stop-Service -Name mosquitto
mosquitto uninstall
If you want to install the Mosquitto service again, run the following command:
mosquitto installAnd as I already mentioned, you can also view Mosquitto service status using the following command:
For cmd:
sc query mosquittoFor PowerShell:
Get-Service -Name mosquittoBy default, the Mosquitto broker service will listen on port 1883 unless you change this in mosquitto.conf file located in the installation folder. To check if Mosquitto is running on port 1883, run the following command (works for both cmd and PowerShell):
netstat -an | findstr 1883If the Mosquitto MQTT server has opened an IPv4 and IPv6 listening socket on port 1883, the output of this command will be the following two lines:
How to run Mosquitto in the foreground
There is an alternative way to run Mosquitto which will, however, run it in the foreground rather than in the background as in the case with services.
Open the command line and use mosquitto -v -c <path to mosquitto.conf> command to run the broker in a verbose mode which will allow you to see the debug messages. Using the -c option, we can pass a mosquitto.conf configuration file to the broker. If you don’t specify it, no configuration file will be used. Read more on this in the following section.
Note that the -d option (that allows us to run Mosquitto in the background) is unusable in Windows because there is no daemon process manager. So, on Windows, we use services instead, as described in the section above.
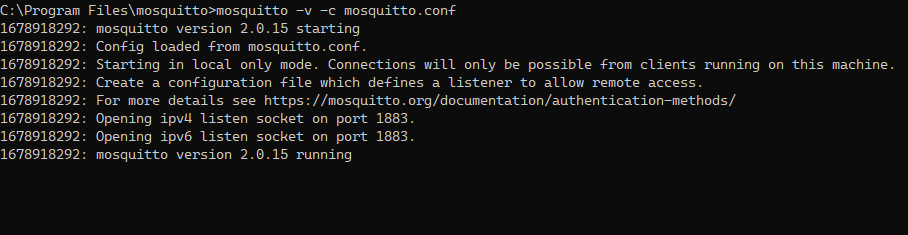
To stop Mosquitto from running in the foreground, press Ctrl + C in the cmd window where the broker is running.
In this article, we use the open-source Eclipse Mosquitto broker. However, the Pro Edition for Eclipse Mosquitto is also available. It provides advanced MQTT broker functionality, such as a rich set of MQTT bridges and metrics exporters, High Availability, OAuth 2.0 / JWT / LDAP Authentication, Audit trail loggins, Persistent Queueing, and more. To test it, sign up for a free Cedalo MQTT Platform trial.
How to Configure the Mosquitto MQTT Broker on Windows
You can configure the operation and features of the Mosquitto broker using the configuration file named mosquitto.conf located in the installation folder. This file is used only for Mosquitto running as a service. If you run Mosquitto from cmd, the mosquitto.conf file is not used, and it has to be manually specified with the -c flag:
mosquitto -c <path to your config file>For example:
mosquitto -c "C:\Program Files\mosquitto\mosquitto.conf"If you want to run Mosquitto as a service and use a non-default configuration file, the easiest way is to install the nssm command line tool. After that, ensure that the broker service is stopped and removed:
For cmd:
sc stop mosquitto
sc delete mosquitto
For PowerShell:
Stop-Service -Name mosquitto
mosquitto uninstall
And finally, execute the following commands (works for both cmd and PowerShell):
nssm install mosquitto "C:\Program Files\mosquitto\mosquitto.exe"
nssm set mosquitto AppParameters -c "<path to your config file>"
For example:
nssm install mosquitto "C:\Program Files\mosquitto\mosquitto.exe"
nssm set mosquitto AppParameters -c "C:\Users\myuser\cedalo\mosquitto.conf"
To prevent unexpected issues avoid spaces in the path to your custom config file.
After that, you can start the service with sc start mosquitto for cmd, Start-Service -Name mosquitto for PowerShell, or just continue using nssm with nssm start mosquitto. Now, Mosquitto will use the custom config file you provided.
Editing mosquitto.conf
You may want to edit the default mosquitto.conf configuration file from the installation directory or create your own and specify the needed settings.
The default mosquitto.conf file in the installation folder contains commented-out lines (lines that begin with the # symbol) with default options. To change them, you need to uncomment the lines you want (by removing the # in front of them) and specify different values. Or you might as well not bother with uncommenting – just add your configuration options anywhere in the file.
If you create your own mosquitto.conf, then start with an empty file and add your options.
Below we will explore some necessary settings of this file.
Authentication settings
To connect to the broker for the first time, you have to configure your authentication settings in the configuration file. There are a few possibilities, some of which we explore below.
You can (but not necessarily should) allow anonymous connections from any host (meaning connections without a username and a password) by adding the following options to your configuration file:
allow_anonymous true
listener 1883 0.0.0.0
This will allow any device on the network to connect to the broker, post messages and subscribe to topics without authentication. However, we recommend allowing only authenticated clients to connect to your broker for security reasons.
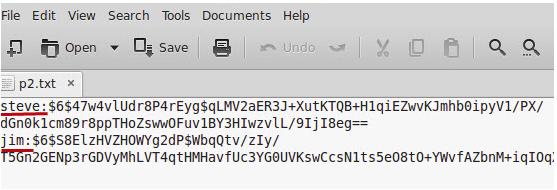
To achieve this, first, create a password file containing usernames and PBKDF2 (with SHA-256) hashes of the passwords in the format: username:pbkdf2_password_hash. This would look like the following (take a look at pwfile.example):
roger:$6$clQ4Ocu312S0qWgl$Cv2wUxgEN73c6C6jlBkswqR4AkHsvDLWvtEXZZ8NpsBLgP1WAo/qA+WXcmEN/mjDNgdUwcxRAveqNMs2xUVQYA==
sub_client:$6$U+qg0/32F0g2Fh+n$fBPSkq/rfNyEQ/TkEjRgwGTTVBpvNhKSyGShovH9KHewsvJ731tD5Zx26IHhR5RYCICt0L9qBW0/KK31UkCliw==
pub_client:$6$vxQ89y+7WrsnL2yn$fSPMmEZn9TSrC8s/jaPmxJ9NijWpkP2e7bMJLz78JXR1vW2x8+T3FZ23byJA6xs5Mt+LeOybAHwcUv0OCl40rA==
This can be achieved using mosquitto_passwd command. To create a password file with the initial Mosquitto user, use the following command:
mosquitto_passwd -c <path where you want your password file to be created> <user_name>For example:
mosquitto_passwd -c C:\"Program Files"\mosquitto\passwd test_userThis will create a password file with the initial user test_user.
To add another user to the password file, run the command:
mosquitto_passwd -b C:\"Program Files"\mosquitto\passwd user_name passwordNote that if you want to delete a user from the file, you can use the -D flag and specify the name of the user to be removed:
mosquitto_passwd -D C:\"Program Files"\mosquitto\passwd user_nameAfter you have created a password file with all the needed users, add the following lines to mosquitto.conf:
password_file C:\Program Files\mosquitto\passwd
allow_anonymous false
listener 1883
Don’t forget to change the password_file option to contain the path to your actual password file.
How to Handle Persistent Data and Logs
Mosquitto broker allows you to save the following types of application data among the rest:
- Information and debug logs.
- Broker system data (persistence feature).
To configure the logging of your MQTT Mosquitto Windows installation, you need to add the logging options (located in the Logging section of the default mosquitto.conf).
Add the following parameter to specify which file to store the logs in. Also, it would be best if you made sure this path exists, so manually create a log folder (‘C:\Program Files\mosquitto\log’ in the example below).
log_dest file C:\Program Files\mosquitto\log\mosquitto.logYou can also choose the events to log: debug, error, warning, notice, information, etc. To save logs for all types of events, use the following option:
log_type allIf you want to get comprehensive information on logging in the Mosquitto MQTT broker, please refer to our MQTT Logging tutorial.
To save persistence data, add the following options to the configuration file. Adjust persistence_location as needed. You need to ensure the path in persistence_location exists, so create a data directory manually if there isn’t one (‘C:\Program Files\mosquitto\data\’ in the example).
persistence true
persistence_file mosquitto.db
persistence_location C:\Program Files\mosquitto\data\
autosave_interval 60
Note that persistence data will only be saved to a file on Mosquitto shutdown or at specific intervals controlled by the autosave_interval config option.
Note that you need to restart the broker for the changes made in the configuration file to take effect. Use the command ‘sc stop mosquitto’ to stop the Mosquitto service and then execute ‘sc start mosquitto’ to start it up again.
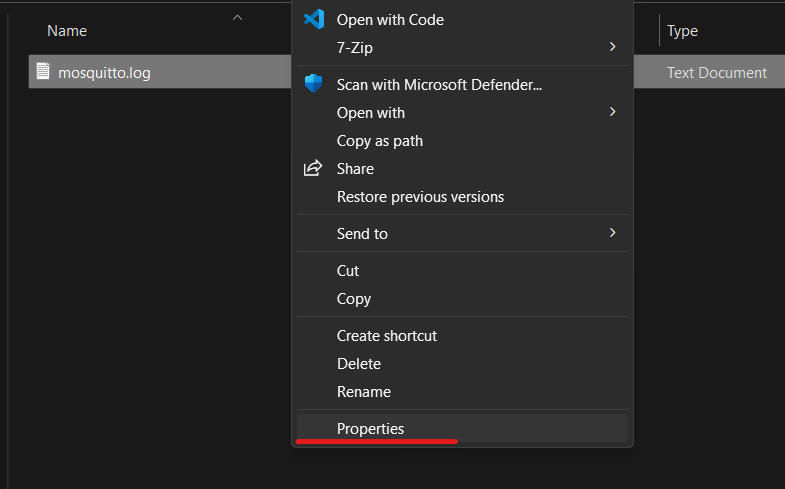
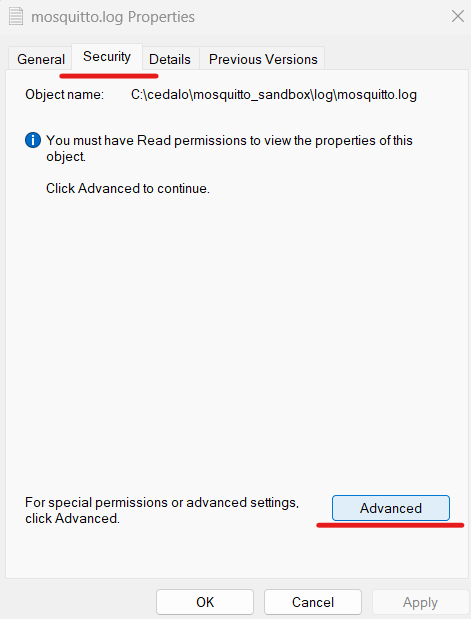
When Mosquitto runs as a service, all the files it creates will have access permissions set only for the SYSTEM Windows account. To access these files from your user account, you must go into the properties of those files and add your Windows user on the Security tab.
More specifically, right-click on the file and choose Properties:
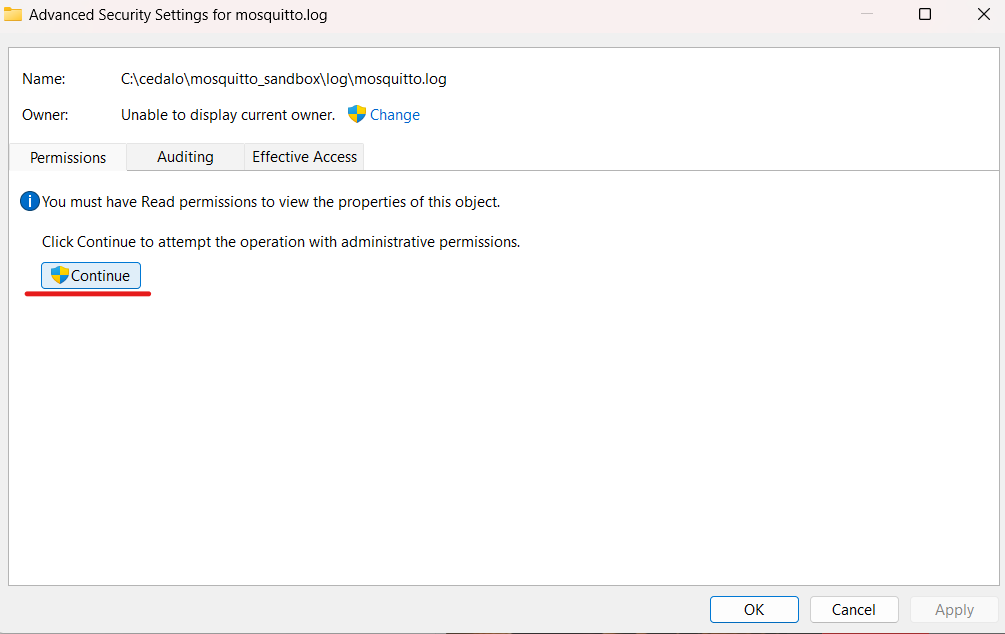
Go to the Security tab and click Advanced:
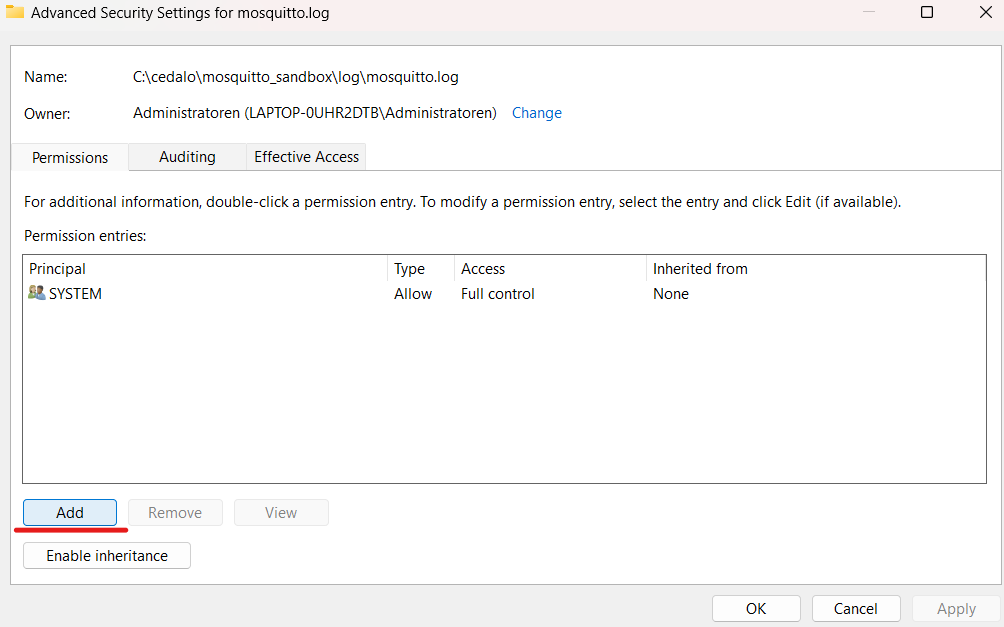
In the “Advanced Security Settings” tab, click on Continue:
Click on the Add button:
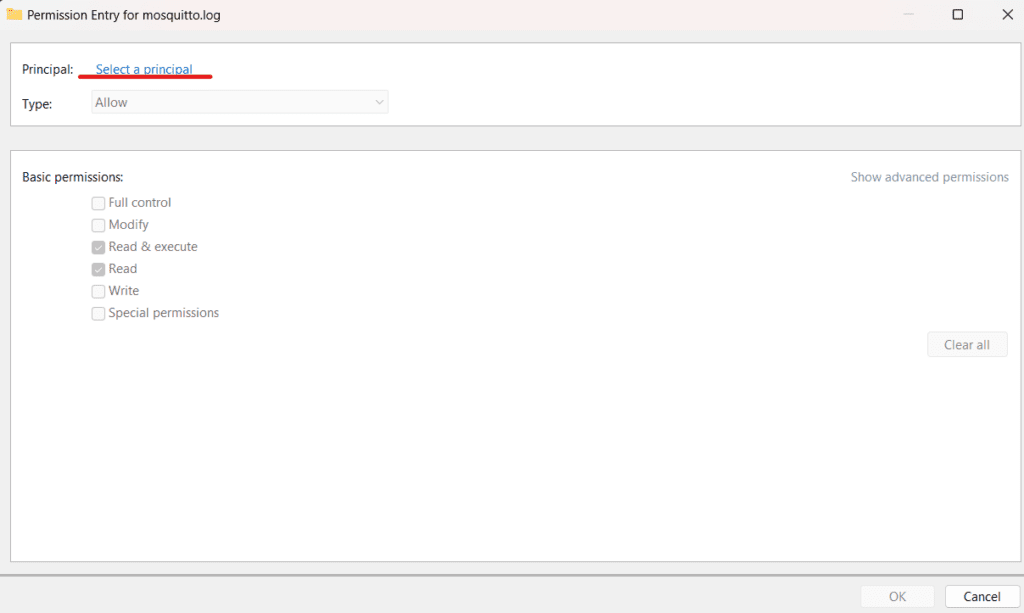
The “Permission Entry” tab will open. Click on Select a principal:
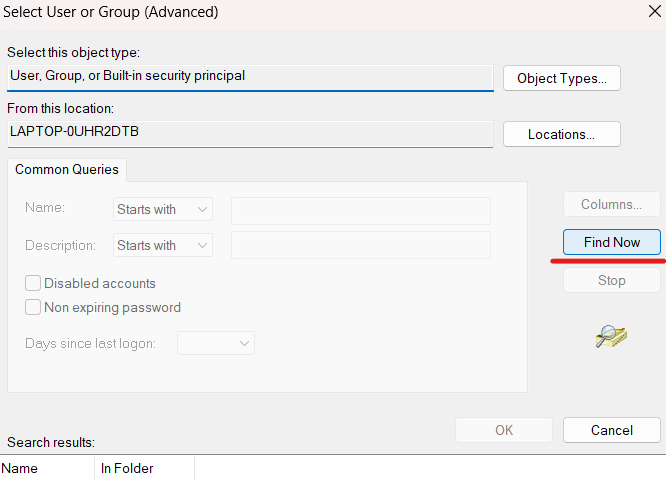
Click Advanced:
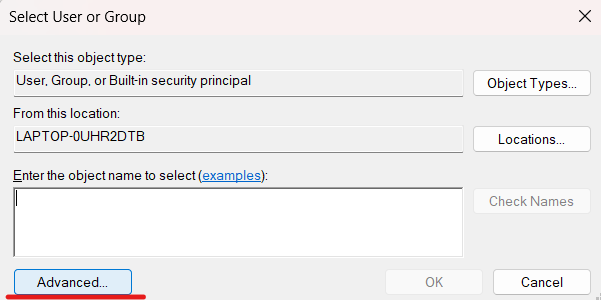
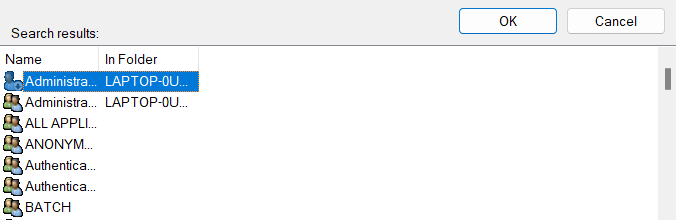
Then click on the Find Now button:
At the bottom of the window, in the Search results section, a list of users, groups, and built-in security principals will appear:
Find the user you are currently logged in as, select it, and click OK:
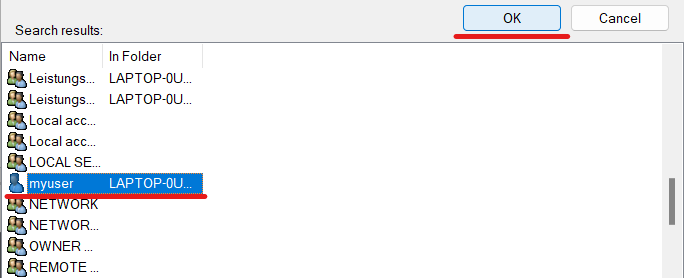
Click OK again:
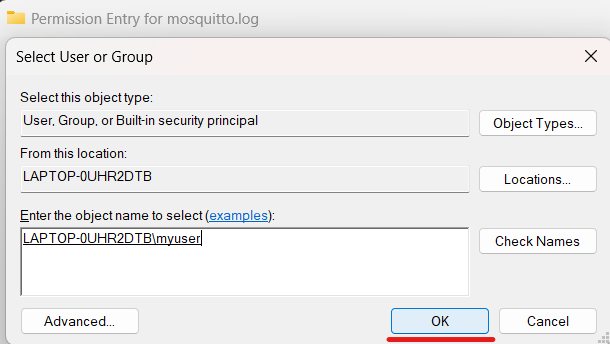
You will be sent back to the Permission Entry tab. Here select the basic permissions you want your user to have and click OK:
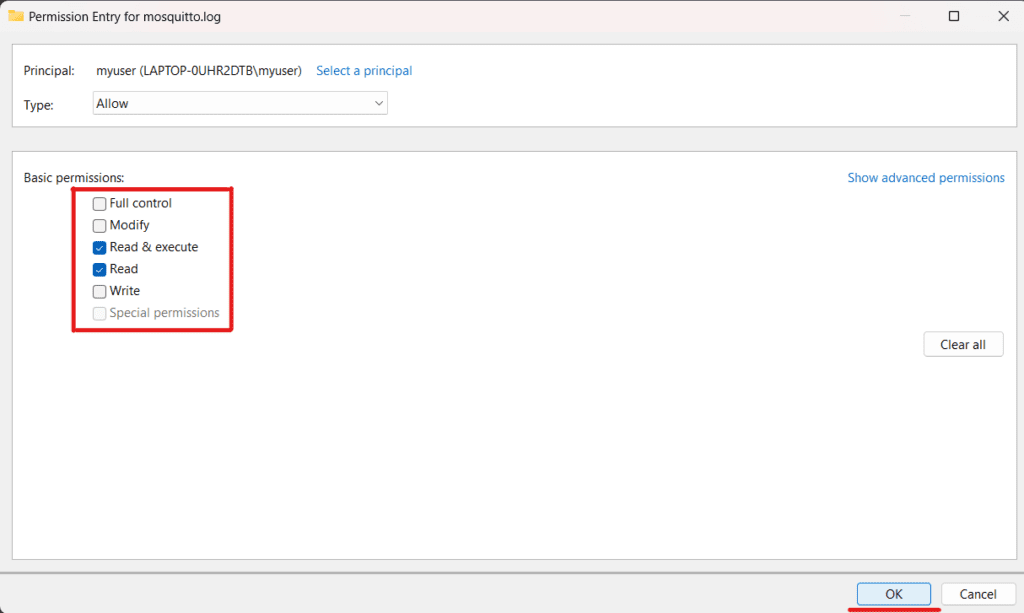
After that, in the “Advanced Security Settings” window, click on the OK button again:
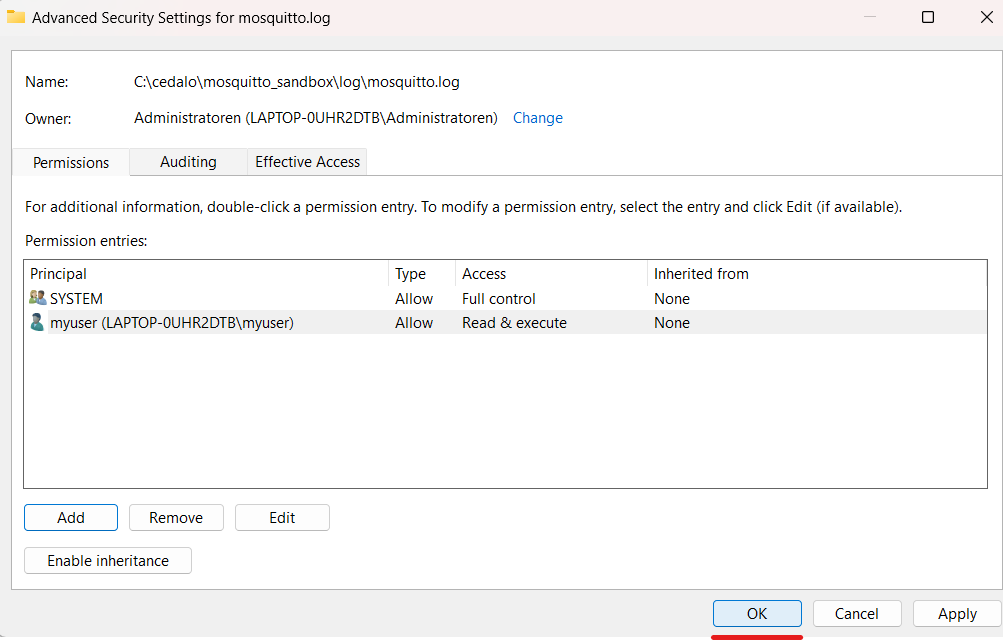
Finally, you should be able to access the file.
Example Mosquitto Configuration File
Summarizing the settings we discussed, you may find an example of the mosquitto.conf file below. Remember to change the paths to suit your environment if you want to use it for your use case.
password_file C:\Program Files\mosquitto\passwd
allow_anonymous false
listener 1883 127.0.0.1
log_dest file C:\Program Files\mosquitto\log\mosquitto.log
log_type all
persistence true
persistence_file mosquitto.db
persistence_location C:\Program Files\mosquitto\data\
autosave_interval 60
There are many other Mosquitto broker settings that you can add to your configuration file. For example, you can configure Mosquitto to listen on multiple ports, configure TLS certificates, limit message size, and more.
You can find a complete list of mosquitto.conf settings here.
How to Test the Installed Mosquitto MQTT Broker on Windows
MQTT Client for Windows
To test Mosquitto MQTT Windows installation, I will use an MQTT client for Windows. The idea is simple: using an MQTT client, I will publish and subscribe to topics to check that basic broker functionality works as expected.
For our setup, we are going to use the mosquitto_sub and mosquitto_pub MQTT clients. These clients are distributed as separate terminal commands shipped together with the broker Windows package. However, you can also use any other MQTT client, such as MQTT Explorer, which provides a friendly graphical user interface.
Subscribe to Topics Using mosquitto_sub Windows
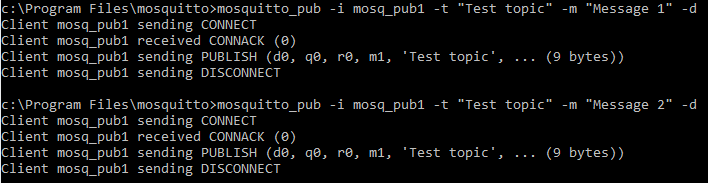
Mosquitto_sub Windows MQTT client allows you to subscribe to topics and print the received messages. To receive a message, you should subscribe to a topic before a message is published. In this example, we subscribe and listen to a topic using mosquitto_sub while publishing the messages with mosquitto_pub.
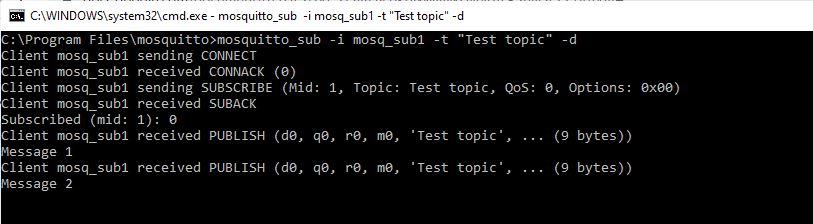
To subscribe to the topic named "Test topic", run the following command:
mosquitto_sub -i mosq_sub1 -t "Test topic" -dThis command uses the following options:
i– Client id. If this parameter is not passed, client ID is generated automatically.t– Name of the topic to subscribe to.d– Enables printing of debug messages.
After that, the MQTT client will be launched, which will notify about new messages on the “Test topic” topic and print them.
Mosquitto_sub uses localhost and 1883 port by default. Use option -h to change the host and option -p to change the port.
mosquitto_sub -i mosq_sub1 -t "Test topic" -h localhost -p 1884 -dIf you use authentication to connect to the broker, specify a username and a password using -u and -P options:
mosquitto_sub -i mosq_sub1 -t "Test topic" -u <username> -P <password> -dPublish Messages with mosquitto_pub Windows
Mosquitto_pub is a simple MQTT client that publishes one message to a topic and exits.
To publish a message, run the following command in a new cmd window:
mosquitto_pub -i mosq_pub1 -t "Test topic" -m "Test message" -dThis command uses the following options:
i– Client id. If this parameter is not passed, the server generates client ID automatically.t– Name of the topic to which the message is published.m– Text payload of the message to be published.d– Enables printing of debug messages.
Below is the output of the command.
By default, messages are sent to the broker at localhost, port 1883. To publish them to a different host, use the -h option. Use the -p parameter to connect to a different port.
mosquitto_pub -i mosq_pub1 -t "Test topic" -m "Test message" -h localhost -p 1884 -dTo specify a username and password for the user authentication, use -u and -P options:
mosquitto_pub -i mosq_pub1 -t "Test topic" -m "Test message" -u <username> -P <password> -dEnsure that the publish topic is the same as the topic you have previously subscribed to (-t “Test topic”). If you did everything correctly, you would see the published messages (“Test message”) in the window where you executed the mosquitto_sub command.
Uninstalling Mosquitto MQTT Server on Windows
If you want to uninstall the Mosquitto Windows service specifically and not the broker application itself, you first need to stop the service using the sc stop mosquitto command. Then run either sc delete mosquitto or mosquitto uninstall.
Otherwise, if you want to delete both service and the application, you can use the “Uninstall.exe” executable, which is located inside the installation folder. After running it, you need to delete the installation folder, and you are done.
To run Mosquitto Uninstall executable from cmd in silent mode, type the following into the Windows Command Prompt from inside the folder where Mosquitto is installed:
Uninstall.exe /STroubleshooting Mosquitto MQTT Server on Windows
Only one user is allowed per socket address
If you receive the error message “Normally only one user is allowed per socket address (protocol/network address/port),” you may already have another application running that is listening on port 1883.
Possible Solution
Run netstat -ano | findstr :1883 (or use a different port instead of 1883 if it was configured) command and check if the specified port is already in use by another program. The occupying process’s process id (PID) will be in the last column. You can copy it and then run taskkill /F /PID <PID> replacing the <PID> with the process id value from netstat. You may also free up the port in any other way after identifying which application occupies it. Then killing the process with taskkill is not necessary.
Can’t Connect to Mosquitto Broker with Local IP Address
When connecting to the Mosquitto broker using a local IP address other than localhost, a connect ECONNREFUSED error occurs.
Possible Solution
You need to edit the configuration file to listen to addresses other than localhost. Add the listener parameter and specify the port on which you want to listen for incoming network connections as well as the desired IP address/hostname:
listener 1883 192.168.1.100 You can specify a hostname instead of the IP address (192.168.1.100 in the example above). This listener option can also be specified multiple times to bind various addresses. If we omit it, Mosquitto will be listening on localhost.
Note that having at least one listener in your config file is always a good idea. This will help avoid some problems down the road.
Additionally, for troubleshooting purposes, you can allow anonymous connections from remote addresses with the following:
allow_anonymous trueHowever, it would be best to be careful with this option as it is not recommended to allow anyone to access the broker because of security considerations. We recommend using this option for testing purposes only.
If you are using the open-source version of Eclipse Mosquitto broker for a commercial project and need advice or help to solve a problem, we offer open-source Mosquitto support. This can help you quickly solve your problems, ensure your system’s stability and security, get quick access to new patches and fixes, and be the first to receive information about new releases.
Summary
In this article, we talked about the open-source MQTT Mosquitto Broker. We learned how to install Mosquitto Windows, configure, and test it. In addition, we considered the most common problems and their solutions when using the broker.
Let’s summarize the main points:
- Use the executable file for Mosquitto MQTT broker Windows installation.
- Add the installation folder to the PATH environment variable to make the ‘mosquitto’ command globally available from the command line.
- By default, Mosquitto will be installed as a Windows service, which can run in the background and automatically start on the operating system boot.
- To configure Mosquitto broker (including authentication settings, logging, etc.), use mosquitto.conf configuration file from the installation folder or provide your own.
- You can test Mosquitto using popular MQTT clients mosquitto_pub and mosquitto_sub, which are bundled into the installation.
About the author
Serhii Orlivskyi is a full-stack software developer at Cedalo GmbH. He previously worked in the Telekom industry and software startups, gaining experience in various areas such as web technologies, services, relational databases, billing systems, and eventually IoT.
While searching for new areas to explore, Serhii came across Cedalo and started as a Mosquitto Management Center developer. Over time, Serhii delved deeper into the MQTT protocol and the intricacies of managing IoT ecosystems.
Recognizing the immense potential of MQTT and IoT, he continues to expand his knowledge in this rapidly growing industry and contributes by writing and editing technical articles for Cedalo’s blog.
Provide feedback
Saved searches
Use saved searches to filter your results more quickly
Sign up
Appearance settings
The following installation instructions are for mosquitto MQTT, version 2.0.12 64-bit, in a Microsoft Windows environment. If you need to install a different version of MQTT software, consult the relevant installation instructions.
Contents
Installing the MQTT Broker
Configuring Usernames and Passwords
Prerequisites
Creating Encrypted Password File
Deleting Users from the Encrypted Password File
Configuring mosquitto.conf to Use the Encrypted Password File
Creating Self-Signed Certificate
Prerequisites
Installing OpenSSL and Setting up Environment Variables
Creating the Self-Signed Certificate and Keys
Create a Certificate Authority (CA) key pair
Create a CA certificate and use the ca.key to sign it
Create a server key pair for use by the broker
Create a broker certificate request
Use the CA certificate to sign the broker certificate request
Edit the mosquitto.conf file
Import a Self-Signed Certificate to a Windows Host
Unsecured connection
Related Links for Additional Information
Installing the MQTT Broker
To install the mosquitto MQTT Broker:
-
Download the mosquitto-2.0.12-install-windows-x64.exe file from https://mosquitto.org/download/.
-
Go to the directory where you downloaded the file. Double-click mosquitto-2.0.12-install-windows-x64.msi.
-
Follow the Eclipse Mosquitto Setup wizard prompts and accept all defaults.
-
If Microsoft Visual C++ is not installed, it will be installed for you as part of the mosquitto installation. Click Accept to accept the license terms, and then click Install.
-
In your desktop, open the Microsoft Services application. Check to see that “Mosquitto Broker” is in “Running” Status with “Automatic” Startup type. If Status is empty, click Start. The mosquitto Broker will automatically start after every system reboot.


Configuring Usernames and Passwords
The following instructions and examples are for the mosquitto MQTT Broker on a Microsoft Windows, 64-bit platform. Other MQTT brokers will have different instructions, configuration, importing credentials, and so forth.
Prerequisites
-
The device must have firmware version 2.29x or newer.
- Microsoft Windows 64-bit operating system
Creating Encrypted Password File
In the FAI Lite scenario, both the devices and the Agent are the clients of the broker. Therefore, the Agent and each device needs its own username and password. Do the following steps:
-
In the C:\etc folder, create a simple text file with each user’s username and password, one for each line. Separate the username and password with a colon as shown below:
-
Configure the credentials for your devices by using the AyyekaGo mobile app.
-
For every device, do the following steps:
-
-
-
-
Click Cellular Settings > MQTT SERVER ADDRESS.
-
In the MQTT Server Address window, type in the username and password of the device that will connect to the MQTT Broker.
-
-
b. Click My Devices, and then click the Export icon. A list of devices is shown.
c. Click EXPORT. Select which app to use for export. For example, you might use Gmail to send the export file to yourself.
d. In the MQTT Broker platform, open the export file, and then copy the usernames and passwords as described in step 1 into the password file.
3. Update the password file as needed.
-
- Encrypt the entire password file. Go to the directory where mosquitto was installed (by default, C:\Program Files\mosquitto).
Command: mosquitto_passwd.exe -U name_of_passwordfile
Notice that all passwords are now encrypted.
-
- Encrypt the password of only the first user.
Command: mosquitto_passwd.exe -c name_of_passwordfile the_first_user
In our example, the_first_user is steve.
You will be prompted to enter a password for the_first_user.
Note: The password that you type in is not echoed, so it looks like it is not being accepted — but it is.
-
- After adding the first user and password, you can add additional users.
Command: mosquitto_passwd -b name_of_passwordfile the_next_user password
4. After updating the password file, restart the MQTT broker by using the Microsoft Windows Services application.
Deleting Users from the Encrypted Password File
If needed, you can remove individual users from the password file.
Command: mosquitto_passwd -D name_of_passwordfile user_to_be_deleted
Configuring mosquitto.conf to Use the Encrypted Password File
You must configure mosquitto.conf file to use the encrypted password file. Do the following steps:
-
Copy the password file into a separate folder. For example, copy the file into C:\etc\mosquitto\.
If you use a different directory, ensure that there are no spaces in the directory path, such as in C:\Program Files\mosquitto\passwordfile”.
2. Edit the mosquitto.conf file to use the password file. Do the following steps:
-
- Set allow_anonymous to false
- Set the password_file path
The password file must not have an extension, such as “.txt”.
For example:
allow_anonymous false
password_file C:/etc/passwordfile
3. Edit the mosquitto.conf file for communication. Do the following steps, as needed:
Note: mosquitto v1.5 authentication is no longer a global setting. It can be configured on a per listener basis. You must enable the per_listener_settings setting.
Examples:
The configuration in mosquitto.conf for only secure communication will be:
#### It is recommended to have secure communication, so the listener is set to 8883
listener 8883
allow_anonymous false
password_file C:/etc/passwordfile
###
Note: If you set listener to 8883, you must embed the certificates. See Edit the mosquitto.conf file below for an example.
4. After updating the configuration or the password file, restart the mosquitto Broker service by using the Microsoft Windows Services application.
For additional information about configuring the password file, see http://www.steves-internet-guide.com/mqtt-username-password-example/
It is recommended that you use the enterprise’s signed certificate. Consult your IT department for instructions about how to use it. In this case, you can now go directly to the Edit the mosquitto.conf file section below.
Alternatively, you can create a self-signed certificate and use that for verification. In this case, continue to the «Creating Self-Signed Certificate” section below.
Creating Self-Signed Certificate
Prerequisites
-
Microsoft Windows 64-bit operating system
-
Microsoft Visual C++
Installing OpenSSL and Setting up Environment Variables
Before you create the self-signed certificate, you must install OpenSSL and set up environment variables. Do the following steps:
-
Download OpenSSL. Use the version for Win64 rather than the Lite version.
-
Run the OpenSSL Installer.
If Microsoft Visual C++ is not installed, the installer will download and install it for you. Run the OpenSSL Installer again and follow the wizard steps.
3. Set up system environment variables.
The environment variables must be set so that OpenSSL functions properly on your system. You need to set OPENSSL_CONF and Path environment variables. Do either of the following steps:
-
-
To set environment variables for the current session only, do the following commands at the command line prompt:
-
set OPENSSL_CONF=C:\Program Files\OpenSSL-Win64\bin\openssl.cfg
-
set Path=%Path%;C:\Program Files\OpenSSL-Win64\bin
-
-
To set environment variables permanently, do the following commands:
-
-
-
-
In the system tray, press the Search icon, and then type in environment.
-
Select Edit the system environment variables. The System Properties window opens.
-
Click the Advanced tab, and then click Environment Variables.
-
In the System variables section, click New.
-
In the New System Variable window, set the following variables:
-
-
-
-
-
-
set OPENSSL_CONF to be C:\Program Files\OpenSSL-Win64\bin\openssl.cfg
-
Set Path to be C:\Program Files\OpenSSL-Win64\bin
-
-
-
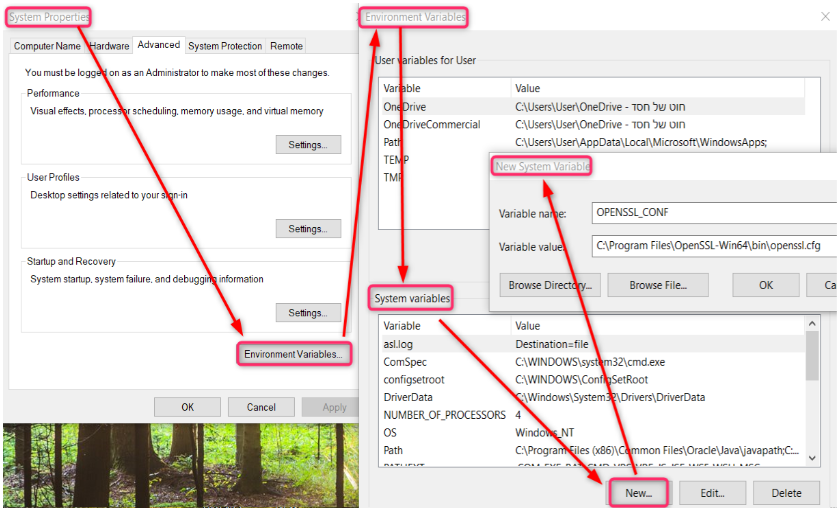
4. Click OK to close the New System Variable window, and then click OK to close the Environment Variables window.
5. Click OK to close the System Properties window.
Note: The changes that you made will take effect only when the window closes, and you open a new command prompt.
Creating the Self-Signed Certificate and Keys
Create the self-signed certificate and keys by doing the following steps at the command line prompt:
Please note that the self-signed certificate files will be created in the folder where the openssl commands will be run from.
- Create a Certificate Authority (CA) key pair.
Command: openssl genrsa -des3 -out ca.key 2048
Generating RSA private key, 2048-bit long modulus (2 primes)
....................................................................................+++
......................+++++
e is 65537 (0x010001)
Enter pass phrase for ca.key:
Verifying - Enter pass phrase for ca.key:
The purpose of the pass phrase is to encrypt the private key. To use an encrypted key, the pass phrase is also needed. In a way, they are two separate factors of authentication. Tip: Write down the pass phrase (pay attention to case) because you will need it when you sign the ca.crt and server.crt certificates.
-
Create a CA certificate and use the ca.key to sign it.
Command: openssl req -new -x509 -days 1826 -key ca.key -out ca.crt
Enter pass phrase for ca.key:
You are about to be asked to enter information that will be incorporated into your
certificate request.
What you are about to enter is what is called a Distinguished Name or a DN.
There are quite a few fields, but you can leave some blank
For some fields there will be a default value,
If you enter '.', the field will be left blank.
Country Name (2 letter code) [AU]:US
State or Province Name (full name) [Some-State]: California
Locality Name (e.g., city) []: San Diego
Organization Name (e.g., company) [Internet Widgets Pty Ltd]: Widgets
Organizational Unit Name (e.g., section) []: RND
Common Name (e.g., server FQDN or YOUR name) []: Widgets
Email Address []:
The directory now has the following files:
08/17/2021 11:51 AM 1,348 ca.crt
08/17/2021 11:50 AM 1,773 ca.key
-
Create a server key pair for use by the broker.
Command: openssl genrsa -out server.key 2048
Generating RSA private key, 2048-bit long modulus (2 primes)
..................................................................................+++++
................+++++
e is 65537 (0x010001)
The directory now has the following files:
08/17/2021 11:51 AM 1,348 ca.crt
08/17/2021 11:50 AM 1,773 ca.key
08/17/2021 11:52 AM 1,702 server.key
-
Create a broker certificate request.
When filling out the form, the Common Name is important and is usually the full domain name of the server, the IP address, or the Microsoft Windows name of the computer that is running the mosquitto broker. You must use the same name when configuring the client connection.
Command: openssl req -new -out server.csr -key server.key
You are about to be asked to enter information that will be incorporated
into your certificate request.
What you are about to enter is what is called a Distinguished Name or a DN.
There are quite a few fields, but you can leave some blank
For some fields there will be a default value,
If you enter '.', the field will be left blank.-------
Country Name (2 letter code) [AU]:US
State or Province Name (full name) [Some-State]:California
Locality Name (e.g., city) []: San Diego
Organization Name (e.g., company) [Internet Widgets Pty Ltd]:Widgets
Organizational Unit Name (e.g., section) []:RND
Common Name (e.g., server FQDN or YOUR name) []:54.72.180.67
Email Address []:
Please enter the following 'extra' attributes to be sent with your certificate request
A challenge password []:widget
An optional company name []:widget -
Use the CA certificate to sign the broker certificate request.
Use the CA key to verify and sign the server certificate. This step creates the server.crt file.
Command: openssl x509 -req -in server.csr -CA ca.crt -CAkey ca.key -CAcreateserial -out server.crt -days 360
Signature ok
subject=C = US, ST = California, L = San Diego, O = widgets, OU = RND,
CN = 54.72.180.67
Getting CA Private Key
Enter pass phrase for ca.key:
Note: If you get the message:
unable to load CA Private Key
13592:error:06065064:digital envelope routines:EVP_DecryptFinal_ex:bad decrypt:crypto\evp\evp_enc.c:610:13592:error:0906A065:PEM routines:PEM_do_header:bad decrypt:crypto\pem\pem_lib.c:461:It means that you did not enter the pass phrase for ca.key correctly. Run the openssl command again, and then type in the correct pass phrase.
The directory now has the following files:
08/17/2021 11:54 AM 1,364 ca.crt
08/17/2021 11:53 AM 1,781 ca.key
08/17/2021 11:55 AM 42 ca.srl
08/17/2021 11:55 AM 1,240 server.crt
08/17/2021 11:55 AM 1,088 server.csr
08/17/2021 11:54 AM 1,702 server.key
Edit the mosquitto.conf File
1. Edit the configuration file to use the following parameters and their values:
per_listener_settings true
listener 8883allow_anonymous false
password_file c:\Users\...\Certificates\passtest.txtprotocol mqtt
certfile c:\Users\...\Certificates\server.crtkeyfile c:\Users\...\Certificates\server.key
require_certificate false
cafile c:\Users\...\Certificates\ca.crt
use_identity_as_username false
log_dest file c:\mosquitto\mosquitto.log
log_type error
log_type warning
log_type notice
log_type information
# the following setting should be added manually after the logs settings
log_type allconnection_messages true
# the following seeing must added at the end of the file
tls_version tlsv1.2
2. After updating the mosquitto.conf file, restart the MQTT broker through the Microsoft Windows Services application. For details about parameters and syntax in the mosquitto.conf file, see mosquitto.conf man page.
Import a Self-Signed Certificate to a Windows Host
If you defined the listener in the mosquitto.conf file for unsecured communication, skip this step.
If the listener uses secure communication, you must add the self-signed certificate (ca.crt) to the Windows repository. Do the following steps:
-
On your Windows desktop, click Start > Run > MMC. The Microsoft Management Console opens.
-
Click File, and then select Add / Remove Snap In.
-
From the list of available snap-ins, select Certificates, and then click Add.
-
In the Certificates snap-in window, select Computer Account, and then click Next.
-
In the Select Computer window, select Local Computer, and then click Finish.
-
Click OK to exit the Snap-In window.
-
Click [+] next to Certificates > Trusted Root Certification Authorities.

8. Right-click Certificates, and then select All Tasks > Import. The Certificate Import Wizard window opens. Follow the wizard prompts. The self-signed certificate is now trusted by all users.
If you see the following error from self-signed certificates in the log:
2021-09-09 15:24:40.252 +03:00 [WRN] MQTT: TLS certificate has policy errors. RevocationStatusUnknown: The revocation function was unable to check revocation for the certificate.
2021-09-09 15:24:40.252 +03:00 [WRN] MQTT: Verify the certificate or ignore by changing the IgnoreCertificateRevocationErrors setting
The Agent will not work until you change the Ignore Certificate Revocation Errors check box in the Agent’s configuration file or the UI.
Unsecured Connection
If you need it, you can set the mosquitto.config file to have an unsecured connection
We recommend avoiding this kind of configuration.
The configuration in mosquitto.conf for only non-secure communication will be:
###
per_listener_settings true
# In non-secure communication, the listener is set to 1883
listener 1883
allow_anonymous false
password_file C:/.../passwordfile.txt
###
Related Links for Additional Information
-
http://www.steves-internet-guide.com/mosquitto-tls/
-
https://mosquitto.org/man/mosquitto-tls-7.html
-
http://richardn.ca/2017/06/07/mosquitto-on-windows/
-
https://mosquitto.org/documentation/authentication-methods/
-
https://mosquitto.org/man/mosquitto-conf-5.html
Table of Contents
- Introduction
- Prerequisites
- Steps
- Testing our Mosquitto MQTT Broker
- Subscriber client
- Publisher client
- Adding the Mosquitto commands to the Windows PATH variable
- How to Uninstall Mosquitto MQTT Broker in Windows?
- Wrap Up
Introduction
This post will discuss how you can install Mosquitto MQTT broker on a Windows machine. MQTT or MQ Telemetry Transport is a publish-subscribe lightweight protocol. This protocol is ideal for memory or bandwidth-constrained devices like our microcontroller.
We will begin the installation process by installing the Mosquitto MQTT broker on a Windows machine and then do the necessary configuration. After that, we will do the initial testing of a publish-subscribe cycle to verify the installation.
Prerequisites
You will need a workstation or laptop running Windows and with sufficient CPU power and memory. Also, ensure you have sufficient Administrator privileges so we don’t encounter any permission issues.
Steps
- Download the MQTT Broker from this link. When writing this post, the latest version is shown in the image below. Select if you want the 32-bit or 64-bit version.

- When the download is finished click the executable file. If a popup for user account control is shown then just click Yes. When this screen is shown click Next.
- Click Next again on which components to install
- Please select where you want to install it but in my case, I have set it to the default installation folder and clicked the install button.
- Once the installation is finished then open a command prompt. Right-click and click the “Run as Administrator Option”
- Change into the directory where you installed your Mosquitto broker and execute the below command to start the Mosquitto service.
net start mosquitto
You should be able to see the following message above to be displayed.
If you go into the services then you will notice that the Mosquitto broker is now Running.
Testing our Mosquitto MQTT Broker
Now that we have successfully configured our Mosquitto MQTT Broker in our Windows environment then we will test it. To test it, we will send a publish and subscribe command on our same Windows machine. This would be enough to test if our installation is successful.
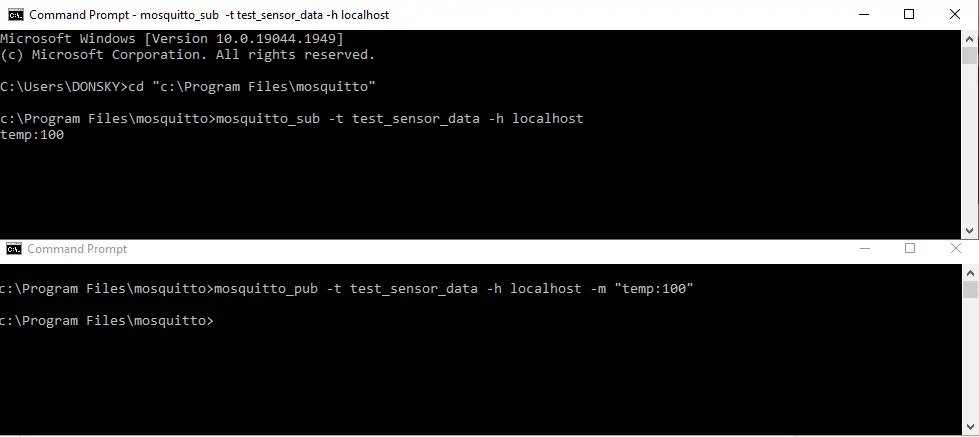
Subscriber client
- Open a command prompt and change the directory into our Mosquitto installation then type in the below command.
mosquitto_sub -t test_sensor_data -h localhostThe command above subscribes to the topic test_sensor_data. Keep this command prompt window open. This is waiting for any publisher to publish any information on that topic.
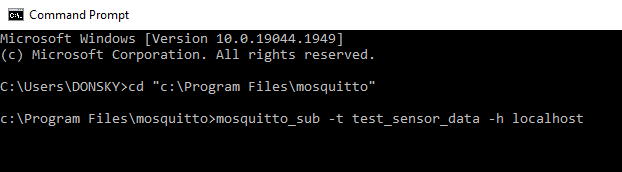
Publisher client
- Open a new command prompt and change the directory into our Mosquitto folder installation. Type in the below command and click enter.
mosquitto_pub -t test_sensor_data -h localhost -m “temp:100”This publishes a message about the temperature on the topic test_sensor_data.
If you take a look now at our subscriber command prompt window then you will see that the message is displayed.
Congratulations! We now have a functioning Mosquitto MQTT broker on our Windows machine. Yay!
Adding the Mosquitto commands to the Windows PATH variable
Right now, when you want to execute the Mosquitto commands then you need to cd to the directory where you installed your Mosquitto software. If you want to access the mosquitto_pub and mosquitto_sub commands anywhere then you can add the Mosquitto folder to the PATH variable.
Follow the following steps to add your Mosquitto software to the PATH environment variable.
- In your search bar, type in “environment”. Click the Edit the system environment variables
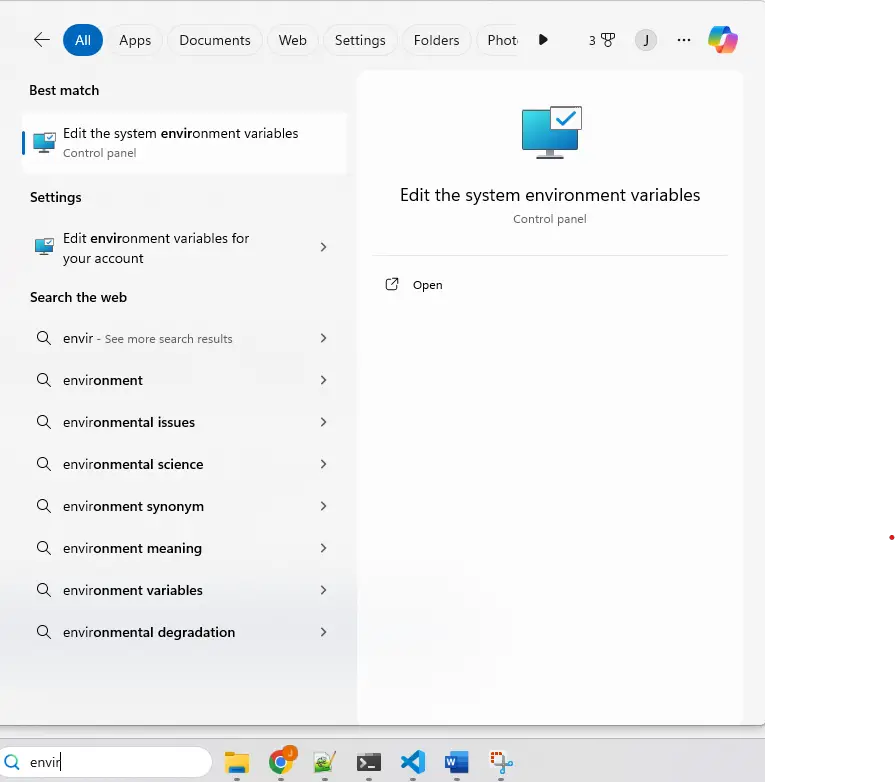
- Click the Environment Variables
- Search for the Path variable and click edit.
- Add a New environment variable and paste it into the directory where you installed your Mosquitto server.
Now, whenever you open a new command prompt then you can execute the mosquitto_pub and mosquitto_sub commands directly.
How to Uninstall Mosquitto MQTT Broker in Windows?
Open a command prompt and make sure that it is running in Administrator mode.
Type in the below command to stop the Mosquitto MQTT service first.
net stop mosquitto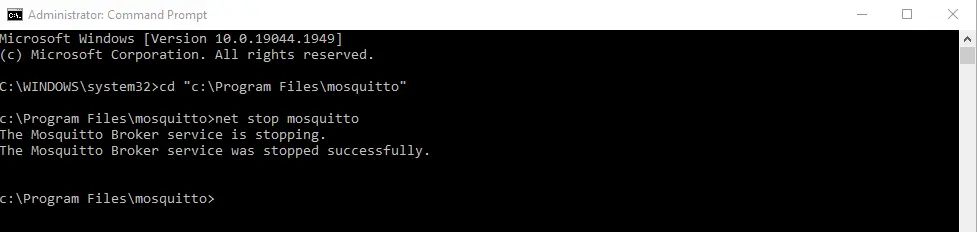
After which, type in the below command to uninstall the Mosquitto
mosquitto uninstallDelete the installation folder if it was not deleted automatically.
Wrap Up
We have completed the process of how to install the Mosquitto MQTT broker on the Windows machine in this post. Also, we have run the configuration needed and then run the initial testing to verify our installation.
We are now ready to explore this awesome protocol in our IOT projects.
That’s it! Happy Exploring!
Read Next:
Pico W -MicroPython MQTT – BMP/BME 280 Weather Station
MQTT Tutorial using Arduino Framework
Read More:
Exploring Node-Red, Dashboard 2.0, and MQTT
How to build your own custom MQTT dashboard?
Уровень сложностиСредний
Время на прочтение11 мин
Количество просмотров32K
Введение
Примечание: данная статья является переводом с дополнительными мыслями автора
MQTT (Message Queue Telemetry Transport) — легковесный протокол обмена сообщениями для публикации/подписки сообщений, на настоящий момент этот протокол является основным стандартом в Интернете Вещей (IoT). Брокер MQTT — главный узел (серверное ПО) для подключения IoT устройств и обмену сообщений между ними. На текущий момент доступно более 20 брокеров MQTT с исходным кодом, что затрудняет выбор архитекторами и разработчиками программного обеспечения. В статье будут рассмотрены и сравнены некоторые из самых популярный MQTT-брокеров.

Критерий оценки: сообщество и популярность
Для сравнения MQTT брокеров с открытым исходным кодом будем учитывать следующие критерии оценки:
-
Сообщество: оцениваем по количеству звёздочек, числу авторов и закрытых проблем в репозиториях GItHub (или другой площадке);
-
Популярность: оцениваем по числу скачиваний из репозитория, пользовательской базе и числу установок из docker репозитория;
-
Активность: оценка по числу коммитов, пулл-реквестов и релизов за последние 12 месяцев.
Основываясь на этих критериях, были выбраны четыре популярных брокера MQTT с открытым исходным кодом:
-
EMQX — самый популярный брокер MQTT с 11,4 тысячами звёзд на GitHub;
-
Mosquitto — второй по популярности брокер, имеет самое большое число установок и пользователей:
-
NanoMQ — новейший и набирающий популярность брокер MQTT, очень легковесный, переносимый и написан на языке C;
-
VerneMQ — третий по количеству звёзд брокер MQTT на GitHub.
Сводная таблица сравнения этих брокеров:
|
EMQX |
Mosquitto |
NanoMQ |
VerneMQ |
|
|
GitHub |
EMQX GitHub |
Mosquitto на GitHub |
NanoMQ на GitHub |
VerneMQ на GitHub |
|
Создан проект |
2012 |
2009 |
2020 |
2014 |
|
Лицензия |
Apache версии 2.0 |
Лицензия EPL / EDL |
MIT License |
Apache версии 2.0 |
|
Язык программирования |
Erlang |
C / C ++ |
C |
Erlang |
|
Последняя версия |
версия 5.0.23 (апрель 2023) |
2.0.15 (август 2022) |
версия 0.17.0 (март 2023) |
версия 1.12.6.2 (ноябрь 2022) |
|
Звезд на GitHub |
11.5k |
7.2k |
800+ |
3k |
|
Общее число коммитов |
14k+ |
2800+ |
2000+ |
2400+ |
|
Число коммитов за последние 12 месяцев |
3000+ |
500+ |
1200+ |
50+ |
|
Закрытых проблем на GitHub |
3500+ |
2200+ |
120+ |
1300+ |
|
Релизов |
260+ |
60+ |
75+ |
40 |
|
Количество PR |
6000+ |
600 |
780+ |
600 |
|
Количество авторов на GitHub |
100+ |
110+ |
20+ |
50 |
Приступаем к сравнению
EMQX
EMQX — является одним из самых популярных брокеров MQTT и имеет 11,5 тыс. звезд на GitHub. Проект EMQX был запущен в 2012 году и распространяется по лицензии Apache 2.0. EMQX написан на языке Erlang / OTP, том самом знаменитом языке программирования для создания масштабируемых программных систем реального времени.
EMQX — самый масштабируемый в мире брокер MQTT на кластерной основе, который поддерживает расширяемость с помощью плагинов, использует протоколы MQTT 3.1, MQTT 5.0, MQTT-SN и MQTT поверх QUIC. Он поддерживает кластеризацию без мастера для обеспечения высокой доступности и горизонтальной масштабируемости. EMQX 5.0, последняя версия, может обслуживать до 100 миллионов одновременных подключений MQTT только с помощью одного кластера состоящего из 23 узлов.

EMQX также предлагает расширенные корпоративные функции, размещение в облачном хостинге, платную поддержку от компании EMQ Technologies Inc. EMQX завоевал популярность среди различных предприятий, стартапов и частных пользователей благодаря своей высокой производительности, масштабируемости и высокой надёжности. Он распространён среди критически важных для бизнеса отраслях, в таких как Индустриальный Интернет Вещей (Industry IoT), умный дом, автомобильная отрасль, производственные предприятия, телекоммуникации.
Официальный сайт проекта: https://www.emqx.io /
GitHub: https://github.com/emqx/emqx
Достоинства брокера EMQX:
-
Поддерживает крупномасштабные развертывания
-
Высокая доступность
-
Горизонтальная масштабируемость
-
Высокая производительность и низкая задержка
-
Богатые корпоративные возможности
-
Поддержка протокола MQTT over QUIC
Недостатки:
-
Сложный в настройке
-
Сложно эффективно управлять (требуется DevOPS)
Mosquitto
Проект Mosquitto разработан Роджером Лайтом в 2009 году, а позже передан на поддержку в Eclipse Foundation, имеет лицензию Eclipse (EPL / EDL license). По состоянию на март 2023 года это самый широко распространенный брокер MQTT с открытым исходным кодом и с большим сообществом и более чем 7 тыс. звезд на GitHub.
Mosquitto написан на языках программирования C / C ++ и использует однопоточную архитектуру (это его главный недостаток). Mosquitto реализует протоколы MQTT версий 5.0, 3.1.1 и 3.1 и поддерживает защищённые соединения SSL / TLS и поддержку веб сокетов. Легкий дизайн Mosquitto делает его подходящим для развертывания во встраиваемых системах или на серверах с ограниченными ресурсами.
Mosquitto имеет небольшой размер около 200 кб. Однако он не поддерживает многопоточность и тем более нет возможности развёртывания на кластере, но Mosquitto доступен для различных платформ, включая Linux, FreeBSD, Windows и macOS.

Официальный сайт проекта: https://mosquitto.org /
Исходный код на GitHub: https://github.com/eclipse/mosquitto
Достоинства:
-
Простота настройки и использования
-
Поддержка протокола MQTT 5.0
-
Легковесный, малое потребление памяти
-
Активная поддержка сообществом
Недостатки:
-
Однопоточная архитектура
-
Ограниченная масштабируемость в продакшне ( <100 тыс.)
-
Нет поддержки кластеризации
-
Отсутствуют корпоративные функции
-
Ограниченная поддержка в облаке
NanoMQ
NanoMQ, проект с открытым исходным кодом, выпущенный в 2020 году, представляет собой легкий и быстрый брокер MQTT, разработанный для вычислительных сценариев Интернете вещей (IoT).
NanoMQ реализован полностью на языке C, использует библиотеку асинхронного программирования NNG и с многопоточной акторной моделью. Брокер полностью поддерживает версии протоколов MQTT 3.1.1, MQTT 5.0 и поддерживает MQTT over QUIC.
NanoMQ отличается малым размером и высокой производительностью, что делает его подходящим для различных периферийных вычислительных платформ (Edge). Он обладает высокой совместимостью и переносимостью, использует исключительно стек POSIX API. Это упрощает развертывание на любой платформе, совместимой с POSIX (Linux, *BSD, MacOS X), и бесперебойно работает на различных архитектурах процессоров, включая x86_64, ARM, MIPS и RISC-V (теперь ещё и E2K).
Примечание: автором проверена сборка и функционирование на компьютерах с процессорами Эльбрус.

Официальный сайт проекта: https://nanomq.io /
Исходный код на GitHub: https://github.com/nanomq/nanomq
Достоинства
-
Простая архитектура
-
Поддержка многопоточности и асинхронного ввода-вывод
-
Высокая переносимость
-
Малый объем загрузки
-
Простота развертывания
-
Поддержка сетевых мостов без посредников
Недостатки
-
Нет поддержки кластеризации
-
Небольшое сообщество и база пользователей
-
Отсутствие документации и руководств
-
Отсутствие корпоративных функций (интеграция данных)
VerneMQ
Проект VerneMQ был запущен в 2014 году и изначально разработан Erlio GmbH. Проект распространяется по лицензии Apache версии 2.0. Он поддерживает MQTT версий 3.1, 3.1.1 и 5.0. Написан на языке Erlang / OTP, и заимствует некоторый код из проекта EMQX.
Что касается архитектурного дизайна, VerneMQ предназначен для обработки миллионов одновременных подключений и сообщений с низкой задержкой и высокой пропускной способностью. Он поддерживает хранение сообщений MQTT в LevelDB и использует архитектуру кластеризации, основанную на библиотеке Plumtree, которая реализует алгоритм деревьев рассылки Epidemic.
К сожалению, кластерная архитектура Plumtree не доказала свою эффективность, хотя теоретически она казалась идеальной. Команда и сообщество VerneMQ потратили много лет, пытаясь заставить его работать, устраняя такие проблемы, как разделение сети, несогласованность данных и аварийное восстановление.
Наконец, проект перестал активно разрабатываться и поддерживаться, за последние 12 месяцев было зафиксировано всего около 50 коммитов.
Официальный сайт проекта: https://www.vernemq.com /
GitHub репозиторий: https://github.com/vernemq/vernemq
Достоинства:
-
Высокая доступность
-
Горизонтальная масштабируемость
-
Сохранение сообщений
Недостатки:
-
Не проверенная кластеризация
-
Ограниченная документация
-
Ограниченные возможности предприятия
-
Не активно развивается
Масштабируемость, производительность и надежность
Критерии оценки масштабируемости, надёжности и производительности:
-
Масштабируемость: может ли брокер масштабироваться горизонтально для обработки миллионов одновременных подключений MQTT
-
Доступность: Поддерживает ли брокер высокую доступность для критически важных приложений
-
Производительность: сколько сообщений MQTT в режимах QoS 0/1/2 в секунду может отправлять и доставлять брокер;
-
Задержка: насколько быстро брокер может отправлять и доставлять сообщения MQTT от одного клиента MQTT другому
-
Надежность: поддерживает ли брокер сохранение и доставку сообщений MQTT без потери данных
Ниже приведен краткий анализ четырех брокеров MQTT:
|
EMQX |
Mosquitto |
NanoMQ |
VerneMQ |
|
|
Масштабируемость |
||||
|
Многопоточность |
ДА |
НЕТ |
ДА |
ДА |
|
Асинхронный ввод-вывод |
ДА |
ДА |
ДА |
ДА |
|
Кластеризация |
Да (кластер из более чем 20 узлов) |
НЕТ |
НЕТ |
ДА |
|
Соединения MQTT на 1 узел |
4 млн. |
100 тыс. |
100 тыс. |
1 млн |
|
Подключения MQTT на весь кластер |
100 млн. |
— |
— |
? |
|
Доступность |
||||
|
Архитектура кластеризации без мастера |
ДА |
НЕТ |
НЕТ |
ДА |
|
Эластичное масштабирование во время выполнения |
ДА |
НЕТ |
НЕТ |
ДА |
|
Автоматическая кластеризация |
ДА |
НЕТ |
НЕТ |
НЕТ |
|
Защита от перегрузки |
ДА |
НЕТ |
НЕТ |
ДА |
|
Отказоустойчивость |
ДА |
НЕТ |
НЕТ |
? |
|
Производительность (на узел) |
||||
|
Режим QoS0 (сообщений / сек.) |
2 миллиона |
120k |
500k |
? |
|
Режим QoS1 (сообщений / сек.) |
800k |
80k |
400k |
? |
|
Режим QoS2 (сообщений / сек.) |
200k |
40k |
200k |
? |
|
Задержка |
||||
|
Задержка (зависит от разных сценариев) |
Однозначная задержка в миллисекундном масштабе |
Задержка до нескольких секунд в некоторых сценариях |
В большинстве сценариев менее 10 миллисекунд |
Задержка до нескольких секунд в некоторых сценариях |
|
Надежность |
||||
|
Сохранение сообщений |
В RocksDB и внешних базах данных |
В файлах |
В SQLite |
В LevelDB |
|
Нулевое время простоя / Горячее обновление |
ДА |
НЕТ |
НЕТ |
НЕТ |
|
Горячий патч |
ДА |
НЕТ |
НЕТ |
НЕТ |
Протокол MQTT и способы соединения
Все представленные брокеры полностью реализуют протокол MQTT версий 3.1.1 и 5.0 и поддерживают MQTT через WebSocket и шифрование с SSL/ TLS. Кроме того, EMQX поддерживает шлюзы протоколов MQTT-SN, CoAP и LwM2M. NanoMQ поддерживает режим без брокеров и может работать с DDS, ZeroMQ и Nanomsg.
EMQX и NanoMQ взяли на себя обязательство продвигать стандарт MQTT over QUIC. Они являются пионерами в реализации MQTT over QUIC, протокола MQTT следующего поколения, который направлен на дальнейшую оптимизацию взаимодействия IoT.
|
EMQX |
Mosquitto |
NanoMQ |
VerneMQ |
|
|
MQTT 3.1/3.1.1 |
ДА |
ДА |
ДА |
ДА |
|
MQTT 5.0 |
ДА |
ДА |
ДА |
ДА |
|
MQTT-SN 1.2 |
ДА |
НЕТ |
НЕТ |
НЕТ |
|
MQTT через TCP |
ДА |
ДА |
ДА |
ДА |
|
MQTT через SSL / TLS |
ДА |
ДА |
ДА |
ДА |
|
MQTT через WebSocket |
ДА |
ДА |
ДА |
ДА |
|
MQTT по сравнению с QUIC |
ДА |
НЕТ |
ДА |
НЕТ |
|
Объединение MQTT |
ДА |
ДА |
ДА |
ДА |
|
Общая подписка |
ДА |
ДА |
ДА |
ДА |
|
Сохраненное сообщение |
ДА |
ДА |
ДА |
ДА |
|
Будет сообщение |
ДА |
ДА |
ДА |
ДА |
|
Запрос / Ответ MQTT |
ДА |
ДА |
ДА |
ДА |
|
LB (прокси-протокол) |
ДА |
НЕТ |
НЕТ |
ДА |
|
Мультипротоколный шлюз |
ДА |
НЕТ |
НЕТ |
НЕТ |
|
CoAP |
ДА |
НЕТ |
НЕТ |
НЕТ |
|
LwM2M |
ДА |
НЕТ |
НЕТ |
НЕТ |
|
Шлюз DDS |
НЕТ |
НЕТ |
ДА |
НЕТ |
|
Шлюз ZeroMQ |
НЕТ |
НЕТ |
ДА |
НЕТ |
|
Nanomsg/NNG |
НЕТ |
НЕТ |
ДА |
НЕТ |
Безопасность, аутентификация и авторизация
Безопасность имеет решающее значение для подключения устройств Интернета вещей и обмена данными между подключенными устройствами с использованием брокеров MQTT (основные уязвимости в IoT связаны с отсутствием аутентификации и авторизации). Все сравниваемые брокеры поддерживают безопасные соединения на основе протокола TLS / SSL, а также простой механизм аутентификации и авторизации по логину и паролю, аутентификацию по JWT, сертификаты X.509 и спискам контроля доступа.
EMQX предлагает расширенные функции безопасности, такие как интеграция с внешними базами данных (хранение аккаунтов), OCSP, политики контроля доступа, обнаружение сбоев и поддержка авторизации по протоколу OAuth 2.0.
|
EMQX |
Mosquitto |
NanoMQ |
VerneMQ |
|
|
TLS/SSL |
Yes |
Yes |
Yes |
Yes |
|
Сшивание OCSP |
ДА |
ДА |
НЕТ |
НЕТ |
|
Аутентификация по имени пользователя / паролю |
ДА |
ДА |
ДА |
ДА |
|
Аутентификация по сертификатам X.509 |
ДА |
ДА |
ДА |
ДА |
|
Аутентификация JWT |
ДА |
Да (через плагин аутентификации) |
НЕТ |
? |
|
Аутентификация LDAP |
ДА |
Да (через плагин аутентификации) |
НЕТ |
Да (через плагин) |
|
Детализированный контроль доступа |
ДА |
ДА |
ДА |
ДА |
|
Авторизация с использованием баз данных |
Да (встроенный) |
Да (через плагины аутентификации) |
НЕТ |
Да (через плагины аутентификации) |
|
Обнаружение взмахов |
ДА |
НЕТ |
НЕТ |
НЕТ |
|
Журналы аудита |
ДА |
НЕТ |
НЕТ |
НЕТ |
Интеграция с хранилищами данных
Все брокеры поддерживают интеграцию с внешними сервисами с использованием REST API и веб-хуки. Как легковесные брокеры, Mosquitto и NanoMQ не поддерживают интеграцию с хранилищами данных. Разработчики могут писать код с использованием брокера Mosquitto и самим передавать их во внешние базы данных или облачные сервисы.
EMQX реализует встроенный механизм правил на основе SQL, помогающий извлекать, фильтровать, обогащать и преобразовывать сообщения MQTT в брокере в режиме реального времени. И корпоративной версии EMQX могут легко интегрироваться с Kafka, базами данных и облачными сервисами с использованием готовых мостов передачи данных.
Таблица сравнения с поддерживаемыми провайдерами хранения данных:
|
EMQX |
Mosquitto |
NanoMQ |
VerneMQ |
|
|
Веб-хуки |
ДА |
ДА |
ДА |
ДА |
|
Механизм правил |
ДА |
НЕТ |
Да (ограничено) |
НЕТ |
|
Кодирование сообщений |
ДА |
НЕТ |
НЕТ |
НЕТ |
|
Реестр схем (моделей данных) |
ДА |
НЕТ |
НЕТ |
НЕТ |
|
Поддержка сетевого моста |
ДА |
НЕТ |
НЕТ |
НЕТ |
|
Confluent/Kafka |
Да (Корпоративная версия) |
НЕТ |
НЕТ |
НЕТ |
|
SAP Event Mesh |
Да (Корпоративная версия) |
НЕТ |
НЕТ |
НЕТ |
|
Apache Pulsar |
Да (Корпоративная версия) |
НЕТ |
НЕТ |
НЕТ |
|
RabbitMQ |
Да (Корпоративная версия) |
НЕТ |
НЕТ |
НЕТ |
|
MySQL |
Да (Корпоративная версия) |
НЕТ |
НЕТ |
НЕТ |
|
PostgreSQL |
Да (Корпоративная версия) |
НЕТ |
НЕТ |
НЕТ |
|
SQL Server |
Да (Корпоративная версия) |
НЕТ |
НЕТ |
НЕТ |
|
MongoDB |
Да (Корпоративная версия) |
НЕТ |
НЕТ |
НЕТ |
|
AWS DynamoDB |
Да (Корпоративная версия) |
НЕТ |
НЕТ |
НЕТ |
|
ClickHouse |
Да (Корпоративная версия) |
НЕТ |
НЕТ |
НЕТ |
|
InfluxDB |
Да (Корпоративная версия) |
НЕТ |
НЕТ |
НЕТ |
|
TimescaleDB |
Да (Корпоративная версия) |
НЕТ |
НЕТ |
НЕТ |
|
Oracle |
Да (Корпоративная версия) |
НЕТ |
НЕТ |
НЕТ |
|
Redis |
Да (Корпоративная версия) |
НЕТ |
НЕТ |
НЕТ |
|
Cassandra |
Да (Корпоративная версия) |
НЕТ |
НЕТ |
НЕТ |
Работоспособность, мониторинг и совместимость
Каждый брокер удобен в использовании и оснащен необходимыми функциями ведения журнала и отладки для мониторинга их состояния и эффективного устранения неполадок. Они могут работать в различных операционных системах и общедоступных облачных платформах. Кроме того, EMQX обладает отличной поддержкой Kubernetes Operator и Terraform.
Кроме того, EMQX предоставляет широкие возможности визуального мониторинга через HTTP API и панель мониторинга, упрощая мониторинг и управление. Кроме того, EMQX поддерживает интеграцию с Prometheus и Grafana, позволяя командам легко использовать платформы мониторинга сторонних производителей.
|
EMQX |
Mosquitto |
NanoMQ |
VerneMQ |
|
|
Информационная панель |
ДА |
НЕТ |
НЕТ |
НЕТ |
|
Конфигуратор |
Формат HOCON |
Формат Ключ-значение |
Формат HOCON |
Формат Ключ-значение |
|
Горячее обновление конфигурации |
ДА |
НЕТ |
Да (Ограничено) |
НЕТ |
|
REST API |
ДА |
ДА |
ДА |
ДА |
|
Утилиты командной строки (cli) |
ДА |
ДА |
ДА |
ДА |
|
Удаленная консоль |
ДА |
НЕТ |
НЕТ |
ДА |
|
Метрики |
ДА |
ДА |
ДА |
ДА |
|
Интеграция с Grafana |
ДА |
ДА |
ДА |
ДА |
|
Мониторинг Prometheus |
ДА |
ДА |
ДА |
ДА |
|
Контейнеры Docker |
ДА |
ДА |
ДА |
ДА |
|
Kubernetes |
Да (EMQX Kubernetes) |
НЕТ |
НЕТ |
НЕТ |
|
Terraform |
Да (EMQX Terraform) |
НЕТ |
НЕТ |
НЕТ |
Финальное сравнение
Сводная таблица сравниваемых брокеров MQTT по всем критериям:
|
EMQX |
Mosquitto |
NanoMQ |
VerneMQ |
|
|
Масштабируемость |
Отлично |
Умеренно |
Хорошо |
Хорошо |
|
Доступность |
Отлично |
Умеренно |
Умеренно |
Хорошо |
|
Производительность |
Отлично |
Отлично |
Отлично |
Хорошо |
|
Задержка (latency) |
Отлично |
Хорошо |
Отлично |
Хорошо |
|
Надежность |
Хорошо |
Хорошо |
Хорошо |
Умеренно |
|
Безопасность |
Отлично |
Отлично |
Хорошо |
Хорошо |
|
Аутентификация и авторизация |
Отлично |
Хорошо |
Умеренно |
Хорошо |
|
Возможность подключения |
Отлично |
Хорошо |
Хорошо |
Хорошо |
|
Интеграция |
Отлично |
Умеренно |
Умеренно |
Умеренно |
|
Работоспособность |
Хорошо |
Отлично |
Хорошо |
Умеренно |
|
Мониторинг |
Отлично |
Умеренно |
Умеренно |
Хорошо |
|
Совместимость |
Хорошо |
Отлично |
Отлично |
Хорошо |
|
Простота использования |
Хорошо |
Отлично |
Хорошо |
Хорошо |
|
Поддержка сообществом |
Отлично |
Отлично |
Хорошо |
Умеренно |
Заключение
За последнее десятилетие брокеры MQTT с открытым исходным стали основным инструментом для построения Интернета вещей. Эти брокеры сыграли значительную роль в улучшении функциональности, масштабируемости и переносимости протокола обмена сообщениями MQTT. Без этого вклада MQTT, возможно, не стал бы таким широко распространенным и универсальным, как сегодня.
Выбор брокера MQTT зависит от различных факторов, таких как количество подключенных устройств, пропускная способность сообщений и требования к интеграции. Из сравнения мы можем сделать вывод, что EMQX — это высокомасштабируемый брокер корпоративного уровня для крупномасштабных критически важных развертываний в облаке. Mosquitto и NanoMQ быстрые и легкие, что делает их подходящими для развертывания на встраиваемом оборудовании с ограниченными ресурсами, промышленных шлюзах и Edge- серверах Интернета вещей.
Будущее IoT
C быстрым расширением Интернета вещей количество подключенных устройств, по различным прогнозам, превысит 100 миллиардов к 2030 году. В результате протокол MQTT может стать еще более незаменимым и потенциально может стать нервной системой Интернета вещей.
В настоящее время в разработке находится несколько технологий, такие как MQTT over QUIC, MQTT Serverless, MQTT Unified Namespace и многие другие.
Ссылки
[1] Оригинал статьи
[2] Comparsion of MQTT implementations
[3] Stress-Testing MQTT Brokers: A Comparative Analysis of Performance Measurements
[4] https://github.com/krylovsk/mqtt-benchmark
[5] EntityFX MQS Simulator