
В этой статье мы рассмотрим особенности реализации, установки и настройки MPIO в Windows Server 2016/2012 R2. MPIO (Multi—Path Input Output) или многопутевой ввод-вывод, это технология для построения отказоустойчивого транспорта к системе хранения данных (СХД) или выполняющему эти функции серверу за счет использования избыточных путей. Дополнительные пути между сервером и хранилищем создаются с использованием избыточных физических компонентов (коммутаторы, кабели, адаптеры или сетевые карты). Обратная сторона такой избыточности – операционная система может видеть один и тот же LUN по разным путям и считать их разными устройствами.
Если сервер может получить доступ к логическому диску (LUN) через несколько адаптеров инициатора iSCSI или несколько портов Fibre Channel, то в диспетчере устройств/дисков на системе без установленного MPIO модуля будет присутствовать большее количество LUN, чем презентовано на самом деле ( = количество путей к LUN * количество презентованных LUN).
На следующем скриншоте видно (список подключенных дисков можно вывести с помощью get-disk), что Windows видит без MPIO видит 2 диска по разным путям, которые по факту являются одним LUN:

Если ОС поддерживает MPIO, она будет видеть каждый из презентованных ей дисков в одном экземпляре. При включенном MPIO сервер может обращаться к данным на СХД по нескольким путям, что увеличивает скорость доступа к подключенному LUN и позволяет задействовать для доступа несколько сетевых или HBA-адаптеров.
MPIO может задействовать альтернативный логический путь при выходе из строя одного/нескольких компонентов, заставив операционную систему использовать для доступа к логическому диску (LUN) резервный маршрут, сохраняя непрерывность доступа к данным. Таким образом MPIO является важным компонентом при реализации отказоустойчивой системы доступа к данным, кроме того входящие в состав MPIO модули позволяют распределять нагрузку между различными путями к одному и тому же LUN-у.
Совет. Если ОС не поддерживает MPIO, то для предотвращения потери данных нужно уменьшить количество путей к LUN до 1. На сервере нужно оставить включенным только один порт Fiber Channel или адаптер iSCSI инициатора. Также нужно отключить дополнительные пути для данного LUN на уровне СХД и коммутаторов.
Содержание:
- Установка MPIO в Windows Server 2016/2012R2
- Настройка MPIO в Windows Server 2016
- SAN Policy
Установка MPIO в Windows Server 2016/2012R2
Windows Server поддерживает многопутевой ввод-вывода MPIO начиная с версии Windows Server 2008 R2. Технология Microsoft MPIO позволяет обеспечить высокую доступность и балансировку нагрузки посредством возможности организации нескольких подключений к СХД, не зависит от протоколов и поддерживает подключение дисковых массивов и хранилищ по iSCSI, Fiber Channel и хранилищ SAS.
MPIO-модуль в Windows Server по умолчанию не включен. Установить его в Windows Server 2016 можно двумя способами:
- Из графического интерфейса с использованием консоли Server Manager
- Из командной строки Powershell
Установка MPIO с помощью консоли Server Manager
- Откройте консоль Server Manager;
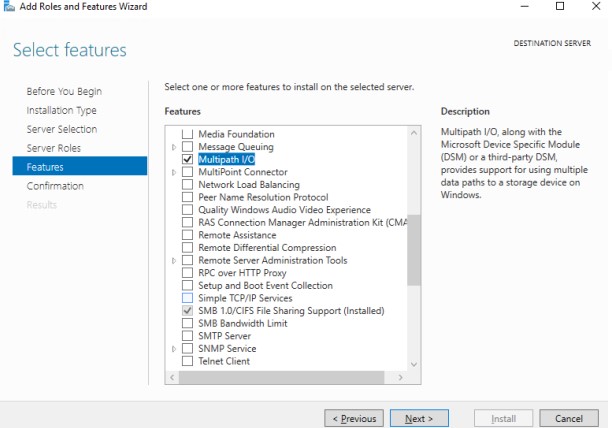
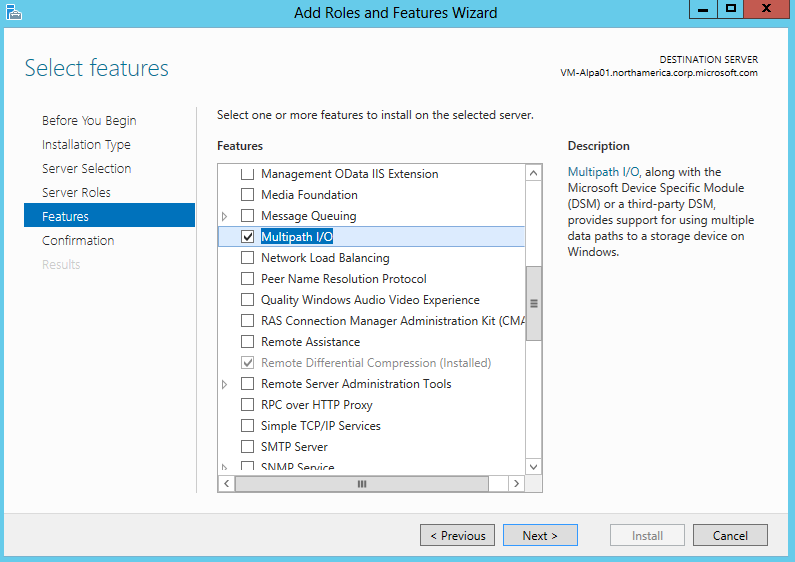
- В списке компонентов (Features) найдите и активируйте опцию Multipath I/O;

- Завершите установку компонента MPIO и перезагрузите сервер.
Установка MPIO с помощью Powershell
Запустите консоль PowerShell с правами администратора и для установки компонента выполните команду:
Add-WindowsFeature -Name 'Multipath-IO'

Чтобы убедиться, что модуль MPIO установлен в вашем Windows Server, выполните:
Get-WindowsFeature -Name 'Multipath-IO'

Примечание. Для отключения MPIO выполните команду:
Remove-WindowsFeature -Name 'Multipath-IO'
Настройка MPIO в Windows Server 2016
После установки MPIO модуля, необходимо активировать его для LUN, которые доступны по нескольким путям. По умолчанию ОС видит каждое подключение к диску как разные логические диски (LUN).
Совет. Одним из компонентов MPIO является специальный модуль MSDSM (Microsoft Device Service Module), позволяющий управлять политиками балансировки нагрузки. По умолчанию MPIO устанавливается со стандартным Microsoft DSM, однако в большинстве случаев стоит установить DSM модуль, предоставляемый производителем СХД (IBM DSM, HP DSM MPIO и т.д.). Обычно скорость работы и функционал нативного DSM модуля выше, чем у стандартного DSM-модуля Microsoft (производитель пишет свои DSM модули с учетом специфики работы и особенностей своего железа)/
Разрешите модулю DSM от Microsoft (MSDSM) автоматически объединять SAN диски в зависимости от типа подключений. MSDSM автоматически определяет наличие LUN, имеющих несколько путей к СХД и поддерживает большинство популярных систем хранения.
Сделать это можно из командной строки:
- Для SAS дисков:
Enable-MSDSMAutomaticClaim -BusType SAS
- Для iSCSI дисков:
Enable-MSDSMAutomaticClaim -BusType iSCSI
Примечание. Эту же операцию можно выполнить с помощью утилиты mpclaim (появившуюся в Windows 2008 R2). Следующая команда проанализирует все устройства, обнаруженные системой, определит какие из них имеют несколько путей и включит поддержку MPIO для них. Опция
-r
[automatically reboot (if needed) without prompting] разрешает автоматическую перезагрузку сервера:
mpclaim.exe -r -i -a ""
Также вы можете включить DSM через графический интерфейс. Откройте консоль управления Server Manager и в меню Tools выберите пункт MPIO (или выполните команду mpiocpl).
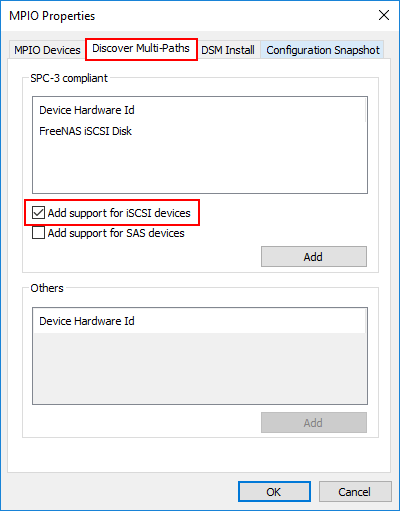
Перейдите на вкладку Discover Multi—Paths, включите опцию Add support for SAS devices (или Add support for iSCSI devices, если вы используете iSCSI хранилище) и нажмите Add. После этого перезагрузите сервер.
После перезагрузки откройте диспетчер устройств или диспетчер дисков и убедитесь, что количество подключенных дисков (LUN), доступных серверу уменьшилось в 2 раза (при наличии подключений к СХД по двум путям).
Вы можете управлять списком устройств, для которых включена поддержка MPIO на вкладке MPIO Devices (или командой
Get-MSDSMSupportedHw
).
Вы можете добавить новые MPIO устройства, нажав кнопку Add или из PowerShell:
New-MSDSMSupportedHw -VendorId <vend> -ProductId <product>
При настройке кластера конфигурацию MPIO необходимо выполнить на всех узлах.
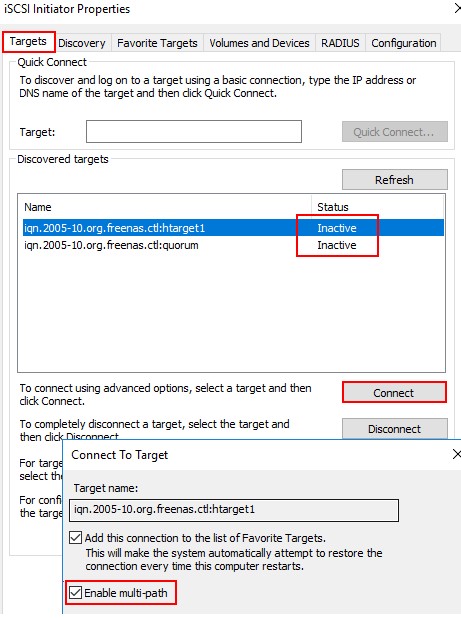
Если вы подключаете iSCSI таргет по 2 путям и хотите использовать MPIO для этого подключения, нужно при подключении Target выбрать iSCSI LUN, нажать кнопку Connect и включить опцию Enable multi—path.
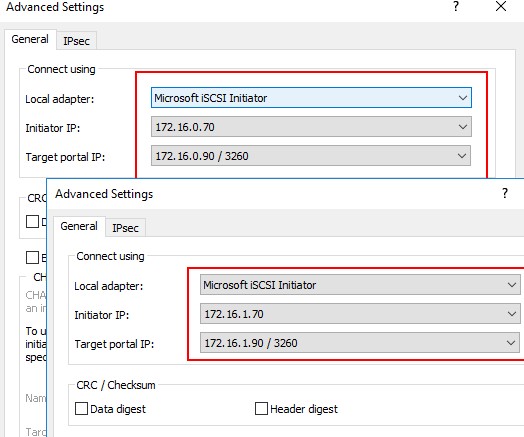
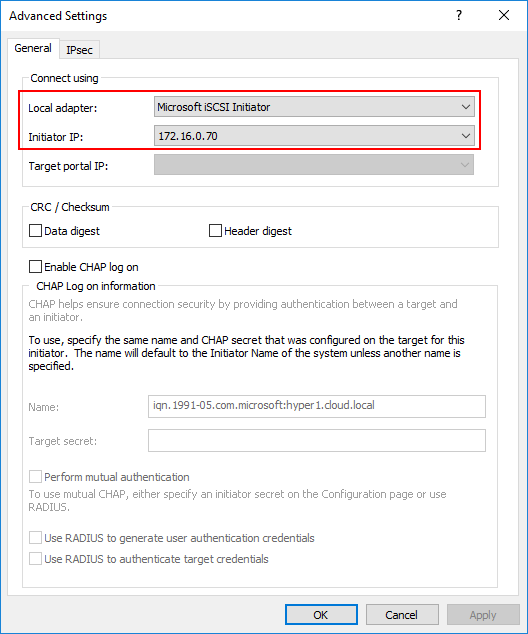
Затем нажмите на кнопку Advanced и привяжите разные IP адреса инициатора к разным IP адресами target.
С помощью PowerShell можно получить текущие настройки MPIO:
Get-MPIOSetting
PathVerificationState     : Disabled
PathVerificationPeriod    : 30
PDORemovePeriod           : 20
RetryCount                : 3
RetryInterval             : 1
UseCustomPathRecoveryTime : Disabled
CustomPathRecoveryTime    : 40
DiskTimeoutValue          : 60
Можно изменить настройки MPIO таймеров так (например, установим рекомендованные настройки для flash массива):
Set-MPIOSetting -NewPathRecoveryInterval 20 -CustomPathRecovery Enabled -NewPDORemovePeriod 30 -NewDiskTimeout 60 -NewPathVerificationState Enabled
Доступны следующие политики балансировки MPIO:
- FOO — Fail Over Only
- RR — Round Robin
- LQD — Least Queue Depth
- LB — Least Blocks
Чтобы задать политику балансировки (например, Round Robin):
Set-MSDSMGlobalLoadBalancePolicy -Policy RR
Также политику балансировки можно изменить в свойствах подключенного LUN на вкладке MPIO. В этом примере для массива выбрана политика Round Robin.
Чтобы увидеть полный список PowerShell команд, доступных в модуле MPIO, выполните команду:
Get-Command –Module Mpio

SAN Policy
В Windows имеется специальная политика дисков (SAN Policy), которая определяет, нужно ли автоматически монтировать диски при их подключении к хосту.
Текущую настройку SAN Policy можно получить с помощью diskpart. По умолчанию используется SAN политика Offline Shared.
Чтобы автоматически монтировать диски, нужно изменить значение SAN Policy на OnlineAll.
DISKPART> san policy=OnlineAll

Возможные значение SAN policy:
| OfflineAll | Все диски по умолчанию в offline режиме |
| OfflineInternal | Все диски на внутренних шинах в offline |
| OfflineShared | Все диски, подключенные через iSCSI, FC или SAS в offline |
| OnlineAll | Все диски автоматически переводятся в онлайн режим (рекомендуется) |
Multipath I/O (MPIO) is a Microsoft framework designed to mitigate the effects of a host bus adapter (HBA) failure by providing an alternate data path between storage devices and a Windows operating system.
MPIO enables up to 32 alternate paths to add redundancy and load balancing for Windows storage environments.
Webmasters can enable Multi-Path Input-Output or MPIO on a Windows server either from a graphical interface using the Server Manager console
or from the PowerShell command line.
Here at Ibmi Media, as part of our Server Management Services, we regularly help our Customers to perform Windows related requests.
In this context, we shall look into the steps to enable MPIO on the windows server.
How to install MPIO Installation on Windows Server 2016/2012 R2 ?
Windows Server supports multi-path input-output (MPIO) starting from Windows Server 2008 R2.
By default, Windows Server disables MPIO module.
There are two ways to install it in Windows Server 2016:
i. From a graphical interface using the Server Manager console
ii. From the PowerShell command line
Steps to enable MPIO Using Server Manager ?
1. Open the Server Manager
2. Find and check the Multipath I/O in the Features list
3. Finish MPIO installation and restart the server
How to install Multipath-IO Using PowerShell ?
Run the PowerShell console as an administrator and use the following command to install the Windows Server feature:
Add-WindowsFeature -Name 'Multipath-IO'
To make sure that MPIO has been installed on the Windows Server, run this command:
Get-WindowsFeature -Name 'Multipath-IO'
To disable MPIO, enter the following command:
Remove-WindowsFeature -Name 'Multipath-IO'
How to configure MPIO on Windows Server 2016 ?
After installing the MPIO module, we need to activate it for the LUNs that are available by multiple paths. By default, Windows sees each connection to a disk as different logical disks (LUNs).
Among MPIO components, there is a special module, MSDSM (Microsoft Device Service Module) that allows you to manage load balancing policies.
Typically, native DSM offers better performance and more features than Microsoft. Thus it would be a good idea to install the DSM module provided by the storage manufacturer (IBM DSM, HP DSM MPIO, etc.) though it is present with the standard Microsoft DSM by default.
Allow the DSM module by Microsoft (MSDSM) to automatically merge SAN disks based on the connection type.
MSDSM automatically detects LUNs that have multiple paths to storage and supports the most popular storage devices.
We can do it from the command prompt:
i. For SAS disks: Enable-MSDSMAutomaticClaim -BusType SAS
ii. For iSCSI disks: Enable-MSDSMAutomaticClaim -BusType iSCSI
We can do the same using the mpclaim tools.
The following command will scan all devices detected by a system, find those that have multiple paths, and enable MPIO support for them:
mpclaim.exe -r -i -a ""
How to Enable DSM vi GUI ?
We can also enable DSM in the GUI. Open the Server Manager and select MPIO in the Tools menu (or run the command: mpiocpl).
Go to the Discover Multi—Paths tab, check to Add support for SASdevices (or Add supportfor iSCSI devices if you are using iSCSI storage), and click Add.
Then restart your server.
After the restart, open the Device Manager (or the Disk Manager) and make sure that the number of connected disks (LUNs) available to your server has reduced twice (if there are two paths to your storage device).
We can manage the list of devices with MPIO support enabled in the MPIO Devices tab (or using the Get-MSDSMSupportedHw command).
We can add new MPIO devices by clicking Add or from PowerShell:
New-MSDSMSupportedHw -VendorId <vend> -ProductId <product>
while deploying a cluster, configure MPIO on all nodes.
To use MPIO while we connect an iSCSI target via 2 paths, select iSCSI LUN while we connect a Target, click Connect, and check the Enable multi-path option.
Then click Advanced and bind different initiator IP addresses to different target IP addresses.
You can get current MPIO settings using PowerShell:
Get-MPIOSetting
PathVerificationState : Disabled
PathVerificationPeriod : 30
PDORemovePeriod : 20
RetryCount : 3
RetryInterval : 1
UseCustomPathRecoveryTime : Disabled
CustomPathRecoveryTime : 40
DiskTimeoutValue : 60
We can change MPIO timer settings as follows:
Set-MPIOSetting -NewPathRecoveryInterval 20 -CustomPathRecovery Enabled -NewPDORemovePeriod 30 -NewDiskTimeout 60 -NewPathVerificationState Enabled
The following MPIO balancing policies are available:
i. FOO — Fail Over Only
ii. RR — Round Robin
iii. LQD — Least Queue Depth
iv. LB — Least Blocks
To change a balancing policy:
Set-MSDSMGlobalLoadBalancePolicy -Policy RR
We can also select the balancing policy in the MPIO tab of the connected LUN properties.
In this example, the Round Robin policy is selected for the array.
To view the full list of PowerShell commands available in the MPIO module, run this command:
Get-Command –Module Mpio
SAN (Disk) Policy on Windows Server
Windows has a special disk policy (SAN Policy) that determines whether disks must be mounted automatically when they are connected to a host.
We can get the current SAN Policy setting using diskpart.
By default, Offline Shared policy for SAN is used:
diskpart
DISKPART>>san<
Due to this SAN policy, external storage LUNs may be disabled after a restart.
To mount the drives automatically, change the SAN Policy value to OnlineAll.
DISKPART> san policy=OnlineAll
Possible SAN Policy values:
1. OfflineAll : All disks are offline by default
2. OfflineInternal : All disks on internal buses are offline
3. OfflineShared : All disks connected via iSCSI, FC, or SAS are offline
4. OnlineAll : All disks get online automatically (recommended)
[Need urgent assistance to enable MPIO on windows server? – We’re available 24*7. ]
I’ve already written about guest cluster in my previous blog posts – now I’d like to create a new guest cluster using Windows Server 2016 as a host OS and a multipath Windows Server 2016 – based iSCSI target. In this article I’ll walk all the steps required to create a two-way iSCSI connection to the iSCSI target. Here’s the schematic of my test network:

Network settings:
Host3 – iSCSI Target, WIndows Server 2016 Standard edition (of course in the productional networks iSCSI targets should not be connected to any switches except the dedicated iscsi switches – in this test I use HOST3 network connection only for the convenience).

Host1 – iSCSI initiator, WIndows Server 2016 Standard edition.

All network adapters to be used for iSCSI traffic should have only IP addresses and subnet masks set up – all other options/settings should be blank:

I’ve already described the process of creating an iSCSI target in Windows Server 2012R2 so I’ll just recap what should have been done in Windows Server 2016 to create an iSCSI target as the process has not changed since Windows Server 2012R2:
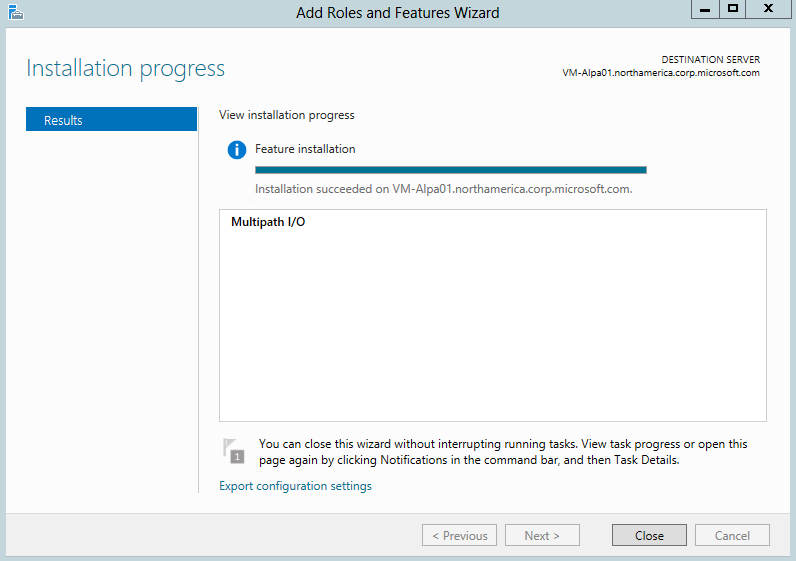
1) On Host3: I start Add Roles and Features Wizard and add iSCSI services to Host3 as depicted below:


Once the installation is complete I can proceed to creating folders that would be the virtual iSCSI disks on Host3. Since I’m going to create a guest cluster with the virtual domain controller and the virtual Exchange Server I will create three folders on different drives: the first one – iSCSI for the cluster forum, the second – iSCSI1 – for the virtual DC and the third one – iSCSI2 – for the virtual Exchange 2016.


Now I create virtual iscsi drives and the new target:


The first VHD and the target are created:

In the same manner I add the other two VHDs to the same target:

2) On Host1: I start Add Roles and Features Wizard and add MPIO to Host1


Let’s run MPIO:

As you can see, by default MPIO does not have iSCSI support:

…so I will add it:

and restart the server:
Now iSCSI support is enabled:
3) Connect to the target:

As Host1 is connected to the target (Host3) via the two independent paths I should connect to the target twice and configure two pairs of target/initiator addresses – for this I click Advanced… button:


– now I press OK twice and return to the iSCSI Initiator’s Target window

Once again, I click Connect and enter the second pair of addresses:


…press OK twice.
On the Volumes and Devices tab we can see the three iSCSI VHDs:

Please note that the third volume still doesn’t use MPIO (there’s no mpio prefix after \) so I press Auto Configure and all three volumes “become multipathed”:

4) To make sure MPIO is working I press Devices… and then MPIO


As you can see there two active connections to the target because by default MPIO uses Round Robin load balance policy – it allows to use both paths simultaniously for load distribution.
We can click on each path and see its properties by pressing Details

Once the multipath connection to the target is established, I can proceed to formatting the newly-created disks (in fact iSCSI VHDs) in the Disk Management:


In the same manner I bring online and format the other two iSCSI disks:

Now let’s see the default MPIO configuration (please run PowerShell as Administrator):
Get-Command -Module MPIO

Please note that the DefaultTimeoutValue is set to 60 seconds – it means that if one of the paths fails MPIO will wait 60 seconds before failing over the current IO operations (which were carried out “along” that failed path) to the second path. I think this is too long so I’ll change this value to 20 seconds:
Set-MPIOSetting -NewDiskTimeout 20


Once the server is restarted I can test the multipath connection by copying the file to iSCSI volume and unplugging one of the path-cords from the server: after the disk timeout period (20 sec.) the copy operation should be resumed.


Note: you may find the picture above (with the copying bar) not too much descriptive – this is due to the speed scale WinServer 2016 chooses (for the unknown reason!) for the bar: the actual copying speed <=250 MBps (using 2 x 1Gbps network adapters), that’s why the speed green “bar” is so “weak”.
Summary:
MPIO in Windows Server 2016 does provide both network speed aggregation and network attached storage fault tolerance.
Windows Server 2016 – MPIO and SAS conectivity with Dell EMC SC Storage Series
This article is focused how to set up MPIO in Windows Server 2016 and DELL EMC SC (Compellent) Storage Series.
Install the MPIO feature
Run Powershell with Administrator privileges and run:
Enable-WindowsOptionalFeature –Online –FeatureName MultiPathIO
and reboot the server.
Configuration with Dell Storage Manager Client
Download latest DELL Storage Manager Client from Dell support website (latest version 2016 R3.11 – 07.02.2017)

and install it on your Windows Server 2016
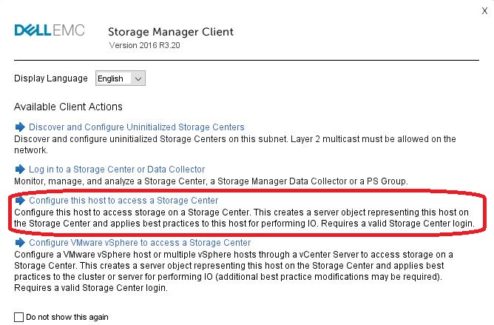
run DSM Client and choose third option „Configure this host to access a Storage Center“

and log in to your Storage Center.

click > Next

Verify localhost information and click to > Next

„The preferred method to create a new server object on SC Series storage is to use the host configuration
wizard on the launch screen of the Dell Storage Manager client. One of the main benefits of this method of
server creation is the wizard will automatically adjust the host server MPIO time-out settings in the Windows registry to match the current best practices “
reboot is required

After installing the MPIO feature and rebooting, if configuring MPIO for iSCSI or SAS, launch the MPIO configuration utility and under the Discover Multi-Paths tab, select Add Support for iSCSI devices or SAS devices as appropriate and click Add.
Configure MPIO
The best practices for using SC storage with SAS connectivity and Windows Server 2016 is use Round Robin with Subset.
The default load balancing policy is set to none, you can verify it with command:

Get-MSDSMGlobalDefaultLoadBalancePolicy
To change the default load balancing policy to RRWS use PowerShell command:
Set-MSDSMGlobalDefaultLoadBalancePolicy –Policy "RR"
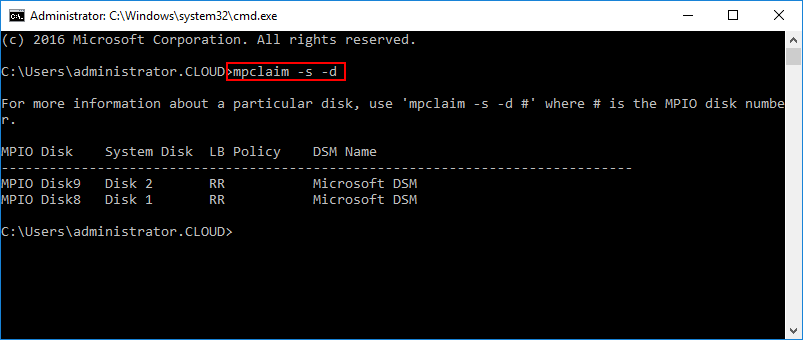
To verify, that your disks use RRWS use command:

mpclaim -s -d
What is RRWS ?
The round robin with subset I/O load balance policy routes I/O requests, in rotation, to each available data path to the RAID controller module that owns the virtual disks. This policy treats all paths to the RAID controller module that owns the virtual disk equally for I/O activity. Paths to the secondary RAID controller module are ignored until ownership changes. The basic assumption for the round-robin policy is that the data paths are equal. With mixed host support, the data paths might have different bandwidths or different data transfer speeds.
(Visited 6 702 times, 1 visits today)
This tutorial describes the steps you should follow to install and use the Multipath I/O (MPIO) feature on a host running Windows Server 2016 and connected to a SAN Storage by using iSCSI technology.
Multipath I/O (MPIO) feature in Windows Server to help build highly available, fault-tolerant iSCSI network configurations. MPIO uses redundant physical path components such as adapters, cables, and switches to create logical paths between the server and the storage device. If there is a component failure, causing a logical path to fail, multipathing logic uses an alternate path for I/O so that applications can still access their data.
Steps for MPIO Installation and Configuration
When you’re setting up MPIO in Windows Server 2012 or 2016, it requires a few steps.
- Adding the MPIO Windows Feature
- Reboot
- Configuring the Add support for iSCSI devices for your particular SAN device
- Reboot
- Configure iSCSI connections with Enable multi-path
- Add all the connections for each target, enabling multi-path
- Check multi-path MPIO connections
Each of the preceding steps is discussed below in detail.
To install MPIO feature, Open Server Manager on your Windows Server host. click Start > Server Manager.
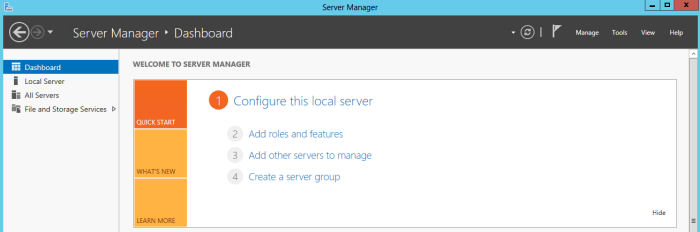
Click Server Manager > Dashboard > Add roles and features. This starts the Add Roles and Features wizard.

On the Select installation type page, accept the default setting of Role-based or feature-based installation. Click Next.
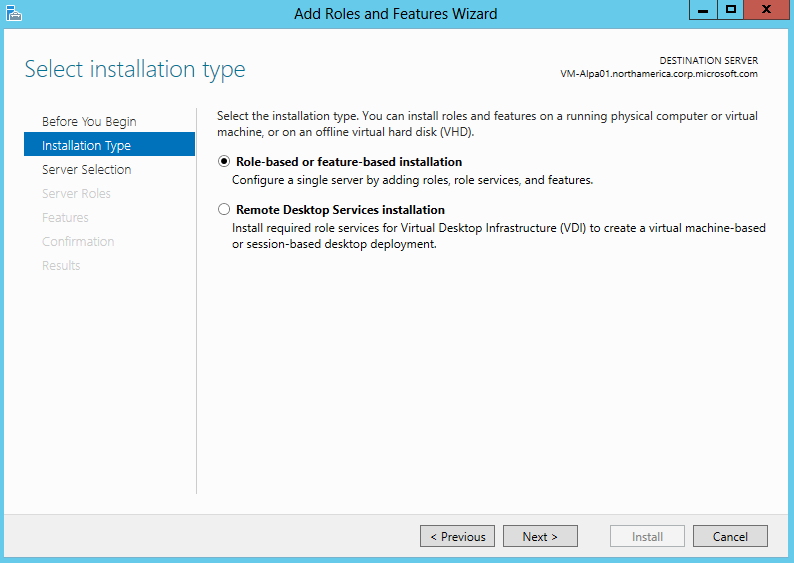
On the Select destination server page, choose Select a server from the server pool. Your host server should be discovered automatically. Click Next.
On the Select server roles page, click Next.
On the Select features page, select Multipath I/O, and click Next.
On the Confirm installation selections page, confirm the selection, and then select Restart the destination server automatically if required, as shown below. Click Install.
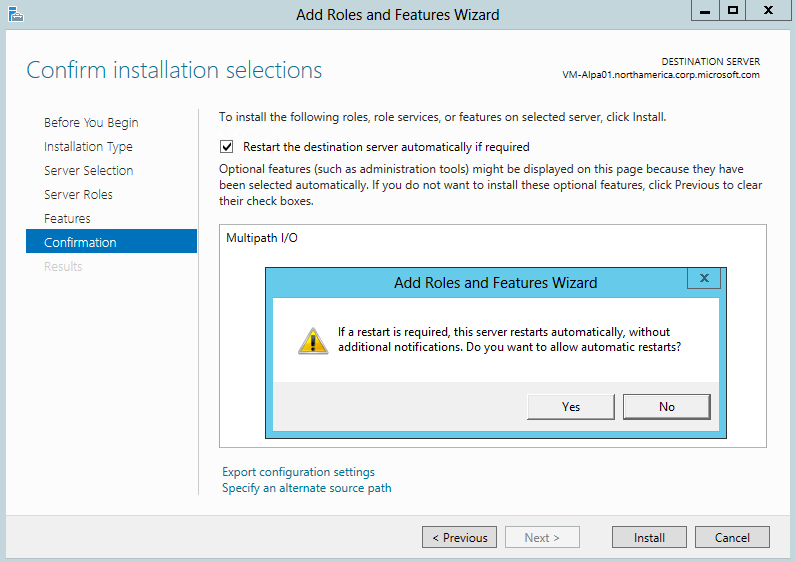
You are notified when the installation is complete. Click Close to close the wizard.
OR simply you can install MPIO role from Windows PowerShell as well.
# get-service -name MSiSCSI | start-service Set-Service -Name msiscsi -StartupType Automatic
# Install-WindowsFeature -name Multipath-IO
Note:
The first command will start the iSCSI service, and changes the start up setting to automatic. The second command will install the windows feature for MPIO.
Once MPIO is installed and the server has been rebooted, you can now configure MPIO for iSCSI connections.
- Launch the MPIO utility by typing mpiocpl at a run menu. This will launch the MPIO Properties configuration dialog.
- Under the Discover Multi-Paths tab, check the Add support for iSCSI devices check box.
- Click OK and Afterwards, click the Add button. You will be prompted for a reboot.
Adding iSCSI Connections with MPIO
Open the iSCSI Initiator Properties window on the Windows Server host. Click Server Manager > Dashboard > Tools > iSCSI Initiator.
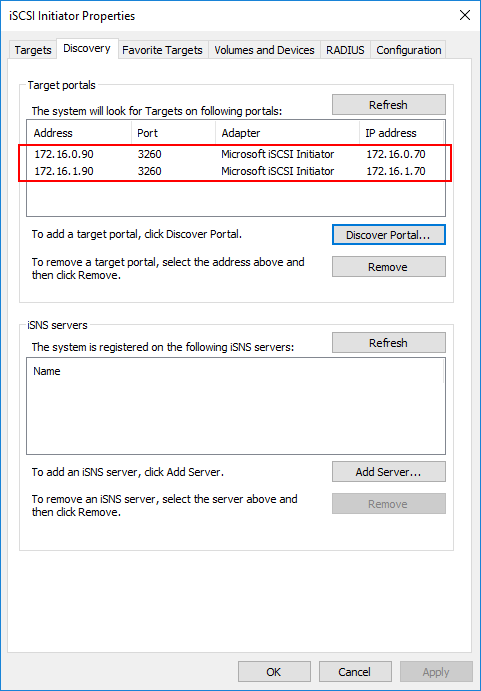
In the iSCSI Initiator Properties dialog box, click the Discovery tab, and then click Discover Target Portal.

Next, Enter your first iSCSI IP address, then click the Advanced button.
Under the Advanced Settings, you can set a specific Local adapter and Initiator IP.
Do this for your multiple target portals. As you can see below, I have different target portal IPs that have been added using the specific network adapter that aligns with the target portal network address/subnet.
After adding the portals, click on the Targets tab. You will see the Discovered targets and they will most likely be in the Inactive status. Click the Connect button.
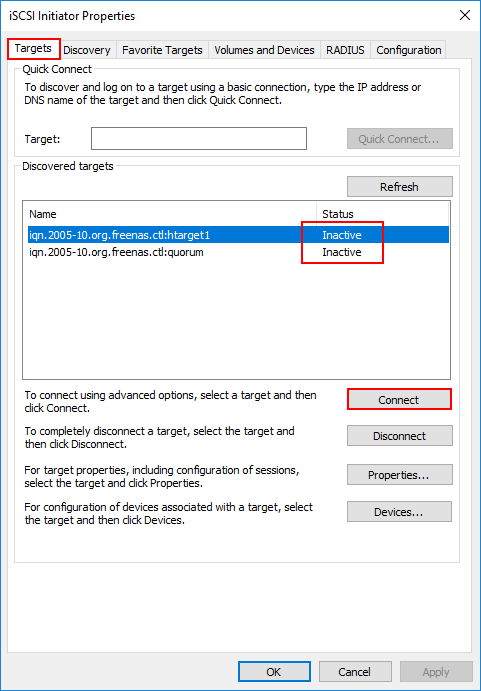
On the Connect to Target dialog box, click the Enable multi-path checkbox and then click the Advanced button.
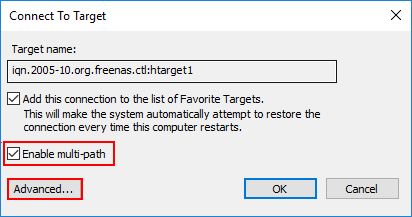
Here is where the actual magic of the MPIO connections comes into play. Below, I am setting the Local adapter, then the Initiator IP and Target portal IP. So our end goal here is to setup the connections using each portal adapter IP.
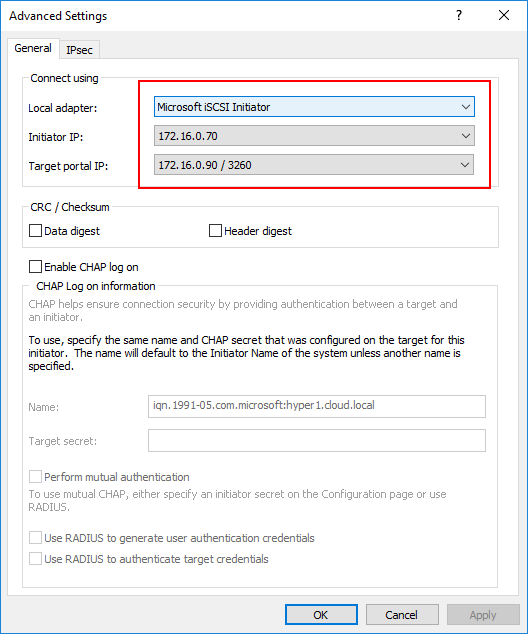
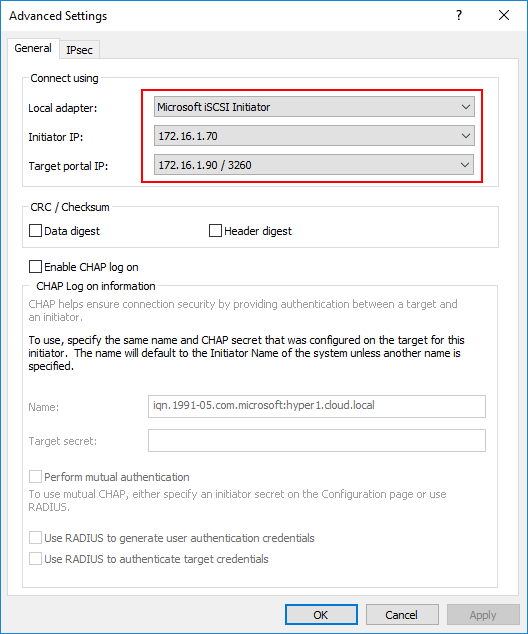
Click the Connect button again on the same discovered target. Now, I use the second Initiator IPand Target portal IP for the second connection to the same target.
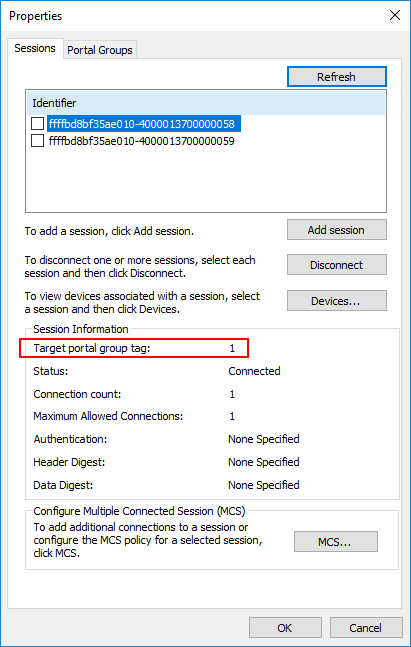
Now we see the Connected status. Click the Properties button so you can verify the MPIO status.

Notice you have two identifiers. Click each one and you will see the respective Target portal group tag.
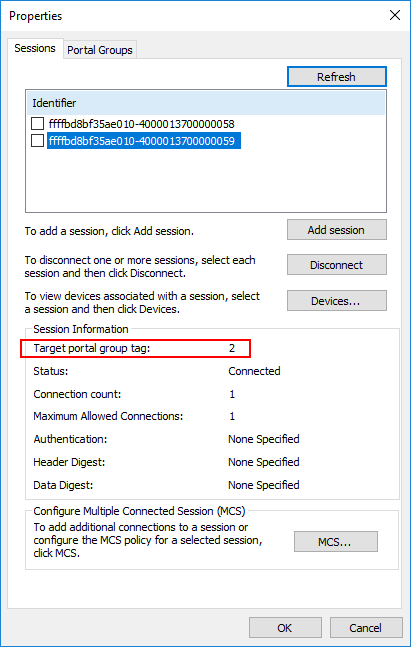
Clicking on the second Identifier and notice the Target portal group tag is the second group tag.
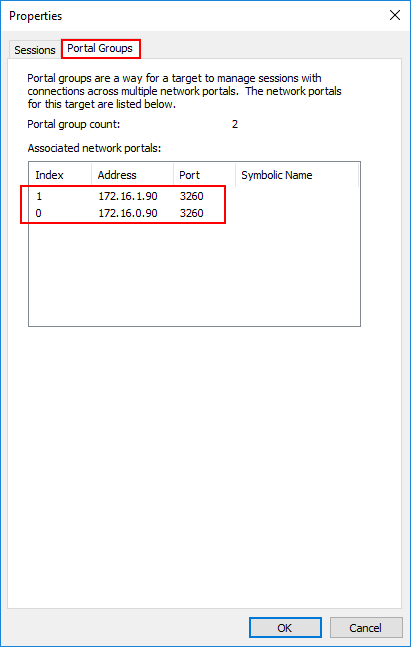
Click the Portal Groups tab and you should see both Associated network portals.
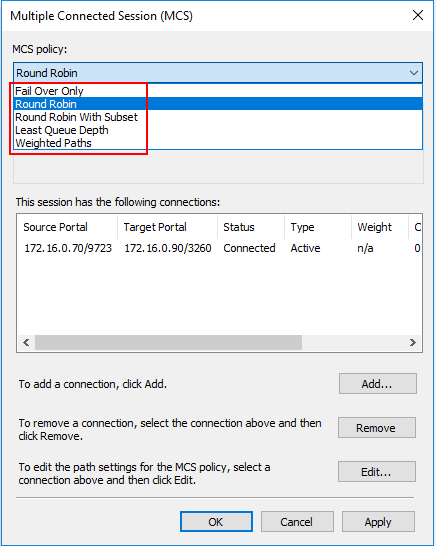
For each Identifier, you can Configurer Multiple Connected Session settings by clicking the MCS button.
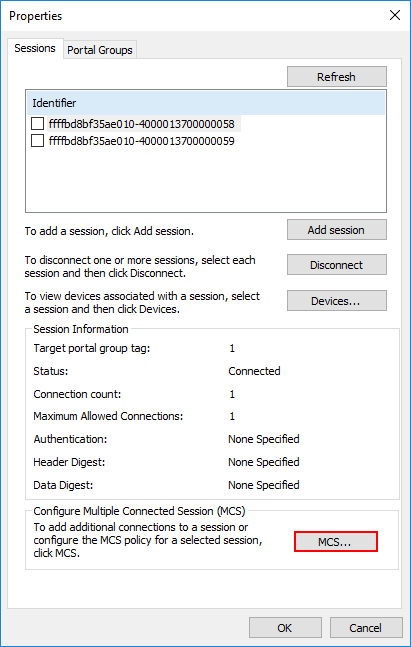
Note the MCS policy options that control the multi-pathing behavior. Options are:
- Fail Over Only
- Round Robin
- Round Robin With Subset
- Least Queue Depth
- Weighted Paths
iSCSI MPIO Multi-path connections verification
Open command prompt and verify the connection status by using MPIO builtin utility mpclaim. Below, you can see your MPIO enabled devices with the command:
- mpclaim -s -d
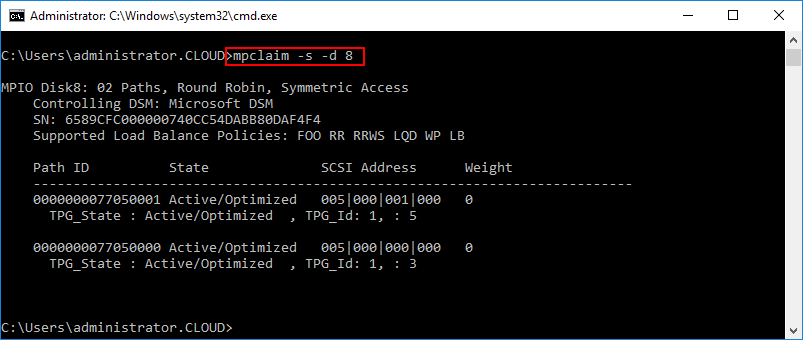
To look at the multipath information for a specific device use:
- mpclaim -s -d <device ID>
You can see below, I have two active paths to the specific device ID queried. State is Active/Optimized.
Conclusion
Configuring MPIO from Windows Server is a necessary configuration step that allows Windows to take advantage of multiple paths to iSCSI storage. By designing an iSCSI storage solution correctly and keeping in mind various technologies that allow iSCSI to be both performant and resilient, Hyper-V administrators can achieve high availability without sacrificing performance.
Please follow and like me: