
Привет, друзья. Последовательно разбираем на сайте тему новой операционной системы Windows 11, которую Microsoft презентовала недавно, и ниже будем говорить о том, как установить Windows 11 без TPM 2.0, Secure Boot и UEFI. Microsoft поставила перед собой амбициозную цель поднять уровень безопасности новой Windows на новый уровень и сделать её стабильной, поэтому официально система будет доступна только для новых компьютеров, и это по большей части таковые не ранее 2017 года выпуска. Дабы соответствовать Windows 11 ПК, ноутбуки, моноблоки и прочие устройства должны иметь на борту, в частности, совместимый процессор, активный режим BIOS UEFI, включённый протокол безопасной загрузки Secure Boot и активный модуль безопасности TPM версии не ниже 2.0. Если у вас из всего этого только неподдерживаемый процессор, вы можете установить Windows 11 неофициально. А если ваш компьютер не отвечает хотя бы одному из требований в плане TPM 2.0, Secure Boot или UEFI, Windows 11 нужно устанавливать неофициально, да ещё и специальным образом. Давайте рассмотрим, как это делается.

Итак, друзья, новая Windows 11 – красивая словно роза.
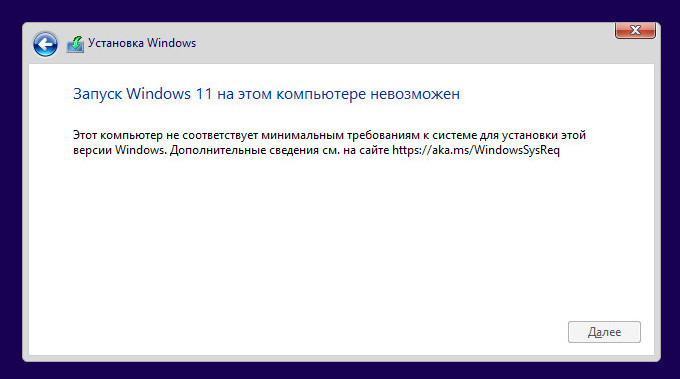
Но и как роза новая система с шипами: доступна не всем, лишь тем, кто соответствует ей, а соответствовать ей непросто. Подробно о системных требованиях Windows 11, установленных Microsoft, читайте в статье «Запуск Windows 11 на этом компьютере невозможен». В этой статье вы найдёте подробный перечень всех требований и их детальное рассмотрение, а также сможете проверить свой компьютер на совместимость с 11-й Windows. Здесь лишь отметим те требования, при несоответствии которых мы не сможем установить Windows 11 с использованием её родного установочного процесса:
- Активный режим BIOS UEFI,
- Включённый Secure Boot,
- Активный модуль безопасности TPM 2.0 (аппаратный или эмулируемый процессором).
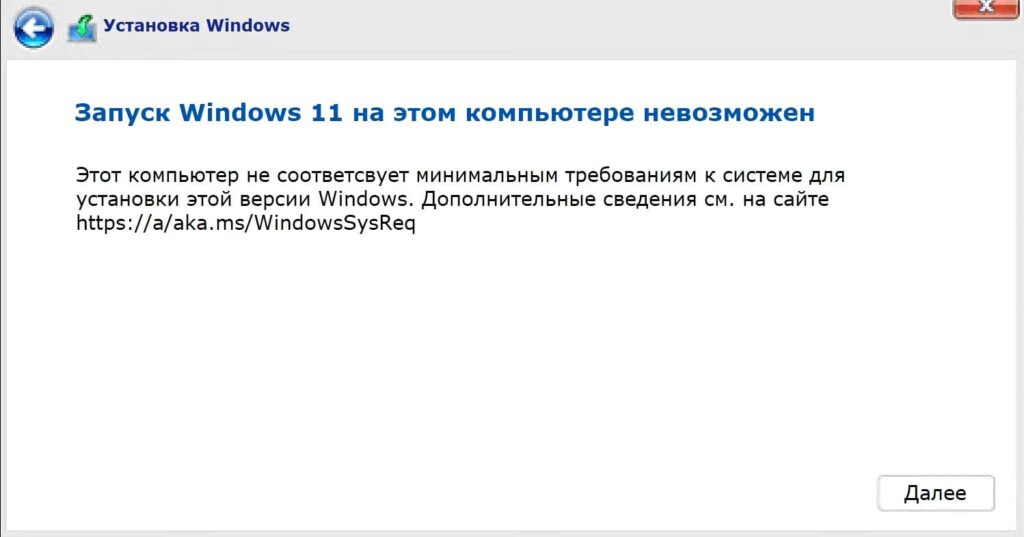
Если хоть чего-то из этого не будет, в процессе установки Windows 11 получим ошибку «Запуск Windows 11 на этом компьютере невозможен».
Установочный процесс Windows 11 проверяет компьютер на соответствие этим трём требованиям и не даёт установить операционную систему, если чего-то нет. Реально же ни TPM 2.0, ни Secure Boot, ни даже UEFI не является для Windows 11 чем-то принципиально необходимым. Внутри Windows 11 – это обычная современная Windows NT, и она может быть и EFI-системой на компьютерах с включённым UEFI, и обычной Legacy-системой на компьютерах с активным в BIOS CSM или со старым BIOS Legacy. Если ваш компьютер не соответствует требованиям Windows 11, нужно устанавливать её неофициально специальными способами. Друзья, неофициальная установка Windows 11 – не значит незаконная, как это неверно истолковывают на некоторых ресурсах умы, далёкие от азов авторского права. Позиция Microsoft такова, что она не запрещает установку Windows 11 на несовместимые компьютеры, лишь не рекомендует. Запрещать и не рекомендовать – разные вещи. И если вы взрослый опытный пользователь, наверняка вы сами разберётесь, чьим рекомендациям в жизни следовать, а чьим – нет.
Способов неофициальной установки множество, выбирайте удобный для вас.
Самый простой способ, как установить Windows 11 на неподдерживаемые компьютеры — создать установочную флешку с помощью утилиты Rufus методом расширенной инсталляции. В этом случае вообще не нужно напрягаться.
Если, например, нужно установить Windows 11 на виртуальную машину в программах VirtualBox и VMware Workstation Player, которые не поддерживают эмуляцию TPM 2.0, просто отредактируйте установочный образ ISO, дабы избавить его от проверки на предмет совместимости компьютера. Детали в статье «Как создать ISO-образ Windows 11 для установки на компьютеры без UEFI, Secure Boot и TPM 2.0».
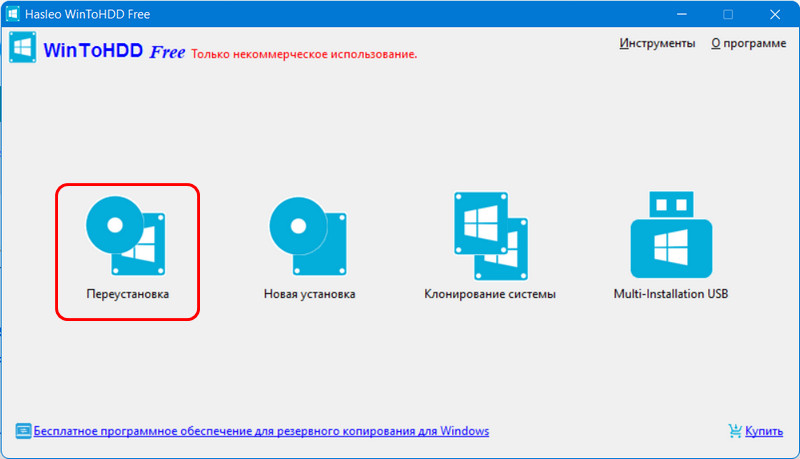
WinToHDD – условно-бесплатная программа для альтернативной установки Windows, бесплатная в части использования пользовательских редакций Windows, скачать можно на её сайте. С её помощью можно переустановить Windows без установочного носителя, т.е. установить новую Windows любой версии из среды текущей Windows. Программа в процессе своей работы сама создаёт WinPE на жёстком диске для выполнения задач по перезаписи файлов на системном разделе устанавливаемой операционной системы. В окне WinToHDD жмём «Переустановка».
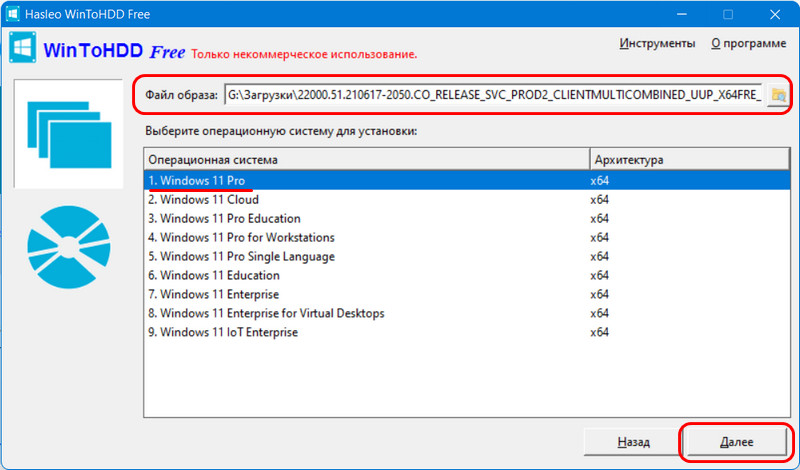
Указываем установочный ISO Windows 11
Запускаем установку.По завершении копирования файлов новой Windows перезагружаем компьютер. Друзья, детально о возможностях программы WinToHDD и переустановке с её помощью Windows можете почитать здесь.
В качестве WinPE для неофициальной установки Windows 11 прекрасно подойдёт WinPE 10-8 Sergei Strelec. Он функциональный и предусматривает много альтернативных способов установки любых версий Windows. Нам нужно:
- Шаг 1 – скачать образ WinPE 10-8 Sergei Strelec на его сайте;
- Шаг 2 – записать образ на флешку;
- Шаг 3 – скачать установочный ISO Windows 11. Его можно оставить на диске компьютера, только на пользовательском разделе, не на том, куда вы будете устанавливать Windows 11. Если вы будете устанавливать Windows 11 на другом компьютере, то просто поместите установочный ISO системы на флешку с записанным WinPE 10-8 Sergei Strelec.
Примечание: друзья, дабы переустановить любую Windows с помощью WinPE 10-8 Sergei Strelec на текущем компьютере, вам флешка, в принципе, не нужна. Вы можете WinPE 10-8 Sergei Strelec запустить с жёсткого диска или добавить его в мультизагрузочное меню Windows.
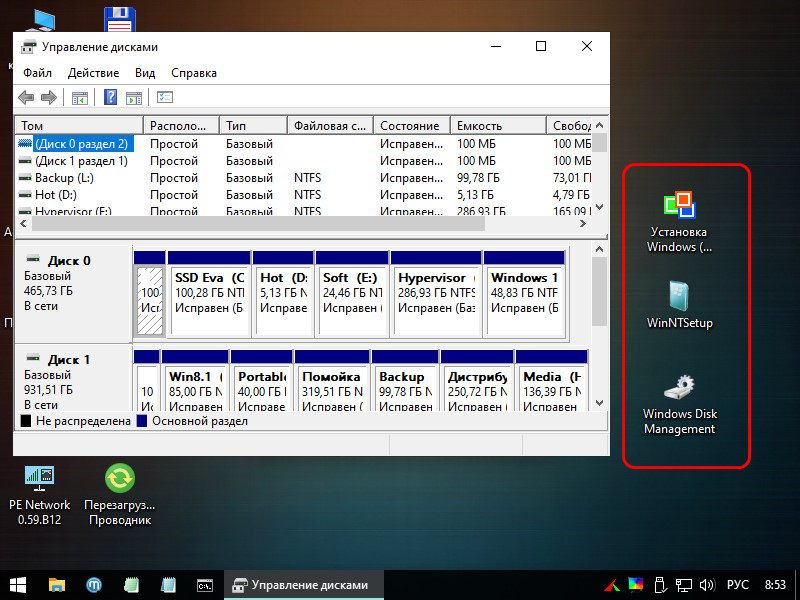
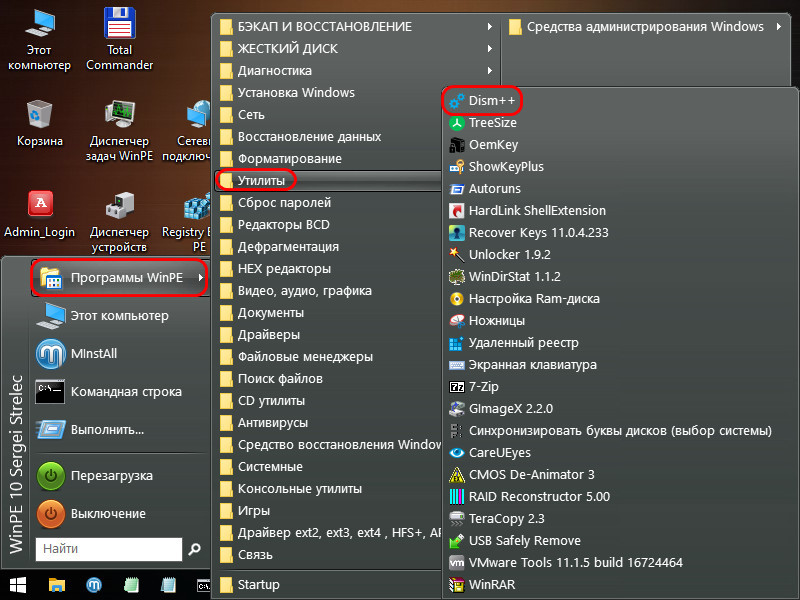
Далее загружаемся в среду WinPE, здесь прямо на рабочем столе будут находиться инструменты, необходимые нам для установки Windows – утилиты 78Setup и WinNTSetup. И, возможно, кому-то понадобится системное управление дисками, например, для определения букв разделов, либо для подготовки разделов под операционную систему.
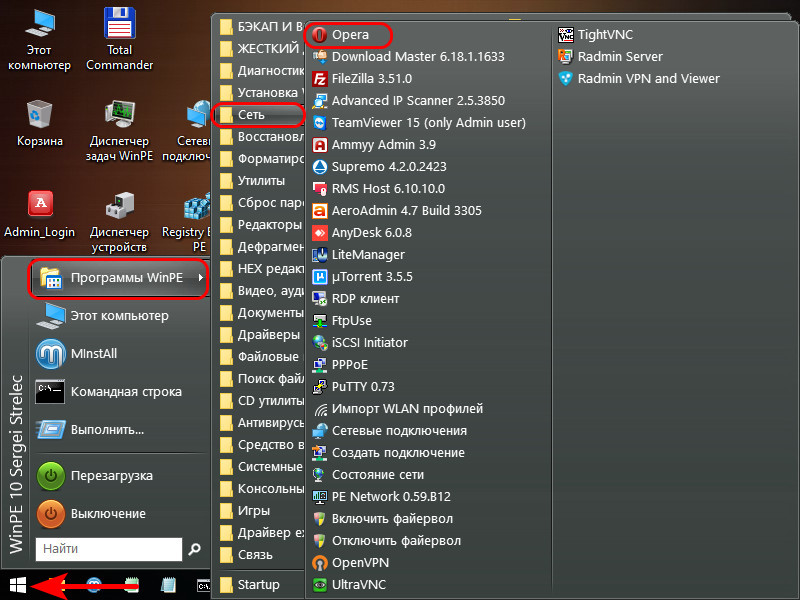
И ещё, друзья, обратите внимание, что в случае чего дистрибутив Windows 11 вы сможете скачать в самой среде WinPE 10-8 Sergei Strelec, здесь есть браузер для доступа к Интернету.
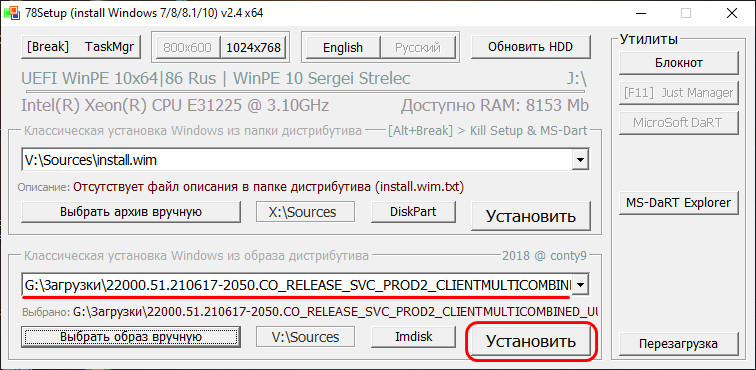
Самый простой способ, как установить Windows 11 без TPM 2.0, Secure Boot и UEFI – использовать на WinPE 10-8 Sergei Strelec утилиту 78Setup («Установка Windows»). В её окошке указываем внизу путь к установочному ISO-образу Windows 11. Жмём «Установить».
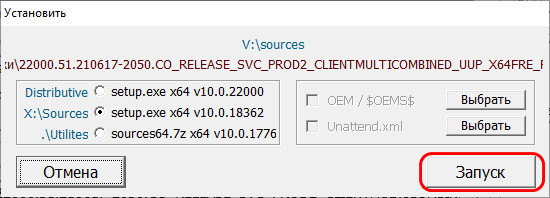
Жмём «Запуск».
И видим перед собой кастомный процесс установки Windows, от родного Windows он отличается лишь иным оформлением. Выбираем язык.
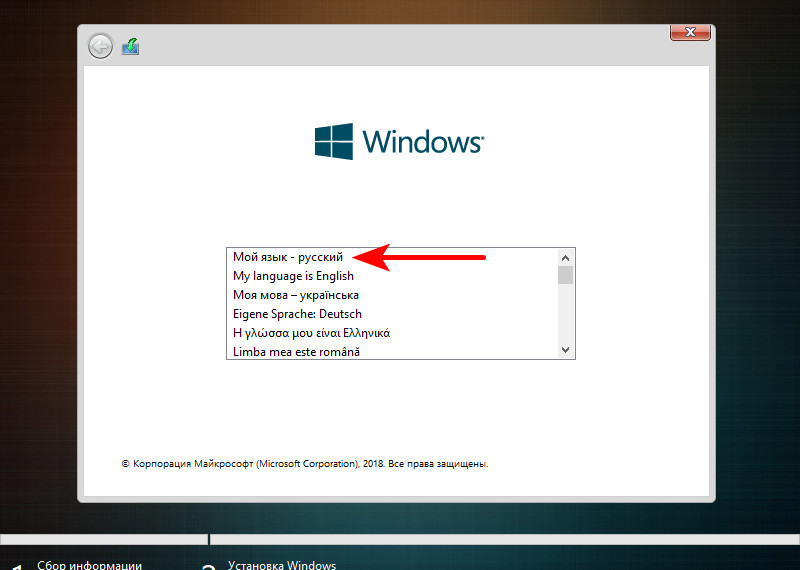
Жмём «Далее».

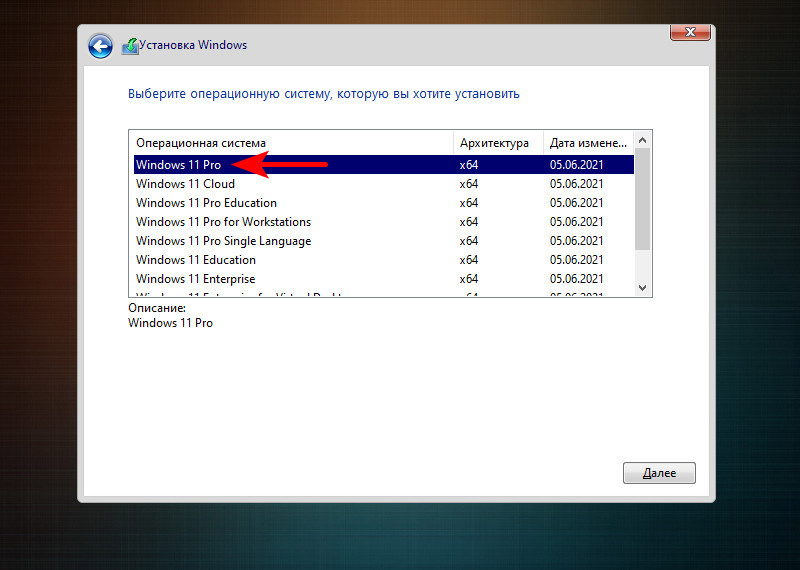
Выбираем редакцию.
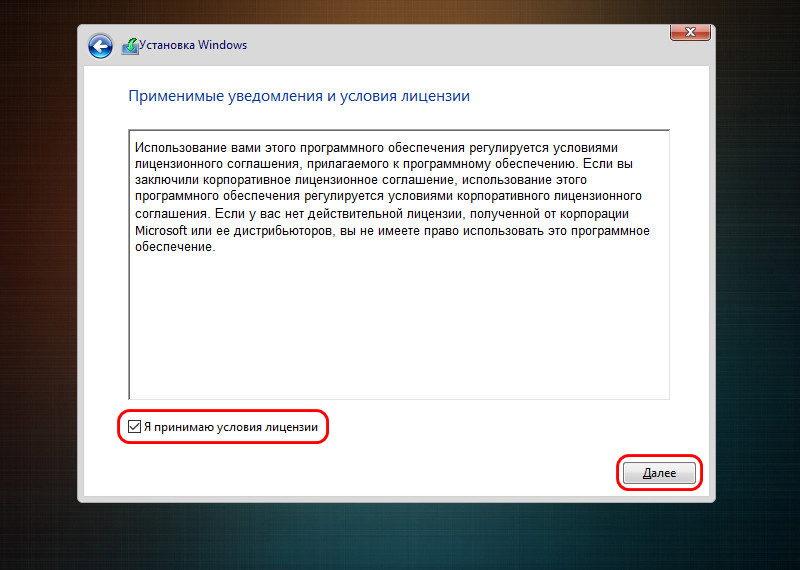
Принимаем лицензионные условия.
Тип установки кликаем «Выборочная».
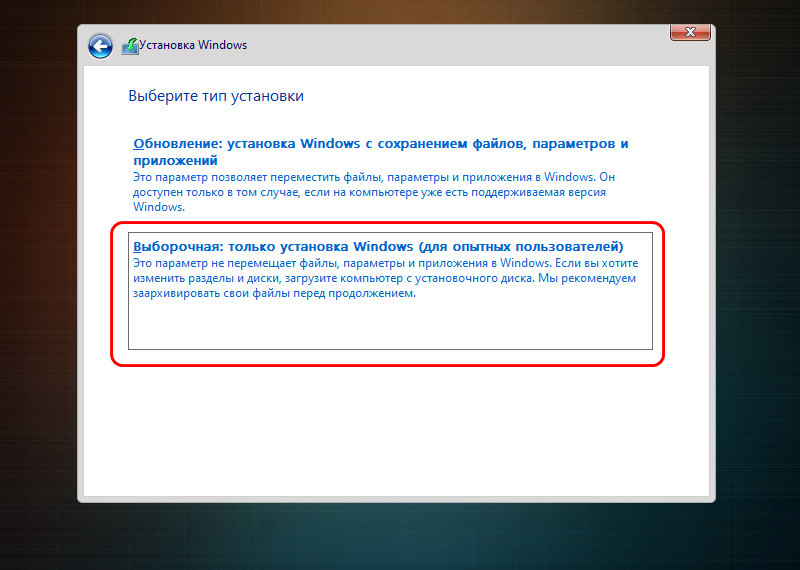
Далее, как в обычном процессе установки любой Windows, указываем место установки. И, собственно, устанавливаем операционную систему. Потом перезагружаем компьютер, загружаемся с жёсткого диска и проходим первичную настройку операционной системы.
Другой способ, как установить Windows 11 без TPM 2.0, Secure Boot и UEFI в среде WinPE 10-8 Sergei Strelec – утилита WinNTSetup. В её окошке указываем путь к установочному ISO-образу Windows 11.
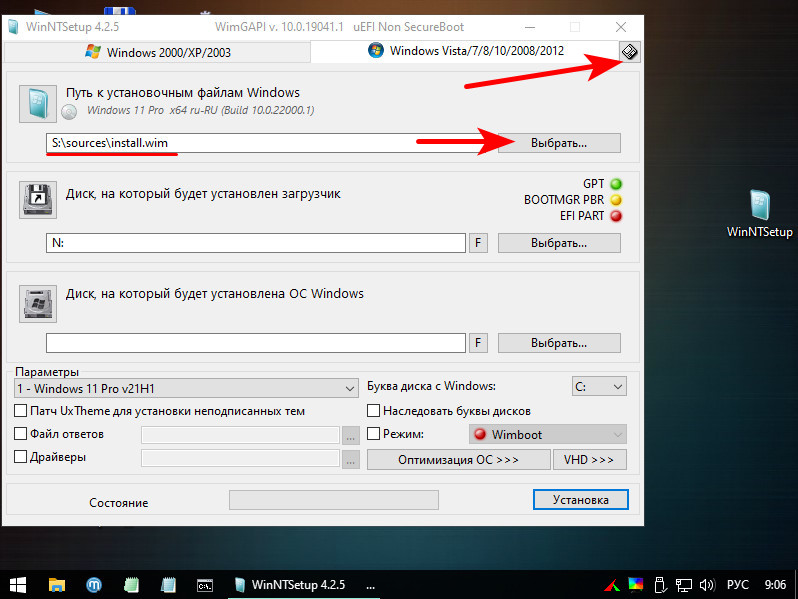
Далее обращаемся к интегрированной в WinNTSetup утилите Bootice, она нам нужна для определения букв разделов загрузочного и системного, куда мы будем ставить Windows 11. Выбираем жёсткий диск, жмём «Parts Manage».
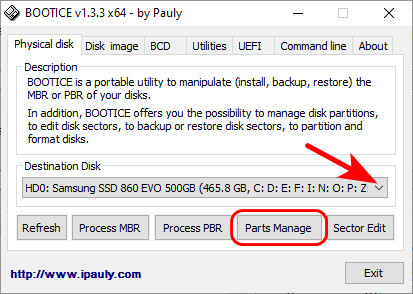
Смотрим буквы нужных нам разделов.

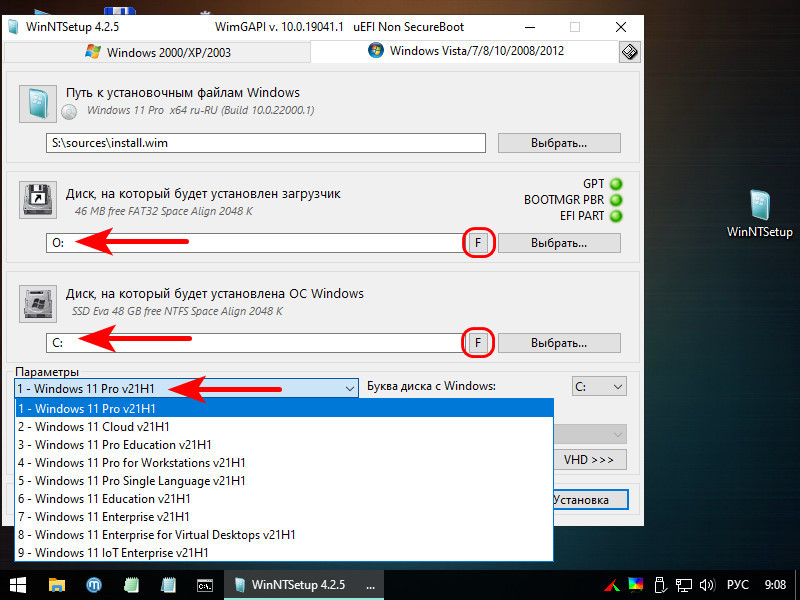
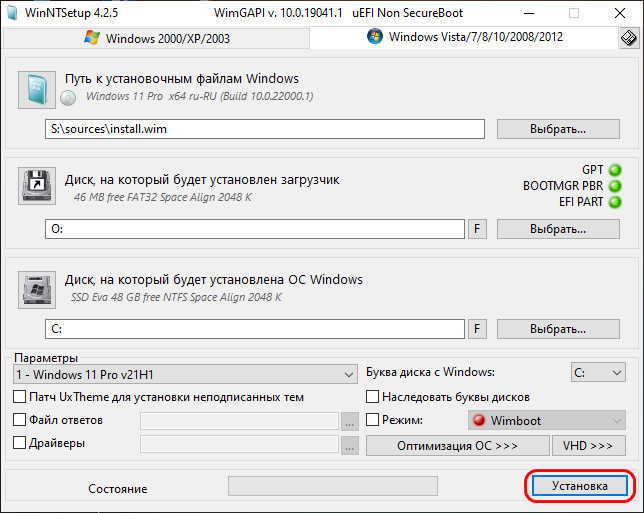
И указываем загрузочный и системный разделы в окне WinNTSetup. Далее как минимум системный раздел, если он не пустой, форматируем (кнопка F в конце строки раздела). Выбираем редакцию Windows 11.
Жмём «Установка».
Далее смотрим, чтобы правильно был указан режим BIOS – UEFI или Legacy. Ставим галочку автоматической перезагрузки по окончании установки. Жмём «Ок».
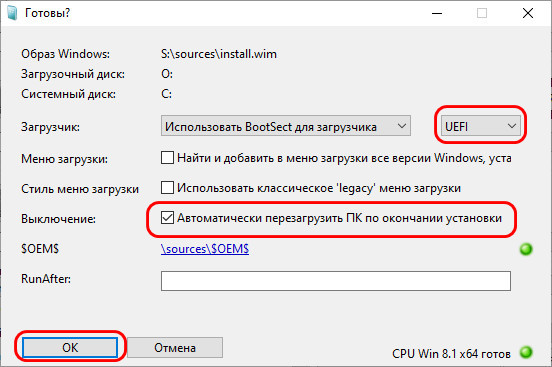
По итогу распаковки системного образа, компьютер перезагрузится. Далее мы загружаемся с жёсткого диска и проходим первичную настройку Windows 11.
И ещё один способ, как установить Windows 11 без TPM 2.0, Secure Boot и UEFI на WinPE 10-8 Sergei Strelec – с помощью утилиты Dism++. Запускаем её.
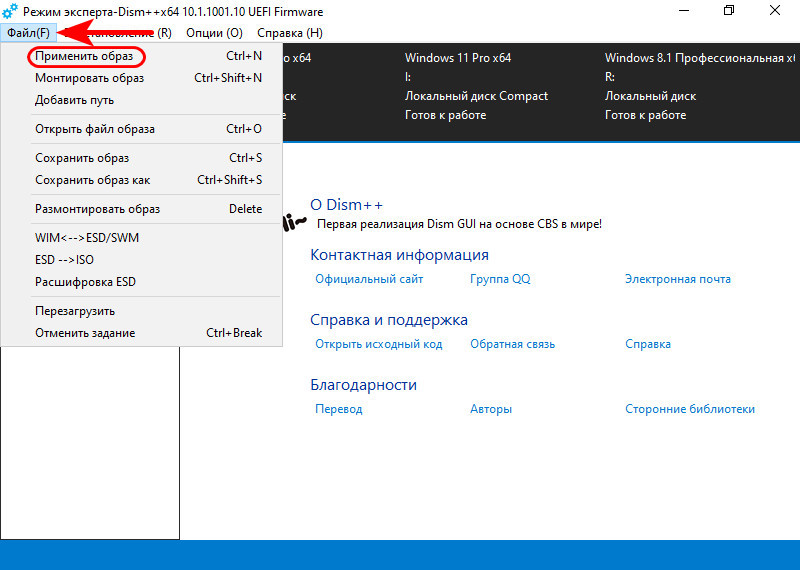
В меню «Файл» жмём «Применить образ».
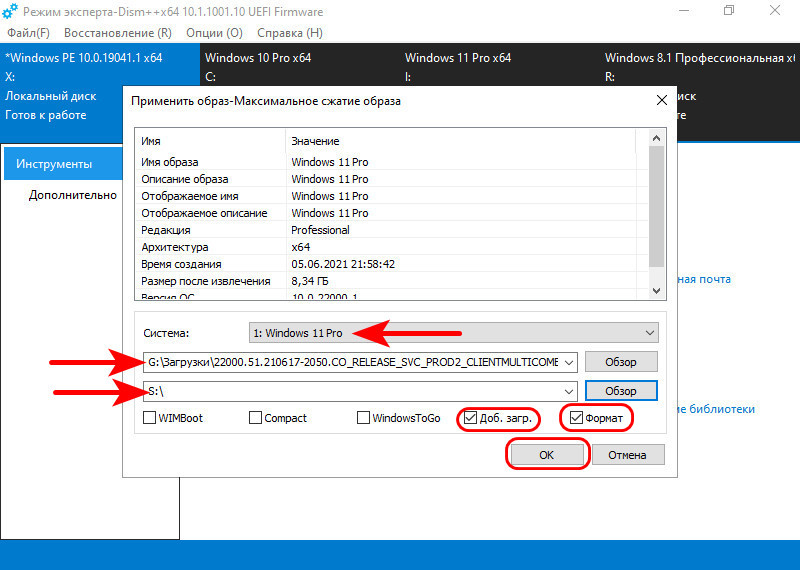
В пустых графах в первой указываем путь к установочному ISO-образу Windows 11, во второй – раздел диска куда хотим установить систему. После выбираем редакцию системы. Ставим галочки «Формат» и «Доб.загр.». Жмём «Ок».
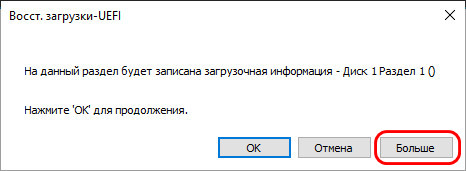
Далее если у вас один жёсткий диск на компьютере, можете просто нажать «Ок». Если жёстких дисков несколько, и на всех них есть загрузчики, нажмите «Больше».
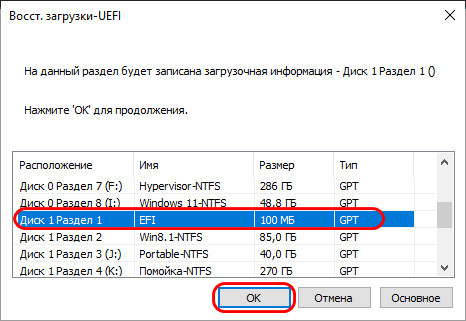
И укажите раздел загрузки на правильном диске.
Дожидаемся извлечения системного образа, прогресс операции на образе Windows 11 должен достигнуть конца.
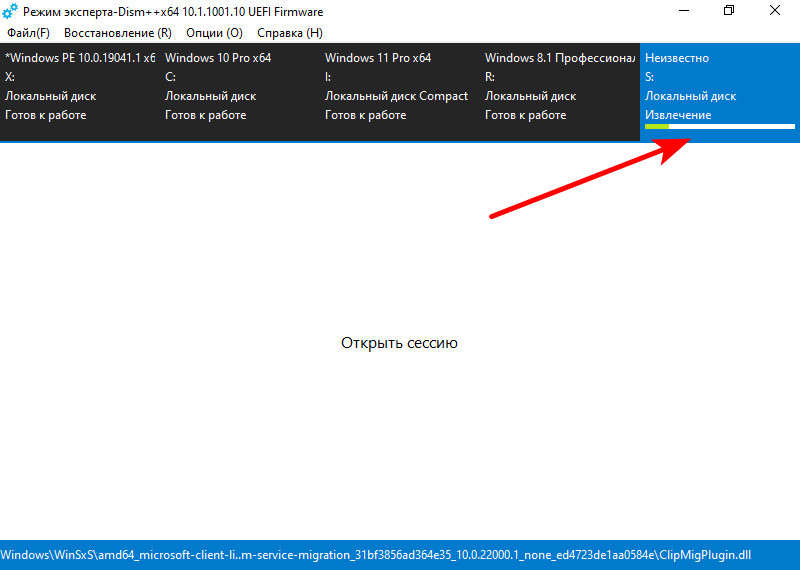
И как только на образе Windows 11 появится статус «Готов к работе», перезагружаем компьютер, загружаемся с жёсткого диска и проходим первичную настройку системы.
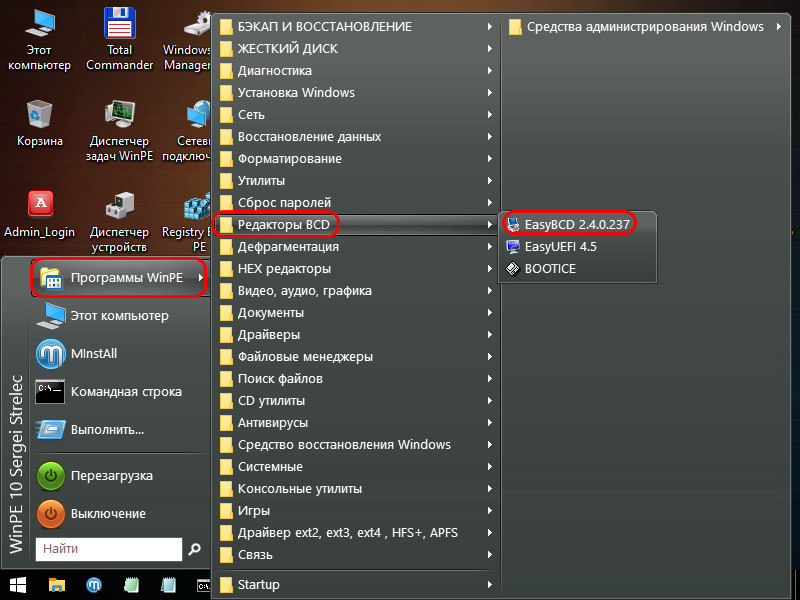
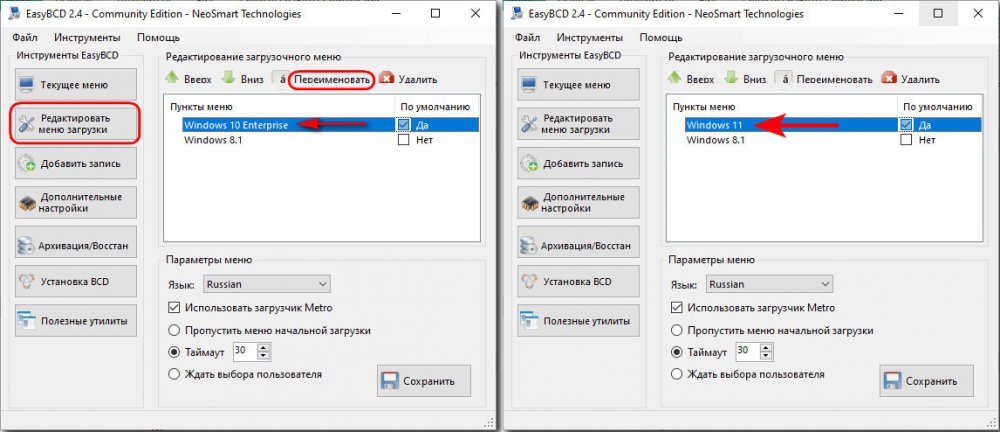
Друзья, если вы будете устанавливать Windows 11 второй системой рядом с основной другой Windows, перед перезагрузкой компьютера для первичной настройки Windows 11 в среде WinPE 10-8 Sergei Strelec зайдите в утилиту EasyBCD.
Новая Windows пока не умеет себя прописывать в меню загрузки как Windows 11. Поэтому переименуйте её как вам удобно.
***
В данный момент Windows 11 доступна только как тестовая система, до неё можно обновиться с инсайдерской Windows 10. Но можно и установить с нуля, скомпилировав установочный образ. Детали смотрим в статье «Как установить Windows 11 Insider Preview».
UEFI, which stands for Unified Extensible Firmware Interface, is a firmware interface that replaces BIOS. Most modern PCs use UEFI firmware to boot up their operating system, and Windows 11 is no exception. However, if you are using an old system that doesn’t support UEFI or if you want to install Windows 11 on a computer that doesn’t have UEFI firmware, you may face some difficulties.
In this blog post, we will discuss how to install Windows 11 on a computer without UEFI firmware. We will go through the steps required to complete this process and provide you with some recommendations and implications to consider.
Video Tutorial:
What’s Needed?
Before we dive into the process of installing Windows 11 on a computer without UEFI, you’ll need to prepare a few things. Here’s a list of what you need:
1. Windows 11 ISO file – You can download the Windows 11 ISO file from the Microsoft website.
2. Rufus application – This is a tool that can help you create a bootable USB drive with the Windows 11 ISO. You can download Rufus from its official website.
3. A USB flash drive – You’ll also need a USB flash drive with at least 8GB of storage capacity.
What Requires Your Focus?
Installing Windows 11 on a computer without UEFI firmware requires your full attention and focus. Here are some things that you need to keep in mind:
1. Make sure your computer supports booting from a USB drive.
2. Check if your computer’s processor supports the 64-bit version of Windows 11.
3. Backup all your important files and data to ensure they are safe before proceeding with the installation process.
Method 1: Using Rufus to Create a Bootable USB Drive
Step 1: Download Rufus
Download Rufus from its official website and install it on your PC.
Step 2: Insert the USB drive
Insert the USB drive that you want to use to install Windows 11. Make sure that there is no important data on it as Rufus will format the drive during the process.
Step 3: Open Rufus
Open Rufus and select the USB drive you have connected.
Step 4: Select the Windows 11 ISO file
Click on the ‘Select’ button next to the ‘Boot selection’ option and browse to where you saved the Windows 11 ISO file.
Step 5: Set Boot Image
Choose ‘MBR’ for the partition scheme and change ‘BIOS or UEFI’ according to boot mode of Windows 11. Then, click ‘Start’ to begin the process.
Step 6: Format USB drive
Once Rufus has finished preparing the USB drive, it will ask you to format the drive. Choose ‘Yes’ to proceed, and Rufus will format the drive in FAT32 file system.
Step 7: Copy Windows 11 ISO files
After formatting, Rufus will copy all the Windows 11 ISO files to the USB drive, which makes the USB drive bootable for UEFI-free computers.
Method 1 Pros:
– Rufus can support multiple file systems such as FAT32, NTFS, ReFS, exFAT, etc.
– Rufus can create a bootable USB drive within minutes.
– Rufus is free to use and available for download on its official website.
Method 1 Cons:
– Rufus can format the USB drive without confirmation, which may cause data loss.
– Rufus may cause compatibility issues with some USB drives.
Method 2: Using Diskpart Command
Step 1: Open Command Prompt
Open the Command Prompt with Administrator privileges by right-clicking the Start menu button.
Step 2: Diskpart Command
Type ‘diskpart’ into the command prompt and hit Enter.
Step 3: Disk List
Type ‘list disk’ to view all the disks connected to your computer.
Step 4: Choose the USB Drive
Identify the USB flash drive that you want to use by its size in the list of disks.
Step 5: Clean Disk
Type the command ‘clean’ to delete all the data on the USB drive.
Step 6: Create the Primary Partition
Type the command ‘create partition primary’.
Step 7: Select the Partition
Type ‘select partition 1’ to select the partition you just created.
Step 8: Format the Partition
Type ‘format fs=fat32 quick’ to format the partition in FAT32 file system.
Step 9: Activate the Partition
Type ‘active’ to activate this partition on the USB drive.
Step 10: Assign a Drive Letter
Type the command ‘assign’ to assign a new drive letter to the USB flash drive.
Step 11: Copy Windows 11 files
Copy all the files from the Windows 11 ISO to the USB flash drive.
Method 2 Pros:
– This method doesn’t require any additional software.
– The Diskpart method is a built-in tool in Windows, which every user has access to.
– The Diskpart method is straightforward and easy to remember.
Method 2 Cons:
– This process can be time-consuming for some users.
– Diskpart does not support multiple partitions, which can be a disadvantage for some users.
Method 3: Use WintoHDD
Step 1: Download WintoHDD
Download WintoHDD from its official website and install the tool on your PC.
Step 2: Select Windows 11 ISO
Launch WintoHDD and select the ‘ISO file’ option and browse to where you saved the Windows 11 ISO file.
Step 3: Select the USB Drive
Select the USB drive that you want to use for installing Windows 11.
Step 4: Choose the Non-UEFI Install Mode
Select the ‘Non-UEFI’ install mode and click ‘Next’.
Step 5. Format USB Drive
Choose the File System, within FAT32, from the drop-down list and format the USB drive.
Step 6: Wait for WintoHDD to Finish
Once everything is done, wait for the WintoHDD process to complete.
Method 3 Pros:
– This method is straightforward and easy to use.
– WintoHDD can automatically format the USB drive and ensure compatibility.
– WintoHDD has a simple interface and is user-friendly.
Method 3 Cons:
– You may need to purchase the Professional version to use some of WintoHDD’s advanced features.
– The free version of WintoHDD allows only five installs per month.
Why Can’t I Install Windows 11 with UEFI?
Installing Windows 11 on a non-UEFI computer requires some additional steps and preparation. Here are some reasons why you may face difficulties installing Windows 11 on a UEFI-free computer:
1. Windows 11 requires a system with UEFI firmware to boot up.
2. Most new computers are designed to support UEFI firmware, and most Windows 11 installations are made for UEFI-based systems.
3. Windows 11 requires newer hardware like graphics cards and processors that may not be available on older computers that do not support UEFI firmware.
Fixes:
1. Use one of the methods above to install Windows 11 without UEFI firmware.
2. Upgrade your computer’s hardware to support UEFI firmware.
3. Buy a new computer that supports UEFI firmware.
Implications and Recommendations
Before proceeding with the installation, be aware of some implications and recommendations:
1. Installing Windows 11 on non-UEFI systems may void your warranty, so proceed with caution.
2. Make sure you have backed up all your important data to avoid losing any important files.
3. Check your computer’s processor and ensure it supports the 64-bit version of Windows 11.
4. Consider upgrading your hardware to support UEFI firmware if you have an older computer.
5. Always create a bootable USB drive to install Windows 11 to ensure a smooth installation process.
FAQs
Q. Is it recommended to install Windows 11 on a non-UEFI computer?
A. This method is not recommended for novice users or those who are not comfortable working with the command prompt.
Q. Can I install Windows 11 from a DVD instead of a USB drive?
A. Yes, you can install Windows 11 from a DVD if your computer has a DVD drive and it supports booting from the DVD.
Q. Will all my applications and files be deleted once I install Windows 11 using these methods?
A. Yes, all the data on your computer will be deleted once you install Windows 11 using these methods, so be sure to back up all your data before you proceed with the installation.
Q. Do I need to have a Windows 11 license to install Windows 11 on a non-UEFI computer?
A. Yes, you will need a valid Windows 11 license key to activate your Windows OS once the installation process is complete.
Q. Can I use the same installation methods to install other versions of Windows on a non-UEFI computer?
A. Yes, these installation methods can be used to install other versions of Windows on a non-UEFI computer.
In Conclusion
Installing Windows 11 on a computer without UEFI firmware requires some additional preparation and steps. You can use one of the methods we outlined above to complete this process. We recommend that you back up all your important data before you proceed and verify your computer’s hardware compatibility to avoid potential issues. By following our recommendations and implications, you should be able to install Windows 11 on a non-UEFI computer without any problems.
При установке Windows 11 многие пользователи сталкиваются с проблемой, когда система отображает сообщение о невозможности установки из-за несоответствия минимальным системным требованиям. В этой статье подробно рассмотрим, как обойти данное ограничение и установить Windows 11 на ваш ПК или ноутбук.
Приобрести оригинальные ключи Windows 11 можно у нас в магазине от 1690 ₽
Скачать официальный дистрибутив Windows 11 можно у нас в каталоге!
Шаг 1: Создание загрузочной флешки с Windows 11
1. Подключите флешку объемом минимум 8 ГБ к компьютеру.
2. Перейдите в наш каталог и скачайте любую из версий Windows 11.
— Windows 11 Pro и Home
— Windows 11 Корпоративная (Enterprise) LTSC
— Windows 11 Корпоративная (Enterprise)
— Windows 11 Для образовательный учреждений (Education)
— Windows 11 Pro Для рабочих станций (For WorkStations)
— Windows 11 IoT Корпоративная (Enterprise)
3. Далее вам нужно записать на флешку дистрибутив Windows 11 который вы скачали, ознакомьтесь как это сделать в нашей другой статье.
Шаг 2: Подготовка файла для обхода проверки совместимости
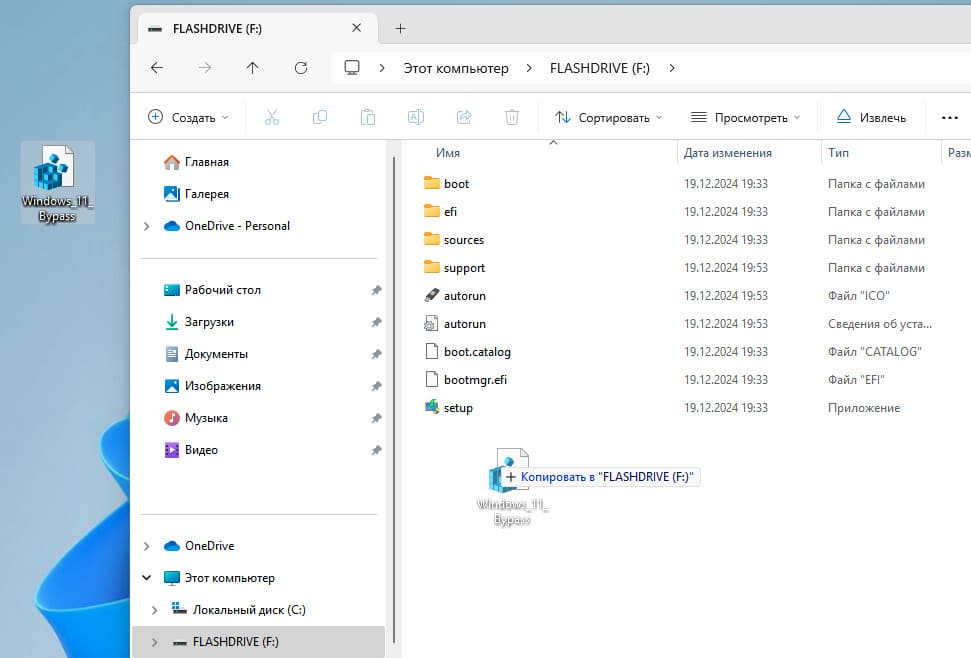
1. На рабочем столе у вас должен быть файл под названием Windows 11 Bypass. Этот файл позволит обойти проверку совместимости при установке. Скачать его можно напрямую с нашего сайта: Windows 11 Bypass.reg
2. Откройте проводник и зайдите в созданную загрузочную флешку.
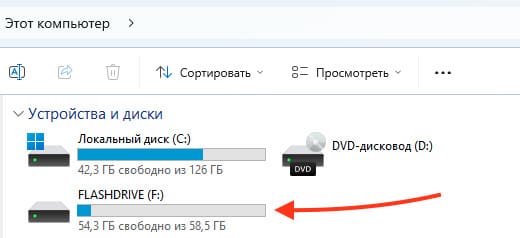
3. Скопируйте файл Windows 11 Bypass в корневую папку флешки.
Шаг 3: Перезагрузка и вход в BIOS
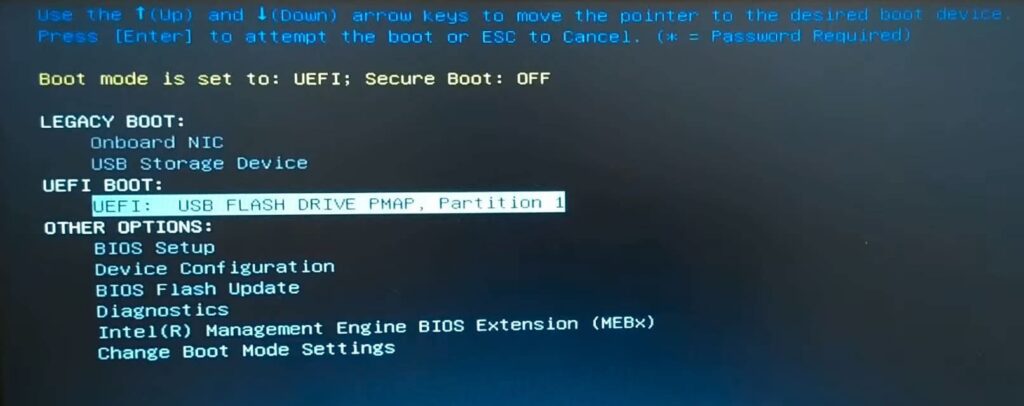
1. Перезагрузите компьютер, не отключая флешку.
2. Во время перезагрузки войдите в BIOS (на ноутбуках Dell это можно сделать, многократно нажимая клавишу F12).
3. В BIOS выберите вашу загрузочную флешку в качестве загрузочного устройства и нажмите Enter.
Если не получается войти в БИОС или выбрать флешку в качестве загрузочного устройства, попробуйте другие варианты описанные в следующей нашей статье.
Шаг 4: Настройка установки Windows 11
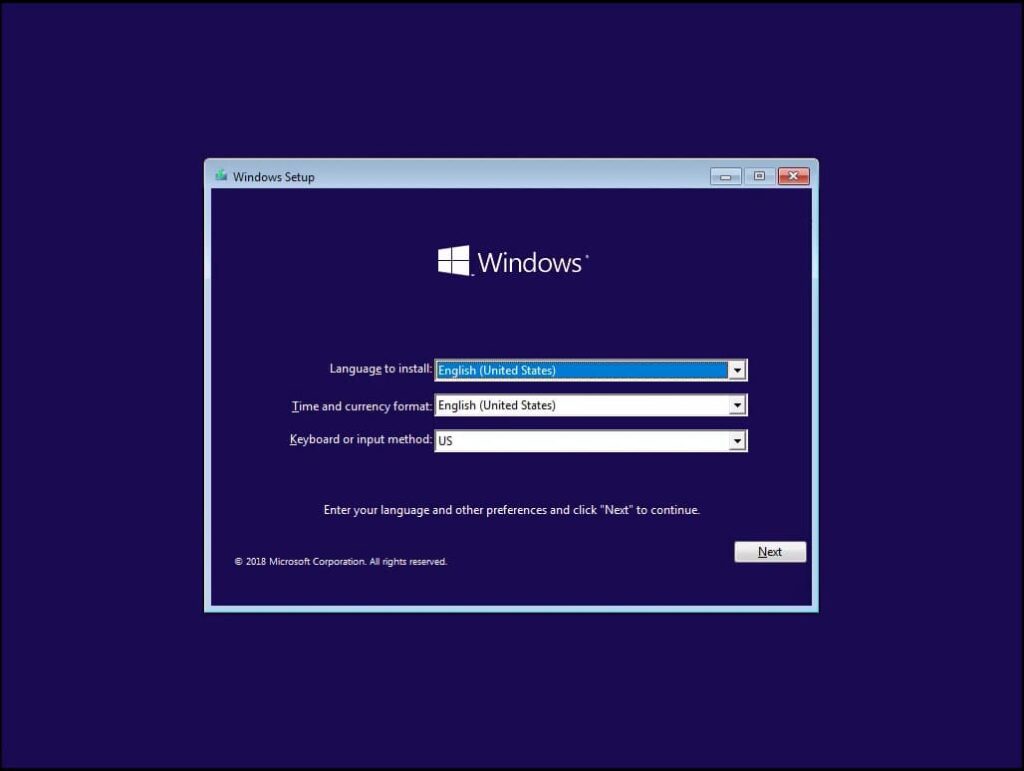
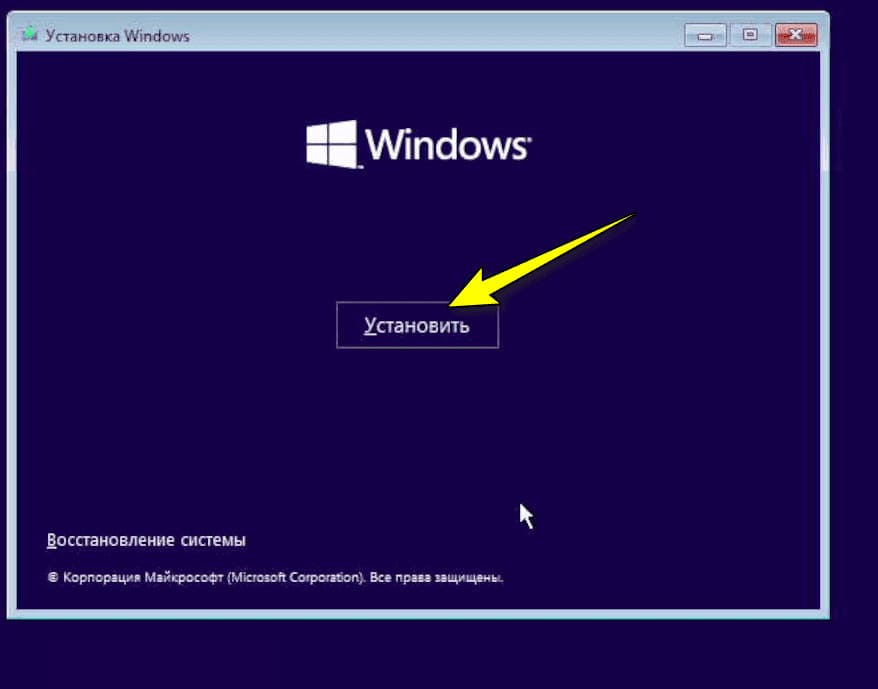
1. После загрузки флешки начнётся процесс установки Windows 11. Выберите язык и нажмите «Далее».
2. Нажмите «Установить». Если ваш компьютер не соответствует минимальным требованиям, появится предупреждение.
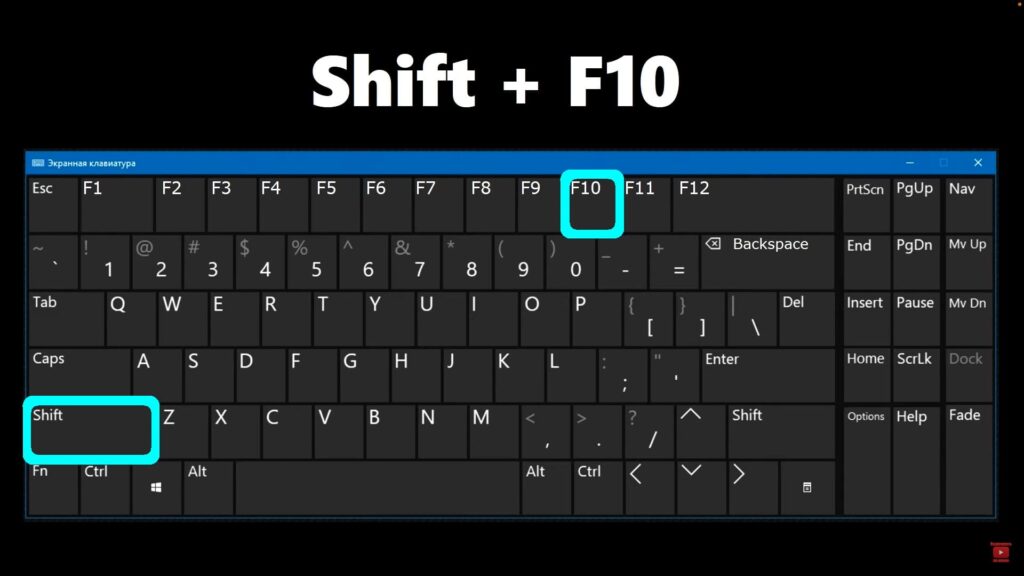
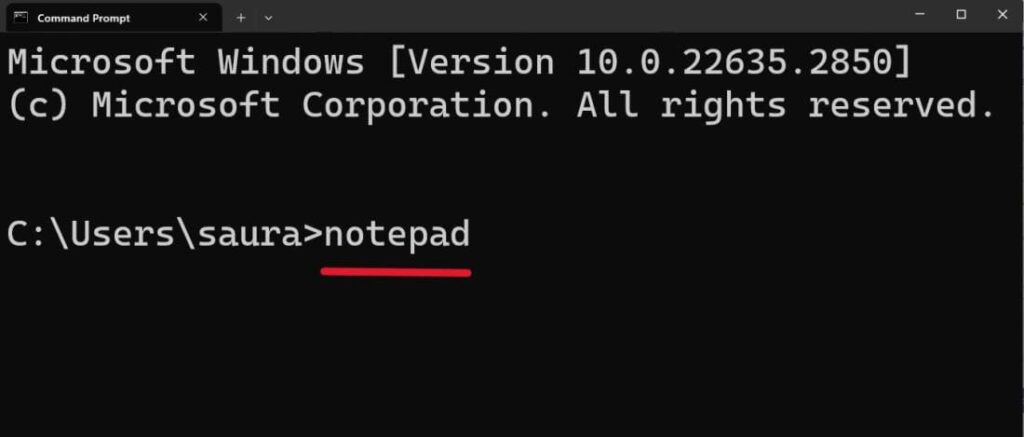
3. Перед продолжением установки одновременно нажмите клавиши `Shift + F10`, чтобы открыть командную строку.
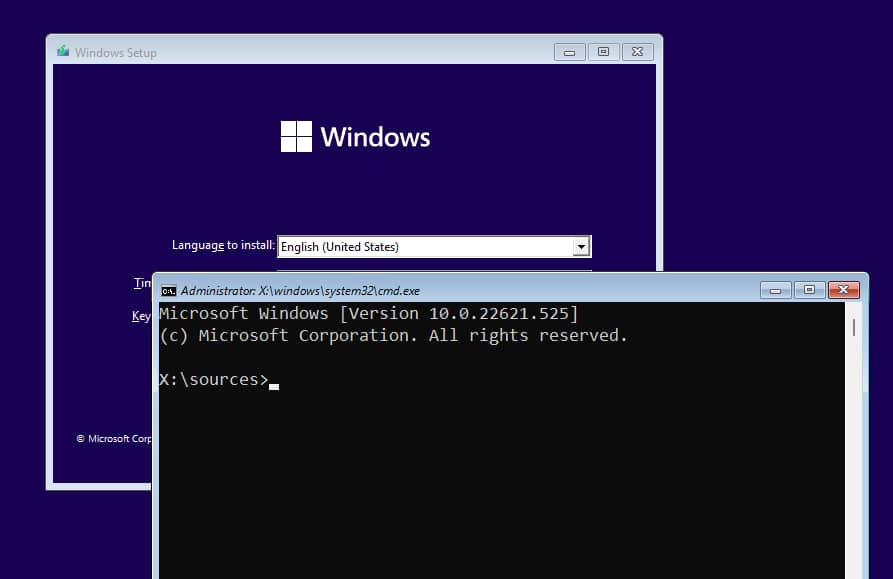
4. В командной строке введите `notepad` и нажмите Enter.
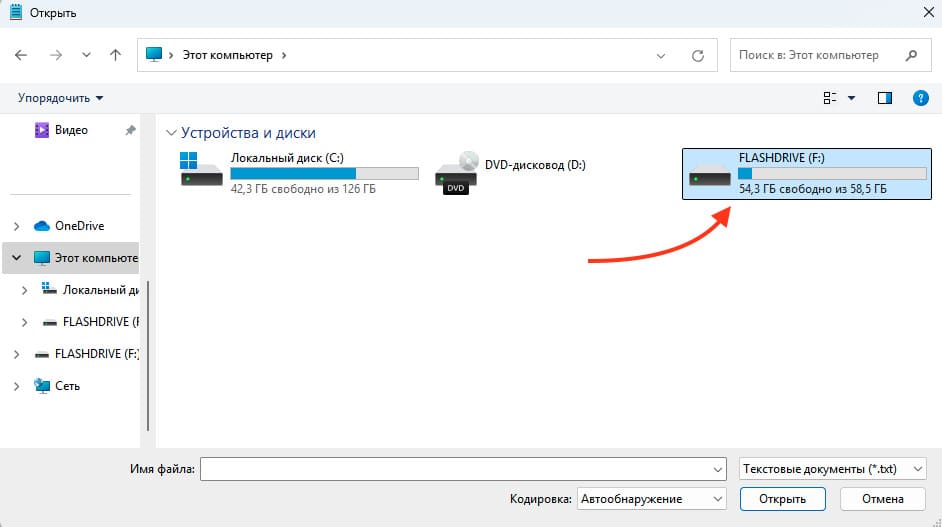
5. В блокноте выберите «Файл» → «Открыть».
6. В проводнике выберите вашу флешку.
7. В типе файлов выберите «Все файлы» и найдите файл Windows 11 Bypass.
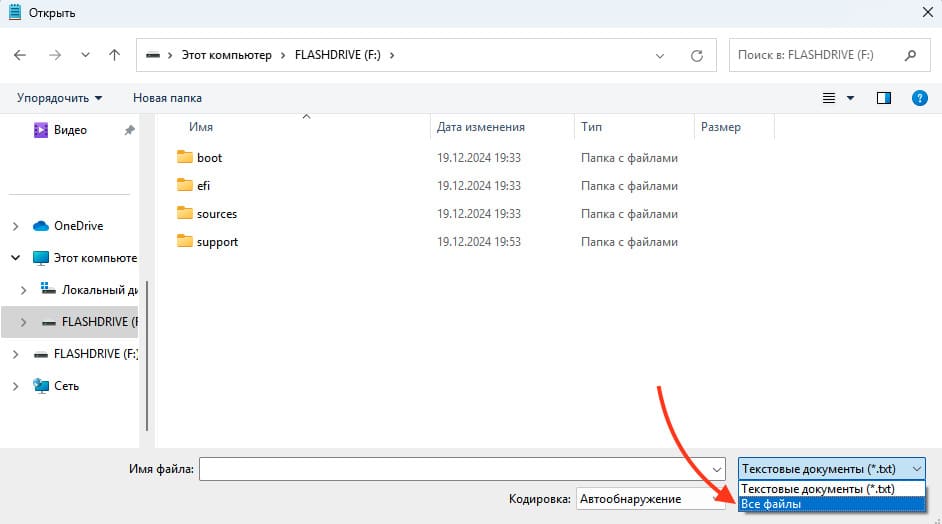
8. Щёлкните по файлу правой кнопкой мыши и выберите «Слияние».

9. Подтвердите действие, нажав «Да» и «OK».
10. Закройте все открытые окна и снова нажмите «Установить».
Шаг 5: Завершение установки Windows 11
После выполнения указанных действий установка Windows 11 начнётся без проблем, даже если ваше устройство не соответствует минимальным требованиям.
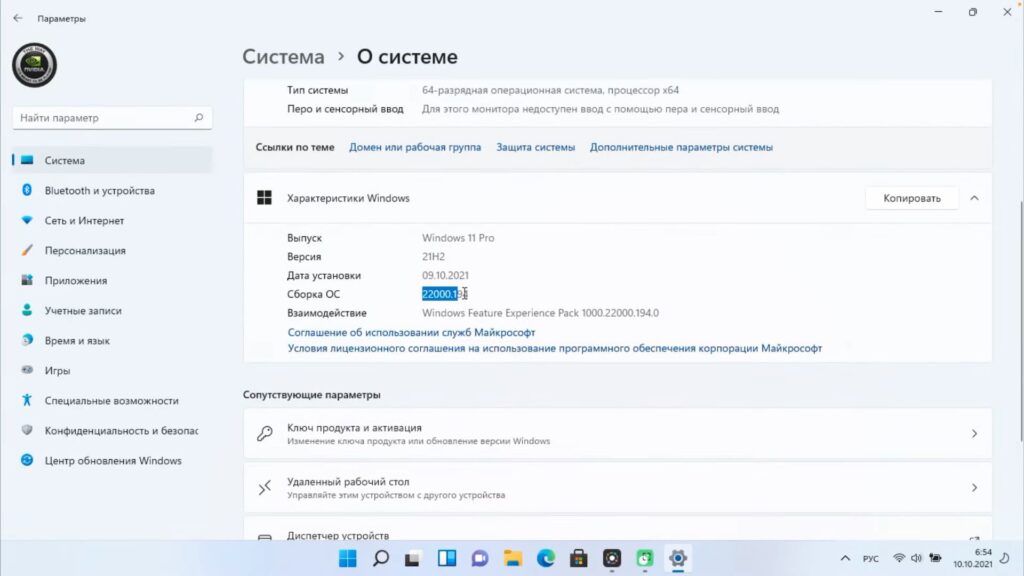
После завершения установки зайдите в «Настройки» → «Система» → «О системе» и проверьте версию Windows. Как видно, версия 22H2 установлена успешно. Также можно проверить активацию в разделе «Ключ продукта и активация».
На этом все, теперь вы можете использовать Windows 11 на вашем устройстве.
Лицензионный ключ активации Windows 11 от
Table of Contents
1
In generate, older computers does not have UEFI and TPM chip because these technologies were not commonly used at the time of manufacturing. Therefore, if you are planning to install Windows 11 on an old PC, it is important to check the system’s hardware requirements.
If the computer lacks UEFI and TPM, please don’t worry! There are a couple of workaround to help you bypass TPM and UEFI during Windows 11 installation.
Introduction to UEFI and TPM
UEFI is a modern firmware interface that has replaced the traditional BIOS on most modern computers. It is a firmware interface that is responsible for initializing the hardware components of the computer and booting the operating system.
UEFI is designed to provide a more flexible and extensible firmware interface compared to BIOS. It supports larger disks, faster boot times, and more secure booting by using digital signatures to verify the authenticity of firmware and operating system code.
TPM (Trusted Platform Module) is a specialized hardware chip that provides a secure storage space for cryptographic keys, as well as other security-related data. TPM is used to enhance the security of computers and other devices, particularly in the areas of authentication and encryption.
TPM is typically included on the motherboard of a computer or other device, and is designed to be tamper-resistant. It stores cryptographic keys in a secure, isolated space that is inaccessible to other components of the system. This means that even if an attacker gains access to the system, they will not be able to access the sensitive data stored in the TPM.
System Requirements for Windows 11 Installation
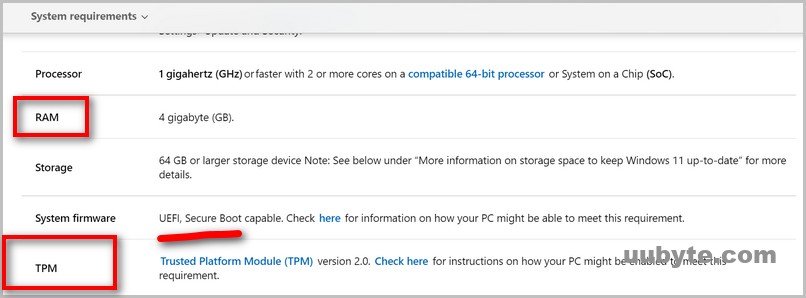
So what are the system requirements for Windows 11 standard installation? Here are mandatory requirements listed by Microsoft:
Processor: The computer must have a compatible 64-bit processor with at least 1 GHz clock speed and 2 or more cores.
RAM: The computer must have at least 4 GB of RAM.
Storage: The computer must have at least 64 GB of storage space.
System Firmware: The computer’s firmware must support UEFI (Unified Extensible Firmware Interface) version 2.0 or later.
Secure Boot: The computer’s firmware must have Secure Boot capability.
TPM: The computer must have a TPM (Trusted Platform Module) version 2.0.
Graphics Card: The computer’s graphics card must support DirectX 12 or later, with a WDDM 2.0 driver.
Display: The computer must have a display with a resolution of at least 720p and 9-inch diagonal size.
Internet Connection: An active internet connection is required for Windows 11 installation and activation.
Can We Bypass TPM and UEFI for Windows 11?
By default, the old PC won’t be able to run Windows 11 If it does not meet these requirements. However, there are some tricks to help you install Windows 11 on an unsupported PC without UEFI and TPM. We will share three different approaches to get through the installation process.
Method 1: Use a Custom Windows 11 ISO
The stand Windows 11 installation requires the computer to have TPM and UEFI by default. However, we can bypass this limitation with a custom Windows 11 ISO, which is a modified version of the original Windows 11 OS that includes additional features, tweaks, or modifications to the operating system. This type of ISO is created by users to meet specific needs.
Custom Windows 11 ISO can be created using specialized software or tools that allow users to customize various aspects of the installation process, such as adding or removing pre-installed apps, changing the default settings, or integrating specific drivers or software.
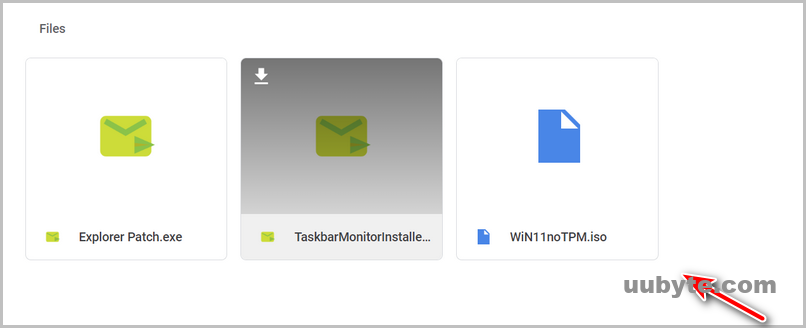
Download this custom Windows 11 ISO that removes UEFI and TPM requirements from here:
https://drive.google.com/drive/folders/1ihtPAztUJ-b5wJER-vulTd556YoAuUZW
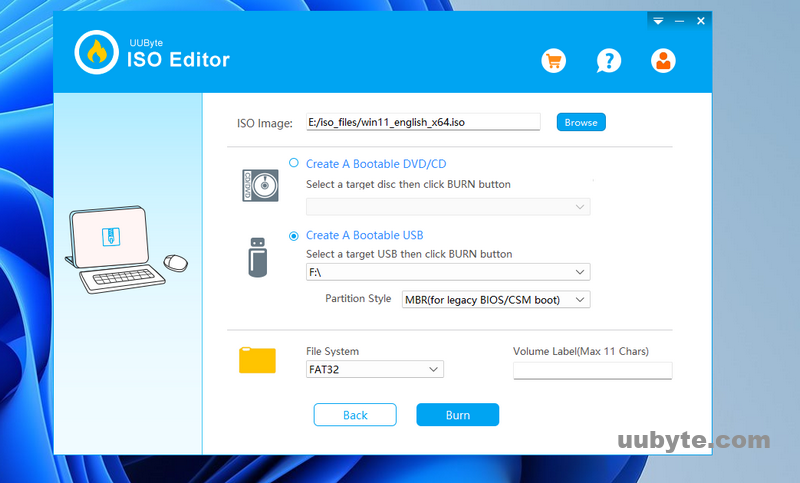
Install and Download UUByte ISO Editor, one of the best tools to create Windows 11 bootable USB on a PC or Mac.
Free DownloadFree Download
Plug in a USB flash drive and open the app and click the Burn menu at the top.
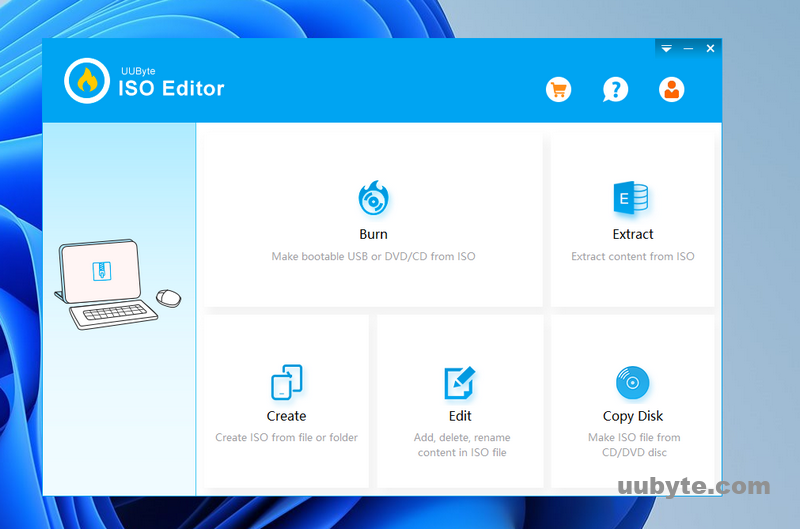
After that, import the custom Windows 11 ISO, pick up the USB drive and click the Burn button to make a Windows 11 installation disk.
Once it is completed, connect the bootable drive to your old PC and boot from it.
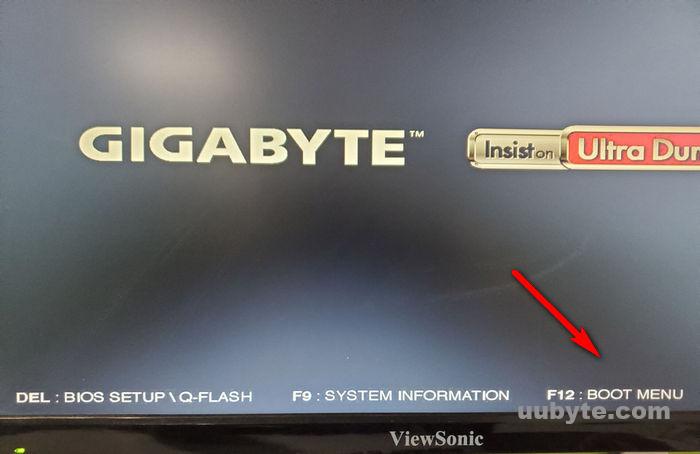
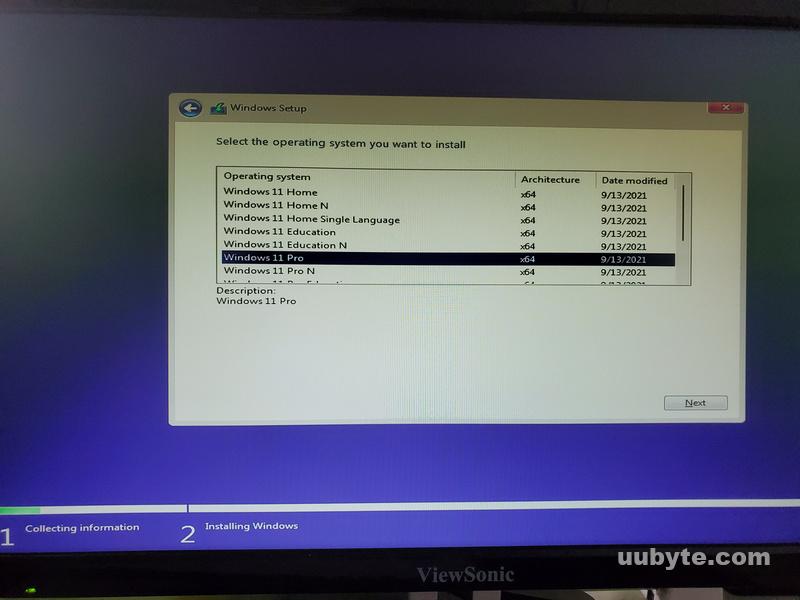
Finally, follow the prompts to install Windows 11 on old PC without TPM and UEFI. No warning message at this time!
Method 2: Bypass Windows 11 UEFI and TPM Check Using Rufus
Rufus is a free and open-source utility tool that enables users to create bootable USB drives for various operating systems. With Rufus, users can create bootable USB drives from ISO, IMG, and DD image files. It also supports various file system formats, including FAT32, NTFS, and UDF. Additionally, Rufus allows users to customize their bootable USB drives, such as creating a custom label, changing the cluster size, and creating a persistent storage partition.
Rufus is easy to use, and it has a user-friendly interface. It is a lightweight tool that can run on any computer without requiring installation. Rufus is also known for its fast operation speed and reliable performance, making it a popular choice among users who frequently create bootable USB drives.
if you are determined to install Windows 11 on unsupported hardware, you can follow these general steps:
1. Download the Windows 11 ISO file from Microsoft’s website.
2. Download Rufus 3.16 from here. The new version does not come with bypass options.
3. Insert a USB flash drive with at least 8 GB of storage capacity into your computer.
4. Open Rufus and select the USB flash drive under «Device» and select Extended Windows 11 Installation under Image option.

5. Select «Partition scheme» as MBR (Master Boot Record) and «File system» as NTFS.
6 .Click on the «Select» button next to «Boot selection» and choose the Windows 11 ISO file that you downloaded earlier.
7. Click on the «Start» button to create a bootable USB drive with Windows 11. Once the process is complete, restart your computer and boot from the USB drive.
8. Follow the on-screen instructions to install Windows 11 on unsupported hardware.
Free DownloadFree Download
Method 3: Bypass Windows 11 UEFI and TPM Check Using Ventoy
Ventoy is known for its fast operation speed, reliability, and versatility. It allows users to store multiple operating systems on a single USB drive, making it convenient for users who frequently install and test different operating systems. Ventoy also provides additional features, such as secure boot and persistence, which enable users to save their data and settings across different sessions.
With Ventoy, users can create a multi boot USB drive by simply copying the ISO files of the operating systems to the USB drive, without requiring any additional steps such as formatting or partitioning. Ventoy will automatically detect the ISO files and display them on the boot menu when the USB drive is inserted into a computer.
To create a bootable USB drive with Ventoy that byass UEFI and TPM:
1. Download Ventoy from the official website (https://www.ventoy.net/en/index.html) and extract the contents to a folder on your computer.
2. Insert your USB drive into your computer and make sure that it is empty or that you have backed up any important files on it.
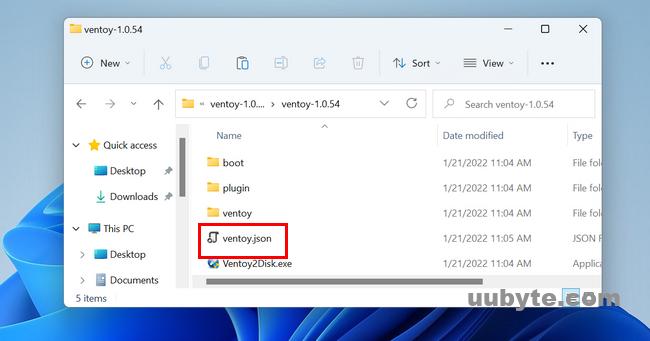
3. Open the folder where you extracted Ventoy and run the Ventoy2Disk.exe file as administrator.
4. In the Ventoy window, select your USB drive from the drop-down list at the top.
5. Click on the «Install» button to start the installation process. This will erase all data on the USB drive, so make sure that you have backed up any important files before proceeding.
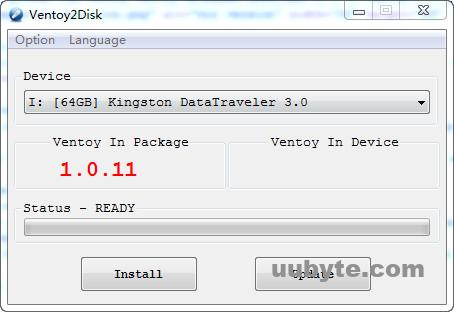
6. After the installation is complete, you will see a message saying «Installation Done«. Now, copy Windows 11 ISO files that you want to use to the USB drive and edit ventoy.json file.
7. Add the following text to the end of tetx file:
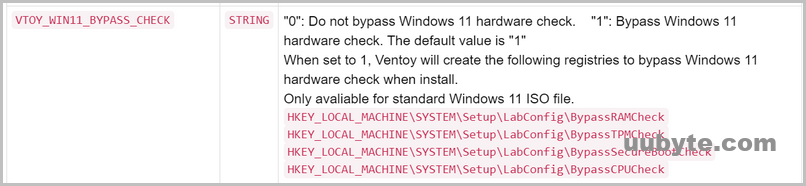
«VTOY_WIN11_BYPASS_CHECK«: «1«
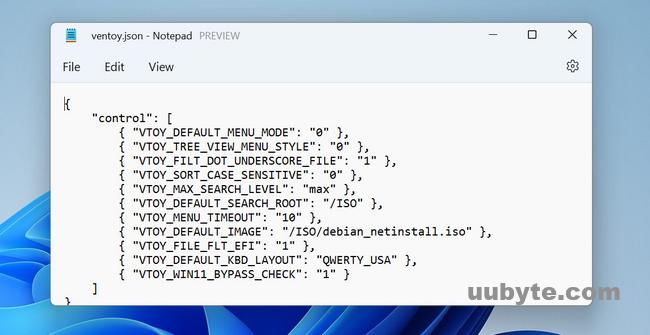
The above parameter indicates Ventoy bypassing Windows 11 system check during installation.
Eject the USB drive safely and you’re done!
YouTube Tutorial: How To Install Windows 11 Without UEFI And TPM 2.0
Summary
Thanks to the technology world, you can now install Windows 11 on any PC even it does not meet all the requirements. For beginners, the first method is much easier to go with as it does not require any advanced knowledge. Rufus is the second on our recommendation list as there are issues with UEFI. Ventoy is good but it is more suitable for tech savvy.
За последние десятилетия установка Windows становилась все проще и доступнее неопытным пользователям. Ушли в прошлое загрузочные дискеты с MS-DOS, ввод длинных ключей продукта, загрузочные CD-ROM сменились удобными флешками. А затем, с появлением Windows 10, Microsoft создала удобный инструмент Media Creation Tool, который сам скачивает свежую версию Windows и записывает ее на флешку, делая ее загрузочной. Вам остается только загрузиться с флешки на новом ПК и установить Windows, следуя простым подсказкам.

Все изменилось около двух лет назад, когда Microsoft стала буквально навязывать пользователям создание учетной записи Microsoft при чистой установке Windows, скрывая опцию создания локального аккаунта, которым пользуются большинство пользователей. А с выходом Windows 11 в 2021 году многие пользователи достаточно шустрых ПК, которые справлялись с Windows 10, узнали, что их компьютеры не подходят для Windows 11.
Системные требования Windows 11 стали довольно жесткими:
- Процессор: с частотой 1 ГГц или более быстрый 64-разрядный процессор с 2 ядрами, как минимум 8-го поколения Intel (поддерживаются некоторые процессоры Intel 7-го поколения) или AMD Ryzen 2000.
- Оперативная память: 4 гигабайта памяти.
- Место на накопителе: 64 гигабайта.
- Прошивка: UEFI, Secure boot, микросхема TPM 2.0
- Видеокарта: DirectX 12, совместимая с драйвером WDDM 2.0.
Довольно быстро выяснилось, что эти системные требования можно обойти и Windows 11 вполне шустро работает и на старых компьютерах, но вот сам метод их обхода с интеграцией ветки реестра при установке Windows был очень неудобен, а неопытный пользователь мог и вовсе не справится с ним.
Microsoft ввела ограничения для россиян

Но с самой главной проблемой при установке Windows столкнулись пользователи из России и Беларуси в 2022 году, когда Microsoft объявила о постепенном сокращении своего бизнеса в России. Теперь при попытке скачать образ Windows 11 или средство создания загрузочной флешки с официального сайта Microsoft можно заметить сообщение о прекращении продаж продуктов и услуг в России на главной странице сайта.

А при попытке скачать ISO-файл с Windows нас встречает сообщение об ошибке:
В данный момент не удается выполнить ваш запрос. Эту службу запрещается использовать некоторым пользователям и лицам, а также в определенных расположениях. По этой причине использование технологий, которые обеспечивают анонимность или скрывают расположение, при подключении к этой службе обычно не разрешается.
Как видите, из простого и удобного процесса, доступного новичку, установка Windows 11 в 2023 году превратилась в квест, чтобы решить который, нужно обладать достаточными техническими знаниями. Но сегодня мы сделаем это просто и легко, воспользовавшись сторонними инструментами. А для начала, давайте скачаем свежий образ Windows 11.
Обходим ограничения и скачиваем Windows 11
Несмотря на то, что Microsoft не разрешает «использование технологий, которые обеспечивают анонимность или скрывают расположение» мы рискнем ими воспользоваться. Для этого зайдите в магазин расширений вашего браузера и введите в поиске расширений «VPN». Первые результаты в выдаче обычно будут бесплатными VPN-сервисами, которыми пользуется множество пользователей и установить их можно без опасений, тем более, что потребуется они нам буквально на несколько секунд.

Я установил расширение Hola VPN, снова зашел на сайт Microsoft и выбрал Windows 11 нужной редакции. Теперь можно без проблем получить ссылку на скачивание нашего ISO-файла, но не спешите на нее нажимать. Если начать скачивание с бесплатным VPN, ожидание окончания скачивания файла ISO, который весит уже более пяти гигабайт, займет несколько часов, если не суток. Поэтому щелкните правой кнопкой мыши по кнопке «64-bit Скачать» и выберите «Скопировать ссылку».

Эту ссылку просто вставьте в другой браузер или отключите VPN и введите в адресную строку вашего основного браузера и начнется скачивание образа Windows с нормальной скоростью, в зависимости от скорости вашего интернета.
Создаем загрузочную флешку с Windows 11

Теперь нам осталось создать установочную флешку Windows 11 без проверки TPM 2.0 и Secure Boot. Даже если в вашем ПК включен TPM 2.0, я рекомендую создать флешку без требований наличия доверенного платформенного модуля (TPM, Trusted Platform Module). Это позволит установить Windows 11 на любой ПК, да и само наличие этого модуля не нужно большинству пользователей. У меня он отключен, так как его реализация на системах AMD может вызывать проблемы со стабильностью, выражающиеся в фризах и заиканиях звука.

Самый простой метод создания загрузочной флешки с Windows 11 с отключением проверки на наличие модуля TPM 2.0 и включенной безопасной загрузки (Secure Boot), а заодно и наличия 4 ГБ ОЗУ — это использование популярной утилиты Rufus, предназначенной для записи образов Windows на флешки. Важно использовать последние версии утилиты, которые можно скачать с официального сайта.

Запускаем утилиту, указываем ей наш ISO-файл.

Но никаких опций по отключению проверки TPM 2.0 и Secure Boot пока не видно. Не переживайте, они появятся после нажатия кнопки «Старт». А заодно можно активировать создание локального аккаунта с нужным вам именем, что очень удобно.

После записи образа на флешку, можно приступать к установке Windows 11. Я проверил работоспособность флешки — требования TPM 2.0 и Secure Boot успешно обходятся, а локальный аккаунт с заданным именем создается с пустым паролем. Первый вход в систему происходит автоматически, а при повторном входе система предлагает задать пароль.

Итоги

Как видите, скачать и установить Windows 11 все еще можно довольно быстро и легко. А вот время создания загрузочной флешки и установки Windows 11 сильно зависит от типа используемой флешки. Многие до сих пор по привычке используют для установки Windows старые флешки USB 2.0 объемом 8 ГБ, но их скорости часто оставляют желать лучшего. Современную быструю флешку можно купить всего за несколько сотен рублей, например, в Регарде наиболее популярны вот такие модели: Kingston DataTraveler Exodia M Black/Blue, SanDisk Ultra Luxe и Kingston DataTraveler Exodia.

Более 550 блогов автора Zystax обо всем, что связано с компьютерами, Windows и играми.
Пишите в комментарии, а как вы устанавливаете Windows 11?
Telegram-канал @overclockers_news — теперь в новом формате. Подписывайся, чтобы быть в курсе всех новостей!