
Applies ToWindows 7 Enterprise Windows 7 Home Basic Windows 7 Home Premium Windows 7 Professional Windows 7 Starter Windows 7 Ultimate
Проблема
При попытке установить, обновить или запустить программу или файл появляется следующее сообщение об ошибке:
Ошибка: «Windows не удается получить доступ к указанному устройству, пути или файлу. Возможно, у вас нет нужных разрешений для доступа к этому объекту.»
Решение
Для решения этой проблемы выполните действия, описанные ниже, начиная со способа 1. Если этот способ не поможет, переходите к следующему способу.
Способ 1. Проверьте разрешения на доступ к файлу и папке
Примечание. Необходимо обладать правами администратора или быть членом группы «Администраторы домена», если компьютер входит в домен.
Разрешения — это правила, связанные с файлами, которые определяют, может ли пользователь получать доступ к файлу и какие действия с ним он может выполнять. Чтобы проверить разрешение на файл или папку, выполните указанные ниже действия.
-
Щелкните файл или папку правой кнопкой мыши и выберите пункт Свойства.
-
Перейдите на вкладку Безопасность.
-
В разделе Группы или пользователи выберите свое имя, чтобы просмотреть имеющиеся разрешения. (Снимок экрана для этого этапа приведен ниже.)
-
Нажмите кнопку Изменить, установите флажки для нужных разрешений и нажмите кнопку ОК. (Снимок экрана для этого этапа приведен ниже.)
Дополнительные сведения о разрешениях см. в статье Что такое разрешения?.
Способ 2. Проверьте расположение файла
Данная ошибка может возникать, если ярлык или установленная программа пытаются получить доступ к расположению, недоступному в настоящее время (например, к сетевой папке или съемному диску). Проверьте путь к файлу, к которому Windows не может получить доступ, и убедитесь, что расположение доступно. (Снимок экрана для этого этапа приведен ниже.)
Способ 3. Убедитесь, что файл не был перемещен или удален
Данная ошибка может возникнуть также в случае, если файл был перемещен или удален. Перейдите в папку, содержащую необходимый файл, и убедитесь, что он находится там.
Способ 4. Создайте ярлык повторно, чтобы проверить наличие повреждений
Данная ошибка может возникать также в случае, если ярлык или файл другого типа был поврежден. Проверить ярлыки на наличие повреждений можно посредством повторного создания ярлыка. Для этого перейдите к разделу Создание или удаление ярлыка.
Если повреждено приложение или файл другого типа, для решения проблемы может потребоваться восстановить приложение.
Способ 5. Разблокируйте файл
В некоторых случаях Windows может блокировать файл. Просмотрите свойства файла — они могут содержать следующее примечание: Этот файл получен с другого компьютера и, возможно, был заблокирован с целью защиты компьютера. Чтобы проверить это и при необходимости разблокировать файл, сделайте следующее.
-
Щелкните заблокированный файл правой кнопкой мыши и выберите пункт Свойства.
-
На вкладке Общие нажмите кнопку Разблокировать, если она доступна.
Способ 6. Проверьте, не блокирует ли файл антивирусное программное обеспечение
Чтобы проверить, не блокирует ли файл ваша антивирусная программа, временно отключите ее и попытайтесь открыть файл. Если потребовалось временно отключить антивирусное программное обеспечение, включите его сразу же после выполнения необходимого действия. Если во время данного отключения компьютер подключен к Интернету, он уязвим для атак.
Важно! Отключение антивирусного программного обеспечения или изменение его настроек может сделать ваш компьютер уязвимым для вирусов, мошенничества и других вредоносных действий. Корпорация Майкрософт не рекомендует отключать антивирусное программное обеспечение или изменять его настройки. Если потребовалось временно отключить антивирусное программное обеспечение, включите его сразу же после выполнения необходимого действия. Применяя этот метод обхода проблемы, вы действуете на собственный риск. Сведения о временном отключении антивирусного программного обеспечения см. в статье Отключение антивирусного программного обеспечения.
Причина
Подобная проблема может возникать при выполнении на компьютере любого из следующих условий.
-
Нет разрешения на доступ к файлу или его расположению.
-
Файл находится в недоступном в настоящее время расположении, например в сетевой папке или на внешнем диске, не подключенном к компьютеру в настоящий момент.
-
Файл был перемещен или удален.
-
Файл или ярлык поврежден.
-
Windows может блокировать файл.
-
Антивирусное программное обеспечение может блокировать файл.
Дополнительная информация
Дополнительные сведения об ошибках при доступе к файлами или папкам в Windows см. в статье «Отказано в доступе» и другие ошибки при попытке доступа к файлам и папкам Windows или при работе с ними.
Нужна дополнительная помощь?
Нужны дополнительные параметры?
Изучите преимущества подписки, просмотрите учебные курсы, узнайте, как защитить свое устройство и т. д.
Many Valorant players have been experiencing game crashes. This can be deeply annoying due to the fact that it is repetitive, which hinders you from enjoying the game as much as you would otherwise.
Yo so this is my fifth time having VALORANT crash when after agent selection @RiotEvrMoar Is this a bug with the new update or should I just re-install the game?
— BoDork (@Bo_Hoogland) December 9, 2022
As it turns out, third-party applications or outdated graphics drivers can cause this problem. You can experience a crash at any point in the game, from the main screen right through to in-game play. This issue has affected many individuals, thus we will discuss several approaches to resolve it in this article.
As it turns out, the solution to the difficulty that you are having can be different for each system, just as we said earlier. Third-party interference and obsolete display drivers are not the only issues.
Do This If Windows Can’t Access Valorant Files
Fix 1 – Gain access permission for Valorant
- Step 1 – Right-click Valorant and select Properties
- Step 2 – Go to Group or User names to check your permissions
- Step 3 – Click on Edit to choose the permissions you need (full control, modify, read, write, or special permissions).
- Step 4 – Launch Valorant and check if it works.
Fix 2 – Check Valorant’s location
Make sure the game location is accessible. Here’s how to do that:
- Step 1 – Right-click on Valorant and click Properties
- Step 2 – Select the General tab and check the file path — it needs to be the correct path
- Step 3 – Still under the General tab, check if there is any mention such as This file came from another computer and might be blocked to help protect this computer next to security. If there is, check the Unblock checkbox
- Step 4 – Reboot your computer and try to run the game again.
Recreate Valorant’s shortcut
This problem may also occur if the location of Valorant’s shortcut path changed. In this case, you need to create a new game shortcut that points to the current game location.
- Step 1 – Click on an empty space on your desktop
- Step 2 – Select New → Shortcut
- Step 3 – Add Valorant by following this path: Riot Games\VALORANT\Live\Binaries\Win64\VALORANT
and hit Next. The path might be slightly different depending on your configuration - Step 4 – Name the new shortcut and hit Finish.
Fix 3 – Disable interfering software
If there are any programs blocking Windows from accessing Valorant’s files, this method will help you solve the problem.
Start with your antivirus. Perhaps the antivirus is blocking the game. Maybe your security software temporarily blocked some of the game files.
Or maybe you installed other programs which are incompatible with Valorant. To fix this, you can clean boot your computer or disable background processes using the Task Manager.
We hope something helps.
Valorants experienced several crash events. Often this is extremely unpleasant due to the repetitive nature of the game that hinders your enjoyment. Windows cannot access the specified device, path, or file. You may not have appropriate permissions to access them with Valorant being one of them. We have seen over Reddit also about the problem of Windows cannot access the specified device valorant.
In this article, we’ll explore the causes of this error and provide you with several effective solutions to help you resolve it and get back to playing Valorant.
Causes of the Error
There are several reasons why this error message may appear, including:
- The Valorant executable file is blocked by your antivirus software
- Your system does not meet the minimum requirements for Valorant
- The Valorant installation is corrupt or damaged
- The Windows Firewall is blocking the Valorant executable
- There is a conflict between Valorant and another program on your system
Run the Game with Compatibility Settings
First of all, we will start with the basic fixes to solve the issue of Windows cannot find the specified device Valorant by running the game in the administrator mode and disabling the full-screen optimization.
Right-click on the Valorant launcher and choose the option “Properties”
Now in the properties tab, click on the “Compatibility” tab and checkmark the option “Run this program as an administrator” and “Disable full-screen optimizations“
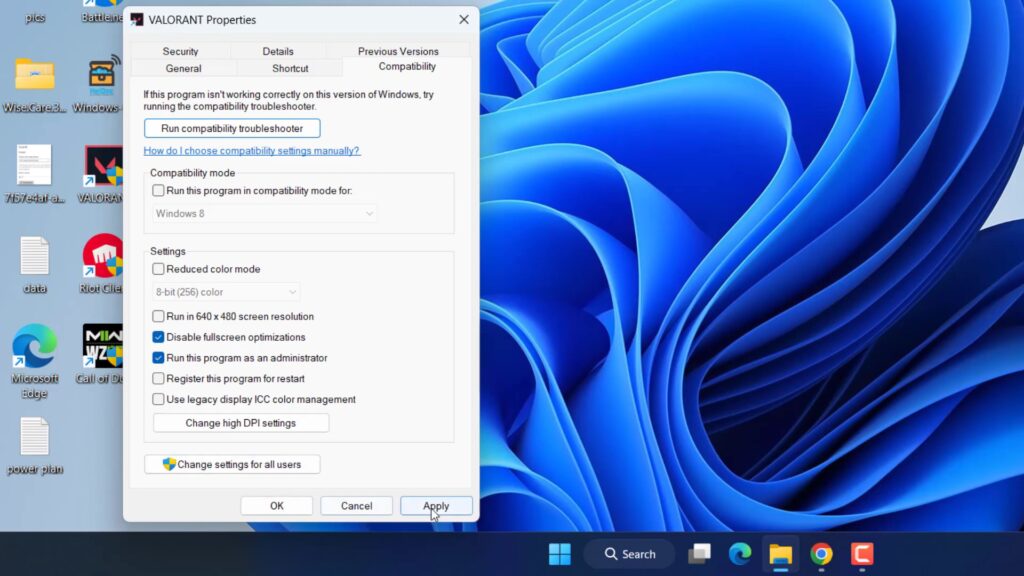
This way we have given permission to Valorant to start the game with admin rights to fix the issue of Valorant you don’t have permission to access the game.
Uninstall Conflicting Programs
In some cases, there may be a conflict between Valorant and another program on your system, causing the “Windows Cannot Access the Specified Device” error message to appear.
To resolve this issue, you should uninstall the conflicting program and then launch Valorant. If the error message no longer appears, you can reinstall the program and make sure it is not conflicting with Valorant.,So go ahead and close all those below-listed programs using the task manager.
- MSI Afterburner
- Riva Tuner
- Citrix VPN
Above mentioned all three programs conflict with the Valorant executable and don’t let you launch the game. In order to disable right click on the start menu and choose “Task manager” to open the task manager. Now in the “processes” tab find all these three programs. Once find right click on each program and choose the option “End task”‘ to close these programs.
If this fixes the issue of Windows cannot find the specified device Valorant, click on the option “Startup apps” right in the task manager and disable each one of them by right click and choose the option of Disable.
Check Permission for the File or folder
Sometimes, the game doesn’t have the appropriate permission to access the Valorant executable file and in turn, gives you the error of Valorant you don’t have the right permission to access the file. In order to gain full permission, right-click on the Valorant app and choose the option “Properties” Now click on the “Security” tab and make sure the option of “full control” must be tick mark. If not click on the “Edit” option and tick mark the option to fix the permission issue of the game.
Recreate the Shortcut to Check for Corruption
The Valorant app file that is created during the installation of the game is corrupted with time and whenever you launch the game you got the issue of Windows cannot access the specified device in Valorant. So we will create a new short to fix the corrupted file. Open the directory of the game which is generally available at C:\Riot Games\Riot Client\RiotClientServices. Right-click on RiotClientServices.exe and click on the option “open”
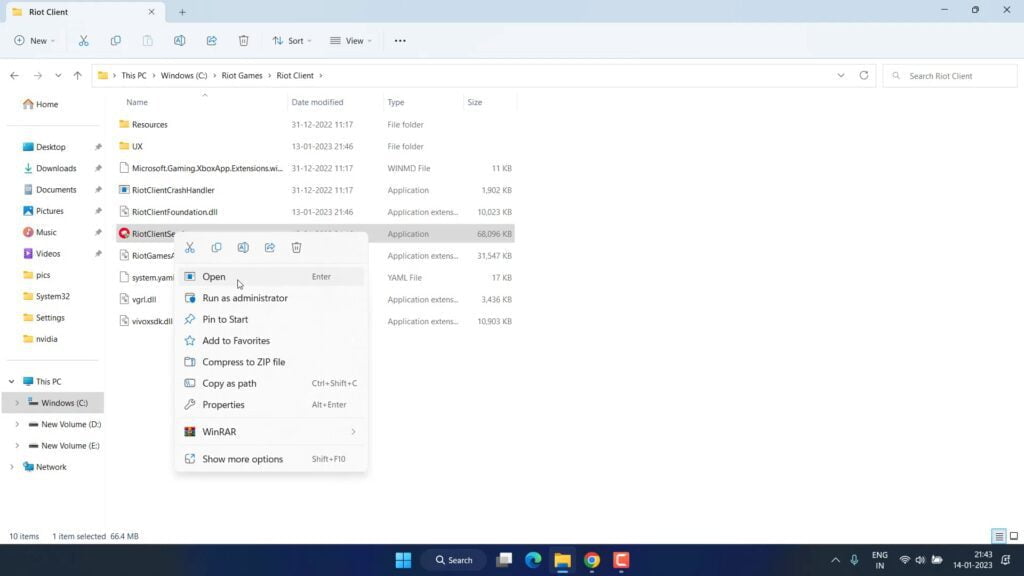
If the game launches properly, you can again right-click and choose the option “Send to Desktop (create shortcut)” to create the Riot Client shortcut onto the desktop to fix the issue of you don’t have the right permission to access the file with valorant.
Disable Your Antivirus Software
In some cases, the “Windows Cannot Access the Specified Device” error message may appear because your antivirus software is blocking the Valorant executable. To resolve this issue, you should temporarily disable your antivirus software and then launch Valorant. If the error message no longer appears, you should contact your antivirus software manufacturer for further assistance or else just disable the antivirus until the problem is resolved with the new update.
Creating Valorant Launcher .Bat file
Now in this method, we are going to manually create a Valorant launcher file so that you can directly launch the game with the .bat executable file. So, open a notepad file by right click on the start menu and typing “Notepad”
In notepad type the following command and then click on the file menu in the top left corner and choose the option “save as”
"C:\Riot Games\Riot Client\RiotClientServices.exe" --launch-product=valorant --launch-patchline=live
Now in the “save as” window give the file name as “Valorantlaunch.bat” and in “Save as type” choose the option “All files” from the drop-down list. Once done hit the save button as shown below.
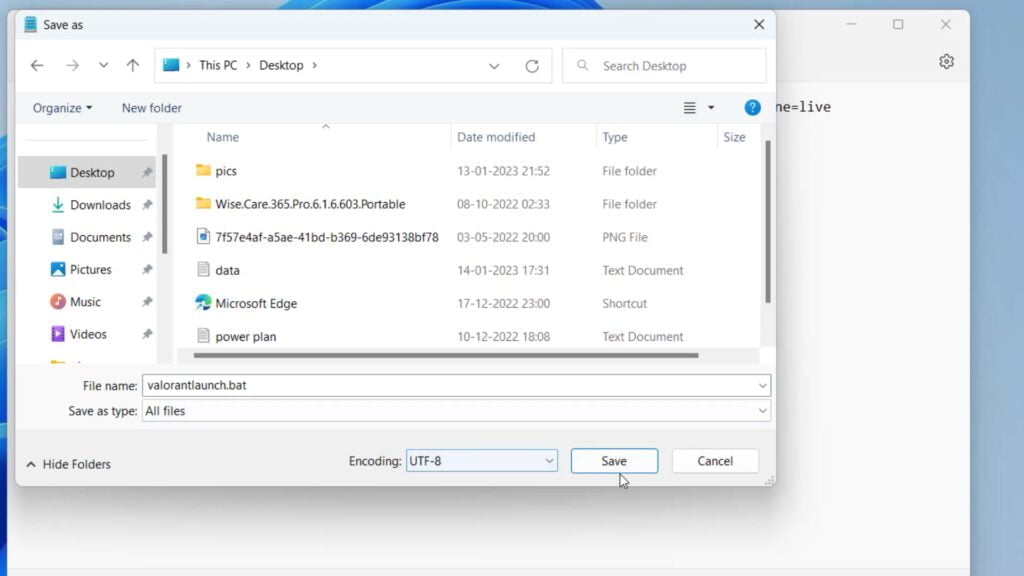
Now open the saved location Valorantlaunch.bat file and run it. This will launch the Valorant for you and fix the issue of Windows cannot access the specified device Valorant for you.
Disable Game Overlays
Overlays play a crucial part while gaming, but sometimes overlays are the major cause of Valorant won’t launch in Windows 11. So make sure to disable overlays present in a different application.
- Discord: In order to open the settings of the discord and click on the option “game overlay” and toggle off the switch “Enable in-game overlay”
- NVIDIA: Open the Nvidia control panel, and choose the “General tab” when you look below you will find the option to toggle on/off the option of “In-game overlay” Just go ahead and toggle off the in-game overlay.
- Steam: Open the steam app and click on the option “Steam” at the top left corner. Click on the option “Settings” Now click on the option “In-game” from the left pane and uncheck the option of “Enable the steam overlays while in-game” to disable overlays in steam
Now, go ahead and launch the game. Now you will not encounter the issue of Windows cannot access the specified device valorant and you will be able to play the game successfully.
Reinstall the Game by Removing all the Files
Now, if all of the above methods failed to work out and you still get the issue of Windows cannot access the specified device Valorant, you need to reinstall the game but first, you need to uninstall the game completely.
In order to uninstall you can go the settings>Apps> and choose both Valorant and Riot client to uninstall.
Now, you need to delete the remaining files present in your system after uninstalling. So for that right click on the start menu and choose the option “run”
In the run command type %programdata% and hit the enter key.
Now in the program data folder, delete the folder named “Riot Games” as well as “Valorant”.
once done again open the run command and this time type %localappdata% and hit the enter key.
Now in the local app data folder again delete the folder named “Riot Games” as well as “Valorant”.
Once deleted, go ahead and download the Valorant installer from the official website and install the game.
Once installed go ahead and launch the game and this will fix the issue of Valorant Windows cannot access the specified device, path, or file. You may not have appropriate permission to access the item in Windows 11.
That’s all folks. This is all you have to do in order to fix “Windows cannot access the specified device Valorant” however the Valorant process is showing in the background.
Let me know in the comments if it doesn’t work out for you so that I can further provide you more support to fix “Windows cannot access the specified device, path or file in Valorant” and if you get another way to get rid of this problem do mention so that other viewers also get benefitted from the solution you provided.
Read More
- Fix Valorant Voice Chat Not Working- [2023]
- How to Uninstall Valorant on PC
- Valorant We Couldn’t Install a Required Dependency
- Valorant FPS Drop After Update
- Valorant Updating Stuck at 0 Kbps
How to fix Valorant Windows access the specified device?
There are various software’s that are conflicting with the Valorant and gives the error of Windows cannot access the specified device Valorant. So to fix you need to disable MSI afterburner, Riva Tuner, and Citrix VPN. Nextly, you may need to check the permission of the file or folder by going to the directory of valorant installation folder. Right click choose properties and select the security tab. Here make sure the “Full control” must be given to fix the Valorant issue of Windows access the specified device, path or file.
How do I fix Voice in-game chat Valorant?
In order to Voice chat not working Valorant while in-game you first need to close the league of legends client id its running in the background. Secondly, you need to lower the bit rate of the sound quality by going to the settings of your sound. For a detailed explanation click on the link
How do I fix the Valorant launcher?
Valorant launcher can’t run because some of the software may be conflicting with valorant anti cheat and makes valorant not start. So make sure to close the following programs from your task manager :
Riva Tuner
MSI afterburner
Citrix VPN
And if this doesn’t work you need to check more details here

Sometimes, when gamers try to launch Valorant, they get this error: Windows cannot access the specified device, path or file. You may not have appropriate permissions.
Why Windows cannot access the specified device, path or file? This issue occurs when another program is blocking the operating system from accessing the files of the program or game you’re trying to launch. Or the user account does not have all the permissions required to launch the respective program. This issue could also indicate that the file location has been changed and it’s no longer accessible or key files have been deleted.
Do This If Windows Can’t Access Valorant Files
Fix 1 – Gain access permission for Valorant
- Step 1 – Right-click Valorant and select Properties
- Step 2 – Go to Group or User names to check your permissions
- Step 3 – Click on Edit to choose the permissions you need (full control, modify, read, write, or special permissions).
- Step 4 – Launch Valorant and check if it works.
Fix 2 – Check Valorant’s location
Make sure the game location is accessible. Here’s how to do that:
- Step 1 – Right-click on Valorant and click Properties
- Step 2 – Select the General tab and check the file path — it needs to be the correct path
- Step 3 – Still under the General tab, check if there is any mention such as This file came from another computer and might be blocked to help protect this computer next to security. If there is, check the Unblock checkbox
- Step 4 – Reboot your computer and try to run the game again.
Recreate Valorant’s shortcut
This problem may also occur if the location of Valorant’s shortcut path changed. In this case, you need to create a new game shortcut that points to the current game location.
- Step 1 – Click on an empty space on your desktop
- Step 2 – Select New → Shortcut
- Step 3 – Add Valorant by following this path: Riot Games\VALORANT\Live\Binaries\Win64\VALORANT
and hit Next. The path might be slightly different depending on your configuration - Step 4 – Name the new shortcut and hit Finish.
Fix 3 – Disable interfering software
If there are any programs blocking Windows from accessing Valorant’s files, this method will help you solve the problem.
Start with your antivirus. Perhaps the antivirus is blocking the game. Maybe your security software temporarily blocked some of the game files.
Or maybe you installed other programs which are incompatible with Valorant. To fix this, you can clean boot your computer or disable background processes using the Task Manager.
We hope something helps.
References:
- Windows cannot access the specified device, path, or file” error when you try to install, update or start a program or file, retrieved from Microsoft Support.
Иногда, при запуске программ (файлов .exe) вы можете получить сообщение об ошибке «Windows не удается получить доступ к указанному устройству, пути или файлу. Возможно, у вас нет нужных разрешений для доступа к этому объекту». При этом права администратора обычно в наличии, а о причинах ошибки можно лишь догадываться.
В этой инструкции подробно о том, как исправить ошибку «Windows не удается получить доступ к указанному устройству, пути или файлу» и о том, чем она может быть вызвана.
- Разрешения на выполнение в свойствах файла
- Windows не удается получить доступ к указанному устройству, пути или файлу при запуске программ с флешки и других USB-накопителей
- Локальные политики безопасности, Software Restriction Policies как причина ошибки
- Блокировка файлов антивирусными программами
- Дополнительная информация
Проверка разрешений в свойствах исполняемого файла и блокировки файла

Первое, что следует проверить при возникновении ошибки «Windows не удается получить доступ к указанному устройству, пути или файлу» — актуальные разрешения на выполнение этого .exe файла. Для этого выполните следующие шаги:
- Откройте свойства .exe файла, который вы пробуете запустить (не свойства ярлыка, а именно исполняемого файла .exe), для этого нажмите по нему правой кнопкой мыши и выберите нужный пункт меню.
- Перейдите на вкладку «Безопасность» (если таковая отсутствует, возможно, файл находится на томе FAT32 и этот раздел инструкции не подходит для вашего случая).
- Выбирая пользователей в списке «Группы и пользователи» проверьте, включен ли запрет на чтение и выполнения для Администраторов или конкретно для вашего пользователя.

- Если такой запрет присутствует, нажмите кнопку «Изменить», а в следующем окне либо снимите отметку «Запретить», либо установите отметку «Разрешить» для нужных пользователей и групп.

Если файл был загружен из Интернета, на всякий случай зайдите также на вкладку «Общие» в свойствах .exe файла и посмотрите, нет ли там сообщения «Этот файл получен с другого компьютера и, возможно, был заблокирован с целью защиты компьютера».
При наличии такого уведомления, разблокируйте его, установив соответствующую отметку и применив настройки.
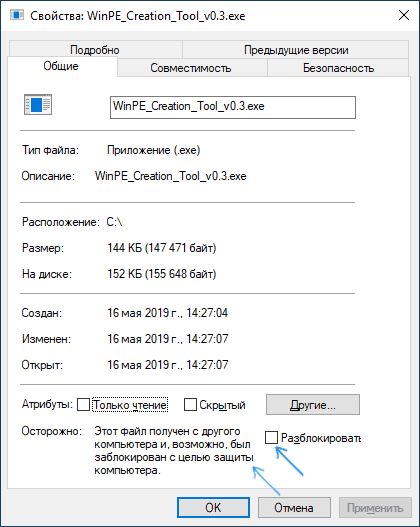
По завершении изменений, примените настройки и попробуйте снова запустить файл, который ранее не запускался для проверки, была ли решена проблема.
Ошибка «Windows не удается получить доступ к указанному устройству, пути или файлу» при запуске .exe с флешки или другого USB-накопителя
Если все программы, за исключением тех, что расположены на флешке, карте памяти или внешнем жестком диске исправно запускаются, причиной могут служить политики доступа к съемным запоминающим устройствам.
Решением в данном случае будет следующий путь:
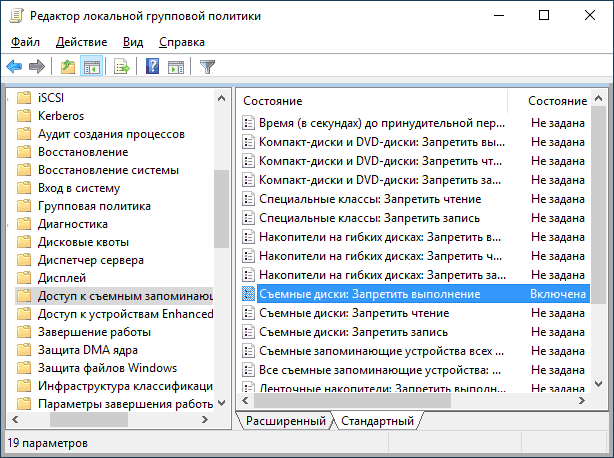
- Если на вашем компьютере установлена Windows 10, 8.1 или Windows 7 версий Профессиональная, Корпоративная или максимальная, нажмите клавиши Win+R, введите gpedit.msc и нажмите Enter. Для домашней редакции Windows перейдите к шагу 5.
- Откроется редактор локальной групповой политики, в нем перейдите к разделу «Конфигурация компьютера» — «Административные шаблоны» — «Система» — «Доступ к съемным запоминающим устройствам». Обратите внимание на значение политик «Съемные диски: Запретить выполнение» и других политик, связанных со съемными дисками.

- Если среди них есть включенные, дважды нажмите по таким политикам и задайте «Не задано» или «Отключена», примените настройки.
- Повторите то же самое для аналогичного подраздела в «Конфигурация пользователя» и перейдите к шагу 9.
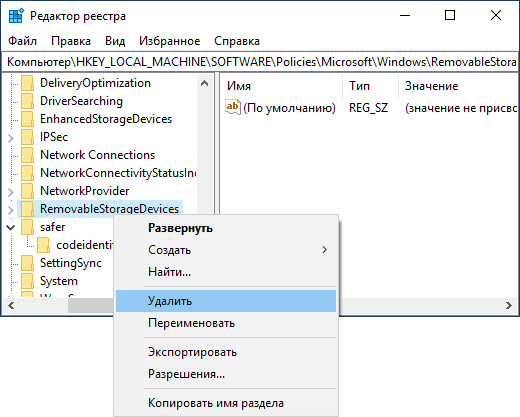
- Если на вашем компьютере установлена домашняя редакция Windows, нажмите клавиши Win+R на клавиатуре, введите regedit и нажмите Enter.
- В открывшемся редакторе реестра перейдите к разделу
HKEY_LOCAL_MACHINE\SOFTWARE\Policies\Microsoft\Windows\
- Если внутри него располагается подраздел RemovableStorageDevices, удалите его.

- Проверьте наличие аналогичного подраздела в HKEY_CURRENT_USER, удалите его в случае, если он присутствует.
- Обычно настройки вступают в силу сразу, однако USB накопитель потребуется отключить и подключить заново.
Политики ограниченного использования программ (SRP) и политики безопасности
Редко, но случается, что причиной рассматриваемой ошибки являются настроенные политики ограниченного использования программ либо локальные политики безопасности.
Проверить наличие политики ограниченного использования программ можно с помощью редактора реестра (случается, что когда они установлены сторонним ПО, в редакторе локальной групповой политики они не отображаются):
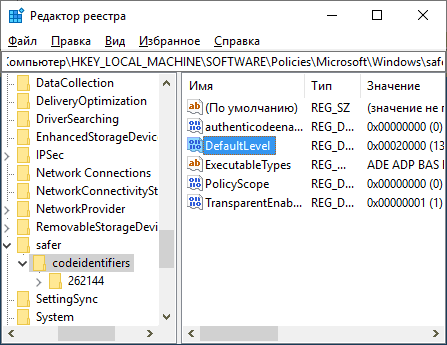
- Нажмите клавиши Win+R на клавиатуре, введите regedit и нажмите Enter.
- Перейдите к разделу реестра
HKEY_LOCAL_MACHINE\SOFTWARE\Policies\Microsoft\Windows\
- Посмотрите, присутствует ли в нем подраздел safer\codeidentifiers. Если да — политики SRP включены и у вас есть два основных варианта действий.
- Более щадящий (особенно если речь идет не о вашем личном компьютере) — изменить значение параметра DefaultLevel в правой части редактора реестра на 40000, применить настройки и перезагрузить компьютер.

- Целиком удалить подраздел codeidentifiers в safer и перезагрузить компьютер.
Аналогичную ошибку могут вызывать и настроенные политики безопасности (посмотреть можно в secpol.msc — Локальная политика — Параметры безопасности. В частности, когда речь идет о пользователе в домене, причиной может быть включенный параметр «Контроль учетных записей: режим одобрения администратором для встроенной учетной записи администратора».
Блокировка запуска файлов антивирусными программами
Антивирусы могут помещать подозрительные файлы (особенно если речь идет об играх из нелицензионных источниках, утилитах из интернета) в карантин и блокировать их запуск, используя техники, которые вызывают появление того же сообщения «Windows не удается получить доступ к указанному устройству, пути или файлу. Возможно, у вас нет нужных разрешений для доступа к этому объекту».
Проверьте журнал вашего антивируса или другого ПО безопасности, не находится ли запускаемый файл в списке найденных угроз. Также можно попробовать просто временно отключить антивирус, если вы уверены, что файл в порядке (но рекомендую сначала проверить его на VirusTotal).
Дополнительная информация
В завершение — несколько дополнительных моментов, которые следует учесть, если вы столкнулись с ошибкой из этой статьи в Windows 10, 8.1 или Windows 7:
- Причиной могут оказаться сторонние средства родительского контроля или блокировки запуска программ (см. Как заблокировать запуск программ в Windows).
- Если вы используете встроенную учетную запись с именем «Администратор», попробуйте создать нового пользователя с не зарезервированным именем и дать ему права администратора, а затем проверить, сохраняется ли проблема при входе под этим пользователем (см. Как создать пользователя Windows 10).
- В случае, если проблема появилась внезапно, а еще недавно этот же файл запускался, попробуйте использовать точки восстановления Windows. Даже если они не запускаются с той же ошибкой, вы можете использовать их с загрузочной флешки с Windows: загрузитесь с неё и на втором экране внизу слева выберите «Восстановление системы».
- Если программа запускается с ярлыка, откройте его свойства и посмотрите, доступен ли путь, на который ссылается поле «Объект».
- При расположении .exe файла на сетевом диске, убедитесь, что он доступен с вашего компьютера.