
Applies ToWindows 11 Windows 10
Поддержка Windows 10 прекратится в октябре 2025 г.
После 14 октября 2025 г. корпорация Майкрософт больше не будет предоставлять бесплатные обновления программного обеспечения из Центра обновления Windows, техническую помощь и исправления безопасности для Windows 10. Ваш компьютер по-прежнему будет работать, но мы рекомендуем перейти на Windows 11.
Подробнее
В течение ограниченного времени после обновления Windows вы можете вернуться к предыдущей установленной версии. Это может быть полезно, если у вас возникли проблемы с новой версией, например проблемы совместимости с программным обеспечением или оборудованием, или если вы просто предпочитаете, как все работало раньше. Откат до предыдущей версии может помочь восстановить стабильность и функциональность, пока вы ожидаете выпуска обновлений или исправлений.
Примечания:
-
Возможность вернуться к предыдущей версии Windows доступна только в течение ограниченного времени после обновления. В большинстве случаев у вас есть 10 дней назад.
-
Приложения, которые были добавлены, удалены или обновлены после обновления, могут быть недоступны или работать должным образом после возврата к предыдущей версии Windows.
Шаги для возврата
-
В приложении «Параметры» на устройстве с Windows выберите Восстановление системных > или используйте следующий ярлык:Открыть параметры восстановления.
-
Если параметр доступен, выберите Назад. При этом будут сохраняться ваши личные файлы, но будут удалены приложения и драйверы, установленные после обновления, а также любые изменения, внесенные в параметры.

Чтобы вернуться к предыдущей версии, необходимо:
-
После обновления сохраните все данные в папках windows.old и $windows.~bt
-
Удаление всех учетных записей пользователей, добавленных после обновления
-
Наличие USB-накопителя, используемого для обновления до Windows (если он использовался)
Сведения о программе предварительной оценки Windows
При возврате к предыдущей сборке вы не будете удалены из Программы предварительной оценки. Когда будет готова следующая предварительная сборка, она будет установлена на компьютере.
Нужна дополнительная помощь?
Нужны дополнительные параметры?
Изучите преимущества подписки, просмотрите учебные курсы, узнайте, как защитить свое устройство и т. д.
Все способы:
- Вариант 1: Обновление до новой ОС
- Вариант 2: Откат до ранней версии
- Вариант 3: Изменение редакции системы
- Предварительные шаги
- Способ 1: Переход с Pro до Enterprise
- Способ 2: Обновление Windows 10 Home до Professional/Enterprise
- Вопросы и ответы: 0
Прежде чем переходить к чтению статьи, следует определиться, что именно вы планируете поменять – саму версию или редакцию. Во втором случае для «десятки» есть несколько вариантов: Home, Professional и Enterprise. Если же нужно обновить до следующей версии или откатиться назад, изучите Варианты 1 и 2 данной статьи. Когда планируется перейти с одной редакции на другую, читайте информацию из Варианта 3.
Вариант 1: Обновление до новой ОС
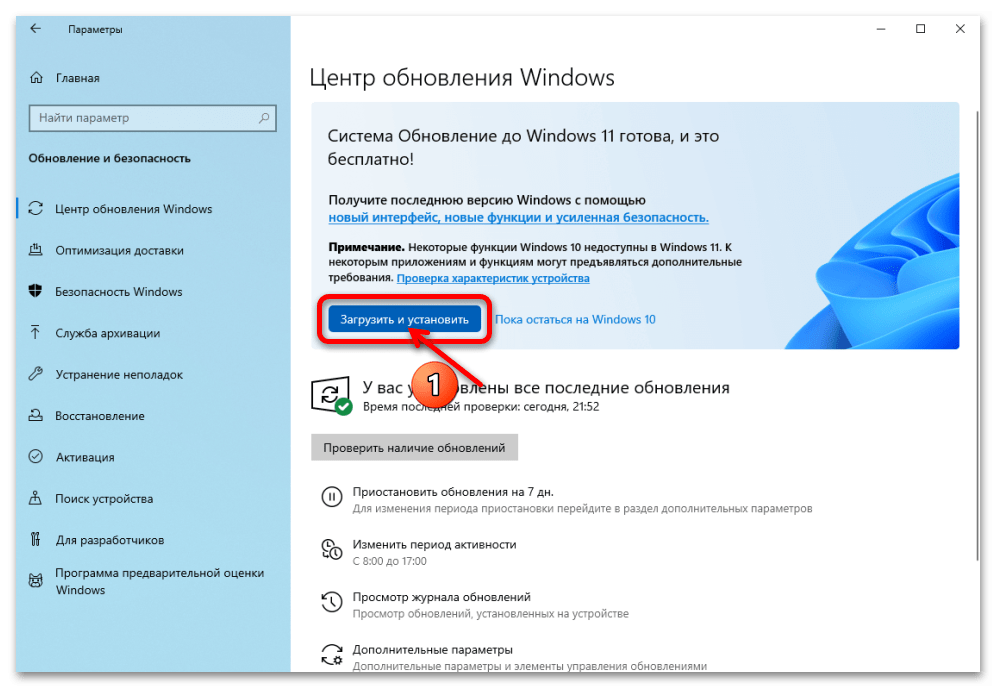
Перед тем как обновиться до следующей Windows, в нашем случае до 11, убедитесь, что ваш компьютер соответствует системным требованиям операционной системы. Также требуется провести несколько подготовительных этапов, которые позволят избежать различных проблем при установке и дальнейшем использовании.
Всего существует несколько методов обновления Windows 10 до Windows 11. Владельцам «десятки» может быть предложено инсталлировать основную версию Windows на компьютер поверх старой с помощью встроенного средства «Центр обновления Windows», при условии, что устройство соответствует требованиям. Также можно воспользоваться вспомогательной утилитой от компании Microsoft, установочным накопителем или специальным софтом для обновления. Обо всем этом мы писали ранее в отдельном материале. Кроме того, при такой процедуре пользовательские данные и настройки не будут потеряны в отличие от случая, когда система полностью переустанавливается.
Подробнее: Обновление ОС компьютера до Windows 11
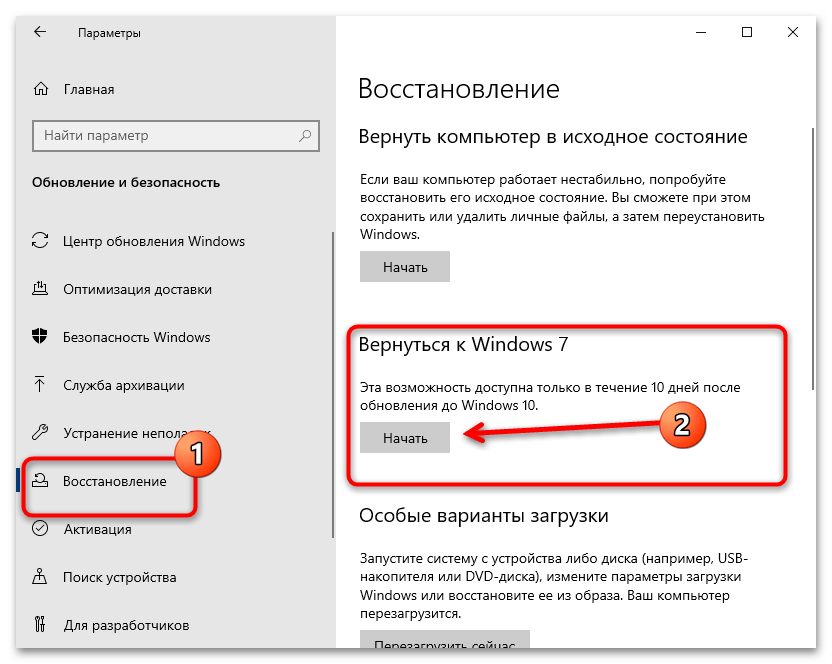
Вариант 2: Откат до ранней версии
Есть ситуации (хоть они сейчас практически и не встречаются), когда нужно, наоборот, откатить Windows 10 до более ранней операционки, а именно до Windows 7. Если с момента перехода на более новую ОС прошло не слишком много времени, можно воспользоваться встроенными средствами для выполнения поставленной задачи. В противном случае потребуются иные методы решения ситуации, в том числе и полная переустановка Виндовс. Более подробно читайте об этом в другой статье на нашем сайте.
Подробнее: Откат с Windows 10 до Windows 7
Вариант 3: Изменение редакции системы
Что касается редакции операционной системы Windows 10, то перейти с одной на другую (с более младшей до более старшей) можно, но в зависимости от самой редакции доступные способы могут отличаться. Они не предполагают удаления настроек, ранее установленных программ или пользовательских данных.
Предварительные шаги
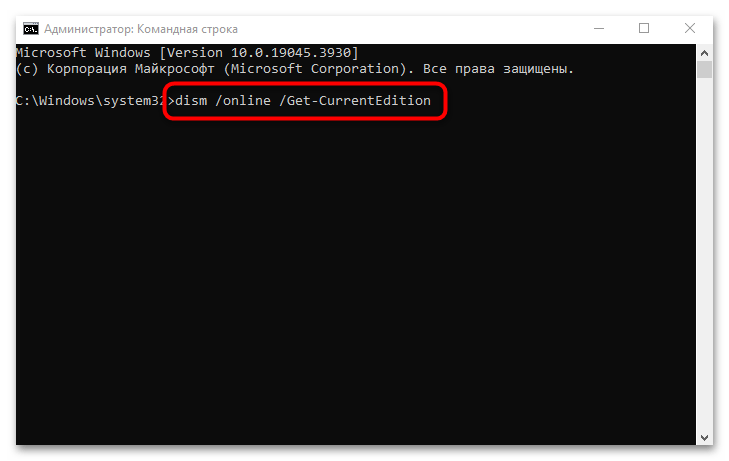
Лучше предварительно убедиться в том, какая редакция текущая. Проще всего — через специальную команду в «Командной строке».
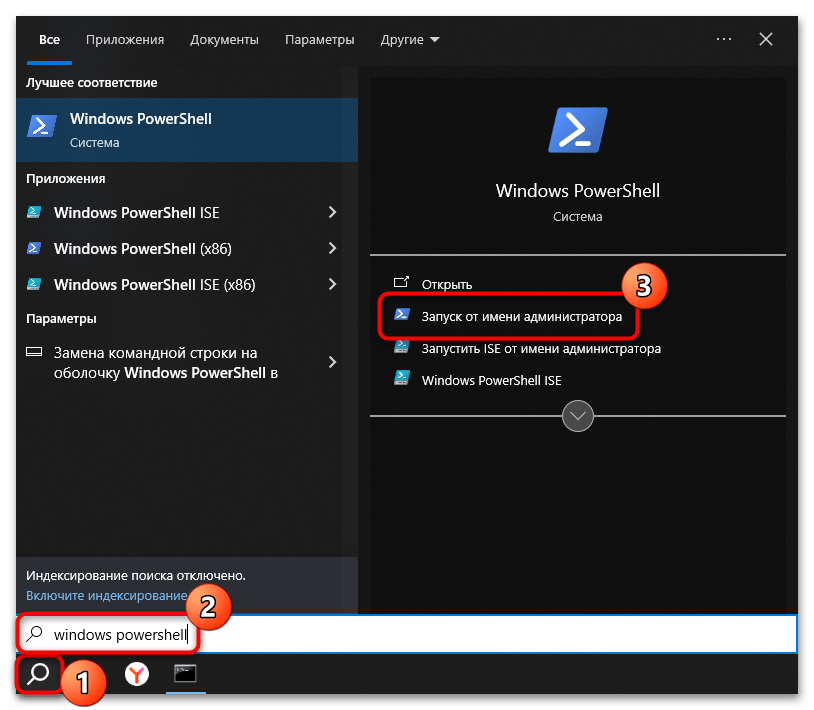
- Запустите консоль с правами администратора, отыскав ее с помощью строки системного поиска и выбрав нужный тип запуска.
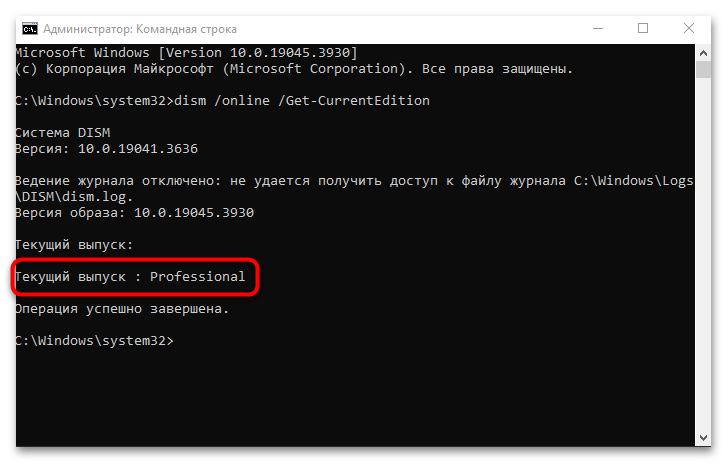
- В окне введите команду
dism /online /Get-CurrentEditionи нажмите на клавишу «Enter». - Ниже отобразится некоторая информация об операционке, включая версию и текущий выпуск (редакцию).

Также с помощью «Командной строки» можно посмотреть, какие редакции доступны для обновления в вашем случае. Для этого выполните команду dism /online /Get-TargetEditions.
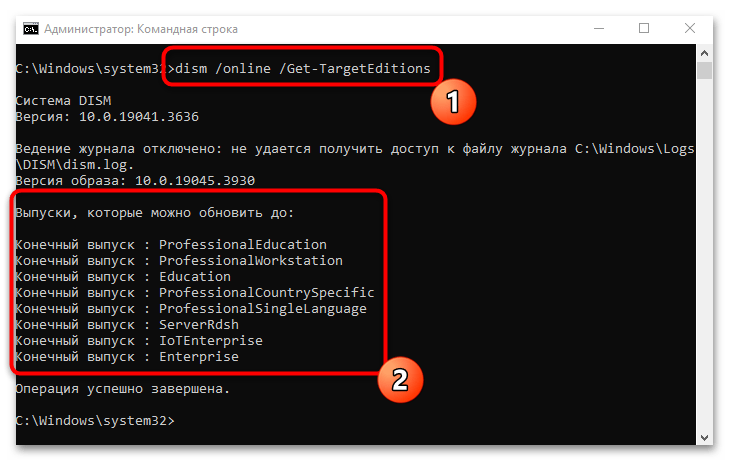
Важно отметить один нюанс: смена редакции автоматически приведет к потере текущей активации системы, поскольку у каждой из них свои особенности и, соответственно, цена.
Читайте также: Активация операционной системы Windows 10
Способ 1: Переход с Pro до Enterprise
Теперь, наверняка зная, какая редакция используется, можно обновить ее до более старшей. Для повышения редакции Windows 10 с Pro потребуется публичный KMS ключ, который доступен на сайте Microsoft.
Перейти на страницу официального сайта Microsoft
- Откройте ссылку выше, чтобы получить публичный ключ Microsoft, который активирует операционную систему на время пробного периода. В таблице «Windows 11 and Windows 10 Semi-Annual Channel» («Полугодовой канал Windows 11 и Windows 10») найдите нужную редакцию, на которую [хотите перейти (например, на Windows 10 Enterprise) и скопируйте в буфер обмена компьютера ее ключ. Выделите его и используйте сочетание клавиш «Ctrl + C» либо контекстное меню, вызываемое нажатием правой кнопкой мыши по выделенному фрагменту.
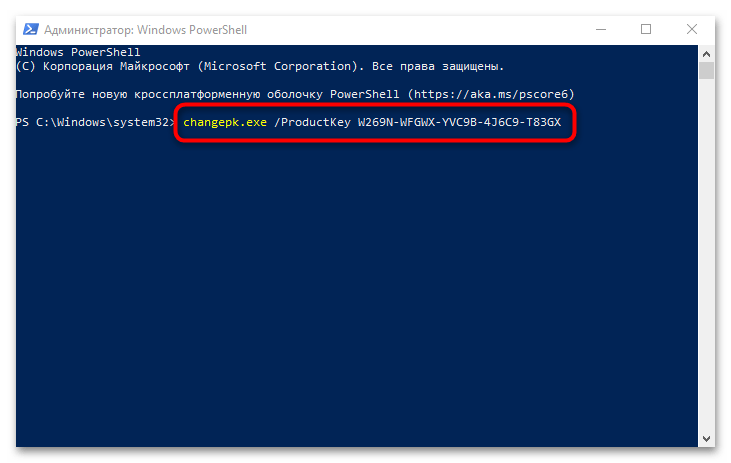
- Теперь запустите консоль «Windows PowerShell» от имени администратора.
- Введите команду
changepk.exe /ProductKey KEY, где вместо «KEY» вставьте ранее скопированный ключ. Для выполнения нажмите на клавишу «Enter».

После выполненных действий редакция «десятки» изменится – ни подтверждение, ни перезагрузка не потребуются. Останется только активировать лицензию текущей редакции.
Проверить, изменена ли редакция, можно таким же методом, что мы описывали в разделе «Предварительные шаги» данной статьи — с помощью «Командной строки» и специальной команды.
Аналогичными способами можно и понизить редакцию Windows 10, например изменить версию с Pro на Home, но следует понимать, что даунгрейд доступен не во всех направлениях. Если нужно откатиться с Enterprise до Home, то сначала придется перейти на Professional, а уж после можно перейти на домашнюю версию «десятки».
Способ 2: Обновление Windows 10 Home до Professional/Enterprise
Для перехода с Windows 10 Home на Professional или Enterprise действовать нужно несколько иначе, и потребуется лицензионный ключ для новой редакции. То есть его нужно предварительно приобрести на официальном сайте Microsoft или у продавцов, имеющих право распространять лицензию на операционную систему.
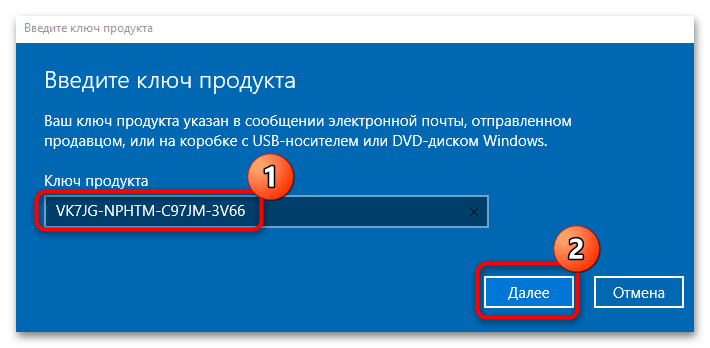
Если ключ пока отсутствует, можно прибегнуть к временной активации, используя комбинацию
VK7JG-NPHTM-C97JM-9MPGT-3V66T, которая, как правило, применяется при установке ОС с пропуском ввода ключа (в ознакомительном режиме).
Если ключ для Pro у вас уже есть, достаточно его применить, после чего редакция будет автоматически обновлена:
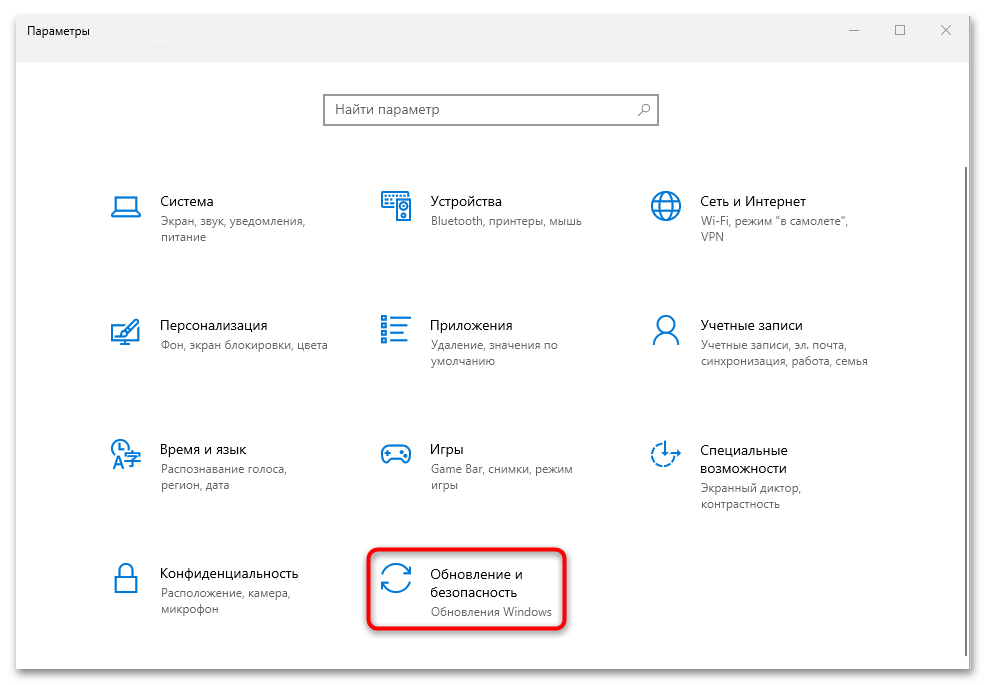
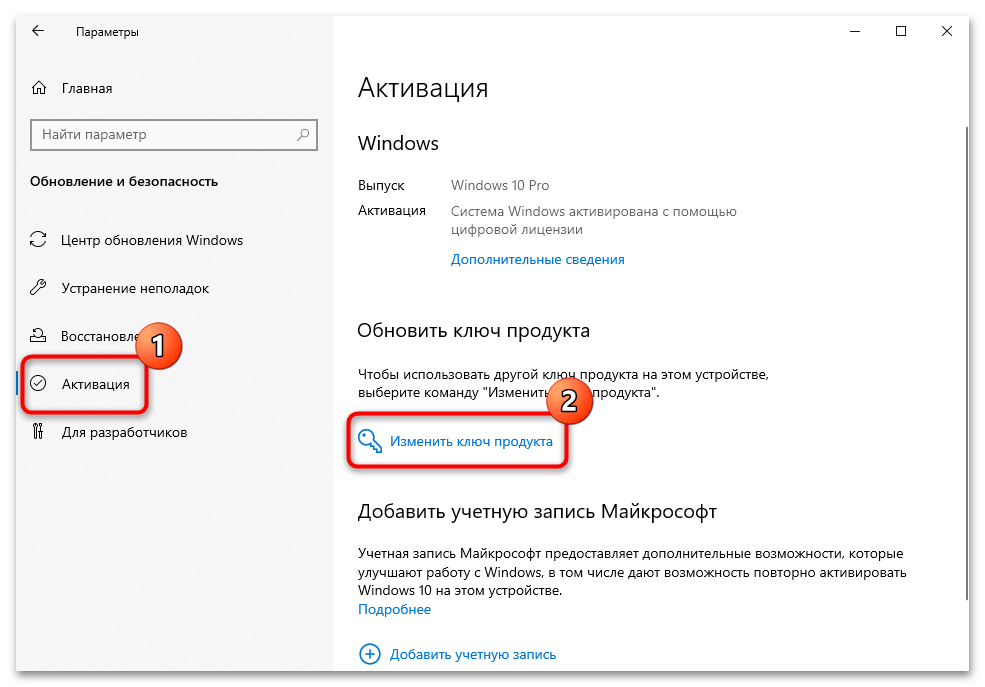
- Через главное меню запустите приложение «Параметры» и выберите раздел «Обновление и безопасность».
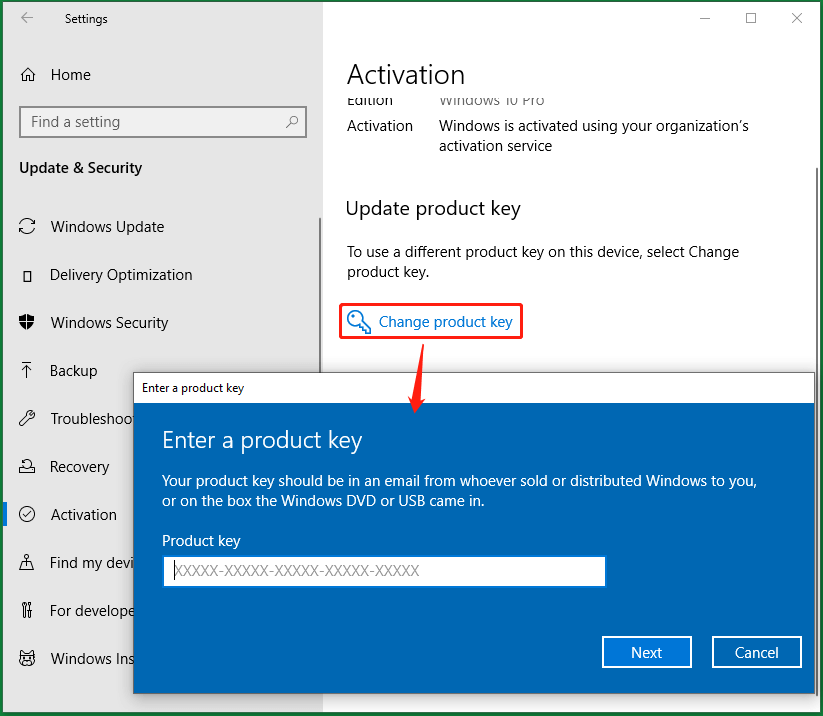
- На панели слева переключитесь на вкладку «Активация», а в центральной части кликните по ссылке «Изменить ключ продукта».
- В открывшемся окне введите временный или лицензионный ключ продукта и нажмите на кнопку «Далее».
Останется перезагрузить систему, после чего можно проверить, изменена ли редакция Windows 10.
Также для этого цели можно использовать предустановленную утилиту «changepk». Проделайте то же самое, что и в инструкции из Способа 1 (Шаги 2 и 3), или предварительно удалите предыдущий ключ и задайте новый. Для этого сначала используйте команду
slui.exe /upk, чтобы очистить старые данные.
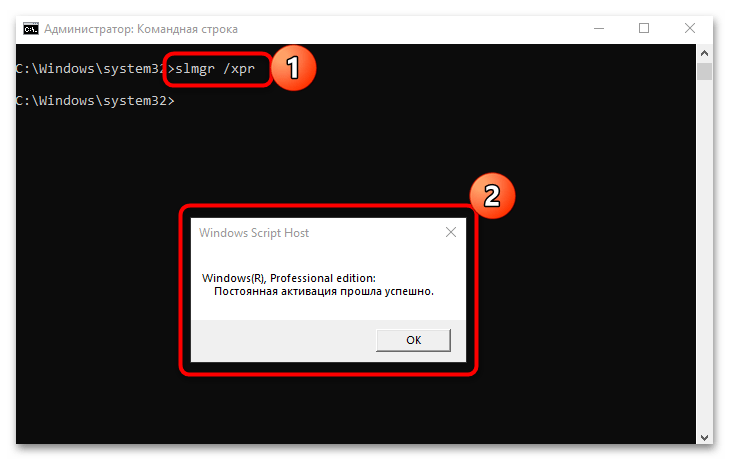
Если был использован ключ, который мы приводили в статье выше, Windows не будет активирована до тех пор, пока вы не приобретете лицензионный код активации. Статус активации можно проверить с помощью консольной команды slmgr /xpr.
Наша группа в TelegramПолезные советы и помощь
В этой статье расскажем, как выполнить откат (даунгрейд) версии или редакции Windows Server, например, понизить версию Windows Server Datacenter до Standard без переустановки системы. Это может быть полезно, если на сервере используются ресурсы, для которых достаточно менее дорогой редакции.
Приобрести оригинальные ключи активации Windows Server можно у нас в каталоге от 1190 ₽
Как узнать редакцию Windows Server?
Проверить установленную редакцию Windows Server можно несколькими способами:
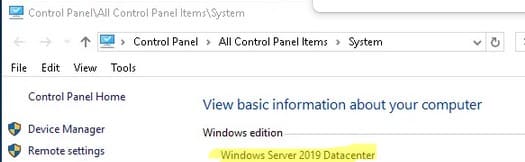
1. Через Панель управления:
— Перейдите в Control Panel > System and Security > System.
— В этом окне будет указана текущая версия и редакция Windows Server.
2. Из командной строки:
systeminfo | findstr /B /C:"OS Name" /B /C:"OS Version"
или
wmic os get Caption, Version, BuildNumber, OSArchitecture

3. С помощью PowerShell:
Get-WindowsEdition –Online
4. В доменных сетях можно использовать командлет для получения информации обо всех серверах в домене:
Get-ADComputer -Filter {(Enabled -eq $True) -and (OperatingSystem -Like '*Windows Server*')} -Property * | Select-Object Name,OperatingSystem,OperatingSystemVersion

Понижение редакции Windows Server с Datacenter до Standard
Microsoft официально не поддерживает понижение редакций (даунгрейд), поэтому рекомендуем перед выполнением даунгрейда создать полную резервную копию системы.
Шаги для понижения редакции:
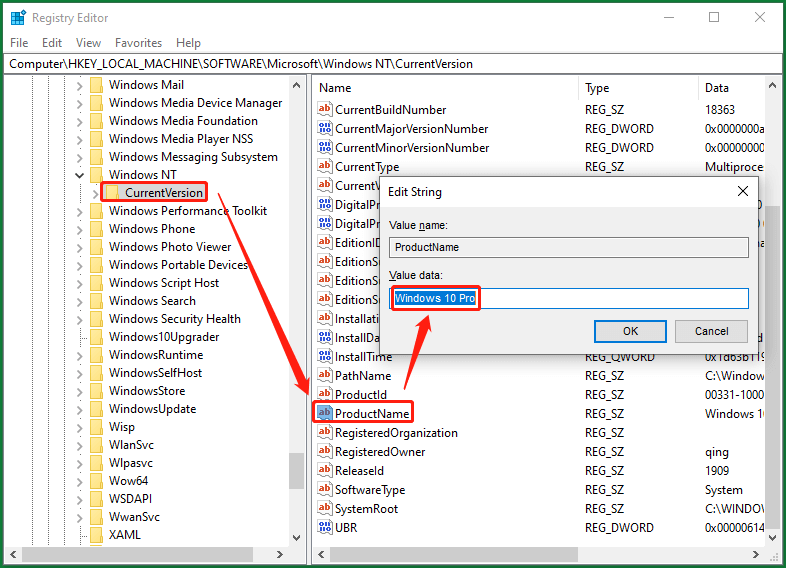
1. Откройте реестр:
— Запустите regedit и перейдите в ветку HKEY_LOCAL_MACHINE\SOFTWARE\Microsoft\Windows NT\CurrentVersion.
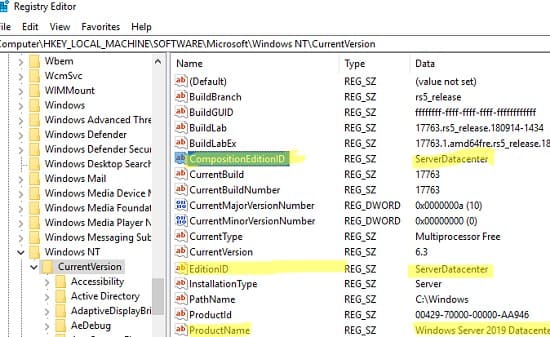
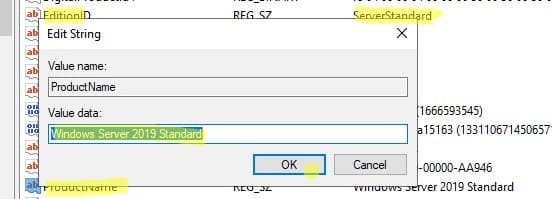
— Измените значения следующих параметров:
— EditionID = ServerStandard
— ProductName = Windows Server 2019 Standard
— CompositionEditionID = ServerStandard
Обратите внимание, что существует довольно редкая редакция Windows Server Essentials. Для нее нужно указывать EditionID = ServerSolution. Так же, не перезагружайте сервер после смены значений указанных ключей реестра, иначе они автоматически вернутся на предыдущие значения.
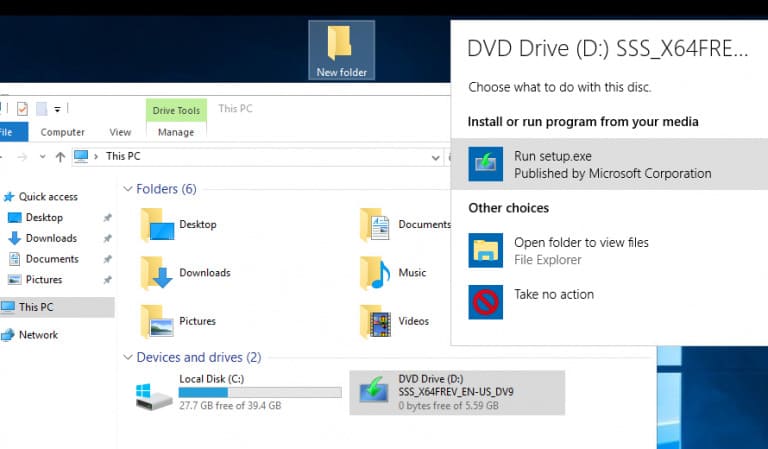
2. Запустите установку Windows Server 2019:
— Смонтируйте ISO образ с Windows Server 2019 и запустите установочный файл setup.exe.
— Выберите Upgrade и укажите редакцию Windows Server 2019 Standard (Desktop Experience).
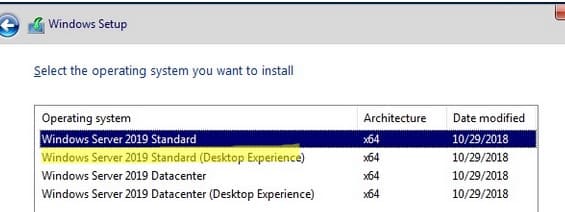
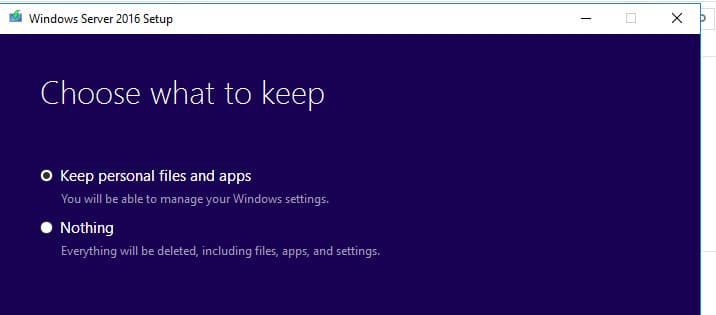
— Убедитесь, что выбрана опция Keep personal files and apps, чтобы сохранить установленные приложения и данные.
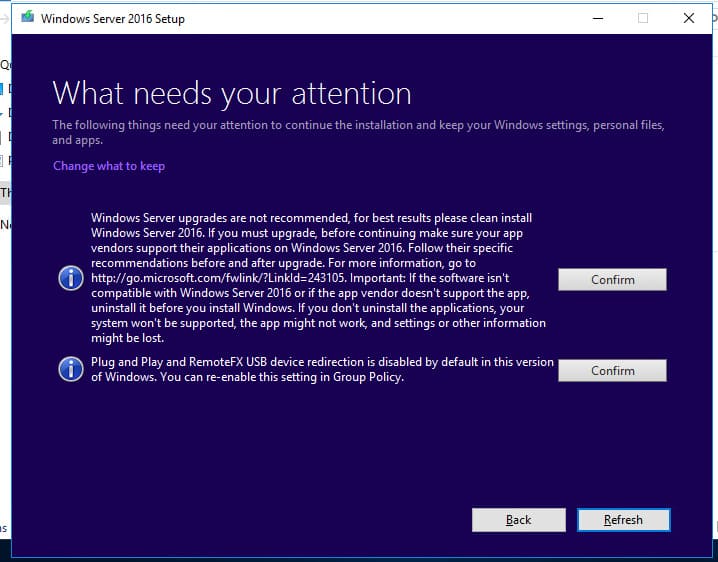
3. Подтвердите предупреждения:
— Если при установке возникают предупреждения, внимательно прочитайте их. Обычно рекомендуется выполнить чистую установку, но для даунгрейда можно продолжить процесс и нажать везде «Confirm».
4. Завершение процесса:
— После завершения установки и перезагрузок проверьте, что сервер теперь работает под редакцией Windows Server 2019 Standard.
Можно ли выполнить даунгрейд Windows Server 2022 до 2019/2016?
Правила лицензирования Microsoft разрешают использовать предыдущие версии Windows Server при наличии лицензии на более новую версию. Например, с лицензией на Windows Server 2022 можно запустить Windows Server 2019 или 2016.
Порядок действий:
1. Для активации предыдущей версии Windows Server получите ключ продукта через VLSC или обратитесь в службу поддержки Microsoft.
2. Установите сервер с использованием публичного GVLK ключа и активируйте через службу KMS.
Важно: Понизить уже установленную ОС с Windows Server 2022 до 2019 или 2016 нельзя. В этом случае потребуется выполнить чистую установку старой версии.
Также обратите внимание на необходимость обновления RDS CAL лицензий при даунгрейде, если у вас развернуты службы удаленных рабочих столов.
Понижение версии Windows Server может быть выполнено без переустановки, однако этот процесс не поддерживается официально Microsoft. Будьте внимательны при работе с важными серверами и всегда создавайте резервные копии перед началом операции.
Лицензионный ключ активации Windows Server от
The following content dissertated by MiniTool Software explains what downgrading from Windows 10 Enterprise to Pro is, why users need to do that, and most significantly how to achieve that without reinstalling personal applications.
What Does “Downgrade Windows 10 Enterprise to Pro” Mean?
Downgrading Windows 10 Enterprise to Pro refers to replacing your current Windows 10 Enterprise edition operating system (OS) with a lower Windows 10 Professional edition. Since Win10 Pro is less advanced than Win10 Enterprise, we usually regard this change as downgrading. On the contrary, to change Windows Pro to Enterprise, people call it “upgrade”.
Why Need to Downgrade Windows 10 Enterprise to Pro?
Users usually upgrade Windows 10 Pro to Enterprise to enjoy more features and better services for advanced tasks or gaming. However, why do some people want to change from Windows 10 Enterprise to Pro? There are several reasons.
- Users encounter some problems while using Windows 10 Enterprise system.
- Users don’t need the special services of Windows 10 Enterprise OS anymore.
- Users mistook Win 10 Enterprise with Win 10 Pro and installed it.
- Dismissed employees are not allowed to use the Enterprise license belonging to the company.
How to Downgrade from Windows 10 Enterprise to Pro?
Next, we will talk about how to downgrade Windows 10 Enterprise to Windows 10 Pro step by step. Please do exactly as what is described below.
Before starting, you need to do some preparations. On the one hand, you need to get a Windows 10 Pro license to register the PRO version you are going to install. On the other hand, you have to back up important data, especially personal files/folders, that you don’t want to lose during the downgrading process, which requires a clean installation of the system that erases all apps and files.
To create a backup of crucial files and tools, you will need a professional and reliable data backup program like MiniTool ShadowMaker, which enables you to back up vital items quickly and freely.
MiniTool ShadowMaker TrialClick to Download100%Clean & Safe
The following solutions not only apply to Windows 10, but also Windows 11, 8.1, 8, 7.
#1 Downgrade Windows 10 Enterprise to Pro by Changing Product Key
The easiest way to turn Win10 Enterprise into Win10 Pro is to alter the Windows Registration key. However, you need to rely on a generic product key below as transit.
- For Windows 10 Pro: VK7JG-NPHTM-C97JM-9MPGT-3V66T
- For Windows 10 Pro N: 2B87N-8KFHP-DKV6R-Y2C8J-PKCKT
Now, let’s see how to downgrade Windows 10 Enterprise to Pro:
- Navigate to Windows 10 Enterprise Settings > Update & security > Activation.
- In the right section, click on the Change product key option.
- Next, input the Windows 10 Pro generic product key above into the column.
- Confirm the change with the Activate button.
If your Enterprise edition is upgraded from Pro before, you will be activated directly to the Pro edition after the above steps. If not, you have to further activate your system with a valid Windows 10 Pro license key that you should have got in the above preparation.
#2 Convert Windows 10 Enterprise to Pro Through Installation ISO
Secondly, you are able to replace Win10 Enterprise with the Pro edition using Windows 10 Pro installation ISO file.
- Get a Win10 Pro Installation ISO file.
- Click on the ISO file to open it.
- Double-click on exe to launch it.
- Then, it will notify you about system updates. You can choose either Download and install updates or Not right now.
- Accept applicable notices and license terms.
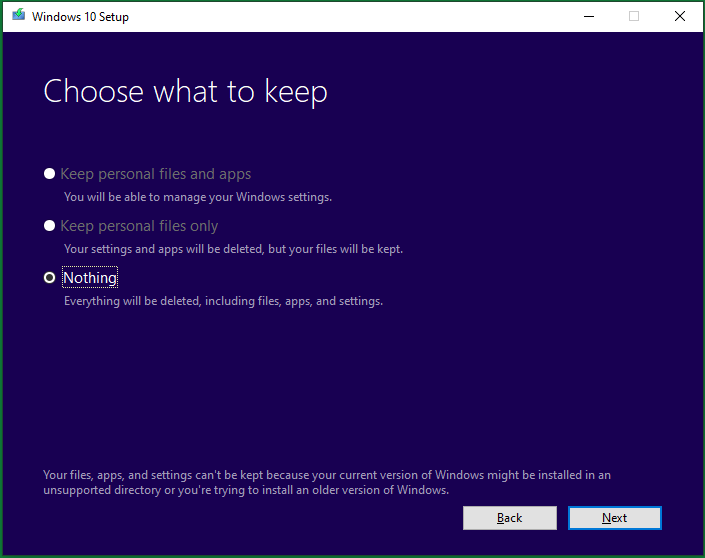
- Choose what to keep, keep personal files and apps, keep personal files only, or nothing.
Then, just follow the guidance to carry out the rest steps.
#3 Downgrade Windows 10 Enterprise to Pro in Media Creation Tool
Media Creation Tool is a Microsoft official program that can help you directly download all editions of Windows 10 automatically with its own downloader. With it, you do not need to manually find the official webpage and download the system you want.
For an important preparation, you have to change some settings in the registry. Go to Computer\HKEY_LOCAL_MACHINE\SOFTWARE\Microsoft\Windows NT\CurrentVersion in your Registry Editor, change ProductName string’s value from Windows 10 Enterprise to Windows 10 Pro and alter EditionID string’s value from Enterprise to Professional.
This preparation is to enable Media Creation Tool to automatically download Windows 10 Professional’s installation files in the below process.
- Download Media Creation Tool onto your PC.
- Then, double-click on the exe to start the process.
- Accept the applicable notices and license terms.
- Choose Upgrade this PC now and wait patiently to let it download Windows 10 necessary files and create Windows 10 media.
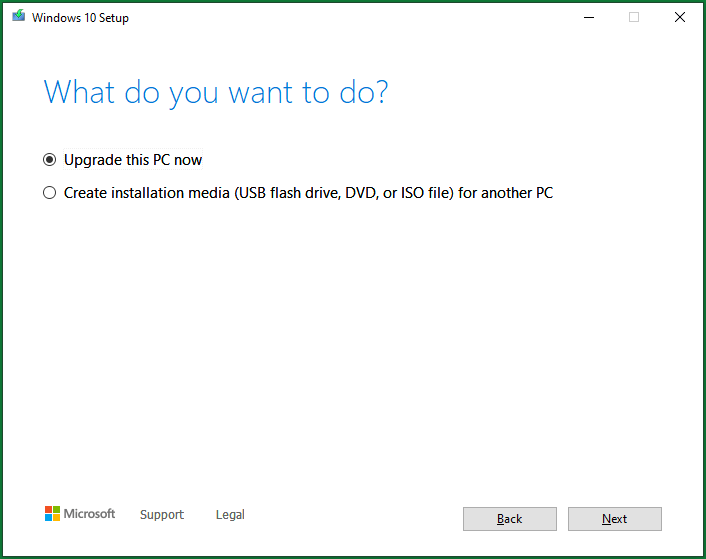
Then, just follow the on-screen instructions to finish the task.
#4 Change Windows 10 Enterprise to Pro with Installation Media
To downgrade from Win10 Enterprise to Pro with an installation device, you can carry out the operations on the target computer with the same preparations as described in the above Method 3. Or, you can perform the task on a Windows 10 Pro PC if you have one without those preparations.
No matter on which machine, just select Create installation media (USB flash drive, DVD, or ISO file) for another PC in the fourth step in the above method 3. Then, specify the language, edition, and architecture. Next, select which kind of installation media you’d like to create, USB flash drive or ISO file. Then, just follow the guide to finish.
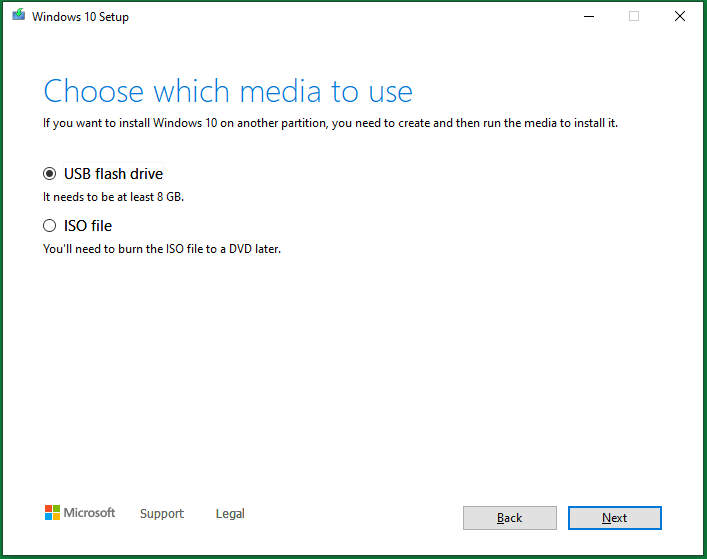
If you choose a USB flash drive, you need to prepare a blank USB with no less than 8 GB storage space and insert it into your computer. If there are important files within the USB, just move them out or back them up with MiniTool ShadowMaker.
MiniTool ShadowMaker TrialClick to Download100%Clean & Safe
If you select an ISO file, just pick up a location to save the ISO image and later burn it into a USB or CD/DVD for use with Windows Disc Image Burner.
Then, you can clean install Windows 10 Pro on your computer with the installation USB/CD/DVD.
#5 Downgrade Windows 10 Enterprise to Pro via Backup and Restore
Finally, if you have another computer running Windows 10 Pro edition, you can create a backup of the system and restore the backup to Windows 10 Enterprise PC. This will rely on MiniTool ShadowMaker mentioned above.
For preparation, you need to connect 2 USB disks to the Win10 Pro PC, one for storing the system image and one for creating bootable media.
- Download and install MiniTool ShadowMaker on the Win10 Pro machine.
- Launch the tool. If it asks for purchase, click the Keep Trial option to continue using it for free.
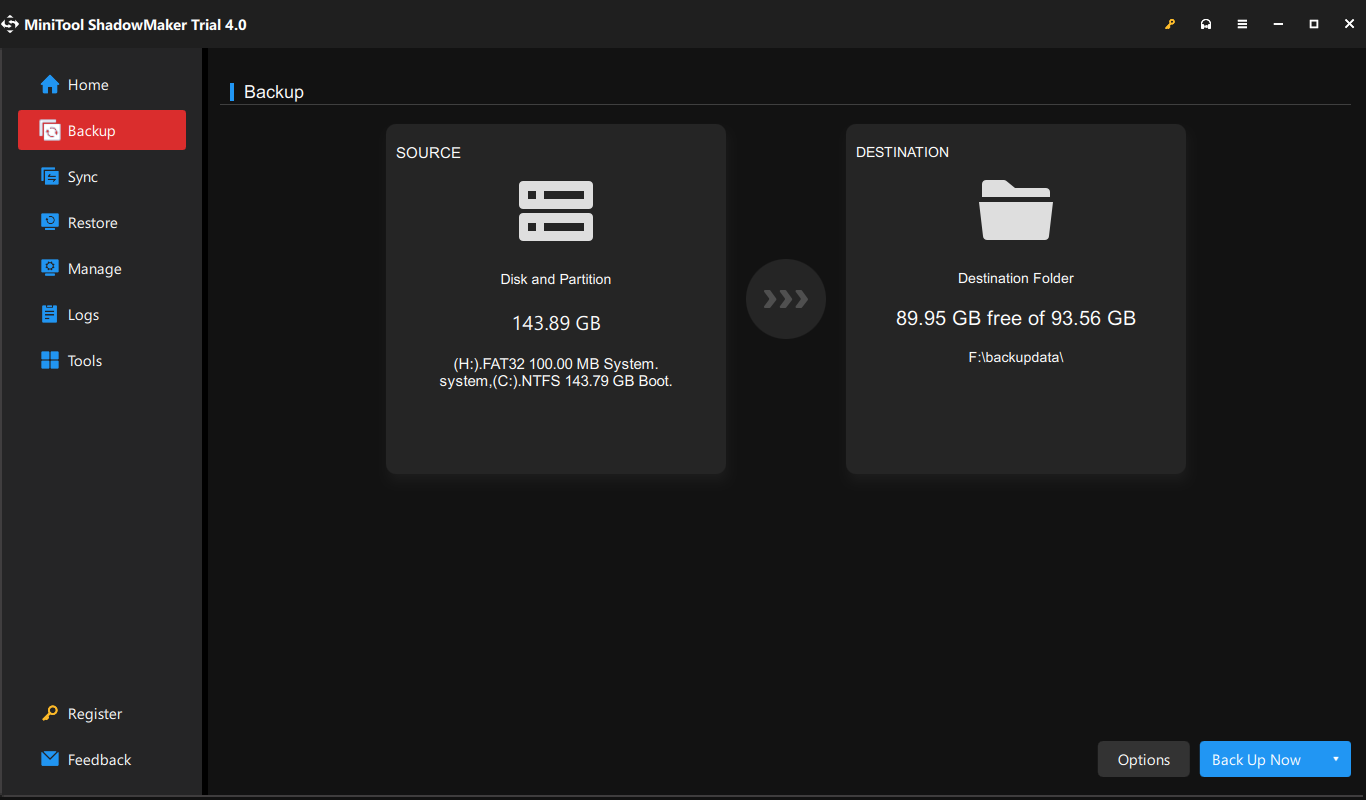
- In its main interface, move to the Backup tab.
- In the Backup tab, the source for system backup is selected by default.
- Click on the Destination module to select a USB hard drive to save the system image.
- Click Back up Now to start.
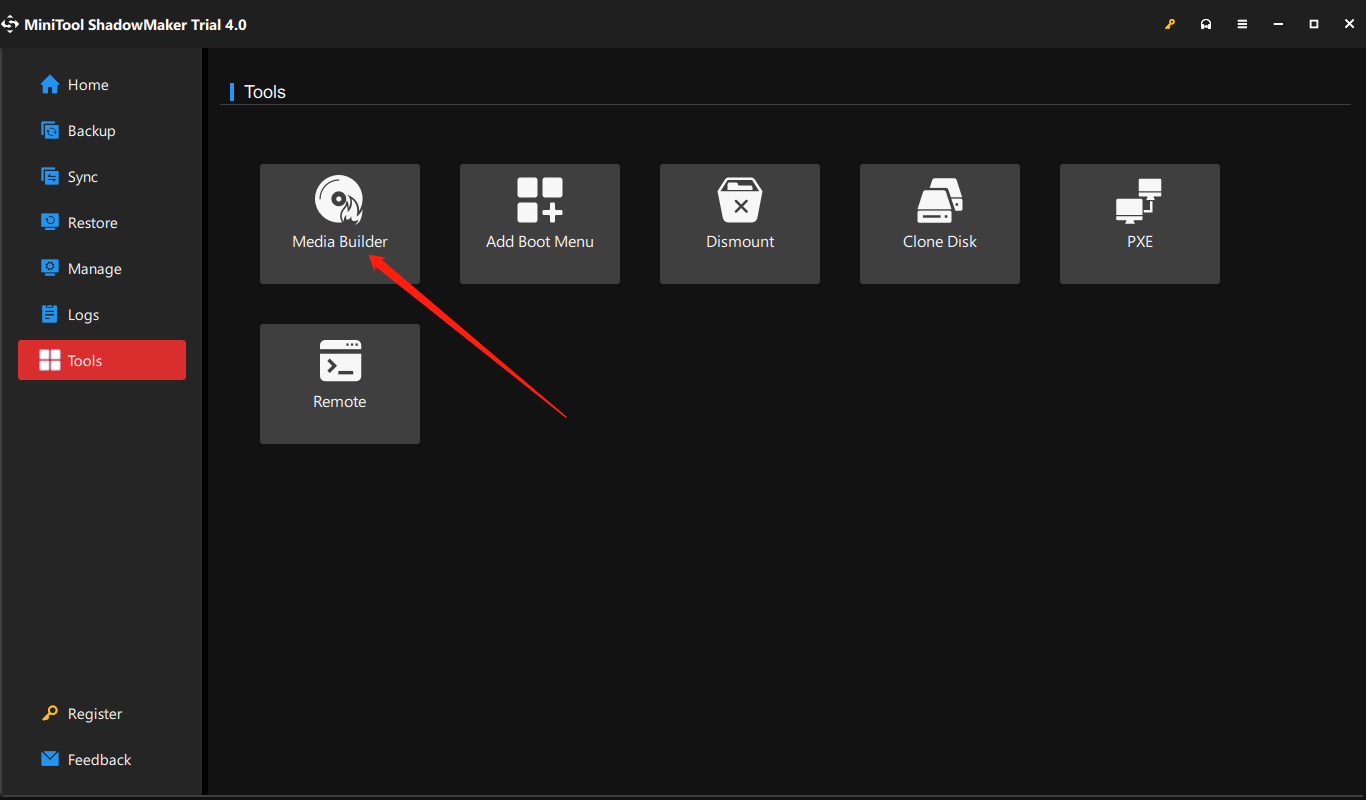
Wait until the process completes. Then, you need to create a bootable media with MiniTool ShadowMaker to boot Win10 Enterprise computer into Windows PE (Windows Preinstallation Environment) to conduct system restore. Just go to the Tools tab and select Media Builder to follow the instruction.
Next, connect the two USB disks to the Win10 Enterprise computer and set up the machine to boot from the bootable USB in its BIOS. When you successfully boot up from the bootable USB, you will enter WinPE and MiniTool ShadowMaker will open automatically.
- Switch to the Tools tab in MiniTool ShadowMaker.
- Click on the Universal Restore option, which improves the chance of system bootability after restoration compared to normal system restore.
- Then, follow the guide to finish the system restoration to a different computer.

Wait until the whole process completes. In this way, you have managed to alter OS from Enterprise to Pro.
Windows 10 Enterprise vs Pro
In general, Windows 10 Enterprise is almost identical to Windows 10 Pro and event to Windows 10 Home in terms of user interface (UI) except for the name in Windows Settings and the config screen. As for function, the advanced Win10 Enterprise system provides more features than the Win10 Pro system, which offers more utilities than Win10 Home.
The following are the features that are only available in Windows 10 Enterprise compared with Windows 10 Pro.
- DirectAccess: It is a VPN-type component that allows automatic VPN connections every time a user connects directly to the network while increasing security through an encrypted session.
- AppLocker: It enables you to create AppLocker rules in the Local Security Policy editor by setting up a whitelist and blacklist for programs as you preferred.
- App-V (Application Virtualization): It permits system administrators to create virtual instances of apps in a container. Then, Windows can run those programs in a self-contained virtual environment.
- UE-V (User Experience Virtualization): It enables users to save their system and app settings as they move from one computer to another so as to work in the same Windows environment.
- WTG (Windows To Go): It allows users to install Windows onto a USB flash drive or an external hard disk. So, you can plug the USB into any other computer and boot from it to work under a familiar system.
Knowing the above features that are embedded in Win10 Enterprise OS but not in Win10 Pro OS, you may have an impulse to upgrade from Windows 10 Pro to Enterprise to enjoy them. However, it’s somehow troublesome to upgrade a system that is similar to downgrade a system described above. If you really want some features above like Windows To Go, you can rely on third-party programs such as MiniTool ShadowMaker mentioned above to help you create bootable media.
MiniTool ShadowMaker TrialClick to Download100%Clean & Safe
As for Windows Enterprise or Pro, which is better or which to choose, it’s hard to say. They are just two editions of the Windows operating system for users with different needs. You need to select the one that suits you most.
Verdict
That is all about downgrading Windows 10 Enterprise to Pro. Hope you can understand the information and manage to degrade Windows 10 Enterprise to Pro. If you have any different ideas or want to share something about this topic, just leave a comment below. If you encounter any problem while using MiniTool ShadowMaker, just contact [email protected].
Also read:
- Can You Use Filter on Snapchat Video Calls? Yes or No?
- What’s the Best Frame Rate for 4k Video? 60 FPS or 50 FPS?
- How to Tag/Untag Photos on Facebook & Hide/See Tagged Photos?
- Windows 11 Video Editor Fade out/in: Movie Maker/Photos/Clipchamp
- [7 Fixes] Windows 11 Can’t Find Camera or Camera Doesn’t Work
Multiple reasons exist to downgrade your current Windows to Windows 10. Perhaps your recent Windows is incompatible with specific programs, or you just like the working of Windows 10 better. You could be worried that this downgrade would result in lost access to your crucial programs, applications, and files. You can get assistance with that from this complete manual. This article will guide you on downgrading your Windows to Windows 10 without losing your data or other crucial programs.
| 🎯Goal: | Help Windows users to seamlessly downgrade to Windows 10 without losing programs. |
| ⏱️Duration: | 35minutes — 1 hour |
| 👔Who Will Need It: | All levels of Windows users |
| 🔢Procedures: |
|
Before moving forward, it’s crucial to understand that while you won’t lose your files, documents, or personal data during the downgrade, some installed programs might be incompatible and require reinstallation. However, following these instructions minimizes the effect on your existing programs and guarantees a seamless downgrade to Windows 10.
The first step in downgrading to Windows 10 without losing any programs is to back up your installed programs. After the downgrade is completed, you will be free to reinstall them. You can back up the apps manually, using efficient tools, or simply by moving the program files to an external hard disk. You can choose the most suited technique based on your circumstances.
🔥Read More: How to Reinstall Windows 10 Without Losing Programs [Easy]
Keep reading for the complete guide to revert to Windows 10 whenever you want.
#1. Backup Installed Programs Before Windows 10 Downgrade
- ⏱️Duration: 20-30 minutes. It can take a little longer if you have many programs or large-sized programs to back up.
- 🧰Tools: An empty external hard drive with sufficient free space; EaseUS Todo PCTrans
While downgrading your operating system may be necessary for compatibility reasons or personal preference, it can result in the loss of your installed applications. We recommend using EaseUS Todo PCTrans with its Backup and Restore feature to mitigate this risk and ensure a smooth transition. This amazing tool helps you to create a backup image of your installed programs and their associated data files, providing a reliable solution for safeguarding your software during the downgrade process.
EaseUS Todo PCTrans simplifies the backup process, enabling users to create a comprehensive backup image of their installed programs. You’ll need an external hard drive that is empty and has enough space on it to start. The backup’s final destination will be this external storage device.
Once your external hard drive is ready, download and install EaseUS Todo PCTrans on your Windows PC. This software offers a user-friendly interface to make the process hassle-free.
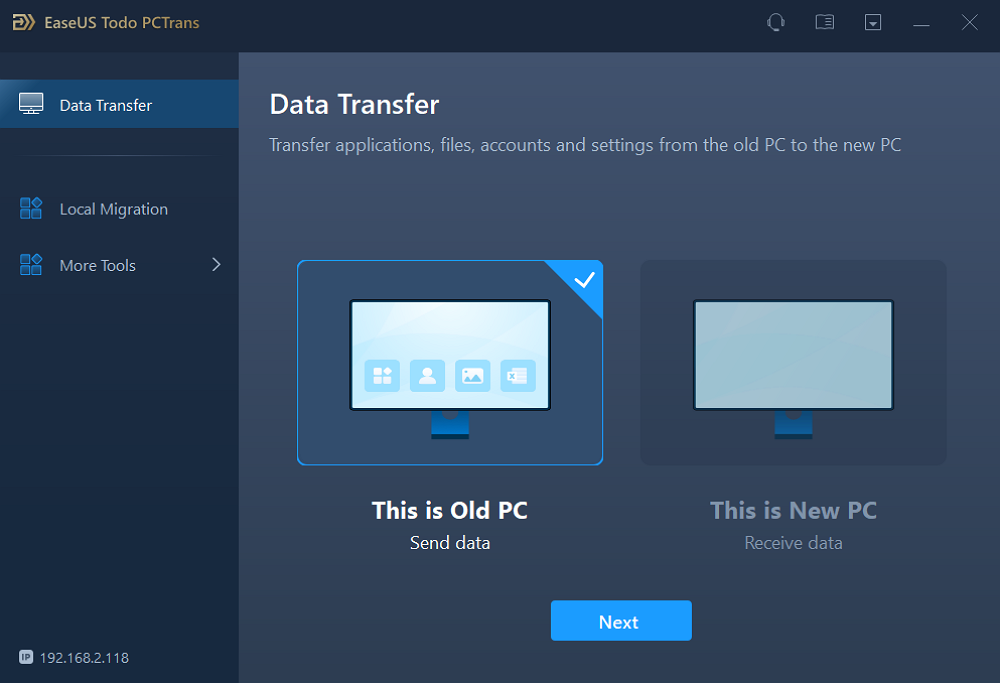
Step 1. Launch EaseUS Todo PCTrans on your computer. Click «Data Transfer» on the main screen, select «This is Old PC» and click «Next.»
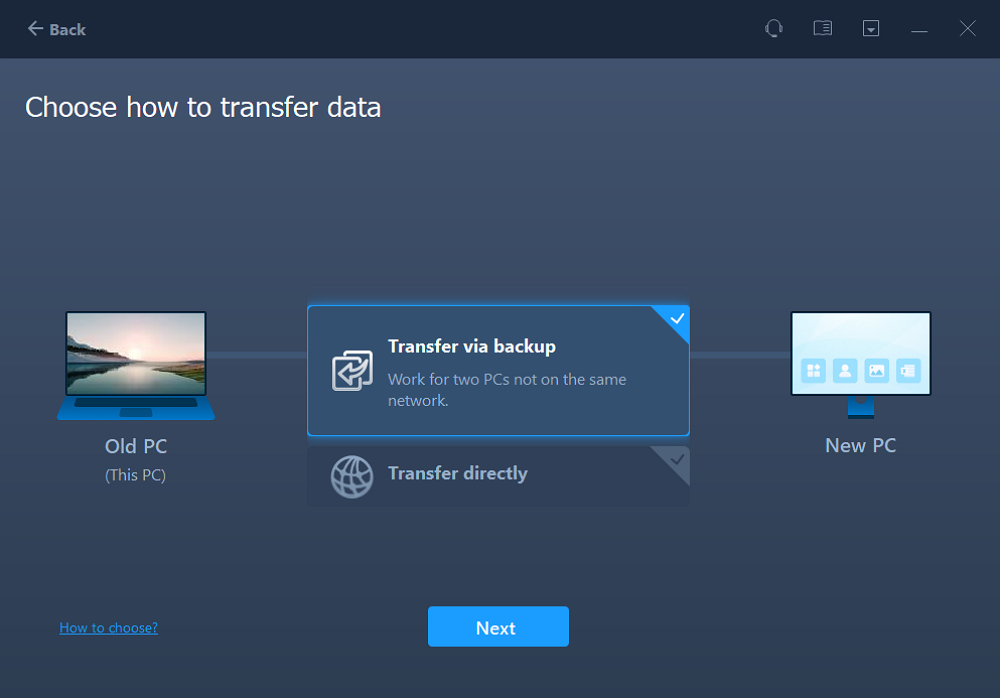
Step 2. Choose the «Transfer via backup» method and click the «Next.»
Step 3. Confirm the backup file name and backup location (Please save your files to a location where the new PC can access, like an external hard disk or shared network location.)
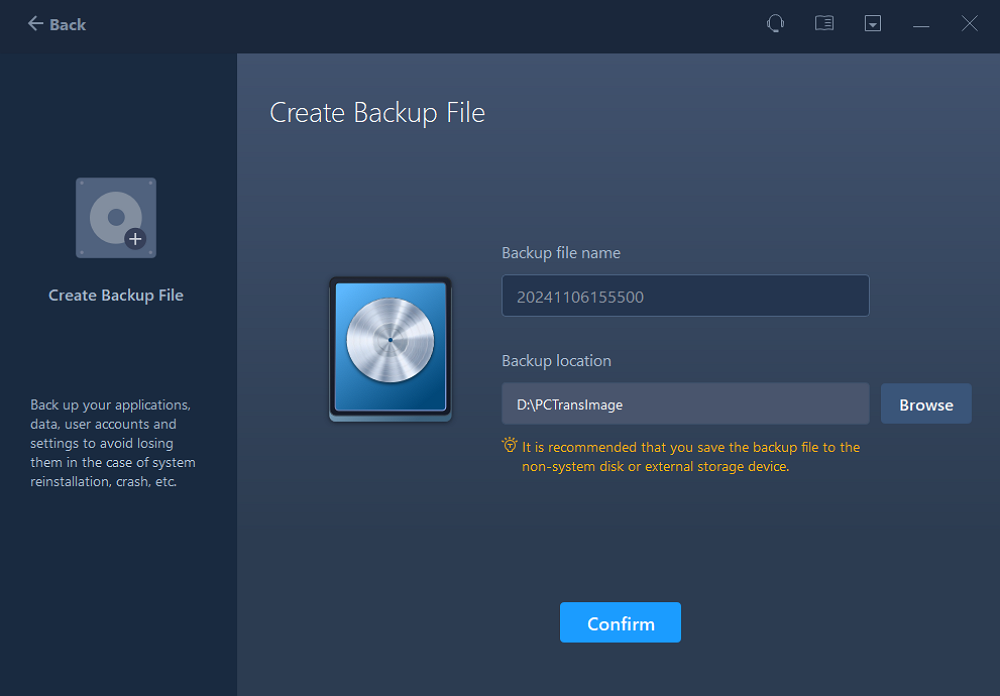
Step 4. Tick the Applications, Files, and Accounts that you wnat to backup. Click the «Backup» option to execute the process.

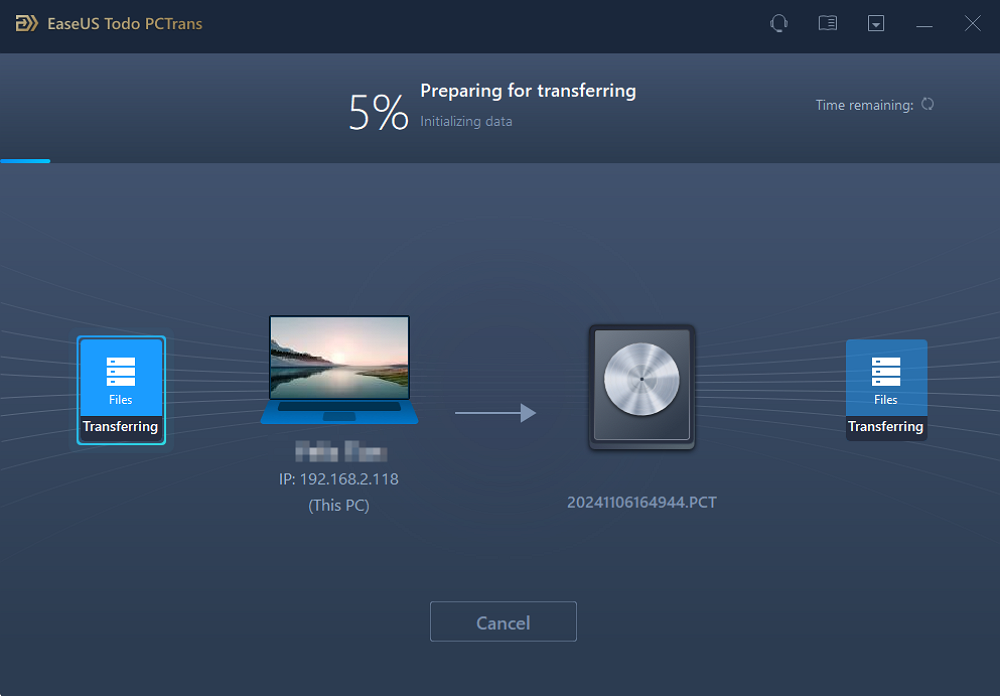
Step 5. Wait patiently till the backup procedure is done.
Creating a backup image of your installed programs ensures you won’t lose any essential software or its associated data files during the Windows 10 downgrade. This approach provides a safety net, allowing you to restore your programs quickly and efficiently to your computer once the downgrade is complete.
If you like this simple method for backing up the installed programs on your computer, share it to help more friends around you online:
#2. Downgrade to Windows 10 [Full Guide]
- ⏱️Duration: 35-45 minutes, depending on system speed and internet connection.
- 🧰Tools: USB flash drive (at least 8GB capacity); Windows 10 ISO file or Windows 10 creation media; Product Key
Follow the below-mentioned guides to downgrade to Windows 10:
Guide 1: Downgrade to Windows 10 within 10 Days
If you want to revert to Windows 10 within 10 days of switching, the process is pretty straightforward. Follow the below-given steps:
Step 1. Click the Start menu and select «Settings».
Step 2. Click on Update & Security.
Step 3. Select Recovery from the left-hand menu.
Step 4. Below, «Go back to the previous version of Windows 10,» press «Get started.»
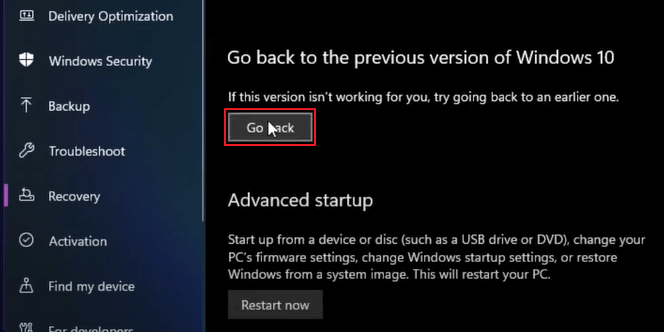
Step 5. Follow the prompts to complete the downgrade process.
This will only work if it’s been less than 10 days since you upgraded to the newer version of Windows.
Guide 2: Downgrade to Windows 10 after 10 Days
Don’t worry if you’ve gone past the 10-day rollback window. By doing the following three things, you can still downgrade to Windows 10:
Step 1. Make a Windows 10 installation media:
- Make an installation media for Windows 10.
- Download the Windows 10 ISO file.
- Create the installation media next using a tool like the Windows USB/DVD Download Tool.
Step 2. Boot from the Installation Media:
- Restart your computer after inserting the Windows 10 installation media.
- Enter the BIOS settings of your computer upon startup.
- Check for a notification directing you to the BIOS settings on the startup screen.
- After entering, set the installation media as the default boot device in the «Boot» section of the BIOS. Exit the BIOS after saving the modifications.
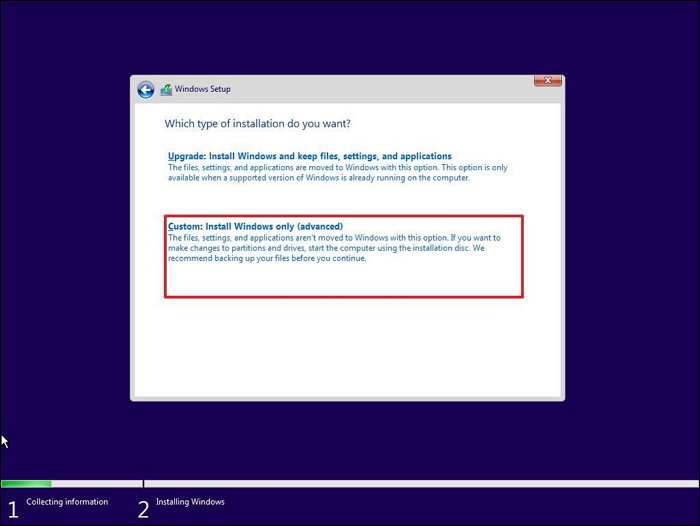
Step 3. Install Windows 10:
- To continue with the installation, follow the on-screen directions.
- Select «Custom: Install Windows only (advanced).»
- Choose the partition where you wish to install Windows 10.
- Continue the installation process after selecting the suitable partition.
- Your device will restart after the installation, and you will have successfully downgraded to Windows 10.
After the installation, you’ll need to reinstall your programs and restore your files from the backup.
It is important that you allow each step enough time to get complete seamlessly and let your PC boot up normally or else you might run into some complications.
#3. Restore Backed Up Programs to Computer After Downgrading to Windows 10
- ⏱️Duration: 20-30 minutes, based on the size and number of programs you’ve backed up.
- 🧰Tools: the external hard drive with your backed-up programs, EaseUS Todo PCTrans
Once you’ve got Windows 10 back and it runs smoothly on your computer, it’s time to restore your programs to Windows 10 from the external hard drive. Users can save time and effort during the changeover by using a few tools and following the instructions outlined.
EaseUS Todo PCTrans is a user-friendly software that simplifies transferring data, programs, and settings between different Windows operating systems. It simplifies the process of restoration without any need to download separate programs.
To learn how to restore your programs back to the Windows 10 computer without taking time, download EaseUS Todo PCTrans and follow the given guide:
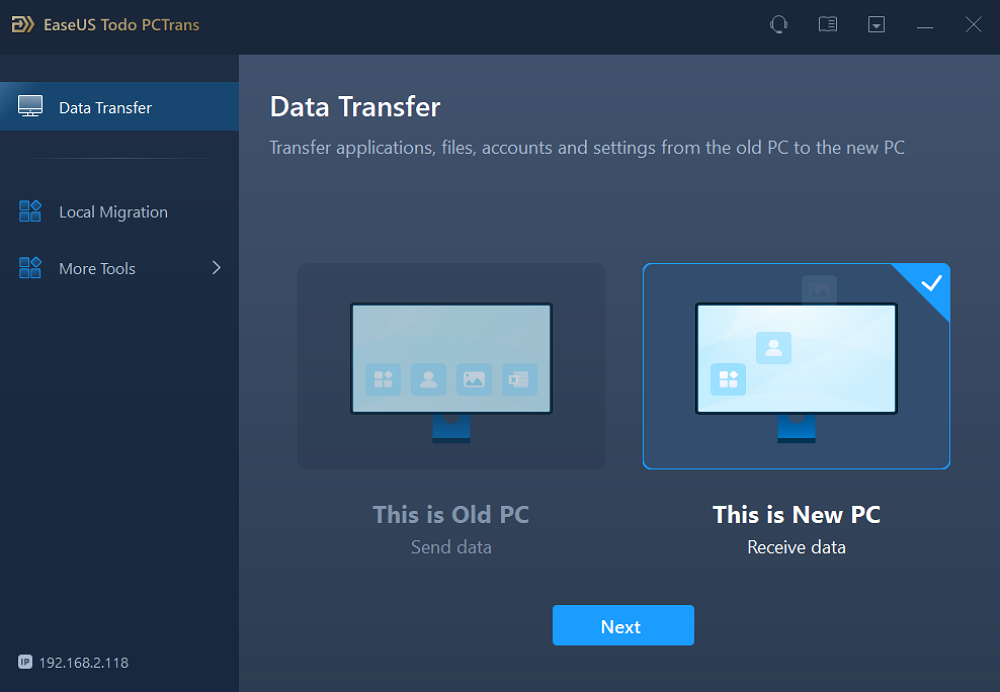
Step 1. Lauch EaseUS Todo PCTrans on the target PC you want to restore the backup image, and choose «This is New PC» in the Data Transfer section. Click «Next».
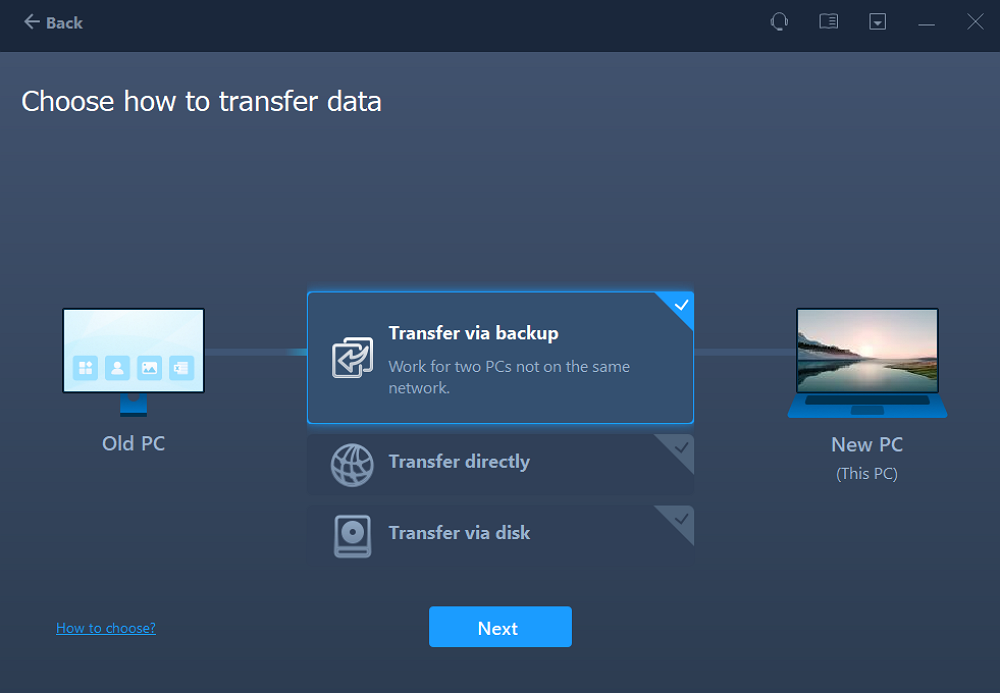
Step 2. Selcet «Transfer via backup» and click «Next.»
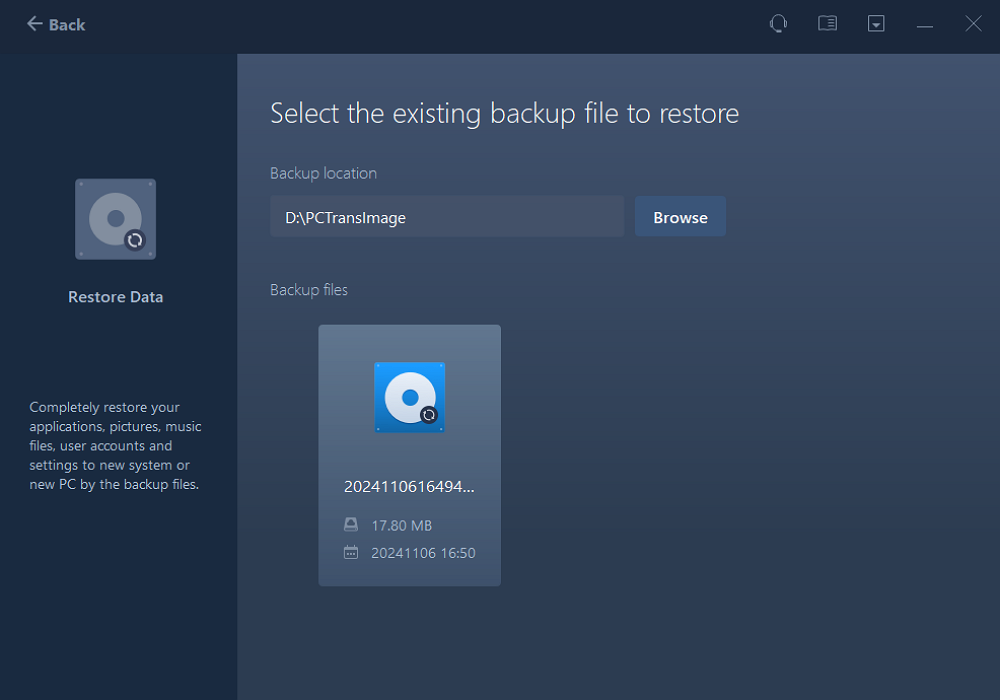
Step 3. Click «Browse» to navigate the Backup location where you stored your backup of files, apps, or settings.
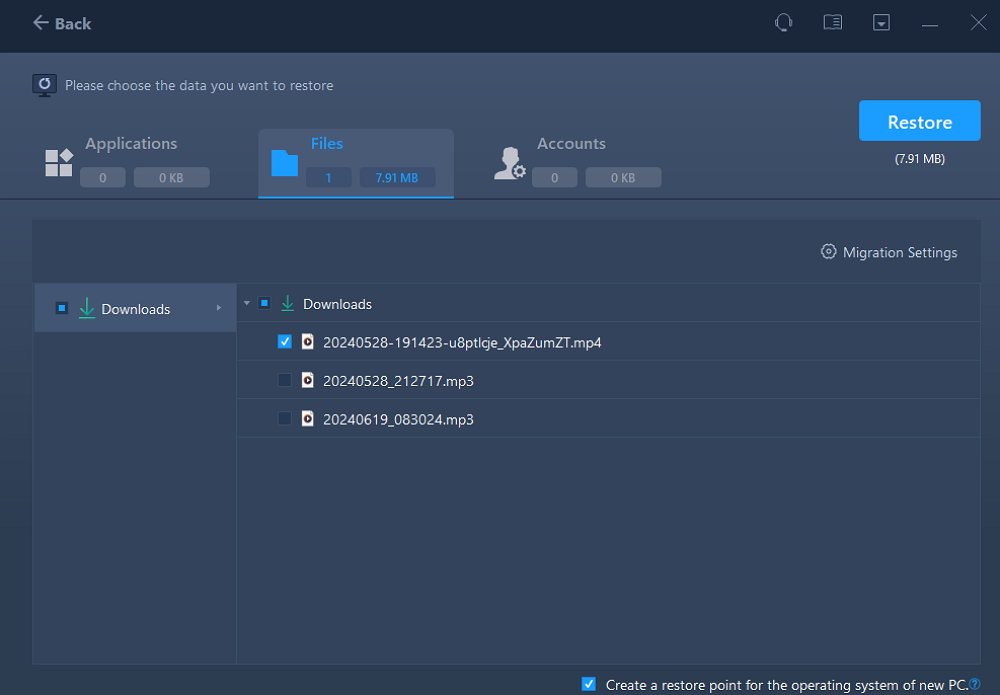
Step 4. Then, go to the Applications, Files, or Accounts sections to select the exact data, apps, or accounts settings you want to restore to the new device, and click «Restore.»
Final Verdict
In conclusion, downgrading to Windows 10 should not be a hassle-worthy procedure; it should be seamless without the fear of data and crucial programs’ loss. Using the backup and restore option in EaseUS Todo PCTrans, users may effectively protect their programs and effortlessly restore them to a Windows 10 computer. This eliminates the need for manual program downloads and installations, saving time and effort during the transition.
Giving enough time for the restoration procedure is crucial because it can take longer or even less time depending on the size and number of programs, computer performance, and the speed of the external hard drive used for backup. Your programs’ entire backup on an external storage device ensures that the installation configurations and data required for the restoration process are easily accessible. Windows users can confidently downgrade to Windows 10 while protecting their priceless programs and files by following the step-by-step instructions in this article and using the suggested tools.
FAQs About Downgrade to Windows 10 and Keep Programs Intact
Refer to the following commonly asked questions if you have any remaining queries about upgrading to Windows 10 without losing programs:
1. What will I lose if I downgrade to Windows 10?
You won’t lose any files or personal data if you downgrade to Windows 10, so don’t worry. Please be aware, nevertheless, that some installed programs can run into compatibility problems.
2. Can I reinstall Windows 10 without losing programs?
You can safely reinstall Windows 10 without losing your programs by meticulously following the steps outlined in this guide.
3. How do I downgrade Windows 11 after 30 days?
After the 30-day period has expired, you have to perform a clean installation of the desired operating system. This means you’ll need to back up your files, create installation media for the previous version of Windows, such as Windows 10, and then reinstall it on your computer.
Related Articles
-
How to Send Files Over 100GB [4 Options]
Oliver/2025/01/23
-
How to Repair Apps and Programs in Windows 10/11
Cici/2025/04/01
-
Windows Cannot Find Uninstall.exe File — 6 Solutions🔥
Sherly/2025/01/23
-
Samsung Data Migration Software & Best Alternative
Tracy King/2025/01/16