
Первые скриншоты Windows 11 — изменения коснулись «Пуска», панели задач, интерфейса и многого другого
В Сети оказались опубликованы скриншоты, сделанные в грядущей операционной системе Windows 11 от компании Microsoft. На опубликованных изображениях демонстрируется новый пользовательский интерфейс, свежее меню «Пуск» и многое другое. Поскольку это очень ранняя сборка, некоторые элементы новой ОС остались такими же, как у текущей версии Windows 10.
Новый пользовательский интерфейс и меню «Пуск» в Windows 11 очень похожи на те, что изначально были в Windows 10X. Microsoft пыталась упростить интерфейс Windows для использования на устройствах с двумя экранами, но в конечном счёте отказалась от дальнейшей разработки Windows 10X. Позже компания пообещала использовать те наработки в основной версии ОС, и как видно, сдержала обещание — многие элементы легли в основу новой Windows 11.
Наиболее заметное визуальное отличие новой ОС связано с панелью задач. Microsoft решила сместить иконки приложений с левого нижнего края экрана в центр. Здесь же находится и новая кнопка меню «Пуск». Последняя представляет собой упрощённую версию того меню, что сегодня присутствует в Windows 10.
В новой версии операционной системы используются закруглённые углы окон. Контекстуальные меню, иконки, а также окно проводника — теперь всё имеет закруглённые углы, включая иконки и окна меню «Пуск».
На панели задач Windows 11 можно увидеть новую иконку Widgets (виджеты). Слухи о том, что компания вернёт их в новую ОС, ходят уже давно. Правда, сами виджеты из-за «сырости» версии сборки пока недогружаются. С помощью виджетов можно будет быстро узнать погоду, свежие новости и другую полезную информацию из Сети.
В ранней сборке Windows 11 компания пока не вносила изменения в интерфейс магазина приложений Windows Store. Прежде сообщалось, что Microsoft собирается серьёзно переработать магазин приложений и сделать его более дружелюбным не только для пользователей, но и для разработчиков приложений. Для них упростят размещение контента на платформе, а также позволят использовать в приложениях сторонние платёжные сервисы.
Визуально изменится и процесс установки Windows 11. Однако пользователя как и раньше будут сопровождать по каждому шагу установки и настройки новой ОС. При каждой загрузке Windows 11 пользователя будет встречать новый звук запуска системы.
Microsoft подробно расскажет о «следующем поколении Windows» на специальном мероприятии, которое состоится в конце этого месяца. Софтверный гигант начал рассылку приглашений на мероприятие, которое будет полностью посвящено программной платформе Windows и начнётся в 18:00 (мск) 24 июня.
Источник
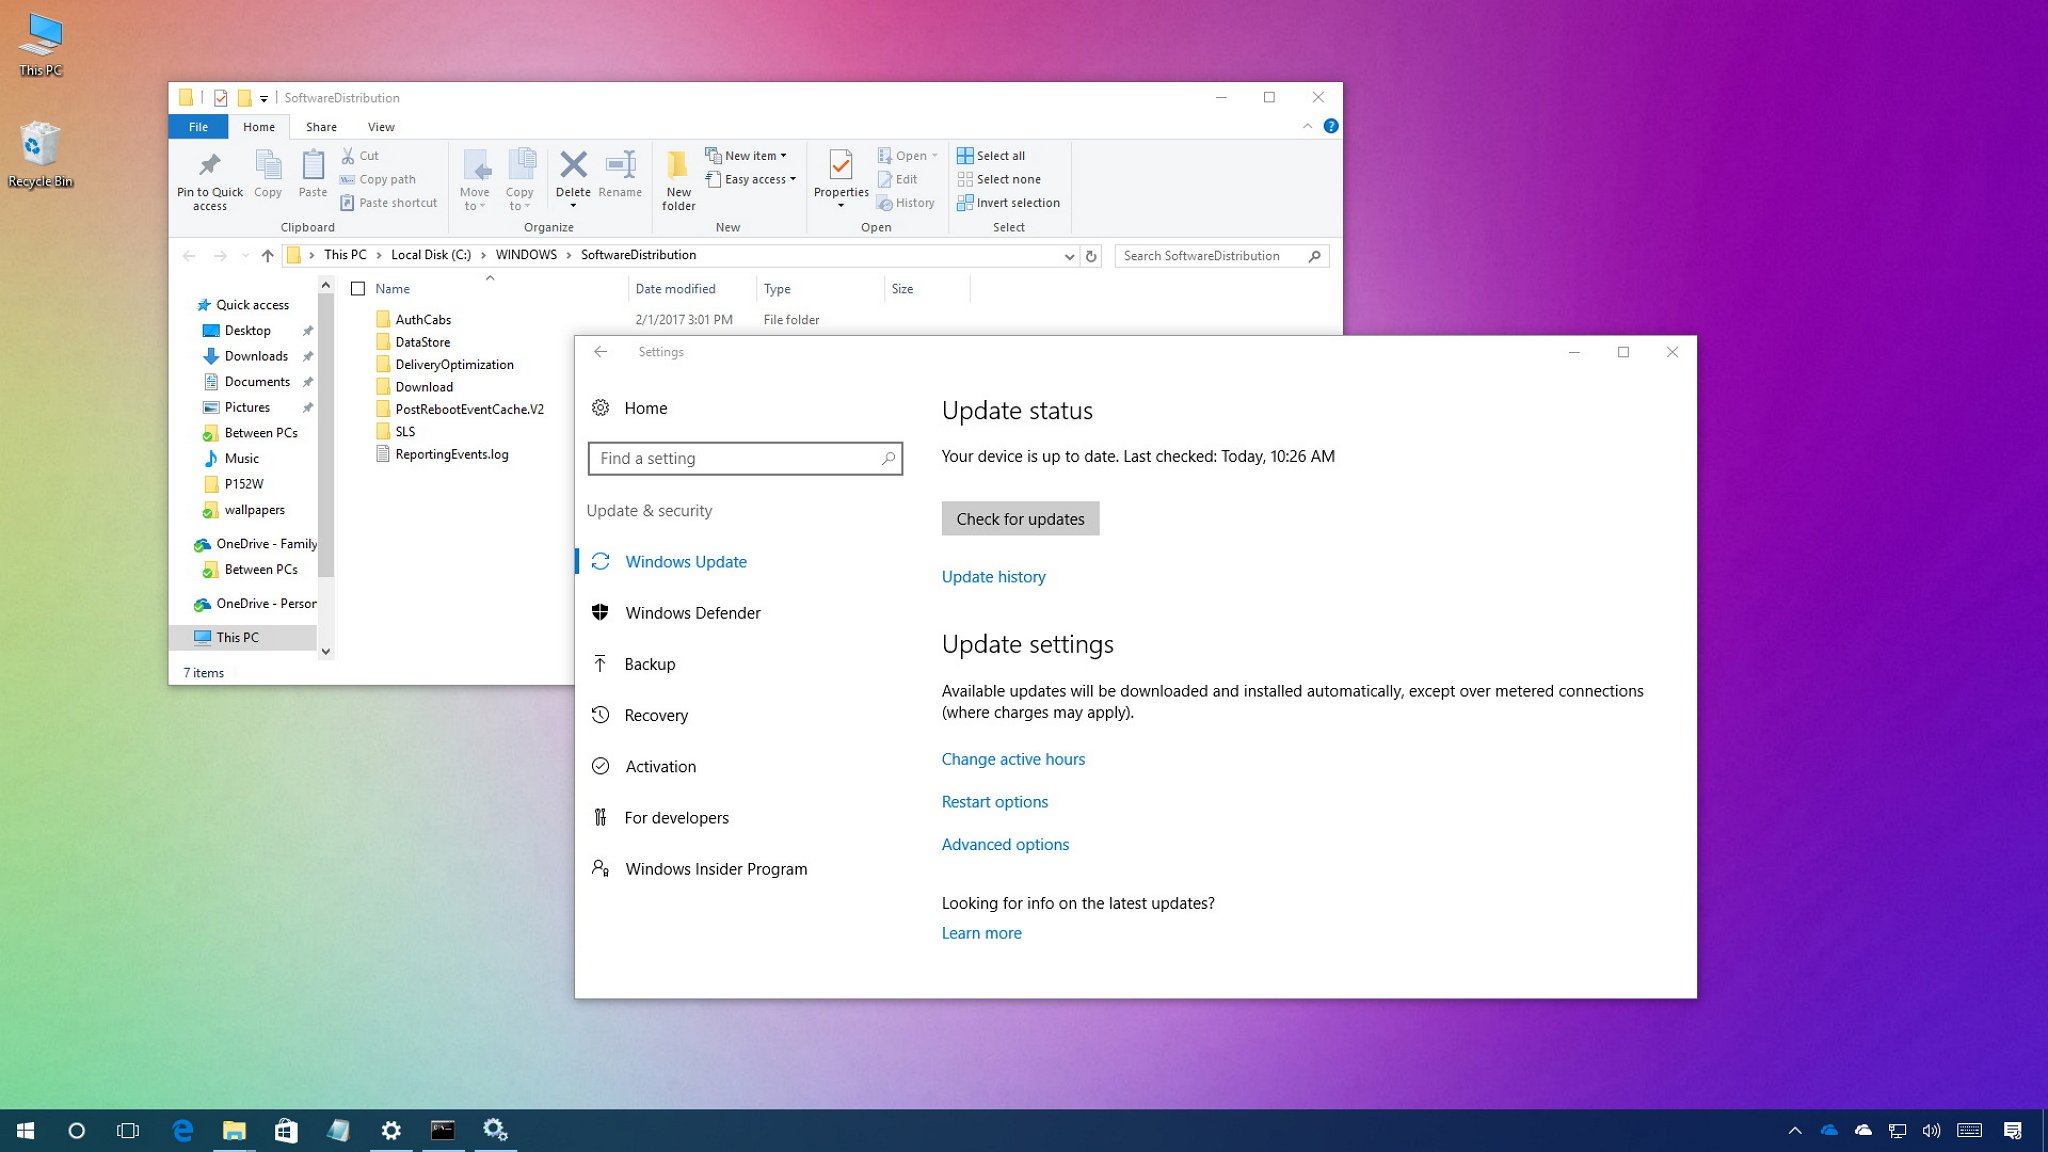
On Windows 10, the «SoftwareDistribution» folder is an essential component for Windows Update, which temporarily stores files needed to install new updates to keep your device secure and with the latest fixes and improvements.
This folder is maintained by the WUAgent (Windows Update Agent), and typically, it should be left alone, but there will be times when you may need to clear its content manually in the case the Datastore and Download folders aren’t synchronized, and it’s preventing Windows Update from applying new updates to your PC.
Usually, if you’re having trouble with Windows Update, or after updates have been applied, it’s safe to empty the content of the SoftwareDistribution folder. Windows 10 will always re-download all the necessary files, or re-create the folder and re-download all the components, if removed.
In this Windows 10 guide, we’ll walk you through the steps to delete the content inside the SoftwareDistribution folder. As an alternative option, we’ll also show you the steps to rename the folder, in case you only want to test if the folder’s content is the one causing problems.
- How to clear the ‘SoftwareDistribution’ folder
- How to rename the ‘SoftwareDistribution’ folder
How to clear the ‘SoftwareDistribution’ folder
To delete the content inside the SoftwareDistribution folder, do the following:
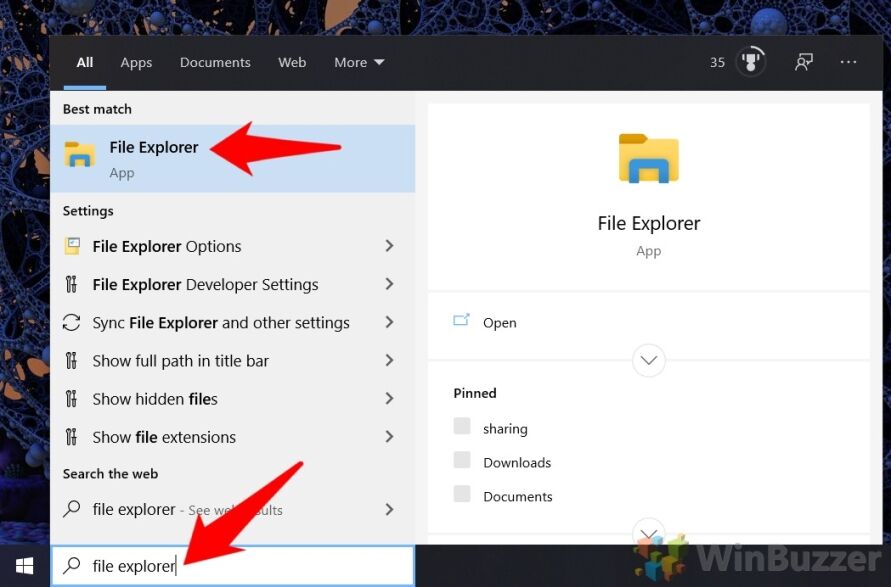
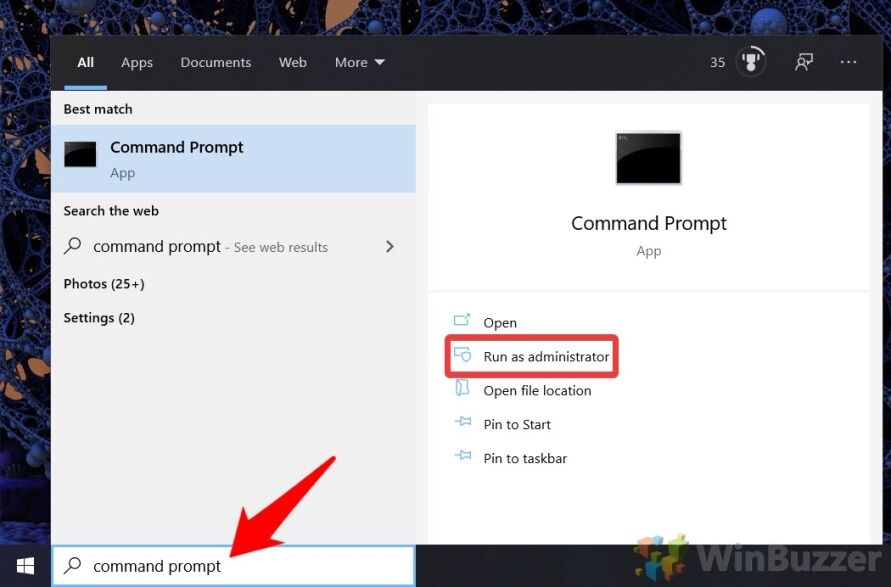
- Open Start.
- Search for Command Prompt, right-click the result, and select Run as administrator.
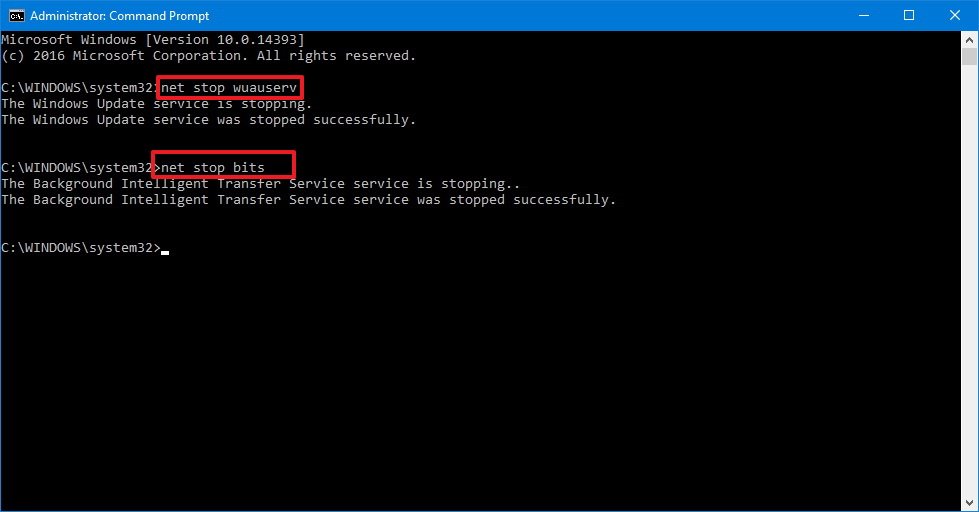
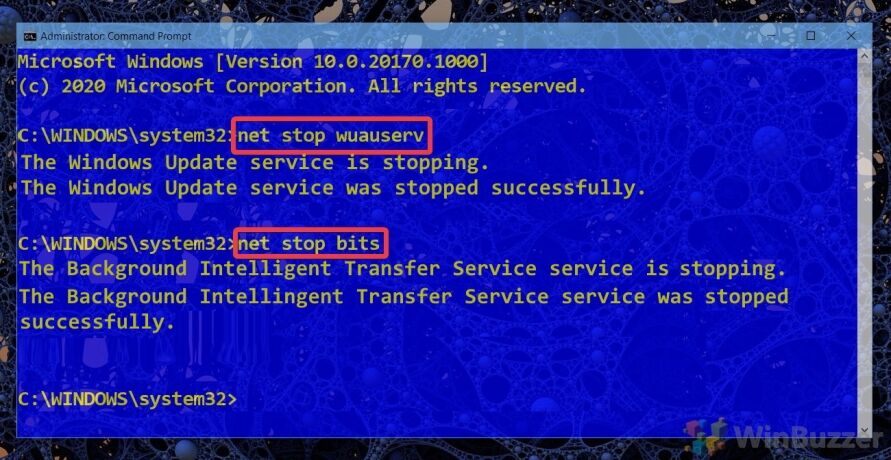
- Type the following command to stop the Windows Update Service and press Enter:
net stop wuauserv - Type the following command to stop the Background Intelligent Transfer Service and press Enter:
net stop bits
- Use the Windows key + R keyboard shortcut to open the Run command.
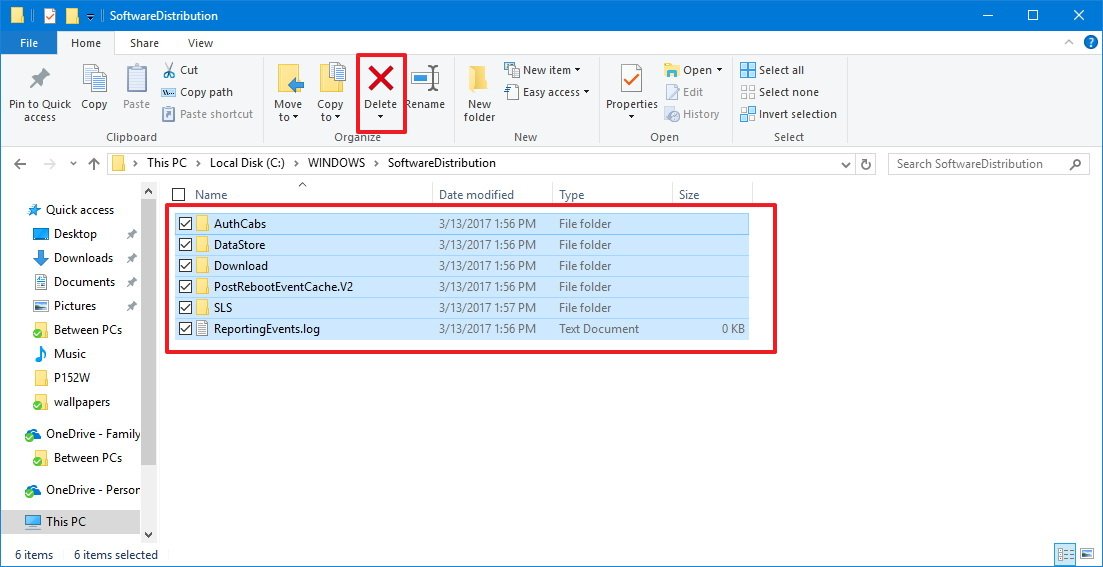
- Open File Explorer and browse the following path:
C:\Windows\SoftwareDistribution - Select all its content and click the Delete button to clear the content.Quick Tip: In the case, you’re having trouble deleting all the files, simply restart your computer, and try again.
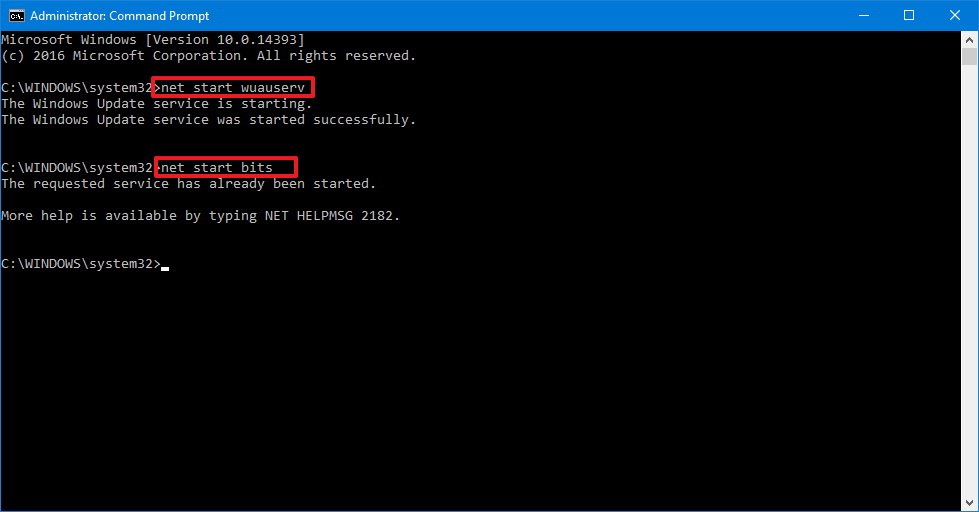
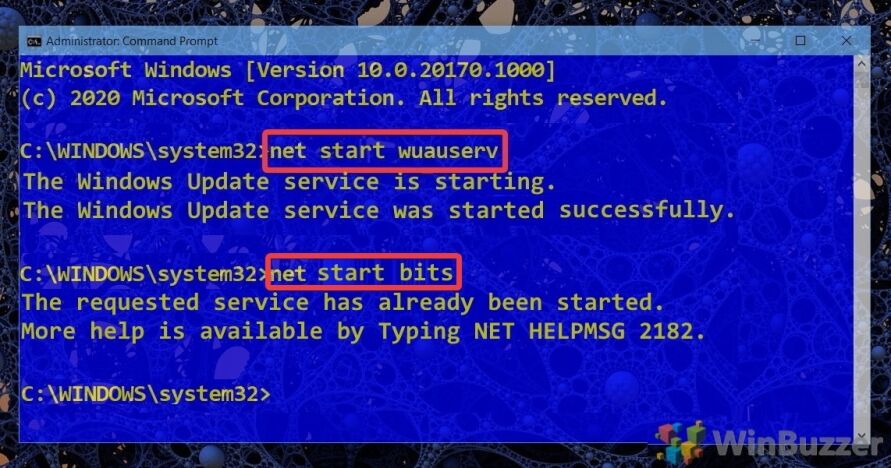
- On Command Prompt, type the following command to start the Windows Update Service and press Enter:
net start wuauserv - Type the following command to start the Background Intelligent Transfer Service and press Enter:
net start bits
Once you completed the steps, Windows 10 will reconfigure the folder and re-download all the necessary components.
How to rename the ‘SoftwareDistribution’ folder
If you don’t want to delete the content inside of the folder, you can alternatively, rename the folder to troubleshoot Windows Update problems.
All the latest news, reviews, and guides for Windows and Xbox diehards.
To rename the SoftwareDistribution folder, do the following:
- Open Start.
- Search for Command Prompt, right-click the result, and select Run as administrator.
- Type the following command to stop the Windows Update Service and press Enter:
net stop wuauserv - Type the following command to stop the Background Intelligent Transfer Service and press Enter:
net stop bits
- Use the Windows key + R keyboard shortcut to open the Run command.
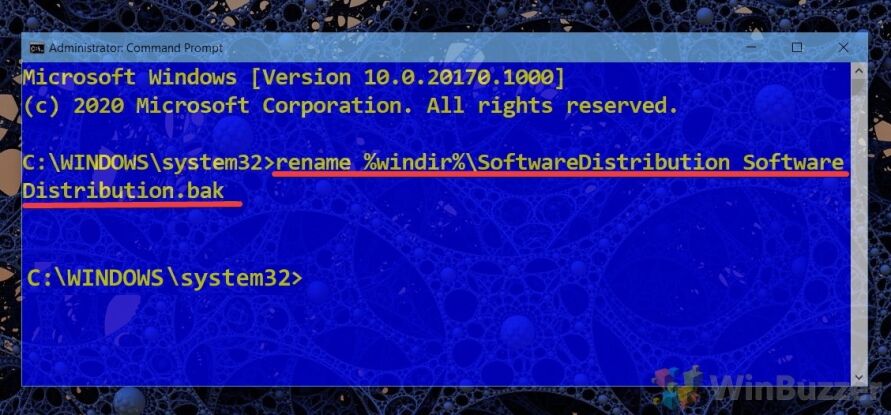
- Type the following command to rename the folder and press Enter:
rename %windir%\SoftwareDistribution SoftwareDistribution.bakQuick Tip: If the command isn’t letting you rename the folder, try steps No. 3 and 4 one more time, and then try to rename the folder.

- Type the following command to start the Windows Update Service and press Enter:
net start wuauserv - Type the following command to start the Background Intelligent Transfer Service and press Enter:
net start bits
After you’ve completed the steps, Windows 10 will re-create the folder and re-download all the necessary components.
The only caveat with this process is that the SoftwareDistribution folder also includes the Windows Update history information, which means that emptying up the folder will result in loss of this data. In addition, you’ll notice that Windows Update will take longer than usual to detect and update your computer because the WUAgent must check and re-create the Datastore information. However, it’s a small price to pay to get your device to update again.
While sometimes the folder may grow, it’s only recommended to use these instructions only when necessary. You shouldn’t mess with the SoftwareDistribution folder to free up storage space on your computer.
More Windows 10 resources
For more help articles, coverage, and answers to common questions about Windows 10, visit the following resources:
- Windows 10 on Windows Central – All you need to know
- Windows 10 help, tips, and tricks
- Windows 10 forums on Windows Central
Mauro Huculak has been a Windows How-To Expert contributor for WindowsCentral.com for nearly a decade and has over 15 years of experience writing comprehensive guides. He also has an IT background and has achieved different professional certifications from Microsoft, Cisco, VMware, and CompTIA. He has been recognized as a Microsoft MVP for many years.
What is the Software Distribution folder?
The SoftwareDistribution folder usually located in C:\Windows\SoftwareDistribution is used by Windows Update to preload downloaded updates and hotfixes before installing them. On Windows 10 you usually find the following folder-structure but there might exist other sub-folders as well:
- C:\Windows\SoftwareDistribution
- C:\Windows\SoftwareDistribution\Datastore
- C:\Windows\SoftwareDistribution\Download
- C:\Windows\SoftwareDistribution\EventCachte.v2
- C:\Windows\SoftwareDistribution\PostRebootEventCache.V2
- C:\Windows\SoftwareDistribution\SLS
While the SoftwareDistribution folder is managed completely by the Windows Update Agent (WUAgent) problems might occur that require a manual cleanup of its contents.
Automatically delete win download files in Windows 10
If you are facing issues with Windows Update you might try to use Windows Disk Cleanup in extended mode before moving forward with our tutorial. This might already fix incomplete or corrupted Windows Update files in the SoftwareDistribution folder by deleting them.
Is it safe to delete Windows\SoftwareDistribution-subfolders?
The method shown below to delete the SoftwareDistribution folder manually is generally safe as Windows Update will download all update files again when needed. To be sure that the issue you try to fix is related to the Windows SoftwareDistribution folder, you might want to temporarily rename it beforehand as shown below. This will preserve the files inside.
If you decide deleting the SoftwareDistribution folder, you will lose the Windows Update history which might be usuful to trace down problematic updates. Also Windows Update will need a bit longer afterwards until available updates are shown and downloaded because the WUAgent must check and re-create the Datastore information.
How to Cleanup the SoftwareDistribution folder?
Before you can clear the SoftwareDistribution folder, you will have to stop both the Windows Update Service (wuauserv) and the Background Intelligent Transfer Service (bits).
- Open an elevated Command Prompt

- Use the net stop command to terminate services
Run the command
net stop wuauservto stop the Windows Update Service andnet stop bitsfor the Background Intelligent Transfer Service.
- Open file Explorer

- Delete contents/subfolders of C:\Windows\SoftwareDistribution

- Use the net stop command to restart services
Run the command
net start wuauservto re-launch the Windows Update Service andnet start bitsfor the Background Intelligent Transfer Service.


How to Rename the SoftwareDistribution folder
Renaming the SoftwareDistribution folder allows to quickly check if Windows Update files there are really causing the issue you are trying to resolve.
- Open Command Prompt
- Use the net stop command to terminate services
Run the command
net stop wuauservto stop the Windows Update Service andnet stop bitsfor the Background Intelligent Transfer Service.
- Rename the SoftwareDistribution folder with one command
Run the following command to rename SoftwareDistribution folder into SoftwareDistribution.bat:
rename %windir%\SoftwareDistribution SoftwareDistribution.bak
To revert this, you can apply the same procedure afterwards using this command:
rename %windir%\SoftwareDistribution.bak SoftwareDistribution

- Use the net stop command to restart services
Run the command
net start wuauservto re-launch the Windows Update Service andnet start bitsfor the Background Intelligent Transfer Service.
How to Pause, Defer, or Delay Quality and Feature Updates
If you deleted the SoftwareDistribution Folder´s contents to free up space you might also want to delete the $SysReset folder to gain even more. If necessary you can also tell Windows Update to Pause, Defer, or Delay Quality and Feature Updates if you don´t want to download new Windows Updates immediately again after clearing SoftwareDistribution.
Last Updated on August 27, 2021 3:53 pm CEST
Ways to Remove Items From C:\Windows\SoftwareDistribution\Download on Windows 10. The Windows update files by default assemble in the download folder of Software distribution directory.
Whenever the update gets stuck you require the deletion of the stuff in this folder in abundant cases.
How to Remove Items From C:\Windows\SoftwareDistribution\Download Windows 10
Way 1 – Manually Delete Windows Update Cache
First of all, make sure that no updates are in action, otherwise, you will land up in a pool of troubles.
Stop the Update Services
Step 1 – Begin the procedure by wide-spreading an elevated Command Prompt. You can do this in various ways. However, the easy one is, right-click on Start. Then on the popped-up menu, tap the choice named Command Prompt (Admin).
Step 2 – Go ahead with hitting Yes button on the UAC confirmation pop up.
Step 3 – Now, write these pieces of codes one by one and hit Enter on the expanded elevated Command Prompt.
net stop wuauserv
net stop bits
Note – The code available in the first line functions to cease the Windows Update Service. Likewise, the other command is to end another service entitled Background Intelligent Transfer Service aka BITS.
Finally, After termination of the above-outlined two services, it is time to dispose of the Windows Update cache. To do so, observe the subsequent steps –
Step 1 – With the combination of Win & E keys outspread File Explorer. Once the File Explorer is visible on the screen, travel through this path accurately C:\Windows\SoftwareDistribution\Download
Unhide the Files
Step 2 – Click or hit the View tab, located on the menu bar.
Step 3 – On the dropped ribbon, click or hit Options box, visible at the extreme right end of the ribbon.
Step 4 – A box labeled Folder Options will arrive. Here also, move to the View tab.
Step 5 – Place a tick mark on the tiny round cell labeled as Show hidden files and folders and drives. Next, clear out mark from the square cell entitled Hide protected operating system files.
Step 6 – Click Apply and successively Ok.
Delete the Items
Step 7 – Now, all the files or folders will become visible. Use Ctrl & A sequence of keys and select all the contents of the Download folder.
Step 8 – Finally, to Remove Items From C:\Windows\SoftwareDistribution\Download Hit or tap the Delete key.
Step 9 – You will see an overlapped box labeled Folder Access Denied. Tick mark the box of Do this for all current items followed by a hit on Continue button.
Now, it is time to restart those two services that you have terminated earlier
Step 1 – Another time outspread the elevated Command Prompt by observing the procedure outlined earlier.
Step 2 – Write down these lines of codes one at a time and then hit Enter.
net start wuauserv
net start bits
Way 2 – Use Comand Prompt to Delete Windows Update Cache
Step 1 – Launch elevated command prompt with the above extant process.
Step 2 – Write down these three lines of codes, one at a time, and hit Enter.
net stop wuauserv
del c:\windows\SoftwareDistribution /q /s
net start wuauserv
Way 3 – A Batch File to Delete Windows Update Cache
Another interesting technique to terminate the items of Windows Update Cache is generating a batch file.
Step 1 – To generate a batch file, first of all, outspread Notepad. Do this by writing Notepad in the search field and hit the same name that appears on the top.
Step 2 – Write out or copy/paste these four codes on the expanded Notepad.
CD\
CD %Windir%
CD SoftwareDistribution
DEL /F /S /Q Download
Step 3 – Now, click or hit the File on the menu bar. From the dropped menu, click or hit Save as.
Step 4 – Pick up Desktop, the location to store the file. While storing, click or hit the Save as type drop-down and pick up All Files.
Step 5 – Make sure to rename the file as Erase_Cache.bat. As the last effort, click or hit Save.
Step 6 – Now, your batch file is absolutely ready to use. Next time onward, first terminate the Windows Update Service by using this code on an elevated Command Prompt – net stop wuauserv
Step 7 – Finally, to Remove Items From C:\Windows\SoftwareDistribution\Download Hit or tap the Delete key, go to your desktop, and double-click Erase_Cache file. In doing so, you will instantly remove all the items of Windows Update Cache.
Furthermore, you don’t like to be bothered with the long steps direct download Erase_Cache file from below and run.
Hopefully, Windows Update will work with all enthusiasm and should start re-downloading the files from scratch since Windows Update cache is reset. Finally, if you hold up some more ways to terminate Windows Update Cache in Windows 10, please make us aware of those by inputting them on the comments form.
What is the SoftwareDistribution folder and what is it used for? Although many users are not aware of this folder, so let’s shed some light on the importance of the SoftwareDistribution folder. This folder is used by Windows to temporarily stores files needed to install the latest Windows Updates on your device.
Windows updates are important as it provides security updates & patches, fixes a lot of bugs and improves your system performance. SoftwareDistribution folder is located in the Windows directory and is managed by WUAgent (Windows Update Agent).
Do you think that deleting this folder is ever required? On what circumstances, you would delete this folder? Is it safe to delete this folder? These are some questions that we all come across while discussing this folder. On my system, it is consuming more than 1 GB space of C drive.
Why would you ever delete this folder?
SoftwareDistribution folder should be left alone but there comes a time when you may need to clear the contents of this folder. One such case is when you’re unable to update Windows or when Windows updates which are downloaded & stored in the SoftwareDistribution folder are corrupt or incomplete.
In most of the cases, when Windows Update stops working properly on your device and you are getting an error message, you need to flush out this folder to solve the problem. Moreover, if you find that this folder is accumulating a large chunk of data taking more space of the drive, you can manually clear out the folder to free up some space on your drive. However, if you face Windows Update issues such as Windows Update not working, Windows Updates fails, Windows Update stuck while downloading the latest updates, etc. then you need to delete SoftwareDistribution folder on Windows 10.

Is it safe to delete SoftwareDistribution folder?
You don’t need to touch this folder under any normal circumstances, but if the content of the folder is corrupted or not synchronized causing issues with Windows updates then you need to delete this folder. It is completely safe to delete this folder. However, you need to first make sure that you are experiencing a problem with your Windows Update. Next time when Windows Update files are ready, Windows will automatically create this folder and download the update files from the scratch.
How to Delete SoftwareDistribution Folder on Windows 10
Make sure to create a restore point just in case something goes wrong.
To delete SoftwareDistribution folder from your device, you need to either open the Command Prompt or Windows PowerShell
1.Open Command Prompt or Windows PowerShell with Administrator access. Press Windows key + X and select the Command Prompt or PowerShell option.
2.Once PowerShell opens, you need to type below-mentioned commands to stop the Windows Update Service and the Background Intelligent Transfer Service.
net stop wuauserv
net stop bits

3.Now you need to navigate to SoftwareDistribution folder in C drive to delete all its components:
C:\Windows\SoftwareDistribution

If you are not able to delete all files because some files are in use, you just need to restart your device. Upon rebooting, you need to again run the above commands again and follow the steps. Now, again try to delete all the content of the SoftwareDistribution folder.
4.Once you have deleted the content of the SoftwareDistribution folder, you need to type the following command to activate the services related to Windows Update:
net start wuauserv
net start bits

An alternate way to Delete SoftwareDistribution Folder
1.Press Windows Key + R then type services.msc and hit Enter.
2.Right-click on Windows Update service and select Stop.

3.Open File Explorer then navigate to the following location:
C:\Windows\SoftwareDistribution
4.Delete all the files and folders under SoftwareDistribution folder.
5.Again right-click on Windows Update service then select Start.

6.Now to try to download the Windows updates and this time it will without any issues.
How to Rename SoftwareDistribution folder
If you’re worried about deleting the SoftwareDistribution folder then you can simply rename it and Windows will automatically create a new SoftwareDistribution folder to download the Windows updates.
1.Press Windows Key + X then select Command Prompt (Admin).
2.Now type the following commands to stop Windows Update Services and then hit Enter after each one:
net stop wuauserv
net stop cryptSvc
net stop bits
net stop msiserver

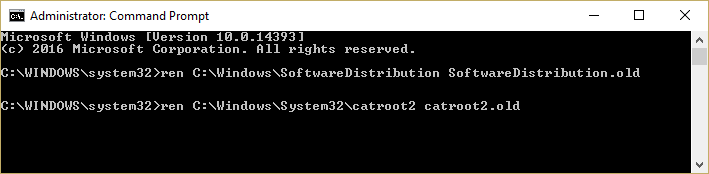
3.Next, type the following command to rename SoftwareDistribution Folder and then hit Enter:
ren C:\Windows\SoftwareDistribution SoftwareDistribution.old
ren C:\Windows\System32\catroot2 catroot2.old
4.Finally, type the folowing command to start Windows Update Services and hit Enter after each one:
net start wuauserv
net start cryptSvc
net start bits
net start msiserver

Once you have completed these steps, Windows 10 will automatically create a folder and download the necessary elements for running Windows Update services.
If the above step is not working then you can boot Windows 10 into Safe Mode, and rename SoftwareDistribution folder to SoftwareDistribution.old.
Note: The only thing which you may lose in the process of deleting this folder is the historical information. This folder also stores the Windows Update history information. Thus, deleting the folder will delete the Windows Update history data from your device. Moreover, the Windows Update process will take more time than it used to take earlier because WUAgent will check and create the Datastore information.
Overall, there is no problem associated with the process. It is a small price to pay for getting your device updated with the latest Windows Updates. Whenever you notice Windows Update problems such as Windows Updates files missing, not updating properly, you can opt for this method to restore the Windows Update process.
Recommended:
- Remove Activate Windows Watermark from Windows 10
- How to Fix Bluetooth problems in Windows 10
- Enable Flash for Specific Websites in Chrome
- How to Sideload Apps on Windows 10
I hope the above steps were helpful and now you can easily Delete SoftwareDistribution folder on Windows 10, but if you still have any questions regarding this tutorial then feel free to ask them in the comment’s section.