
MoUSO Core Worker Process (он же MoUsoCoreWorker.exe) периодически вызывает нагрузку на компьютер. Многие пользователи, заприметив данный процесс в списках Диспетчера задач, задаются вопросом: а не вирус ли это? В конце концов, перед нами какой-то непонятный процесс, который еще и потребляет для своей работы — хоть и не всегда — n-ную часть системных ресурсов.
В сегодняшней статье о том, что собой представляет процесс MoUSO Core Worker и стоит ли о нем переживать.
MoUSO Core Worker Process — что это за процесс?
MoUSO Core Worker Process — один из основных компонентов платформы Unified Update Platform (UUP). В активный обиход платформа вошла еще на ранних этапах жизни Windows 10. Согласно Майкрософт, UUP многократно ускоряет и оптимизирует процесс обновления поддерживаемых операционных систем. Сам же процесс MoUSO Core Worker ответствен за проверку наличия, загрузку и установку обновлений для ОС Windows 10 и Windows 11. Проще говоря, мы имеем дело с одной из ключевых служб Центра обновления.
Проверить легитимность этого процесса довольно легко: кликните ПКМ на MoUsoCoreWorker.exe и выберите «Открыть расположение файла». Если вы оказались в папке \Windows\UUS\amd64, то все в порядке — это никакой не вирус и вредоносное ПО. Если же вас перенесло в какое-то иное расположение в системе, в срочном порядке просканируйте исполняемый файл доступным антивирусом.
MoUSO Core Worker грузит процессор — как исправить?
Важно отметить, что процесс MoUSO Core Worker активизируется только во время поиска и установки обновления для Windows 10/11. В зависимости от ПК нагрузка может достигать высоких отметок, однако она не продолжительна: работа процесса не должна помешать работе системы. Как и многие другие службы и процессы, пользователь может завершить работу MoUSO Core Worker, но в этом нет смысла, т.к. он снова будет запущен сразу либо при следующей проверке наличия обновлений.
Пожалуй, единственный способ сделать так, чтобы рассматриваемый процесс перестал чрезмерно нагружать компьютер — это дождаться окончания обновления Windows. Совет особо актуален для владельцев машин, которые не могут похвастаться высокой производительностью. Подождите завершения загрузки/установки обновлений и MoUSO Core Worker Process не только перестанет «съедать» ресурсы, но и исчезнет из Диспетчера задач.
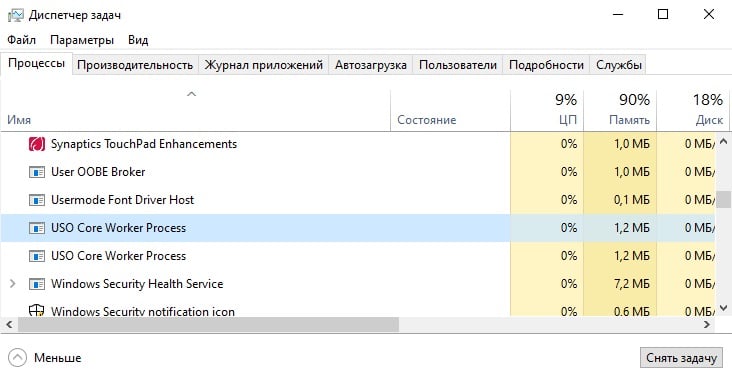
Если вы из тех пользователей, которые, заметив всплеск нагрузки, заглядывают в диспетчер задач, с большой вероятностью однажды вы заметите, что нагрузка на процессор и высокое потребление памяти вызвано процессом MoUSO Core Worker Process и соответствующим ему файлу MoUsoCoreWorker.exe.
Далее в статье подробно о том, что это за процесс, почему он может нагружать процессор или RAM и следует ли что-то предпринимать по этому поводу.
Назначение процесса MoUSO Core Worker Process

MoUsoCoreWorker.exe — один из компонентов унифицированной платформы обновлений Windows или Unified Update Platform (UUP). Впервые появился в Windows 10 (но не с самых первых версий), в Windows 11 в наличии сразу после релиза операционной системы.
UUP представляет собой новую архитектуру доставки и развертывания обновлений Windows, более подробно о которой, на английском, можно прочитать на официальном сайте Майкрософт.
В свою очередь, MoUSO Core Worker Process представляет собой процесс одного из компонентов этой платформы обновлений — Update Session Orchestrator (USO), что можно перевести как Оркестратор сессий обновлений и участвует в проверке наличия, загрузке и установке обновлений Windows 11 или Windows 10.
Что делать при высокой нагрузке из-за MoUsoCoreWorker.exe

При нормальной работе системы процесс MoUSO Core Worker появляется в диспетчере задач только в случаях, когда система выполняет какие-либо действия с обновлениями, что легко проверить, зайдя в Параметры и открыв раздел «Центр обновления Windows».
В некоторых случаях нагрузка может быть значительной, но как правило это непродолжительный процесс, завершения которого стоит дождаться: по завершении процесса установки обновлений всё придёт в норму.
При необходимости вы можете снять задачу MoUsoCoreWorker.exe в диспетчере задач, но процесс может запуститься снова, а скачивание и установка обновления начаться с самого начала.
Ещё один нюанс: MoUSO Core Worker может выводить компьютер или ноутбук из режима сна для установки обновлений. Лучше дождаться завершения процесса или, если это неприемлемо, отключить таймеры пробуждения, как это описывается в статье Что делать, если Windows сама включается или просыпается.
Может ли процесс MoUsoCoreWorker.exe вирусом? Теоретически, это возможно. Но если файл расположен в папке C:\Windows\UUS\amd64 и запускается при установке обновлений, то, похоже, это обычный системный файл Windows.
During a Windows update, your computer just started to slow down and you find that the process is consuming a lot of CPU and RAM? Here in a couple of minutes you will learn about what kind of file it is and how to make it so that it does not overload your computer.
What Is MoUSO Core Worker Process?
Windows contains many routines and files whose purpose we may not even know, but which are very important because they provide the work of all parts of this advanced operating system. One such file in Windows 10 and Windows 1 is musocoreworker.exe and it stands for Microsoft Update Session Orchestrator. This file is part of the UUP platform (Unified Update Platform), which is responsible for the stable implementation of periodic updates of the operating system.
Important tip! Viruses and trojans often mimic legitimate Microsoft file names, so it’s a good idea to make sure that a running file under the name is exactly the same file, and does not resemble it in name. Real Windows executables are signed by Microsoft. To verify the authenticity of the file, in the Task Manager, right-click on the MoUSO file and select Properties, and then in the General tab of the Properties window, copy the path next to Location and paste the copied path into the address bar of File Explorer. Also, to be sure, you can scan this file as you would any .exe file with the built-in Microsoft Defender/Windows Security scanning service. It’s very simple. Locate the file and right-click it > Scan with Microsoft Defender.
Locate the process executable, right-click on it and select Properties and open the Details tab. There should be an inscription: «Microsoft Corporation. All rights reserved«.
How to Fix MoUSOCoreWorker.exe
As we already mentioned, usually musocoreworker.exe is activated when there is a check for updates. But sometimes it may happen that after completing the check and installation of updates, the update does not start and the file continues to work. This leads to high RAM and disk usage, which naturally results in a significant slowdown in your PC.
Restart Windows Update
You can try restarting the update, and perhaps the glitch will disappear. You can restart the Windows Update service by writing Services in the Windows search bar > Windows Update. Right click on it > Restart.
It can also help further restarting the Update Orchestrator Service. You can find this service in the Services app.
Run Windows Update Troubleshooter
But what if that doesn’t help and the file continues to work stubbornly? Find and fix problems in updating the OS will help you the built-in Troubleshooter that Windows 11 is equipped with. To launch it, click Start and in the search bar write Settings and confirm this with the Enter key. In the list that appears, find the item Troubleshooting, and click on it. Here search for a troubleshooter labeled Windows Update.
In the older versions of Windows, right-click the Windows Start button and select Settings. In the Update & Security section, find the Troubleshooting tab and right click on Advanced Troubleshooters. Locate the Get Up and Running section and click on Windows Update > Run the troubleshooter.
Disable the Update Orchestrator Service
If all else fails and the glitch continues, you can completely cancel the update service and thus stop the MoUSO process. To do this, in the Services application, right-click on the Update Orchestrator option and select Properties > General > Startup Type > Disabled > Apply > OK.
HAVE MORE WINDOWS QUESTIONS? CHECK OUT OUR FORUM!
Quick Links
-
What Is MoUSOCoreWorker.exe?
-
How to Fix MoUSOCoreWorker.exe Problems
-
Is MoUSOCoreWorker.exe Malware?
Summary
MoUSOCoreWorker is a normal part of Windows. It’s a component of Microsoft’s Unified Update Platform Microsoft. Don’t end the MoUSOCoreWorker process in Task Manager unless it seems to be stuck consuming large quantities of system resources, as it’s necessary for system updates.
A mysterious executable that is causing high disk usage, high RAM consumption, and using your CPU can be alarming. But don’t worry — mousocoreworker.exe is a normal part of Windows 10 and Windows 11. Here’s what you need to know.
What Is MoUSOCoreWorker.exe?
Windows updates are notorious for being less than perfect. Microsoft attempted to improve the update experience a few years after Windows 10 was released with the Unified Update Platform (UUP). The UUP was included with Windows 11 from the beginning.
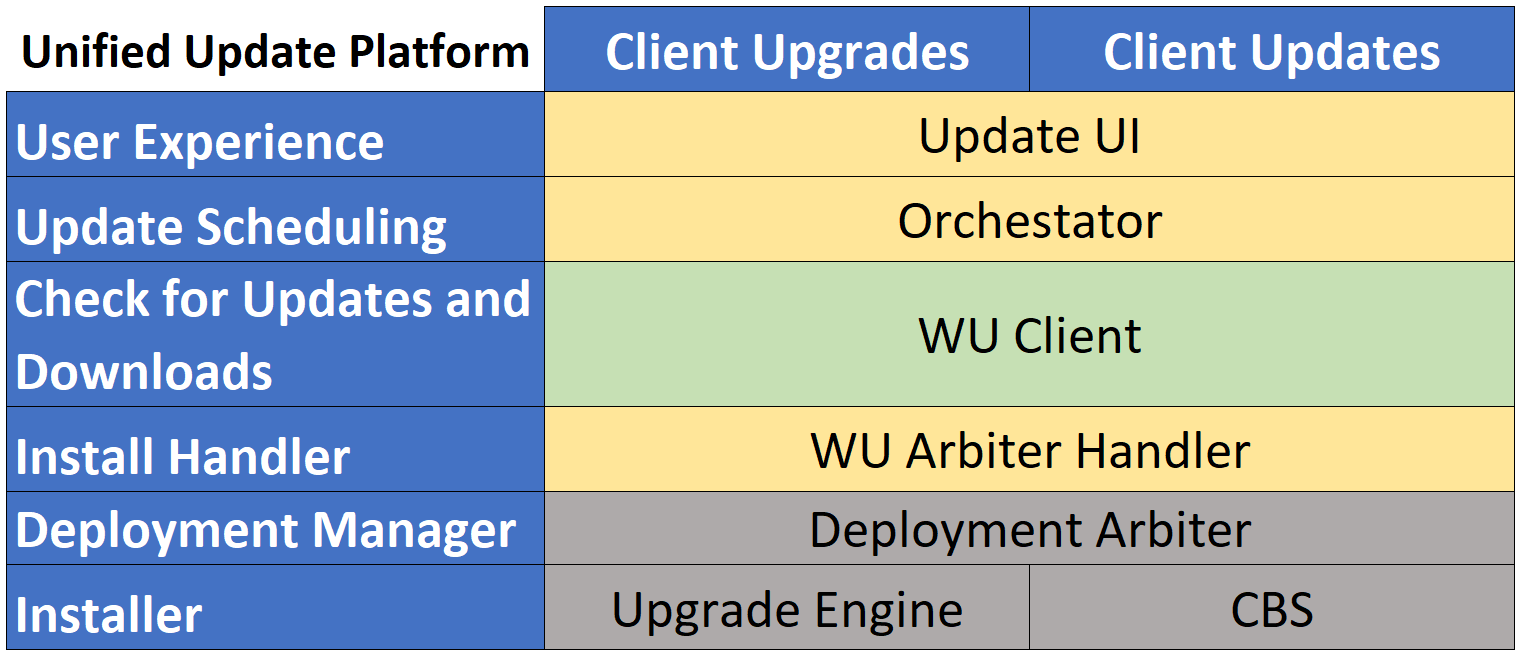
The Unified Update Platform can be broken into multiple layers, each of which handles a different part of the update process. The mousocoreworker.exe process is part of the new update platform.
The «USO» in MoUSOCoreWorker stands for «Update Session Orchestrator» — the component of the update process that coordinates the order in which updates are downloaded and installed.
Microsoft provided the table below on its website to explain how the new(ish) Unified Update Platform works, though the company didn’t include any specific documentation about exactly what mousocoreworker.exe does.
When it is functioning correctly, mousocoreworker.exe should appear in Task Manager when Windows checks for updates, and then disappear afterward.
How to Fix MoUSOCoreWorker.exe Problems
If mousocoreworker.exe is not working correctly people have noticed that it remains active and using system resources. High disk usage and high RAM usage are particularly common complaints. Usually, the problems occur if there isn’t an update running, though it sometimes happens if an update gets stuck. You can open up Task Manager and end the process in either case.
It has also been known to repeatedly wake PCs from sleep and attempt to install an update. If that happens, your best bet is to let it run and try to sort itself out.
If letting it run or restarting the process doesn’t resolve the problem, you probably need to take additional steps to fix Windows Update.
Is MoUSOCoreWorker.exe Malware?
A glitch is the most likely explanation if your mousocoreworker.exe isn’t behaving properly, but it is always possible that malware is masquerading as a legitimate Windows process. Malware has been disguised as legitimate software and services many times in the past.
If you’re concerned about the possibility of having a virus, you can always scan your computer with Microsoft Defender or Malwarebytes. They’re both excellent and will likely catch any malware running on your system.
Windows repeatedly waking up PC from sleep mode can be irritating and cause several issues. MoUSO Core Worker Process is responsible for this error. It is a program that coordinates Windows Update operation. It exclusively works in the back end and doesn’t hinder regular processes. But, sometimes in sleep mode it often wakes your system without permission. We bring to a perfect guide to fix MoUsoCoreWorker.exe process issue in Windows 10.

Table of Contents
Here are some plausible reasons why MoUSO Core Worker Process may wake up your PC from sleep.
- Outdated Windows
- Incorrect Power Settings
- Interference by third party applications
- Orchestrator Service issues
After understanding why MoUsoCoreWorker.exe keeps waking up your PC from sleep, let us go to into the method for resolving this MoUsoCoreWorker.exe process error in Windows 10.
Method 1: Uninstall GoodSync
Syncing third-party applications can keep your PC engaged causing MoUSO Core Worker Process to run continuously. They may cause this MoUsoCoreWorker.exe process error. GoodSync app is well-known for causing such issues. You can fix this by disabling or uninstalling such programs using the steps below.
1. Press the Windows + I keys together to open Settings.
2. Select Apps option from Settings window.

3. Select Apps and features on the left pane. After that, scroll down in the right pane and select GoodSync app and click on Uninstall button.

4. Click Uninstall on the confirmation prompt.
5. Again, click Uninstall on Uninstall GoodSync window.
Note: You can check the box marked Delete Private Data (Jobs, Credentials, Logs) if you have a backup of your private data.

6. Click Yes on GoodSync Runner popup.

7. After uninstallation is complete, restart PC.
Also Read: Fix the Trust Relationship Between This Workstation and the Primary Domain Failed
Method 2: Disable Wake Timers
Wake timers are used for waking your PC automatically to complete specified tasks at a certain time. Sometimes they can disturb PC when it is on Sleep mode, thus causing this MoUsoCoreWorker.exe process error. Follow the steps given below and disable them.
1. Press the Windows key and type control panel, and click on Open.

2. Select Hardware and Sound option.

3. Select Power Options on Hardware and Sound page.

4. Click Change plan settings as shown.

5. Click Change advanced power settings. Power Options window will open.
Note: You can directly open Power Options from Desktop by running control.exe powercfg.cpl,,3 command in Run dialog box.

6. Locate Sleep and click on the + icon to expand it. You will see Allow Wake Timers option.

7. Again click on the + icon to expand Allow Wake Timers and select Disable both On Battery and Plugged in.

8. Click Apply and OK to save changes.

9. After that, reboot the PC.
Check if this MoUsoCoreWorker.exe process error is fixed.
Also Read: Fix Multiple Google Chrome Processes Running
Method 3: Stop Update Orchestrator Service
UsoSVC or Update Orchestrator Service organises updates released by Windows and does tasks like downloading, verifying and installing updates. It may trigger MoUSO Core Worker Process and could be the cause behind this error. To fix this issue, you can disable UsoSVC by following these steps.
Note: You will need to enable update orchestrator service whenever you update your PC.
1. Hit the Windows key, type services, and click on Run as administrator.

2. Locate and right-click on Update Orchestrator Service and select Properties.

3. In the General tab, change Startup type to Disabled.

4. Click Apply and OK to confirm changes.
Method 4: Disable Task Scheduler
Task Scheduler is a service that enables you to schedule and perform any task on your PC without manual intervention at any specific time. Sometimes a planned automated task can wake PC from sleep, causing this MoUsoCoreWorker.exe process issue. Follow the instructions below to turn off Task Scheduler.
1. Press Windows + R keys simultaneously to open the Run dialog box.

2. Type taskschd.msc on Run Dialog Box and press Enter to launch Task Scheduler.

3. In Task Scheduler Window, navigate to the Task Scheduler Library > Microsoft > Windows > UpdateOrchestrator folder on the left pane.

4. In the UpdateOrchestrator folder, find and right-click Schedule scan task and select Disable.

5. Exit Task Scheduler and restart the PC.
Also Read: How to Check How Much VRAM Do I Have on Windows 10
Method 5: Update Windows
Outdated Windows PC can create compatibility issues. Microsoft team releases updates to fix bugs and add other useful features. Updating Windows may fix this MoUsoCoreWorker.exe process issue. Follow these to do so.
1. Press the Windows + I keys simultaneously to launch Settings.
2. Click on the Update & Security tile, as shown.

3. In the Windows Update tab, click on Check for updates button.

4A. If a new update is available, then click Install Now and follow the instructions to update.

4B. Otherwise, if the Windows is up-to-date, then it will show You’re up to date message.

Method 6: Use Registry Editor
Registry Editor is a repository containing all configurations, values and settings for Windows. We can use it to create NoAutoRebootWithLoggedOnUsers DWORD which will stop PC from auto rebooting and may fix this MoUsoCoreWorker.exe MoUSO Core Worker process error. Follow the below-mentioned steps to do it.
Note: Modifying Registry Editor may cause issues. Create Registry backup before following this method as shown below.
1. Press Windows + R keys together to open the Run dialog box.

2. Type regedit and click OK to launch Registry Editor.

3. Click on File and select the Export… option. It will open Export Registry File window.

4. Name it accordingly and click on Save. Registry Backup will be created which you can import if things go wrong.

5. After creating backup, navigate to the following path in Registry Editor.
HKEY_LOCAL_MACHINE\SOFTWARE\Policies\Microsoft\Windows\WindowsUpdate\AU

6. In the right pane, locate and double click NoAutoRebootWithLoggedOnUsers key.
7. Set Value data as 1 on the popup and click OK to save changes.

8. Exit Registry Editor and restart the PC.
Also Read: How to Fix hkcmd High CPU Usage
Method 7: Restart Windows Update Service
If your PC is unable to Sleep it may be because Windows Update service not working properly because of various errors. To resolve this, restart Windows Update service by following these steps.
1. Press the Windows key and type services and click on Run as administrator to launch Services window.

2. Locate and right-click on Windows Update service and select Stop.

3. After that, minimize Service window.
4. Press Ctrl + Shift + Esc keys simultaneously to open Task Manager.
5. Click on More details.

6. Locate and right-click on MoUSO Core Worker Process and select End task.

7. Close Task Manager and maximize Services window.
8. Right-click on Windows Update and select Start.

After restarting Windows Update service, check if this MoUsoCoreWorker.exe process error is resolved.
Method 8: Change Windows Update Service Startup Mode
If the Windows Update service is set as manual in Startup type, it can sometimes freeze during its processes which may trigger PC to wake up from sleep. You can fix this issue by changing its Startup type to Automatic and to do that follow the steps below.
1. Follow Step 1 from Method 7 to open Services.
2. Locate and right-click Windows Update service and select Properties to open Properties window.

3. In General tab, change Startup type to Automatic from drop down list.

4. Click Apply and OK to save changes.
5. In Services window right-click on Windows Update service again and select Restart.

6. When Windows update has restarted, close Services window.
Note: If the error persists, try to stop automatic updates and check if it works for you.
Method 9: Run Windows Update Troubleshooter and Power
Troubleshooting detects and resolves any problem present within a program. As MoUSO Core Worker Process is related to Windows updates, running Windows update troubleshooter can resolve the error. You can do it by following our guide to Run Windows Update Troubleshooter.
Also Read: Fix .NET Runtime Optimization Service High CPU Usage
Method 10: Run Power Troubleshooter
If you are still facing this issue after running Windows Update Troubleshooter, try running Power troubleshooter to see if it resolves it. Follow the steps to do the same.
1. Hit the Windows + I keys together to open Settings.
2. Select Updates and Security on Settings page.

3. Click on the Troubleshoot menu on the left pane.
4. Then, select the Power option under Find and fix other problems section and click the Run the troubleshooter button.

5. Wait for the troubleshooting process to complete and reboot your PC.
Method 11: Restore Default Power Settings
If power settings are misconfigured, then can affect functioning of sleep mode on PC. Try changing power settings to default and see if it fixes this MoUsoCoreWorker.exe process issue. To do so, follow the given steps.
1. Press the Windows key and type command prompt and select Run as administrator to launch Command Prompt.

2. Type the following command in Command Prompt and press Enter key to execute it. Once command is executed, power settings will revert to default settings.
powercfg -restoredefaultschemes

3. Exit Command Prompt and reboot the PC.
Method 12: Overrule MoUSO Core Worker Process Request
Another way to fix this issue is by modifying your power settings to overrule MoUSO Core Worker Process request. To do it, follow these instructions carefully.
1. Follow Step 1 from Method 11 to open Command Prompt as administrator.
2. Type the following command to overrule MoUSO Core Worker Process request and press the Enter key.
powercfg /requestsoverride process MoUsoCoreWorker.exe execution

3. After executing the previous command, type the following command to verify the overrule process and press the Enter key.
powercfg /requestsoverride

Note: In case you want to stop overruling MoUSO Core Worker Process request, simply execute this command in Command Prompt.
powercfg /requests override process MoUsoCoreWorker.exe

Also Read: Fix DISM Host Servicing Process High CPU Usage
Method 13: Disable Troublesome Hardware Components
MoUSO Core Worker Process may stay if it is unable to power off certain hardware components. It can be fixed by disconnecting such hardware devices by enabling PC to power them off. Follow the steps below do the same
1. Press the Windows key, type Device Manager and click on Open.

2. Select and expand Universal Serial Bus Controllers. Choose a device, right-click on it and select Properties. It will open Properties window.

3. Go to Power Management tab, check the box marked Allow the computer to turn off this device to save power and click OK to save changes.

4. Repeat the process for all other devices to identify which ones are the problematic hardware devices and disable them.
5. If the issue persists, you can run the following command to check which devices are not powered off and hit the Enter key.
powercfg -devicequery wake_armed

6. After this command is executed unplug the device mentioned in Command Prompt or modify its properties by going to the Power Management tab as shown in Step 3.
Method 14: Perform System Restore
If none of the above solutions works, your final option is to perform System Restore. If you are unable to identify any program or driver causing MoUSO Core Worker Process to constantly wake up PC from sleep, restore your PC to a previous date by following our guide to Use System Restore on Windows 10. This method will surely fix the issue.
Recommended:
- Top 30 Best IRC clients for Windows
- How to fix WDF_VIOLATION Error in Windows 10
- 14 Ways to Clear Cache in Windows 11
- Fix The Active Directory Domain Services is Currently Unavailable
We hope that this guide was helpful and you were able to stop MoUSO Core Worker Process from waking your PC from sleep. Let us know which method worked for you the best. If you have any queries or suggestions then feel free to drop them in the comments section.