
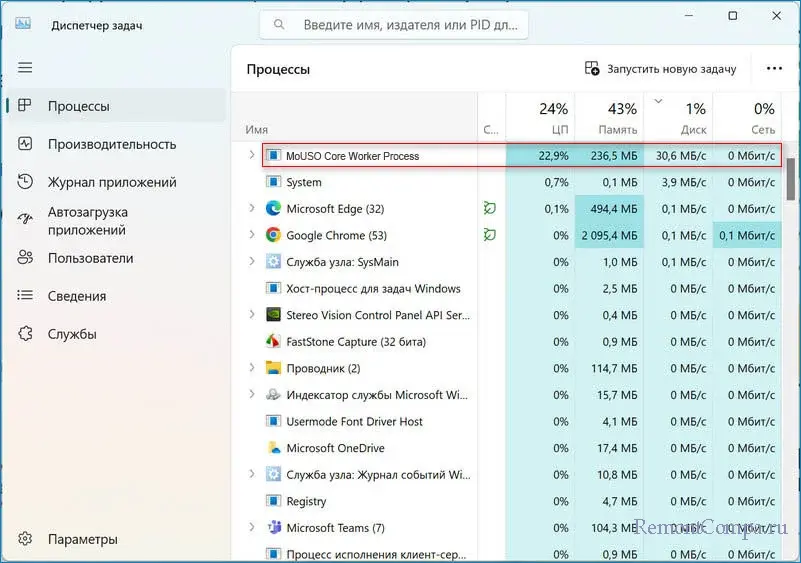
Если вы из тех пользователей, которые, заметив всплеск нагрузки, заглядывают в диспетчер задач, с большой вероятностью однажды вы заметите, что нагрузка на процессор и высокое потребление памяти вызвано процессом MoUSO Core Worker Process и соответствующим ему файлу MoUsoCoreWorker.exe.
Далее в статье подробно о том, что это за процесс, почему он может нагружать процессор или RAM и следует ли что-то предпринимать по этому поводу.
Назначение процесса MoUSO Core Worker Process

MoUsoCoreWorker.exe — один из компонентов унифицированной платформы обновлений Windows или Unified Update Platform (UUP). Впервые появился в Windows 10 (но не с самых первых версий), в Windows 11 в наличии сразу после релиза операционной системы.
UUP представляет собой новую архитектуру доставки и развертывания обновлений Windows, более подробно о которой, на английском, можно прочитать на официальном сайте Майкрософт.
В свою очередь, MoUSO Core Worker Process представляет собой процесс одного из компонентов этой платформы обновлений — Update Session Orchestrator (USO), что можно перевести как Оркестратор сессий обновлений и участвует в проверке наличия, загрузке и установке обновлений Windows 11 или Windows 10.
Что делать при высокой нагрузке из-за MoUsoCoreWorker.exe

При нормальной работе системы процесс MoUSO Core Worker появляется в диспетчере задач только в случаях, когда система выполняет какие-либо действия с обновлениями, что легко проверить, зайдя в Параметры и открыв раздел «Центр обновления Windows».
В некоторых случаях нагрузка может быть значительной, но как правило это непродолжительный процесс, завершения которого стоит дождаться: по завершении процесса установки обновлений всё придёт в норму.
При необходимости вы можете снять задачу MoUsoCoreWorker.exe в диспетчере задач, но процесс может запуститься снова, а скачивание и установка обновления начаться с самого начала.
Ещё один нюанс: MoUSO Core Worker может выводить компьютер или ноутбук из режима сна для установки обновлений. Лучше дождаться завершения процесса или, если это неприемлемо, отключить таймеры пробуждения, как это описывается в статье Что делать, если Windows сама включается или просыпается.
Может ли процесс MoUsoCoreWorker.exe вирусом? Теоретически, это возможно. Но если файл расположен в папке C:\Windows\UUS\amd64 и запускается при установке обновлений, то, похоже, это обычный системный файл Windows.
Как всегда, когда пользователи замечают, что их компьютер потребляет слишком много ресурсов, они захотят в диспетчер задач и пытаются найти того самого «жруна». Иногда им становится MoUSO Core Worker Process. Встретиться с ним можно исключительно на Windows 10 и 11-й серии. В данном материале рассмотрим, что это за процесс и почему он может потреблять большое количество ресурсов ПК.
MoUSO Core Worker Process — что за процесс
Если вы вдруг подумали, что это какой-то вирус или нежелательное ПО, то вы ошибаетесь. Да, теоретически вирусы могут маскироваться и под данный процесс, но в случае если файл находится по пути C:\Windows\UUS\amd64 и проявляет активность только во время обновления системы, то это не угроза.
Данный процесс — это часть платформы UUP, которая была представлена вместе с одной из сборок Windows 10 и служит для развертывания апдейтов. По сути MoUSO Core Worker Process занимается поиском, загрузкой, установкой обновлений и назначением приоритета установки апдейтов. Большую часть времени процесс ведет себя достаточно сдержанно, не кушая лишних ресурсов. Запускается только при попытке обновить систему вручную или по заранее указанному расписанию. В такие моменты, конечно, нагрузка на компьютер возрастет. После того как платформа закончит апдейт винды все вернется в изначальное состояние, так что в большинстве случаев необходимо просто подождать. Если, например, завершить процесс, то, вероятнее всего, он активируется снова, возможно даже выведя ПК из режима сна. Да, это он тоже умеет.
В случаях если процесс в течение продолжительного времени пожирает память, грузит диск и процессор, первым делом стоит проверить компьютер на наличие угроз. Сделать это можно с помощью любого специализированного антивируса, а также утилит, по типу Dr. Web CureIt или HitmanPro.
Следующим шагом стоит попробовать перезапустить процесс и дождаться пока он не успокоится. Сделать это реально через диспетчер задач. Жмем по процессу ПКМ, выбираем «Снять задачу» и перезапускаем компьютер. В некоторых случаях приходится перезапускать всю службу апдейтов Windows.
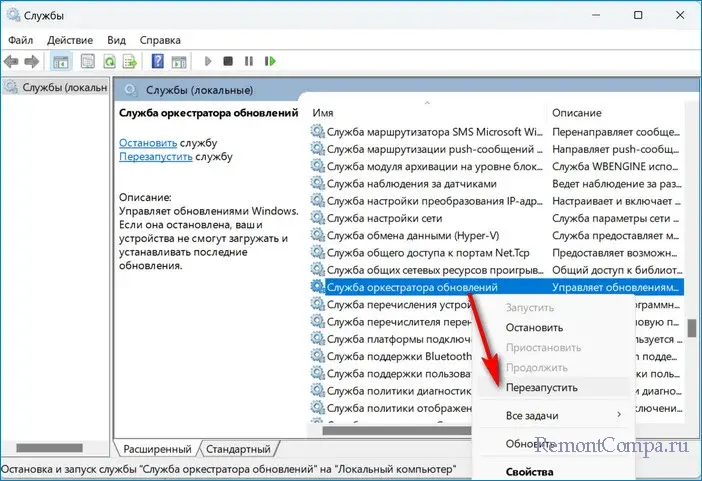
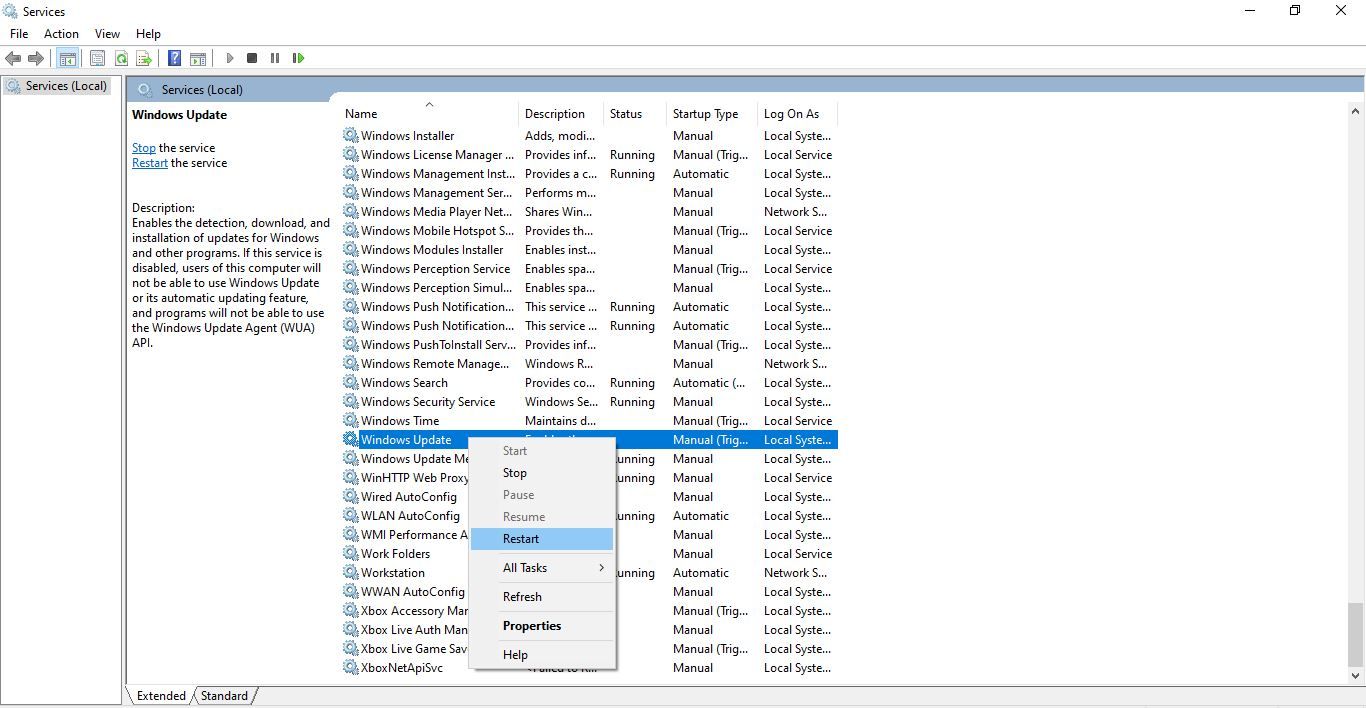
1. Жмем «Win+R», вводим «services.msc».
2. Находим «Центр обновления Windows» и «Служба оркестратора обновлений».
3. Поочередно щелкаем по ним ПКМ и выбираем «Перезапустить».
4. Иногда для решения проблемы следует дважды клинкуть ЛКМ «Служба оркестратора обновлений» и выбрать «Остановлена» и нажать «Остановить». Это лучше предпринять в самом конце, если остальные способы не сработали.
Установка всех актуальных обновлений Windows зачастую может решить проблему с потреблением ресурсов процессом MoUSO Core Worker Process. В таком случае все просто, заходим в «Центр обновлений Windows» и устанавливаем накопившееся.
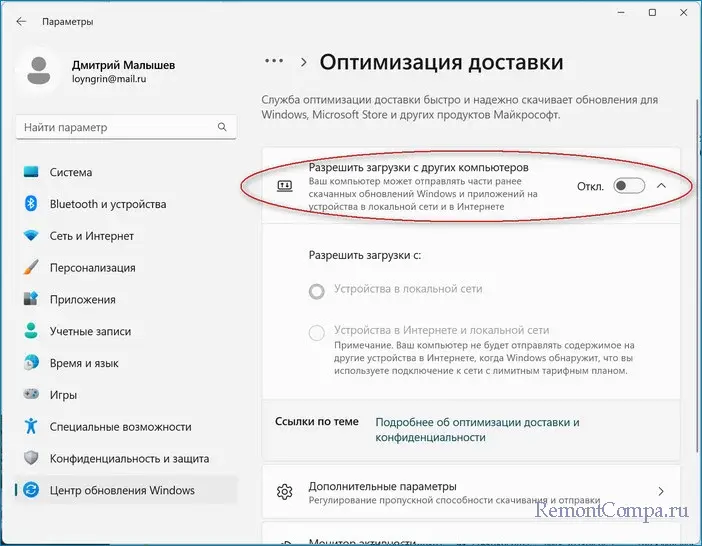
Есть в винде такая функция, как «Оптимизация доставки». Если объяснить просто, то служит она для передачи апдейтов не с серверов Microsoft на прямую, а через локальную сеть или интернет с других компьютеров. Как сообщают пользователи, отключение данной фичи может успокоить MoUSO Core Worker Process.
1. Жмем «Win+I».
2. Идем по маршруту
«Центр обновления Windows» — «Дополнительные параметры» — «Оптимизация доставки» и убираем отметку «Разрешить загрузки с других компьютеров».
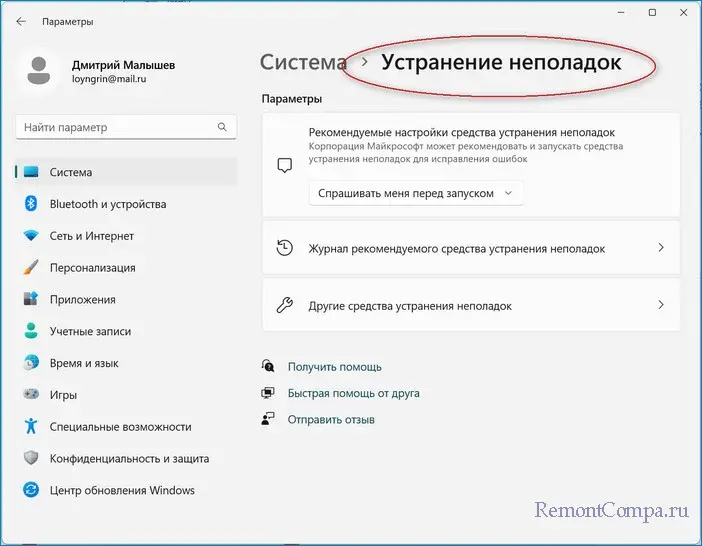
Иногда причину может устранить средство устранения неполадок.
1. Нажимаем «Win+I». Переходим в «Устранение неполадок» — «Другие средства устранения неполадок».
2. Выбираем необходимый раздел, то есть «Центр обновлений Windows» и следуем инструкциям помощника.
В большинстве случаев вышеописанные методы помогают устранить жор ресурсов.
Did you notice the MoUSO Core Worker Process running in the Windows Task Manager? Has it raised alarm bells since it hasn’t been seen before? Is it consuming too much RAM and CPU, which is causing concern? Would you like to disable it but aren’t sure if it’s safe?
No matter why you’re interested in learning more about the process, this article will cover all you need to know. Additionally, if it’s consuming a lot of your resources, we’ll show you solutions for fixing it.
The MoUSO Core Worker Process: What Is It?
The term USO in the process name stands for Update Session Orchestrator. According to Microsoft documentation, it is one of the Windows 10 built-in components of Microsoft’s Unified Update Platform (UUP), Microsoft’s update model introduced in Windows 10.
MoUSO Core Worker Process manages the order in which updates are downloaded and installed on the operating system. Simply put, this process controls which updates are downloaded and installed first.
By default, the MoUSO Core Worker Process only begins its processing when Windows searches for an update. However, sometimes it remains active for a long time without apparent reason. This results in excessive CPU or RAM consumption, resulting in your computer hanging. This is where it becomes problematic.
Following are some fixes you can use if the MoUSO Core Worker Process uses too much CPU and RAM on your computer.
1. Verify the Authenticity of the Process
The first thing to do is to confirm that the executable file is from Microsoft rather than a Trojan installed by a cybercriminal. The hackers commonly use the same names as the original processes, making it difficult to identify them.
To verify the authenticity of any executable file, follow the below steps:
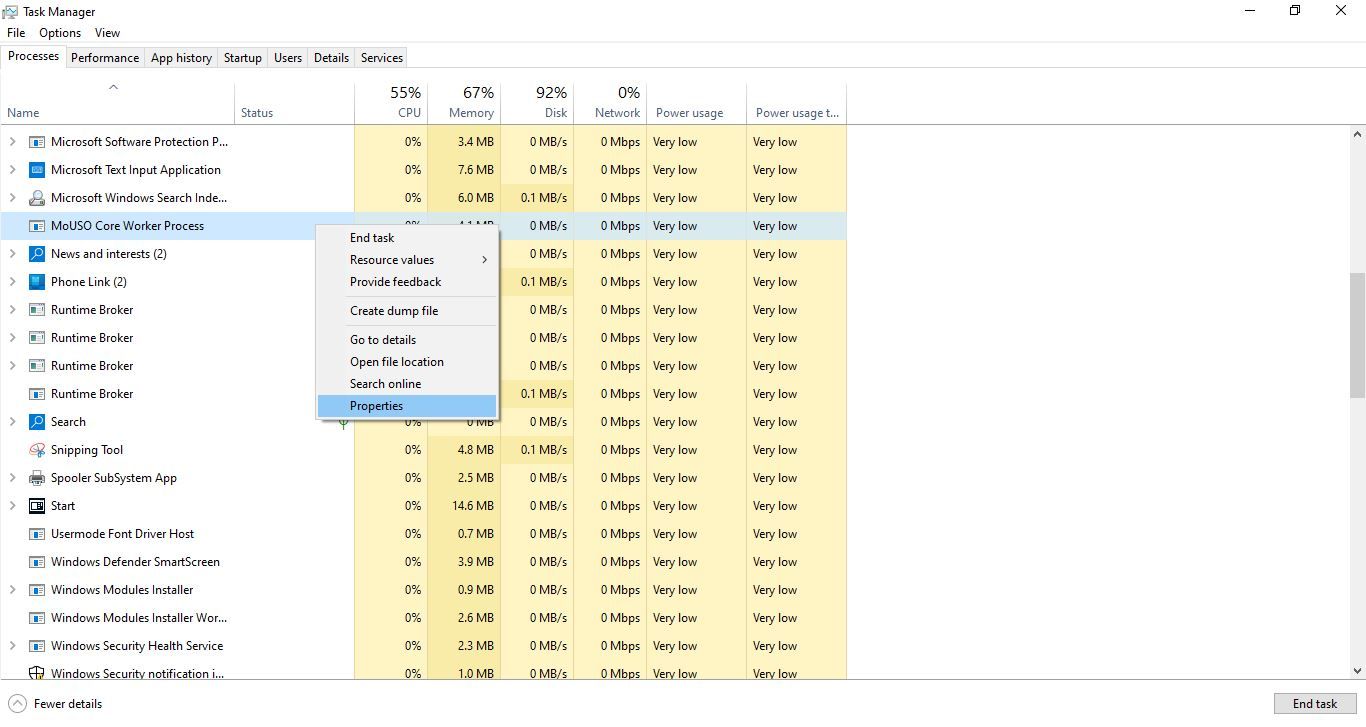
- Right-click the Windows Start button and select Task Manager.
-
Right-click on MoUSO Core Worker Process and select Properties.

-
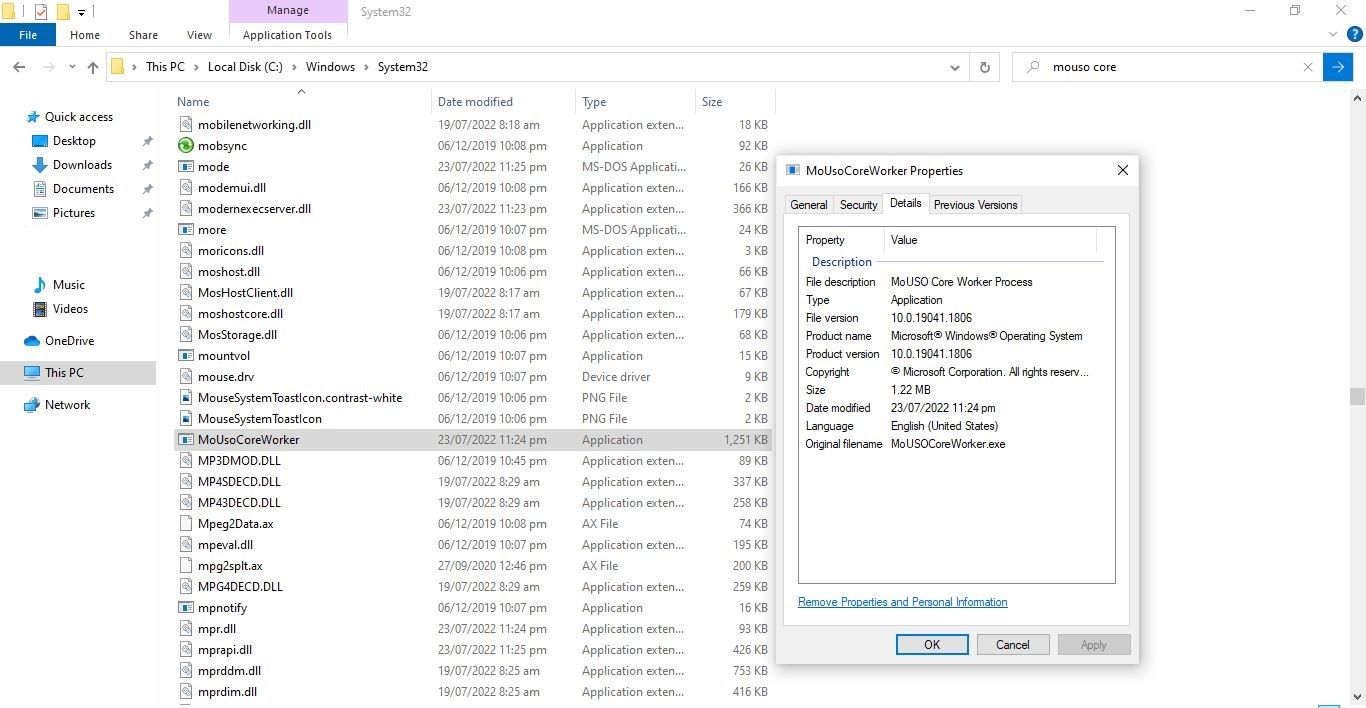
Under the General tab of the Properties window, copy the path next to Location.

- Paste the copied path into the address bar of File Explorer.
- Find the executable file for the process.
- Right-click it and select Properties.
- In the Properties window, navigate to the Details tab.
-
Confirm that «Microsoft Corporation. All rights reserved» is written next to Copyright.


2. Restart the MoUSO Process
The old-school approach of restarting the program to fix issues may also work here. Therefore, you should give a fresh start to the process before implementing any major fixes. You can restart the process by following the below steps:
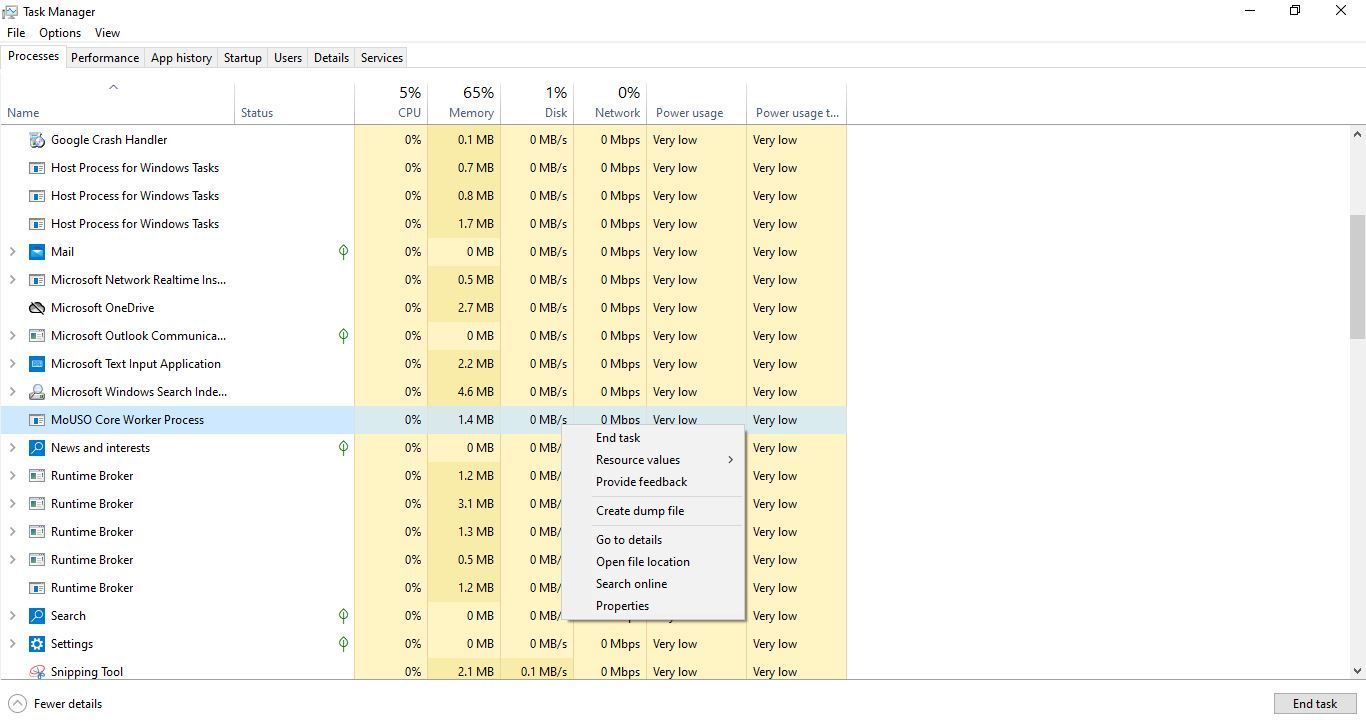
- Right-click on the Windows Start button and select Task Manager.
-
Right-click the MoUSO Core Worker Process and hit End task.

Restart your computer to give the process a fresh start. If restarting the process fails to lower CPU or RAM consumption, try the following fix.
3. Check for Available Updates and Install or Pause Them
Manually installing the available updates will reduce the burden on the MoUSO Core Worker Process. Consequently, it will reduce the process’s resource consumption. So, check for updates and let Windows install them. It is also essential to check for and install the optional Windows updates if they are available.
If installing automatic and optional updates doesn’t fix the issue, pause the Windows updates and see if that helps.
4. Run the Windows Update Troubleshooter
A handy Windows Update troubleshooter included in Windows can help you resolve any issues related to Windows updates. Therefore, run the troubleshooter to see if it helps identify the problems and fix the high resource consumption.
Follow the below steps to run the troubleshooter:
- Right-click the Windows Start button and select Settings.
- Go to Update & Security.
- Select the Troubleshoot tab in the left sidebar.
- In the right-hand pane, click Additional troubleshooters.
- Select Windows Update under Get up and running.
-
Click on Run the troubleshooter.


Check if the Windows Update troubleshooter has identified any problems and reduced resource consumption.
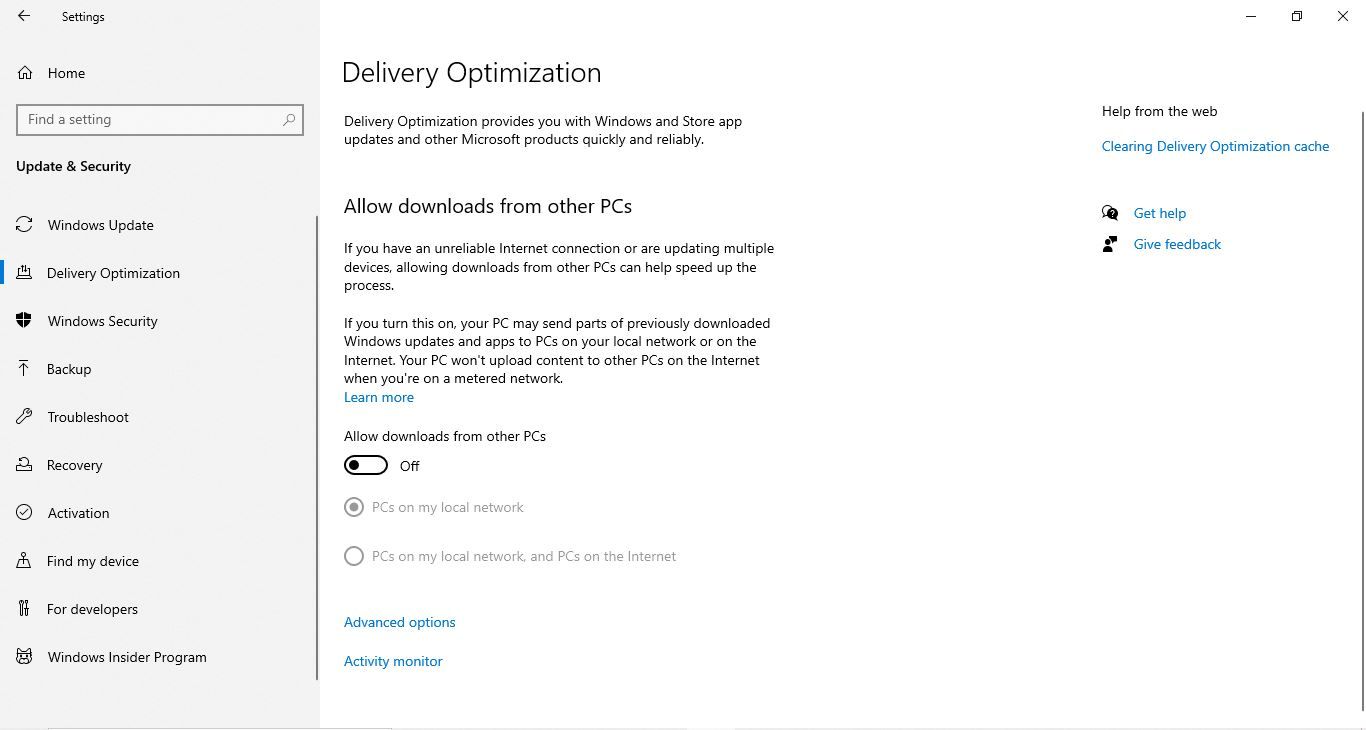
5. Disable Delivery Optimization
Delivery Optimization allows Windows users to download new updates or parts of updates from other PCs on the same network. This makes new updates more accessible.
However, since the USO Core Worker Process manages Windows updates and their installation, the extra burden of downloaded updates from other machines can make the process incredibly resource-intensive.
To rule out this possibility, disable Delivery Optimization. For this, go to the Windows Settings app > Update & Security > Advanced Options > Delivery Optimization. If it is on, turn the toggle next to Allow downloads from other PCs to the left to turn it off.
6. Restart Relevant Windows Update Services
Restarting services in the Windows operating system has a good chance of resolving common issues. Windows Update and Update Orchestrator Service are the most relevant services to restart to resolve the issue.
You can restart the Windows Update service by following the steps below:
- Open the Services app by searching for «Services» in the Windows search bar.
- In the right-hand pane, locate the Windows Update service.
-
Simply right-click it and hit Restart.
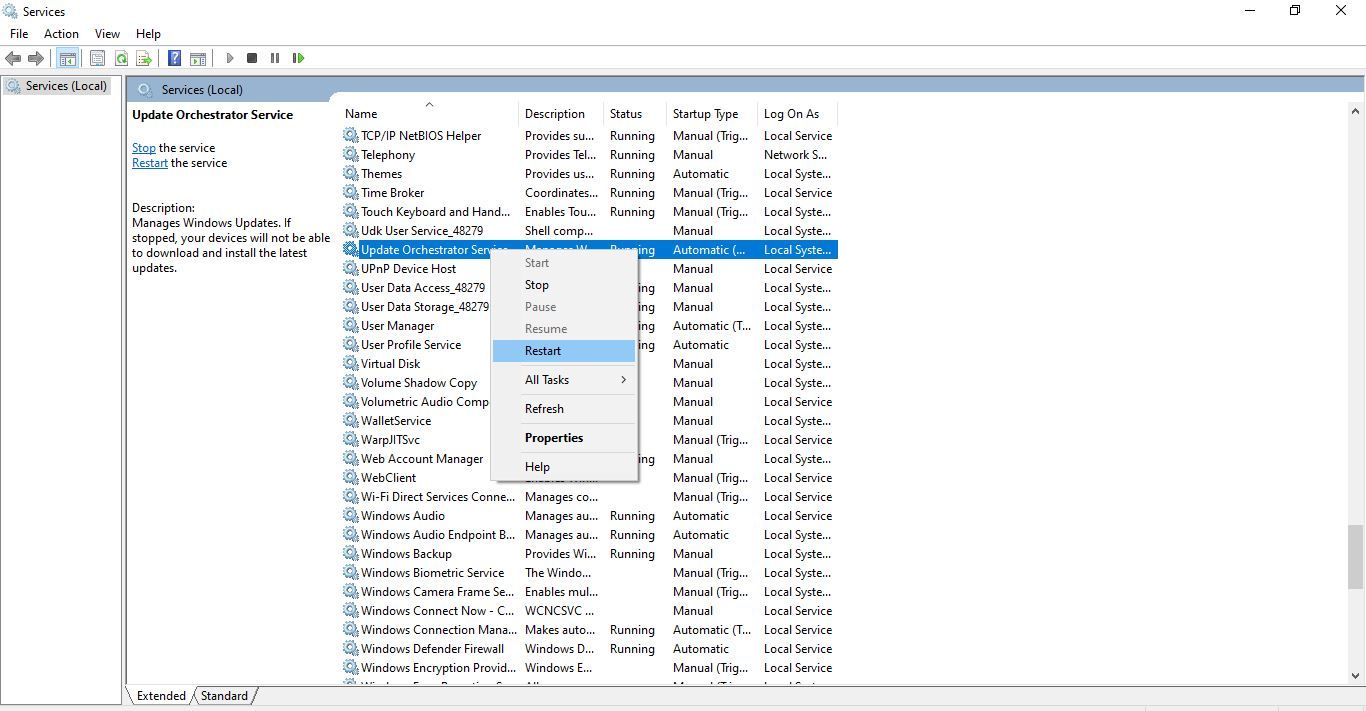
Next, restart the Update Orchestrator Service by following these steps:
- In the Services app, locate Update Orchestrator Service.
-
Right-click on it and hit Restart.

Is the process still consuming too much power? Then it’s time to disable the service.
7. Disable the Update Orchestrator Service
As a last resort, disable the Update Orchestrator Service to terminate the MoUSO Core Worker Process. Follow the below process to disable it:
- Open the Services app.
- Within the Service app, locate the Update Orchestrator Service.
- Right-click on it and select Properties.
- Select Disabled from the dropdown next to Startup type on the General tab.
-
Once you’ve done that, click Apply and then OK.

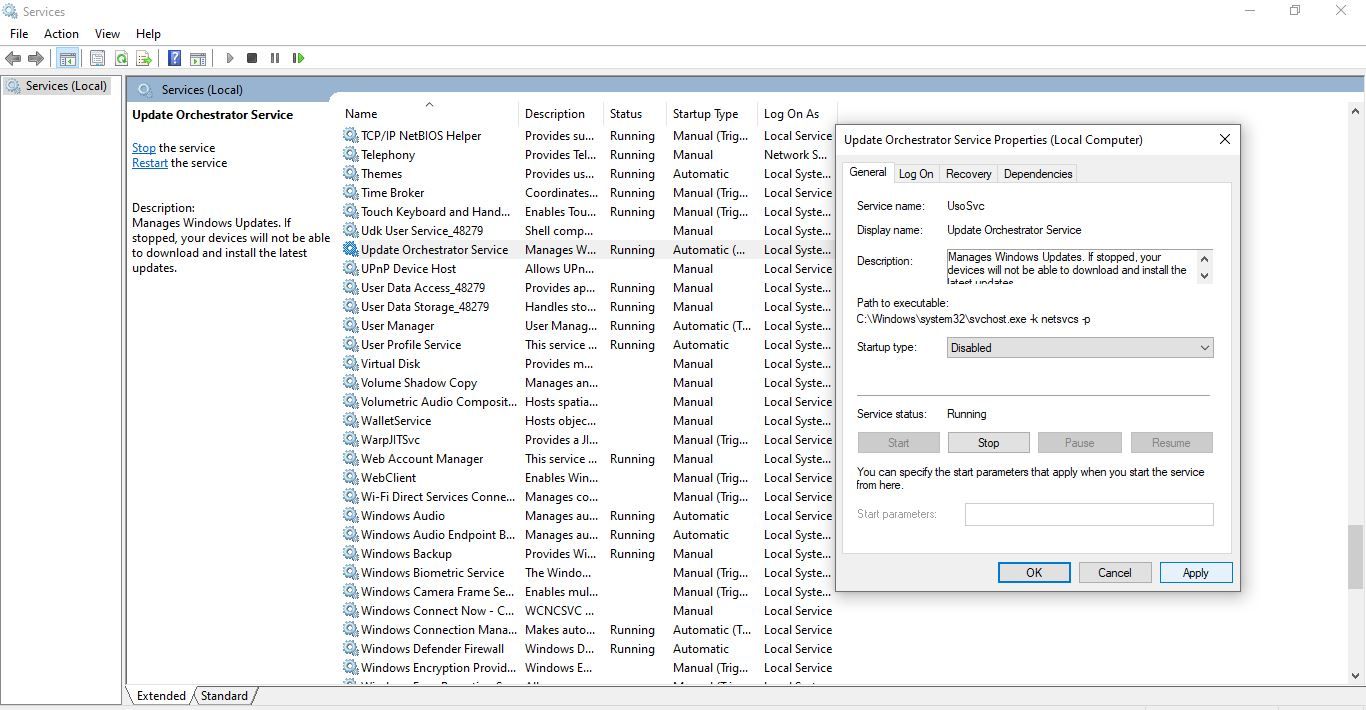
Disabling this service should stop the MoUSO Core Worker Process. If it doesn’t work, you can go back to Task Manager and end it there. Disabling the service will prevent it from running in Task Manager ever again.
While disabling MoUSO Core Worker Process will reduce resource consumption, it will also stop looking for new updates, which may adversely affect the performance of your device.
Reduce the MoUSO’s Core Worker Process’ Resource Consumption
After reading our guide, you will hopefully have a clearer picture of the MoUSO Core Worker Process. Moreover, if it’s consuming a lot of memory or CPU, now you know how to reduce it. If they cannot lower it, disable it to help your computer run smoothly.
During a Windows update, your computer just started to slow down and you find that the process is consuming a lot of CPU and RAM? Here in a couple of minutes you will learn about what kind of file it is and how to make it so that it does not overload your computer.
What Is MoUSO Core Worker Process?
Windows contains many routines and files whose purpose we may not even know, but which are very important because they provide the work of all parts of this advanced operating system. One such file in Windows 10 and Windows 1 is musocoreworker.exe and it stands for Microsoft Update Session Orchestrator. This file is part of the UUP platform (Unified Update Platform), which is responsible for the stable implementation of periodic updates of the operating system.
Important tip! Viruses and trojans often mimic legitimate Microsoft file names, so it’s a good idea to make sure that a running file under the name is exactly the same file, and does not resemble it in name. Real Windows executables are signed by Microsoft. To verify the authenticity of the file, in the Task Manager, right-click on the MoUSO file and select Properties, and then in the General tab of the Properties window, copy the path next to Location and paste the copied path into the address bar of File Explorer. Also, to be sure, you can scan this file as you would any .exe file with the built-in Microsoft Defender/Windows Security scanning service. It’s very simple. Locate the file and right-click it > Scan with Microsoft Defender.
Locate the process executable, right-click on it and select Properties and open the Details tab. There should be an inscription: «Microsoft Corporation. All rights reserved«.
How to Fix MoUSOCoreWorker.exe
As we already mentioned, usually musocoreworker.exe is activated when there is a check for updates. But sometimes it may happen that after completing the check and installation of updates, the update does not start and the file continues to work. This leads to high RAM and disk usage, which naturally results in a significant slowdown in your PC.
Restart Windows Update
You can try restarting the update, and perhaps the glitch will disappear. You can restart the Windows Update service by writing Services in the Windows search bar > Windows Update. Right click on it > Restart.
It can also help further restarting the Update Orchestrator Service. You can find this service in the Services app.
Run Windows Update Troubleshooter
But what if that doesn’t help and the file continues to work stubbornly? Find and fix problems in updating the OS will help you the built-in Troubleshooter that Windows 11 is equipped with. To launch it, click Start and in the search bar write Settings and confirm this with the Enter key. In the list that appears, find the item Troubleshooting, and click on it. Here search for a troubleshooter labeled Windows Update.
In the older versions of Windows, right-click the Windows Start button and select Settings. In the Update & Security section, find the Troubleshooting tab and right click on Advanced Troubleshooters. Locate the Get Up and Running section and click on Windows Update > Run the troubleshooter.
Disable the Update Orchestrator Service
If all else fails and the glitch continues, you can completely cancel the update service and thus stop the MoUSO process. To do this, in the Services application, right-click on the Update Orchestrator option and select Properties > General > Startup Type > Disabled > Apply > OK.
HAVE MORE WINDOWS QUESTIONS? CHECK OUT OUR FORUM!
What is MoUSO Core Worker Process? How to Fix High CPU or Disk Usage
Are you having problems with a process in Task Manager that looks like an MoUSO Core Worker Process, like usocoreworker.exe, usoclient.exe, or USO Core Worker Process? You can read about what it is and how to fix the problem in this post from FastSoftware.
The MoUSO Core Worker Process, also known as MoUSOCoreWorker.exe, is a Microsoft process that helps the operating system manage the installation of Windows updates. The term “USO” in its name stands for “Update Session Orchestrator,” which pretty well sums up what it does.
The MoUSO Core Worker Process can be the cause if your machine keeps waking up from sleep. Furthermore, the process can lead to excessive disk or CPU utilization. If left unchecked, this might cause your computer to run much slower and could lead to more serious problems down the road.

What is Windows 10’s MoUSO Core Worker Process?
MoUSO is an Update Session Orchestrator (USO) that appears in the Task Manager every time Windows checks for updates. Depending on your power configuration, it might show up as either MoUsoCoreWorker.exe or USOCoreWorker.exe. They’re replacement programs for the wuauclt.exe command in Windows 10.
This procedure monitors the status of various updates as they go from notification to installation. This monitoring is usually done in the background and should not cause any problems during normal use.
Windows will periodically search for updates in the background if you have automatic updates. This causes your computer to wake up from sleep mode and, if not configured properly, may slow down your system.
Is the MoUSO Core Worker Process malware?
No, it’s safe. The MoUSO Core Worker Process is a Microsoft-made program that comes with Windows when it’s installed on your device. This means the process cannot harm your system in any direct way, and you don’t need to worry about removing it.
However, because of the potential increased CPU or disk usage, it could have some harmful effects if you let the process run rampant for an extended period of time. Some users have reported that, in extreme cases, it may harm your SSD drive.
There are some things you can do if the MoUSO Core Worker Process is depleting your resources. Although the process itself cannot be removed, you can troubleshoot some issues that may cause it to excessively use your CPU, disk, or memory.
Method 1: Install all pending updates
The first thing you should try is to install any pending and optional updates that are scheduled for your system.
- To get to the Start menu, click the Windows icon in the bottom left area of your screen. You can quickly go to Settings or press Windows + I.

- You can click on the Update & Security tile. This is where you can find most of your Windows Update settings, including the option to choose when to receive updates.

- Be careful to remain on the Windows Update tab by default. After selecting the Check for Updates option, let Windows search for any updates that are available. To view and install any available updates, select the View all optional updates link.

- Choose to Install the update when Windows detects one. Hold off as Windows downloads and installs the required updates.
Method 2: Run the Windows Update troubleshooter
A number of troubleshooting tools included with Windows 10 are intended to help users fix problems without consulting an IT expert. Even if they are not flawless, these can be useful in identifying issues with your system. If you are having issues with the MoUSO Core Worker Process, try using the Windows Update troubleshooter.
- Launch the taskbar search bar by clicking the magnifying glass icon. As an alternative, you can open it with the Windows + S keyboard shortcut.
- Open a search window and type Control Panel. Click on it to open the program when you see it in the results.

- Use the input field located at the top right to search for “troubleshoot,” and then select the heading pertaining to troubleshooting from the list of results.

- In the window on the left, select the View All link. This will direct you to a new page that will show you every troubleshooter that is available.

- Find the Windows Update troubleshooter by scrolling down. After giving it a single click, watch for the troubleshooter to open a new window.

- To start the Windows Update problem analysis, click Next. The troubleshooter will try to resolve any issues it finds after diagnosing them. A comprehensive report is displayed once the troubleshooting procedure is complete.

Method 3: Disable Delivery Optimization
- Combining the Windows and R keys on your keyboard will launch the Run utility. Without using quotation marks, type “regedit,” then press the OK button.

- Use the window’s left-hand navigation pane or the address bar to copy and paste the URL in order to access the following registry key: HKEY_LOCAL_MACHINE\SYSTEM\CurrentControlSet\Services\DoSvc

- Right-click on the Start value, and then choose Modify… from the context menu. A new window should open up.

- Change the Value data field from the current number to 4. Make sure that the Base is set to Hexadecimal, and then click the OK button.

- At this point, you need to reboot your computer before you can proceed with the next steps. Once your system has successfully restarted, continue with the steps below.
- You can open the Run utility by pressing the Windows and R keys together on your computer. Press and hold the same keys on your keyboard to launch the Run utility. Click OK after entering “services. msc” without the quote marks. This will cause the Services to open in another window.

- Navigate down the list of services until you find delivery optimization. Click it with a right-click and select Properties from the context menu. in the services list. Click it with a right-click and select Properties from the context menu.

- Make sure that the Startup type is set to Disabled. If it’s not, change it by opening the drop-down menu and selecting it.

- Click “OK.” You should be able to test if the MoUSO Core Worker Process is still causing high CPU, disk, or memory usage after making this adjustment.
Method 4. Restart the Windows Update service
If your Windows PC won’t go to sleep and you’ve already verified the reason as the MoUSO Core Worker Process, restarting the Windows Update service should solve the problem.
- You may launch the Run utility by pressing the Windows and R keys together on your computer. Click OK after entering “services. msc” without the quote marks. This will cause the Services to open in another window.

- After you find Windows Update in the list of services, scroll down. From the context menu, choose Refresh by performing a right-click on it.
Method 5. Reset Windows to default power settings
It’s possible that the MoUSO Core Worker Process is causing your computer to wake up from sleep mode on a regular basis. To resolve this, just restore your power settings to their default settings.
- To use the search interface, either click the magnifying glass icon in your taskbar or press the Windows + S keys on your keyboard.
- Type “PowerShell” into the search field, and when the application shows up in the list of results, choose it with a right-click. “Run as administrator” should be selected from the context menu. Click this link to learn how to modify a local account that you are using but does not have administrator privileges.

- If the User Account Control (UAC) prompts you to launch the app with administrator permissions, click Yes.
- To execute the command, type it in and press the Enter key on your keyboard: powercfg -restoredefaultschemes

- Wait for the command to finish its task. After that, restart your computer to see whether the fix works.
Final thoughts
It’s important to be aware of what the MoUSO Core Worker Process is and how it works to maintain a stable system. The article provided troubleshooting tips for when your computer’s CPU, memory, or disk usage spikes due to this process running in the background.
If you have any more queries or worries, do not be afraid to get in touch with us—our team of experts will be pleased to help! To remain current on all things tech while you wait, make sure to follow us on social media and come back for more information about troubleshooting.
For more fantastic stories like this one, subscribe to our blog! Additionally, for a plethora of knowledge on troubleshooting different situations, visit our Help Center.
One additional thing
Subscribe to our email to receive early access to our blog content, promotions, and discount offers. I appreciate you taking the time to read! We are hoping to see you shortly.