
Contents
- General Considerations
- Using the File Manager
-
File System Differences
- NTFS
- FAT32
-
Configuring /etc/fstab
- Preface
- Automatic Configuration
- Manual Configuration
- Other Resources
- Footnote
Ubuntu is capable of reading and writing files stored on Windows formatted partitions. These partitions are normally formatted with NTFS, but are sometimes formatted with FAT32. You will also see FAT16 on other devices.
General Considerations
Ubuntu will show files and folders in NTFS/FAT32 filesystems which are hidden in Windows. Consequently, important hidden system files in the Windows C:\ partition will show up if this is mounted. Since it is all-too-easy to accidentally modify or delete files which are essential for Windows, it is advisable to mount your Windows C:\ partition as seldom as possible, preferably not at all, or read-only by configuring /etc/fstab (see below). If you have data which you want to access regularly from both Windows and Ubuntu, it is better to create a separate data partition for this, formatted NTFS.
Whether you write to your Windows C:\ partition or a shared NTFS data partition, be aware that if you are using Windows 7, and Windows 7 is in a hibernated state when you write to the NTFS partition from Ubuntu, you will lose all your changes. This is because when Windows 7 is hibernated it writes the system state to a file stored on disk and restores from that file when the system is re-awakened, thus restoring the whole fileystem to a state before any changes made from Ubuntu. In Windows 7 you must avoid using hibernation. With Windows 8, the situation is more complex in that, by default, it uses a hybrid hibernation/shutdown when you shut the system down. Any changes made by Ubuntu will be lost when you reboot into Ubuntu.
With both Windows 7 and Windows 8 (when installed to a legacy mbr partition table) there is usually a 100-200MB boot partition labelled «SYSTEM». Do not mount it — you do not need to. Similarly it is highly advisable to leave any recovery partitions unmounted.
Using the File Manager
For those using a desktop version of Ubuntu, or one of its offical derivatives, the easiest and quickest way of mounting NTFS or FAT32 partitions is from the file manager: Nautilus in Ubuntu, Thunar in Xubuntu, Dolphin in Kubuntu and PCManFM in Lubuntu. Simply look in the left pane of the file manager for the partition you wish to mount and click on it — it will be mounted and its contents will show up in the main pane. Partitions show with their labels if labelled, or their size if not.
Unless you require your Windows partition — or a NTFS/FAT32 partition for data shared with Windows — mounted every time you boot up for one of the reasons given below, mounting from the file manager in this way should suffice.
If you are using a Wubi version of Ubuntu and you wish to browse the host partition, you do not need to mount it — it is mounted already in the «host» folder. Click on «File System» in the left pane of the Nautilus file browser and then open the host folder which you will see in the main pane.
File System Differences
For a more in depth analysis, see LinuxFilesystemsExplained, but here are some basics:
- Windows 7, Vista, XP, 2000, older NT systems, and Windows Server 2003 and 2008 are formatted with NTFS. In rare cases, OEM manufacturers have pre-installed Windows XP and Windows 2000 to FAT32 filesystems.
- Older versions of Windows such as Windows ME, 98, and 95 are formatted with FAT32.
- Flash drives, such as a USB thumb drive or a camera’s flash card are typically formatted as FAT16. Some Flash drives are formatted with Microsoft’s proprietary exFAT file system.
In Windows, you can check which filesystem your partition is formatted with by right-clicking the partition in Windows Explorer and selecting Properties. In Ubuntu, run from terminal:
-
sudo fdisk -lu
NTFS
The ntfs-3g driver is used in Linux-based systems to read from and write to NTFS partitions.
NTFS (New Technology File System) is a file system developed by Microsoft and used by Windows computers (Windows 2000 and later). Until 2007, Linux distros relied on the kernel ntfs driver which was read-only. The userspace ntfs-3g driver now allows Linux-based systems to read from and write to NTFS formatted partitions.
The ntfs-3g driver is pre-installed in all recent versions of Ubuntu and healthy NTFS devices should work out of the box without further configuration. In Ubuntu versions 11.10 and later the ntfs-3g package included the functionality previously provided by ntfsprogs. Trying to install ntfsprogs in 11.10 (and possibly in 12.04) will cause the package-manager to ask if you wish to remove ntfs-3g. Users who have installed ntfsprogs and failed to notice the message from the package manager have unintentionally uninstalled ntfs-3g, after which the system falls back to the read-only kernel ntfs driver. Loss of the ntfs-3g driver for similar reasons has also been reported when upgrading from 11.04 to 11.10. If you are experiencing inability to write to a NTFS formatted partition or device, check whether or not the ntfs-3g package is installed.
FAT32
The vfat driver is used in linux to read and write FAT32 and FAT16 partitions.
Configuring /etc/fstab
Preface
If you require one or more of your Windows partitions mounted automatically during bootup, it is necessary to add one line to the file /etc/fstab for each partition that is to be mounted. Some reasons for mounting partitions by means of /etc/fstab, rather than relying on the file manager, include:
- Convenience.
- Where more than one user account is in use during a session. Partitions mounted from one user account by means of the file manager are not accessible to the other account(s).
- Where libraries have been set up in applications such as Banshee or Rhythmbox (for music) or Shotwell (for photos). If those libraries contain files on partitions mounted by means of the file manager, an error will occur in a subsequent session if the partition is not mounted first.
-
Where more advanced or special mount options are needed. Three working configurations for different needs are given below, but anything more advanced is beyond the scope of this wiki page. The NTFS-3G manual gives a list of mount options suitable for NTFS filesystems.
Automatic Configuration
Although there are a number of GUI applications available from the Ubuntu Software Centre, none of these can be recommended at the time of this writing, unfortunately. They are obsolete and unmaintained and can all cause problems. Two examples are ntfs-config and PySDM. (PySDM is no longer in the repository with effect from 12.10.) If you find a recommendation anywhere for either of these applications, it is likely to be an old one, and should not be followed. At this time it is advisable to configure /etc/fstab manually.
Manual Configuration
First, you need to find the device locations of the partition(s) you wish to mount. Open a terminal and run:
-
sudo blkid
For illustration purposes, an example output from a computer setup with a Vista/Ubuntu dual-boot and shared NTFS data partition is shown here:
-
/dev/sda1: LABEL="Recovery" UUID="B23613F43613B875" TYPE="ntfs"
/dev/sda2: LABEL="Windows" UUID="38CE9483CE943AD8" TYPE="ntfs"
/dev/sda3: LABEL="Data" UUID="519CB82E5888AD0F" TYPE="ntfs"
/dev/sda5: UUID="00d7d951-2a35-40fd-8e5d-411bb824ff3b" TYPE="swap"
/dev/sda6: LABEL="Ubuntu" UUID="6044b1d0-208e-4ab3-850d-03a92e1516fc" TYPE="ext4"
The first three partitions, all NTFS, are the ones that concern us here. There are no FAT32 partitions. In this instance, all three NTFS partitions have partition labels, which makes it easier to identify the purpose of each. If your blkid output does not include partition labels, this means that the partitions do not have labels and you will have to determine which partition you wish to mount by another means. Of the three NTFS partitions, we are going to configure /etc/fstab with only the third, the Data partition. Partition /dev/sda1 is the OEM manufacturer’s recovery partition and should be left unmounted, or as described below. Partition /dev/sda2 is the Windows C:\ partition and is best not included in /etc/fstab for the reasons described above, or mounted read-only — see below.
You will now need to create a mountpoint for each NTFS partition that you wish to mount by means of /etc/fstab. In our illustration we are going to add one entry only for /dev/sda3. From a terminal:
-
sudo mkdir /media/Data
In this case we have created a mountpoint with the same name – Data – as the partition label. You may use (almost) any string you wish.
Before editing /etc/fstab directly, it is a good idea to make a backup. From a terminal:
-
sudo cp /etc/fstab /etc/fstab.orig
Now open /etc/fstab in a text editor with root privileges. In Ubuntu:
-
gksudo gedit /etc/fstab
In Kubuntu:
-
kdesudo kate /etc/fstab
In Xubuntu or Lubuntu:
-
gksudo leafpad /etc/fstab
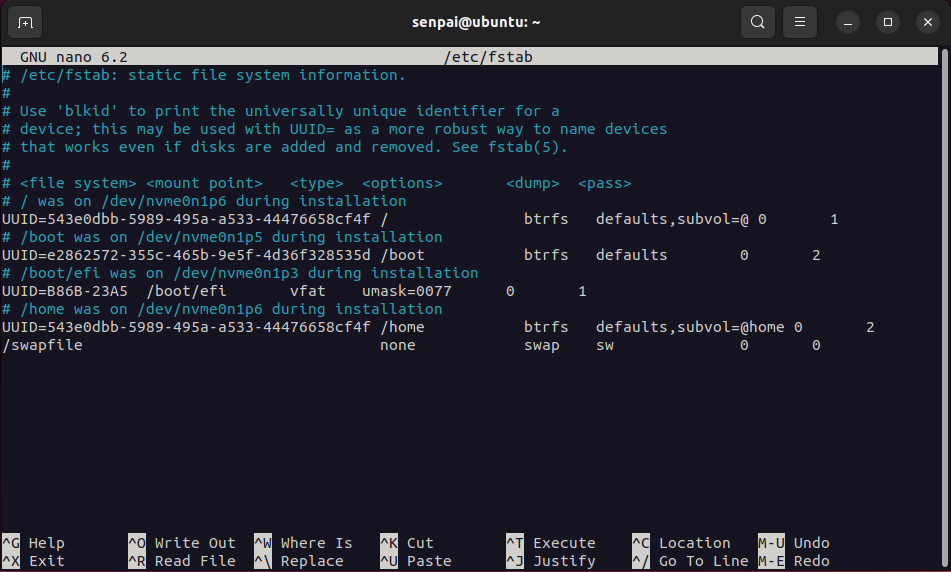
For a general-purpose read-write mount, add this line to the end of /etc/fstab:
-
UUID=519CB82E5888AD0F /media/Data ntfs-3g defaults,windows_names,locale=en_US.utf8 0 0
Replace the UUID with the one relevant for your partition as shown in your blkid output. “519CB82E5888AD0F” will not work for you.
Also, substitute your mountpoint for “/media/Data”. In case you have a blank space in the name of the mountpoint you want to use like «New Volume» instead of «Data» located in «/media» use «/media/New\040Volume». The space character is created by using «\040» in the fstab.
You will also need to change the “locale=en_US.utf8” option to one suitable for your location and language if you are not in the USA. You can determine your locale with this terminal command:
-
locale
Or for a list of all locales available on your system:
-
locale -a
Now save your edited /etc/fstab and close the text editor. The partition(s) you have configured will be mounted the next time you reboot, but to mount them now:
-
sudo mount -a
Two special cases
Sample /etc/fstab lines are suggested for two special cases.
Option 1 — for mounting read-only access. For example, this would be suitable for mounting your Windows C:\ partition if you need to access it. Modify the line below with your UUID and mountpoint:
-
UUID=519CB82E5888AD0F /media/Data ntfs defaults,umask=222 0 0
Option 2 — to ensure that Ubuntu does not mount the partition and also disables graphical mounting from the file manager. For example, you may wish to ensure that recovery and system partitions are never inadvertently mounted and do not appear in the file manager. In this case you need to create a mountpoint in /mnt, not /media. Modify the line below with your UUID and mountpoint:
-
UUID=519CB82E5888AD0F /mnt/Data ntfs noauto,umask=222 0 0
Note: with these mount options, the partition does not appear in the Devices list in the left pane of Nautilus (the Ubuntu file manager), but it still appears in Dolphin, the Kubuntu File Manager. Clicking on the partition in Dolphin causes the display of an error message. This solution is less elegant in Dolphin than with Nautilus, but the desired effect is achieved — the partition cannot be mounted.
If you need to revert to the original configuration:
-
sudo mv /etc/fstab.orig /etc/fstab
sudo umount  /media/<mountpoint>
Substitute your mountpoint in the second line.
FAT32 Partition
FAT32 partitions are mostly only found in older systems. If you are creating a partition to be used for data to be shared between Windows and Ubuntu, it is better to choose NTFS. Should you have a FAT32 partition which you need to mount using /etc/fstab, this will work to mount it read-write:
-
UUID=<UUID> /media/<mountpoint> vfat defaults,user,exec,uid=1000,gid=100,umask=000 0 0
Replace <UUID> with the UUID that blkid reveals for your partition, and adjust for your mountpoint. These mount options will make all files in the partition executable. If you have other needs, you will need to modify the options, but this is beyond the scope of this wiki page.
Other Resources
-
ntfs-3g homepage
-
Fstab
-
LinuxFilesystemsExplained
-
How to fstab
-
CategoryBootAndPartition
This page has recently been subject to significant revision. If you have any comments about current content, or suggestions for further additions or edits, please head over to this Ubuntu forums discussion thread so that we can co-ordinate our efforts.
If you are using a dual-boot setup on your PC while using Linux as well as Windows, on different drive or partitions, then it might be necessary for you to set up auto mount the Windows partition on boot in case you need to access data on that partition or drive, because Linux operating systems don’t mount it by default.
Well, In this tutorial we will learn how to manually mount the Windows drive/partition on your Linux system as well as set up auto-mount on every reboot so that you won’t have to go through the hassle again and again.
Check your Kernel version
Since Windows uses the NTFS file system unlike Linux which uses Ext4 or BTRFS, you will need additional drivers on Linux distributions in order to support NTFS. Now, these drivers are already built into the Linux kernel versions 5.15 and above, and you don’t need to install anything if you are using the required kernel versions. To check which kernel is being used by your PC, you can type the following command in your Terminal:

If your Linux kernel version is less than 5.15, then you can either choose to update your system, or simply install the ntfs-3g driver by typing the following commands:
# On Debian and Ubuntu based distributions:
sudo apt install ntfs-3g

# On CentOS or Red Hat Linux:
sudo dnf install ntfs-3g

# For Manjaro or Arch Linux based distributions:
sudo pacman -S ntfs-3g
Since my Nobara PC uses the 6.11 kernel, I don’t have to install anything, and We can proceed to the next section, which is setting up the auto-mount.
Recognizing the Drive
First of all, you should recognize the drive or partition you are going to mount from the command line. This can be done by understanding the size of the Windows partition or drive from the GUI and matching it with the command line output of the parted or lsblk command.
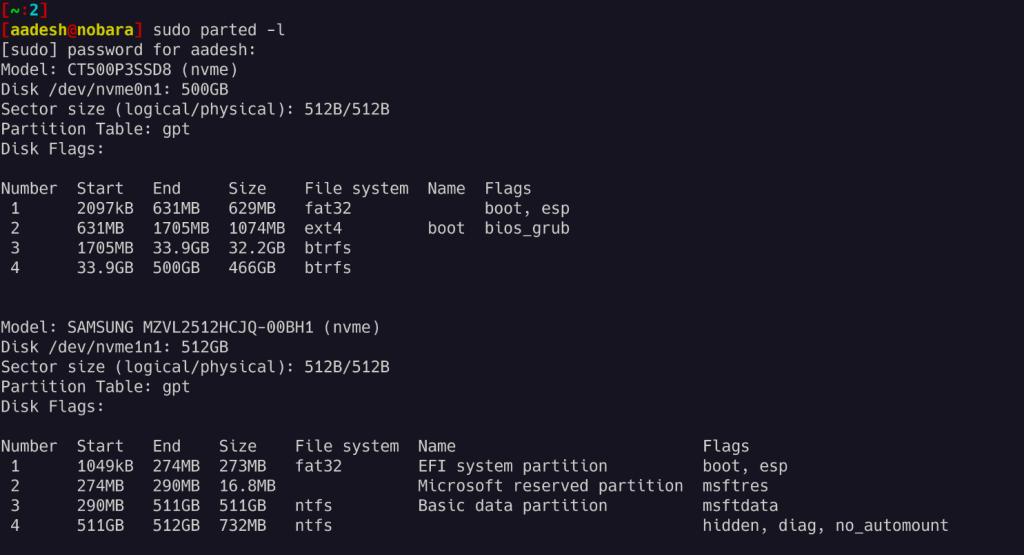
As you can see, I have two NVMe SSDs attached to my PC and my windows drive is located on the second NVME drive which is mounted at /dev/nvme1n1, if you have a hard drive then it should look something like /dev/sda or /dev/sdb.
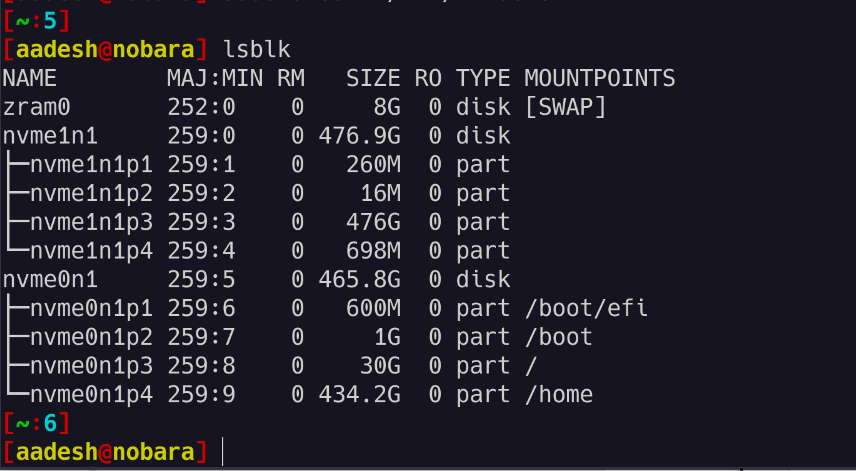
Now, you should notice in the screenshot that my data partition is listed in the 3rd position and is 511GB in size, so my partition’s name is actually /dev/nvme1n1. If you are using a hard drive then it should be something like /dev/sda1 or /dev/sdb1 etc. You can verify the partitions using the lsblk command:
Mounting the NTFS partition
Once you have recognized the partition, we can begin setting up a mount point in a directory where the drive will be mounted. Normally, the drives are mounted in the /mnt directory, so we’ll make the mounting directory there. Type the following command:
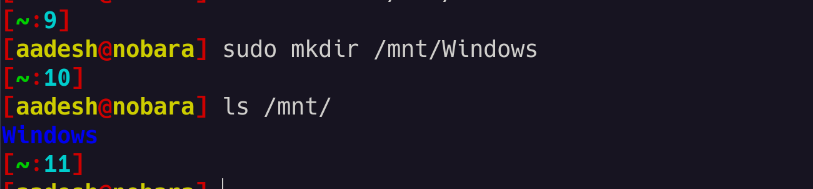
Once the directory is created, you can mount it by typing:
sudo mount /WINDOWS_PARTITIONS /MOUNT_POINT
For example, for my /dev/nvmen1p3, I have to type:
sudo mount /dev/nvmen1p3 /mnt/Windows
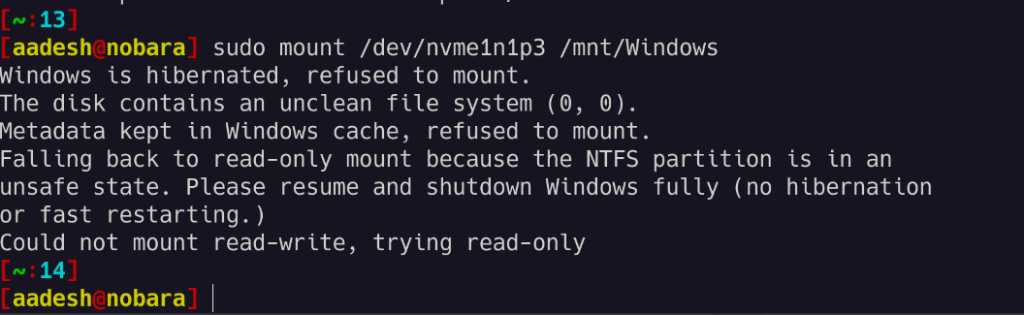
As you can see that I got an error because I didn’t shut down Windows properly (because fast boot is enabled from Windows), but I can mount the drive with read-only permission if I want to with the -ro flag like this:
sudo mount -o ro /dev/nvme1n1p3 /mnt/Windows

That’s it, you can now access your data from the Windows NTFS partition directly from your Linux PC without having to reboot.
Summary
In this tutorial, we learned how to mount and access a Windows NTFS partition on Linux in both read-only mode and with read and write access. Note that to gain write access, you need to disable Fast Boot from Windows settings so that it shuts down every time you press the power button instead of hibernating (which is the default in Windows 10 and 11).
We also learned about the NTFS-3G driver and its significance for different Linux kernel versions.
If you are rocking a dual-boot setup with Windows and Linux, you might want to access data stored in the Windows drives from the Linux system.
However, you might find that Windows drives do not appear in the file manager. This is because, in some distros, you need to manually mount them. Let’s take a look at how you can access your NTFS/Windows drives in Linux.
Step 1: Install the NTFS-3G Driver
To successfully mount and access NTFS drives on Linux, you will need to install a driver to ensure no incompatibility issues arise. The go-to driver when working with NTFS drives is NTFS-3G. It’s cross-compatible between Debian/Ubuntu derivatives, Arch Linux-based systems as well as RHEL/CentOS/Fedora systems.
To install the NTFS-3G driver on your Linux system, fire up a terminal and install it using the package manager of the distro that you’re running:
On Debian and Ubuntu, run:
sudo apt install ntfs-3g
On Arch-based systems, run:
sudo pacman -S ntfs-3g
To install the NTFS-3G driver on Fedora, CentOS, or RHEL, issue the following command:
sudo dnf install ntfs-3g
This should install the driver on your Linux system. Now you can move on to the next steps.
Step 2: Identify the NTFS Partition
A preliminary step before mounting a drive is to first identify its device ID. This is important because you might end up causing unwanted data loss by working with the wrong partition or drive.
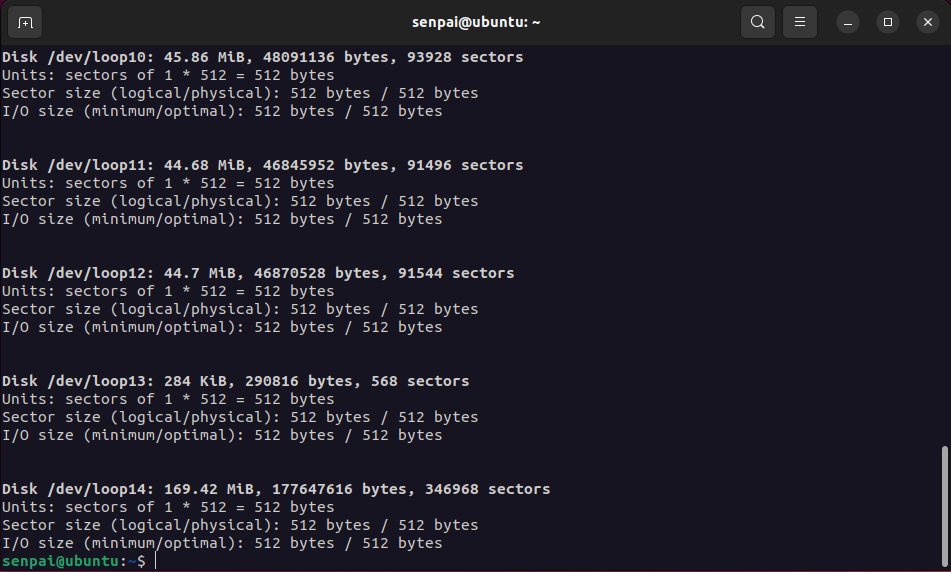
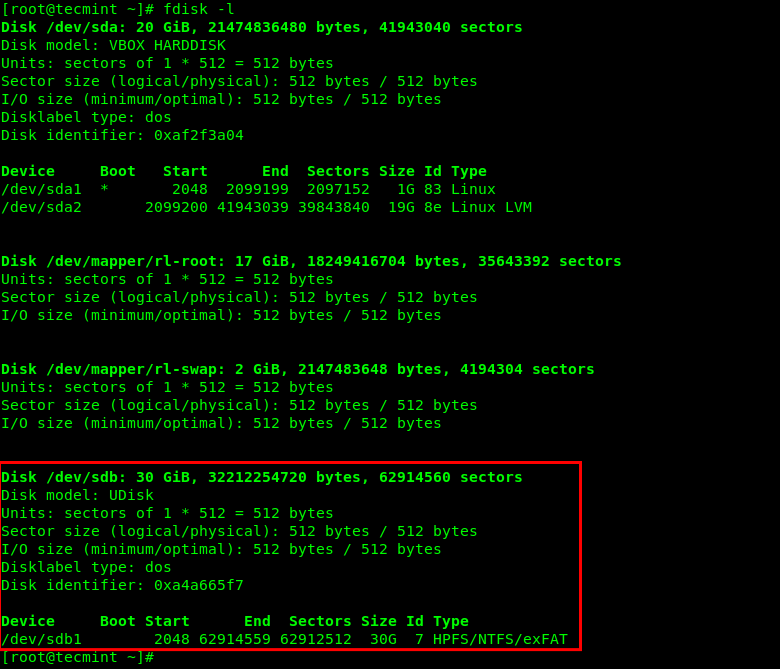
To identify all the drives and their partition types, use the fdisk command with the -l flag.
sudo fdisk -l
The output will display all the different drives and partitions along with useful information like size, available free space, partition type, and more. Take note of the device name carefully. You will be needing it later on in this guide.
Step 3: Make a Directory to Mount the Drive
In Linux, everything is treated as a file, including hardware devices. So, to mount your NTFS drives on Linux, you have to create a separate directory wherein the drive will be mounted, and its content laid out.
This process is as simple as creating a regular directory on Linux. Using the mkdir command, create a new directory in the root partition of your Linux system. For the sake of better organization, make the directory under the /mnt directory and name it «media».
sudo mkdir /mnt/media
Now that we’ve allocated a directory for the NTFS drive, we need to update the file system tables on Linux with the location of the drive.
Step 4: Update the File System Tables and Mount the Drive
Updating the file system tables is a crucial step that enables your Linux machine to recognize and mount new storage drives. In Linux, the /etc/fstab file stores the file system configurations.
sudo nano /etc/fstab
You need to add the NTFS drive’s location and other important data to make sure that your system can mount it without any hiccups.
To update the file system table of your Linux system, use any text editor of your choice and open the /etc/fstab file.
In a new line, add the NTFS drive location, the directory that you created earlier, the driver to use (NTFS-3g), and read, write, and user access information. Make sure to separate each input with one Tab space. If you’re unsure what to type in, you can replicate the settings for any drive that’s already mounted and functional.
Write out the file once you’re done inputting the data. Fire up the terminal and use the mount command in conjunction with your device ID to mount it:
mount /dev/sda3 /mnt/media/drive_location_here
In case you wish to unmount the drive, you can do that using the umount command:
umount /dev/sda3 /mnt/media/drive_location_here
That’s all you need to do. Optionally you can restart your system, however, it won’t be required in most cases. You can now explore your NTFS drive from the terminal using the cd command or via the file manager of your Linux distro.
Now You Can Access Windows Drives in Linux
While it may be a bit tedious, it is still straightforward and a permanent process. You can now freely mount and unmount your Windows drives when logged into Linux. In case you want to permanently use the drive on Linux, you will need to format it.
Are you trying to access an NTFS partition or NTFS formatted USB drive on an RHEL-based operating system, and have encountered an error?
Do not worry, all will be fine once you finish reading this guide where we will show how to mount and access Windows/USB partitions formatted with NTFS file system type, on RHEL-based systems such as CentOS, Fedora, Rocky, and AlmaLinux.
The following screenshot shows an error encountered while mounting a Windows NTFS partition in Rocky Linux, an RHEL-based system developed as a replacement for CentOS.
mount: /media: unknown filesystem type 'ntfs'.

This guide assumes that you are logged in as a root user and will run commands with root user privileges, otherwise, use the sudo command where necessary.
Table of Contents
How to Mount Windows NTFS Partition in Linux
To mount any NTFS-based partition in RHEL-based systems, you need to install and use a package called NTFS-3G.
What is NTFS3G
NTFS-3G is an open-source cross-platform NTFS driver that works on Linux and other Unix-like operating systems. It supports mounting and accessing NTFS partitions using the FUSE (Filesystem in Userspace) interface, which then enables a user to create, delete, rename, and move files, directories, hard links, streams, and much more within the mount point.
The NTFS-3G package is available in the EPEL (Extra Packages for Enterprise Linux) Repository. To install it, first enable the EPEL repository on your machine as follows:
----------- On RHEL-based Linux 9 Release -----------
# yum install https://dl.fedoraproject.org/pub/epel/epel-release-latest-9.noarch.rpm

----------- On RHEL-based Linux 8 Release -----------
# yum install https://dl.fedoraproject.org/pub/epel/epel-release-latest-8.noarch.rpm

----------- On RHEL-based Linux 7 Release -----------
# yum install https://dl.fedoraproject.org/pub/epel/epel-release-latest-7.noarch.rpm
Next, run the following yum command to install the ntfs-3g package on your system, follow any prompts on the screen to import the GPG key for signing the package:
# yum install ntfs-3g

Identify NTFS Partition
Now plug your USB drive into the computer and check for all connected block devices using the fdisk command. Your USB device should be listed in the output as highlighted in the following screenshot.
This command will also enable you to get the device name under the /dev directory. In this example, the device name is /dev/sdb and the first mountable partition is /dev/sdb1.
# fdisk -l
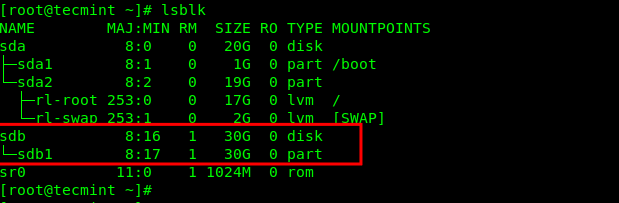
Alternatively, you can use the lsblk command to list all block devices connected to your computer:
# lsblk
Mount NTFS Partition in Linux
Now it’s time to mount your USB drive by creating a new directory under /media, for example, /media/myusb. Then mount the USB drive using the mount command with -t flag, which is used to specify the filesystem type, which is ntfs-3g in this case:
# mkdir -p /media/myusb
# mount -t ntfs-3g /dev/sdb1 /media/myusb/

You can check if the USB drive has been mounted successfully to the defined location by running the mount command and filtering its output via the grep command as shown:
# mount | grep /dev/sdb

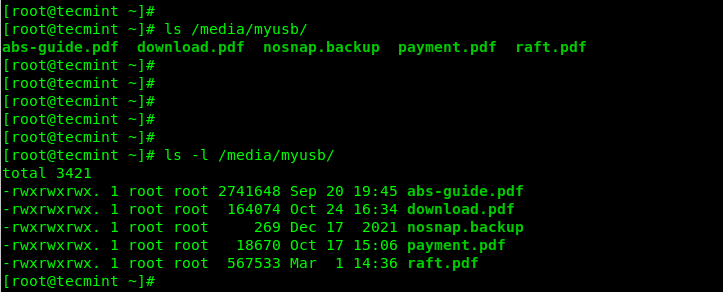
Next, run the ls command in the mount location to view files stored in the USB drive. The -l flag allows for a long listing of files with their permissions and size, and more:
# ls /media/myusb/
OR
# ls -l /media/myusb/
To mount a Windows NTFS partition at boot time, add the following line in your /etc/fstab file. Make sure to replace /dev/sdb1 and /media/myusb with the device name and mount point respectively:
/dev/sdb1 /media/myusb auto defaults 0 0
Unmount NTFS Partition in Linux
To unmount the /media/myusb mount point, use the umount command as shown.
# umount /media/myusb/
We have come to the end of this guide where we showed how to mount and access Windows NTFS partitions in RHEL systems by using the ntfs-3g driver. Share your feedback concerning this topic via the comment section below.
Posted by
on May 24, 2017
The New Technology File System (NTFS) is a proprietary file system created by Microsoft and is used extensively in Microsoft’s Windows operating systems.
By default most Linux distributions are not able to mount NTFS, however it is possible to install a driver that allows us to do this so that we can read and write data to an NTFS disk.
In this example I have attached the VMDK file from a Windows based virtual machine to a CentOS 7 Linux virtual machine.
When we run ‘fdisk -l’ we can see that the disk is recognized (after a system reboot), however it is not yet mounted for us to access the data. We can see the primary disk for the Linux system /dev/sda, while /dev/sdb is our 1GB NTFS disk which has the /dev/sdb1 NTFS partition.
[root@centos7 ~]# fdisk -l

Disk /dev/sda: 21.5 GB, 21474836480 bytes, 41943040 sectors
Units = sectors of 1 * 512 = 512 bytes
Sector size (logical/physical): 512 bytes / 512 bytes
I/O size (minimum/optimal): 512 bytes / 512 bytes
Disk label type: dos
Disk identifier: 0x0004c930

   Device Boot      Start         End      Blocks   Id  System
/dev/sda1   *        2048      616447      307200   83  Linux
/dev/sda2          616448     4810751     2097152   82  Linux swap / Solaris
/dev/sda3         4810752    41943039    18566144   83  Linux

Disk /dev/sdb: 1073 MB, 1073741824 bytes, 2097152 sectors
Units = sectors of 1 * 512 = 512 bytes
Sector size (logical/physical): 512 bytes / 512 bytes
I/O size (minimum/optimal): 512 bytes / 512 bytes
Disk label type: dos
Disk identifier: 0xfc757b2a

   Device Boot      Start         End      Blocks   Id  System
/dev/sdb1             128     2091135     1045504    7  HPFS/NTFS/exFAT
By default when I try to mount the NTFS disk, we get the below error.
[root@centos7 ~]# mkdir /windows
[root@centos7 ~]# mount /dev/sdb1 /windows/
mount: unknown filesystem type 'ntfs'
Install Required Packages
In order to perform the mount, we need to install the ntfs-3g package, which is a Linux NTFS userspace driver. This package comes from EPEL if you’re using CentOS/RHEL, so if you have not yet configured your system to use the EPEL repository, run the following command.
[root@centos7 ~]# yum install epel-release -y
Now we should be able to install the ntfs-3g package from the EPEL repository.
[root@centos7 ~]# yum install ntfs-3g -y
Otherwise if you’re using Ubuntu/Debian, you should just be able to run ‘apt-get install ntfs-3g’ straight away. In my Debian 8 installation it was already available so I was able to mount NTFS without any problems.
Mount The NTFS Disk
We can now successfully perform the mount without any errors.
[root@centos7 ~]# mount /dev/sdb1 /windows/

[root@centos7 ~]# blkid /dev/sdb1
/dev/sdb1: LABEL="NTFS" UUID="CA4A1FD94A1FC0DD" TYPE="ntfs"
We can confirm that the NTFS disk is now seen as mounted by the operating system.
[root@localhost ~]# df -h /windows/
Filesystem      Size  Used Avail Use% Mounted on
/dev/sdb1      1021M   11M 1011M   2% /windows
At this point you should be able to read and write data on the mounted NTFS disk.
Automatically Mount NTFS
We can create an entry in the /etc/fstab file so that our NTFS disk will automatically mount on system boot. Below is an example of the entry that I have placed into my fstab file. This will mount the disk to the /ntfs directory.
/dev/sdb1 /windows ntfs-3g defaults 0 0
Once this configuration has been added, the NTFS disk should mount automatically on system boot. Before performing a reboot, it is recommended to first run the ‘mount -a’ command and confirm that the disk mounts without errors. If there are errors that happen during boot, you may be left with a system that does not properly boot so it’s important to test first.
Summary
We have seen that it is possible to easily mount an NTFS disk in CentOS 7 Linux once the ntfs-3g package has been installed which provides us with the necessary drivers.