
(Image credit: Mauro Huculak)
An ISO image is a digital replica of a physical disc, such as a CD, DVD, or Blu-ray, encapsulating all its data and file structures into a single file. This format is widely adopted by software companies to distribute apps and tools efficiently, eliminating the costs and logistics associated with physical media. For instance, Microsoft uses ISO images to distribute Windows 11 (and 10) installation files as well as previews to testers and various other products.
Although many tools exist for working with images, Windows 10 and Windows 11 include the ability to mount ISO files natively without the need for extra software.
In this how-to guide, I’ll show you how to mount and unmount the ISO images using File Explorer and PowerShell commands.
How to mount ISO image with File Explorer
On Windows 11 and 10, File Explorer allows you to access the content of an image in at least three different ways: double-clicking the file, using the context menu option, or using the option available in the ribbon menu.
Mount image with double-click
To quickly mount an ISO file on Windows 11 (or 10), use these steps:
- Open File Explorer.
- Browse to the folder with the ISO image.
- Double-click the .iso file to mount it.
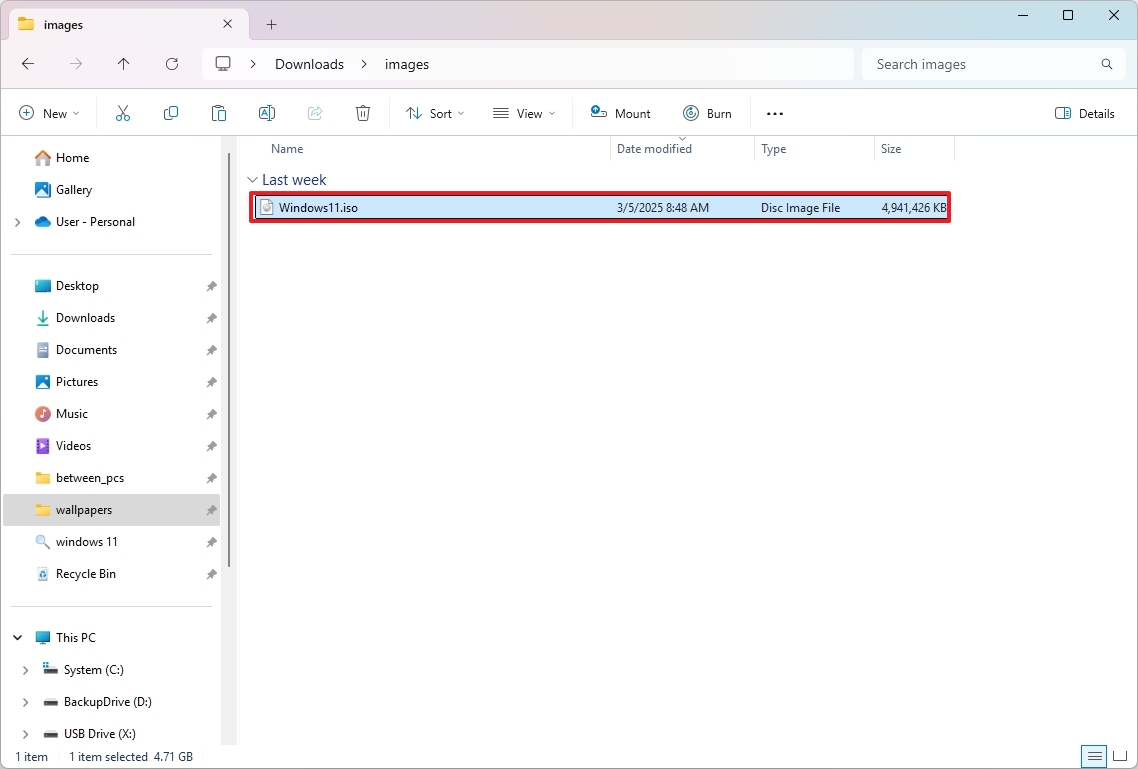
Once you complete the steps, the ISO file will open like any other folder, allowing you to access and extract the contents as necessary.
This action will work as long as you don’t have another app set as the default for «.ISO» extensions.
All the latest news, reviews, and guides for Windows and Xbox diehards.
To mount an ISO image with the File Explorer context menu, use these steps:
- Open File Explorer.
- Browse to the folder with the ISO image.
- Right-click the .iso file and select the Mount option.
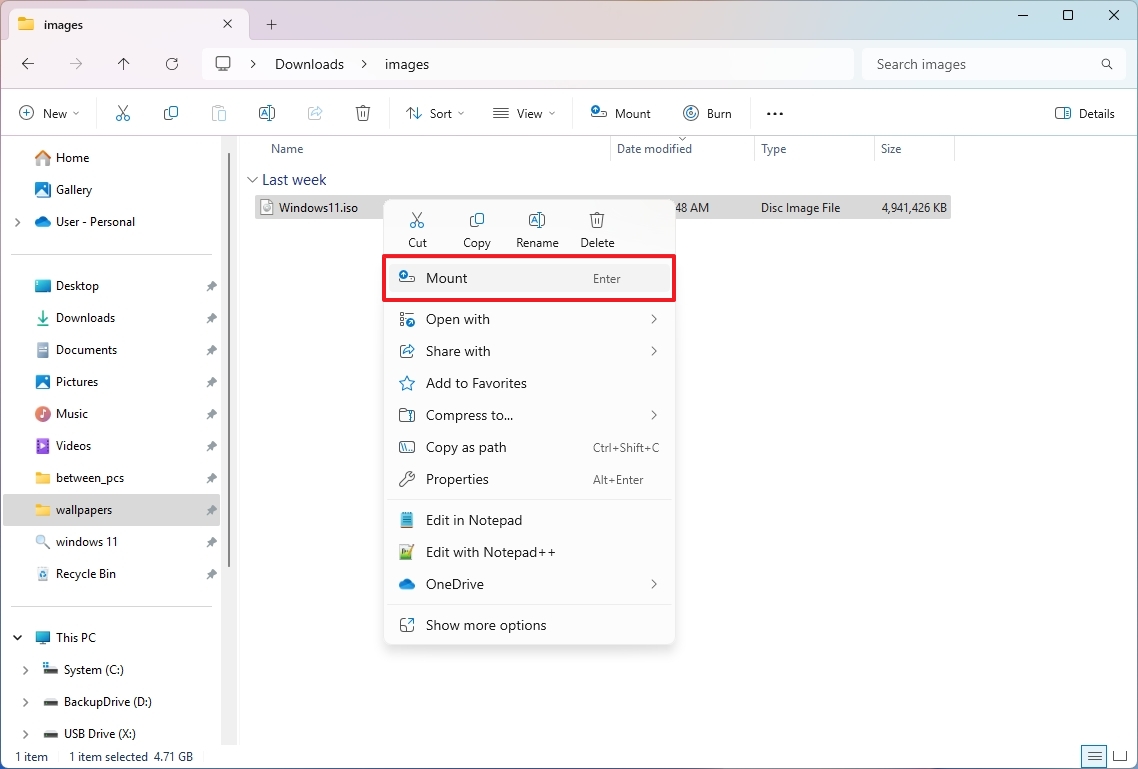
Once you complete the steps, you can access the contents of the image by selecting the virtual drive from the left navigation pane.
To mount an image with the ribbon menu, use these steps:
- Open File Explorer.
- Browse to the folder with the ISO image.
- Select the .iso file.
- Click the Mount button.
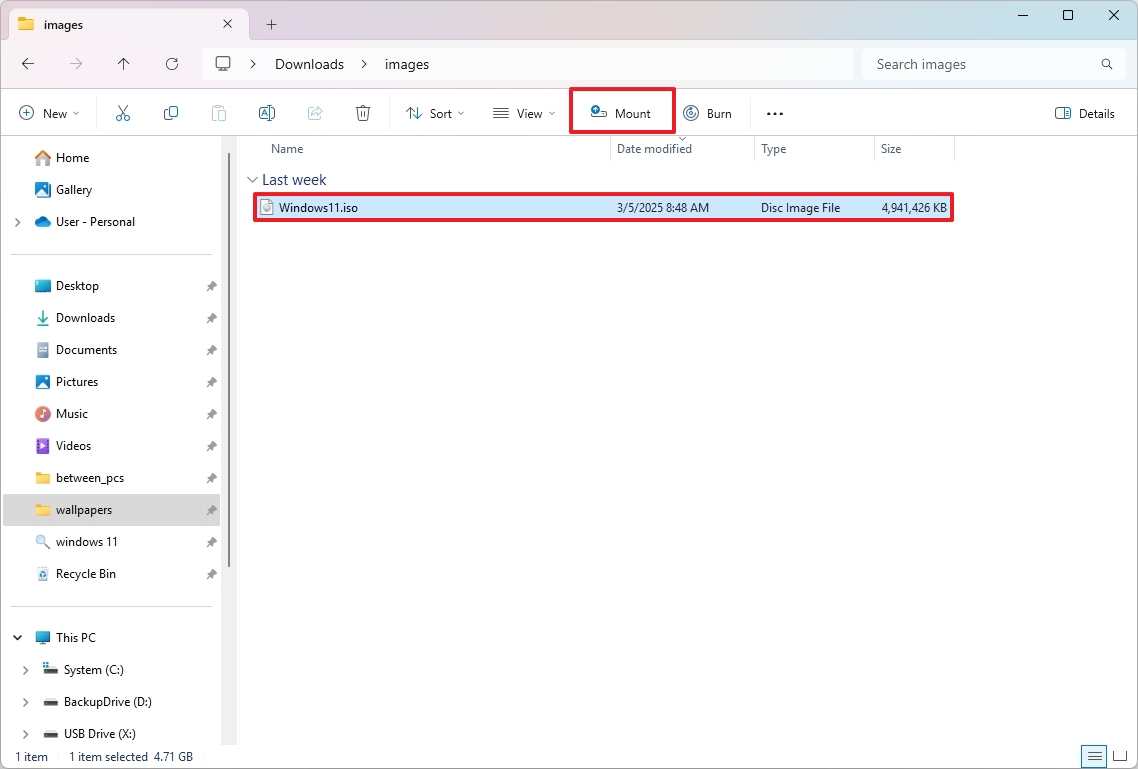
On Windows 10, the option is located in the «Disc Image Tools» tab.
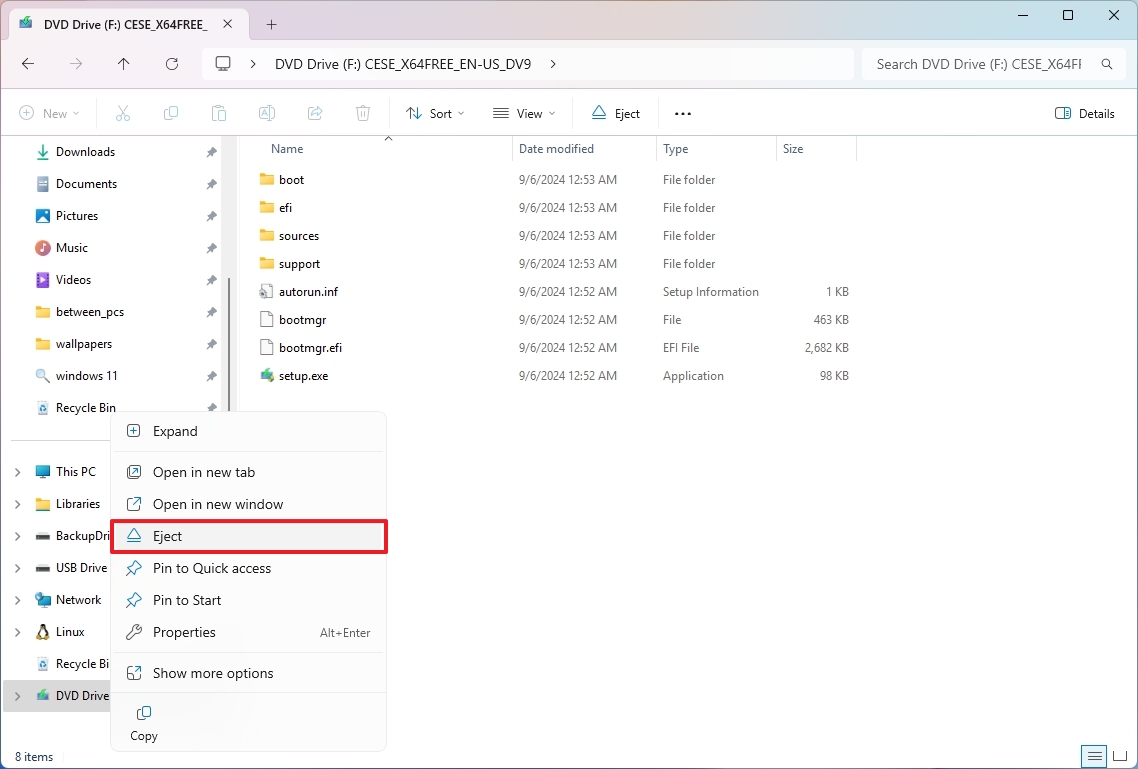
Unmount image
Once you are no longer using the image, you can quickly unmount the image with these steps:
- Open File Explorer.
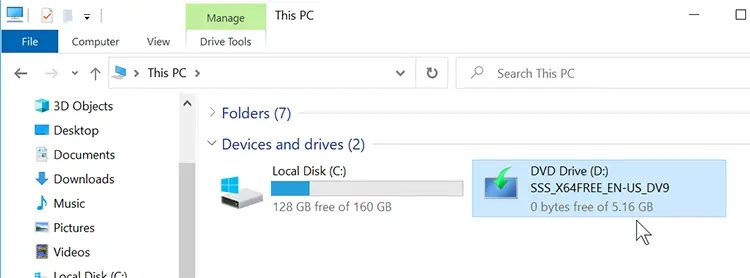
- Expand This PC from the left navigation pane.
- Right-click the virtual drive and select the Eject option.
After you complete these steps, the image will no longer be accessible until you mount it again.
How to mount ISO image with PowerShell
It’s also possible to mount and unmount an image using commands with PowerShell.
Mount ISO image command
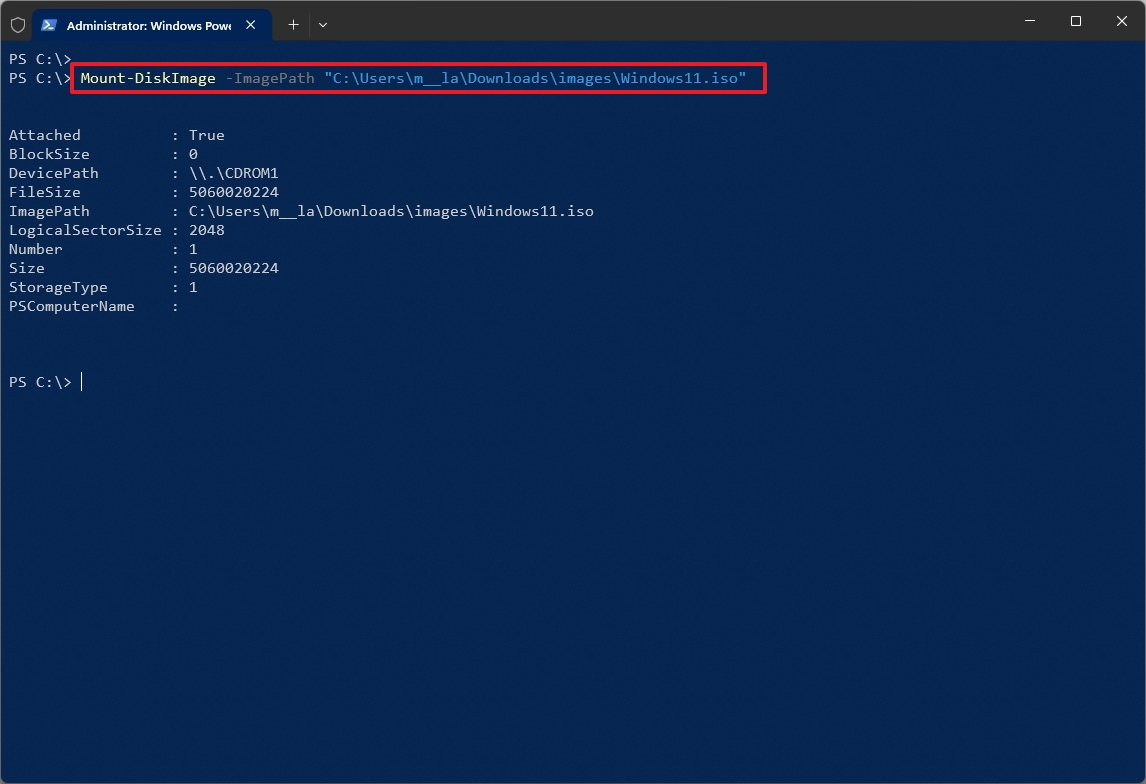
To mount an ISO image using a PowerShell command, use these steps:
- Open Start.
- Search for PowerShell, right-click the top result, and select the Run as administrator option.
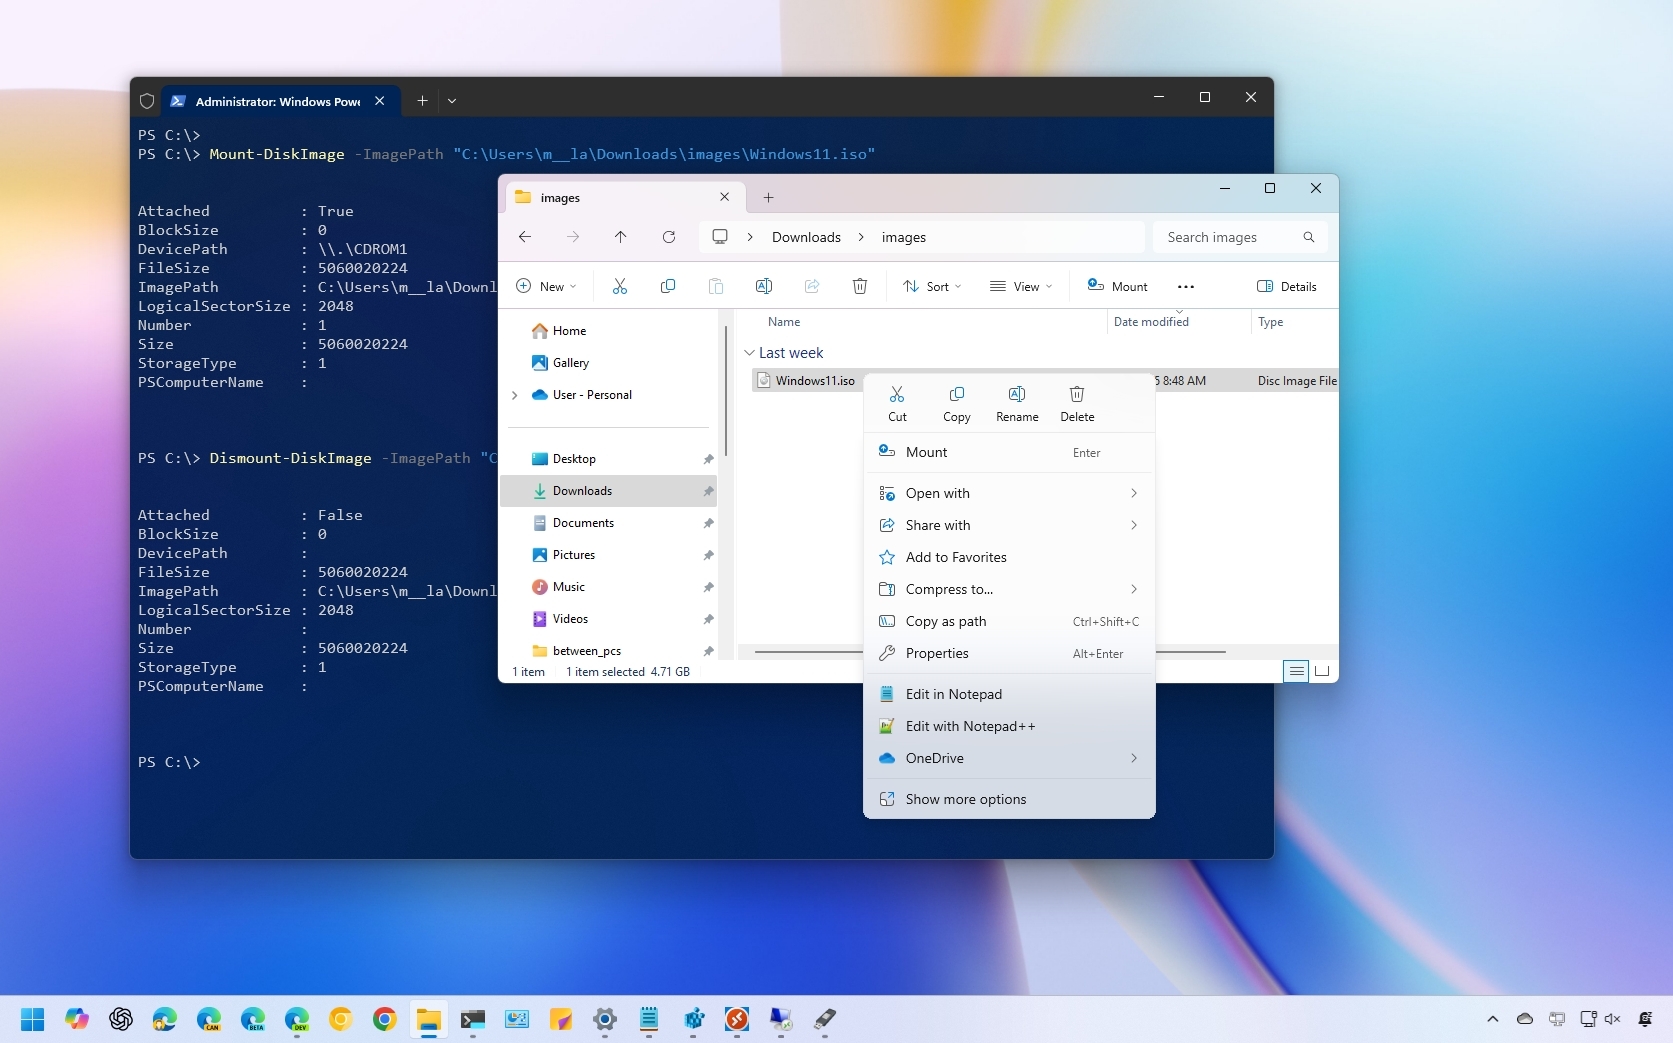
- Type the following command to mount an ISO image and press Enter: Mount-DiskImage -ImagePath «PATH\TO\ISOFILE»
In the command, make sure to replace the «PATH\TO\ISOFILE» with the actual path of the .iso file. For example, this command mounts an image in the «X:\» virtual drive: Mount-DiskImage -ImagePath «C:\Users\USERNAME\Downloads\images\Windows11.iso»
Once you complete the steps, the ISO image will mount, and you will be able to access the contents to install the application or extract the image contents from the newly-available drive letter.
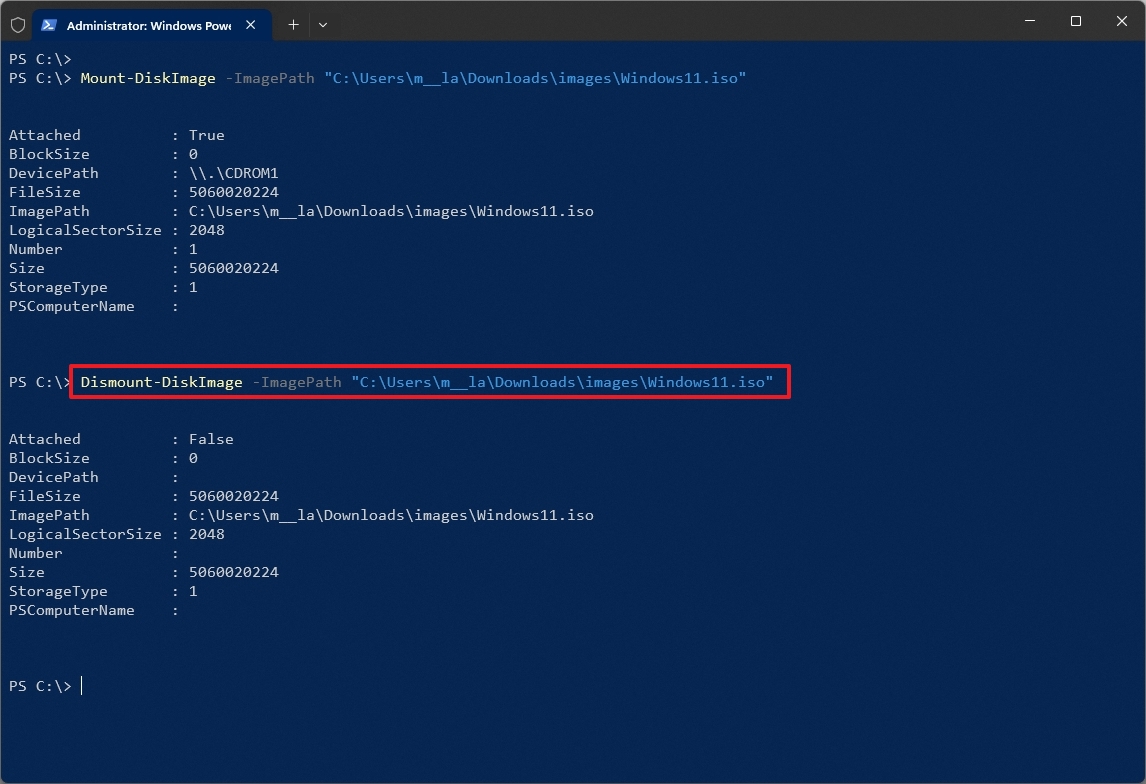
Unmount ISO image command
To unmount an image with PowerShell, use these steps:
- Open Start.
- Search for PowerShell, right-click the top result, and select the Run as administrator option.
- Type the following command to mount an ISO image and press Enter: Dismount-DiskImage -ImagePath «PATH\TO\ISOFILE»
In the command, make sure to replace the «PATH\TO\ISOFILE» with the actual path of the .iso file. For example, this command removes the mount for an image in the «X:\» virtual drive: C:\Users\USERNAME\Downloads\images\Windows11.iso
After you complete the steps, the virtual drive will be removed, and the image will no longer be accessible until you mount it again.
More resources
Find in-depth guides, troubleshooting tips, and the latest updates on Windows 11 and 10 here:
- Windows 11 on Windows Central — All you need to know
- Windows 10 on Windows Central — All you need to know
Mauro Huculak has been a Windows How-To Expert contributor for WindowsCentral.com for nearly a decade and has over 15 years of experience writing comprehensive guides. He also has an IT background and has achieved different professional certifications from Microsoft, Cisco, VMware, and CompTIA. He has been recognized as a Microsoft MVP for many years.
Have you ever wondered how to mount an ISO file in Windows 10? It’s a common question among computer users who want to access the contents of disk images without burning them to a physical disc. Fortunately, Windows 10 provides a built-in feature that allows you to mount ISO files effortlessly, making it convenient and efficient.
To mount an ISO file in Windows 10, simply right-click on the ISO file and select «Mount» from the context menu. This will create a virtual drive that emulates a physical disc, allowing you to access the file’s contents as if you had inserted a disc into your computer. This feature is especially useful when installing software or accessing files contained within ISO images. With the ability to mount ISO files, Windows 10 streamlines the process of working with disk images, saving you time and effort.
To mount an ISO file in Windows 10, follow these simple steps:
Step 1: Right-click on the ISO file and select «Mount» from the context menu.
Step 2: The ISO file will be mounted as a virtual drive.
Step 3: Open File Explorer and navigate to the virtual drive to access its contents.

Mounting an ISO File in Windows 10 for Easy Access to Disc Contents
Mounting an ISO file in Windows 10 allows you to access the contents of a disc image file without the need for physical media. Whether you want to install software, play a game, or access files stored on an ISO image, mounting it provides a convenient way to do so. In this guide, we will explore the different methods to mount ISO files in Windows 10.
Method 1: Using File Explorer
One of the easiest ways to mount an ISO file in Windows 10 is by using File Explorer. Here’s how to do it:
- Locate the ISO file you want to mount on your computer.
- Right-click on the ISO file and select «Mount» from the context menu. Windows will then create a virtual disc drive and assign it a drive letter.
- Open File Explorer and navigate to the newly created virtual disc drive. You can now access and use the contents of the ISO file as if it were a physical disc.
- To unmount the ISO file, right-click on the virtual disc drive in File Explorer and select «Eject».
Advantages of Using File Explorer to Mount ISO Files
Using File Explorer to mount ISO files offers several advantages:
- It is a built-in feature in Windows 10, so there is no need to install additional software.
- It is a quick and straightforward process that can be done with just a few clicks.
- Once mounted, the ISO file behaves like a physical disc, allowing you to run applications or access files as if you had the actual disc.
Limitations of Using File Explorer to Mount ISO Files
While using File Explorer to mount ISO files is convenient, it does have a few limitations:
- It can only mount one ISO file at a time. If you need to mount multiple ISO files simultaneously, you will need additional software.
- It does not provide advanced features like virtual drive customization or encryption.
- If you frequently mount and unmount ISO files, using third-party software might offer a more streamlined experience.
Method 2: Using Windows PowerShell
Another method to mount ISO files in Windows 10 is by using Windows PowerShell. Follow these steps:
- Open Windows PowerShell by searching for it in the Start menu.
- In the PowerShell window, type the following command:
Mount-DiskImage -ImagePath "C:\Path\To\Your\ISO\File.iso"- Replace «C:\Path\To\Your\ISO\File.iso» with the actual file path of your ISO file.
- Press Enter to execute the command. Windows will mount the ISO file, and you can access its contents in File Explorer.
- To unmount the ISO file, use the following command:
Dismount-DiskImage -ImagePath "C:\Path\To\Your\ISO\File.iso"- Again, replace the file path with the actual path of your ISO file and press Enter.
Advantages of Using Windows PowerShell to Mount ISO Files
Using Windows PowerShell provides some advantages for mounting ISO files:
- It is a built-in tool in Windows 10, so no additional software is required.
- It allows for a command-line approach, which can be beneficial for automation or scripting purposes.
Limitations of Using Windows PowerShell to Mount ISO Files
However, there are a few limitations to using Windows PowerShell to mount ISO files:
- The command-line interface might not be as user-friendly for those unfamiliar with PowerShell.
- Mounting multiple ISO files simultaneously can be cumbersome.
- Advanced features like virtual drive customization or encryption are not available using this method.
Method 3: Using Third-Party Software
If you require more advanced features or frequently work with ISO files, using third-party software to mount them might be a better option. Some popular choices include:
- Virtual CloneDrive
- DAEMON Tools Lite
- PowerISO
- WinCDEmu
- UltraISO
Once installed, these software applications integrate directly into the Windows operating system, allowing you to mount ISO files by right-clicking on them and selecting the appropriate option.
Advantages of Using Third-Party Software to Mount ISO Files
Using third-party software offers several advantages for mounting ISO files:
- Additional features and customization options, such as creating multiple virtual drives, setting drive letter preferences, and encrypting ISO files.
- Some software allows for batch mounting of multiple ISO files at once.
- Integration with context menus makes it easy to mount and unmount ISO files with a simple right-click.
Limitations of Using Third-Party Software to Mount ISO Files
However, there are a few limitations to using third-party software to mount ISO files:
- Some software applications are not free and require a purchase for full functionality.
- They may consume system resources, especially if you have multiple virtual drives mounted simultaneously.
- Compatibility issues might arise with certain software or ISO file formats.
Mounting an ISO File for Easy Access to Disc Contents
In addition to File Explorer, Windows PowerShell, and third-party software, there are other methods to mount ISO files in Windows 10. Using virtual machine software like Oracle VM VirtualBox or Microsoft Hyper-V allows you to mount ISO files as virtual discs within the virtual machine environment. However, these methods are more advanced and require additional setup and technical knowledge.
Mounting ISO files in Windows 10 is a convenient way to access the contents of disc image files without the need for physical media. Whether you choose to use File Explorer, Windows PowerShell, or third-party software, each method has its own advantages and limitations. Select the method that best suits your needs, and enjoy the convenience of accessing ISO file contents with just a few clicks or commands.

Mounting an ISO File in Windows 10
If you need to access the contents of an ISO file on your Windows 10 computer, you can easily mount it as a virtual drive. Here’s how:
Method 1: Mounting with File Explorer
1. Right-click on the ISO file you want to mount.
2. Select «Open with» from the context menu.
3. Choose «Windows Explorer» or «File Explorer» as the application.
4. The ISO file will now be mounted as a virtual drive, and you can access its contents like a regular folder.
Method 2: Mounting with Disk Image Tools
If you prefer using third-party tools, you can download and install software like «Daemon Tools» or «WinCDEmu» to mount ISO files on your Windows 10 computer. These tools provide additional features and customization options.
By following these simple steps, you can easily mount ISO files in Windows 10 and access their contents without burning them to a physical disc. This method is convenient for installing software, running programs, or accessing files stored in ISO format.
Key Takeaways — How to Mount Iso File in Windows 10
- To mount an ISO file in Windows 10, simply right-click on the file and select «Mount».
- Alternatively, you can also double-click on the ISO file and Windows 10 will automatically mount it.
- Once the ISO file is mounted, it will appear as a virtual disc drive in File Explorer.
- You can access the contents of the ISO file by opening the virtual disc drive.
- To unmount the ISO file, simply right-click on the virtual disc drive and select «Eject».
Frequently Asked Questions
Here are some commonly asked questions about mounting ISO files in Windows 10:
1. How do I mount an ISO file in Windows 10?
To mount an ISO file in Windows 10, follow these steps:
Step 1: Right-click on the ISO file and select «Mount» from the context menu.
Step 2: The ISO file will be mounted as a virtual CD/DVD drive. You can access its contents in File Explorer, just like a physical drive.
2. Can I mount multiple ISO files at the same time?
No, you can only mount one ISO file at a time in Windows 10. If you try to mount another ISO file while one is already mounted, you will receive an error message.
If you need to work with multiple ISO files simultaneously, you can use third-party software that allows you to mount multiple virtual drives.
3. How do I unmount an ISO file in Windows 10?
To unmount an ISO file in Windows 10, follow these steps:
Step 1: Right-click on the virtual CD/DVD drive in File Explorer that corresponds to the mounted ISO file.
Step 2: Select «Eject» from the context menu. The ISO file will be unmounted, and the virtual drive will disappear from File Explorer.
4. Can I mount an ISO file without using the context menu?
Yes, you can also mount an ISO file using the built-in Windows 10 Disk Image Mounter utility. Here’s how:
Step 1: Open File Explorer and navigate to the location of the ISO file.
Step 2: Double-click on the ISO file. Windows 10 will automatically mount it as a virtual drive.
5. Can I mount an ISO file in Windows 10 without administrative privileges?
Yes, you can mount an ISO file in Windows 10 without administrative privileges. However, if you want to mount an ISO file that is located in a protected system folder or requires administrative access, you will need to run File Explorer with administrative privileges.
To do this, right-click on the File Explorer icon in the taskbar, then right-click on «File Explorer» in the context menu, and select «Run as administrator.» You can then mount the ISO file as usual.
To conclude, mounting an ISO file in Windows 10 is a simple process that can be done in a few steps. First, you need to locate the ISO file that you want to mount. Then, right-click on the file and select «Mount» from the context menu. Windows will create a virtual drive and automatically mount the ISO file to it.
Once the ISO file is mounted, you can access its contents as if it was a physical disc inserted into your computer. This allows you to install software, access files, or perform other tasks without needing to burn the ISO file to a disc or extract its contents. When you’re done using the mounted ISO file, you can easily unmount it by right-clicking on the virtual drive and selecting «Eject».
Встроенный функционал монтирования файлов с ISO образами доступен во всех современных версиях Windows (начиная с Windows 8/ Windows Server 2012). ISO файл представляет собой файл-контейнер с образом оптического диска с файловой системой ISO 9660. Несмотря на то, что оптические CD/DVD/Blu-ray приводы уже почти не используются, формат ISO образов все еще остается очень популярным форматом для распространения различных дистрибутивов продуктов. Чаще всего ISO образы используются для распространения дистрибутивов операционных систем (Windows, Linux и т.д).
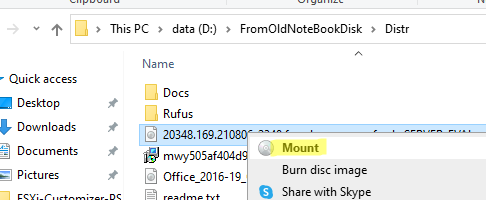
В Windows 10/11 вы можете смонтировать файл с ISO образом прямо из проводника File Explorer. Просто дважды щелкните по файлу с расширением *.iso или выберите в контекстном меню пункт Mount.
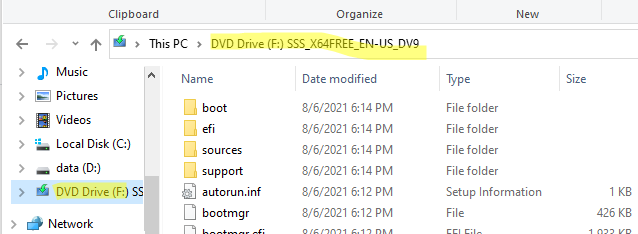
В результате в Windows появится новый виртуальный CD/DVD привод, в который будет смонтирован файл с образом (буква диска будет назначена автоматически). Вы можете работать с файлами на диске, как будто они находятся на обычном физическом диске (файлы на виртуальном диске доступны только для чтения).
Чтобы отмонтировать ISO образ, щелкните по виртуальному приводу и выберите пункт Eject.
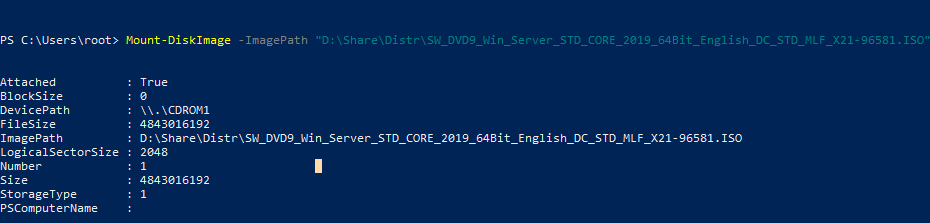
Вы можете использовать PowerShell, чтобы подключить файл с ISO образом в Windows. Для этого нужно указать полный путь к *.iso файлу в команде:
Mount-DiskImage –ImagePath "D:\Share\Distr\win_Server_STD_CORE_2019.ISO"
ISO образ смонтирован успешно (
Attached: True
).
Командлет Mount-DiskImage позволяет монтировать не только ISO файлы, но и виртуальные диски в формате VHD/VHDX/VHDSet. Если вы хотите указать, что файл нужно монтировать только в виде ISO, используйте команду:
Mount-DiskImage –ImagePath your.iso -StorageType ISO
Чтобы сразу узнать букву диска, которая назначена вашему ISO образу, используйте команду:
Mount-DiskImage –ImagePath "D:\Share\Distr\win_Server_STD_CORE_2019.ISO"| Get-Volume
В данном примере видно, что ISO образу назначена буква F (DriveLetter).

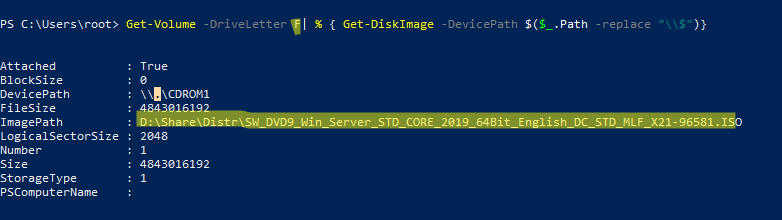
Также с помощью команды Get-Volume можно определить имя файла с ISO образом, который смонтирован в указанный виртуальный CD привод:
Get-Volume -DriveLetter F| % { Get-DiskImage -DevicePath $($_.Path -replace "\\$")}
Если вам нужно, чтобы ISO файлу с образом всегда назначалась определенная буква диска, можете использовать такой PoweShell скрипт:
$myISO = "D:\Share\Distr\win_Server_STD_CORE_2019.ISO"
Mount-DiskImage $myISO
$vol = Get-DiskImage $myISO | Get-Volume
$old_drv = $vol.DriveLetter + ':'
$new_drv = 'Y:'
Get-WmiObject -Class Win32_Volume | Where-Object {$_.DriveLetter -eq $old_drv} | Set-WmiInstance -Arguments @{DriveLetter=$new_drv}
Чтобы отмонтировать ISO образ, выполните:
Dismount-DiskImage -ImagePath "D:\Share\Distr\win_Server_STD_CORE_2019.ISO"

Mounting ISO Files in Windows 10
Mounting an ISO file on Windows 10 is a straightforward task that allows you to access the contents of the ISO without burning it to a physical disc. All you need to do is right-click the ISO file and select the «Mount» option. The ISO will appear as a virtual drive, and you can access it just like any other drive on your computer.
These steps will guide you through mounting an ISO file on Windows 10, making it easy to access the contents of the file without any need for additional software.
Step 1: Locate the ISO file
Find the ISO file you want to mount on your computer.
You can usually find it in your Downloads folder or wherever you saved it. If you can’t find it, use the search function in the File Explorer to locate it quickly.
Step 2: Right-click the ISO file
Right-click on the ISO file to open the context menu.
Make sure you’re clicking on the correct file, identified by its «.iso» extension. The context menu will present several different options related to the file.
Step 3: Select «Mount»
From the context menu, choose the «Mount» option.
This option will only appear if you have a compatible version of Windows 10. Selecting «Mount» will create a virtual drive on your computer.
Step 4: Access the virtual drive
Open File Explorer and find the new virtual drive created by mounting the ISO.
The virtual drive will appear alongside your other drives and devices. You can access it like any other drive and view its contents.
Step 5: Explore the contents
Double-click the virtual drive to open it and explore the files inside.
You can now use the files inside the ISO just like any other files on your computer. To unmount the ISO, simply right-click the virtual drive and select «Eject.»
Once you’ve completed these steps, the contents of the ISO file will be accessible through a new virtual drive on your computer. You can interact with this drive just like you would with a physical CD or DVD drive.
Tips for Mounting ISO Files in Windows 10
- Ensure the ISO file is not corrupted: A corrupted ISO can cause problems and may not mount correctly.
- Update Windows: Ensure your Windows 10 is updated, as older versions may not support ISO mounting.
- Use File Explorer for mounting: Built-in support in File Explorer makes it easy without needing additional software.
- Check drive letters: If you have many drives, ensure there’s an available letter for the new virtual drive.
- Safely eject: Always eject the virtual drive before deleting or moving the ISO file.
Frequently Asked Questions
What is an ISO file?
An ISO file is a complete image of a CD or DVD that includes all the data and the file structure.
Why can’t I mount my ISO file?
Possible reasons include a corrupted file, an outdated version of Windows, or a missing «Mount» option in the context menu.
Do I need special software to mount ISO files in Windows 10?
No, Windows 10 has built-in support for mounting ISO files using File Explorer.
Can I mount multiple ISO files at once?
Yes, you can mount multiple ISO files, and each will appear as a separate virtual drive.
How do I unmount an ISO file?
To unmount, right-click the virtual drive in File Explorer and select «Eject.»
Summary
- Locate the ISO file.
- Right-click the ISO file.
- Select «Mount».
- Access the virtual drive.
- Explore the contents.
Conclusion
Mounting ISO files in Windows 10 is a simple and useful feature that can save you time and effort. Instead of burning the ISO onto a disc, you can access the file’s contents directly through a virtual drive. This guide has walked you through the easy steps to mount an ISO file, making it accessible in just a few clicks.
Remember, having an up-to-date version of Windows 10 ensures the process goes smoothly. And if you ever encounter issues, checking for file corruption or missing updates can often solve the problem quickly. By following this guide, you should be well-equipped to handle ISO files with ease, making your computing experience a bit more efficient.
Feel free to revisit these steps anytime you need to mount an ISO file, and consider sharing this guide with friends or colleagues who might find it useful. Happy computing!
Matt Jacobs has been working as an IT consultant for small businesses since receiving his Master’s degree in 2003. While he still does some consulting work, his primary focus now is on creating technology support content for SupportYourTech.com.
His work can be found on many websites and focuses on topics such as Microsoft Office, Apple devices, Android devices, Photoshop, and more.
In the following tutorial, you will learn how to mount ISO files in Windows 10/11 operating system. You will also learn how to create an ISO file directly from a folder on your computer.
Both Windows 10 and Windows 11 natively support mounting ISO files, so you no longer need third-party software to mount ISO files.
To mount an ISO file, right-click the ISO and choose Mount from the contextual menu that appears (you can also just double click an ISO image to open it in Windows Explorer and view its contents).
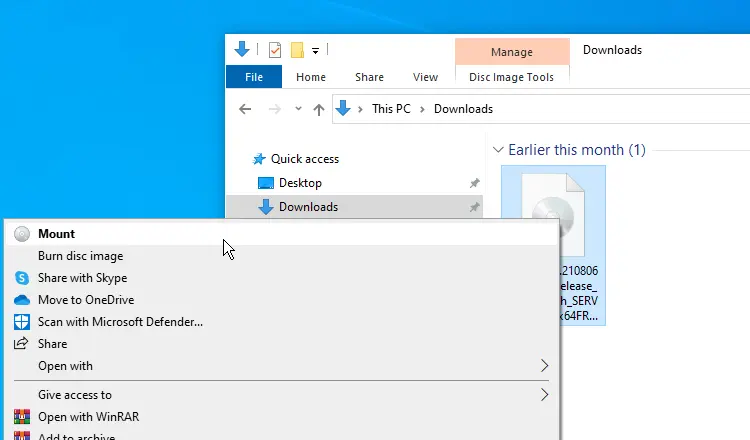
Windows will mount the ISO image as a virtual DVD drive. You will see the mounted drive under This PC section of the Windows Explorer.
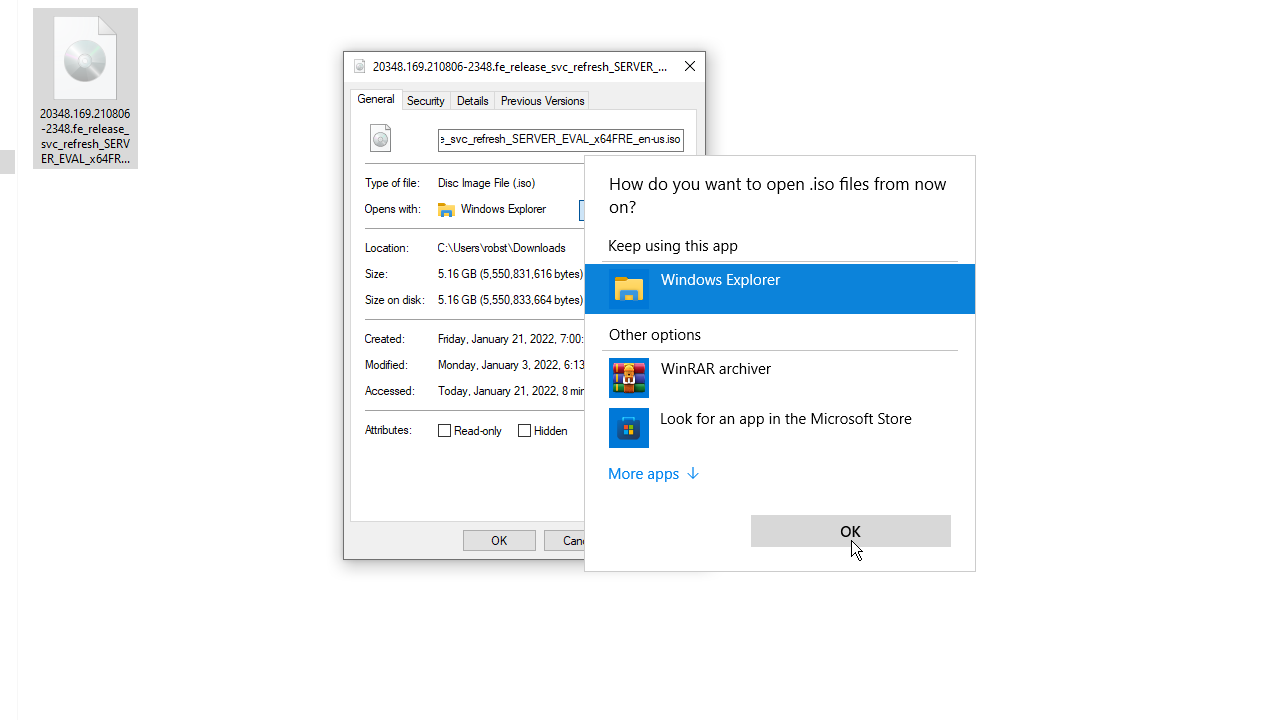
If you don’t see the Mount option in the right-click menu, then do the following: right-click the ISO and choose Properties.

On the General tab, click Change and then choose Windows Explorer as the default app to open ISO files.
Inside the virtual DVD drive, you can view the contents of the ISO. However, you can’t edit or delete its contents. If you want to edit the ISO, you need to copy its contents to a different folder, edit it and then create a new ISO from the folder.
To unmount the drive, in the File Explorer, go to This PC and right-click the virtual DVD drive.
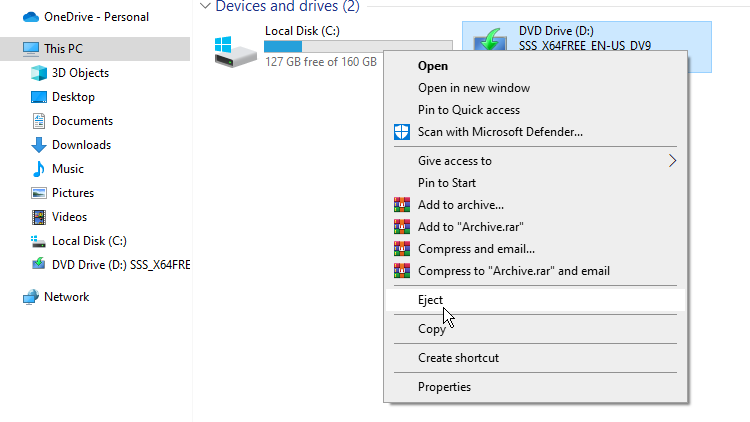
Then click Eject in the menu that appears, as shown in the above screenshot.
Creating ISO Files
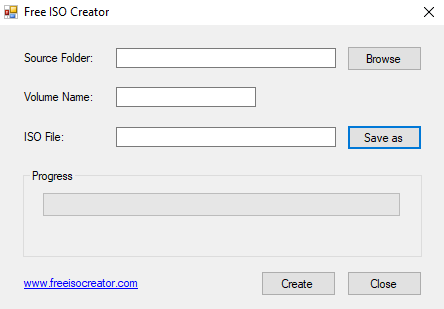
If you need to create an ISO file, you need to install ISO creator software. There is a lot of free software for creating ISO files, such as freeisocreator and wincdemu.
The following screenshot shows the freeisocreator interface:
If you install wincdemu, the «build an ISO image» option will be available in the context menu of the Explorer.
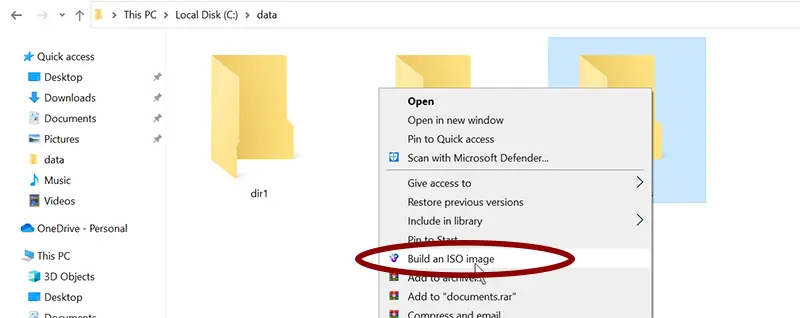
That enables you to convert any folder on your PC to an ISO file very quickly.