
Windows Mixed Reality (WMR) immerses users in a universe where digital experiences seamlessly blend with the real world. While visual elements and immersive environments captivate users, the true magic often lies in the interaction offered by motion controllers. These controllers allow users to navigate, manipulate, and engage with virtual environments in a natural and intuitive manner. This article will delve deep into everything you need to know about setting up motion controllers for Windows Mixed Reality, ensuring you’re prepared to dive into your favorite virtual adventures.
Understanding Windows Mixed Reality
Before heading into the setup process, it’s important to have a grasp of what Windows Mixed Reality entails. WMR combines aspects of augmented reality (AR) and virtual reality (VR), creating immersive simulations that can interact with the physical world. With the aid of compatible headsets and motion controllers, users can become an integral part of the virtual realms waiting to be explored.
Windows Mixed Reality supports different hardware manufacturers, including HP, Lenovo, Acer, Samsung, and others, typically providing a range of headsets and controllers that conform to a standard set of functionalities. Understanding the differences and similarities among these can assist in making informed decisions when purchasing or setting up your WMR experience.
Choosing the Right Controllers
Windows Mixed Reality motion controllers are designed uniquely for navigating and interacting with the virtual environment. Most commonly, you will encounter:
-
Windows Mixed Reality Motion Controllers: These are the standard controllers used with WMR headsets, equipped with the necessary sensors and tracking capabilities.
-
Third-Party Controllers: Some VR platforms support third-party motion controllers. However, make sure they are compatible with Windows Mixed Reality to avoid compatibility issues.
When choosing controllers, factors to consider include comfort, build quality, battery life, and the availability of games or applications that you intend to use.
Getting Started: Preparation Steps
Before you can set up your motion controllers, follow these preliminary steps to prepare your workspace.
1. Check Your PC Requirements
Windows Mixed Reality has specific hardware requirements. Ensure your PC meets the minimum or recommended specifications to avoid performance issues. Check for:
- Operating System: Windows 10 (version 1709 or later).
- Processor: Intel Core i5-7200U or AMD Ryzen 5.
- Graphics: DirectX 12 compatible GPU (NVIDIA GTX 960, AMD RX 450, or equivalent).
- Memory: 8 GB RAM or more.
- USB Ports: Several USB 3.0 ports are essential for controllers and accessory connectivity.
2. Check for Available Space
WMR experiences require sufficient physical space for movement. Ideally, you should have an area clear of obstructions, approximately 6.5 feet by 5 feet, to ensure freedom of movement.
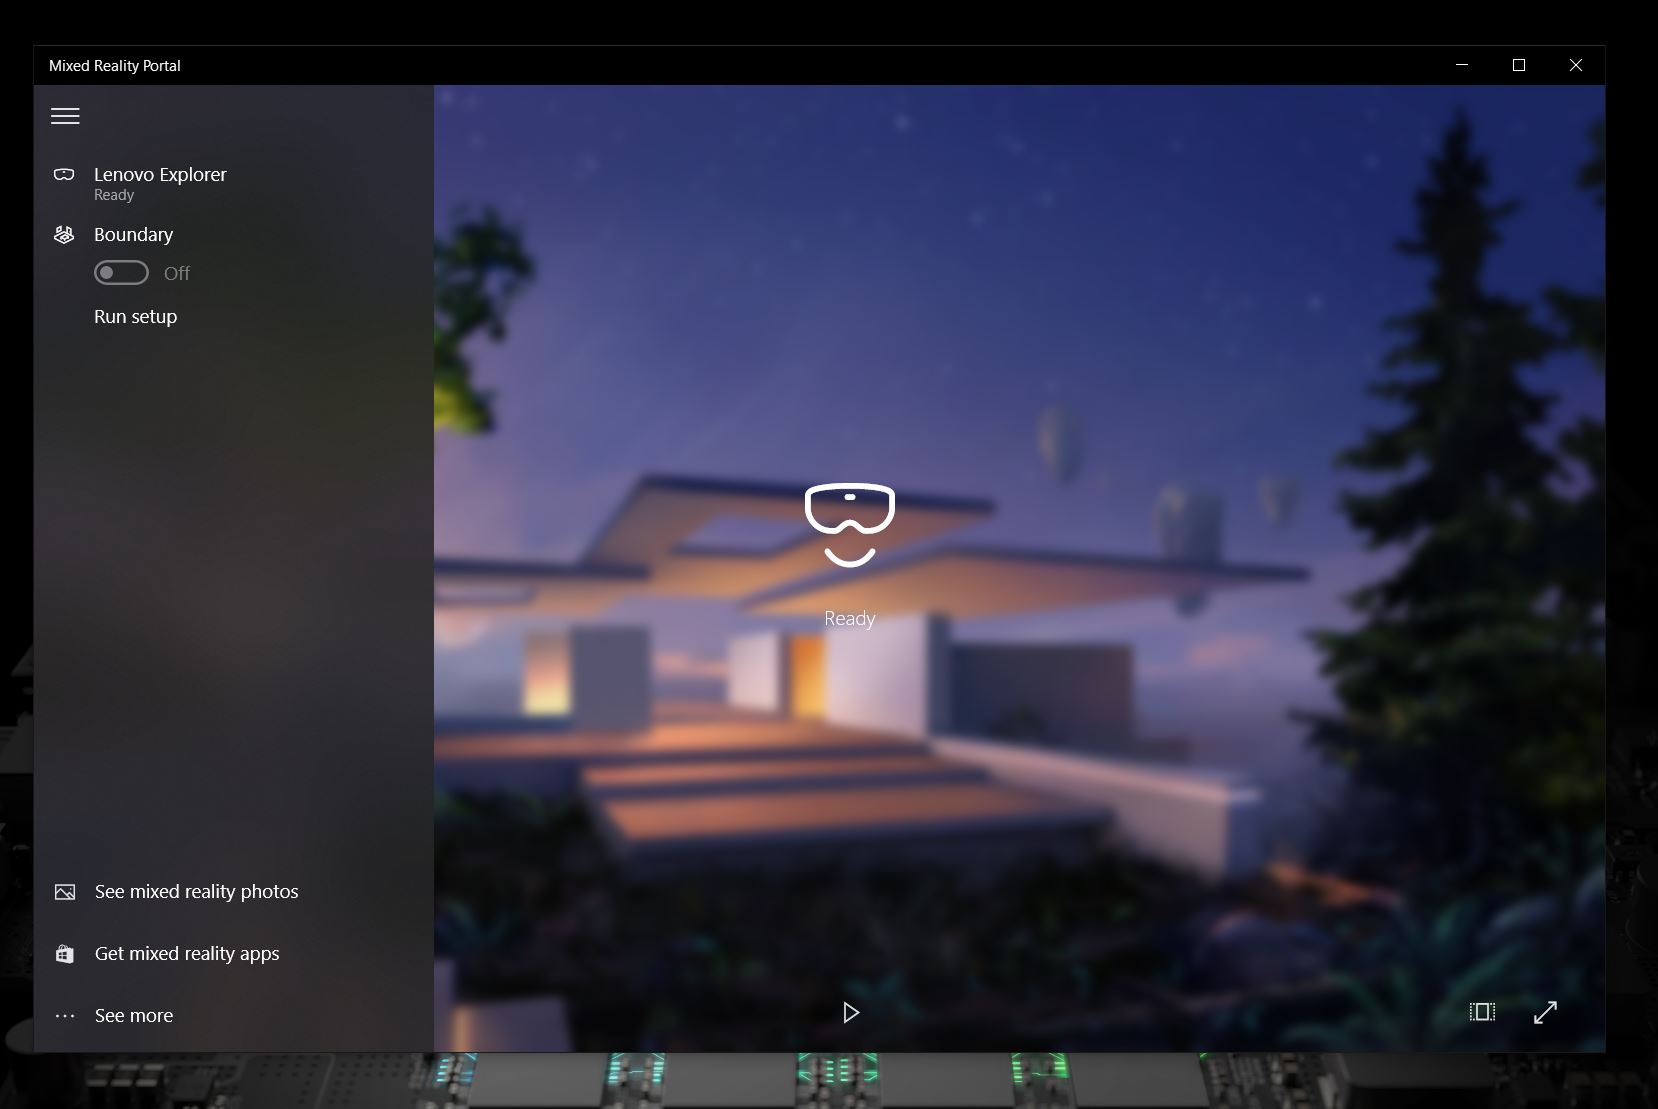
3. Install the Mixed Reality Portal
- Navigate to the Microsoft Store in Windows 10 and download the ‘Mixed Reality Portal’ if it isn’t pre-installed on your PC.
- Launch the portal to ensure everything runs smoothly.
4. Update Windows
Ensure your Windows OS and any related drivers are up to date. An updated system can enhance compatibility and performance with WMR.
Setting Up Your Motion Controllers
With your PC and environment ready, it’s time to set up your motion controllers.
Step 1: Unboxing and Battery Installation
When you unbox your motion controllers:
- Remove them from their packaging and check for any included components – typically, this includes two motion controllers, batteries, and manuals.
- Insert batteries according to the orientation marked in the battery compartment. Most WMR controllers use AA batteries.
Step 2: Pairing Controllers with Your Headset
-
Put on Your Headset: Once your WMR headset is connected to your PC and calibrated, place it on your head.
-
Open the Mixed Reality Portal: The portal should automatically open when you put on the headset. If not, navigate to it via the Start menu.
-
Select ‘Set Up Your Controllers’: The portal will guide you through the setup process. You’ll find an option, typically found within the setup dialogue, to pair your controllers.
-
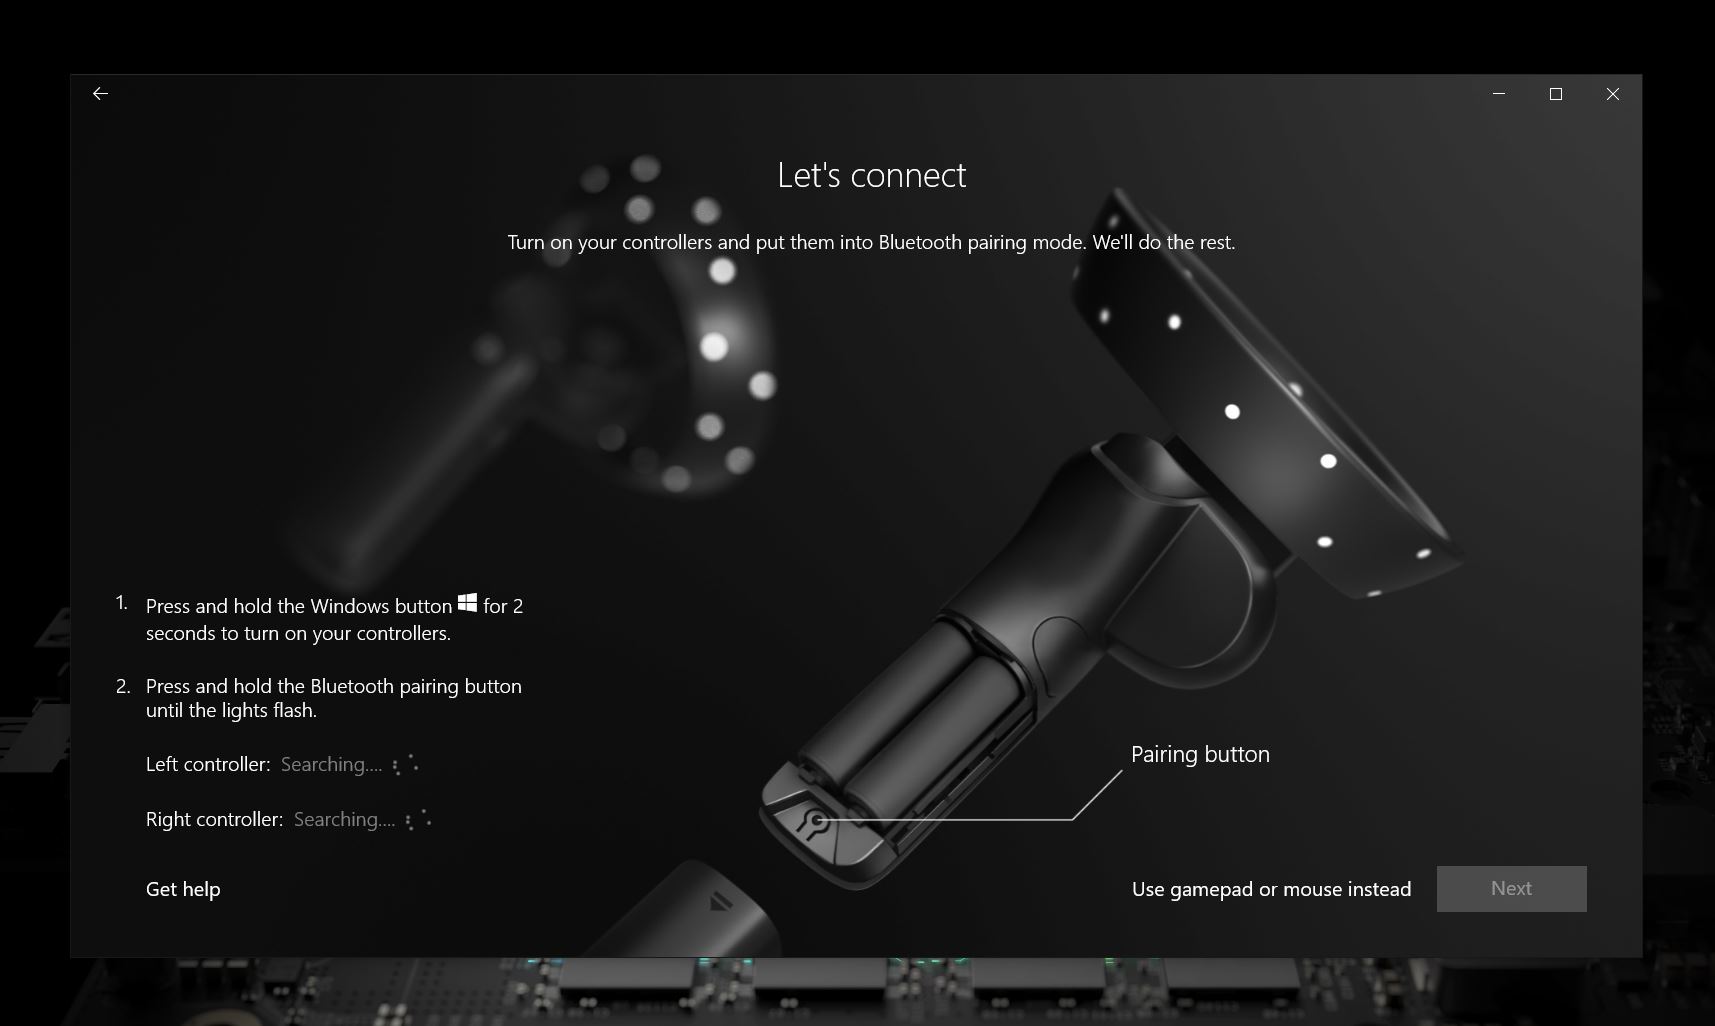
Activate Pairing Mode: Locate the Windows button on your motion controllers – it’s usually situated towards the top. Press and hold this button for a few seconds until the pairing light begins to blink.
-
Complete the Pairing Process: Follow the on-screen instructions until the Mixed Reality Portal acknowledges that your controllers are paired. This usually involves some synchronization steps where the portal detects controller movements.
-
Calibration: Once paired, you may be prompted to calibrate the controllers. This ensures they accurately track your movements and position within the mixed-reality space.
Step 3: Connecting Additional Sensors (If Needed)
If you’re in a larger physical space or encountering tracking issues, you might want to use external sensors to enhance tracking capabilities. These sensors often improve accuracy and motion detection.
-
Connect Your Sensors: Follow the manufacturer’s instructions for your specific sensors, typically involving connecting via USB ports and initiating tracking calibration through the Mixed Reality Portal.
-
Test the Setup: After connecting, return to the Mixed Reality Portal, where you can confirm the sensors and adjust settings for optimal performance.
Step 4: Adjusting Tracking Settings
Depending on your physical space and preferences, you might require some adjustments.
-
Play Area Settings: Specify the play area in the Mixed Reality Portal. You can set it up either as a “seated” experience or a “standing” experience, based on how you plan to use your motion controllers.
-
Boundary Setup: Designate a safe play boundary to avoid hitting physical objects during your VR experience. Walk around the defined space and confirm the boundaries marked by the portal.
-
Fine-tuning: Use the Mixed Reality Portal to fine-tune sensitivity, tracking speed, and other control behaviors as per your comfort.
Using Your Motion Controllers
With everything set up, you’re now ready to explore the vast worlds of Windows Mixed Reality.
Navigating the Virtual Environment
-
Pointing and Selecting: Use the motion controllers like a virtual pointer. Point directly at objects and press the trigger to select or interact with them.
-
Gestures: Familiarize yourself with gestures commonly used in WMR – such as swiping and flicking motions to navigate menus.
-
Grabbing and Manipulating Objects: Depending on the game or application, you can pick up objects by approaching them and pressing the grip button.
-
Inventory Navigation: Some experiences allow you to access inventories directly through your motion controllers. Use the designated button to open or close your inventory space.
Enhancing Your Experience
-
Adjusting Controller Settings: Dive into the Mixed Reality settings to adjust controller tracking sensitivity, vibration feedback, and other features based on individual preferences.
-
Customization: Some applications may support customization of controls. Familiarize yourself with the in-game settings to tailor controls to your gaming style.
-
Using Haptic Feedback: Many WMR controllers are equipped with haptic feedback features that add an element of touch sensation. Leverage this for a more immersive experience.
Troubleshooting Common Issues
Like any technology, there may be a few bumps along the way. Here are some common troubleshooting tips.
1. Controller Not Connecting
- Ensure Batteries Are Installed Correctly: Double-check the battery orientation in both controllers.
- Re-Pair Controllers: Return to the Mixed Reality Portal and attempt the pairing process again.
- Check for Interference: Ensure other wireless devices are turned off, or shift further away from potential sources of interference.
2. Tracking Issues
- Reset Your Play Area: Sometimes moving the boundary can resolve minor tracking inaccuracies.
- Clean Sensors: Ensure there’s no obstruction in the sensor view. Dust or other objects can hinder tracking performance.
- Ensure Adequate Lighting: Poorly lit rooms can affect the tracking performance of your controllers. Aim for even amateur lighting.
3. Controller Lag or Performance Issues
- Update Drivers: Verify that your graphics drivers and the Mixed Reality software are up to date.
- Close Background Apps: High CPU/RAM usage can result in poor performance. Close unnecessary applications before starting your WMR experience.
- Check for Software Conflicts: Occasionally, other software on your PC might interfere with WMR performance. Disable unnecessary programs running in the background.
Conclusion
Setting up motion controllers for Windows Mixed Reality enhances the immersive experience significantly, allowing users to interact intuitively with the digital worlds. By following the steps outlined in this guide, you can expect a seamless setup process, ensuring that you are well-equipped to explore virtual environments and delve into the realities of mixed-reality gaming and applications.
As technology evolves, so will the capabilities of Windows Mixed Reality and its hardware. Staying updated on the latest trends and enhancements will ensure your experience – both currently and in the future – continues to be cutting-edge and incredibly immersive.
Remember, the most important aspect of this journey into Mixed Reality is to have fun, explore new worlds, and embrace the possibilities that lie ahead!
Motion controllers in Windows Mixed Reality
Motion controllers are hardware accessories that allow users to interact in mixed reality. An advantage of motion controllers over gestures is that the controllers have a precise position in space, allowing for fine-grained interaction with digital objects. For Windows Mixed Reality immersive headsets, motion controllers are the primary way that users will take action in their world.
Windows Mixed Reality motion controllers offer precise and responsive movement tracking in your field of view through the immersive headset sensors. There’s no need to install hardware on the walls in your space. These motion controllers will offer the same ease of setup and portability as Windows Mixed Reality immersive headsets.
You can also use an Xbox controller, a mouse, and keyboard or get around by using just your voice.
Motion controller setup
Most headsets come pre-paired directly to the headset, but some early headsets require the motion controllers to be paired to your PC with Bluetooth 4.0. When you connect your immersive headset for the first time, you’ll be walked through turning on your motion controllers during setup. But if you need to re-pair them later on, here’s how:
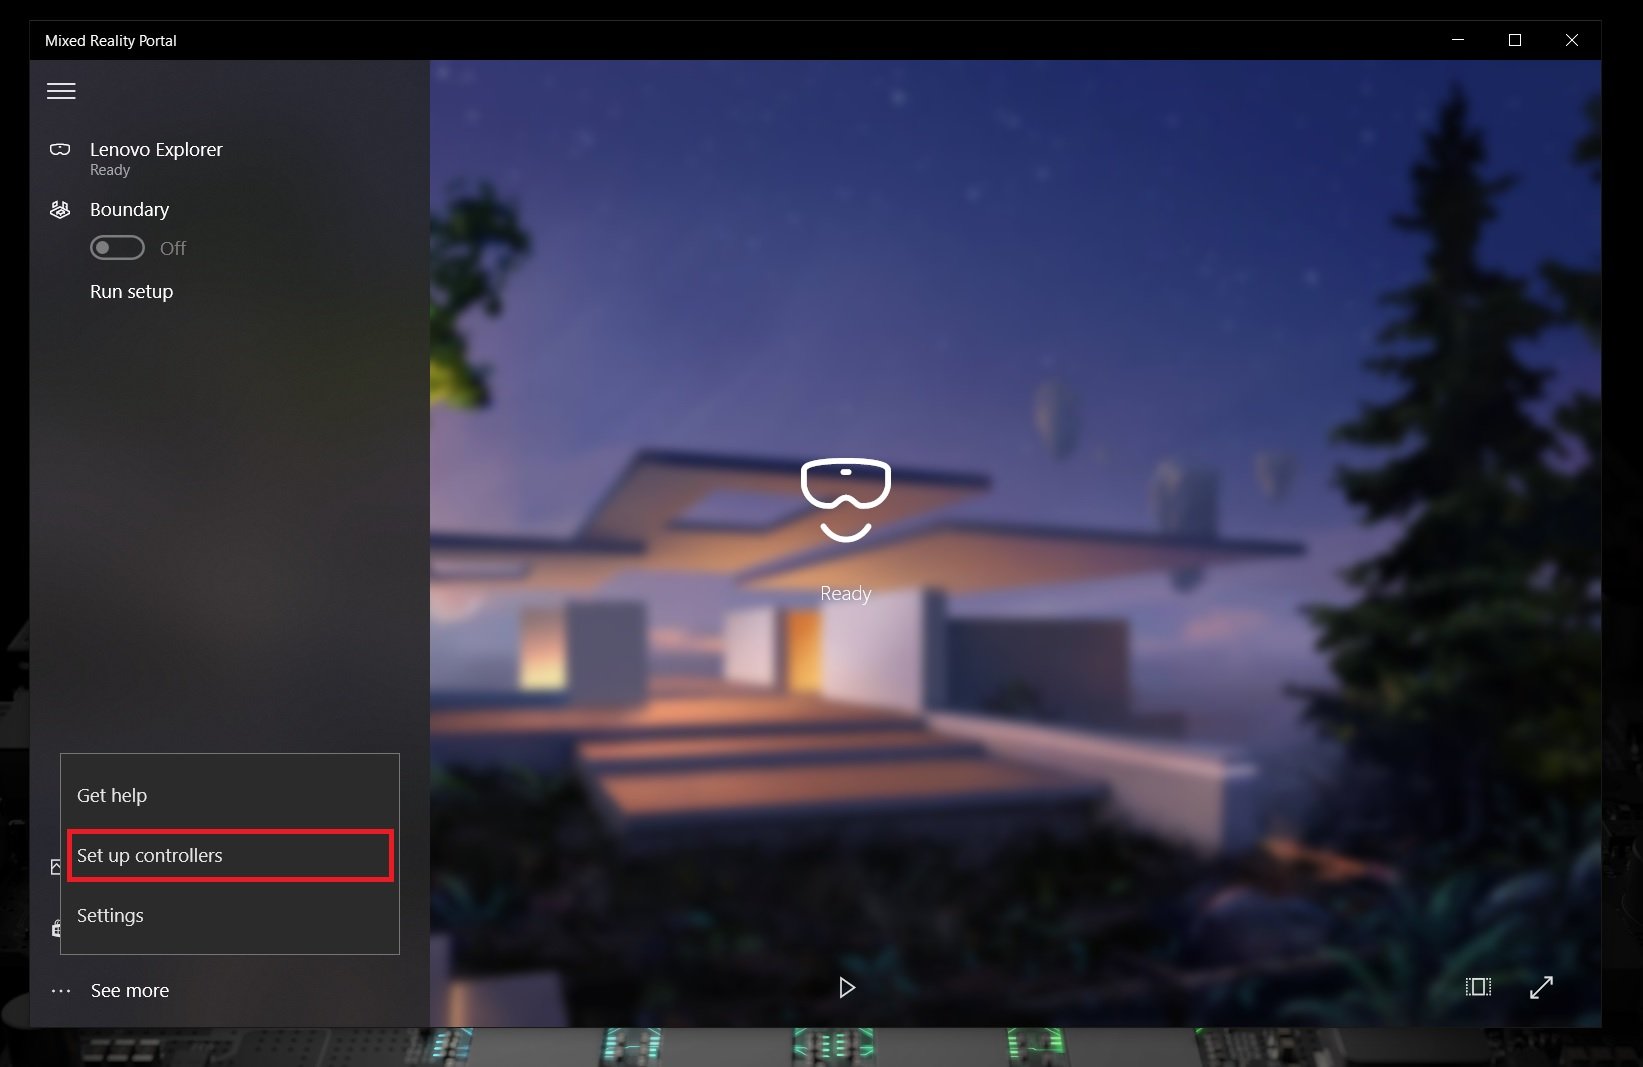
- Launch Mixed Reality Portal with your headset connected.
- In the lower-left corner, select … > Set up controllers.
- Insert two AA batteries into each controller and put your controller in pairing mode (see instructions in pair motion controllers section
- Follow the instructions provided on-screen.
[!NOTE]
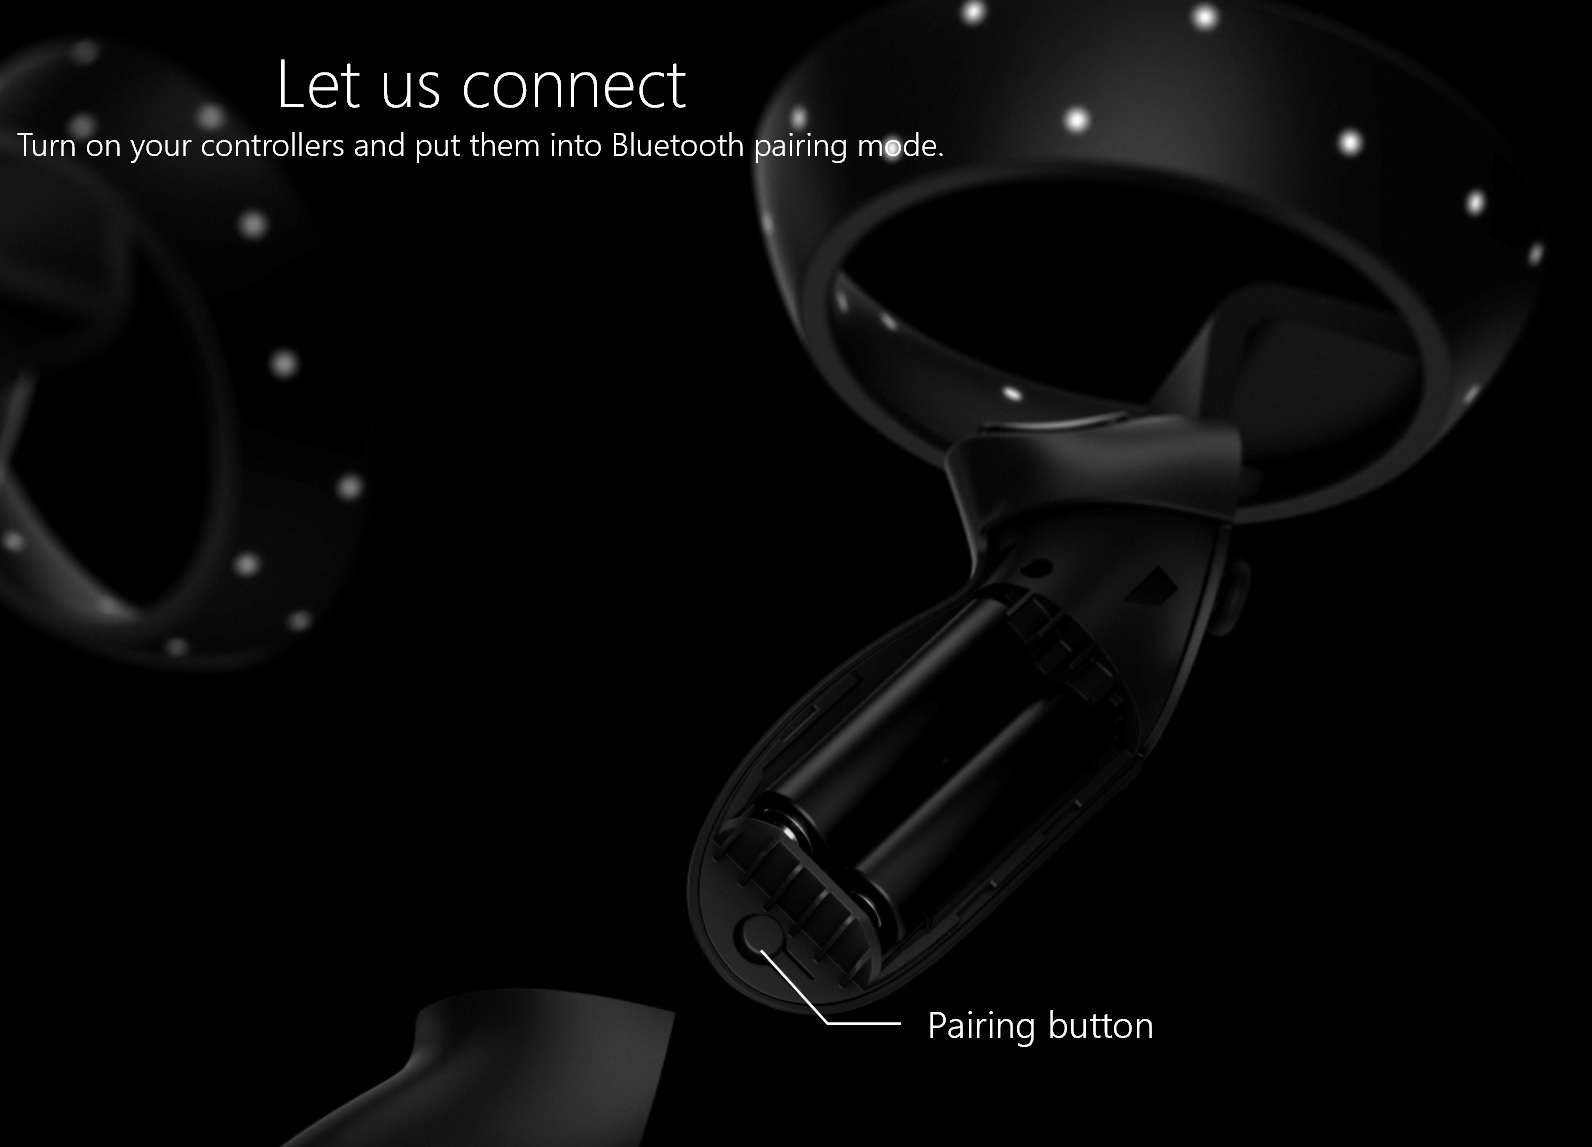
- For controllers that pair directly to your PC, you’ll need to put them into pairing mode by turning them on and then pressing the pairing button inside the battery compartment until the lights start flashing.
- Motion controllers only support being paired to one PC at a time. If you need to use them with a different headset, you’ll need to go through the pairing process. See Set up Windows Mixed Reality
Get help connecting
[!IMPORTANT]
Got an Xbox controller?If you have a Bluetooth Xbox controller, pair it with your PC to use it with your headset.
If you have a wired Xbox controller, plug it in to your PC.
Some games and apps use the Xbox controller differently from how it’s used in mixed reality. To use the controller for a game or app, select Use as gamepad on the app bar or say, “Use as gamepad.” To switch the controller back to mixed reality, select Use as gamepad, again, or say, “Use with gaze.”
Pair motion controllers
If you’re using a headset that includes an integrated Bluetooth controller, such as the Samsung Odyssey+ or HP Reverb, your controllers should already be paired. But you can still pair your controllers using setup app (it should be already installed during the HMD set up. You can also get it from Microsoft store).
Pair motion controllers to HMD
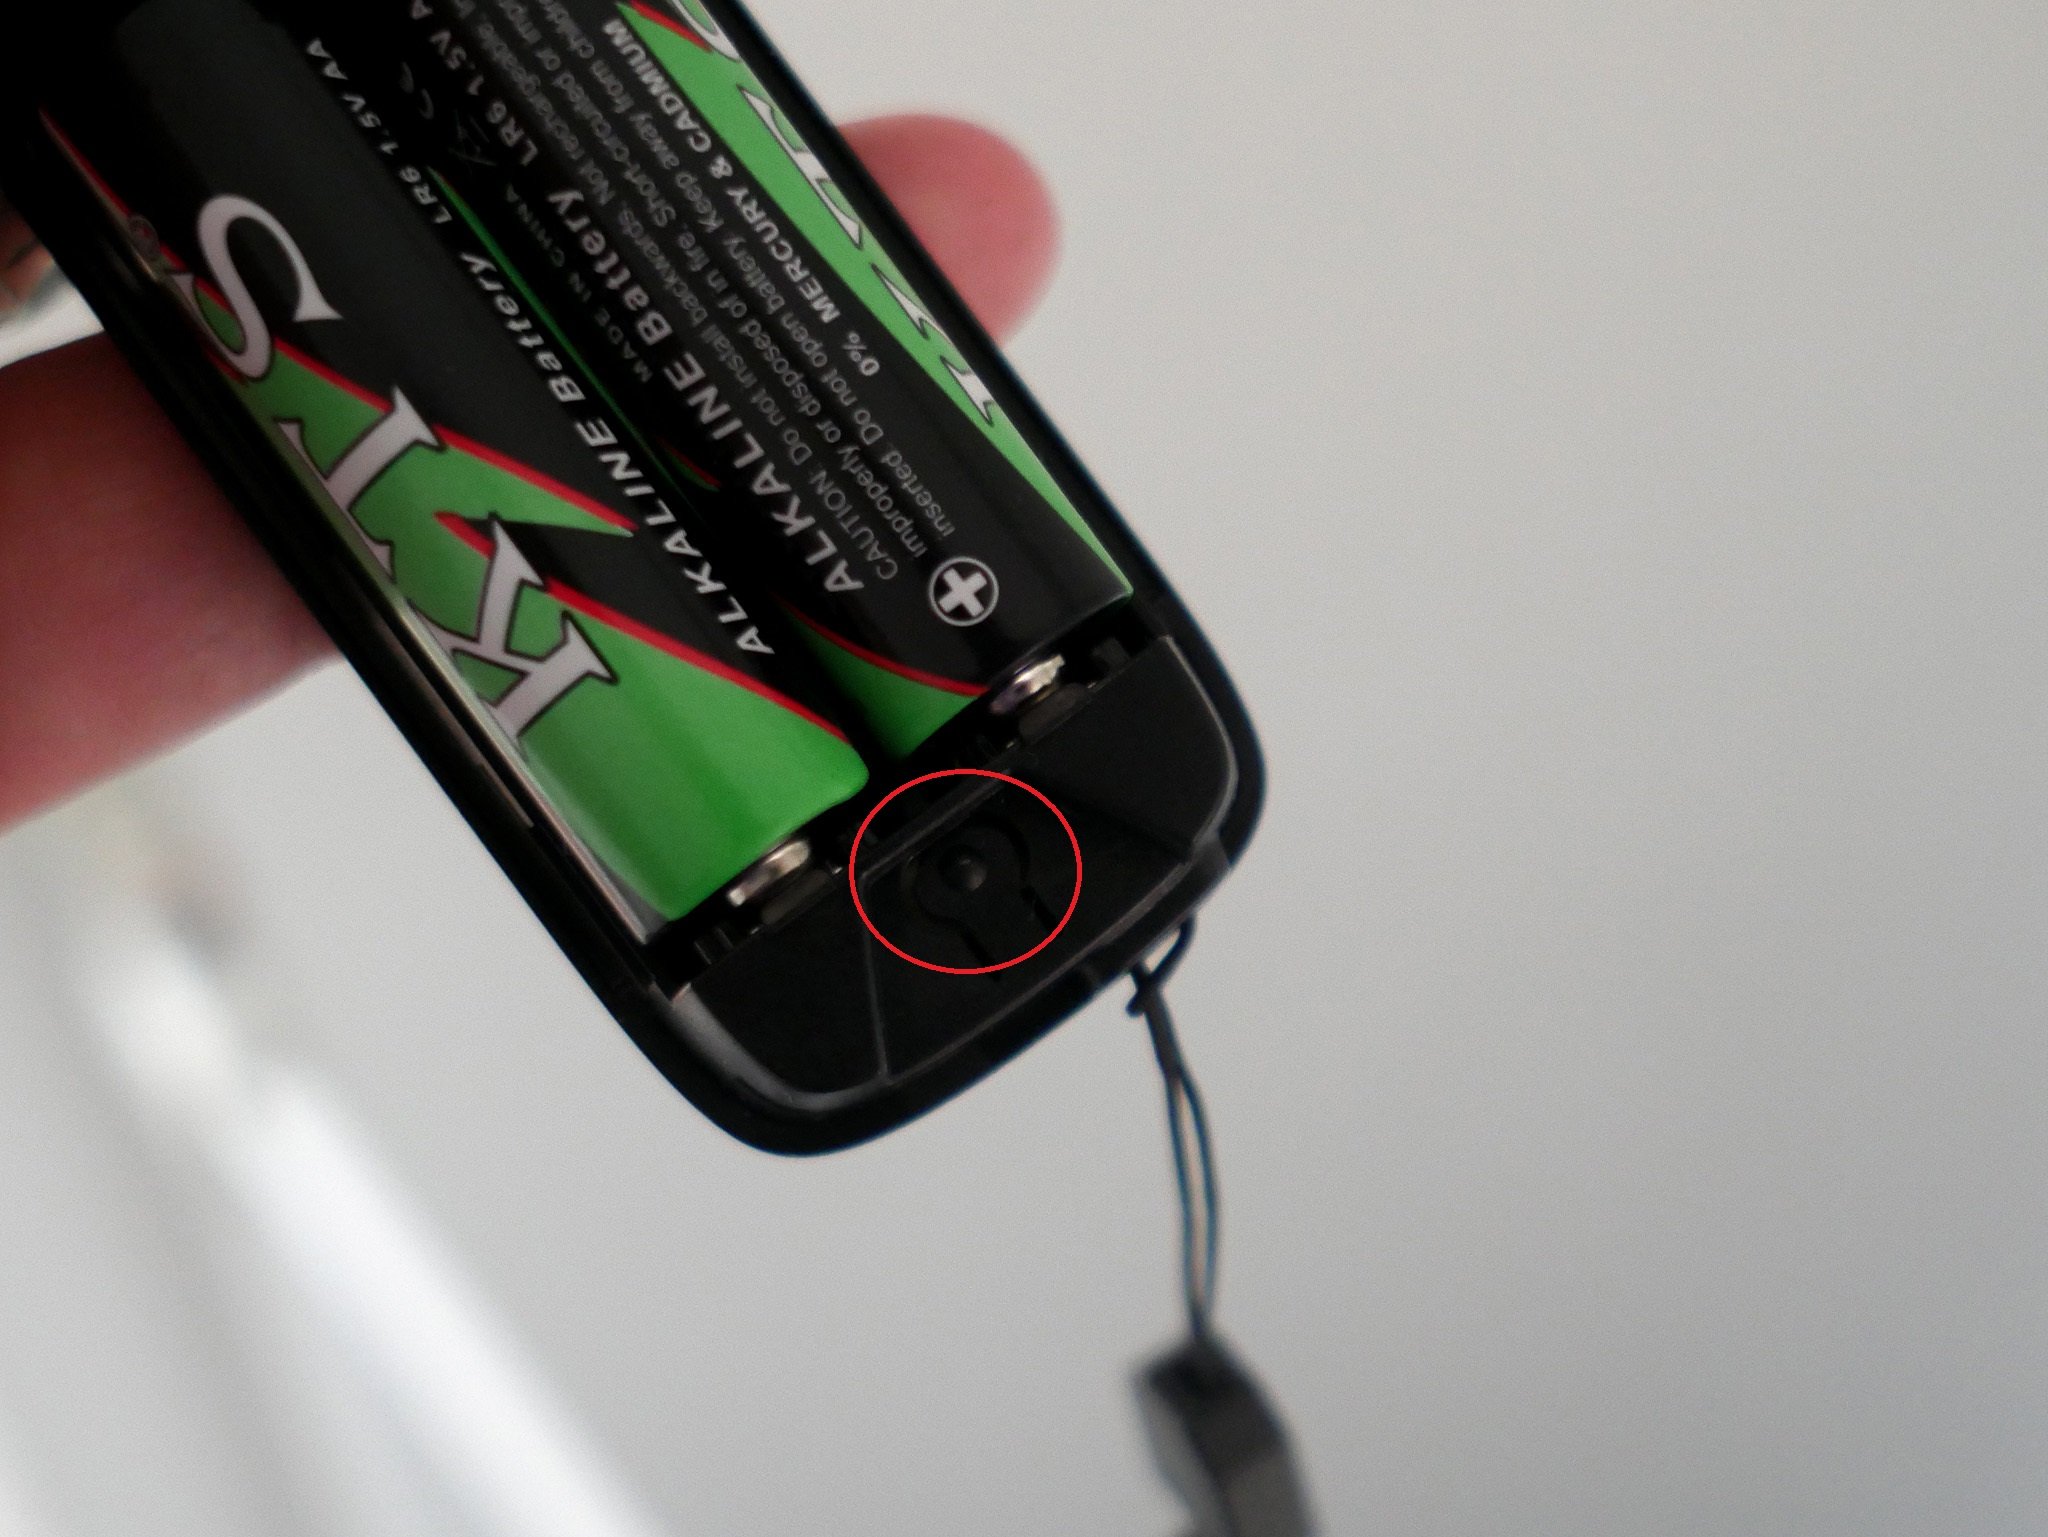
Power the controllers by pressing the Windows button for 2 seconds until LEDs light up.
Remove the battery cover from your controllers and find the small pairing button at the edge of the controller. Hold this button down to pair with your PC.
Launch Mixed Reality Portal with your headset connected.
In the lower-left corner, select … > Set up controllers.
Follow the instructions on the screen.
Pair motion controllers to PC
You can pair your controller to a PC by adding another bluetooth device.
Power the controllers and place them into pairing mode as described above.
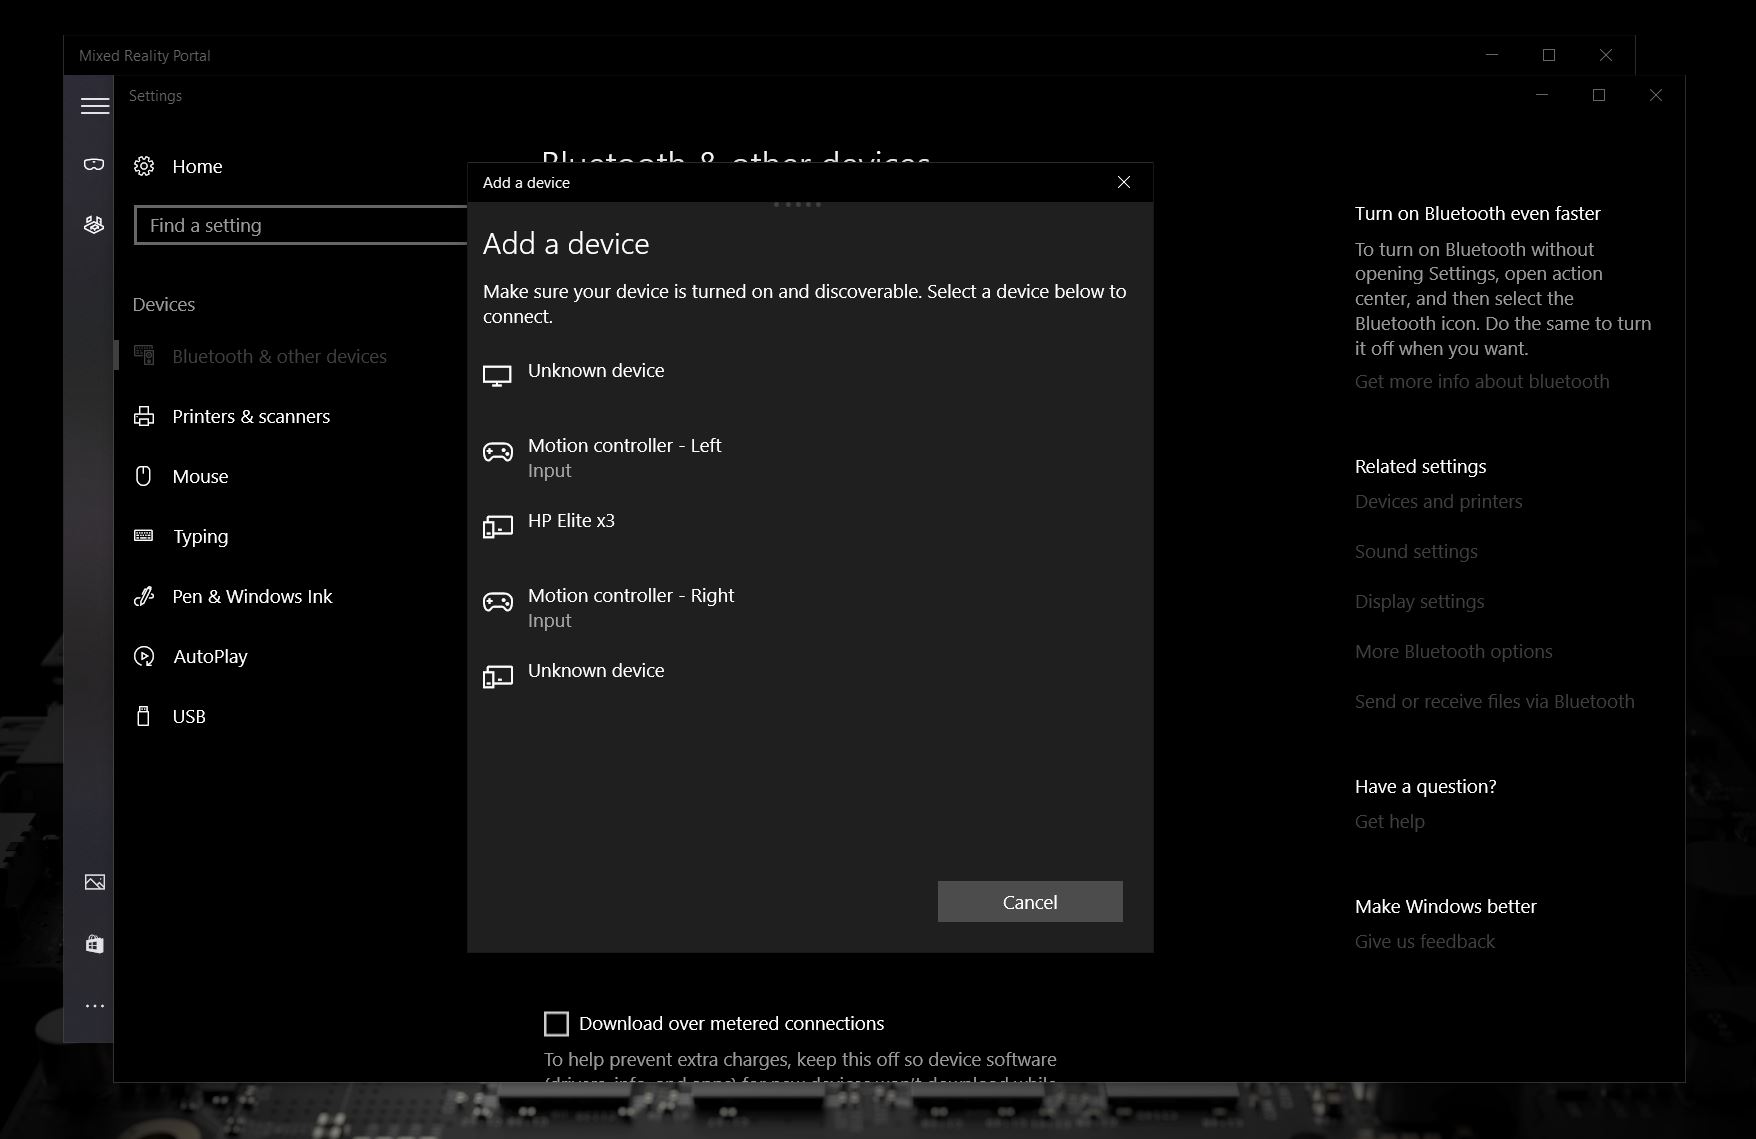
- Navigate to Computer settings
- Device/ Add Bluetooth or other device.
Once pairing is complete, LEDs will be solid on and bright.
Common issues
- Verify that you have only one Bluetooth radio active on your PC. If you have more than one Bluetooth radio, you’ll need to disable the other radios in Device Manager.
- Place your Bluetooth dongle in a port that has a clear line of sight to your controllers, and far from plugged in USB 3.0 devices. USB 3.0 is known to have RF interference with Bluetooth (read this paper from Intel for more details). USB 2.0 ports may work better for your Bluetooth dongle.
- Make sure your Bluetooth dongle isn’t plugged into a USB port next to your HMD’s USB cable. The headset cable has been known to cause interference with Bluetooth dongles as well. Plug the dongle into the front USB port on your PC for best results.
- For notebooks, ensure WiFi is connected to 5-GHz band for the best experience. Select the wireless network icon bottom-right tray and select properties for the network you’re using. Notebooks that are designed to share a 2.4-GHz antenna for Bluetooth and WiFi connectivity will see data congestion from slow network speeds or poor motion controller tracking performance.
- Your motion controllers will receive new software updates from Microsoft on a regular basis. The controllers will show an alternating pattern of flashing lights when they receive these new software updates. This is normal. Wait until the software upgrade is complete before using the controllers. The controllers will vibrate and a constant light will replace the alternating flash pattern when it’s done.
- You may be told to “Put on the headset and use the thumbstick to teleport” before the controllers finish the update process. The controllers won’t be visible or usable until the update is completed. Most updates occur within two minutes, but updates can take as long as 10 minutes or so. Wait for the update to complete before proceeding to the next step.
Using controllers
Here’s how to get around in mixed reality with motion controllers, an Xbox gamepad, or a mouse and keyboard.
[!TIP]
To switch input between mixed reality and your desktop, press Windows logo key + Y on your PC keyboard.
| To do this | Motion controllers | Gamepad | Mouse + keyboard |
|---|---|---|---|
| Teleport | Press the thumbstick forward, then point the controller where you want to go. Release the thumbstick. | Press the left thumbstick forward, then look where you want to go. Release the thumbstick. | Select and hold the right button, then point the mouse where you want to go. Release the button. |
| Select | Point the controller, then pull the trigger or use the touchpad. | Gaze at the target, then press A. | Point the mouse, then left-click. |
| Open the Start menu | Press the Windows button. | Press the Xbox button. | Press the Windows logo key. |
| Leave an immersive app | Press the Windows button. Then select Mixed reality home on the quick actions menu. | Press the Xbox button. Then select Mixed reality home button on the quick actions menu. | Press the Windows logo key. Then select the **Mixed reality home button on the Quick Actions menu that appears. |
| Rotate | Move the thumbstick left or right. | Move the right stick left or right. | Not available. |
| Back up | Move the thumbstick backward. | Move the left stick backward. | Not available. |
| Walk | Push the thumbstick straight down, then press it in the direction you want to walk. | Push the left stick straight down, then press it in the direction you want to walk. | Not available. |
| Move an app window | Point at the app bar. Pull and hold the trigger to grab the window, then use the controller to move it in any direction. Release the trigger. | Gaze at the app bar, then press and hold A to grab the window. Use the left stick to move the window side-to-side or up and down. Use the triggers to move it closer and farther away. Then release A. | Point the mouse at the app bar. Left-click and hold to grab the window, then use the mouse to move it side-to-side or up and down. Use the scroll wheel to move the window closer or farther away. Release the mouse button. |
| Move a 3D object | Point at the object, then pull and hold the trigger to grab it. Move it in any direction with the controller, then release the trigger. | Gaze at the object, then press and hold A to grab it. Use the left stick to move the window side-to-side or up and down. Use the triggers to move it closer and farther away. Then release A. | Point the mouse at the object. Left-click and hold to grab it, then use the mouse to move it side-to-side or up and down. To move it closer or farther away, use the scroll wheel. Release the mouse button. |
| Rotate or resize an app window | Point one controller at the app bar and the other controller anywhere on the window. Hold down both triggers, then move the controllers together or apart to resize. To rotate, move one controller toward you and the other one away from you. Release the triggers. | Select Adjust on the app bar. Gaze at a corner of the adjustment frame, then press A to select it. Use the left stick to resize the window. | Select Adjust on the app bar. Select and hold a corner of the adjustment frame, then use your mouse to resize the window. |
| Rotate or resize a 3D object | Point both controllers at the object. Hold down both triggers, then move the controllers together or apart to resize. To rotate, move one controller toward you and the other one away from you. | Select Adjust on the app bar, and then move the object using the left stick. | Select Adjust on the app bar, and then select and hold the object and use your mouse to move it. |
| Scroll in an app window | Pull and hold the trigger, then move the controller up or down. | Use the D-pad. | Use the mouse scroll wheel. |
| Zoom in or out in app window | Pull both triggers, then move the controllers closer together or farther apart. | Pull the right trigger to zoom in, and the left trigger to zoom out. | Use the mouse scroll wheel while holding down the CTRL key on the keyboard. |
| Open a menu | Press the Menu button. | Press the Menu button. | Right-click. |
What do the vibrations and lights mean
Your controller communicates to you what it’s doing by vibrating and blinking its LED lights.
| When your controller does this | It means this |
|---|---|
| LEDs turn on, and the controller vibrates once | Turning on |
| LEDs turn off, and the controller vibrates twice | Turning off |
| LEDs blink every 3 seconds | Sleeping |
| LEDs slowly pulse, and the controller vibrates once | Entering pairing mode |
| Controller vibrates once | Connecting or disconnecting from your PC |
| LEDs are brightly lit | Controllers tracked by headset |
| LEDs are dimly lit | Controllers not tracked by headset |
| Controller vibrates three times and then turns off | Critical battery level |
| The outer and inner rings of LEDs blink in an alternating pattern | Updating |
Updating motion controllers firmware
- If an immersive headset is connected to your PC, and new controller firmware is available, the firmware will be pushed to your motion controllers automatically the next time they’re turned on.
- Controller firmware updates are shown with a pattern of illuminating LED quadrants in a circular motion, and take 1-2 minutes. Firmware updates can occasionally take longer, up to 10 minutes, which may indicate poor Bluetooth connectivity or radio interference.
- In case firmware update is interrupted (controller powered off or battery runs out) it will be tried again on next power on.
- After the firmware update completes, the controllers will reboot and reconnect.
- Both controllers should be connected now. Navigate to Mixed Reality Portal to check the status of your controllers.
- Verify your controllers work properly:
- Launch Mixed Reality Portal and enter your Mixed Reality Home.
- Move your controllers and verify tracking, test buttons, and verify teleportation works. If they don’t, then check out the motion controller troubleshooting section
FAQ
How can I check battery level?
A: Battery level is on reverse side of the virtual model, there’s no physical battery level indicator. After powering on the controller, wait few seconds to let the reading stabilize.
Can you use these controllers without a headset? Just for the joystick/trigger/etc input?
A: Not for Universal Windows Applications
Filing motion controller feedback/bugs
Give us feedback in Feedback Hub, using the “Mixed Reality -> Input” category.
See also
- HP Controllers in Unity
- HP Controllers in Unreal
- Ask the community
- Contact us for support
- Troubleshooting
Having trouble with your motion controllers? Get help
Provide feedback
Saved searches
Use saved searches to filter your results more quickly
Sign up
Appearance settings
You don’t need the Motion Controllers to have an experience with Windows Mixed Reality, but you do if you want the best experience. Initially, availability of controllers separate to headsets is a little lacking, though can be found from places like Dell’s online store.
In any case, if you picked up a headset without them and invest in some down the line, you’ll need to get them connected first before you do anything. Fortunately, it’s really easy.
- Open the Mixed Reality Portal app on your PC.
- In the side menu click on see more.
- Select set up controllers.
- In the settings screen you now see, click add Bluetooth or other device.
- Open the battery door on your controllers.
- Press the small button below the batteries for 2 seconds until the lights flash.
- When the controllers appear in the list, click connect.
Once the controllers have paired over Bluetooth the lights on the ring will stop flashing and instead stay bright and steady.
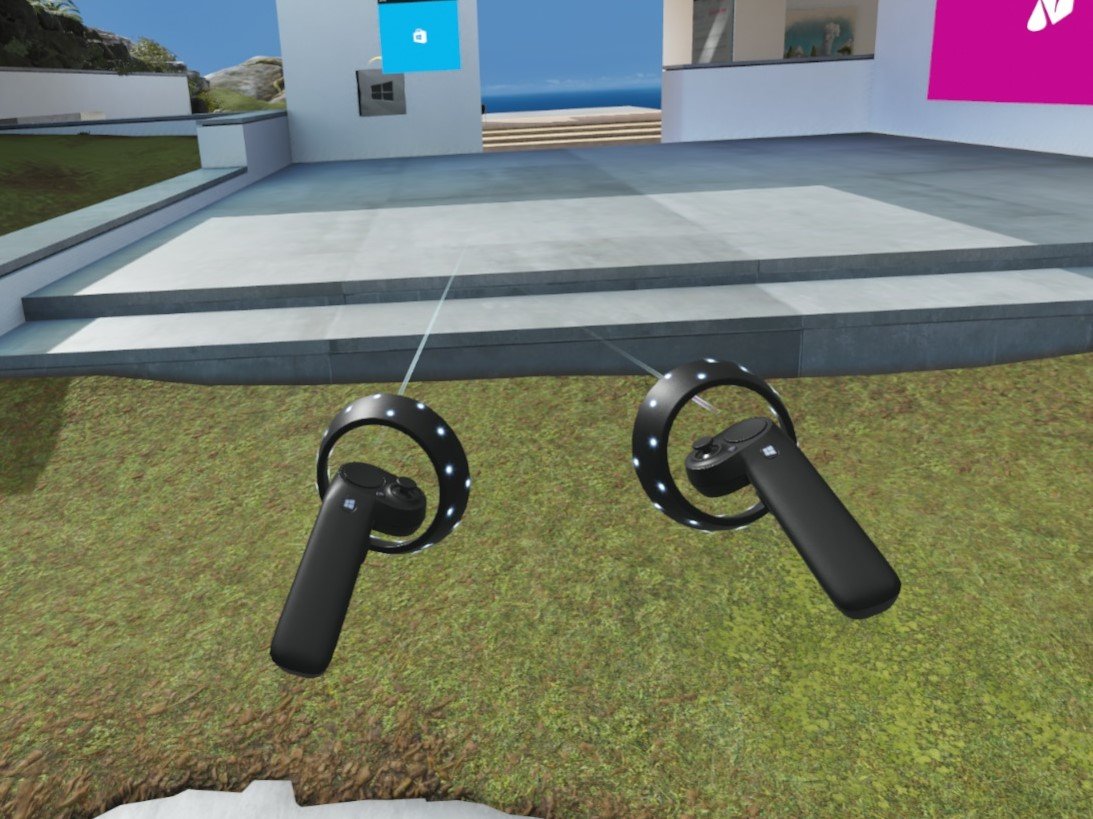
Now, put on your headset and make sure that they’re working and tracking OK. If you don’t see them as in the image above, hold down the Windows button for two seconds until it vibrates to turn them off.
Then repeat the process to turn them back on again and this should make them both appear in front of you.
If you bought your controllers as part of a bundle, the setup process is even easier. When doing your initial setup, you’ll be asked whether you have Motion Controllers to setup or whether you’re using a gamepad.
The process of pairing is the same as above, but you won’t need to be in settings to do it. You’ll perform steps 5 and 6 from the list above and that’s it.
All the latest news, reviews, and guides for Windows and Xbox diehards.
Whichever way you did it you’ll now have a pair of working Motion Controllers to take your Windows Mixed Reality experience up a notch or two.
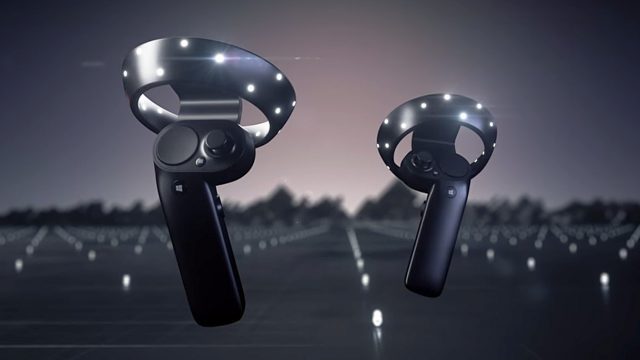
Microsoft debuted the lengthily-named “Windows Mixed Reality motion controllers” back in May, but until now we haven’t had a chance to actually try them out. During a recent meeting with Microsoft in San Francisco, I got to try the VR controllers for the first time paired with the Acer Windows VR headset.
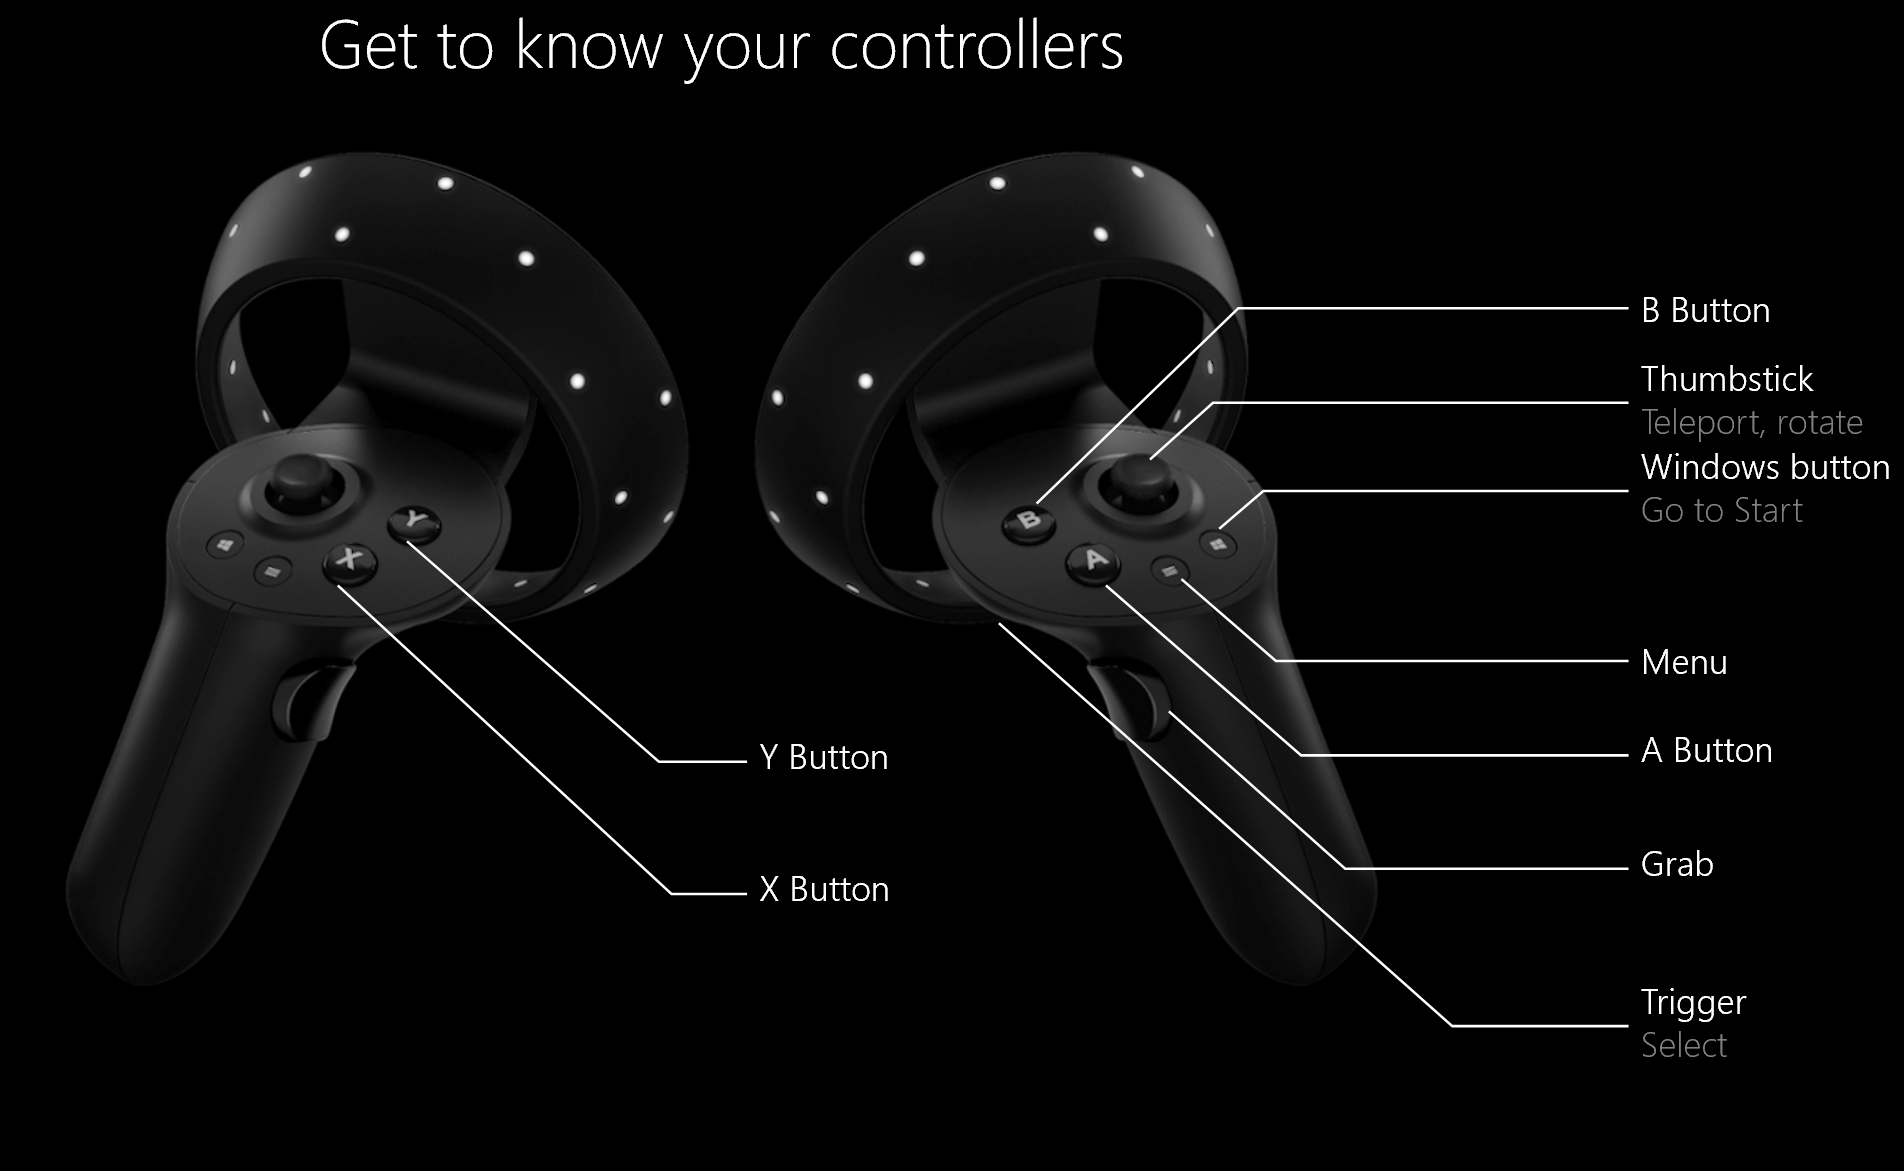
Microsoft’s VR controllers are designed to let you reach into VR and interact naturally with the virtual world. With both a trackpad and a thumbstick, they look like a crossbreed of the Oculus Touch controllers and the Vive controllers.
In addition to the trackpad and thumbstick, there’s also a menu button and a Start button, as well as a grip button along the handle. The big circular parts on the front contain an array of LEDs which provide bright markers for the headset’s on-board cameras to detect and track. Microsoft tells us that the shipping version of the controllers will indeed use visible-light, just like we’ve seen in renderings and promo videos. (Microsoft didn’t allow any pictures of the controllers during my hands-on time).
Buttons and Inputs
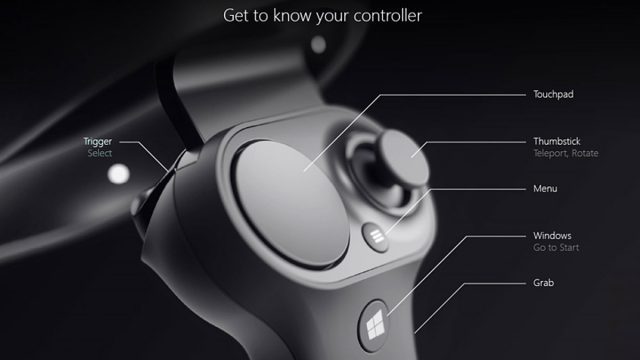
Grabbing the controllers for the first time, they didn’t feel quite as elegant as either Touch or the Vive controllers. The odd side-by-side trackpad & thumbstick arrangement is useable, but seems to effectively put neither of the two in an ideal position for your thumb. The grip button is indeed a binary button (rather than being pressure sensitive), and doesn’t feel so much like a “grab” as it does a clicky button press with your palm.
Ergonomics
Though they resemble Touch with their ring-shaped tracking appendages, the Windows motion controllers are actually noticeably larger and clunkier thanks to the placement of the tracking rings, which don’t encompass your hand like Touch, making the controllers easier to bump together, especially when their physical outline is hidden in VR.
The shape of the rings is necessary though, as they need to present a substantial surface area from which the headset’s on-board cameras can track their movement. Though I was using the Acer dev kit headset, our understanding is that these controllers will work with any of the soon to be released Windows VR headsets (all of which feature on-board cameras).
Pros and Cons of Inside-out Controller Tracking
This method of controller tracking differs from both the Rift and the Vive in that it’s the cameras on the headset which are watching the controllers to track their movement (which is called ‘Inside Out’), whereas the Rift and Vive both use external sensors to track their controllers (called ‘Outside In’).
The upside to this approach is that you don’t need to set up any external trackers, but the downside is that the controllers must always be in view of the headset’s front-facing cameras to be properly tracked. Thankfully, the size of the tracking volume felt reasonable; for basic use (like reaching out in front of me to grab virtual objects), I didn’t feel like my reach was artificially limited by the camera’s field of view.
Outside of the Box Tracking
And for times when your hands will go out of the camera’s field of view, Microsoft is doing its best to compensate. When that happens, the system relies purely on the controller’s on-board IMU to estimate positional movement until it reappears in the camera’s view. This works well enough for quick jumps in and out of the camera’s view, but after a second or two, the IMU-only tracking estimation is too unreliable, and it appears that the system will eventually freeze the location of the controllers in the air and only feed them the rotation data from the IMU, though they snap quickly back into their proper place as soon as they’re brought back into view. It remains to be seen how much this limitation (the need to be seen by the front-facing cameras) will impact different VR games and apps, and how effectively it can be designed around.
Tracking Accuracy
As for the tracking accuracy when they are in sight of the camera, I did see some jumpiness here and there—especially if I was rotating my body while moving the controllers—but on the whole they seem entirely usable, and (in my short time with them thus far) to be more accurate than the PlayStation Move controllers.
As part of my testing, I played Arizona Sunshine (2016), and found that guns were steady when I held them out in front of me and aimed down their sites; I didn’t have any trouble landing zombie headshots. Granted, for inside-out controller tracking, holding a gun up in front of me to aim is pretty much the best case scenario—I’m curious to see how other common input modalities hold up (like shooting a bow and arrow or swinging a sword).
The occasional jumps didn’t present much issue in a shooting scenarios, but for more precise uses, like VR drawing, painting, and animating, it remains to be seen if those jumps will cause any usability issues.
– – — – –
Microsoft says that the Mixed Reality motion controllers will be bundled with Windows VR headsets starting at $400 this holiday.
Got questions about the Mixed Reality controllers? I’ll be taking questions in our comment section below.