
Eclipse Mosquitto is one of the world’s most popular open-source MQTT brokers. Among its many installation options, it can also run on Windows. This article will explain how to install and configure a free open-source version of Mosquitto MQTT Broker on Windows, including how to install Mosquitto as a Windows service. Then, I will explain how to run Mosquitto on Windows and test it using the popular command line tools: mosquitto_sub and mosquitto_pub.
How to install Mosquitto Broker on Windows
To install Mosquitto on Windows, select the desired installation file from mosquitto.org (64-bit or 32-bit), download it, and run it.
This file is a Mosquitto Windows 10 and Windows 11 tested package (including Windows for ARM). Compatibility with older Windows versions is possible but not guaranteed.
The Eclipse Mosquitto Setup wizard will start. Click Next to continue the installation.
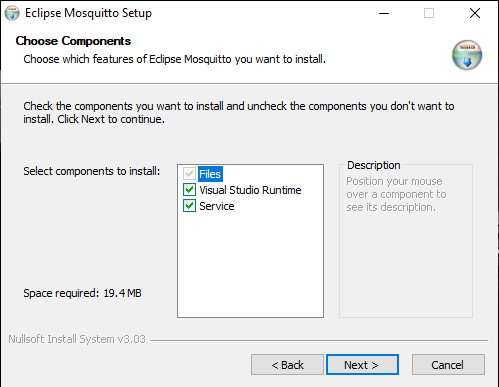
Select the components to install. If you want to start Mosquitto automatically when Windows starts, install the Service component. It will install the broker as a Windows service. See the “How to run Mosquitto MQTT Broker as a Service on Windows” section.
You will also need Visual Studio Runtime because Mosquitto depends on specific libraries and components provided by it. You might not want to install this component if you already have it, but if you are unsure, leave this option as it is and continue to the next step.
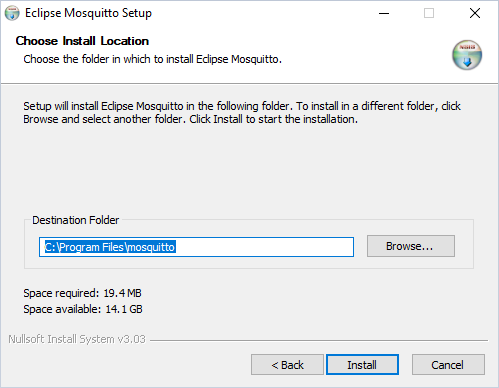
Select the installation folder for Eclipse Mosquitto or leave the default value (C:\Program Files\mosquitto for a 64-bit executable and C:\Program Files (x86)\mosquitto for 32-bit) and click Install.
After the installation process is complete, you will see a corresponding message. All required files for operating Mosquitto will be automatically saved to your chosen installation folder.
Click Finish in the setup wizard. Now, you can start using MQTT Mosquitto Broker on Windows.
If you want to install Mosquitto broker without running the graphical part of the installer, you can do so by running the installer from the command line (also referred to as cmd or Command Prompt) with the /S switch (silent mode):
mosquitto-2.0.15-install-windows-x64.exe /SUse the /D switch to change the installation folder:
mosquitto-2.0.15-install-windows-x64.exe /S /D=:\"Program Files"\mosquittoAs an alternative to cmd, you can use PowerShell. Note that PowerShell uses a slightly different syntax than the command line. For example, running the mosquitto command in cmd (inside of the Mosquitto installation folder) has its equivalent in PowerShell, which is: .\mosquitto. This difference is, however, irrelevant as soon as you add Mosquitto to the system path (more on how to do this below). Then you can use the mosquitto command in both PowerShell and cmd.
After installing Mosquitto broker, you can check how to run it and which command line options it supports. To do this, navigate inside the folder where Mosquitto is installed (installation folder) and run the following command:
mosquitto -h
Note: Mosquitto is not automatically globally visible in cmd. So, to work with it using the mosquitto command, you must either be inside of the installation folder or add the installation folder to the PATH environment variable and restart the Command Prompt (see the following section).
Please note: There is a more powerful Mosquitto version – Pro Edition for Eclipse Mosquitto™, which is available as part of the Cedalo MQTT Platform. To test it and it advanced functionality, sign up for a free cloud or on-prem trial here.
Your Mosquitto Windows installation is now complete. The next sections will explore how to add the mosquitto command to the system path, how to run Mosquitto in foreground and background (as a daemon service), and how to test its basic capabilities using a command line MQTT client.
Making Mosquitto command globally available. Adding Mosquitto to system path
You can use Mosquitto directly from the installation folder by navigating to this folder in the Command Prompt and typing mosquitto. However, if you want to use the broker from any location in the command line, you need to add it to your system path (specifically to the PATH environment variable).
To add Mosquitto to your system path, copy the installation folder’s path, which contains mosquitto.exe.
Right-click on My Computer or This PC on your desktop or in File Explorer, and choose Properties.
Click on Advanced system settings.
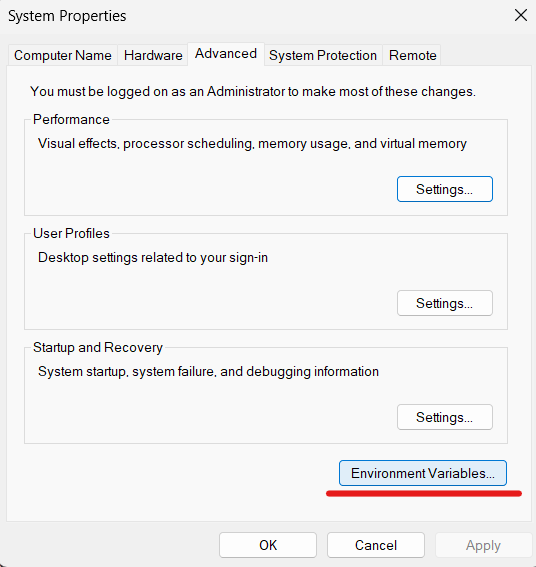
Click on Environment Variables, as you can see in the image below.
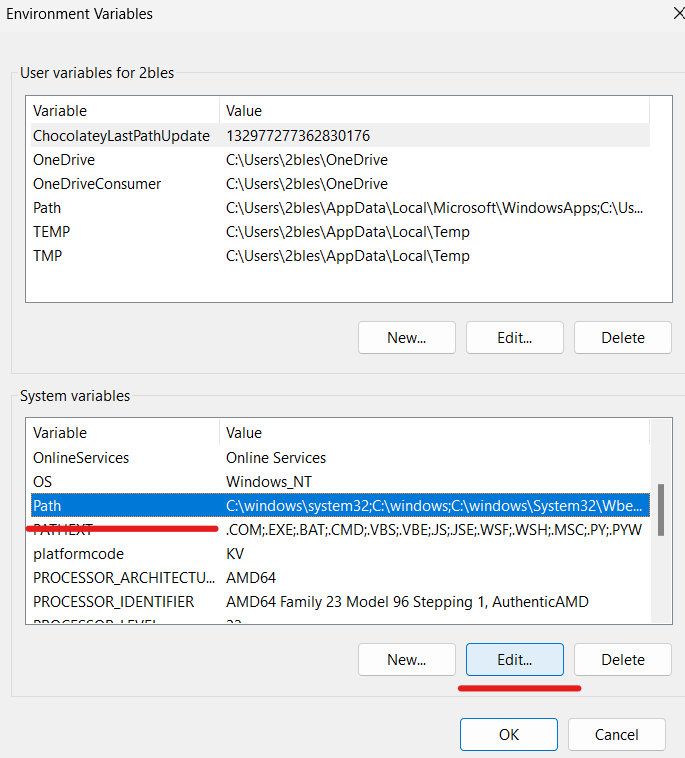
In the “System variables” section, find the variable called Path and click Edit.
Now, the “Edit environment variable” window will open. Click on New and insert the path to your Mosquitto installation folder you copied earlier. Click OK:
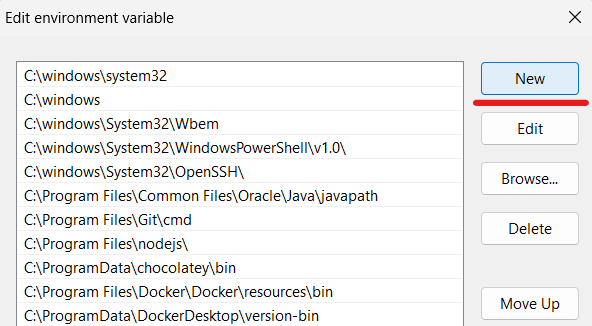
In case you don’t see the “New” button, then in the “Variable value” box, scroll to the end and add a semicolon (‘;’) in case there isn’t one. Then paste the path to the Mosquitto installation folder and click OK.
Restart your command line application (by closing and opening the cmd window), and you should be able to issue commands like mosquitto -h from any location.
Other sections of this guide assume that you have added Mosquitto to your system path as described above. If you did not, then you must run all the Mosquitto-related commands (mosquitto, mosquitto_passwd, mosquitto_pub, mosquitto_sub) from the folder where you installed the broker.
The next sections will explore how to start the Mosquitto broker in Windows.
How to Run Mosquitto MQTT Broker as a Service on Windows
Most of the commands from this section must be executed with administrative permissions. To do this, you must run Command Prompt as administrator by right-clicking on the command line icon and choosing the “Run as administrator” option.
By default (if the “Service” option was ticked during installation), Mosquitto is installed as a Windows service to run in the background and automatically start on Windows startup. It will also automatically start immediately after the installation. Note that in this case, Mosquitto will use the mosqutto.conf config file from the installation directory.
To check if Mosquitto is running in the background, execute the sc query mosquitto command in cmd. Note that PowerShell sc is not a service control command but an alias for Set-Content. Therefore, in PowerShell, you must use Get-Service -Name mosquitto instead.
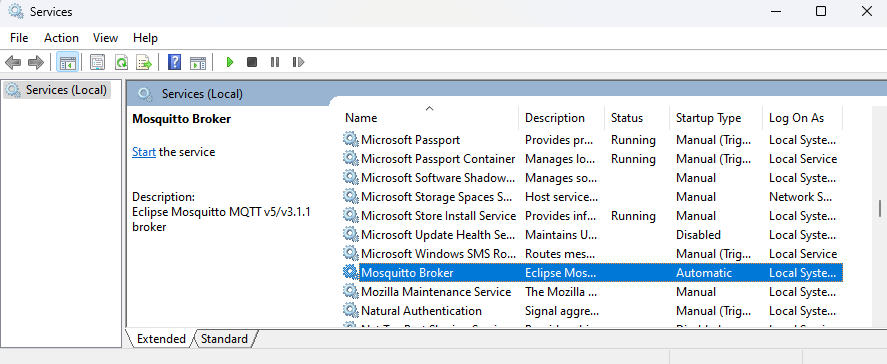
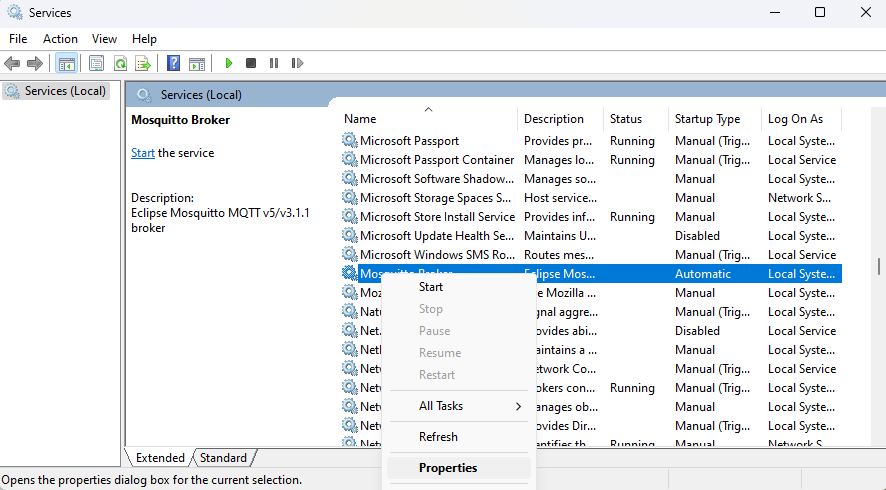
You can also view the status and manage services via a dedicated GUI application. To access the Services application: open Windows search and type services.msc or simply Services and press enter. Then, find the service named Mosquitto Broker. You will see the current state of the services in the “Status” column. In case the status is not “Running…”, right-click on it, and start it as shown below:
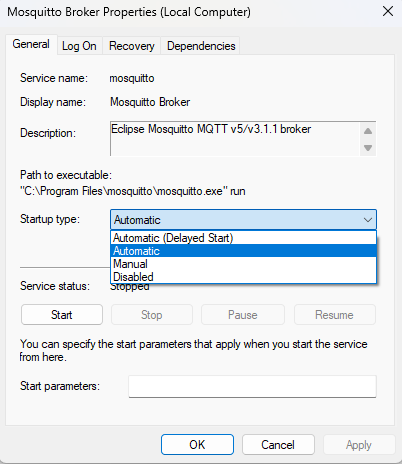
Mosquitto service is configured to start on every Windows startup automatically. You can change this behavior in service properties by right-clicking the “Mosquitto Broker” entry in “services.msc” and selecting “Properties”:
Then, change the “Startup type” field to the desired value (“Manual” will not start the service after the system restart, and “Disabled” will turn the service off completely), and press OK.
Alternatively, you can manage Mosquitto service using sc or net commands from the command line. Note that you will have to open the command line as an administrator. For PowerShell, you will have to use one of Start-Service, Stop-Service, Get-Service, Restart-Service to manage the service.
Example:
Starting the service.
With cmd:
sc start mosquittoWith PowerShell:
Start-Service mosquittoStopping the broker:
With cmd:
sc stop mosquittoWith PowerShell
Stop-Service mosquittoRemoving Mosquitto Windows service:
For cmd enter the following two commands one by one:
sc stop mosquitto
mosquitto uninstall
Alternatively:
sc stop mosquitto
sc delete mosquitto
For PowerShell:
Stop-Service -Name mosquitto
mosquitto uninstall
If you want to install the Mosquitto service again, run the following command:
mosquitto installAnd as I already mentioned, you can also view Mosquitto service status using the following command:
For cmd:
sc query mosquittoFor PowerShell:
Get-Service -Name mosquittoBy default, the Mosquitto broker service will listen on port 1883 unless you change this in mosquitto.conf file located in the installation folder. To check if Mosquitto is running on port 1883, run the following command (works for both cmd and PowerShell):
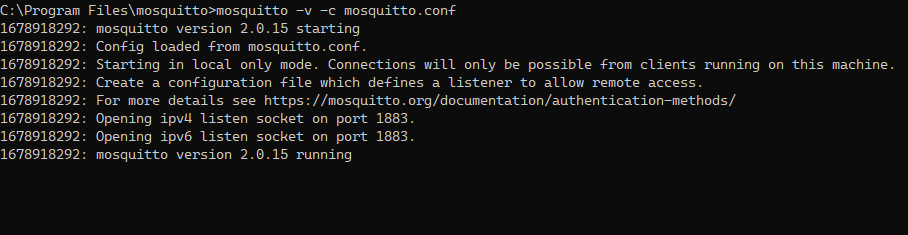
netstat -an | findstr 1883If the Mosquitto MQTT server has opened an IPv4 and IPv6 listening socket on port 1883, the output of this command will be the following two lines:
How to run Mosquitto in the foreground
There is an alternative way to run Mosquitto which will, however, run it in the foreground rather than in the background as in the case with services.
Open the command line and use mosquitto -v -c <path to mosquitto.conf> command to run the broker in a verbose mode which will allow you to see the debug messages. Using the -c option, we can pass a mosquitto.conf configuration file to the broker. If you don’t specify it, no configuration file will be used. Read more on this in the following section.
Note that the -d option (that allows us to run Mosquitto in the background) is unusable in Windows because there is no daemon process manager. So, on Windows, we use services instead, as described in the section above.
To stop Mosquitto from running in the foreground, press Ctrl + C in the cmd window where the broker is running.
In this article, we use the open-source Eclipse Mosquitto broker. However, the Pro Edition for Eclipse Mosquitto is also available. It provides advanced MQTT broker functionality, such as a rich set of MQTT bridges and metrics exporters, High Availability, OAuth 2.0 / JWT / LDAP Authentication, Audit trail loggins, Persistent Queueing, and more. To test it, sign up for a free Cedalo MQTT Platform trial.
How to Configure the Mosquitto MQTT Broker on Windows
You can configure the operation and features of the Mosquitto broker using the configuration file named mosquitto.conf located in the installation folder. This file is used only for Mosquitto running as a service. If you run Mosquitto from cmd, the mosquitto.conf file is not used, and it has to be manually specified with the -c flag:
mosquitto -c <path to your config file>For example:
mosquitto -c "C:\Program Files\mosquitto\mosquitto.conf"If you want to run Mosquitto as a service and use a non-default configuration file, the easiest way is to install the nssm command line tool. After that, ensure that the broker service is stopped and removed:
For cmd:
sc stop mosquitto
sc delete mosquitto
For PowerShell:
Stop-Service -Name mosquitto
mosquitto uninstall
And finally, execute the following commands (works for both cmd and PowerShell):
nssm install mosquitto "C:\Program Files\mosquitto\mosquitto.exe"
nssm set mosquitto AppParameters -c "<path to your config file>"
For example:
nssm install mosquitto "C:\Program Files\mosquitto\mosquitto.exe"
nssm set mosquitto AppParameters -c "C:\Users\myuser\cedalo\mosquitto.conf"
To prevent unexpected issues avoid spaces in the path to your custom config file.
After that, you can start the service with sc start mosquitto for cmd, Start-Service -Name mosquitto for PowerShell, or just continue using nssm with nssm start mosquitto. Now, Mosquitto will use the custom config file you provided.
Editing mosquitto.conf
You may want to edit the default mosquitto.conf configuration file from the installation directory or create your own and specify the needed settings.
The default mosquitto.conf file in the installation folder contains commented-out lines (lines that begin with the # symbol) with default options. To change them, you need to uncomment the lines you want (by removing the # in front of them) and specify different values. Or you might as well not bother with uncommenting – just add your configuration options anywhere in the file.
If you create your own mosquitto.conf, then start with an empty file and add your options.
Below we will explore some necessary settings of this file.
Authentication settings
To connect to the broker for the first time, you have to configure your authentication settings in the configuration file. There are a few possibilities, some of which we explore below.
You can (but not necessarily should) allow anonymous connections from any host (meaning connections without a username and a password) by adding the following options to your configuration file:
allow_anonymous true
listener 1883 0.0.0.0
This will allow any device on the network to connect to the broker, post messages and subscribe to topics without authentication. However, we recommend allowing only authenticated clients to connect to your broker for security reasons.
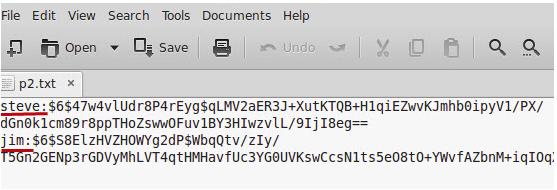
To achieve this, first, create a password file containing usernames and PBKDF2 (with SHA-256) hashes of the passwords in the format: username:pbkdf2_password_hash. This would look like the following (take a look at pwfile.example):
roger:$6$clQ4Ocu312S0qWgl$Cv2wUxgEN73c6C6jlBkswqR4AkHsvDLWvtEXZZ8NpsBLgP1WAo/qA+WXcmEN/mjDNgdUwcxRAveqNMs2xUVQYA==
sub_client:$6$U+qg0/32F0g2Fh+n$fBPSkq/rfNyEQ/TkEjRgwGTTVBpvNhKSyGShovH9KHewsvJ731tD5Zx26IHhR5RYCICt0L9qBW0/KK31UkCliw==
pub_client:$6$vxQ89y+7WrsnL2yn$fSPMmEZn9TSrC8s/jaPmxJ9NijWpkP2e7bMJLz78JXR1vW2x8+T3FZ23byJA6xs5Mt+LeOybAHwcUv0OCl40rA==
This can be achieved using mosquitto_passwd command. To create a password file with the initial Mosquitto user, use the following command:
mosquitto_passwd -c <path where you want your password file to be created> <user_name>For example:
mosquitto_passwd -c C:\"Program Files"\mosquitto\passwd test_userThis will create a password file with the initial user test_user.
To add another user to the password file, run the command:
mosquitto_passwd -b C:\"Program Files"\mosquitto\passwd user_name passwordNote that if you want to delete a user from the file, you can use the -D flag and specify the name of the user to be removed:
mosquitto_passwd -D C:\"Program Files"\mosquitto\passwd user_nameAfter you have created a password file with all the needed users, add the following lines to mosquitto.conf:
password_file C:\Program Files\mosquitto\passwd
allow_anonymous false
listener 1883
Don’t forget to change the password_file option to contain the path to your actual password file.
How to Handle Persistent Data and Logs
Mosquitto broker allows you to save the following types of application data among the rest:
- Information and debug logs.
- Broker system data (persistence feature).
To configure the logging of your MQTT Mosquitto Windows installation, you need to add the logging options (located in the Logging section of the default mosquitto.conf).
Add the following parameter to specify which file to store the logs in. Also, it would be best if you made sure this path exists, so manually create a log folder (‘C:\Program Files\mosquitto\log’ in the example below).
log_dest file C:\Program Files\mosquitto\log\mosquitto.logYou can also choose the events to log: debug, error, warning, notice, information, etc. To save logs for all types of events, use the following option:
log_type allIf you want to get comprehensive information on logging in the Mosquitto MQTT broker, please refer to our MQTT Logging tutorial.
To save persistence data, add the following options to the configuration file. Adjust persistence_location as needed. You need to ensure the path in persistence_location exists, so create a data directory manually if there isn’t one (‘C:\Program Files\mosquitto\data\’ in the example).
persistence true
persistence_file mosquitto.db
persistence_location C:\Program Files\mosquitto\data\
autosave_interval 60
Note that persistence data will only be saved to a file on Mosquitto shutdown or at specific intervals controlled by the autosave_interval config option.
Note that you need to restart the broker for the changes made in the configuration file to take effect. Use the command ‘sc stop mosquitto’ to stop the Mosquitto service and then execute ‘sc start mosquitto’ to start it up again.
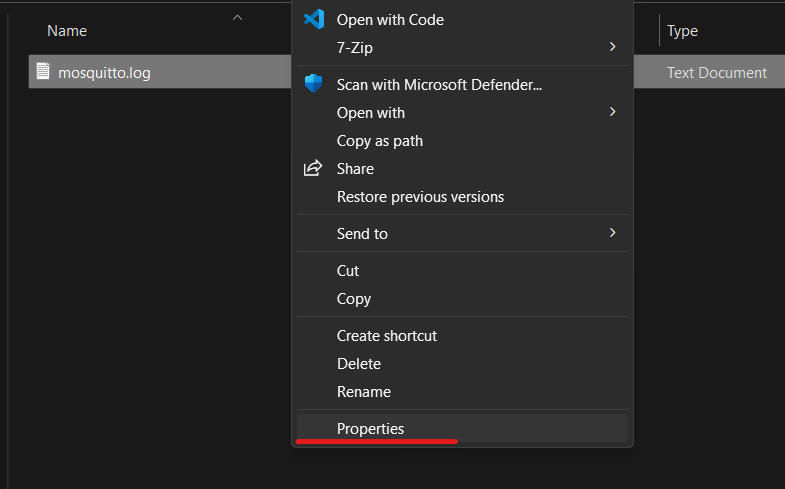
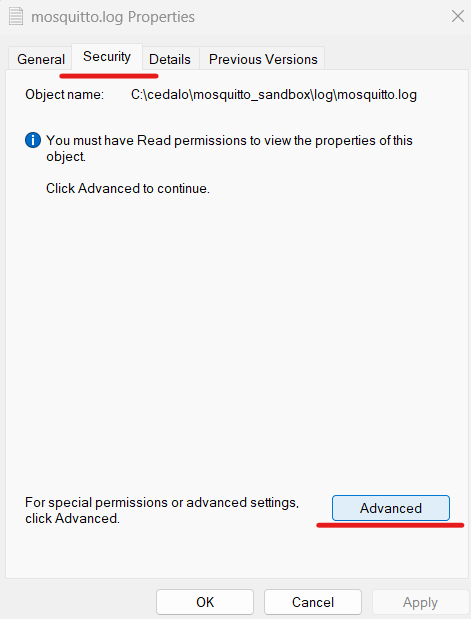
When Mosquitto runs as a service, all the files it creates will have access permissions set only for the SYSTEM Windows account. To access these files from your user account, you must go into the properties of those files and add your Windows user on the Security tab.
More specifically, right-click on the file and choose Properties:
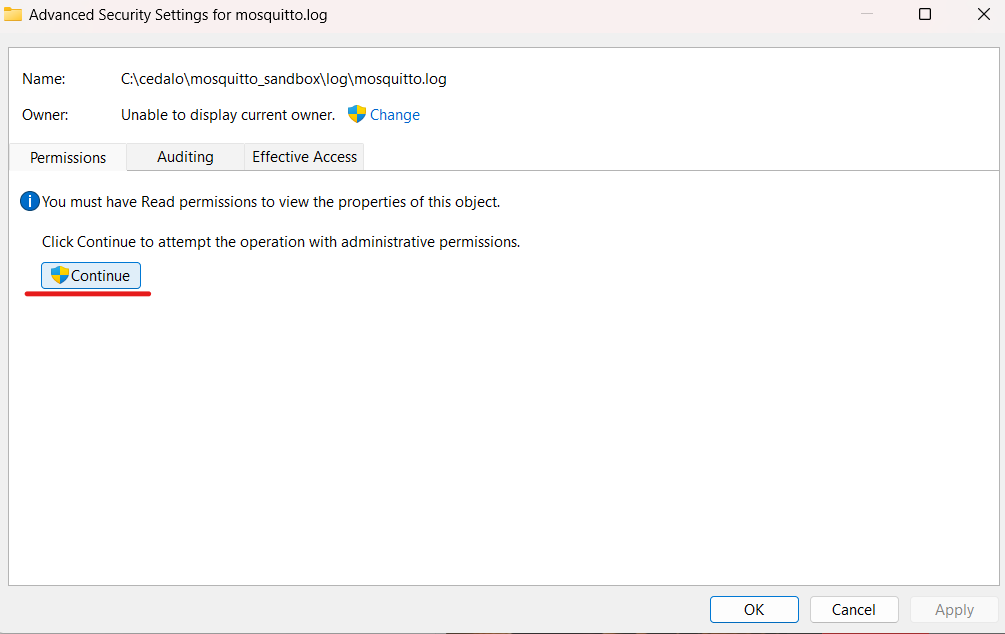
Go to the Security tab and click Advanced:
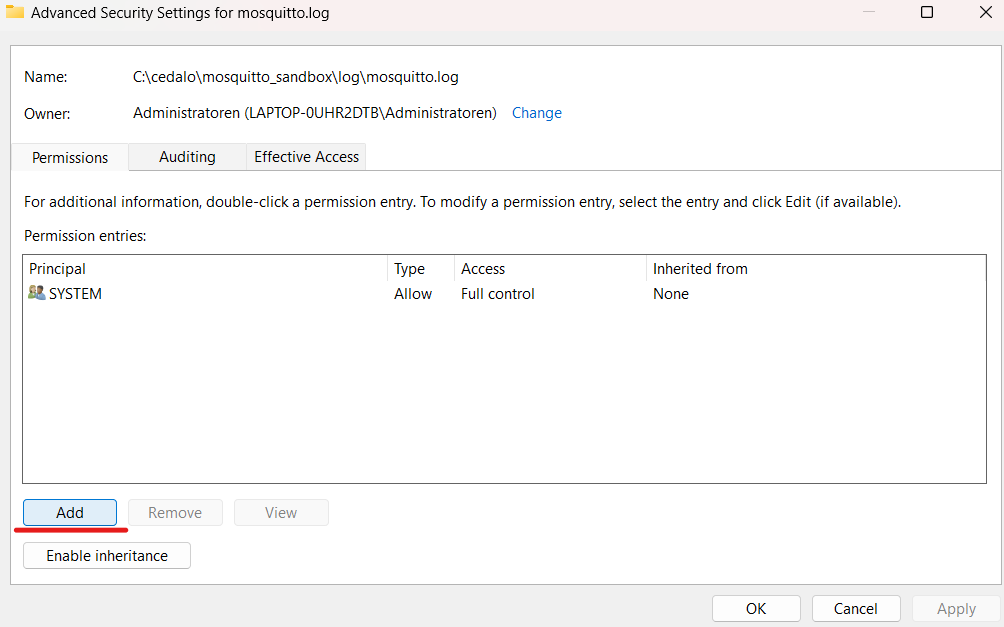
In the “Advanced Security Settings” tab, click on Continue:
Click on the Add button:
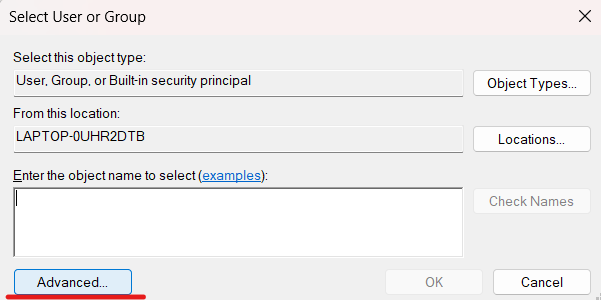
The “Permission Entry” tab will open. Click on Select a principal:
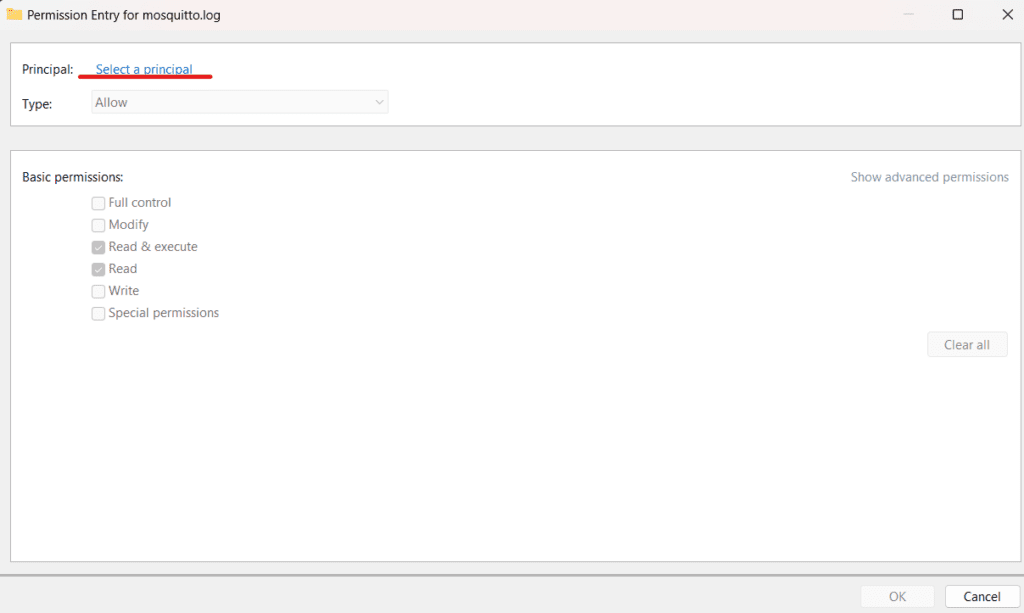
Click Advanced:
Then click on the Find Now button:
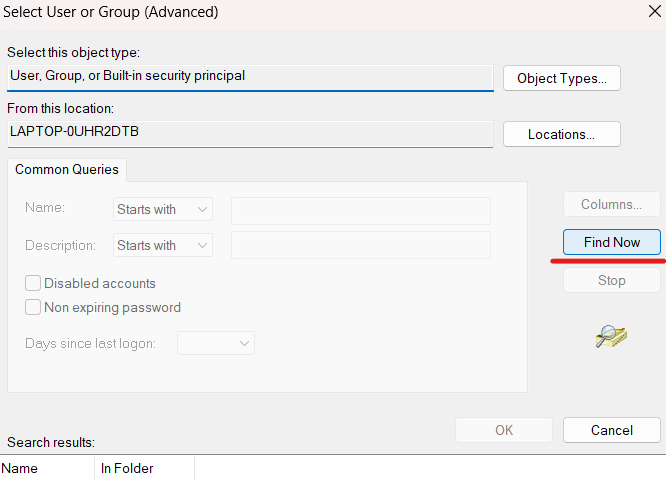
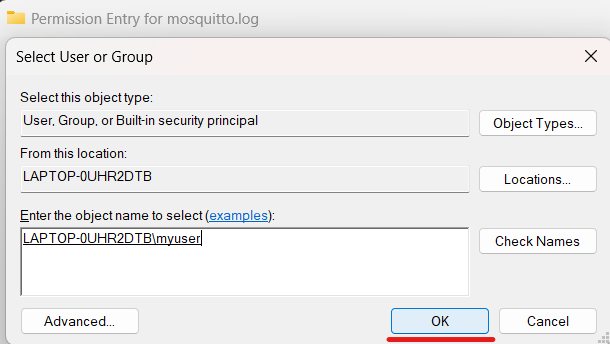
At the bottom of the window, in the Search results section, a list of users, groups, and built-in security principals will appear:
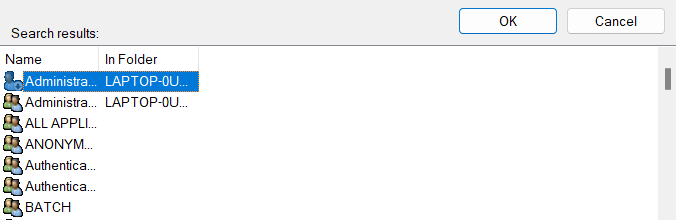
Find the user you are currently logged in as, select it, and click OK:
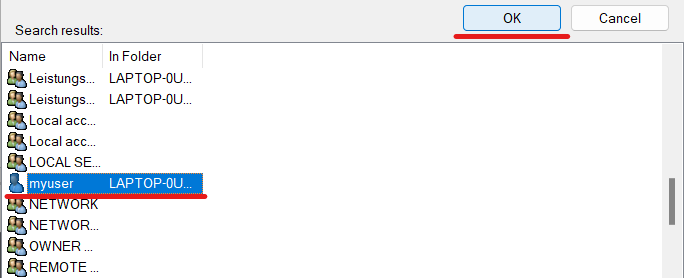
Click OK again:
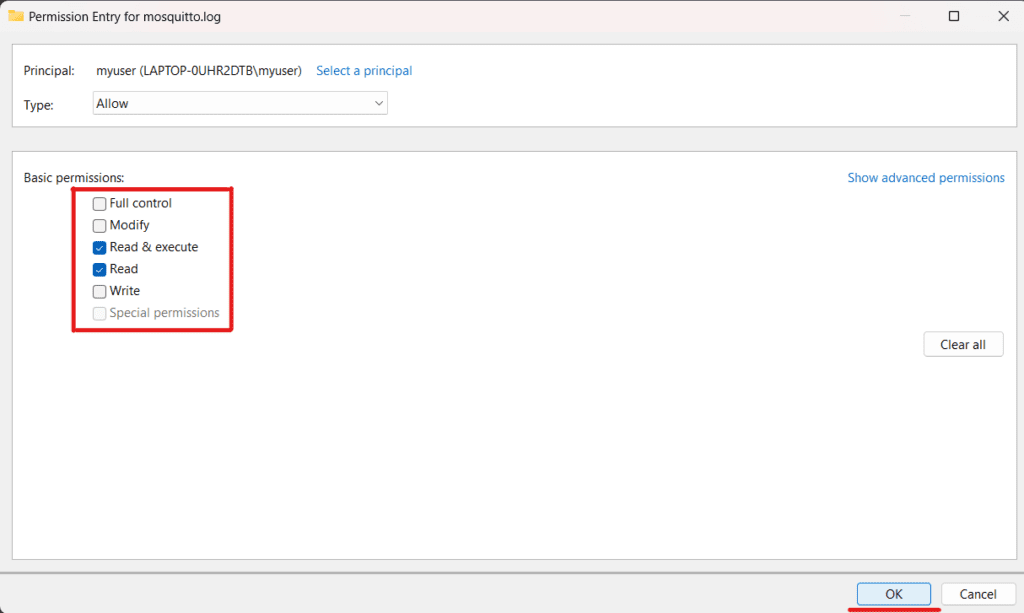
You will be sent back to the Permission Entry tab. Here select the basic permissions you want your user to have and click OK:
After that, in the “Advanced Security Settings” window, click on the OK button again:
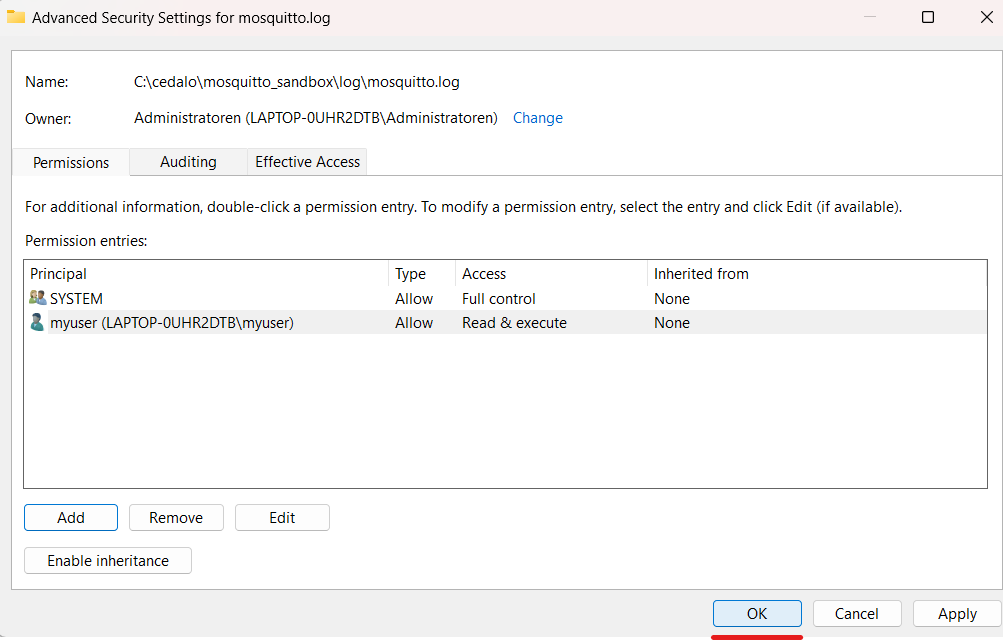
Finally, you should be able to access the file.
Example Mosquitto Configuration File
Summarizing the settings we discussed, you may find an example of the mosquitto.conf file below. Remember to change the paths to suit your environment if you want to use it for your use case.
password_file C:\Program Files\mosquitto\passwd
allow_anonymous false
listener 1883 127.0.0.1
log_dest file C:\Program Files\mosquitto\log\mosquitto.log
log_type all
persistence true
persistence_file mosquitto.db
persistence_location C:\Program Files\mosquitto\data\
autosave_interval 60
There are many other Mosquitto broker settings that you can add to your configuration file. For example, you can configure Mosquitto to listen on multiple ports, configure TLS certificates, limit message size, and more.
You can find a complete list of mosquitto.conf settings here.
How to Test the Installed Mosquitto MQTT Broker on Windows
MQTT Client for Windows
To test Mosquitto MQTT Windows installation, I will use an MQTT client for Windows. The idea is simple: using an MQTT client, I will publish and subscribe to topics to check that basic broker functionality works as expected.
For our setup, we are going to use the mosquitto_sub and mosquitto_pub MQTT clients. These clients are distributed as separate terminal commands shipped together with the broker Windows package. However, you can also use any other MQTT client, such as MQTT Explorer, which provides a friendly graphical user interface.
Subscribe to Topics Using mosquitto_sub Windows
Mosquitto_sub Windows MQTT client allows you to subscribe to topics and print the received messages. To receive a message, you should subscribe to a topic before a message is published. In this example, we subscribe and listen to a topic using mosquitto_sub while publishing the messages with mosquitto_pub.
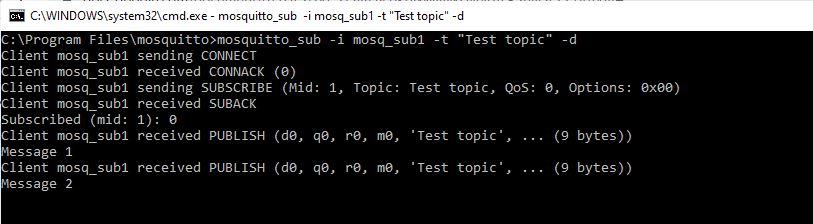
To subscribe to the topic named "Test topic", run the following command:
mosquitto_sub -i mosq_sub1 -t "Test topic" -dThis command uses the following options:
i– Client id. If this parameter is not passed, client ID is generated automatically.t– Name of the topic to subscribe to.d– Enables printing of debug messages.
After that, the MQTT client will be launched, which will notify about new messages on the “Test topic” topic and print them.
Mosquitto_sub uses localhost and 1883 port by default. Use option -h to change the host and option -p to change the port.
mosquitto_sub -i mosq_sub1 -t "Test topic" -h localhost -p 1884 -dIf you use authentication to connect to the broker, specify a username and a password using -u and -P options:
mosquitto_sub -i mosq_sub1 -t "Test topic" -u <username> -P <password> -dPublish Messages with mosquitto_pub Windows
Mosquitto_pub is a simple MQTT client that publishes one message to a topic and exits.
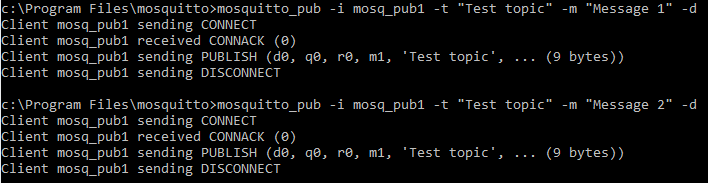
To publish a message, run the following command in a new cmd window:
mosquitto_pub -i mosq_pub1 -t "Test topic" -m "Test message" -dThis command uses the following options:
i– Client id. If this parameter is not passed, the server generates client ID automatically.t– Name of the topic to which the message is published.m– Text payload of the message to be published.d– Enables printing of debug messages.
Below is the output of the command.
By default, messages are sent to the broker at localhost, port 1883. To publish them to a different host, use the -h option. Use the -p parameter to connect to a different port.
mosquitto_pub -i mosq_pub1 -t "Test topic" -m "Test message" -h localhost -p 1884 -dTo specify a username and password for the user authentication, use -u and -P options:
mosquitto_pub -i mosq_pub1 -t "Test topic" -m "Test message" -u <username> -P <password> -dEnsure that the publish topic is the same as the topic you have previously subscribed to (-t “Test topic”). If you did everything correctly, you would see the published messages (“Test message”) in the window where you executed the mosquitto_sub command.
Uninstalling Mosquitto MQTT Server on Windows
If you want to uninstall the Mosquitto Windows service specifically and not the broker application itself, you first need to stop the service using the sc stop mosquitto command. Then run either sc delete mosquitto or mosquitto uninstall.
Otherwise, if you want to delete both service and the application, you can use the “Uninstall.exe” executable, which is located inside the installation folder. After running it, you need to delete the installation folder, and you are done.
To run Mosquitto Uninstall executable from cmd in silent mode, type the following into the Windows Command Prompt from inside the folder where Mosquitto is installed:
Uninstall.exe /STroubleshooting Mosquitto MQTT Server on Windows
Only one user is allowed per socket address
If you receive the error message “Normally only one user is allowed per socket address (protocol/network address/port),” you may already have another application running that is listening on port 1883.
Possible Solution
Run netstat -ano | findstr :1883 (or use a different port instead of 1883 if it was configured) command and check if the specified port is already in use by another program. The occupying process’s process id (PID) will be in the last column. You can copy it and then run taskkill /F /PID <PID> replacing the <PID> with the process id value from netstat. You may also free up the port in any other way after identifying which application occupies it. Then killing the process with taskkill is not necessary.
Can’t Connect to Mosquitto Broker with Local IP Address
When connecting to the Mosquitto broker using a local IP address other than localhost, a connect ECONNREFUSED error occurs.
Possible Solution
You need to edit the configuration file to listen to addresses other than localhost. Add the listener parameter and specify the port on which you want to listen for incoming network connections as well as the desired IP address/hostname:
listener 1883 192.168.1.100 You can specify a hostname instead of the IP address (192.168.1.100 in the example above). This listener option can also be specified multiple times to bind various addresses. If we omit it, Mosquitto will be listening on localhost.
Note that having at least one listener in your config file is always a good idea. This will help avoid some problems down the road.
Additionally, for troubleshooting purposes, you can allow anonymous connections from remote addresses with the following:
allow_anonymous trueHowever, it would be best to be careful with this option as it is not recommended to allow anyone to access the broker because of security considerations. We recommend using this option for testing purposes only.
If you are using the open-source version of Eclipse Mosquitto broker for a commercial project and need advice or help to solve a problem, we offer open-source Mosquitto support. This can help you quickly solve your problems, ensure your system’s stability and security, get quick access to new patches and fixes, and be the first to receive information about new releases.
Summary
In this article, we talked about the open-source MQTT Mosquitto Broker. We learned how to install Mosquitto Windows, configure, and test it. In addition, we considered the most common problems and their solutions when using the broker.
Let’s summarize the main points:
- Use the executable file for Mosquitto MQTT broker Windows installation.
- Add the installation folder to the PATH environment variable to make the ‘mosquitto’ command globally available from the command line.
- By default, Mosquitto will be installed as a Windows service, which can run in the background and automatically start on the operating system boot.
- To configure Mosquitto broker (including authentication settings, logging, etc.), use mosquitto.conf configuration file from the installation folder or provide your own.
- You can test Mosquitto using popular MQTT clients mosquitto_pub and mosquitto_sub, which are bundled into the installation.
About the author
Serhii Orlivskyi is a full-stack software developer at Cedalo GmbH. He previously worked in the Telekom industry and software startups, gaining experience in various areas such as web technologies, services, relational databases, billing systems, and eventually IoT.
While searching for new areas to explore, Serhii came across Cedalo and started as a Mosquitto Management Center developer. Over time, Serhii delved deeper into the MQTT protocol and the intricacies of managing IoT ecosystems.
Recognizing the immense potential of MQTT and IoT, he continues to expand his knowledge in this rapidly growing industry and contributes by writing and editing technical articles for Cedalo’s blog.
You can configure the mosquitto broker using a configuration file.
The default configuration file is called mosquitto.conf and it is used by the mosquitto broker when started as a Linux daemon or Windows service.
You will find the mosquitto.conf file in the /etc/mosquitto directory on Linux, and in the c:\mosquitto\ directory on Windows.
Note: the Windows install lets you choose the directory.
Important: In order for changes in the mosquitto.conf file to become effective you must restart the mosquitto broker.
However many changes can become effective without restarting the broker and are marked with the comment- Reloaded on reload signal in the manual.
MQTTv5 and MQTT v3.1.1
The mosquitto broker supports both client types and so some of the settings in the configuration file will only affect MQTTv5 clients.
Listeners
It is possible to configure a mosquitto broker to listen on several ports at the same time.
This is very useful if you want your broker to support multiple protocol configurations. The most common are:
- MQTT
- MQTT +SSL
- MQTT +Websockets
- MQTT + Websockets +SSL
The default configuration uses a default listener which listens on port 1883.
To configure the broker to listen on additional ports you need to create extra listeners.
If you look at the settings you will find that they are divided into sections and some of the settings affect the entire broker instance, whereas others affect a particular listener.
A major change introduced in version 1.5 allowed many configuration settings that were previously global to be made on a per listener basis.
However to maintain backward compatibility this option must first be enabled.
per_listener_settings [ true | false ]
Setting to true will affect the following configuration options.
password_file, acl_file, psk_file, allow_anonymous, allow_zero_length_clientid, auth_plugin, auth_opt_*, auto_id_prefix.
The most important is the ability to configure authentication and access control options on a per listener basis and not globally as was the case pre version 1.5.
IPv6
When you add a listener in the mosquitto.conf file mosquitto will listen on that port for IPV4 and IPv6 traffic.
you can select the IP version by using the socket_domain option
So
listener 1883
will listen for both IPV4 and IPv6 on port 1883 and
listener 1883
socket domain ipv6
will listen for only IPv6 on port 1883 and
listener 1883
socket domain ipv4
will listen for only IPv4 on port 1883
Default Settings
All settings have a default setting that is not set in the configuration file but is internal to mosquitto. Settings in the configuration file override these default settings.
Settings Notes
When consulting the Mosquitto.conf manual you will come across two important setting properties. They are:
- Global – This means that they apply to all listeners
- Reloaded on reload signal. – Changes can be implemented while mosquitto is running by using a reload.
Global Settings
These settings are global and generally reloaded on reload signal.
These include logging and file locations. Logging is covered in more detail in the Logging tutorial.
They also cover persistence settings which enable mosquitto to keep messages and status information, like retained messages, across restarts.
per_listener_settings [ true | false ]
allow_anonymous [ true | false ]
persistence [ true | false ]
persistence_file file name
persistence_location path
autosave_interval seconds
retain_available [ true | false ]
user username
The user option allows you to run Mosquitto as a different user (Linux) by default it runs as the use Mosquitto.
Message Restriction Settings
There are a number of messages restriction settings available.
These settings are global settings and affect all listeners. Important ones are:
max_packet_size value
message_size_limit limit -MQTT v5 clients
max_inflight_bytes count
max_inflight_messages count
max_queued_bytes count
max_queued_messages count
Authentication Settings
Allows users to connect without a password or enforces username/password authentication.
This can be configured on a per listener basis if per_listener_settings is true. The default is true provided no other security options are present. If for example a password_file or psk_file is set then it defaults to false.
allow_anonymous — [ true | false ]
Associated with the allow anonymous setting is the password file settings.
password_file file path
If allow anonymous is false then you need to create a password file and set the path to the file. This is covered in the using username/password authentication tutorial.
This can be set on a per listener basis and is reloaded on reload signal.
This means that you do not need to restart Mosquitto when you add new users to the password file.
TLS /SSL Support
Provided through certificates or pre shared keys (PSK) and is configurable on a per listener basis and doesn’t require the per_listener_settings to be configured.
This is covered in more detail in configuring SSL on Mosquitto
Access Control Restrictions
You can configure mosquitto to restrict access to clients using ACL (access control lists).
Access control list restrictions are set using the setting:
acl_file file path
and can be configured on a per listener basis if per_listener_settings is true.. They are reloaded on reload signal.
This means changes made to the access control lists can be applied without restarting the broker.
See Using and testing ACL restrictions in mosquitto for more details
Per Listener Settings
There are many settings that apply to listeners regardless of the if per_listener_settings setting.
Default Listener
This listens on port 1883 by default and doesn’t usually require configuration. However you can set the address the listener listens on using the bind_address setting and interface using the bind_interface setting (Linux only) and also the port number using the port setting.
If you configure the listener to use websockets using the protocol setting then you can also configure the broker to act as a simple http server and set the directory where the files are located using the http_dir setting.
Note: The manual doesn’t recommend using the default listener if you are configuring additional listeners.
The following is a list of other settings taken from the manual that should give you an idea of what can be configured.
bind_addressaddressbind_interfacedevicehttp_dirdirectorylistenerport[bind address/host]max_connectionscountmaximum_qoscountmax_topic_aliasnumber-MQTTv5 onlymount_pointtopic prefixportport numbersocket_domain[ ipv4 | ipv6 ]protocolvalue(MQTT or websockets)use_username_as_clientid[ true | false ]websockets_log_levellevelwebsockets_headers_sizesize
Bridge Settings
Mosquitto can be configured to act as a bridge so that it will rely messages to another broker there is an entire section that covers these settings.
Bridges can also be configured to use authentication and SSL.
You can find more details in configuring Mosquitto as a bridge tutorial
Starting Mosquitto – Notes
When starting mosquitto for the command line unless you specify a configuration file none is used. Therefore
mosquitto
mosquitto -v
and other similar commands start mosquitto without using a configuration file.
If you install mosquitto as a service on Windows then it starts using the mosquitto.conf.
The Linux install also configures the Mosquitto broker to start automatically using the mosquitto.conf file..
Important: When testing mosquitto you need to stop the mosquitto instance that has been started when the machine booted, and then start your own instance from the command line.
Editing The File Configuration File
When testing I would recommend you create a configuration file in your local folder and use that.
I don’t recommend that you copy the default mosquitto.conf file as it contains all possible settings which are commented out, and if you do make change to it it is difficult to locate them.
However It is very useful for documentation as it contains help for all of the settings.
You can use a normal text editor to edit the file.
If you do use it then put all of your settings at the top of the file, and use the commented out section as documentation.
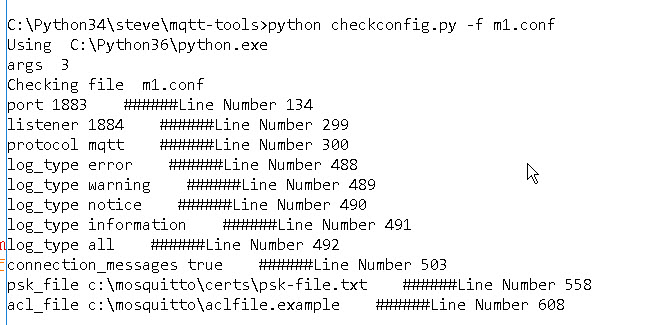
If you do edit the individual sections then I have created a simple Python script that will display only the un-commented settings from the file.
When you run it you will see something like the screen shot below
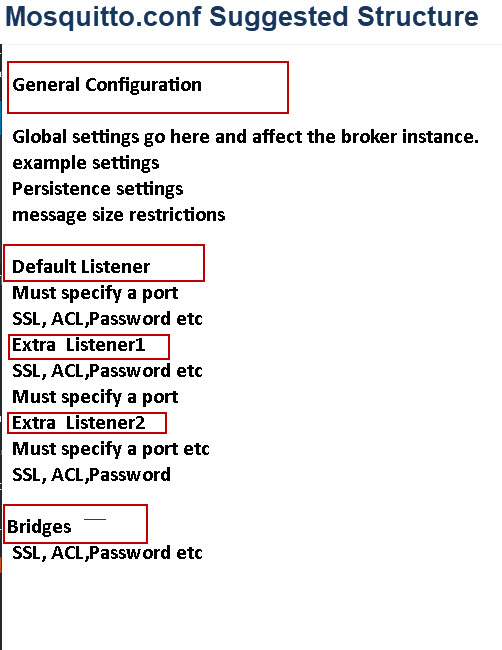
File Structure
There is no imposed structure although certain settings mus appear before others e.g you must specify the per_listener_settings setting before you create listeners.
The structure I use is shown in the sketch below:
Restarting Mosquitto or Reloading Config Files
If you update mosquitto configuration files you can restart mosquitto to pick up the changes.
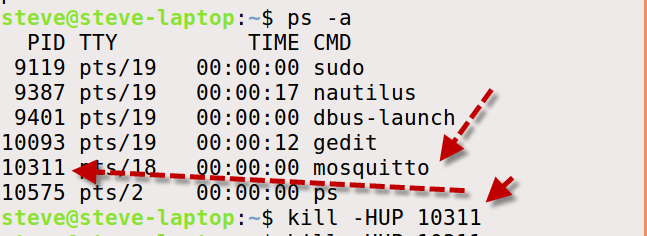
However on Linux you can also reload the configuration files without restarting the broker by sending the HUP signal as follows:
kill -HUP PID # where PID is the process ID as shown below:

If you look at the console it should show that the config files have been reloaded.

Important Note: Not all configuration file changes will be picked up on reload you will need to consult the manual
I have created a table showing the settings and what requires a restart that you can use as a quick reference.
Configurations Examples
The best way to understand how to use the configuration file is to see some examples. The following shows some typical configurations.
Note: I don’t include logging or persistence in these examples so as to keep them short and simple, but I do I my real files.
Mosquitto Broker Listening on Several Ports
The mosquitto broker can be configured to listen on several ports at the same time.
However this configuration doesn’t mean that you have virtual brokers. as most of the configuration is shared.
Example 1- Listen on ports 1883 and 1884
Section Default listener
port 1883
Section Extra listeners
listener 1884
Example 2- Listen on ports 1883 and 1884 without default listener
Section Default listener
Section Extra listeners
listener 1883
listener 1884
Example 3- Listen on ports 1883 and 8883 (SSL)
Section Default listener
port 1883
Section Extra listeners
listener 8883
Certificate based SSL/TLS support
(Windows)
cafile c:\mosquitto\certs\ca.crt
keyfile c:\mosquitto\certs\server.key
certfile c:\mosquitto\certs\server.crt
(Linux)
cafile /etc/mosquitto/certs/ca.crt
keyfile /etc/mosquitto/certs/server.key
certfile /etc/mosquitto/certs/server.crt
Example 4- Listen on ports 1883 and WebSockets (SSL)
Section Default listener
port 1883
Section Extra listeners
listener 9001
protocol websockets
Example 5- Listen on ports 1883 and 1884 with authentication
Notes:
Global
per_listener_settings true
Section Default listener
port 1883
Section Extra listeners
listener 1884
allow_anonymous false
password_file file path
Example 6 – Listen for IPV6 traffic only
listener 1883
socket domain ipv6
Example 7 – Listen on a particular IP address (ipv4 only)
listener 1883 192.168.1.23
#note this also disables ipv6
Example 8- Restrict number of connections on default listener to 1000
Global
max_connections 1000
Useful Linux Commands
To stop Mosquitto when running as a daemon:
ps -aux | grep mosquitto

pgrep mosquitto
sudo kill -9 PID (that you get from above command)
If you found this guide useful then perhaps you would like to Buy Me a Coffee
Resources:
- Mosquitto.conf Manual Page
- Mosquitto Change log shows what was changed in what version
Related Tutorials
- Mosquitto MQTT Bridge-Usage and Configuration
- Understanding and Configuring Logging – Mosquitto Broker Configuration
- Mosquitto SSL Configuration -MQTT TLS Security
- Configuring and Testing MQTT Topic Restrictions
- Mosquitto Username and Password Authentication -Configuration and Testing
- How to Install The Mosquitto MQTT Broker- Windows and Linux
Please rate? And use Comments to let me know more
The following installation instructions are for mosquitto MQTT, version 2.0.12 64-bit, in a Microsoft Windows environment. If you need to install a different version of MQTT software, consult the relevant installation instructions.
Contents
Installing the MQTT Broker
Configuring Usernames and Passwords
Prerequisites
Creating Encrypted Password File
Deleting Users from the Encrypted Password File
Configuring mosquitto.conf to Use the Encrypted Password File
Creating Self-Signed Certificate
Prerequisites
Installing OpenSSL and Setting up Environment Variables
Creating the Self-Signed Certificate and Keys
Create a Certificate Authority (CA) key pair
Create a CA certificate and use the ca.key to sign it
Create a server key pair for use by the broker
Create a broker certificate request
Use the CA certificate to sign the broker certificate request
Edit the mosquitto.conf file
Import a Self-Signed Certificate to a Windows Host
Unsecured connection
Related Links for Additional Information
Installing the MQTT Broker
To install the mosquitto MQTT Broker:
-
Download the mosquitto-2.0.12-install-windows-x64.exe file from https://mosquitto.org/download/.
-
Go to the directory where you downloaded the file. Double-click mosquitto-2.0.12-install-windows-x64.msi.
-
Follow the Eclipse Mosquitto Setup wizard prompts and accept all defaults.
-
If Microsoft Visual C++ is not installed, it will be installed for you as part of the mosquitto installation. Click Accept to accept the license terms, and then click Install.
-
In your desktop, open the Microsoft Services application. Check to see that “Mosquitto Broker” is in “Running” Status with “Automatic” Startup type. If Status is empty, click Start. The mosquitto Broker will automatically start after every system reboot.


Configuring Usernames and Passwords
The following instructions and examples are for the mosquitto MQTT Broker on a Microsoft Windows, 64-bit platform. Other MQTT brokers will have different instructions, configuration, importing credentials, and so forth.
Prerequisites
-
The device must have firmware version 2.29x or newer.
- Microsoft Windows 64-bit operating system
Creating Encrypted Password File
In the FAI Lite scenario, both the devices and the Agent are the clients of the broker. Therefore, the Agent and each device needs its own username and password. Do the following steps:
-
In the C:\etc folder, create a simple text file with each user’s username and password, one for each line. Separate the username and password with a colon as shown below:
-
Configure the credentials for your devices by using the AyyekaGo mobile app.
-
For every device, do the following steps:
-
-
-
-
Click Cellular Settings > MQTT SERVER ADDRESS.
-
In the MQTT Server Address window, type in the username and password of the device that will connect to the MQTT Broker.
-
-
b. Click My Devices, and then click the Export icon. A list of devices is shown.
c. Click EXPORT. Select which app to use for export. For example, you might use Gmail to send the export file to yourself.
d. In the MQTT Broker platform, open the export file, and then copy the usernames and passwords as described in step 1 into the password file.
3. Update the password file as needed.
-
- Encrypt the entire password file. Go to the directory where mosquitto was installed (by default, C:\Program Files\mosquitto).
Command: mosquitto_passwd.exe -U name_of_passwordfile
Notice that all passwords are now encrypted.
-
- Encrypt the password of only the first user.
Command: mosquitto_passwd.exe -c name_of_passwordfile the_first_user
In our example, the_first_user is steve.
You will be prompted to enter a password for the_first_user.
Note: The password that you type in is not echoed, so it looks like it is not being accepted — but it is.
-
- After adding the first user and password, you can add additional users.
Command: mosquitto_passwd -b name_of_passwordfile the_next_user password
4. After updating the password file, restart the MQTT broker by using the Microsoft Windows Services application.
Deleting Users from the Encrypted Password File
If needed, you can remove individual users from the password file.
Command: mosquitto_passwd -D name_of_passwordfile user_to_be_deleted
Configuring mosquitto.conf to Use the Encrypted Password File
You must configure mosquitto.conf file to use the encrypted password file. Do the following steps:
-
Copy the password file into a separate folder. For example, copy the file into C:\etc\mosquitto\.
If you use a different directory, ensure that there are no spaces in the directory path, such as in C:\Program Files\mosquitto\passwordfile”.
2. Edit the mosquitto.conf file to use the password file. Do the following steps:
-
- Set allow_anonymous to false
- Set the password_file path
The password file must not have an extension, such as “.txt”.
For example:
allow_anonymous false
password_file C:/etc/passwordfile
3. Edit the mosquitto.conf file for communication. Do the following steps, as needed:
Note: mosquitto v1.5 authentication is no longer a global setting. It can be configured on a per listener basis. You must enable the per_listener_settings setting.
Examples:
The configuration in mosquitto.conf for only secure communication will be:
#### It is recommended to have secure communication, so the listener is set to 8883
listener 8883
allow_anonymous false
password_file C:/etc/passwordfile
###
Note: If you set listener to 8883, you must embed the certificates. See Edit the mosquitto.conf file below for an example.
4. After updating the configuration or the password file, restart the mosquitto Broker service by using the Microsoft Windows Services application.
For additional information about configuring the password file, see http://www.steves-internet-guide.com/mqtt-username-password-example/
It is recommended that you use the enterprise’s signed certificate. Consult your IT department for instructions about how to use it. In this case, you can now go directly to the Edit the mosquitto.conf file section below.
Alternatively, you can create a self-signed certificate and use that for verification. In this case, continue to the «Creating Self-Signed Certificate” section below.
Creating Self-Signed Certificate
Prerequisites
-
Microsoft Windows 64-bit operating system
-
Microsoft Visual C++
Installing OpenSSL and Setting up Environment Variables
Before you create the self-signed certificate, you must install OpenSSL and set up environment variables. Do the following steps:
-
Download OpenSSL. Use the version for Win64 rather than the Lite version.
-
Run the OpenSSL Installer.
If Microsoft Visual C++ is not installed, the installer will download and install it for you. Run the OpenSSL Installer again and follow the wizard steps.
3. Set up system environment variables.
The environment variables must be set so that OpenSSL functions properly on your system. You need to set OPENSSL_CONF and Path environment variables. Do either of the following steps:
-
-
To set environment variables for the current session only, do the following commands at the command line prompt:
-
set OPENSSL_CONF=C:\Program Files\OpenSSL-Win64\bin\openssl.cfg
-
set Path=%Path%;C:\Program Files\OpenSSL-Win64\bin
-
-
To set environment variables permanently, do the following commands:
-
-
-
-
In the system tray, press the Search icon, and then type in environment.
-
Select Edit the system environment variables. The System Properties window opens.
-
Click the Advanced tab, and then click Environment Variables.
-
In the System variables section, click New.
-
In the New System Variable window, set the following variables:
-
-
-
-
-
-
set OPENSSL_CONF to be C:\Program Files\OpenSSL-Win64\bin\openssl.cfg
-
Set Path to be C:\Program Files\OpenSSL-Win64\bin
-
-
-
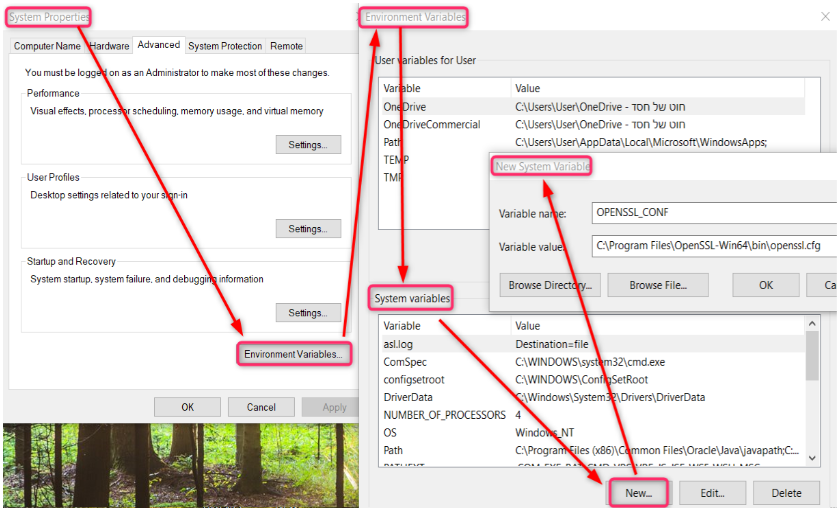
4. Click OK to close the New System Variable window, and then click OK to close the Environment Variables window.
5. Click OK to close the System Properties window.
Note: The changes that you made will take effect only when the window closes, and you open a new command prompt.
Creating the Self-Signed Certificate and Keys
Create the self-signed certificate and keys by doing the following steps at the command line prompt:
Please note that the self-signed certificate files will be created in the folder where the openssl commands will be run from.
- Create a Certificate Authority (CA) key pair.
Command: openssl genrsa -des3 -out ca.key 2048
Generating RSA private key, 2048-bit long modulus (2 primes)
....................................................................................+++
......................+++++
e is 65537 (0x010001)
Enter pass phrase for ca.key:
Verifying - Enter pass phrase for ca.key:
The purpose of the pass phrase is to encrypt the private key. To use an encrypted key, the pass phrase is also needed. In a way, they are two separate factors of authentication. Tip: Write down the pass phrase (pay attention to case) because you will need it when you sign the ca.crt and server.crt certificates.
-
Create a CA certificate and use the ca.key to sign it.
Command: openssl req -new -x509 -days 1826 -key ca.key -out ca.crt
Enter pass phrase for ca.key:
You are about to be asked to enter information that will be incorporated into your
certificate request.
What you are about to enter is what is called a Distinguished Name or a DN.
There are quite a few fields, but you can leave some blank
For some fields there will be a default value,
If you enter '.', the field will be left blank.
Country Name (2 letter code) [AU]:US
State or Province Name (full name) [Some-State]: California
Locality Name (e.g., city) []: San Diego
Organization Name (e.g., company) [Internet Widgets Pty Ltd]: Widgets
Organizational Unit Name (e.g., section) []: RND
Common Name (e.g., server FQDN or YOUR name) []: Widgets
Email Address []:
The directory now has the following files:
08/17/2021 11:51 AM 1,348 ca.crt
08/17/2021 11:50 AM 1,773 ca.key
-
Create a server key pair for use by the broker.
Command: openssl genrsa -out server.key 2048
Generating RSA private key, 2048-bit long modulus (2 primes)
..................................................................................+++++
................+++++
e is 65537 (0x010001)
The directory now has the following files:
08/17/2021 11:51 AM 1,348 ca.crt
08/17/2021 11:50 AM 1,773 ca.key
08/17/2021 11:52 AM 1,702 server.key
-
Create a broker certificate request.
When filling out the form, the Common Name is important and is usually the full domain name of the server, the IP address, or the Microsoft Windows name of the computer that is running the mosquitto broker. You must use the same name when configuring the client connection.
Command: openssl req -new -out server.csr -key server.key
You are about to be asked to enter information that will be incorporated
into your certificate request.
What you are about to enter is what is called a Distinguished Name or a DN.
There are quite a few fields, but you can leave some blank
For some fields there will be a default value,
If you enter '.', the field will be left blank.-------
Country Name (2 letter code) [AU]:US
State or Province Name (full name) [Some-State]:California
Locality Name (e.g., city) []: San Diego
Organization Name (e.g., company) [Internet Widgets Pty Ltd]:Widgets
Organizational Unit Name (e.g., section) []:RND
Common Name (e.g., server FQDN or YOUR name) []:54.72.180.67
Email Address []:
Please enter the following 'extra' attributes to be sent with your certificate request
A challenge password []:widget
An optional company name []:widget -
Use the CA certificate to sign the broker certificate request.
Use the CA key to verify and sign the server certificate. This step creates the server.crt file.
Command: openssl x509 -req -in server.csr -CA ca.crt -CAkey ca.key -CAcreateserial -out server.crt -days 360
Signature ok
subject=C = US, ST = California, L = San Diego, O = widgets, OU = RND,
CN = 54.72.180.67
Getting CA Private Key
Enter pass phrase for ca.key:
Note: If you get the message:
unable to load CA Private Key
13592:error:06065064:digital envelope routines:EVP_DecryptFinal_ex:bad decrypt:crypto\evp\evp_enc.c:610:13592:error:0906A065:PEM routines:PEM_do_header:bad decrypt:crypto\pem\pem_lib.c:461:It means that you did not enter the pass phrase for ca.key correctly. Run the openssl command again, and then type in the correct pass phrase.
The directory now has the following files:
08/17/2021 11:54 AM 1,364 ca.crt
08/17/2021 11:53 AM 1,781 ca.key
08/17/2021 11:55 AM 42 ca.srl
08/17/2021 11:55 AM 1,240 server.crt
08/17/2021 11:55 AM 1,088 server.csr
08/17/2021 11:54 AM 1,702 server.key
Edit the mosquitto.conf File
1. Edit the configuration file to use the following parameters and their values:
per_listener_settings true
listener 8883allow_anonymous false
password_file c:\Users\...\Certificates\passtest.txtprotocol mqtt
certfile c:\Users\...\Certificates\server.crtkeyfile c:\Users\...\Certificates\server.key
require_certificate false
cafile c:\Users\...\Certificates\ca.crt
use_identity_as_username false
log_dest file c:\mosquitto\mosquitto.log
log_type error
log_type warning
log_type notice
log_type information
# the following setting should be added manually after the logs settings
log_type allconnection_messages true
# the following seeing must added at the end of the file
tls_version tlsv1.2
2. After updating the mosquitto.conf file, restart the MQTT broker through the Microsoft Windows Services application. For details about parameters and syntax in the mosquitto.conf file, see mosquitto.conf man page.
Import a Self-Signed Certificate to a Windows Host
If you defined the listener in the mosquitto.conf file for unsecured communication, skip this step.
If the listener uses secure communication, you must add the self-signed certificate (ca.crt) to the Windows repository. Do the following steps:
-
On your Windows desktop, click Start > Run > MMC. The Microsoft Management Console opens.
-
Click File, and then select Add / Remove Snap In.
-
From the list of available snap-ins, select Certificates, and then click Add.
-
In the Certificates snap-in window, select Computer Account, and then click Next.
-
In the Select Computer window, select Local Computer, and then click Finish.
-
Click OK to exit the Snap-In window.
-
Click [+] next to Certificates > Trusted Root Certification Authorities.

8. Right-click Certificates, and then select All Tasks > Import. The Certificate Import Wizard window opens. Follow the wizard prompts. The self-signed certificate is now trusted by all users.
If you see the following error from self-signed certificates in the log:
2021-09-09 15:24:40.252 +03:00 [WRN] MQTT: TLS certificate has policy errors. RevocationStatusUnknown: The revocation function was unable to check revocation for the certificate.
2021-09-09 15:24:40.252 +03:00 [WRN] MQTT: Verify the certificate or ignore by changing the IgnoreCertificateRevocationErrors setting
The Agent will not work until you change the Ignore Certificate Revocation Errors check box in the Agent’s configuration file or the UI.
Unsecured Connection
If you need it, you can set the mosquitto.config file to have an unsecured connection
We recommend avoiding this kind of configuration.
The configuration in mosquitto.conf for only non-secure communication will be:
###
per_listener_settings true
# In non-secure communication, the listener is set to 1883
listener 1883
allow_anonymous false
password_file C:/.../passwordfile.txt
###
Related Links for Additional Information
-
http://www.steves-internet-guide.com/mosquitto-tls/
-
https://mosquitto.org/man/mosquitto-tls-7.html
-
http://richardn.ca/2017/06/07/mosquitto-on-windows/
-
https://mosquitto.org/documentation/authentication-methods/
-
https://mosquitto.org/man/mosquitto-conf-5.html
Обновлено: 20 января 2024 г. Автор: steve
Краткое руководство по файлу Mosquitto.conf с примерами
Вы можете настроить брокер Mosquitto с помощью файла конфигурации.
Файл конфигурации по умолчанию называется mosquitto.conf и используется брокером mosquitto при запуске в качестве демона Linux или службы Windows.
Файл mosquitto.conf находится в каталоге /etc/mosquitto в Linux и в каталоге c:\mosquitto\ в Windows.
Примечание: установщик Windows позволяет вам выбрать каталог.
Важно: чтобы изменения в файле mosquitto.conf вступили в силу, необходимо перезапустить брокер mosquitto.
Однако многие изменения могут вступить в силу без перезапуска брокера и отмечены в руководстве комментарием « Перезагружено по сигналу перезагрузки» .
MQTTv5 и MQTT v3.1.1
Брокер Mosquitto поддерживает оба типа клиентов, поэтому некоторые настройки в файле конфигурации будут влиять только на клиентов MQTTv5.
Слушатели
Можно настроить брокер Mosquitto для прослушивания нескольких портов одновременно.
Это очень полезно, если вы хотите, чтобы ваш брокер поддерживал несколько конфигураций протоколов. Наиболее распространенными являются:
- MQTT
- MQTT+SSL
- MQTT +Вебсокеты
- MQTT + Веб-сокеты + SSL
В конфигурации по умолчанию используется прослушиватель по умолчанию, который прослушивает порт 1883.
Чтобы настроить брокер на прослушивание дополнительных портов, необходимо создать дополнительных прослушивателей .
Если вы посмотрите на настройки, то увидите, что они разделены на разделы, и некоторые из них влияют на весь экземпляр брокера , тогда как другие влияют на конкретного слушателя.
Значительное изменение, внесенное в версию 1.5, позволило сделать многие параметры конфигурации, которые ранее были глобальными, индивидуальными для каждого слушателя .
Однако для сохранения обратной совместимости эту опцию необходимо сначала включить.
per_listener_settings [ правда | ложь ]
Установка значения true повлияет на следующие параметры конфигурации.
файл_пароля, файл_acl, файл_psk, allow_anonymous, allow_zero_length_clientid, плагин_auth, auth_opt_*, префикс_автоид_идентификатора.
Наиболее важной является возможность настраивать параметры аутентификации и контроля доступа для каждого слушателя, а не глобально, как это было до версии 1.5.
IPv6
При добавлении прослушивателя в файл mosquitto.conf mosquitto будет прослушивать этот порт на предмет трафика IPV4 и IPv6.
Вы можете выбрать версию IP с помощью параметра socket_domain.
Так
слушатель 1883
будет прослушивать как IPV4, так и IPv6 на порту 1883 и
прослушиватель
домена сокета 1883 ipv6
будет прослушивать только IPv6 на порту 1883 и
прослушиватель
домена сокета 1883 ipv6
будет прослушивать только IPv4 на порту 1883
Настройки по умолчанию
Все настройки имеют настройки по умолчанию, которые не установлены в файле конфигурации, но являются внутренними для mosquitto. Настройки в файле конфигурации переопределяют эти настройки по умолчанию.
Настройки Примечания
При обращении к руководству Mosquitto.conf вы столкнетесь с двумя важными свойствами настройки. Это:
- Глобально – это означает, что они применяются ко всем слушателям.
- Перезагрузка по сигналу перезагрузки . – Изменения могут быть реализованы во время работы Mosquitto с помощью перезагрузки.
Глобальные настройки
Эти настройки являются глобальными и обычно перезагружаются по сигналу перезагрузки .
К ним относятся ведение журнала и расположение файлов. Ведение журнала более подробно рассматривается в руководстве по ведению журнала .
Они также охватывают параметры сохранения , которые позволяют Mosquitto сохранять сообщения и информацию о состоянии, например сохраненные сообщения, при перезапусках.
per_listener_settings[ правда | ложь ]
allow_anonymous[ правда | ложь ]
persistence[ правда | ложь ] [ правда | ложь ]
persistence_file file name
persistence_location path
autosave_interval seconds
retain_available
user username
Параметр «Пользователь» позволяет запускать Mosquitto от имени другого пользователя (Linux). По умолчанию он запускается от имени пользователя Mosquitto.
Настройки ограничения сообщений
Доступен ряд настроек ограничения сообщений.
Эти настройки являются глобальными и влияют на всех слушателей. Важными являются:
max_packet_size value
message_size_limit limit-Клиенты MQTT v5
max_inflight_bytes count
max_inflight_messages count
max_queued_bytes count
max_queued_messages count
Настройки аутентификации
Позволяет пользователям подключаться без пароля или принудительно устанавливает аутентификацию по имени пользователя и паролю.
Это можно настроить для каждого слушателя, если per_listener_settings имеет значение true. Значение по умолчанию — true, если нет других параметров безопасности. Если, например, заданы password_file или psk_file, то по умолчанию оно равно false.
allow_anonymous— [ правда | ложь ]
С настройкой разрешения анонимного доступа связаны настройки файла паролей.
password_file file path
Если allow anonymous равно false, то вам нужно создать файл паролей и указать путь к файлу. Это рассматривается в руководстве по использованию аутентификации имени пользователя/пароля .
Его можно настроить для каждого слушателя отдельно и перезагрузить по сигналу перезагрузки .
Это означает, что вам не нужно перезапускать Mosquitto при добавлении новых пользователей в файл паролей.
Поддержка TLS/SSL
Предоставляется посредством сертификатов или предварительных общих ключей (PSK) и настраивается для каждого слушателя отдельно, не требуя настройки per_listener_settings .
Более подробно это описано в разделе Настройка SSL на Mosquitto.
Ограничения контроля доступа
Вы можете настроить Mosquitto для ограничения доступа клиентов с помощью ACL (списков контроля доступа).
Ограничения списка контроля доступа задаются с помощью настройки:
acl_file file path
и могут быть настроены для каждого слушателя отдельно, если per_listener_settings имеет значение true. Они перезагружаются по сигналу перезагрузки.
Это означает, что изменения, внесенные в списки контроля доступа, можно применять без перезапуска брокера.
Более подробную информацию см. в разделе Использование и тестирование ограничений ACL в Mosquitto.
Настройки для каждого слушателя
Существует множество настроек, которые применяются к слушателям независимо от настройки per_listener_settings .
Прослушиватель по умолчанию
По умолчанию прослушивается порт 1883 , и обычно не требует настройки. Однако вы можете задать адрес, который прослушиватель прослушивает, с помощью настройки bind_address и интерфейс с помощью настройки bind_interface (только для Linux), а также номер порта с помощью настройки port .
Если вы настроите прослушиватель на использование веб-сокетов с помощью настройки протокола, то вы также можете настроить брокера так, чтобы он работал как простой http-сервер, и задать каталог, в котором будут находиться файлы, с помощью настройки http_dir .
Примечание: в руководстве не рекомендуется использовать прослушиватель по умолчанию, если вы настраиваете дополнительные прослушиватели.
Ниже приведен список других настроек, взятых из руководства, который должен дать вам представление о том, что можно настроить.
- bind_address address
- bind_interface device
- http_dir directory
- listener port [bind address/host]
- max_connections count
- maximum_qos count
- max_topic_alias number— только MQTTv5
- mount_point topic prefix
- port port number
- socket_domain[ ipv4 | ipv6 ]
- protocol value(MQTT или веб-сокеты)
- use_username_as_clientid[ правда | ложь ]
- websockets_log_level level
- websockets_headers_size size
Настройки моста
Mosquitto можно настроить так, чтобы он работал как мост, и тогда он будет передавать сообщения другому брокеру. Для этого существует целый раздел, посвященный этим настройкам.
Мосты также можно настроить на использование аутентификации и SSL.
Более подробную информацию можно найти в руководстве по настройке Mosquitto в качестве моста .
Запуск Mosquitto – Заметки
При запуске mosquitto для командной строки, если вы не укажете файл конфигурации, ни один не используется. Поэтому
комар комар
-v
и другие подобные команды запускают mosquitto без использования файла конфигурации.
Если вы устанавливаете mosquitto как службу в Windows, то она начинает использовать mosquitto.conf .
Установка Linux также настраивает брокер Mosquitto на автоматический запуск с использованием файла mosquitto.conf .
Важно: при тестировании mosquitto вам необходимо остановить экземпляр mosquitto, запущенный при загрузке компьютера, а затем запустить свой собственный экземпляр из командной строки.
Редактирование файла конфигурации
При тестировании я бы рекомендовал вам создать файл конфигурации в локальной папке и использовать его.
Я не рекомендую вам копировать файл mosquitto.conf по умолчанию , так как он содержит все возможные настройки, которые закомментированы, и если вы внесете в него изменения, их будет сложно найти.
Однако он очень полезен для документирования, поскольку содержит справку по всем настройкам.
Для редактирования файла можно использовать обычный текстовый редактор.
Если вы его используете, то поместите все свои настройки в начало файла и используйте закомментированный раздел в качестве документации.
Если вы редактируете отдельные разделы, то я создал простой скрипт на Python, который отобразит только незакомментированные настройки из файла.
Когда вы запустите его, вы увидите что-то похожее на снимок экрана ниже.

Структура файла
Не существует навязанной структуры, хотя некоторые настройки должны отображаться раньше других, например, необходимо указать настройку per_listener_settings до создания слушателей.
Структура, которую я использую, показана на рисунке ниже:

Перезапуск Mosquitto или перезагрузка файлов конфигурации
Если вы обновите файлы конфигурации Mosquitto, вы можете перезапустить Mosquitto, чтобы изменения вступили в силу.
Однако в Linux вы также можете перезагрузить файлы конфигурации без перезапуска брокера, отправив сигнал HUP следующим образом:
kill -HUP PID # где PID — это идентификатор процесса, как показано ниже:
Если вы посмотрите на консоль, то увидите, что файлы конфигурации были перезагружены.

Важное примечание: не все изменения в файле конфигурации будут учтены при перезагрузке, вам необходимо обратиться к руководству.
Я создал таблицу, в которой показаны настройки и условия, требующие перезагрузки, которую вы можете использовать в качестве краткого справочника.
Примеры конфигураций
Лучший способ понять, как использовать файл конфигурации, — это посмотреть несколько примеров. Ниже показаны некоторые типичные конфигурации.
Примечание: я не включаю в эти примеры протоколирование или сохранение, чтобы сделать их краткими и простыми, но я делаю это в своих реальных файлах.
Mosquitto Broker прослушивает несколько портов
Брокер Mosquitto можно настроить на прослушивание нескольких портов одновременно.
Однако эта конфигурация не означает, что у вас есть виртуальные брокеры , поскольку большая часть конфигурации является общей.
Пример 1. Прослушивание портов 1883 и 1884.
Раздел Прослушиватель по умолчанию
порт 1883
Раздел Дополнительные слушатели
слушатель 1884
Пример 2. Прослушивание портов 1883 и 1884 без прослушивателя по умолчанию
Раздел Прослушиватель по умолчанию
Раздел Дополнительные слушатели
слушатель 1883
слушатель 1884
Пример 3. Прослушивание портов 1883 и 8883 (SSL)
Раздел Прослушиватель по умолчанию
порт 1883
Раздел Дополнительные слушатели
слушатель 8883
Поддержка SSL/TLS на основе сертификатов
( Windows )
cafile c:\mosquitto\certs\ca.crt
keyfile c:\mosquitto\certs\server.key
certfile c:\mosquitto\certs\server.crt
( Линукс )
cafile /etc/mosquitto/certs/ca.crt
keyfile /etc/mosquitto/certs/server.key
certfile /etc/mosquitto/certs/server.crt
Example 4- Listen on ports 1883 and WebSockets (SSL)
Section Default listener
port 1883
Section Extra listeners
listener 9001
protocol websockets
Example 5- Listen on ports 1883 and 1884 with authentication
Notes:
Global
per_listener_settings true
Section Default listener
port 1883
Section Extra listeners
listener 1884
allow_anonymous false
password_file file path
Example 6 – Listen for IPV6 traffic only
listener 1883
socket domain ipv6
Example 7 – Listen on a particular IP address (ipv4 only)
listener 1883 192.168.1.23
#note this also disables ipv6
Example 8- Restrict number of connections on default listener to 1000
Global
max_connections 1000
Useful Linux Commands
To stop Mosquitto when running as a daemon:
ps -aux | grep mosquitto

pgrep mosquitto
sudo kill -9 PID (that you get from above command)
If you found this guide useful then perhaps you would like to Buy Me a Coffee
Resources:
- Mosquitto.conf Manual Page
- Mosquitto Change log shows what was changed in what version
Related Tutorials
- Mosquitto MQTT Bridge-Usage and Configuration
- Understanding and Configuring Logging – Mosquitto Broker Configuration
- Mosquitto SSL Configuration -MQTT TLS Security
- Configuring and Testing MQTT Topic Restrictions
- Mosquitto Username and Password Authentication -Configuration and Testing
- How to Install The Mosquitto MQTT Broker- Windows and Linux
Please rate? And use Comments to let me know more
M osquitto
mosquitto.conf
78 comments
- Andy Jones says:
- steve says:
- Andy Jones says:
- R.G. says:
- steve says:
- R.G. says:
- Стив говорит:
- Пол Кларк говорит:
- Стив говорит:
- секо говорит:
- Стив говорит:
- секо говорит:
- Хеман говорит:
- Стив говорит:
- Хеман говорит:
- steve says:
- Heman says:
- Givi Soltani says:
- steve says:
- Givi Soltani says:
- steve says:
- juergen says:
- Стив говорит:
- Райхардт говорит:
- Стив говорит:
- Райхардт говорит:
- Стив говорит:
- импван говорит:
- Стив говорит:
- Фредерик Ван де Стене говорит:
- Фредерик Ван де Стене говорит:
- Стив говорит:
- Фредерик Ван де Стене говорит:
- Фредерик Ван де Стене говорит:
- Стив говорит:
- Марк говорит:
- Стив говорит:
- Padir1 говорит:
- Стив говорит:
- Джонни Грэм говорит:
- Edd says:
- Juergen Grete says:
- sun says:
- steve says:
- sun says:
- steve says:
- sun says:
- Ian Stewart says:
- steve says:
- Ian says:
- Ian Stewart says:
- Стейси говорит:
- Стив говорит:
- Киран Шетти говорит:
- Стив говорит:
- Винч говорит:
- Стив говорит:
- Сайчаран говорит:
- Стив говорит:
- Сафир ТажаПаданнаил говорит:
- Стив говорит:
- Барри Лафт говорит:
- Стив говорит:
- Мартин говорит:
- Vijay says:
- steve says:
- Anil says:
- Стив говорит:
- Аргья говорит:
- Стив говорит:
- Леон говорит:
- Стив говорит:
- Тинг говорит:
- Стив говорит:
- Остин говорит:
- Стив говорит:
- unnakb говорит:
October 22, 2024 at 9:56 am
Hi Steve
just a follow up to my previous comment, one of those where 5 minutes after hitting send you figure it out. Turns out I had per_listener_settings set to true but forgot to set each listener up with authentication and password !!
this seems to work Ok
listener 1883
allow_anonymous false
password_file C:\Program Files\mosquitto\UserList.txt
listener 1884
allow_anonymous false
password_file C:\Program Files\mosquitto\UserList.txt
Thanks again for a great and extremely website.
Reply
October 22, 2024 at 12:20 pm
Andy
Glad you found the problem.
Rgds
Steve
Reply
October 22, 2024 at 9:18 am
Hi Steve
Thanks for all your help in this fantastic website, I would never have been able to get as far as I have without it!!
I have come across something I haven’t been able to resolve and I know you touched on something similar in one of you’re previous responses, but I still cant resolve my own issue.
I am struggling to add multiple listeners e.g.
listener 1883
listener 1884
It only seems to allow one listening port, that port being the last one in the list, so in this case it would be 1884. If I swapped the order to
listener 1884
listener 1883
It would only monitor on 1883, but I can’t get it to monitor both..
I can use
listener 1883
port 1884
which will monitor both ports, but again if I add more, only one last listener or the last port is used?
I’m just wondering if I am misunderstanding how this part works? In summary I thought I’d be able to just add a list of specific listeners to the config and all the ones on the list would be monitored.
Many thanks
note I’m using mosquitto version 2.0.18 under Windows.
Reply
May 14, 2024 at 1:21 am
After having mosquitto running on a Raspberry Pi, I’m trying to get it going on a Ubuntu machine. I ran into an issue that I can’t find any data on.
A config file made with “sudo nano /etc/mosquitto/yada-yada-yada…” fails with an error reading the config file stating that “#” on line one – that is, the first character – is an invalid configuration variable. After much thrashing around, I used the file command to find out that the config file is in UTF-8 with BOM (byte order marker) bytes first. Using iconv to change the character encoding to UTF-8 without the BOM gets rid of the error.
So character encoding may matter.
Now I’m digging through why sudo mosquitto -c /etc/mosquitto/conf.d/yada-yada-yada just starts, but never writes back any of the verbose stuff. I don’t know if that’s an encoding issue or something else. I hope this may help someone.
Reply
May 14, 2024 at 9:50 am
Hi
What is in your config file?
rgds
steve
Reply
May 14, 2024 at 11:08 pm
Я увлекся удалением пустых строк и комментариев, чтобы файл конфигурации было легче читать, подумал: «Эй, я не пытался…» и провел следующие несколько часов, следуя запутанным кроличьим следам.
Я знаю приблизительную область, почему это не работает, но не точно. Это проблема с правами доступа, и я проследил путь назад по различным файлам, пользователям и правам доступа и теперь что-то работает. Но я все еще не могу заставить его работать с включенным сохранением и ведением журнала таким образом, который соответствует моему прочтению руководства по настройке mosquitto.
Все, что мне удалось сделать, это создать нового пользователя «mqtt-user» для резервного пользователя из sudo start, вместе с необходимым домашним каталогом. Если я правильно прочитал, пользователь, которого я пытался использовать («mosquitto»), работает только на локальном хосте; поэтому я изменил пользователей.
По-прежнему нет функции, и файл mosquitto.log показал невозможность записи pid-файлов и mosquitto.db. Часы возни с chmod, chown, chgrp и т. д. не дали никаких результатов с файлами в /var/(что угодно), несмотря на установку каталогов /var/*/mosquito в rwxrwxrwx. Я до сих пор не понимаю, почему.
Помещение файлов .db, .pid и .log в домашний каталог mqtt-user наконец позволило запустить эту штуку из команды:
sudo mosquitto -c /etc/mosquitto/mosquitto.conf -v
Ваш комментарий верен – многие проблемы с усыновителями связаны с правами доступа.
Отвечать
15 мая 2024 г. в 7:52 утра
В документации расположения постоянных данных и журналов предполагают, что mosquitto запускается как пользователь mosquitto, поскольку разрешения устанавливаются для этого пользователя при установке.
При тестировании я помещаю все свои файлы в свою тестовую папку и запускаю mosquitto как свой пользователь.
Если вы хотите использовать расположения из документации для pid, данных о постоянстве и журналов, то вам нужно запустить mosquitto как пользователь mosquitto, указав пользователя в команде.
sudo -u москит москит myconfig.conf
Вам может быть полезно это
http://www.steves-internet-guide.com/tips-for-testing-the-mosquitto-broker-on-linux/
С уважением,
Стив
Отвечать
30 января 2024 г. в 14:11
Привет, Стив.
Большое спасибо за то, что уделили время созданию этого сайта. У меня есть вопрос, на который я не смог найти ответа. Я радиолюбитель, и у меня есть 2 сети с ячейками, одна на 433 МГц и одна на 868 МГц. Я хочу, чтобы узлы на ячейке 433 видели узлы на ячейке 868 и передавали сообщения между двумя ячейками и наоборот. У
меня есть сервер MQTT mosqitto, и обе ячейки подписаны на одну и ту же тему «relay», но режимы и сообщения на одной ячейке не отображаются на другой. Есть какие-нибудь предложения?
Отвечать
30 января 2024 г. в 14:22
Используете ли вы файл конфигурации по умолчанию, если да, то смотрите примечание в верхней части этой статьи
http://www.steves-internet-guide.com/mosquitto-broker/
Если это не так, можете ли вы публиковать и подписываться на одной сетке и видеть сообщения?
С уважением,
Стив
Отвечать
6 июля 2023 г. в 1:17 дня
Привет, Стив. Спасибо за твою замечательную работу над этим сайтом, я многому у тебя научился.
Я разработал проект IoT, для которого мне приходится использовать очень ненадежное интернет-соединение на периферийном устройстве. У меня есть брокер MQTT, работающий на сервере, и я слушаю его с помощью своего скрипта Python. Я разделяю свои данные на фрагменты по 1024 байта, и у меня в среднем получается 20 фрагментов на каждое пробуждение.
Однако, когда я теряю соединение на периферийном устройстве во время публикации фрагментов, даже если оно подключается обратно через 5-6 секунд, я сталкиваюсь со странной проблемой: в python моя полезная нагрузка «on_connect» срабатывает, но нет сообщения по теме, на которую я подписан. Это невозможно, потому что у меня есть только одна тема, в которую я публикую сообщения.
Я не смог найти, что изменить в конфигурации, чтобы установить таймер или реализовать какой-то алгоритм для восстановления фрагментов, если это необходимо. Можете ли вы мне помочь в этом?
Отвечать
6 июля 2023 г. в 13:22
Привет,
это издатель дает сбой при отправке?
С уважением,
Стив
Отвечать
6 июля 2023 г. в 14:25
Во-первых, извините. Часть, где я сказал: «В python моя полезная нагрузка «on_connect» срабатывает, но сообщения по теме нет», неверна. Я ее отладил.
Я пытался справиться с этой проблемой больше дня, и сразу после того, как я задал этот вопрос здесь, я решил ее. Речь шла о строке ошибочного кода. На стороне издателя все еще есть некоторые проблемы, но я не уверен, почему они существуют. Как только я разберусь, я обновлю здесь.
Спасибо также за ваш быстрый ответ!
Отвечать
27 мая 2023 г. в 9:44 утра
Привет, я настроил свой брокер mqtt Eclipse Mosquitto, следуя вашему руководству.
Я хочу, чтобы брокер использовал mqtt версии 5, а не версии 3 или 3.1. Как мне это сделать, какие изменения мне нужно сделать в файле conf, чтобы добиться этого?
Идея моего проекта — сделать фаззер mqtt для версии 5, но я не могу преобразовать версию в 5, так как по умолчанию она установлена на версию 3.1.
Спасибо.
Отвечать
27 мая 2023 г. в 14:15
Привет,
никаких изменений на брокере не требуется. Когда вы подключаетесь с помощью клиента, вам нужно указать протокол. В настоящее время все клиенты по умолчанию используют v3.1, если вы не указали его явно.
С уважением,
Стив
Отвечать
28 мая 2023 г. в 6:11 утра
How can Specify it to default my client to use version5 of mqtt? any example is available ? As I will be required to produce valid mqttv5 packets so can I achieve this via PAHO library??
And like by default 1883 listener port is open..So the same port will also accept mqttv5 requests from the client?
Reply
May 28, 2023 at 8:22 am
It depends on your client here is the configuration for python
http://www.steves-internet-guide.com/python-mqtt-client-changes/
what client are you using?
Rgds
Steve
Reply
May 28, 2023 at 4:42 pm
I am using Python Paho client only.
import paho.mqtt.client as mqtt
This is my import statement.
Thank you for sharing the link.
Regards.
April 15, 2023 at 5:07 pm
Hi Steve,
I have followed your tutorials and I am making progress. However, I tried to use multiple “ports” as you mentioned in Section Extra listeners: listener 1883; listener 1884 and received the following errors, so I only use “port 1883” now, which seems to be working. Any suggestions or ideas as what I maybe missing here?
Client (null) sending CONNECT
Client (null) received CONNACK (5)
Connection error: Connection Refused: not authorised.
Error: The connection was refused.
Thanks,
Givi
Reply
April 16, 2023 at 8:25 am
Hi
It is an authorisation issue. The allow anonymous an be used before any listener statement an it will apply to all listeners or in each listener statement in which case it will apply to that listener.
apply to all
allow_anonymous
listener 1883
listener 1884
or
only allow anonymous on 1883
listener 1883
allow_anonymous
listener 1884
Rgds
Steve
Reply
April 26, 2023 at 4:46 pm
Hi Steve,
Followed your instructions and my ACLFILE and PASSWD files working just right on multiple ports. Now, I would like to move on to SSL/TLS and port 8883. Would you please let me know which lines/statements in “mosquitto.conf” file should be commented out and which one should be uncommented to accommodate that?
Reply
April 26, 2023 at 4:57 pm
Hi
From you question I gather you are using the mosquitto.conf file with all of the settings commented out.
I don’t recommend doing that.rename it as it si usful to keep so you can see all of the possible settings. Create a new one and add in the entries and save it as mosquitto.conf.
Below is an example file:
# Place your local configuration in /etc/mosquitto/conf.d/
#
# A full description of the configuration file is at
# /usr/share/doc/mosquitto/examples/mosquitto.conf.example
persistence true
persistence_location /var/lib/mosquitto/
log_dest file /var/log/mosquitto/mosquitto.log
include_dir /etc/mosquitto/conf.d
log_type error
log_type notice
log_type information
log_type debug
log_type websockets
connection_messages true
log_type all
log_dest stdout
allow_anonymous true
listener 1883
listener 8883
cafile /etc/mosquitto/certs/ca.crt
#capath /home/openest/certs/ca
# Path to the PEM encoded server certificate.
certfile /etc/mosquitto/certs/server.crt
# Path to the PEM encoded keyfile.
keyfile /etc/mosquitto/certs/server.key
Reply
February 16, 2023 at 5:04 pm
I’m trying to run mosquitto on my Ubuntu Laptop. The system finally installed Mosquitto 2.0.15 and I’m using ../conf.d/default.conf which (for the beginning) only specifies:
listener 1883
listener 8883
allow anonymous true
The Laptop is located behind a FritzBox which I can access via my personal MyFritz-URL.
There is no problem to connect Mosquitto from another Laptop in the LAN with a Python script addressing my MyFritz-URL.
However I’m unable to connect Mosquitto from a Smartphone App (MyMQTT) if I use the MyFritz-URL !!!
Note to mention that I can connect the broker if I specify the actual IPv4 address (which changes day by day) . Also I’m able to connect other (external) brokers with the Smartpone-App (either via port 1883 or via SSL-port 8883).
Finally I have to mention that my ufw firewall allows Anywhere-access to ipv4 and ipv6 on both ports.
У вас есть какие-нибудь идеи? Вы знаете кого-нибудь еще, у кого были проблемы с подключением приложения для смартфона к Mosquitto в FritzBox-LAN?
Заранее спасибо
Юрген
Отвечать
16 февраля 2023 г. в 17:38
Привет,
ты включил переадресацию портов на внешнем маршрутизаторе?
С уважением,
Стив
Отвечать
17 февраля 2023 г. в 12:03
Привет, Стив
, да, переадресация портов включена в FritzBox…
Отвечать
17 февраля 2023 г. в 14:01
Включили ли вы веб-сокеты на брокере Mosquitto или приложение для смартфона использует только MQTT+SSL.
С уважением,
Стив.
Отвечать
17 февраля 2023 г. в 17:52
Приложение для смартфона из PlayStore просто идет с портом 1883, поэтому я предполагаю, что оно просто использует MQTT без SSL.
У меня также есть собственное приложение для смартфона, где я использую Paho Client со следующим кодом Kotlin:
class MQTTClient(context: Context?,
serverURI: String,
clientID: String = “”) {
private var mqttClient = MqttAndroidClient(context, serverURI, clientID)
private val defaultCbConnect = object : IMqttActionListener {
override fun onSuccess(asyncActionToken: IMqttToken?) {
Log.d(this.javaClass.name, “(Default) Connection successful”)
}
override fun onFailure(asyncActionToken: IMqttToken?, exception: Throwable?) {
Log.d(this.javaClass.name, “Connection failure: ${exception.toString()}”)
}
}
…
Этот код всегда дает сбой в onFailure(), выдавая следующую трассировку стека:
java.net.ConnectException: failed to connect to j9g.myfritz.net/2a05:4540:6f00:8899::1c9e (port 1883) from /2a05:4540:6f1c:c200:8a5:8b3a:5bb1:f8f1 (port 38242) after 30000ms: isConnected failed: ECONNREFUSED (Connection denied)
(адрес брокера и реальные адреса IPv6 были изменены…)
17 февраля 2023 г. в 19:19
Отказ в подключении обычно означает неправильный порт или IP-адрес или заблокированный порт. Можете связаться со мной на странице ask steve, и я рассмотрю это подробнее.
С уважением,
Стив
16 июля 2022 г. в 21:33
Опечатка в статье?
В разделе «Настройки аутентификации», где написано «Если allow_anonymous имеет значение true, то вам необходимо создать файл паролей» — наверняка должно быть «..is false..»?
Отвечать
17 июля 2022 г. в 15:26
Хорошо подмечено, я исправил. Спасибо,
Стив.
Отвечать
27 марта 2022 г. в 20:40
привет,
Я хочу изменить файл mosquitto.conf, но могу открыть его только в режиме чтения.
Что я могу сделать?
Я не могу ничего изменить в файловой системе.
Отвечать
27 марта 2022 г., 17:59
привет,
Я хочу изменить файл mosquitto.conf, но могу открыть его только в режиме чтения.
Что я могу сделать?
Отвечать
27 марта 2022 г. в 19:07
В Linux я копирую его в свою домашнюю папку, а затем меняю разрешения на него. Если вы не можете этого сделать, то просто скопируйте содержимое и вставьте его в новый файл, а старый файл удалите. После того, как вы закончите, просто sudo cp mosquitto.conf /etc/mosquitto/mosquitto.conf
При тестировании я использую файл conf в локальной папке и запускаю mosquitto вручную с ключом -c.
С уважением,
Стив
Отвечать
27 марта 2022 г. в 20:44
Спасибо за ответ.
Но я даже не могу удалить файл, получаю сообщение «доступ запрещен».
Отвечать
27 марта 2022 г. в 21:03
У меня Debian запущен на моем PI, может быть в этом проблема?
Как мне войти как владелец?
Отвечать
28 марта 2022 г. в 14:12
Вы пробовали использовать команду sudo?
Спасибо,
Стив.
Отвечать
6 февраля 2022 г. в 17:00
Я настраивал тестовую сеть с помощью Mosiquitto Broker, и у меня есть устройство, публикующее компоненты даты и времени (гг-мм-дд-чч-мм-сс) в теме «DCNET/DT/» и подписывающееся на то же самое с помощью устройства и MQTT Explorer. Каждые 30 секунд Broker приостанавливает пересылку сообщений на 21 секунду, затем передает приостановленные сообщения и синхронизируется с текущей публикацией устройства. Затем у меня есть 30 секунд публикации и подписки в реальном времени, а затем пауза повторяется. Может ли это быть одной из настроек конфигурации Broker?
С уважением
Марк
Отвечать
6 февраля 2022 г. в 17:14
Нет, брокер не останавливается, происходит что-то еще. Брокер немедленно повторно опубликует сообщение, и нет настройки, которая бы запретила ему это делать.
Я бы взглянул на консоль брокера и посмотрел, что происходит.
С уважением,
Стив
Отвечать
17 ноября 2021 г. в 16:51
Привет, Стив! Мы пытаемся подключить наш Raspberry Pi к нашему приложению IOS Swift и испытываем трудности с поиском правильного IP-адреса для подключения к Pi при попытке настроить MQTT. Мы перепробовали все IP-адреса, предоставленные командами ifconfig, и не смогли. Мы даже пытались настроить собственный IP-адрес на самом Pi, но он все еще не взаимодействует с приложением. Есть ли у вас какие-нибудь идеи?
Отвечать
17 ноября 2021 г. в 18:53
Пи выступает в качестве брокера или клиента?
Отвечать
20 ноября 2021 г. в 17:55
The latest version of Mosquito changed the default behaviour. See https://mosquitto.org/documentation/migrating-to-2-0/
By default you can’t connect from an external host. To get the equivalent behaviour as the default used to be, you must put in your config:
listener 1883
allow_anonymous true
Reply
December 6, 2021 at 2:32 pm
I have been tripping over this for weeks trying to connect. Thank you!
Reply
September 18, 2021 at 3:10 pm
Hi Steve,
I had problems configuring tls support and I found that tabs are not a good idea in mosquitto.conf
mosquitto wasn’t able to find the keyfile nor the server.crt. After hours of pulling hair I replaced tabs by
spaces – et voila …
This might be of interrest for all using tabs to make conf files looking a little bit better.
I used source code from github, version 2.0.12
Thanks for your great work!
Juergen
Reply
May 3, 2021 at 9:04 am
hi steve,i want to add user “nisun”,but it is say C:\mosquitto>mosquitto_passwd -c ./pwfile.examplt “nisun”
Password: Error: Empty password.,something wrong?please help me,thank you.
Reply
May 3, 2021 at 4:41 pm
Looks like a simple typo
Reply
May 4, 2021 at 8:05 am
if i use C:\mosquitto>mosquitto_passwd -c -b ./pwfile.example “nisun” “password”,it is ok,so,if win7 not support?or bug?
Reply
May 4, 2021 at 3:18 pm
Hi
I had problems I remember running those tools on windows xp I haven’t used them on win7 as I tend to use linux.
rgds
steve
Reply
May 5, 2021 at 12:49 am
good morning, steve,thank you for your help,but xp is too old.so i find the better way to run,TKS.bye!
March 20, 2021 at 12:22 pm
Sorry the last message didn’t keep the formatting
Reply
March 20, 2021 at 12:43 pm
Hi
Version 2 has security changes and only listens on the localhost you need to create a listener in the config file
listener 1883
Reply
March 21, 2021 at 5:52 pm
Hey Steve,
Thanks a lot
Reply
March 20, 2021 at 12:21 pm
Hello Steve,
I recently updated mosquitto 2.0.9 on my RaspPI running DietPi v7.0.2 without change anything else I’m getting Error: Address already in use.
Before this it was running fine accepting external connections, I definitely didn’t change it to local only mode.
Any ideas?
Regards
Ian
1616241556: запуск mosquitto версии 2.0.9
1616241556: использование конфигурации по умолчанию.
1616241556: запуск только локального режима. Подключения будут возможны только с клиентов, работающих на этой машине.
1616241556: создание файла конфигурации, определяющего прослушиватель для разрешения удаленного доступа.
1616241556: открытие прослушивающего сокета ipv4 на порту 1883.
1616241556: ошибка: адрес уже используется
1616241556: открытие прослушивающего сокета ipv6 на порту 1883.
1616241556: ошибка: адрес уже используется
Отвечать
9 марта 2021 г. в 15:34
В начале поста указан каталог для Linux, каталог — /etc/mosquito, должен быть /etc/mosquitto? Позже в посте упоминается ссылка /etc/mosquitto/mosquitto.conf.
Отвечать
10 марта 2021 г. в 16:30
Извините за опечатку. Спасибо за это,
С уважением,
Стив.
Отвечать
22 марта 2021 г. в 6:54 утра
Привет, Стив.
Та же проблема с моим телефоном на Android. Я не могу подключиться к Mosquitto Broker
«—1616241556: запуск версии mosquitto 2.0.9
1616241556: использование конфигурации по умолчанию.
1616241556: запуск только локального режима. Подключения будут возможны только от клиентов, работающих на этой машине.
1616241556: создание файла конфигурации, определяющего прослушиватель для разрешения удаленного доступа.
1616241556: открытие прослушивающего сокета ipv4 на порту 1883.—»
пожалуйста, направьте меня
Спасибо
Отвечать
22 марта 2021 г. в 8:55 утра
Привет
, похоже, проблема версии 2. Нужно добавить эти строки в конфигурацию
прослушивателя 1883
allow_anonymous true.
Взгляните на введение в учебник здесь
http://www.steves-internet-guide.com/mosquitto-broker/
Отвечать
16 декабря 2020 г. в 22:34
Привет
на стороне клиента мне нужно запустить
rtl_433 -F json -M utc | mosquitto_pub -h 10.18.42.175 -p 1883 -d -t iot12-rpi3b-gw-433 -l
как только я закрываю терминал, сервер с Node Red не получает никаких сообщений.
как/где добавить информацию, которая будет вызываться при перезапуске клиента или закрытии терминала?
и как изменить настройку QoS на 1 или 2 на стороне клиента?
хорошего дня,
Винч
Отвечать
17 декабря 2020 г. в 17:36
Не совсем уверен, что ты делаешь. Используй страницу ask steve и дай мне знать более подробно
Отвечать
19 ноября 2020 г. в 5:24 утра
Привет,
я новичок в концепции MQTT и пытаюсь использовать RaspberryPi в качестве издателя для связи. Я использую свою машину Linux с IP-адресом 10.60.62.125 для запуска брокера mosquitto. И код издателя работает на RaspberryPi, а код подписчика работает на моей машине Linux. В коде издателя я пытаюсь подключить клиента к «10.60.62.125», что не работает и через некоторое время выдает ошибку превышения времени ожидания соединения. Так какой же IP-адрес мне нужно указать в коде издателя? Есть ли помощь?
Отвечать
19 ноября 2020 г. в 10:18 утра
Привет,
вы используете правильный адрес. Однако я заметил, что вы используете диапазон 10.xxx для своей сети, что необычно. Может ли машина, с которой вы пытаетесь подключиться (клиент), пинговать адрес 10.60.62.125?
С уважением,
Стив
Отвечать
27 мая 2020 г. в 7:51 утра
Привет, Стив!
Я большой новичок в этом деле, теперь я создал свой сертификат с моим локальным доменным именем, но когда я запускаю свой клиент, который создан в JavaScript, он возвращает ошибку, например: Не удалось установить соединение WebSocket с ‘wss://innocube:9001/mqtt’: Ошибка при установлении соединения: net::ERR_NAME_NOT_RESOLVED
Отвечать
27 мая 2020 г. в 13:33
Привет,
это похоже на ошибку разрешения имени, а не mqtt.
Отвечать
6 апреля 2020 г. в 23:37
Извините за простой вопрос. Я новичок, пытающийся заставить работать помощника по дому. Очень утомительный процесс.
Я прошил tasmota на Sonoff basic и пытаюсь заставить HA распознать его. Я установил Mosquito на HA, но когда я пытаюсь настроить MQTT, я получаю ошибку «невозможно подключиться к брокеру».
Я перепробовал все адреса, которые смог найти, и понятия не имею, как и где найти адрес брокера.
Отвечать
7 апреля 2020 г. в 12:38
На машине, на которой запущен Mosquitto, откройте командную строку и введите
ipconfig (Windows) или ifconfig (Linux). Она покажет вам IP-адрес
rgds
steve.
Отвечать
20 мая 2020 г. в 19:37
I set up Sonoff PWRR2 with HA today. Just check that you have done these steps:
– set up mosquito to use passwords:
allow_anonymous false
password_file /etc/mosquitto/passwd
in mosquito.conf or any other config file in the conf.d subfolder
– create a user with password
sudo mosquitto_passwd -c /etc/mosquitto/passwd my_username
– test your config by publishing while you have a subscription running (assuming you are executing on same machine where mosquito is running)
mosquitto_sub -h localhost -t test -u my_username -P my_password
mosquitto_pub -h localhost -t test -m “hello World!” t -u my_username -P my_password
– configure tasmota to use Mqtt, set ip, port (1883), …, account:my_username, my_password, topic=my_topicname. (my_topicname must be unique for each device if you have several tasmotas)
– activate automatic discovery on your tasmota:
mosquitto_pub -h localhost -t cmnd/my_topicname/SetOption19 -m “1” -u my_username -P my_password
– add mqtt integration to HA, fill in ip, port (1883), my_username,my_password
The tasmota entities will appear on the MQTT tile of the integrations page
Reply
February 12, 2020 at 11:16 am
Hi Steve,
I am working on SCADA and it contains inbuilt MQTT drivers, and I am connecting with AWS server by using MQTT, So here mosquitto broker is running fine in services but I am little doubt on config file, the config file is commented but where I have to enter the broker details and port details exactly in the config file, can you please send me some example config file for my understanding purpose.
Reply
February 12, 2020 at 5:23 pm
Hi
You don’t normally need to enter the IP address of the broker in the conf file as it listens on all ip addresses assigned to the machine the broker runs on by default.
When you add extras listeners you add them normally just using the port number.But you can add the ip address using
# listener port-number [ip address/host name]
e.g
listener 1884 192.168.1.68
For the default listener use
bind_address ip-address/host name
e.g
bind_address 192.168.1.68
rgds
Steve
Reply
January 25, 2020 at 10:06 am
Привет, Стив,
я обновил файл конфигурации для tls, но mosquitto все равно не слушает порт 8883, когда я даю команду «mosquitto -c mosquitto.conf». Он ничего не выполняет.
Отвечать
25 января 2020 г. в 16:09
Можете ли вы воспользоваться страницей «Спросите Стива» и отправить мне копию файла
? Спасибо,
Стив.
Отвечать
4 января 2020 г. в 1:21 дня
Привет, Стив,
спасибо за этот пост. Не могли бы вы поделиться руководством или инструкцией по созданию собственного брокера MQTT с помощью Python? Спасибо.
Отвечать
4 января 2020 г. в 15:58
Привет,
вот один из них, который используется для тестирования:
https://github.com/eclipse/paho.mqtt.testing
Спасибо,
Стив.
Отвечать
24 мая 2019 г. в 7:30 утра
пытаюсь запустить ваш скрипт на Raspi:
import paho.mqtt.client as paho
ImportError: Отсутствует модуль с именем ‘paho’
это после того, как я успешно установил его:
pip install paho-mqtt
Отвечать
24 мая 2019 г. в 8:22 утра
Если вы установили его, он может быть установлен под другой версией Python, но это необычно для PI.
Посмотрите здесь
http://www.steves-internet-guide.com/python-notes/
Отвечать
11 февраля 2019 г. в 10:52 вечера
Привет,
у меня пропали некоторые данные при подключении устройств IoT к mosquitto, который я установил на Linux. Но если я подключаю устройства к «m2m.eclipse.org» или «test.mosquitto.org», никаких данных не пропадает.
Не знаете, что тут происходит? Все настройки для mosquitto установлены по умолчанию на моем Linux.
Большое спасибо!
Отвечать
12 февраля 2019 г. в 9:58 утра
Я подозреваю, что проблема в локальной сети. Вы запустили mosquitto в режиме verbose, чтобы вы могли быть сообщениями.
rgds
steve
Отвечать
20 ноября 2018 г. в 6:06 утра
Привет, я настраиваю MQTT на сервере Windows. Как мне изменить номер порта в Windows и сделать MQTT доступным для публичного адреса?
Отвечать
21 ноября 2018 г. в 20:40
Вам необходимо отредактировать файл mosquitto.conf или запустить mosquitto из командной строки с помощью
mosquitto -p 1884
, чтобы запустить mosquitto на порту 1884.
Отвечать
20 июня 2018 г. в 10:43 утра
Я использую Windows 10. Мне удалось успешно запустить брокер Mosquitto для прослушивания на 1883, следуя вашему руководству. Я также протестировал соединение с помощью mosquitto_pub и mosquitto_sub. Когда я попытался проверить TLS, я изменил файл mosquitto cfg для прослушивания на 8883 и сертификаты сервера. Затем попытался перезапустить Mosquitto в службах (локальных), но он выдает ошибку «Служба брокера Mosquitto на локальном компьютере была запущена, а затем остановлена. Некоторые службы автоматически останавливаются, если они не используются другими службами или программами». В командной строке Windows я также попробовал
sc start «mosquitto», а затем sc query «mosquitto». Запросы sc показывают STATE как 2 START_PENDING, а затем STATE как 1 STOPPED. Есть ли какая-либо причина, по которой брокер Mosquitto не может быть запущен?
Отвечать
- Стив говорит:
20 июня 2018 г. в 12:14
Я подозреваю, что в файле конфигурации есть ошибка, или он не может его найти. Вы пробовали запустить командную строку как mosquitto -c configfile, это может дать вам больше информации.
Отвечать
Оставить ответ
Ваш адрес электронной почты не будет опубликован. Обязательные поля отмечены *
Комментарий *
Имя *
Электронная почта *
Веб-сайт
Опросы
Вас интересует
- Сети Лора
- Сети Лораван
- lorawan и MQTT
Посмотреть результаты
Привет, меня зовут Стив, и добро пожаловать на мой сайт, где вы можете узнать, как создавать системы Интернета вещей с использованием MQTT.
This tutorial will guide you through the process of setting up a Mosquitto MQTT server on a Windows 11 computer.
Prerequisites
- MQTT Explorer or another MQTT client installed on your server computer.
- An additional MQTT client, ESP32, or another computer to test the connection to the server.
Mosquitto Installation
1) Download Mosquitto 64-bit version from Mosquitto’s official website.
2) Run the installation file and follow the prompts, clicking «Next» until the «Install» button appears.
3) Install Mosquitto using the default path by clicking «Install.»
4) Once installation is complete, click «Finish.»
5) Open the Task Manager and navigate to the Services tab. You should find the Mosquitto service listed and stopped.

6) Start the Mosquitto service.
7) Use your MQTT client to connect to ‘localhost’ and verify the connection.

You should be connected to the broker like below

Configuration
1) Edit the mosquitto.conf file located in your mosquitto.exe installation directory in a text editor.
Add:
allow_anonymous true
listener 1883 YOUR_SERVER_IP
Replace YOUR_SERVER_IP with the IP address of your server. This configuration allows anonymous connections and specifies the server’s listening address. Note: Strengthen security with authentication after initial testing.
2) Save the file. If administrator rights are required, save to a different location and then copy it back to the original directory.
3) Restart the Mosquitto service via the Task Manager.
Firewall Configuration
1) Type firewall in the Windows search input and select «Windows Defender Firewall»
2) Click on Advanced settings
Now we are going to create 2 rules for Mosquitto, one for Inbound connections, one for Outbound connections
3) Click on «Inbound Rules» and «New Rule»

4) Click «Next»
5) Enter your mosquitto.exe install path

6) Click «Next»
7) Select «Allow the connection» and click «Next»

 Uncheck «Domain» and «Public» and click «Next»

9) Name your rule and click «Finish»

10) Repeat the same for an Outbound rule

Upon completing these steps, your Mosquitto server should be accessible to clients within your local network.
Now don’t forget to strenghten your broker security
Security
Adding a username and a password
1) Create a text file named pwd.txt and enter your desired username and password in the format username:password.
Example: admin:strongpassword123

2) Save this file and move it to the directory where mosquitto.exe is installed.
3) Open Command Prompt as an administrator.
4) In the Command Prompt, navigate to the Mosquitto directory and run the following command to hash your password for security:
mosquitto_passwd -c pwd.txt

5) In your mosquitto.conf file, add:
password_file C:\Program Files\mosquitto\pwd.txt
6) Change the line allow_anonymous true to allow_anonymous false. This ensures that only authenticated users can connect.
7) Your final configuration should include these lines:
allow_anonymous false
password_file C:\Program Files\mosquitto\pwd.txt
listener 1883 YOUR_SERVER_IP
Restart mosquitto service
Retry to connect from your MQTT client
Restricting firewall rules
1) Open Windows Firewall and navigate to Advanced settings.
2) In the Inbound Rules, find your Mosquitto rule and double-click to edit it.
3) Go to the ‘Protocols and Ports’ tab.
4) Set the rule to only allow traffic through the port used by your broker (default is 1883).
6) Apply the same settings to the Outbound Rule.
7) Test the connection with your MQTT client to ensure everything is functioning correctly.
By following these steps, your MQTT broker on Windows is now more secure, reducing the risk of unauthorized access.