
(Image credit: Windows Central)
Although Windows 10 can automatically mount a drive, the ability to mount and unmount a drive manually can come in handy in many scenarios. For example, when the system does not automatically assign a drive letter upon connecting a new storage device. You formatted a drive using commands, and you did not specify a mount point. Or you need to unmount a device’s storage to make it permanently inaccessible to users.
Whatever the reason it might be, Windows 10 allows you to quickly mount or unmount a drive using a graphical interface with Disk Management or with command-line using the mountvol and DiskPart tools in Command Prompt.
In this Windows 10 guide, we will walk through the steps to mount and unmount a drive (or volume) using the Disk Management graphical console and mountvol and DiskPart command-line tools available with Command Prompt.
- How to mount drive on Windows 10
- How to unmount drive on Windows 10
How to mount drive on Windows 10
On Windows 10, when you mount a drive manually, you will create a mount point with a drive letter that will make the storage available to users and allow the system to automatically mount the drive with the same drive letter.
You can complete this process in at least three ways with the Disk Management console and the mountvol and DiskPart command-line tools.
Mount drive with Disk Management
To use Disk Management to mount a drive on Windows 10, use these steps:
- Open Start.
- Search for Create and format hard disks partitions and click the top result to open Disk Management.
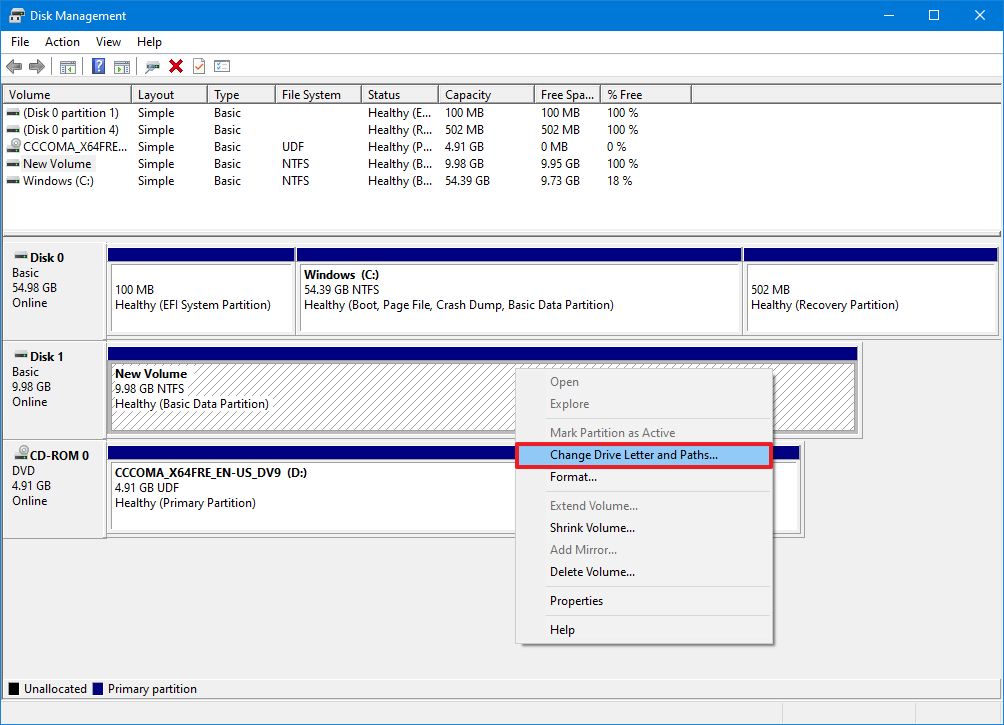
- Right-click the drive and select the Change Drive Letter and Path option.
- Click the Add button.
- Select the Assign the following drive letter option.
- Use the drop-down menu and select one of the available letters.Quick tip: When assigning a letter manually, it’s best to start with the last available letter to have a point of reference to determine if the volume was mounted manually or automatically.
Once you complete the steps, the drive will mount and appear in the system to store data.
All the latest news, reviews, and guides for Windows and Xbox diehards.
Mount drive with mountvol
To use mountvol to mount a drive, use these steps:
- Open Start.
- Search for Command Prompt, right-click the top result, and select the Run as administrator option.
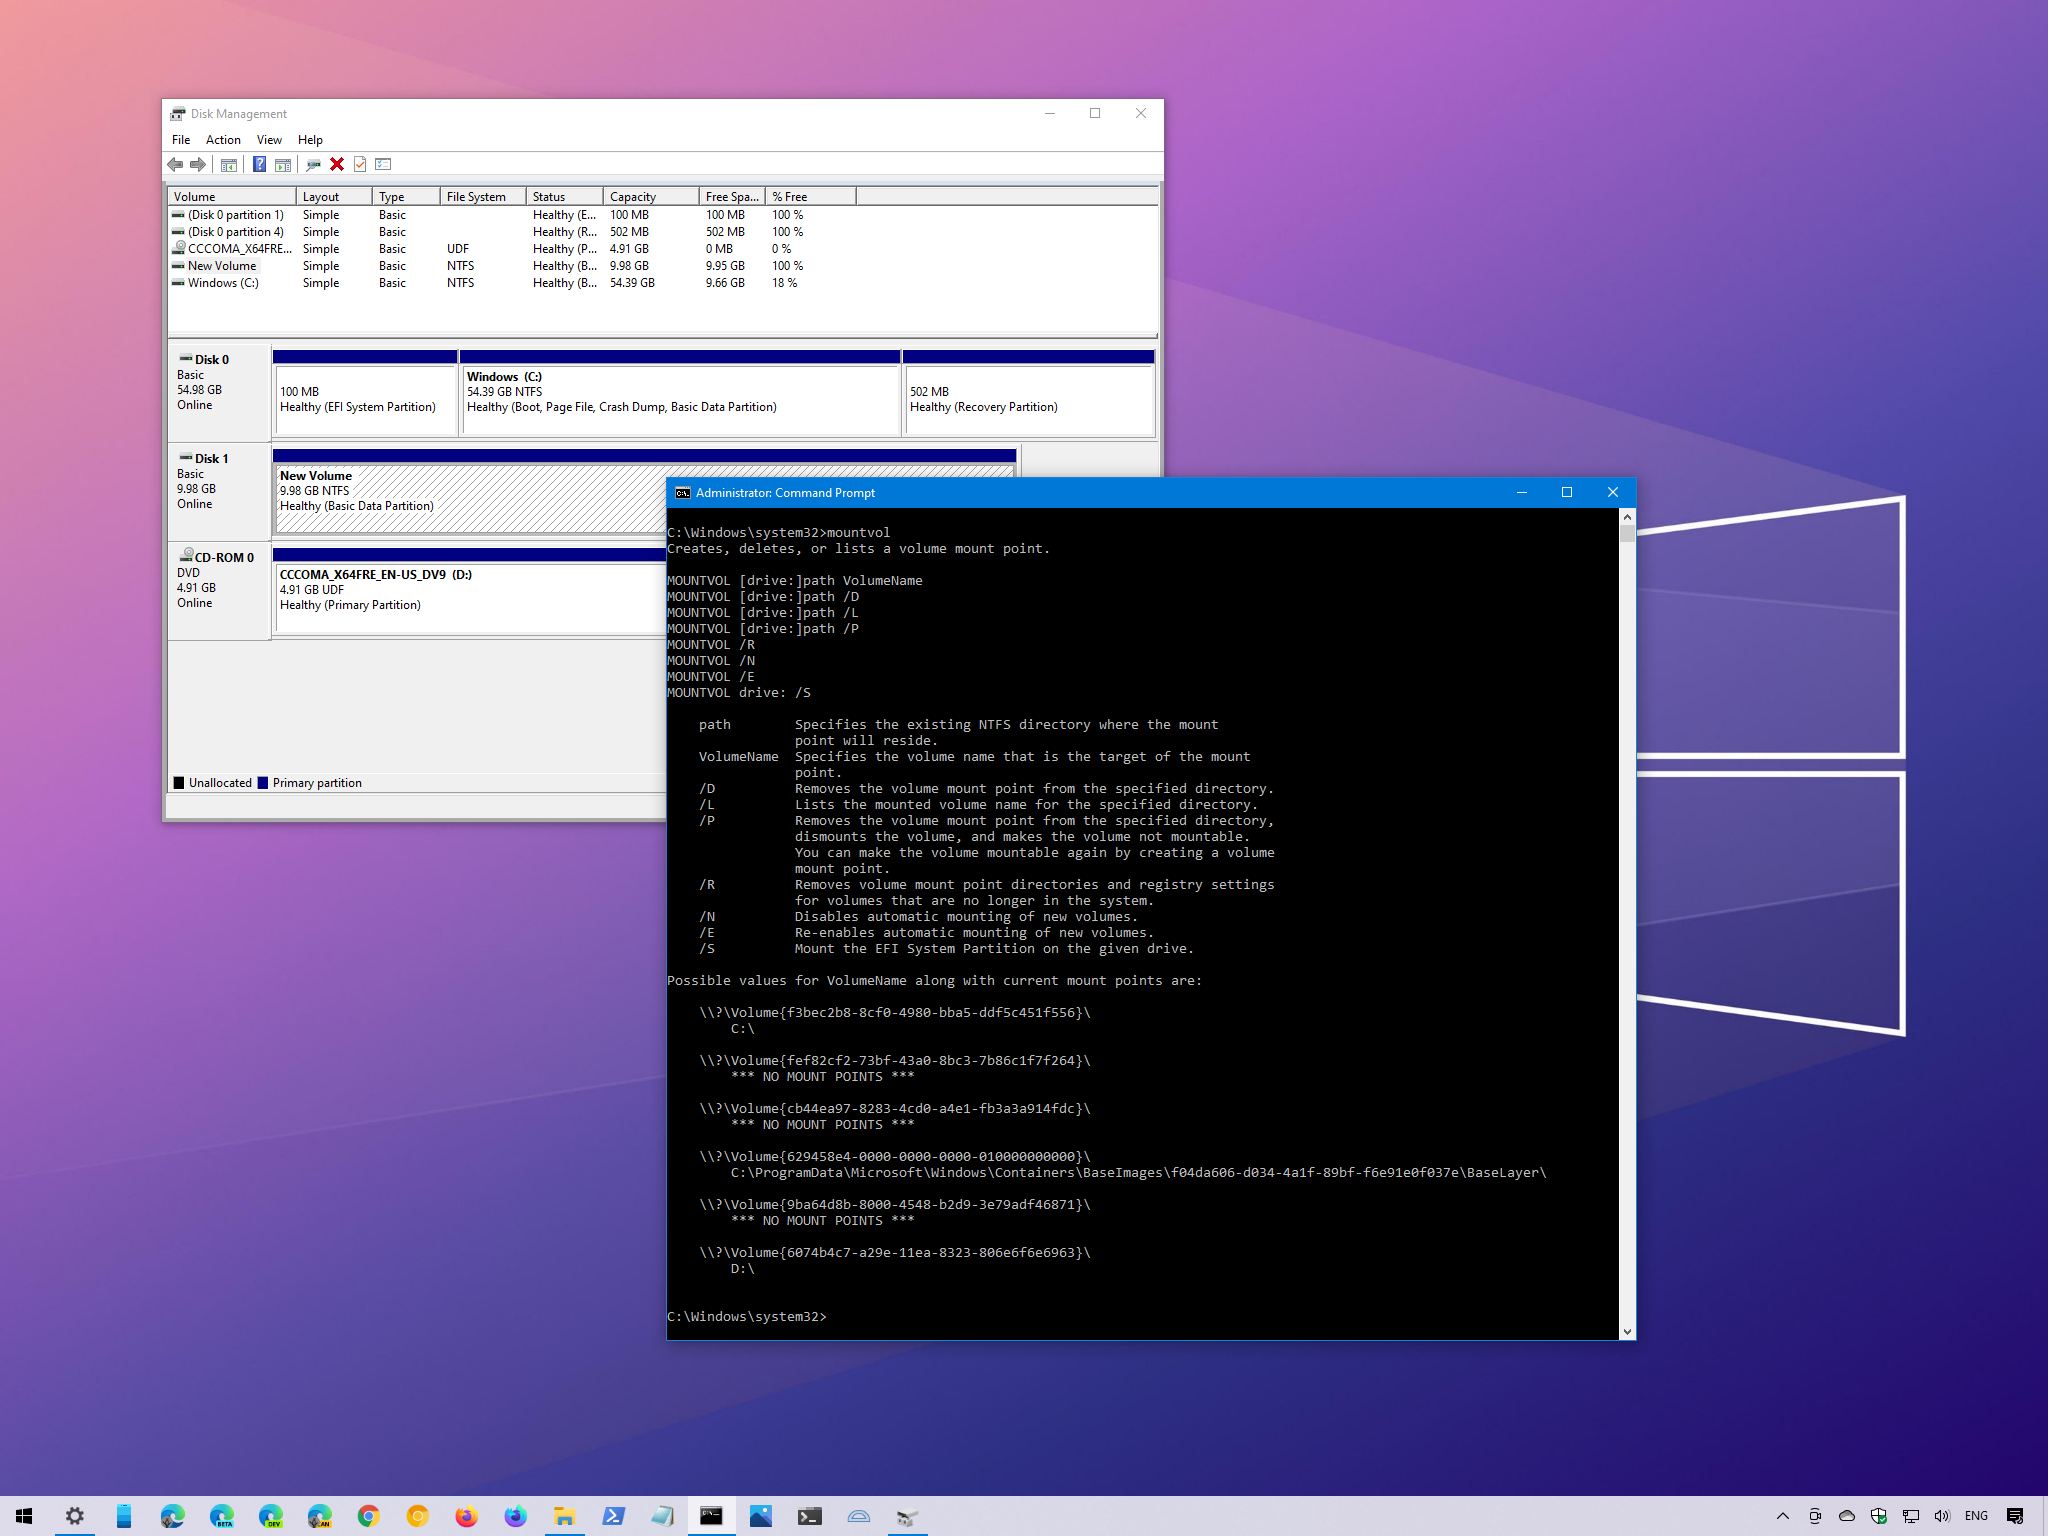
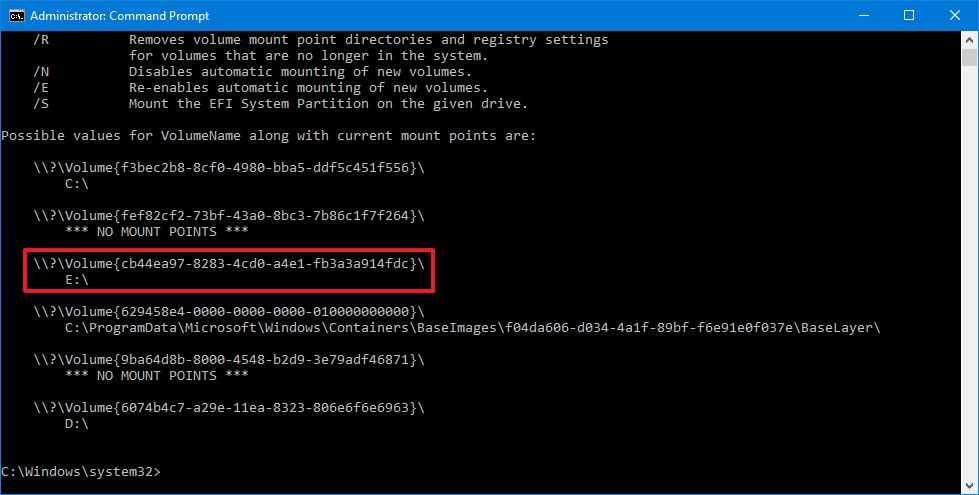
- Type the following command to list all the available mount points and press Enter:
mountvol
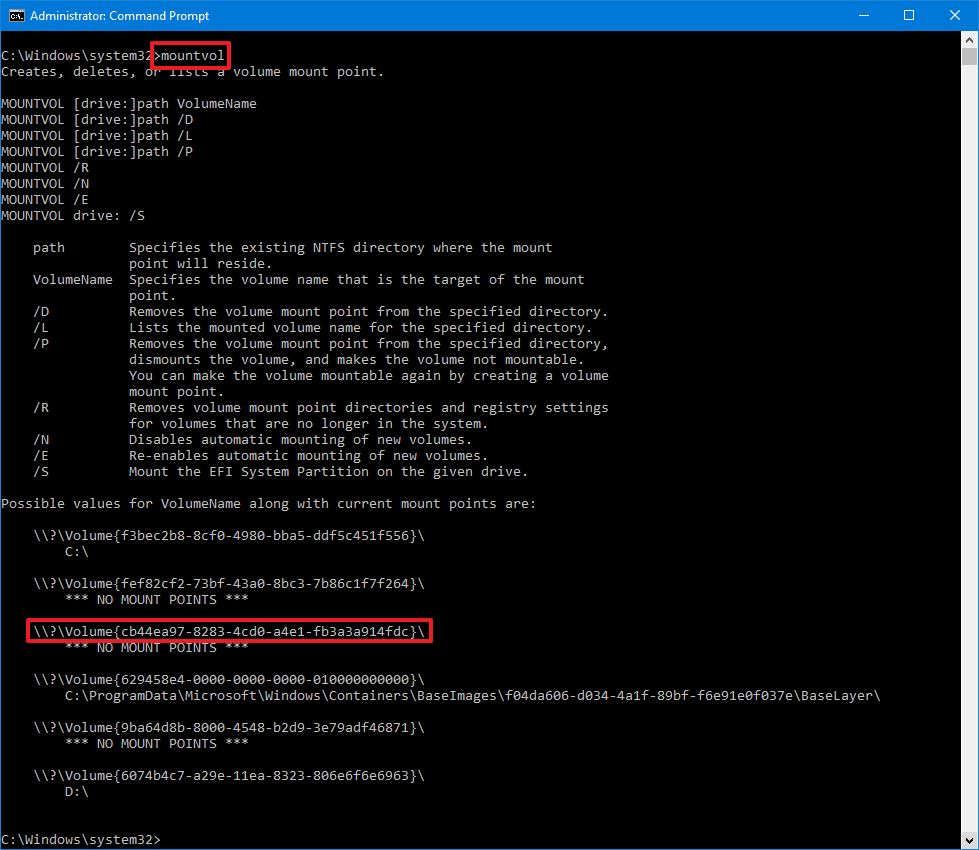
- Select the mount point path to copy the information to the clipboard.Quick note: Usually, the volume may or may not be listed with the «Not mountable until a volume mount point is created» label. If you cannot identify the volume, then use the Disk Management console instead.
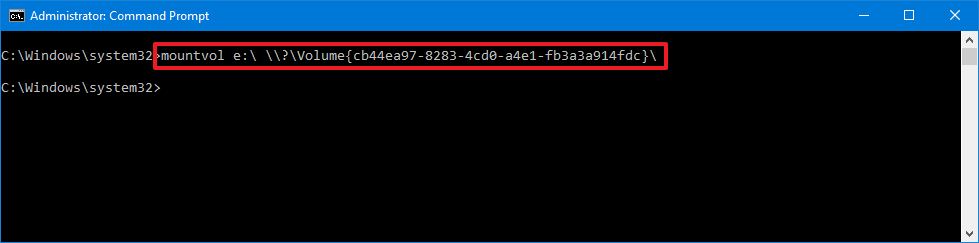
- Type the following command to mount the volume and press Enter:
mountvol DRIVE-LETTER:\ VOLUME-NAMEIn the command, make sure to replace DRIVE-LETTER and VOLUME-NAME with the appropriate information.For example, this command mounts the\\?\Volume{cb44ea97-8283-4cd0-a4e1-fb3a3a914fdc}\with theedrive letter:mountvol e:\ \\?\Volume{cb44ea97-8283-4cd0-a4e1-fb3a3a914fdc}\
After you complete the steps, the volume will be accessible through File Explorer and across the experience.
Mount drive with DiskPart
Alternatively, you can also accomplish the task using DiskPart with these steps:
- Open Start.
- Search for Command Prompt, right-click the top result, and select the** Run as administrator** option.
- Type the following command to start the tool and press Enter:
diskpart - Type the following command to list all the available volumes and press Enter:
list volume - Confirm the volume you want to mount.
- Type the following command to select the drive and press Enter:
select volume VOLUME-NUMBERIn the command, replace VOLUME-NUMBER with the number of the drive (volume) you want to mount.For example, this command selects volume number four:select volume 4

- Type the following command to mount the drive on Windows 10 and press Enter:
assign letter DRIVE-LETTERIn the command, replace DRIVE-LETTER with the letter you want to mount and access the storage.For example, this command mounts the drive and assigns theedrive letter:assign letter e
How to unmount drive on Windows 10
When you unmount a drive manually, you will remove the mount point making the storage inaccessible. Also, the system will no longer try to mount it automatically. If you want to make the drive mountable again, you will need to revert the changes (see above steps).
If you want to unmount a drive, you can also use the same Disk Management, mountvol, and DiskPart tools.
Unmount drive with Disk Management
To unmount a drive with Disk Management, use these steps:
- Open Start.
- Search for Create and format hard disks partitions and click the top result to open Disk Management.
- Right-click the drive and select the Change Drive Letter and Path option.
- Click the Remove button.
- Click the Yes button.
Once you complete the steps, the drive will no longer be accessible on Windows 10.
Unmount drive with mountvol
To dismount a drive (or volume) with mountvol, use these steps:
- Open Start.
- Search for Command Prompt, right-click the top result, and select the Run as administrator option.
- Type the following command to list all the available mount points and press Enter:
mountvol
- Type the following command to dismount a drive and press Enter:
mountvol DRIVE-LETTER:\ /pIn the command, make sure to change DRIVE-LETTER with the correct drive letter of the mount point you are trying to dismount.For example, this command unmounts thee:\mount point:mountvol e:\ /pQuick note: The/poption will unmount the drive and remove the drive letter. The tool also offers the/doption, but it is only meant to remove mount points individually.

After you complete the steps, the mount points will be removed, making the storage inaccessible to users.
Unmount drive with DiskPart
You can also dismount a drive with DiskPart using these steps:
- Open Start.
- Search for Command Prompt, right-click the top result, and select the** Run as administrator** option.
- Type the following command to start the tool and press Enter:
diskpart - Type the following command to list all the available volumes and press Enter:
list volume - Confirm the volume you want to unmount.
- Type the following command to select the drive and press Enter:
select volume VOLUME-NUMBERIn the command, replace VOLUME-NUMBER with the number of the drive (volume) you want to mount.For example, this command selects volume number four:select volume 4
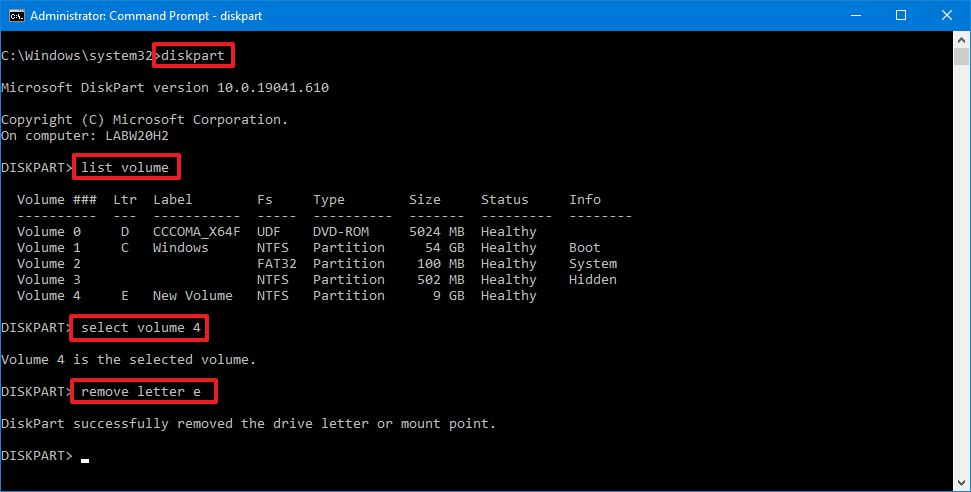
- Type the following command to unmount the drive on Windows 10 and press Enter:
remove letter DRIVE-LETTERIn the command, replace DRIVE-LETTER with the letter of the storage you want to unmount.For example, this command dismounts theedrive:remove letter e
Also, do not confuse mounting a drive with mounting a drive as a folder, which is something different. You can use these instructions to mount a drive as a folder.
Mauro Huculak has been a Windows How-To Expert contributor for WindowsCentral.com for nearly a decade and has over 15 years of experience writing comprehensive guides. He also has an IT background and has achieved different professional certifications from Microsoft, Cisco, VMware, and CompTIA. He has been recognized as a Microsoft MVP for many years.
Most Windows computers come with a single hard drive. But you may want to add a second hard drive if you are running out of disk space.
In this tutorial, I will show you how to add a new hard drive in Windows 10 and 11. I assume you have already physically attached the hard drive to your computer.
- Open Disk Management Tool — To open the Disk Management tool right-click on the Windows Start button and choose Disk Management. In the Disk Management tool, you should see your second hard drive is listed. If this is a new hard drive, the status will be «Not Initialized» and it will have a little red icon.

- Initialize Disk — Before we create new partitions, we need to Initialize the new disk. To initialize the disk, right-click on the disk label and select «Initialize Disk».
- Choose Partition style — You need to select a partition style—either MBR or GPT. Choose GPT if your computer has UEFI BIOS; otherwise, choose MBR. You can check if your computer uses UEFI by going to the System Information.
Check if Your PC Uses UEFI or Legacy BIOS in Windows 10/11
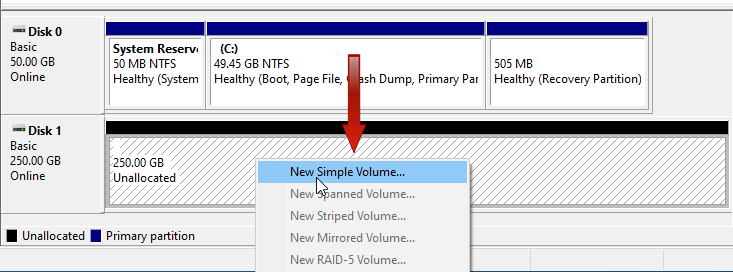
- Create a New Partition — Now we can create one or more windows partitions from our new disk. To create a partition, right-click on the unallocated space and select «New Simple Volume».
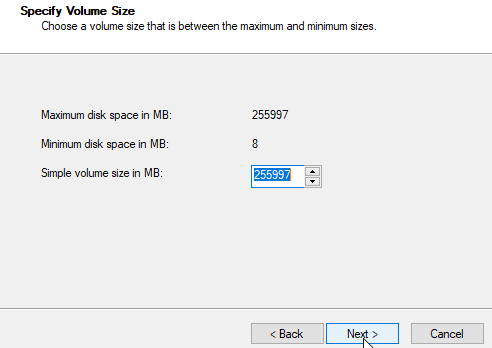
- Specify Partition Size — In the New Simple Volume Wizard, specify the size of the new partition. If you only want to create one partition, allocate the maximum available disk space.
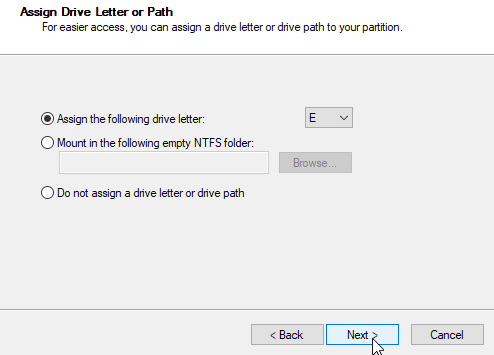
- Assign Drive Letter — Next, select a drive letter for the new Windows Partition.
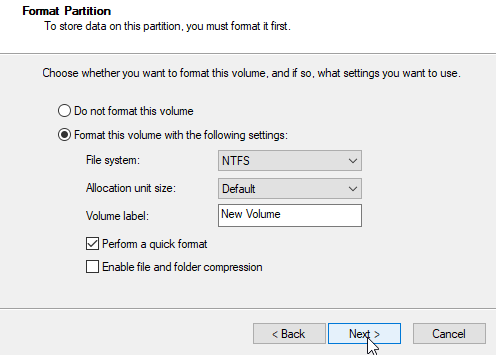
- Format Partition — Finally, select the file system type (NTFS) to create a new Windows 10 partition.


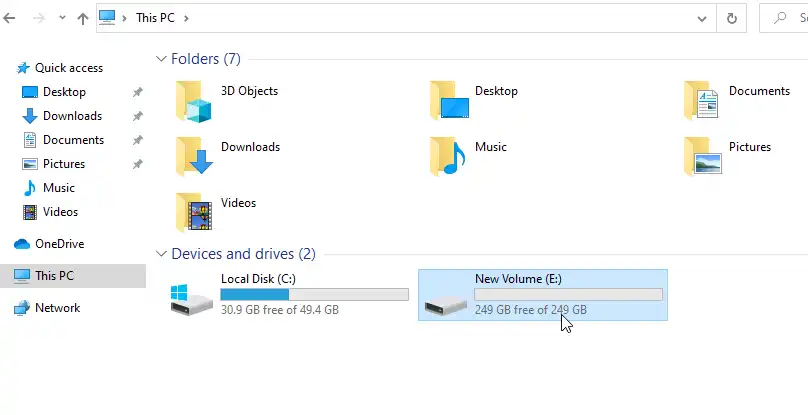
The new hard drive has been successfully added to Windows. The new partition is now available in File Explorer.
Summary — Add Hard Drive Windows 10/11
In this tutorial, we learned how to add a new hard drive to Windows 10 and Windows 11 using the Disk Management tool. First, we initialized the new hard drive, then created a new partition from the unallocated space.
Все способы:
- Добавление HDD в Windows 10
- Вариант 1: Новый жесткий диск
- Вариант 2: Виртуальный накопитель
- Вопросы и ответы: 4
Жесткий диск является неотъемлемой частью любого современного компьютера, в том числе работающего на операционной системе Windows 10. Однако иногда места на ПК становится недостаточно и требуется подключить дополнительный накопитель. Про это мы и расскажем далее в настоящей статье.
Добавление HDD в Windows 10
Нами будет пропущена тема подключения и форматирования нового жесткого диска при отсутствии старого и работоспособной системы в целом. Если вас это интересует, может ознакомиться с инструкцией по теме переустановки Windows 10. Все варианты далее будут нацелены на добавление накопителя при уже имеющейся системе.
Подробнее: Как установить Windows 10 на ПК
Вариант 1: Новый жесткий диск
Подключение нового HDD можно разделить на два этапа. Однако даже учитывая это, второй шаг не является обязательным и в некоторых отдельных случаях может быть пропущен. При этом работоспособность диска напрямую зависит от его состояния и соблюдения правил при подключении к ПК.
Шаг 1: Подключение
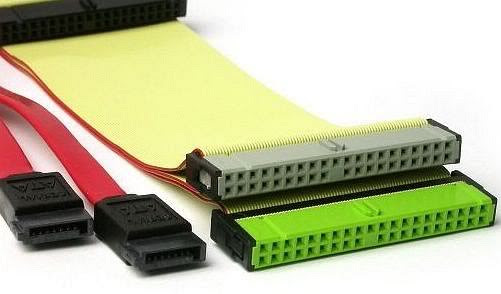
- Как сказано ранее, сначала накопитель требуется подключить к компьютеру. Большинство современных дисков, в том числе и для ноутбуков, имеет интерфейс SATA. Но также встречаются и другие разновидности, например, IDE.
- С учетом интерфейса диск подключается к материнской плате с помощью кабеля, варианты которого были представлены на изображении выше.
Примечание: Вне зависимости от интерфейса подключения процедуру необходимо производить при отключенном питании.
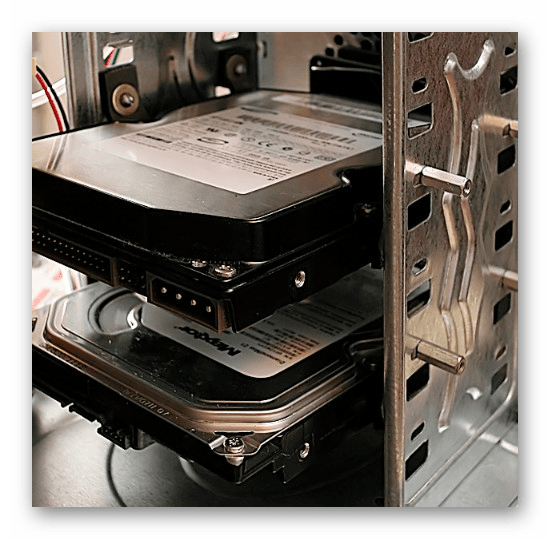
- Важно при этом четко зафиксировать устройство в одном неизменном положении в специальном отсеке корпуса. В противном случае вибрация, вызванная работой диска, может негативно отразиться на работоспособности в будущем.
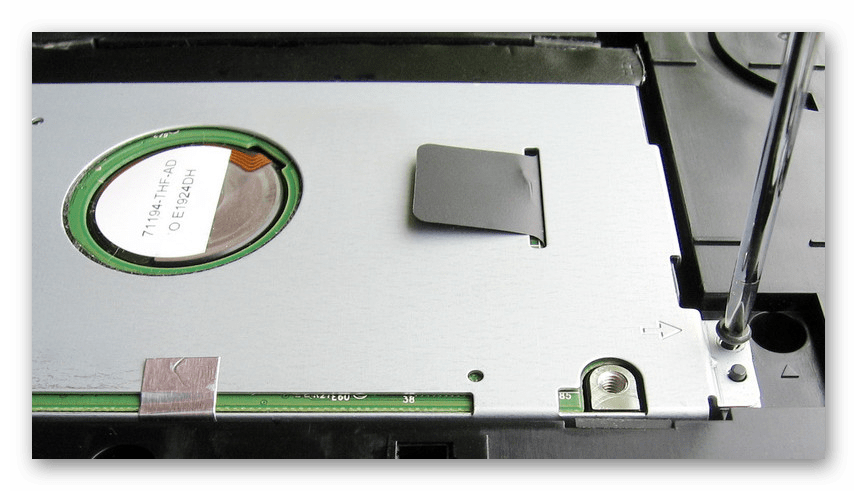
- На ноутбуках используется меньший по размерам жесткий диск и для его установки зачастую не требуется разборка корпуса. Устанавливается он в отведенный для этого отсек и фиксируется металлической рамкой.
Читайте также: Как разобрать ноутбук

Шаг 2: Инициализация
В большинстве случаев после подключения диска и запуска компьютера ОС Windows 10 автоматически настроит его и сделает доступным для использования. Однако иногда, например, вследствие отсутствия разметки, для его отображения надо произвести дополнительную настройку. Эта тема была нами раскрыта в отдельной статье на сайте.

Подробнее: Как инициализировать жесткий диск
После инициализации нового HDD потребуется создать новый том и на этом процедуру можно считать завершенной. Однако дополнительно следует произвести диагностику, чтобы избежать возможных проблем. В особенности, если при использовании устройства замечены какие-либо неисправности.
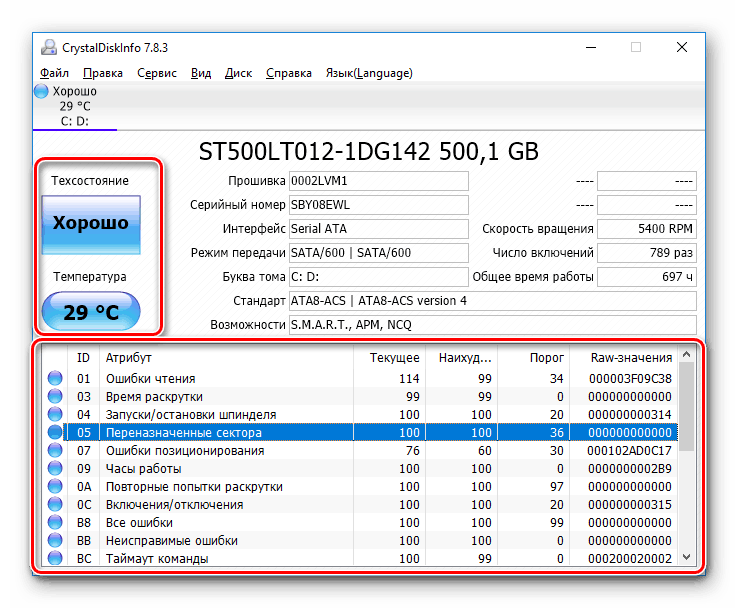
Читайте также: Диагностика жесткого диска в Windows 10
Если после ознакомления с описанным руководством диск работает неправильно или вовсе остается неопознанным для системы, ознакомьтесь с инструкцией по устранению проблем.
Подробнее: Не работает жесткий диск в Windows 10
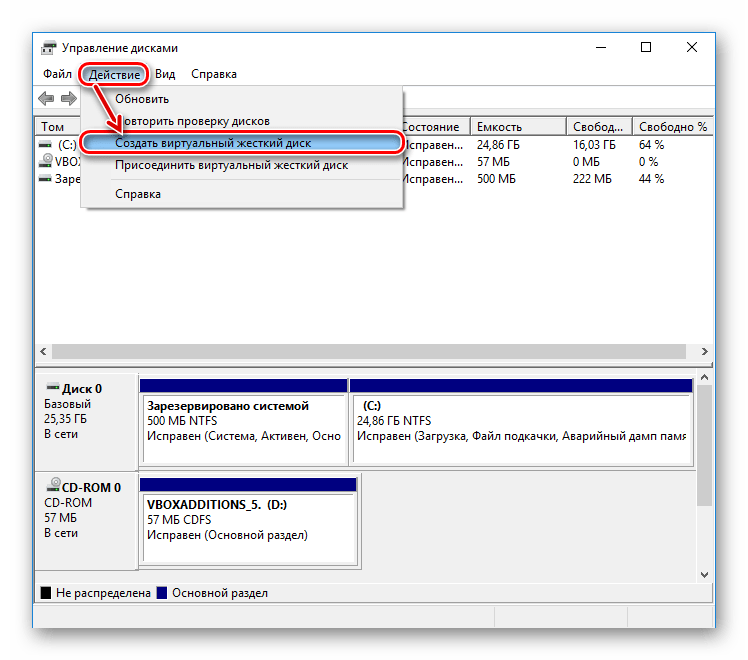
Вариант 2: Виртуальный накопитель
Помимо установки нового диска и добавления локального тома Windows 10 позволяет создавать виртуальные накопители в виде отдельных файлов, которые можно использовать в определенных программах для хранения различных файлов и даже рабочих операционных систем. Максимально детально создание и добавление подобного диска нами рассмотрено в отдельной инструкции.
Подробнее:
Как добавить и настроить виртуальный жесткий диск
Установка Windows 10 поверх старой
Отключение виртуального жесткого диска
Описанное подключение физического накопителя полностью применимо не только к HDD, но и твердотельным дисками (SSD). Единственное отличие при этом сводится к используемым креплениям и не связано с версией операционной системы.
Наша группа в TelegramПолезные советы и помощь
Windows automatically mounts any connected drive. When needed, you can mount or unmount a drive in Windows manually. Here’s how.
If you turn on the computer and open File Explorer, you will see all the available drives ready to use. This is because Windows automatically mounts all the drives or volumes connected to the system. Of course, the drive’s file system should be compatible. That way, you can access all the files and programs in those drives right from the start—no need to manually mount drives on each reboot.
Though this is a good thing, there might be a time when you need to unmount a drive in Windows. For example, maybe the drive is causing errors, you no longer need the drive to appear in the File Explorer, etc. On the other hand, you might want to manually mount a drive in Windows if it is not mounting automatically.
No matter the reason, if you ever needed it, Windows makes it easy to mount and unmount a drive. All it takes is a few clicks or a couple of commands, depending on your use case.
This simple Windows how-to guide shows you the steps to mount and unmount a drive in Windows without ado.
Table of contents:
- How to mount a drive in Windows
- Using the Disk Management tool
- Using Command Prompt
- How to unmount a drive in Windows
- Using the Disk Management tool
- Using Command Prompt
If a specific drive does not mount automatically, you can use the disk management or Command Prompt tool to mount it. It is pretty easy to do. I will show both methods, and they achieve the same thing. Follow the one you think is easy. Generally, if you want a point-and-click method, follow the Disk Management method. Follow the Command Prompt method if you want to dabble with commands or create a script.
Using the Disk Management tool
The Disk Management application is the built-in tool to manage drives or volumes in Windows. Follow the steps below to mount a Windows drive using the Disk Management tool.
- Open the Start menu.
- Search and open “Create and format hard disk partitions.”
- Identify the unmounted volume.
- Right-click on the unmounted drive.
- Choose the “Change Drive Letter and Paths” option.
- Press the “Add” button.
- Select the “Assign the following drive letter” radio option.
- Choose a drive letter from the dropdown menu.
- Press the “Ok” button.
- With that, the drive/partition is mounted.
- You can close the Disk Management tool.
- Open the File Explorer to see the newly mounted drive.

Using Command Prompt
You can also mount a drive using the Command Prompt with just a few commands. Here’s how.
Open the Command Prompt window with admin rights. To do that, search for “Command Prompt” in the Start menu and choose the “Run as administrator” option.

Next, execute the below command to list all the drives or volumes.
mountvolThe above command lists all the mounted and unmounted volumes with their respective GUIDs. Identify the unmounted volume and copy the respective Volume GUID.
A volume GUID looks something like “\\?\Volume{cf8ec040-28a9-43c6-bc10-3152b85b34cd}\.” You should copy the entire thing.

Next, execute the below command while replacing the “DriveLetter” with the drive letter you want to assign and the “VolumeGUID” with the actual string you copied earlier.
Important note: Make sure there is a space between the drive letter’s “:” and the volume GUID. Otherwise, the command won’t get executed. The drive letter you use in the command should not already be in use.
mountvol DriveLetter: VolumeGUIDThe actual command looks something like this:
mountvol E: \\?\Volume{cf8ec040-28a9-43c6-bc10-3152b85b34cd}\
As soon as you execute the command, Windows mounts the target volume with the drive letter.
How to unmount a drive in Windows
You can unmount a drive in Windows using the Disk Management tool or Command Prompt. Both methods are easy. Follow the one you think is easy. For beginners, I recommend following the Disk Management tool. If you are not afraid of commands or want to create custom scripts, follow the Command Prompt method.
Using the Disk Management tool
Follow these steps to unmount a drive in Windows using the Disk Management tool.
- Open the Start menu.
- Search and open “Create and format hard disk partitions.”
- Identify the drive you want to unmount.
- Right-click on the drive.
- Choose the “Change Drive Letter and Paths” option.
- Press the “Remove” button.
- Press “Yes” in the warning window.
- With that, the drive/partition is unmounted.
- You can close the Disk Management tool.
- Open the File Explorer, and you will no longer see the unmounted drive.

Using Command Prompt
You can unmount a drive in Windows using Command Prompt with a single command. It is pretty neat and easy to use. Let me show you how.
Press the Start key, search for “Command Prompt,” and choose the “Run as administrator” option to open the CMD window with admin rights.
Execute the below command while replacing the “DriveLetter” with the actual drive letter of the drive you want to unmount. For example, if I want to unmount the E: drive, I will relace “DriveLetter” with “E.”
mountvol DriveLetter: /P
Close the Command Prompt window after executing the command. You will no longer see the unmounted drive in File Explorer.
–
That is all. It is that simple to mount or unmount a drive in Windows.
I hope this simple Windows how-to guide helped you.
If you are stuck or need some help, comment below, and I will try to help as much as possible.