
Обновлено:
Опубликовано:
Используемые термины: CIFS, Linux.
Протокол CIFS (SMB) позволяет работать с общими папками. В инструкции будет рассказано, как в системах на базе Linux можно настроить клиент для подключения к файловому серверу, который работает по данному протоколу.
Подготовительная работа
Синтаксис mount
Ручное монтирование
Автоматическое монтирование
Примеры
Дополнительная информация
Подготовка
Установка пакетов
Для монтирования общей папки необходимо установить набор утилит для работы с CIFS (в противном случае, мы получим ошибку mount.cifs команда не найдена).
а) Для систем RPM (РЕД ОС, Rocky Linux, CentOS):
yum install cifs-utils
б) Для DEB-систем (Astra Linux, Debian, Ubuntu):
apt update
apt install cifs-utils
Сетевые порты
Если мы будем монтировать сетевую папку, сервер которой находится за брандмауэром, необходимо открыть следующие порты:
- 137/UDP
- 138/UDP
- 139/TCP
- 445/TCP
Данные команды нет необходимости выполнять на клиентах. Только на стороне сервера.
В зависимости от используемого типа фаервола, команды будут отличаться.
а) iptables (как правило, на системах DEB):
iptables -I INPUT -p tcp —dport 445 -j ACCEPT
iptables -I INPUT -p udp —dport 137:138 -j ACCEPT
iptables -I INPUT -p tcp —dport 139 -j ACCEPT
Применяем настройки:
apt install iptables-persistent
netfilter-persistent save
б) firewalld (как правило, на системах RPM):
firewall-cmd —permanent —add-service=samba
firewall-cmd —reload
Синтаксис
mount.cifs <папка на сервере> <во что монтируем> <-o опции>
* вместо mount.cifs можно написать mount -t cifs.
Пример:
mount.cifs //192.168.1.1/public /mnt
* простой пример монтирования папки public на сервере 192.168.1.1 в локальный каталог /mnt.
Если нам не известны расшаренные папки на сервере, мы можем воспользоваться утилитой smbclient. Для начала установим ее.
а) на RPM (Rocky Linux / РЕД ОС / Red Hat / CentOS / Fedora):
yum install samba-client
б) на Deb (Debian / Ubuntu / Astra Linux / Mint):
apt install samba-client
Теперь вводим:
smbclient -L 192.168.1.1
или, при необходимости авторизоваться на файловом сервере:
smbclient -L 192.168.1.1 -U username
Ручное монтирование
Теперь монтирование можно выполнить следующей командой:
mount.cifs //192.168.1.10/share /mnt -o user=dmosk
* в данном примере будет примонтирован каталог share на сервере 192.168.1.10 в локальную папку /mnt под учетной записью dmosk.
То же самое, с использованием домена:
mount.cifs //192.168.1.10/share /mnt -o user=dmosk,domain=dmosk.local
Автоматическое монтирование CIFS через fstab
Для начала создаем файл, в котором будем хранить данные авторизации при подключении к общей папке:
vi /root/.smbclient
И добавляем в него данные следующего вида:
username=dmosk
password=dPassw0rd
domain=dmosk.local
* в этом примере создана пара логин/пароль — dmosk/dPassw0rd; domain указывать не обязательно, если аутентификация выполняется без него.
Задаем права на созданный файл, чтобы доступ был только у пользователя, скажем, root:
chmod 600 /root/.smbclient
chown root:root /root/.smbclient
Теперь открываем конфигурационный файл fstab:
vi /etc/fstab
и добавляем в него следующее:
//192.168.1.10/share /mnt cifs user,rw,credentials=/root/.smbclient 0 0
* в данном примере выполняется монтирование общей папки share на сервере с IP-адресом 192.168.1.10 в каталог /mnt. Параметры для подключения — user: позволяет выполнить монтирование любому пользователю, rw: с правом на чтение и запись, credentials: файл, который мы создали на предыдущем шаге.
Чтобы проверить правильность настроек, вводим следующую команду:
mount -a
Примеры использования опций
Версии SMB
Если на стороне Windows используется старая или слишком новая версия протокола SMB, при попытке монтирования мы можем получить ошибку mount error(112): Host is down. Чтобы это исправить, указываем версию:
mount.cifs //192.168.1.10/share /mnt/ -o vers=1.0
* монтирование по протоколу SMB1.0
Монтирование от гостевой учетной записи
Если сервер принимает запросы без логина и пароля, то клиент подключается, как гость:
mount.cifs //192.168.1.10/share /mnt -o guest
или в fstab:
//192.168.1.10/share /mnt cifs guest 0 0
Для монтирования шары Windows, иногда, недостаточно указать опцию guest. Нужно делать так:
mount.cifs //192.168.1.10/share /mnt -o user=guest,pass=»
Или в fstab:
//192.168.1.10/share /mnt cifs guest,pass 0 0
Права на примонтированные каталоги
При монтировании папки мы можем указать определенные права:
mount.cifs //192.168.1.10/share /mnt -o file_mode=0777,dir_mode=0777
Для указания владельца, который будет назначен для примонтированного каталога, используем:
mount.cifs //192.168.1.10/share /mnt -o uid=33,gid=33
* чтобы посмотреть идентификаторы пользователя, вводим id -u <имя пользователя> и id -g <имя группы>.
Читайте также
Дополнительная информация по теме:
1. Как во FreeBSD примонтировать CIFS.
2. Как настроить автоматическое монтирование дисков в системах Linux.
3. Установка и настройка файлового сервера Samba на Ubuntu или Debian.
4. Установка и настройка файлового сервера Samba на CentOS.
5. Пример скрипта для создания резервной копии файлового сервера.
Как известно (или еще неизвестно), начиная с CentOS 5 / RHEL 5, система больше не поддерживает smbfs, на смену этому устаревшему протоколу пришел cifs. Именно с помощью него мы и будем монтировать виндовые шары на ОС CentOS 5.5.
Опишу три метода. Первый самый простой и незамысловатый. Во втором и третьем прибегнем к редактированию fstab. К сожалению все три метода не позволяют скрыть пароль (шифровать) от третьих лиц.
Первый метод. Монтируем шары из консоли. При таком монтировании при перезагрузке сервера, виндовая шара не восстанавливается.
1. Создаем папку куда будем монтировать.
# mkdir /mnt/share
2. Устанавливаем пакет Samba.
# yum install samba samba-client
3. Монтируем шару. (в виндосе должна быть расшарена, и выставлены соответствуюшии права на пользователя).
# mount.cifs //10.0.0.1/share$ /mnt/share -o iocharset=utf8,codepage=cp866,uid=500,gid=500,rw,user=admin%password
где —
//10.0.0.1/share$ – //ip или имя виндовой машины/имя шары
/mnt/share — точка монтирования в Линуксе
iocharset=utf8,codepage=cp866 — кодировка, дабы и там и там были русские символы, вместо кракозябр.
uid=500,gid=500,rw — какой uid и gid будет присвоен нашей подмонтированной шаре, разрешаем чтение/запись.
user=admin%password — имя виндового пользователя и его пароль
Второй метод. Теперь, дабы наша виндовая шара даже после перезагрузки сервера была подмонтирована, добавим запись в fstab.
1. Редактируем fstab
# vi /etc/fstab
Добавляем в конце всех записей строчку:
//10.0.0.1/share$ /mnt/share cifs iocharset=utf8,codepage=cp866,uid=500,gid=500,rw,user=admin%password 0 0
Сохраняем файл и выходим из редактора. Теперь можно не беспокоиться что наша шара не подцепится после перезагрузки.
Третий метод. Теперь сохраним имя пользователя и пароль в отдельном файле, а не в виде записи в fstab.
1. Открываем fstab
# vi /etc/fstab
Добавляем в конце всех записей строчку:
//10.0.0.1/share$ /mnt/share cifs iocharset=utf8,codepage=cp866,uid=500,gid=500,rw,credentials=/root/pass.txt 0 0
2. Создадим и отредактируем файл который будет содержать имя и пароль виндового юзера (pass.txt)
# vi /root/pass.txt
Добавим в этот файл следующии строки:
username=admin
password=password
3. Выставим права на этот файл
# chmod 600 /root/pass.txt
На этом все. Защита конечна никакая, но можно еще воспользоваться командой chattr.
Contents
- Required packages
- Basic method
- Better Method
- Even-better method
- Yet Another Even-better method
OK, we live in the wonderful world of Linux. BUT, for many of us, having to deal with Windows is a fact of life. For example, you may want to use a Linux server to back up Windows files. This can be made easy by mounting Windows shares on the server. You will be accessing Windows files as if they are local and essentially all Linux commands can be used. Mounting Windows (or other samba) shares is done through the cifs virtual file system client (cifs vfs) implemented in kernel and a mount helper mount.cifs which is part of the samba suite.
The following names are used in our examples.
-
remote Windows machine winbox
share name on winbox: getme
username: sushi
password: yummy
Word of warning: the default behaviour for mount.cifs is leaving the mounted share unsecured (http://bugs.centos.org/view.php?id=4537). If you are managing a multiuser system, consider setting the dir_mode and file_mode options to your mount point.
1. Required packages
Make sure that the following packages are installed:
[root@host]# yum install samba-client samba-common cifs-utils
which will also pull in any needed dependencies. Note that cifs-utils is for CentOS-6 (or later) only.
2. Basic method
Create a local mount point. For example:
[root@host]# mkdir /mnt/win
Edit the /etc/fstab file and add a line like:
\\winbox\getme /mnt/win cifs user,uid=500,rw,suid,username=sushi,password=yummy 0 0
The Windows share gets mounted on boot. Add the noauto option if you wish to manually mount it by the command mount /mnt/win . In this example, local user (uid=500) will become the owner of the mounted files. Use of the uid flag is optional. However, it may be required for certain applications (for example, Acrobat) to work because they are picky about the permissions.
You may want to use different options for cifs. For example, nocase allows case insensitive path name matching. Do a man mount.cifs to see more options.
[Note: if you used smbfs in earlier versions of CentOS, you must replace it with cifs in CentOS 5 because smbfs has been deprecated.]
3. Better Method
The above method has a little problem. Username and password are visible to everyone. We can avoid this by using a credentials file.
\\winbox\getme /mnt/win cifs user,uid=500,rw,noauto,suid,credentials=/root/secret.txt 0 0
Note: per jbroome, in IRC, a working example looks like this
\\jellyfish\DBRefreshLogs\beta2 /media/DBRefreshLogs/beta2 cifs credentials=/root/secret.txt,_netdev,uid=oracle,gid=dba 0 0
Where the /root/secret.txt file looks like this:
username=sushi
password=yummy
This file can be placed anywhere. Encrypted passwords cannot be used. Make sure it is not readable by others. Note also that no spaces are allowed.
(Note: username can have a form of username=<domain>/<hostname>)
4. Even-better method
Once mounted through /etc/fstab the remote share remains mounted unless you umount it. This might cause problems if the remote share becomes unavailable, resulting in stale mounts. For example, the Windows machine you are connecting to might crash (surprise!) or the network might go down.
Automount comes in handy (if you don’t already have autofs, install it by yum install autofs). Here is what you need to do. First create a mount point
[root@host]# mkdir /mymount
[Note: You can use any directory; make sure that directory exists]
To the /etc/auto.master file add a line like:
/mymount /etc/auto.mymount
Then edit the /etc/auto.mymount file you just entered:
winbox -fstype=cifs,rw,noperm,user=sushi,pass=yummy ://winbox/getme
Or by using the same credentials file as above:
winbox -fstype=cifs,rw,noperm,credentials=/root/secret.txt ://winbox/getme
Note that /etc/auto.mymount can be made world-unreadable, so, use of the credentials file is not as important as in the previous method.
[More note: If you cannot connect by the machine name but can connect by its IP address, then add wins on the hosts line of /etc/nsswitch.conf .]
When all is ready, run /sbin/service autofs restart as root.
Now try accessing the share by ls /mymount/winbox or by cd /mymount/winbox . It is dynamically loaded upon access. After some inactivity (default 60 seconds), the share will be unmounted.
[Note: Upon automounting, you may see an error mount_cifs.so: cannot open shared object file in /var/log/messages. This is harmless and can be safely ignored.]
5. Yet Another Even-better method
If you have multiple shares to mount with the same credentials, there is a handy way to set it up.
Create a local mountpoint (of your choice):
[root@host]# mkdir /mnt/smb
Add this line to /etc/auto.master:
/mnt/smb /etc/auto.smb.top
Create /etc/auto.smb.top as:
* -fstype=autofs,-Dhost=& file:/etc/auto.smb.sub
Create /etc/auto.smb.sub as (adjust as needed):
* -fstype=cifs,credentials=/root/secret.txt,uid=500,gid=100 ://${host}/&
Let’s make sure that the permission bits are correct and restart the service:
[root@host]# chmod 644 /etc/auto.smb.*
[root@host]# /sbin/service autofs restart
Now you can access by simply typing:
[user@host]$ cd /mnt/smb/winbox/getme
(Thanks to Mia Via for sending in this tip)
Additional tips:
If you have multiple remote servers and shares with different usernames and/or passwords, use this formula:
* -fstype=cifs,credentials=/root/${host}.secret.txt,uid=${UID},gid=${EUID} ://${host}/&
To allow users to put their own usernames/passwords to their home directories (might expose security even more):
* -fstype=cifs,credentials=${HOME}/${host}.secret.txt,uid=${UID},gid=${EUID} ://${host}/&
To improve security with Samba-servers, you could also add sec=ntlmv2, and make credentials file hidden like this:
* -fstype=cifs,sec=ntlmv2,credentials=${HOME}/.${host}.secret.txt,uid=${UID},gid=${EUID} ://${host}/&
See mount.cifs man page for details about the sec- and other cifs related mount parameters.
(Thanks to Tapio Ryhänen for sending in these tips)
If you just want to browse Windows files, you do not need to mount them. There are easy ways to access them from your file browser.
In Konqueror, Go -> Network folders -> Samba Shares
In Nautilus, Places -> Network -> Windows Network
To go to a specific share more quickly, you can type directly in the Location box of Konqueror:
smb://winbox/getme
If you use Nautilus and do not see the location box, you can type a / to bring it up (thanks to JohnnyHughes for this hint).
-
Written and currently maintained by AkemiYagi. Corrections/suggestions welcome.
If we need to work together with team or access windows storage, we need to mount remote windows share or Samba on CentOS 7.
Mounting Windows or other samba) shares is done through the cifs virtual file system client (cifs vfs) implemented in kernel and a mount helper mount.cifs.
If we are managing a multi user system, consider setting the dir_mode and file_mode options to your mount point.
The default behaviour for mount.cifs is leaving the mounted share unsecured (http://bugs.centos.org/view.php?id=4537).
For Centos:
# yum install samba-client samba-common cifs-utilsFor Ubuntu:
# sudo apt-get install cifs-utils samba-common system-config-samba samba winbindExample output:
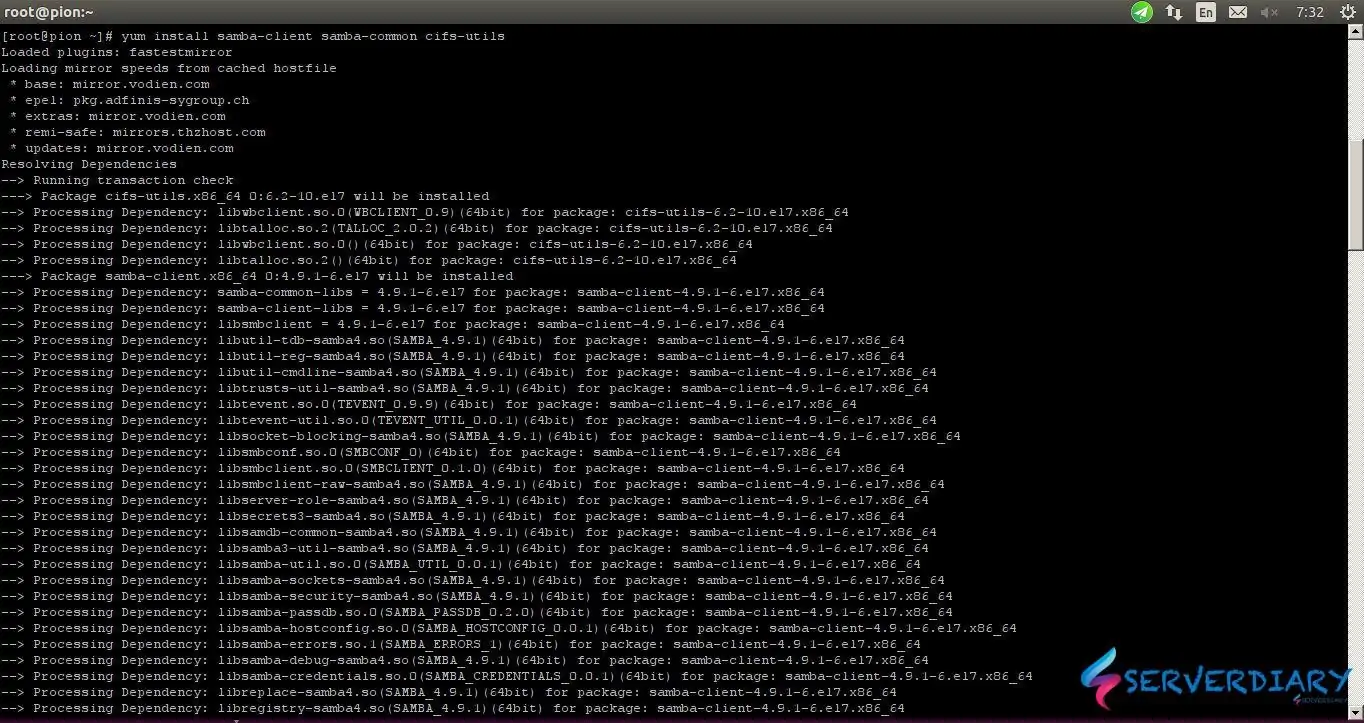
[root@pion ~]# yum install samba-client samba-common cifs-utils
Loaded plugins: fastestmirror
Loading mirror speeds from cached hostfile
 * base: mirror.vodien.com
 * epel: pkg.adfinis-sygroup.ch
 * extras: mirror.vodien.com
 * remi-safe: mirrors.thzhost.com
 * updates: mirror.vodien.com
Resolving Dependencies
--> Running transaction check
---> Package cifs-utils.x86_64 0:6.2-10.el7 will be installed
--> Processing Dependency: libwbclient.so.0(WBCLIENT_0.9)(64bit) for package: cifs-utils-6.2-10.el7.x86_64
.................................
--> Running transaction check
---> Package libtdb.x86_64 0:1.3.16-1.el7 will be installed
--> Finished Dependency Resolution

Dependencies Resolved

.................................................................

Installed:
  cifs-utils.x86_64 0:6.2-10.el7                       samba-client.x86_64 0:4.9.1-6.el7                       samba-common.noarch 0:4.9.1-6.el7

Dependency Installed:
  libldb.x86_64 0:1.4.2-1.el7          libsmbclient.x86_64 0:4.9.1-6.el7      libtalloc.x86_64 0:2.1.14-1.el7             libtdb.x86_64 0:1.3.16-1.el7
  libtevent.x86_64 0:0.9.37-1.el7      libwbclient.x86_64 0:4.9.1-6.el7       samba-client-libs.x86_64 0:4.9.1-6.el7      samba-common-libs.x86_64 0:4.9.1-6.el7

Complete!
Create a local mount point directory, for example:
# mkdir /mnt/windowsExample Windows share detail is:
Remote Windows machine ip address is 192.168.1.9
share name : storage-photo
username: pion
password: my_password
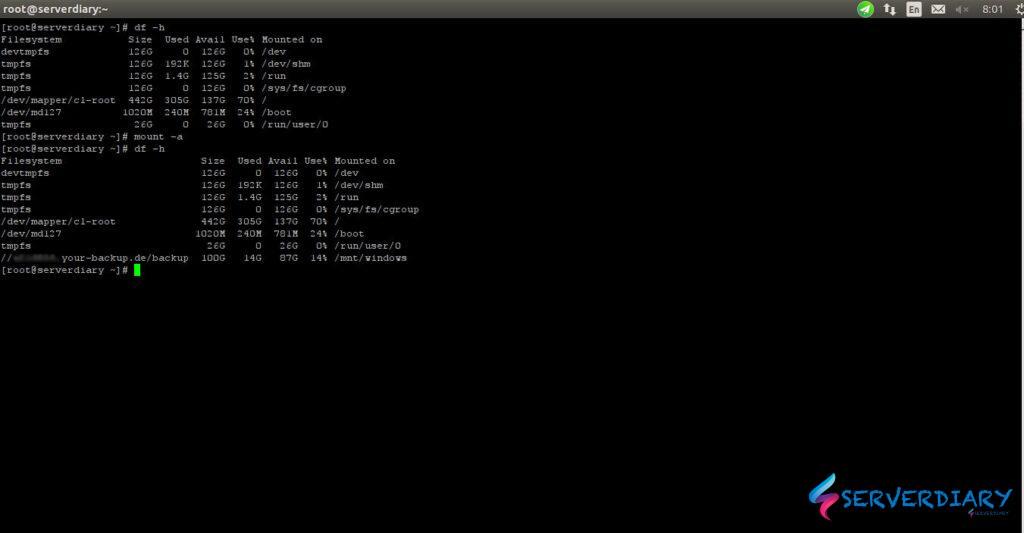
# mount.cifs //192.168.1.9/storage-photo /mnt/windows-storage -o rw,username=pion,password=my_passwordIf you want to auto mount on boot, edit /etc/fstab and add the following mount command:
\\192.168.63.9\storage-photo /mnt/windows cifs user,uid=1001,rw,suid,username=pion,password=my_password 0 0The problem from above samba mount configuration is username and password visible to all user.
So we need make it more secure. Put username and password on /root/secret.txt and put your username and password with format:
username=pion
password=my_password
\\192.168.63.9\storage-photo /mnt/windows cifs credentials=/root/secret.txt,rw,_netdev,uid=1001,gid=1001 0 0We have free backup storage box backup on Hetzner.
This is great feature from Hetzner if you rent Dedicated server with middle or high specs.
This is how we mount storage box using cifs and keep the cradentials on /root directory.
CIFS-utils (Common Internet File System utilities) — это набор утилит для монтирования и управления файловыми ресурсами, доступными через протокол CIFS (SMB). Протокол CIFS позволяет подключаться к файловым ресурсам, расположенным на других компьютерах, включая Windows-серверы.
Устанавливаем утилиту cifs-utils
1 |
$ sudo yum install cifs-utils |
Добавляем пользователей
1 2 3 4 5 |
$ sudo useradd -u 5000 UserPackages $ sudo useradd -u 5001 UserTraffic $ sudo groupadd -g 6000 share_library $ sudo usermod -G share_library -a UserPackages $ sudo usermod -G share_library -a UserTraffic |
Создаем каталоги, в которые будем монтировать расшаренные windows-ресурсы
1 2 |
$ sudo mkdir /mnt/Packages $ sudo mkdir /mnt/Traffic |
Создаем файл с настройками доступа к расшаренным windows-ресурсам и задаем права на этот файл
1 2 3 4 5 |
$ sudo nano /root/smb_user username=user domain=DOMAIN password=password $ sudo chmod 0600 /root/smb_user |
Монтируем
1 2 |
$ sudo mount.cifs \\192.168.0.15\Packages /mnt/Packages -o credentials=/root/smb_user,uid=5000,gid=6000 $ sudo mount.cifs \\192.168.0.15\Traffic /mnt/Traffic -o credentials=/root/smb_user,uid=5001,gid=6000 |
Команды для размонтирования:
1 2 |
$ sudo umount /mnt/Packages $ sudo umount /mnt/Traffic |
Автоматическое монтирование каталогов при последующей загрузке операционной системы
Открываем файл /etc/fstab в текстовом редакторе и добавляем в конце файла строки:
1 2 3 |
$ sudo nano /etc/fstab \\192.168.0.15\Packages /mnt/Packages cifs credentials=/root/smb_user,uid=5000,gid=6000 0 0 \\192.168.0.15\Traffic /mnt/Traffic cifs credentials=/root/smb_user,uid=5001,gid=6000 0 0 |
Авторский пост защищен лицензией CC BY 4.0 .