
В случае, если вам потребовался доступ из Windows к данным на разделе диска с файловой системой Linux — ext4/ext3/ext2, встроенными средствами системы сделать это не получится. Однако, возможности есть, причем реализовать это можно встроенными средствами системы или с помощью сторонних инструментов.
В этой инструкции подробно о способах подключить раздел диска в файловой системе Linux в Windows 11 и Windows 10 для доступа к данным на этом разделе как для чтения, так и для записи.
Ext2 File System Driver (Ext2Fsd) — самый простой способ открыть раздел ext4/ext3/ext2 в Windows
Ext2 File System Driver или Ext2Fsd — сторонний и полностью бесплатный драйвер для подключения разделов Linux во всех версиях Windows начиная с XP. Несмотря на название, поддерживаются не только разделы не только с файловой системой ext2, но и более новые ext4 и ext3.
Порядок использования Ext2 File System Driver для доступа к дискам Linux будет следующим:
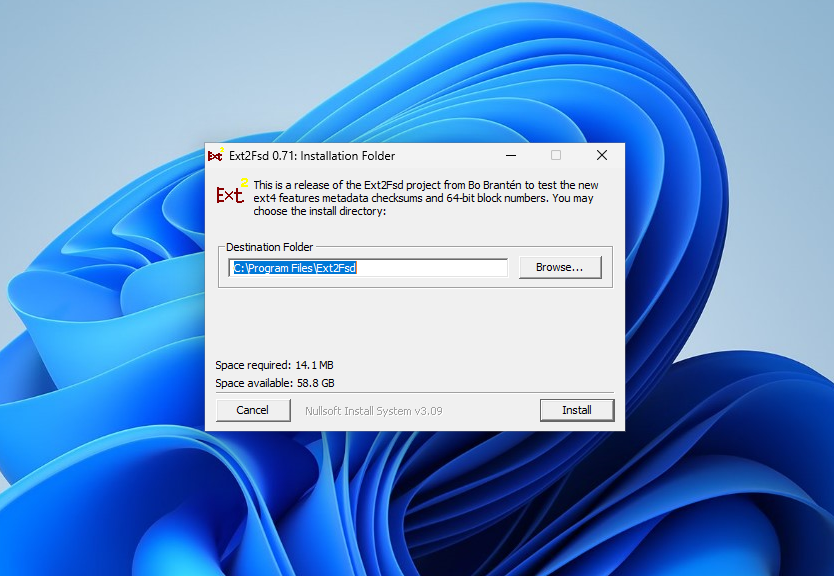
- Загрузите установщик Ext2Fsd с сайта https://sourceforge.net/projects/ext2fsd/
- Установите драйвер, в параметрах установки как правило не требуется ничего изменять.
- По завершении установки вам будет предложено запустить Ext2 Volume Manager (менеджер томов), запустите его.
- Нажмите правой кнопкой мыши по разделу Linux ext4, ext3, ext2 и выберите пункт «Assign Drive Letter» — назначить букву диска.

- Для раздела будет автоматически назначена буква диска, и вы увидите раздел в Проводнике Windows с возможностью чтения и записи файлов на нём.


В дальнейшем вы тем же способом сможете удалить букву диска с раздела (опция «Change letter» — «Remove»).
Доступ к разделам Linux средствами Подсистемы Windows для Linux (WSL)
Подсистема Windows для Linux (WSL) также может быть использована для подключения дисков Linux в Windows таким образом, чтобы доступ к ним был возможен из проводника. Шаги будут следующими:
- Запустите командную строку, Терминал или PowerShell от имени администратора и по порядку введите команды
wsl --install
wsl --set-default-version 2
dism.exe /online /enable-feature /featurename:VirtualMachinePlatform /all /norestart
wsl --install -d Ubuntu

- После выполнения последней команды откроется окно консоли Linux (командную строку при этом не закрывайте, она еще пригодится) с предложением настроить имя пользователя и пароль, сделайте это. Если в окне консоли вы увидите сообщение об ошибке, скачайте и установите обновление WSL, перезагрузите компьютер и запустите Ubuntu из меню «Пуск».
- В консоли Ubuntu введите команду
sudo mkdir -p /mnt/ext-drives/
для создания папки, к которой будут монтироваться диски.

- В консоли Windows (командная строка, терминал, Powershell) введите команду
wmic diskdrive list brief
- Обратите внимание на DeviceID диска, который нужно подключить и введите команду (так же в консоли Windows) указав соответствующий номер в имени PHYSICALDRIVE
wsl --mount \\.\PHYSICALDRIVE

- В консоли Ubuntu введите команду lsblk — это отобразит список подключенных дисков, разделов на них и их размер. В следующей команде используем имя нужного раздела для монтирования:
sudo mount /dev/sdИМЯ /mnt/ext-drives/
- После успешного выполнения всех указанных шагов вы можете зайти в Проводник Windows, выбрать пункт «Linux» в панели быстрого доступа, перейти в папку mnt\ext-drives и получить доступ к файлам на подключенном разделе Linux с возможностью записи и чтения.


В дальнейшем для отключения диска от WSL можно использовать ту же команду, которая использовалась на 5-м шаге, заменив mount на unmount.
Есть и другие программы (драйверы) для доступа к разделам Linux из Windows, но не полностью бесплатные. Среди них:
- DiskInternals Linux Reader — в бесплатной версии доступно только чтение данных с разделов.
- Paragon Linux File Systems for Windows — бесплатная работа в течение пробной версии, затем необходимо приобретать лицензию.
If you want to use Windows in dual booting with Linux, sometimes you will need to copy files from one operating system to another. There are no problems with opening Windows partitions on Linux because it has excellent support for the NTFS file system. But you can’t open Ext4 or other Linux filesystems in Windows by default.
In this article, I will show a few ways to mount ext4 in Windows 10 or 11. You can add an Ext4 driver to the Windows or just extract required files using special applications.
Table of Contents
- Mounting Ext4 in Windows Tutorial
- Extract files from Ext4 partitions in Windows
- Wrapping Up
Mounting Ext4 in Windows Tutorial
1. Ext2fsd Driver
First of all, you can use an open-source Ext* filesystems driver for Windows that is called ex2fsd. It hasn’t been updated since 2017, but still works. I was able to start and successfully use this driver in Windows 10 but not in Windows 11.
You can download an installer for your version of Windows on the releases page of the project on GitHub. The installation process is easy, just press the Next button in each installation wizard window. Only the following step is interesting:
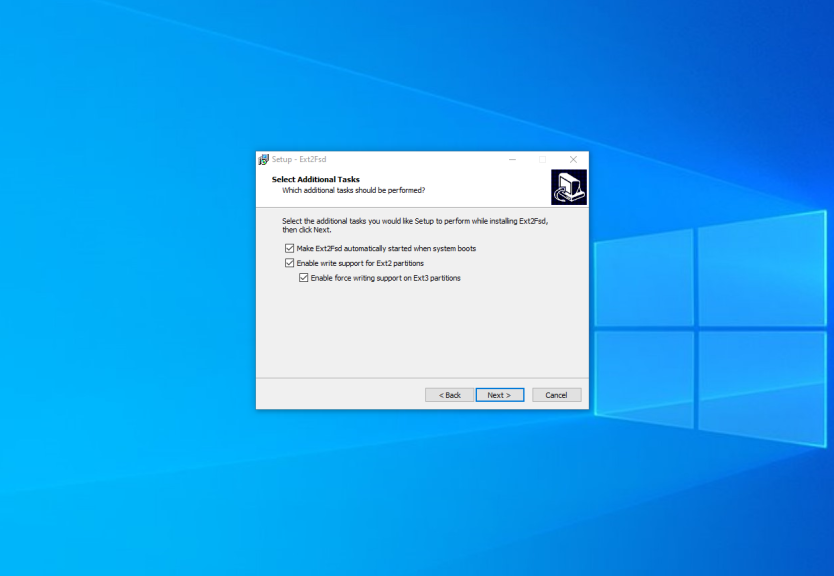
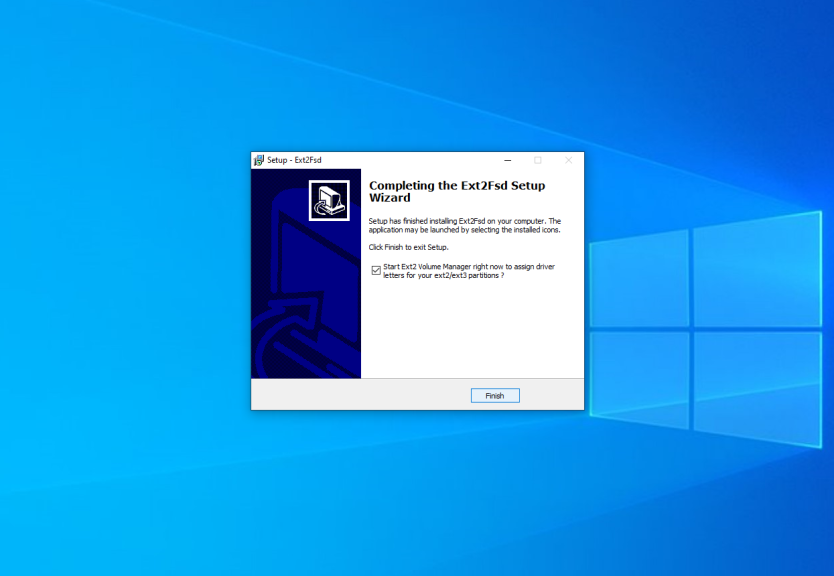
Here you can configure whether the driver should be loaded automatically on the system startup and whether it has writing support for Ext2 and Ext4 filesystems. Check the checkboxes which you want and press Next. In the next window check the Start Ext2 Volume Manager right now to assign drive letters for your ext2/ext3 partitions checkbox to start the mounting manager now:
Here is the main application window:
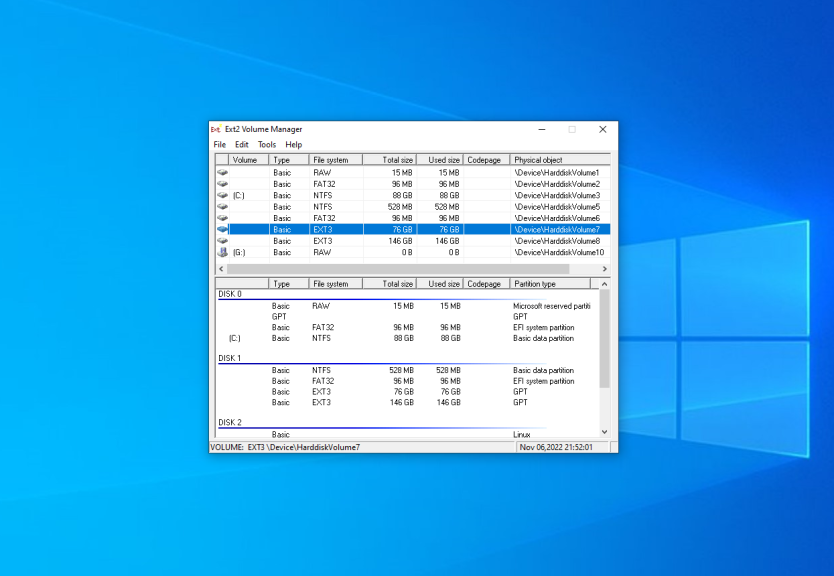
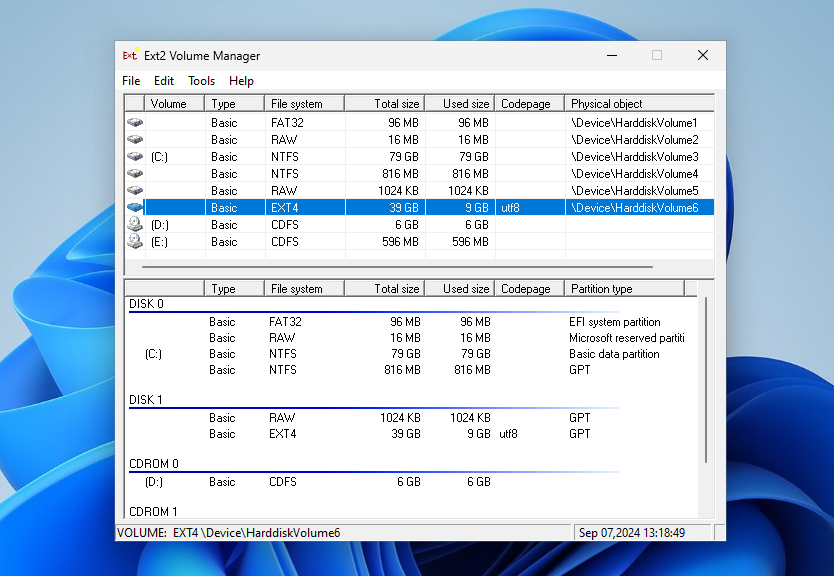
Here you can see all available partitions, their size, and their filesystem. Double-click on any of them to mount it.
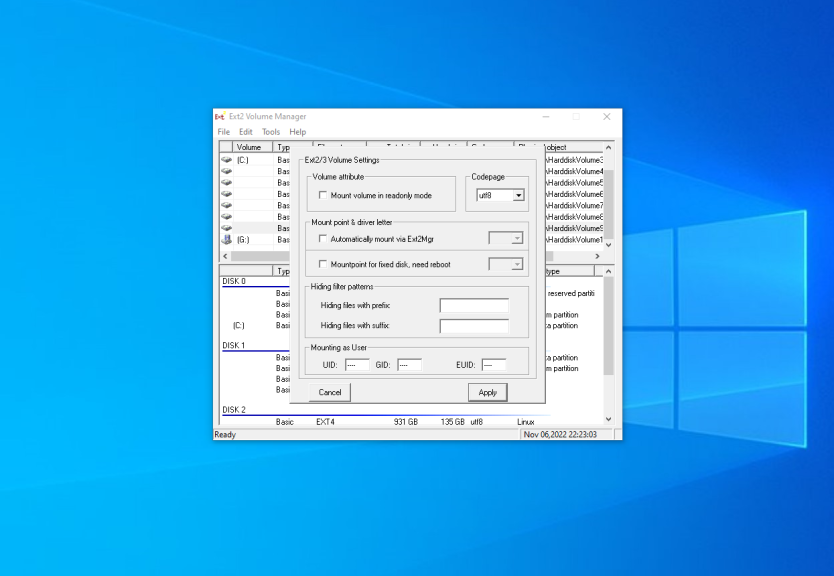
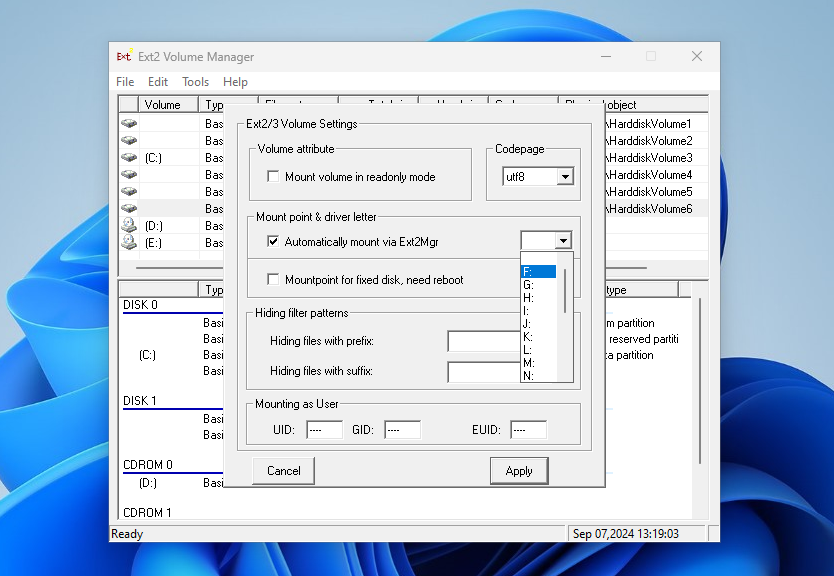
Here are two mounting options:
- Automatically mount via Ext2Mgr — the partition will be mounted for the current session, the application will not mount it after reboot automatically.
- Mountpoint for fixed disk — the partition will be permanently mounted with the same name on the system startup.
Select the drive letter for the partition near the chosen mount type. Also, you can specify in the Hiding files with prefix field which prefixes are used for hidden files. By default, all files which start from a dot are hidden in Linux. After this press the Apply button.
Pay attention that the window with mounting settings should look as well as the window on the screenshot above. If it looks different, something went wrong. If the application does not work, ensure that there are no other applications for mounting Ext4 running or installed. Try to reinstall the application.
If everything is good, open This Computer and you will see your Ext4 drive mounted. The Ext2fsd driver allows you to work with Ext4 partitions as well as you work with regular NTFS or FAT partitions.
2. Ext4fsd Driver
If you want to use Ext2fsd in Windows 11, there’s a solution. In early 2024, a fork of Ext2fsd was made, and it includes a signed Ext4 driver that can work on systems with Secure Boot and supports more features of the modern Ext4 file system. As of writing this article, the driver is still in the testing phase, but in my case, it works perfectly in Windows 11. Before you can install the program, you must install the Microsoft Visual C++ Redistributable, version 2017 or later. You can download it from the official website. Launch the installer and follow all the steps in the installation wizard:

You can download the Ext4fsd installer from the Releases page on the project’s GitHub repository. Installation is straightforward: simply click Install and wait for the process to finish.
After installation, launch the Ext2 Volume Manager from the Start menu. Since this is a fork of Ext2fsd, the same Volume Manager is used here and the settings are the same. You can view all available Ext4 file system partitions in the main window of the application:
As before, there are two options for mounting the partition. For example, check the box near to Automatically mount via Ext2Mgr and select the drive letter you want to use:
Once you’ve completed this step, you should find the mounted partition in Explorer.

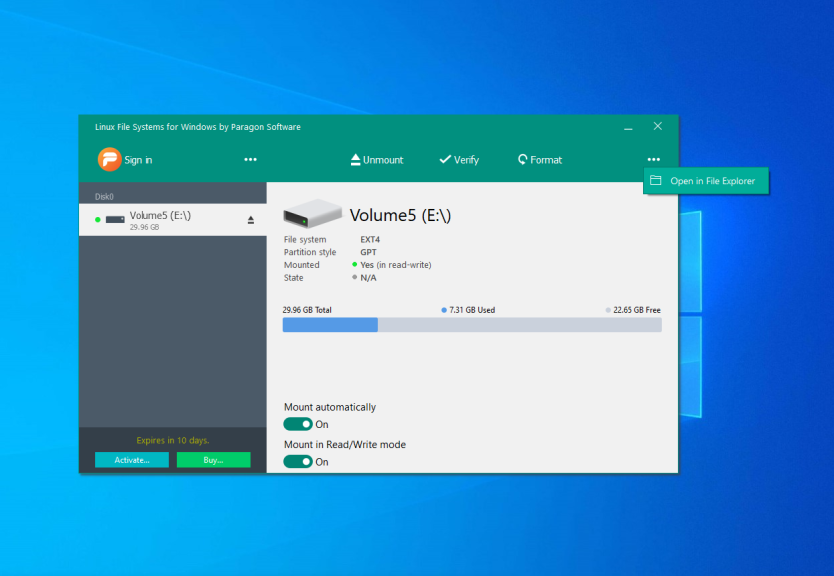
3. Linux Filesystems for Windows by Paragon
Paragon Software is the same company that added a new NTFS driver to the Linux kernel in 2021. Also, they developed an application for mounting Ext4 in Windows. It is a filesystem driver as well as Ext2fsd and it is actively maintained and developed. Also, it has a modern user interface. You can mount and unmount Ext4 partitions for reading and writing. In addition, you can mount XFS and Btrfs but only for reading.
The application is paid, but it has a trial version that can be used for 10 days for free. Its price at the moment of writing is almost 20 euros.
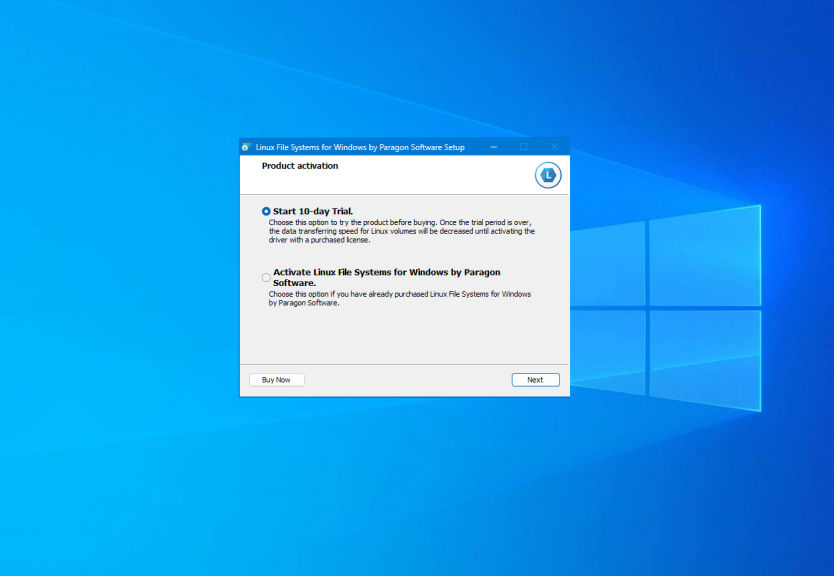
You can download a trial version from the official site. The installation process has nothing unusual, just press the Next button for each step as well as in the previous section. On the activation step, you should start your trial period or activate a license:
When the installation is complete, the main application window will be opened. The application will mount all available partitions with Linux filesystems:
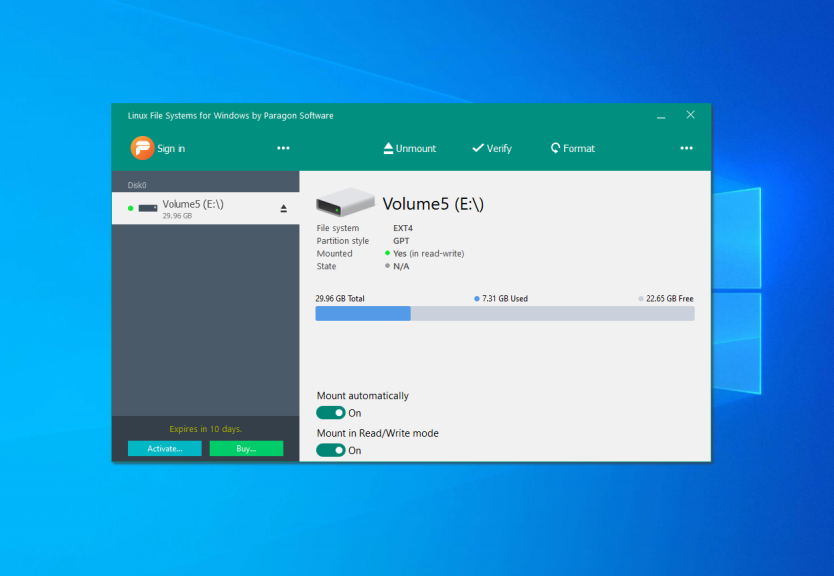
On the left side of the window, you can find the list of available partitions, and on the right — detailed information about each of them. You can unmount the partition by pressing the Unmount button or the button with an arrow near its name:
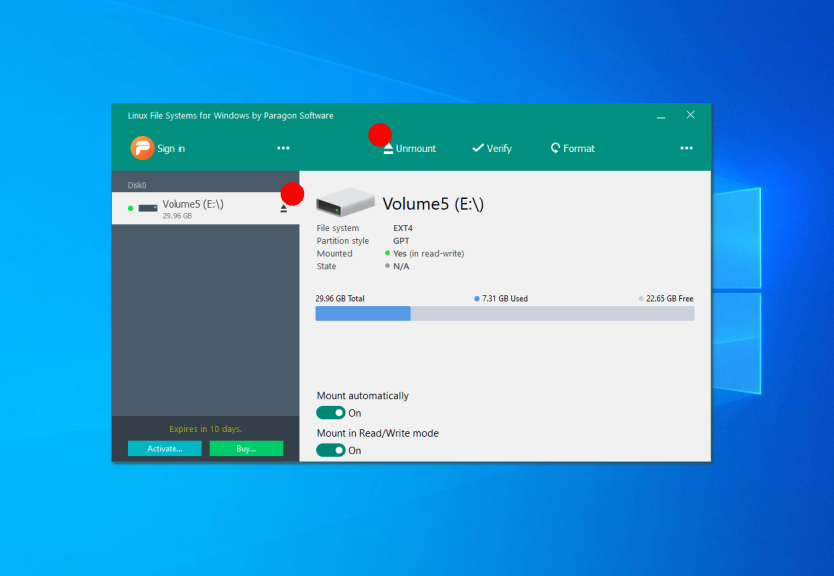
Also, you can check the partitions for errors using the Verify button or format it using the Format button. If you don’t want to mount this partition automatically in the future, disable this feature at the bottom of the window:
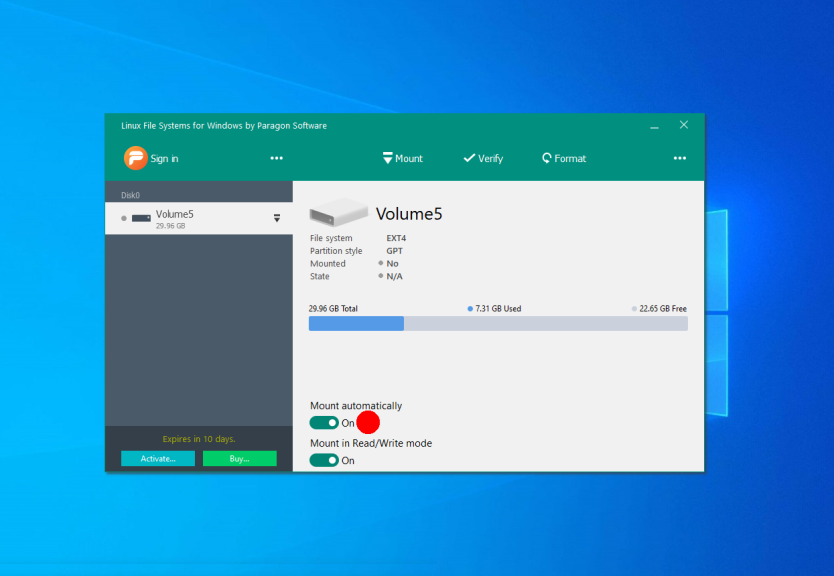
When a partition is unmounted you can mount it by clicking the Mount button. The application will open a new window when you can choose a mounting mode and a volume drive letter:
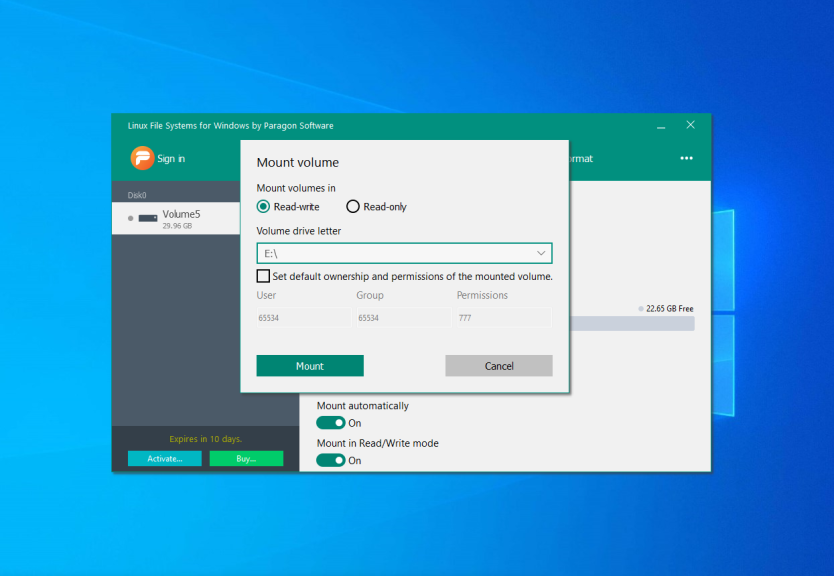
Then, just open This computer and choose the mounted disk to get access to your files. Now, all Linux partitions are available in Windows. Also, you can use the Open in Explorer button in the application:
1. Windows Subsystem for Linux
If you need to access a Ext4 from Windows just once to retrieve a few files or copy something there, and you don’t want to install any third-party software, you can use the Windows Subsystem for Linux. This will work on both Windows 10 and 11. In case of Windows 10 you will need build 2004 or later.
This subsystem allows running a Linux distribution environment within Windows. So you can run Ubuntu, grant it access to a specific disk, mount that disk within the environment, and then gain the ability to browse those files directly in the Windows Explorer.
However, this method has a significant drawback: you need to give the Linux distribution control of the entire disk containing the desired partition. If that disk holds the Windows system partition or has other mounted partitions, the approach won’t work, and you’ll have to look for another solution. You can find more information about this issue here.
To install WSL, simply open a command prompt with administrator privileges or PowerShell and run the following command:
wsl --install
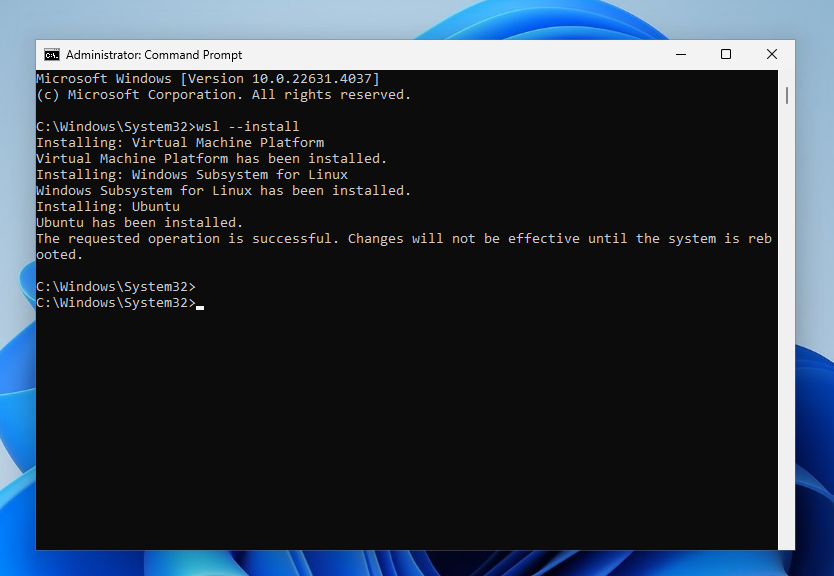
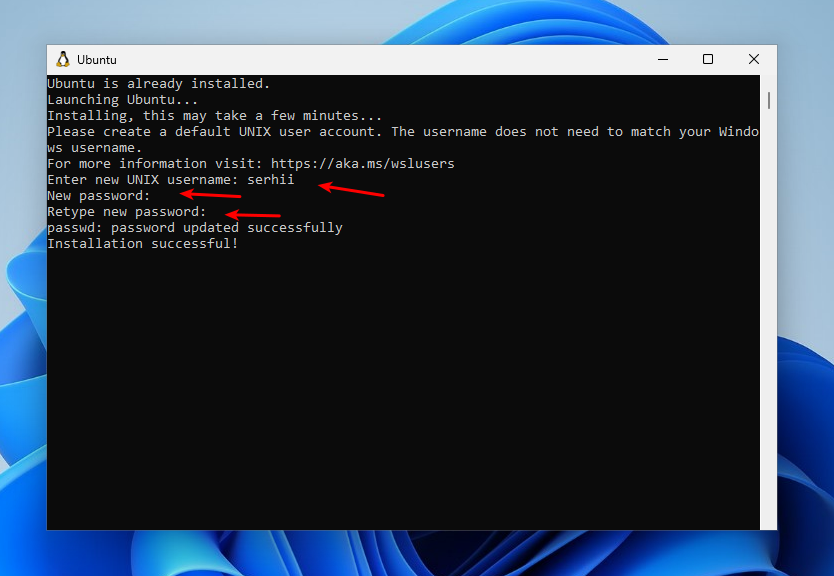
The command activates all the necessary components, downloads and installs the Linux environment. By default, the Ubuntu distribution will be used. After executing the command, you need to restart the computer. After reboot, the WSL installation will continue, and you will need to specify a username and password for Linux.
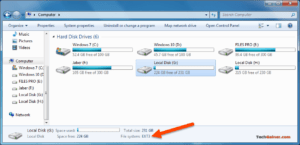
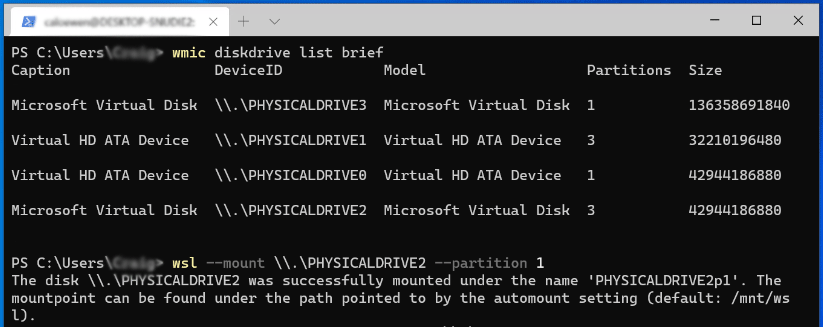
Next, we need to determine which disk and partition to mount in WSL. To view the list of physical disks, open the Command Prompt and run the following command:
wmic diskdrive list brief
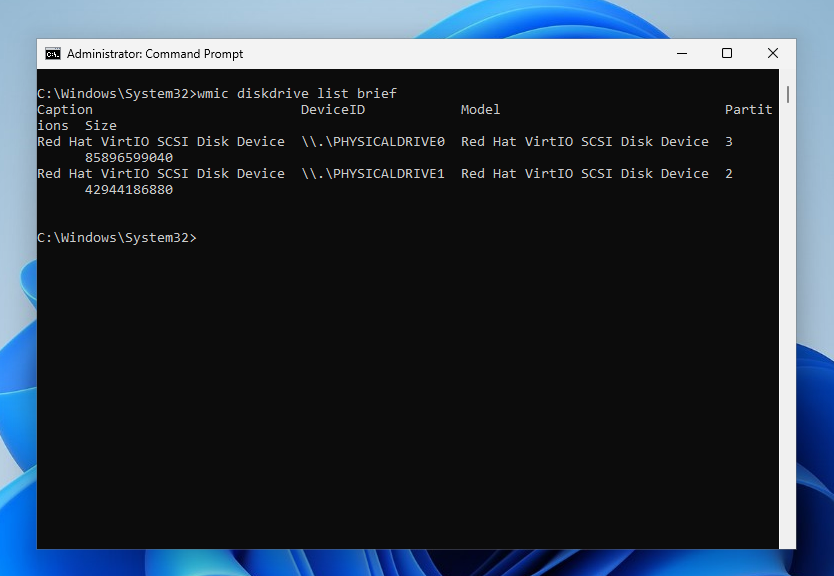
The output will show the disk identifier in the DeviceID field and the disk size in the Size field. In this example, Windows is installed on disk PHYSICALDRIVE0, while PHYSICALDRIVE1 contains the Linux partition we need to mount. If you’re unsure which disk is which, you can try identifying them by size. For example, I know my Linux disk is 40GB. However, a more convenient way to identify the disks is to use the Disk Management tool. To access it, right-click on This PC, then select Manage -> Disk Management.
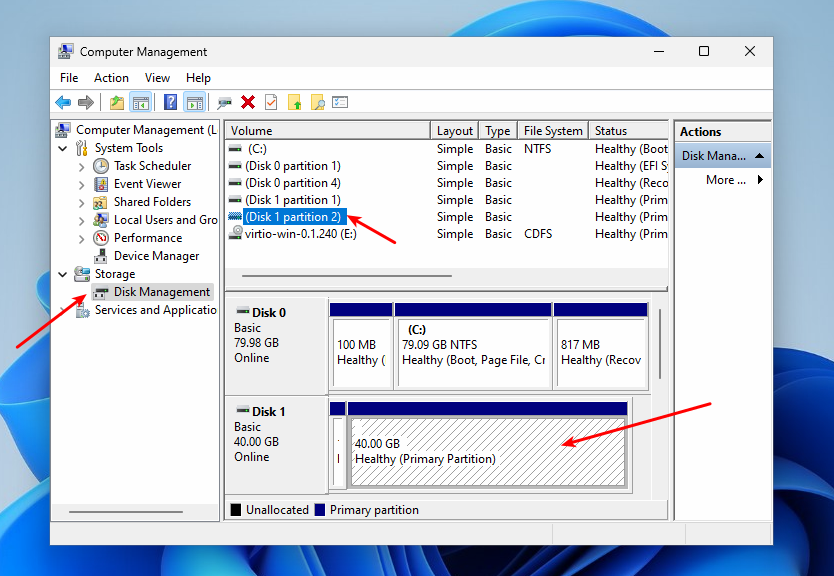
Here you will see a list of all disks and their partitions, displayed with their size and labels in a readable format.
Now that you know the disk number and partition number, you can use WSL’s —mount option to mount drive and partition with the Ext4 filesystem. For example:
wsl --mount \.PHYSICALDRIVE1 --partition 2
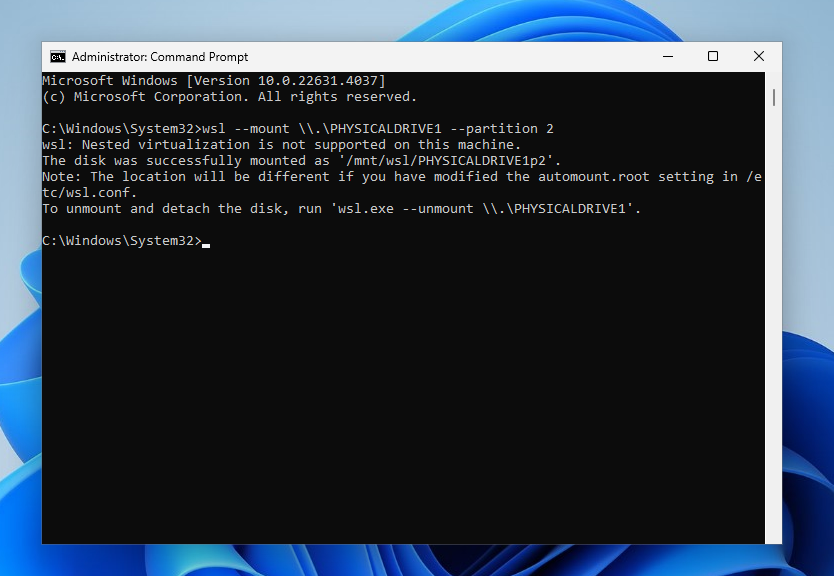
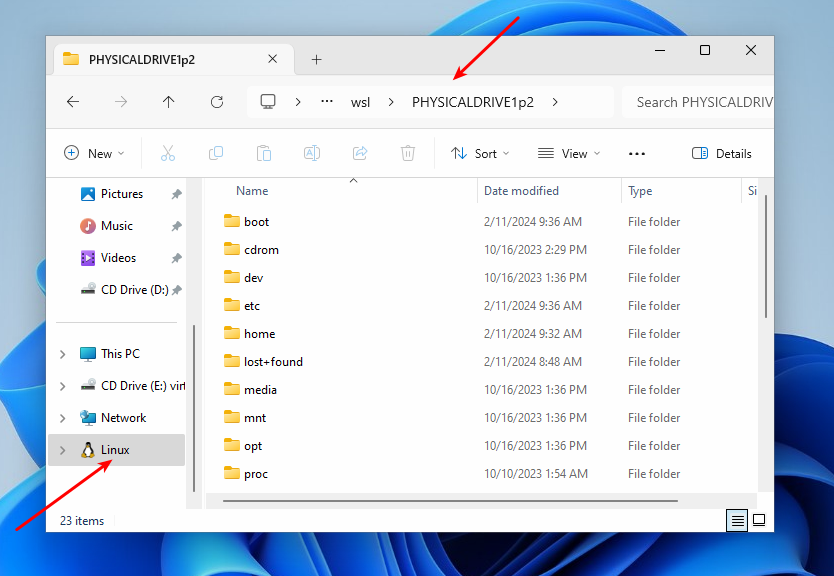
Once mounted, the partition will be available in WSL under /mnt/wsl/PHYSICALDRIVE1p2. You can also access it from the File Explorer by navigating to Linux -> Ubuntu -> /mnt/wsl and then selecting your disk name.
To unmount the disk, execute the following command:
wsl --unmount \.PHYSICALDRIVE1
If you receive the WSL_E_ELEVATION_NEEDED_TO_MOUNT_DISK error during mounting, you need to restart the command prompt with administrator privileges. This will be the simplest method to access Ext4 in Windows, especially if you’re comfortable
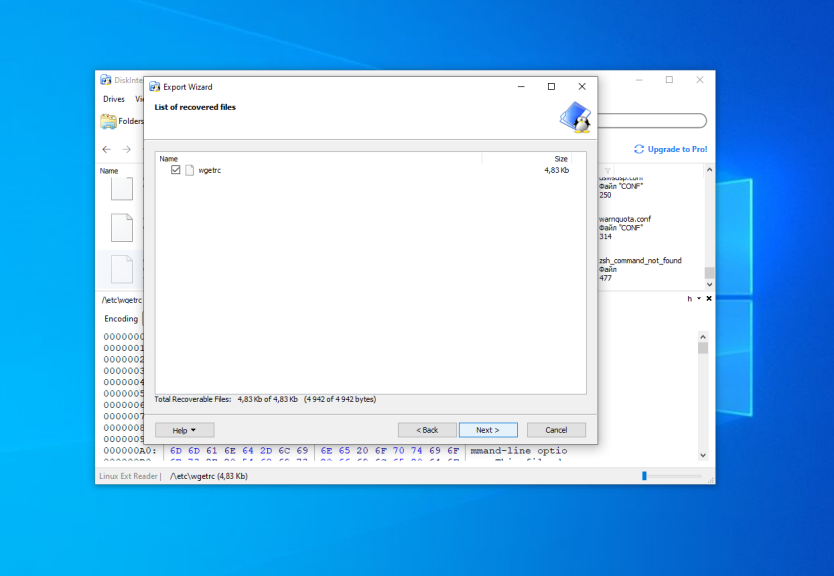
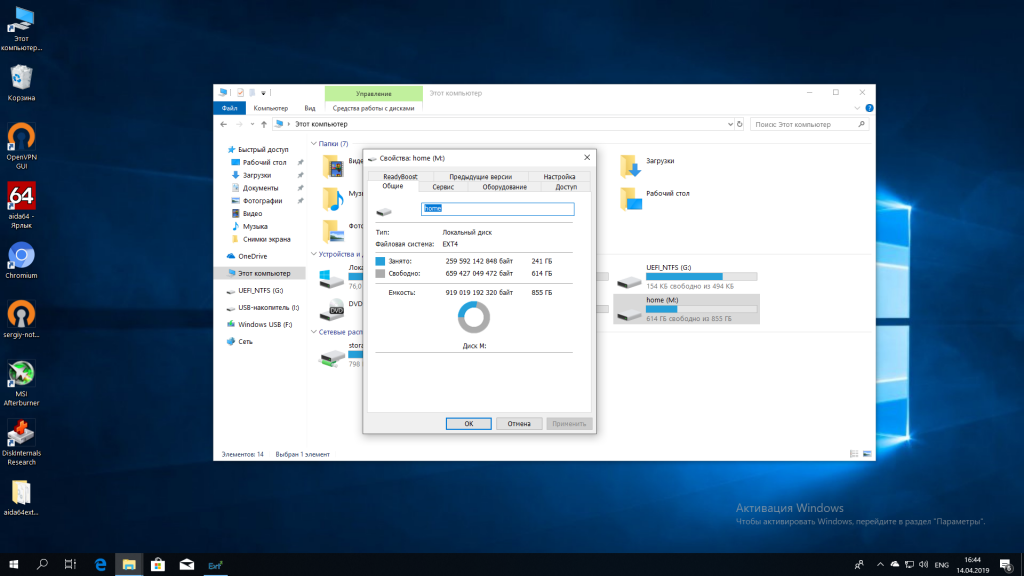
2. Diskinternals Linux Reader
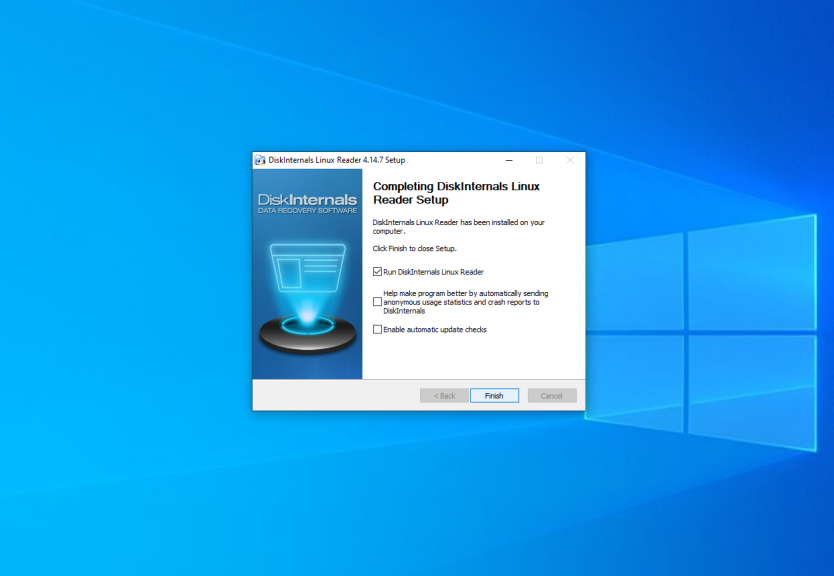
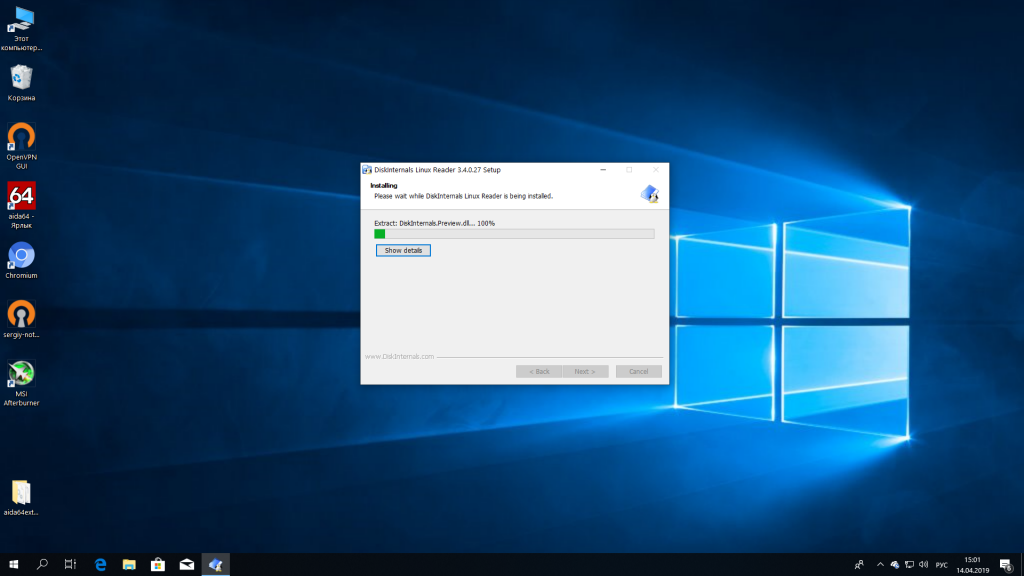
It is the simplest way to open Ext4 in Windows 10 or 11. This application can help you to extract required files from Linux partitions without adding support for this filesystem to Windows. You can download the application from the official site. Then run the installer and just continue pressing the Next button as well as for other applications.
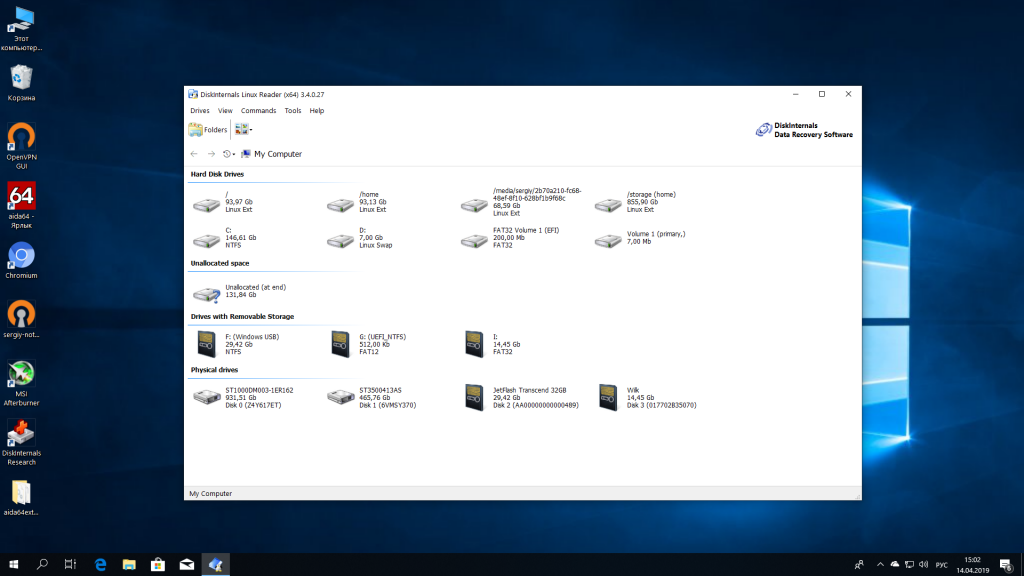
The main application window looks like this:
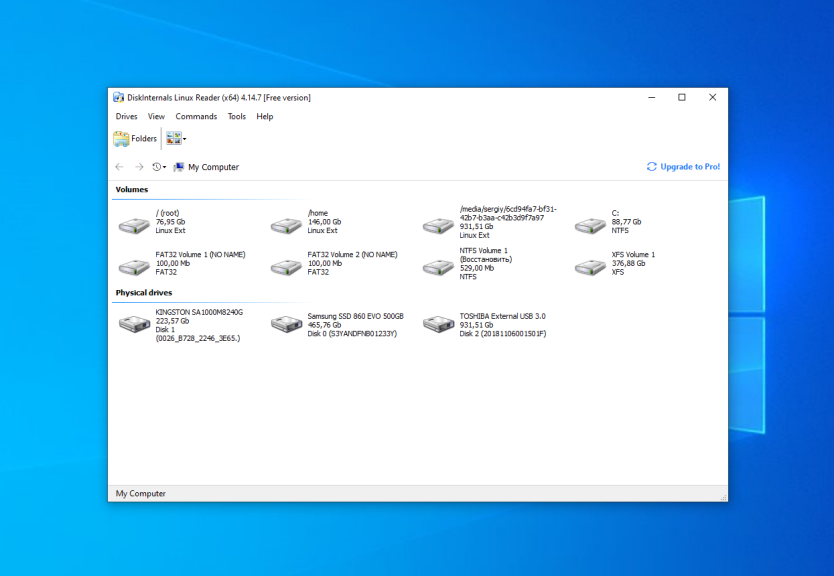
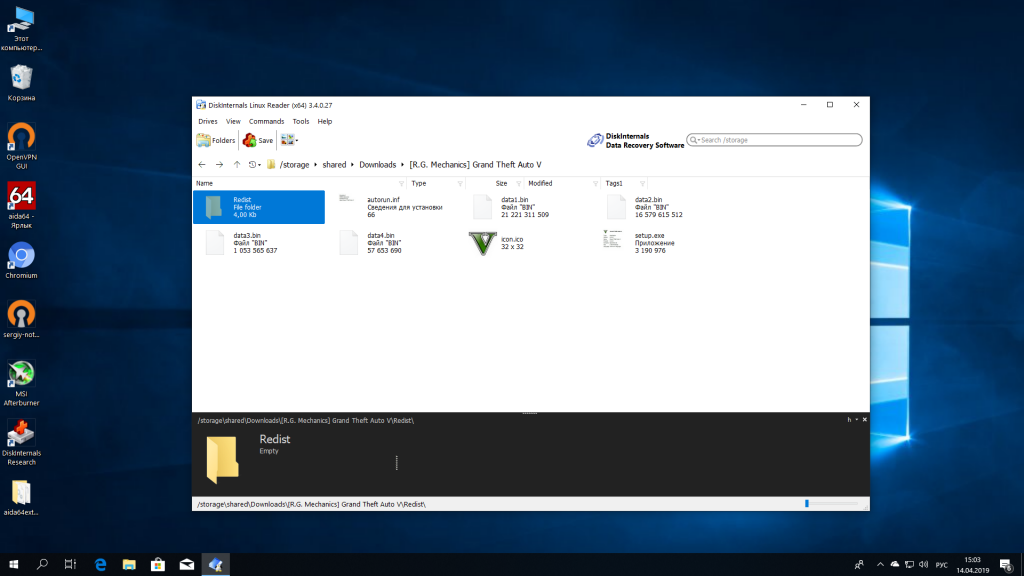
Here you can choose the required partition with the Ext4 filesystem and view all files which are located there:
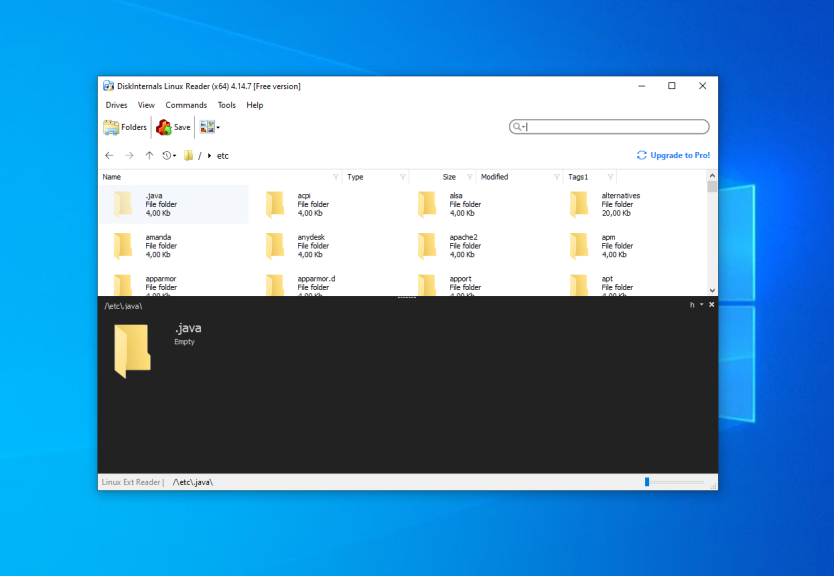
The application supports searching too. Just enter the file name, which you want to find and the application will highlight it in the list.
To extract any of the files or folders, right-click on it and choose Save in the contextual menu. Then choose Save files:
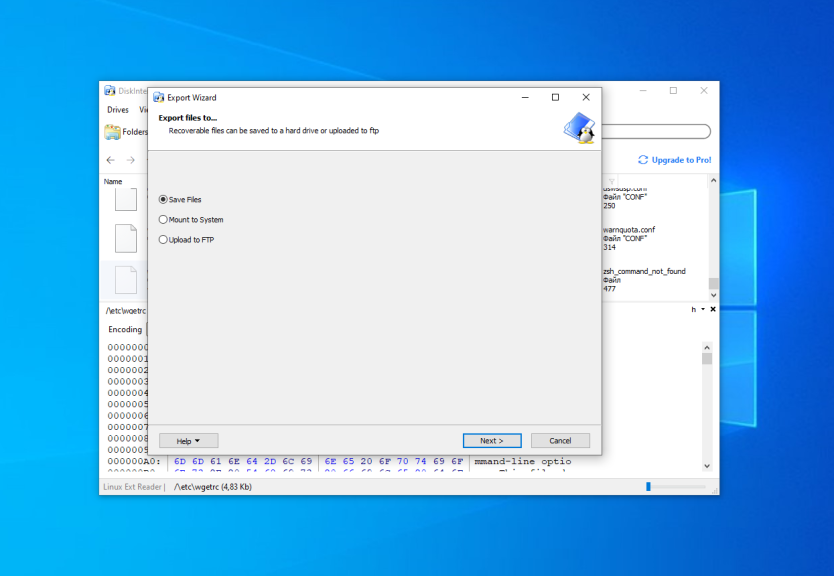
Then, choose the destination folder which will be used for saving the file:
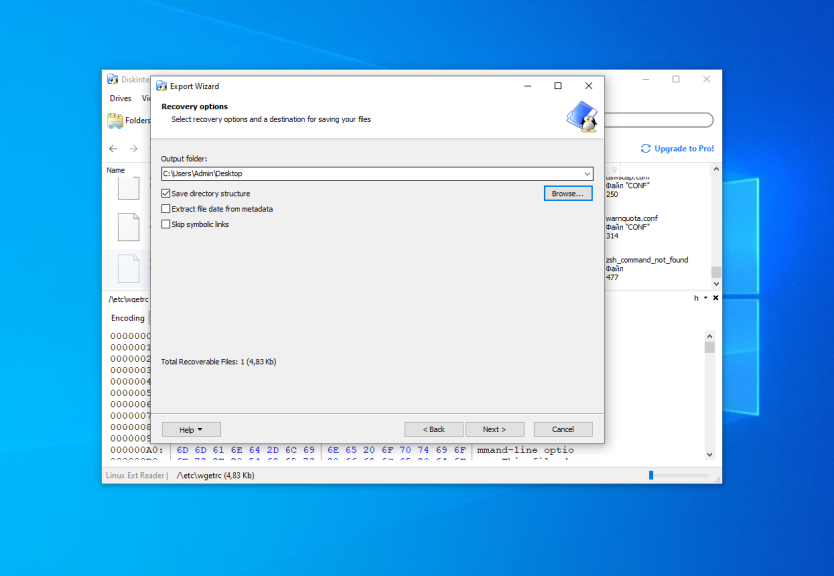
Check the Save directory structure flag if you want. On the next step ensure that all files which you want to extract are in the list and press the Next button:
Finally, wait until the extracting process is complete and do what you want with the files in Windows Explorer.
Wrapping Up
Now, you have learned how to open Ext4 in Windows 10 and 11. The open-source driver Ext2fsd still works despite not being updated for a long time. If it does not work in your system, you can use Ext4fsd, Diskinternals or a proprietary driver from Paragon.
There also exist other tools which not described in this article. For example, e2explore. It was discontinued in 2012 and I was unable to launch it. Also, you can find information about utilities which can convert Ext4 into NTFS. But be careful with them. Don’t convert the root or home partition, because this will break your Linux system.
The article is distributed under Creative Commons ShareAlike 4.0 license. Link to the source is required.
На чтение 4 мин Просмотров 13.2к. Опубликовано Обновлено
В этой статье рассказывается о том, как вы можете получить доступ к разделам файловой системы Linux Ext2, Ext3 и Ext4 в Windows 10 и автоматически сохранить их в проводнике, как все другие разделы NTFS или FAT32. Вы даже можете копировать файлы и записывать новый файлы на эти разделы.
Хотя Windows использует файловую систему NTFS и FAT32, Linux (например, Ubuntu) использует расширенные архитектуры файловой системы Ext 3, Ext4 и т. д. Самое интересное то, что Linux может получать доступ, читать и записывать файлы в файловые системы Windows, а Windows не может получить доступ к файлу Linux — системы. Я имею в виду, что Windows не имеет поддержки для чтения или доступа к разделам Ext3 или Ext4.
Таким образом, если у вас есть система с двойной загрузкой или более, в которой вы можете переключаться между Windows и Linux из меню загрузчика, иногда вам может понадобиться доступ к Linux-дискам / разделам. Или предположим, что вы находитесь в Windows, и у вас есть съемный / жесткий диск, который отформатирован в Ext3, и теперь вам нужно открыть файл внутри него. Или ваша система Linux «зависла», и вам необходимо восстановить важные файлы с помощью Windows. В таких случаях вам необходимо прочитать эти файловые системы без переключения с Windows.
Хотя Windows никогда не интересовалась файловыми системами Linux, к счастью, существуют сторонние диски и инструменты для открытия и чтения разделов Linux из Windows. Мы рассмотрим несколько инструментов в этой статье. Однако здесь мы будем использовать драйвер файловой системы Linux с открытым исходным кодом под названием Ext2Fsd, который предназначен исключительно для поддержки Ext2/3/4 в Microsoft Windows. При этом вы можете автоматически монтировать разделы Ext при загрузке диска, когда вам нужно.
- Размонтируйте разделы Linux Ext4/3/2 в проводнике Windows
- Загрузите Ex2Fsd из sourceforge.net/projects/ext2fsd/.
Содержание
- Подключение EXT4 в Windows 7/8/8.1/10
- Восстановление личных файлов
- Выводы
Подключение EXT4 в Windows 7/8/8.1/10
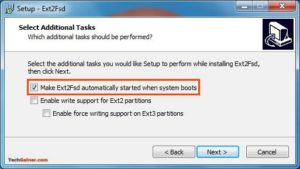
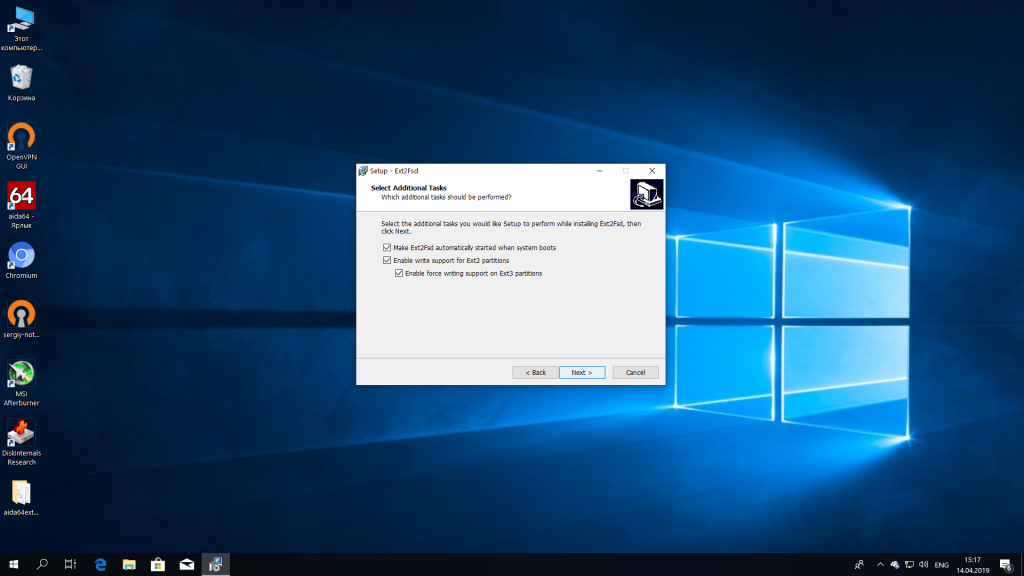
При установке отметьте «Make Ext2Fsd автоматически запускается при загрузке системы» и нажмите «Далее» и завершите настройку. Он будет автоматически запускать драйвер Ex2Fsd с Windows после следующей перезагрузки.
Запустите диспетчер томов Ext2Fsd. С помощью этого вы можете установить точку монтирования и настройки.
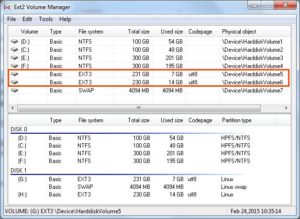
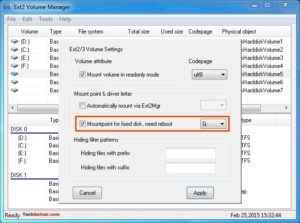
Чтобы назначить последний том, дважды щелкните раздел (или выберите раздел и выберите «Инструменты»> «Управление томами Ex2»), включите «Mountpoint for fixed disk» и назначьте букву диска. Затем нажмите Применить.
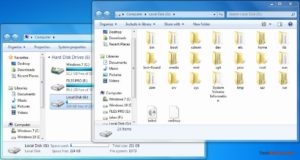
При следующей перезагрузке Windows вы увидите, что ваш желаемый раздел Linux монтируется в Проводнике в качестве других стандартных разделов.
Вы также можете указать свое имя, переименовав имя по умолчанию «Локальный диск». Готово!
Примечание 1: Рекомендуется хранить ваши разделы Linux только для чтения, чтобы вы или ваша система не могли повредить системе Linux.
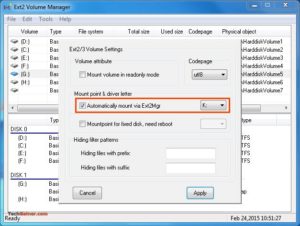
Примечание 2: Если вы не хотите, чтобы Ext2Fsd автоматически монтировал диск в проводнике при загрузке, вы можете отметить «Автоматически монтировать через Ex2Mgr». При этом ваш раздел будет монтироваться только при открытии диспетчера томов Ex2Fsd, как показано ниже:
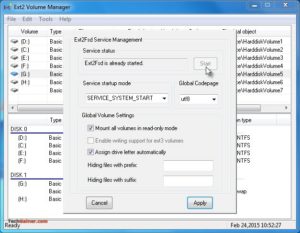
Примечание 3: Во время установки Ext2Fsd, если вы не устанавливали службу Ex2Fsd для автоматического запуска с Windows, вам необходимо вручную запустить службу из меню «Сервис»> «Управление службами»> «Пуск», как показано ниже:
Восстановление личных файлов
Про подключение EXT4 в Windows поговорили, теперь узнаем что делать дальше. Если вы ищете доступ к своим личным файлам, хранящимся в Linux, перейдите в home\name\, как показано ниже:
Хотя это руководство сделано в Windows 7, я протестировал его на Windows 10 и способ должен также работать с Windows 8.x в соответствии с его редакциями. Возможность просмотра и чтения всех разделов в обеих ОС — это, безусловно, классная функция для тех, кто использует Linux и Windows на одной машине.
Выводы
Подключение EXT4 в Windows является очень простым. Надеемся, Вам была интересна наша статья об этом — расскажите нам в комментариях.
Также, не забудьте поделится ссылкой на статью в Google+, Facebook, Twitter, Одноклассники или, например, ВКонтакте.
Подключение ext4 в Windows
Подключение ext4 в Windows
Если вы используете Windows рядом с Linux, рано или поздно может возникнуть необходимость скопировать файлы из одной операционной системы в другую. При копировании с Windows в Linux проблем не возникнет так как Linux отлично открывает файловые системы семейства NTFS, но вот открыть файловую систему ext4 в операционной системе от майкрософт будет не так то просто.
В этой инструкции я опишу несколько способов подключения ext4 в Windows. Вы можете либо добавить поддержку этой файловой системы в Windows либо просто извлечь из неё файлы с помощью специальной программы.
Подключение ext4 в Windows 10
Сообществом открытого программного обеспечения был разработан открытый драйвер ext4 для windows под названием ext2fsd.
1. Установка драйвера ext2fsd
Загрузить установщик для вашей версии ОС можно с официального сайта программы. Процесс установки не должен вызвать никаких трудностей и сводиться к нажиманию кнопки Далее в мастере установки, как обычно при установке программ в Windows. Интерес представляет только это окно:
Здесь:
- Make Ex2Fsd automatically started when system boots — автоматическая загрузка драйвера во время загрузки системы, желательно включить.
- Enable write support for ext2 partitions — поддержка записи в файловую систему ext2
- Enable force writing support on Ext3 partitions — поддержка записи в файловую систему ext3
Установите необходимые галочки и еще несколько раз нажмите кнопку Далее.
2. Подключение ext4
Главное окно программы выглядит вот так:
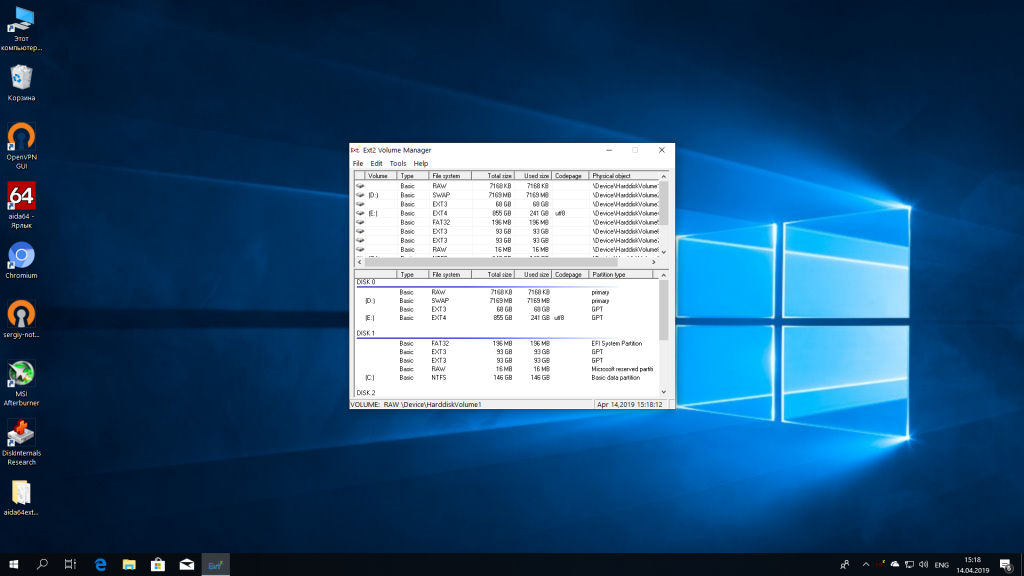
Здесь в в списке показаны все доступные разделы, их размер и файловая система. Для того чтобы примонтировать любой из разделов выполните на нем двойной щелчок:
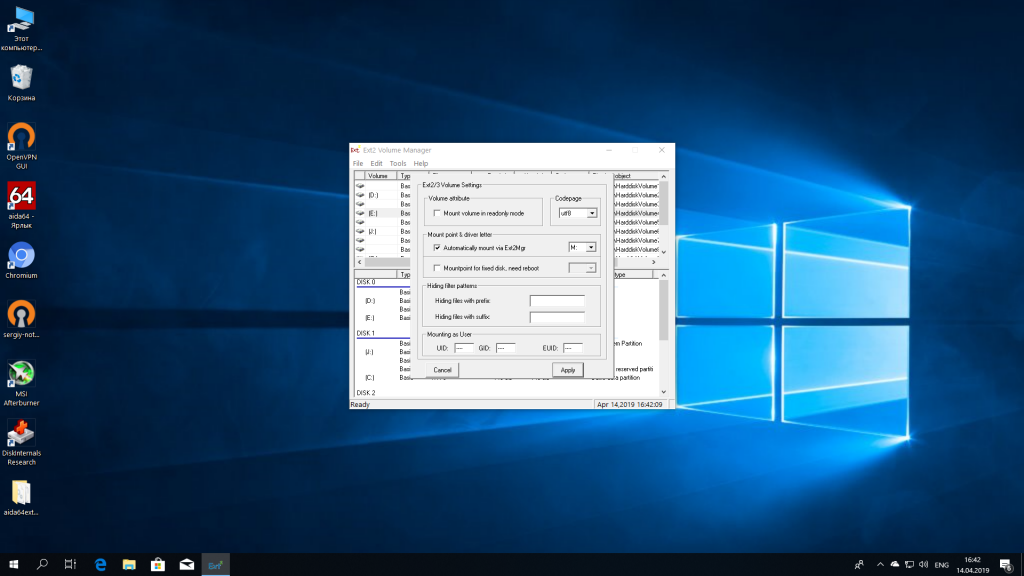
Здесь есть два варианта монтирования:
- Automaticly mount via Ext2Mgr — раздел будет подключен сейчас, но только до перезагрузки
- Mountpoint for fixed disk — постоянное автоматическое подключение раздела при старте системы.
С права от поля способа монтирования можно выбрать букву диска для монтирования.
Также в поле Hiding files with prefix можно указать с какими префиксами файлы нужно считать скрытыми, как вы знаете в Linux считаются скрытыми файлы с префиксом точка. Когда укажите все необходимые параметры нажмите кнопку Apply.
Теперь открыв Мой компьютер вы увидите подключенный диск:
С помощью драйвера Ext2fsd вы можете работать с вашими разделами Linux как с обычными NTFS или FAT.
Извлечение файлов из Ext4 в Windows
Это самый простой способ открыть ext4 в windows 10. С помощью программы DiskInternals Linux Reader вы можете извлечь файлы из раздела с файловой системой Linux не добавляя её поддержку в ядро системы. Скачать программу можно на официальном сайте. Установка программы аналогично предыдущей сводится к нажатию кнопки Далее:
Главное окно программы выглядит вот так:
Здесь вы можете выбрать нужный раздел с файловой системой ext4 и просмотреть все файлы, что там есть:
Чтобы извлечь любой из файлов или папку, кликните по ней правой кнопкой мыши и выберите Save As, затем выберите папку, в которую будет сохранен ваш файл:

Чтобы сохранить структуру папок нужно отметить флажок Save directory structure. Затем дождитесь завершения процесса копирования и можете делать с полученными файлами все что нужно уже в проводнике.
Source
-
Home
-
Partition Magic
- EXT4 Windows: Mount EXT4 File System in WSL2
By Linda | Follow |
Last Updated
Do you want to mount EXT4 Windows? This post from MiniTool Partition Wizard shows you how to mount the EXT4 partition in WSL2. It also introduces other tools to manage EXT4 partitions on Windows.
Windows 10 Lets You Mount EXT4 File System in WSL2
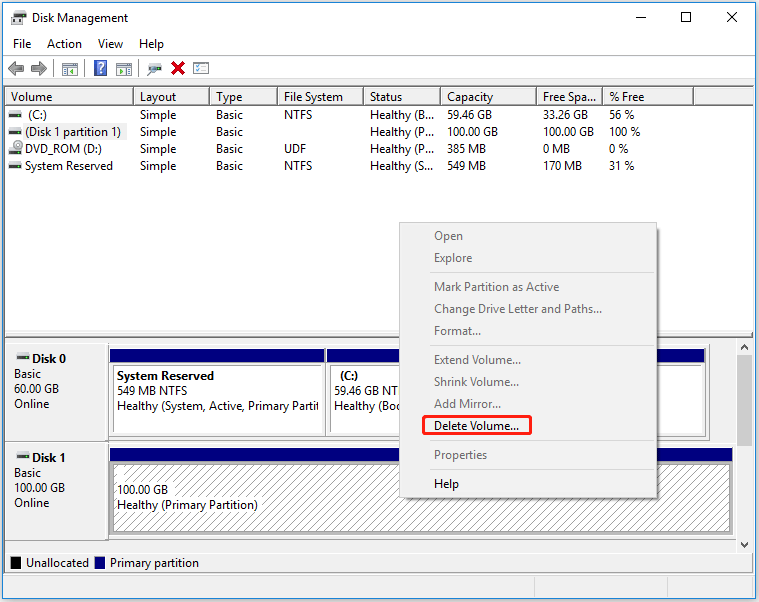
EXT4 (fourth extended filesystem) is a log file system under the Linux system. Windows can’t recognize the EXT4 partition and can’t access data in it. In Windows, the only thing you can do with an EXT4 partition is to delete it. The following picture shows the status of an EXT4 partition in Windows Disk Management.
Is there any way to manage EXT4 Windows? Yes. There is. You can use WSL2 (Windows Subsystem for Linux 2), which allows developers to run the GNU/Linux environment – including most command-line tools, utilities, and applications – without the overhead of a traditional virtual machine or dual-boot setup.
Starting with Windows 10 preview build 20211, WSL 2 includes a wsl –mount command that lets you mount ext4 and other Linux kernel supported filesystems, directly in installed WSL distributions.
How to Mount a Disk in WSL 2? You just need to open a PowerShell command prompt with administrative privileges and run the following commands:
- wmic diskdrive list brief (it will list available drives and display their information including the caption, device ID, model, partition number, and size)
- wsl –mount [Divice ID] –partition [PartitionNumber] (This can mount a partition on a disk. If the disk has a single partition, you can remove the “–partition” section)
Then, you can access the mounted EXT4 partition in Windows 10’s File Explorer directly. You just need to open the Linux category and navigate to /mnt.
[SOLVED] Failed to Format Ext4 Windows? – Solutions Are Here!
Other Ways to Manage EXT4 Windows
Some people may don’t like to use WSL2 to mount EXT4 Windows 10 and access Linux files from Windows 10 because this tool doesn’t have a GUI. Then, the following tools are recommended.
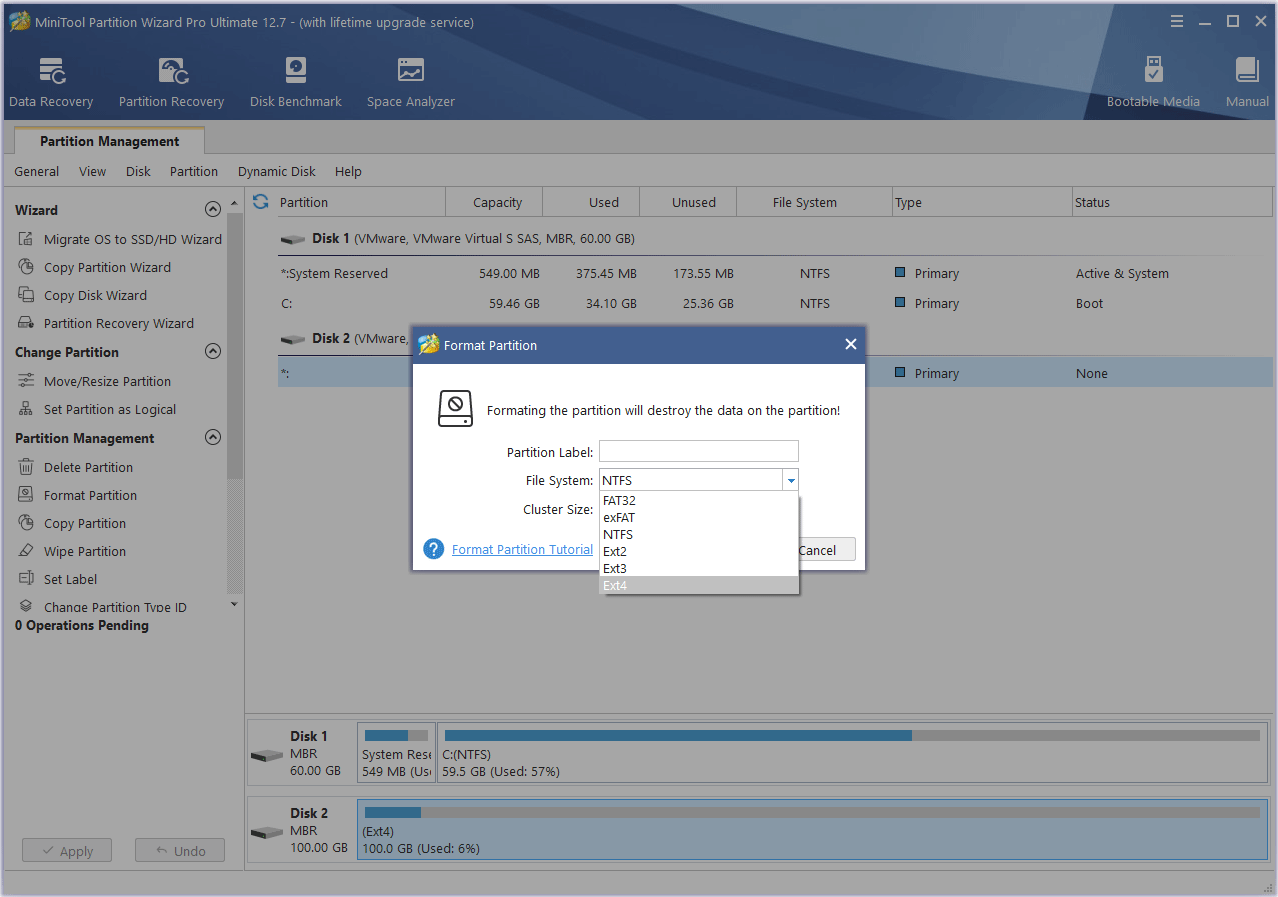
#1. MiniTool Partition Wizard
MiniTool Partition Wizard is a professional Windows disk and partition management tool. It is mainly used to create/format/delete partitions, recover lost partitions and data, clone disk, convert disk between MBR and GPT without data loss, migrate OS, etc.
However, this tool also allows you to format a partition to EXT4. It is a free EXT4 formatter Windows 10.
MiniTool Partition Wizard FreeClick to Download100%Clean & Safe
#2. Ext2Fsd
This tool also allows you to mount EXT4 Windows 10, making Windows read EXT4. It is free and facilitates read and write access to the ext2, ext3, and ext4 file systems.
However, since 2017 the application has effectively been abandonware as its author seemingly disappeared in August 2020. So, its interface may look old.
How to Access Linux Files from Windows 10
#3. DiskInternals Linux Reader
This free tool also allows you to access Linux files from Windows 10. In addition, you can read EXT4 Windows within this application. Therefore, if you want a tool to make Windows read EXT4, this tool is recommended. This tool also supports ReFS, HFS, and HFS+ file systems.
Bottom Line
MiniTool Partition Wizard can help you clone the system, manage disks better, and recover data. If you have this need, you can download it from the official website.
About The Author
Position: Columnist
Linda has been working as an editor at MiniTool for 5 years. She is always curious about computer knowledge and learns it crazily. Her articles are simple and easy to understand. Even people who do not understand computer can gain something. By the way, her special focuses are disk management, data recovery and PDF editing.