
-
Home
-
News
- How to Turn On or Off Mono Audio in Windows 10/11
By Alisa |
Last Updated
Learn how to turn on or turn off mono audio on Windows 10 or 11 in this post. For more computer tips and solutions, you can visit MiniTool News Center. You can also find some useful programs from MiniTool Software website.
Mono audio combines left and right audio channels into one channel. If you want to turn on mono audio on Windows 10/11 or force Windows 10/11 to make all audio mono, you can check the detailed steps below.
How to Turn On or Off Mono Audio on Windows 10
Step 1. Press Windows + I to open Windows Settings app. Click Ease of Access. In newer Windows 10 versions, you can click Accessibility.
Step 2. Next, click Audio under Hearing in the left panel.
Step 3. In the right window, toggle the switch on of the Turn on mono audio option to turn on mono audio in Windows 10. If you want to turn off mono audio in Windows 10, toggle the switch off.

On this Windows audio settings page, you can also change device or app volume, change other sound settings, fix sound problems in Windows 10, etc.
How to Enable or Disable Mono Audio on Windows 11
Step 1. Click Start -> Settings to open the Settings app on Windows 11. Click the System tab.
Step 2. Click Sound on the right side.
Step 3. Under the Output section, you can turn on the switch of Mono audio option to turn on mono audio on Windows 11. After this, your system will combine the left and right audio channels to deliver mono sound. To turn off mono audio in Windows 11, turn off the switch.
How to Fix Sound Problems in Windows 10/11
To help users fix audio or sound problems, Microsoft provides an audio troubleshooter that is embedded in the Windows system. It helps fix audio problems automatically in Windows.
For Windows 10, click Start -> Settings -> Update & Security -> Troubleshoot. Find and click Playing Audio in the right window and click the Run the troubleshooter button to run the audio troubleshooter to detect and fix possible problems with audio.
For Windows 11, click Start -> Settings -> System -> Troubleshoot -> Other troubleshooters. Click the Run button next to the Playing Audio option to run the audio troubleshooter in Windows 11 immediately.
Free Audio Converter and Recorder for PC
MiniTool Video Converter is a 100% clean and free program that combines video/audio convert, video download, and screen record functions into one suite.
You can use MiniTool Video Converter to convert any audio to MP3 or other formats, convert any video to MP4 or other popular formats, free download YouTube video for offline playback, record Windows computer screen and audio, etc.
Download and install MiniTool Video Converter on your Windows PC or laptop and check the simple guide below.
MiniTool Video Converter FreeClick to Download100%Clean & Safe
- Launch MiniTool Video Converter. Choose a module on the main UI.
- After you click the Video Convert module, you can add the source video or audio file, click the Edit icon under the Target section, click Video or Audio tab to choose output audio or video format. Click the Convert button to convert the video/audio to the target format at a fast speed.
- You can click Screen Record mode to open the MiniTool Screen Recorder window. Choose a recording module and choose to record system audio or microphone audio or not. Click the Record button to instantly start the recording.
This post teaches you how to turn on or turn off mono audio on Windows 10/11 and offers an all-in-one tool MiniTool Video Converter for your reference. Hope it helps.
About The Author
Position: Columnist
Alisa is a professional English editor with 4-year experience. She loves writing and focuses on sharing detailed solutions and thoughts for computer problems, data recovery & backup, digital gadgets, tech news, etc. Through her articles, users can always easily get related problems solved and find what they want. In spare time, she likes basketball, badminton, tennis, cycling, running, and singing. She is very funny and energetic in life, and always brings friends lots of laughs.
Ways to Disable, Enable Mono Audio in Windows 10. – Microsoft offers few very useful accessibility tools for the visually impaired users. You can see our previous guide in this concern – How to Enable Braille Support in Windows 10. Another one is Mono audio that allows you to listen to the complete sound through each earbud.
When you play music or audio there are two Modes- Mono and Stereo. Stereo mode makes you feel sound coming from 2 directions. It is pleasant to hear but equally disturbing when you are using earbuds. When you use earbuds in both the ears each of them blows different sounds. The separate sound seems noise to the ears. Here the Mono Audio settings come into the role. When you enable Mono Audio in Windows 10 you listen the completely audible sound through each of the earbuds separately. In contrast, when you disable mono audio, both earbuds again cause to listen to different sounds.
Ease of Access Settings include the Mono Audio so you can easily turn on or off it. In this guide, we will help you to disable enable Mono audio in Windows 10.
Important – Mono audio is an accessibility feature and to experience it you should have Windows 10 build 15025 or higher running on your PC.
Mono Audio in Windows 10 Enabling Disabling Methods
Step 1 – First of all, press Windows logo and then select the Settings icon. Instead, pressing Win & I keys altogether will also show up Settings app.
Step 2 – Now, in the home page of Settings application, locate and click the category Ease of Access.
Step 3 – You find few options in the left pane of Ease of access. Select Other options.
Step 4 – Moving ahead, locate the title Audio options on the right pane. Just below it, Mono audio will be visible.
To Disable Mono Audio
Step 5 – Now, to disable Mono audio in Windows 10, simply drag the slide towards left.
To Enable Mono Audio
Step 6 – Make the slide into ON position and enable Mono audio in Windows 10.
Mono audio is a very useful and handy feature for the visually impaired users. These users take the support of screen reader application to read out the entire contents of the PC to them. So, when they are in meetings they use earbuds to hear the contents of the screen. In this situation, most users put only one earbud to listen to the PC, and with another ear, they hear people around them. And as a result, they cannot hear the sound that is blown to the other earbud. So, changing the audio into Mono mode will direct all audio to both the ears, and hence there will be no hurdle in their hearing. Go through
Go through How to Enable Read Aloud on Microsoft Edge for clearly hear a webpage content.
This option makes sure that you don’t miss any note or sound with an earbud or headset on.
In case, if your audio is giving trouble, please follow this guide for reference – How to Download Audio Troubleshooter for Windows 10 Pro, Home and Run.
Winding Up
Hence, every time you use earbuds, enable the Mono audio so that you don’t skip out any sound, note or other important information. Not only Mono audio but Microsoft has also included Braille support in Windows 10. Well, avail these features and write to us if there is anything more.
Монофонический звук — это одна из функций специальных возможностей Windows 10, которая гарантирует, что даже если у пользователя возникнет проблема с одним аудиоканалом, он или она никогда не пропустит ни слова, ни звука при воспроизведении через стереогарнитуру или многоканальные динамики. В течение многих лет аудио, которое мы слушаем, имеет два разных канала — левым и правым. В этом случае пользователь при прослушивании получает разные аудиопотоки из обоих каналов. В отличие от стерео, монофонический звук воспроизводит один и тот же поток через оба канала. Windows 10 включает встроенную опцию для включения монофонического вывода звука. Вы можете получить к нему доступ быстрее, добавив специальную команду контекстного меню рабочего стола.
Хотя эта возможность стала доступной в программном обеспечении медиаплеера в течение достаточно долгого времени благодаря понижающему микшированию стереофонического или многоканального звука в монофонический, она не была доступна в Windows 10 на системном уровне. Включение монофонического аудиовыхода полезно, когда вы слушаете звук, который имеет только один канал, или кодируется неправильно, или если закодированные каналы несовместимы с настройками вашего оборудования, в результате чего звук воспроизводят только один наушник или динамик.
В Windows 10 возможность включения монофонического звука является частью функций «Специальные возможности». И его можно включить в настройках соответствующей категории.

Если вы часто включаете функцию Монозвук, для вас может быть полезно иметь специальную команду контекстного меню, чтобы быстрее включить / отключить эту функцию.
Windows 10 Переключение моно – стерео в контекстном меню.
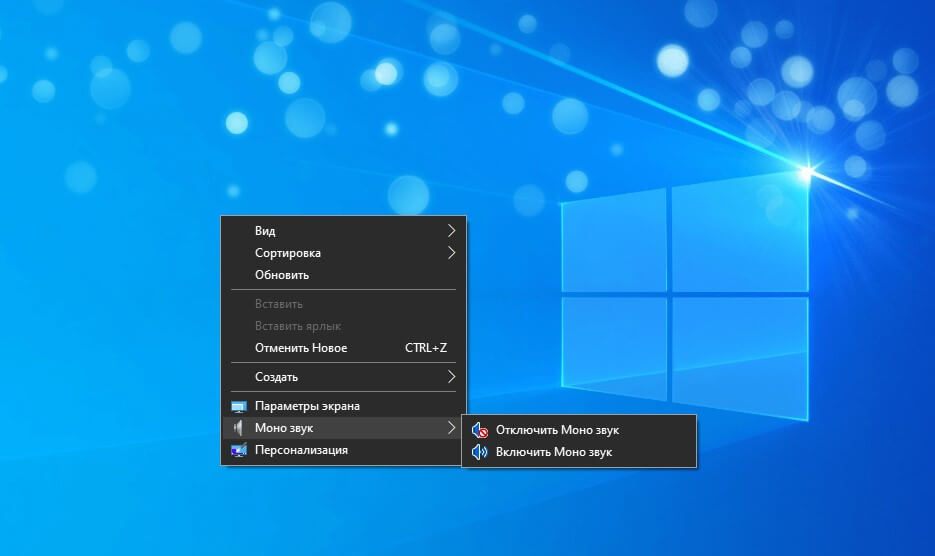
Чтобы добавить Монозвук в контекстное меню в Windows 10,
Шаг 1: Загрузите следующий ZIP-архив: Скачать ZIP-архив.
Шаг 2: Распакуйте его содержимое в любую папку. Вы можете разместить файлы прямо на рабочем столе.
Шаг 3: Дважды кликните файл «Add Mono Zvuk Desktop Context Menu.reg», чтобы автоматически добавить значения в реестр системы.
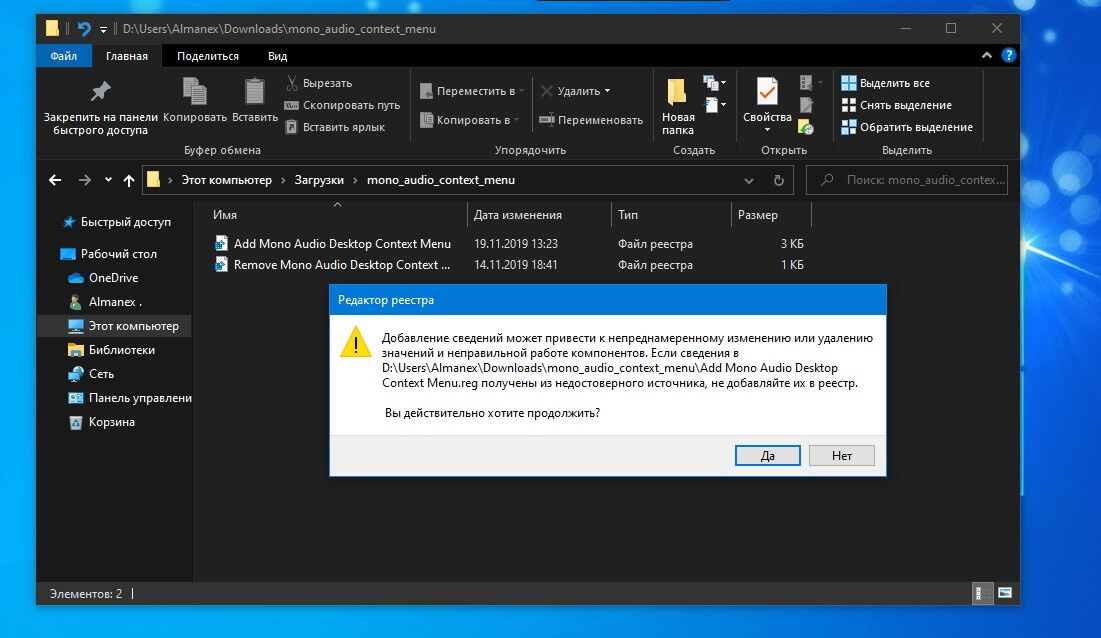
Шаг 4: Чтобы удалить запись из контекстного меню, используйте предоставленный файл Remove Mono Zvuk Desktop Context Menu.reg.
Все!
Как это работает или ручная правка реестра.
Указанные выше файлы реестра изменяют ветку реестра.
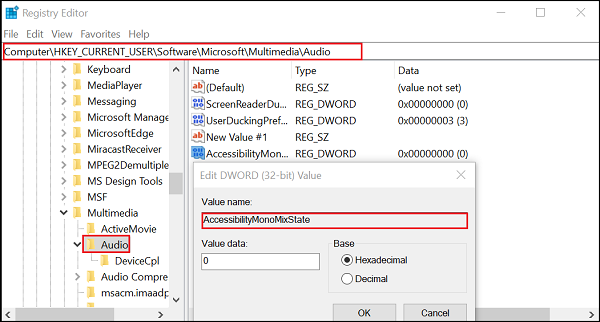
Шаг 1: Откройте редактор реестра и перейдите по следующему пути:
HKEY_CURRENT_USER\Software\Microsoft\Multimedia\Audio
Шаг 2: Чтобы включить эту функцию, создайте новый параметр DWORD (32 бита) с именем «AccessibilityMonoMixState» и установите для его значение равным «1».

Примечание: Даже если вы используете 64-разрядную версию Windows, вы все равно должны создать параметр DWORD (32 бита).
Шаг 3: Значение «0» отключит функцию моно и вернет стерео режим.
Шаг 4: Чтобы применить изменения, перезагрузите ПК или перезапустите службу Windows Audio.
Вот и все.
Download Windows Speedup Tool to fix errors and make PC run faster
Modern-day electronic devices such as PCs and movie players allow users to readily switch the audio channel between stereo and mono in an instant. That said, a majority of us aren’t even aware of the difference between the two, i.e., Mono Audio and Stereo audio.
How to Enable or Disable Mono Audio in Windows 11/10
We’ll learn about this and also see the method of disabling or enabling Mono Audio output in Windows 11/10. It is very apparent that every individual will have his or her own interpretation of the terms ‘mono’ and ‘stereo’, influenced by their own experiences and expectations. At the very basic level, Stereo means a sound system that comes from more than one source and is directed through two or more speakers which surround the listener. It induces spatial magic by creating the illusion that you are in the middle of a three-dimensional sound source.
On the other hand, mono audio has only one spatial dimension; something that can be either close to (loud) or far away (quiet) from the listener. People or individuals with hearing impairment find Mono audio useful. As such, with accessibility options directly built into OS, users who may have trouble using their computers normally can get a little more functionality out of their favorite OS. Windows features the mono audio option. It is built right into the Settings.
In Windows 11, you can readily combine left and right audio channels into one by enabling the Mono audio. The same feature exists in Windows 10, though under a different setting.
Earlier, the option to enable Mono audio in Windows 10 resided under Ease of Access settings. Now it has been moved to System settings in Windows 11. Apart from the change in location, there’s no change in function:
- Go to Start.
- Choose Settings.
- Select Systems.
- Switch to the Sound section.
- Scroll down to Output section.
- Toggle the switch next to Mono audio entry to On position.
The above steps will configure the system to combine the left and right audio channels to provide mono sound.
If you are running the latest version of Windows 11, go to Start and search for Settings.
When visible, click it and go to System.
Click System to display its settings.
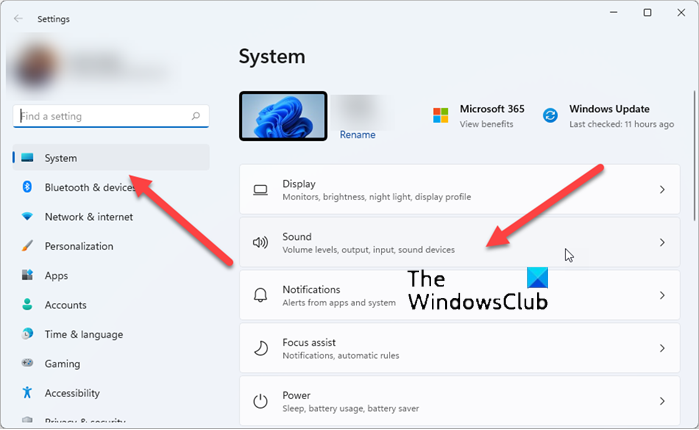
Choose the Sound heading on the right.
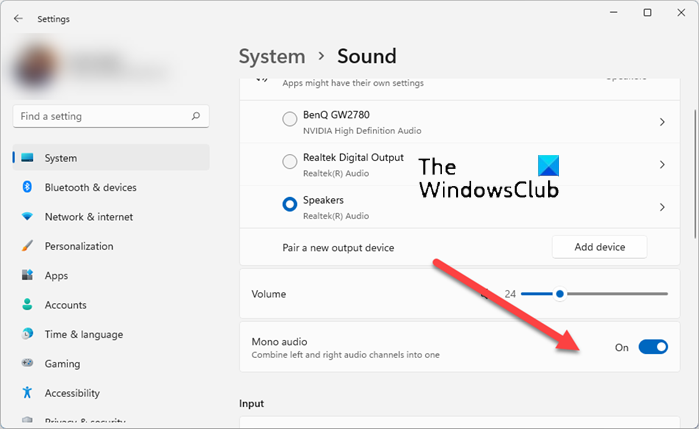
Now, scroll down to the Output section of Sound and toggle the switch next to the Mono audio entry to the ‘On’ position.
This will enable Mono Audio in Windows 11. Close the settings and exit.
How to Enable Mono Audio in Windows 10
1] Via Settings

Click the Windows Start button and select the “Settings” icon. Next, choose the “Ease of Access” tile visible under the Settings window.
Now, click “Other options” in the sidebar and scroll down to the bottom of the window. There, you’ll find “Mono audio” option displayed in Audio menu. Set it to “On”.
2] Via Registry Editor
Alternatively, you can enable the same feature via a registry tweak. Follow the instructions given below.
Open the Registry Editor and navigate to the following address-
Computer\HKEY_CURRENT_USER\Software\Microsoft\Multimedia\Audio
In the right side you will see a 32-Bit DWORD value AccessibilityMonoMixState. Double-click on it and give it a value of 1 to enable it.
The values are:
- 0 – Off
- 1 – On.
If this DWORD does not exist, you will have to create it.
What is the difference between Mono and Stereo?
At the very basic level, Stereo means a sound system that comes from more than one source and is directed through two or more speakers which surround the listener. It induces a spatial magic by creating the illusion that you are in the middle of a three-dimensional sound source. As opposed to this, Mono or monoaural sound only uses one channel when converting a signal into a sound.
What is better mono or stereo?
There is no real answer. Mono audio is useful for people or individuals with hearing impairments. Stereo sound is recommended for listeners who prefer a more detailed and realistic sound experience.
I hope this helps!
Anand Khanse is the Admin of TheWindowsClub.com, a 10-year Microsoft MVP (2006-16) & a Windows Insider MVP (2016-2022). Please read the entire post & the comments first, create a System Restore Point before making any changes to your system & be careful about any 3rd-party offers while installing freeware.