
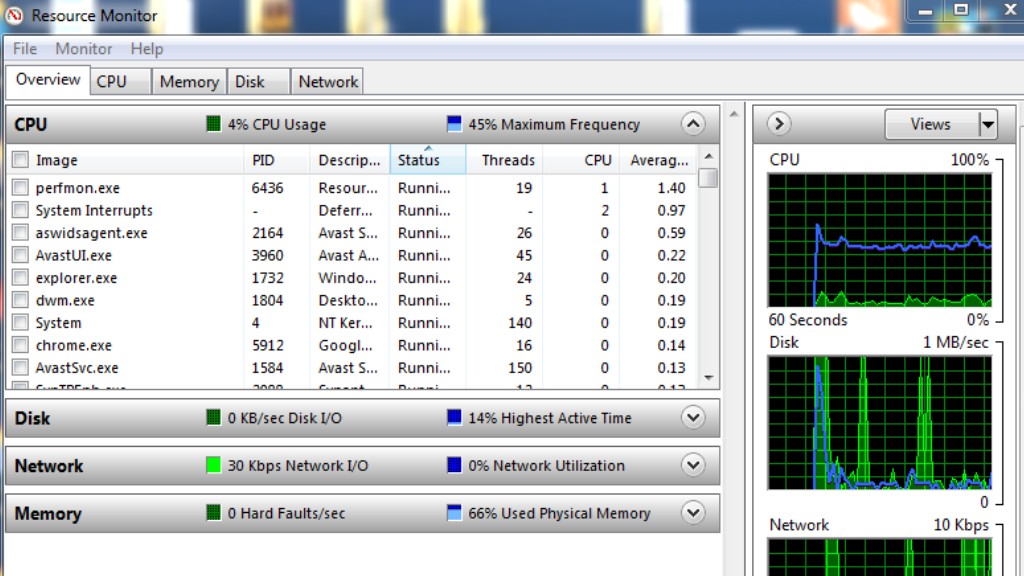
You’ve probably seen the word ‘Maximum Frequency’ in the Resource Monitor if you’re using Windows Vista.
What is the actual location of this? You’ll see a graph (and a status box) immediately next to the ‘CPU Usage’ figures in the Windows Resource Monitor’s CPU tab, titled ‘Maximum Frequency’?
What does ‘Maximum Frequency’ in Resource Monitor mean?
Maximum Frequency refers to the maximum speed at which your processor may run.
The Maximum Frequency of the Response Monitor for Windows Vista is always 100 percent if speed step, power saving, and other functions that impact the processor’s usual speed are disabled.
In other words, Processor Performance percent of the Maximum Frequency counter in Performance Monitor is equivalent to Maximum Frequency.
Here’s an illustration: If your 2.5 GHz processor runs at 800 MHz, your Maximum Frequency is 31 percent, according to the formula above. This indicates that the processor is operating at 31% of its maximum frequency of 2.5 GHz.
When you do certain tasks on your system, the Maximum Frequency of the Response Monitor now fluctuates. If Power Saver is enabled, for example, the CPU will be underclocked compared to the stock speed. The Maximum Frequency will indicate a lesser percentage in this situation.
Similarly, if turbo boost is enabled on your system, your Maximum Frequency in Response Monitor will show a greater percentage.
What is the relationship between Maximum Frequency and the processor’s clock speed?
When you first look at it, you’ll notice that Maximum Frequency is only weakly tied to the CPU’s operating frequency. Now, if Maximum Frequency is tied to the frequency at which the CPU runs, this may suggest that Maximum Frequency denotes the “percentage of the CPU’s maximum possible frequency.”
When you put your Windows system in Power Saving Mode, the Maximum Frequency figure drops to roughly 60%, but changing it to High Performance raises it to around 110 percent.
In Windows 10, how do I enable the Maximum Processor Frequency option?
We’ll go over how to add Maximum Processor Frequency in Windows 10 in the sections below:
The first method is to use the Command Prompt.
Enter “cmd” by pressing Windows Key + R, then Ctrl + Shift + Enter. Now, open a new elevated
Command Prompt and grant it administrative access by clicking Yes in the UAC (User Account Control) Prompt.
In the new Command Prompt, type “powercfg -attributes SUB PROCESSOR
75b0ae3f-bce0-45a7-8c89-c9611c25e100 -ATTRIB HIDE” and press Enter.
Your computer must now be restarted.
Press Windows Key + R to bring up the Run dialogue box. In the empty box, type “powercfg.cpl” and hit Enter.
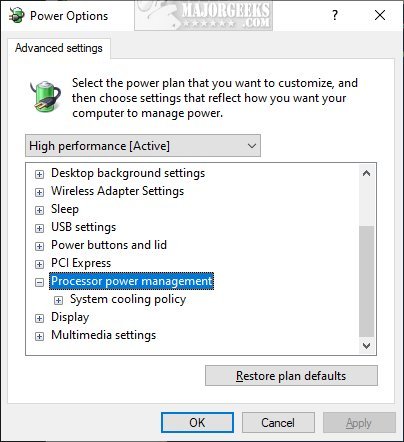
Change Advanced power settings can be found in the Power Option menu.
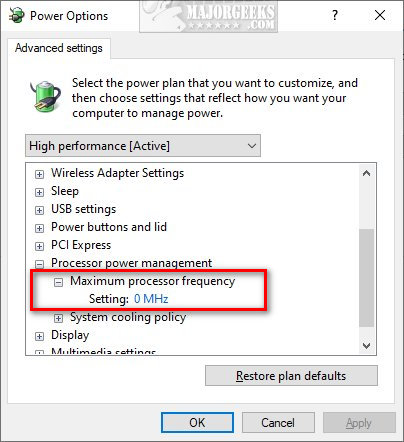
Scroll down to Maximum Processor Frequency and make changes there.
Once you’ve successfully changed the values, restart your computer.
Method 2: Editing the Registry
To open the Registry Editor, hit Windows Key + Run, type “regedit” in the empty box, then press
Enter. When prompted by the UAC, grant administrative rights (User Account Control).
Paste “HKEY LOCAL
MACHINESYSTEMCurrentControlSetControlPowerPowerSettings54533251-82be-4824-96c1-47b60b740d0075b0ae3f-bce0-45a7-8c89-c9611c25e100″ into the navigation bar.
On your right-hand plane, double-click Attributes. To activate the Maximum Processor Frequency menu, change the values under Attributes to 2.
On Windows 10, how do you modify the Maximum Processor Frequency?
So far, you’ve learned how to increase the Maximum Processor Frequency in Windows 10. In this section, we’ll look at how to change the Maximum Processor Frequency in Windows 10.
The first method is to use the Power Options menu.
Check to see if the Maximum Processor Frequency menu has been enabled. If you haven’t already done so, use any of the ways listed above to activate.
Press Windows Key + R to open the Run dialogue box, then type “powercfg.cpl” and press Enter. Change plan settings in the Power Option menu, then Change Advanced Power options in the Plan Settings menu.
Simply scroll down and select Processor Power Management from the drop-down menu.
Select the + icon next to the Maximum Processor Frequency from the Processor Power Management drop-down menu.
Change the On Battery and Plugged in numbers to match the CPU’s capabilities, then click Apply to save the changes.
Your computer should be restarted.
The second method is to use the Command Prompt.
Ctrl + Shift + Enter after pressing Windows key + R and typing “cmd.””powercfg -setdcvalueindex SCHEME CURRENT 54533251-82be-4824-96c1-47b60b740d00 75b0ae3f-bce0-45a7-8c89-c9611c25e100 75b0ae3f-bce0-45a7-8c89-c9611c25e100
75b0ae3f-bce0-45a7-8c89-c9611c25e100 To change the default values of Maximum Processor Frequency, use the “MHz>” command in the elevated command prompt (On Battery). P.S. Don’t forget to substitute MHz> with the custom frequency you wish to use in the command.
For the plugged in values, type “powercfg -setacvalueindex SCHEME CURRENT 54533251-82be-4824-96c1-47b60b740d00 75b0ae3f-bce0-45a7-8c89-c9611c25e100 MHz>” As you did in step 2, replace MHz> with the custom frequency.
Once the values have been adjusted, restart your computer.
What does “disc queue length” in Windows 7’s Resource Monitor actually mean?
If a queue of pending operations exists on a disc, the disc queue length indicates the length of the queue in terms of I/O operations.
The disc queue length in the Response Monitor is simply the amount of requests that have accumulated while waiting for the disc drive to respond.
For example, if your disc can only handle one job per second but receives seven other requests,
In the resource monitor, what is the Modified and Standby Ram region?
In real-time, the Resource Monitor tool displays information about the use of both hardware and software resources. It may be easily started by typing “resmon.exe” at the command prompt.
Modified, as the name implies, stores data that has been changed. The Standby Ram is essentially a collection of caches that store data or information for later use. It is simple to remove or delete the Standby data.
Related Articles:
iBuyPower Review: Is iBUYPOWER gaming PC Good?
Is Instant Gaming Legit?

Yoodley is reader-supported. When you buy through links on our site, we may earn an affiliate commission.
As a Windows Vista user, you must have come across the term ‘Maximum Frequency’ in the Resource Monitor.
Where exactly is this located? In the Windows Resource Monitor’s CPU tab, you will notice a graph (and a status box) which is right next to the ‘CPU Usage’ values, labelled as ‘Maximum Frequency’?
Maximum Frequency denotes your total maximum of your processor’s normal speed.
If you have speed step, power saving, and other features that affect the processor’s normal speed disabled, then the Maximum Frequency of the Response Monitor for your Windows Vista is always 100%.
In other words, Maximum Frequency is equivalent to Processor Performance\% of Maximum Frequency counter in Performance Monitor.
Here’s an example: If your 2.5 ghz processor is running at 800 mhz, then, according to the formula above, your Maximum Frequency would be 31%. This means that the processor is running at 31% of the processor’s maximum frequency of 2.5 ghz.
Now, Maximum Frequency of the Response Monitor fluctuates, upon performing certain actions on your system. For example, if Power Saver is turned on, it will underclock the CPU in comparison to the stock speed. In this case, the Maximum Frequency will report a lower percentage.
Similarly, if turbo boost is enabled on your system, the Maximum Frequency on your Response Monitor will report a higher percentage.
How is Maximum Frequency related to the processor’s clock speed?
Initially, when you look at it, you’ll be able to infer that Maximum Frequency is loosely related to what frequency the CPU is running at. Now, if Maximum Frequency is related to the frequency the CPU is running at, this could collectively mean that Maximum Frequency denotes the “percent of maximum possible frequency the CPU is running at”
Now, if you switch your Windows system into Power Saving Mode, the Maximum Frequency will lower down to a value of about 60% while setting your system to High Performance increases the Maximum Frequency value to around 110%.
Although the percentage does not completely correlate to the CPU Speed being shown, it is a value based on how your CPU is clocked – BIOS wise or another way.
How to Add the Maximum Processor Frequency option in Windows 10?
Below, we have discussed how you can add Maximum Processor Frequency in Windows 10:
Method 1 using Command Prompt
- Press Windows Key + R, enter “cmd” and then press Ctrl + Shift + Enter. Now a new elevated Command Prompt will be opened, and grant administrative privileges to the new Command Prompt by clicking on Yes in the UAC (User Account Control) Prompt.
- Enter “powercfg -attributes SUB_PROCESSOR 75b0ae3f-bce0-45a7-8c89-c9611c25e100 -ATTRIB_HIDE” command in the new Command Prompt and press Enter.
- Now you need to restart your computer.
- Open the Run dialogue, to do so Press Windows Key + R. Type “powercfg.cpl” in the empty box and press Enter.
- In the Power Option menu, click on Change Advanced power settings.
- Scroll down and go to Maximum Processor Frequency, and modify the values.
- Restart your computer once you have successfully modified the values.
Method 2 using Registry Editor
- Press Windows Key + Run, type “regedit” in the empty box and press Enter to open the Registry Editor. Grant the administrative privileges when prompted by the UAC (User Account Control).
- Go to the navigation bar and paste “HKEY_LOCAL_MACHINE\SYSTEM\CurrentControlSet\Control\Power\PowerSettings\54533251-82be-4824-96c1-47b60b740d00\75b0ae3f-bce0-45a7-8c89-c9611c25e100”.
- Double click on Attributes on your right-hand plane. Change the values in Attributes to 2 in order to enable the Maximum Processor Frequency menu.
How to change the Maximum Processor Frequency on Windows 10?
Okay, so far, you have learnt adding Maximum Processor Frequency to your Windows 10. Now, we shall discuss changing the Maximum Processor Frequency in Windows 10.
Method 1 using the Power Option menu
- Make sure that you have already enabled the Maximum Processor Frequency menu. In case you haven’t followed any of the methods above to enable.
- Press Windows Key + Run, type “powercfg.cpl” in the Run dialog box, and press Enter.
- In the Power Option menu, click on Change plan settings, and then click on Change Advanced Power settings in the Plan Settings.
- Now just scroll down, and click on Processor Power Management.
- From the Processor Power Management drop-down menu, click on + icon beside the Maximum Processor Frequency.
- Modify the values of both On Battery and Plugged in according to the capabilities of the CPU, then click on Apply to save the changes.
- Restart your computer.
Method 2 using the Command Prompt
- Press Windows key + R, type in “cmd” and press Ctrl + Shift + Enter.
- Type “powercfg -setdcvalueindex SCHEME_CURRENT 54533251-82be-4824-96c1-47b60b740d00 75b0ae3f-bce0-45a7-8c89-c9611c25e100 <MHz>” command in the elevated command prompt to modify the default values of Maximum Processor Frequency (On Battery). P.S. Don’t forget to replace <MHz> in the command with the custom frequency you want to use.
- Type “powercfg -setacvalueindex SCHEME_CURRENT 54533251-82be-4824-96c1-47b60b740d00 75b0ae3f-bce0-45a7-8c89-c9611c25e100 <MHz>” for the plugged in values. Replace <MHz> with the custom frequency like you did in step 2.
- Restart your computer, once the values have been changed.
FAQs
In the Resource Monitor of Windows 7, what does the “disk queue length” really mean?
For any given disk, if there is a queue of pending operations, the disk queue length will denote the length of the queue in terms of I/O operations.
In simpler terms, the disk queue length in the Response Monitor is the number of requests that have stacked up, waiting for the disk drive to attend to these requests.
For example, if your disk can process one task in a given second, but gets 7 other requests for processing in that span, the queue length of the disk will be 6 (since one request will be processed in one second).
What is the Modified and Standby Ram region in the resource monitor?
The Resource Monitor tool displays the information of the use of both hardware and software resources in real time. It can be easily launched by executing “resmon.exe“.
Modified, as the name goes it holds the data that is modified. The Standby Ram is actually a list of cache, which stores the data or information that can be used later. The Standby data can be easily removed or deleted.
Read More
- What is FCLK Frequency?
- What Does Erp-Ready Mean in Bios?
In the Windows Resource Monitor’s CPU tab, there is a status box and graph for the “Maximum Frequency”, right next to the “CPU Usage” values. What does this mean? The value is sometimes over 100% on my system… what could that imply?

By looking at CPU-z’s real-time report of the processor’s clock speed, it seems to be loosely related to what frequency the CPU is running at, which would imply that it means “percent of maximum possible frequency the CPU is running at”; this would be of relevance on systems with SpeedStep and/or TurboBoost technology (or similar). Furthermore, setting the system to “power saving mode” lowers the “maximum frequency” value to around 60%, while setting it to “high performance” mode sets it to around 110%. However, the percentage does not seem to exactly correlate to the CPU speed being shown. What value is this actually representing then?

Solution:
It simply means of the total maximum of your processors normal speed.
With speed step, power saving and everything else disabled, this should always read 100%.
If you have power saving on your laptop that under clocks your CPU compared to the stock speed, it will report a lower percentage.
If you have turbo boost or similar, it will report a higher percentage.
So, again, this is the current maximum percentage your processor can currently run when compared against its reported normal speed.
I am not 100% sure, but my guess is that if you overclock, the overclocked amount would be the “base” speed to Windows and overclocking by 20% would not show a 120% maximum frequency – this is just guessing, I have no way to test.
By Timothy Tibbetts |
Maximum processor frequency specifies the operating frequency of your CPU’s core. The maximum processor frequency option is hidden and set to 0 by default, which means your processor runs as fast as allowed. Advanced users can slow down the processor if your computer is running hot or consuming too much power.
Once added you will see the option Plugged in, and laptop users will also have On battery.
To edit the Maximum frequency, type in, and click on Edit power plan, and then click on Change advanced power settings.
Here’s a before and after:
1: Add or Remove ‘Maximum processor frequency’ With PowerShell
Using the Command Prompt (PowerShell) only takes seconds and is easy for anyone to try.
Open PowerShell and type in:
Add:
powercfg -attributes SUB_PROCESSOR 75b0ae3f-bce0-45a7-8c89-c9611c25e100 -ATTRIB_HIDE
Remove:
powercfg -attributes SUB_PROCESSOR 75b0ae3f-bce0-45a7-8c89-c9611c25e100 +ATTRIB_HIDE
2: Add or Remove ‘Maximum processor frequency’ In Registry
While more complicated, you can also enable or disable the Maximum processor frequency option in the registry manually or download the registry files.
Open the Registry editor and type HKEY_LOCAL_MACHINE\SYSTEM\CurrentControlSet\Control\Power\PowerSettings\54533251-82be-4824-96c1-47b60b740d00\75b0ae3f-bce0-45a7-8c89-c9611c25e100 in the search bar.
Double-click Attributes and change the Value data:
1 — Remove
2 — Add
That’s it.
Similar:
comments powered by Disqus
Высокая частота процессора, Turbo Boost, гигагерцы и прочее — это отлично, но не во всех случаях. К примеру, при работе на ноутбуке преимущественно от батареи с не особенно ресурсоемкими приложениями, отключив повышение частоты и ограничив максимальную частоту процессора вы получите более тихую работу системы охлаждения и продолжительное время работы от аккумулятора, не особенно потеряв в производительности.
В этой инструкции подробно о способах ограничить максимальную частоту процессора в Windows 11 и Windows 10, используя встроенные средства управления схемами электропитания, не прибегая к сторонним утилитам.
Установка опции «Максимальное состояние процессора» в дополнительных параметрах схемы электропитания
Первый способ — настроить схему электропитания, используемую при работе от батареи, задав максимальное состояние процессора ниже 100% — это отключит ускорение Turbo Boost (когда частота может повышаться выше номинальной частоты процессора) и, даже если мы выставим 99% в значительной мере повлияет на расход заряда и нагрев. Шаги будут следующими:
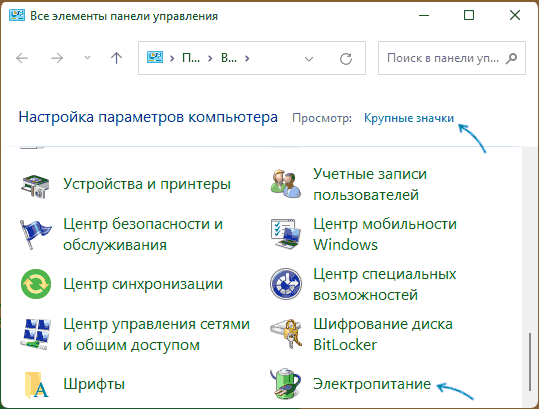
- Откройте Панель управления, для этого в Windows 11/10 можно использовать поиск в панели задач. В поле «Просмотр» установите «Значки» и откройте пункт «Электропитание».

- Нажмите по пункту «Настройка схемы электропитания» у той схемы, которую вы используете при работе от батареи (при условии, что это ноутбук и вы переключаете схемы питания).

- В следующем окне нажмите «Изменить дополнительные параметры питания».

- В дополнительных параметрах раскройте раздел «Управление питанием процессора», а затем задайте собственное значение в пункте «Максимальной состояние процессора». Его можно задать отдельно для питания от батареи и электросети.

- Примените сделанные настройки.

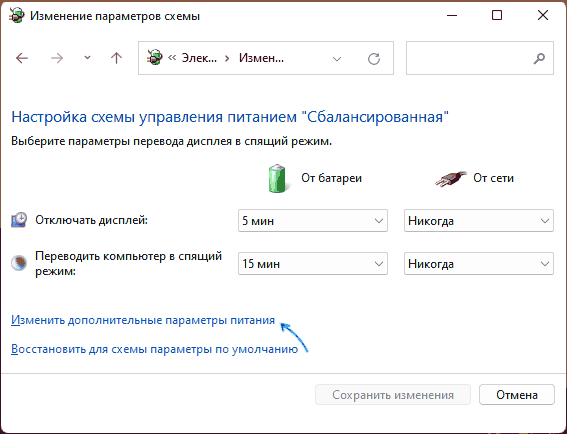

На этом процесс будет завершен — изменения должны начать действовать сразу.
Полезным будет настроить две или более схем электропитания: одну экономичную с ограничением частоты, другую — для случаев, когда нужна высокая производительность. Также вы можете ускорить переключение между имеющимися схемами электропитания: Программы для удобно переключения схем электропитания на ноутбуке или ПК.
К примеру, я на своем основном ноутбуке с горячим Core i7-10870H пишу статьи в бесшумном режиме с ограниченной частотой, и температура процессора держится в пределах 35-40 градусов, при этом каких-либо неудобств нет. А когда необходимо монтировать видео — включаю схему электропитания с высокой производительностью.
Добавление опции «Максимальная частота процессора» в дополнительные параметры электропитания
Возможен вариант, когда ограничение «Максимального состояния процессора» не срабатывает. В этом случае можно установить максимальную частоту процессора. По умолчанию эта опция в дополнительных параметрах электропитания отсутствует.
Чтобы добавить возможность настройки максимальной частоты процессора, используйте один из следующих способов:
В Терминале Windows или PowerShell
- Запустите Windows PowerShell или Терминал Windows от имени администратора, нажав правой кнопкой мыши по кнопке «Пуск» и выбрав соответствующий пункт меню.
- Введите команду
powercfg -attributes SUB_PROCESSOR 75b0ae3f-bce0-45a7-8c89-c9611c25e100 -ATTRIB_HIDE
и нажмите Enter.


В редакторе реестра
- Нажмите клавиши Win+R на клавиатуре, введите regedit и нажмите Enter.
- Перейдите к разделу реестра
HKEY_LOCAL_MACHINE\SYSTEM\CurrentControlSet\Control\Power\PowerSettings\54533251-82be-4824-96c1-47b60b740d00\75b0ae3f-bce0-45a7-8c89-c9611c25e100
- Дважды нажмите по параметру с именем Attributes в правой панели и установите значение 2 для него. Примените сделанные настройки.


В результате, в дополнительных параметрах схемы электропитания в разделе «Управление питанием процессора» появится новый пункт «Максимальная частота процессора».

По умолчанию указано значение «0 МГц», при таком выборе частота не ограничивается. Вручную можно указать любую частоту в пределах номинальной частоты вашего процессора.
Надеюсь, для кого-то из читателей представленная информация окажется полезной. Если остаются вопросы — задавайте их в комментариях, я постараюсь ответить.